#fin fin plush pattern
Explore tagged Tumblr posts
Text
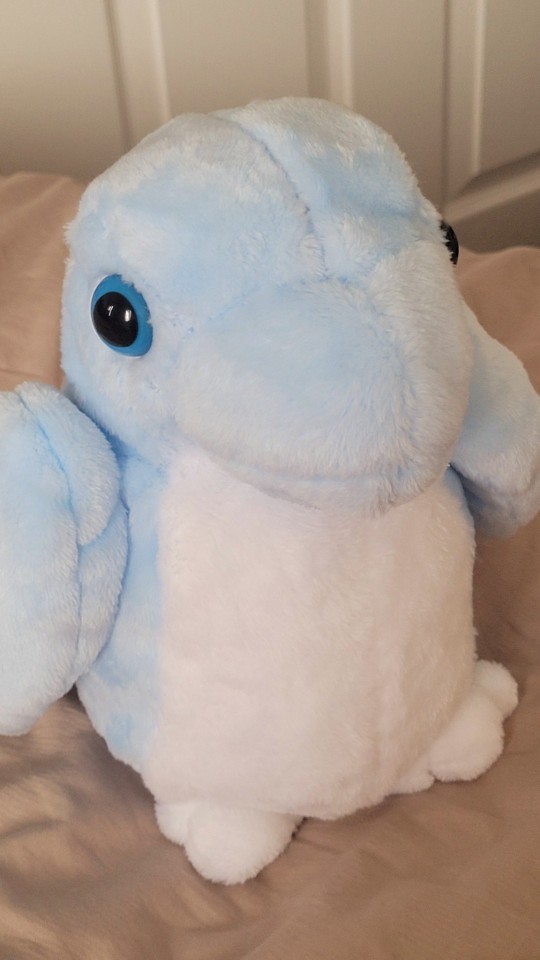
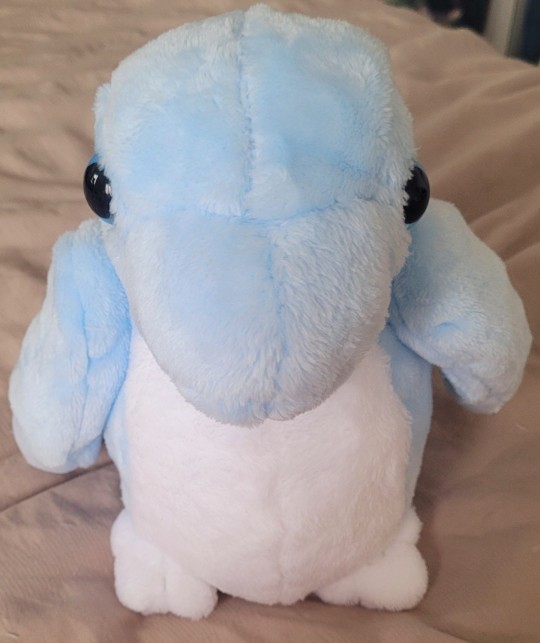
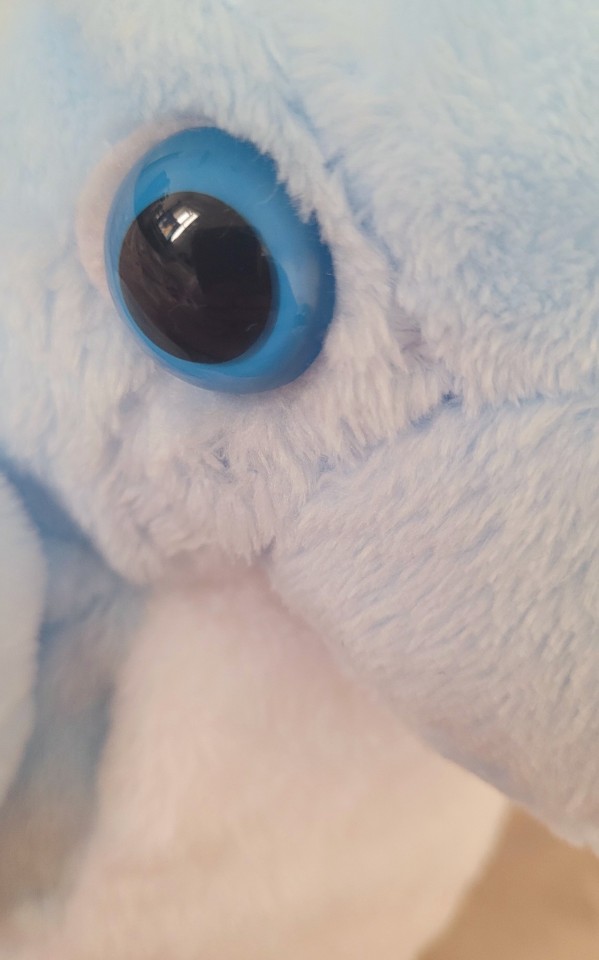
Free simple Fin Fin plush pattern!
Having found the amazing blender plugin Seams to Sewing Pattern, I created a Fin Fin plush model in Blender with the intent to make it in real life (despite not having sewn anything since I was very little).
And... here he is! 100% hand sewn to the best of my newbie ability. I'm now releasing this pattern for free, hopeful to see more Fin Fin out in the world!
Download Link (Google Drive Folders)
Kofi donation link
Disclaimers under the break (Please read before sewing!):
I'd recommend machine sewing if you take this up yourself. Hand sewing requires a lot of patience, but it is very doable if it's your only option.
Some basic sewing knowledge is required as I can't provide a good guide for putting this guy together (I had to piece him together with some trial and error myself, using my own model as reference. Feel free to use it for reference yourself, too.
You will need at least half a meter of blue and white fabric for him. I used cuddle fleece. However, you can use whatever you like. You will also need something for his eyes, I used the traditional plastic safety eyes with a felt lining.
I've included two sizes in the download, I used the larger of the two, and printed on regular A4 paper, he comes out about a hand and a half tall and about a hand wide.
I can't provide too much help or support for the process, but you're free to ask me simple questions in DMs or on my Discord server. I can't guarantee I'll have an answer since I'm basically brand new with sewing and pattern making.
Good luck!
#fin fin#finfin#fin fin on teo the magic planet#fin fin teo the magic planet#fin fin teo#irl#fin fin plushie#plushie#plushie pattern#seams2sew#fin fin plush#fin fin plush pattern#fin fin plushie pattern#free#free pattern#sewing
475 notes
·
View notes
Text
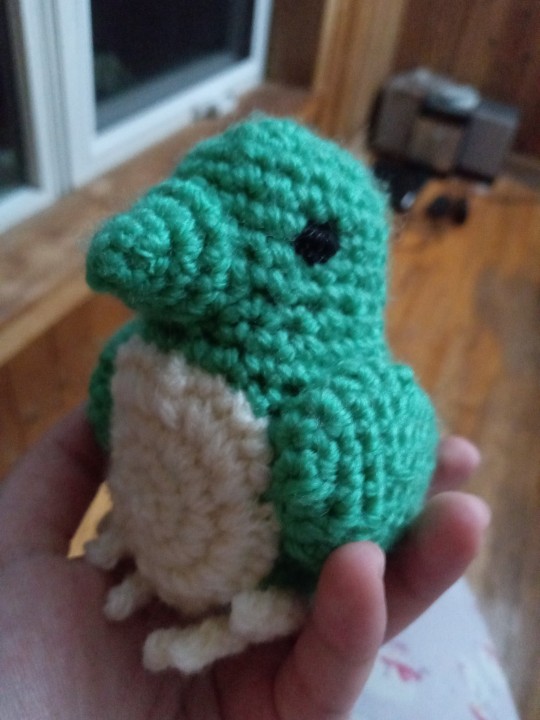
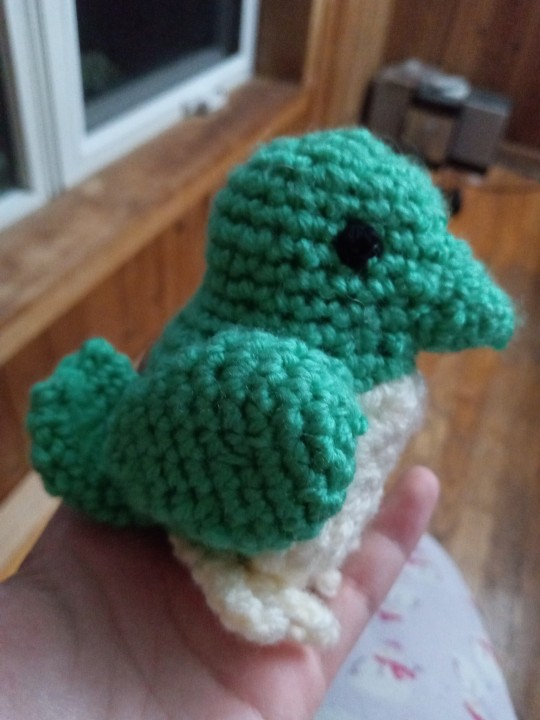
guess who just watched this years fourth of footwerk
#idk why it hadnt occurred to me how easy it would be to make my own fin fin#i was watching the youtube upload of the stream and wayne started talking about how he wishes he had a fin fin plush#and i was like wait a minute.........#bc like its literally just a bird body with a fish tail. i just frankensteined like 3 patterns to make him#i love him <33333#he looks better in person i just have a shitty phone lol#rtvs#fourth of footwerk#fin fin#teo the magic planet#amigurumi#man my wrists are not happy that i was crocheting oh my god. they're cracking and stinging like crazy#i was sewing the other day so they were already a little fucked up but doing tiny crochet projects like this are the worst for my wrists#its worth it tho like look at him :3
321 notes
·
View notes
Text
Wet Beast Tuesday: Blåhaj
The time has come to discuss the shark, the myth, legend. Blåhaj was only discovered by marine biologists recently, but it has swiftly become on of the most iconic sharks in the world, up there with the likes of great whites and hammerheads. But what is it about this shark that has taken the world by storm? Let us discuss.

(Image: a Blåhaj seen from the side. It is a large, plush shark made of blue and white fabric with embroidered eyes and a pink mouth. End ID)
Blåhaj (Mollispistris transcustos, pronounced "blaw-high) is a medium-sized shark tentatively placed in the family Carcharhinidae. They reach up to 1 meter in length. Reports have been made of Blåhaj half that size and it is not clear if these are juveniles or a smaller subspecies. Blåhaj have rounded features and large heads with blunt snouts. Their scales are soft and fuzzy and, uniquely among sharks, they are smooth when petted both ways. They have a unique pattern of countershading with white underbellies and light blue backs. The mouth sits on the underside of the head and is less proptrusible than in most sharks. The fins are thinker than in most sharks and end is rounded edges. Blåhaj has large, round eyes that reflect kindness and understanding. Through currently unknown means, Blåhaj is capable of spending much of its time on land, possibly with adaptations similar to those of the epaulette shark, though the two species are not closely related.
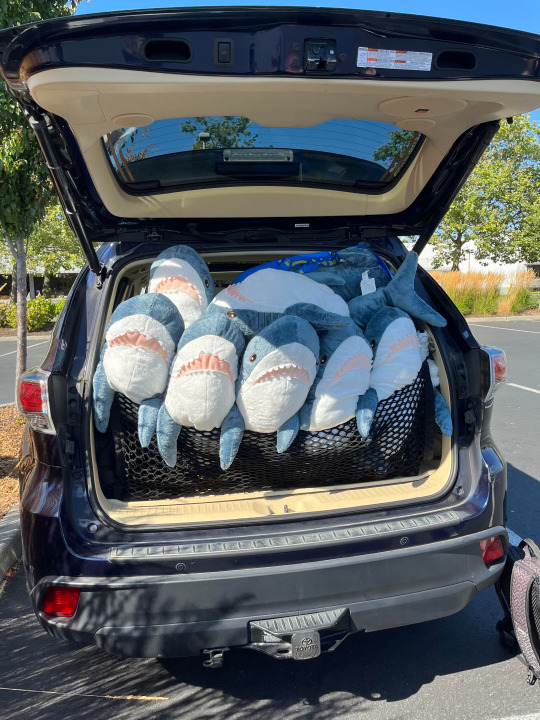
A group of Blåhaj being transported by conservationists. (Image: a photo of 8 Blåhaj in the trunk of a car. End ID)
Blåhaj were first spotted in the Baltic Sea off the coast of Sweden. The common names means 'blue shark' in Swedish. It is worth noting that prior to Blåhaj's formal scientific classification, there were reports of very similar sharks with grey coloring locally named klappar haj. It is possible that these were early sightings of Blåhaj or of a closely-related species or color morph. While it was previously believed that Blåhaj was endemic to the Baltic Sea, they have recently been proven to be a highly migratory species with worldwide distribution. In particular. Blåhaj seem to migrate to the ocean off of Indonesia to reproduce. As with many sharks, their exact mating grounds are unknown and juveniles are rarely seen. It is believed that juveniles will migrate from Indonesia to the Baltic Sea, where they reach maturity. Many will then leave the Baltic Sea to travel across the world. Blåhaj is a social species, often seen traveling in schools of both full-size and half-sized individuals. Uniquely among sharks, Blåhaj are receptive to human contact and appear to form bonds with humans. Blåhaj that bond with humans will often follow their new friends back to land and live with them.

A Blåhaj protecting trans kids from a distance (Image: a Blåhaj on a bead covered with a towel to look like a sniper's nest. It is posted with a model sniper rifle. End ID)
Through unknown means, Blåhaj seems to be able to detect transgender, nonbinary, and gender non-conforming humans and will preferentially seek them out for bonds. While people outside those demographics can befriend a Blåhaj, the sharks will never bond with bigots. Once bonded with somebody, a Blåhaj will become very protective of them. Blåhaj are normally harmless to humans, but they will act to defend their bonded person from harassment. Blåhaj is the guardian of trans people. Blåhaj enjoys contact with humans, especially being petted and hugged. Hugging a Blåhaj is clinically proven to reduce stress. While it may seem like there's noting going on behind those eyes, Blåhaj understands your problems and is here for you. Many trans people see befriending a Blåhaj as a rite of passage. If possible, befriend someone else with a Blåhaj and let your sharks play together as enrichment. Do not be surprised of your Blåhaj picks up hobbies like reading and cooking, this is a good form of intellectual stimulation and should be encouraged. While they can survive out of water for a very long time, Blåhaj will eventually need water to breathe. A recommended source of water is through laundry, as Blåhaj is machine washable.
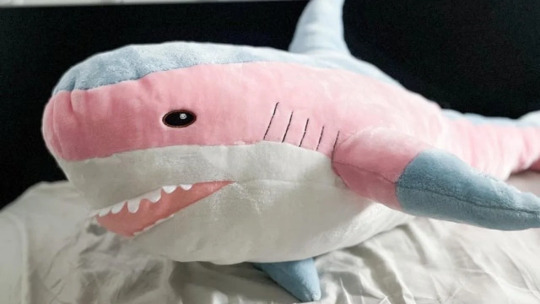
A rare Blåhaj color morph. (Image: a special-edition Blåhaj made of cloth in the color of the trans pride flag)
Blåhaj protects. Blåhaj forever.
(For people seeing this meme, I do weekly posts in this style about real aquatic animals with real facts. This one is my April Fool's edition)
#wet beast wednesday#april fools#blajah#blåhaj#ikea shark#marine biology shitpost#trans memes#transgender#plush#plushies
149 notes
·
View notes
Text
god i hope this won't be too confusing-- here's the seeker pillow/plush pattern (just a loose guide, plus the actual pattern!)
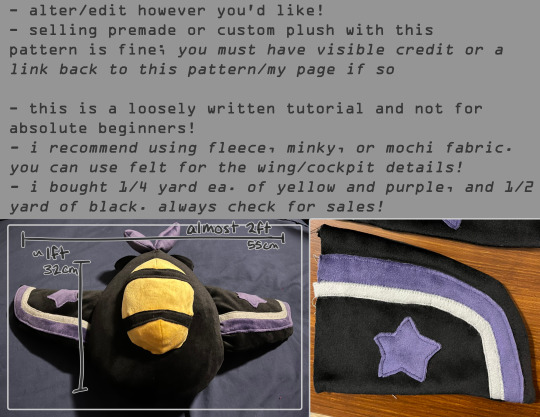
***attach the cockpit AFTER the body is stuffed instead!!! so, skip step 7 and do it last!***
- step 5 is optional!
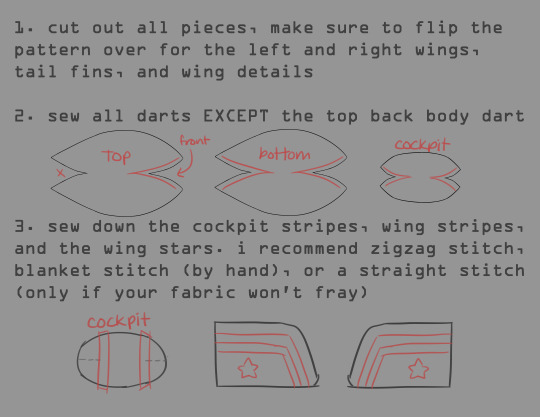
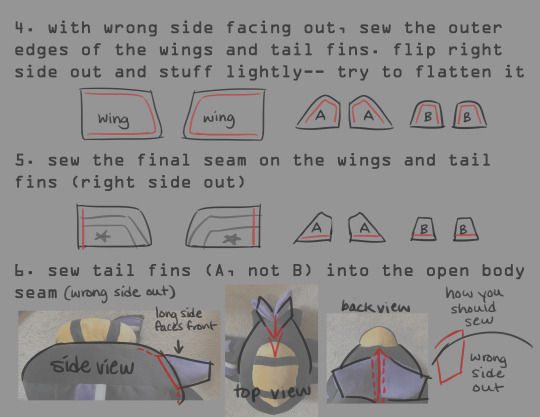

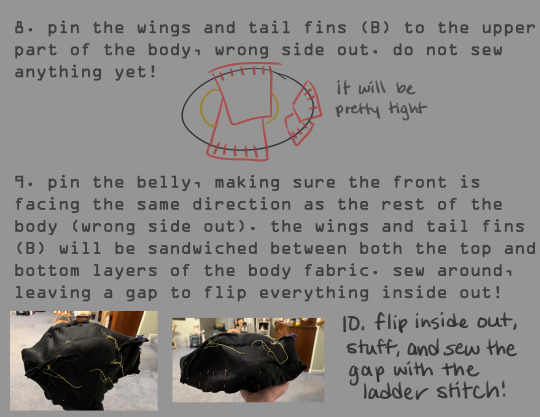

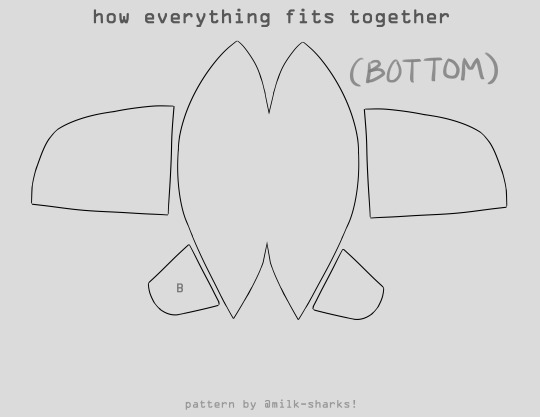
the pattern should be printer-ready on 8.5x11 paper, but if tumblr eats the quality, then twitter will hopefully work!
seam allowance is already included (whoops), and the dotted lines show where you should be sewing
the grey (non-dotted) lines on the wings and cockpit are there as a reference, please don't cut them!
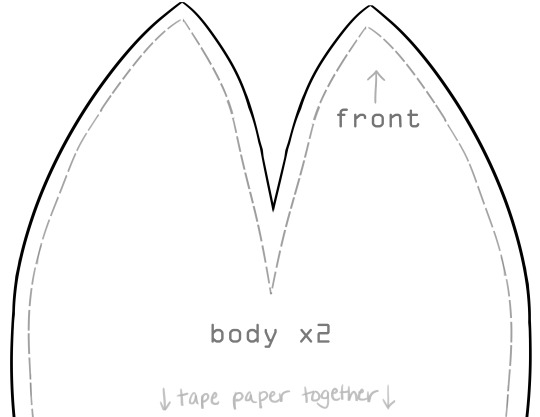
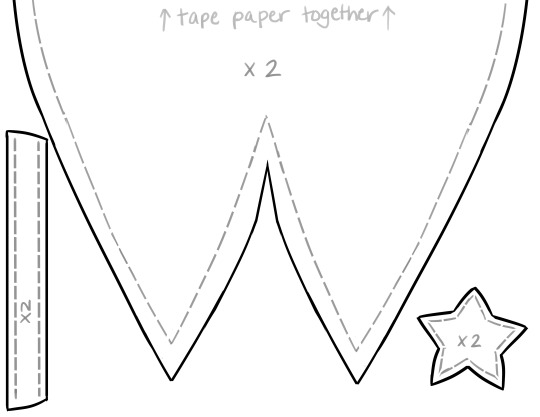

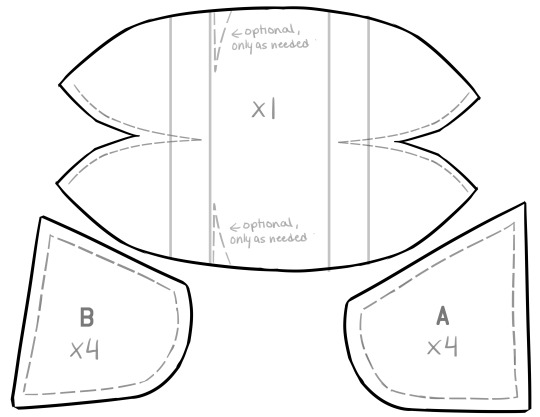
if your fabric has a right and wrong side, make sure to flip over the paper pattern when making the L vs R wings (and tail fins and wing details).
if the pile of your fabric faces one way, make sure that you pin the pattern accordingly!
if there's any errors, please let me know so i can correct them!
#pls show me if you make one!#my art#transformers#maccadam#transformers seeker#g1#plush pattern#skywarp#tutorial#am i allowed to tag this as#thundercracker#starscream
1K notes
·
View notes
Text
Cod Grian Cosplay Build!
The fish man himself, season 10 Grian!
Reference Sketch

Some notes:
I always end up changing somethings from the reference when making the actual outfit, although I stayed pretty close it it this time.
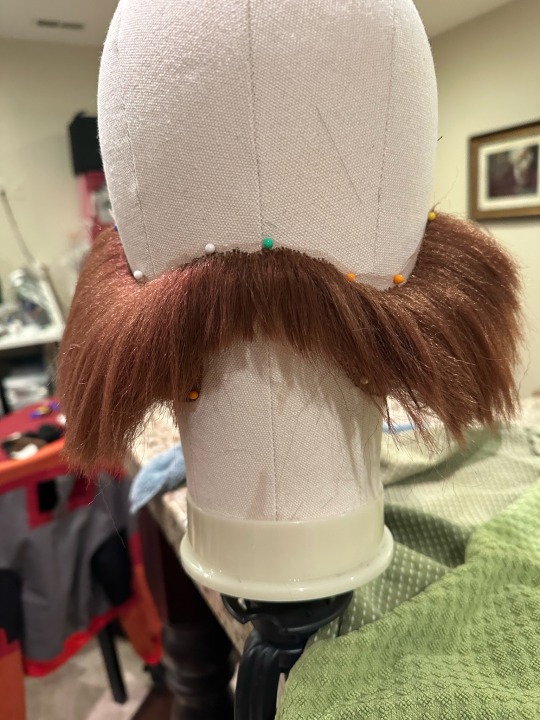
I initially drew him with a handlebar mustache and goatee to mimic the whiskers of a fish, however I switched to a fluffier mustache beard to match the guy from Frozen.
I also opted for my turtleneck shirt over the red sweater+collar to go for more of a fisherman vibe
Since Grian is usually drawn with parrot wings, I wanted to call back to that with red yellow and blue feathers on the bobbers.
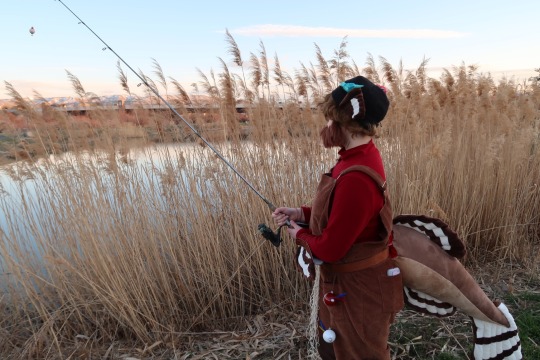
The tail and fins
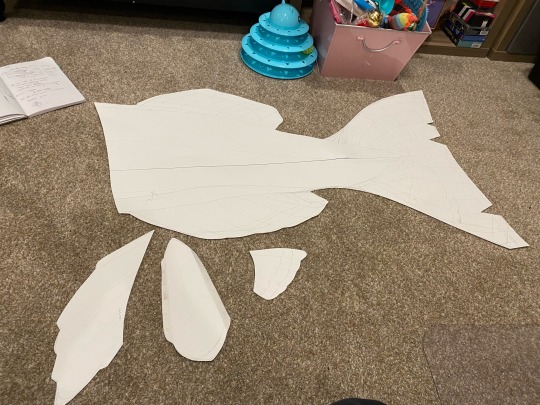
I wanted to lean into the “fish”er man design and gave him fish fins and a tail.
It’s design is based on a cod fish with striped fins based on the feathers of an osprey
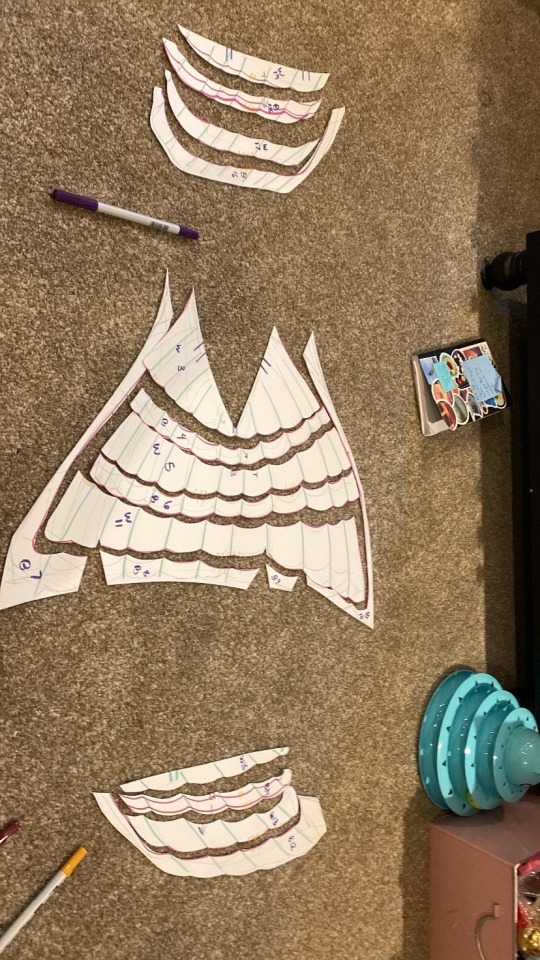
To make it, I drew the tail pattern on a large piece of paper, cut it out, cut each section out of the respective fabric times two, sewed the two sides together, and lastly filled it with a ton stuffing.
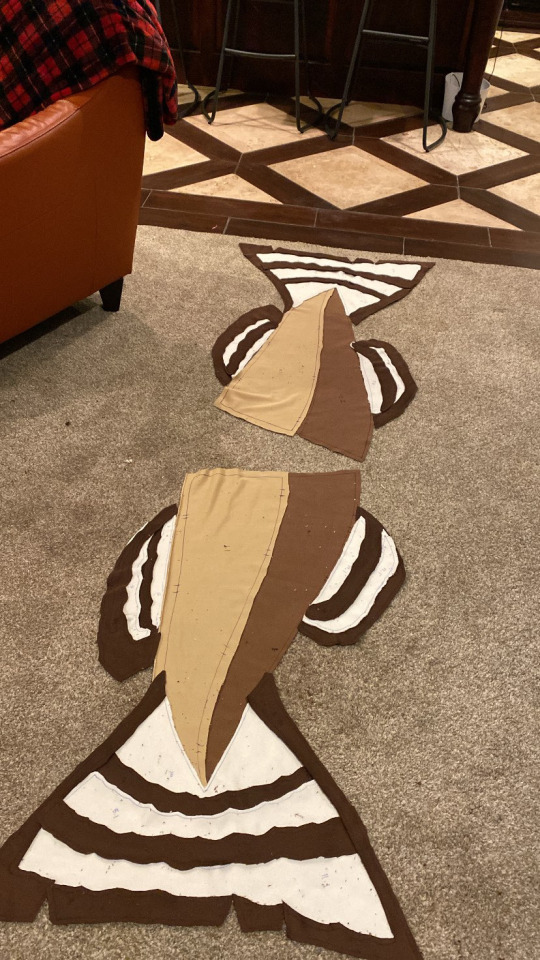
The tail is heavy, but it’s fun to wack people with it.
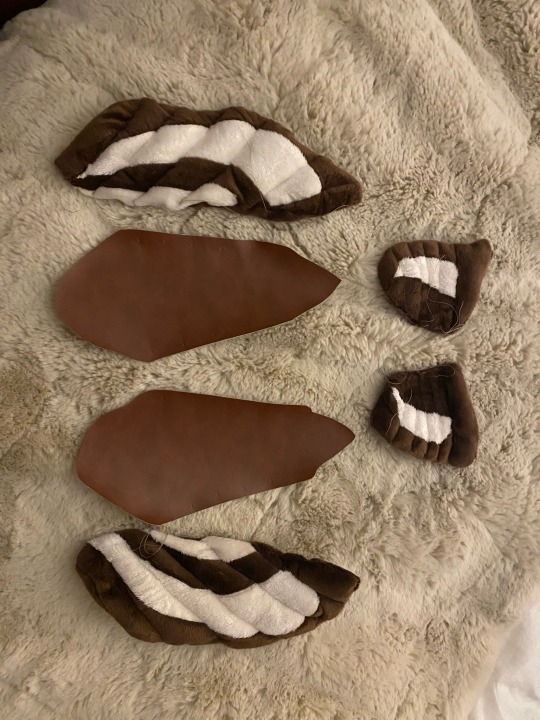
The fins for the arms and beanie are made in a similar way, each hand sewn onto the beanie/bracers once stuffed.
The Overalls
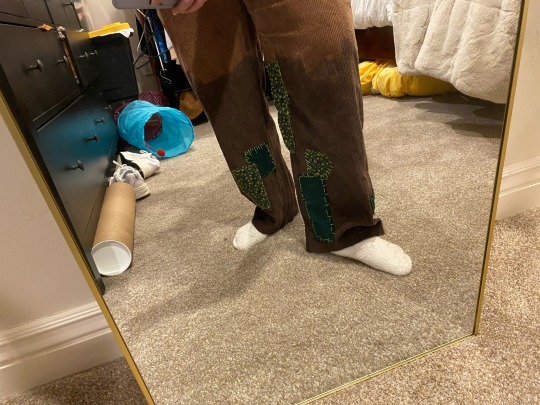
I had originally planned for him to be wearing waders, but wanted to make the outfit more wearable for everyday wear without overheating. So I opted for some brown corduroy overalls instead.
To add a “wet” look to each pant leg, I briefly dipped each one into some black fabric dye before rinsing and drying.
The green pixels on his skin look like they could be kelp or patches so I decided to go with the latter and dug through my scrap fabric to find these green pieces.
I embroidered the edge of each piece with a unique stitch and placed them randomly on each leg.
The snails!
Of course we can’t forget about the snails
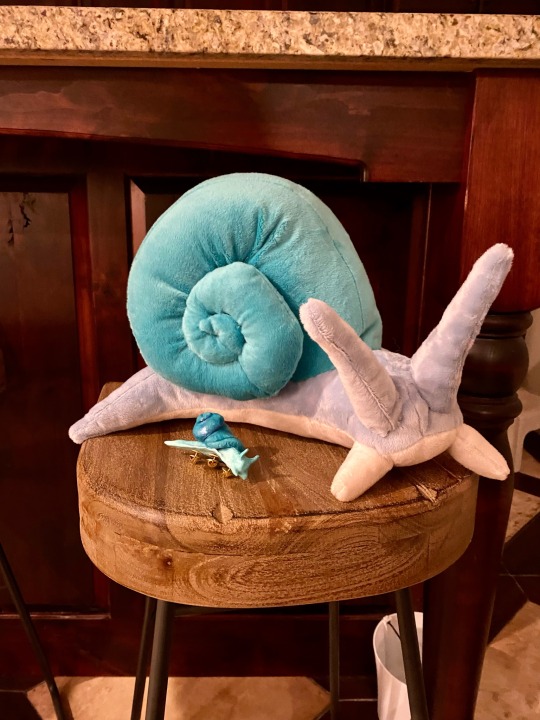
There are three snails for this project with two more eventually on the way (a plush pink snail, and a plush brown snail).
I made the clay blue snail first with polymer and attached tie tacks to the underside so I can use it like a pin and stick it anywhere on my clothes.
Same goes for the pink worm snail which is also made of clay.
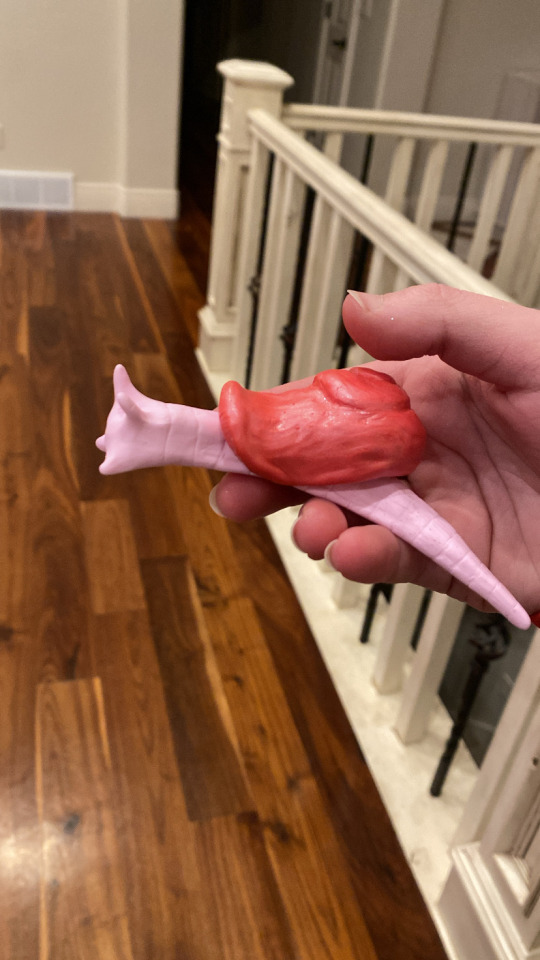
The blue plush snail is based on a pattern from Etsy by willowynn with some slight modifications, mainly to the eyes/feelers, and doubling the size.
Facial hair
This was one of the parts I was the most excited about for this cosplay and the only part I didn’t do myself. I commissioned @basic-amoeba to make a custom ventilated beard, styled and everything. This part turned out so good!
Some final notes for this project
This cosplay took from Feb 20 to March 15th to complete since I was so determined to finish it before Grian changed his skin. Haha look at me now. He still hasn’t changed it.
Not pictured (cause why can I only add 10 photos 😭) is the mending book with a fish hook I made using scrap faux leather, cardboard, and some cut printer paper. I painted in galactic the word mending and sprayed the whole thing in my “enchanting” spray paint (a blue to purple iridescent glitter spray paint)
A small fun backstory to the fishing rod:
My grandpa is an experienced fisherman and has dozens of fishing poles. When I talked about this project with him, he brought me out to his workshop and pulled down the dustiest fishing rod there. He told me he had fished this fishing rod from a lake one day with the line and bait still attached. Can’t get anymore accurate to Minecraft fishing than that lol.
Obligatory cosplay photo:
#grian#hermitcraft#grian cosplay#hermitcraft season 10#cod grian#fisherman grian#hermitcraft cosplay#cosplay build#cosplay#skygoldcosplaybuild#skygoldcosplaywip
494 notes
·
View notes
Text
Fin Fin Plush Interest Survey
If you're interested in custom plush of Fin Fin and other TEO creatures, please take a look at this survey!
#fin fin#finfin#finfin on teo the magic planet#fin fin plush#finfin plush#teo the magic planet#teo the other earth#fin fin teo
95 notes
·
View notes
Text
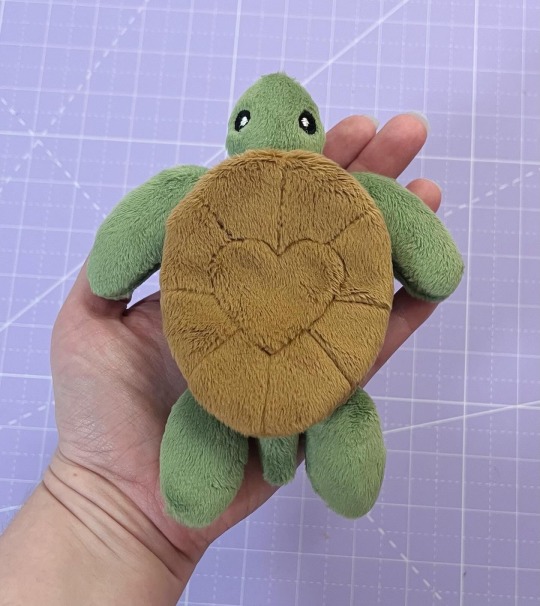

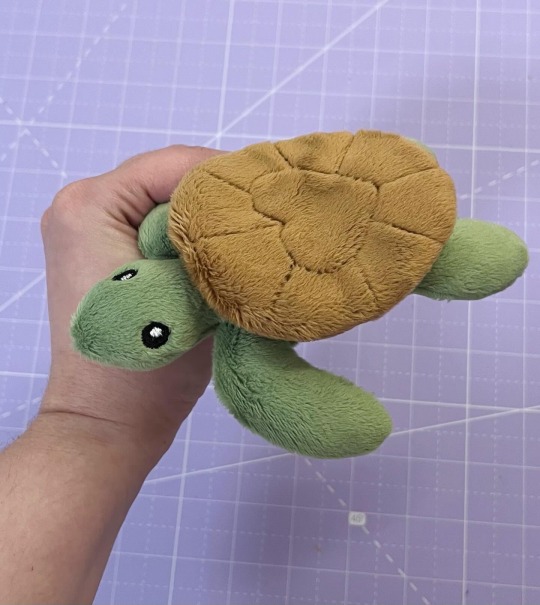
I’m bringing back my In the Hoop Sea Turtle plush pattern soon! It has a new shell design and bigger fins. The sewing pattern will be included too.
264 notes
·
View notes
Note
APOLOGY for the gaslight gamerbro himself perhaps? idk i would just love it if you had a reason to make julian grovel for his wife just a lil
Hearts/Wires (2.2k, nsfw)
February 2021
Here’s the thing about Julian Sim: when he wants to gut you, he uses a scalpel, not a cleaver.
The main area of the penthouse haven is all dark wood, black marble, muted LED underglow—reeking ego.
Three neon-lit servers hum like a hive mind stacked neatly in a small, panelled alcove; on top, a lacquered black terminal and various split-screen monitors. There’s an entire wall of vintage gaming consoles and rare, limited edition collector’s items, all bespoke shelving and shiny sleek casing.
A cyber koi dominates another wall on a matte black canvas, silver and teal metallic paint catching light, glowing circuit-board patterns along the scales and through its fins. There’s an Eames chair beneath that; dark grey, horrific little Licker plush perfectly centered, and a thin, bioluminescent algae tank splits the space, tints everything in cyan.
Portishead’s Glory Box is an audio autopsy; drags lazily from somewhere.
Sol leans against the back of a leather suite by the floor-to-ceiling windows, watching her first snowfall skirl thick over the city. Elena’s in the HQ sublevel garage; Nadia’s still spying downtown.
Julian’s fingers fly over a tablet.
“Hey,” he says.
Sol just glances over her shoulder.
He swivels in his chair, grinning—that fuckboy grin. That one.
“Got something for you.”
“If it’s another USB drive of NFTs I swear to god, Julian, I’m out.”
“Nope.” He stands, all lean lines in his stupidly expensive techwear, and gestures to a black case on the marble-topped kitchen island. “Open it.”
She saunters over, pops the latches.
Inside: a leather jacket—deep shade of grey-brown, oversized, buttery-soft, lined with Kevlar. The back’s embroidered with two tiny hummingbirds in black and silver thread; the cuffs studded with citrine and gunmetal hardware. Sewn into the pocket: a rosary—each bead delicately carved obsidian.
“Customized the Kevlar weave,” he says, too casual. “Stops .50 cals, UV-resistant, self-healing nano-fibers. Also, y’know. Looks hot on you.”
Sol runs a thumb over the hummingbirds.
“You had this made?”
“Nadia sourced the leather. I did the code for the nano-fibers.” He steps closer, smelling of designer cologne and mint gum—he’d held another 2100X lecture at the University of Denver earlier this evening. “And the embroidery’s mine. Took a week. Fuckin’… needlework.” He mimes stabbing himself. “Torture.”
Sol keeps her expression carefully neutral.
“You should’ve stuck to hacking.”
“Probably.” His grin fades.
The jacket’s perfect. Infuriatingly perfect. So perfect she wants to cry or hurl him through the ten-storey window. Instead, she shucks off her old one, slides into the new. It molds to her—alive.
Sol can’t help the small smile. Her palms run along the smooth leather and she turns to him with a brow raised, exaggerated bedroom-eyes: Like what you see?
Julian’s gaze darkens. He closes the distance and smirks as he fixes her collar, tucking loose hair behind her ear, and it’s like every drop of squirming vitae in her system suddenly streams towards his touch.
She slaps his hand away.
“Don’t.”
“Don’t what?”
“Don’t do that. The… soft shit.”
He catches her wrist.
“You’re mad. I get it, Sol. Be fucking mad.” They’re chest-to-chest, her back against the counter, so close his breath ghosts her scar. “But let me at least try while you’re mad.”
“Try?” She snorts. “Try what? Try to fix this? You get fucking and fighting and nothing else. You don’t know the first—”
Julian drops to his knees.
Sol shivers.
Hands on both sides of her hips, his mouth laves a hot, pleading stripe up the inner seam of her jeans. Sol grips the counter’s edge, knuckles white.
“Julian,” she hisses, but her thighs part anyway. Fuck him. Fuck his pretty little mouth, fuck his goddamn eyes—wide and wet like he’s the one being gutted. She shoves him back, but he catches her foot, pressing a kiss to the snake at her ankle. “Fuck. You.”
“You first,” he murmurs, tugging her jeans down.
She should knee him in the fucking face. She should. Instead his breath scalds through the fabric of her underwear and she whines like a kicked dog. He noses her clit, deliberately slow, savoring.
Sol’s head thuds back against the cabinet. She fists his hair—god, his hair, still so fucking soft, no one but her allowed to mess with the stupid fucking coiff—and grinds down.
“Hate you.” It sounds laughable on the tail end of a moan.
“Mmhmm.” Julian drags her panties with his teeth, then bites the fleshy inside of her thigh hard enough to leave a bruise. Two fingers slide into her, curling exactly right, and she hates how he remembers her body. “Tell me again, Sol.”
She doesn’t. She can’t, because his tongue replaces his fingers, lapping at her like she’s the last O-neg he’ll ever fucking see. The whimper chokes out of her throat, sharp, shallow, broken. Julian groans against her, vibration ratcheting her even higher.
“Solona,” he rasps, fucking her with his tongue now, deep and filthy. “Missed you. Missed how you taste—”
Her legs almost give out. Her claws unfurl, digging into the marble.
“Shut—fuck—shut up—”
He doesn’t. It’s Julian—he talks; words muffled but relentless against her clit.
“I remember when you used to beg me not to stop—”
“Julian—”
“Beg.”
“Go to hell—”
He pulls back, cold air hitting her soaked cunt. Sol nearly sobs. He looks up at her, lips glistening, pupils huge.
“Say it.”
She slaps him.
He blinks; when he meets her eyes he’s smiling again—shit-eating, I’m-untouchable—but his hands tremble.
She holds his gaze for two seconds before her heel slams his shoulder.
Julian crashes back into the algae tank, cyan light rippling violently over the room. In that moment he looks scary; his fangs drop with one slick schlick, eyes flat black fucking fury—
Then he laughs.
“You’re savage tonight.” He staggers up, licking vitae from the cut on his palm. He sounds as unhinged as she feels, spreading his arms like some shitty messiah. “Okay, Solona. Hurt me.”
She’s on him, fangs bared, slamming him against the server wall. Monitors clatter; the Licker plush tumbles to the floor. Julian’s cock strains against his pants, and the scent of his blood—wired monsoon nights, algorithmic zips of lightning; hers, her Sire’s, mine mine mine—drags a guttural moan from deep in her chest.
“Hate you,” she sobs, clawing his shirt open. “HATE.”
“I know. I know—”
It’s not a kiss she pulls him into. It’s teeth and tongue and ten years of fucked-up festering feelings. Sol shreds his belt with her claws. He lifts her onto the marble counter, ice-cold against her bare skin, and she resents how easy it brings her back—how his hands stay gentle, how his cock twitches against her stomach, leaking and desperate, how she wants to curl up and keep him inside her forever.
“Sol, look at me,” he whispers.
“No.”
“Please.”
“You left,” she snarls.
“I came back. I was always coming back.”
“To use me.”
“And you let me. Is that what you want to hear?”
She slaps him again, harder, tips of her claws splitting skin; two thin jagged slices across his cheek bone.
The crack echoes. Julian’s head snaps sideways, hair falling over his eyes. He touches the blood blooming beneath his eye and just sighs.
“Feel better?”
“No.”
He cups her jaw, pressing his forehead to hers and Sol exhales a shuddering breath between them.
“I’m sorry,” he says.
“Forget it. Just fuck me.” Her eyes are steepling with red. She’s using every gram of composure to keep them from running over.
Julian fucks her like he’s trying to carve an apology into her bones. Sol fucks him like she’s digging a grave.
Her heels cut into the small of his back. The counter’s edge bites into her ass. He slows, angling deeper, hitting that spot that makes her vision white. It’s a conscious effort to retract the claws, but she does, finally gripping his shoulders, grasping the nape of his neck, their foreheads still tight together.
“Look at me.” Begging. Begging. “Solona, please.”
Sol opens her eyes and stares into him the way she did when she thought he hung the stars.
Then, tears.
“Fuck. I’m sorry. I’m so sorry—” The words glitch out of him—staccato, inelegant, cracking. His thumbs swipe, smearing blood like warpaint.
He kisses her. It’s clumsy. It’s not enough. It’s everything. His lips tremble against hers, hands cradling her face like she’s made of cracked glass.
She kisses him back, nails digging crescents into the softness of his neck. Blood mingles metallic and salt-bitter between them. Julian’s hips stutter, buried to the hilt, chest hitching.
“I’m sorry I’m sorry I’m sorry,” he repeats against her mouth.
She doesn’t answer. She wraps her legs tighter around him. Her hips roll slow now, aching, like she’s trying to fuse their skeletons.
Julian matches her pace, each thrust deep and punctuated—I’m. Here. I’m. Here.
His kiss trails along the thin ridge of her scar, her throat, her collarbone, every mole and freckle he finds there. When she comes, it’s silent—clenching around him, full-body shudder. Julian follows with a choked groan, forehead to her sternum, watching mingled vitae paint her thighs.
For a long moment, they stay like that, suspended—sticky, bleeding, Julian’s arms locked around her waist like she’ll ash if he lets go.
The algae tank continues to pulse, low and steady.
Sol shoves him.
He stumbles back, red scratches across his cheek almost closed over, Dior shirt hanging in tatters. She eases off the counter, legs shaky, and stalks to the bathroom. Julian follows, silent, hovering in the doorway as she splashes cold water on her face.
“Sol—”
“Don’t. Please.”
He doesn’t.
She strips, steps into the shower. Julian leans against the sink, watching through the glass as steam fogs the edges of her silhouette. When she’s done, he’s there with a towel—
Sol snatches it, wrapping herself tight.
Julian’s fingers brush her wrist.
“Let me fix your hair.”
“Fuck off.”
He retrieves a comb from the drawer anyway.
She gives him a look… but perches on the toilet lid.
Julian kneels behind her, carefully detangling the damp mass of waves. He used to do this—since the first weeks after her Embrace, when her hair would snarl from Sonoran winds whipping through the Geo and in the later 00s after messier Camarilla hit jobs. His fingers move in gentle, practiced patterns.
“We’re so fucked up,” she mutters.
“Maybe.”
“Lettow should’ve killed us both in Tucson.”
His mouth twitches.
They don’t speak after that. She leans into his touch despite herself.
Julian finishes her hair, silently debating a shower. Not wanting to leave her alone long, he burns vitae to blur through the motions, veins sparking with hunger, then dresses in a faded Evangelion t-shirt and black sweatpants.
Ridiculous, giddying relief slumps his shoulders when he walks back out into the living area and finds Sol slouched in the Eames chair, toeing the Licker plush on the floor, wearing one of his older hoodies—still raiding his wardrobe even here, even now.
Snow whirls behind her in the darkness outside, choking Denver’s skyline. Her eyes are closed, head drooped, limbs heavy, and he feels it too—the pressure droning behind his brow bone, blood beginning to stick and clump as arteries dry up to collapse. Dawn’s close.
Julian rakes his fingers through damp, painfully mussed and un-styled hair, and grabs the prayer mat tucked in a compartment beside the arch leading to the bedroom. It’s silk, deep olive green and embroidered—ayat al-Kursi in delicate gold calligraphy.
“Prayer time,” he says lightly, mostly to bridge the awkwardness stretching between them.
Sol looks up and frowns. He’s paler than usual, deep circles under his eyes, movements sluggish as he hits in a key code on the far wall and then lays out his mat.
“Skip it.”
Julian pauses.
“You know I can’t.”
She strains and stands, grabbing the Licker plush and what can only be an incredibly expensive throw blanket from the arm of the leather suite.
Julian watches, an almost imperceptible tightening in his jaw, as she follows him over, drops both to the floor beside him, and lies down.
“Fucking hypocrite.” She sighs, eyes closing. “You think Allah’s cool with diablerie?”
“He’s cool with me surviving sunrise.” Julian shrugs. “I’ll be quick.”
She watches him kneel, forehead pressed to the rug, earring glinting as he rocks forward, and thinks he looks beautiful like this.
The murmured Arabic is a familiar rhythm. She’s listened to it a thousand times as a fledgling in their trailer, but tonight it aches differently.
When he finishes, he doesn’t move.
“Julian?”
“I meant what I said in Santa Fe, Sol. Monterrey’s yours if you want it,” he says quietly. “I’ll follow you. No scripts. No strings.”
“No backseat Blood Sorcery?”
He finally flashes a smile at her, but she’s still lying on her back, eyes closed. He rolls up the mat with quick precision, even half-dead and mid-dying, and crawls over.
“None.”
“Liar.” Sol opens her arms.
He collapses into her, face buried in the crook of her neck.
“Missed this,” he mumbles.
“Missed you whining through Fajr.”
“Mean.” He flicks her nipple through the fabric.
Sol tugs his hair just enough to hurt. Julian purrs, fucking purrs, like some deranged cat.
Right before daysleep takes her:
“...Thank you. For the jacket.”
Julian smiles against her skin.
“Wait til you see what’s in the garage.”
[ prompt list ]
#THANK YOU BREE <333#x: exit wounds#jez writing#vtm night road#julian sim#oc: soledad#i hope this is ok.. little more serious but it was fun conceptualizing ^^#not gonna indent anymore bc when i do it on blocks of text like this it crashes my phone aghh. ill make an ao3 for easier format
47 notes
·
View notes
Text

"I want to fly high and defy gravity...and thanks to Levitate, I can!"
My Eelektrik crochet amigurumi pattern is now live on Etsy as a digital download! This Medium (level 3) crochet pattern has material lists for both Normal and Shiny Eelektrk and wirework tutorials to help you make your zappy snake-fish dreams into a reality! 🪭⚡🐍
The Eelektrik pattern features:
🪭whimsical full-color photos of Eelektrik playing in the snow
🪭clickable links to tutorials, including video tutorials for tapestry crochet techniques and shaping wire frames for plushes
🪭a materials list that includes yarn colors for both Normal and Shiny forms
🪭a handy glossary of crochet terms
🪭Each part of the plush is broken down into its own sub-pattern table under their own headings for keeping track of your progress.
🪭Schematics for creating the wire frame that lets you twist and pose the plush
🪭Large text and simplified graphic design ensure that crocheters of all abilities can equally read and perceive the pattern as it is written.
🪭An embroidery guide for the fin details
Patreon | Pinterest | Instagram | BlueSky | TikTok | LinkTree
Commission me on Ko-Fi
#crochet pattern#crochet#amigurumi#pokemon crochet#pokemon go#nintendo#pokemon#shiny pokemon#pkmncreatives#artists on tumblr#pkmnart#pokemon art#art#pkmn#unova#eelektrik#pokemon black and white#pokemon bw#pokemon b2w2#shiny hunting#tapestry crochet#video#chinese new year#warden ingo#submas ingo#subway boss ingo#pokemon ingo#pokemon legends arceus#pokemon scarlet and violet#submas emmet
51 notes
·
View notes
Text


I finished Sidon!
Although I do want to add his fangs and possibly the black lining in his design, right now I’m pleased with him and taking a break due to life. So for me, he is finished and being snuggled with.
Sidon is 63 inches long. He’s made of royal blue, red, yellow and white minky. His fins have quilt batting, and his back fin has a thin sheet of cardboard. He used about 13 lbs of fluff and uh. I stopped counting hours at hour 60 but I’d wager he took about 80ish over the course of the last two months, from pattern drawing to this point.
His pattern was something I put together studying the Bandai garchomp photos, and also other handmade giant Garchomp plushes, and studying his 3D model on Plushify. He was an absolute labor of love and was so worth it.
39 notes
·
View notes
Text
scrap yeah skydive plushie!!!
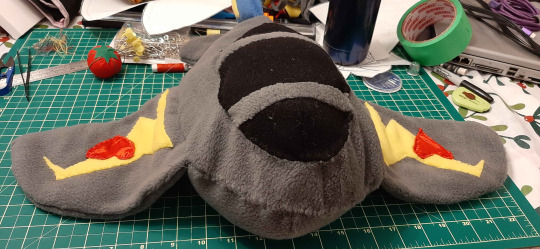
Reblog chain of wip pictures and comments here
He's finally real! My favourite transformers character of all time!! The blorbo!!!!
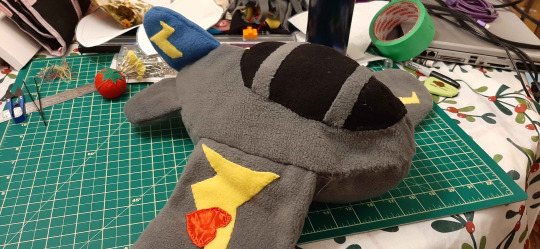
Skydive is made using a slightly modified version of @milk-sharks' Seeker plush pattern, two kinds of fleece, and satin. He's stuffed with batting offcuts from quilting, kindly given to me by a friend who also printed the pattern out for me (since the printers in my house can't print. . . yay. . .). Delightfully squishy, though I think he could've been stuffed with more.
Modifications and additions to original pattern:
Didn't do stripes
Only made one upright tailfin, since Skydive is an F-16 in comparison to the Seekers' F-15
Did hearts instead of stars for the faction badge
Gave him lightning bolts for his wings and upright tailfin
Fabric colours and types:
Yellow, gray, and blue: regular fleece
Black: arctic/polar fleece (would have gotten regular fleece, but the Fabricland didn't have it in stock at the time)
Red: satin
Things I'll do (and I reccomend you do if it's within your ability!) if I make another him:
Give him a nosecone in black
Reorientate his tailfin bolts. Small quibble, but I only realized they should be a different direction when the tailfin was sewed into the body lol
Make a new pattern just for his wings, so he can have wings closer to the actual shape of the F-16
Give him those little tube things(?) at the end of the F-16 wings to go with the changed wings
Give him more stuffing!! both in the body and the wings/fins
#transformers#maccadam#maccadams#skydive#plushie#sewing#aerialbots#my crafts#he exists!!!!! and he's so lovely to squish
61 notes
·
View notes
Note
I'm violently obsessed with the salmon plushie, is there absolutely any way we could get even a very rough pattern? Like rough ideas of shapes/sizes/placements? It wouldn't have to be super detailed, or even complete, I'm mostly interested in how you did the head/jaw and fins. I would be willing to pay you for it. You are the BEST auntie ever!!!! 🐟💗
@benevolentbirdgal you asked something similar i just haven't got around to answering
I have had people in real life ask for a pattern of how I did this and unfortunately I don't even know how to read/follow a pattern much less write/arrange/format one. If you scroll back through my blog a bit you can find all the progress pictures, they should all be tagged with both #plushie and #neice creature.
I suppose if you wanted a write up of the process it would go something like this.
Step one, become intimately acquainted with fish. Be born in a place where a large chunk of the state charter is about fishing rights. Go to kindergarten in a place where they not only teach kids about every phase of the life cycle but also raise salmon fry in classroom aquariums. Catch and clean alot of fish, like alot, like get up into the thousands. Become so quick and efficient at cleaning fish that tourists stop to watch you and people ask for lessons and knife sharpening.
Step two, now that you have the anatomy of a salmon ingrained into the fibers of your soul, just, draw one in its entirety on the inside of a pair of jeans that never fit. Make it half size, for baby hands, about the size of a trout. I literally never put a ruler anywhere near this thing, but like, 12-14 inches tip to tail.
Step three, make the pectoral, pelvic, anal, and dorsal fins as well as the caudal fin(tail). Make vague plans about the adipose fin and then give up and ignore it because no one cares about the adipose fin, including the fish themselves. Turn all the fins right-side out and stitch their rays on, giving them a little bit of structure and shape. Get to the tail fin and realize you are not stitching 20 fin rays on there and find a happy medium between accuracy and ease.
Step four. Fuck. Fish are hollow. The whole point of cleaning a fish is to cut it into lots of little pieces, some of which you eat and some of which you discard, which is not something you want of a child's toy. You could. But you don't want whoever is cleaning up after this toddler to run around picking up lil fishy organs. Rethink the way you filet a fish. Cringe at the thought that the most efficient way to make this plush is the least efficient way to filet a fish.
The filets themselves are easy, or at least, they're easy if you've done step one. It's an oblong shape with the belly color stitched directly to the denim, about the width of a hand. The meat is a safety orange tee-shirt that is now a crop top (insert long rant about the correct color of sockeye salmon meat here. It should not be fucking pink. Do not let anyone tell you it should be pink.) Stitch everything inside out and turn the seams in, then stuff them with shredded tee-shirt scraps because batting and stuffing is for people who can plan projects before they do them.
Step five, carcass. The dorsal fin gets seamed between a pair of denim strips to make the back. The adipose fin is a useful reference point for the locations of everything else but I couldn't figure out how to get the seams to work the way I wanted them so I ignored the adipose fin. Rip. The meat color gets seamed to the back and then the belly color to make a funky looking tube shape with fins sticking out. There was some finagling to make the fins sit in the places I wanted them to but everything sits in a seam except the anal fin which was easy enough to shove in a dart.
Step six, fishheads. Uhh, okay, there's how I did it and then there's how I would do it again. What I did was make a head out of a single piece of denim with some darts to make it the shape I wanted. Then I made the gills a sort of half moon shaped pocket with a redish pink color and seamed the pectoral fins in where the red met the orange. The jaw was a stuffed tongue of material attached to the belly and inside of the mouth, which is when realized I forgot to stuff the body. I do like how I stuffed the body because I took 6 layers of tee-shirt material tacked together in the vague shape of a fish and crammed it inside so it laid flat. It held more structural shape without being rigid or puffy. If I could have remembered to do that before I stitched everything close it would have been ideal.
If I was gonna do it over I would have made the head hollow and lined it with the red gill color and made the jaw a continuation of the belly so there would be an opening all the way through. I would also add some gill frills and fill them with rigid plastic to maintain the structure. I would also rearrange the pectoral fins to seam them in right behind the gills rather than below them.
Eyeballs this time around were buttons and finding sew on eyeballs is harder than I thought it would be but thats the obvious upgrade.
Guts were just a simple blob hand-sewn on, but with a bit more planning, I could actually do a digestive tract gas bladder, liver and roe sac. If I was gonna get that in depth I would rearrange the piecing order to have correctly fileted belly, so it would better explain how to harvest roe and belly meat. Plus as long as I was planning things rather than just slapping things together I would do some quick machine embroidery for muscle separations and a midline on the scales, mostly to make it pretty but also as a reference and indication of musculature.
Oh. Step six, the damn Velcro. Every craft store in Alaska is out of Velcro at the moment. Okay, maybe not every single one but all of them in between Fairbanks and Anchorage. And Home Depot. I found the stuff to stick on walls at Lowes which did not work nearly as well as I hoped it would. I had to force the needle through by bracing it against the floor and forcing the plush down on top of it. Forget a thimble, I was considering pliers. I was rushing (and also finishing it at my moms house) by the time I got to this part but I would get more creative and cut it into a shape more reminiscent of a spine next time.
I was gonna vacuum pack it before I wrapped it as a present because it would have been hilarious but I was slapping wrapping paper on while getting squawked at about being late, so we can all mourn the joke that never got the chance to land.
In conclusion, winging it gets you some crazy places and wild results but there are trade offs to careening speed, mostly in missed opportunities. But if you have a lot of pre-existing knowledge like general understanding of how seams work and also how fish work, you can pad out a lot of the inevitable fuck ups. If you are just jumping into raw dog a plushy pattern, I recommend starting out with something you are innately familiar with, rather than something that strikes you as cool.
#ask answered#plushie#Salmon#Project write up#Jesus this took forever#Tumblr ate another paragraph every time I looked away#Not a pattern but close enough#Pattern
65 notes
·
View notes
Text
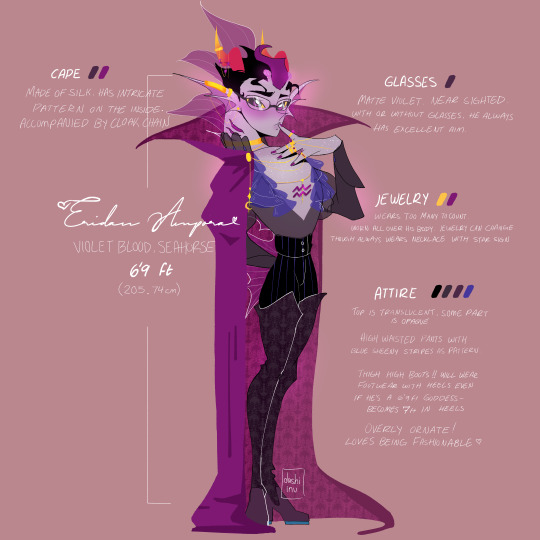
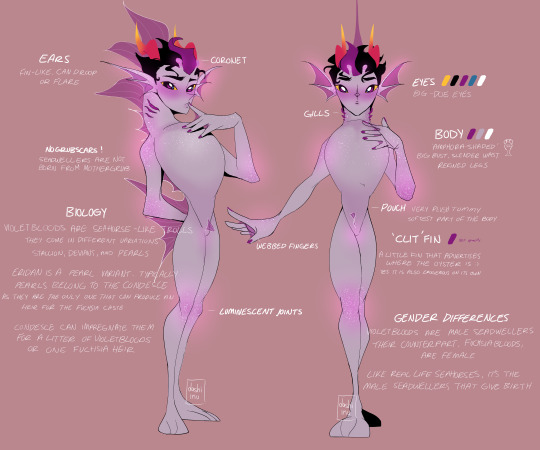
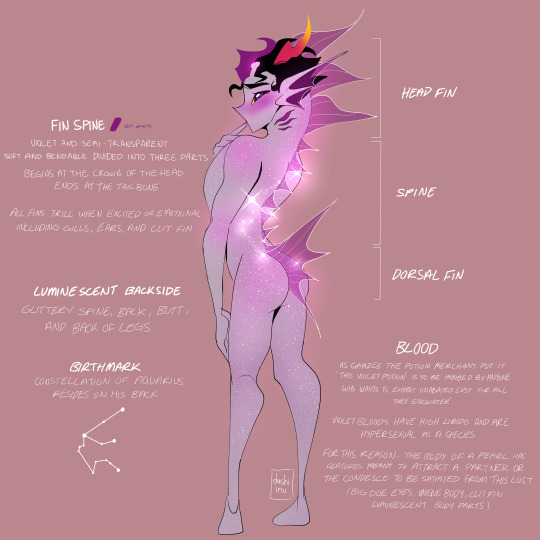
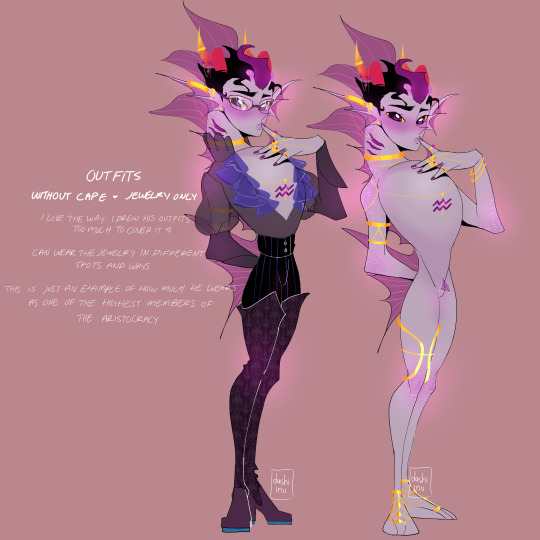
eridan ampora from homestuck 🫧 he was my first favorite and still is from the cast ♡ i know, i know, he is one way in canon, but i wanted to have fun with this sea dweller and make him to my image. like all of my faves *babygirlifies eridan
rewrote the info on eridan's reference sheet under the cut 🌊 this design features nsfw content! 🔞
ERIDAN AMPORA (VIOLET BLOOD, SEAHORSE)
6'9 ft (205.74 cm)
CAPE. Made of silk. Has intricate patterns on the inside. Accompanied by cloak chain.
GLASSES. Matte violet. Near-sighted. With or without glasses he always has excellent aim.
JEWELRY. Wears too many to count. Worn all over his body. Jewelry can change though always wears a necklace with star sign.
ATTIRE. Top is translucent. Some parts are opaque. High-waisted pants with blue, sheeny stripes as pattern. Thigh-high boots!! Will wear footwear with heels even if he's a 6'9 ft goddess- Becomes 7ft in heels.
Overly ornate! Loves being fashionable ♡
---
EARS. Fin-like. Can droop or flare.
NO GRUBSCARS! Sea dwellers are not born from Mothergrub.
BIOLOGY. Violet bloods are seahorse-like trolls. They come in different variations; Stallion, Deviant, and Pearl. Eridan is a pearl variant. Typically pearls belong to the Condesce as they are the only ones that can produce an heir for the Fuchsia caste. Condesce can impregnate them for a litter of violetbloods or one Fuchsia heir.
CORONET, GILLS, WEBBED FINGERS, LUMINESCENT JOINTS
EYES. Big-doe eyes.
BODY. 'Amphora-shaped'. Big bust, slender waist. Refined legs.
POUCH. Very plush tummy. Softest part of the body.
'CLIT' FIN. A little fin that advertises where the oyster is :) Yes, it is also erogenous on its own.
GENDER DIFFERENCES. Violetbloods are male sea dwellers. Their counterpart, Fuchsiabloods, are female. Like real-life seahorses, it's the male sea dwellers that give birth.
---
FIN SPINE. Violet and semi-transparent. Soft and bendable. Divided into three parts; head fin, spine, and dorsal fin. Begins at the crown of the head, and ends at the tailbone. All fins trill when excited or emotional, including gills, ears, and clit fin.
LUMINESCENT BACKSIDE. Glittery spine, back, butt, and back of legs.
BIRTHMARK. Constellation of Aquarius resides on his back.
BLOOD. As Gamzee the potion merchant put it, 'This violet potion is to be imbibed by anyone who wants to exhibit unabated lust for all they encounter.'
Violetbloods have a high libido and are hypersexual as a species.
For this reason, the body of a pearl has features meant to attract a partner or the Condesce to be satiated from this lust. (Big doe eyes, unique body, clit fin, luminescent body parts.)
---
OUTFITS
WITHOUT CAPE ♡ JEWELRY ONLY
Can wear the jewelry in different spots and ways. This is just an example of how much he wears as one of the highest members of the aristocracy.
#my art#homestuck#homesmut#eridan ampora#fullbody reference sheets#hey if ur gonna be a prude .. pls don't bother babe 💋 i love this design too much i don't wanna hear ANY of it#also sorry if there is some misspelling or something wonky i tried my absolute BEST with this fanart 🛐#it took me a MONTH to get this together#random note: he is not a minor here. im roleplaying my own story of homestuck and hes an adult (20 something)#UPDATE: I edited Eridan's back to have a contellation!
50 notes
·
View notes
Text


Finally finished my Momoo plush! I was sad at how little merch this baby gets, so I made my own.
It's been so long since I finished his body (a year...ADHD brain go brrrr) that I don't have links to any of the free patterns I used to cobble him together. But it's the head of a cow, the body of a seal, and then standalone horn and back fin patterns. The wonky nose, belly, and spots were just me messing around until it looked right.
So many people have made him better but I'm still proud of my chonky sea cow.
#one piece#momoo#crochet#spot my zosan shrine in the background#wonky art#baby sea cow#original creation#amigurumi
7 notes
·
View notes
Text

Mudkip + Catch A Wave Stitch Build-a-Bear Headmate Pair!
Created by: Mod 💾 Requested by: Anonymous



Name: Surf, Wave, Bubble, Max(well), Splash, Marlin, Blue, Mikey, Capri, Breezy, Koi, Skipper, Dew(drop), Scout, Puddles, Azul, Finn, Flounder
Gender: Nonbinary boy, Demiboy, Drizzlegender, Pokemongender, Watertypic, Pluvian, Charcon, Leafdripsoundic, Marinic, Waterparkic, Aquagender, Gummysharkic, Happylexic, Caprisungender, Dolphfloatic, Fishboy
Pronouns: He/Him, They/Them, It/Its, Ne/Nem/Nir, Se/Sim/Ser, Wave/Waves, Fin/Fins, Rive/River/Rivers, Splash/Splish/Splosh, Glub/Glubs, Blu/Blue/Blues, Bub/Bubble/Bubbles, Fish/Fishs, Rai/Rain/Rains, Wet/Wets
Age: Young, Animal-Like Age
Species: Mudkip
Personality: Friendly, excitable, and fun-loving! Shy at first, but warms up easily. Loves affection! Easily entertained. Childlike. Enjoys silly activities, especially ones involving water. Flees from things that are uncomfortable or scary. Social, always wants to be around close friends.
Appearance: Bright blue Mudkip with orange cheeks. Quadruped with Short, Stubby legs and paws. Often wearing a rain coat and rain hat. Has a Light layer of fuzz all over- More plush-like than other Mudkips. Small like a cat, if cats had Large heads.
Favorite Things: Water, Rain, Puddles, Fruit-flavored Soda, Mud, exploring, Bugs, worms, Beach balls, Watermelon, Playing in Sprinklers, Water parks, Oranges
Source: Build-a-Bear, Pokemon
Emojis: 💧, 🌧, 💦, 🍊, 🧊, 🐬, 🐟



Name: Cruise, Malibu, South, Fisher, Ferris, Coast, Harbor, Journey, Calypso, Oasis, Bay, Hibiscus, Riptide, Sunbeam, Oscar, Noah, Ripley, Sai
Gender: Male, Genderocean, Tropigender, Summergender, Beachic, Hibiscian, Seasoundic, Cocktailgender, Oceanlexic, Sunnyskyaesic, Sorbetic, Goodvibic, Mangopopsic, Aecoraromic
Pronouns: He/Him, Wave/Waves, Ce/Cir/Cirs, Jhey/Jhem/Jheirs, Oc /Ocean/Oceans, Bay/Bays, Sun/Suns, Sea/Sear, Fa/Fanta/Fantas, Naut/Nauti/Nautic, Claw/Claws
Age: Late 20s
Species: Koala-like Creature
Personality: Chill, casual, laid-back attitude. Great at comforting people. "The Dad Friend". Acts like a surfer dude. Always tries to look at the bright side of situations. Usually listening to music. Always up for new experiences. Sees the good in all people!
Appearance: Looks like Stitch with Blue + Light blue Marbled fur, With an orange hibiscus flower inner-ear pattern. Often wearing Hawaiian shirts, Usually as jackets. A little chubby. Fashion sense is very summery.
Favorite Things: The Beach, Sunshine, Cold fruity drinks, Swimming, Surfing, The smell of Saltwater, Collecting shells, Tide pools, Lounging, Sewing, Flowers
Source: Build-a-Bear, Lilo & Stitch
Emojis: 🌴, 🌺, 🍍, 🍹, 🥥, 🌊, ☀, 🏖

Headmates will not always arrive as a perfect replica of what was in the pack. Be patient, be open-minded, and treat your new friend with respect and care! You are also free to tweak your pack to your liking as much as you please. Happy forming!

#sunfish headmates#mod 💾#request#Source: Build-a-Bear#build a headmate#build an alter#headmate pack#alter pack#bah blog
7 notes
·
View notes
Text


[ID: Two pictures of a handmade plush of a newt laying on its belly and side against a light background. The plush is made from green fabric with a minecraft creeper pattern on it, with a light green belly. It has a spiky crest along its back and a flat tail fin. It has clear plastic eyes. End ID]
I reused some fleece to make a newt plush 🦎
#sey art#newt#handmade#handmade plush#I might make some more of these#tomorrow I'll take some pics too. maybe#my little guys
11 notes
·
View notes