#enter your username in the ‘Username’ empty field. By default
Explore tagged Tumblr posts
Visit Tumblr Blog
Explore Tumblr blogs with no restrictions, modern design and the best experience.
Last Seen Tumblr Blogs


Fun Fact
130K people were victims of a chain letter scam that affected Tumblr in May 2011.
Text
Step By Step Guide For Linksys Extender Login
Connect your device to the Linksys Extender's Wi-Fi network in order to log in. Enter "http //extender.linksys.com" or "192.168.1.1" in the address bar of an open web browser. Enter your Linksys extender's login information. "admin" is used by default as both the username and the password. You can also leave both fields empty. To get the best results, change the parameters as necessary. To find out more about Linksys Extender login, visit our website. Our professionals can help you further.
0 notes
Text
How to Login Linksys Velop
If you looking for login solution, do the following steps and try to Login Linksys velop as soon as
possible.
Initially, you need to connect your PC into the network, which has to be the same network the
Linksys router is on.
Furthermore, turn on your device, open the web browser and enter IP address ‘192.168.1.1’ into
the address bar. After this, a box will appear on the screen and provoking you to enter your
“username” and “password” in order to do Linksys Velop login.
Moreover, enter your username in the ‘Username’ empty field. By default, the username field
needs to be left blank, but in case, you have to change your username, then you have to enter
that username.
After that, enter your password in ‘Password’ field, which by default is ‘Password’ only, but if
you have changed it, then enter that you have changed.
In last, click ‘Login’ and you will be able to efficiently do Velop login.
When you are positively login after that you are able to do Linksys Velop Setup process. For more
information Contact us on 877-372-5666.
#How to Login Linksys Velop#If you looking for login solution#do the following steps and try to Login Linksys velop as soon as#possible.# Initially#you need to connect your PC into the network#which has to be the same network the#Linksys router is on.# Furthermore#turn on your device#open the web browser and enter IP address ‘192.168.1.1’ into#the address bar. After this#a box will appear on the screen and provoking you to enter your#“username” and “password” in order to do Linksys Velop login.# Moreover#enter your username in the ‘Username’ empty field. By default#the username field#needs to be left blank#but in case#you have to change your username#then you have to enter#that username.# After that#enter your password in ‘Password’ field#which by default is ‘Password’ only#but if#you have changed it#then enter that you have changed.# In last#click ‘Login’ and you will be able to efficiently do Velop login.
0 notes
Text


THEME PACK: THE ARCHIVE
Styled after AO3, this pack includes a theme and matching pages, and was designed for writers and readers alike.
🖋️ Theme 11: Archive Of Your Own
Live preview | Static previews: index page, permalink | Code
Full-width posts in an AO3 work index page format
Sidebars with optional sections such as featured tags, updates, rules, progress bars, and more
Unlimited custom links (display on sidebar or in top navbar), plus several social links in the footer
Add a custom logo beside/replacing your avatar
Inbuilt tag filtering plugin by glenthemes
All fields editable directly in the Customize menu, no HTML required. See below the cut for a full guide
🖋️ Page 3: Archive Records
Preview | Code
A WIP page designed to resemble an AO3 work page
Add tags for ratings, warnings, fandoms, characters, and more, as well as statistics like start dates, word counts etc.
Spaces for summary, start and end notes, and the 'work' itself
🖋️ Page 4: Archivist
Preview | Code
A combined about/navigation page based on the AO3 profile page
Include user statistics or any data you'd like, plus a longer bio
Sidebar navigation with link sections - unlimited links and link groups
The theme and pages all include options for multiple color palettes (initially set to Default and Reversi), text styling (choice of Tumblr/Google fonts and casing options), and more. -
Each page includes instructions on how to edit it, and color/image variables have been gathered together to make customization easier. While not necessary, basic knowledge of HTML is helpful.
For help, check my codes guide, or feel free to send me an ask. Theme 11 customization guide and credits are under the cut.
Theme 11 customization
Regarding the simpler fields:
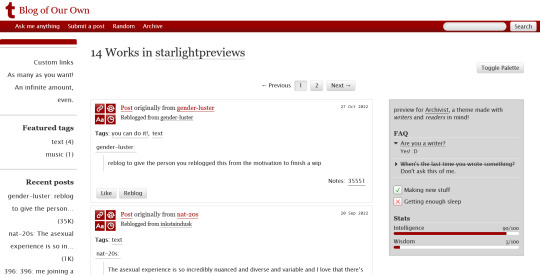
"Secondary title" refers to the title just above the posts, under the header and navigation. This defaults to "[Total posts] Works in [Username]" when the field is left empty.
"Filtered tags" takes a comma-separated list of tags, entered exactly as they'd be written in the Tumblr post editor but without the hashtag. E.g. the tags #politics, #red and blue, and #green would be entered as "politics, red and blue, green" (make sure there's spaces, and no comma after the last item!). The filtering plugin will then put a warning message over any posts with those tags, along with a button letting you show the post.
"[Section] title" act as the headers for the corresponding section, if provided. "Custom links title" defaults to "Pages" if nothing is entered, and is used when the custom links are displayed on the navbar.
"Featured tags" takes a comma-separated list of tags, in the same format as Filtered tags. This field will display links to those tags, along with the number of posts in that tag on your blog, in the left sidebar.
The Recent posts section displays the 5 most recently posted/reblogged posts on your entire blog, displaying in the left sidebar. If you enter a tag under "Recent posts tag", it'll instead display the 5 most recent posts in that tag on your blog. Only 1 tag is allowed.
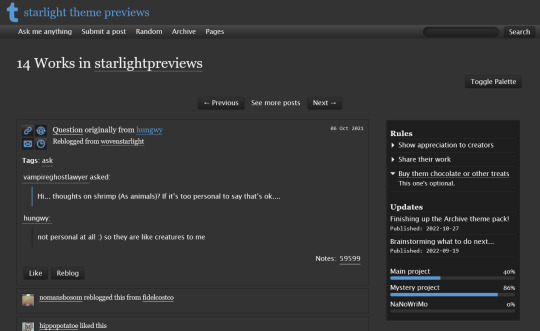
Rules and FAQ
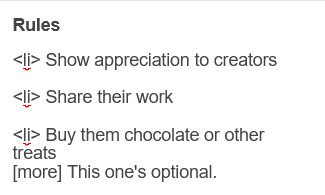
Both these sections work the same way. Each new item, a rule or a question, consists either of one statement, or a statement and some more text, usually as an answer or additional note. E.g. the screenshot below shows three rules, where the last one has more text in the dropdown.
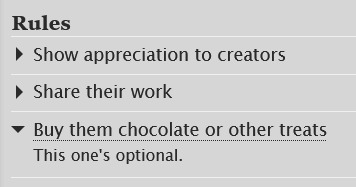
To create an item, prefix it with <li> . To add more text, create a <li> item and add a [more] label underneath, then write your extra text after that. To illustrate, here's the Customize page code for the above:
Updates
This section is similar to Rules/FAQ, though it flips the order around. After each <li>, first list the date, then add the [label] marker, then add your actual update. Again, here's an example:
And here's the Customize page code that created that:
Toggles
This section displays checked/crossed-out items, and uses a simpler version of the formatting for the above sections. Use <li> for each new item, then add [on] or [off] at the end, depending on whether you want it checked or crossed off. Here's an example:

And here's the corresponding Customize code:
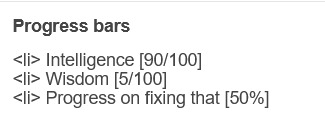
Progress bars
This section also uses <li> items, where each item has two parts: the text label, and the number(s) for the progress percentages, put inside square brackets like with the other sections. Here's an example (note how the top two use fraction values while the bottom one uses a percentage):
And here's the code that made these. In short, the format is <li> Text here [##/##], or <li> Text here [##%], where ## refers to any number.
Social links in footer
The footer links, aside from the email and personal website fields, take usernames or user IDs for various websites. Be sure to check you're not entering a username in a user ID field!
The Email address field takes a standard email in the format [email protected] and adds a link to let people mail that address.
The Personal website fields will generate a link in the footer's Follow section. Personal website name is the human-readable text label for the generated link, and Personal website URL is the URL that will open when the generated link is clicked. Make sure to add https:// to the start of the personal website URL so the generated link doesn't just redirect you to a different part of your blog.
Credits
Layout and design by Archive of Our Own
Style My Tooltips by malihu
Phosphor Icons
Expanded Tumblr localization and NPF photosets plugin by codematurgy
Custom audio posts by annasthms
Tag filtering by glenthemes
Palette toggle by eggdesign
Scroll to top by Fabian Lins
#code#theme#theme 11#page#page 3#page 4#coding cabin#theme hunter#free#full width#sidebar#topbar#nav text#pagination#unlimited links#header img#custom font size#tfont#gfont#unnested#responsive#npf#color mode#search#rblk buttons#timestamps#tags#group
1K notes
·
View notes
Text
The Living Joke, Ch. 2
Harley has discovered a cure for the Joker’s broken mind, and now a mostly sane Jack Napier must come to grips with all of the harm he’s done over the years, and decide whether he’s damned for the actions of a madman wearing his face.
***
One hundred feet below Wayne Manor, elevator doors open into a vast cavern and a dead man steps out. Jason Todd, the Red Hood, the black sheep of the Bat Family, Titan and Outlaw, enters the Batcave carrying his cycling helmet under his arm and wondering why Bruce has invited him here. Especially in the middle of the day.
"Chemical analysis looks hopeful," he hears Bruce say. "The formula seems to be doing exactly what Harley predicted it would."
"Seems to?" Dick replies. "Didn't you say yourself he was acting like a normal person in the café?"
"He's very good at that," Bruce responds as Jason rounds the corner and sees Bruce in chinos and a button-down sitting at the Batcomputer, looking over analysis of what Jason recognizes vaguely as a variety of antipsychotic, though not one he's ever seen before. Dick, meanwhile, is perched on one of the railings and dressed like a well-groomed hobo. "He fooled me for months as Eric Border," Bruce continues. "I'm not exactly objective here." He takes a sip of his coffee from a #1 Mom mug that Tim and Cass had found at a flea market and had rapidly become his favorite. "Good morning, Jason," he says, without turning around.
"Hey, B," Jason says, unsurprised that Batman has noticed he's here. He places his helmet down on an empty stainless steel table. "Doesn't sound like I'm in trouble for anything?"
"You're not," Bruce says, typing a long string of nonsense symbols, or rather, a code designed by Clark to be easily readable at super-speed. In the corner, the computer states that the file is being shared with SciencePizza—Barry's username on the Justice League groupchat. "I need your perspective on something." He glances at Dick. "Both of yours."
"Sure, whatcha got?" Jason says, dropping into one of the spare chairs and spinning a few times.
Bruce gestures to the screen. "What do you think of this?"
Jason tilts his head. "Looks like a new kind of anti-psychotic," he says. "Organic ingredients, some novel stuff..." He looks at Bruce. "This for Harvey?"
Dick shudders. "God, I hope not."
"Be nice, Dick," Barbara says, coming up the stairs with Cassandra trailing quietly behind her. Barbara is wearing jeans and a leather jacket, while Cass is dressed in jeans, a messy white blouse, and a black skinny tie. "Harvey's an old friend."
"He shot me in the face," Dick pouts back.
"Poor baby," Barbara responds, caressing her boyfriend's cheek. "Always a shame when something happens to a face that pretty."
Cass walks over to her father's side, leaning onto the back of the chair with crossed arms. "Your call seemed urgent."
"Somewhat." Bruce looks up at her, naked fondness in his eyes. "Cassandra, darling, can you move? I need to turn around."
Cassandra moves over slightly, turns, and leans against the keyboard, and Jason is somewhat jealous to note that she's perfected the "bisexual slouch" that Jason has been trying to practice on Roy and Artemis for months. And given that it's Cass, she probably knows exactly what she's communicating, though given that Tim and Stephanie are in California Jason isn't exactly sure who she's communicating to.
Bruce turns the chair around, so Cass is behind him and the rest of his present children in his field of vision. "I've called the four of you here because each of you has a unique perspective on a particular issue," he says. "We have reason to believe that Harley Quinn has managed to create an effective treatment for the Joker's mental condition."
There's a moment of absolute stunned silence that echoes through the entire cave, then Barbara breaks it with a hearty "Holy shit."
Dick whistles.
Jason crosses his arms behind his head. "So what's the plan to get him to take it?" he says. "Force it down his throat?"
Bruce shakes his head. "I already had Aaron Cash deliver him the first dose," he says. "And from what Barry, Harley, and I can all tell, it seems to be working. But."
"But," Cassandra echoes knowingly. She nods. "You're not sure."
Bruce purses his lips. "I want it to work," he says. "But at the same time, the pessimist in me is hoping that it won't. Punching him is simpler. So it's..." He tilts his head. "...difficult." He looks at his three oldest partners. "You three have the most experience with him out of anyone in the family, and Cassandra—" he acknowledges her with a nod of his head, "—is the best equipped to notice smaller signs. I'd like to ask you four to watch him, to gauge whether he actually is getting better or whether it's some kind of ruse."
Jason grimaces, leaning forward. "You know I'm going to default to no."
Bruce sucks in his lips and nods. "That's why I asked your advice specifically," he says. "You and Barbara are the least likely people in the family to trust him." He does not say why, because everyone in the room knows and he of all people knows what it's like to have to relive significant trauma. "If he is faking, I'm counting on you two to find out why."
It's an odd experience, being needed by Bruce for possibly the first time since he died. Jason decides he likes it.
"I kinda feel like the odd man out, here," Dick says.
Bruce turns to him. "You're the most likely to believe him," he says, and it's not an accusation—there's pride in his voice as he says it. "If it is, then Jack is going to need—"
"Jack?" Barbara interrupts.
"Jack Napier," Bruce says. "It's his name."
Cassandra raises an eyebrow. "First-name basis?"
Bruce remains completely impassive, which for him means he’s basically rolling his eyes. "If this is real, then Napier is going to need someone in his corner to make sure he doesn't backslide."
"I have a condition," Barbara announces. Everyone turns to her, and she clutches at her elbow, nervously shifting her weight to one hip. "I'm not going near him," she says. "I'll do it, but only as Oracle. No Batgirl involved."
Jason's eyes unconsciously flick to her stomach, where the bullet scar is hiding among a small number of larger knife wounds, then he catches himself and looks away. He feels a twinge on his back, the one he feels whenever he gets cold, where the Lazarus pit never quite erased the scarring from the crowbar. He can sympathize with not wanting to share space with that monster. It's a big part of why he started carrying guns, and why he decided to wear the red helmet—his own twisted form of exposure therapy.
"Agreed," Bruce says, turning back to his computer. "Now, if you'll excuse me, Croc's been robbing bodegas again." He glances at Jason. "You've got a fairly good relationship with him. Care to come with?"
In case anyone is wondering why Bruce seems out of character, I'm using @unpretty's Bruce from the Sorrowful and Immaculate Hearts series—specifically taking inspiration from the fic "Christmas in Kansas"—who I think is the best Batman/Bruce Wayne ever written.
#batman#the living joke#batman white knight#bruce wayne#the joker#jack napier#jason todd#the red hood#red hood#dick grayson#nightwing#barbara gordon#oracle#batgirl#cassandra cain#cassandra wayne#black bat#orphan#batdad#fic#my fic#fanfic#original content
61 notes
·
View notes
Link
Thanks for the question! I've created an answer in three parts, each one meant to address a specific question you've asked. PART ONE: How to Create Second-Generation Extension Packages PART TWO: How to Get the LMA to "see" a Second-Generation Managed Package PART THREE: Technical Enablement for Second-Generation Extension Packages Not gonna lie, this is a long read. For those who something shorter, here's the TLDR. TL;DR: Second-generation extension packages are created by adding dependencies on metadata found in other packages to a second-generation package, then creating a new package version using force:package:version:create. The LMA has no problem seeing 2GP extension packages so long as your Dev Hub is linked to your packaging org and you've created and promoted at least one second-generation package from that Dev Hub. There are several enablement materials that are relevant to this topic, but they're spread out over a large number of sites and locations. If you only have 20 minute to learn more, the one resource you should check out is this 17-minute video from DreamTX '20: Build Apps Using 2nd-Generation Managed Packages. For those with time to kill (and an itch to learn!) let's dive in! PART ONE: How to Create Second-Generation Extension Packages Fundamentally, an "extension package" is any package that has one or more hard dependencies on another package. For example, Package A and Package B start life out as unrelated entities. The moment that Package B adds a custom field, Apex reference, or other hard dependencies to metadata components that are defined in Package A...that moment is when Package B becomes an "extension" of Package A. How Package Dependency Works During Development Package dependency is at the heart of what makes one package an "extension" of another, so it's important to understand the rules that govern this interaction, especially those that impact you during development. Package Dependency Rule #1: Package dependencies (i.e. "base packages") must be present in the org where development of the dependent (i.e. "extension") package takes place in order to satisfy design-time metadata dependencies. For 1GP, this means that the package dependency must be installed in the packaging org For 2GP, this means that one of two things must happen If the package dependency has a different namespace, it must be installed in any namespaced scratch orgs where development takes place If the package dependency has the same namespace, it could either... Be installed in any namespaced scratch orgs where development takes place Be present in its own package directory within the same SFDX Project as the extension package source is, allowing the source of both packages to be deployed to the scratch org using force:source:push Package Dependency Rule #2: 2GPs that depend on other packages must explicitly define such dependencies inside of the sfdx-project.json file at the root of the SFDX project directory where the 2GP is being developed. Package Dependency Rule #3: Second-Generation Packages (2GPs) can depend on both First-Generation Packages (1GPs) and other 2GPs. On the other hand, 1GPs can only depend on other 1GPs because extending a 2GP with a 1GP is not supported by Salesforce. In other words... OK OK NOT OK OK Package Dependency Rule #4: Circular package dependencies are prohibited. This means that if Package B depends on Package A then it's not OK for Package A to also depend on Package B. Packages built in this way would never be installable because no matter which package you install first the subscriber org would always be missing a package dependency. Package Dependency in Action With all the rules of package dependency in mind, let's look at an example of 2GP extension package development in action. Consider this excerpt of a Salesforce DX project definition file, sfdx-project.json, used during the development of an expense calculator app. // Note: This is an excerpt of an sfdx-project.json file, used for demonstration // purposes only. A complete file would have additional keys defined. { "namespace": "exp_calc_demo", "packageDirectories": [ { "path": "accounting-logic", "default": false, "package": "Accounting Logic", "versionName": "Summer ‘21", "versionNumber": "4.5.0.NEXT", "dependencies": [ { "package": "Apex [email protected]" } ] }, { "path": "expense-calculator", "default": true, "package": "Expense Calculator", "versionName": "Summer ‘21", "versionNumber": "1.2.0.NEXT", "dependencies": [ { "package": "Apex [email protected]" }, { "package": "Accounting Logic", "versionNumber": "4.5.0.LATEST" } ] } ], "packageAliases": { "Expense Calculator": "0HoB00000002JAiWAP", "Accounting Logic": "0HoB00000004CFpKAM", "Apex [email protected]": "04tB0000000IB1EIYR" } } Observation #1: The "Expense Calculator" app is actually an MPSN (multi-package, same-namespace) solution because both the Expense Calculator and Accounting Logic packages are 2GPs that share the same namespace. We know this because each package is defined inside of the packageDirectories object array and each one has a package alias that points to a 0Ho Package2 ID. Observation #2: The definition of the Accounting Logic package directory appears before the definition of the Expense Calculator package directory. When running the force:source:push command, this causes the Salesforce CLI to push the project source one package directory at a time in the same order as those package directories are defined inside sfdx-project.json This is very important because the Expense Calculator package has metadata components that depend on the metadata found in the Accounting Logic package. When getting an empty scratch org ready for development, if the source from the Accounting Logic package was not pushed to the scratch org first the force:source:push command would end up failing due to invalid metadata references. Observation #3: The dependency between Expense Calculator and Accounting Logic is an internal dependency because both packages share the same namespace and were created against the same Dev Hub. This allows the Expense Calculator package directory definition to use the specialized syntax of "versionNumber": "4.5.0.LATEST" to specify which version of the Accounting Logic package it depends on. Observation #4: The dependency on Apex [email protected] is an external dependency because that package is neither part of the same namespace nor owned by the same Dev Hub as the Expense Calculator and Accounting Logic packages. The fact that it's an external dependency is also why Apex [email protected] is aliased to a 04t package version ID. Note that both Expense Calculator and Accounting Logic are aliased to 0Ho Package2 IDs, something that's only possible when the packages referenced are owned by the same Dev Hub that's being used to run any force:package commands in this project. Observation #5: It's not clear from looking at sfdx-project.json so I'll have to state it here: The Expense Calculator package in our example doesn't actually have any direct dependencies on the Apex [email protected] package. If that's the case, why do we need to explicitly list Apex [email protected] as a dependency of Expense Calculator? The reason is that Second-generation packages must declare all package dependencies, even indirect ones. When you run force:package:version:create the 2GP Build System needs to know the complete list of packages to install in the behind-the-scenes Build Org where your package is validated. When the build org is created, each package dependency defined by the package being built will be installed in the same order in which they are defined. That's why Apex [email protected] is the first dependency listed for the Expense Calculator package. It must be installed first because the package that Expense Calculator actually depends on, Accounting Library, would fail on installation in the Build Org if Apex [email protected] wasn't already there. Final Observations: There is a lot for a developer to keep track of when it comes to package dependencies in 2GP. Knowing the responsibilities up front can help avoid problems. Developers must identify the specific package versions that each 2GP depends on, whether those dependencies are direct or indirect External package dependencies must be installed in scratch orgs before the source of 2GPs that depend on those packages can be pushed/deployed to the scratch org Very little is automated (yet), so developers must be ready to manually determine indirect dependencies and install package dependencies into scratch orgs during development PART TWO: How to Get the LMA to "see" a Second-Generation Managed Package Connecting a second-generation managed package to an LMA is a relatively straightforward, two-step process...once you know how to do it. To make the first time easier, I'll walk through the process visually. STEP ONE: Connect the Publishing Console to Your Dev Hub This step assumes that your company has already joined the partner community and the Salesforce AppExchange Partner Program. If you haven't done this yet, please see the Connect with the Salesforce Partner Community unit on Trailhead for details on how to proceed.* Log in to the Partner Community with a user who's part of your partner organization and has been granted the Listings permission Click on the Publishing tab to open the Publishing Console Click on the Organizations sub-tab Click the Connect Org button to start the Connection Wizard Enter the username of an admin user from the org where your Developer Hub lives Enter this user's password with the security token appended If you don't have or don't know the security token for this user, you'll have to reset it Click the Connect button to complete the process STEP TWO: Register Your Second-Generation Package with Your LMA Please note that it may take several minutes for the packages owned by your linked Dev Hub to show up in the Publishing Console. Also note that ONLY released (i.e., non-beta) packages will show up here and that it may take several minutes for newly promoted 2GPs to appear. Log in to the Partner Community with a user who's part of your partner organization and has been granted the Listings permission Click on the Publishing tab to open the Publishing Console Click on the Packages sub-tab. This will show you... All released (i.e. non-beta) first-generation managed packages owned by the 1GP packaging orgs that you've linked to your Publishing Console All first-generation unmanaged packages owned by orgs (packaging or otherwise) that you've linked to your Publishing Console All released (i.e. non-beta) second-generation managed packages owned by each Dev Hub that you've linked to your Publishing Console Observe how different packages, VMC 2GP Lab (core-ux) and VMC 2GP Lab (SR-Test), each with the same namespace, vmc2gplab, are both listed here. This is what happens when you link a Dev Hub to the Publishing Console All second-generation packages owned by the linked Dev Hub which have at least one released (i.e. non-beta) package version will show up here. Connecting a managed package to your LMA requires you to click the Register Package link next to the package version that you want to wire up to your LMA. Clicking this link will kick off the package registration wizard. Click the Log In button to go to the next stage of the package registration wizard. Enter the username of an admin user from your License Management Org (LMO) "License Management Org" or "LMO" is a term used to describe an org where the License Management App (LMA) is currently installed. Enter this user's password with the security token appended If you don't have or don't know the security token for this user, you'll have to reset it. Click the Log In button to move to the next step in the package registration wizard. Choose the default license behavior. Trial licenses give subscribers access to your solution for up to 90 days. Active licenses provide subscribers with continuous access. Set the length of trial licenses in number of days. The maximum value that can be set is 90. When the default license is *active instead of trial, the option to specify the length of trial disappears. Choose whether the default license should be site-wide (available for all users) or per-seat (must be granted to users individually). If selecting per-seat as your default license, you must also specify the number of seats that will be granted to the subscriber by default. Click the Save button when done to complete the package registration wizard. Key Considerations When Using the LMA with Second-Generation Packages Please keep these things in mind when using the LMA with first and second-generation packages Packages will only appear in your publishing console once you've... Connected a packaging org (1GP) or Dev Hub (2GP) to your Publishing Console Uploaded a managed/released package version (1GP) or promoted a beta package version to the released state (2GP) Packages do not have to pass security review before being registered with your LMA Partners are welcome to register packages with their LMA early This allows partners to get comfortable with being "hands on" with the LMA Registering your package with the LMA also makes it possible see how the Feature Management App (FMA) works end-to-end IMPORTANT! Being able to register a package with your LMA before passing Security Review is not an invitation to skipping Security Review or the AppExchange Listing/Contracting process and distributing your package directly to customers. Doing so is a viloation of the Salesforce Developer Services MSA and the Salesforce Partner Program Agreement (SPAA). Installing in sandbox and trial orgs is fine. Installing in production orgs is not. Please don't do it! To go through Security Review, packages must be associated with a Listing. This is a core part of how the AppExchange publishing system works and can not be bypassed. Having a listing does not mean your app has to be publicly listed (i.e. visible) on the AppExchange. Creating a listing, going through Security Review, and keeping your listing private so customers must install via URL or 04t package version ID is perfectly acceptable. PART THREE: Technical Enablement for Second-Generation Extension Packages Documentation and enablement material for packaging in general can be found in many places. The Salesforce ISV Platform Expert Team aggregates 2GP specific enablement content in this Trailmix: Tech Enablement: Second-Generation Packaging (2GP) As for enablement resources that are relevant to the topic of 2GP extension packages, Phil W shared some great links in his answer. I'll share them again here along with some other ones I know of. (Thanks, Phil!) Finally, there's this super long article-disguised-as-StackExchange-answer which is (hopefully) a nice enablement resource all by itself. :-)
0 notes
Text
www.dlinkrouter.local : Dlink Router Setup Wizard
What are the steps if using 192.168.1.1 does not load the D'link router login page for D-Link DIR-615 Wireless-N300 Router?
In case the router’s configuration and login page fail to load, verify that the computer is connected to the router only and not to any other network.

If the problem remains, it means that the D-Link router must have been used by someone else and that user might have modified the default login address. In this situation, you may have to try to reset your D- Link router to its factory default settings. To do so, press and hold the Reset button positioned at the back of the router for about 10 seconds. Now, you have reset the router to its factory default settings by which you will also be able to access the configuration page by visiting the default IP Address 192.168.1.1.
What are the steps for D'link router login?
Open any web browser of your choice on a computer or laptop and enter the default IP address of the router into the address bar, which is 192.168.1.1. If this IP address does not work, you can still, however, log in to your router by entering the URL dlinkrouter.local. After visiting the above IP address or URL dlinkrouter.local, you will automatically get navigated to a D-Link router login page. Enter the default login credentials. The default username is “admin”, and the password domain should be left empty in case of logging into the router’s admin page. Close the D'Link setup wizard only after you have saved the settings.
How to log into the D-Link DIR-825 AC 1200 Wi-Fi Dual-Band Gigabit (LAN/WAN) Router through the domain dlinkrouter.local?
Before you start your login process, keep in mind that you must connect to the router either by a wired or wireless connection. Also, there are two addresses via which you can log into the Admin setup page of your D-Link router that is www.dlinkrouter.local and using the default IP address 192.168.1.1.
How to access the D’link router login page for D-Link DSL-2730U Wireless-N 150 ADSL2+ 4-Port Router?
To access the D-Link router login page, you can go to the web domain http://dlinkrouter.local, or you can also use the default IP address for your router, which is 192.168.1.1. This will direct you to the D'Link setup wizard and you can continue with the on-screen steps.
How to change the D-Link DWR-920V Wireless N300 4G LTE Router’s password?
Follow these steps to change the D‑Link Router login password:
● Launch any internet browser and enter the default web domain dlinkrouter.local or default IP address 192.168.1.1 into the address bar.
● Type the password for your Admin account in the password field given. If you have not modified this password from the default, then leave the field blank and click Log In.
● Most of the D-Link routers have a default user name as admin and password as admin/blank.
● Determine the Wireless Settings from the drop-down menu list. In the Password section, set the new wireless password for the desired radio band.
● Your wireless gadgets will demand this password to get access to your wireless network. It may ask you to update your wireless device’s configuration. Tap on the Save button to save your settings.
How do I set up the D-Link DIR-841 – AC1200 MU-MIMO Wi-Fi for the first time using the Dlink setup wizard?
To set up your D-Link router unplug and remove all the connections with your modem and router and follow the instructions:
● Join the Ethernet cable from any of the LAN ports of the router with the desktop PC that you desire to utilize to set up your router for the first time.
● Now, attach the modem into the WAN port of the router. Then, connect the router with a wall power outlet and turn it on.
● Now, power on the modem, the switch, and the PC. Launch any web browser of your preference on your desktop machine and type www.dlinkrouter.local in the address bar and hit enter.
● It will automatically take you to the Setup Wizard page in the web browser. If by any chance, the Setup Wizard page doesn’t automatically appear on the browser after typing http://dlinkrouter.local in the address bar, then you can also try using the default IP address of your router in the address bar. And the default IP address of the D-Link routers is 192.168.1.1.
● Meanwhile, the setup wizard page displays, it will supervise you through a step by step method to configure and set up your D-Link router and support you to connect with the internet.
● Click on Next to proceed. If you have already configured the router previously, then you will need to reset your router to go through the setup wizard process again.
● Now, the router will examine the type of internet connection that you own. It will successfully scan and skip the setup itself, but in some circumstances, if it doesn’t, you will be urged to choose the type of internet connection that you have. From the displayed choices, pick the DHCP connection (Dynamic IP).
● For all the wired associations, the connection type is always Dynamic IP. After choosing the DHCP connection type, click on Next.
● Now, you will notice a Wireless Settings, and you will get a prompt to set in a new wireless network name and password. It is essential as it will further benefit you in securing your network. Set and enter the desired Network name and password in particular fields. Click on Next.
● Record the username and passphrase for your wireless network so that the passphrase doesn’t get lost or forgotten. In case, if it gets lost or forgotten, a factory reset will be needed. Now, the Setup Wizard will again request you for a password. It is the password for the router configuration page, not your passphrase. Click on Next.
● Presently, the setup wizard page will demand you to set your time zone. After setting the time zone, click on Next.
● A report summary of all your router settings will get revealed. Click on the Save button to apply and save the changes in the settings.
● Don’t try to interrupt the reboot process anytime, as it may damage the router and even make it worthless. And you can now start utilizing your wireless internet connection.
0 notes
Text
Login To Linksys Extender Using Extender.linksys.com
To log in, connect your device to the Linksys Extender's Wi-Fi network. Open a web browser and enter "http //extender.linksys.com" or "192.168.1.1" in the address bar. Enter the login credentials for your Linksys extender. "Admin" is the password and the username by default. You can alternatively leave both fields empty. Adjust any required settings for optimal performance. Visit our website to learn more. You can ask our experts for more assistance.
0 notes
Text
How to Login Linksys Velop
If you looking for login solution, do the following steps and try to Login Linksys velop as soon as
possible.
Initially, you need to connect your PC into the network, which has to be the same network the
Linksys router is on.
Furthermore, turn on your device, open the web browser and enter IP address ‘192.168.1.1’ into
the address bar. After this, a box will appear on the screen and provoking you to enter your
“username” and “password” in order to do Linksys Velop login.
Moreover, enter your username in the ‘Username’ empty field. By default, the username field
needs to be left blank, but in case, you have to change your username, then you have to enter
that username.
After that, enter your password in ‘Password’ field, which by default is ‘Password’ only, but if
you have changed it, then enter that you have changed.
In last, click ‘Login’ and you will be able to efficiently do Velop login.
When you are positively login after that you are able to do Linksys Velop Setup process. For more
information Contact us on 877-372-5666.
-----------------------------------------------------------------------------------------------------------------------------------------
Fix Linksys Velop Login Issue
Having an issue on Linksys velop or you can also say that Linksys velop login problem. Reset your Linksys
velop at once and resolve your issue:
Reset your Linksys velop and try to fix Linksys velop Login:
Primly, find out the Reset button on the back of your Linksys velop
Second, when the velop powered on, use the pointed end of a paperclip or similar object to
press and hold the Reset button till 15 seconds
Wait till Linksys velop router to fully reset and power back on.
After reset your routers try Linksys Velop Login again. For more information Contact us on this number
877-372-5666 and get the solution.
How to resolve Linksys velop not working issue
If you are facing issue with Linksys velop means your Linksys velop not working then, there are lots of
reason that are mentioned below:
Understand the reason and try to resolve your issue.
Ensure that your router and modem are connected to each other properly
May be your velop is overheated
Might be Linksys velop firmware is not updated
Outdated Linksys velop drivers is the reason of error
After understand the reason after that, try to resolution Linksys velop issue. You need to Restart your
Linksys Velop and try to resolve your issue in one step. To restart Linksys velop just plug out your Linksys
velop from outsource, wait for a while after that plugin your Linksys velop, try Linksys velop Login again
and see the issue has been resolved or not.
Linksys Velop not showing up- steps
Are you looking solution for Linksys velop not showing up then follow the below step and resolve the
issue.
Check the Ethernet Cable
One of the main reasons behind the Linksys Velop router not showing up- because of faulty Ethernet
cable. If there is some damage within the Ethernet cable or something is wrong with this cable then your
Linksys velop router may not work.
Arrange Another Ethernet cable
Pull out Enternet cable from your computer and router
Now, insert Another Ethernet Cable.
Next, See Whether The Lights Lit Up On The Router Or Not.
Last, check that if the Router Starts to Work.
If the issue with Ethernet cable then you should be able to use the router with another cable or you
have to change your Ethernet cable and try to Login Linksys velop. If you are facing another issue then,
contact us on 877-372-5666.
#Linksys Velop Signin#Linksys Velop Login#Linksys Velop Setup#Linksys Velop Router#Linksys Velop App
0 notes
Text
Lenovo ThinkServer RD650 with new Xeon E5-2600 v3 processors
In Septemeber of 2014 we saw the primary press anouncements for Lenovo’s new Grantly platforms with two new rack established servers, the RD550 and RD650. Those have been the first new structures from Lenovo that might use the modern-day Intel Xeon E5-2600 v3 series processors and DDR4 reminiscence. In the lab today we will take a look at the Lenovo ThinkServer RD650.E3-1270 v6
Lenovo ThinkServer RD650 Base Server SpecificationsLenovo makes a number of?Exclusive variations of the ThinkServer RD650 however there are a fixed of common specs:
Processor: Up to two 18-center Intel Xeon E5-2600 v3 SeriesMemory: up to 768 GB DDR4 – 2133 MT/s thru 24 slots (RDIMM/LRDIMM)growth Slots: All chassis up to – 3 x PCIe Gen3: LP x8, 4 x PCIe Gen3: FLFH x8, 1 x PCIe Gen3: HLFH x8Systems control: ThinkServer gadget supervisor. Non-compulsory ThinkServer gadget manager PremiumDimensions: 19.0″ x 3.4″ x 30.1″Weight: starting at 35.Three lbsFrom aspect: 2U Rack MountThe ThinkServer RD650 is available in three simple models that permit for special garage configurations. The first is the 12x 3.5″ power server:
Lenovo ThinkServer RD650 12 x three.Five Inch DrivesLenovo makes a mixed 8x 2.5″ and 9x three.5″ server (are you salivating but vSAN, backup appliance and virtualized ZFS equipment lovers?)
Lenovo ThinkServer RD650 – eight x 2.5 and nine x 3.5 inch DrivesFinally there's a model with 24x 2.5″ drives that's every other commonplace shape thing:
Lenovo ThinkServer RD650 – 24 x 2.5 inch DrivesThe pattern we obtained for review is the ThinkServer RD650 with 12 x three.Five Inch Drives.
Unpacking the Lenovo ThinkServer RD650Let’s take a look at how the RD650 is packed for delivery.
Lenovo ThinkServer RD650 transport boxWe continually like to show how servers are boxed up for transport to look how nicely the server is included from the same old bumps, drops and bins smashed up by using difficult managing. We can see that the RD650 is well included with foam inserts and in this case it's miles further included by being encased in an additional card board field. Down within the bottom underneath the server there's an accent box that is placed in foam inserts and additional knock outs are furnished for extra accessory bins. Along the bottom is the rail package.
This became no longer double boxed like we see in different servers, but there may be empty space around the server itself to protect from punctures.
Lenovo ThinkServer RD650 FrontHere we see the the front of the RD650 with the top lid eliminated. Over all it's miles very much like the earlier Lenovo servers excluding progressed method cooling systems.
Lenovo ThinkServer RD650 BackThe lower back of the RD650 suggests the progressed cooling shroud and the massive variety of growth bays that this server includes.
Lenovo ThinkServer RD650 CPU-RAM AreaThe RD650 CPU region uses passive warmness sinks for cooling. These use everyday socket 2011 R3 rectangular mounting holes and?We found in our trying out they may be?Superb at eliminating heat from the CPU’s. See our rectangular v. Slim ILM manual for the distinction in LGA2011 mounting alternatives. The fan bar includes six redundant warm-swap fanatics with 2 processors load outs. If best one processor is used there will be four enthusiasts mounted that can assist keep electricity.
We have examined a fair number of Lenovo servers in the beyond and located the lovers which can be used offer excessive air float and do no longer make too much noise. The provided air shroud channels air thru the warmth sinks and reminiscence region very successfully and we had no warmth troubles with the server even underneath very heavy hundreds.
Each of those fanatics are warm swappable and the complete cooling bar can be removed with easy locking levers on either side of the bar.
Lenovo ThinkServer RD650 growth BayTwo growth bays just like the one proven above may be geared up into the RD650, each bay can handle up to a few growth cards. These bays can deal with full length expansion playing cards which permit for larger cards to fit right into a 2U chassis.
Lenovo ThinkServer RD650 iKVM and TPM ModuleIn among the two expansion bays are iKVM and TPM modules. These are non-compulsory modules.
Lenovo ThinkServer RD650 Raid ControllerAt the the front of the server the RAID controller card is placed right at the back of the power bays. Right here we've got eliminated the main cooling bar to get a higher observe this. The principle cooling lovers for the server are positioned proper next to the controller card which permits suitable air glide to assist keep this cool.
Putting in place the Lenovo ThinkServer RD650The usual method to install an operating machine onto the RD650 is to use the Lenovo ThinkServer Deployment supervisor. This could stroll you thru installing an OS and drivers for the server.
Lenovo ThinkServer RD650 TDM BIOS SettingTo get admission to the TDM honestly boot the system into the BIOS and head over to the Boot supervisor and select launch TDM.
Lenovo ThinkServer RD650 Deployment ManagerAfter deciding on release TDM you will see the above display. From right here you could regulate just about some thing you can do inside the BIOS and do platform updates. Storage management permits you to setup any Raids which you need for the server earlier than you start installing an working device.
The Deployment alternative will get you began installing your OS of choice.
These options are:
Quantity choice – available garage volumes may be displayedOS choice – pick the OS to be deployed (Linux, home windows, VMware)installation Settings – Time quarter, Language, License Key, laptop call, Admin/root passwordPartition options – two options are to be had:Use present partition – preceding OS set up exists at the driveRepartition the force at some point of installation – sets size of OS partitionAfter you have got selected the essential alternatives the system will start to deploy the working gadget. Our gadget did now not have an DVD drive so we used a USB DVD force to mount the running machine DVD. After the installation turned into completed the gadget completed with us on the login display screen of windows Server 2012 R2 which we used for some of our exams. We may also boot directly from an Ubuntu run DVD and pass the TDM completely the usage of the USB DVD power.
Lenovo ThinkServer RD650 gadget ManagerFor faraway control the RD650 consists of the machine manager. Surely enter the IP address for the server into your browser and login.
The default username/ password login data for the Lenovo ThinkServer RD650 is:
Username: lenovoPassword: len0vOIf you have got an iKVM Module established?You could choose the “release” button to go into far flung control and operate the device that manner.
Lenovo ThinkServer RD650 gadget manager manage ScreenThe next display screen indicates the alternatives that you may monitor and alternate thru the far flung control interface.
Test ConfigurationOur take a look at setup includes the pinnacle end Intel Xeon E5’s which we use in all of our checks. These CPU’s include 18 cores every and gives our system the maximum processor load out. We also crammed all memory slots to present the most load out of memory that we could, the usage of 16GB sticks in each slot, this dropped our memory velocity to 1600MHz.
Processors: 2x Intel Xeon E5-2699 v3Memory: 24x 16GB crucial DDR4 (384GB overall)garage: 1x SanDisk X210 512GB SSDOperating systems: Ubuntu 14.04 LTS and windows Server 2012 R2AIDA64 MemoryWith a complete 24 DIMM’s of DDR4 reminiscence installed the memory pace has dropped right down to 1600MHz. But we are seeing very good outcomes which can be just beneath what a system the use of much less memory at higher speeds.
Memory Latency ranged at ~99ns and our common structures the use of 16x 16GB DIMM’s ranged approximately ~78ns.
RD650 flow ResultsOur circulate test outcomes showed similar outcomes as compared to a gadget strolling 16x 16GB DIMM’s. Using a complete load out and lower reminiscence speeds confirmed ~20 MB/s bandwidth loss.
The memory tests results are as predicted with this big load out of 24x DIMM slots completely populated.
ThinkServer RD650 Linux-Bench ResultsThe complete check outcomes for a pattern?Linux-Bench run may be found right here. RD650 with 2x E5-2699 v3 Linux-Bench
Our pattern server got here with one Intel Xeon E5-2690 v3 and 16GB of DDR4 installed. We also ran our exams with this configuration as it might show a typical setup for an entry stage RD650. RD650 with 1x E5-2690 v3 Linux-Bench
Lenovo ThinkServer RD650 power?ConsumptionOur test configuration did function two very excessive-give up processors which can be at the very pinnacle of Intel’s Xeon E5-2600 V3 product line-up.
RD650 electricity ConsumptionThe common idle strength use of the RD650 turned into ~95watts which is fairly excellent for a server of this type. Whilst we max out the gadget underneath heavy AIDA64 strain test, we noticed ~575watts pulled for the whole system which is a touch excessive for systems like this. Of course adding a complete praise of drives and expansions gadgets will impact those numbers as would using lower energy processors.
ConclusionThe first element that sticks out with the Lenovo ThinkServer RD650 is the sheer number of growth alternatives that this server line up has to offer. 3 distinctive models that provide big abilties in garage options that also include options for two additional company-magnificence M.2 SSD’s for booting in addition to SD card alternatives for hypervisor booting. These servers are designed from the ground up for bendy boot alternatives.?Our pattern server can max out at 96TB’s of spindle storage the use of it’s 12 three.5″ force bays with excessive capability 8TB disks.
With a total of 8 PCIe there may be plenty of expansion space that permits you to scale up I/O if wished.The RD650 additionally offers you the choice of Raid adapters that in shape in the bay between the difficult pressure area and the primary cooling bar. That is a pleasant characteristic as they do no longer absorb and extra PCIe slots within the again and are in a great area for cooling.
In keeping with Lenovo the cooling machine is rated at forty five tiers Celsius / 113 F continuous operation and we discover the cooling gadget is up to the task in our tests. We are always impressed for the cooling setups on Lenovo servers, the fanatics do an awesome job at moving lots of air thru the case and they do not make a variety of noise that is a huge plus for us inside the lab.
We also just like the ThinkServer Deployment manager for its ease in getting a machine up and running. Its rather simple to use and installs all wished drivers throughout the setup and OS installation. We also ran Ubuntu proper off a USB DVD force on our RD650 and had no troubles with drivers on our test setup.
We also noticed Lenovo make a shift from DVI video output which without a doubt is a general to DisplayPort. Within the lab we use a KVM switch with all DVI connections to run our test setups, we can without problems connect up several machines and have all of them walking, however in this situation we could not get a DisplayPort to DVI adapter to work. We ended up simply using far flung management and iKVM to run the server. This worked satisfactory and the majority would use this in a production environment, but for crash carts and other setups used at vicinity a DisplayPort screen might be required.
0 notes
Text
Introducing MongoDB 4.0 compatibility and Transactions in Amazon DocumentDB
Amazon DocumentDB (with MongoDB compatibility) is a fast, scalable, highly available, and fully managed document database service that supports MongoDB workloads. Today we’re announcing compatibility with MongoDB 4.0 for Amazon DocumentDB. With this launch, you can now use atomic, consistent, isolated, and durable (ACID) transactions, open a change stream cursor for a database or cluster, and much more. For the full release notes for Amazon DocumentDB 4.0, see MongoDB 4.0 Compatibility. In this post, I summarize what’s new in Amazon DocumentDB 4.0 and show you how to get started with Amazon DocumentDB 4.0 and transactions using an AWS Cloud9 environment. What’s new in Amazon DocumentDB 4.0? The following are some of the major features and capabilities that were introduced in Amazon DocumentDB 4.0. To see a full list of the new capabilities, see MongoDB 4.0 Compatibility. ACID Transactions – Amazon DocumentDB now supports the ability to perform transactions across multiple documents, statements, collections, and databases. Transactions simplify application development by enabling you to perform ACID operations across one or more documents within an Amazon DocumentDB cluster. For more information, see Transactions. Change streams – You can now open a change stream at the cluster level (client.watch() or mongo.watch()) and the database level (db.watch()). You can also specify a startAtOperationTime to open a change stream cursor, and extend your change stream retention period to 7 days (previously, the limit was 24 hours). For more information, see Using Change Streams with Amazon DocumentDB. AWS DMS – You can now use AWS Database Migration Service (AWS DMS) to migrate your MongoDB 4.0 workloads to Amazon DocumentDB. AWS DMS now supports a MongoDB 4.0 source, Amazon DocumentDB 4.0 target, and an Amazon DocumentDB 3.6 source for performing upgrades between Amazon DocumentDB 3.6 and 4.0. For more information, see Using Amazon DocumentDB as a target for AWS Database Migration Service. Monitoring – With the addition of transactions, you can now monitor your transaction usage with five new Amazon CloudWatch metrics: TransactionsOpen, TransactionsOpenMax, TransactionsAborted, TransactionsStarted, and TransactionsCommitted, in addition to new fields in currentOp, ServerStatus, and profiler. For more information, see Monitoring Amazon DocumentDB with CloudWatch. Performance and indexing – Included in this release are multiple performance and indexing improvements: the ability to use an index with the $lookup aggregation stage, find() queries with projections can be served directly from an index (covered query), the ability to use hint() with the findAndModify API, performance optimizations for $addToSet operator, and improvements to reduce overall index sizes. For more information, see Release Notes. Operators – We have added support for new aggregation operators: $ifNull, $replaceRoot, $setIsSubset, $setInstersection, $setUnion, and $setEquals. For more information, see Supported MongoDB APIs, Operations, and Data Types. Role based access control (RBAC) – With the ListCollection and ListDatabase commands, you can now optionally use the authorizedCollections and authorizedDatabases parameters to allow users to list the collections and databases that they have permission to access without requiring the listCollections and listDatabase roles, respectively. Users can also end their own cursors without requiring the KillCursor role. For more information, see Restricting Database Access Using Role-Based Access Control (Built-In Roles). Getting started with Amazon DocumentDB 4.0 and transactions The first step is to create an AWS Cloud9 environment and an Amazon DocumentDB cluster in your default Amazon Virtual Private Cloud (Amazon VPC). For instructions on creating a default VPC, see Getting Started with Amazon VPC. This post demonstrates how to connect to your Amazon DocumentDB cluster from your AWS Cloud9 environment with a mongo shell and run a transaction. When creating AWS resources, we recommend that you follow the best practices for AWS Identity and Access Management (IAM). The following diagram shows the final architecture of this walkthrough. For this walkthrough, use the default VPC in a given Region. For more information, see Creating a Virtual Private Cloud (VPC). Creating an AWS Cloud9 environment To create your AWS Cloud9 environment, complete the following steps: On the AWS Cloud9 console, choose Create environment. Under Environment name and description, for Name, enter a name for the environment. This post enters the name DocumentDBCloud9. Choose Next step. In the Configure settings section, accept all defaults. Choose Next step. In the Review section, choose Create environment. The provisioning of the AWS Cloud9 environment can take up to 3 minutes. When it’s complete, you see a command prompt. You’re redirected to the command prompt to install the mongo shell and connect to your Amazon DocumentDB cluster. Creating a security group In this step, you use Amazon Elastic Compute Cloud (Amazon EC2) to create a new security group that enables you to connect to your Amazon DocumentDB cluster on port 27017 (the default port for Amazon DocumentDB) from your AWS Cloud9 environment. On the Amazon EC2 console, under Network & Security, choose Security groups. Choose Create security group. For Security group name, enter demoDocDB. For VPC, accept the usage of your default VPC. For Description, enter a description. In the Inbound rules section, choose Add rule. For Type, choose Custom TCP Rule. For Port Range, enter 27017.The source security group is the security group for the AWS Cloud9 environment you just created. To see a list of available security groups, enter cloud9 in the destination field. Choose the security group with the name aws-cloud9-. Accept all other defaults and choose Create security group. The following screenshot shows you the security groups that were created in this step and the AWS Cloud9 security group that was created when you created an AWS Cloud9 environment. Creating an Amazon DocumentDB 4.0 cluster To create your Amazon DocumentDB 4.0 cluster, complete the following steps: On the Amazon DocumentDB console, on the Clusters page, choose Create. For Engine version, choose the default (4.0.0). On the Create Amazon DocumentDB cluster page, for Instance class, choose t3.medium. For Number of instances, choose 1. This helps minimize costs. Leave other settings at their default. In the Authentication section, enter a username and password. Turn on Show advanced settings. In the Network settings section, for VPC security groups, choose demoDocDB. Choose Create cluster. Amazon DocumentDB is now provisioning your cluster, which can take up to a few minutes to finish. You can connect to your cluster when both the cluster and instance status show as Available. While Amazon DocumentDB provisions the cluster, complete the remaining steps to connect to your Amazon DocumentDB cluster. Installing the 4.0 mongo shell You can now install the mongo shell, which is a command-line utility that you use to connect to and query your Amazon DocumentDB cluster. On the AWS Cloud9 console, under Your environments, choose DocumentDBCloud9. Choose Open IDE. To install the 4.0 mongo shell, at the command prompt, create the repository file with the following code: echo -e "[mongodb-org-4.0] nname=MongoDB Repositorynbaseurl=https://repo.mongodb.org/yum/amazon/2013.03/mongodb-org/4.0/x86_64/ngpgcheck=1 nenabled=1 ngpgkey=https://www.mongodb.org/static/pgp/server-4.0.asc" | sudo tee /etc/yum.repos.d/mongodb-org-4.0.repo When it’s complete, install the mongo shell with the following code: sudo yum install -y mongodb-org-shell Transport Layer Security (TLS) is enabled by default for any new Amazon DocumentDB clusters. For more information, see Managing Amazon DocumentDB Cluster TLS Settings. To encrypt data in transit, download the CA certificate for Amazon DocumentDB. See the following code: wget https://s3.amazonaws.com/rds-downloads/rds-combined-ca-bundle.pem Connecting to your Amazon DocumentDB cluster You’re now ready to connect to your Amazon DocumentDB cluster. On the Amazon DocumentDB console, on the Clusters page, locate your cluster. This post uses the cluster docdb-2020-10-09-21-45-11. Choose the cluster you created. Copy the connection string provided. Omit so that you’re prompted for the password by the mongo shell when you connect. This way, you don’t have to type your password in cleartext.Your connection string should look like the following screenshot. When you enter your password and can see the rs0:PRIMARY> prompt, you’re successfully connected to your Amazon DocumentDB cluster. For information about troubleshooting, see Troubleshooting Amazon DocumentDB. When you have connected with the mongo shell, you can discover the version (4.0.0) with the following command: db.version() You get the following output: 4.0.0 Using transactions Now that you’re connected to your cluster with the mongo shell, you can explore using transactions. One of the classic use cases for transactions is debiting money from one person’s account and crediting that money in another person’s account. Because the use case deals with two separate operations in the database, it’s desirable that the two operations run within a transaction and follow the ACID properties. For this post, we transfer $400 from Bob’s bank account to Alice’s bank account. Both accounts begin with $500. To start from with an empty collection, first drop the account collection: db.account.drop() You get the following output: {true, false} Insert data into the collection to represent Bob’s account: db.account.insert({"_id": 1, "name": "Bob", "balance": 500.00}); You get the following output: WriteResult({ "nInserted" : 1 }) Insert data into the collection to represent Alice’s account: db.account.insert({"_id": 2, "name": "Alice", "balance": 500.00}); You get the following output: WriteResult({ "nInserted" : 1 }) To start a transaction, create a session and a session object for the account: var mySession = db.getMongo().startSession(); var mySessionObject = mySession.getDatabase('test').getCollection('account'); mySession.startTransaction({readConcern: {level: 'snapshot'}, writeConcern: {w: 'majority'}}); Within the transaction, debit $400 from Bob’s account: mySessionObject.updateOne({"_id": 2}, {"$inc": {"balance": 400}}); You get the following output: { "acknowledged" : true, "matchedCount" : 1, "modifiedCount" : 1 } Similarly, credit Alice’s account with $400: mySessionObject.updateOne({"_id": 1}, {"$inc": {"balance": -400}}); You get the following output: { "acknowledged" : true, "matchedCount" : 1, "modifiedCount" : 1 } Within the transaction, you can see both updates with the following code: mySessionObject.find() You get the following output: { "_id" : 2, "name" : "Alice", "balance" : 900 } { "_id" : 1, "name" : "Bob", "balance" : 100 } If you view outside of the transaction, the updates aren’t yet visible: db.account.find() You get the following output: { "_id" : 1, "name" : "Alice", "balance" : 500 } { "_id" : 2, "name" : "Bob", "balance" : 500 } Commit the transaction and end the session: mySession.commitTransaction() mySession.endSession() To see the updates, enter the following code: db.account.find() You get the following output: { "_id" : 2, "name" : "Alice", "balance" : 900 } { "_id" : 1, "name" : "Bob", "balance" : 100 } Cleaning up When you complete the walkthrough, you can either stop your Amazon DocumentDB cluster to reduce costs or delete the cluster. By default, after 30 minutes of inactivity, your AWS Cloud9 environment stops the underlying EC2 instance to help save costs. Summary This post introduced you to MongoDB 4.0 compatibility in Amazon DocumentDB and showed you how to get started with Amazon DocumentDB 4.0 and transactions by creating an AWS Cloud9 environment, installing the mongo 4.0 shell, creating an Amazon DocumentDB cluster, connecting to your cluster, and walking through a common use case for transactions. For more information, see MongoDB 4.0 Compatibility and Transactions. For more information about recent launches and blog posts, see Amazon DocumentDB (with MongoDB compatibility) resources. About the author Joseph Idziorek is a Principal Product Manager at Amazon Web Services. https://aws.amazon.com/blogs/database/introducing-amazon-documentdb-with-mongodb-compatibility-4-0/
0 notes
Text
300+ TOP DRUPAL Interview Questions and Answers
Drupal Interview Questions for freshers experienced
1. What Is Drupal? Drupal (pronounced Dru-Pull) is an open source content management system offering a toolset that rivals those of most commercial alternatives. With integrated social media and e-commerce functionality, it provides unique value as part of your social media strategy. 2. How to create a folder and a module file in Drupal? Given that our choice of short name is "onthisdate", start the module by creating a folder in your Drupal installation at the path: sites/all/modules/onthisdate. You may need to create the sites/all/modules directory first. Create a PHP file and save it as onthisdate.module in the directory sites/all/modules/onthisdate. As of Drupal 6.x, sites/all/modules is the preferred place for non-core modules (and sites/all/themes for non-core themes), since this places all site-specific files in the sites directory. This allows you to more easily update the core files and modules without erasing your customizations. Alternatively, if you have a multi-site Drupal installation and this module is for only one specific site, you can put it in sites/your-site-folder/modules. The module is not operational yet: it hasn't been activated. We'll activate the module later in the tutorial. 3. How to name your module? The first step in creating a module is to choose a "short name" for it. This short name will be used in all file and function names in your module, so it must start with a letter and by Drupal convention it must contain only lower-case letters and underscores. For this example, we'll choose "onthisdate" as the short name. Important note: It is not just a convention that the short name is used for both the module's file name and as a function prefix. When you implement Drupal "hooks" (see later portions of tutorial), Drupal will only recognize your hook implementation functions if they have the same function name prefix as the name of the module file. It's also important to make sure your module does not have the same short name as any theme you will be using on the site. 4. Explain the menu system in Drupal? Define the navigation menus, and route page requests to code based on URLs. The Drupal menu system drives both the navigation system from a user perspective and the callback system that Drupal uses to respond to URLs passed from the browser. For this reason, a good understanding of the menu system is fundamental to the creation of complex modules. Drupal's menu system follows a simple hierarchy defined by paths. Implementations of hook_menu () define menu items and assign them to paths (which should be unique). The menu system aggregates these items and determines the menu hierarchy from the paths. For example, if the paths defined were a, a/b, e, a/b/c/d, f/g, and a/b/h, the menu system would form the structure: a a/b a/b/c/d a/b/h e f/g 5. How to interact with Drupal search system? There are three ways to interact with the search system: Specifically for searching nodes, you can implement nodeapi ('update index') and nodeapi ('search result'). However, note that the search system already indexes all visible output of a node, i.e. everything displayed normally by hook_view () and hook_nodeapi ('view'). This is usually sufficient. You should only use this mechanism if you want additional, non-visible data to be indexed. Implement hook_search (). This will create a search tab for your module on the /search page with a simple keyword search form. You may optionally implement hook_search_item () to customize the display of your results. Implement hook_update_index (). This allows your module to use Drupal's HTML indexing mechanism for searching full text efficiently. If your module needs to provide a more complicated search form, then you need to implement it yourself without hook_search (). In that case, you should define it as a local task (tab) under the /search page (e.g. /search/mymodule) so that users can easily find it. 6. How to Customize a Drupal Syndicate Feed Icon? For a recent project I needed to customize the feed icon in the Drupal theme I was creating. This wasn't as straight forward as I thought it would be. Being the drupal newbie that I am I went looking for it in the core templates and suggestions page only to come empty handed. Previously I found the solution to theming a search form by using the search-block-form.tpl.php template file and thought there would be one for the feed icon too. I found the solution to this in the function reference in the form of a theme hook. theme_feed_icon($url, $title) This function is internally called by drupal to generate the feed icon in the Syndicate block. Our Job is to override this function. 7. How to backup a Drupal site? Backing up your Drupal site is now very easy, you just need to download and install a module called Backup & Migrate. To install the module click on the Administer Modules check the Backup and Migrate module and enable it and save the settings. Then navigate to the Administer Content Management Backup and Migrate then do the following settings. Exclude the following tables altogether: select the table which you dont want to take backup. Give the backup file name. There are also options to compress the file before download, or add a datestamp. And then click Backup Database. Alternately you can take backups using PhpMyAdmin. 8. How to move a Drupal Site from One host/server to another on your NEW host? Upload your folder with the complete drupal installation to your home-directory. Once done, go to phpadmin on the new host, create a new mysql database, example "name_drpl1" and create a new mysql user. Create a password for this new mysql user, click "assign all privileges" to this user and assign the user to the new database. You now should have a new mysql database on the new host with a mysql user, eg. "name_drpl1" as database name and "name_username" as database user name. Import (upload) the database (which you exported from the old host earlier) with phpadmin to the new database. This might take a minute. If needed edit the file /sites/default/settings.php and edit at the section where you enter the database, location, username and password. You CAN enter the password either encrypted or not encrypted there. Chmod your "files" folder so it is writeable using your ftp client (filezilla), chmod to 777 Double check your .htaccess and /sites/default/settings.php and make changes in case they are needed. Change nameserves on your domain host and let them point to your new host's nameservers. Enter the new nameservers in your control panel where your domain names are hosted, overwriting the old ones. After some time (sometimes a day or two) your domain should point to the new host and drupal should be up and running on the new host. 9. How to move a Drupal Site from One host/server to another? Migrating Drupal On your OLD host: Backup your whole home directory from your ftp access using an ftp client like filezilla. Make a folder on your local harddisk and download the complete directory to that local folder. Backup your mysql database on your old host using phpadmin, select your mysql database, usually something like "name_drpl1". Select all fields, click "export" and save the database to your local harddisk. Leave default options enabled. You will receive a file similar to "name_drpl1.sql". This is your mysql database 10. How to install Drupal on a local WAMP server? Preparing your computer with a local installation of Drupal with WampServer is comparatively a trouble-free process to follow. Since WampServer will install an Apache-server, SQL, PHP and phpMySQL on your computer, with those tools you can install and run Drupal locally even without an internet connection.

DRUPAL Interview Questions 11. How to remove breadcrumbs from my Drupal pages? Breadcrumbs or breadcrumb trail is a navigation aid used in drupal interfaces. Normally it appears in between the top banner area and the page title. It gives users a way to keep track of their location within programs. Breadcrumbs are really useful in a comparatively bigger website with plenty of sections and subsections. But when it comes to smaller websites, it may found useless. In those cases you may either hide it using CSS (eg. .breadcrumb {display: none;}) or in the page.tpl.php file remove the line that says 12. How to add custom PHP codes in my Drupal pages or blocks? By default, drupal will not allow inserting PHP code directly inside a post or in a block. To do this, you need to activate a drupal module called PHP filter via, Administer Site building Modules. Even though this module ships with drupal, it remains disabled by default. 13. How can I create a custom region in my Drupal template? Adding a new region in your drupal template is not a hard thing, but its not as easy as adding a new block. It's basically a two-step process: define the custom region in your theme's .info file insert some PHP in your theme's page.tpl.php file wherever you would like the new region to appear 14. What does Views do and how do you use it? Views is a practical necessity for sites built on Drupal 6, and it's imperative that your developer understands how to take advantage of it. Earl Miles has written a great summary on the Views project page. 15. How can I add a new Block In Drupal? Adding a new block is a simple process in drupal 6. Go to Administer Blocks and click on the Add Block link (tab). Fill in the form with the necessary PHP/HTML code in the block body. And click the 'Save Block' button. 16. How can I customize my 404 - Page not found page? Create a new page with some extra information, so that your visitors don't ever plunge on to the default boring 404 - page not found error page. Once this page is created: Remember its node ID, Go to Administer > Site configuration > Error reporting Set Default 404 (not found) page to the node ID you just created Save your settings You can also use the Search 404 module as an alternative. 17. How to handle upgrades in Drupal? It's a fact of life that you'll have to upgrade your Drupal installation and contributed modules fairly frequently. Your candidate should mention: backing up the site, putting it into maintenance mode downloading the new version of the module uncompressing it running update.php testing the site aking the site out of maintenance mode Ideally, your candidate would also mention creating a development environment to minimize downtime. There is also a big difference between upgrading a module (process described above) and a Drupal minor version upgrade, which requires more careful patching. Drupal major version upgrades, which happen every couple years, are another can of worms entirely. 18. How do I show different Drupal themes on different pages? Yeah it's possible! You can apply different themes to different pages in your drupal site simply with the help of a cool module called 'Sections'. 19. How do I add images to Drupal? Image module allows users with proper permissions to upload images into Drupal. Thumbnails and additional sizes are created automatically. Images could be posted individually to the front page, included in stories or grouped in galleries. 20. How can I translate Drupal to my local language? The interface text (like the "Log in" button and the "Add new comment" text) is in English by default, but can be translated. For many languages, there are completed or partly completed translations available. (See the locale module on how to use them.) All languages need more translation contributions. Some have only incomplete versions of the text in core, so that parts of the interface will show up in English. Others may be complete but need corrections and improvements of the language. And no language has a complete set of translations for all contributed modules. 21. How do I remove the title 'Navigation' from the navigation block? To prevent the navigation block title or any other block title from appearing in the pages, just do the following. Navigate to Administer Site building Blocks and click the configure link next to the Navigation block. In the block configuration page, enter in the Block title filed. This will override the default title for the block and remove the title. 22. How do I get my site to have SEO-friendly URLs? The Pathauto module automatically generates URL/path aliases for various kinds of content (nodes, taxonomy terms, users) without requiring the user to manually specify the path alias. This allows you to have URL aliases like /category/my-node-title instead of /node/123. The aliases are based upon a "pattern" system that uses tokens which the administrator can change. 23. How can I enable clean URLs in Drupal? Drupal's default URL structure is like "http://www.sitename.com/?q=node/10″ This URL format can be hard to read, and can sometimes prevent search engines from indexing all your pages properly. In this case you can eliminate this "?q=" and clean the URLs through the following steps. Navigate to Administer Site configuration Clean URLs. By default, it will be disabled. Select enabled and click the save configuration button. You are done. You can make your URLs even more cleaner with the help of path module. Home Administer Site building Modules: enable the Path Module. 24. How can I change the favicon in my Drupal Site? Create your own favicon.ico file using any graphic tools or with the help of any online favicon generator tools like dnamicdrive. Navigate to admin site building themes and click the configure link next to your current theme. This will bring up the theme configuration page. Here you will see a section titled Shortcut icons settings. You can either upload your favicon file or specify the path to your customized icon file. The changes may not appear immediately in your browser, you need to clear your browser's cache and reload the page. If you have bookmarked your site, you may need to delete the bookmark and then recreate it again so that the new favicon will appear in the bookmarks menu. 25. Explain favicon in Drupal? A favicon (short for favorites icon), also known as a website icon or bookmark icon is a 1616 pixel square icon that appears near the address bar and in the bookmarks folder in a visitor's browser. By default, a drupal site shows that water drop kinda drupal logo as favicon. 26. How can I reset my Drupal admin password? Login to cPanel -> Databases box -> phpMyAdmin; Select the Druapl database folder from the left navigation bar. The page will refresh and and the Drupal database's tables will be displayed on it. Click on the SQL tab. In the text field write the following SQL query: update users set pass=md5('NEWPASS') where uid = 1; where "NEWPASS" is your new Drupal administrative password. Click the GO button to submit the query. If the query is executed correctly and no errors are displayed then you should be able to login with the new password. 27. How to install a new module in Drupal? After finding and downloading a module, the next step would be to copy it the modules folder. Most people copy the file to the default modules folder here http://sitename.com/drupal/modules this is where all the modules that ship with Drupal are stored so it seems somewhat logical to do this. But this folder is actually meant to store only Drupal's default modules. Instead you should go to http://sitename.com/drupal/sites/all folder, there you will see a readme.txt file. This file will clearly tell you the trick. You just need to create a new folder named modules here. Now copy the modules folder here. That's all, you have successfully installed the module. Next step would be to enable the module through the Admin interface. To do this navigate to Administer Site Building Modules. Here you will see a list off all installed modules, and our newly installed module will also be listed here. You just have to check the enable check box against the new module and then click the Save Configuration button. That's all. 28. How can I install a new theme in Drupal? This is another common question among Drupal newbies all time. After trying out all available themes under Drupals theme directory, we may naturally want to try new themes. Installing a new theme is very simple and straightforward. Follow the steps below. Download a new theme package. Note that themes for different Drupal versions are not compatible, version 5.x themes do not work with Drupal 6.x and reverse. Read any README or INSTALL files in the package to find out if there are any special steps needed for this theme. Upload the contents of the theme package to a new directory in the themes directory in your Drupal site. In Drupal 5.x & 6.x, you place your themes in /sites/all/themes/yourThemeName Click administer themes and enable the new theme (Drupal will auto-detect its presence). Edit your user preferences and select the new theme. If you want it to be the default theme for all users, check the default box in the themes administration page. 29. How to make my Drupal site offline to public, while it is under construction? You can set your Drupal site in off-line mode, while it is being developed. Just click Administer Site maintenance. There you can set the status to off-line. If you wants, you can also set your own custom off-line message. When set to Off-line, only users with the administer site configuration permission will be able to access your site to perform maintenance; all other visitors will see the site off-line message configured there. Authorized users can log in during Off-line mode directly via the user login page. 30. How does caching work in Drupal? One of the common (mostly unfounded) complaints about Drupal has been, "Drupal is slow." You want to hire a developer who understands Drupal's built in caching system, and what its limitations are. For example, Drupal 6's block cache will not appreciably speed up the page if the user is logged in. Ask your candidate to recommend some additional solutions to speed up Drupal's caching. These could include the Boost module, Varnish, Squid, Memcache or Pressflow. Ask if they've ever run into issues with Drupal's cache. 31. Can you please explain the difference between Core and Contrib in Drupal? The standard release of Drupal, known as Drupal core, contains basic features common to content management systems. These include user account registration and maintenance, menu management, RSS-feeds, page layout customization, and system administration. The Drupal core installation can be used as a brochureware website, a single- or multi-user blog, an Internet forum, or a community website providing for user-generated content. As of August 2011 there are more than 11,000 free community-contributed addons, known as contrib modules, available to alter and extend Drupal's core capabilities and add new features or customize Drupal's behavior and appearance. Because of this plug-in extensibility and modular design, Drupal is sometimes described as a content management framework. Drupal is also described as a web application framework, as it meets the generally accepted feature requirements for such frameworks. 32. What are System requirements for Drupal? A minimum base installation requires at least 3MB of disk space but you should assume that your actual disk space will be somewhat higher. For example, if you install many contributed modules and contributed themes, the actual disk space for your installation could easily be 40 MB or more (exclusive of database content, media, backups and other files). 33. Why ca not A Drupal user edit a node they created? Symptoms: An authorized Drupal user loses "edit" access to nodes they've created, even if they have appropriate node (or other module) access permissions. Or, user cannot edit a node that should be editable by them, based on access control or node access settings. No errors or warnings are presented to the user. Nothing in the Drupal watchdog log. Possible Cause: The user does not have permission to use the input filter currently assigned to the node. (An administrator or other privileged user may have changed the input filter settings, or, input filter permissions may have been changed to exclude the node author since the node was created. As a result, the user never had, or no longer has permission to use the input filter associated with the node.) 34. How Does Drupal Compare to Ruby on Rails? Another common alternative platform to Drupal is Ruby on Rails. We really don't have much to say about Ruby except that it is a framework moreso than a platform. There are some characteristically challenging web development tasks that are quite easy to do with Ruby, and there are others which are infinitely more complicated than they should be. One big difference is the fact that Ruby lacks the refined data object model found in Drupal that ensures interoperability between various aspects of the system, such as adding new modules to modify the operations of others. Whereas Drupal offers a self-generating database schema for many modules and underlying components of the platform, Ruby on Rails emphasizes a design philosophy holding that simplification of code conventions leads to better outcomes. While this all sounds good in principle, we have found there are certain tasks that make adherance to this philosophy an ideal moreso than a practical goal and breaking free from these conventions when necessary a daunting task (especially when integrating with external systems). 35. How Does Drupal Compare to Other Open Source CMS Systems? Drupal is also often compared with other open source content management systems including Joomla, Plone, Scoop, Silverstripe, Typo3, Graffitti, Moveable Type and Wordpress. There are characteristic features to all of these systems that make them appropriate in certain contexts, and most of them compare favorably to Drupal in one category of operation or another. Few of them, however, are capable of offering the balance between performance and functionality found in Drupal. 36. How Does Drupal Compare to Commercial CMS Systems? Drupal is often compared to a number of commercial content management systems including Crown Peak, Expression Engine, Clickability and Site Life in terms of capabilities. None of these systems offer the range of features that can be found in Drupal or the flexible, developer-friendly architecture that allows us to rapidly deploy dynamic web sites. In terms of sustainability, these platforms charactertistically lack the innovative approach to development embraced by the Drupal community, with updates and new features continually being added to the platform. These systems typically do surpass Drupal in terms of out-of-the-box reporting and metrics tools, generally providing views of data that is also stored in other systems. For instance, detailed page tracking information can just as easily be pulled from a CDN and integrated into a Drupal site for much less than the costs of per-seat licenses from a commercial vendor over a 1 month period. 37. What Kind of Support Is Available? A wide range of support services are available for organizations running Drupal sites. The Drupal community itself is an excellent resource for people looking to learn more about the platform or resolve specific issues that emerge using the system. Acquia offers an enterprise distribution of Drupal that includes uptime monitoring, email and telephone based troubleshooting support, and subscription plans for sites with varying performance requirements. For hosting, Our works with a variety of partners to deliver solutions to ensure sites are operational and can scale to meet changing traffic expectations. Rackspace is Our preferred hosting partner, and their 100% uptime guarantee allows us to focus on building great web sites without worrying about the network. Workhabit and Amazon S3 offer cloud hosting solutions that allow us to build sites that automatically scale to handle large peaks of traffic, and to provision new servers dynamically based on actual traffic conditions on any given day. 38. How Does Drupal Scale? Trellon has built Drupal sites and deployed them in very demanding scenarios, serving millions of page views a day. Drupal scalability and performance optimization is one of our core competencies, and we often work with existing web properties to find ways to improve their performance. Contact us to discuss your specific needs. 39. What Does Drupal Do? Drupal is the choice for many great web sites because it does a lot of different things very well, and allows different kinds of information to interact effectively through its flexible, open architecture. Compared with commercial or custom solutions, Drupal's feature set is far more economic and practical for most organizations. 40. Explain coding standards in Drupal? As per the Coding standards, omit the closing ?> tag. Including the closing tag may cause strange runtime issues on certain server setups. (Note that the examples in the handbook will show the closing tag for formatting reasons only and you should not include it in your real code.) All functions in your module that will be used by Drupal are named {modulename}_{hook}, where "hook" is a pre-defined function name suffix. Drupal will call these functions to get specific data, so having these well-defined names means Drupal knows where to look. We will come to hooks in a while. 41. What is CMS? A content management system (CMS) is a collection of procedures used to manage work flow in a collaborative environment. These procedures can be manual or computer-based. The procedures are designed to: Allow for a large number of people to contribute to and share stored data Control access to data, based on user roles. User roles define what information each user can view or edit Aid in easy storage and retrieval of data Reduce repetitive duplicate input * Improve the ease of report writing Improve communication between users In a CMS, data can be defined as almost anything – documents, movies, pictures, phone numbers, scientific data, etc. CMSs are frequently used for storing, controlling, revising, semantically enriching, and publishing documentation. Content that is controlled is industry-specific. For example, entertainment content differs from the design documents for a fighter jet. There are various terms for systems (related processes) that do this. Examples are web content management, digital asset management, digital records management and electronic content management. Synchronization of intermediate steps, and collation into a final product are common goals of each. cms,drupal,drupal cms,interview questions,technical,joomla,joomla cms,drupal interview question,content management system 42. Source Code The program must include source code, and must allow distribution in source code as well as compiled form. Where some form of a product is not distributed with source code, there must be a well-publicized means of obtaining the source code for no more than a reasonable reproduction cost preferably, downloading via the Internet without charge. The source code must be the preferred form in which a programmer would modify the program. Deliberately obfuscated source code is not allowed. Intermediate forms such as the output of a preprocessor or translator are not allowed. 43. Derived Works The license must allow modifications and derived works, and must allow them to be distributed under the same terms as the license of the original software. 44. Integrity of The Author’s Source Code The license may restrict source-code from being distributed in modified form only if the license allows the distribution of “patch files” with the source code for the purpose of modifying the program at build time. The license must explicitly permit distribution of software built from modified source code. The license may require derived works to carry a different name or version number from the original software. 45. No Discrimination Against Persons or Groups The license must not discriminate against any person or group of persons. 46. What are GNU Licenses ? Does free software mean using the GPL? Not at all—there are many other free software licenses. We have an incomplete list. Any license that provides the user certain specific freedoms is a free software license. 47. Why are so many Drupal versions available – 4.x, 5.x …? Which one should I use? It is recommended that you run the most current stable release. This can always be found at the Drupal Project page. However, if there are no compelling features in the latest version, a contrib module that is important to you isn’t ready or you don’t have time, there is no need to rush your upgrade as long as security updates are available for the version you are running. 48. Can I use Drupal on the command line? Yes, you can use drush – drush is a command line shell and Unix scripting interface for Drupal 49. What are hooks in Drupal ? Allow modules to interact with the Drupal core. Drupal’s module system is based on the concept of “hooks”. A hook is a PHP function that is named foo_bar(), where “foo” is the name of the module (whose filename is thus foo.module) and “bar” is the name of the hook. Each hook has a defined set of parameters and a specified result type. To extend Drupal, a module need simply implement a hook. When Drupal wishes to allow intervention from modules, it determines which modules implement a hook and calls that hook in all enabled modules that implement it. 50. what is Database abstraction layer in Drupal ? Allow the use of different database servers using the same code base. Drupal provides a slim database abstraction layer to provide developers with the ability to support multiple database servers easily. The intent of this layer is to preserve the syntax and power of SQL as much as possible, while letting Drupal control the pieces of queries that need to be written differently for different servers and provide basic security checks. Most Drupal database queries are performed by a call to db_query() or db_query_range(). Module authors should also consider using pager_query() for queries that return results that need to be presented on multiple pages, and tablesort_sql() for generating appropriate queries for sortable tables. 51. Explain the menu system in Drupal ? Purpose of menus ? Define the navigation menus, and route page requests to code based on URLs. The Drupal menu system drives both the navigation system from a user perspective and the callback system that Drupal uses to respond to URLs passed from the browser. For this reason, a good understanding of the menu system is fundamental to the creation of complex modules. Drupal’s menu system follows a simple hierarchy defined by paths. Implementations of hook_menu() define menu items and assign them to paths (which should be unique). The menu system aggregates these items and determines the menu hierarchy from the paths. For example, if the paths defined were a, a/b, e, a/b/c/d, f/g, and a/b/h, the menu system would form the structure: a a/b a/b/c/d a/b/h e f/g Note that the number of elements in the path does not necessarily determine the depth of the menu item in the tree. When responding to a page request, the menu system looks to see if the path requested by the browser is registered as a menu item with a callback. If not, the system searches up the menu tree for the most complete match with a callback it can find. If the path a/b/i is requested in the tree above, the callback for a/b would be used. The found callback function is called with any arguments specified in the “page arguments” attribute of its menu item. The attribute must be an array. After these arguments, any remaining components of the path are appended as further arguments. In this way, the callback for a/b above could respond to a request for a/b/i differently than a request for a/b/j. For an illustration of this process, see page_example.module. Access to the callback functions is also protected by the menu system. The “access callback” with an optional “access arguments” of each menu item is called before the page callback proceeds. If this returns TRUE, then access is granted; if FALSE, then access is denied. Menu items may omit this attribute to use the value provided by an ancestor item. In the default Drupal interface, you will notice many links rendered as tabs. These are known in the menu system as “local tasks”, and they are rendered as tabs by default, though other presentations are possible. Local tasks function just as other menu items in most respects. It is convention that the names of these tasks should be short verbs if possible. In addition, a “default” local task should be provided for each set. When visiting a local task’s parent menu item, the default local task will be rendered as if it is selected; this provides for a normal tab user experience. This default task is special in that it links not to its provided path, but to its parent item’s path instead. The default task’s path is only used to place it appropriately in the menu hierarchy. Everything described so far is stored in the menu_router table. The menu_links table holds the visible menu links. By default these are derived from the same hook_menu definitions, however you are free to add more with menu_link_save(). 52. How to interact with Drupal search system ? There are three ways to interact with the search system: Specifically for searching nodes, you can implement nodeapi(‘update index’) and nodeapi(‘search result’). However, note that the search system already indexes all visible output of a node, i.e. everything displayed normally by hook_view() and hook_nodeapi(‘view’). This is usually sufficient. You should only use this mechanism if you want additional, non-visible data to be indexed. Implement hook_search(). This will create a search tab for your module on the /search page with a simple keyword search form. You may optionally implement hook_search_item() to customize the display of your results. Implement hook_update_index(). This allows your module to use Drupal’s HTML indexing mechanism for searching full text efficiently. If your module needs to provide a more complicated search form, then you need to implement it yourself without hook_search(). In that case, you should define it as a local task (tab) under the /search page (e.g. /search/mymodule) so that users can easily find it. 53. What is a Module in drupal ? A module is software (code) that extends Drupal features and/or functionality. Core modules are those included with the main download of Drupal, and you can turn on their functionality without installing additional software. Contributed modules are downloaded from the Modules download section of drupal.org, and installed within your Drupal installation. You can also create your own modules; this requires a thorough understanding of Drupal, PHP programming, and Drupal’s module API. 54. Explain User, Permission, Role in drupal. Every visitor to your site, whether they have an account and log in or visit the site anonymously, is considered a user to Drupal. Each user has a numeric user ID, and non-anonymous users also have a user name and an email address. Other information can also be associated with users by modules; for instance, if you use the core Profile module, you can define user profile fields to be associated with each user. Anonymous users have a user ID of zero (0). The user with user ID one (1), which is the user account you create when you install Drupal, is special: that user has permission to do absolutely eveything on the site. Other users on your site can be assigned permissions via roles. To do this, you first need to create a role, which you might call “Content editor” or “Member”. Next, you will assign permissions to that role, to tell Drupal what that role can and can’t do on the site. Finally, you will grant certain users on your site your new role, which will mean that when those users are logged in, Drupal will let them do the actions you gave that role permission to do. You can also assign permissions for the special built-in roles of “anonymous user” (a user who is not logged in) and “authenticated user” (a user who is logged in, with no special role assignments). Drupal permissions are quite flexible — you are allowed to assign permission for any task to any role, depending on the needs of your site. 55. Explain the concept of node in drupal. A node in Drupal is the generic term for a piece of content on your web site. (Note that the choice of the word “node” is not meant in the mathematical sense as part of a network.) Some examples of nodes: Pages in books Discussion topics in forums Entries in blogs News article stories Each node on your site has a Content Type. It also has a Node ID, a Title, a creation date, an author (a user on the site), a Body (which may be ignored/omitted for some content types), and some other properties. By using modules such as the contributed Content Construction Kit (CCK) module, the core Taxonomy module, and the contributed Location module, you can add fields and other properties to your nodes. 56. Concept of Comment in Drupal . Comments are another type of content you can have on your site (if you have enabled the core Comment module). Each comment is a typically small piece of content that a user submits, attached to a particular node. For example, each piece of discussion attached to a particular forum topic node is a comment. 57 explain Taxonomy in drupal . Drupal has a system for classifying content, which is known as taxonomy and implemented in the core Taxonomy module. You can define your own vocabularies (groups of taxonomy terms), and add terms to each vocabulary. Vocabularies can be flat or hierarchical, can allow single or multiple selection, and can also be “free tagging” (meaning that when creating or editing content, you can add new terms on the fly). Each vocabulary can then be attached to one or more content types, and in this way, nodes on your site can be grouped into categories, tagged, or classified in any way you choose. 58 . How database system of drupal works ? Drupal stores information in a database; each type of information has its own database table. For instance, the basic information about the nodes of your site are stored in the Node table, and if you use the CCK module to add fields to your nodes, the field information is stored in separate tables. Comments and Users also have their own database tables, and roles, permissions, and other settings are also stored in database tables. 59. Explain the path system of drupal ? When you visit a URL within your Drupal site, the part of the URL after your base site address is known as the path. When you visit a path in your Drupal site, Drupal figures out what information should be sent to your browser, via one or more database queries. Generally, Drupal allows each module you have enabled on your site to define paths that the module will be responsible for, and when you choose to visit a particular path, Drupal asks the module what should be displayed on the page. For instance, this site (drupal.org) is (of course) built with Drupal. The page you are now viewing is http://drupal.org/node/19828, whose path is “node/19828?. The module that is responsible for this path is the core Node module, so when you visit this page, Drupal lets the Node module determine what to display. To determine the path to a particular page on your site, for purposes of creating a link, go to the page you want to link to and look at the URL in the address bar. By default the URL, after the base address of your site, will begin with ‘?q=’. When ‘Clean URLs’ are enabled you will see a directory structure in the URL. The “path” for use in a menu item is the part of the URL after the site’s base address and without the “?q=”. 60. Explain Region, Block, Menu in drupal .. Pages on your Drupal site are laid out in regions, which can include the header, footer, sidebars, and main content section; your theme may define additional regions. Blocks are discrete chunks of information that are displayed in the regions of your site’s pages. Blocks can take the form of menus (which are concerned with site navigation), the output from modules (e.g., hot forum topics), or dynamic and static chunks of information that you’ve created yourself (e.g., a list of upcoming events). There are three standard menus in Drupal: Primary Links, Secondary Links, and Navigation. Primary and Secondary links are built by site administrators, and displayed automatically in the page header of many themes (if not, you can enable their blocks to display them). Navigation is the catch-all menu that contains your administration menus, as well as links supplied by modules on your site. You can also create your own custom menus, and display them by enabling their blocks. You can customise menus in several ways, such as reordering menu items by setting their “weight” or simply dragging into place, renaming menu items, and changing the link title (the tooltip that appears when you mouse over a menu item). You can move a menu item into a different menu by editing the Parent property of the menu item. You can also add custom menu items to a menu, from the Add menu item tab of the Menu administration screen. To create a menu item, you will need to provide the path to the content (see above). In all cases a menu item will only be shown to a visitor if they have the rights to view the page it links to; e.g., the admin menu item is not shown to visitors who are not logged in. 101. What hardware does Drupal.org run on? 100. Drupal and Working with JavaScript 99. Why does Drupal need a database? What database… 98. How to create a static archive of a Drupal web… 97. Programming best practices and CMS(drupal) bes… 96. what are Drupal Distributions and Drupal inst… 95. Drupal coding standards 94. Drupal 8 classes and interfaces 93. Explain drupal advanced search 92. Drupal 8 , Changelog.txt – What’s new in Drupa… 91. Drupal Negatives and explanation on Usability,… 90. Explain Drupal Architecture 89. Drupal Version release dates 88. Drupal at a glance 87. Why you shouldn’t modify core drupal files ? 86. Explain hardcoding in drupal ? 85. Explain Theming in Drupal 8 ? 84. Steps for launching a drupal site ? 83. Explain drupal administration 82. How to configure .htaccess to ignore specific … 81. What are the steps for migrating drupal websit… 80. How to install and configure drupal 8 ? 79. How to Install Drupal ? 78. What are alpha, beta releases and release cand… 77. What do version numbers in drupal mean? 76. Explain Backward Compatibility in Drupal ? 75. Explain Security features of Drupal ? 74. What are Entity types in drupal ? 73. What is Bootstrap in drupal ? 72. What is drupal weight ? 71. What is triage ? 70. What is drupal trigger ? 69. What is theme and theme engine in drupal ? 68. What is teaser in drupal ? 67. What is render array in drupal ? 66. What is drupal region ? 65. What is permission in drupal ? 64. What is Git in drupal ? 63. What is DrupalCon and Druplicon ? 62. What is cron in drupal ? 61. What is critical path ? DRUPAL Questions and Answers pdf Download Read the full article
0 notes
Text
How to install WordPress on Windows[XAMPP]
WordPress is a widely used CMS for a long time and nowadays where everywhere lockdown blogging boosts up and lots of people have started blogging and so many students learning online courses, and skills like web design, graphics design, etc.
WordPress is a very easy to learn and user-friendly cms and it is the world's best cms for blogging. If you learn about What id WordPress? How does it work?. In this article, we are talking about How to install WordPress in localhost in Windows 10.
How to install wordpress on windows 10
Before installing WordPress in localhost you need to set up a localhost or local server. So you should know how to install XAMPP in windows. You can read our post where I have explained step by step.
What are the steps to install WordPress?
Step1: Download WordPress –
After setup localhost, you need to download WordPress latest version from the official website :
https://wordpress.org/download
Step2: Place the package in the root directory –
After download the wordpress package zip file that size approx 15.7 and extract the zip file and now we have to place it in the localhost directory. So if you are using XAMPP then you have to place this wordpress folder into the htdocs(C:\xampp\htdocs) directory, and if you are using WAMPP then you have to place it in www(C:\wampp\www).
So now you can rename that WordPress setup folder as you want for your website. Note that name should not start with a special character or space.
Step3: WordPress File Structure –
Before getting the next step make sure you have complete files and folders in your wordpress package directory and it should contain 16 files and 3 folders as below screenshot. In the below setup, I have rename wordpress as mywordpress.
Step4: Start the local server -
Now start your XAMPP server by using the XAMPP control panel as below-
We need services that run Apache and MySQL. Then we need to go browser and type this URL: http://localhost/ or http://127.0.0.1/ both are the same. SO there you can see the Dashboard of XAMPP.
Step5: Open website path –
In the browser add your wordpress directory name with a localhost URL like :
http://localhost/mywordpress and you will see this interface: In this step, you have to choose your language for your website. and then click on the Continue button.
After that, you will see the Welcome screen where you have read the information that mentioned 5 points related to Database, So to get these information you need to follow next step.
Step6: Create Database from PHPMyAdmin –
Go to http://localhost/phpmyadmin and click on Databases tab or direct open this URL: http://localhost/phpmyadmin/server_databases.php
Where you can see the default databases list and at the top there you will see, an input text field, So just enter your database name that is mostly the same as your website name.
After creating your website database come back to our browser and click on the Let’s Go button
And insert detail like below – Here I have used my Database name “mywordpress”, So you have to use your database.
Username will be the same for all that is “root” by default.
Password should be “empty” just leave blank.
Database Host also will be same for all “localhost”
Table Prefix by default is “wp_” but you can change as you want.
After that just click on Submit button
Step7: Run the Installation –
After submitting database detail you will move the next step window like this:
Step8: Website Configuration –
In this step, you have to enter your website following detail as below-
Website name – your website name
Username – your website username which will be used for website login and it should be unique for every user. And you can use a combination with a numeric, alphabetic, and special character.
Password – It should be also a critical combination so no one cannot hack your website.
Confirm Your Password: just check that checkbox.
Your Email: Enter your email id that will use for admin activates.
Search Engine Visibility: if your website is not ready to live and you don’t want to submit it to search engines then you have to check to discourage option.
After Click on Install WordPress Button, you will get Success Message Screen as below. So that means you have successfully installed wordpress.
Step9: Login Admin –
Now you have installed WordPress successfully in your localhost, so at the end, you have to login into the backend site and you will see this popup box.
Use your website username and password that you have inserted in the last step. And finally, you can see the WordPress admin dashboard where you can access everything like menus, users, posts and categories, etc…
Front this area you can create new menus and posts and post categories etc..
Next blog you will learn about how we can create Posts, Categories in WordPress.
There are 2 URLs as below-
Admin URL: http://localhost/yourwordpres/wp-admin
Frontend URL: http://localhost/yourwordpres
So front end look will be like this:
You may Interest to read this :
5 Best WordPress Hosting in 2021
What is WordPress and how does it work?
How to Create a WordPress Plugin
How to install XAMPP on Windows 10?
0 notes
Text
Linksys Smart Wifi Login
Welcome To Linksys Smart Wifi Login Page !
Almost every application or website gives you the likelihood to possess your own account, with a special username and password. Everything is completed so as for a user to possess a private controllable page, where he or she will see any issue or maybe receive notifications, regarding the service that they need .
First of all anyone has ahead of them the likelihood to make an Linksys smart wifi account and save their data in their smartphone or maybe computer. Linksys smart wifi gives you the prospect to use the web site wherever you would like , because it's computer and also mobile friendly.
Our Linksys smart wifi servers are always up so far with the newest technology which makes it easier for everybody to access everything. Our Linksys smart wifi support team is usually quite able to help everyone who has troubles or issues into signing up or logging in. Our team is well trained to offer to every of our customers the simplest and fastest service, so as for them to not lose time. Everything comes with a telephone number or an email provided for every of our customers to contact our great Linksys smart wifi team.
While you create a linksys smart wifi account or log in into our platform you would possibly find some issues and you can’t confirm by yourself and also distract you from the important problem.
This is why our linksys smart wifi team provides the solutions below, so as for you to finish your account and solve everything by yourself in some easy steps.
Linksys Smart Wifi Router Login Using Linksyssmartwifi.Com
So, you've got tried using the linksyssmartwifi.com and you were redirected to a window where there's no page of Linksys smart wifi login? In many instances when Linksys users attempt to access linksyssmartwifi.com or IP 192.168.1.1 for home network setup, they do not get any login page. that's because your Linksys smart wifi router doesn't found out perfectly. during this website, you'll get all the small print to setup Linksys router so you'll get quick access to linsyssmartwifi.com or linksyssmartwifi.net login.
To Create An Account you would like to possess a legitimate Email.
The email should be one that you simply use tons and there you'll receive all the knowledge you would like for creating the new linksys smart wifi account. There could be issues regarding the account, because you would possibly not receive a confirmation link to activate it. Please read below:
Go to linksys smart wifi Website .
Click “ Forgot the password” .
Write down the e-mail address again .
You will now receive the confirmation link .
If you're still having issues, please contact our linksys smart wifi support team .
An Unique Password.
The minimum requirements for a robust and unique password are:
The password should have a minimum of 1 letter .
The password should have a minimum of 1 number .
The password should have quite 8 characters .
The main problems that you simply simply may need during your log in process are listed below and please read carefully all the steps that you got to follow, so as for you to enter into your personal linksys smart wifi account:
• If you are doing not remember your password, that you simply once registered your Linksys smart wifi account with:
Click “ Forgot Password”
Linksys smart wifi team will send you an automatic link, where you'll create a replacement password, where you'll need to write it twice, so as to verify the new one .
• If you can’t log in into your Linksys smart wifi account because it says that the e-mail isn't registered into our platform:
You might have typed your email address wrong .
You might have internet connectivity troubles .
Your CAPS LOCK key could be active ( the e-mail address is usually written in small letters ) .
There could be cookies on your actual browser, so we propose you to use another browser or enter incognito page.
• If you receive an email, that writes about some changes into your linksyssmartwifi.com page that you simply don't know, please reset your password again and ensure it. For issues that keep appearing on your email, please contact Linksys smart wifi support team.
• you would possibly got to disable the antivirus programs or ever restart your computer, so as for the server to urge restored, so you'll try again the Login part.
• If it shows that the Linksys smart wifi page isn't available:
Please observe correctly all the knowledge that you simply have written
Whenever you reload the page, you'll tend the empty spaces into your username and password and you've got to write down them again.
If you're still having troubles, please contact our 24/7 Linksys smart wifi support team.
Linksys has been releasing wifi routers for quite long, but now they need been added new smart wifi router series which conveniently provides you secure access for your Linksys router settings. Linksys users can easily login to router settings by simply using the Linksys router login or linksyssmartwifi.com website.
While logging in to the unique Linksys setup, you ought to confirm you've got already created a Linksys smart Wi-Fi account with a legitimate email id and a secure password. Only use that email which you've got used precisely for creating a Linksys smart Wi-Fi login account. If you're unable to recollect your password for Linksys router login, then you receive an option of resetting the password. There are another Linksys login problems which we'll discuss on this website. If you're facing any problem with Linksys router setup, Linksys extender setup, and Linksys smart Wi-Fi login the troubleshooting steps for Linksyssmartwifi.com refused to attach are same.
How Do I Access Linksys Router Login?
Linksys has provided some ways to login to your Linksys router. Linksys users can attend Linksys smart wifi account from anywhere. You exactly got to enter your email and password to access your Linksys smart wifi page. many of us were experiencing problems regarding Linksys router login. So let’s provide the foremost effective ways to login to your Linksys wireless router using default gateway which is 192.168.1.1(Default IP address). There are some certain issues you'll experience once you try to log in to your Linksys router.
What Are The Default Username And Password Of Linksys EA7300 Router?
The default login information for your Linksys router is usually an equivalent altogether models. All Linksys routers use an equivalent login information.
Default username – admin
Default Password – Leave Blank
Note: Change your default password once you get into the router’s administrative settings.
Change The Admin Password For Linksys Smart Wi-Fi Account.
Change the Admin Password for Linksys Smart Wi-Fi AccountThe minimum requirements for a robust and unique password are:
Go to Linksys smart wifi login by typing linksyssmartwifi.com within the address bar of your browser.
Type within the username and password for accessing the Linksys Smart Wi-Fi setup page.
The default username is an admin and password is "leave blank. | www.linksyssmartwifi.com login
Click on the advanced option in your Linksys smart wifi page.
Here you'll find the choice for a group password for administrative.
Type within the password you would like to vary for your Linksys router login and click on on save button.
What Is Linksys Router Login IP Address?
Linksys router contains a default IP address when it's manufactured. Internet service provider delivers a public IP address for the foreign connection. Linksys router intentionally sets a default private IP address used for local networking. The default IP address of all Linksys router is 192.68.1.1.
Any device connected to a Linksys router with the default IP address can access the router settings employing a browser . Type this URL within the browser address field: www.linksyssmartwifi.com
This address is usually designated the default gateway or Linksys router login website . If your router is already found out and configured and you would like to understand your Linksys router IP address that it uses for its internal gateway. All you would like to try to to is type ipconfig within the prompt using any computer connected to your home wireless network.
The second effective thanks to check the IP address of your Linksys router is to travel to network connections in your computer. you would like to right click on the wireless connection then click on the status button. Click on details button and note the ipv4 default gateway address.
Linksys Router Login Not Working |Fix
If you're unable to login to your Linksys wireless router, you or somebody else presumably changed the password at some extra point buying, during which case your Linksys default password is not any longer getting to work. There are another issues also which provides you blockage to log in to your Linksys router. we'll deliver you the resolution step by step so you'll be ready to log in after performing these steps.
Turn off your Linksys wireless router by unplugging the facility cable from the facility outlet. await some seconds and switch on your Linksys router. this might solve your Linksys router login issue.
If your computer connected with an coaxial cable then confirm all the wires are tight enough to urge the right power.
Make sure your computer is connected to the router’s network if you're trying to travel to Linksys smart wifi login page. Your computer must have updated network drivers.
If you've got tried all the previous steps but still unable to login to your Linksys router then plow ahead and reset your Linksys router.
The Linksys router reset replaces all the network settings, including its local IP address and router admin credentials. albeit an administrator has changed the default address before, resetting the router changes it back to default Linksys router settings. Resetting a Linksys router is important only in some situations like corrupted firmware that causes it to prevent responding to administrative settings.
How To Reset A Linksys EA8300 Router?
Power on your router: Whenever you're intentionally trying to reset your Linksys router confirm your router is power on because Linksys router reset won't work if your router is transitioned .
Linksys router reset: Press and hold down the push button for about 25-30 seconds at the rear of your Linksys router with the assistance of a paperclip. await the blinking power light on the router and release the push button .
Power Cycle: Power off your Linksys router and await 30 seconds. Power on your wireless router and await the solid power light.
Connect to Linksys router: Connect your computer to a router with wireless of your Linksys router. If you would like to attach with an coaxial cable then you'll use LAN ports which are at the rear of your router.
Linksys Login: Open an internet browser in your computer and sort Linksyssmartwifi.com within the address bar of your browser. Linksys Smart Wi-Fi login page will appear on your browser . Type the default username and password for Linksys router login.
What Is The Username And Password For Linksys?
Default username - admin Default password - password
You will be redirected to Linksys router login page.
Press "Next" button once you "log in" to router page.
Click on the "Save" button to save lots of all the settings you've got made for www.linksyssmartwifi.com address.
You can check the Linksys router connectivity by clicking on the "Router Status" option.
Some Issues you'll Face With Linksys Router Login
You can face some issues while accessing the Linksys Smart WiFi login. Please confirm the configuration you've got made is correct if you're facing any issues accessing the linksyssmartwifi.com address, reboot your Linksys router. Here are a number of the problems which you'll face so as to succeed in Linksys login.
0 notes
Link
In this article, four methods will be shown on how to export MySQL data to a CSV file. The first method will explain the exporting process by using the SELECT INTO … OUTFILE statement. Next, the CSV Engine will be used to achieve the same. After that, the mysqldump client utility will be used and in the end, the Export to CSV feature from the ApexSQL Database Power Tools for VS Code extension will be used to export MySQL data.
Throughout this article, the following code will be used as an example:
CREATE DATABASE `addresses` CREATE TABLE `location` ( `address_id` int(11) NOT NULL AUTO_INCREMENT, `address` varchar(50) NOT NULL, `address2` varchar(50) DEFAULT NULL, PRIMARY KEY (`address_id`) ) ENGINE=InnoDB DEFAULT CHARSET=latin1 INSERT INTO location VALUES (NULL, '1586 Guaruj Place', '47 MySakila Drive'), (NULL, '934 San Felipe de Puerto Plata Street', NULL), (NULL, '360 Toulouse Parkway', '270, Toulon Boulevard');
Using SELECT INTO … OUTFILE to export MySQL data
One of the commonly used export methods is SELECT INTO … OUTFILE. To export MySQL data to a CSV file format simply execute the following code:
SELECT address, address2, address_id FROM location INTO OUTFILE 'C:/ProgramData/MySQL/MySQL Server 8.0/Uploads/location.csv';
This method will not be explained in detail since it is well covered in the How to export MySQL data to CSV article.
Using the CSV Engine to export MySQL data
MySQL supports the CSV storage engine. This engine stores data in text files in comma-separated values format.
To export MySQL data using this method, simply change the engine of a table to CSV engine by executing the following command:
ALTER TABLE location ENGINE=CSV;
When executing the above code, the following message may appear:
The storage engine for the table doesn’t support nullable columns
All columns in a table that are created by the CSV storage engine must have NOT NULL attribute. So let’s alter the location table and change the attribute of the column, in our case that is the address2 column.
When executing the ALTER statement for the address2 column:
ALTER TABLE location MODIFY COLUMN address2 varchar(50) NOT NULL;
The following message may appear:
Data truncated for column ‘address2’ at row 2
This message appears because NULL already exists in the column address2:
Let’s fix that by adding some value in that field and try again to alter the column.
Execute the following code to update the address2 column:
UPDATE `addresses`.`location` SET `address2` = "Test" WHERE `address_id`=2;
Now, let’s try again to execute the ALTER statement:
ALTER TABLE location MODIFY COLUMN address2 varchar(50) NOT NULL;
The address2 columns will successfully be modified:
After the column has been successfully changed, let’s execute the ALTER statement for changing the storage engine and see what happens:
ALTER TABLE location ENGINE=CSV;
A new problem appears:
The used table type doesn’t support AUTO_INCREMENT columns
As can be assumed, the CSV engine does not support columns with the AUTO_INCREMENT attribute. Execute the code below to remove the AUTO_INCREMENT attribute from the address_id column:
ALTER TABLE location MODIFY address_id INT NOT NULL;
Now, when the AUTO_INCREMENT attribute is removed, try again to change the storage engine:
ALTER TABLE location ENGINE=CSV;
This time a new message appears:
Too many keys specified; max 0 keys allowed
This message is telling us that the CSV storage engine does not support indexes (indexing). In our example, to resolve this problem, the PRIMARY KEY attribute needs to be removed from the location table by executing the following code:
ALTER TABLE location DROP PRIMARY KEY;
Execute the code for changing the table storage engine one more time:
Finally, we managed to successful change (alter) the storage engine:
Command executed successfully. 3 row(s) affected.
After the table engine is changed, three files will be created (CSV, CSM, and FRM) in the data directory:
All data will be placed in the CSV file (location.CSV):
Note: When exporting MySQL data to CSV using the CSV storage engine, it is better to use a copy of the table and convert it to CSV to avoid corrupting the original table.
Now, let’s create a table without indexes:
CREATE TABLE csv_location AS SELECT * FROM location LIMIT 0;
Then change the storage engine of the newly created table to CSV:
ALTER TABLE csv_location ENGINE=CSV;
And then load data into the newly created table from the location table:
INSERT INTO csv_location SELECT * FROM location;
Using the mysqldump client utility to export MySQL data
Another way to export MySQL data is to use the mysqldump client utility. Open the Windows command-line interface (CLI) not MySQL CLI. In case the MySQL CLI is opened, type and execute the mysqldump command, and the following error message may appear:
ERROR 1064 (42000): You have an error in your SQL syntax; check the manual that corresponds to your MySQL server version for the right syntax to use near ‘mysqldump’ at line 1
This happens because mysqldump is an executable command, not MySQL syntax command.
Let’s switch to Windows CLI and execute the mysqldump command. As can be seen from the image below, a new problem appears:
‘mysqldump’ is not recognized as an internal or external command, operable program or batch file.
To resolve this, navigate to the directory where is the mysqldump.exe is located:
cd C:\Program Files\MySQL\MySQL Server 8.0\bin
Now, execute the mysqledump.exe command. If the results are the same as from the image below, it means that mysqldump works correctly:
To export MySQL data execute the following code:
mysqldump -u <username> -p -T </path/to/directory> <database>
The -u is used as a flag after which you need to specify a username that will be connected to MySQL server.
The -p is used as a flag for a password for the user that wants to connect to the MySQL server.
The -T flag create a tab-separated text file for each table to a given path (create .sql and .txt files). This only works if mysqldump is run on the same machine as the MySQL server.
Note that specified path (directory) must be writable by the user MySQL server runs as, otherwise, the following error may appear when exporting data:
mysqldump: Got error: 1: Can’t create/write to file ‘ H:/ApexSQL/Test/location.txt (Errcode: 13) when executing ‘SELECT INTO OUTFILE’
By executing the following command:
mysqldump -u root -p -T H:/ApexSQL/Test addresses
All tables from the specified MySQL database (addresses) will be exported in the directory that you named. Every table will have two files; one is .sql and another is .txt:
The .sql files will contain a table structure (SQL for creating a table):
And the .txt files will contain data from a table:
If you want to export MySQL tables only as .txt files, then add -t flag to mysqldump command:
mysqldump -u root -p -t -T H:/ApexSQL/Test addresses
This will create a .sql file, but it will be empty:
In case, that want to export just one table from a MySQL database rather than all tables, in the mysqldump command add a name of the table that want to export next to a specified MySQL database:
mysqldump -u root -p -t -T H:/ApexSQL/Test addresses location
With -T flag in mysqldump command, exported data in the files will be separated with tab delimiter. A delimiter can be changed by using the –fields-terminated-by= flag.
In the example below comma (,) is used as value separator:
mysqldump -u root -p -t -T H:/ApexSQL/Test addresses location –fields-terminated-by=,
With the –fields-enclosed-by= flag it can be put quotes around all values (fields):
mysqldump -u root -p -t -T H:/ApexSQL/Test addresses location –fields-enclosed-by=” –fields-terminated-by=,
When executing the above code, the following error may appear:
mysqldump: Got error: 1083: Field separator argument is not what is expected; check the manual when executing ‘SELECT INTO OUTFILE’
To fix that, add \ in front of the quote “ under the –fields-enclosed-by flag:
mysqldump -u root -p -t -T H:/ApexSQL/Test addresses location –fields-enclosed-by=\” –fields-terminated-by=,
The exported MySQL data will look like this:
Using a third-party extension to export MySQL data
In this VS Code extension, execute a query from which results set wants to be exported:
In the top right corner of the result grid, click the Export to CSV button and in the Save As dialog enter a name for a CSV file, and choose a location where data should be saved:
Just like that, in a few clicks, data from the result set will be exported to CSV:
0 notes
Text
How I can update or change router’s admin password for my Linksys router?
Linksys router admin comes with default credentials but its highly recommended to update the router’s admin for security purposes.You can follow the below-mentioned steps to update the router’s admin password:
Open a web browser from a computer or device that is connected to your router’s network.
Type linksyssmartwifi.com or 192.168.1.1 in the address bar.
It will open up a login authentication page.
Enter the default password that is “admin”.
You can leave the username field empty.
Once you are successfully logged in, it will direct you to the home page.
Check the administration page.
Go to the management section; enter the new password in the Router password or Re-enter to confirm the fields.
Click on the save settings.
linksys smart wifi login
0 notes
Text
How to set up Solace PubSub+ Event Broker with OAuth for MQTT against Keycloak
OAuth 2.0 and OpenID Connect (OIDC) are getting more and more popular as authentication and authorization protocols. OIDC also uses JSON Web Tokens (JWT) as a simple token standard. Another protocol that is gaining popularity is MQTT. Since Solace PubSub+ Event Broker supports all these protocols, why don’t we see how they all work together nicely in a simple demo? We will use the Keycloak server as the authorization server and a simple dotnet core application to build a full end-to-end demo.
Set up the servers
For this blog, I’m running both Solace PubSub+ Event Broker and the Keycloak server as Docker containers on macOS. The configuration steps are the same regardless where we run the servers. One thing to note is that we need connectivity from the Solace PubSub+ Event Broker to the Keycloak server.
Run this command to set up Solace PubSub+ Event Broker software in your local Docker environment.
$ docker run -d --network solace-net&nbsp; -p 8080:8080 -p 1883:1883&nbsp; --shm-size=2g --env username_admin_globalaccesslevel=admin --env username_admin_password=admin&nbsp; --name=mypubsub solace/solace-pubsub-standard:9.3.0.22
Run this command to set up the Keycloak authorization server in your local Docker environment.
$ docker run -p 7777:8080 \ --network solace-net \ --name keycloak \ -e KEYCLOAK_USER=user \ -e KEYCLOAK_PASSWORD=password \ -e DB_VENDOR=H2 \ -d jboss/Keycloak:7.0.0
If Port 8080 is already used on your local machine, change it to any other available port (the first port in the -p argument).
Using the docker network parameter enables you to access this host using hostname from other Docker instances. If you don’t have one yet, create one with the following command:
$ docker network create solace-net
Once the Keycloak server container is started, we can verify it from the Keycloak homepage.
Figure 1 Keycloak Homepage – use the port we published in the docker run command
Keycloak as the Authorization Server
An authorization server grants clients the tokens they can use to access protected resources. In this setup, we are using the Keycloak server as the authorization server.
In this section, we will set up the user account in the authorization server. We will use this user to get the access and ID token from the authorization server.
The first step is to log in using the username and password defined during the Docker container creation.
Figure 2 Use the username and password defined as environment variable
By default, Keycloak is set up with a built-in realm called Master. For simplicity, we will use this realm for our user. If you want to create a new realm, you can do that as well.
Create a Client
The next step is to create a new client in the realm. We do this by clicking the Create menu on the top right of the clients table.
Figure 3 Client Admin Page
Enter a client ID and choose openid-connect as the client protocol. We will use this client for our OpenID Connect test.
We can leave the Root URL field empty for this demo.
Figure 4 Create a new client
Next, enter the mandatory Redirect URLs for this client. Since we’re not going to use this for the Web, we can use a simple URL such as localhost/* for this demo.
Figure 5 Enter the Redirect URL
Optionally, change the default Access Token Lifespan to a longer period if you want to use a single token for multiple tests spanning several minutes or more.
Figure 6 Change the default Access Token Lifespan
Configure Client Scope for a Custom Audience
Additionally, we will add a custom audience called “pubsub+” to this client for audience validation. Keycloak will add the client ID as the audience attribute value and provide a few ways to add a custom audience. For this test, we create a client scope by the name of “pubsub+” and include a custom audience there. We then include this client scope in the client we created earlier.
Figure 7 Create a client scope to have a custom audience value
Figure 8 Add the client scope to the Solace client
Configure Solace PubSub+ Event Broker
Create an OAuth Provider
The first step is to configure an OAuth provider for OpenID Connect in the Solace PubSub+ Event Broker.
Figure 9 Create a new OAuth provider
We will create the new OAuth provider based on the Keycloak authorization server. We will enable audience validation and authorization group as per our Keycloak client configuration, use the JWKS URL from the Keycloak, and use the preferred_username field from the id_token as the username claim source.
We will look for audience and authorization group claims from the access_token since Keycloak will have those in access_token by default. This is not a mandatory option. Simply configure against how your authorization server would have the claims.
Refer to the screenshot below for the configuration values and don’t forget to enable this provider by toggling the Enabled option on.
Figure 10 Set up a new OAuth provider
We will not configure Token Introspection for this test.
For the username, we will find the username claim from the id_token from the preferred_username attribute rather than from sub. This attribute should carry the value of “user” as the username we use in Keycloak. We will use the username “user” in our sample application.
And as a bonus feature, not really part of OpenID Connect, we can enable API username validation so that the broker validates if the username provided in your application API call matches the username claim extracted from the token.
Figure 11 Set up a new OAuth provider (2)
Enable OAuth
Next, we will set up the Solace PubSub+ Event Broker’s Client Authentication to enable the OAuth Authentication. This is done by toggling the OAuth Authentication switch and then select one of the available OAuth providers as the default provider for OAuth authentication. This value is used when a client using OAuth authentication does not provide the OAuth provider information.
Notice that we disable the Basic Authentication and Client Certificate Authentication for this test to ensure that our broker will only do OAuth authentication.
To keep it simple, we will use default Authorization Type of Internal Database.
Figure 12 Enable OAuth Authentication and set the Default Provider Name
Create an Authorization Group
The next step is to make sure we have configured authorization groups to be used by the broker to validate the authorization claim in the token.
Figure 13 Create an authorization group
Let’s create a sample authorization group by the name “pubsub+” to be used later by the OAuth client.
Figure 14 Enable and select profiles
Make sure to enable this new authorization group and feel free to play around with the ACL and Client Profiles. For now, we will settle with the default profiles for both.
Ready for Test
Now we have the Solace PubSub+ Event Broker and the Keycloak authorization server configured, we are ready to run some tests.
Sample Project
This is a sample .Net Core application to test the OAuth authentication and authorization features. It will take the two arguments access_token and id_token and subscribe and publish a message.
<Project Sdk="Microsoft.NET.Sdk"> <PropertyGroup> <OutputType>Exe</OutputType> <TargetFramework>netcoreapp2.2</TargetFramework> <RootNamespace>solace_dotnet_mqtt</RootNamespace> </PropertyGroup> <ItemGroup> </ItemGroup> <ItemGroup> </ItemGroup> <ItemGroup> </ItemGroup> <ItemGroup> <PackageReference Include="M2MqttClientDotnetCore" Version="1.0.1"/> </ItemGroup> </Project> myproject.csproj using System; using System.Text; using M2Mqtt; using M2Mqtt.Messages; namespace solace_dotnet_mqtt { class Program { static void Main(string[] args) { if (args.Length < 2) { Console.WriteLine("Usage: dotnet run <access_token> <id_token>"); Environment.Exit(-1); } MqttClient client = new MqttClient("localhost"); client.MqttMsgPublishReceived += client_MqttMsgPublishReceived; string clientId = Guid.NewGuid().ToString(); string solace_oauth_provider = "keycloak-openid"; string oidcpass = "OPENID~" + solace_oauth_provider + "~" + args[1] + "~" + args[0]; client.Connect(clientId, "user", oidcpass); string strValue = "Hello World!"; client.Subscribe(new string[] { "test/topic" }, new byte[] { MqttMsgBase.QOS_LEVEL_AT_LEAST_ONCE }); client.Publish("test/topic", Encoding.UTF8.GetBytes(strValue), MqttMsgBase.QOS_LEVEL_AT_LEAST_ONCE, false); } static void client_MqttMsgPublishReceived(object sender, MqttMsgPublishEventArgs e) { Console.WriteLine("Message received: " + System.Text.Encoding.UTF8.GetString(e.Message)); } } }
Prepare the Tokens
To get the tokens, we can use tools such as Postman to get new tokens from the Keycloak authorization server.
We can simply create a new request and go to the Authorization tab, select OAuth 2.0 as the type, and click the Get New Access Token button on the right panel.
Figure 15 Use Postman to get the tokens using OAuth 2.0 Authorization
Figure 16 Get to the New Access Token menu
Fill in the token request details as per the sample below. Make sure you enter the correct client ID.
Since we have set the client ID with public access, we don’t need to enter any client secret. And for Scope, we will use openid so that this is handled as OpenID Connect.
For State, we just put any value for this test.
Figure 17 Use Auth URL from the Keycloak server
Figure 18 Use Access Token URL from Keycloak and change the Client Authentication setting
You will be presented with the Keycloak login page to authenticate yourself to be able to get the tokens. Use the username “user” and password “password” that we used when running the Docker container for the Keycloak server.
Once you get the tokens, you can copy both the access_token and id_token for use in the test later.
Figure 19 Copy the Access Token
Figure 20 Copy the id_token
Peek into the Tokens
You can peek into the tokens to see the contents and attribute values. You can go to https://jwt.io and simply paste the token into the Encoded text box on the left.
Figure 21 Decode a JWT access token
The highlighted aud and scope attributes are the ones we use in this test. As you can see, the aud value of pubsub+aud is extracted from the token, as well as the scope of pubsub+.
Figure 22 Decode a JWT id_token
As we can see, the id_token will contain a preferred_username attribute with the value “user”.
Run the Test Program
To test with the provided sample program, simply run the dotnet run command with both tokens as arguments. For this sample, I have simply used localhost for the Solace PubSub+ Event Broker address as we are running it on Docker locally. Upon successful run, the program will simply print out “Message received: Hello World!” to the console.
ari@Aris-MacBook-Pro solace-dotnet-mqtt % dotnet run [access_token] [id_token] Message received: Hello World! ^C ari@Aris-MacBook-Pro solace-dotnet-mqtt %
I hope you find this blog post useful. For more information about the topic, please refer to the following:
Getting Started with PubSub+ Standard Edition
OAuth Authentication Configuration
Keycloak
The post How to set up Solace PubSub+ Event Broker with OAuth for MQTT against Keycloak appeared first on Solace.
How to set up Solace PubSub+ Event Broker with OAuth for MQTT against Keycloak published first on https://jiohow.tumblr.com/
0 notes