#easy recipe for making coconut milk at home
Explore tagged Tumblr posts
Visit Tumblr Blog
Explore Tumblr blogs with no restrictions, modern design and the best experience.
Last Seen Tumblr Blogs


Fun Fact
130K people were victims of a chain letter scam that affected Tumblr in May 2011.
Text
Sims In Bloom: Generation 2 Pt. 113 (Cozy Celebrations)


The events of this post occurred leading up to Winterfest (Generation 2 parts 99 to 102)
The Winterfest season began in Henford with a fresh coat of snow on the ground. White powder was rare in the rural river town, but like anywhere else, it was always welcome during the holiday season.
Hazel Moody-Nesbitt lived in a two-story cottage in the Bramblewood with her wife, Nicola. They also lived with Nicola's mother, Kim, and brother, Dominic, and Hazel had recently returned from a political conference in San Myshuno with holiday traditions on her mind.
The high school sweethearts had been married close to three years, but they were already growing apart. Still, they both hoped they could find the spark still lit amid the magic of the festive season.

"The first Winterfest without your father won't be easy, but we should try to make it a happy holiday," said Kim. "For Eddie's sake."
"We don't need to be sad, Mom. Dad's still with us, especially at this time of year." Nicola and her family wanted a quiet Winterfest at home, wrapping themselves in comfort and tradition as they soldiered on without her father. Outgoing Hazel wanted to support her wife, but she was hoping for something more this holiday season.
"Staying in watching Winterfest movies sounds like a really nice time, but maybe we could spice things up a little, and add some traditions from other cultures for the fun of it. Like cooking different kinds of food! Maybe we can't travel anywhere, but we could do the next best thing exploring different cultures."

Nicola hadn't travelled much. She'd heard Hazel's tales of camping in Granite Falls with her family, but she thought it sounded uncomfortable and full of bugs. She was a homebody, but expanding their holiday celebrations to embrace other cultures was a good idea. It's exactly the sort of thing Nicola would want to teach her students.
They got the season started by hanging a festive wreath over the bay window in the living room, and Nicola made japchae at Hazel's suggestion. "Apparently, it's a noodle dish they serve in places like Mount Komorebi for the holidays."


Nicola was comfortable with things like roast turkey, gingerbread, even egg nog - the comforts she'd grown up with in Henford, but the more gregarious Hazel wanted to try new things. Taking it upon herself to learn new recipes as well, Hazel taught herself to make brigadeiro, a Selvadoradian holiday confection made with chocolate and condensed milk.
The girls decorated, donned festive sweaters, and brushed over their relationship issues with tinsel and fairy lights. They both wanted to discuss their relationship fears, but they avoided it at every turn. They could never find time for couples counseling, even though they brought it up whenever they would argue about one thing or another.


Living with Nicola's mother and brother often left Hazel feeling like the odd man out. She'd come downstairs after working on the computer, listening to her wife chat happily with her family. But when Hazel would enter the room, they'd grow quiet, as though their conversations weren't meant to include her. As if she wasn't family.
Late at night, while Nicola graded papers and listened to familiar winter holiday music on the stereo, Hazel would head to the Gnome's Arms. She was a social creature and always had been; Nicola was more outgoing when they were younger, but after she lost her father, she didn't enjoy the nightlife anymore.


Hazel tried to understand, but it's not like Henford even had particularly wild nightlife to begin with. At the Gnome's Arms alone she would socialize, getting to know the locals in support of her work for Mayor Varner.
She'd even stay late enough - and often enough - that the pub owner, Laura Jameson, let her practice mixology for fun when the tables started clearing. She even learned to make a coquito - best described as coconut-flavoured egg nog mixed with rum from Isla Paradiso.
She visited her childhood home in Finchwick one afternoon after work, excited to discuss their plans for the holiday season. She found her father, Neal, standing in the laneway with River's wife, Cassandra.

"I'm looking forward to Nicola and I blending family traditions this year. We'll be over for Winterfest dinner, but she wants to spend a lot of time with her family remembering Eddie, so I don't know how many other family traditions we'll be able to join." She couldn't hide the regret in her voice.
Neal smiled. "We'll miss you for whatever traditions you and Nicola won't make it to, but we'll be thrilled to see you both, as always."
By the time Hazel made it home that night after a visit with her family, Nicola had finished grading papers and fallen asleep. Hazel climbed into bed and leaned over for a cuddle, but Nicola was sound asleep and grunted as she turned the other way.

Laying in bed, Hazel tossed and turned, resorting to counting falling snowflakes out the window to quiet her mind enough to sleep. ->
<- Previous Chapter | Gen 2 Start | Gen 2.1 Summary
Gen 1 Start | Gen 1 Summary
NOTE: Japchae is Korean (Mount Komorebi), brigadeiro is Brazilian (Selvadorada) and coquitos are Puerto Rican (Isla Paradiso). The game says the real places in the descriptions, but I'm trying to be cute and keep country/world names in-universe, even though it's impossible to perfectly match every Sims world with a real-world location.
#sims 4#sims 4 gameplay#sims 4 screenshots#sims 4 legacy#sims in bloom#ts4#ts4 gameplay#ts4 legacy#ts4 screenshots#sims 4 story#ts4 story#legacy challenge#sims legacy#ts4 legacy challenge#gen 2#henford on bagley#cozy celebrations#cassandra goth#kim goldbloom#flashback
55 notes
·
View notes
Text

𝕄𝕚𝕝𝕜𝕤𝕙𝕒𝕜𝕖𝕤 𝕥𝕠 𝕞𝕒𝕜𝕖
Here are some milkshake recipes to try at home! They are all so easy!
To make the milkshakes, mix all the noted ingredients in a blender and serve! (You can add some whipped cream and sprinkles to make them even better!)
Btw, if you are vegan/vegetarian, or just cant or dont want to drink milk, you change it with oat/rice/coconut/soy milk!
⋆ ˚。 ⋆୨♡୧⋆ ˚。 ⋆
𝐂𝐥𝐚𝐬𝐬𝐢𝐜𝐬:
Strawberry: Milk, strawberries, strawberry syrup (optional) & sugar (optional).
Chocolate: Milk, milk chocolate & chocolate syrup (optional).
White chocolate: Milk & white chocolate.
Vanilla: Milk, vanilla essence & cinnamon powder (optional).
Berries: Milk, strawberries, blueberries, raspberries, strawberry syrup (optional) & sugar (optional).
Oreo: Milk, oreo cookies & chocolate syrup (optional).
Caramel: Milk & caramel syrup.
⋆ ˚。 ⋆୨♡୧⋆ ˚。 ⋆
𝐎𝐭𝐡𝐞𝐫 𝐫𝐞𝐜𝐢𝐩𝐞𝐬:
Blueberry muffin: Milk, blueberries, vanilla essence & a pinch of cinnamon.
Triple chocolate: Milk, dark chocolate, milk chocolate & white chocolate.
Cherry: Milk, vanilla essence & cherries.
Bannana: Milk, bannanas, vanilla essence (optional) & sugar (optional).
Monkey: Milk, bannanas, milk chocolate & chocolate syrup (optional).
Cheescake: Milk, vanilla essence, cream cheese & strawberry syrup.
Mint chocolate: Milk, mint, dark chocolate & sugar (optional).
Peanut butter: Milk, peanut butter, peanuts (optional) & sugar (optional).
Resees: Milk, peanut butter, peanuts (optional) & milk chocolate.
Tropical: (Coconut) Milk, pineaple, mango & sugar (optional).
Spicy chocolate: Milk, milk chocolate & cayenne pepper.
Tiramisu: Milk, milk chocolate, coffee, cinnamon & cream cheese.
Yogurt: Milk, yogurt, berries & sugar (Optional).
Matcha strawberry: Milk, matcha tea, strawberries & sugar (optional).
Matcha chocolate: Milk, matcha tea & milk chocolate.
Green avocado: Milk, avocado, bannana & sugar (optional).
Peach: Milk, peach & sugar (optional).
Sweet summer: Milk, peach, strawberries & sugar (optional).
Fruit mix: Milk, strawberries, orange (not much), mango, peach, appple, bannana, othet fruits (optional) & sugar (optional).
Red velvet: Milk, raspberries, cream cheese, strawberry syrup & sugar (optional).
Pistachio: Milk, cream, pistachios & sugar (optional).
Pumpkin: Milk, pumpkin puree, pumpkin spice mix, vanilla essence & sugar (optional).
⋆ ˚。 ⋆୨♡୧⋆ ˚。 ⋆
#recipes#tradwife#traditional femininity#cooking#homemaking#milkshake#milkshakes#recipe#dessert#food
8 notes
·
View notes
Text
Chill Out with These Refreshing Cold Coffee Recipes

Did you know that cold coffee consumption has increased by over 60% in the past five years? Whether it’s a hot summer day or you just prefer a chilled caffeine boost, cold coffee is the perfect way to stay refreshed while enjoying your favorite beverage. But instead of buying expensive café drinks, why not make them yourself? With simple ingredients and easy steps, you can whip up delicious cold coffee right at home. Ready to explore? Let’s dive in!
The Basics: What Makes Cold Coffee Different?
Cold coffee isn’t just hot coffee poured over ice—it’s a carefully crafted drink that balances flavors, texture, and temperature. The three most popular methods include:
Cold Brew – Slow steeped coffee, known for its smooth, less acidic taste.
Iced Coffee – Regular brewed coffee chilled and served over ice.
Blended Coffee (Frappé-Style) – A creamy, milkshake-like coffee drink made with ice and milk.
1. Classic Iced Coffee
Why You’ll Love It: Simple, quick, and tastes just like your favorite coffee shop version.
Ingredients:
1 cup brewed coffee (cooled)
Ice cubes
2 tbsp milk or cream
1-2 tsp sugar or sweetener
Optional: Flavored syrups (vanilla, caramel, etc.)
How to Make It:
Brew your coffee and let it cool.
Fill a glass with ice cubes.
Pour the cooled coffee over the ice.
Add milk and sweetener to taste.
Stir well and enjoy!
Pro Tip: Use coffee ice cubes instead of regular ice to prevent dilution.
2. Creamy Caramel Frappé
Why You’ll Love It: A rich, café-style drink blended to perfection.
Ingredients:
1 cup strong brewed coffee (chilled)
½ cup milk
2 tbsp caramel syrup
1 cup ice
Whipped cream (optional)
How to Make It:
Blend coffee, milk, caramel syrup, and ice until smooth.
Pour into a glass and top with whipped cream.
Drizzle extra caramel on top for extra flavor.
Pro Tip: Freeze coffee into ice cubes beforehand for a stronger flavor.
3. Mocha Madness Shake
Why You’ll Love It: Chocolate and coffee—a match made in heaven!
Ingredients:
1 cup cold brew or strong coffee (chilled)
½ cup milk or dairy alternative
2 tbsp cocoa powder
1 tbsp chocolate syrup
1 cup ice
Whipped cream (optional)
How to Make It:
Blend all ingredients until smooth.
Pour into a glass and add whipped cream.
Garnish with extra chocolate drizzle or cocoa powder.
Pro Tip: Use chocolate milk instead of regular milk for an even richer taste.
4. Vanilla Almond Cold Brew
Why You’ll Love It: A nutty, smooth twist on traditional cold brew.
Ingredients:
1 cup cold brew coffee
½ cup almond milk
1 tsp vanilla extract
1-2 tsp maple syrup or honey
Ice cubes
How to Make It:
Fill a glass with ice.
Pour cold brew coffee over the ice.
Add almond milk, vanilla extract, and sweetener.
Stir well and serve!
Pro Tip: Swap almond milk for oat milk for a creamier texture.
5. Coconut Espresso Cooler
Why You’ll Love It: A tropical-inspired coffee drink that’s light yet flavorful.
Ingredients:
1 shot of espresso (chilled)
½ cup coconut milk
1 tbsp coconut syrup or sugar
Ice cubes
Shredded coconut for garnish (optional)
How to Make It:
Add ice cubes to a glass.
Pour chilled espresso and coconut milk over the ice.
Stir in coconut syrup or sugar.
Garnish with shredded coconut and enjoy!
Pro Tip: Toast the shredded coconut for extra depth of flavor.
Conclusion
There you have it—five easy, delicious, and refreshing cold coffee recipes to try at home. Whether you love the boldness of a mocha shake or the smoothness of a vanilla almond cold brew, these recipes allow you to customize and enjoy coffee just the way you like it.
So, why wait? Grab your ingredients, experiment with flavors, and sip your way to coffee bliss!
1 note
·
View note
Text
Chickpea and vegetable korma with brown rice.
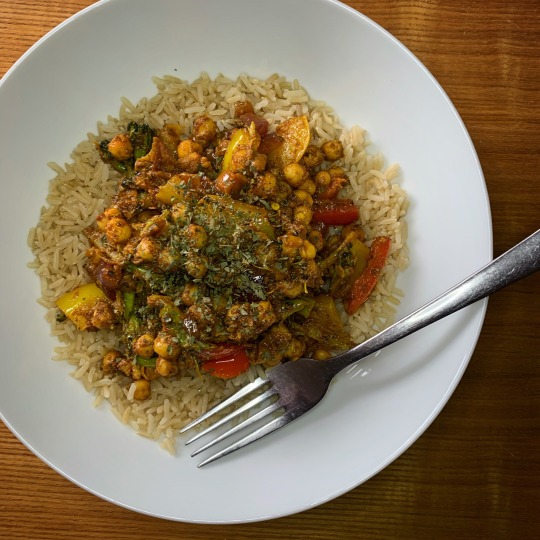
Are you looking for a flavourful and nutritious vegan meal that is easy to make? Look no further than this chickpea vegetable korma with brown rice recipe. This dish is packed with protein, fibre, and a variety of colourful vegetables that provide essential vitamins and minerals. The creamy coconut-based sauce is spiced with a blend of aromatic Indian spices, making this korma a delicious and satisfying option for lunch or dinner.
Before we jump into the recipe, let's talk about some of the health benefits of the ingredients in this dish. Chickpeas are an excellent source of plant-based protein and fiber, which can help you feel full and satisfied for longer. They are also rich in folate, iron, and zinc, which are essential minerals for maintaining good health. Broccoli is a cruciferous vegetable that is high in vitamin C, vitamin K, and fiber. Red and yellow bell peppers are rich in antioxidants and vitamin C, while red onions are a good source of quercetin, a flavonoid that has anti-inflammatory properties.
Ingredients
For the korma:
1 can of chickpeas, drained and rinsed
1 head of broccoli, cut into florets
1 red bell pepper, sliced
1 yellow bell pepper, sliced
1 red onion, sliced
3 cloves of garlic, minced
1 tablespoon of grated fresh ginger
1 tablespoon of curry powder
1 teaspoon of ground cumin
1 teaspoon of ground coriander
1/2 teaspoon of ground turmeric
1/4 teaspoon of cayenne pepper (optional)
1 can of coconut milk
1 tablespoon of olive oil
Salt and pepper to taste
Fresh cilantro for garnish
For the brown rice:
1 cup of brown rice
2 cups of water
1/4 teaspoon of salt
Instructions
Step 1: Cook the brown rice
Combine the brown rice, water, and salt in a medium-sized saucepan and bring to a boil. Reduce the heat to low, cover, and simmer for 45 minutes or until the water is absorbed and the rice is tender. Fluff with a fork and set aside.
Step 2: Prepare the vegetables
Heat the olive oil in a large skillet over medium-high heat. Add the garlic and ginger and sauté for 1-2 minutes until fragrant. Add the sliced onions and bell peppers and sauté for 5-7 minutes until slightly softened. Add the broccoli florets and sauté for an additional 3-4 minutes.
Step 3: Make the korma sauce
Add the curry powder, cumin, coriander, turmeric, and cayenne pepper (if using) to the skillet and stir to combine with the vegetables. Add the chickpeas and coconut milk and stir well. Reduce the heat to low and let the korma simmer for 10-15 minutes until the sauce thickens and the vegetables are tender. Season with salt and pepper to taste.
Step 4: Serve
Serve the chickpea vegetable korma over the brown rice and garnish with fresh cilantro. Enjoy!
This vegan chickpea vegetable korma with brown rice is a delicious and nutritious meal that is easy to make at home. The combination of chickpeas, broccoli, red and yellow bell peppers, and red onion provides a variety of essential vitamins and minerals, while the creamy coconut-based sauce is spiced with a blend of aromatic Indian spices that will tantalize your taste buds. So next time you're looking for a plant-based meal that is both healthy and flavourful, give this recipe a try!
#food#plant based#vegan#what vegans eat#foodpics#vegancommunity#foodie#veganism#vegano#vegetarian#curry
29 notes
·
View notes
Note
10, 12, 29, and 30! 🫶🏽
hii ! <33
10. something you’ve created in the last year that you’re proud of (a playlist, a piece of art, some writing, a craft hobby, a social media account, etc)
hmm i'm pretty proud of my 2023 wrapped post ! it was one of my first attempts at gfx with truly giant gifs and i think it turned out nice! and i guess they're kinda like mini playlists too so that's neat!
12. if you could make a candle that smelt like anything, what would you pick?
this is maybe very asian of me but the way my grandma’s kitchen smells when she makes sticky rice .. i'm not huge on food smelling candles but dude it's like the perfect blend of floral from the jasmine and sweet from the coconut milk and mango oof shit is crazy it smells like home <3
29. a favourite easy recipe: 5 ingredients or less, or takes less than 30 min to make
my mom makes this watermelon salad in the summer it's literally just chopped watermelon, cucumber, red onion, and feta cheese it is soooooo good
30. a song that makes you want to have a boogie round your bedroom
i have a playlist specifically for this purpose ndjsnlcvdk it's called 'dance dance (alone in ur room)' and the first song to come on shuffle is page by got7 🕺
soft asks ! 🌸
#also i'll say papaya salad (som tam) for another recipe#it's a little more involved but it's so fricking good i ate it with like all my meals when i was in thailand#it's getting warmer out here can u tell i'm shifting into summer refreshing food mode lol#thank u for sending ! 🫶🏼#ask
2 notes
·
View notes
Text
Discovering the Marvels of Sea Moss from St. Lucia: A Nutrient-Rich Seaweed Revolution
Introduction:
In the heart of the Caribbean, the picturesque island of St. Lucia is not just a haven for sun-seekers and nature enthusiasts but also home to a hidden gem that has been making waves in the health and wellness community – Sea Moss. Known scientifically as Chondrus crispus, this nutrient-packed seaweed has been harvested off the shores of St. Lucia for centuries, and its popularity has surged in recent years due to its myriad of health benefits.
The Origins of Sea Moss in St. Lucia:
St. Lucia boasts pristine waters and a unique climate that create the perfect conditions for the growth of Sea Moss. The nutrient-rich Caribbean Sea, combined with the warm temperatures and ample sunlight, fosters the optimal environment for this seaweed to thrive. Harvested by local divers, the Sea Moss from St. Lucia is renowned for its purity and quality.
The Health Benefits of Sea Moss:
1. Rich in Essential Nutrients:
Sea Moss is a nutritional powerhouse packed with essential vitamins and minerals. It is a rich source of iodine, potassium, magnesium, and vitamins A, E, and K. These nutrients support various bodily functions, from immune system health to maintaining healthy skin and hair.
2. Digestive Health:
The high fibre content in Sea Moss makes it a valuable ally in promoting digestive health. It acts as a prebiotic, supporting the growth of beneficial gut bacteria and aiding in proper digestion. Regular consumption of Sea Moss may contribute to a healthier gut microbiome.
3. Thyroid Support:
Iodine, a vital component for thyroid function, is abundant in Sea Moss. Including Sea Moss in your diet may help regulate thyroid hormones, promoting a healthy and balanced metabolism.
4. Anti-Inflammatory Properties:
Sea Moss contains bioactive compounds with anti-inflammatory properties. These compounds may help reduce inflammation in the body, making Sea Moss a potential asset in managing inflammatory conditions.
5. Weight Management:
Sea Moss can be a valuable addition to a weight management plan with its low-calorie content and high nutrient density. It provides essential nutrients without the excess calories, making it a nutrient-dense and satisfying food choice.
Harvesting and Sustainable Practices:
The sustainable harvesting of Sea Moss in St. Lucia is a delicate process that involves skilled divers hand-harvesting the seaweed from the ocean floor. This method ensures minimal impact on the marine ecosystem, allowing for Sea Moss beds' continued growth and regeneration. The commitment to sustainable practices preserves the natural habitat and ensures the high quality and purity of the Sea Moss harvested from St. Lucia.
The Sea Moss St. Lucia Difference:
The Sea Moss from St. Lucia stands out for its exceptional quality and commitment to organic and sustainable farming practices. Unlike mass-produced alternatives, Sea Moss from St. Lucia is free from pesticides, herbicides, and other harmful chemicals. This commitment to purity ensures that consumers receive a product that is nutritionally dense and free from potentially harmful contaminants.
Incorporating Sea Moss into Your Routine:
Adding Sea Moss to your daily routine is easy and versatile. It can be consumed in various forms, including gel, capsules, or as an ingredient in smoothies, soups, and desserts. The Sea Moss gel, made by blending soaked Sea Moss with water, is a popular choice for those looking to seamlessly incorporate this nutrient-rich seaweed into their diet.
Recipes to Try:
1. Sea Moss Smoothie:
Blend fresh Sea Moss gel with your favourite fruits, leafy greens, and a splash of almond milk for a delicious and nutritious smoothie
2. *Sea Moss Pudding:
Create a healthy dessert by combining Sea Moss gel with coconut milk, vanilla extract, and a natural sweetener.
Conclusion:
In conclusion, the Sea Moss from St. Lucia is a true superfood, offering many health benefits in a natural and sustainable package. From supporting digestive health to providing essential nutrients, Sea Moss has become a popular choice for those seeking a holistic approach to wellness. By embracing the rich traditions of harvesting Sea Moss in St. Lucia and incorporating it into our daily lives, we can unlock the potential of this nutrient-dense seaweed and embark on a journey towards improved health and vitality.
3 notes
·
View notes
Text
Finding Your Perfect Healthy Creamer Match

Love that morning cup of coffee but want to make it a bit kinder to your body? You're not alone! Many of us rely on coffee creamer to get that perfect taste and texture, but traditional options can be loaded with sugar and weird ingredients. The good news? Finding a healthy creamer that tastes great is totally possible. This guide will help you understand what makes a creamer healthier, what to look for (and avoid!), and even how to whip up your own delicious version at home. Let's upgrade your coffee game!
Key Takeaways
- "Healthy" Means Less Junk: Healthy creamers focus on lower added sugar, better fats (or fat-free), and minimal artificial additives like flavors, thickeners, and hydrogenated oils. - Read the Label: Always check the nutrition facts and ingredient list. Aim for less than 5g of added sugar per serving and recognizable, whole-food ingredients. - Plant-Based Isn't Always Healthier: While often lower in calories and saturated fat, some plant-based creamers still contain added sugars, oils, and gums. Look for unsweetened options with simple ingredients. - DIY is Easy: Making your own healthy creamer gives you complete control over ingredients and sweetness. Basic recipes use nuts, seeds, or canned coconut milk. - Good Options Exist: Many store-bought healthy creamers are available, including unsweetened almond, oat, or coconut milk varieties, and even simple half-and-half.
What Does "Healthy Creamer" Actually Mean?
Let's be real, "healthy" can mean different things to different people. When we talk about a healthy creamer, we generally mean one that steps away from the usual suspects found in many popular coffee creamers. Traditional creamers often contain: - Lots of Sugar: Sometimes listed as sugar, corn syrup solids, or other names, many creamers pack a surprising amount of added sugar (often 5g or more per tablespoon!). - Hydrogenated Oils: These are trans fats or saturated fats (like palm oil) used for texture and shelf life, but they aren't great for heart health. - Artificial Flavors & Sweeteners: Used to create those fancy flavors or sugar-free options, but many people prefer to avoid synthetic ingredients. - Thickeners & Emulsifiers: Ingredients like carrageenan, cellulose gum, or dipotassium phosphate are used for texture and stability. While generally considered safe in small amounts, some research raises concerns about potential digestive issues or inflammation from additives like carrageenan. So, a healthier creamer focuses on minimizing or eliminating these. It usually means: - Low or No Added Sugar: Sweetened naturally (if at all) and sparingly. - Better Fats: Using fats from nuts, seeds, coconut, or opting for fat-free like plain milk or half-and-half. Avoiding hydrogenated oils is key. - Simple, Recognizable Ingredients: Fewer additives and things you can actually pronounce. - Minimal Processing: Closer to whole foods. It's not about finding a "perfect" creamer, but making a better choice that aligns with your health goals without sacrificing that creamy coffee goodness completely. Reading labels is your best tool here!
Key Things to Look for in a Healthy Creamer
Navigating the creamer aisle can feel overwhelming. To find a genuinely healthy creamer, focus on these key factors when reading labels: Sugar Content (The Big One!) This is often the biggest offender in regular creamers. Look specifically at "Added Sugars" on the nutrition label. - Aim Low: Try to find options with less than 5 grams of added sugar per serving (which is usually just one tablespoon!). Ideally, choose unsweetened versions. - Natural vs. Artificial: If you need sweetness, look for creamers sweetened naturally with small amounts of maple syrup, coconut sugar, or dates. Be wary of "sugar-free" options using artificial sweeteners like sucralose or acesulfame potassium, as some people experience side effects or prefer to avoid them. Some sources note zero-calorie sweeteners might even contribute to weight gain for some individuals. - Watch Out for Hidden Sugars: Corn syrup solids, dextrose, maltodextrin – these are all forms of sugar. Type of Fat Creaminess often comes from fat, but the type matters. - Avoid Hydrogenated Oils: These trans fats are bad news for heart health. Palm oil is also common and high in saturated fat. - Consider Saturated Fat: Coconut milk/cream based creamers are popular but high in saturated fat. While okay in moderation for many, if you're watching saturated fat intake (the American Heart Association recommends limiting it), nut-based (almond, cashew) or oat-based creamers might be better choices. - Simple is Good: Good old half-and-half (just milk and cream) is a simple option with no added oils or sugars, though it contains dairy fat. Unsweetened plant milks (almond, soy, oat) can also work well. Ingredient List Length & Quality - Shorter is Often Better: Creamers with long lists of chemical-sounding names are usually highly processed. - Recognizable Ingredients: Look for things you know, like almond milk, coconut cream, oats, water, vanilla extract, etc. - Things to Limit or Avoid: - Hydrogenated or partially hydrogenated oils - High amounts of added sugar (especially high-fructose corn syrup) - Artificial flavors and colors - Carrageenan (some people experience digestive issues) - Dipotassium phosphate (a chemical stabilizer) - Polysorbate 60 (an emulsifier) - Chemical preservatives like BHA/BHT (banned in some countries) Learning how to decipher food labels is a powerful skill. The FDA offers a guide that can help! Plant-Based Power Many healthy creamers are plant-based, using nuts, seeds, or grains. - Common Bases: Oat milk (creamy, slightly sweet), almond milk (lighter, nutty), soy milk (creamy, protein-rich), coconut milk/cream (rich, distinct flavor, higher saturated fat), cashew milk (mild, creamy), macadamia milk (rich, unique flavor). - Check Ingredients: Don't assume plant-based automatically means healthy. Many still contain added oils, sugars, and gums for texture and stability. Look for unsweetened versions with minimal additives. Brands like Three Trees or some Elmhurst varieties often have very simple ingredient lists. By paying attention to these details, you can confidently choose a store-bought creamer that fits your definition of healthy.
Top Picks: Store-Bought Healthy Creamer Options
Okay, you know what to look for, but what are some actual good choices you might find at the store? While specific product availability and formulas change, here are some categories and types of healthy creamers that generally fit the bill, along with examples: - Unsweetened Nut Milk Creamers: These are often the simplest and lowest in sugar. - Why they're good: Usually very low calorie, zero added sugar, dairy-free. Often have short ingredient lists. - Examples: Califia Farms Unsweetened Almond Milk Creamer, Nutpods Original Unsweetened (Almond & Coconut base), Silk Unsweetened Almond Creamer. - Keep in mind: Can sometimes be thinner than traditional creamers. - Oat Milk Creamers (Simple Ingredients): Oat milk provides natural creaminess and slight sweetness. - Why they're good: Often very creamy texture, dairy-free. Look for options without added oils or excessive sugar. - Examples: Elmhurst Unsweetened Oat Creamer, Califia Farms Oat Barista Blend (good for frothing), some Chobani Oat Creamers (check sugar). - Keep in mind: Naturally higher in carbs than nut milks. Some brands add oils for richness. - Coconut Cream/Milk Based (Unsweetened or Lightly Sweetened): Great for richness, but mind the fat. - Why they're good: Very creamy, rich flavor, dairy-free. - Examples: So Delicious Organic Coconutmilk Creamer (Unsweetened), Laird Superfood Creamers (often have added functional ingredients like MCT oil). - Keep in mind: Higher in saturated fat. Coconut flavor is distinct. - Half-and-Half (Organic/Grass-Fed): A simple dairy option. - Why it's good: Just two ingredients: milk and cream. No added sugars, oils, or thickeners. Organic/grass-fed options offer better quality. - Examples: Organic Valley Half-and-Half, Horizon Organic Half-and-Half. - Keep in mind: Contains dairy and saturated fat. - Specialty & Functional Creamers: Some creamers add extras like protein or MCT oil. - Why they're good: Can offer added nutritional benefits like collagen or healthy fats. - Examples: Vital Proteins Collagen Creamer, Bulletproof Creamer (with MCT oil/ghee), some Laird Superfood options with functional mushrooms. - Keep in mind: Often more expensive. Check ingredient lists carefully for sweeteners or additives. Comparing Common Bases: Creamer BaseProsConsGood ForAlmond MilkLow calorie, low sugar (unsweetened), mildCan be thin, potential allergens, check for gums/oilsCalorie-conscious, mild flavor preferenceOat MilkVery creamy, often froths well, mild sweetnessHigher carb, check for added oils/sugar, potential gluten*Creamy texture lovers, latte makingCoconutVery rich & creamy, distinct flavorHigh saturated fat, strong flavor, check for gumsRichness seekers, coconut flavor fansSoy MilkCreamy, source of protein, often simplePotential allergen, some avoid soyProtein boost, creamy textureHalf-&-HalfSimple ingredients (milk/cream), no additivesContains dairy & saturated fat, not plant-basedDairy consumers wanting simplicityCashew MilkCreamy, mild flavorPotential allergen, less commonMild flavor, good creaminess *Ensure certified gluten-free oats if needed. Always double-check the label of the specific product you choose, as formulations can differ even within the same brand!
DIY Healthy Creamer: Easier Than You Think!
Want complete control over what goes into your coffee? Making your own healthy creamer at home is surprisingly simple and often more affordable! Plus, you can customize the sweetness and flavor exactly how you like it. Basic Homemade Healthy Creamer Recipe (Nut/Seed Base) This is a versatile base you can adapt. Ingredients: - 1 cup Raw Cashews (soaked for at least 4 hours or overnight, then drained) OR 1/2 cup Hemp Seeds OR 1/2 cup Blanched Almonds (soaked overnight) - 3-4 cups Filtered Water (use less for thicker creamer, more for thinner) - 1-2 tbsp Maple Syrup or a few Pitted Dates (Optional, for sweetness) - 1 tsp Vanilla Extract (Optional) - Pinch of Sea Salt Instructions: - Soak (if using nuts): If using cashews or almonds, soak them in water for the recommended time. This softens them for smoother blending. Drain and rinse well. (Hemp seeds don't require soaking). - Blend: Combine the soaked nuts/seeds, filtered water (start with 3 cups), optional sweetener, vanilla, and salt in a high-speed blender. - Blend Until Smooth: Blend on high speed for 1-2 minutes, or until completely smooth and creamy. If it seems too thick, add the remaining cup of water and blend again. - Strain (Optional): For an ultra-smooth creamer, especially if using almonds, pour the mixture through a fine-mesh sieve or a nut milk bag lined over a bowl. Squeeze gently to extract all the liquid. (Cashew and hemp seed creamers often don't need straining if blended well). - Store: Pour the creamer into an airtight jar or bottle and store it in the refrigerator. It should last for about 4-5 days. Shake well before each use as natural separation can occur. Flavoring Your Creation Naturally Once you have your base, get creative! Stir in: - Spices: Cinnamon, nutmeg, cardamom, pumpkin pie spice - Extracts: Almond extract, peppermint extract - Cocoa Powder: For a mocha flavor (whisk in well) - Sweeteners: Adjust maple syrup, date paste, or try stevia/monk fruit drops. Quick Coconut Creamer: For a super easy, rich option, simply whisk a can of full-fat coconut milk (unsweetened) with a splash of vanilla and your preferred sweetener. Store in the fridge. Making your own DIY coffee creamer puts you in the driver's seat, ensuring no unwanted additives sneak into your morning cup.
Making the Switch: Tips for Success
Swapping your usual creamer for a healthier option can sometimes take a little getting used to, especially if you're accustomed to very sweet or thick creamers. Here are a few tips to make the transition smoother: - Start Gradually: Don't feel you have to go cold turkey. Try mixing your old creamer with a new, healthier option (half and half) for a week or so. Gradually increase the amount of the healthy creamer until your taste buds adjust. - Adjust Sweetness Expectations: Many healthy creamers are unsweetened or only lightly sweetened. You might find you actually prefer less sweetness over time, allowing the coffee's flavor to shine through. If you need sweetness, add a small amount of natural sweetener like maple syrup or stevia yourself, giving you control. - Experiment with Types: If the first healthy creamer you try isn't your favorite, don't give up! The textures and flavors of almond, oat, soy, and coconut creamers vary significantly. You might love oat milk's creaminess or prefer the lightness of almond milk. Try a few different kinds. - Focus on the Coffee: Sometimes, upgrading the quality of your coffee beans can make a huge difference. A better-tasting coffee might need less creamer to be enjoyable. - Flavor it Yourself: If you miss flavored creamers, add a dash of vanilla extract, a sprinkle of cinnamon, or a bit of cocoa powder to an unsweetened healthy creamer. Be patient with yourself! Finding the perfect healthy creamer that you genuinely enjoy might take a few tries, but your body (and taste buds) will thank you in the long run.
Frequently Asked Questions (FAQs)
Let's tackle some common questions about finding and using healthy coffee creamers. What is the absolute healthiest coffee creamer? There's no single "healthiest" option for everyone, as it depends on individual dietary needs and preferences. However, options often considered very healthy include: - Unsweetened plant-based milks with minimal ingredients: Think almond, oat, or soy milk with just nuts/grains, water, and maybe salt. Brands like Three Trees or Elmhurst (some varieties) often fit this. - Plain Half-and-Half (especially organic/grass-fed): Simple ingredients (milk, cream), no additives. Moderation is key due to saturated fat. - Black Coffee: Technically the healthiest way to drink coffee! - DIY Creamer: Making your own gives you full control over ingredients. The "healthiest" choice avoids added sugars, hydrogenated oils, artificial ingredients, and excessive additives. Are plant-based creamers automatically healthier? Not necessarily. While often lower in calories and saturated fat than dairy cream, many plant-based creamers contain added sugars, oils (like sunflower or canola), thickeners (gums), and emulsifiers to mimic the texture of traditional creamers. Always read the label! An unsweetened plant-based creamer with simple ingredients is a healthier choice than one loaded with sugar and additives. What coffee creamers have no sugar at all? Look for creamers explicitly labeled "unsweetened" or "zero sugar." Good options include: - Unsweetened almond milk creamers (e.g., Califia Farms Unsweetened) - Unsweetened oat milk creamers (e.g., some Nutpods varieties, Elmhurst unsweetened) - Unsweetened soy milk creamers - Plain half-and-half - Plain milk (whole, low-fat, skim) - Heavy cream (in moderation, high in fat) - Some specialty "zero sugar" flavored creamers (but check labels for artificial sweeteners if you avoid those). What ingredients should I definitely avoid in coffee creamer? Try to limit or avoid: - Hydrogenated or Partially Hydrogenated Oils: Trans fats. - High-Fructose Corn Syrup & High Amounts of Added Sugar: Look for - - - - - Read the full article
0 notes
Text
Bammy Jamaica: The Crispy Cassava Delight Canadians Are Loving
If you're searching for an authentic Caribbean food experience, look no further than Bammy Jamaica. This traditional Jamaican flatbread, made from grated cassava, is gaining popularity in Canadian kitchens for its rich flavor, crispy texture, and cultural roots. Cool Runnings Foods, a trusted name for Caribbean products in Canada, offers high-quality Bammy Jamaica that brings island vibes to your dining table.
What Is Bammy Jamaica?

Bammy Jamaica is a circular flatbread crafted from cassava root, a starchy tuber native to South America and widely used across the Caribbean. The cassava is grated, pressed to remove toxins, shaped, and then fried or steamed. The result is a satisfying bread with a golden crust and a chewy center that pairs well with many Jamaican dishes. Once a staple of the Arawak Indigenous people, Bammy remains a cultural symbol and a flavorful addition to meals across Jamaica and now, thanks to Cool Runnings Foods, in homes throughout Canada.
Why Canadians Are Embracing Bammy Jamaica
Canadian consumers are becoming more adventurous in their culinary choices, seeking bold and authentic flavors. Bammy Jamaica fits perfectly into this trend. It's gluten-free, plant-based, and versatile. Whether you're looking to recreate a traditional Jamaican breakfast or serve something unique at dinner, Bammy adds both texture and taste to your plate. In a multicultural country like Canada, where diverse food traditions are embraced, Bammy is quickly becoming a favorite comfort food.
Health Benefits of Bammy Jamaica
Bammy Jamaica isn’t just delicious—it’s also full of health benefits. Cassava is naturally gluten-free, making Bammy an excellent bread alternative for those with gluten sensitivities. It’s rich in carbohydrates for energy and provides fiber to support digestion. When sourced from quality brands like Cool Runnings Foods in Canada, Bammy is made with minimal ingredients and no artificial preservatives, ensuring a wholesome experience.
How to Prepare Bammy Jamaica
Preparing Bammy Jamaica is easy and adaptable. For a classic Caribbean taste, soak it in coconut milk before frying. This enhances the flavor and gives it a soft interior while keeping the outside crisp. You can also steam Bammy for a more tender texture, perfect for soaking up sauces and stews. Whether you enjoy it as a side dish with fried fish, curry, or jerk chicken, or even as a base for creative fusion recipes, Bammy delivers both authenticity and satisfaction.
Bammy Jamaica and Caribbean Pairings
Bammy Jamaica is most commonly served with escovitch fish, a Jamaican dish made with fried snapper and pickled vegetables. However, it also complements other Caribbean favorites such as callaloo, ackee and saltfish, or spicy curry goat. Canadians are finding that Bammy also works well with local ingredients, blending beautifully with maple-glazed meats or hearty vegetable soups, offering a unique fusion of flavors.
Why Choose Cool Runnings Foods in Canada?
Cool Runnings Foods is committed to bringing authentic Caribbean cuisine to Canadian households. Their Bammy Jamaica is prepared with traditional methods and premium cassava, giving you an experience that's true to its roots. With a wide distribution across Canada and a reputation for quality, Cool Runnings Foods is the go-to source for those looking to explore Jamaican flavors at home.
Final Thoughts
Bammy Jamaica is more than a bread—it's a celebration of Jamaican heritage and Caribbean culinary creativity. As more Canadians discover the appeal of traditional island foods, Bammy is standing out for its simplicity, versatility, and nostalgic charm. Whether you're reliving childhood memories, exploring new cuisines, or just craving something crispy and satisfying, Cool Runnings Foods’ Bammy Jamaica is the perfect choice to elevate your meals in Canada.
0 notes
Text
How to Bake with Sobisco Marie Biscuits: A Guide

If you have a pack of Sobisco Marie Biscuits lying around and don’t know what to do with them, you’re in the right place. These light, crispy biscuits are not just for tea-time. You can turn them into amazing desserts and bakes with just a few simple ingredients. This guide will show you how to bake using Sobisco marie biscuits in a way that’s easy and fun, especially for beginners.
Why Choose Sobisco Marie Biscuits for Baking?
They are light and crisp
Have a mild sweetness, making them a perfect base
Easy to crush and blend
Budget-friendly and easily available
In short, Sobisco Marie Biscuits are perfect for no-fuss baking.
1. Marie Biscuit Cake (No Oven Needed)
One of the most popular and easiest recipes is the no-bake biscuit cake.
Ingredients:
1 pack of Sobisco Marie Biscuits
1 cup milk
2 tbsp cocoa powder
2 tbsp sugar
1 tbsp butter
Chopped nuts (optional)
Steps:
Crush the Sobisco Marie Biscuits into a powder.
In a pan, heat milk, cocoa powder, sugar, and butter.
Add the crushed biscuits to the mix and stir well.
Once thick, pour into a greased mould and let it set in the fridge for 1-2 hours.
Slice and serve chilled.
2. Biscuit Pudding
A quick, simple dessert that tastes amazing.
Ingredients:
Sobisco Marie Biscuits
1 cup milk
Instant coffee (optional)
Custard or whipped cream
Chocolate syrup
Steps:
Dip biscuits briefly in coffee or plain milk.
Layer them in a dish.
Add a layer of custard or cream on top.
Repeat the layers and finish with chocolate syrup.
Refrigerate for an hour and enjoy.
3. Biscuit Crust for Cheesecake or Pie
You can replace traditional graham crackers with Sobisco Marie Biscuits for a crust.
Steps:
Crush the biscuits into fine crumbs.
Mix with melted butter (about 2-3 tbsp).
Press into a pie tin or springform pan.
Bake for 10 minutes at 180°C (optional) or chill in the fridge.
Add your favorite filling and chill before serving.
4. Chocolate Balls Using Sobisco Biscuits
Perfect for kids and quick treats.
Ingredients:
Crushed Sobisco Marie Biscuits
Condensed milk
Cocoa powder
Desiccated coconut (for rolling)
Steps:
Mix crushed biscuits, cocoa, and condensed milk to form a soft dough.
Roll into small balls and coat with coconut.
Chill for 30 mins and serve.
5. Mini Tarts with Biscuit Base
Looking to impress guests with something small and pretty? Try making mini tarts using Sobisco Marie Biscuits as the base.
Ingredients:
Sobisco Marie Biscuits
Butter (melted)
Custard or cream
Fresh fruits (strawberries, kiwi, grapes)
Steps:
Crush the biscuits into fine crumbs.
Mix with melted butter and press into small tart moulds.
Chill in the fridge for 20 minutes to set.
Add custard or whipped cream on top.
Garnish with chopped fruits and chill before serving.
These are perfect for parties and require no baking!
6. Ice Cream Sandwiches
This is a fun way to turn your regular ice cream into something special using Sobisco Marie Biscuits.
Ingredients:
Sobisco Marie Biscuits
Your favorite ice cream
Chocolate chips or sprinkles (optional)
Steps:
Place one scoop of ice cream between two biscuits.
Gently press to form a sandwich.
Roll the sides in chocolate chips or sprinkles for extra fun.
Freeze for 1-2 hours and serve.
Kids especially love these cool, crunchy treats!
7. Biscuit Trifle
A layered dessert that looks fancy but is so easy to make.
Ingredients:
Sobisco Marie Biscuits
Fruit juice or milk
Custard or whipped cream
Chopped fruits
Jelly (optional)
Steps:
Soak biscuits briefly in juice or milk.
Place a biscuit layer at the bottom of a glass or bowl.
Add a layer of custard and fruits.
Repeat layers till the glass is full.
Top with jelly or chocolate shavings and chill before serving.
Why These Recipes Work
All these recipes use basic ingredients you already have at home. Plus, Sobisco Marie Biscuits are light, easy to handle, and absorb flavors well, making them a perfect base for both cold and baked desserts.
Whether you're a student in a hostel, a mom looking for quick snacks, or someone who just started baking, these recipes are simple, budget-friendly, and super tasty.
Final Words
Don’t let that pack of Sobisco Marie Biscuits sit in your cupboard. With just a few ingredients and some creativity, you can turn them into cakes, puddings, tarts, and so much more. Baking doesn’t have to be hard or expensive.
#CreamCrackerBiscuit#SnackTime#CrackerLovers#Biscuits#SnackCravings#CrispyDelight#TeaTimeTreat#CrunchyGoodness
0 notes
Text
Where Can You Find the Best Coconut Jungle Cooking Class in Vietnam?
Vietnam’s lush landscapes and rich culinary heritage make it a top destination for food lovers, but where can you combine these with an unforgettable experience? Where Can You Find the Best Coconut Jungle Cooking Class in Vietnam? This question leads travelers to a unique blend of tropical beauty and hands-on cooking in the heart of Vietnam’s coconut jungles. From the Mekong Delta to Hoi An’s serene villages, these classes offer more than just recipes—they’re an immersion into local culture and nature. In this article, we’ll guide you to the best spots across Vietnam for a coconut jungle cooking class, highlighting what makes each location special. Let’s explore where you can uncover this culinary gem.
Hoi An: The Coconut Jungle Classic
Hoi An is a standout choice for coconut jungle cooking classes, thanks to its charming Cam Thanh Coconut Village. Just 5 km from Hoi An’s ancient town, this area is famed for its water coconut forests and eco-tourism vibe. Classes here, like those at Hoi An Eco Cooking Class, start with a basket boat ride through the jungle, followed by lessons in dishes like coconut curry or banh xeo (crispy pancakes). The serene setting and expert local chefs make it a top pick for an authentic, immersive experience.

Explore Hoi An’s coconut jungle on a basket boat before your cooking class.
Mekong Delta: A Riverside Culinary Haven
The Mekong Delta offers a rustic, river-lined backdrop for some of Vietnam’s best coconut jungle cooking classes. In places like Ben Tre or Cai Be, you’ll find tours that blend jungle exploration with cooking. Mekong Riverside Resort, for example, lets you pick herbs from their garden before preparing coconut basil chicken or spring rolls. The region’s abundance of coconuts and fresh produce, paired with its laid-back charm, makes it a paradise for anyone seeking a true farm-to-table experience.

Cook riverside with fresh coconuts in the Mekong Delta jungle.
Da Nang: Urban Access Meets Jungle Vibes
For those near a city, Da Nang provides easy access to coconut jungle cooking classes with a tropical twist. Just a short trip from the city, Cam Thanh Village offers classes that combine jungle boat rides with lessons in coconut rice or grilled fish. Da Nang Home Cooking Class stands out by blending urban convenience with the jungle’s tranquility, appealing to travelers who want both culture and nature without venturing far. It’s a hidden gem for a quick yet authentic escape.

Da Nang offers jungle cooking close to the city’s buzz.
Phu Quoc: Island Jungle Flavors
On the tropical island of Phu Quoc, coconut jungle cooking classes bring a coastal flair to the experience. Set amid lush groves, classes here—like those at local eco-tours—teach you to make coconut fish stew or seafood in coconut milk, using the island’s fresh catch. The laid-back island vibe, combined with jungle surroundings, offers a unique twist on the traditional class, perfect for travelers craving a beachy yet adventurous culinary day.

Phu Quoc blends island life with coconut jungle cooking.
Hue: Royal Cuisine in the Jungle
Hue, the former imperial capital, adds a regal touch to coconut jungle cooking classes. Just outside the city, in areas like Thuy Bieu Village, you’ll find classes set near coconut groves where you can learn coconut sticky rice or Hue’s famous bun bo. The blend of royal culinary traditions with the jungle’s rustic charm makes Hue a standout. Tours often include bike rides through the greenery, enhancing the experience with a dash of history and flavor.

Hue’s royal flavors shine in a coconut jungle cooking class.
Discover Central Vietnam with Viet Dove Travel
Embark on an unforgettable journey through Vietnam with Viet Dove Travel! Discover the rich culture, stunning landscapes, and unique experiences of Central Vietnam through our expertly crafted tours. From iconic landmarks to hidden gems, our itineraries cater to every traveler, ensuring a seamless and memorable adventure. Visit our homepage to explore all our exciting tour options and start planning your dream trip today!
Tips to Choose Your Perfect Class
To find the best coconut jungle cooking class, consider your travel style. Prefer a hands-on adventure? Opt for Hoi An or the Mekong Delta. Want a mix of city and jungle? Da Nang or Hue might be your pick. Check for basket boat rides, market visits, or local chef expertise to ensure authenticity. Book in advance, especially in peak seasons, and look for reviews praising fresh ingredients and engaging instructors. Wherever you go, wear comfy clothes and bring your appetite!
Conclusion: Your Coconut Jungle Culinary Quest
Where Can You Find the Best Coconut Jungle Cooking Class in Vietnam? The answer lies in gems like Hoi An, Mekong Delta, Da Nang, Phu Quoc, and Hue—each offering a distinct flavor of this tropical experience. Whether it’s the basket boats of Cam Thanh, the riverside kitchens of the Mekong, or the island vibes of Phu Quoc, Vietnam’s coconut jungles are calling. Pick your spot, roll up your sleeves, and dive into a cooking adventure that blends nature, culture, and taste. Your perfect class is out there—go find it!
Discover the enchanting beauty of Central Vietnam with our curated tours!
Visit the iconic Golden Hand Bridge at Ba Na Hills for breathtaking views, or explore the ancient ruins on a My Son Sanctuary Sunrise Tour. Marvel at the natural wonders of the Marble Mountains & Lady Buddha Tour, and immerse yourself in the charm of the Hoi An Ancient Town & Night Tour. For a unique experience, join the Coconut Jungle & Cooking Class in Hoi An. Dive into history with our Hue City Tours, or enjoy a comprehensive adventure with the Hoi An & Da Nang 3D2N Package Tour. Book now for an unforgettable journey!
0 notes
Text
Unveiling the Top 5 Protein Shake Recipes You Need to Try Today
Protein shakes have gained popularity as a tasty and convenient way to boost nutrition. Whether you are hitting the gym or just trying to up your protein game, these shakes cater to various tastes and preferences. Packed with flavor and nutrition, let's explore five easy protein shake recipes that you can whip up at home.
1. Chocolate Peanut Butter Protein Shake
Chocolate and peanut butter combine to create a satisfying shake perfect for any time of day.
Ingredients:
1 scoop of chocolate protein powder
2 tablespoons of natural peanut butter
1 banana (preferably frozen)
1 cup of almond milk (or milk of choice)
A handful of ice cubes
Instructions:
Combine all ingredients in a blender.
Blend until smooth, adding more almond milk to adjust the consistency if needed.
Pour into a glass and enjoy!
2. Green Spinach Protein Shake
For a health-boosting option, the green spinach protein shake is loaded with essential vitamins and minerals.
Ingredients:
1 scoop of vanilla protein powder
1 cup of fresh spinach
1 small apple (cored and chopped)
1 tablespoon of chia seeds
1 cup of coconut water or regular water
A handful of ice cubes
Instructions:
Place all ingredients in a blender.
Blend until the spinach is fully mixed in and the shake takes on a vibrant green color.
Serve fresh for maximum nutrient retention.
3. Berry Blast Protein Shake
Fruit lovers will enjoy the refreshing and vibrant flavors in this mixed berry protein shake.
Ingredients:
1 scoop of berry-flavored protein powder
1 cup of mixed berries (strawberries, blueberries, raspberries)
1 cup of almond milk or yogurt
1 tablespoon of honey or maple syrup (optional)
A handful of ice cubes
Instructions:
Combine all ingredients in a blender.
Blend until creamy and smooth.
Pour into a glass and, if desired, garnish with extra berries.
4. Tropical Mango Coconut Protein Shake
Escape to the tropics with this refreshing mango coconut shake.
Ingredients:
1 scoop of vanilla or coconut protein powder
1 cup of frozen mango chunks
1/2 cup of coconut milk
1/2 cup of Greek yogurt
A handful of shredded coconut (optional)
Instructions:
Add all ingredients to a blender.
Blend on high speed until creamy and combined.
Serve chilled, garnishing with shredded coconut if desired.
This shake is not only delicious but also provides over 20% of your daily vitamin A from the mango. It’s perfect for replenishing nutrients after a sweaty session at the gym.
5. Coffee Protein Shake
This protein shake is ideal for coffee lovers, delivering great flavor and a caffeine boost.
Ingredients:
1 scoop of vanilla or chocolate protein powder
1 cup of brewed coffee (cooled)
1/2 cup of milk of choice
1 tablespoon of cocoa powder (optional)
1-2 teaspoons of sweetener (as needed)
A handful of ice cubes
Instructions:
In a blender, combine all ingredients.
Blend until smooth and frothy.
Pour into your favorite mug and enjoy.
This shake is an excellent source of caffeine and protein, making it a great option for mornings or an afternoon perk-up. It can provide around 25 grams of protein along with your coffee fix!
Final Thoughts
Incorporating protein shakes into your diet can be both tasty and rewarding. These five recipes offer unique flavors and nutritional benefits that align with your fitness goals. Feel free to experiment with these combinations, adding in your favorite fruits or nut butters to create something uniquely yours.
Enjoy the numerous possibilities of protein shakes, and blend your way to a more nutritious lifestyle!
0 notes
Text
Indulge in Plant-Based Comfort: 10 Irresistible Vegan Mac & Cheese Recipes You Must Try!
Indulge in Plant-Based Comfort: 10 Irresistible Vegan Mac & Cheese Recipes You Must Try! Looking for a delicious way to spice up your meals? This blog post features a mouthwatering Chicken Tikka Masala Recipe that will not only satisfy your cravings but also impress your guests. Discover the secrets to perfecting this beloved dish with easy-to-follow steps, tips for balancing spices, and variations for different dietary needs. Whether you’re a seasoned chef or a kitchen novice, this recipe is sure to elevate your cooking game. Learn how to create an authentic taste of India right at home. Don’t miss out—try it today! https://hillrecipes.com/wp-content/uploads/2025/04/Creamy-and-Dreamy-10-Vegan-Mac-n-Cheese-Recipes-Youll.png Indulging in a bowl of creamy, dreamy mac n cheese can be one of the most comforting culinary experiences. But what if you're committed to a vegan lifestyle or simply trying to incorporate more plant-based options into your diet? Fear not, because we've got you covered with ten mouth-watering vegan mac n cheese recipes that will satisfy your cravings and maybe even convert the biggest cheese enthusiasts. ### 1. Classic Vegan Mac n Cheese Start with this timeless version featuring cashew cream and nutritional yeast for that cheesy, umami flavor we all love. A touch of turmeric adds the perfect color while providing anti-inflammatory benefits. ### 2. Smoky Chipotle Mac n Cheese Turn up the heat with a kick of chipotle peppers blended into a silky sauce. Perfect for those who like a little spice with their comfort food. ### 3. Creamy Spinach and Artichoke Mac Combine your favorite appetizer with mac n cheese for a super creamy and tangy dish. The acidity of artichokes pairs beautifully with a coconut milk-based sauce. ### 4. Truffle and Mushroom Mac n Cheese Elevate your taste buds with the rich, earthy flavors of truffle oil and sautéed mushrooms. This gourmet twist is perfect for a special dinner or date night. ### 5. Pumpkin Sage Mac n Cheese Capture the essence of autumn with this luscious pumpkin and sage concoction. It's perfect for fall gatherings or just cozy weekends at home. ### 6. Cauliflower and Garlic Mac Sneak in some extra veggies without sacrificing flavor. Roasted garlic and cauliflower make a smooth, creamy sauce that even the pickiest eaters will love. ### 7. Nut-Free Sweet Potato Mac n Cheese Allergy-friendly and packed with nutrients! Sweet potatoes create a creamy base that’s free from nuts, making it accessible for everyone to enjoy. ### 8. Jalapeño Popper Mac n Cheese Inspired by everyone's favorite spicy snack, this version features jalapeños and breadcrumbs for a crunchy, indulgent treat. ### 9. Pesto Avocado Mac n Cheese For a refreshing twist, try adding homemade pesto and avocado to your mac n cheese. The fresh herbs and creamy avocado will make you rethink traditional recipes. ### 10. Sun-dried Tomato and Basil Mac Bring the flavors of a sunny Italian kitchen to your bowl with sweet sun-dried tomatoes and fresh basil infusing each bite. Whether you're a vegan veteran or just taking your first plant-based steps, there's something for everyone in this selection of decadent mac n cheese recipes. Let these dishes add warmth and flavor to your table, and don't forget to experiment by mixing and matching ingredients. ### Ready to Dive In? Which recipe are you excited to try first? Share your favorite vegan mac n cheese variations or experiences in the comments below. Don't miss out on more delightful vegan recipes; subscribe to our blog for the latest updates and culinary inspiration! https://hillrecipes.com/creamy-and-dreamy-10-vegan-mac-n-cheese-recipes-youll-love/
0 notes
Text
Vegetarian Variations of Chicken Pastil: A Creative Twist on a Filipino Classic
Discover creative vegetarian variations of Chicken Pastil! Learn how to replace chicken with plant-based alternatives while keeping its authentic flavor.
🌿 Can Chicken Pastil Be Made Vegetarian?
Chicken Pastil is a beloved Mindanaoan dish known for its simplicity and rich flavors. Traditionally, it consists of steamed rice topped with shredded chicken, wrapped in banana leaves for easy eating. But what if you’re a vegetarian or simply want a plant-based version of this Filipino classic?
The good news is that Chicken Pastil is highly adaptable. By replacing the chicken with plant-based ingredients, you can still enjoy its savory, comforting taste while keeping it 100% vegetarian! In this article, we’ll explore delicious vegetarian variations of Chicken Pastil, their health benefits, and how to prepare them at home.
🥗 1. Why Go for a Vegetarian Chicken Pastil?
Many people are embracing plant-based eating for various reasons:
✔️ Healthier Alternative – Plant-based proteins contain less cholesterol and saturated fat. ✔️ Sustainability – Reducing meat consumption helps lessen environmental impact. ✔️ Inclusivity – Offers a great option for vegetarians and vegans to enjoy Filipino cuisine. ✔️ Flavorful and Versatile – Different plant-based ingredients bring unique textures and flavors.
The key to making a vegetarian Chicken Pastil is to find a tasty meat alternative while keeping the signature seasonings and preparation methods intact.
🌱 2. Top Vegetarian Substitutes for Chicken in Pastil
1️⃣ Tofu Pastil (The Classic Substitute)
Tofu is a perfect replacement for shredded chicken because it absorbs flavors well and has a slightly firm texture.
🔹 Best type of tofu: Firm or extra firm (for a meaty texture) 🔹 How to prepare:
Press tofu to remove excess water.
Crumble or shred it into small pieces.
Sauté with onions, garlic, soy sauce, and turmeric (to mimic the color of chicken pastil).
👉 Best for: Those looking for a high-protein, soy-based option.
2️⃣ Mushroom Pastil (Umami-Rich Alternative)
Mushrooms provide a rich, savory taste that mimics the depth of chicken flavor.
🔹 Best mushrooms to use: Oyster mushrooms, shiitake, or button mushrooms 🔹 How to prepare:
Shred oyster mushrooms by hand for a stringy texture.
Sauté with garlic, onions, and coconut milk for extra richness.
👉 Best for: Those who love a deep, umami-packed flavor.
3️⃣ Jackfruit Pastil (The Best Meat Texture)
Young unripe jackfruit (langka) has a fibrous texture that resembles shredded chicken.
🔹 How to prepare:
Use canned young jackfruit or fresh unripe jackfruit.
Shred and cook with coconut oil, turmeric, soy sauce, and black pepper.
👉 Best for: A meaty texture without soy-based ingredients.
4️⃣ Tempeh Pastil (Crunchy and High-Protein)
Tempeh is a fermented soybean cake with a firm, chewy texture and a nutty taste.
🔹 How to prepare:
Crumble tempeh into small bits.
Pan-fry until slightly crispy before adding seasonings.
👉 Best for: Those who prefer a protein-rich, slightly crunchy texture.
5️⃣ Lentil Pastil (Budget-Friendly and Nutritious)
Lentils are an affordable and protein-packed substitute with a soft, slightly meaty texture.
🔹 How to prepare:
Cook lentils until soft but not mushy.
Sauté with garlic, onions, soy sauce, and turmeric.
👉 Best for: A healthy and fiber-rich alternative.
🍽 3. Step-by-Step Recipe: How to Make Vegetarian Chicken Pastil
🔹 Ingredients:
2 cups cooked rice
2 pcs banana leaves (for wrapping)
1 cup shredded tofu, mushrooms, or jackfruit
2 tbsp cooking oil
1 tsp soy sauce
½ tsp turmeric powder
1 small onion, chopped
2 cloves garlic, minced
Salt and pepper to taste
🔹 Instructions:
1️⃣ Prepare the Filling
Heat oil in a pan, then sauté garlic and onion until fragrant.
Add your chosen meat substitute (tofu, mushrooms, jackfruit, tempeh, or lentils).
Season with soy sauce, turmeric, salt, and pepper. Cook for 5-7 minutes.
2️⃣ Wrap in Banana Leaves
Lay a clean banana leaf flat and place a scoop of rice in the center.
Add a generous amount of vegetarian filling on top.
Wrap tightly, securing the ends like a burrito.
3️⃣ Steam for Extra Flavor (Optional)
To enhance the taste, steam the wrapped pastil for 10 minutes.
4️⃣ Serve and Enjoy!
Unwrap and enjoy it warm. Pair with spicy palapa sauce or soy-calamansi dip.
🌏 4. The Cultural Significance of a Plant-Based Chicken Pastil
The traditional Chicken Pastil is deeply connected to Mindanao’s food culture, but adapting it for a vegetarian diet is a way to:
✔️ Preserve traditions while catering to modern diets ✔️ Make Filipino cuisine more accessible to plant-based eaters ✔️ Promote sustainability by reducing meat consumption
By keeping the essence of pastil while modifying the ingredients, we show that Filipino food can be both authentic and innovative.
🥢 Conclusion: Enjoying Chicken Pastil, The Vegetarian Way
Chicken Pastil is one of the most iconic Mindanaoan dishes, but it doesn’t have to be just for meat lovers. With plant-based alternatives, you can still enjoy the same flavors, textures, and cultural significance while making it healthier and more sustainable.
✔️ Tofu, mushrooms, jackfruit, tempeh, and lentils make great substitutes. ✔️ The key is in the seasoning – turmeric, soy sauce, and aromatics recreate the pastil flavor. ✔️ Steaming and banana leaf wrapping keep it authentic.
Have you tried a vegetarian version of Chicken Pastil? Let us know in the comments!
❓ FAQ Section
1. Can I make this vegan?
Yes! Simply use vegetable oil and make sure your soy sauce is vegan-friendly.
2. Where can I buy banana leaves?
Banana leaves are available at Asian grocery stores or fresh markets.
3. What’s the best protein substitute?
Tofu and jackfruit are the closest to shredded chicken texture.
4. How long does vegetarian pastil last?
It lasts up to 2 days unrefrigerated and 4-5 days in the fridge.
5. Can I make this gluten-free?
Yes! Just use gluten-free soy sauce or coconut aminos.
#ChickenPastil#VegetarianFood#FilipinoCuisine#PlantBasedEats#MindanaoFood#HealthyEating#VeganFriendly#FoodBlog
0 notes
Text
Delicious and Easy Chicken Curry Recipe: A Flavorful Homemade Delight

Craving a comforting, homemade meal packed with rich flavors and aromatic spices? This Easy chicken curry recipe is perfect for a cozy dinner at home. Whether you’re a seasoned cook or a beginner, this flavorful chicken curry is simple to make and guarantees to impress your family and friends. Let’s dive into this authentic Indian-inspired dish that’s bursting with taste and warmth!
Why You’ll Love This Recipe
Quick and Easy: Ready in under 45 minutes, making it ideal for busy weeknights.
Rich in Flavor: A blend of aromatic spices, garlic, and ginger gives this dish its signature taste.
Customizable: Adjust the heat level to your preference and add vegetables for extra nutrition.
Perfect with Rice or Bread: Pair it with steamed rice, naan, or roti for a complete meal.
Ingredients You’ll Need
1.5 lbs (700g) boneless chicken (thighs or breast), cut into bite-sized pieces
2 tbsp oil (vegetable or coconut oil)
1 large onion, finely chopped
3 cloves garlic, minced
1-inch piece ginger, grated
2 large tomatoes, pureed (or ½ cup canned tomato puree)
1 cup coconut milk or water (for a lighter version)
1 tsp turmeric powder
1 tsp coriander powder
1 tsp cumin powder
1 tsp garam masala
½ tsp red chili powder (adjust to taste)
Salt to taste
Fresh cilantro for garnish
Step-by-Step Instructions
Sauté the Aromatics: Heat oil in a pan over medium heat. Add chopped onions and sauté until golden brown.
Add Garlic & Ginger: Stir in the minced garlic and grated ginger, cooking for another minute until fragrant.
Cook the Tomatoes: Add the pureed tomatoes and cook until the mixture thickens and the oil separates.
Spice It Up: Mix in turmeric, coriander, cumin, garam masala, red chili powder, and salt. Stir well.
Cook the Chicken: Add the chicken pieces and coat them with the spice mixture. Cook for 5 minutes.
Simmer: Pour in coconut milk or water, cover, and let it simmer for 20-25 minutes until the chicken is tender.
Garnish and Serve: Sprinkle with fresh cilantro and serve hot with rice or naan.
Tips for the Best Chicken Curry
Use Fresh Spices: Freshly ground spices enhance the flavor significantly.
Marinate the Chicken: For extra depth, marinate the chicken with yogurt and spices for at least 30 minutes before cooking.
Adjust Thickness: Add more coconut milk for a creamier consistency or water for a lighter version.
Make it Spicier: Increase the red chili powder or add chopped green chilies for extra heat.
Pairing Suggestions
This homemade chicken curry pairs wonderfully with:
Steamed Basmati Rice
Jeera Rice (Cumin Rice)
Garlic Naan
Chapati or Roti
Final Thoughts
This delicious chicken curry is not only easy to prepare but also a guaranteed crowd-pleaser. Whether you’re cooking for yourself or entertaining guests, this homemade curry will satisfy your cravings for something rich, comforting, and packed with flavor. Try it today and bring the magic of Indian-inspired cuisine to your kitchen!
For more recipes and cooking tips, visit Behtreen.
in Behtreen Oil
0 notes
Text
Shore Time Pinoy: A Filipino Restaurant Experience Like No Other in Qatar
If you're looking for an authentic Filipino dining experience in Qatar, Shore Time Pinoy is the place to be. This restaurant brings the best of Filipino cuisine to the Middle East, offering a diverse menu of classic dishes that showcase the rich culinary heritage of the Philippines. Whether you're craving a comforting bowl of Sinigang or a sizzling plate of Sisig, Shore Time Pinoy promises a flavorful journey through the Philippines' most cherished recipes.
A Taste of Filipino Tradition and Innovation At Shore Time Pinoy, the menu is a fusion of traditional Filipino dishes with a modern twist. The restaurant is committed to offering the best of both worlds: the comfort and nostalgia of home-cooked Filipino meals, alongside innovative takes on classic dishes. The chefs at Shore Time Pinoy are passionate about using fresh, local ingredients to ensure that every dish tastes as authentic as possible.
Must-Try Dishes at Shore Time Pinoy
Sizzling Sisig: A popular Filipino dish made from finely chopped pork face, ears, and liver, served on a sizzling hot plate.
Adobo: A savory stew made from marinated pork or chicken, cooked in soy sauce, vinegar, garlic, and bay leaves.
Bicol Express: A spicy pork dish cooked in coconut milk and chilies, perfect for spice lovers.
The Ultimate Dining Experience More than just a restaurant, Shore Time Pinoy provides a cultural experience that celebrates Filipino food, hospitality, and tradition. The friendly staff and vibrant ambiance create a warm, welcoming environment, whether you're dining in or enjoying your meal to go.
Why Choose Shore Time Pinoy?
Authentic Flavors: Savor Filipino dishes made with traditional recipes.
Cultural Experience: Enjoy a dining experience that immerses you in Filipino culture.
Convenient Location: Centrally located in Doha, making it easy to enjoy Filipino food wherever you are.
Whether you're in the mood for traditional comfort food or a modern take on Filipino classics, Shore Time Pinoy offers a dining experience that will transport you to the Philippines with every bite.
0 notes
Text
How to Pair Thai Food with the Perfect Drink: A Guide by Sriphai Thai Kitchen
Thai food is loved worldwide for its bold flavors—spicy, sour, sweet, and salty. But have you ever wondered which drinks go best with your favorite Thai dishes? Choosing the right drink can enhance the flavors and make your meal even more enjoyable. If you're cooking Thai food at home and aren’t sure what to pair it with, we’ve got you covered!

At Sriphai Thai Kitchen, we’re sharing some of the best Thai food and drink pairings so you can experience the perfect balance of flavors.

Spicy Shrimp Soup (Tom Yum Goong) + Fresh Coconut Water
Tom Yum Goong is a bold and spicy dish with a tangy kick. Fresh coconut water is the perfect match—it cools down the spice and adds a natural sweetness that balances the flavors beautifully. Plus, it’s refreshing and great for digestion!

Pad Thai + Iced Green Tea
Pad Thai has a mix of sweet, salty, and tangy flavors, with a slight crunch from peanuts. Iced green tea is a great pairing because it’s not too sweet and helps cleanse your palate, making every bite of Pad Thai taste even better.

Papaya Salad (Som Tum) + Chilled Fruit Juice
Som Tum is spicy, sour, and super fresh. A chilled fruit juice like pineapple or pomegranate is a great choice—it tones down the heat while enhancing the fruity, zesty flavors of the dish.

Green Curry + Butterfly Pea Lemonade
Green curry is rich and creamy with a hint of spice. Butterfly pea lemonade adds a citrusy touch that cuts through the coconut milk’s richness, making the meal feel lighter and more refreshing. Plus, its deep purple color makes for a beautiful presentation!

Mango Sticky Rice + Fresh Orange Juice
This classic Thai dessert is rich, creamy, and sweet. A glass of fresh orange juice adds a tangy contrast that keeps the dish from feeling too heavy while highlighting the natural sweetness of the mango.
The right drink doesn’t just quench your thirst—it brings out the best in your meal! Pairing drinks with Thai food helps balance strong flavors, enhances the overall taste, and gives you a deeper appreciation for Thai cuisine.
At Sriphai Thai Kitchen, we share easy-to-follow how-to guides for cooking authentic Thai food at home. Our free e-magazine includes delicious Thai recipes and insights into our mission with Avoda Foundation, which Sriphai Thai Kitchen proudly supports in Thailand. Plus, you’ll find fun and helpful tips to make your Thai cooking experience even better!


Download Your Free E-Magazine!
📥 Free E-magazine | Sriphai Thai Kitchen
Have you ever cooked Thai food at home? What’s your go-to recipe?
Let us know in the comments!
#thaifood #SriphaiThaiKitchen #ThaiFoodCulture #MissionThroughCooking #Thaifood #cookingtips #charitycooking #Missionthailand #Charityfood #avodafoundation
0 notes