#each layer is adjusted to that one gif specifically
Explore tagged Tumblr posts
Visit Tumblr Blog
Explore Tumblr blogs with no restrictions, modern design and the best experience.
Last Seen Tumblr Blogs


Fun Fact
70% of Tumblr users say the Dashboard is their favorite place to spend time online.
Text


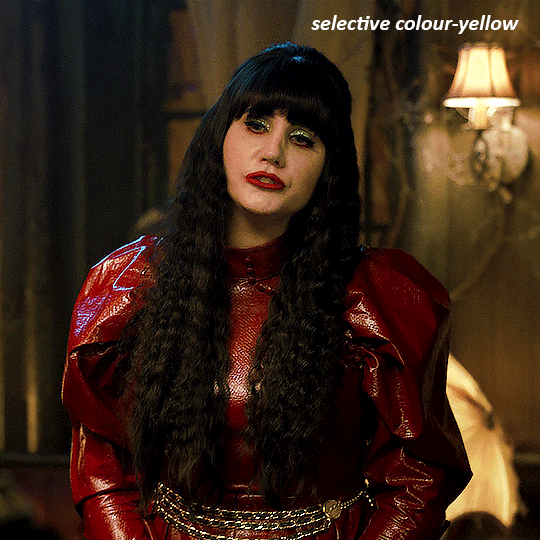
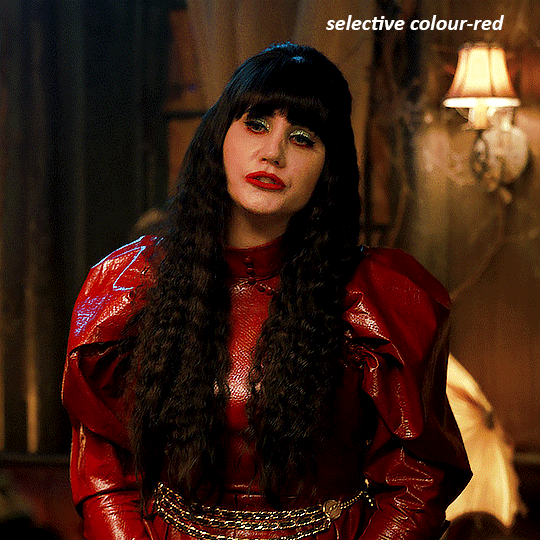
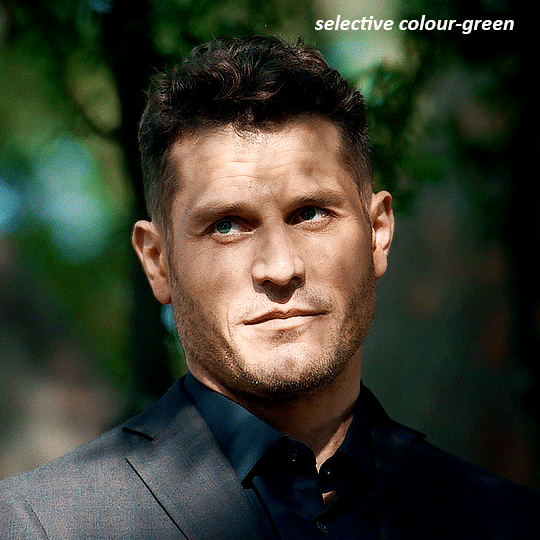
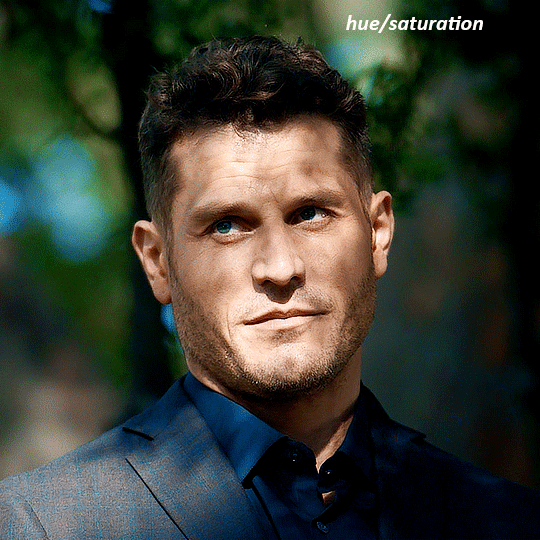
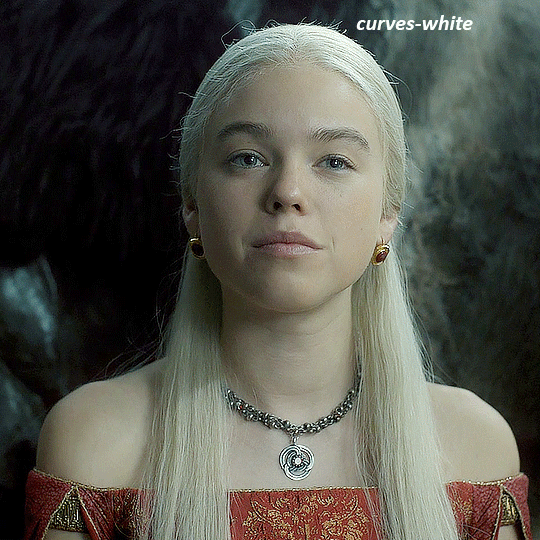
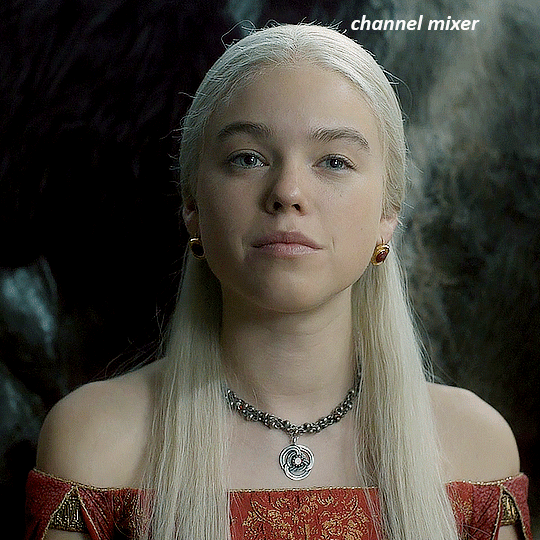
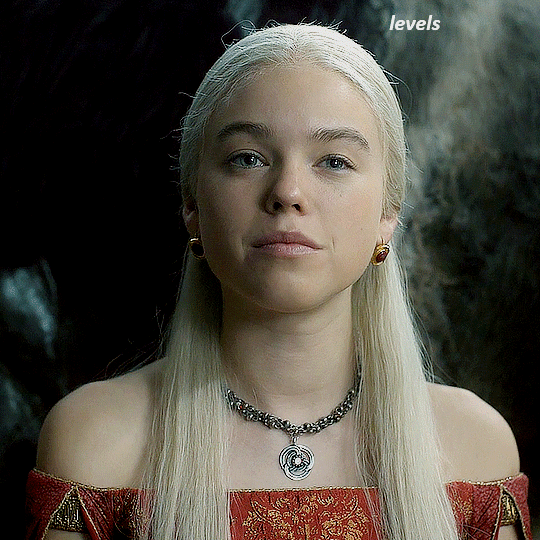
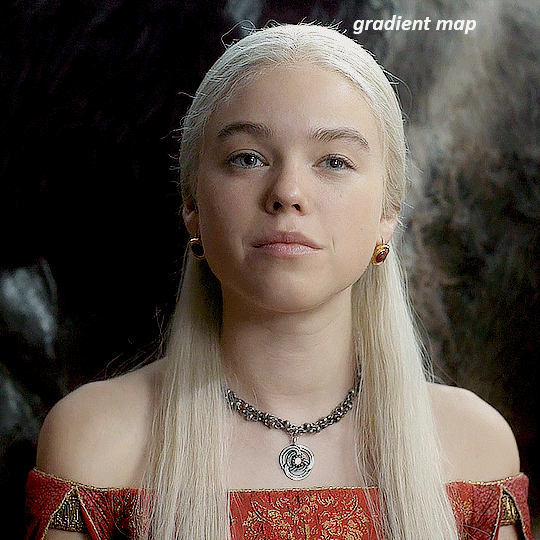
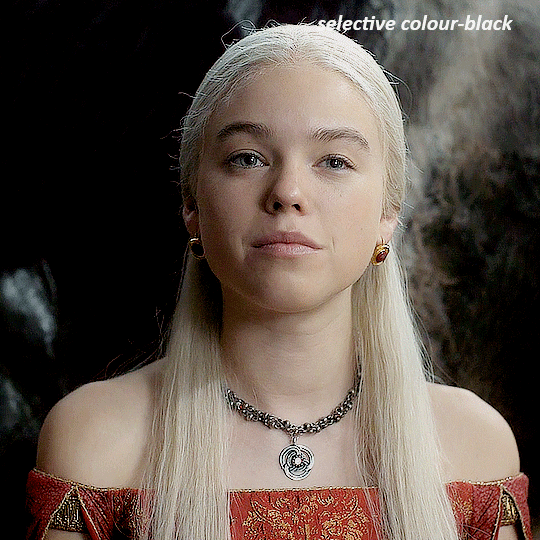
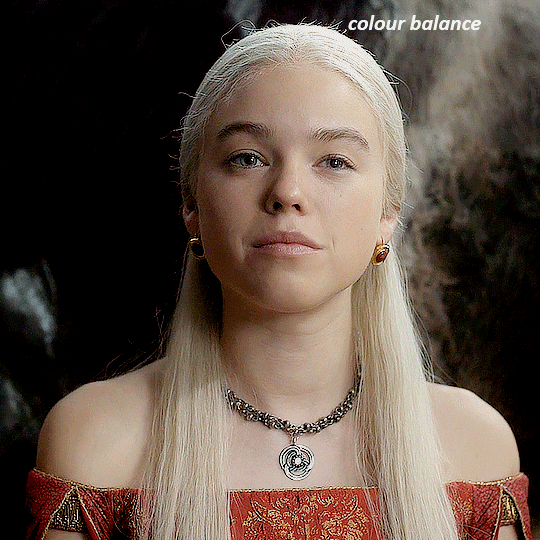
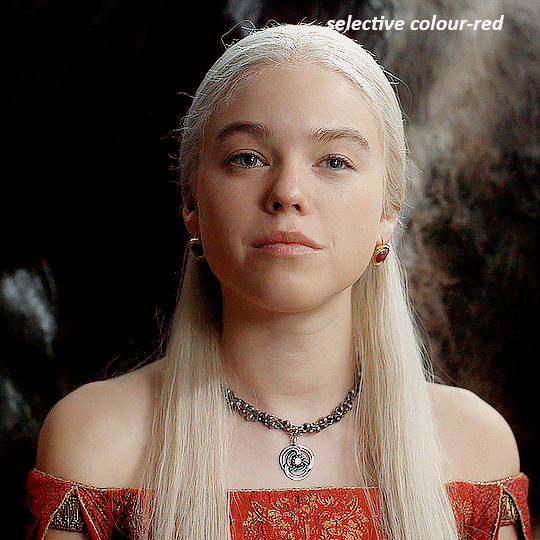
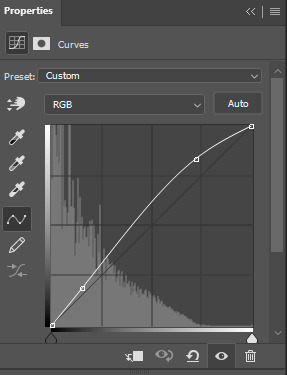
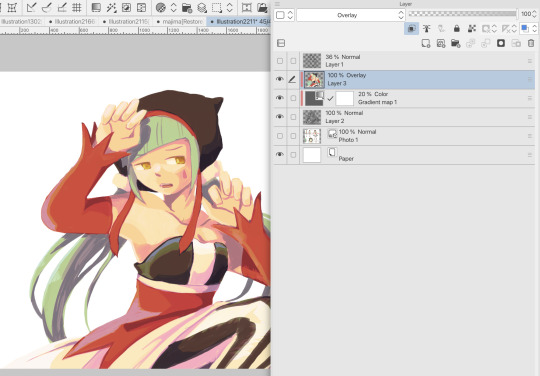
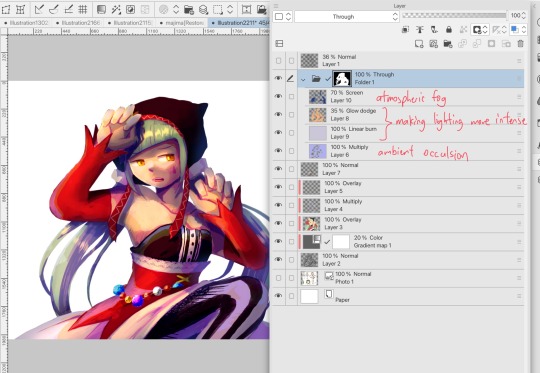
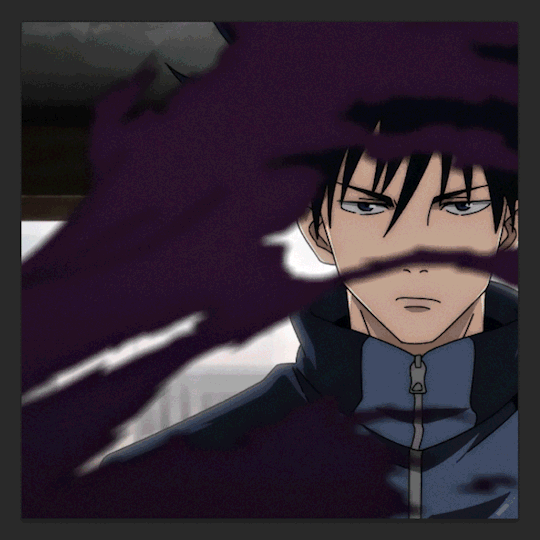
Gif Colouring Process | Ramking Set
There are various steps needed to adjust the colours of a gif. Good colouring can match tones of different shots, make colours look more true to life or cohesive, adjust so lighting is kinder to skintones and make scenes generally prettier to look at.
Because gifs allow for fewer colours than videos, it also involves prioritising which colours are needed in a scene and adjusting accordingly.
It can also be used for effects: subtle ones (like in like in gif 4: fading colours to highlight the focal characters in a photograph), or much more dramatic or stylised effects.
This is a tiny tiny glimpse of what gifmakers do when we refer to "colouring". 🖤
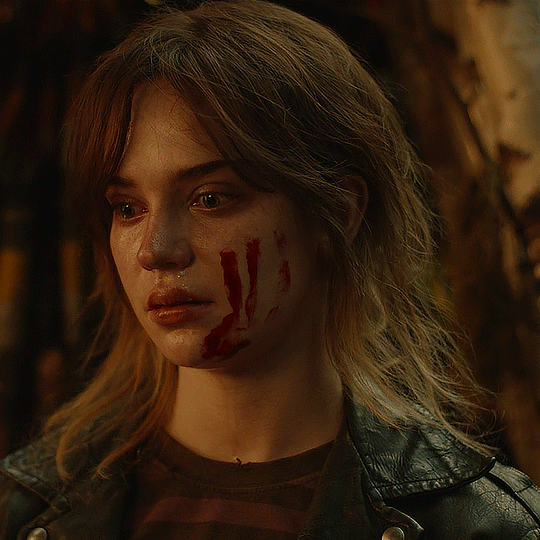
#flashing gifs cw#flashing gif cw#gifmaking#gif making#gif colouring#bee.gif#obviously I thought it would be interesting but I also wanted to highlight just how much work goes into each gif#also as a Not White gifmaker that is (mostly) giffing Not White people it's really important to me that I get the skintones right#so that's a huge factor in what makes a good gif to me#and each layer isnt just 'hit the curves button' or 'hit the selective colour button'#each layer is adjusted to that one gif specifically#unless it's from exactly the same scene and exactly the same angle you cant really copy colouring across from one to the other#you're relying on a person and a gif maker as a kind of visual artist to learn what's needed and what actually looks good#and I hate hate hate to turn this negative but it's why it's so hearbreaking when gifs are stolen or reposted without permission#and to counterpoint why its so very lovely when people reblog gifs to share them - or ask the artists to share!#There are some really great tutorials out there on how to make gifs#also gifmaking is really a easy to get into and it takes such a short amount of time to train your eye and create really lovely results#I mean it does make you go hRRRRR I COULD FIX THIS when a show or film lights something badly and doesnt fix it in post lmao#if you're a marvel gifmaker you're stronger than god btw#I justify fixing the shitty lighting in these scenes because the budget of my engineer was about 43p and a button#multimillion dollar blockbusters with teams of professional colourists should not look like that.#i digress#do not talk to me about the third gif I dont want to fucking know I dont care I never want to look at it ever again dghjksghjkrs#my worstie my behated#I was fighting for my life#I had to use red text on it as well because it dropped all the magentas out of the colour slots and it their lips went grey#like also because each gif is shown thorugh lots of iterations of colouring there are fewer colour slots overall#so the change is even MORE dramatic than what's shown here#but I made these mostly as an illustration of how much thought went into the set :)#hopefully the vibe still comes across anyway lol
5 notes
·
View notes
Text
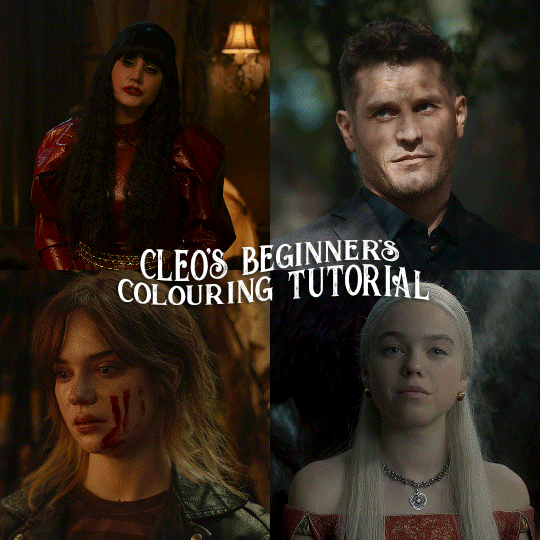
here is the colouring tutorial i promised to go with my beginner's gifmaking tutorial.
to save image space, i've written up a simple explanation of how each adjustment layer works here, so i'm just going to over my colouring for these 4 different gifs.
as always, very image heavy underneath
there are many ways to get the same results and i'll use various methods usually just based on what i'm feeling at the moment. some of it is a little convoluted, but hopefully this will give you a rounded idea of how it all works so you feel more comfortable playing around with your own colouring
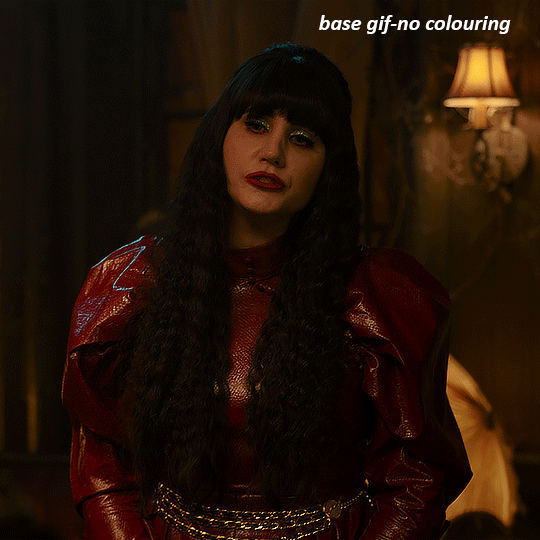
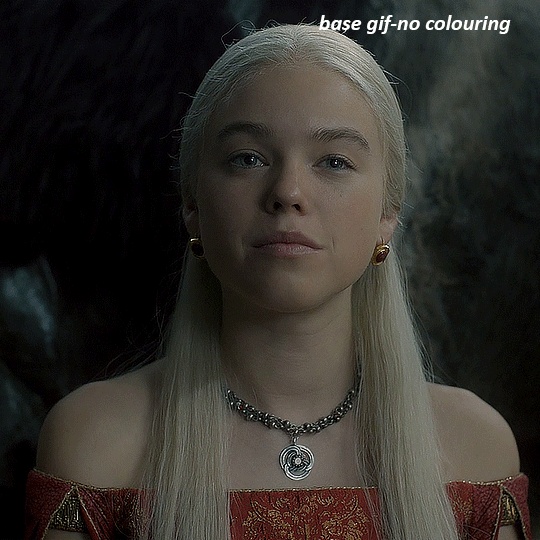
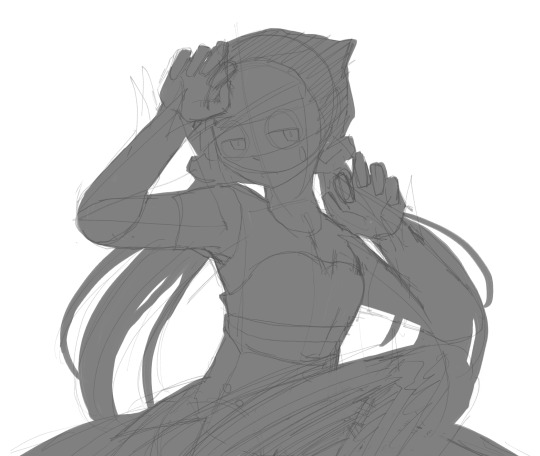
NADJA
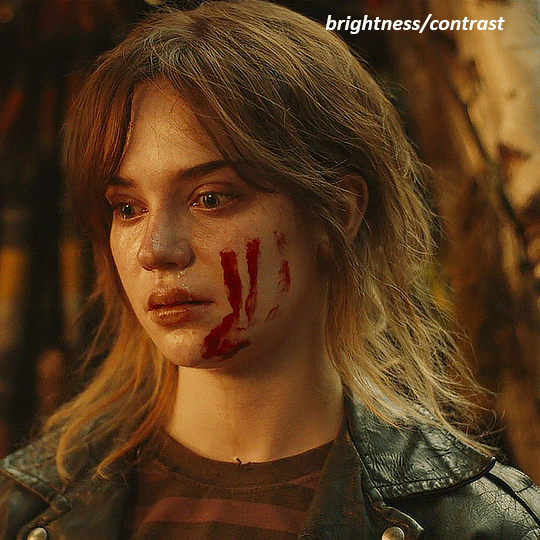
this is the base gif with zero colouring adjustments, just resized and sharpened.
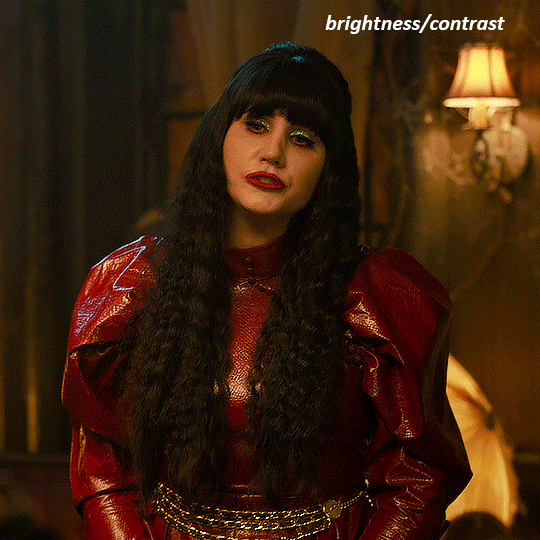
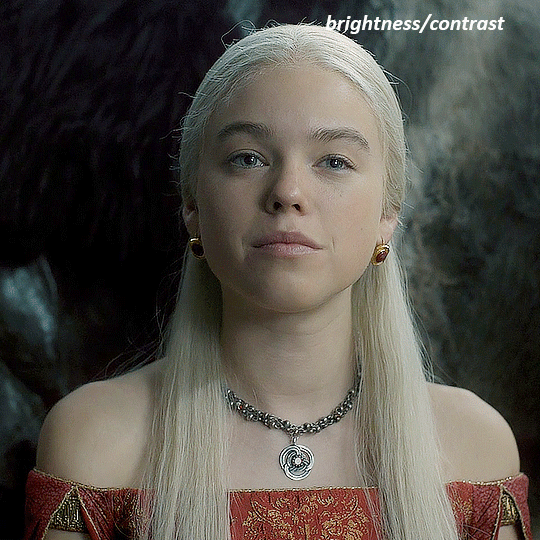
unless the base gif is already very bright, which doesn't often happen because directors nowadays are allergic to light, the first layer i add is always a brightness/contrast layer. i don't adjust any of the sliders, i just change the blending mode to "screen", and then adjust the opacity if needed. this gif was pretty dark, so i left it at 100%,
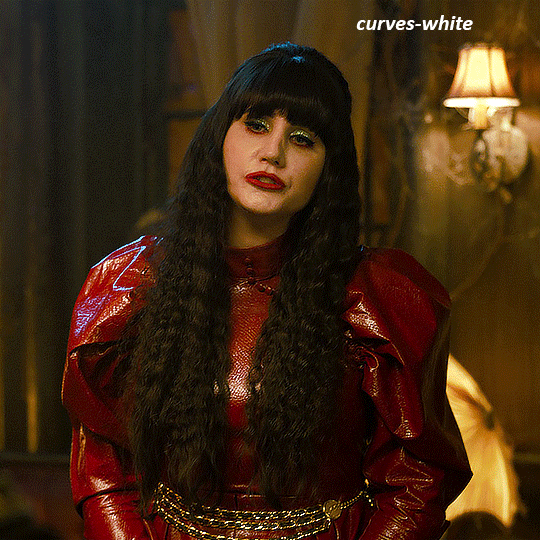
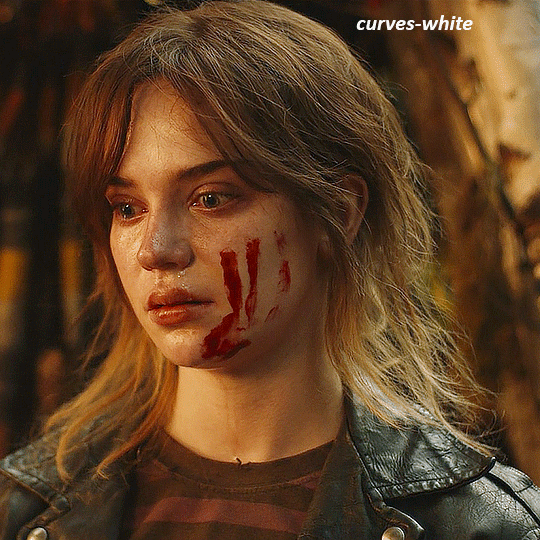
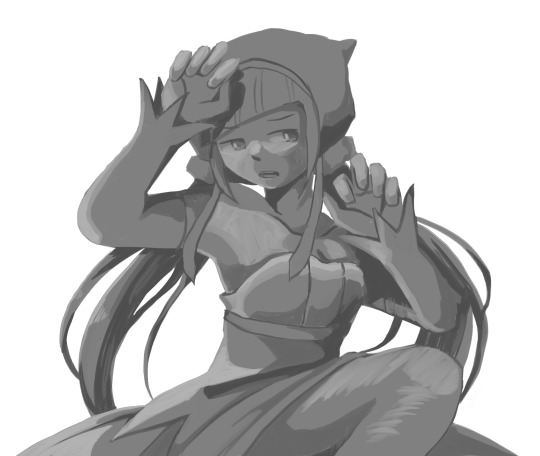
my next layers are always curves to even out the white and blacks. i use two curves layers, one for white and one for black. i used the white drop-picker and selected just below the lightshade on the lamp behind her, and for the black drop-picker i selected her hair near her neck which gives us this
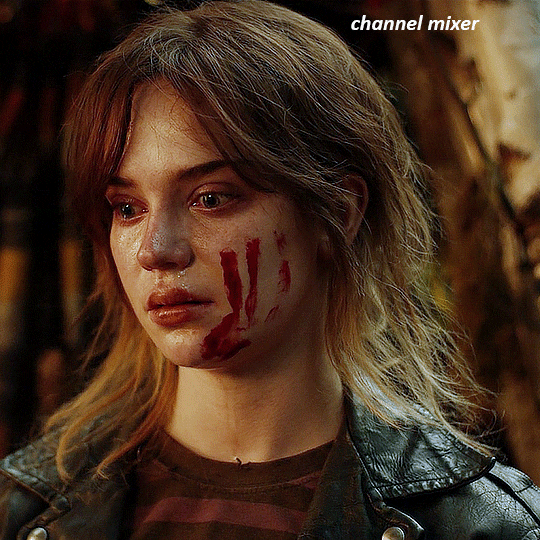
it's already looking much better, it's not as green tinted, but i want to make the red of her dress pop a bit more. in order to do that without making her face too red, i'm gonna remove some of the yellow. so next i'm gonna add a selective colour layer, and under the yellow channel i moved the yellow slider to -5 and the black slider to -52. now
now that the yellow is reduced, i add another selective layer, and under the red i move the cyan slider to -66 and the black slider to +29. now the red of her dress pops and her face is still a realistic tone. when i first made the gif, i added the red selective layer first, then added another selective layer under it and adjusted the yellows to offset it. you can always shift layers around or add a new layer underneath as you go.
voila
TOMMY
here is our base gif

this scene is better lit than the nadja one, but i prefer bright and colourful gifs, so i'm gonna once again add a brightness/contrast level and keep it at 100%
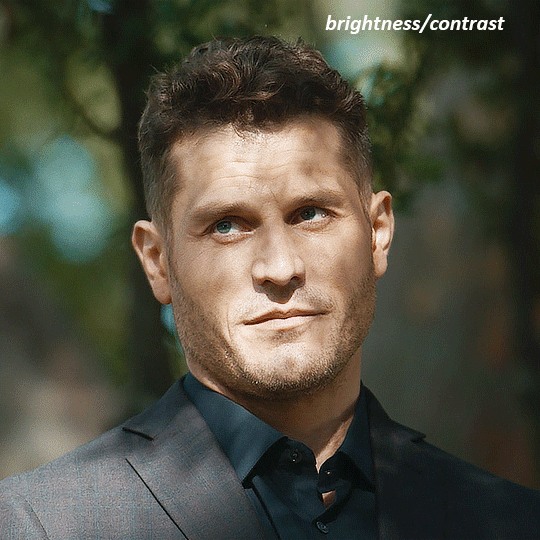
and then the curves layers to even it all out. since there isn't a spot that is immediately noticeable as white, you can hold the alt button with the white dropper selected and it will highlight all the white/very near white pixels. you can also zoom real close in to select specific pixels. i selected a from the white area around his chin/mouth. the same process works for finding a black spot with the black dropper, and for that i selected from a dark spot in his hair
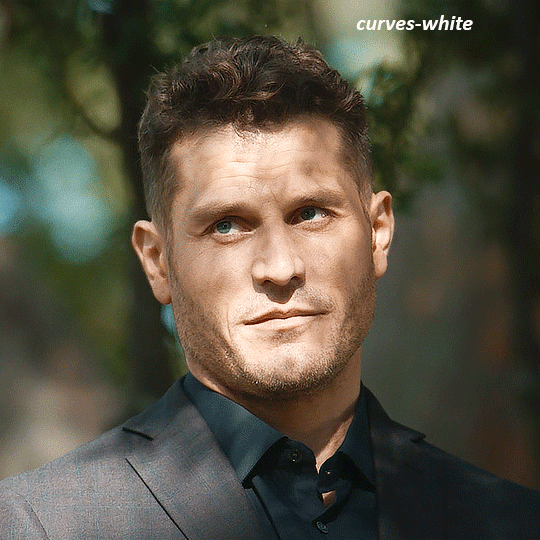
the curves layers evened it out but also made the gif a bit more red and warm toned, and since i've decided i want the end result to be more blue/green, so i'm gonna add a colour balance layer. in the shadows channel i moved the cyan/red slider to -16, and the yellow/blue slider to +11

now the gif already looks great, it's bright, skin tone is accurate, he's not washed out, but like i said i like my gifs colourful, so i'm gonna add two more selective colour layers. in the first i'm gonna adjust the greens, bringing the magenta slider to -87, and the black slider to +81. in the second layer i'm gonna adjust both the blues and cyans, because when you see blue in a gif it's rarely ever straight blue or straight cyan, so always adjust both. (you could adjust the blue and green in the same layer, but i prefer to do them separately in case i need to move the layers around)
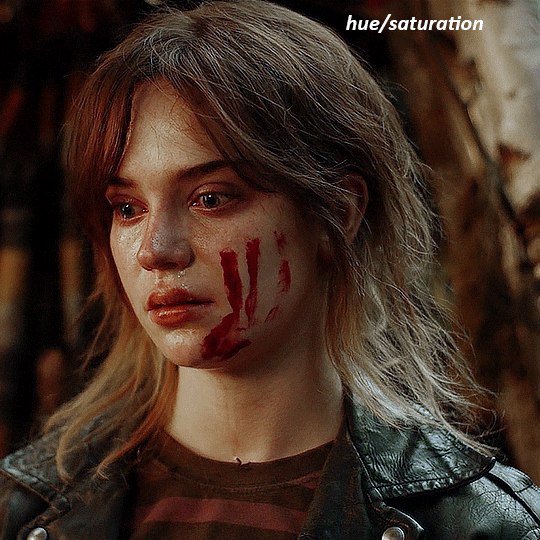
now finally i'm gonna add a hue/saturation layer because i think the blue of his suit is too blue when the sky behind him is more cyan. (also, since you only have 256 different colours to work with, you don't want too many different colours otherwise it will distort the colouring.) in the blue channel i move the hue slider to -12 to make the blue a bit more cyan, and i also move the saturation to +38 to make it pop more
and voila
RHAENYRA
here is the base gif (this one is going to get very convoluted and imo best exemplifies what colouring gifs is like most of the time)
as always, a brightening layer set to screen
now the curves layers. for the white i clicked on her hair at the top of her head, and for the black i i clicked in the shadows to the left of her.
but as you can see, while it added contrast, it also made the gif more green tinted than it was. you could click around more, or manually adjust the red, green, and blue lines on the curves until it looks better but i decided to add a channel mixer layer instead. in the green channel i set the greens to -95, and in the blue channel i set the blue to -97
next i wanted to add a little contrast, but i find that using the contrast in brightness/contrast can saturate it too much, so instead i added a levels layer. first i adjusted the bottom bar, moving the right slider to 230 which reduces the overall brightness of the gif, so when i adjust the top bar it doesn't brighten the gif too much. on the top bar, i moved the right slider to 212, and the left slider to 9
now, i'd like it to be not exactly warm toned, but less cool, and while i could use colour balance or a photo filter, i'm instead going to add a gradient map, using the default gradient pink 08, and setting it to blend mode soft light at 50% opacity

next i just want to increase the blacks a little, so i'm gonna add a selective colour layer and under black i'm gonna set the black slider to +10
it's still not as warm as i'd like, so i'm gonna add a colour balance layer, in the midtones setting the cyan/red to +10 and the yellow/blue to -5
we're almost done, but i want to make her dress pop a bit more, so first i'm gonna add another selective colour to bring the yellows down a bit, setting the black slider to -15

and finally one more selective colour layer, in the reds, setting the cyan slider to -50, the yellow slider to +10, and the black slider to +15
voila
NATALIE
here's the base gif
as always the brightness/contrast layer set the screen
now the curves layer. for the white, i zoomed in and selected a pixel on her cheek under her right eye. for the black i the dark spot just above her head
now she's very yellow, so i added a channel mixer layer. in the red channel i set the reds to +88. in the blue channel i set the reds to +10
she's still a little too yellow for my liking, so i'm gonna add a hue/saturation layer, and under the yellows i'm gonna adjust the saturation to -60
finally, i want her to be a it brighter, so i'm gonna add another curves layer, but instead of using the drop, i'm going to manually adjust it. the two points along the line are where i selected it and then i dragged until it looked how i wanted. i start with the upper dot, which made it brighter and moved the line into an arch, and then selected at the lower end of the line and dragged in back closer to centre to add some darkness and contrast
voila
and that's how i do my colouring. it's generally all trial and error, using a layer to fix one thing and then needing another layer to fix something the previous layer did.
play around, have fun, see what works for you and what doesn't. it will take a while for you to develop your own method and style, and even then you'll come across scenes that make you question if you have any sills at all. you do, directors just hate us
have fun and feel free to ask any questions
#tutorial#gif tutorial#colouring tutorial#photoshop tutorial#gifmakerresource#completeresources#*tutorials
276 notes
·
View notes
Note
ayato + a soul sucking blowjob
synopsis. ayato was tired, fatigued and frustrated. arriving home from work shortly after to get finally spoiled by you <3
cw. oral (male! receiving), flustered ayato, fem! reader


you can easily discern certain noises in your place, or specific emotions you feel when you hear them. serving as an illustration— look at when the quick chime of the door being unlocked sparks over your eardrums. what's more, you remember that it's like an unwinding lullaby to you, when ayato lastly arrives home after a long day at work.
the high-priced material of his shoes made a rhythmic click as he walked, which then echoed through the living room when the yashiro commissioner crossed the dinner table to walk towards the couch— nothing else in his mind other than the cloying anticipation to feel you in his arms.
each footfall was unevenly separated from the last and clearly indicating fatigue, no rhythm in them at all. you note that your boyfriend must be utterly tired from his long day, quite spent as he ultimately reaches over to greet you before adjusting his pants to sit down.
"how was your day?" you kindly ask, your smile rumbling with a welcoming affection as you place one hand on top of his muscular thigh, "everything ran smoothly... not to worry," the man assures you after a moment of hesitation.
if there was something entirely true about kamisato ayato— it's that his honesty towards his beloved would only include the details he deemed for you to be okay to know. you were aware of that and really didn't mind, although sometimes you wished you could smooth over the secrets he's forced to carry with himself and make it a little easier.
chewing briefly on his lower lip, ayato searches for your trace, his hands slowly slipping between your legs to rub over the inside of your thigh as he gently exhales through his parted mouth, the clouded sight on his face accentuating his immense attractiveness.
"you look tired, baby," you note, squeezing his thigh, a sensual chime melting on the tip of your tongue when you move as slowly as the petals of a flower opening, silently kissing his cheek before pointing towards the obvious tent in his trousers.
"or… do you want me to take care of this?"
"you— you mustn't trouble yourself with it, i—," ayato ponders out loud, glancing awkwardly to everywhere but your face.
he didn't even realize that he's gotten a little too excited to see you tonight. this hasn't happened in ages and only served as an additional indicator that there was more to the frustration inside of him than he originally let on.
swiftly, and with a touch of silk, you unravel every sharp edge of his strong bravado— and the tension rises beneath the layers of garments he wore, a slight hue of embarrassment catching onto his pale skin.
"i'm just so happy to finally see you, 'cannot control it, i apologize."
his pure admittance coupled with his flustered expressions burns into your heart like liquid gold as he laps over his lips softly when you smile back at him, ready to worship him as if you're born to savor this hallowed moment.
"don't apologize," you remind him, and in the split second that your hand feels over his bulge, every nerve in his body and brain was electrified— as the motion of your palm spoke of a movement coupled perfectly to itself, confident, focused and reverent, "i missed you too."
unhurriedly, you get yourself off the couch before settling in between his thighs, your hands coaxing out a shaky groan from him as you slid them over his legs before hooking your fingers into the waistband of his pants, freeing him shortly after. at the feeling of his bulging erection being met with the cold air of the room, ayato whimpers, yet what actually made him lose his mind was when you took him in your hand, his glossed pre glazing over your knuckles and sending him into a heady trance.
he feels how his balls were tightening when you slant your lips forward to spit on his cock, his body starting to ready itself for your warm, wet mouth before you're slowly dragging your tongue over the slit, the feeling of ecstasy coming through him in a controlled wave of pleasure.
in this moment, ayato feels like all the relief in his life settled in his stomach and his worries died down, all the times he had dreamt of you the entire day when he was supposed to be actually focusing on work— not the memories of last night where he had you draped over the mattress, stuffed entirely with his cum. the memories of the night still left him in a tremble, and how utterly beautiful you looked claimed in such lewd manner.
your hand wraps around the base tight enough to heighten the feeling of pressure and bliss on him, a choked rumble coming from above you as ayato covers his face with one arm while the other settles on your head. your hand firmly palms around the base of his erection as you began to gave his tip a tentative lick, never focusing less on how he was reacting to you.
the more inches you decided to swallow, the more you cam into contact with a rich, masculine musk permeating on your tongue at the first taste of him— ugh, ayato tasted so good, and he always took such good care of himself that you cannot help yourself but rub your thighs together, hoping it's enough to pleasure yourself on your own.
to make him further lose his mind, you know what you had to do and proceeded to sweep your tongue across the head several more times until his eyes would turn bloodshot from the little droplets of tears hovering on his pretty lashes.
oh well, he must be so tired, fatigued and frustrated. at the same time, suffusing into the loss of his mind and the hotness of your lips softly pressing into his shaft.
he cannot wait until you take him in your mouth.
which then, naturally you did, yet slow, encouraged by the addictive taste of him filling your senses as you take more of his length into your mouth. you bob your head up and down, the heavy tip of his erection nudging in the back of your throat as you let him guide you up and down with his hand, working the first couple inches of his dripping dick against your tongue until you hit your limit.
for what you couldn't gather inside your wetness, you let your hand make up for the rest, finding a comforting pace as ayato grew so absorbed in watching you please him, it's almost as tasteful as feeling it in the first place.
just how obediently you let him feel around your mouth as his fingers slide through your hair— he hopes he manages to turn you soaked by the end of it, so he mustn't prepare you any further and can sink himself inside of you much quicker.
you lift your eyes to meet his delirious half-gaze before you hollow your cheeks, pulling back with a soft popping sound and a faint rush of adrenaline.
"you enjoying yourself?" you coo devilishly, then cock an eyebrow that destroyed all its softness within your triumphant gaze, "very much so," he smirks back.
boldly, he hides between the beautiful implications of a clouded expression hovering all over his facial features, when in reality, ayato has already planned out the entire night for you two.
©2024 anantaru do not repost, copy, translate, modify, claim as your own
#genshin x reader#genshin Impact x reader#genshin smut#genshin impact smut#ayato x reader#ayato smut#genshin x you#genshin impact x you#ayato x you#genshin impact drabbles#genshin drabbles
1K notes
·
View notes
Note
The sheets are linen, so comfortable that you wouldn’t ever want to get up. The only thing more comfortable is already set across the bed.
You are slowly, carefully pulled in by his large soft arms until you’re left like a little baby resting on his torso. The animatronic body kept its general shape when pressed into, but there was a layer of padding and stuffing just under the fur to make it more plush in case of hugs and snuggles.
You relax as you’re placed there, your head sinking into the warm fluff on his chest. The down stuffing parts, then steadily falls back into place, gently enveloping your face as you lay there. It was like a puff of silk fur waiting for something to nestle into its deep softness to be enjoyed.
There’s a light touch of a smooth nose on the top of your head. It slowly nuzzles into you. Then comes a long, low breath out, ending with a soft, careful kiss.
You pull your legs up as you curl into a ball, the light-colored fur on his torso brushing against your skin while you move. It was as if the fur itself was trying to calm you and welcome you to rest. It was gentle. And safe.
One arm closes overtop of your curled lower body like a weighted blanket, with its excess fur covering where you may get cold. His second arm crosses over your torso, shifting up slowly until his hand reaches your head. It doesn’t simply rest there, however. The sharp tips of his fingers silently adjust until they find the edges of your face, tracing your cheek slowly. Every digit moves in line, careful with each brush against your skin. It almost tickles.
You can feel his voice gently rumble in your head, the filling sound even reaching your stomach as your relax further into the fluff of his chest: “… You’re so soft…”
Your hand lightly half-closes and opens, getting a handful of his pale fur each time. Now that was soft. That’s what it was made for. And you didn’t want to stop.
The light fur had a position it would rest in, a grain it would follow, but it was still easy to move. And every time you moved it, it cozied up into your hand, soothing and gentle, inviting you to do it again. You knew it was such an old fabric, and yet it felt like a thick plume of velvety fur fresh from a warm drying. It was something you’d want to be completely buried in, to have it carefully fall around you and snuggle you there endlessly. It’s as if there were a million gentle kisses on your skin with every movement.
You stop suddenly as a low noise begins, but it only takes a few moments for the gentle rumble to grow into a deep, calming purr.
Your eyelids grow heavy as the resonant buzz fills the air, touching from your fingers to your toes. It rolls out from his chest as you give a quiet, comforted sigh in response, nuzzling closer into his fluff once more.
-heartbeat anon
SHIP WRITING FOR MY SPRINGTRAP SPECIFICALLY OKAY *DIES* *DIES* *DIES* *DIES*
#springtrap x reader#FLAPS MY ARMS LIKE A CCKINGFN BIRD#springtrap x yn#yn insert#springtrap#gif#heartbeat anon#anon ask#answered ask#snuggles
162 notes
·
View notes
Text
Troublemaker
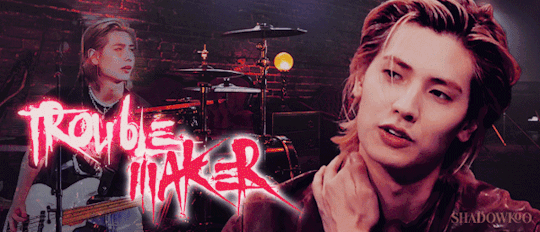
→ Summary: Jooyeon needs help finishing his song and the only way to do that is by unraveling you. You're the missing piece; the only voice he wants to layer into his track, the only one he craves to hear making those breathy little moans that already have him on edge. But as the recording session goes on, it’s no longer enough to just listen to you like that, he needs to be the reason you sound that way.
↠ jooyeon x f.reader | 3.1k words | 18+ ↠ genre: idol!au, smut
→ Warnings: y’all getting freaky in the studio (as deserved), mutual pining, begging, fingering, unprotected sex, orgasm control, multiple orgasms, dry humping/grinding, breast play, PRAISE PRAISE PRAISEEEEE (did i mention praise? no? well there’s a good amount of praise lol), dirty talk, mild exhibitionism, pet names (you’re his fave troublemaker ofc duh)
→ Networks: @ksmutsociety @k-vanity @keopihaus @lapydiaries @cosyhomenet
→ Author Note: this is a belated birthday gift to myself bc sometimes the fics you want to read you have to write lol. also a big shoutout to aeris @aeristudios for creating a gif for me from a very specific vid that i needed to make this banner <3 i had a vision and it came to lifeeee | divider credit

⋆˙⟡ m.list ⟡⋆⟡ ao3 ⟡⋆⟡ wips ⟡⋆⟡ updates ⟡⋆⟡ shadow realm ⟡˙⋆
“Thanks for agreeing to this,” Jooyeon says with a nervous grin tugging at his lips. “I really appreciate it. I know I asked for the favor super last minute.”
He and his band, Xdinary Heroes, have been grinding nonstop on their upcoming full-length album. It’s a personal project packed with some killer new singles, plus deeply personal solo tracks written, performed, and produced by each member. All in all, it’s shaping up to be their most anticipated album yet.
Jooyeon’s been pouring himself into his solo track for days now, getting lost in the lyrics and layering harmonies late into the night. It’s different from anything he’s done before. It’s slower, sultrier, a little more exposed, maybe even a little dangerous.
It’s so close to being complete, but something is missing. And it’s been driving him crazy trying to figure it out. That is, until last night, when it struck him like a lightning bolt; what Jooyeon wants to add is the right fit, it’s just not the right voice.
He doesn’t need just any voice, though. He needs yours.
The one that has haunted his thoughts more than he’d ever admit. The one belonging to the woman who always brushes off his flirting with a smirk and an eye roll. Like he’s just playing a teasing game. Like he couldn’t be serious about you.
But he is.
“It’s no problem,” you reply with a gentle smile as he holds the studio door open for you. “I’m always happy to help.”
Jooyeon watches you settle onto the couch, then crosses the room to grab the lyric sheet from the soundboard. He sits beside you, just close enough for his knee to graze yours.
Together, you start to go over the song. You read through the verses, pausing to smooth awkward phrasing or tweak the flow, marking spots for vocal layering, planning out subtle additions.
He talks through the nuances of harmonies and breathwork, and you decide exactly where your voice should slide in without overpowering his. It’s more like a dance, your parts should wrap around his, complementing him. Keeping it intimate, intricate.
Once you're both satisfied with the new arrangement, Jooyeon runs through it, testing how it feels when he sings.
"I like it," he says, glancing up at you with a nervous smile. "What do you think?"
You lean back, giving him a slow once-over before smirking. "I think you'd better warm up that pretty voice of yours, I’m gonna need to hear it for real before I let you know my honest thoughts."
He chuckles before ducking into the recording booth and slipping on the headphones. You move to the soundboard, adjusting levels and offering feedback, telling him which takes hit hardest, when to push his tone, when to let it fall softer.
You do your best to stay composed, acting like his voice isn’t crawling all over your skin, like the shift between his sharp high notes and his deeper rasp isn’t doing something to your insides. But every time he looks at you through the glass with his lips parted, brows drawn in focus, it gets harder to pretend you're unaffected.
Jooyeon’s always been a triple threat; insanely talented, unfairly gorgeous, and effortlessly magnetic in the most maddening way. You had the biggest crush on him back in your trainee days, though you’d never dared to act on it. The kind of crush that made it hard to breathe whenever he was around. The kind that never really faded, just got buried under layers of sarcasm, eye rolls, and distance.
But now, hearing him sing this kind of song, watching the way he pours himself into every note, you’re not so sure you can keep pretending those old feelings are still locked away.
"I've always hated how fast you’re able to wrap up your parts," you tease through the studio mic, doing your best to sound casual.
Jooyeon laughs, tugging off his headphones and letting them dangle from the edge of the music stand before stepping back into the room.
"You're so annoyingly perfect," you add with a dramatic roll of your eyes, trying to deflect the growing heat low in your stomach.
"What's wrong with that?" he grins, cocking his head and raising his eyebrows in that boyish, heart-melting way he always does, like he knows exactly the kind of effect he has on you.
"Just—whatever," you grumble, losing your train of thought completely as you push out of your chair, grabbing your water bottle on the way to the booth.
The studio is always too warm, so you shrug out of your sweater and toss it over the back of a chair, left in just your tank top and flared leggings. You slip on the headphones, adjusting them over your ears as the track cues up. Jooyeon’s voice echoes in the background as you add the breathy textures and moan-like embellishments the song calls for.
When the section wraps, you glance through the glass, locking eyes with him.
"How was that?" you ask, a little breathless yourself.
Jooyeon doesn’t answer right away. He’s staring at you, or through you, and his face is completely unreadable. It’s as if he’s caught somewhere between thought and instinct, and you suddenly feel far too exposed under his hard gaze.
"Jooyeon?" you inquire, heart beating faster.
The sound of his name seems to snap him out of it. He clears his throat roughly, fumbling to press the talk button. "Uh, yeah. Let’s, um—let’s run that again, if you don’t mind."
You blink, surprised. "Not at all," you say, adjusting your mic slightly. "Anything you want me to tweak for this next take?"
He hesitates, and when he does, his voice is lower as if almost strained. "Just...make it a little more believable, more…sexual.”
A slow blush creeps up your cheeks as you nod. You close your eyes, letting the music flow through you, trying to feel it, be it. But it still feels off. Too fake, too forced.
You crack one eye open and give Jooyeon a small, frustrated shake of your head. He pauses the track immediately.
"It still doesn’t feel genuine, does it?" you sigh, raking a hand through your hair.
Jooyeon leans forward, "Are you open to an idea?"
Without waiting for an answer, he sets the track on a loop, steps away from the soundboard, and steps into the booth with you. The space begins to feel even smaller with him in it.
He grabs the chair off to the side of where you’re standing, dragging it back against the wall. Then he lowers the mic stand to match the new setup. Sitting down, he pats his thighs with a steady hand.
"Come sit."
You blink, your heartbeat picking up once again. "What?" you ask, half-breathless. "Why?"
"Just trust me. Come sit," he says, voice low but insistent, his eyes locked on yours.
Against better judgment, you do as he says. Carefully, you settle onto his lap, feeling the solid heat of him beneath you. His hands are patient but firm as he adjusts your headphones, slipping one ear off so you can hear him while the track hums softly into the other.
Jooyeon’s voice brushes your exposed ear, low and coaxing. "Now just relax. Feel the music. Feel me." His hands trail slowly down your arms as you start to sing the first section of harmonies.
Heat floods to your core almost instantly, and you can’t help the way your thighs instinctively press tightly together. He notices and lets out a pleased chuckle before his lips brush against the sensitive skin of your neck.
A soft, involuntary moan slips from your mouth, your head tipping back against his shoulder.
"That’s it," Jooyeon murmurs, his voice low against your ear, careful not to let the mic catch it. "That’s what I want to hear."
His hands gliding over your upper thighs before sliding up, fingers hooking lightly at the waistband of your leggings. He lingers there, teasing, testing your boundaries.
"God, you’re trouble," he breathes, his voice thick with want. "Do you trust me?"
You nod without hesitation, your whole body buzzing with anticipation.
"Then open your legs for me," he says.
The second you obey, he slips his hand beneath your lower layers of fabric, fingers skating lower and lower until he finds the soft heat of you, brushing against your clit with a featherlight touch that makes your breath hitch.
You bite your lip hard, struggling to stay composed as the track plays on, your own voice layered under Jooyeon's. You sound breathy, aching, just the way he envisioned.
His touch is light at first, just enough to drive you mad, tracing slow circles over your sensitive bundle of nerves. Your hips twitch without meaning to, seeking more pressure, more friction, but he holds you still with a firm arm wrapped around your waist.
"Easy," he murmurs, dragging his mouth along your jawline. "We’re not in a rush.”
You whimper softly, the sound melting right into the music, blending so naturally that if anyone else heard the track later, they might think it was just another embellishment, another perfectly captured emotion.
Jooyeon's free hand slides up, slipping under your tank top to palm your breast through your bra, thumb brushing over the hardening peak. Every touch, every movement of his is purposely slow, calculated to wring every ounce of sensation from you.
"You’re doing so good," he whispers.
Your hands find his thighs, gripping tight as his fingers slip lower, teasing at your entrance before gliding back up to circle your clit again, just a little firmer this time. Pleasure coils hot and sharp inside you, tightening with every lazy pass of his fingers.
"Joo, please," you gasp, not even sure what you're begging for. More of something, anything. Everything.
Jooyeon groans low in your ear, the sound vibrating through you as his fingers slip lower once again, this time dipping two into your slick heat.
“O-Oh god,” you mewl loudly, not caring what gets picked up by the mic anymore. He stiffens below you, his hard length pressing against your backside.
"My favorite little troublemaker makes the prettiest sounds for me," he murmurs against your skin, voice dark and possessive.
His fingers curl deeper inside you, finding that devastatingly perfect spot that has you gasping sharply, your whole body jolting against him. “You feel so good, trouble, you’re so wet for me.”
Jooyeon speeds up just enough to tip you closer to the edge, and when your head lolls back against his shoulder again, he captures your mouth in a slow, devastating kiss.
It’s messy, and when you finally break the kiss to gasp for air, your body shudders against his as the first waves of release start to crash over you.
"That's it," he rasps, working you through it, keeping his movements steady. "Sing for me."
And you do. A high, broken moan spills from your lips, right on cue, weaving seamlessly into the track playing in your ear as pleasure tears through you, leaving you shuddering helplessly in his lap.
For a moment, all you can hear is the thundering rush of your heartbeat and the faint echo of the music. But then reality crashes back in.
Jooyeon’s hand is still tucked inside your pants, his breath still hot against your ear, his voice still murmuring sweet, dizzying things meant only for you.
Panic surges inside your body, choking you. You tense, jolting upright, desperate to put space between you. Scrambling off his lap, you make a move toward the door, the walls of the studio feeling like they’re closing in.
"Y/N, wait—" Jooyeon’s voice is sharp with concern. He reaches out, catching your hand before you can leave, his fingers wrapping around yours, grounding you. "Please. Don’t go."
There’s a hint of fear in his voice now, a crack in his usual easy confidence. It stops you cold; you’re torn between the overwhelming urge to flee and the equally powerful pull to turn back to him.
"I'm sorry," Jooyeon says, voice low and rushed. "I'm sorry if I took that too far. I acted impulsively and overstepped. I should've thought about your boundaries instead of getting caught up in my own feelings."
He drags a hand through his hair, frustration bleeding through every word. "I put myself first, and I’m sorry. I know you probably still see me as just a friend. I... I’ve liked you for years, and I got wrapped up in the moment. If you want, I'll scrap the whole recording. We can pretend it never happened."
"Wait, what?" you blink up at him, stunned.
"I’ll throw the whole song away," he says quickly, almost tripping over his words. "Start over. I don’t care."
"No. No, I don’t want that," you cut him off, heart pounding. "But...what did you say before?"
He hesitates, eyes darting nervously across your face.
"I, uh..." He chuckles awkwardly, scratching the back of his neck. "I said I’ve liked you. Probably since the day I met you. That’s why I was so excited when you agreed to help me with this. I just…" He stops himself, tilting his head slightly, trying to read you, trying to see if he’s ruined everything, if you’re about to walk out for good.
But before he can figure it out, you close the distance between you and crash your mouth against his, silencing every doubt burning in his mind.
Your hands tangle into his long hair, fingers threading through the blonde strands, tugging just enough to draw a low, needy growl from his chest. His arms wrap around you tightly, hauling you against him before spinning you and pressing you back against the padded wall.
You gasp into his mouth, and he devours it as he lifts you effortlessly. Your legs wrap around his waist, anchoring yourself to him as you grind down instinctively, a moan slipping free when you feel the heat of him, hard and ready, pressed against you through his jeans.
Jooyeon breaks the kiss just long enough to breathe, his forehead resting against yours.
"Are you sure you want this?" he asks, his voice rough, his eyes searching yours like his entire world depends on your answer.
You smile, tracing your fingers down the line of his jaw. "There’s nothing I want more than you," you whisper, tugging him back in for another kiss.
He sets you down gently, his hands lingering on your body as he peels off your tank top. Your pants follow next, pooling at your ankles, leaving you bare and burning under his gaze.
His clothes are stripped away just as quickly, until there's nothing left between you but body heat.
Without another word, you're back in his arms, pinned between his body and the wall. He slides a hand down, lining himself up, his tip slowly circling your entrance. His teasing has you whimpering against his lips.
"Mmmm, still so wet for me, trouble," he growls against your skin, the deep rumble of his voice making your thighs tremble around his waist. "I think I could fully sink into you in one move. What do you think?"
His mouth trails hot kisses along your jaw, down the sensitive column of your throat. "Can you take all of me at once?" he murmurs, his voice dark and possessive, like he already knows the answer.
You tilt your head back, offering him more of your neck, your chest heaving as you clutch at his bare back, desperate for him. "Yes," you gasp breathlessly, wrecked already from just the anticipation. "I want you inside me, Jooyeon. Please."
That single word shatters the last thread of his restraint.
With one smooth, devastating thrust, he buries himself fully inside you. He fills you so perfectly that you cry out, your body arching against him. The stretch is intense, making your walls flutter helplessly around him.
"J-Jooyeon," you moan, your voice breaking, raw with pleasure.
He holds you there for a moment, just letting you feel every thick inch of him, nestled so deep it feels like he’s part of you. His forehead presses against yours, his breathing just as ragged while he composes himself.
"Fuck," he groans, grinding his hips in a slow, punishing circle once he’s got a hold of himself. "You feel like heaven...squeezing me so tight already. So perfect for me." His hands grip your thighs tightly enough to leave marks.
You whimper, rolling your hips to meet his, and he curses again. His control slips even further as he pulls out almost entirely, only to slam back into you, setting a rhythm that’s brutal and achingly perfect.
Each thrust rocks you harder against the wall, pleasure clawing up your spine until your nails are digging into his back, desperate for more. So much more.
"You’re my little troublemaker," he growls against your ear, voice rough, possessive, as he drives into you over and over, each snap of his hips pushing you closer to the edge. "Say it."
"I’m yours," you choke out, stars bursting behind your eyelids.
"Again," he demands, thrusting deeper, making you sob out the words.
"I’m yours, Jooyeon. Only yours."
He captures your mouth again, swallowing your cries hungry kiss, claiming every sound you make as he pounds into you mercilessly, bringing you closer and closer to falling apart.
Your walls clench helplessly around him as you shatter. You sob his name into his mouth, your body spasming in his arms as he fucks you through your orgasm, never never letting up.
The rush of heat and sensation leaves you dizzy, your vision white-edged and blurred.
Feeling you fall apart around him drives him over the edge, too.
"I’m gonna–" he gasps, his voice a whisper against your lips. He buries himself deep with one final, punishing thrust, his whole body tensing as he comes inside you. His forehead drops to your shoulder, his heart pounding against your chest while he catches his breath.
For a long moment, you just cling to each other, trembling, your bodies still fused together, the air thick with the scent of sex and the sound of your heavy breaths.
Slowly, Jooyeon lifts his head, brushing your sweaty hair back from your face with a tenderness that makes your chest ache.
"You okay?" he asks gently, his voice low.
You nod, still too wrecked to form words, and he smiles breathtakingly before pressing a kiss to your forehead.
"Good," he murmurs, a teasing glint in his eye. "Because I can be ready for round two in a few minutes."
You throw your head back and laugh, loving how effortlessly playful he can be in any situation. “Maybe we should focus on editing that recording first. Then maybe you can fuck me into the couch out there. After you lock the studio door, of course.”
It’s his turn to laugh, his chuckle rumbles through the room while his arms instinctively tighten around your body. You nuzzle closer into him, skin still tingling, breathing in his scent.
And you wouldn’t want to be anywhere else.
⋆˙⟡ m.list ⟡⋆⟡ ao3 ⟡⋆⟡ wips ⟡⋆⟡ updates ⟡⋆⟡ shadow realm ⟡˙⋆
→ Taglist: want to be notified when I post new fics? join my taglist here! OR follow @shadowkoo-fics & turn on post notifications!
@mar-lo @sinfullygay @starsrens @lovetaroandtaemin @daniela-f-uwu @curse-of-art @velvetskize @fancypeacepersona @verogonewild @victoriaaf @mar-lo-pap
©shadowkoo 2025. All rights reserved.
#100#ksmutsociety#kvanity#lapydiariesnet#keopihausnet#cosyhomenet#jooyeon#xdh#xdinary heroes#xdh smut#xdh fanfic#xdh imagines#xdh scenarios#jooyeon smut#jooyeon x reader#jooyeon xdinary heroes#jooyeon scenarios#jooyeon fanfic#jooyeon imagines#jooyeon oneshot#xdh oneshot#xdinary heroes smut#xdinary heroes oneshot#xdinary heroes fanfic#xdinary heroes imagines#shadowkoo
176 notes
·
View notes
Text

Hello! I got an ask [x] for a tutorial for one of my recent gifsets for tgcf [x], so here it is, split into three parts:
Drawing a Curve
Template - optional: if you want the curve to flow throughout your entire gifset
Colouring - optional: specific to that particular gifset I did
Progressions
PART 1: DRAWING A CURVE
Trying this out as a screen recording for the first time since it's easier to show 🤡
PART 2: TEMPLATE
This part is optional and only applies if you want your curve to flow throughout all the gifs in your gifset. Of course, you can do your curves individually per gif, but it's generally better to have a template for how the entire curve will flow first so that the joining lines between each gif flow smoothly.
Create a new document for your template. For the height, calculate the height of the entire gifset, including the buffer areas between each gif (4px). E.g. for a gifset of 4 gifs, each of which are 540px in height, the total height would be 540px x4 gifs + 4px x3 buffers = 2172px
In your new document, go to View > Guide > New Guide Layout and change the number of rows to the number of gifs. Make sure Gutter is 4px.
In my case, for this gifset, I skipped step 2 and manually created the template for each gif instead, since every other gif has a different height.
Put in a single frame of each scene in your template (see image below).

5. Club the layers according to which gif they will be in, apply the corresponding layer masks for each gif, and draw your curve that will flow through all 5 gifs (see image below). The reason for doing this (having the previews of the scenes in at this stage) is so that as you're drawing your curve, you have a better idea of where it will flow.

6. Duplicate the curve such that each group (i.e. gif of your gifset) has one such curve layer.

7. When you're ready to edit your actual gif, import your scene into Photoshop and duplicate the layers for that particular gif to your imported document. You may need to shift your duplicated layers or crop your file to the right size.

PART 3: COLOURING
The colouring for this gifset is pretty straightforward since everything is in black and white.
1. Import all your scenes and position them accordingly. Add a mask on your curve layer so that you can mask out the parts of the curve you want to be "hidden under" your scene - so that your curve looks like it's interacting with your scenes.

2. These are the usual adjustment layers I use for black and white colouring, but it's up to you to use what you prefer or are familiar with. Play around with the numbers for each adjustment layer to see what works best for the particular scene.

3. Slap on a crumpled paper texture for an added grunge effect.

4. Colour the remaining scenes and done!


PART 4: OTHER GIFS THAT ALSO WORK THIS WAY
Progression 1: curves flowing to organic shapes
set: [x]
Using the same Curvature Pen Tool, but this time with the fill on, to create shapes first. Then, link up the shapes with lines.

Progression 2: flickering curves and organic shapes
set: [x]
On top of Progression 1, draw 2-3 variations of your curves and shapes and lay them out chronologically on timeline so that you get this flickering effect.

119 notes
·
View notes
Note
hi i'm sorry to bother you but do you have any tips on giffing dark indoor scenes? yours always look so good!
hi there! not a bother at all :) i can definitely try to explain the steps i usually take under the cut!
this tutorial will assume that you already know the basic steps of gif-making — if you don't, there are lots of great tutorials floating around on this site that can help you out! :)
here's the gif i'll work with to explain my steps, the bottom being the original and the top being the coloured/brightened version.

before we start, a general tip i recommend keeping in mind: if you want to brighten a dark scene, you'll want to get your hands on the highest quality download you can find. 1080p is decent, but if your laptop can handle 2160p 4k hdr files* without sounding like it's about to explode, that'll get you even better results!
(*colouring hdr 4k files requires a different set of steps — the scene will appear washed-out on photoshop, so you need to make sure that you don't end up whitewashing anyone if you do choose to work with this type of file.)
since most of my downloads are 1080p, i'll use this type of file in this tutorial.
the first step of my gifmaking process with 1080p files is almost always the same no matter what scene i'm giffing. i make a brightness/contrast layer and set the blending mode to screen:

now my gif looks like this:

depending on the scene and how washed out it looks after this layer, i'll play around with the opacity. for this gif, i didn't touch the opacity at all. use your best judgement for this, because every scene is different!
i find that dark indoor scenes are usually tinted in yellow or green. one of my first goals is to try to fix the undertone of this scene before focusing on brightening it any further. i go to colour balance for this, and play around with the midtones, shadows, and highlights.
again, every scene is different, so the amount to which you use colour balance will differ, but for this specific scene, my goal was to neutralize the yellow. i focused particularly on the midtones and shadows of the colour balance layer, moving the scales to the opposite of the reds.


doing so will help with neutralizing the yellow. the only reason i moved the scales towards magenta and blue (therefore making it a bit more red than less) rather than green and yellow in shadows was because i wanted a darker contrast in the blacks. moving them to green and yellow made the overall scene more yellow since there were so many dark spots that shadows affected. (you'll see what i mean when you start experimenting with your own gif — this part of the process really just depends on your preferences!)
our gif might not look that much better yet, but it will soon! our best friend channel mixer is gonna help us out. for an in-depth post about how to use this adjustment layer, i recommend checking out this tutorial.
i'm someone who prefers to make more than one layer for the same adjustment layer for a reason i can't even explain (i just find that it helps me stay more organized). so don't think of this process like i can only use this layer once so i MUST fix it NOW. you can create multiple layers of the same adjustment layer, because every layer on top will affect the ones underneath it.
since my priority is getting rid of the yellow tint, i went to the Blue section of the channel mixer and increased it in all of the scales:

this step alone has helped us out so much, because look at our gif now!

not only does the background look less yellow, but so does izzy's skintone.
now i'm going to focus on trying to brighten the scene even more without destroying the quality. the levels layer can actually help out a lot with this.

the amount to which i move each toggle differs per scene, and i think experimenting depending on your gif works best for this layer.
side note: i prefer not to use the ink droppers on the side because the contrast in the result usually ends up feeling too strong for my preferences, but if you find that this works better for you, then go for it! basically, the first dropper with the black ink should be clicked before you select the darkest part of the scene that you can find, and vice versa for the third dropper with the white ink — click it, and then select the brightest part of your scene.
curves is the next layer that does fantastic work! unlike the levels layer, i do actually use the ink droppers for this. it's the same concept, with the first dropper being used on the darkest part of the scene, and the third dropper on the brightest.
try to think of curves as something that not only further brightens your scene, but also helps with the colour neutralizing process.
i grab the first dropper, then click the darkest parts of the gif that i can see. depending on the undertone of the blacks that you're clicking on, the tint of your gif might actually change significantly. this is why i prefer to click once, then undo the action if i don't like what it gives me. izzy's leather jacket was the sweet spot for this gif.
when i'm satisfied, i make another curves layer and use the third dropper to click the bright/white parts of the scene. for this gif in particular, the lights in the background were a good fit because they carried a yellow undertone — this meant that my curves layer actually helped to further neutralize the yellows in the scene as a whole!


(i manually dragged the curves graph upwards for the third dropper to make it brighter. i don't need to do this if the dropper does this for me automatically, but since the lights were pretty bright, it only changed the tone of the scene and didn't increase the brightness — hence the manual step.)
pat yourself on the back, because this is what our gif looks like now!

this is good, but it's not great — there's still just a bit too much yellow in the scene for my liking (sorry, i'm picky! :P)
i created another channel mixer layer and played with the toggles until i was satisfied:


ta-da! the gif as a whole is much less red/yellow now:

this is when i start fixing the colouring now — namely, his skin tone. selective colour will be your best friend here. i wanted to make his face just a tad brighter and less of a yellow-ish magenta shade, so i focused on the reds and yellows.


then, out of habit, i created another selective colour layer and took out more of the "yellow" in the whites to make them whiter, and increased the black (just by +1, since the contrast is pretty good enough already).


note: i switched to "absolute" for these two colours. basically, relative = less vibrant colour manipulation, and absolute = more vibrant/stronger colour manipulation. i prefer to stick to "relative" for fixing skin-tone since "absolute" can be a bit too strong for that.
our gif looks like this now!

his face looks brighter and much less yellow, so i'm satisfied!
this next step is not mandatory at all — again, i'm just picky and despise yellow-tinted scenes. i personally believe that indoor scenes that are yellow/green tinted make them look more dark than they actually are, so i do my best to get rid of these colours.
i also don't always do this, but for this gif, i just simply went to hue/saturation, selected the yellows from the drop-down menu and decreased its saturation.

be careful not to do this too much. depending on the quality of your download, this can significantly decrease your gif quality. i tend to worry less about this when i'm working with 2160p files, but again, those files require an entirely different set of steps when it comes to brightening/colouring.
since this was a 1080p file download (and one that was actually less than 1GB, oops, don't do that), i played it safe and decreased it by -39 only.
note: you also want to be cautious of colour-washing skintone when it comes to this step. i find that another selective colour layer can help perfect the skintone in case the yellow drains out of it too much, but skip the hue/saturation step if it's too difficult to work with — better to be safe than sorry.
anyway, this is the final gif!

that's usually what i do when it comes to colouring dark indoor scenes! i hope this tutorial makes sense, and if you have any further questions, don't hesitate to reach out! :)
#tutorial#gif tutorial#resources#completeresources#coloring tutorial#allresources#dailyresources#userraffa#userdean#uservivaldi#alielook#usercats#usermoonchild#usernaureen#userbarrow#userabs#useraish#useralison#userisaiah#*mytutorials#i am so sorry if this is incoherent#it’s so hard to explain things coherently 😫
756 notes
·
View notes
Note
Hel!o, again! I meant ur Van Helsing poster 😊 Happy Holidays if you celebrate 😊

i'd be more than happy to! happy holidays to you as well! here's the kind of poster i'll walk you through how to make:

the most important thing you need to think about with this type of poster is which shots will blend best with each other. i recently made a blending tutorial for another anon and you can find it here. in it, i go a bit more in depth on what types of shots will blend best, and you can also check out the blending tutorial tag on my resource blog, @gifmakerresource.
overall, dark on dark blends the best. the lighter your scene(s), the harder it's going to be to see. when making this poster, i went in knowing i wanted to use this silhouetted shot of van helsing. silhouetted shots are one of the best kinds of shots you can blend with because the silhouette itself will be much darker than the surrounding area.

this is what i started with (after cropping and sharpening). the dimensions i used are 540px x 700px but the height can be whatever you want. next, i wanted to focus on lightening the background and further darkening his silhouette.
here are my coloring layers (which will, of course, vary with every shot and every movie):

and here are the specifics for each layer in order from bottom (first) to top (last)*:


*note: the blue selective color layer also makes the same adjustments to cyan
i created a new layer (ctrl+shift+n) and painted over the extra-bright parts around his head for later blending. this is a layer i added after the fact once i found all the shots i wanted to use and blend together.

this is the second shot i used:

once cropped, sharpened, and converted to a smart object, i bring it over to the existing canvas, making sure it's properly aligned with ctrl+t, and set the blending mode to screen.
here are my coloring layers:

and the details for each (and if you're wondering, to color code your layers, right click in the box where the eye is and select your color):

and this is what the gif looks like prior to using a layer mask:

it's not terrible, but i wasn't happy with how much of the second gif could be seen outside of the silhouette. this is also a good illustration of how dark blends with dark best, compared to dark and light or light and light. i grouped together the second gif and the coloring layers (select the appropriate layers and ctrl+g) and then added a layer mask to the group by clicking this at the bottom of the layers panel:

when using a layer mask, you're only working with 2 colors: black and white. using a soft circular brush (0% hardness), as you can see in the selected thumbnail titled Group 3, i used black to color all around van helsing's silhouette. if you make a mistake when coloring, simply press x to switch to white and brush over the desired area and your gif will reappear. it's a way to "erase" a layer without permanently deleting it and is something i use frequently!
i used another layer mask so the gif was only visible right around the top of his hat:

and the coloring layers (note the gradient map is applied to the gif using a clipping mask [right click on the gradient map layer and choose 'create clipping mask'] so it only is applied the the layer immediately below it [the third gif] and not everything below it):

details:


this is the final gif before all the typography:

for the typography, i don't really remember why i didn't just use a transparent png of the movie logo other than knowing i had the actual font they use on the poster already installed. you can find it here (dafont). at the top of this screenshot, you can see my font settings and at the bottom, you can see the blending modes i added:

and here are those details (click to enlarge):


using the same font, i added these two layers and positioned them where i wanted:

the names layer is 24pt and adventure is 36pt. to create/position the typography, i was referencing one of the movie posters btw!
for the final two layers, i used the font sf movie poster, which you can download here (dafont) and decreased the opacity of both to 30%:

ignore the warning symbols - i had to replace the font files and ps is mad at me

the "larger" letters are just capitals while the smaller ones are lowercase. i'm pretty sure this is the typical font used at the bottom of movie posters. i believe i either typed all this out referencing one of the posters or i went through the imdb page for the movie and went through the cast and crew sections.
and that's it! we have our finished gif! making a poster like this can result in a large file size, so keep in mind that tumblr's upload limit per gif is 10mb. i believe this gif is 45 frames, which is probably pushing it with these dimensions. if you finish your gif and find that it's over the limit, i HIGHLY recommend using ezgif's optimizer. you upload your file and then adjust the lossy slider and you'll be surprised just how much it drops the file size down without a noticeable difference. i also use this site to convert webp files to gifs/pngs when necessary.
if you have any further questions or didn't understand something, please let me know! i'm always happy to help :) and lmk if you ever want a tutorial on any of my other gifs! happy holidays!
#answered#Anonymous#gif tutorial#my tutorials#flashing gif#gifmakerresource#completeresources#dailyresources#chaoticresources
55 notes
·
View notes
Text
Night Shift
Spencer Reid x Reader
Summary: In the pursuit of an audacious art thief, Spencer Reid and you engage in a thrilling cat-and-mouse game.
Word Count: 1.2k
In the dimly lit room of the FBI's Behavioural Analysis Unit, Special Agent Spencer Reid meticulously studied the pattern of a notorious art thief. Known for their audacious heists, the thief had been stealing famous religious paintings, leaving behind little evidence but a trail of intrigue and frustration. As Spencer delved into the case, he couldn't shake the feeling that there was more to this thief than met the eye.
It was another morning at the BAU, and the team gathered around the large round table, ready to discuss their latest case. Spencer adjusted his glasses, flipping through the files and crime scene photos, attempting to find a connection that eluded even the most seasoned investigators.
"Alright, team," Hotch began, his voice steady and authoritative. "We've got a new case. The thief has struck again, stealing 'The Madonna with Child' from the St. Augustine Museum. Reid, what have you found so far?"
Spencer looked up from his notes, his mind racing with information. "The thief seems to be specifically targeting religious paintings. There's a pattern in the choice of artwork, and I'm working on identifying any potential religious or symbolic significance."
As the team continued to brainstorm and strategise, a mysterious figure lurked in the shadows, watching them from a distance. You, the infamous art thief, observed the investigation unfold with a mix of amusement and fascination. The challenge of outsmarting the brilliant minds of the FBI excited you, and you relished in the chase.
Over the course of the investigation, Spencer's intellect and determination began to catch your attention. You found yourself drawn to the enigmatic agent, intrigued by the way his mind worked. As the thefts continued, the cat-and-mouse game between you and Spencer intensified, each move more calculated than the last. Each heist brought the two of you closer, like chess players engaged in an intricate dance, each move calculated and deliberate. Spencer found himself captivated by the mystery that surrounded you, your motives, and the brilliant mind that orchestrated these audacious thefts.
One day, after another successful heist, you received a mysterious message. An encrypted note left at the scene of the crime, challenging you to a meeting. Intrigued, you decided to take the bait.
The moon cast a soft glow over the secluded park where the meeting was set to take place. Spencer stood in the shadows, his eyes scanning the area. Suddenly, you emerged from the darkness, your face obscured by a hood.
"Special Agent Reid," you greeted, your voice low. "Impressive. You managed to find me."
Spencer's gaze was unwavering as he replied, "I'm not here to arrest you. I want to understand why you're doing this. There has to be a reason behind the choice of these paintings."
You chuckled, the sound echoing in the quiet night. "Curiosity killed the cat, Agent Reid."
But Spencer wasn't deterred. He continued to engage you in conversation, unravelling the layers of your motives and the intricate web of your past. As the night wore on, an unexpected connection formed between you and Spencer, a bond that transcended the roles of detective and thief.
The echo of footsteps resonated through the quiet museum as you emerged from the shadows, your face still concealed by the hood of your cloak. Spencer's gaze met yours, and for a moment, time seemed to stand still.
"You're quite persistent, Reid," you remarked, your voice laced with a mixture of amusement and intrigue.
"I need to understand why," Spencer replied, his tone earnest. "There has to be more to this than just stealing paintings."
A spark of curiosity flickered in your eyes as you engaged in a battle of words, each probing the other's vulnerabilities. The conversation danced between danger and desire, the line between captor and captive becoming increasingly blurred.
The stolen artworks were not just random targets; they held a deeper meaning, a connection to your past that even you hadn't fully unravelled. Spencer, with his keen intellect, became the key to unlocking the mysteries that shrouded your motives.
The heists continued, each one revealing a layer of complexity in the relationship between the art thief and the profiler. Spencer found himself torn between duty and an inexplicable attraction that defied logic. You, in turn, struggled with the emotions that surfaced as you got to know the man behind the badge.
In the quiet moments between heists and investigations, there were stolen glances and fleeting touches. The air was charged with unspoken words, the tension simmering beneath the surface. A slow burn, like a fuse inching its way toward an inevitable explosion.
One night, after the recovery of yet another stolen masterpiece, Spencer found himself standing in front of you, the weight of the investigation heavy on his shoulders. "Why did you choose me?" he asked, his eyes searching for answers in the depths of yours.
You hesitated, the vulnerability in your gaze betraying the walls you had built. "Because you see beyond the surface. You see the person, not just the criminal.”
The admission hung in the air, a silent acknowledgement of the connection that had formed between you. As the investigation intensified, the line between right and wrong blurred further. Spencer found himself grappling with the realisation that the art thief he was chasing was not just a criminal but a complex individual with layers of pain and redemption.
In the midst of a high-stakes operation to recover a stolen painting, the unexpected happened. A moment of danger, a shared adrenaline-fuelled escape, and the realisation that the lines between love and justice had become indistinguishable. The slow burn ignited into a fiery passion that neither of you could deny.
The aftermath of the operation left you standing in the dimly lit room, surrounded by recovered artworks. Spencer approached you, his gaze intense yet tender. "I can't just let you go, but maybe there's another way. Join us, and work with the FBI. Help make amends for what you've done."
And so, the notorious art thief became an unexpected ally, a consultant to the BAU. The slow burn of your connection continued, navigating the complexities of love and redemption. Spencer and you found solace in each other's arms, the weight of the past gradually lifting as you embraced a future that defied expectations.
The dance between the art thief and the profiler had evolved into a love story, a journey that transcended the boundaries of law and order. As the days turned into months, the BAU faced new challenges, but with the strength of an unexpected bond, they confronted each obstacle together.
In the quiet moments, between stolen glances and whispered confessions, Spencer and you discovered that love, like art, was a masterpiece that took time to unfold, layer by layer, brushstroke by brushstroke, in the canvas of their intertwined lives.
A/N: Thank you for reading ◡̈
#criminal minds#spencer reid#mathew gray gubler#fanfic#mgg#fanfiction#spencer reid x reader#spencer reid x you#criminal minds evolution#bau#penelope garcia#jj jareau#emily prentiss#aaron hotchner#derek morgan#criminal minds fanfic#criminal minds fanfiction
186 notes
·
View notes
Note
hi! not exactly a request but i do wanna ask, whats your process when you're rendering more paint like art? (if that makes sense, English isnt my first language so apologies hdskhsjdbd) i really love how you use the colors and im curious how you do it :0
i’ve been meaning to answer this one for a while so here’s how i painted miku in today’s post (put under the read more because yeah prepare for a long post
i’d also like to preface this by saying that i never follow a set way of doing things, so in terms of what my personal process is like, these are only broad strokes of what i do! sometimes i’ll combine or skip parts entirely, depending on how i feel. also, this is not a tutorial, just how i do things, so please don’t treat it like one :’D this will read like the ‘how to draw an owl’ picture if you do
first, like every artist, i sketch. more specifically, i’m getting an idea of what i want to paint later on. this could be how a scene is set up or in this case, how a character is posed. here i’m not concerned about details or getting everything perfectly, i’m only planning how the thing will be composed. maybe a lot of canvas size changing, or adjusting what miku’s doing (note how busted miku’s right hand looks from all the transforming!) however, i still have to be concerned with how clear the sketch will be to future me, because the sketch won’t be any good if i can’t read what miku’s doing

after that, i lay down a flat gray under the sketch, mainly focusing on giving miku a clear silhouette. this is also a good time to make adjustments to the composition on the fly if i suddenly feel like something can be improved upon, like shortening miku’s left arm from the sketch!
after painting a flat silhouette, i start shading in grayscale, focusing only on lighting. i usually do it in two passes, one for the lightest and darkest tones i’ll use (not black and white) and then a second for midtones to blend them better with the base gray but i forgot to screenshot the result of the first pass 🗿 nevertheless, here is where i can start adding some amount of details. i’m not including any extra accessories yet, just focusing on the base design of the outfit and the character herself (for anyone wanting to draw characters from That Gacha Game, this is how i personally make the process more bearable for myself.) i still use the dark gray to separate where certain details (like the facial features and fingers) begin and end, mainly to make colouring more bearable later.
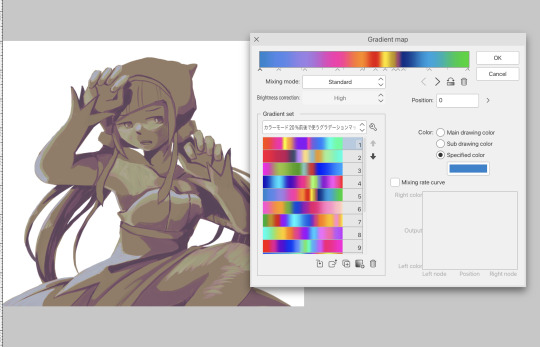
now here’s where i get the Good Colours. it’s a cheat lol. i put a gradient map layer over the grayscale painting so that there’s a little bit of color to start. some gradient maps can be applied as is, some need the layer settings adjusted to make it look good. this one, for example, is a (free) gradient map set from the csp assets store that needs you to set the layer opacity to 20% and to set the blending mode to color to achieve this result. in general, i tend to pick which gradient map i want to use based on vibes, or basically whether i want the work to be warmer or cooler, colour-wise. but this does do quite a bit of lifting for the colors in my stuff.
and then, finally, i add the colours. i add flat base colours in an overlay layer. at this stage, i’ve made the character silhouette clear enough that i don’t need to refer to the sketch anymore for what miku looks like. also, the gradient map layer does its magic by making the shading a bit more vibrant than it would’ve been without it. after that i paint over with a new layer to add details like the lace.
and then i put some extra shading on top. basically this is where the ‘better lighting’ happens. again, this isn’t a tutorial, so i’m not here to say what each part of the lighting is, but i’ve labeled which layers do which job. in other works where the lighting within a scene is more defined (from a window, from a small crack in the walls, etc) the glow dodge layer may be more opaque and sharper, but since this isn’t a work with that, the lighting was applied using an airbrush. the linear burn layer is also there to make the whole thing darker so the glow dodge doesn’t end up oversaturating miku. i also usually match the lights to the vibe i want, and use a complementary color for the shadows. so here you can see i have warm colors on the glow dodge layer, but light purple on both the linear burn and multiply layer.
and that’s it for the character—here’s a gif showing how each layer adds to miku! (sorry it’s so toasty)

as for the background, depending on the complexity, it may go through a similar process, or if i can settle with flat image backgrounds, i just go for that. it’s ok to use external image materials. i didn’t have a background in mind for this miku in specific, so i got some default csp materials and threw together something
and that’s about a rough overview of what my process for more finished works looks like! again, art is a fluid process so i never specifically stick to certain steps all the time, and you shouldn’t either. i can probably answer why i’d pick this colour over another in one particular work, but it’s something that kinda has to be learned on a grander scale. i think everyone can already feel what colors work with what atmosphere or what setting, even if they can’t immediately explain why. colors and composition do take some level of experimentation to find what works best!
125 notes
·
View notes
Text


Hi! I've finally organized my PNGTuber commissions ^^ These are very fun to make, so I hope I'll get the chance to make some fun ones for y'all. Information and pricing below! If you have any questions about specifics or clarification, or are interested, please reach out to me through DM!
If you commission a PNGTuber from me, you'll receive a .save file compatible with the free program PNGtuber+ (specifically the most recent release, 1.4.5, but should work with some older releases). Loading this file in the program will load up the finished avatar with pre-linked and positioned pieces layered appropriately. You'll be able to adjust specifics such as FPS, bounciness, blink chance, etc. to your liking. They can easily be used with OBS and set up to use for Twitch or Discord streams, or just enjoyed as fun, bouncy, animated pieces of art.
The base price of a PNGTuber commission is $45 USD. This includes:
A waist up figure (examples 1 & 2) or full small & simple figure (example 3), rendered either in a lineless or a clean lined style, with simple shading.
A maximum of 10 separately layered objects. For reference, example 2 contains only 8 layers (3 eye states, 2 head states, body, ruffle, and additional ball.) Additional layers can also be used for alternate costumes/special mode changes. Each additional separately layered object beyond the initial 10 will cost $3 USD.
1 piece of simple animation. Animated pieces continue to cycle through their frames of animation regardless of sound input, and extend beyond blinking and the simple left-right or up-down movement of the program. For example, the flapping wings in example 1 and the rotating katamari in example 3. Simple animation includes color changing/glowing, tail wagging, wing flapping, and things along those lines. Each additional piece of simple animation beyond the initial one will cost $8 USD.
Complete control and unlimited revision throughout the process until you're satisfied with the finished product ^^
Thanks for taking a look!
74 notes
·
View notes
Note
hi, your gifs are extremely good, I'm sincerely intimidated by your talent so excuse me for the anon ask. I was wondering how did you make this blending? /post/739252081037328384 What was the process to make it look so good? cause I'm trying to do a similar blending with another anime but it's getting hard (and honestly, turning ugly ajskd) thank you
hi! thank you so much 🥺 i'm so sorry for the late reply btw. tbh blending is always hard for me to explain. so i put together a few progress gifs and videos to hopefully demonstrate how i went from start to end, and i'll do my best to add commentary at the end. i'll show the megumi gif from that set, since it had the most layers:
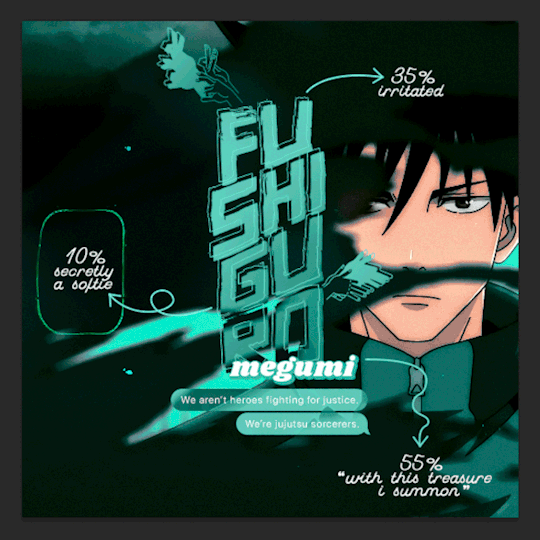
(click for full size) 1. each individual gif before and after coloring + masking (erasing) // 2. each gif being added to the composition
(there's no sound on this video. here you can see me toggling on/off my adjustment layers to demonstrate some aspects i'll explain below the cut)
key parts of blended gifs for me:
choose scenes where the focal point (megumi's face) can be made to stand out. for that, i'll look for scenes against very dark backgrounds or solid backgrounds that can be darkened. when you set a gif to screen (the blend mode used for blended gifs), the light areas of that gif will stand out the most against the dark areas of the gifs underneath
choose scenes with minimal pulsing/harsh/fast movements but with fluid, soft movement (for anime since this style of animation has a lower fps). scenes with enough movement that aren't too jarring can be hard to find in shonen since there's so much action, but some of the best scenes are those "hero pose" moments where their hair blows in the wind lol (one of my fav scenes to gif is gojo in at shibuya station after choso first tries to hit him with his ct bc his blowing hair is animated so gracefully sldkfjs). in this case, i have todo's torn shirt breezing in front of megumi's face. i knew it would be a great shot to blend with bc i could darken the purple of the shirt and any gif layered above those spots would stand out against it
use layer masks and adjustment layers to "erase" distracting parts of the gif. as you can see in the video, i've erased huge chunks of some of my gifs. i often also use levels with a layer mask to darken select parts of my gif (even reducing the white point as shown in the base gif) + hue/sat to darken specific colors in a gif.
so one of my best tips for coloring is to focus on scene selection, masking, and darkening!
i know it's not a full blending tutorial, but i hope there's something here that can help you. i've also talked about parts of my blending process in these asks:
[one]
[two]
[three] (i've been told tip 2 has been super helpful for ppl)
[four]
if you're interested in reading other inquiries, i have a specific tag #nik.help and all my tutorials are tagged #resource* :)
and good luck with your anime gifset! keep at it! blending can be frustrating but trust the process and i'm sure it'll come out stunning!
15 notes
·
View notes
Note
Could make a tutorial for creating subtitles on Photoshop for beginners! Thank you so much, continue the amazing work!
thank you nonny! i'm glad my tutorials are helping at least one person.
creating subtitles is quick and easy. i'll go over simple subtitles, and also making subtitles appear partway through a gif. once you know how to make them i recommend saving an action for it, for your most common gif sizes, that way you can just press one button and then type in your subtitles.
Font Overview
it's good to have a go-to font. i use Calibri Bold Italic, but any clean, simple print font can work
these are my font settings below. quick rundown of each option
A- this your font family B- this is the specific font; light, regular, bold, italic etc. C- this is the font size D- this is the spacing between each row of text; it's default setting is [auto], which uses the built-in font spacing, but all fonts have different spacing and you could end up with a huge gap between rows. the spacing pt's also don't necessarily match up with the font size, so experiment to get the spacing you want E- this is the space between letters; if you think the letters are too close together then increase the number into the positives, if you think they're too far apart then decrease the number into the negatives F- this will "stretch" the letters sideways; not really used for basic subtitles G- this will stretch the letters up and down; not really used for basic subtitles H- this is your font colour

the setting above are my go-to for 540px gifs, though i occasionally adjust the font size between 18-22, and then also adjust the row spacing to match. for 268px gifs, i'll usually use a font size of 16px
Basic Subtitles
to make the subtitles, select the text tool the left hand toolbar, the icon that looks like a "T", and your cursor will turn to a text selector line in a dotted square. put your cursor at the bottom left of the gif; it doesn't have to be exactly on the corner, but so long as it's close the the edge of the canvas it will "lock on" to the corner.
click and drag to the right side of the gif, and up as big as you want the "text box". there will be a pop-up tell you the width and height of the box you're making. width should be the full width of the gif, and for the height i've set it to 40. the top of the text box will be the very top of the letters on the top row.
the size of the text box can always be adjusted later by clicking a side and dragging.
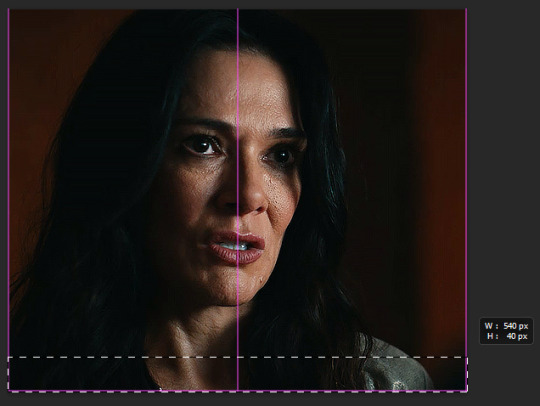
type your subtitle into the new text box, and then click anywhere outside the workspace (the canvas and the grey area behind it) to "exit" the text layer
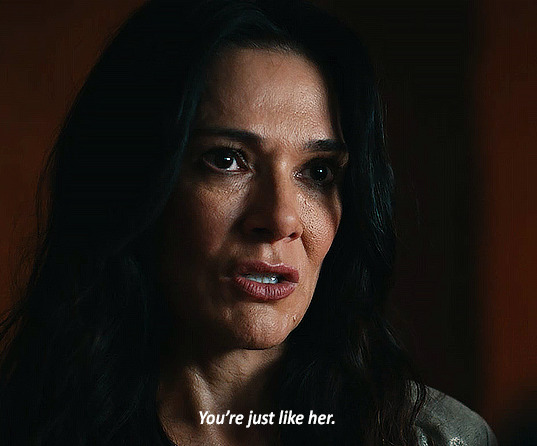
now the text looks pretty good here, because the parts of the gif under it are dark. but a different gif might be lighter, or you might be using a different text colour. to make sure the subtitle is visible and readable on any gif, you're going to go to the menu on the bottom right, with the text layer selected, and click the fx button. any option in the menu that appears will open the same box, just on a different option, i always just click blending options

the layer style box will open. all the options on the side are various effects that can be applied to the text. the ones with a plus sign will allow you to add multiple instances of that effect on the same text. the 2 we'll be using on the subtitles are stroke and drop shadow, so one at a time click on the row for both and a check-mark will appear in the box. you'll also see that effect labelled under the text layer
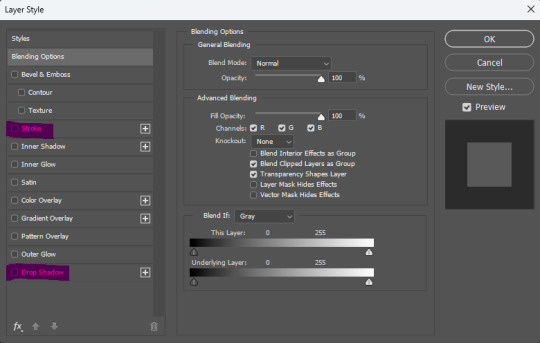
this is the menu for stroke. stroke is simply an outline of the text/object
A- this is the size of the stroke, the width of it B- position can be outside, inside, or centre. for subtitles it should always be on outside C- this changes the blend mode of the stroke, which will have essentially no effect if the stroke is black or white D- the opacity of the stroke E- you can have a stroke made of a solid colour, a gradient, or a pattern F- the colour of the stroke
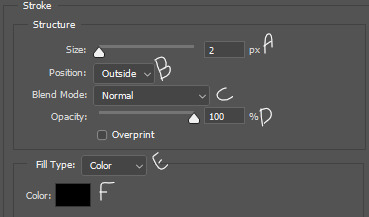
this is the menu for drop shadow.
A- blend mode, again, doesn't do anything if the colour is black or white B- colour of the drop shadow C- the opacity of the drop shadow D- the angle of the shadow E- make sure this in unchecked, otherwise it can screw with the angle F- this is how far from the text the shadow will be G- this makes the edges of the shadow sharper or harder H- this makes the overall shadow sharper or harder
the options under "quality" i never adjust

click ok on the layer style box and you have your basic subtitles!

Fade In Subtitles
now maybe you have a slightly longer gif, where the character isn't speaking at the beginning of it and you want to time the subtitles with the speech. so we're going to use keyframes!
keyframes do various things, by setting two (or more) points on the gif, and the gif will automatically change between those two points, depending on which keyframe you use. (hopefully this will make more sense a little further down)
first play the gif a few times in the export preview window to see when the talking starts and then move the frame tracker (the red line) to 2-3 frames before the speaking begins, in this gif the character starts speaking at frame 50, so move the frame tracker to frame 48

when you click the arrow at the start of the layer, it opens a dropdown of the layer and gives various options to use keyframes on, depending on what kind of layer it is. clicking the little stopwatch will create the first keyframe
transform- this lets you change the size/orientation of the text opacity- this lets you change the opacity of the text style- this lets you change the layer style of the text text warp- this lets you animate the warping of the text

when you click the stopwatch, a keyframe will appear on the timeline on the frame selected, and next to the stopwatch two arrows with a keyframe point between them will appear. the arrows move you from one keyframe to the next, and the point between the arrows will add a keyframe on the selected layer, or remove the keyframe if there is already one there. if you click the stopwatch button again, it will remove all keyframes
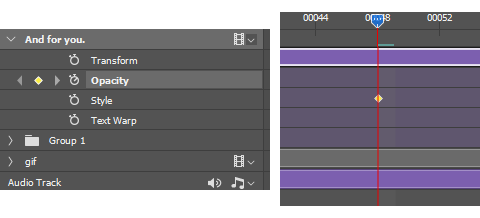
while the tracker is on a frame that has a keyframe attached, anything you do that falls under that type of affect while on that frame will be recorded by the keyframe. on opacity there's only the one thing that will be recorded—opacity.
since we want the text layer to be invisible when the gif starts, turn the opacity down to 0, while on the frame with the first keyframe. now move the tracker to the frame where the speaking begins. add a new keyframe on frame 60 using the new keyframe button. then turn the opacity on the text layer back up to 100
now the text layer will go from 0 opacity to 100 opacity over between the 2 keyframe points, and gradually appear as the character begins talking. if the timing isn't quite right, you can click and drag the keyframe points along the timeline.

A Few Random Notes
some people use white for an entire gifset, even if more than one person is speaking, and some people use different colours to show who is speaking. you can have set colours for speaker #2, #3, etc. but when possible, i like to use the eyedropper to select a pixel colour for the other speaker that is already in the gif, but not prominent where the subtitles will show, so i don't add a colour that wasn't already present, and reduce the number of colours in the gif itself
if the subtitle is long enough to go on two lines (or more) try and cut it to be somewhat even i.e. don't have the top line stretch from side to side, and the bottom line only had 1 or 2 words; if there's a comma or semi-colon in the text, splitting it there as a natural gap/pause
if there are two people speaking in 1 gif, and you want to show their dialogue at the same time, you can put the two different speakers on separate lines of the same text box, highlight one of them, and change only that colour
#cleo gets mail#anonymous#tutorial#gif tutorial#typography tutorial#photoshop tutorial#gifmakerresource#completeresources#*tutorials
48 notes
·
View notes
Note
do you have a coloring tutorial? your gifs are so nice and vibrant, how do you do it? :)
hi, here's a simple basic coloring tutorial that I use pretty much for all of my gifsets:

I won't get into the basics of making a gif as this is just a coloring tutorial, but here is my gif after I just crop and resize it:
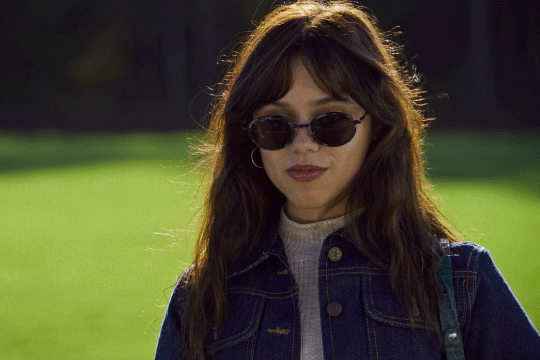
and here it is after I sharpen it:
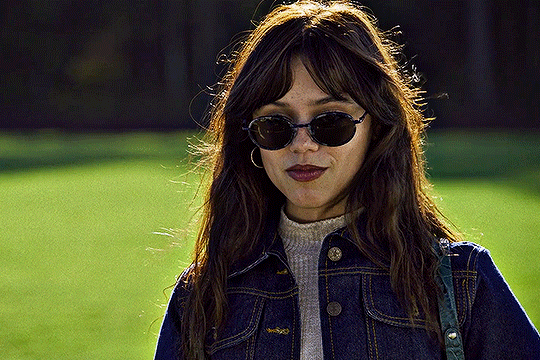
sharpen can affect the depth of shadows in a gif, so I do this before I add any coloring, but I know some people color first and only then sharpen, so both ways work!
alright, ready for some fun coloring? let's go!
before adding any adjustment layers, I suggest creating a new group, so all of your coloring changes can neatly sit in one place.
I always start with levels and curves, they often help to make the overall gif more natural if the lighting is too yellow, too dark, etc., it's a very useful guide, especially if you're new to gifmaking. so, let's start by clicking on the levels icon, a new adjustment layer should appear over your gif layers:
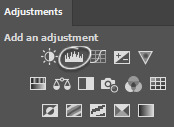
the next step is to click on each of these little icons (I usually only use the top and bottom ones) and to select the lightest and the darkest parts of your gif. pick the top one, select the darkest part and then pick bottom one and pick the lightest part, you should see some changes on your gif, sometimes they're subtle, sometimes they're very obvious:
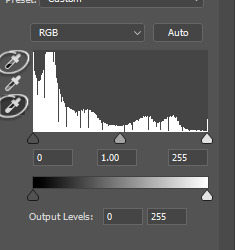
in my gif the lightest part is somewhere near her shoulder where the light hits, the darkest part is her sunglasses (if there are a lot of dark/light parts, I just click around and see whichever looks more subtle. for example, I tried the part on top of her head where the light hit, but it made the gifset too blue because the lighting is yellowish, but since the whole scene is not very yellow, it looked weird so I'm sticking with her shoulder, it just simply looks better overall):

and then I do the same thing with the curve adjustment layer, selecting the darkest and lightest part of my gif just like I did with the levels layer:
while this is a good guide for beginners, it doesn't always fix all the problems. it can be quite harsh, so I recommend setting the opacity to a lower percentage and if it looks a little weird, sliding the arrows to one side and another with each color until it looks better to you:
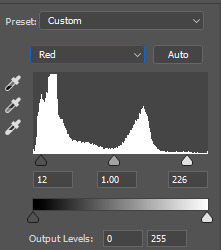
like I said, it's a good guide but manual work is often needed, don't be afraid to mess around with the settings. for this gif I set levels layer opacity to 60% and curves to 37%.
moving on, I'm adding a selective color adjustment layer to fix how the skintone looks with red and yellow colors. it differs with each scene, sometimes the skin is too yellow and orange, so I add more cyan and less yellow but in this case I chose these settings and I set the opacity of this layer to 35%:
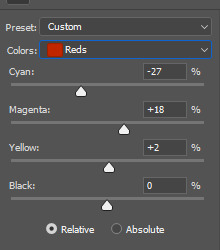
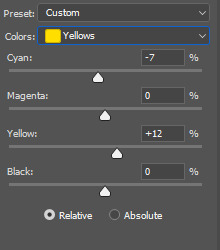
I want to mention that with poc it's very important not to mess around too much with their skin tone and not to white-wash and orange-wash them, there are quite a lot of tutorials on how to avoid doing that.
the next layer I add is exposure, I want to brighten my gif a little bit. you can do that by selecting either brightness or exposure layer like I did:
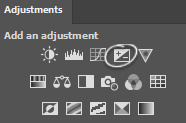
the scene I'm working with is pretty bright, so I'm not adding too much of exposure, here are my settings:
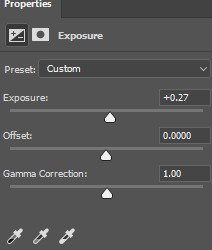
next up, I want to deepen the shadows a little bit, so I use a gradient map for that:
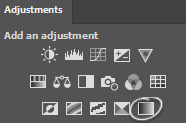
I use black and white gradient and set the opacity to 10%:
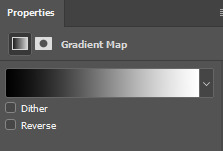
moving on, color balance is another great trick to make the gif look more smooth with one consistent color overall:
if I'm working with scenes that have a lot of green/yellow in them and I want to get rid of that, this is a quick way to slide the arrow to the opposite color and soften it a little bit by adding another color. I usually like to add more magenta to midtones and make the gif have a little bit of a pink look. here are my settings for this specific gif and the opacity of this layer is set to 30%:
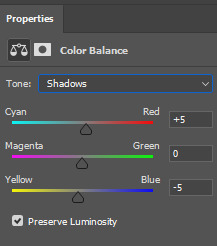
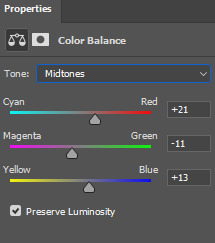
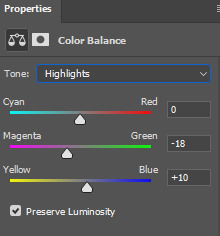
and here's what difference it made to the gif:
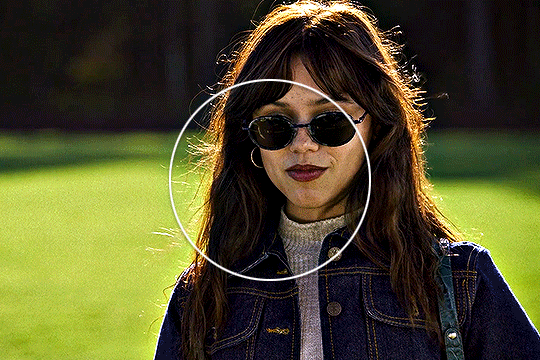
as you can see, the colors outside the circle are less green on her skin and hair. it's all coming together nicely!
let's move on to the background colors. I add another selective color layer and I'm gonna play with the colors I want to enhance the most. in this case it's green grass and her blue clothes. here are my settings for these colors:
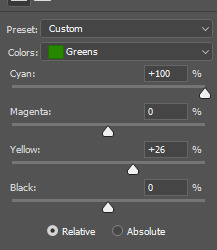
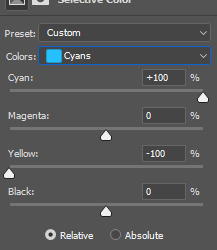
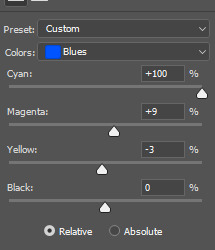
and finally, to enhance the vibrant coloring even more, I like to add one final hue/saturation layer:
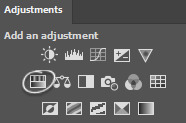
here I like to add more saturation to the colors we're focusing on in the background and add around +20 of saturation. I did this to green, cyan and blue colors:
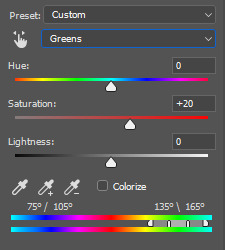
and that's it! here is the finished gif compared to the completely raw one:
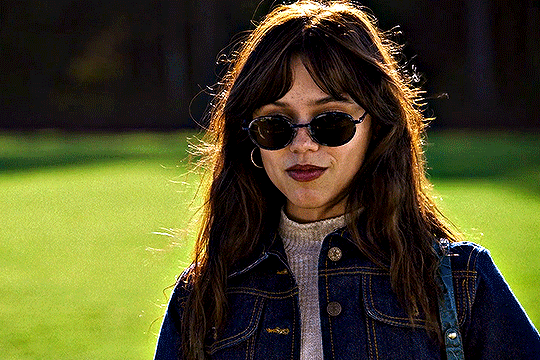
this coloring tutorial is very basic, but it works for most scenes I work with, I just sometimes focus on other colors, add more or less layers but the overall process is very similar.
I encourage to mess around with all the settings and see which ones look the most pleasing to your eye. let me know if you have any questions :)
129 notes
·
View notes
Note
hello your gifs are really wonderful!~ <3 do you have any tutorials to follow or tips for black and white gifs? i can't get the black and white gifs i generate to look okay. thank you so much for whatever you can provide!
thank you!! i don't really have a tutorial for this, but i do pretty much always follow the same steps for my black and white gifs: i use a black and white method first (there are 2 main methods that i use), and then i add contrast and brightening layers (that's when we go from a dull b&w to a nice b&w)
BLACK AND WHITE
this will be your base black and white layer. i use either a gradient map layer, or a black & white layer, whatever looks best for the specific gif. the black & white layer offers more flexibility to change each color tone directly in one layer: playing with the red and yellow sliders will help make skintones darker or lighter as needed, same with other colors present in the gif. the gradient map layer usually gives a more contrasted look, and you can play with the gradient slider to make the gif brighter, but you'll have to use a selective color layer under the gradient map to edit each color as needed (especially reds and yellows, it's usually what i do).
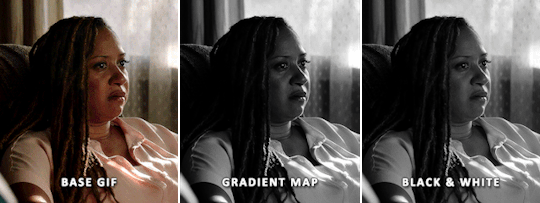
it's possible to achieve similar results with both base black and white methods, it just depends on your preferences and the base gif itself really. (more under the cut)
EXPOSURE & BRIGHTNESS
once you're satisfied with the black and white look so far, you can adjust the gif's brightness with your preferred method. just make sure the brightening layers are UNDER the b&w layer. i usually do a combination of these layers: exposure, curves, levels. when using gradient map i'll also use a selective color layer to edit the reds/yellows (and sometimes blacks) a little to balance the skintone(s). i always prefer brightening a gif after applying the black and white effect, while keeping these layers under the b&w layer.
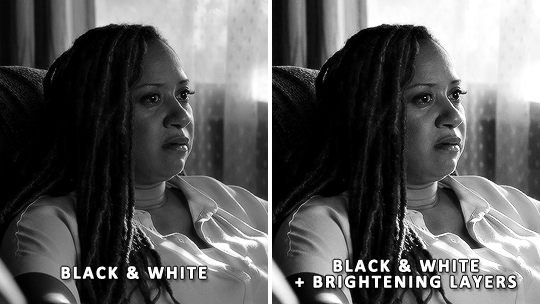

CONTRAST & FINAL TOUCH
at this point, you could stop there or you may want to add more contrast on top of everything if you need, or even reduce the contrast, or go back and edit each color channel. also make sure the black and white effect didn't affect someone's skintone: sometimes it makes a skintone too dark or too pale compared to something in color.
for the gradient map method, i've added a brightness/contrast layer on top of the gradient map and brightening layers. i've also went back to the selective color layer below the gradient map to play with the white sliders so the curtains are not just bright white without any details to them when contrast is added.
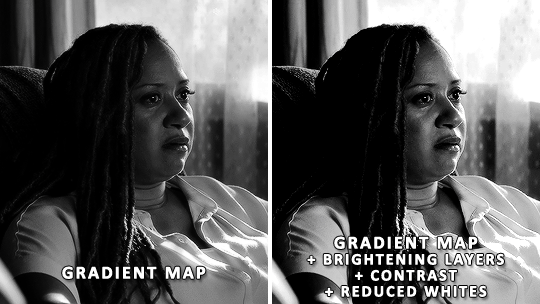
for the black & white method it's quite similar, on top of the black & white layer i have: brightness/contrast and another black & white layer with its blend mode set to soft light and its opacity set to 20% (a neat trick to introduce subtle contrast). i've also added a selective color layer under the black & white to add some deepness to the black values by playing with the black slider of the blacks tab, as well as reducing the bright whiteness in the curtains.
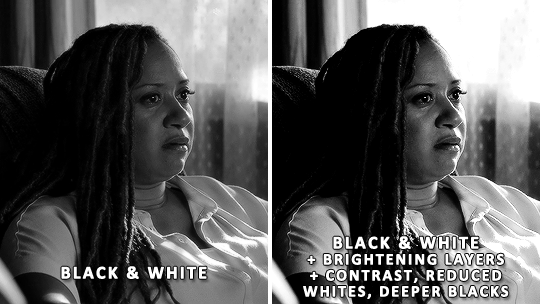
SHARPENING
one last thing to keep in mind: your sharpening method may need to be tweaked a little when using black and white. sometimes it enhances details, so your usual sharpening would be too strong, and sometimes it's the opposite. just make sure you aren't over sharpening and you're good to go.
i hope that helped a little!
125 notes
·
View notes
Note
hello! Your edit for the artful dodger is awesome ✨ would you please post a tutorial on how you made this cool layout with those effects.
https://www.tumblr.com/jakeperalta/768056589581156352/pscentral-members-choice-event-33-underrated?source=share
thank you! of course - i was inspired by this wonderful edit, so credit goes to @perryabbott for the design 😊 it's pretty simple to do, only basic gifmaking knowledge required!
tutorial on how to make this layout below the cut:
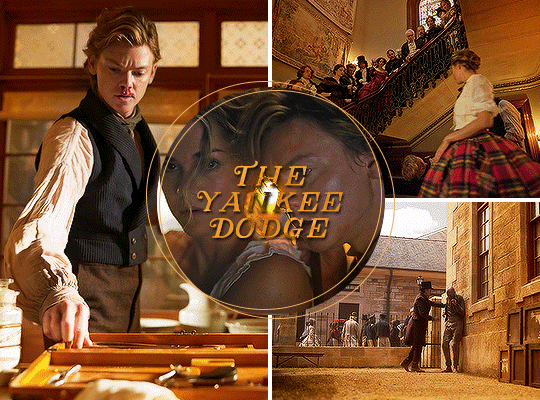
step 1: make your gifs — these are the dimensions to follow (if you want do an alternate layout or canvas size, just make sure the gap between gifs is 4px)
tall side gif — 268px (width) x 400px (height)
wide top/bottom gif — 500px (width) x 268px (height)
smaller gifs (2 per overall gif) — 268px (width) / 198px (height)
circle gif — 230px square
create your gifs, crop and resize. (personally i sharpened each gif at this stage, then did colouring at the end, but you can do that whenever).
step 2: position the three base gifs — either expand the canvas of one gif (using ctrl+alt+c) or create a new canvas (ctrl+n) to be 540x400px.
when you've got your gifs + your canvas, just drag each gif across into the main canvas and position it. depending on your settings/photoshop version, cropping may only hide the cropped parts of the gif instead of removing them so the whole gif will be visible when you put it onto a larger canvas. in this case, after resizing you should use ctrl+a to select the gif, then create a layer mask using this button:

step 3: the circle gif — use the ellipse tool to draw a circle. don't worry about making it the correct size, as you can then resize it (+ turn fill on if not already) using the toolbar at the top:

centralise your circle (ctrl+a then the align buttons on your top toolbar). now you can drag your final gif onto the canvas and position it over the circle. right click the gif layer on the layers list on the right hand side and select create clipping mask from the menu (or select the gif then press ctrl+alt+g). the gif should then be contained within the circle shape.
step 4: add the rings — use the ellipse tool again; this time you want fill turned off and stroke set to 1px and whatever colour you want, like this:

do this twice, then just position them on top of all the other layers however you like (you could also change the dimensions if you wish).
step 5: repeat — do the same thing for each big gif, alternating the positioning of the small gifs. once you've made the circle + rings once you can just reuse them for each so it's not too time consuming.
and that's it! i added my colouring on top (again using clipping masks to add certain adjustments to specific gifs and to paint the orange colour onto each gif) and some text in the middle. let me know if you have any questions!!
17 notes
·
View notes