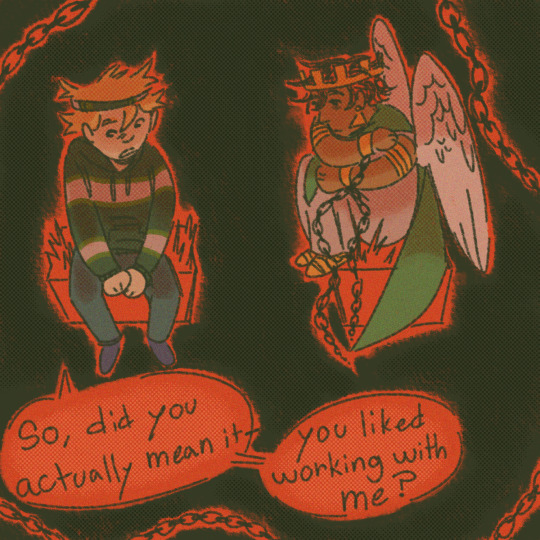
#do I use pngs for parts of drawings i don't want to do??
Explore tagged Tumblr posts
Visit Tumblr Blog
Explore Tumblr blogs with no restrictions, modern design and the best experience.
Last Seen Tumblr Blogs


Fun Fact
In 2020, 27% of US Tumblr users had an annual household income of over $100,000.
Text
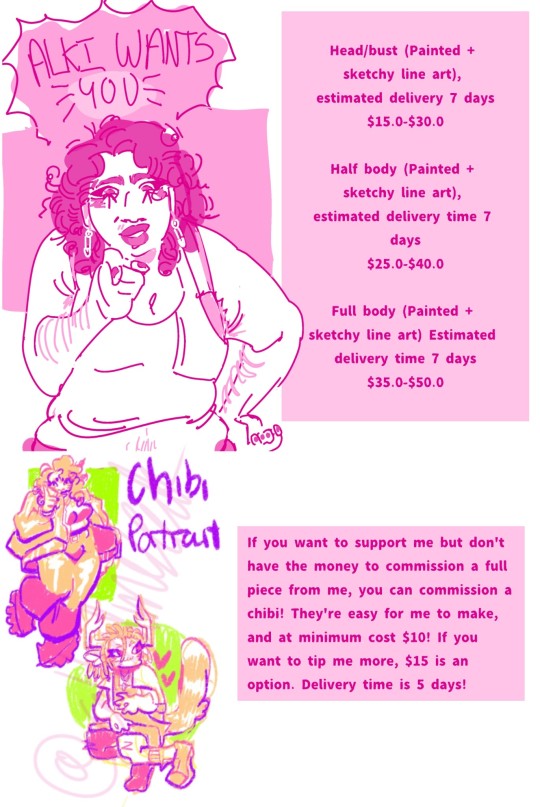
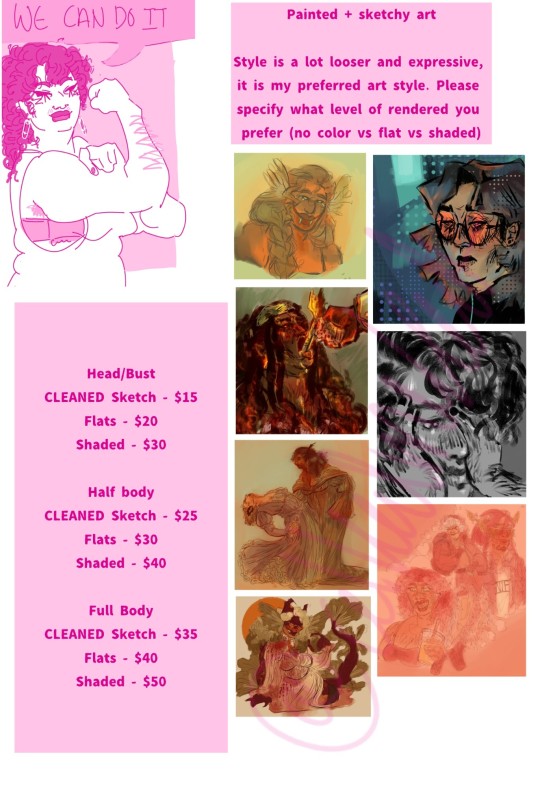

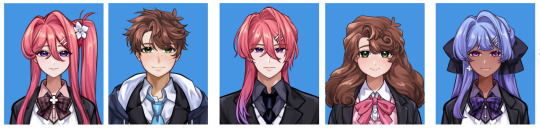
Commissions are open on Ca$h app!! If anyone ks interested please DM me! 3/3 slots are currently opened!
I
Terms of Service
1. You can contact me on discord (aaaabattery), Instagram (crisanto.blooms), Twitter (battsleak) or Tumblr (alkalineleak)! I can't promise I'll respond immediately, but I will try to respond as quickly as possible.
2. I am chronically I'll and experience fatigue, this means that commissions may closed or take a long time to complete. Please be patient and kind.
3. Please be respectful! I will not tolerate rude behavior, and reserve the right to deny or cancel your commission. If this behavior continues, I will block and blacklist you.
4. Do not use my art for any commercial use such as merchandise, book coverage, etc. Profiles and banners are fine since it's personal use, just credit me! The same goes for reposting the art I commissioned, just tag me an or credit me!
5. I reserve the right to post and include all the art I make into my personal portfolio since I still own it. If you don't want the art posted, please tell me and I'll hear you out!
6. Do not submit my art to any AI or AI engine, I do not appreciate my work being stolen and claimed by someone else.
7. Listed prices are the base price, they can increase based on additional details and complexity of the commission.
8. I have every right to deny a commission if I do not meet the skill level required (as to protect customers) or falls under subjects that I will not do.
9. Please provide visual references when commissioning me as it makes my work a lot easier and means I can better fulfill your request and avoid unnecessary mistakes.
10. During the process of commissioning, I will attempt to regularly send updates so that you may request alters or changes. Having to change any major parts of the commission post sketch phase (which I will approve with you) will enquire a fee. Once a piece is past the sketch phase, only minor edits are allowed for free.
11. Do not rush me, but if a commission is time-sensitive, give me two weeks in advance. If you consistently pressure me on completing a commission when I have clearly stated my limits, I reserve the right to cancel or deny a commission.
12. In the rare event that I feel I cannot complete a commission at all, I can give a partial refund depending on how much I've completed. (I will keep 25% of the total cost minimum.)
13. When I am finished, I will message you full res png files of the work, and watermarked .jpegs for social media posting.
FAILURE TO COMPLY WITH A TOS CAN RESULT IN BEING DROPPED, HAVING YOUR COMMISSION CANCELLED OR DENIED, AND BLACKLISTED.
Higher res images of the drawings under the cut


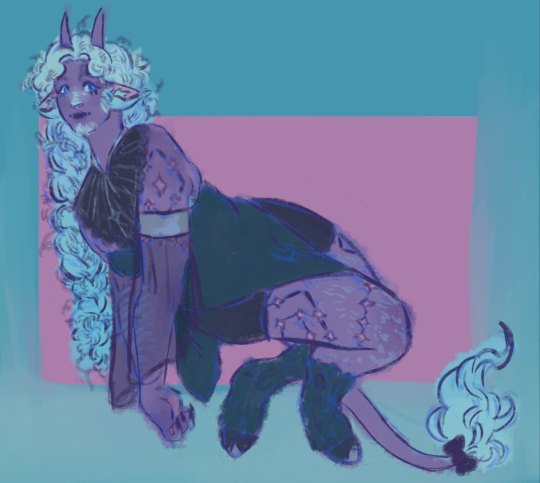


#batterys drawing again#commission#art commissions#dms open#art comms open#art comms info#commisions open#digital commisions#digital illustration#artist comms#comms info#art commisions
19 notes
·
View notes
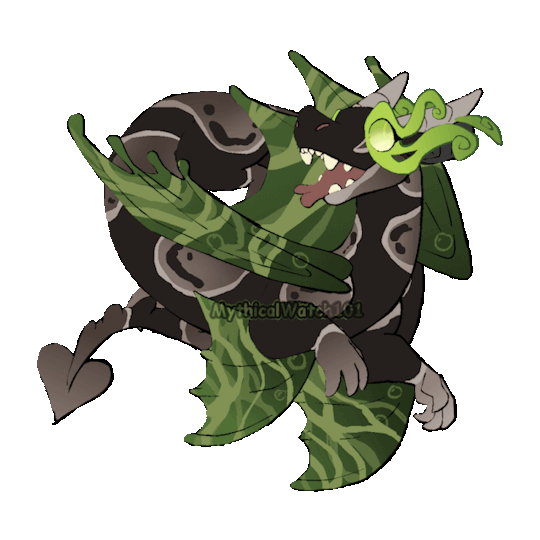
Text
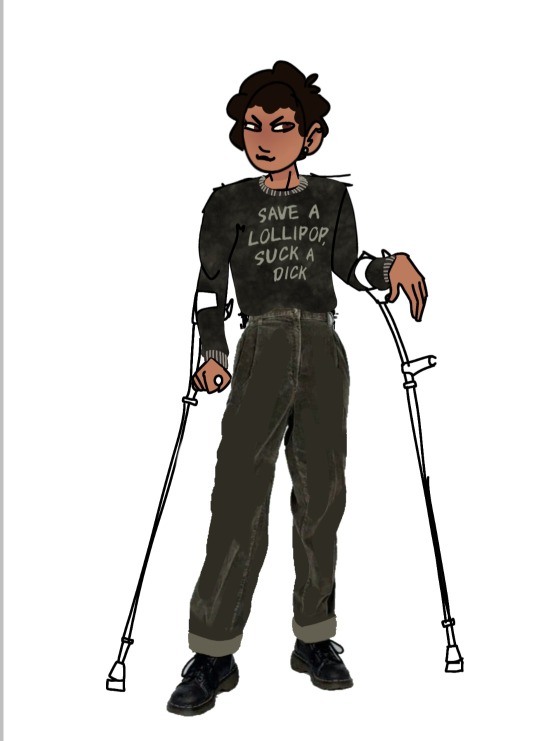
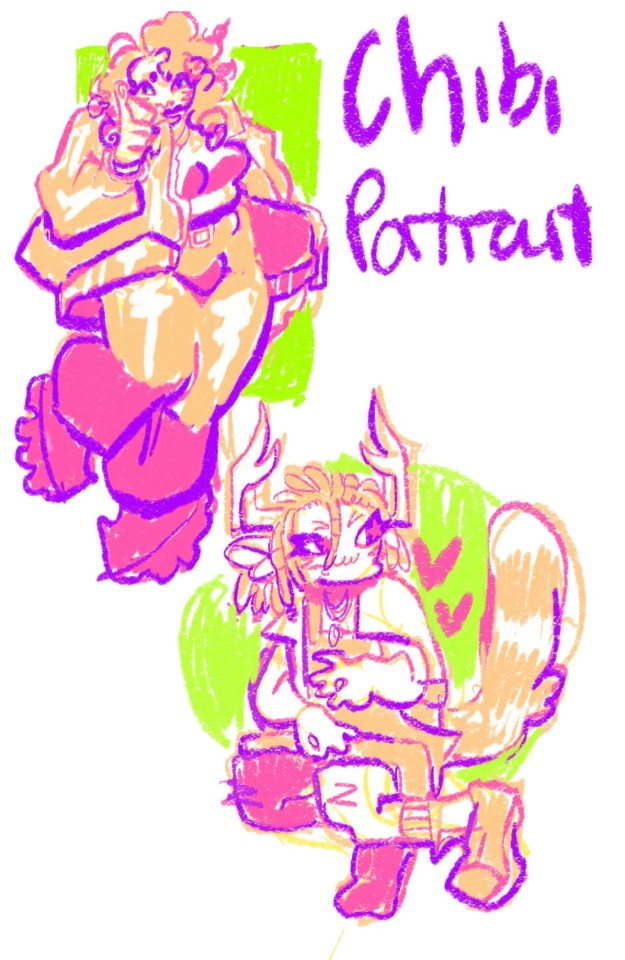
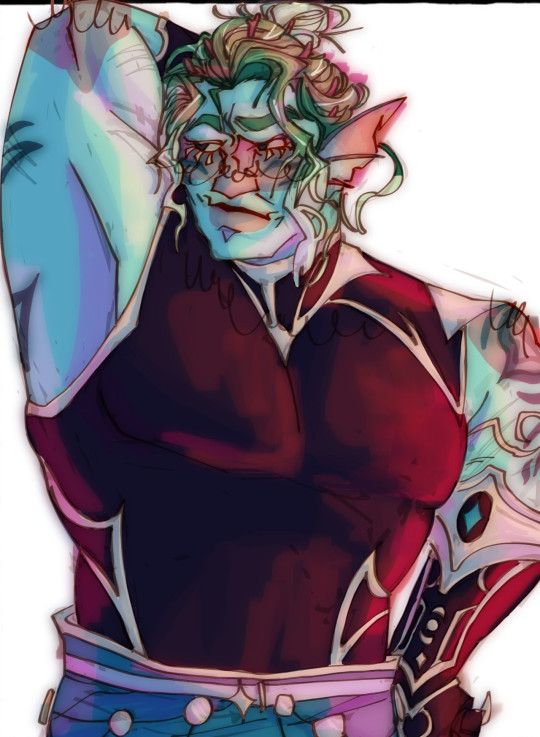
#doodle#not Vincent and loomis for once 🤯#disabled characters#he has a service dog but I am still workinf on drawing her ;v;#original character#my art#gay#obviously#i love him#look at him#Filippo Darion-Jacobs#i can't draw backgrounds#digital art#do I use pngs for parts of drawings i don't want to do??#what??#yes#art#artists on tumblr#lgbtq characters#fashion#phil tomei#phiero#sketch#nsft language#filippo tomei#gay characters#crutches
0 notes
Text

MASTER POST
The Experimental Monster Laboratory, or Monster Labs, is a TADC AU where the cast is in the physical world! Sorta..
C&A Research Facilities is one of the cornerstones of the science and medical worlds! They do everything; funding research, manufacturing equipment, and research into the known and unknown in an effort to understand everything. To the public, that is.
They experiment heavily in everything, from hiring literal Gods on earth to manage the more ..sensitive divisions; mixing machine and magic, technology and the supernatural, genetic experimentation, you name it, they’ve probably done it! The world outside may not know anything of the advancements they’re researching but there is little C&A Labs won’t allow in the name of progress in understanding and cataloging everything in their universe. Our story takes place in one of the more private residencies deep in C&A, belonging to Caine; a minor God with mysterious origins, unknown limitations, and boundless enthusiasm for learning everything he can about his little science friends.

╰┈➤ Content
╚═ Unnamed fic (Coming soon...) ╚═ Bubble can cook?? .
╰┈➤ Asks
╚═ Does Pomni act like a zombie? ╚═ Is Zooble's Demon Snake Leg happy? ╚═ Gangle is in a Situation.png ╚═ Gangle's temperament ╚═ Has Ragatha ever shocked anyone? ╚═ Gangle love RAAAH ╚═ Do Caine and Ragatha fight over Pomni? ╚═ Why did Gangle summon a demon? ╚═ Why does Pomni wear a bell collar? ╚═ Kinger's eye ╚═ What if there was a baby crying? ╚═ Death trauma [Gangle and Pomni] ╚═ Kinger has ONE hobby outside of Bugs ╚═ Is Zooble protective of Gangle? ╚═ What happens when you touch Pomni's brain? ╚═ JAX DATED SOMEONE?? ╚═ What does Jax do? .
╰┈➤ References
╚═ Intro Cards ╚═ Height Chart Lineup ╚═ Zooble Demon Snake Leg Intro Card /j ╚═ Queenie ╚═ Gummigoo ╚═ The Sun Room ╚═ Logo .
╰┈➤ Arts
╚═ First ML AU Post ╚═ Second, exploring outfits ╚═ Design sketches part 2 ╚═ Pomni + flower language ╚═ Showtime + Ragapom doodles ╚═ Jax not practicing lab safety ╚═ Abstragedy cuddles ╚═ Raga doodle ╚═ Ragapom doodle ╚═ Jax and Meadowsweet ╚═ Pomni staring out a fake window.png ╚═ [Gives pomni flowers] ╚═ more doodles ig
.
╰┈➤ Misc.
╚═ Caine Lemon Rant [Animatic] ╚═ Zodiac signs?? ╚═ Caine gets called a Tumblr Sexyman and cries ╚═ Bubble Looksmaxxing ╚═ Jax wants to take ketamine with you (Romantically) ╚═ Caine eats a lemon [Animatic] ╚═ BUNNYSUITSSS ╚═ Magma doodles ╚═ Magma doodles part 2
.
╰┈➤ Pomniverse
╚═ Wonderland and Zombni are friends :D
.
╰┈➤ Boundaries / Q&A
╚═ Any story plans? I'm not sure yet, currently writing a fic and several comics on the way.
╚═ Any boundaries? None, so go crazy! I am OK with gore, NSFW, angst, violence, etc, just be sure it is tagged/TW'd appropriately as not everyone is OK with that content. I'd also like to see please LOL
╚═ Can we create fanart/fics/content? Can we dub or fancam? Yes of course!! Please tag me, I'd love to see all of it! I'm tracking the tag #TADC Monster Labs AU for other's content
╚═ Is NSFW allowed? Yes, both art and fic, so long as it's marked appropriately I'd very much love to see!
╚═ Can I ship the characters, self-ships, or OC x Canon? Yes, ship away! Just be aware the only au-canon ships are Caine/Pomni, Ragatha/Pomni, Gangle/Zooble, and PAST Ragatha/Jax.
╚═ Can we make OCs? Go on ahead! Here is a PSD file for the blank template and the PNG can be found here.
╚═ Who are you?
✦✧ Hi I'm Audi! 26, she/they. Full-time office worker, I do art in my free time. ✦ My current interests are TADC, RWBY, Looney Tunes, and Trolls. ✧ I draw using a custom PC, a Huion Kamvas 16 (2.5K), and Adobe Photoshop. Currently learning to use Procreate. ✦ I do not RP and this isn't an ask blog, asks interacting directly with characters will probably not be answered. ✧ Asks are not guaranteed to be answered, sorry if yours isn't but please don't spam/send multiple times! ✦ Commissions and requests are not open at this time, thank you. ✧ My main tumblr is Audi-art. My Twitter is Hammerspaced.
463 notes
·
View notes
Note
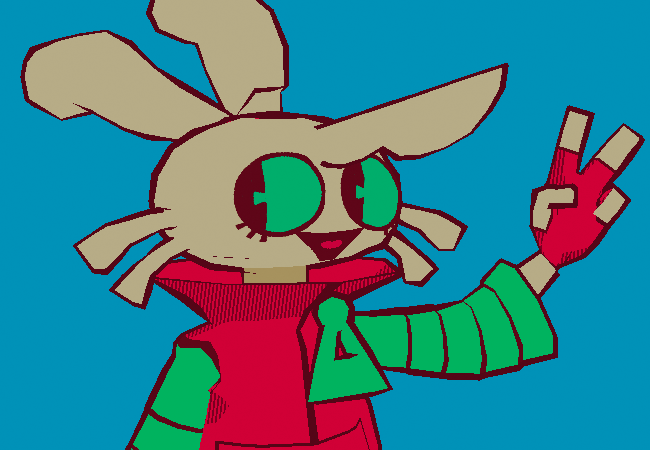
i love the style of that 3d render of your character! may i ask how you animated the outline and made the whole thing pixel-y? :0
Very glad you asked!
There isn't many tutorials on how to make this kind of stuff so I am totally glad to be the first one.
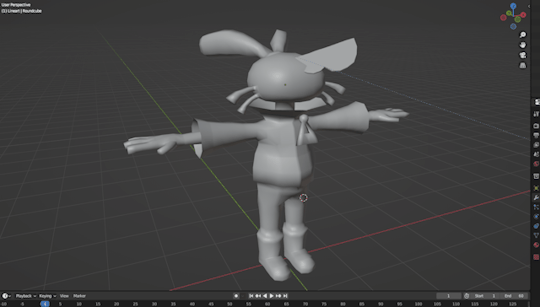
BLENDER 2.5D TUTORIAL
First of all

Get your model ready and steady, that part is what I ain't explaing, however if you want it to have these colors, you will have to put this nodes in your texture shader
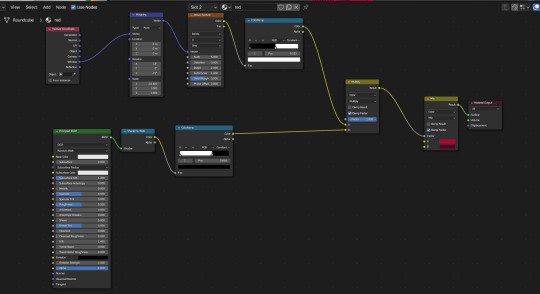
`[ This is for her red jacket, the lower nodes is for her primary colour and the upper nodes are for her shadows, which also has some extra nodes to give it a comic texture. ]
Quick reminder to give the model some lineart yourself to the parts that don't form its sihlouette, for example her shoes.
Now for the lineart, first of all make sure you have created a black Emissive material and that it has Backface Culling activated

After that go to the Modifier Properties and add a Solidify modifier

Make sure to Flip the Normals, set the Material Offset to where the Lineart material is, and adjust a little bit the Thickness of the mesh, then you will get some natural good-looking lineart like hers.

Now, you could easily be satisfied like this, but now we are going to make it feel like each frame is a new drawing by making her model lineart jiggly
First of all create a Displacement Modifier and give it a cloud texture

Make sure to lower the strenght and midlevel, otherwise it will look like this


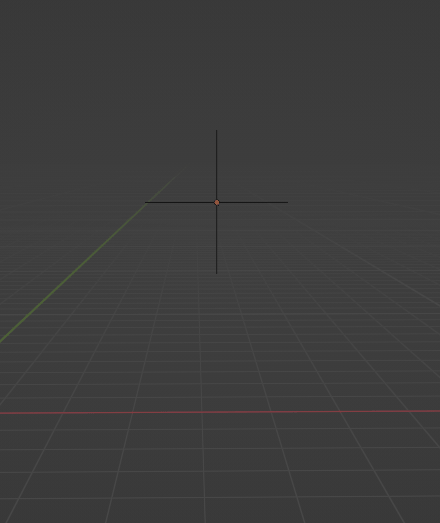
Now, create an Empty Plain Axes and go to the Displace modifier, change the coordinates from Local to Object and focus the object on the Empty


And thanks to this adjustments, if you move the empty around, it will create a slight jiggle
Now what we want is for this empty to automatically move around without you having to do anything
Create a new screen and go to the Graph Editor section
In here we will be making the empty move with a modifier
Select the empty and press "I" of Italy and select Location, this will create a keyframe for the empty that we will be able to manipulate

Go to the Editor and ONLY SELECT THE Z POSITION, and then go to the Modifiers tab and add a Noise modifier
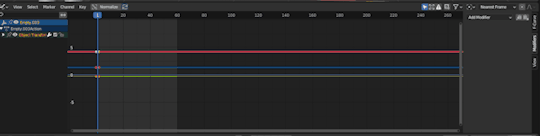
Make sure to adjust the Scale and the Strength so that it looks more proper for the jiggle effect, make it look like a rollercoaster!

And now, if you did everything right, your empty will be moving up and down and all around by its own
WHICH also means, the model displacement will follow the path of the empty to create that jiggly effect we crave so so much
However...

The model is indeed jiggling, but it's doing it the wrong way, we are trying to make it look like a cartoon not a gosh darnit gelatin
So to make it jiggle the right way we are going to make its noise feel more STEPPED
Go back to the modifiers of the Graph Editor and add a Stepped Interpolation, and make sure it has a Step Size of 5
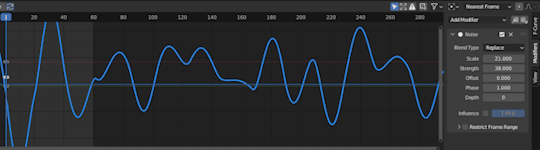
And now we finally get the choppy jiggle effect!!
Now you can play around the Displace and the Noise to make it more or less jiggly
But nonetheless, if you followed the tutorial right, you will be gifted with the perfect looking 2.5D effect!!!

Now you can go ahead and try to fool everyone into thinking a 3D animation is 2D
And before we wrap up, one more extra for the one who asked how this is made,
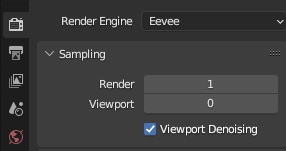
We are going to make the render feel pixel-y!
Go to Render Properties, make sure you are using Eevee, and in Sampling put the Render on 1 and the Viewport on 0
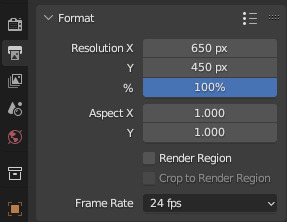
Then go to Output Properties and you can do two things:
1) Change the X n Y to a size lower than 1000 px
2) Change the Resolution % to these numbers (8, 16, 32, 64) This way if you wanna do pixel art you are more accurate
For this render I used the 1st option
And last but not least, in the Output Properties make sure you save your files in the right way with these settings

THen render animation, make an image sequence with all the pngs, and TA-DAH
You get a pixel-y 2.5D animation!!!
Thank you so much for checking, I hope this is useful for anyone who wants to do this stuff, if anyone has any questions don't be afraid to ask, I may have explained some stuff badly.
Anyways have a very jolly day
Tsuyo OUT
#blender#blender 3d#blender tutorial#tutorial#3d modelling#3d tutorial#art#model#3d model#my art#tsuyo art
1K notes
·
View notes
Text
Adoption Sundays, Halloweek Edition!
(Part 2)
Hey guys, happy spooky month! This time and for the next adoptions, we have some special themes 'mons in need of a new home. This time, Fairy Types!
They're both combat and contest-friendly, but they can be quite a handful! As any Whimsicott, she is very playful and intro pranks, and the Ghost-type genes don't help, either. I think she'll do best with someone as playful as her; or someone who can impose some rules!
For the Kirlia, apparently, she's not very social and just kindly tolerates the presence of a trainer in her surroundings. She would do better alone, but if not, I'd recommend some experience with Psychic types before adopting her!
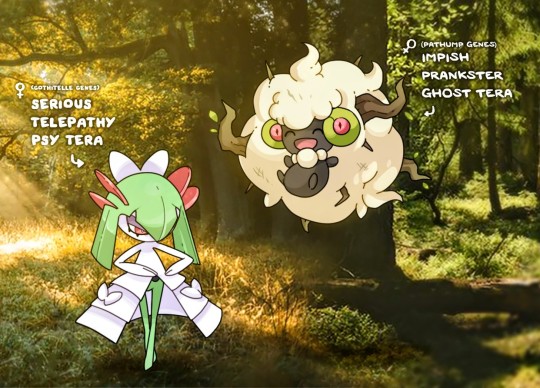
Gothic Kirlia: Adopted by @rebbykins!
Prickle Whimsicott: Adopted by @tannuki-in-training!
If you're interested in any of 'em, respond to this posts with your qualifications and why!
//I'll send DMs to potential adoptees to confirm and, once "adopted", they'll get a background-less PNG from this drawing. You're free to do whatever you want with them! No need to credit me from the design unless you use the OG picture.
//As always, it's not first come first get, I reserve the right to give them to whoever I want. Pokeblogs have priority!
#clay talks#pokemon irl#pokeblogging#rotomblr#pokemon rp#poke pics#pokemon adoptables#adoptables#adoption sundays
75 notes
·
View notes
Note
Hey, so I really love Lore Rekindled, and the art is one of my favorite parts! The style, the coloring, the background, all of it is just so… smooth! I don’t really know how to describe it. Recently, I’ve been trying to replicate it, and I was hoping you would give me a few pointers. What brushes do you use for line art? How do you decided what to line, and what to leave blank? What about coloring brushes? Do you use smudge brushes? Whats, like, the step by step process? You don’t have to answer if you don’t want to! But any tips or answers would be great!
Ah thanks so much!!!
Here are the brushes! They're .abr brushes, so they should work in Photoshop, Clip Studio and Procreate :) (they don't work in Krita or other software that utilizes PNG brushes though, sorry ; ; )
There's also a tutorial included with that file that breaks down my process layer by layer! That said, there are a couple things that have changed in my process since doing that tutorial:
I mostly use the Hard Square Pastel brush now for all of that 'crispy' lighting that often happens along the edges of characters' shoulders and heads, such as seen here:

I now do an extra step of applying a 'blur' layer, where I essentially merge all the layers into a new layer on top of everything, set it to Overlay, and then Gaussian Blur by about 60%. This is how I get that 'dreamy' look that's been present in a lot of the more recent episodes!
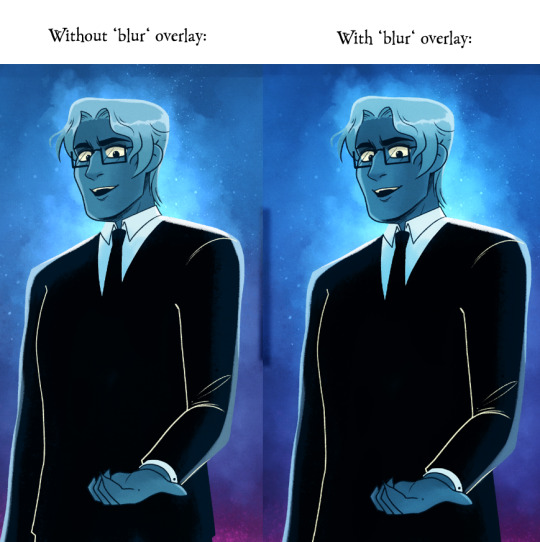
It's subtle, but really effective in making the glow effects and deeper colors really pop!
As for the more nuanced stuff like lineart, it's kinda just something I do by feel! Sometimes I'll shade something in and realize the lineart doesn't need to be there, so then I'll go in and erase, other times I have to be a bit more excessive with it esp if two similar colors are up against each other. I'm actually trying to use less lineart going forward to get more of that authentic LO look but it's hard, I'm very used to doing lineart-heavy drawings so it's forcing me to draw in a way that I'm not used to! 😆 I usually always start with flat colors first though, meaning I start by 'shaping' out the character poses and then lining them in afterwards!
You can see an example of this process in my END OF PERSEPHONE time lapse here:
youtube
I also usually stream work sessions of Rekindled over on my Twitch, but I'm currently on hiatus from streaming due to technical difficulties (OBS just... decided it was gonna stop working, sigh). Go give it a follow anyways tho so you can be notified when I start streaming again! I'm thinking in the meantime until I can get my Twitch going again I might start doing some screen sharing sessions in Discord. So keep your eyes peeled for that if you ever wanna catch me working! I'm always happy to talk about and demystify the process <3
95 notes
·
View notes
Text


ALL SLOTS HAVE BEEN TAKEN, THANK YOU FOR YOUR PARTICIPATION!
hello everyone! i come to you today with a celebration, for my birthday! my bday isn't until the 26th, but february is my favourite month and i like to celebrate the whole month hehe... so here is a little event for all to take part in!
if you don't know what a YCH is, it's basically a base drawing that i provide, and then given your input, draw characters on top of! meaning everyone will receive the same base drawing, but can customise it to their hearts content! please see below for the YCH and an example!
and please read the rules further down carefully, thank you!

this is the base that i'll be drawing on top of! it's kinda valentines themed because that's my favourite holiday, but i also just love love hehe...

and this is a finished example! i drew piper and kent together!! <3


Follow me on tumblr, because this is an event for my followers and supporters, everyone else stinks <3
I'm drawing from SDV, DoL, and FoM ONLY. Just like my writing.
You must pick two characters. They can be oc x canon, or canon x canon. I will not be doing oc x oc. Modded characters are allowed.
Non romanceable options for SDV are allowed (except a few, you can ask).
Only the LI's are allowed from DoL and FoM.
Please be patient as this event is on a first come first served basis, and you will be placed in the queue appropriately.
You can use the art however, wherever you want, with or without credit. Just DO NOT feed it to AI, or use it for commercial purposes. Not that I assume any of you will but y'know.
0 SLOTS LEFT
WONDERING HOW TO TAKE PART? Message me (askbox, DM, or discord if you have access to it already, i wont be handing it out) the following information:
Which two characters you want included (oc x canon OR canon x canon).
Which character do you want in which position (shooter vs victim)?
Include REFERENCES of your OC if applicable (picrews are fine for references).
Tell me three colours you'd like included for bg elements (pictures, hexcodes, whatever is easiest).
I can change expressions, so would you like the default (above) OR something different?
Any accessories you want included, such as angel wings, devil horns, etc?
Anything else you feel worth mentioning?
and i think that's it! any questions, please don't hesitate to ask!
and please, if you'd rather, i've included the base PNG below if you'd rather draw upon it yourself! thank you for reading this far, and i hope you're doing well!

29 notes
·
View notes
Note
I genuinely cannot tell, what is the reason you are doing this stuff with the ai? Is it just cause it’s neat? Or what
part of the reason is because it's funny to get an anon saying that AI art has no practical use case and is stealing money from artists, then answer it with AI art that never would have been commissioned otherwise to disprove both of their points at once.
a second, much larger reason is because i fundamentally do not respect 90% of people who call themselves "anti-AI" because they either have no idea how the tech works (no, there are not literal .png copies of all your artwork sitting on the Stable Diffusion servers somewhere), are ableist ("AI art is so ontologically evil that you should learn to draw by holding the pencil with your mouth instead of using it, no, really, it's not that hard, see, this guy on twitter did it so you know it's possible, if you don't learn how to do that you are literally robbing artists", "everyone can make art it came free with your fucking humanity/brain"), or have boring and/or fundamentally reactionary ideas on what constitutes "art" (anything mentioning the word "soul" even in passing, "this is the death of art", getting really mad about accurate comparisons to painting after the invention of photography, etc etc). not only do i not respect these arguments, but they are shitting up my inbox and replies. at a certain point i just want to piss these people off.
175 notes
·
View notes
Text
Personal ID portrait Commission OPEN
Slot: 1/3
Waitlist (Start after ~26/12): 0/4
Price: 35$ - 40$ depending on your level of detail required. Transaction through Paypal!
Commission sample belongs to @zola-no-kanojou
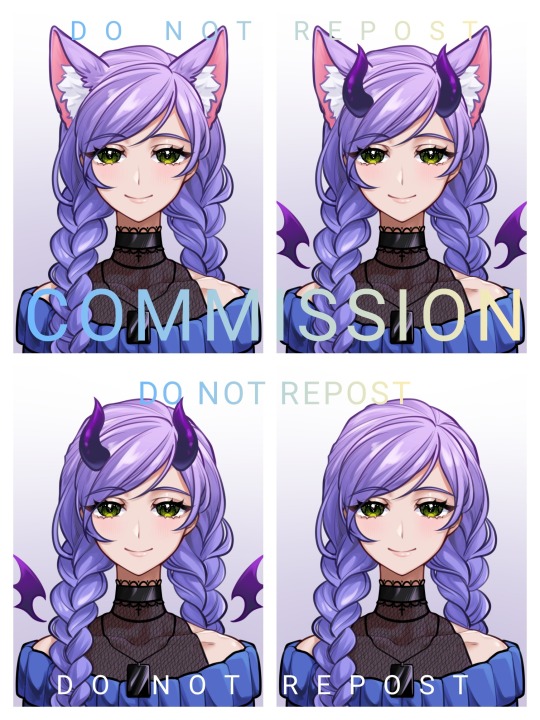
More details below cut:
Messages and discussion through Discord or Tumblr DM. Please DM me first, and I'll secure your slot and send you my discord. After I finish the sketches, please send me 100% of the agreed payment through Paypal. Then I'll start finishing your commission. You can totally ask me to livestream my drawing process.
The final pieces (PNG, with and without background) will be sent to your Gmail.
It's a Portrait ID drawing, meaning it will at most show the character standing still, from the chest up. No hands allowed, if you want to include hands holding objects or doing something we will have to discuss more and turn it into a regular portrait commission.
For this kind of commission, I can draw: Humans, kemonomimi, anthro, casual clothing, "details level Genshin/HSR/HI3" I don't accept: Furry, mecha, metal or heavy armor, sci-fi clothing, gore or body horror, disturbing details.
I can use the final product (with watermarks, resolution reduced) to post on my social networks and use them as self-promote samples. If you want to make it private I will charge a "private fee". You're free to use the final product and edit it to be ava, icon,... or print it out for personal use, as long as it's not commercial and profitable. If you wish to use the product as part of your branding, please contact me for more discussion.
Also, I'd like to open ONE (1/1) slot for the comic commission.
This kind of commission often takes longer and requires much more communication effort, so I can only accept one at a time. I also kindly ask my client to be patient because I'm not a native English speaker, so I might need more explanation to truly get what my client wants.
Each page will be 35 - 50$ depending on the details, we will discuss more about it in the process. I recommend doing a short strip, about 5 - 10 pages for our first time working together.
Examples are The Sydney Nymphs comic, DDD short, or this small one


#reblog appreciated#Tumblr is hiding my post over the new blog so I'll try this one and then reblog#Strange....#Weird#Now it do appear?#dollya art
135 notes
·
View notes
Note
hiii your art style is so good!! i got two questions :3
1) any tips for any beginner artists?
2) do you have like, an inprnt or anywhere i could buy your stuff?? i would love to hang some of your art up on my walls bc its so gorgeous :0
haiii thank you so much!
im no teacher by any means and of course don't consider myself a professional, but will try to give you some tips that kinda helped me on my journey ^_^
1. don't focus on artstyle. the way you hold the pen in your hand is already original. you don't have to use same process, same brush, same eyes size and proportions on every drawing. for me, it lead to a burnout and a safe face syndrome. try new things, new brushes, new techniques, play around with proportions, art is about fun, not about putting yourself in a box!
2. anatomy isn't a most important thing. yes, knowing how certain part connect to each other is important and learning is good, but don't focus on anatomy only. learn things as you need them, not everything at once, look for references, break them down and apply to your art. it doesn't have to look exactly like the reference, it's your art, do whatever you want!
3. basics are quite important. shapes, lines, boxes. simple art exercises such as drawing shapes in 3D can help you build a better control of your hand and understanding of space and shapes.
4. gesture drawing is very fun and helps you build more dynamic and realistically looking poses!
5. do not focus on realism if that's not what you're aiming for.
6. give yourself some rest when needed and don't be too harsh. learning curve isn't straight and sometimes you can feel bad about what you're doing, but that's alright, nothing is linear, just keep going and you'll see the result!
as for prints.. i don't think im cool enough and my art is worth printing?? but if you want i could send you full sized pngs of drawings you want if you want to print them yourself or something 🥺
27 notes
·
View notes
Text
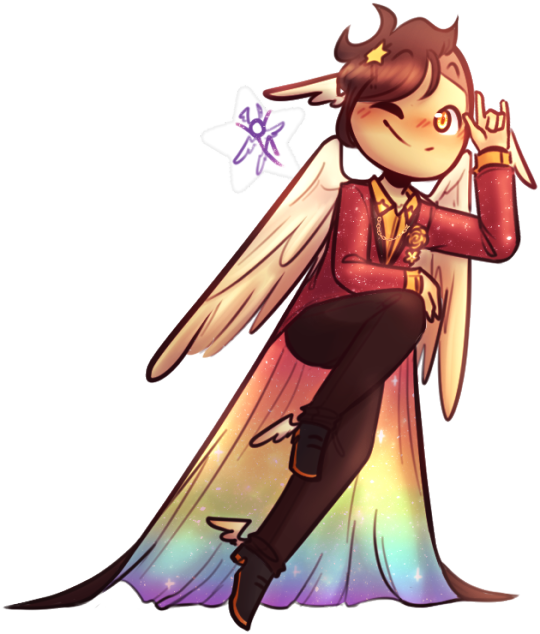
THE MAP IS OUT!! Here's my individual part for it, along with my credit image! I'm so happy to have been able to work with such cool collaborators on this project, this was so fun! :D <33
WIP and fun facts below the cut!
First pass of my part!

General Notes: - All of us had a cut-off frame so Sammy (our MAP host!) had space to transition shots! the stick in my cut-off is my oc Lixy <3 - As always, I don't have an actual animation program. Each frame of this was individually drawn in Clip Studio, saved as PNGs, and meticulously arranged in a video editing software. it took a while and a headache. the software crashed 4 times hdkjh </3 - The process was sketching, lining, then compiling it all together! Line art took the most time (because i don't like lineart hkjdh) - Fun fact, all of the sketches (seen in the wip above) were all drawn on my first plane ride ever :> <3 - The background is Alan's animation program that I took from a screenshot from AVA 6 :> I didn't want to do anything too complex for it ;w; <3 - All of the slide transitions were done manually! It may look like tweening, but I don't have a program that can do tweening lmao :'> <3 Each of the slidings was individually 3-6 frames of moving them across the frame, a single frame of stretch for movement, then a settling frame before the next stick slid in. - Green is doing air guitar as they slide in :3 <3 - My Blue design has a hat that can magically change into a Witch hat (when potion making), Chef hat (when cooking) or Sunhat (when gardening <33 - Purple looks nervous after he crashes into everyone, like they're expecting to be in trouble, but smiles and laughs when everyone else does. You can see Blue with their hands up, reassuring Purple. - Originally Yellow didn't move as much in the final laugh scene, but I saw the first frame of the person after me (@/sleptonce!) which had Yellow in a little crouch :> i adjusted Yellow to match the next frame a little better! - Also Yellow's hair is flipped from the way I usually draw it because I felt it worked better this way hgkjh <3 - (I totally didn't forget my Second's design has green eyes and had to edit those frames very quickly hfkjh <33) - The only colors that aren't the stick's original colors are when Blue's hat falls on Purple, and Red's yellow bandana <3 (These are also the only movement animation in the blinking sequence!) - Adding Alan's cursor was a literal last minute decision, he was never in any of the sketches, I literally added him in 15 minutes before submitting my part hgkjh <33 I think after my shot, Alan helps gently pick them up <3 - My suit in the credits is mostly red and orange, because my favorite sticks are Red and Second! <3 The rainbow cape reflects how I enjoy the color gang the most though hkjdh <33
Thanks for reading!! :D <33
#Alan Becker#Animation Vs Minecraft#Animator Vs Animation#AvM#AvA#my avm art#avm red#avm second coming#avm orange#avm yellow#avm green#avm blue#avm purple#starlight originals#lixy
183 notes
·
View notes
Note
How do you art, and where do you art?
hi my name is moe! i've doing digital 2d art since about 2017 and here's a big post about the how and where of it!
the program i use for my 2d art is firealpaca! the version i use is free to download with the exception of a popup ad that shows up when you start up the program! it's a great, very consistent, program that has updated a lot and improved since i started and i don't think i can vouch for it more. everything i include in this post applies to firealpaca specifically though you can probably do similar things in other programs im a college student on a budget and im very comfortable working with this program.
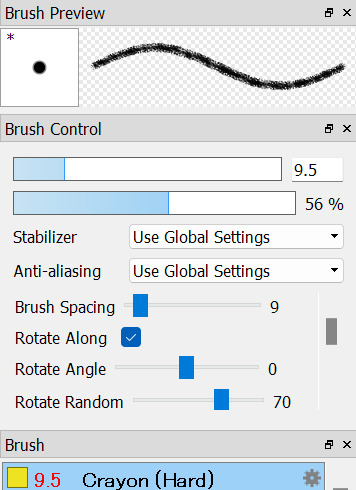


the three main brushes i use i got off firealpaca's brush marketplace! they're all free crayon brushes the first one hard one being the one i use for lineart, the second sort brush i use for sketching, and the third hard one i use for coloring. i think this might be the reason why i get some stuff about people associating my art with childhood/ children's illustrations, im a big fan of using texture where i can and these help to add a lot of visual interest.

seawatt jumpscare
you may see that my finish pieces don't have a lot of flat colors if you zoom all the way in. that's because i use a lot of noise to make the colors look less flat. it sort of reminds me of construction paper, gives a little bit of a fuzziness to it.


i have it set to color at usually around 50. i turn it down sometimes if im working on something smaller. my canvas sizes usually are about 1500 x 1500 just to keep a more consistent square shape across most of my drawings.
another thing i do to make my art pop is i duplicate my lineart layer, use protect alpha to color the duplicated layer another color that's usually brigther than the original layer, put some gaussian blur on it and add multiply or add to the blending on that layer.

with versus without the added layer! i have this set to add on 31% opacity and ill add more or less if i want the effect to be more or less subtle. it's not very noticable but i think it helps a lot with line clarity and can make something almost glow if you wanted that effect.
here's another example with a multiply layer (i turned up the opacity to give a better example) subtle and it fights a lot with tumblr image degradation but it makes me happy.
i also make a lot of use of halftoning as you can see in the examples above. I usually only use it to make shadows darker and highlights stand out but they're also really good at filling up dead space like backgrounds to make them more visually appealing


with versus without halftoning! in firealpace you achieve this by using a 8-bit layer (one highlighted) once you add the layer hit the gear icon by the layer and use that to modify the halftoning to your choosing


i usually have mine with a density of 40 but you can tweak it to your choosing. you can also change the blending type on these types of layers i usually just use multiply/ add and occasionally overlay. mess around with the opacity! make it more or less subtle! have fun!
halftoning is tricky to use in firealpaca however due to the way it works. usually i apply it with my soft crayon brush since it hangs around 35% opacity. you can get a more dense halftoning using more or less opacity on your brush and can go back and forth over the halftoning to layer more on. you can also layer two different layers of halftoning to create interesting effects

two different halftoning layers laid on top of each other ^

more opacity + two different halftoning layers laid on top of each other ^
when you go to combine all your layers however because 8bit layers when combined with regular layers lose their halftoning properties. my way around this when combining everything is going layer > merge all when going to finish up and convert everything to png.

that, for the most part is all the technical stuff. i wish i could tell you how i knew what colors to pick but for me i usually pick some variation of green and just go with it. i usually pick the lineart color with my background colors in my mind and go from there until i get bored. complimentary colors such as blue/ orange and red/ green are usually good picks.
did you notice the background/ lineart is green in this picture? that's because the red cancels it out. i sneak it in there sometimes C:
that's pretty much the how of it all, as for the where, usually my bed

that's all
24 notes
·
View notes
Note
Do you sell versions of your embroidery designs? I'm obsessed with your Solas patterns and would love to try them!
Hello!
So, short answer is yes, while the first digital mockups I made were designed just for my own reference and as color guides for transferring the designs painstakingly by hand, I ended up going back to them and turning them all into digital vectors. This means they can be printed onto transfer paper or directly onto stabilized fabric for stitching, which is MUCH easier than drawing by hand. Lots of people asked me if I could sell the designs so I figured this part out and was able to test it myself--the tower embroidery was an example of printing the vector directly onto the fabric and worked out great!
(above: tedious hand-drawing process for the Hierophant design, vs my failed attempt at transfer pencils that did not work at all for the Tower, vs printing directly onto fabric which did work in the end)
Long answer is after I did that, I uh, never figured out how or where to list them for sale online. Or what all to include with them--like what level of written instruction to include, should i also make notes on the thread colors I picked, should I include my colored-in-versions as color guides or just let everyone free-for-all it, in the case of the Tower embroidery i also hand-dyed a lot of grey thread that was crucial for it coming out how i wanted it to look--is it deceptive to sell a pattern when other people can't necessarily recreate it the same way because of that? Should I list in general the dye instructions if they wanna recreate it, or for people who want some of my extra thread or for people who don't have an inkjet printer so can't print the design onto the fabric themselves, should i think about selling full "embroidery kits" that include the printed pattern sized for a display hoop and the thread needed? etc etc etc
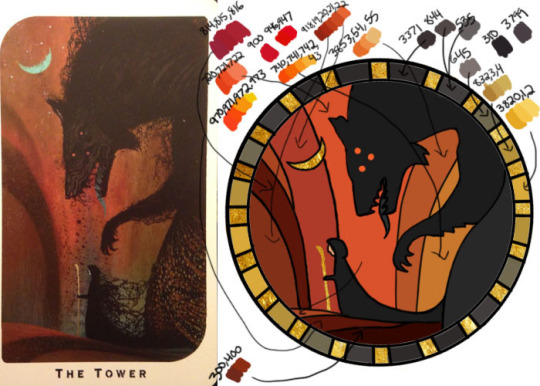
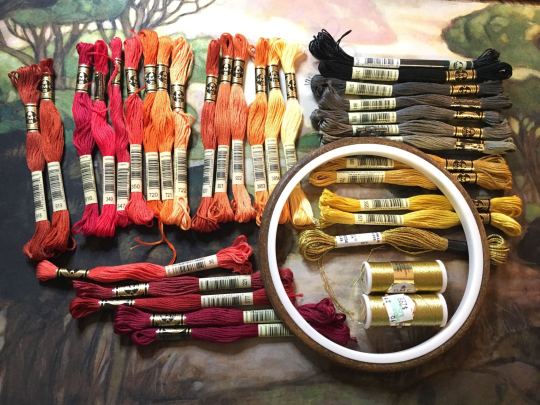
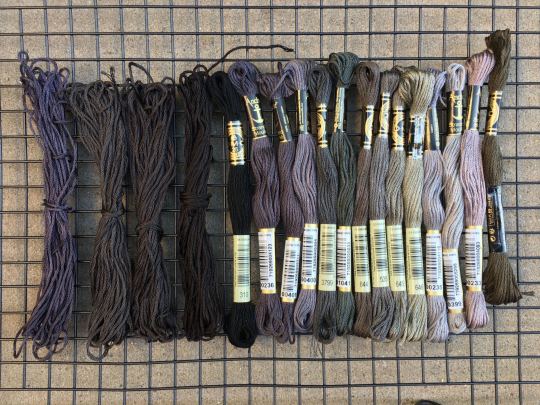
(above: photo of the color guide I made myself with tentative thread color selections (warning NOT the ones I actually ended up using), photo of my pile of threads I picked from, and photo of some of the threads I ended up dying myself to get closer to the design I wanted)
Anyway that was all a lot of thinking and work to do, so i put it off!!! and uh here we are 2 years later and I have still not posted them anywhere. I really gotta get around to all that still...
But in the meanwhile, if anyone reading would like a pattern, just let me know directly what you're looking for and I can save the versions of the files as needed for your plans and send them over. like for a digital only version (so no threads or me printing for you) i would probably make a zip file with a transparent png of the design (so you can put it in a word doc to print at whatever size you desire), as well as a pdf with a few copies of it already pre-sized for a display hoop for ease of printing or transfer, the colored-in version i used based on the tarot cards, photos of my finished versions, etc (note to self i must remember to include the design both normal for direct printing and horizontally flipped for anyone who plans to use transfer paper for it since those are mirrored...). Oh and a quick explanation of how i managed to get my fabric through a standard printer if you wanna try that.
But yeah i'm happy to work out something with kofi or paypal or venmo and sell the digital ones for like $20 each or something for now, if you don't mind not having written step-by-step instructions accompanying the patterns and example photos. Or if anyone has suggestions on where to host them for sale, for someone not interested in maintaining a dedicated storefront like etsy or storenvy long term. Maybe Gumroad? If i stuck to digital-only sales something like that might work. I'm open to input for sure. If you want something more than digital like a pre-printed fabric (since it's kind of weird to do yourself), I'm still open to trying, it just would be a little more $ to account for the fabric/stabilizer and cost of shipping, and probably take me a few more days to do.
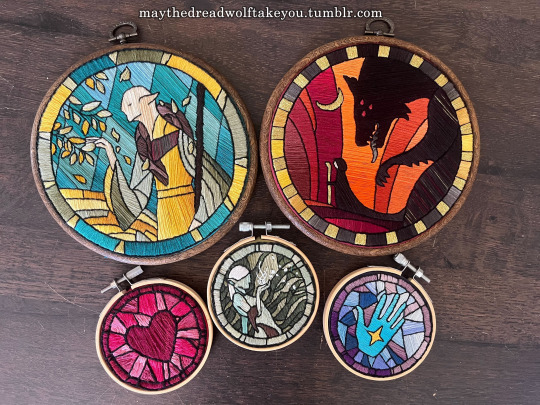
(above: example of finished DA themed embroideries)
But regardless, thank you for your interest at all!! I'm so glad people have enjoyed my embroidery series :) While I'd love to make lots of copies to sell to whoever wants one, I simply don't have the time, and they are SO labor intensive to make it really is like 80-90% of the cost is manhours. I spend anywhere from 5-15 hours making the patterns and vectors, but the stitching and rest of it itself is easily the bulk at 40-100 hours depending on complexity and number of threads used. So WAY more feasible to sell the patterns than make more to sell myself, and then anyone willing to put in the time can have one too :)
#ramblings#my stuff#my embroidery#dragon age embroidery#dragon age#replies#sparrowposting#dear tumblr PLEASE do not eat this one as i post it 🙏
26 notes
·
View notes
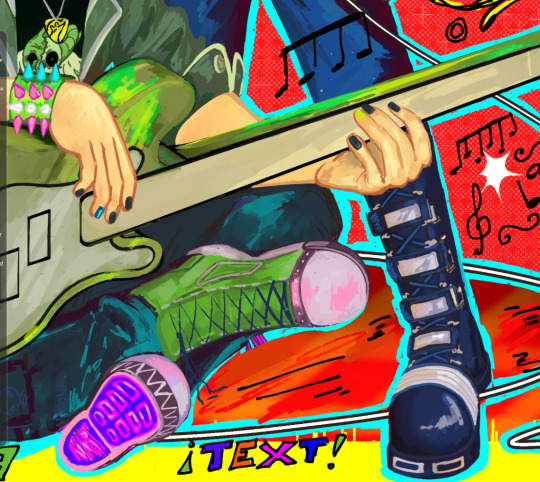
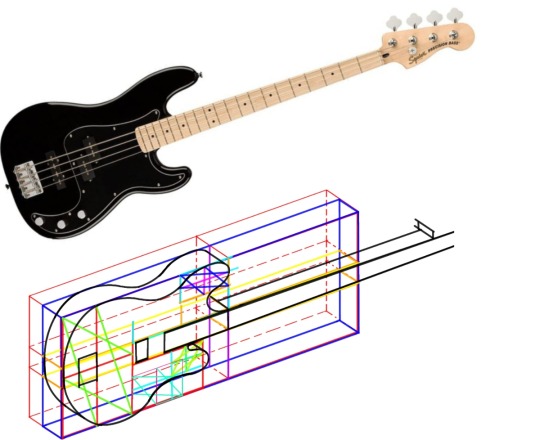
Text
This is the process‼️
the actual final thing is here 😺
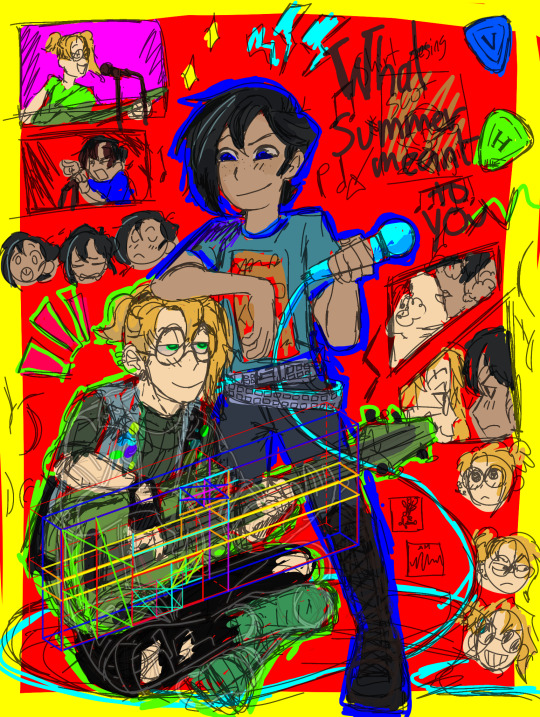


this fucKing bass
Aaaaaallsooooooo
All this text is made with the tool that transforms your voice and whatever you're saying into text so don't expect this to have sense in too many ways okay?
Okay so this is part of the process that I end up making cuz there was a bunch of trial and error in this process because whenever I was doing like the front the front the front and the thing I was getting a little bit confused cuz I was having too many ideas at once and it didn't work out as you think it will but at the end I end up like merging some of those ideas into one and end up looking pretty good that this is the stupidest sketch of how it was looking at the beginning in the terms of the title and stuff
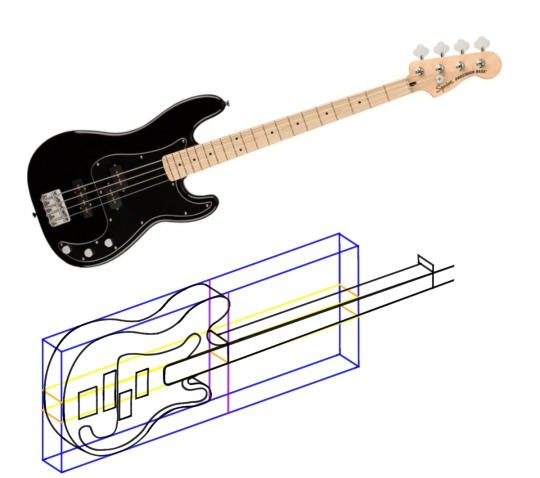
Now the bass that instrument took so long to get it right cuz listen I end up studying technical draw in architecture and if I see something that doesn't have the right perspective I'm killing myself
So of course I was going to get into technical details with creating or drawing the bass
And also in the first parts you can kind of see how it was at the beginning like the colors and stuff trial and error yada yada yada
And I end up making some color arrangements cuz I want this to be bright and stuff and I didn't want this to be pale or look a little bit weird I wanted to have the right contrast
And also talking about contrast you can see the pictures in black and white that's because I wanted to get rid of the contrast and I didn't want something to not pop up right using the wrong colors so that's why there's black and white pictures yes
And also as I know that @aziraphalesbookkeeper favorite color is green cuz I asked that in the ask box I end up placing a bunch of green and several places in the complete piece or the complete render
And also yes the thing that Google was wearing it was going to have some pins with like some flags or whatever and that didn't make up to the end because I was tired and I was lazy and I didn't want to do more things in the jacket
:b
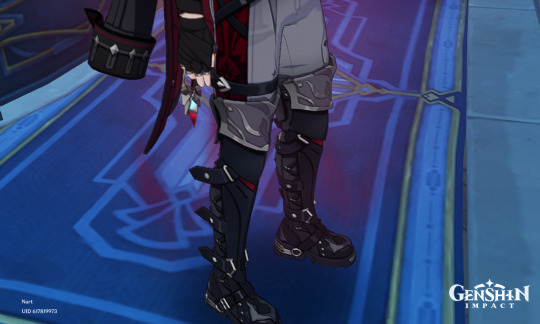
In for the boots I end up searching on Pinterest several things regarding I don't know ehhh Punk boots or something like that and at the end of the day I end up just getting in genshin to look at my wriottesley and admire or have a treaty view of some boots that are similar to the things that I wanted to draw
And also talking about the boots yeah there is not that many things on the boots and I end up getting lazy and tired of drawing details on the boots but it wasn't worth it at the end of the day
And also in the part of Hugo's pants I was thinking into creating like this patches that punk pants end up having with some band names or something embroidered into them cuz that looks cool and I think it matches his personality in some sort of way and I kind of did that it doesn't look that much in contrast with they're saying something his pants but they're there and that's what it matters
I tried okay I tried
Also another little detail in the part of the front I was just searching for several inspiration on rock or metal covers for albums and stuff and I didn't find much of inspiration into that but then I look into some posters and stuff like that and that was just a boost of inspiration and that's why the fronts in the thing end up going from whatever you see on that thing that has like pngs of a scrap of papers and something is already in some kind of text of a chat cuz I remember that in the story both of them end up talking on chat and stuff
On my head it was looking right but then I put it into the actual canvas and it was looking like shit to me so that idea was a scratched and he didn't make it up to the end hehe
And I think that settled it and that's it basically for all maybe I will read all this shit later and find out something that I missed but that's it
:b
#rambling rambles of rambling#creative process#???????#don't expect much from disposed in terms of grammar and sense overall#Nick is probably my accent is too thick for this tool that transfers words talking words into writing words#okay it seems that yes my accent is too thick sometimes#hey if you see a word that doesn't have any kind of sense in whatever I was saying?writing?#dont quote me on that#vat7k#varigo
47 notes
·
View notes
Note
Hey Rontra, I'm properly digging through the archives, but I will forever love this animatic you did for Offal Hunt: https://www.tumblr.com/actualbampot/190639258301/rontra-cinder-voice-im-so-stressed-that?source=share
I really want to try making an animatic, but I have no idea what the workflow for this is. Was it a million still images fed into video editing software, or is there anything I'm missing/do you have any helpful tips?
Thanks so much.
ah, thank you, i'm glad you like it!
now i dont Usually really make animatics specifically, i just "make videos", so most of my experience is in PMVs (and adjacent fields) and that shows. but the act of Assembling them can be similar so the experience is relevant :p
there's lots of ways to do it and ultimately depends on what you find easiest for your idea. drawing images in your art software and then assembling them in a video editor is probably the simplest way, especially if it's a longer video (more numerous (or elaborate) "shots" = probably easier to organize in a video editing timeline)
if your preferred drawing software doesn't have audio import, you're probably better off arranging them in a video editor as well... especially if you have parts with animation in them! clip studio paint for example didn't always have audio importing, so before then you had to just kinda guess at the timing and keep tweaking your animation until it worked--or, more conveniently (though it doesn't feel like it), save each frame individually and time them in a separate program
and if youre using a non-linear video editor you can easily add/replace placeholders too which is convenient. i often put text placeholders that describe what i need to draw for the missing part, so i don't forget xD
religion of loneliness was made this way because it's elaborate and long and has a lot of parts and effects i wanted to do. a video editing software is usually more comfortable for that kind of thing (depending on which softwares are available to you ofc)... even the small bits of animation it has are individual pngs i assembled in the video editor
but for no particular reason, so was therefore you and me -- this video's super simple! i just felt like taking it into the video editor because i'm more comfortable there. the characters were drawn in clip studio and the text/bg/whatever was done in the video editor, even though it could've easily all just been baked into the same pngs bdfhjgfdjk
in this workflow you can also use finished animation cuts as separate gifs/mp4s/whatever where needed ofc, depending. i sometimes mix and match
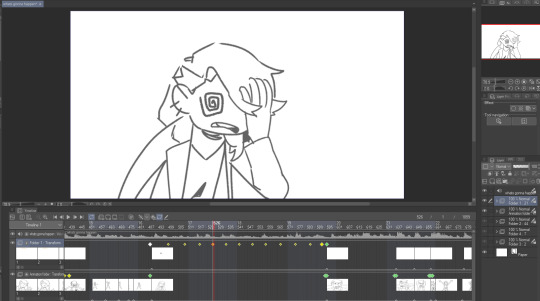
on the other hand, your link in particular ("what's gonna happen") was made entirely in one clip studio paint file, after csp added the ability to import audio into its animation timeline. this video is a very simple mix of animation and tweening, which are both doable from inside clip studio now, so i said fuck it and crammed everything into one file
it looks like this in clip studio paint*
that kind of thing works for me because im a little messy and i like being able to redraw or adjust stuff inside the same software instead of switching back and forth. but for more elaborate project it will probably start wearing on your sanity to have everything crammed into one file (not to mention the file size might become unwieldy depending on what you're working with)
not all drawing programs will have animation features or audio import as part of their kit, which can make things troublesome. but if you're using animation software or an art software with animation features, it's possible to just do it all inside that program with relative ease like that (though some of them can be quirky to Learn)
as an aside, the original black eyes was made entirely in photoshop of all things because csp didn't have as many tools back then, and you can tell because . that is not a brush ive ever used and the pans/crossfades are Occasionally Very Weird JHBHSJK i could've just used a video editor but noooo. photoshop timeline tools ONLY No Assists
and that video is All still images so it could've easily been handled either way. important part is it worked out and i had fun messing around in there
i'm sure there's some other workflows out there someone finds super useful but i think the Main Branches are definitely
drawing software + video software (tag team)
drawing/animation software with audio import capability (solo job)
the first one tends to be more accessible i think? not only like Generally Speaking because there are more free drawing programs and more free video editors than there are free programs with drawing + animating + timeline editing all together (which . is true) BUT ALSO because even when we already have our programs ready the learning curve is usually sharper for the all-in-one and can be challenging to figure out, depending
but for me when im just playing around in there i find working all in the same program gives me a lot of flexibility. since i don't have to keep taking an image back and forth between the drawing room and the video editing room if i have to change something. yknow
it depends on the project. just try stuff out idk :)
my advice is definitely to start smaller and don't jump into making like a 3-minute video right away until you're more comfortable with your developing workflow. but that's about it. i think beyond that its Fuck Around And Find Out HAHAH i dunno
if theres anything specific i missed im sorryyy but you can ask and i can try 😂 good luuuuck!!
*to compare i guess, RoL looks like this -- behold the filenames of a genius

16 notes
·
View notes
Note
what program did you use to make the looping achievementlass gif? it looks amazing!!
thank you, i'm really happy with how it turned out!!
I used a program called AnimeEffects! this video is really good at explaining how it works/how to use it:
youtube
additional notes:
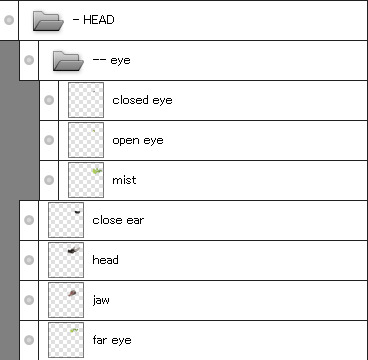
I can't remember if this was specified in the video, but when drawing it (in an art program of your choice; I use FireAlpaca) make sure each individual body part that you plan to animate is on its own layer. and then save as a psd. you don't have to name or sort the layers but it helps a lot
also DON't export it as a gif. to quote my friend: "the quality is actual trash garbage and it doesn't export as transparent either"
INSTEAD try exporting as a PNG Sequence @ 30 fps (preferably in its own folder just so everything is all in one place without extra files muddling it up)
slap the pngs together using ezgif. it may take a while to load depending on how many frames you have but it will eventually just give it some time. then set the Delay time to 3

also remember to check "don't stack frames" otherwise the previous frames won't disappear. unless that's specifically what you want it to do

aand you got your own gif the end !! ✨✨
128 notes
·
View notes