#diy tree
Explore tagged Tumblr posts
Text
no thoughts, head empty, just my handmade mcr and fob christmas balls

yes i have already decorated my house it’s very pretty thank you
#my chemical romance#mcr#gerard way#frank iero#mikey way#ray toro#three cheers for sweet revenge#tcfsr#fall out boy#fob#patrick stump#pete wentz#andy hurley#joe trohman#take this to you grave#tttyg#from under the cork tree#futct#i think that was the era? not sure#christmas#christmas diy#christmas balls
603 notes
·
View notes
Note
The foxes would do the craziestttt trauma dump candy salad tik tok
“My names Kevin and I brought sour worms?”
“Kev, you have to trauma dump. Say something traumatising.”
“Why?”
“Because it’s funny?”
“Trauma isn’t funny. I don’t understand why-“
Quick cut away from him to Matt who’s there like, “My names Matt and my dad was the first person to give me cocaine and I brought jolly ranchers!”
#Andrew just looks into the camera and dumps it#if even#maybe he just throws it into the bowl from off camera#Neil says like. the least traumatising thing about him#if they somehow convinced him to do it#’my names neil and one time I broke my arm because I fell out of a tree’#my brother in Christ you DIY CREMATED YOUR MOTHER?
644 notes
·
View notes
Text

#artists on tumblr#art#fun#lebanon#arab#new#happy#beauty#Aesthetic#Vaporwave#DarkAcademia#Art#Photography#Fandom#QuotesRetro#Nature#DIY#fog#trees#winter vibes#blackandwhitephotography#blackandwhite#black and white#home & lifestyle#dark#dark aesthetic
496 notes
·
View notes
Text

Lads x Animal Crossing x DONUTS
#love and deepspace#animal crossing#I needed a new bsky twt header#and needed to add Caleb to ac#tweaked the designs of the others a lil#since bugs wouldn’t dare bother Sylus each time he knocks a wasp nest out of a tree they go after whoever is closest#Caleb’s always got a diy recipe for you#Zayne waters all ur flowers#you keep giving him stuff to wear but he’s always in the black button down#Rafayel always has a lil exclamation point or thought bubble#and does a lot of Naruto running#Xavier loves ur museum#thoughts from the discord
228 notes
·
View notes
Text
finally realized i don't have to choose between my love of traditional art and my love of tumblr incorrect quotes. sfth hand drawn meme blast (character ids in alt)


#i've got a million for phandrews so i might do dedicated phandrews memes in another post 👍#memes#sfth#sfthposting#sfth memes#sfth fanart#fanart#my art#art#traditional art#pencil#watercolor#magnus o.puss#sfth bus#the detective versus the christmas tree bandits#the cardboard stegosaurus#sfth the unrelenting aubergine#the unrelenting aubergine#strange noises from the hole in the wall#clarissa's diy wedding#beetroots and murder#priscilla's final petal#the grape depression#sfth wild wet and worrisome#wild wet and worrisome#shoot from the hip#sorry for all the tags i feel embarrassed
101 notes
·
View notes
Text

I found the plans for free, on Pinterest, for a fabulous DIY Gothic cat castle (they sell the plans on Etsy). It's made out of carboard, then you can cover it with carpet, cork, etc., if you like.
379 notes
·
View notes
Text
Made a gift for my mom for today's Craftmas project!

Took a bunch of old broken/never used jewelry and made a Christmas tree!
54 notes
·
View notes
Text

I probably won’t have a real Christmas tree this year, but at least I have these little cuties to keep my Christmas spirit alive! 🎄🥰
Crochet pattern for amigurumi Christmas Minis set 3 is available in English, German, French, Spanish, Italian, Dutch and Portuguese here -> https://etsy.me/4a4HzCK 🤗
#aradiyatoys#olka novytska#adorable#cute#handmade#amigurumi#crochet#diy#crochet pattern#kawaii#christmas#christmas tree#mini christmas tree#christmas eve#christmas decorating trends#christmas decorations#christmas ornaments#xmas#christmas decor ideas#amigurumi pattern#aww
45 notes
·
View notes
Text
106 notes
·
View notes
Text
Last few days I tried something new for me. DIY hand embroidered patch.

Popped a bit of fabric in a hoop, traced out the pattern, then just started stabbing for a few hours. Total time? No idea, might be 5, could be 15. I was semi-watching/listening to shit on Stremio.
There's a reason I went with this pattern. It's a Tree Star from The Land Before Time (1988). I'm a Millenial and that movie is a super solidified Core Memory for me, even if I haven't watched it since I was a kid.
It's my symbol for childhood innocence lost, as well as a beautiful leaf in general. I also lost my mother last year, and even just the thought of that scene from the movie makes me well up.
So yeah, this'll go on my battle jacket soon. A reminder of my mum, of my childhood, of nature, and of course, to deal 3D6 Damage to any Millennial that recognizes it.
#DIY#Sewing#Embroidery#Patch#Battle Jacket#Solarpunk#the land before time#Little Foot#Tree Star#Leaf
83 notes
·
View notes
Text


robot christmas. bitch
x | x | x
x | x | x
#talos gifs#stim gifs#stim#stimboard#talos stimboards#mini stimboard#tech stim#tehnology#techncore#glow#glow stim#christmas#diy#christmas tree#robotcore#circuit boards#rainbow#flashing#leds#gif ids#id in alt#tiktok links r by hiyehoo.soldering & criusdigitalstudio#the second person is only for the broken link that goes nowhere. why tiktok do this to me
33 notes
·
View notes
Text
youtube
i love what i do
#shijoco#art#artists on tumblr#fun#explore#abstract art#beanie#beanie season#orange#embroidery#sewing#sewist#diy#diy fashion#viral#follow#like#subscribe#viral video#edits#my edit#edit#music video#music#teejmadeit#trap#trees#Youtube
20 notes
·
View notes
Text
He wouldn't drop the ornament 😂🎄🐶
#cute animals#dog#dogs of tumblr#pets#dog blog#cute#big dog#fur baby#adorable#aww#cute dog#cute pets#pets of tumblr#its tiiiiiiiime#christmas dog#all i want for christmas is you#christmas tree#christmas diy#dog christmas#oh christmas tree#christmas time#christmas 2024#christmas#diy projects#diy#so cute#cutie pie#cutie patootie#ornament#christmas decorations
25 notes
·
View notes
Text

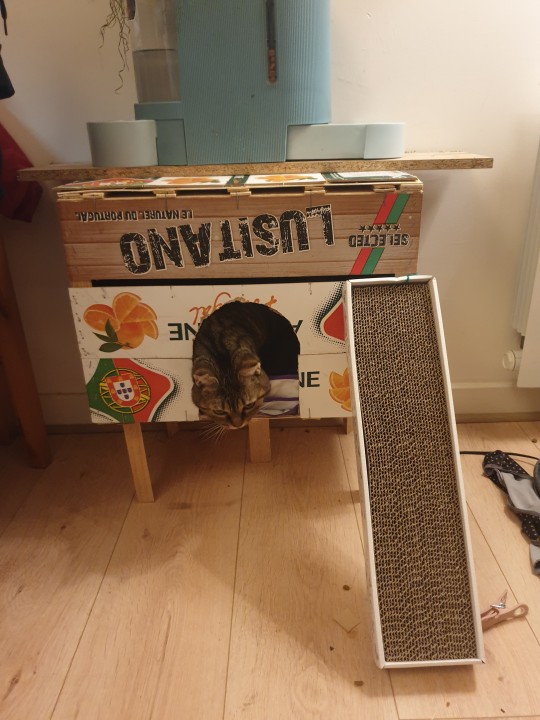
Hear ye hear ye
Today an extremely rare occurrence has happened. A cat whose owner spent the day building her a house immediatly went inside it when offered the opportunity. She is now inside her house peacefully asleep.
Her human is now crazy with joy and will spend the next few weeks bragging about her cat house building skills.
21 notes
·
View notes
Text
#willow#folklore#willow tree#home made#diy#diy craft#making#upcycle#craft#diy ideas#diy punk#diy projects#sewing#forest#tlm#grass#landscape#mountains#trees#nature
77 notes
·
View notes
Text


CREEPYPASTA XMAS TREE LETS FUCKING GOOOOOOOOOO
#creepypasta#emo#creepypasta fanart#crp#jeff the killer#plushies#diy#EJ#ej#eyeless jack#nina the killer#christmas#fandom christmas#special intrest#autism#autistic special intrest#creepypasta fangirl#xmas#xmas tree decor#creepypasta xmas#creepypasta xmas tree#laughing jack#lj#LJ
24 notes
·
View notes