#csvimporter
Explore tagged Tumblr posts
Visit Tumblr Blog
Explore Tumblr blogs with no restrictions, modern design and the best experience.
Last Seen Tumblr Blogs


Fun Fact
70% of Tumblr users say the Dashboard is their favorite place to spend time online.
Text
How to import CSV files in WordPress without a plugin
If you’re planning to transfer content to your WordPress site and wondering if it’s possible to do so without a plugin, then the answer is a resounding yes!
Fortunately, WordPress offers several built-in options that allow you to import without relying on a third-party plugin. Moreover, it also supports various file types that cater to your specific needs.
In this tutorial, we’ll guide you through the step-by-step process of importing programmatically to WordPress without the use of a third-party plugin.
Warning 1: Backup Before You Proceed
It is always important to backup your data regularly before you do something that updated the database whether you use a plugin or not. This ensures that you have a safe backup copy of your website’s content and database so that you can always rollback to a previous version in case of any issues, data loss or corruption.
Warning 2: Potential Risks Involved
Importing content without a plugin can potentially cause issues with theme or other plugins, and break the functionality or design issues. It is also increase the risk of security vulnerabilities if the content with malicious code or scripts get injected while importing.
How to use WordPress functions
Do you want to import a bunch of posts into your site but don’t want to do it manually one by one? Well, you’re in luck because I have a solution for you!
One way to import posts as CSV is by using the built-in wp function called wp_insert_post(). This function allows you to programmatically create and insert them into the database.
Here’s how you can use this function:
First, make sure your file is uploaded to your server or host through ssh, cpanel, ftp or sftp, for example in the directory /var/www/html/wp-content/uploads/posts.csv.
Next, add the following code snippet to your theme’s functions.php file e.g: \wp-content\themes\twentytwentythree\functions.phpif (($handle = fopen("/var/www/html/feb/wordpress/wp-content/uploads/smack_uci_uploads/imports/d107020a28796c63d6984ad91f0fcab5/post.csv", "r")) !== FALSE) { // Read the CSV file line by line while (($data = fgetcsv($handle, 1000, ",")) !== FALSE) { // Create a new post object and set its properties $post = array( 'post_title' => $data[0], 'post_content' => $data[1], 'post_status' => 'publish', 'post_type' => 'post', ); // Insert the post into the database $post_id = wp_insert_post($post); // Check if the post was inserted successfully if ($post_id > 0) { // Post was inserted successfully, do something else if needed } else { // Post was not inserted, handle the error if needed } } fclose($handle); }
Save the changes to your functions.php file.
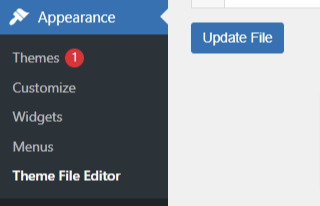
You can also edit the theme file from Appearance > Theme File Editor
That’s it! You are done now. .
Keep in mind that this is just a basic example, and you can modify the code to suit your specific needs. For example, you can add additional code to handle custom post types, taxonomies, or other properties.
Also, you can customize to use the code snippet in any filter or action hooks based on your trigger function.
If you need more help or would like to see more use cases, additional examples and code snippets, do not hesitate to reach out to us! You can leave a comment below or use the contact form, and we’ll be happy to update the tutorial with more information to help you out.
How to use the wp-cli method
Another method to import users as CSV into WordPress is by using wp-cli. This method is pretty straightforward and easy to follow. First, you need to prepare a the file in a specific format, which should look something like this:user_login,user_email,display_name,role,authors_parameter Johndoe,[email protected],John Doe,contributor,create smacksupport,[email protected],smackcoders,administrator,create jiju2fabio,[email protected],jiju2fabio,author,create
You can create or update your user CSV file to match this structure. If you want to use the same sample that we’ve used in this tutorial, you can download it for training purposes. Once you have your file ready, upload it to your uploads folder, and the path to the file should be /var/www/html/wp-content/uploads/users.csv.
Assuming you have already installed wp-cli, you can use the following WP-CLI command:
wp user import-csv /var/www/html/wp-content/uploads/users.csv
And that’s it! Your users should be imported now. Note that you can also upload the file from a remote URLs using this method.
However, it’s important to note that this method is only useful for users as CSV. If you’re looking to import posts from CSV, the wp function method is the better option. The wp-cli method is only compatible with WXR files, which can be complicated. So, if you want to import posts, it’s best to stick with the first method we discussed.
How to use the Built-in Options
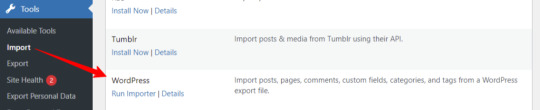
First, log in to your wp-admin dashboard and go to the Import section under Tools. Scroll down until you see the WordPress option and click “Install now”. Once it’s installed, you’ll see a new option called “Run Importer”. Click on that to start the process.
Next, you’ll be prompted to upload the WXR (.xml) file. This is the file that contains all the content you want to bring to your site.

Once you’ve uploaded the file, you’ll see the “Assign Authors” section. Here, you can choose how to handle author information. You can import authors, create new users, or assign them to already available users. Make sure to review and adjust the settings as needed. You can also choose to download any attachments that are included in the file.
Once you’ve configured all the settings, click “Submit” to start the process. The tool will process the WXR file and import the content. If any errors occur during the process, you’ll be notified so you can address them.
And that’s it! With this built-in tool, importing content has never been easier. No need for other plugins or custom code.
Know about Built-in WordPress All Import Options
Well, did you know that WordPress has other built-in options that you can use for this purpose?
To access these built-in tools, all you need to do is go to your WP-Admin dashboard, click on “Tools,” and then select “Import.” From there, you’ll see a table with different options available.
Depending on your needs, you can choose the option that suits you best. For example, if you want to migrate from a Blogger blog, you can use the Blogger option. If you want to import from an RSS feed, you can use the RSS option. And if you want to transfer from an export file in WXR format, which supports posts, pages, comments, custom fields, categories, and tags, you can choose the WordPress run importer option.
However, keep in mind that these default tools have some limitations. You can only use them for a one-time process, and you cannot automate or schedule the process. Also, filters and partial imports may not work correctly, and there is no proper support or fixes available.
But don’t worry, if you need more robust and reliable tools, there are third-party plugins like WP Ultimate CSV Importer available that can help you out.
Here are some plugins you can try
https://wordpress.org/plugins/one-click-demo-import/
https://wordpress.org/plugins/advanced-import/
https://wordpress.org/plugins/import-facebook-events
How to plan a simple migration
If you’re planning to import your data, it’s essential to plan well before getting started. Let’s discuss some takeaways that can help you choose the right option.
Firstly, if you want to import user metadata as CSV, you can do it programmatically using wp-cli without the need for any plugin. Secondly, you can use the WP function method by customizing the shared code to your specific needs. And if you have WooCommerce installed and active, you can import products and tax details as CSV without needing another plugin.
If you’re planning to use WXR, you can use the wp-cli method, but it requires more effort and time. The easiest way is to use the default importer option.
Moreover, there are other options available for bloggers, Tumblr, LiveJournal, Movable Type, TypePad, etc., and from an RSS feed as well. Understanding each option’s capabilities and limitations can help you choose the right option for your needs.
Also, It’s important to know about each file type that WordPress supports. Let me explain each file type in detail so that you can understand it better.
WXR: It stands for WordPress eXtended RSS. It is an XML-based file format that contains content, categories, and tags. It is the most common file format used for import export data.
XML: It stands for eXtensible Markup Language. It is a file format that is used to store and transport data. WordPress uses XML to export and import content.
CSV: It stands for Comma Separated Values. It is a file format that stores data in a tabular form where each column is separated by a comma. CSV files are commonly used to store data like product information, user data, and more.
RSS: It stands for Really Simple Syndication. It is a file format used to publish frequently updated content. It also allows you to import RSS feeds into your site.
JSON: It stands for JavaScript Object Notation. It is a file format used to store and exchange data. So, those are the file types supported. It’s important to choose the right file format based on your data and requirements.
I hope this information helps you. Some useful References:
If you want to learn more about the WP-CLI method, you can visit the WP-CLI website.
For using the WP function method, you can use the wp_insert_post() function. This function allows you to programmatically insert data into your WordPress site. You can learn more about it from wp developer reference.
Lastly, if you want to use the WordPress default options , you can find it in the plugin repository. In conclusion, importing content can be made easy with the right tools and an understanding of the available options and knowing the limitations and capabilities of each option.
With these tips in mind, you can transfer your content seamlessly and focus on creating quality content for your website.
#cms#wordpress#wordpress plugins#wordpress tutorial#plugins#website development#wordpresswebsite#import#blog post#csvimporter#importdata
0 notes
Text
youtube
Are you a WooCommerce store owner looking for a quick and easy way to import your products from a CSV or Excel file? Look no further! In this tutorial, I'll show you an effortless method to import your products seamlessly into your WooCommerce store.
First, make sure you have your CSV or Excel file ready with all your product information. Whether it's the product name, price, stock quantity, or any other details, having it all organized in your file is crucial.
Next, log in to your WooCommerce backend and navigate to the "Products" tab. From there, click on the "Import" button.
This will take you to the product import page. Here, you can choose the file you want to import by clicking the "Choose File" button. Select your CSV or Excel file from your computer, and click "Continue."
Now, it's time to map your file columns to WooCommerce fields. WooCommerce will try to automatically match your file columns, but it's important to review and ensure everything is correct.
For example, make sure that your file's column for the product name is correctly mapped to the product title in WooCommerce. Do the same for other fields like price, stock quantity, and any other relevant information.
Once you've double-checked everything, click "Run the Importer" to start the import process. WooCommerce will now process your file and import all the products within it.
Depending on the size of your file, this may take some time. You can track the progress at the top of the page.
And that's it! You've successfully imported your WooCommerce products from a CSV or Excel file. Now you can see all your products listed and ready to go in your store.
Remember, if you ever need to update or add more products, simply repeat the same process. It's as easy as that!
Thanks for watching this tutorial on how to import WooCommerce products from a CSV or Excel file. If you found this video helpful, make sure to subscribe to our channel for more useful tutorials like this. Happy importing and happy selling!
#woocommerce#productimport#csvtutorial#exceltutorial#tutorial#ecommerce#wordpress#csv#excel#importdata#datamanagement#onlinestore#ecommercetutorial#digitalmarketing#onlineselling#wocommerceproductimport#csvimport#excelimport#howto#beginnersguide#Youtube
0 notes
Text
CSV import tutorial shows how to add images or binary data in CSV files for Odoo. Learn efficient methods using XML and Python scripts to process and import image data. #Odoo #CSVImport #Images #BinaryData #Tutorial
0 notes
Photo

Upload CSV files and import to Database using Laravel PHP In this article, we are how to upload CSV file from a system and import in the database using Laravel. https://www.blazingcoders.com/upload-csv-files-and-import-to-database-using-laravel-php #web #website #US #india #outsource #offshore #webdesign #webdevelopment #itcompany #knowledge #laravel #fileupload #import #csv #csvimport https://www.instagram.com/p/CKlZrl0JVfq/?igshid=7w5fv46etztz
#web#website#us#india#outsource#offshore#webdesign#webdevelopment#itcompany#knowledge#laravel#fileupload#import#csv#csvimport
1 note
·
View note
Text
How to Extract Coupon Details from the Walmart Store using LXML and Python?

This tutorial blog will help you know how to scrape coupon details from Walmart.
We’ll scrape the following data from every coupon listed in the store:
Discounted Pricing
Category
Brand
Activation Date
Expiry Date
Product Description
URL
From, below screenshot you can see how data is getting extracted.

You can extract or go further with different coupons created on different brand & filters. But as of now, you need to keep it simple.
Finding the Data
Use any browser or choice a store URL.
https://www.walmart.com/store/5941/washington-dc.
Click the option Coupon on left-hand side and you will able to see list of all the coupons which are offered for Walmart store 5941.

You need to Right-click on the given link on page and select – Inspect Element. The browser will help you to open toolbar and will display HTML Content of the Website, organized nicely. Click on the Network panel so that you can clear all requirements from the Demand table.
Click on this request – ?pid=19521&nid=10&zid=vz89&storezip=20001
You can see this Request URL – https://www.coupons.com/coupons/?pid=19251&nid=10&zid=vz89&storezip=20001
After that, you need to recognize the parameters values- nid, pid, as well as storezip. Check the variables in a page source - https://www.walmart.com/store/5941/washington-dc
Here, you can observe different variables are allocated to the javascript variable _wml.config. You can use variables from different source, page and make the URL of coupons endpoint – https://www.coupons.com/coupons/?pid=19251&nid=10&zid=vz89&storezip=20001
Recover the HTML coupon from URL and you will see how data can be extract from javascript variable APP_COUPONSINC. You can copy data into JSON parser to display data in a structured format.
You can see data fields for the coupons with each coupon ID.
Building the Scraper
Utilize Python 3 in this tutorial. This code is not going to work if you use Python 2.7. You require a computer to start PIP and Python 3 fixed in it.
Many UNIX OS like Mac OS and Linux come with pre-installed Python. However, not each Linux OS ships by default with Python 3.
Let’s check Python version. Exposed the terminal (in Mac OS and Linux) or Facility Prompt (with Windows) and kind
-- python version
and click enter. In case, the outputs look like Python 3.x.x, then you need to install Python 3. If you say Python 2.x.x then you are using Python 2. If error comes, that means you don’t have installed Python. If Python 3 is not install then, install that first.
Installing Python 3 as well as Pip
You can go through the guide of installing Python 3 with Linux – http://docs.python-guide.org/en/latest/starting/install3/linux/
The Mac Users may also follow the guide – http://docs.python-guide.org/en/latest/starting/install3/osx/
Installing Packages
Python requirements, for making requests as well as downloading HTML content about various pages (http://docs.python-requests.org/en/master/user/install/).
You can use Python LXML to analyze HTML Tree Assembly through Xpaths (Find out how to install it there – http://lxml.de/installation.html)
UnicodeCSV to handle Unicode typescripts in output folder. Install that using pip install unicodecsv.
The Code
from lxml import htmlimport csvimport requestsimport reimport jsonimport argparseimport tracebackdef parse(store_id):"""Function to retrieve coupons in a particular walmart store:param store_id: walmart store id, you can get this id from the output of walmart store location script#sending request to get coupon related meta detailsurl = "https://www.walmart.com/store/%s/coupons"%store_idheaders = {"accept":"text/html,application/xhtml+xml,application/xml;q=0.9,image/webp,image/apng,*/*;q=0.8","accept-encoding":"gzip, deflate, br","accept-language":"en-GB,en;q=0.9,en-US;q=0.8,ml;q=0.7","referer":"https://www.walmart.com/store/finder","upgrade-insecure-requests":"1","user-agent":"Mozilla/5.0 (X11; Linux x86_64) AppleWebKit/537.36 (KHTML, like Gecko) Chrome/64.0.3282.186 Safari/537.36" }#adding retryfor retry in range(5):try:response = requests.get(url, headers=headers)raw_coupon_url_details = re.findall('"couponsData":({.*?})',response.text)if raw_coupon_url_details:coupons_details_url_info_dict = json.loads(raw_coupon_url_details[0])#these variables are used to create coupon page urlpid = coupons_details_url_info_dict.get('pid')nid = coupons_details_url_info_dict.get('nid')zid = coupons_details_url_info_dict.get('zid')#coupons details are rendering from the following url#example link:https://www.coupons.com/coupons/?pid=19251&nid=10&zid=vz89&storezip=20001coupons_details_url ="https://www.coupons.com/coupons/?pid={0}&nid={1}&zid={2}".format(pid,nid,zid)print("retrieving coupon page")coupon_headers ={"Accept":"text/html,application/xhtml+xml,application/xml;q=0.9,image/webp,image/apng,*/*;q=0.8","Accept-Encoding":"gzip, deflate, br","Accept-Language":"en-GB,en;q=0.9,en-US;q=0.8,ml;q=0.7","Host":"www.coupons.com","Upgrade-Insecure-Requests":"1","User-Agent":"Mozilla/5.0 (X11; Linux x86_64) AppleWebKit/537.36 (KHTML, like Gecko) Chrome/64.0.3282.186 Safari/537.36"}response = requests.get(coupons_details_url,headers=coupon_headers) coupon_raw_json = re.findall("APP_COUPONSINC\s?=\s?({.*});",response.text) print("processing coupons data")if coupon_raw_json:data = []coupon_json_data = json.loads(coupon_raw_json[0])
Perform the code using script name trailed by a store ID:
python3 walmart_coupon_retreiver.py store_id
For example, get the coupon information from store 3305, we can run a script like that:
python3 walmart_coupon_retreiver.py 3305
Also, you will get file name 3305_coupons.csv which will remain in the similar folder as a script. The result file will appearance similar.

Identified Limitations
The given code works for extract eCommerce Data Scraping coupons information of Walmart stores for store IDs obtainable on Walmart.com. In case, you wish to extract data of millions of pages you need to go through more sources.
If you are looking for the professional with scraping complex website, then you can contact RetailGators for all your queries.
Source:- https://www.retailgators.com/how-to-extract-coupon-details-from-the-walmart-store-using-lxml-and-python.php
0 notes
Photo

Import Series - Import CSV TXT File into Excel http://ehelpdesk.tk/wp-content/uploads/2020/02/logo-header.png [ad_1] Premium Course: https://www.teac... #csvimport #csvtxtimport #dataanalysis #dataconnectionsinexcel #datamodeling #datavisualization #deleteconnectionsinexcel #excel #excelcourse #exceldashboard #excelformulas #excelfunctions #excelhelp #excelimportwizard #excelmacros #exceltraining #excelvba #freeexcelhelp #importdataintoexcel #microsoftaccess #microsoftexcel #microsoftoffice #microsoftoffice365 #microsoftofficetraining #microsoftpowerbi #microsoftproject #microsoftword #officeproductivity #pivottables #powerpivot #powerpoint #sap #teachexcel #teachexcel.com #txtimport
0 notes
Text
Save CSV data to a database through an API using Golang
In this post we are going to setup an API that has an endpoint to save data from a CSV file to a MongoDB database. The data is going to be an address book of people. I am not going to go into specifics on how to setup a mongo database as the mongo documentation is really good and you will get everything you need from there.
First off we need to use the mgo golang package. You can find it here. Now we can get started with setting up the code to handle retrieving the CSV file from the web handler in the API.
Next we need to setup the db session. This is split over several files and I am only going to show the necessary steps to setup the db, connect to the db and save the data to the db. The main focus is for retrieving the file from the POST request and parsing that data to be saved to the database.
Then we need to create the Person struct for import the data into the database like so:
type Person struct { Id bson.ObjectId `bson:"_id,omitempty" json:"id,omitempty"` FirstName string `bson:"first_name" json:"first_name"` LastName string `bson:"last_name" json:"last_name"` Email string `bson:"email" json:"email"` Phone string `bson:"phone_number" json:"phone_number"` }
We now need to create the method to import the data into the database:
func (p *Person) CSVImport(app *AppContext, people []Person) error { c := app.Mongo.session.DB(app.Mongo.database).C("people") for _, i := range people { i.Id = bson.NewObjectId() err := c.Insert(i) if err != nil { log.Println(err.Error()) return err } } return nil }
Now we need to create the API endpoint for receiving the POST request:
func ImportCSV(app *AppContext, w http.ResponseWriter, r *http.Request) (*jsonData, *appError) { w.Header().Set("Content-Type", "application/csv") var Buf bytes.Buffer file, _, err := r.FormFile("people") if err != nil { return nil, &appError{ Code: http.StatusNotFound, Message: "File is not found.", Err: err.Error(), } } io.Copy(&Buf, file) contents := Buf.String() contentsToString := strings.NewReader(contents) x := csv.NewReader(bufio.NewReader(contentsToString)) var people []Person person := Person{} record, _ := x.ReadAll() for _, i := range record { people = append(people, Person{FirstName: i[0], LastName: i[1], Email: i[2], Phone: i[3]}) } person.CSVImport(app, people) return &jsonData{}, nil }
The key to making all this happen is the line:
file, _, err := r.FormFile("people")
That line takes an actual file that is posted to the enpoint mentioned above. Which then can be parsed to a bytes.Buffer, then to a strings.Newreader, and the finally to a csv.NewReader. Then all the lines of the file are read at once and we loop over all the lines and create new person objects for each line in the file. This is saved into a slice of Person called people. We then pass in the application context and the people to the person.CSVImport function mentioned above, where each person object will be inserted into the database.
Here is the actual route to handle the POST request for us:
router.Handle("/person/upload", use(AppHandler{app, ImportCSV})).Methods("POST")
Now how do we actually make the call to the endpoint to do all of this? Well we use this exact command if your running your app on port 8088 on localhost.
curl http://localhost:8088/person/upload -vvv -F "[email protected]"
The variable people in equal to the file name that we are uploading and in this case is people.csv. To see the full code and get a better understanding of the application context please visit here
Thanks for reading.
0 notes
Link
dhamaniasad starred edcrewe/django-csvimport
Sep 8, 2017
0 notes
Text
How to Manage Coupons in WooCommerce? – An Ultimate Guide
The best way to increase sales for your business is by offering exciting coupons to customers. If you’re using WordPress, then you might know about WooCommerce Plugin. WooCommerce helps you to build an online store in WordPress. WooCommerce provides many many features to build and maintain a complete eCommerce store. WooCommerce’s Coupons Management is one of the best features. You can create coupons for any specific products in your store to boost store sales and attain more revenue. The created coupons are useful for your store visitors or customers to buy your products at discounts. You can share the coupons with your existing customers and encourage them to buy more from your website.
The coupons are easily customizable to your needs. When creating coupons, you need to set the coupon expiration date, assign the coupon code for any particular product in your store, and configure a minimum or maximum cart total to be eligible for the discount. If you want to provide the coupon only for some specific customers you can do that simply by mentioning their email IDs.
Boost sales with WooCommerce Coupons
Here are some simple tips to increase your sales by providing coupons.
Primarily mention the coupon offer on top of your website as a banner or create pop-up banners which may show after a few seconds the visitor landed on your website.
Promote the coupons on social media platform like Facebook, Twitter, or any other platforms where your target audience spends time.
The coupons must be eye-catching and visible to the user. It can be short to make it easy for them to apply at checkout. Make sure it creates some urgency to make them take action soon. Provide texts like ‘only for a limited time’ or mention the coupon expiry date. Create personalized coupons by adding the customer’s name or their business name. It makes your customers feel more special and also increases sales.
Now let’s see the steps to create WooCommerce coupons.
Steps to create a coupon with WooCommerce
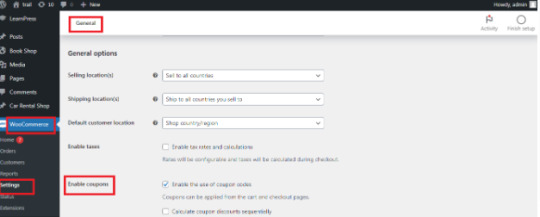
1. Install WooCommerce in your WordPress instance and activate it. Once it is done make sure that Enable Coupons is checked under the General tab in WooCommerce Settings menu. If not, enable it and click Save Changes.
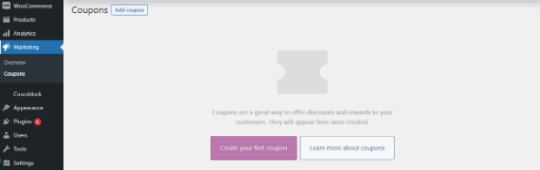
2. Go to Marketing → Coupon → Add Coupon. Click Add Coupon to start creating a new one or hover and click edit of any one to change the existing coupon.
3. Enter your Coupon code. You can use the code to share it with your customers. The code must be unique. Add description for internal reference.
Code of your choice – Any alphanumeric code is valid and Coupons are case-insensitive.
Generate Code – By clicking this button WooCommerce will auto-create and generate code via algorithm.

4. Next, let’s see the Coupon data widget. There are three sections within the widget: General, Usage restrictions, and Usage limits.
General
WooCommerce coupons offer three different discount types.
Percentage discountThe discount in percentage is applied to the total value in the cart.
Fixed product discountIt applies a fixed discount for each selected product in the cart.
Fixed Cart discountIt provides a fixed amount of discount to the total entire cart.
Coupon Amount – Upon choosing the discount type, enter the Coupon Amount you are going to offer. Enter the number and it will automatically add the percent sign or currency unit.
Allow free shipping – Enable free shipping to remove the cost of shipping when using a coupon.
Coupon expiry date – Select the date for the coupon to expire. An expiration usually occurs at 12 a.m. or 00 a.m. on the specified date. Note that the time will be calculated based on the time zone of your site.
Usage Restrictions
The Conditions are usually set here in this section for the coupon code applied. This section contains a set of 9 fields. Using these you can control the coupon you are generating.
Field
Description
Minimum spend
A coupon code is only valid if one spends the minimum amount set by the store owner on the product. The minimum amount includes subtotal + tax.
Maximum spend
To use a coupon code, you must spend a maximum amount set by the store owner.
Individual use only
The coupon can only be applied to a single item, and cannot be combined with other coupons.
Exclude sale items
Enable to exclude sale items from a WooCommerce coupon
Products
Select the product to which you would like to offer a discount.
Exclude products
Select the product that you don’t want to offer any discount.
Product categories
You can give a discount on products from a certain category.
Exclude categories
This can be useful if you want to offer a discount on everything except products of a particular category.
Allowed Emails/Email restrictions
You can specify which email addresses are allowed to use the coupon. This is useful if you want to limit the use of a coupon to specific customers.
Usage Limits
With Usage limits, store owners can set limits to the coupon which is the total number of times the coupon can be used. This will ensure that the coupon cannot be overused. It is totally optional so that store owners can decide whether they need it or not.
Usage Limit per coupon: Set here how many times the coupon can be used before it becomes invalid.
Usage limit per user: It lets you set how many times a user can use the coupon.
Limit usage to X items: Enter the maximum number of items for the coupon that may be applied.
Limitations of coupons
Even Though we have a lot of advantages in using coupons, there are some limitations. Using a coupon will definitely bring traffic to your store and boost your sales. However, it will reduce the margin amount of the product which means a lower amount in your account. In some cases, coupons can be misused, resulting in a reduction in revenue. Over Reliance on coupons can lead to a situation where customers only make purchases when there is an active coupon or promotion, which can hurt long-term sales and customer retention.
Ultimate CSV Importer with WooCommerce Coupons
Ultimate CSV Importer is a simple yet powerful plugin. Here is how the Ultimate CSV Importer plugin will help you to import/export WooCommerce Coupons data. You quickly import your WooCommerce coupons using a CSV/XML file. Just upload your file and map the header fields and click import to finish the process. Let’s see how to import WooCommerce Coupons data to WordPress site along with how to add the values to your CSV file to properly import WooCommerce Coupons.
Steps to import WooCommerce Coupons
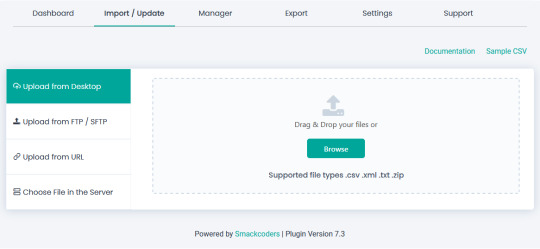
Upload your CSV or XML file.
With the plugin, you can upload the file in three different formats. Upload from desktop or FTP/SFTP or URL. Upload the data in your Google sheets using the Upload from URL option.

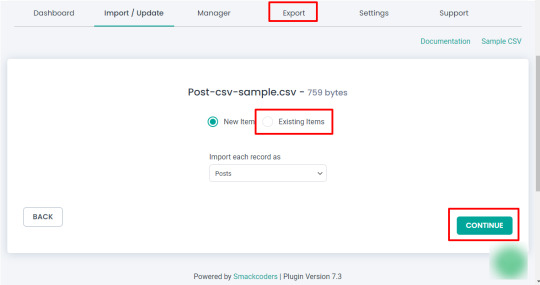
Choose WooCommerce Coupons from the dropdown. Select “New Item” to import new coupons data and “Existing Item” to modify the old data.

Click Continue and the Mapping section will be displayed. If the headers in the CSV file are the same as the WordPress fields, they will be mapped automatically. If they don’t match, you can choose the corresponding field from the dropdown.
How to Add Values in your CSV/XML WordPress Core Fields
Coupon Code – Provide the name of the coupon code in your CSV that can be applied at checkout to avail the discount.
Description – Specify the description for the coupon.
Coupon date – Specify the coupon date to publish.
Coupon status – Mention the status here. For example: publish.
Coupon Meta Fields
Discount Type – Mention any one coupon type. Percentage as Percent, Fixed cart discount as fixed_cart and Fixed Product Discount as fixed_product.
Coupon Amount – Specify the amount in numerical values.
Individual_use – Specify yes in your CSV to select it.
Product_ids – Specify the ID of the product for applying coupon. To mention multiple values use comma separator(,)
Exclude_product_ids – Specify the ID of the product to exclude from applying the coupon. Mention multiple values using a comma separator.
Usage_limit,Usage_limit_per_user, limit_usage_to_x_items – Specifies the value in numerical form.
Expiry_date – Mention the date format in YYYY-MM-DD
Free_shipping – To enable this field mention yes.
Exclude_sale_items – Mention yes in your CSV/XML to enable this field
Product_categories, Exclude_product_categories – Mention the ID of the categories
Minimum_amount, Maximum_amount – Enter the amount in Numerical Value
Customer_email – Mention multiple email addresses using comma separator
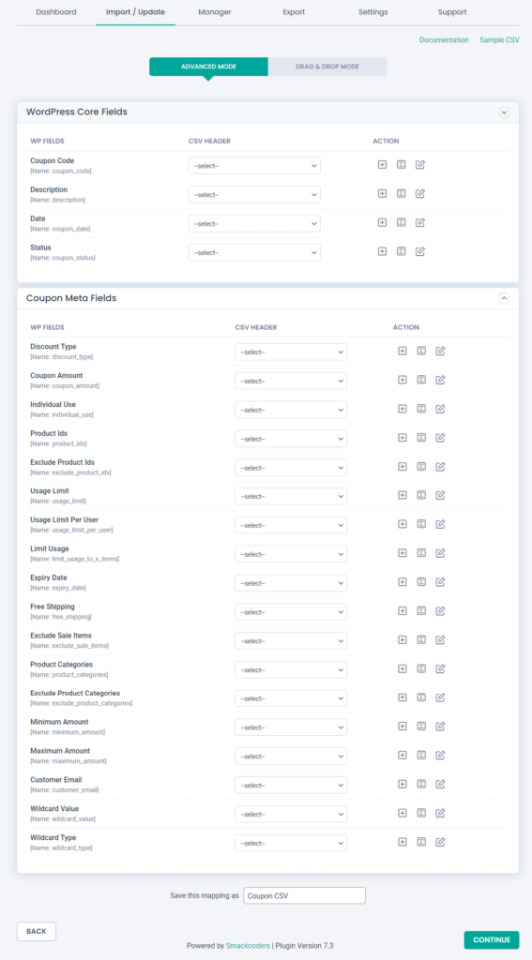
After mapping, all the fields save the mapping as a template to use this mapping later. For this, enter a template name in ‘Save this mapping as’ textbox provided in the bottom of the mapping section page. Click Continue and skip the Featured Image Media Handling section if you don’t want to upload any external url images. This section is enabled automatically. So you don’t need to worry about it.
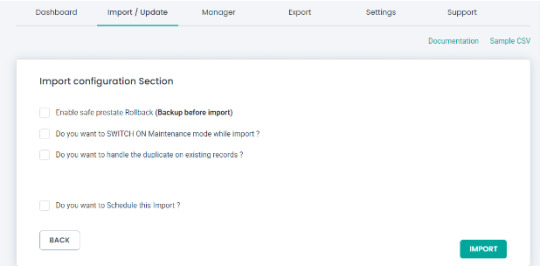
And finally you will be landed in the Import Configuration Section. There are 4 different steps to import your data safely.
Enable safe prestate Rollback – Before proceed to import, check the box to take a safe backup of your old data. If any problem arises while importing, the previous version will be restored.
Do you want to SWITCH ON Maintenance mode while import? – Notifies the visitors that your website is under maintenance if the option is enabled.
Do you want to handle the duplicate on existing records? – Imports the data by truncating the duplicate records.
Do you want to schedule the import? – Configure to Import your data at your convenient time.
Now click the Import button and all your data will get imported.
Export WooCommerce Coupons with Ultimate CSV Importer
You can easily export the WooCommerce Coupons data. The plugin lets you export the data in different file formats such as CSV/XLS/XML/JSON. The advanced filter option is also available to export only the data that you want in your hand.
Steps to export WooCommerce Coupons
1. Click on the “Export” tab in Ultimate CSV Importer.
2. Select the “WooCommerce Coupons” module and move to the next step.
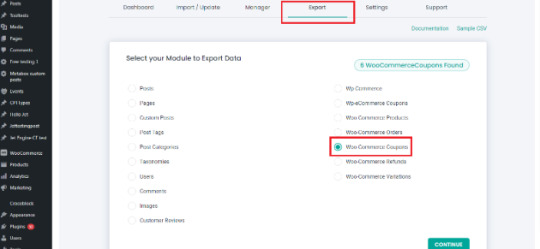
3. Give the export file name and select the type of file you want to export. The export option has a range of filtering options. That allows you to customize the export output. Here’s the list of filters available.
Export data with auto delimiters
Export data for the specific period
Export data based on specific Inclusions
Do you want to Schedule this Export
Check our documentation to know more about how to an apply export filter.
4. You can export your data now by clicking “Export”. On the next page, the export file will be prepared and ready to download. Click download and get your Coupons data file.
Import/export all WooCommerce coupons using the WP Ultimate CSV Importer Premium. Check out our Demo now to see how it works. Have any questions or need any assistance? Write to us now at [email protected]
#cms#wordpress#wordpress plugins#wordpress tutorial#plugins#website development#blog post#wordpresswebsite#import#csvimporter#woocommerce website#woocommerce#woocommercestore#woocommerce plugins#woocommerce coupons
0 notes
Text
How to Import and Export WordPress Users to CSV with Ultimate CSV Importer
When migrating your website content, it’s important to know that users data is just as significant as Posts, Pages, and Custom Posts data. Migrating all data is simply done using an Import/Export plugin such as WP Ultimate CSV Importer. This plugin can import and export your users/WooCommerce customers data along with their billing and shipping information. It can also let you update existing users’ data.
Using WP Ultimate CSV Importer, you can easily manage the users information without manual entries. It offers a wide range of filters to export only the data you require. Adding to that, you can export and import users with metadata. To create meta fields in the users, you can use third-party add-ons like WP-Members, Members, Ultimate Member and ACF, Toolset, JetEngine, and more.

Is it significant to take a backup of your WordPress site?
Any reasons like hardware or software failure, human error, or server crashes may result in the loss of necessary site data. Taking a backup can protect you from such data loss and help you restore the site data quickly. So you wouldn’t lose your data. Using Ultimate CSV Importer you can take a safe backup of all your content including Posts, Pages, Comments, Categories, WooCommerce data, and more. Here in this blog, we’ll see the complete features of User export using the Ultimate CSV Importer plugin.
How to Export WordPress Users?
Exporting users data is indispensable if you’re about to migrate your site or need to take a backup of all your necessary data. You can export user information, their passwords, WooCommerce plugin-generated fields like billing/shipping information, and other data. Here we will see how to export users with the metadata using Ultimate CSV Importer.
Navigate to the Ultimate CSV Importer (Pro) plugin in your WordPress instance and click the Exporter tab.

Select users and click continue.
The next step is “To export data based on the filters”.
1. Export File Name - Give a name to the export file.
2. Export Type - Here are the four different types of file formats you can export: CSV, XML, XLS, and JSON. Choose anyone.
3. Split the Record - Allows splitting and exporting records. If you have many records to export you can use this option. For example, you give the value 100 after enabling the checkbox and have chosen the CSV file type to export. It will download the files as a zip. Inside the zip file, you can see CSV files. The first exported CSV will contain the first 100 records and the second CSV contains the next hundred records and so on.
4. Using advanced filters, you can export any specific data from WordPress you need. Export data with auto delimiters, specific periods, and specific Inclusions(specific fields selection to export).
5. To schedule your export, just enable the "Do you want to schedule this export" and fill out the details: schedule date, time, frequency, and time zone then click Schedule Export.

If you haven’t used the scheduling option. Click the Export button to export your data and then Download. Now the files will be downloaded locally that contain all the User details and meta fields in your CSV.

Exported CSV

How to Export Users with Metadata?
To begin with, let’s see why users should have custom fields. Custom fields are helpful to collect more information about website users. You can use third-party add-ons to create these additional fields.
If you have created metadata(custom fields) using plugins like ACF, JetEngine, Toolset, Metabox, etc., You can export users data along with its metadata using the Ultimate CSV Importer plugin.
We have the aforementioned export steps. To export specific users fields with metadata follow the below steps
1. If you only want to export metadata and some specific user fields, navigate to the Ultimate CSV Importer Pro plugin. Click Export and select the module “Users” and then click Continue.
2. On the next page click “Export Based on Specific Inclusion”. Here you can select the meta fields and default user fields you want to export.
3. At last, click export and download.
The below picture shows the custom fields assigned for users that were created using ACF, Toolset Types, and MetaBox plugins.

How to Export WooCommerce Customers along with Membership plugin information
In WordPress, the customer who visits and makes a purchase on your WooCommerce store will automatically become a User. This will include some additional fields in the users like Billing and Shipping Information. Ultimate CSV Importer will export all the User details along with Billing and Shipping information.
It also supports membership plugins like WP Member, Ultimate Member, and Members. For example, I have created meta fields using Ultimate Member, and WP Member plugins and assigned them to users. You can see that in the below screenshot.

To export WooCommerce customers with metadata follow the above steps explained to export the User with all the details. And if you want to export only some fields with WooCommerce User information, navigate to the Ultimate CSV Importer plugin >> click Exporter Tab. Select Users >> then click Continue.
Choose “Export Based on Specific Inclusion”. There you can see Billing and Shipping Information and Custom Fields of Membership plugins widgets. Click and select the fields you want to export.

Import WordPress Users using WP Ultimate CSV Importer
Creating large numbers of users or updating existing users or adding new roles, etc manually sucks your time. Ultimate CSV Importer makes the process simple and easy with just a few clicks. You can import Customer Billing Shipping information and metadata using the plugin. Let’s see how to do it.
Click on the Ultimate CSV Importer(Pro) plugin in your WordPress dashboard. It will open up the Import tab. Upload your CSV/XML file. If you don’t have any, download a sample CSV/XML file for reference. Then prepare your own and upload it.

After uploading, select users from Import each record dropdown. Continue with New Item to import the new users or choose Existing Items to update the old users data. All the file header fields must be mapped to WordPress field headers. User Login, User Email, and Language are mandatory fields. Skip the media handling section. In the Import configuration section, there are 4 different options available to configure your import. Enable safe prestate Rollback (Backup before import) - Import can be reverted to the previous state if any issues arise. Do you want to SWITCH ON Maintenance mode while import? - To notify the visitors that the site is under maintenance mode. Do you want to handle the duplicate on existing records? - Enable this to truncate the duplicate records.
Do you want to Schedule this Import? - Fill out all the details necessary to run the data import at a particular time.
Click Import to finish the process.
You can verify the status in Admin View/Web View by clicking the “View Log” button.
How to Import Users with Metadata?
Follow the above steps to import the User. If you have to add additional columns in your CSV that are the meta fields. At the time of configuring import, in the mapping section, a new widget will appear for mapping custom fields so you have to map the CSV headers with WordPress fields.
As mentioned above, the Ultimate CSV Importer plugin supports meta fields created with plugins like JetEngine, ACF, toolset, Meta Box, etc., Know the compatible plugins listed here.
For instance, I created an ACF and Types fields and assigned them to the User. In the mapping section, new widgets with naming ACF Pro Fields and Types Custom Fields will appear. You can see that in the below screenshot.

How to Import WooCommerce Users and Membership plugin information
Not only exporting, but Ultimate CSV Importer also supports importing data into Membership plugins like WP Member, Ultimate Member, and Members plugins. Furthermore, you can import the WooCommerce Billing and Shipping Information of the User.
1. After you upload your file inside the plugin, choose "Users" from the drop-down menu.
2. Then in the Mapping section, along with the default user field, the WooCommerce Billing Shipping Information widget and Membership custom field widget will appear.
3. Map all the fields and next continue to Import.
How does it work with Passwords?
In the plugin page, go to Settings >> General Settings >> Send password to user. Enable the “Send password to user” toggle to send passwords via email.

To provide customized passwords to the users, prepare your CSV with the password assigned to users and import it. Otherwise, the plugin will automatically generate the password and share it with the users via email.
Note: To send passwords via email, make sure you have enabled and configured Easy WP SMTP in your WordPress.
How to update WordPress Users?
When you decide to update existing User data, begin to export the users data from your WordPress and make all necessary changes to the exported CSV file, and save it. Then import the file with our plugin.
Let’s explore how we can accomplish this using the Ultimate CSV Importer plugin.
Updating is just as same as importing, only a few steps will differ.
Likewise, import, and upload the CSV file. Next to that, you have to select Existing Items and map all the fields required to update data.
Select a field from the ‘Update records based on’ dropdown in the Import section, to update existing records based on the selected User Email/ID/Login field. That’s all you need to do.

Tips for successful User Import and Export
File Format: When you are ready to import, make sure your CSV/XML is in a valid format. Use a file validator to check the files before uploading.
Duplicate Checking: Check if there are any duplicate records in your CSV or else enable “Do you want to handle the duplicate on existing records?” in the Import configuration section to restrict the duplicates entering your website.
Trial Import: Try a test import with the User CSV to ensure it is error-free and successfully import. Download CSV & XML file samples here to know how to give or include values to the files.
Backup your WordPress site: Before importing any data it is necessary to keep a safe backup to revert the website data in case of any error occurs in the import process. Use the “Enable safe prestate Rollback (Backup before import)” in the Ultimate CSV Importer plugin to keep a backup before import.
Frequently Asked Questions for WordPress Users Import & Export
1. How do I export my WordPress users to another site?
To get started, install and activate the Ultimate CSV Importer plugin on your WordPress site. Go to the plugin’s Export tab and click on users. Provide a filename and choose a file type. Then click the Export button. After the file is exported, make changes to that file as needed and prepare it for re-import into your new website.
2. Can I export/import WordPress users with their passwords?
Yes, you can. Ultimate CSV Importer plugin exports users data along with their password. You can import users and their passwords, if the password fields are empty the plugin will send auto-generated passwords to the appropriate user email id.
3. I have a specific scenario where I have two user profiles with the same name. How can I change/update the record in this situation?
Yes. Even though the users have the same name they differ in their Email IDs. So you can easily update the users record based on Email ID.
4. Can I import Zip Code with user data?
Yes, it is possible to import Billing and Shipping Information(including Zip Codes) to the users module. Prepare the CSV, with all the details and import the data.
5. Is there a plugin for automated User Import and Export?
There are many plugins available to Import & Export users. Here are a few suggestions:
WP Ultimate CSV Importer
WP All Import
User Meta Pro
Export User Data
When choosing a plugin do detailed research and select the best plugin that fits your needs.
We hope that this article is helpful to you. Please don’t hesitate to reach out to us at [email protected] if you have any inquiries.
#wordpress#wordpress plugins#wordpress tutorial#cms#website development#plugins#blog post#import#wordpresswebsite#csvimporter#users#import export data#wordpress users
0 notes
Text
How to use Google Sheets for WordPress schedule import and update
Are you looking to streamline your WordPress content management with ease? If so, the WP Ultimate CSV Importer plugin is a powerful tool at your disposal. This plugin allows you to import, update, and schedule data effortlessly on your WordPress site. In this guide, we’ll show you how to use Google Sheets effectively in conjunction with WP Ultimate CSV Importer for a more efficient and automated workflow.
Why Use Google Sheets with WP Ultimate CSV Importer?
Before we dive into the specifics, let’s understand why combining Google Sheets with WP Ultimate CSV Importer is a smart move:
User-Friendly Collaboration: Google Sheets is a widely-used online spreadsheet tool that allows multiple users to collaborate in real time. By creating and managing your data in Google Sheets, your team can work together seamlessly.
Data Validation and Cleanup: Google Sheets provides robust data validation and cleanup features. You can easily spot and correct errors, ensuring that your data is clean and ready for import.
Automatic Updates: With Google Sheets, you can schedule automatic updates to your data. When used with WP Ultimate CSV Importer, this means your WordPress site can stay up-to-date without manual intervention.
How to Ensure Google Sheet Publicly Accessible URL
In the WP Ultimate CSV Importer, the user needs to provide a publicly accessible downloadable URL for the data import, updates, and scheduling to occur. So we initially need to generate a publicly accessible URL from google sheet.
How to Get the Publicly Accessible URL
Following the steps given below to create a publicly accessible URL on Google Sheets:
Open the google sheet you want to publish.
Click the on File menu > Share > and select Publish to web.
The publish to web window will pop up. In the link tab, select the required sheet name from the first dropdown and choose one file type from the second dropdown.
In this case, let’s choose the CSV format.
Click Publish, it will generate a shareable CSV link to share with others.
Copy the link. to use it for our import process.
Watch the below video tutorial for how to generate a CSV link from Google Sheets:
youtube
How to import/update data from Google Sheets to WordPress?
Importing data from Google Sheets to WordPress becomes seamless with the utilization of the Importer plugin. This plugin streamlines the process, allowing you to transfer data and content effortlessly. Once you provide the link, WP Ultimate CSV Importer will automatically fetch the data added in Google Sheets and import it into WordPress based on mapping settings. Let’s see how we can import first.
Set Up Your Google Sheets Document
Initially, create a Google Sheets document. If you don’t already have one, create a Google Sheets document and input your data. This can be content, product listings, user information, or any data you want to manage on your WordPress site.
Ensure that your data is organized in rows and columns. Each row typically represents an individual item, while columns represent attributes like titles, descriptions, categories, and more.
Share the Google Sheets document with your team members or collaborators so they can work on it simultaneously.
Configure Import Settings
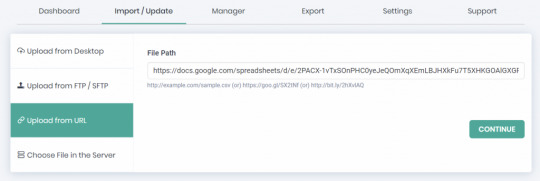
Access the Ultimate CSV Importer plugin in your WordPress dashboard. There visit the upload from the URL tab present inside the import/update menu and paste the copied generated CSV link.
To initiate the import process, you can import new items or update existing posts/pages/custom posts/Woo-Products, using title, ID, slug, and SKU. You can choose an existing item from the options shown below to set up a schedule:
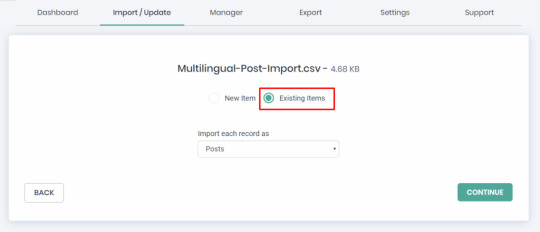
Ensure to choose the right post type.
Mapping Data
Mapping data fields contributes a lot to successful import. So carefully choose and map all the header fields in your Google Sheets to the corresponding fields in WordPress. This step ensures that your data is imported correctly. Some fields are mapped automatically or else you need to drag and map or use the dropdown and map. At the end of the page, ensure that you save the mapping templates with a name, as they are crucial for successful scheduled import or update.
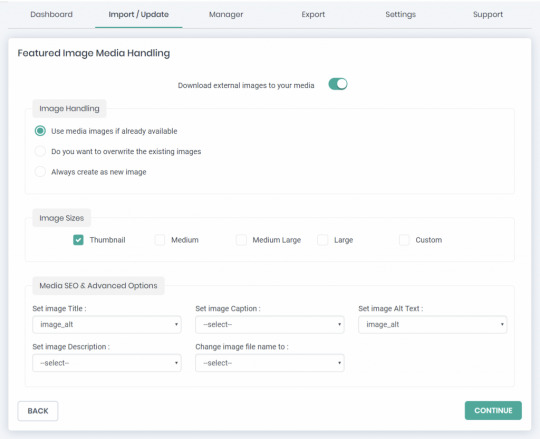
Handling Images
The handling of images during the import process involves several options:
Select the first option when utilizing existing images and new ones.
Enable the second radio button if there is a need to overwrite existing images with new images.
When introducing new image URLs from external sources, activate the third radio button.
You can configure the image sizes and map the images’ SEO fields here.
Scheduling the Process
WP Ultimate CSV Importer offers a scheduling feature that allows you to schedule imports and updates according to your preferred UTC time zone. This convenient scheduling process is easy to set up:
In the final stage of your import, simply choose “Do you want to Schedule this import?”
Next, provide the Date, Frequency(choose how often you want the updates to occur, whether it’s daily, weekly, or at custom intervals), UTC Time, and Time Zone that aligns with your requirements.
Confirm your settings by clicking the “Schedule” button.
Once scheduled, your import will run automatically at the designated date and time, saving you time and effort.
Please refer to the image below for a visual guide and step-by-step instructions.
After scheduling, monitor the import runs through the “Manager” section’s >> “Scheduled Imports” page. This feature cancels out the need for repeated rescheduling when performing new imports or updates. That is, you can add new records conveniently row by row in Google Sheets, while already imported documents can be modified directly in the sheets. This approach ensures the automatic import of new data and seamless updating of existing content from Google Sheets to the WordPress system.
Conclusion
Using Google Sheets for data import to WordPress with the WP Ultimate CSV Importer plugin empowers you to manage and update your WordPress content more efficiently. It allows for seamless collaboration, data validation, and automated updates, reducing manual effort and potential errors.
By following the step-by-step guide outlined in this article, you can harness the full potential of these tools, ensuring that your WordPress site remains up-to-date with minimal effort. Say goodbye to manual data entry and hello to a more streamlined content management process!
FAQs
1. How can I import a Google Sheet into my website? You can import a Google Sheet into your website using various methods, including embedding, Google Sheets API, or third-party tools. The choice depends on your specific needs and technical expertise.
2. Is it possible to import and update custom post types and taxonomies using Google Sheets? Yes, our WP Ultimate CSV Importer plugin supports custom post types, taxonomies import, and updates via Google Sheets. Ensure that your Google Sheet reflects the structure of your custom content.
3. Can I automate the import process with Google Sheets and WordPress? Yes, you can automate the process by using the WP Ultimate CSV Importer plugin for importing and updating data from Google Sheets.
4. How do I import a Google Sheet into WooCommerce? You can import Google Sheets data to your WooCommerce Products, Orders, Coupons, and more with the steps explained in this article using Ultimate CSV Importer.
#wordpress#wordpress plugins#wordpress tutorial#cms#website development#plugins#blog post#import#wordpresswebsite#csvimporter#google#google sheets#Youtube
0 notes
Text
How to Update WordPress plugins
WordPress plugins are software extensions that add new functionality to your WordPress website. They are like apps for your website, allowing you to customize and enhance its features without having to write any code. With over 55,000 plugins available in the official WordPress Plugin Directory, there’s a plugin for practically every need.
Why is it Important to Update WordPress Plugins?
Keeping your WordPress plugins up to date is crucial for several reasons. First and foremost, updates often contain bug fixes and security patches that address vulnerabilities discovered in previous versions. By updating your plugins, you ensure that your website remains protected against potential attacks.
Additionally, updates can introduce new features, improve performance, and enhance compatibility with the latest version of WordPress. By regularly updating your plugins, you can take advantage of these improvements and ensure that your website runs smoothly.
How to Check for Plugin Updates
Before we dive into the update process, it’s important to know how to check for plugin updates. Fortunately, WordPress makes it easy. Here’s how:
1. Login to your WordPress dashboard: Visit your website’s admin area and enter your login credentials.
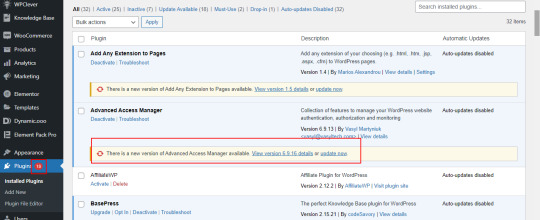
2. Navigate to the Plugins page: From the sidebar, click on “Plugins” to access the list of installed plugins.

3. Check for updates: On the Plugins page, you’ll see a notification if any updates are available. Look for the number in a red circle next to “Plugins”.
4. Update individual plugins: To update a specific plugin, click on the “Update Now” link beneath its name. The latest version will be downloaded and installed by WordPress automatically.
5. Update all plugins: If you prefer to update all plugins at once, click on the “Update Available” link at the top of the page. WordPress will update all plugins that have pending updates.
Manual Update Process for WordPress Plugins
While updating plugins manually is not the most convenient option, it still provides you with greater control over the process. Here’s how to manually update WordPress plugins:
Secure your website: Before implementing any updates, it’s advisable to generate a backup of your website. This precautionary step ensures that should any issues arise during the update process, you can effortlessly revert your website to its previous state.
Download the latest version: Visit the plugin’s website or the official WordPress Plugin Directory to download the latest version of the plugin you want to update.
Deactivate the old version: In your WordPress dashboard, navigate to the Plugins page and deactivate the plugin you wish to update.
Delete the old version: Once the plugin is deactivated, click on the “Delete” link beneath its name to remove the old version from your website.
Upload and activate the new version: On the Plugins page, click on the “Add New” button at the top. Choose the downloaded plugin file from your computer and click “Install Now”. Finally, click on “Activate” to enable the updated plugin.
Pros and Cons of Manually Updating Plugins
While manual updates give you more control, they also come with their own set of pros and cons.
Pros:
Greater control over the update process.
Ability to thoroughly test the updated plugin before activating it.
No reliance on automatic updates, which can sometimes cause compatibility issues.
Cons:
Requires manual effort and time investment.
Higher risk of human error during the update process.
It might pose a greater challenge for users who are not familiar with technical concepts.
How to Update WordPress Plugins Automatically
If you prefer a more hands-off approach, you can enable automatic updates for your WordPress plugins. Automatic updates ensure that your plugins are always up to date without requiring any manual intervention. Here’s how to enable automatic plugin updates:
Install a plugin for automatic updates: There are several plugins available that can handle automatic updates for you. A well-liked choice is the “Easy Updates Manager” plugin, which can be installed and activated directly from the WordPress Plugin Directory.
Configure automatic updates: Once the plugin is activated, navigate to its settings page. Here, you can specify which plugins you want to update automatically and choose the update frequency.
Save your settings: After configuring the automatic update settings, make sure to save your changes.
Benefits of Using Automatic Plugin Updates
Automatic plugin updates can offer several advantages for website owners:
Improved security: With automatic updates, you can ensure that your plugins are always up to date with the latest security patches, minimizing the risk of potential vulnerabilities.
Time-saving: Automatic updates eliminate the need for manual intervention, saving you time and effort that can be better spent on other website management tasks.
Enhanced performance: By regularly updating your plugins, you can take advantage of performance improvements and bug fixes, ensuring your website runs smoothly.
Compatibility: Automatic updates help ensure that your plugins remain compatible with the latest version of WordPress, preventing any compatibility issues that may arise from using outdated plugins.
Best Practices for Updating WordPress Plugins
To ensure a smooth update process and maintain the security and functionality of your website, follow these best practices:
Backup your website: Before updating any plugins, always create a backup of your website. This allows you to restore your website in case anything goes wrong during the update process.
Update one plugin at a time: To minimize the risk of conflicts or compatibility issues, update one plugin at a time and thoroughly test your website after each update.
Keep track of plugin updates: Regularly check for plugin updates and stay informed about any new features, bug fixes, or security patches. This helps you make informed decisions about which plugins to update.
Read release notes and changelogs: Before updating a plugin, read the release notes or changelogs provided by the plugin developer. This gives you valuable insights into what changes are included in the update and any potential impact on your website.
Test after updating: After updating a plugin, thoroughly test your website to ensure that everything is functioning correctly. Pay special attention to any areas or features that are directly affected by the updated plugin.
Common Issues and Troubleshooting Tips When Updating Plugins
While updating WordPress plugins usually goes smoothly, occasionally, issues may arise. Below, you’ll find a list of common issues along with troubleshooting tips:
White screen of death: If your website displays a blank white screen after updating a plugin, it may indicate a compatibility issue. Try deactivating the recently updated plugin and see if the issue resolves. If it does, contact the plugin developer for further assistance.
Plugin conflicts: Sometimes, updating a plugin can cause conflicts with other plugins or themes. If you notice any unexpected behavior after an update, deactivate other plugins one by one to identify the conflicting plugin. Once identified, contact the plugin developer for a possible solution.
Missing or broken features: If a plugin update results in missing or broken features, ensure that you have followed the update process correctly. If the issue persists, reach out to the plugin developer for guidance, or consider rolling back to the previous version of the plugin.
Slow website performance: Occasionally, a plugin update may negatively impact your website’s performance. To address this, check if the updated plugin has any new settings that could affect performance. If necessary, revert to the previous version or consider alternative plugins.
Importance of Keeping Plugins Updated for Website Security
Keeping your WordPress plugins updated is crucial for maintaining the security of your website. Outdated plugins can become a prime target for hackers looking to exploit vulnerabilities and gain unauthorized access to your website.
By regularly updating your plugins, you ensure that any security vulnerabilities discovered in previous versions are patched. This significantly reduces the risk of your website being compromised.
Additionally, outdated plugins can also pose compatibility issues, leading to website malfunctions or conflicts with other plugins or themes. By keeping your plugins up to date, you minimize the chances of these compatibility issues and ensure a smooth user experience.
Conclusion
Updating your WordPress plugins is a vital part of website maintenance. It not only improves security but also enhances performance and compatibility. Whether you choose to update your plugins manually or enable automatic updates, following best practices and staying vigilant ensures that your website remains secure and up to date.
By regularly checking for updates, testing after each update, and addressing any issues promptly, you can keep your website running smoothly and provide a seamless experience for your visitors.
Don’t neglect the importance of updating your WordPress plugins. By staying proactive, you can safeguard your website and leverage the latest features and improvements offered by plugin developers.
Remember, your website’s security and functionality depend on regular plugin updates. Stay informed, stay updated, and keep your website in top shape.
Stay ahead of the curve. Update your WordPress plugins today!
#wordpress#wordpress plugins#wordpress tutorial#cms#website development#plugins#blog post#import#wordpresswebsite#csvimporter#Wordpressplugindata
0 notes
Text
How to Create and Import Custom Post Types in WordPress
In this blog post, we will explore the process of creating and importing custom post types in WordPress. Whether you are a seasoned WordPress developer or just starting, this guide will provide you with a step-by-step tutorial on how to create and import custom post types to your WordPress website. We will cover the basics of custom post types, including what they are, why you might need them, and how to create them using plugins. Also, we will discuss how to import custom post types from other sources, such as a CSV file. By the end of this tutorial, you will have a clear understanding of how to create and import custom post types in WordPress, and you will be able to take your website to the next level by offering unique content types to your users.
What is Custom Post Type in WordPress?
Let’s begin with understanding what a custom post is. In WordPress, custom post types are content types that you can create and customize to your specific needs. It can be created using custom code or a third-party add-on. In this article, we will see how to create custom posts using third-party plugins. By default, WordPress comes with five post types: Posts, Pages, Attachments, Revisions, and Menus. Custom post types allow you to add additional content types beyond defaults.
Why do we need Custom Post Types?
If you are planning to build a Real Estate website, the default Post/Page won’t be sufficient because we want a Post Type to have a Product Image, Custom Fields related to the Post we are building here are some sample fields we need – Number of bedrooms, bathrooms, Pools and Minimum Price, and Type of Property either an apartment or Building or Bangalow, etc., so definitely we need a custom post to achieve our needs.
Most Popular Third-party Plugin for Custom Post Types
There are several third-party plugins available to create custom Posts but here I’m listing the most popular ones,
Toolset
JetEngine
PODS
Metabox
As a whole, these are the most popular plugins. Each has several features and depending on your specific needs and preferences, you can select any for your website.
In this article let us see how to create Custom Post using the above addon and how to import it using the Ultimate CSV Importer Plugin.
How to create Custom Post Types using Toolset?
Toolset is a powerful plugin that allows you to create Custom Posts, Custom Fields, and Taxonomies without coding knowledge in simple steps. Toolset also includes other features, such as views, forms, and templates. These features enable you to create highly customized WordPress websites and applications.
Install and activate the Toolset Types plugin in your WordPress instance.
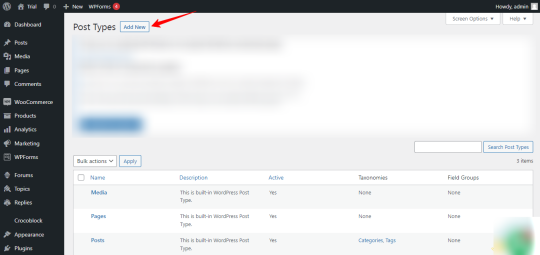
Go to the Toolset -> Post Types in your WordPress dashboard.

Click on the Add New button to create a new custom post.
In Post Type Name enter the Custom Post name and in the description field, enter the short description of the post. Under “Options,” select the settings you want for your custom post type. This includes the post-type label, menu icon, and capabilities. And fill in all the necessary fields and click Save Post
Once you have created a custom post, your newly created custom post will appear in your WordPress instance.
Add new custom fields to your custom post in two ways. By clicking Dashboard under the Toolset menu, you will see a newly created custom post. Then click Add Custom Fields, and Add Custom Taxonomy, to create custom fields and taxonomies for the custom post. You can also click on Custom Fields under the Toolset menu to create custom fields and Taxonomies to create custom Taxonomy.


How to create Custom Post Types using PODS?
PODS is a popular plugin that allows you to create custom Posts, Custom Fields, and Custom Taxonomies. Overall, PODS is a powerful plugin that offers a lot of flexibility for customizing WordPress sites.
We will see how to create Custom Post,
Install and activate the PODS plugin in your WordPress Instance.
In your WordPress dashboard, Click PODS Admin -> Add New -> Create New.
Select Custom Post Type in the dropdown menu to create Custom Post, Custom Taxonomy to create a custom category and tag.
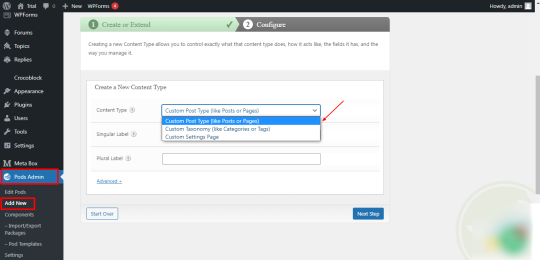
Provide the CPT name in the Label field and click Save Pod, then new CPT will be created and it is displayed in your WordPress dashboard.
To create Custom Fields, Click on Edit Pods in the WordPress dashboard ->Select your Custom Post (To add custom fields) -> Fields ->Add field group name and fields for the post -> Save Pods.
That’s it! With PODS, you can easily create custom post types and custom fields for your WordPress site without writing any code.
How to create Custom Post Types using MetaBox?
Metabox is a powerful and flexible plugin that lets you easily create Custom Posts, Custom Fields, and Custom Taxonomies for your WordPress posts, pages, and custom post types. Whether you’re a developer building custom themes or plugins, or a content creator looking to add more information to your posts, MetaBox is worth checking out.
Install and Activate the MetaBox to create Custom Fields and MB Custom Post Types & Custom Taxonomies in your WordPress instance.
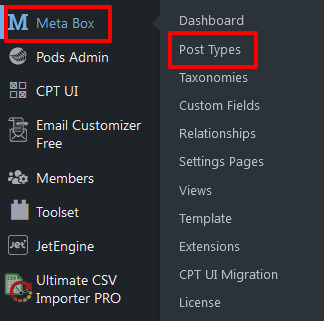
Once the plugin is activated you can see the new MetaBox menu in your WordPress dashboard.
In your WordPress dashboard, go to MetaBox > Custom Post Types and Click the “Add New” button to create a new custom post type.
Fill in all required fields such as name, and slug for your Custom Post. You can also select the post type’s capabilities, menu icon, and taxonomies and click Publish and now your Custom Post will be created.
Under MetaBox -> Custom Fields, you can add custom fields to your custom post type or existing post. You can choose from various field types such as text, textarea, select, checkbox, and more. Fill in all necessary details like field name and Field location etc and click Publish to see your Custom Fields displayed in the desired location.
That’s it! You have now created a custom post type and custom fields using the MetaBox plugin’s user interface, without writing a single line of code.
How to create Custom Post Types using JetEngine?
JetEngine is a powerful plugin that allows you to create custom post types, custom fields, and custom taxonomies without any coding. For storing additional information to your post you can create custom fields using the plugin. Now, we will walk you through the process of creating custom post types and fields with JetEngine.
Install and Activate the JetEngine plugin in your instance.
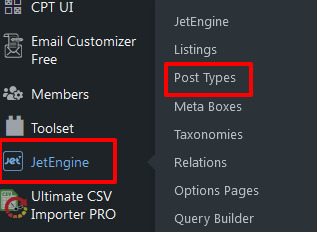
Once it is activated, JetEngine Menu will be displayed in your WordPress dashboard.
Click JetEngine ->Post Type -> Add New.
Add your Post Name, Slug, and fill in all necessary details. Customize your Custom Post by adding Custom Fields and taxonomies by clicking the Add Meta Field button under Meta Fields. Choose the field type you want to add, such as “Text”, “Number”, “Checkbox”, or “Image”. Fill out the field settings, such as the field label, meta key, and default value.
And click “Add Post Type” to create Custom Post with Metadata.
Ultimate CSV Importer - To Import Custom Post Types
It’s always nice to be in trend, isn’t it? Not only for lifestyle but also for business. The Ultimate CSV Importer always keeps up with the latest market developments. Interesting right, then try our demo now. So let us see how to import data into a Custom Post using the plugin.
This involves a few steps,
Import File Preparation,
Upload File
Field Mapping
Media Handling Section
Import Configuration Section
File Preparation
Ultimate CSV Importer will import both CSV and XML file formats. Ensure your CSV file is formatted correctly, with each column representing a different field in your custom post type. Also, we have provided a Sample CSV/XML for your reference. If you are unclear, you can look for clarification.
Upload File
Install and Activate WP Ultimate CSV Importer in your WordPress instance. Click the Ultimate CSV Importer plugin and navigate to the Import tab and upload your CSV/XML and select the post type you want to import in the dropdown menu. Select New Items to import New data or Existing Items to update the old data.
Field Mapping
Field mapping in the Ultimate CSV Importer plugin allows you to map the columns in your CSV file to specific fields in your WordPress database, such as post title, post content, post meta fields, custom fields, and taxonomy terms. Field mapping is essential because it tells the plugin where to place the data from each column in your CSV file. Once it is done you can save the mapping as a template so you can use the same mapping in the future use.
Media Handling Section
Download external images to your media – You can decide whether the image (Inline Image/Featured Image/Gallery Image) imported with your Post should be in the Media Library or not in this section.
Image Handling – Ultimate CSV Importer will handle your images perfectly by not allowing duplicate images inside the Media library. If the images are already present inside the Media and you want to keep them, you can do it or delete the old ones by overwriting the existing images or always creating fresh ones during the import process. Select anyone based on your needs.
Post Content Image Option – Enable to download the Post content image to the Media Library
Image Sizes – The image can be imported in different sizes such as thumbnails, medium, medium large, and large. If you need any custom size you can do it by specifying the image width and height.
Media SEO & Advanced Options – You can import images along with the SEO fields like Image Name, Description, ALT text, and Caption. Map the desired CSV header to the fields. And click Continue to proceed with the import process.
Import Configuration Section
In this section, you can take a safe back backup before importing. Also, you can notify your visitors that the site is under Maintenance mode. Then Kickoff the duplicates while importing the data based on Title/name. Schedule your import at your own time in this section. Once it is done click Import to import all your data into the WordPress instance.
How to Export Custom Post Types using Ultimate CSV Importer?
Click on Ultimate CSV Importer and navigate to the Export Tab and Click Custom Posts. Now the created custom post will be listed in the dropdown, select the desired post and Click Continue.
Give the name of the file to be exported and download the file in the format you need like CSV/XLS/XML/JSON. And the advanced filters allow exporting the data you need. (Refer to Ultimate Exporter documentation for more details)
Update your data using Ultimate CSV Importer
Both import and update are the same processes and it only differs in two steps. In the first step select Existing Items and upload your CSV and map all the necessary fields and click continue.
And in the Final Step select Update based on Field to update the record based on the title/slug/ID.
#wordpress#wordpress plugins#wordpress tutorial#cms#website development#plugins#blog post#custom post#custom post type#import#csvimporter#custom field
0 notes
Text
How to Create or Edit CSV and XML Files to Import into WordPress
CSV (Comma Separated Values) and XML (Extensible Markup Language) are two commonly used file formats for data storage and exchange. CSV files store data in a tabular format where values are separated by commas. XML files, on the other hand, use a hierarchical structure to organize data with tags and elements. In this article, we will explore how to create and also edit CSV and XML files for importing into WordPress.
CSV and XML File Characters
CSV files primarily use characters like commas, double quotes, and line breaks to separate and format data. The comma acts as a delimiter between each value, while double quotes enclose values containing special characters or spaces. Line breaks indicate the end of a record or row. XML files use tags enclosed in angle brackets (<>) to define elements and their content. These tags provide structure and hierarchy to the data.
How do CSV files help in Your Business?
More or less all commercial platforms are using CSV files to import and export their ecommerce data to and from the database. CSV files are generally faster and consume less memory space when compared to the Spreadsheet. CSV files are handled by various businesses to save posts, products, and other requisite data.
Benefits of CSV Import
It is effortless to Install and child’s play to resolve any changes. Faster to handle the data. It runs in no time to import and export the file.
How to Open a CSV File
To open a CSV file, you can use various text editors or spreadsheet applications. Here are a few popular options:
Using Notepad
Launch Notepad, a basic text editor that comes pre-installed on most Windows computers.
Go to the File menu and select Open. Navigate to the location of your CSV file, select it, and click Open. The CSV file will open in Notepad, displaying the data in plain text format.
Using Notepad++
Download and install Notepad++, a free source code editor and launch Notepad++.
Go to the File menu and choose Open. Find your CSV file, choose it, and press the Open button. Notepad++ will display the CSV file with syntax highlighting and better readability.
Using MS Excel
Open Microsoft Excel, a widely-used spreadsheet application. Click on the File tab >> Open.
Browse to the location of your CSV file, select it, and click Open. Excel will automatically detect the CSV format and present the data in a spreadsheet view.
Using Google Sheets
Open a web browser and navigate to Google Sheets. Sign in with your account or create one.
Click on the File menu and select Import. Choose Upload and select your CSV file from your computer. Google Sheets will import the CSV file and display it in a spreadsheet format.
Using LibreOffice
Launch LibreOffice, a powerful open-source office suite. Click on the Calc option to open the spreadsheet application.
Go to the File >> Open. Navigate to the location of your CSV file, select it, and click Open. LibreOffice Calc will automatically detect the CSV format and present the data in a spreadsheet view.
Using OpenOffice Calc
Start OpenOffice, another popular open-source office suite. Select Calc from the available applications to open the spreadsheet component.
Click on the File menu >> choose Open. Find your file location and open it.
How to Prepare a CSV file using Notepad++?
Open Notepad++ for Windows and text editor for Mac. On the new file, start to create field names separated by comma values. Add field headers in the first row. Beneath the headers, add the field values.
Save the file with .csv extension by visiting File > Save as > Name.csv
Likewise, you can create your preferred CSV file with various text editors and save it in the .csv extension.
Using Notepad
Launch Notepad, a basic text editor available on most Windows computers.
Start by opening a new blank document. Type or copy and paste your data, ensuring each value is separated by a comma. To indicate a new row, press the Enter key after entering each set of values. Save the file with a .csv extension, ensuring the “Save as type” field is set to “All Files” in the save dialog box.
Using MS Excel
Open Microsoft Excel and enter your data into the cells, with each value in its respective column.
Save the file as a CSV by visiting the File menu, selecting Save As, and choosing CSV (Comma delimited) as the file format.
Using Google Sheets
Open a web browser and navigate to Google Sheets. Create a new sheet by clicking on the “+” icon or open an existing one. Enter your data into the cells, following the desired table structure.
To save the sheet as a CSV file, go to the “File” menu, select “Download,” and choose Comma-separated values (.csv, current sheet).
Using LibreOffice
Launch LibreOffice, a free and open-source office suite. Open Calc, the spreadsheet program in LibreOffice. Enter your data into the cells, organizing it into columns and rows.
Move to File >> Save As. Select CSV from “Save as type” and click Save.
Using OpenOffice Calc
Open OpenOffice Calc and enter your data into the cells, ensuring proper column and row alignment.
Select the File menu and choose Save As. Specify the CSV format in the Save as type field and click Save.
Downloading and Opening a Sample CSV File for Importing
To practice importing CSV files into WordPress, you can download sample CSV files from our website. Get access to the collection of sample CSV files. Download the desired file and save it to your computer. Then, follow the previous steps to open the downloaded CSV file in your preferred editor. You can also get sample XMLs by visiting the above link.
How to Edit a CSV File
Editing a .csv (Comma-Separated Values) file is a straightforward process that can be done using a variety of software applications. Here’s a step-by-step guide on how to edit a .csv file.
Open the .csv File
Launch a spreadsheet software application like Microsoft Excel, Google Sheets, or a text editor capable of handling .csv files. Navigate to the file location and open the .csv file in the chosen application.
Review the Data
Take a moment to review the data within the .csv file. Familiarize yourself with the columns, rows, and the overall structure of the data. This step will help you understand the information you’re working with and plan your edits accordingly.
Make Changes to the Data
To edit a cell
Locate the cell you want to modify and click on it. Then, simply type the desired changes directly into the cell.
To insert a new row or column
Right-click on an existing row or column, and choose the “Insert” option. This will add a new row or column where you can enter your data.
To delete a row or column
Select the row or column you want to remove, right-click, and choose the “Delete” option. Confirm the deletion if prompted.
Format the Data
If needed, you can apply formatting options to enhance the appearance of the data. This may include changing font styles, adjusting column widths, setting date or number formats, or applying conditional formatting to highlight specific data points.
Save the Edited File
Once you have made the necessary changes, save the edited .csv file. Use the “Save” or “Save As” option in your software application to overwrite the existing file or create a new file with the modifications. Choose the .csv file format when saving to ensure the data remains in the proper format.
Validate the Edited Data
After saving the edited .csv file, it’s a good practice to validate the changes you made. Check the data to ensure that the edits are accurately reflected and that the file still maintains its integrity.
Test Import/Export Operations
If you plan to import or export the .csv file into another system or application, perform a test operation to verify that the edited file functions as intended. This step helps ensure that the data is correctly processed in the target system.
Remember to back up your original .csv file before making any edits to avoid permanent data loss. Additionally, consider documenting your changes or keeping a record of the editing process for future reference.
By following these steps, you can confidently edit a .csv file, modify the data within it, and save the changes for further use or analysis.
How to fix all my CSV data appears in the first column
If you are experiencing the issue of all your CSV data appearing in the first column when opening the file in spreadsheet software, here are some steps to help you fix this problem:
Open the CSV File
Open any preferred spreadsheet software. Navigate to the location where your CSV file is stored and open it within the application.
Check the File Format
Make sure the CSV format is right and also the extension is saved as ‘.csv’ and not in another file extension.
Use the Text Import Wizard
Most spreadsheet software offers a Text Import Wizard or a similar feature to handle CSV files with specific settings. Look for an option like “Import” or “Text to Columns” within the software.
Specify the Delimiter
In the Text Import Wizard, you will be prompted to specify the delimiter used in the CSV file. Common delimiters include commas (“,”), semicolons (“;”), tabs (“\t”), or spaces. Select the appropriate delimiter that separates the fields in your CSV file.
Choose the Correct Data Format
If your CSV file contains numerical data or dates, you may need to specify the appropriate format for each column. For example, you can select “General” for text, “Number” for numerical values, or “Date” for date fields.
Adjust Column Widths
After importing the CSV file, check if the column widths need adjustment. Sometimes, when all the data appears in the first column, it might be due to narrow column widths that are not automatically adjusted by the software. Double-click on the column separators or use the “AutoFit Column Width” option to ensure the data is properly displayed.
Review the Data
Take a moment to review the CSV file’s content and verify that the data is now correctly distributed across multiple columns. Ensure that each field is in its appropriate column and that the rows and columns align as expected.
Save the Corrected CSV File
If the data is now displayed correctly in the spreadsheet software, save the file with the corrected formatting. Use the “Save” or “Save As” option to overwrite the original file or create a new file with the corrected data.
By following these steps, you should be able to resolve the issue of CSV data appearing in the first column. The Text Import Wizard helps you specify the delimiter and format settings, ensuring that the data is properly separated and distributed across the respective columns within the spreadsheet software.
How do XML files help in Business?
XML lets you extend data when it is needed. What’s more beneficial about XML files for your business, it supports Multilingual.
Benefits of XML File Import
It is faster than any other file format and can store a lot of customized data. XML data can be sent via the Internet. So that it can get access from anywhere.
How to Open an XML File
To open an XML file, you can use various text editors that support XML syntax highlighting and editing. Here’s how to open an XML file:
Using Notepad++
Launch Notepad++ if you have it installed on your computer. Go to the “File” menu and select “Open.”
Navigate to the location of your XML file, select it, and click “Open.” Notepad++ will display the XML file, providing syntax highlighting and improved readability.
Using Code Browser
Launch Code Browser, a versatile code editor with XML support. Navigate to the “File” menu and select “Open” or use the shortcut Ctrl+O. Find and visit the XML file and open it.
Code Browser will display the XML file, providing syntax highlighting and an organized view of the XML structure.
Using Atom
Open Atom and click on the “File” menu. Select “Open” or press Ctrl+O.
Browse your XML file and open it. Atom will load the XML file, providing syntax highlighting and a user-friendly environment for viewing and editing XML content.
Using Edit Plus
Launch Edit Plus, a powerful text editor with XML support and a range of features for efficient editing. Visit the File menu and open the desired file.
Edit Plus will open the XML file, displaying the content with syntax highlighting and customizable editing options.
Using other editors
If you prefer to use a different text editor, ensure that it supports XML file editing. Examples of popular XML editors include Sublime Text, Visual Studio Code, and Atom.
Open your preferred editor and use the file navigation options to locate and open the XML file.
How to Prepare an XML File
To prepare an XML file for importing into WordPress, you can follow these steps:
Using Notepad++
Launch Notepad++ if it’s installed on your computer. Go to the “File” menu and select “New” to create a new blank document. In the new document, start defining the structure of your XML file by adding opening and closing tags.
Add elements, attributes, and content within the tags to represent your data. Continue adding tags and nesting them as needed to organize your XML structure. Save the file with a .xml extension, giving it an appropriate name.
Using Code Browser
Open Code Browser, an XML-specific editor that provides features for easier XML file creation. Click on the “File” menu and choose “New” to create a new XML document. Use the editor’s interface to define the structure of your XML file. Add elements, attributes, and content as necessary. Save the file with a .xml extension, providing a relevant name.
Using Atom
Create a new file by going to the “File” menu and selecting “New File.” Begin constructing the XML structure by adding opening and closing tags.
Fill in the tags with elements, attributes, and content based on your XML requirements. Save the file with a .xml extension, choosing an appropriate name.
Using Edit Plus
Start a new document by selecting “New” from the “File” menu. Begin building your XML file structure by adding the opening and closing tags. Populate the tags with elements, attributes, and content specific to your XML data. Save the file with a .xml extension, naming it suitably.
Using other editors
If you prefer to use a different text editor, ensure that it supports XML file creation and editing. Open your chosen editor and create a new document. Follow the XML syntax rules to define the structure and elements of your XML file. Add attributes and content as needed, keeping in mind the hierarchical structure of XML. Save the file with a .xml extension and an appropriate name.
How to edit it?
Open the XML file in Notepad++ or any other XML editor. Review the file’s structure and hierarchy, making sure it adheres to the XML specifications. Ensure that each element is properly enclosed within opening and closing tags (<element>…</element>). Validate the XML file using an XML validation tool or online XML validator to ensure it is well-formed.
How to re-update Data into WordPress?
Export your desired content in XML format. Then edit the data on your exported file. Again import the same file into WordPress.
Bulk Import - What is it?
Bulk import is importing a large amount of data into WordPress. For example, importing more than 1000 records into WordPress.
How to Prepare Bulk Import Files in CSV?
For illustration, the product list has various products with its specification.
To store and update those products listed on the website, you can create 1000’s products in an Excel sheet and save that file in CSV format, and import that CSV file using WP Ultimate CSV Importer.
Conclusion
Creating and editing CSV and XML files for importing into WordPress requires careful attention to formatting, structure, and compatibility. Try to follow the above-explained steps. You can successfully create and edit the CSV and XML files. Remember to validate the file structure, handle special characters appropriately, and use compatible software to open and edit the files. With these skills, you’ll be able to seamlessly manage data imports in WordPress and enhance the functionality of your website. If you want a bulk import and export plugin for WordPress, try the WP Ultimate CSV Importer plugin. The popular Import Export WordPress plugin with many satisfying features.
#wordpress#wordpress plugins#wordpress tutorial#cms#website development#plugins#blog post#csv#xml#import#csvimporter
0 notes
Text
CSV import tutorial explains the process of adding many2many fields in CSV files for Odoo. Follow clear steps for file upload, extraction, mapping, and troubleshooting. #Odoo #CSVImport #Many2Many #Tutorial #FileUpload
0 notes
Text
CSV Records in Odoo: A Tutorial
CSV Import Odoo teaches you how to efficiently add and manage records via CSV files in Odoo. Follow our step-by-step tutorial for integrating CSV records and boosting your Odoo setup. #Odoo #CSVImport #Tutorial
In this tutorial, we explain how to add records in a CSV file using Odoo. We cover every detail in clear, simple steps and include code samples that you can use in your own projects. We use CSV file operations, Odoo record management, and practical examples to guide you. We also distribute the keyphrases such as “CSV file,” “Odoo,” and “add records” evenly throughout this post so you can better…
0 notes