#creativeediting
Explore tagged Tumblr posts
Text

ICE FACE IN WINTRY WOODS (CHAPEL HILL, NC)
Here are my TOP FIVE photos posted to Tumblr at least in 2024. This selection process made me realize how little I have shared on Tumblr, mostly due to a lack of community engagement. Great frames silently sitting in cyberspace. 2024 was full of great captures! For example, I have an awesome new series on Instagram that can only be called 'painting with light.' Check it out! I'd love to post more here this year. We'll see.

2) VINTAGE EDIT OF THISTLE FLOWER ALONG THE HAW RIVER TRAIL, SAXAPAHAW, NC.

3) ALONGSIDE A CHAPEL HILL STREAM IN THE WOODS ONE DAY. This is one of several bark patterns in a series.

4) MOSSY MASK. You guessed it, on the forest floor somewhere in the Triangle area of North Carolina.

5) HELLEBORE, aka LENTEN ROSE. Alt edit.
#original photographers#photographers on tumblr#natureabstract#nature abstract#abstract nature#abstract photography#originalphotographer#abstracart#original photographer#creativephotography#creativeediting#top 5#2024
37 notes
·
View notes
Text


The vibes we bring to the function if you will.
I love making scrap book style edits. Scroll through to get the full vibes 💕
#autumn#autumn aesthetic#friends#original photography on tumblr#photography#photoshoot#the ghost and pumpkins photoshoot trend will remain my favorite till i die! 👻🎃#photography trend#cute#pumpkin head#pumpkin#fall#fall vibes#fall leaves#my photgraphy#my photos#my post#artistic edits#photography editing#creativeediting#creative editing#scrapbook#scrapbook style#Spotify
9 notes
·
View notes
Text

Image Editing - Photoshop, Editing & Retouching Services
Reasonably priced freelance editing, retouching, and Photoshop editing services Get your Photoshop job done in less than a day by hiring a professional freelance Photoshop designer.
#PhotoRetouching#PhotoEditing#BeforeAndAfter#DigitalArt#PhotographySkills#ImageEditing#PhotoEnhancement#CreativeEditing#Retouch#Photoshop#PhotoManipulation#VisualArt#PhotographyLove#PicsArt#InstaArt#ContentCreation#VisualStorytelling#PhotographyTips#ArtisticExpression#USA#SienaSigdha
4 notes
·
View notes
Text

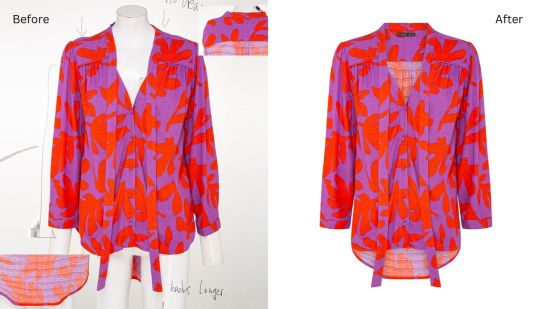
Need to make your product shots stand out? Look no further! We specialize in the Ghost Mannequin Effect, a technique that brings life to your clothing line without the need for an actual model. Our skilled team ensures high-quality, affordable, and reliable editing services, catering to clients worldwide. Let us elevate your brand's image today!
#GhostMannequin#ProductPhotography#PhotoEditing#Ecommerce#OnlineShopping#FashionPhotography#ProductShoot#ClothingPhotography#VisualMerchandising#RetailPhotography#MannequinEditing#ApparelPhotography#CreativeEditing#ImageManipulation#OnlineRetail
2 notes
·
View notes
Text
Unlock the Magic of Photoshop with Content-Aware Fill

Ever wish you could remove unwanted objects from photos like a pro? 🤩 Learn how Content-Aware Fill in Photoshop can magically erase distractions and make your images look flawless! Discover the step-by-step secrets here.
#PhotoshopTips#ContentAwareFill#PhotoEditing#PhotographyLovers#DesignMagic#PhotoshopTutorial#CreativeEditing#GraphicExpertsIndia
0 notes
Text
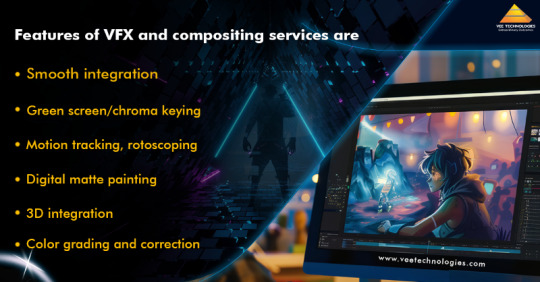
Turn Your Imaginative Worlds and Complex Scenes into Reality with Your Creativity Using VFX and Compositing Services

In the post-production process, VFX and compositing services are a focal point for creating and integrating computer-generated imagery (CGI) with live-action footage for the purpose of creating scenes that would be impossible to shoot on camera and improving visual storytelling.
Visit: https://www.veetechnologies.com/industries/animation-services/animation/vfx-compositing.htm
#VFXServices#CompositingServices#PostProduction#CGIIntegration#VisualStorytelling#FilmMakingTech#CreativeEditing#VeeTechnologies
0 notes
Text
https://clickthephoto.com/real-estate-photo-editing/
Real Estate Photo Editing Real-life shooting might be hampered by a variety of natural factors so, in order to satisfy their customers, photographers must capture and deliver excellent photographs. These photographs are generally used by real estate companies to attract customers and make purchases in real life.
This is why Real estate businesses require customized photos regularly to satisfy the needs of their clients. As a result, both of them require real estate photo editing services in order to conduct business successfully. Real estate photo editing service is very much needed for client conversion in the real world.
#EditingServices#PhotoEditingService#CreativeEditing#EditLikeAPro#DigitalEditing#VisualMarketing#ContentForRealtors#RealEstateContent#MarketingForRealtors
0 notes
Text
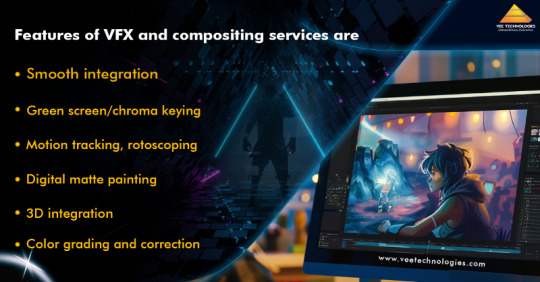
Turn Your Imaginative Worlds and Complex Scenes into Reality with Your Creativity Using VFX and Compositing Services

In the post-production process, VFX and compositing services are a focal point for creating and integrating computer-generated imagery (CGI) with live-action footage for the purpose of creating scenes that would be impossible to shoot on camera and improving visual storytelling.
Visit: https://www.veetechnologies.com/industries/animation-services/animation/vfx-compositing.htm
#VFXServices#CompositingServices#PostProduction#CGIIntegration#VisualStorytelling#FilmMakingTech#CreativeEditing#VeeTechnologies
0 notes
Text
The Art and Science of Photo Editing: Unlocking Your Creative Potential
In today’s digital world, photo editing has become an essential part of photography, whether for professional photographers, content creators, or casual enthusiasts. While some might see it as simply manipulating an image, photo editing is a powerful tool that allows individuals to enhance, transform, and communicate ideas through visual art. But how did this art form come about, and why is it so important today?

The Evolution of Photo Editing
When photography first emerged in the early 19th century, the process was painstaking and time-consuming. The invention of the daguerreotype in 1839 by Louis Daguerre, for example, required photographers to work with long exposure times and complex chemical processes. Editing was virtually impossible—if you wanted to alter a photo, you'd need to physically manipulate the photograph itself, often by retouching or painting on it.
Fast forward to the 20th century, and we see the rise of digital photography. The creation of the digital image revolutionized the way we capture and edit photos. Suddenly, editing was not only possible but also far more accessible. With programs like Adobe Photoshop, Lightroom, and others, photographers and designers now had the ability to tweak every pixel, adjust colors, and even remove unwanted elements. But it wasn’t until the rise of smartphones and apps like Instagram that photo editing reached mainstream audiences. Today, nearly everyone with a smartphone is a potential photo editor, thanks to powerful and easy-to-use tools.
Why Photo Editing Matters
Photo editing isn’t just about making pictures “prettier” or “perfect”—it’s about telling a story and conveying emotion. The beauty of photo editing lies in its versatility. Whether it’s improving the exposure, changing the color palette, or even creating surreal or fantastical images, photo editing helps photographers and artists achieve their vision. Here are a few reasons why photo editing is so important:
Enhancing Visual Appeal A good photo can always be improved. Sometimes, an image might have too much contrast, be too dark, or not quite capture the scene's true colors. Photo editing allows for adjustments that can make an image more eye-catching and professional-looking, helping the photographer convey their artistic intent more effectively.
Correcting Technical Issues Not every shot is perfect. Perhaps your camera settings weren’t optimal, or the lighting conditions weren’t ideal. Photo editing tools allow you to fix these issues—whether by reducing noise, correcting white balance, or adjusting sharpness. It can even help correct minor imperfections in skin tones for portraits or balance the exposure between dark and light areas.
Expressing Creativity Some photographers and digital artists use photo editing as a way to push the boundaries of reality. Through layering, digital painting, and creative effects, photo editing becomes a medium for creating images that would be impossible to capture with a camera alone. From dreamlike landscapes to sci-fi compositions, photo editing gives creators the freedom to experiment and break conventional rules.
Branding and Marketing For businesses and brands, photo editing is a key component of digital marketing. Whether it’s enhancing product images or creating engaging social media content, edited photos help brands stand out. With the rise of visual storytelling, edited images have become one of the most powerful tools in the marketer’s toolkit.
The Tools of the Trade
There’s no shortage of photo editing tools available today, ranging from simple apps to sophisticated desktop software. Depending on your goals and skill level, here are some popular tools to consider:
Adobe Photoshop Photoshop is the industry standard for photo editing. It’s an incredibly powerful program with a steep learning curve. For professionals, it offers a vast array of features, including advanced retouching, compositing, and color correction. Photoshop can handle everything from simple adjustments to complex manipulations.
Adobe Lightroom While Lightroom isn’t as complex as Photoshop, it’s excellent for photographers who want to manage and edit large quantities of photos quickly. It’s known for its user-friendly interface, non-destructive editing (meaning your original image remains intact), and powerful tools for color correction, exposure adjustment, and batch editing.
GIMP (GNU Image Manipulation Program) For those who want a free alternative to Photoshop, GIMP is a great choice. It offers many of the same features as Photoshop, from advanced retouching to custom brushes and plugins. While it’s not as polished as Adobe products, it’s a powerful tool in its own right.
Snapseed If you’re editing on your smartphone, Snapseed is one of the best free photo-editing apps out there. It’s packed with features, including filters, tools for adjusting exposure, contrast, saturation, and even more advanced features like lens blur and healing. Snapseed is perfect for quick edits and on-the-go adjustments.
VSCO Another great app for smartphone users, VSCO is known for its simple interface and wide range of beautiful filters. It’s particularly popular among Instagram users, offering presets that give photos a film-like aesthetic. While it may not offer the in-depth features of Photoshop, it’s an excellent tool for casual editing.
Tips for Effective Photo Editing
While photo editing can seem intimidating at first, some simple techniques can help make the process more intuitive and effective. Here are a few tips for getting started:
Start with Exposure and Contrast Adjusting exposure is one of the easiest ways to improve a photo. Make sure your image isn’t too dark or too light. Contrast adjustments can also help add depth and make your subject pop against the background.
Don’t Overdo It It’s easy to get carried away with filters and effects, but subtlety is key. The best edits often look natural, with enhancements that complement the photo rather than overpower it.
Use Layers for Flexibility If you're working in software like Photoshop, always edit in layers. This allows you to make adjustments without permanently altering the original image, giving you more flexibility to experiment.
Focus on the Details Retouching small details can make a big difference, especially in portrait photography. Use the clone tool or healing brush to remove blemishes or distractions, and pay attention to elements like skin texture or stray hairs.

Conclusion: Photo Editing as a Form of Art
At its core, photo editing is about transforming a visual into something meaningful. Whether you're correcting an image’s technical flaws or creating something entirely new, photo editing empowers you to express yourself and communicate ideas visually. As technology continues to evolve, so too will the ways in which we edit and manipulate images. For both professionals and hobbyists, the future of photo editing holds endless possibilities, enabling us to turn ordinary images into extraordinary works of art.
#PhotoEditing#Photography#Photoshop#PhotoRetouching#CreativeEditing#PhotoEnhancement#ImageEditing#Lightroom#PhotoManipulation#VisualArt#PhotoEffects#EditingTips#MobilePhotography#CreativePhotography#EditingTools#PhotoFilters#PhotographyTips#PhotoArt
1 note
·
View note
Text

Nostalgic edit of thistle flower along the Haw River Trail in Saxapahaw, NC.
#photographers on tumblr#original photographers#nostalgic#moody nature#original photography on tumblr#originalphotographer#alt photography#alternative photography#photography on tumblr#originalphotography#creativeediting#creativephotography#photography
4 notes
·
View notes
Text


First post. ✨ a small introduction, like many artist I dabble in many many mediums. One of which is photography. I love doing creative photoshoots and sometimes making fun unique edits with said photos. This is one of them.
Do not repost, thank you. 💕
#photography#my photos#photoshoot#friends#creativeediting#art blog#cozy aesthetic#cozy#autumn#autumn aesthetic#original photography on tumblr#small artist#small blog#Spotify
6 notes
·
View notes
Text
Flat Lay Photo Editing: A Complete Guide for Stunning Visuals

What Is Flat Lay Photography?
Flat lay photography is a top-down view of objects arranged aesthetically. It is widely used for social media, e-commerce, and branding. With the right editing techniques, flat lay photos can become visually appealing and professional.
Why Flat Lay Photo Editing Matters
A well-edited flat lay image enhances colors, sharpness, and composition. It ensures consistency and engages viewers instantly. Effective image editing makes photos stand out, creating a polished and cohesive look.
Essential Steps in Flat Lay Photo Editing
1. Adjust Brightness and Contrast
Good lighting is crucial for flat lay photography. Increase brightness to eliminate dull areas. Adjust contrast to enhance details and make objects pop. Image retouching can also help refine lighting inconsistencies.
2. Color Correction and Enhancement
Color plays a significant role in visual appeal. Use tools like saturation, vibrance, and hue adjustments to achieve a balanced color palette. Ensure that white backgrounds remain crisp and free of unwanted tints. Background removal techniques can help isolate subjects for a cleaner look.
3. Remove Unwanted Shadows and Imperfections
Shadows can add depth, but harsh ones can be distracting. Use the dodge and burn tool to refine shadows. Spot healing and clone tools help remove dust, scratches, or other unwanted elements. Image retouching techniques further refine the final look.
4. Crop and Align for Composition
A well-aligned flat lay maintains balance. Use cropping tools to center the subject and remove unnecessary space. Gridlines help achieve proper alignment. Image resizing ensures that the final output fits different platforms and resolutions.
5. Enhance Texture and Details
Sharpening tools bring out details in flat lay images. Avoid over-sharpening to maintain a natural look. Apply slight texture enhancements to highlight intricate elements. Image retouching helps achieve a professional touch.
6. Background Refinement
A clean background enhances the subject. Use background removal tools or blur techniques to eliminate distractions. This creates a professional and sleek appearance, making the subject stand out.
Best Tools for Flat Lay Photo Editing
Adobe Photoshop
Photoshop offers advanced tools for precise editing, from color correction to background removal.
Lightroom
Lightroom provides powerful presets and adjustments to enhance flat lay images effortlessly.
Canva
For quick and easy edits, Canva offers user-friendly tools and templates ideal for flat lay photography.
Pro Tips for Perfect Flat Lay Edits
Keep the color scheme consistent for brand identity.
Use natural lighting to reduce excessive post-processing.
Experiment with shadows for added depth.
Apply presets for a cohesive look across multiple images.
Use image resizing techniques to optimize photos for various platforms.
Final Thoughts
Flat lay photo editing enhances the appeal of images, making them more engaging and professional. By using the right techniques such as image retouching, background removal, and image resizing, anyone can create visually stunning flat lay photos that capture attention instantly.
#FlatLay#FlatLayPhotography#PhotoEditing#ImageEditing#Retouching#BackgroundRemoval#ImageResizing#ImageRetouching#PhotographyTips#EditingTips#FlatLayStyle#SocialMediaPhotography#EcommercePhotography#ProductPhotography#CreativeEditing#VisualContent#AestheticPhotos#FlatLayInspo#PhotographyLovers#PhotoshopEditing#LightroomPresets#CanvaDesign#BrandPhotography#ContentCreation#PhotographyHacks#PhotoRetouching
0 notes
Text

Photo Editing Services | Image & Photo Editing | Photoshop
photo editing services for online stores, marketplaces, and e-commerce in all their forms. Obtain affordable post-production services for your images.
#PhotoRetouching#PhotoEditing#BeforeAndAfter#DigitalArt#PhotographySkills#ImageEditing#PhotoEnhancement#CreativeEditing#Retouch#Photoshop#PhotoManipulation#VisualArt#PhotographyLove#PicsArt#InstaArt#ContentCreation#VisualStorytelling#PhotographyTips#ArtisticExpression#USA#SienaSigdha
1 note
·
View note
Text
Mastering Color Removal in Photoshop – The Easy Way! 🎨✨

Struggling to remove a specific color from your images in Photoshop? There's a simple way to do it efficiently! Whether you're a designer, photographer, or eCommerce seller, mastering this technique can save you time and enhance your edits.
Discover the step-by-step guide here.
📌 Perfect for product photos, background removal, and creative edits!
1 note
·
View note
Text

Whether it’s a last-minute edit or a quick question, RetPix is here for you—24/7.
Our round-the-clock live support ensures your projects stay on track, no matter the time zone. Fast, reliable, and always ready to assist.
Contact Us Today:
📱: +370 666 70141
0 notes
Text

Experimental photography with images I took this morning in Durham, NC. 📸 Pamir Kiciman. Leave as-is if you repost.
#photographers on tumblr#experimental photography#alternative photography#altered consciousness#original photographers#alternative process#originalphotographer#creativephotography#creativeediting#original photography on tumblr#photography on tumblr#originalphotography#photography#original photographer
0 notes