#cool wool
Explore tagged Tumblr posts
Note
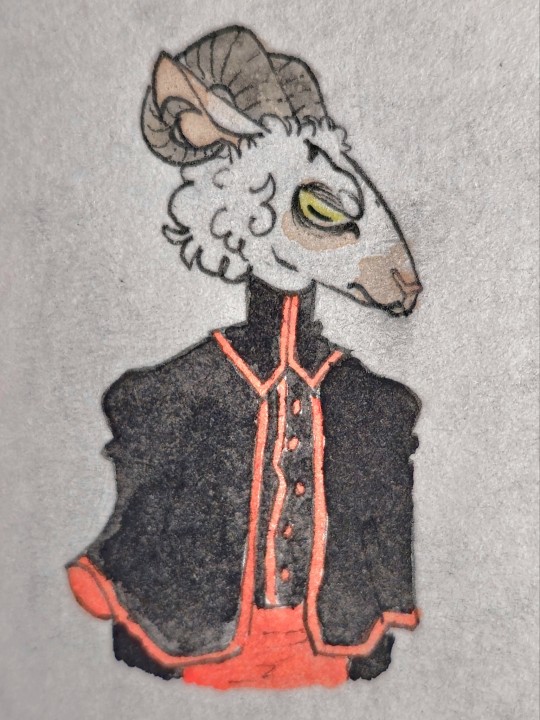
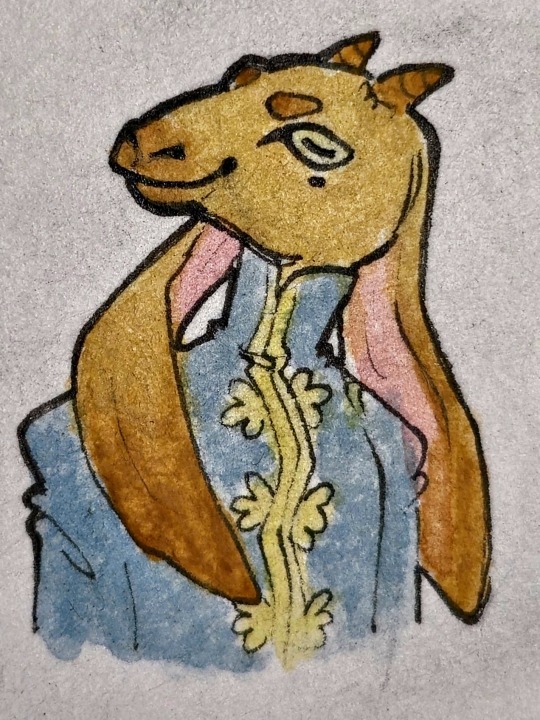
I tried to draw sheep Machete and goat Vasco (but I am not good at drawing goats, at all)
.
#Macsheep and Goatsco#what do you mean I LOVE goat Vasco#the ears! the hejazi goat ears!#and his expression is just *chef's kiss* perfect#really captures that ungovernable goatlike glee#I like how he retained his smooth coat and sleek and curved shapes#and Machete looks very appropriate as a sheep as well#he would have even more reason to trim his neck wool as a sheep#come to think of it would he have to keep himself sheared at all times if he wanted his clothes to fit correctly?#and just keep the head fluff#I noticed that you paid attention to their snout shapes! sheep have kind of rabbitlike nose whereas goats have a smoother upper lip#with less prominent philtrum#I thought that was such a cool detail#something I often forget myself when I'm drawing these species#thank you!#gift art#arttsuka#Machete#Vasco#it's weird how much harder their expressions are to read solely because of the horizontal pupils#they're mammalian but lack that anthropomorphic familiarity I guess
929 notes
·
View notes
Text
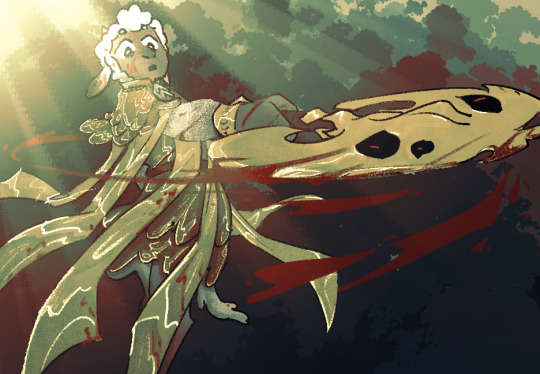
Golden Fleece
#my art#cotl#cotl lamb#blood#it was really fun to ponder this one#cause in the game sprite the body on the fleece has the scale-like texture but the hem is sharp like the standard fleece#i felt a 2 tiered piece would work nicely to show both of these contrasting elements#the sprite always makes me think of gold scale mail but i wanted to avoid it looking explicitly like armor#since the fleece gives you stacking atk damage in exchange of taking 2x damage when hit#although tbqh gold armor would be fucking pointless anyways. gold is a very soft metal. which may have been the point but w/e#instead i wanted the shapes to be more reminiscent of wool since like. yknow. the golden fleece#and i wanted it to speak of luxury and power but be rather impractical for movement or protection#i just wanted to do an axe for funsies and by wonderful coincidence remembered the godly axe was gold :]#anyways this pose is brought to you by my stupid ass who spun too hard with my upper body when swinging a bat and felt cool for 1 second#before totally unbalancing myself and falling#the instant after this image lambo eats shit. rest in peace
932 notes
·
View notes
Text

Yeah I’m posting my au now. Cause I need to make my own fnaf content now that fnaf week is over.
#five nights at freddy's#fnaf fandom#fnaf security breach#fnaf movie#fnaf vanessa#help wanted 2#steel wool studios#ruin fnaf#freddy fazbear#fnaf#mike afton#mike schmidt#fnaf mike#cassie fnaf#Cassie dad fnaf#jeremy fitzgerald#yeah that’s right#WHAAAAAAT I’m so cool#fnaf missing children#fnaf comic#comic au#fnaf au#schmidtfritzau#Mike is alive BELIEVE IT#this will age badly me feels
208 notes
·
View notes
Text


The voices are loud and I am WEAK
#nebula rambles#gripping my FUCKING HEAD#i love fnaf sb. i do. i think besides the fucking. INSANE SHIT it canonizes and whips out#it has really cool concepts and actually are giving the animatronics and even the humans (all things considered)-#more personality and theyre so silly#but god. i still remember the confusion and like. befuddlement watching gameplay at last and i watched chaos#bring back the old concepts BRING BACK THE OLD LAYOUT BETTER COMPRESS YOUR GAME STEEL WOOL#and im. grips head.#hey guys im dbs' number one hater#you can hate on dbgt all you want that's. understandable#but GOD NOTHING WILL MAKE ME WANT TO EXPLODE THAN DBS#i know it's definitely for either nostalgia or to bring people back to familiarity whatever#but WHY do you have it take place BEFORE the final episode but AFTER the buu saga#why not just. make it the new gt#why not make an ACTUAL CANON for AFTER dbz???#cause with all the new shit coming in [multiple universes#the gods of destructions and their angels-#NO ONE FUCKING MENTION MAI TO ME IM SO FUCKING ANGRY BY HOW THEY HAVE THE PILAF GANG BUT ESPECIALLY MAI#do i still adore they made broly canon and rewrote him into such an interesting take?#yes#do i FUCKING LOVE the dbs super hero movie?#absolutely#but i cannot look away from the everything else it's attached to#admittedly im an anime watcher bc it's easier for me to digest but i have seen some stuff from the manga after super hero and#anyways this is. long. hi. i have visions i dont know if i'll ever act upon
105 notes
·
View notes
Text
I DON'T think the notion that everyone in the past except the hyper-wealthy wore rags all the time is a grand conspiracy to make us satisfied with the throwaway bullshit clothes have become
because a lot of smaller and more ordinary factors snowballing into two unrelated things is more likely
but.
part of me thinks all the companies peddling a world made of plastic, where 90% of textures are knits, would really not like it if more people were aware of just how sensorily rich and durable a lot of clothing- up and down the social ladder -used to be
it's convenient for them, at least, that so many people don't know it can be different
#dress history#clothing history#fast fashion#have you ever felt soft wool? have you ever heard rustling silk? have you ever experienced how cool linen can be in the summer?#NO these things were NOT for the elite only
276 notes
·
View notes
Text
thinking about puppet tattoo parlors. A wall covered in so many different thread colors to choose from - swatches of different types of stitch for different textures / effects. modified handheld sewing machines for tattooing with multiple settings for the different stitches. individual needles + embroidery thread as stick n pokes...
#THINKING SO HARD ABOUT THIS#wouldnt this be cool though???#cause i was thinking fondly of tattoos and went 'hm. how would a puppet do this?'#cause ink can bleed in fabric. it can scrub out. the lines wouldnt be as clean and i just dont think it would really Stick?#but EMBROIDERY! STITCHES! COOL SEWING GUNS INSTEAD OF TATTOO MACHINES!!!#and now im wondering Could They Remove Their Tattoos?#it would probably be pretty invasive!#hold on im doing research real quick#yeah looks like they'd need to lift their felt/fleece/skin to get at the back of the stitches#then sew the skin back together afterwards...#so to them tattoos would be just as permanent as they are to Us! because who wants to go through That!#im having a grand ol time imagining the Range their tattoos would have#textures! endless colors! glitter thread! metallic thread! wool! cotton! polyester! glow in the dark! scratch n sniff!#that last one was a joke.#imagining someone with an entire detailed forest scene carpeting their back... it has Depth...#absolutely unprompted#puppets#sundown summer is getting a motherfuckin tattoo if its the last thing i do#resisting the urge to just litter every puppet that i know of with this idea#YOU get a tattoo and YOU get a tattoo and YOU-
128 notes
·
View notes
Text
Me: Ahhh yes. I have finally finished the first truly completed draft of Better the Wool's outline. It's got goofy scenes and gut-wrenching plotlines, tragic backstories and a central theme of power and control versus trust and uncertainty... plus shipping! This project is taking a hot minute, but thankfully I don't have anything demanding I finish prepping the fanfic ASAP :>
Meanwhile, the looming urge to participate in NaNoWriMo again in November:

#for clarity's sake: I wouldn't be using the official NaNoWriMo organization's website if I participate this year.#I'd use alternate word count tracking tools for it.#while the NaNoWriMo organization has said deplorable things the challenge itself has existed for much longer than the organization has#and isn't inherently associated with the organization; as much as they've tried to chain the challenge to them and their services.#TL;DR— NaNoWriMo the writing challenge is very cool. NaNoWriMo the organization that thinks generative AI is good is not very cool.#better the wool AU#cult of the lamb#cotl#national novel writing month#nanowrimo#sofie says stuff#queued
38 notes
·
View notes
Text
hi! ok so i'm going to talk about one of my top-five favourite things, which is: dyeing stuff! this is going to be specifically about dyeing protein fibres (animal fibres—wool, alpaca, silk, etc) in a pretty low-key way in your kitchen.
to be clear up front: this is not the most scientific, most perfectly reproducible, or most Objectively Correct way to dye things. i get a lot of fibre that i like this way, though, and i think that other people can, too.
fibre i've dyed that i think is neat:
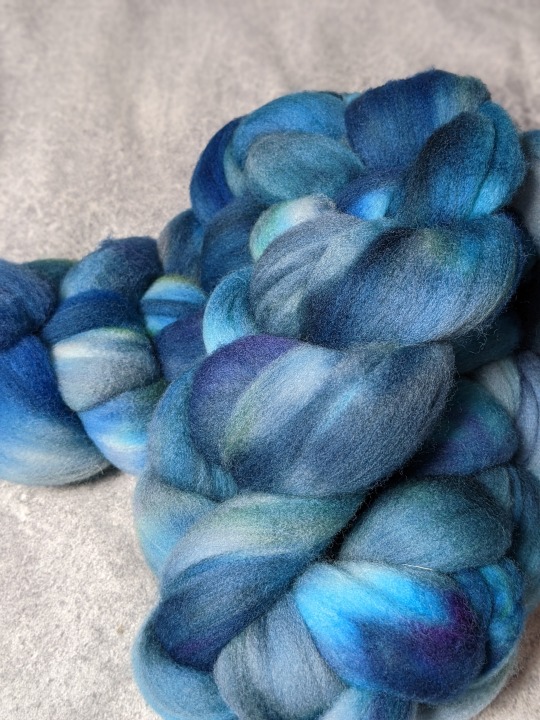
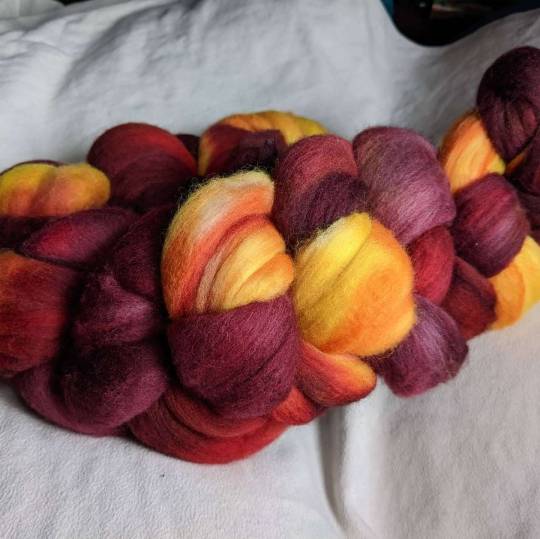
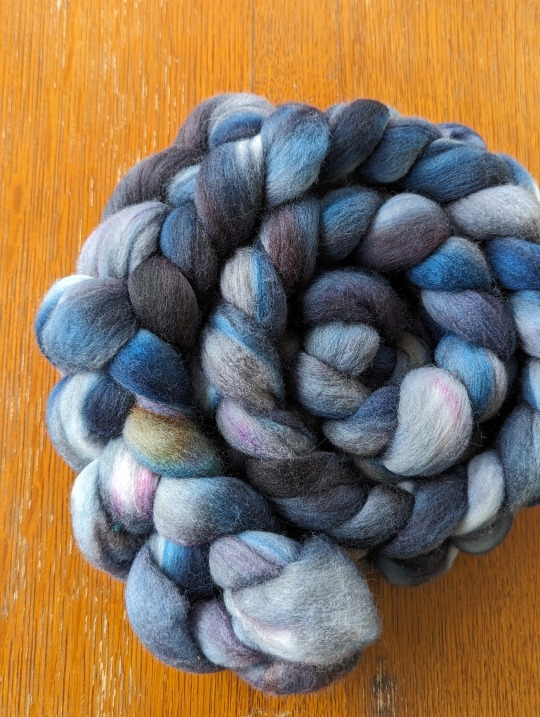
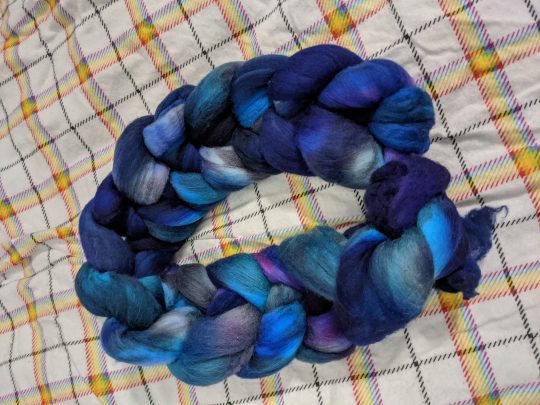
you can also dye yarn like this:
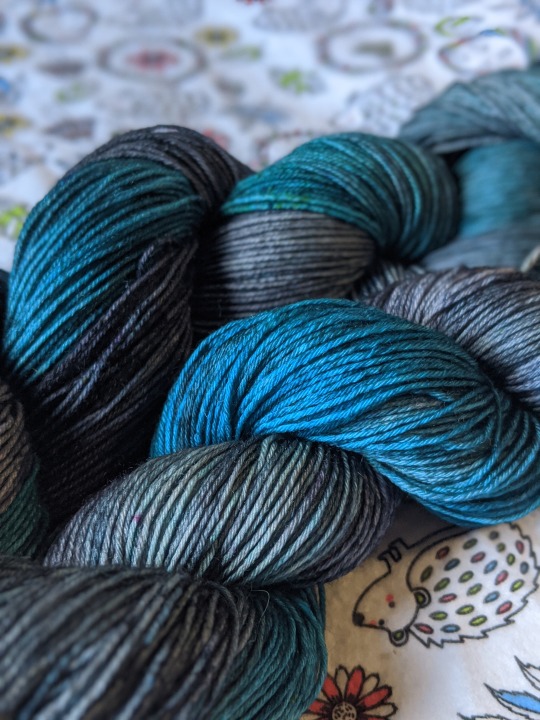
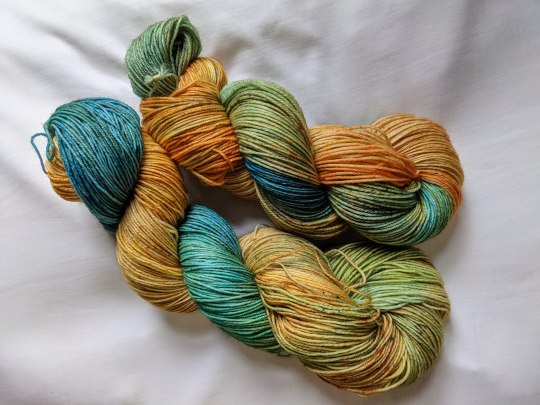
yes, i like blue a lot. i also really like variegation and heathering, which is why most of the fibre here has patches of white—it's an intentional choice that i've made. you can make different choices.
here is what you need to dye things:
fibre, vinegar, dye, a pot, heat, and some water.
that was so you don't get overwhelmed by the impending wall of text. here is what you need to dye things (it's the same stuff!), but with way more detail:
fibre or yarn. this is the big one, obviously. i tend to dye in 100-200 gram batches, because that's approximately what fits on my stovetop easily. if you're very nervous about felting or harming your fibre, you can use stuff that's been treated to be superwash, start with yarn (which is harder to felt than fibre is), or use a felt-resistant breed like dorset or suffolk. honestly, though, i learned with merino because that's what i had, and it was fine. again, though, this guide is only for protein fibres. it will not work for things like cotton. the only exception to this is nylon, which will take on some colour, but less than a protein fibre will.
a mordant. this is a fancy way of saying a thing that makes dye stick, and for what we're doing here, it's citric acid or vinegar. your grocery store definitely has at least one of them, though if you can choose, i prefer citric acid, because i love wet wool smell but i do not always love wet wool vinegar smell.
dye. i use acid dyes, and am personally deeply loyal to dharma acid dyes, but ashford and jacquard acid dyes work the same way. if you don't want to buy dye or don't have access to it, food colouring will often work, as well, though i haven't tried this with natural food colourings and have no idea how well they'll work.
a dedicated dye pot. ok, if you're doing food dyes, you don't need this. if you're not, it's definitely best practice, though i don't know how dangerous it is not to. any large metal pot will do, but my favourite option is hotel pans, which are those huge metal pan/tray things that hold food at buffets and the like. i have a full-size one that's 15cm deep, and a half-size one that's 4cm deep. they're great because they let you lay out the fibre you're working with so you can see most of it in a single layer.
dedicated dye utensils. as before, i don't know how much of a huge deal this is. i'll be honest and admit that for several years i had a single pair of tongs that got used for all tong-requiring events, including dyeing, and i'm still alive. i suggest that you have at least a big spoon, and a big spoon and tongs are even better.
something to mix the dye in. yeah, i use empty plastic sports drink or soda bottles for this. you can be fancy and get mason jars or little squirt bottles or whatever, and if you get super into dyeing you'll want to mix up dye stocks, but that's way outside the scope of what we're doing here. i like the powerade bottles that have a little squirty mouthpiece, because it's fun to squirt dye onto things.
personal protective equipment. i think this is the part of things that freaks people out. ideally, you wear plastic gloves and a mask (yeah, like your covid masks) when you're working with dye. realistically, i almost never remember to put on gloves and just accept that my hands are going to be blue sometimes. you should wear a mask, because dye is an irritant, but the world is an imperfect place and i have wicked bad adhd and sometimes i forget. this isn't advice. i'm just being honest. you should use some kind of safety stuff. you probably won't die if you don't.
you might also want some little random bits: an old toothbrush or paintbrush, a pipe cleaner, some toothpicks, etc. this is mostly if you like speckles, or if you want very small patches of colour.
so first: there are a million ways to dye things, and i'm not convinced that any of them are objectively correct. i do what i do and it works for me. some of the things i do are the opposite of what most guides suggest, but i do them because i like the effects they create.
ok, that's all the background stuff you need. let's dye some stuff!
the number one most important thing to remember when you're dyeing is this:
you can always add more colour. you cannot take it away.
that's in fancy writing and bold because every once in a while i forget this, and every single time i end up regretting it.
here is how to dye things:
put water, citric acid (or vinegar), and fibre into a pot. add dye and heat. let cool completely. rinse the fibre in cool water, then hang to dry.
like, sure, we're going to go into way more detail, but push come to shove, if you do that, you're going to end up with dyed fibre. there are a lot of tutorials telling you that you must soak your fibre first, or you must add your citric acid this way, or hold the water at exactly this temperature, and i'm here to tell you that while any of these things can give you different results, those results aren't necessarily better.
the only way that you can totally screw this up is by accidentally felting your fibre, so before i get into the way more detail part of things, i'm going to talk about that.
how not to felt your fibre
i feel like if you've read this far, you know how things felt: wool, heat, and agitation. you may also notice that at least two of these things are required for dyeing. this can be stressful! but you don't have to be afraid of it. there's only been one time that i felted something to the point that it was unusable, and that happened because i literally fell asleep for several hours while the pot was on the stove. you can avoid doing this by simply setting an alarm—this is a good idea anyhow, because you'll want to check on your dye pot!
when you're dyeing, use the lowest heat that you can while still keeping the water at a simmer. if your stove, like mine, has one burner that's wildly unpredictable and sort of out of control, you may want to look for some sort of flame diffuser, also called a flame tamer or a simmer ring. i bought one on amazon for about fourteen dollars, and it's literally just a thick metal circle. it works fine.
you can also keep the heat low by using a pot with a thick bottom, though in my experience those are expensive, and if i had one i would be using it for soup, not wool.
avoid shocking your wool—never put room temperature wool into hot water, and never put hot wool into cold water. leave your wool in the dye bath until it's cooled completely, which for me usually means overnight.
finally, obviously you have to move the fibre around some. you'll need to peek under it in the pan, and when you're done, you have to rinse it and squish out the water. try to minimise handling, though. don't run water directly onto the fibre, don't get a wooden spoon and stir your dye pot around, don't wring the fibre dry when it's done.
you're probably never going to be perfect. i often find that i lose a gram or two of wool where fibres have grabbed onto each other, or where parts of the ends clumped up. it's not really felted, just sort of compacted, but it's not great to work with, and i'd rather lose a gram of fibre than fuss with the clumpy bits.
back to how to dye things
let's take it step by step, assuming a hundred grams of fibre.
put your pan on the stove and fill it halfway with water. add either a teaspoon of citric acid or a tablespoon of vinegar. this is going to help the dye strike, or stick to the fibre. the teaspoon/tablespoon is a guideline, but one that it's fine to exceed. adding more will help the dye strike faster, which can be useful if you're trying to create blocks of colour on your fibre. i usually err on the side of a little more than the guidelines, and just eyeball this—if you feel like the dye isn't taking well, you can add more later.
add your fibre to the pan. this is the first place you have to think about what you want the finished fibre to look like! you can put it into the pan any way you want, but i suggest trying to keep it in a relatively even layer, regardless of what that layer looks like. here are some ways to get specific effects:
if you want a gradient from one end of the fibre to the other, use a rectangular pan and lay your fibre out so that the line of it is parallel to the short sides of the pan
if you want a short, repeating gradient, use a rectangular pan and lay your fibre out so that the line of it is parallel to the long sides of the pan
if you want something that starts with very close repeats that get further apart as you go down the fibre, make an approximate spiral
if you don't want A Pattern (i usually don't) just lay things out in a single layer, more or less
here comes the next exciting part! decide if you want to let your fibre soak or not. again, doing or not doing this gives you some different effects!
soaking your fibre will mean that dye takes more evenly. if you want consistent colours, you'll want to soak.
not soaking your fibre means that the dye takes less evenly. the fibre on top will have less acid available to it, spends less time in the dye bath, and also has to actually get wet before it will start to dye. i actually love doing this, and think it affords a lot of cool opportunities to play with and layer colours.
if you're soaking, leave the fibre there until it's submerged. if not, don't.
now you're going to add dye! decision time, again.
you can add dye when the water is cold, which will give you more even dye coverage, and in my experience gives the colours more time to mix together
you can add dye when when the water is hot, which will give you less even coverage, and tends to encourage the colours to stay more delineated
probably surprising no one, i tend to heat the water first unless i'm starting with a base colour or i'm doing a two-colour gradient.
time to mix up some dye
as i mentioned earlier, i'm assuming that you're using powered acid dyes for this. if you're not, this mixing up part is technically optional—but doing it gives you way more control about how and where you place your colours, so i'm going to assume that you'll do it.
i usually mix dye in some sort of empty drink bottle. regardless of what you're using, before you add dye to anything, put some water in the bottle, wipe off the lip, put the lid on tightly, and shake the bottle vigorously. if there is any leakage at all, do not use that bottle. find a better bottle. if your bottle cap doesn't seal well or if you have an empty condiment bottle that's just a little wonky or whatever, you will get dye all over the kitchen, and your landlord will be really really mad about it, and you will regret your life choices. (if you own your kitchen, you can do whatever you want, but this isn't about you and you know it.)
so you have a bottle that seals tightly! great job. dump out the water and carefully put some dye powder into the bottle. remember earlier how i said you should be wearing a mask? this is the part where you should be wearing a mask.
i know that people are reading this and going, ok, but how much dye do i put in?
my answer is put in the amount that feels right in your heart, and don't forget the number one rule of dyeing things, which is that you can always add more colour, but you cannot take it away.
this isn't a very scientific answer. most dyes have a guideline about how much to use, expressed as a percentage of the dry weight of the fibre, which is what you use to get the whole quantity of fibre dyed evenly. for dharma dyes, it's like 1.5-2%, i think ashford is 1%, and jacquard is more like 2-4%, depending on the colour.
here is the problems with doing that in your kitchen: first, using that much dye will get you an evenly dyed piece of fibre, which—for me, at least—is basically the opposite of what i want. second, and more importantly, unless you have one of those teeny tiny scales used by jewelers and drug dealers, your kitchen scale will not weigh out such tiny quantities with any accuracy. third, if you do it like this, you really have to plan what you're doing ahead of time, because there's a point after which no more dye will bind! the fibre will be like enough thank u that's it i'm good and that'll be it, so you lose some of your ability to decide that actually, you want more green.
you can probably guess, at this point, that i don't weigh the dye. once you've done a couple batches of fibre with a given brand of dye, you'll start to get the vibes for how much you should use. if you really want a guideline, for a hundred grams of fibre, start with a quarter teaspoon of a given colour. you can add more—either more of this colour or a different one—later, as desired.
put your dye in the empty bottle, and then fill the bottle partway with hot water. the amount of water doesn't really matter here, nor does the specific temperature of the water. i usually fill about 3/4 of the way, because that way there's plenty of room for this next step, which is: wipe the lip of the bottle, recap it tightly, and then shake it up real good. the dye powder is going to dissolve into the water, and you now have a bottle of dye!
if you're going for a gradient, you might want to mix up your second colour so you can add them at (basically) the same time for more even mixing. if you're not, or if you only have one mixing bottle, you can do them one at a time.
oh my god we're finally putting dye on the fibre
are you ready? it's time!!
you have basically infinite options for how to do this, and many of them will give you different effects. here are some ideas:
pour the dye all at one side of the pan. and if you don't add anything else, your fibre will fade from the colour of the dye to the natural colour of the fibre
pour two colours, one at either side of the pan. depending on how much dye you use (and remember, you can always add more), this will give you either chunks of colour surrounded by white, or a two-colour gradient
add all the dye to unheated water and mix it gently, then let the fibre soak for a few minutes longer before turning on the heat. this will give you a fairly even colour
pour randomly all over, and you'll either end up with a tonal yarn or a heathered one, depending on how much dye you're using
add the dye to the water under the dry fibre, which will sink in and take up more dye on the bottom of the fibre than the top
if your heat wasn't on before, it should be now, and you're going to let the dye hang out in the hot but not boiling water for a while. how long? well, one of the cool things about dyeing with these dyes is that they exhaust, which means that when the dye has been sucked up by the fibre, the surrounding water will be clear. how long this takes will depend on the specific dye, how much of it you used, how much mordant you used, etc. i try to check every fifteen minutes.
reminder: if you started with room temperature water, the dye's not going to start taking until the water heats up, so don't check it after fifteen minutes and freak out that nothing has happened. it is fully normal for it to take up to an hour for the dye to exhaust. don't turn up the temperature, just give it time.
yay it worked!
at this point, you have a pot of hot water with some beautifully coloured fibre in it! but maybe it's not beautiful enough. maybe you want...more colours.
that's cool as hell and you should go for it. we mentioned two-colour gradients up there, but what if you want something else?
the answer, probably obviously, is adding more dye.
first, a caveat: while you can successfully make multicoloured gradients like this, it's more difficult than you think, and if it gets messed up—all the colours bleed into each other, say—it turns into a muddy mess. my suggestion is to stick to two (or three at most!) colour gradients until you have a much better feel for what you're doing.
let's talk about ways you can add more colour. you have two options: big colour and little colour.
big colour is going to add a lot of colour—you're going to mix up the dye and pour it just like you did before, but paying more attention to places that don't have dye yet. sometimes it's the middle of a gradient, or the white splotches from random pouring, or the half of the fibre that wasn't submerged when you started. or maybe you dyed the whole thing yellow, and now you want to add a blue gradient over top. whatever!
if you don't want to freehand pour, consider buying a couple large syringes, or a bottle with a squeezy top. these are also fun because you can easily get more colour between the laid-out fibre, or even under it.
in the pictures at the start of this post, the red-and-gold top and both yarns were dyed by adding big colour.
little colour isn't going to add big patches, but is going to add speckling, tonal depth, or smaller patches of colour. all of the blue-base fibres and the yellow-and-blue yarn were dyed like this.
if you're still reading this closely, you might have caught that i just said both yarns were dyed with big colour, and that the yellow-and-blue yarn was also dyed with little colour. these are both true! the base colours of the yarn were done to make big colour, but if you look at the full-size image, there are also a bunch of speckles. you can do whatever you want! no one can stop you!
here are some ways to add little colour:
mix up some dye, but use less water. add drops of the dye, either directly onto the fibre (more dramatic!) or in the water (tonal!)
use a toothpick to grab a little bit of dye powder and drop it into the dye bath (similar to the previous one, but a little less predictable)
put on a damn facemask. take a clean toothbrush, paintbrush, or pipecleaner, and just barely touch it to the dye powder. gently flick or tap the brush to add speckles of that colour
find a salt shaker that you're never going to use for anything but this. put citric acid, salt (to make it distribute better), and dye powder into it, and shake it up (with the holes covered, please cover the holes) to make sure they're evenly distributed. gently shake this over the fibre to add speckles, but more of them, and clustered together
put a little dye in a spray bottle and gently mist the exposed fibre, kinda glazing it with colour
another thing is that if you like a natural coloured yarn with dyed speckles, you can do any of these techniques without doing big colour first. the only thing to note when doing this is that you'll want to be very sure to spread out the fibre well, and maybe to consider dyeing one side, then very very carefully flipping it over and getting the other side.
ok, now what?
let's say that you've added all the colours that you want, and you've let your bath simmer long enough that the water is clear, or nearly clear. (if it's not, check troubleshooting, below.)
put the lid on your pan and walk away. if you don't have a lid, just walk away, but it's less dramatic.
the super frustrating part here is that the safest thing to do is wait until the water and fibre is fully cooled before you do anything else.
have i ignored this? yes
has it ever gone horribly wrong? not horribly wrong, but it's definitely caused me to lose an inch or two of roving on occasion
is it way more stressful if you don't wait? absolutely yes
honestly maybe just go to bed and deal with your fibre in the morning
so now let's say that it's morning and you slept long enough that your water and fibre are both room temperature, which often actually feels quite cool on your hands.
you have to drain your fibre. there are two ways to do this:
lift the fibre out of the water. this has the upside of not risking dumping your beautiful fibre into your sink, and not needing to maneuver a full pot of water, both of which are admirable. the downside is that wet fibre is fragile, and you'll want to be careful to support it.
dump the water out of the pan. this has the upside of minimising how much handling you're doing of the fibre, as well as (in my opinion) making rinsing easier. the downside is attempting to keep the fibre into the pot while you dump the water into the sink, and also needing to carry around a full pot of water.
secret third option: dump the fibre (and the water) into a strainer. upside: very easy, and you can keep the fibre in the strainer while you rinse, minimising both how much it needs to be handled and the weight on the fibre. downside: i never remember that this is an option until i'm already elbows-deep in acidulated water, discovering every tiny cuticle tear.
you're going to fill your dyepot with water again so that you can rinse the fibre. you want to minimise thermal shock, so keep the water temperature as close to the temperature of the fibre as you can, and don't run the water directly onto the fibre. i like to pull all the fibre to one side of the pan, and fill the pan on the other side.
side note: if you, smart person, remembered that you can use a colander, simply fill a pot with water, put the colander in the pot, and gently agitate the colander.
if you, person who is deeply relatable, did not remember you can use a colander and now have a pot with clean water and fibre, gently move your fibre in the water to encourage any excess dye and also citric acid to get out of there.
drain your fibre again, and this time, you're going to squeeze it dry. you're still trying to minimise agitation, so this isn't a 'wring it out' situation, it's a 'gently squish it between your hands and/or a hand and the side of the pot' situation.
hang your fibre to dry. remember what i was saying earlier about it being fragile? let me suggest, here, that you do not simply drape the entire length over a single hanger or something and hope for the best. if you literally have a single hanger, at least drape it back and forth a bit, but better if you can use more than one hanger, or a clothes drying rack, or that weird metal wine rack thing that came with your fridge that you've never used, or whatever.
important reminder: drip-drying things will make your floor wet! if you live somewhere very clear with no major roads or pollen nearby, you can probably dry things outside, but if you don't, you'll probably want to position the drying rack in a bath, shower, laundry area, or otherwise over something that will catch and/or absorb the water.
how long it takes for the fibre to dry is another unknowable variable. if it's warm and dry where you are, it might literally be overnight. if it's damp and cool, it can take days. the batch i posted a couple days ago literally took almost a full week to dry. spread it out as best you can, gently squeeze out the water you can, and otherwise you just have to wait.
you're done!
when it's dry, that's it, you're done! you might find that you need to pick off some little lint balls or a bit of compacted or slightly felted fibre from the tips, but other than that, you should be good to go.
like most fibre stuff, this is best maintained by handwashing in cool water. you may see a little bit of dye or colour loss the first time you wash it, which is pretty normal and nothing to worry about.
congratulations! you made it to the end of this incredibly long post, and if you followed along, you've just dyed some fibre!
troubleshooting
this isn't dyed enough! i want more colours!
add more dye! i'm not the boss of you.
this is true even after the fibre is all done and dryed. there's nothing that says you can't dye it again—you can, and i have.
some fibre seems to require more dye than others. silk, for example, dyes beautifully with acid dyes, but also needs way more dye than i expect it to.
remember that if you're dyeing something that's a wool/cotton blend, for example, the cotton isn't going to dye. the only exception is nylon, which will kinda dye, but not as dramatically. this guide will not work for plant fibres.
this is too dyed! i want fewer colours!
please refer back to the number one most important thing about dyeing, which—as you know—is: you can always add more colour, but you cannot take it away.
pull out some more fibre and try again. this has a learning curve, just like any other fibre craft.
these colours don't look like i expected!
this can be about a lot of things.
colour guides, especially if you're looking at them online, aren't always very accurate.
colour guides tend to assume that you're dyeing a single colour at the suggested dye percentage of weight, and using less than that will give paler colours.
dyes, especially if you're mixing brands, can interact with each other and behave in ways you didn't expect.
dyes can also break, which is when they split into their component colour molecules. this happens commonly with blacks and browns, food colouring, and anything that dharma trading has marked as 'advanced'. some people find this very desirable and seek it out; some people are very frustrated by it.
the ph of your water can sometimes affect your dye. i've been lucky enough that i've only lived places with lead problems, not weird ph stuff, so i haven't investigated this closely, but if you're consistently not getting the results you expect, even going for a single, solid-colour dye, look at the ph.
my dye water's not clear!
if you used a quarter teaspoon of dye and a hundred grams of fibre, and it's been, say, 45 minutes of actually hot water and your water still isn't clear, you probably didn't use enough mordant, and you should add some more citric acid or vinegar to encourage the dye to get in there and do its thing.
if you used you used more like a teaspoon of dye, or if the citric acid doesn't change anything, you used too much dye for your fibre. you can either shrug and pour it down the drain, or you can add some more fibre and dye that, too.
my rinse water's not clear!
you probably used too much dye. it's ok—just keep rinsing it, gently, until it's more or less clear.
some colours just like to run—you know how every once in a while you get a yarn and it just bleeds a little bit every time you wash it? sometimes it's just like that. i wouldn't worry about it too much.
my fibre has felty/clumpy bits!
a little bit of this is normal, especially at the ends of a fibre that felts easily (this means you, merino!)
pick off the bits that you don't like—this is generally fairly easy, and involves very minimal fibre loss. i don't bother doing it until i sit down to spin, and then just pull off bits as i come to them.
if there's a lot of felty/clumpy bits, more than you can reasonably pick out, you agitated the fibre too much. there's not much for this other than trying to card it out, which may or may not work.
sometimes this happens because your stove got weirdly aggressive and boiled your fibre. especially for wool that's prone to felting, the bubbling and jostling can be enough to encourage more clinginess than you'd like.
i want my dyeing to be reproducible!
this is kinda doable. it's a handmade thing, so it's always going to have some natural variance, but you can do it.
buy a jeweler's scale that measures in fractions of a gram.
start measuring your dye and acid, and take detailed notes about what you do.
follow those notes in the future, and you'll be probably 90% of the way there.
i want to dye with natural dyes!
i fully support this and have played around with it a little bit myself, but absolutely do not know enough about it to advise you.
the internet is very large and full of many people who are much smarter than i am, and i feel confident that at least one of them is desperate to tell you all about how to do natural dyeing.
i am, at this point, not that person.
i want to dye plant fibres!
i am begging you to find another guide, because this one will not work.
you didn't answer my question!
that's what my inbox is for
i have to reiterate that i'm just a person with real specific interests who started dyeing things because i couldn't find or afford the kinds of colourways that i wanted.
i am not a professional
i will do my best to answer questions, but sometimes the answer is 'just fuck around until you find out'
plant fi—
shhhhh
the end
thank you for reading this incredibly long post! i might make another one in the near future, either so i can show pictures or because i took out an entire section about how to choose colours and pick a colour scheme and work with colours, and i kinda want to talk more about that, but this is no joke almost six thousand words long, so i thought, you know. maybe not tonight.
anyhow, i hope that this was useful to someone! thank you for letting me talk about one of my very favourite things.
#dyeing#craftblr#fiber arts#fiber craft#fibre arts#fiber#fibre#dyeing wool#i'm sorry this is so long#it kinda got away from me#i just want to tell people about cool stuff!#and then talk about the cool stuff for an unreasonably long time#you know#like a normal person#anyhow this was fun#dyeing is super fun and you should try it#sorry to say that i am Not editing this#because i only edit things when people are paying me for them#but i did make my wife read it to make sure i got all the main stuff#so we should be good#still: sorry for any stylistic inconsistencies#smartest raccoon i know
316 notes
·
View notes
Text
"Thank you for all of your works!"

"What image would you put on my lifeless body?"
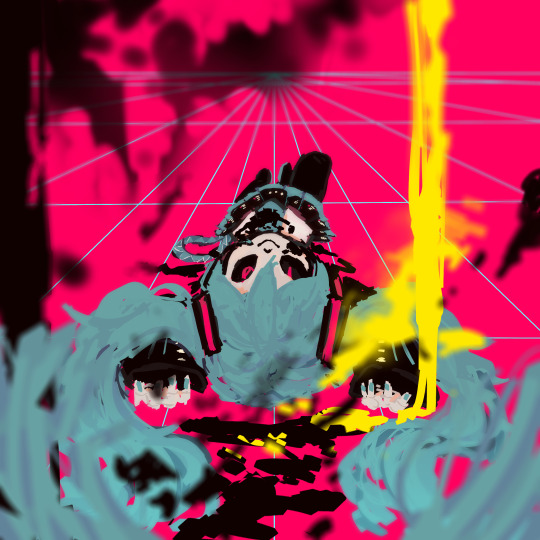
"I used to be empty, but now I'm filled with memories"
#rev posts#Ink sans#Ink my beloved#utmv#[ut]mv and my insanity#PERSPECTIVE#I HATE AND LOVE YOU AT THE SAME TIME#hatsune miku#HATSUNE INKU#Is this my contribution to#miku day#?#Probably#Anyway Anonymous M by PinocchioP is very cool#The vision of Ink cosplaying as Hatsune Miku laying down and looking straight at You smiling in this perspective has been in my brain for-#quite a while#Wool Gatherer's Gallery
69 notes
·
View notes
Text
The late night sketches RETURNS!!!


#the blorbos are just vibin#theyre cool lil guys#also steel wool Justice for Monty pls#or not#idk just give the Monty and maybe Bonnie fans SOMETHING#also i find cassie and greg's dynamic either cute and wholesome#or OI BITCH FUCK YOU#joshblogs#glamrock bonnie#glamrock freddy#montgomery gator#fnaf gregory#gregory sb#cassie fnaf#fnaf sb cassie#glamrock chica#glamrock foxy#roxanne wolf#fnaf sb
36 notes
·
View notes
Text
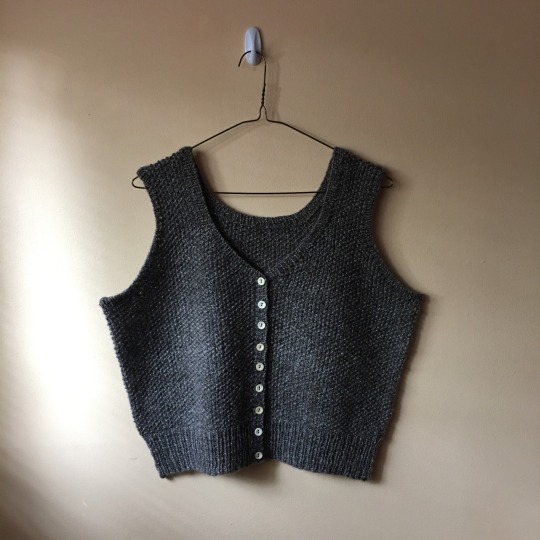
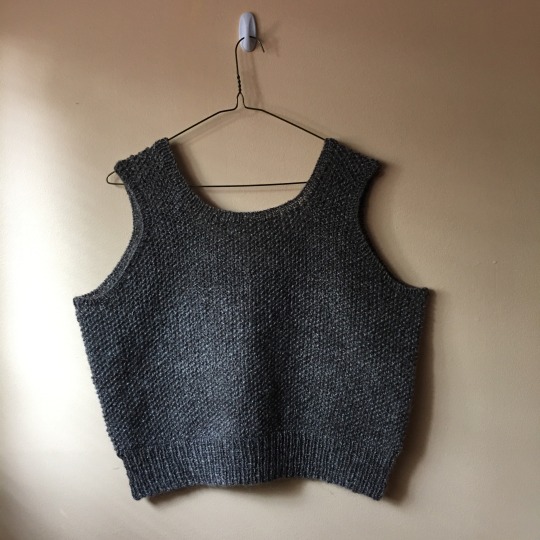
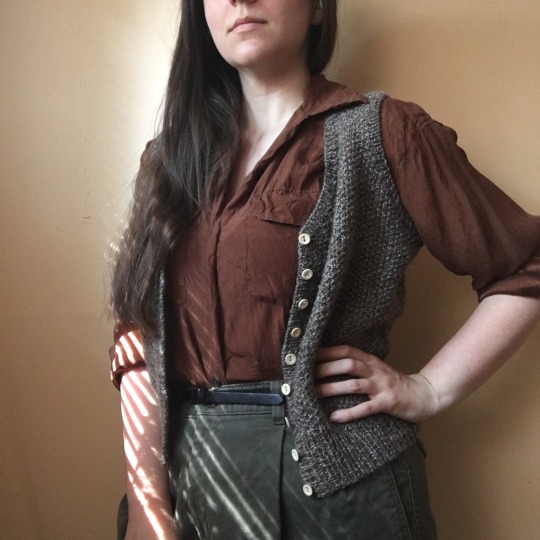
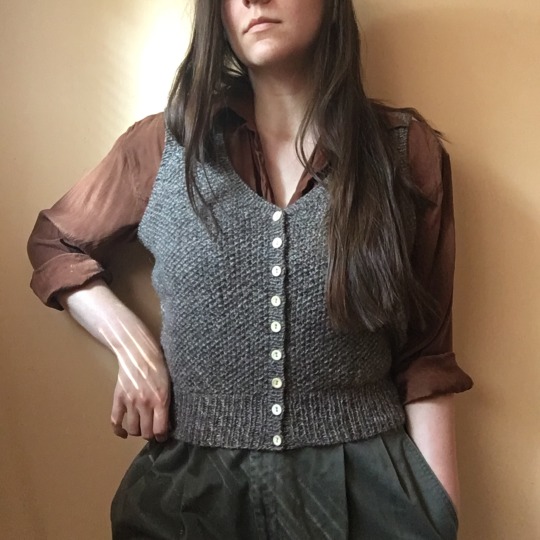
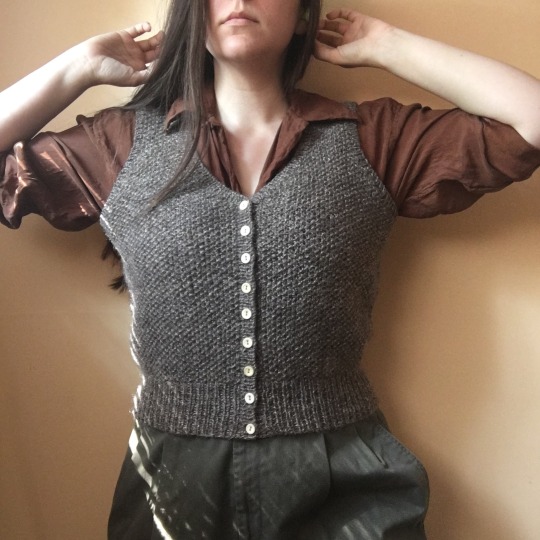
I may not be able to carry the one ring, nor even the one ring bearer, but I could absolutely do second breakfast…and elevenses…and luncheon. And I’d do it in my hobbiton vest, made from romney spun entirely by me! I’m so excited to finally have a wearable of my own hand spun yarn!! This has been the goal for a long time now, and I’m excited to see what more I’ll make.
#I’ve come to discover a big drawback with long hair is it covers all the knitting in modeled pictures…thinking of whacking it off.#hobbiton vest#fabel knitwear#knitblr#knit vest#knitting#handspun yarn#Romney wool#the buttons are made from bone which so very cool to me for some reason. got them second hand.#edit: I forgot to say I modified this pattern. the original is in the round with a fake button band. I didn't realize that originally#my crafts
360 notes
·
View notes
Text
Finally knitted Halloween socks that I've been meaning to knit since I bought this yarn last year!


The yarn is from "SavannahRoseHandmade" from the 90s Halloween Collection (sold out now UGH [understandable, but UGH]) and is visually inspired by the movie Scream (1996). I saw the colour pooling effect on their sample swatch when they shared the yarn collection images on Reddit last year, and was immediately like, 'Holy shit it's just like CRT TV static!!' And I had to get it. (And then life happened and I didn't get around to knitting them until now lol).
And unfortunately, I'm SO IN LOVE WITH IT!! THE EFFECT DID TRANSLATE TO SOCKS AND NOW IT'S LIKE, AHHH I NEED MORE. I don't know if I have enough yarn left to make an additional pair, so I'll have to figure out how to weigh it and the socks and see if the weight compares (really don't wanna end up with 3 socks and not enough for the 4th lol). But yeah. I'm so glad I got to do this. The yarn colouration was SO fun to work with, and the yarn was a nice and smooth 1-ply which was a huge relief from the fluffy yarn on the socks I'd been working on just before this. And yes, I did intentionally take this photo in front of those books because of the spiral-ish pooling.
Can I just also... like... holy fuck, man. I LOVE when yarn pools into unique patterns. It's the best phenomenon ever. And especially like for this one being black and white? That subtle grey transition from stark white to pitch black is EVERYTHING. Like I never would have thought one could create yarn that would pool EXACTLY like TV static rolling down the screen when knit. Major nostalgia vibes. I can feel the forcefield.
Also, started these babies September 27 and finished the second sock today October 3rd, which may be a new record for me knitting socks, I was so fucking excited. I even have a big ole 'writers bump' on my finger from the way I hold my knitting needles lmao (was also knitting a different pair of socks before this, too), and my arthritis is Not happy, but screw you, arthritis! I'M HAPPY.
Side note: it would be cool to pair this yarn with like a red addition somehow. Get a Saw vibe going bc of the TV static pooling effect. (I do love Scream though.) Or you could even probably take it a The Ring route with like a fly applique or something. So many horror movie staples with TV static effect, and not enough Scream yarn to test them out!!
Bonus image when the socks were a WIP:

I had my new tooth and doll eye stitch markers going. I DO have bloody murder weapon stitch markers, but none of them are a buck knife (Ghostface's weapon), so I went for general Halloween vibes instead (even tho I use stitch markers like this year-round lol).
#seriously tho im gonna have to weigh the leftovers bc i want more of these socks#just feeling by hand it MAY be enough. but if i knit 1.5 more socks and run out im gonna fucking eat them in rage lol#would hate to have to frog 1.5 socks#halloween#horror#scream 1996#90s#savannahrosehandmade#knitting#nostalgia#horror movies#vhs aesthetic#merino wool#yarn#90s horror#90s kid#fashion#Cori.exe#Image.exe#Create.exe#tbh like i can PROBABLY ask the yarn dyer for a custom order of more of this but i dont have the money to buy it in bulk#so. if i had the money to spend id at least ask but i dont wanna waste their time when id only want like 1 or 2 more#would be awesome if i could afford a whole sweaters worth of yarn in this but i dont think it would pool the same on a sweater#i mean maybe it would idk ive never actually knit a whole sweater before idk how long the colour changes need to be#i forgot to take pics of the yarn when it was a hank still lol but the dyer has pics on their site still#ill try n post my socks elsewhere later bc this is seriously so cool like im so glad they turned out#i was iffy as i was knitting the cuffs like 'oh no its gonna spiral too close together and just look heathered'#but once i started doing the heel i was like 'oh thank god its doing the pooling now' lol. side note: watched uzumaki today as i finished#...and also i saw the tv glow since that was also a fitting topic for knitting socks like this
17 notes
·
View notes
Text

The way the sunset light hit my spinning wheel last night: very chiaroscuro, much dramatique. 🧶🔆
#handspun#handspun yarn#spinning wheel#fiber arts#fiber artist#highlynerdy makes#golden hour#sunset#yes the weather is starting to cool off#so all I wanna do is play with wool#and I've been watching so much#dimension 20#so I've been spinning a lot more
97 notes
·
View notes
Text
Part 2 of interpreting my bro's ic here is Merchant he is just a guy who wander around being omnipresent and all that


So in canon he doesn't have pet sheep, but I gave him one because he reminded me of something and his normal blue coat in canon, also lamb have two heads because he is merchant who is collecting weird stuff all around, I made him into humanoid void because he would fall in that moster type in my lore, also the reason he is omnipresent is that he have pocket dimension he can travel around, don't know about limitations, this is just for fun, he was inspired by minecraft wandering trader
Also have small backstory, he is simple character, but I gave a bit depth because why not
the shepherd wanted to slaughter Punkin and Apple, but Merchant came at the right time, he beat shepherd up, stole his coat and the lamb
Done pretty much all, he is not good or bad he is in middle pretty much
Here is he in canon

Stinker with smile
Merchant (not mine)
#oc#artwork#drawing#oc art#original character#art#draw#interpetation#part 2#merchant#sheep#two headed sheep#humanoid void#void#mysterious#mystery#grey#travel#traveling#lamb#pet#pet sheep#wool#stuff#blue#guy#he is so silly#maybe not#still cool
21 notes
·
View notes
Text

finally managed to doodle my s/i even if it didnt turn out how i wanted jt... so i kinda stopped.. hehelp 💔
♡ her name's vivi!! but she can also go by sophie.. since yk she . is sorta me
very sleepy and loves to daydream and be wrapped in warm blankets and hugs . always carrying a plush of her f/os anywhere she goes
funnily enough, whichever one she ends up nodding off with , most times ends up in her dreams...
she's an odd mix between a lamb , a goat and a canine . god's favorite little critter
#self ship#self shipping#selfship#my art 💫#self insert#artists on tumblr#ibispaintx#more stuff under the cut#her wool is odd. its like a night sky.. yet it still looks and feels it other than being a little misty and cool#she has an older sister who's dusk and a younger brother who's dawn
18 notes
·
View notes
Note
What Is Vegan Leather Made Of? Many Plant Leathers Are Being Used (greenmatters.com)
Yes, plant leather is a great idea (not better than animal leather, in my personal opinion, but that's down to each individual's thoughts on the matter). But unfortunately much of it just can't replicate many of real leather's beneficial properties- and a lot of plant leathers heavily involve plastic in their production. (source)
Look, ALL clothing production needs to be more sustainable at this point. The chemicals involved in tanning actual leather, unless it's organic leather, aren't good for the environment either. And I will never rag on someone for their choice to avoid real leather- we're all just trying, I hope, to make the best choices according to our values and within the confines of a broken system (as long as we're not hurting anyone else). For me, the massive habitat loss and environmental destruction caused by plastics production and waste is a greater evil than the deaths of individual animals in the production of meat and/or leather. So I choose real leather and try to make each piece last as long as I can, aware that any choice I make will have environmental impacts and is not perfect. Someone else might see it differently, and I really am not in a position to judge their choices.
However.
The term "vegan leather" is blatant greenwashing, and 99% of the time it applies to plastic. If people prefer to wear plastic to avoid real leather, that's fine, but they- and moreover companies -need to be honest about that. Just like synthetic fabrics should be called plastic, so should synthetic leather. Even some of the allegedly "plant-based" stuff, it turns out.
I'm honest that my real leather is animal hide. Time for the faux-green fashion industry to display some honesty of its own.
#ask#moss-and-wildflowers#also obviously the meat and leather industry needs to be more humane#I'm not opposed to the use of animal products- they WILL eat us in some form one day after all -but they should be treated with respect#so that their lives- however short -are Good#now I AM pissed at the largescale framing of animal clothing products as Evil that drives up the price of wool and leather for#those of us who want it#newsflash: I live in Massachusetts. it's still cool or cold here most of the year. if I don't want to wear plastic there are no alternative#and yet because of misinformation by the likes of P*TA farmers are forced to compost their wool#because there's not much demand for it. making it nigh-impossible to get at reasonable prices
236 notes
·
View notes