#compact microwave ovens
Link
Here is the #Best #Compact #MicrowaveOvens with #Reviews
0 notes
Text
803 notes
·
View notes
Text
SiliNOT! Testing and Review
Since I run a lot of casting workshops, I've had several people in the costuming/maker community ask me my opinion on SiliNOT!, a relatively new product advertised as a budget- and eco-friendly moldmaking alternative to silicone, urethane, and other single-use materials.
I finally bought a couple of bottles to play with, so I did a test project. My experience and findings are below! (It's not a recipe blog, but if you want to skip the play-by-play and get to the TL;DR, it's under the big "In Summary" header near the bottom.)

First, if you aren't familiar with this material, SiliNOT! is a remeltable, reusable medium for making molds. Though its exact ingredients are not disclosed, it purports to nontoxic, food-safe, and compostable. It melts in a household microwave or double boiler and solidifies at room temperature (or in a refrigerator/freezer for faster results). The website is https://silinot.com/.
(I am not an affiliate, and have no connection to this company apart from having made one retail purchase from them. I just have a lot of casting experience and like trying out new products.)
The Positive Original
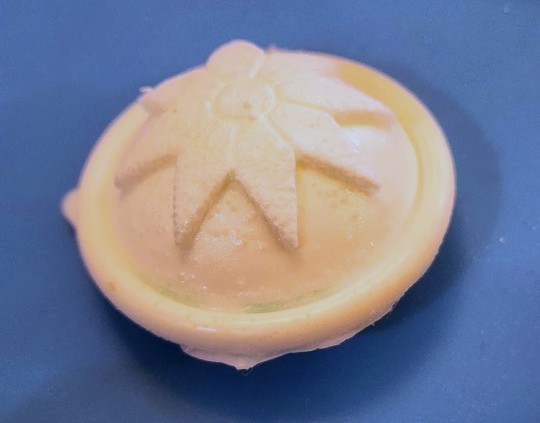
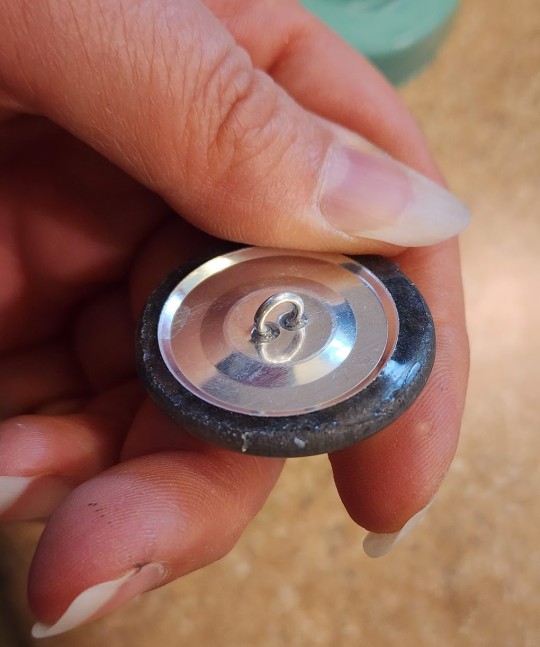
I’m still in the middle of a Vincent Valentine build, so I decided to test the SiliNOT! on his custom buttons. My original is a stack of various nonporous materials: an antique (probably Bakelite) coat button, an epoxy resin dome I cast using a mold I already had in my library, and some engraved Worbla’s Pearly Art for the raised detail. The button shanks won’t be added until the final casting, so the original can be mounted flat for the moldmaking process.
Sample Worbla on the left; completed button stack on the right:

The Mold
I built the mold container the same way I do for silicone pours, with the flat back of the button fixed to a styrene plate and a cylinder (actually a small paper cup with the bottom cut off) surrounding it for the walls. The lip of the cup is sealed all the way around with Monster Clay to prevent leaks.
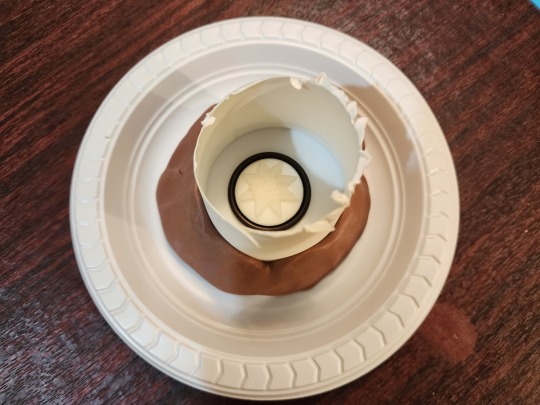
Heating and Pouring
The SiliNOT! didn’t take long at all to heat up; I did maybe four or five 20-second bursts before it was completely fluid. The bottle does get rather warm, so hand protection isn’t a bad idea. If you have heat-resistant gloves, you can use those; I was working in my kitchen (yay for nontoxic stuff!), so I just grabbed an oven mitt with a silicone grip.
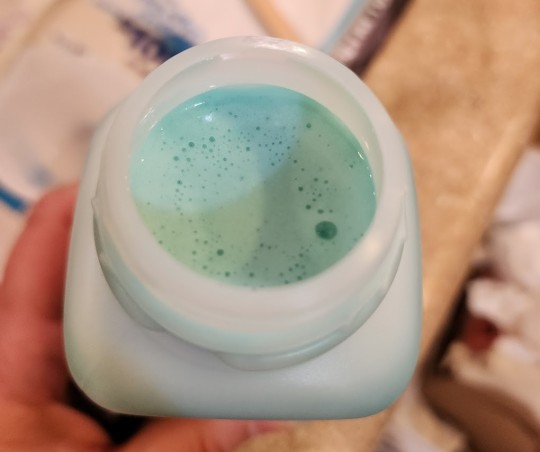
The melted SiliNOT! looks a bit like Luke Skywalker’s blue milk. It’s about the consistency of a yogurt smoothie and likes to pour in a thicker stream compared to silicone. While silicone can be stretched into a thin ribbon for delicate pours or chemically thinned with solvent for really tricky jobs, SiliNOT!'s viscosity is dependent on temperature and never seems to get quite as thin as silicone.
I’d automatically made my mold compact to conserve material (not really a concern with a reusable moldmaking material like SiliNOT!, but after using silicone for more than a decade, I’ve trained myself to be as efficient as possible), so the walls of my mold container were only about half or three quarters of an inch from my object. Because the target was so narrow, I found it difficult to accurately fill from the lowest area of the mold with the SiliNOT! The heavier pour also means more air can get trapped in or under the material.
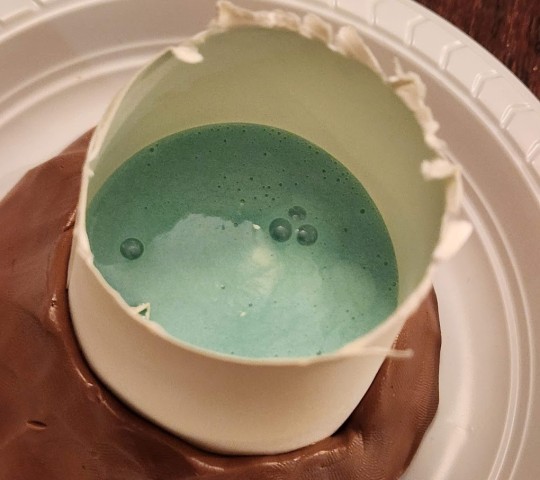
Bubbles are one of the areas in which SiliNOT! is decidedly inferior to silicone. SiliNOT! has higher viscosity, so bubbles don’t want to rise to the surface without vigorous tapping, which can distort the mold edges or affect leveling depending on your mold container. The bubbles that do make their way to the surface are difficult to pop, even when poked with a sharp implement. Heat gun degassing doesn’t have much effect.
Since the bubble surface cools and skins over quickly, I actually had to use a tool and scoop some large bubbles completely out of the mold to allow the surface to level. Critically, the SiliNOT! is opaque, so you can’t spot bubbles clinging to the surface of your original. (This is why my first mold was a reject, and I had to repour. More on that below.)
Hardening
Once the surface had set, I carefully moved the mold into the refrigerator to cool faster. Here’s another area where some types of silicone can have an advantage: I typically use fast-curing Smooth-On products (because I always have random quantities left to use up after our casting workshops), so I rarely have to wait more than half an hour for a silicone mold to cure, regardless of its size or mass.
The SiliNOT! has to chill completely before handling, though, and discharging that amount of heat requires a fair amount of time even in a cool environment. My mold was pretty small, maybe 2 1/2” wide by 1” deep, and it still took around 40 minutes to cool completely. A larger, deeper mold could hold considerably more energy in the center, and might have to be left in the freezer for a couple of hours before use.
Demolding the Original
When the mold was completely chilled, I removed it from the refrigerator and popped it off the plastic plate I’d used for the base of the mold. The texture was very different from what I’d expected: Unlike other meltable materials (Monster Clay, et al.) that have a firm surface when cool, the SiliNOT! remains tacky, which means it promptly collects any debris that crosses its path. In my case, this meant I had to pick dog hair off the surface throughout the casting process (and I don’t want to think about what would happen if glitter had contaminated the work space).
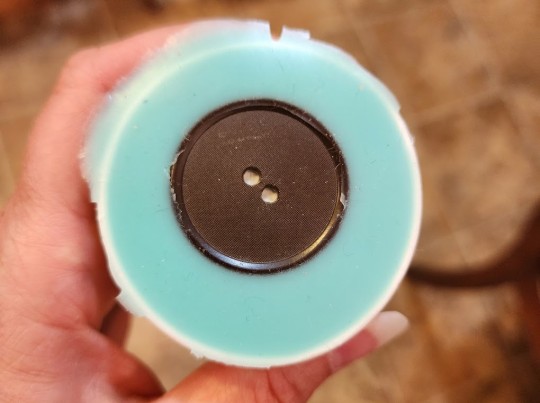
I’d used a paper cup for my mold walls, which usually works fine with fast-curing silicone. But the SiliNOT! must have a high oil content, because the cup absorbed some of it:
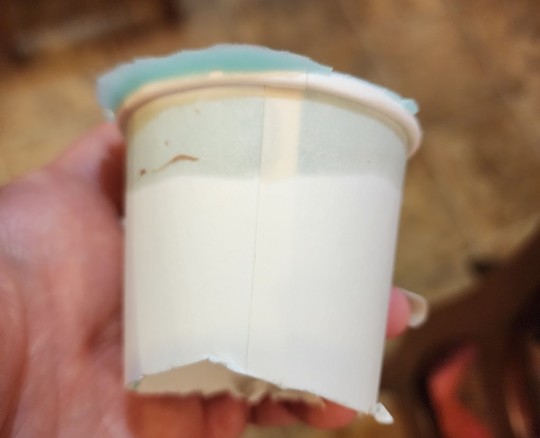
Lesson learned; use only nonporous containers with this stuff.
The SiliNOT!! really wanted to cling to the edges of my original, so I had to go slow at first to avoid tearing the thin flanges of the mold off. However, it did demold nicely from the smooth surfaces, and preserved texture very well. You can see the Worbla pebbling and the engraving channels clearly in the mold (as well as some dust and dog hair, because I made the mistake of setting it down briefly):
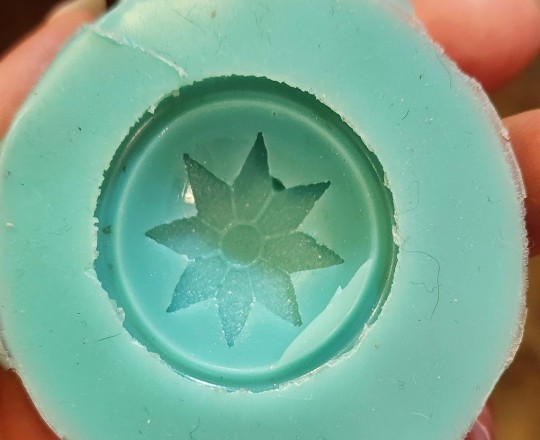

Unfortunately, as you can see, a large bubble had stuck to my original and created a pit in the mold, so I decided to do a second mold pour. I figured I’d tear up the failed mold and put the pieces back in the bottle to remelt… and discovered I couldn’t. The mold would stretch and twist, but not tear. It also seemed to return to its original shape relatively faithfully. Here’s a video of me manhandling the mold:
As you can see, the SiliNOT! has much better stretch and recovery than many silicone products (there are silicones that stretch well -- some of the Dragon Skin products come to mind -- but they’re not typically marketed for moldmaking). This means it’s likely well suited to casting objects with moderate undercuts or oddly-shaped bits that need the mold to stretch during demolding.
You can cut the SiliNOT! easily with scissors, which is the recommended method for getting it back in the bottle when you’re ready to remelt.
Take Two
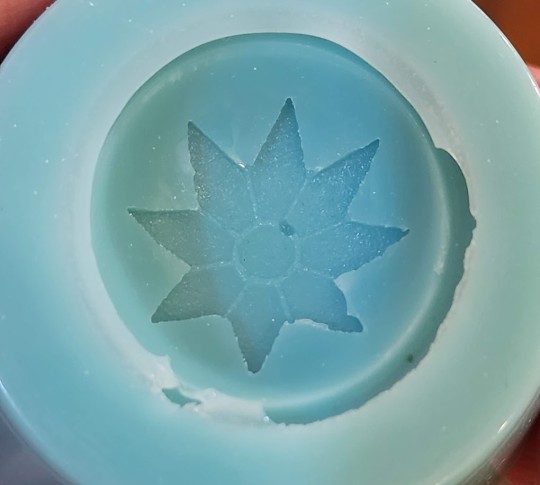
Using what I’d learned from the first pour, I did the second one inside a hard plastic ramekin. This gave me a bit more room to pour into the floor of the mold, reducing the bubble risk, and also eliminated the porous paper cup that had absorbed oil. I still had the issue with bubbles that didn’t want to pop, but there were fewer of them this time.

The ramekin made for a much cleaner mold, buuuuut there was ANOTHER BUBBLE right in the middle of the design. >.<
Take Three
Lather, rinse, repeat. Or in this case, melt, pour, chill.
This time I heated the SiliNOT! as much as I dared and did the absolute slowest, narrowest pour I could manage, giving the air extra time to escape as the mold was filled from the bottom. The risk with stringing out the pour like this is that in a thinner stream, the heat escapes faster, leading to uneven viscosity as the liquid fills the mold. I don’t think that’s a major problem for this particular piece, but it’s something to pay attention to as regards leveling and degassing, especially for larger molds that will take longer to fill.
The result of pour three:
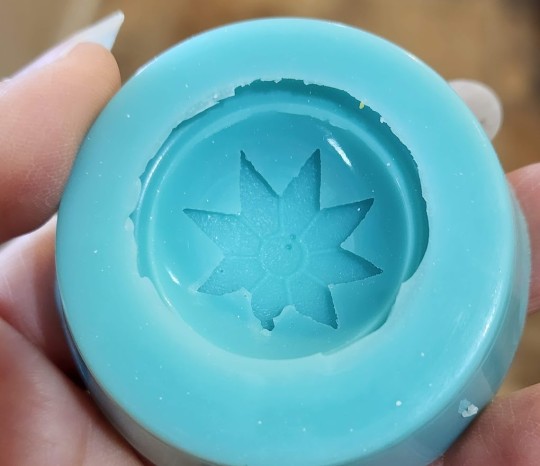
/siiiiigh/ Well, at least the bubbles are smaller, this time. They may not show up enough to matter in the final cast. I’ll give it a try.
Casting
I had leftover workshop resin that was getting on toward the end of its shelf life, so I used Smooth-On Smooth-Cast 300 for my initial resin trial. It’s an opaque white resin with about a 10-minute cure time (the fast turnaround is why we use it for workshops).
Before pouring, I had to do a little mold cleanup where the SiliNOT! had managed to sneak under the edge of the Worbla (I think I’d loosened the corner of the star from prying it out of so many molds), but since the SiliNOT! stretches so well, it was pretty easy to invert it to get little scissors down into the bottom of the depression.
For the first cast, I didn’t use anything but the resin in order to get a baseline. Ideally I’d like to cold cast or dye the resin so I don’t have to worry about paint chipping, but since I’m doing a trial here (and need multiple buttons anyway) I figured some plain white extras wouldn’t hurt.
So, my first cast…

…smacked into a big problem, which I probably should have seen coming: The resin I’m using is a fast cure formula, which means it discharges a fair amount of heat as it's going through that rapid chemical reaction -- enough heat to melt the SiliNOT!, as it turned out. When I tried to demold it (after giving it a few extra minutes beyond label time to be sure it was done), the surface of the mold had melted to the resin and even embedded itself in a few places. It’s difficult to see the resin detail in the photos (my camera went into white balance panic mode with all the shades of white and blue), but you can see how pitted the formerly-smooth mold surface is.
In fairness to the SiliNOT!, the bottle does say that you should put the mold in the freezer for half an hour before casting high-temperature materials. But I assumed high-temperature material was something like candle wax or melted chocolate, rather than ordinary resin. (And the mold had just come out of the refrigerator.)
So, on to pour FOUR of the SiliNOT! mold…
Take Four
NGL, this is getting a little old. >.<
Fourth mold definitely needed some cleanup around the edges, and there are still a couple of tiny bubbles I can’t seem to get rid of, but it’s good enough for a test. (I’m starting to despair of using these for actual production, given how many times I’ve had to redo the molds because of bubbles...)

Deep in the recesses of my basement, I found some transparent epoxy resin with a 24-hour cure time -- much slower and lower-temperature than the Smooth-Cast. Since it cures clear, I went ahead and mixed in some metallic powder pigment on the off chance that I get a usable button out of this one. I had excess resin after mixing, so I poured that into my first mold, which has a bubble in the design but is otherwise fine. Two test pieces are better than one, right?
Results
Here are the results of the slow-curing resin out of mold #4:

Finally, a (mostly) clean cast!
As you can see, the detail reproduction is excellent -- certainly on par with the pulls from the silicone mold I ended up making while waiting on this set to cure (purely for time reasons; I couldn’t afford five days to cast the buttons using slow-curing resin, and with a silicone mold and fast-curing resin I could get them all done within a couple of hours).
However, you can also see a few spots where bits of the SiliNOT! embedded themselves in the final cast. Part of that may be due to design flaw in the original; I didn’t want to glue anything permanently to the antique button, and that resulted in a tiny gap between the button and the resin hemisphere. Silicone has enough strength to resist tearing out in that kind of area, but apparently the SiliNOT! doesn’t. The bits of mold around the outer edge seem to have stuck just to be difficult, as there was no structural reason for those to have become embedded in the resin. This means the mold could be damaged by successive casts, reducing its usable life and accuracy.
Still, the mold definitely produced decent results for a first cast, and a different shape might not have had as much of a problem with tearing off mold parts. The slow-curing resin is a bit of a limitation, but not a unique one (I use this same epoxy resin for any glass-clear casts I do, and only use the Smooth-Cast 300 for opaque items or things I need very quickly). I don’t personally use UV resin, but I’d be curious to learn how it performs with the SiliNOT!
IN SUMMARY:
Here’s the TL;DR on SiliNOT!
Pros
Cost effectiveness. This is the most obvious advantage of SiliNOT! over silicone; it’s (theoretically) infinitely reusable, and even with natural attrition/inevitable contamination from use, you can likely get over a hundred pours out of a bottle. That's a lot cheaper per use than silicone.
Non-toxicity. SiliNOT! is touted as food contact-safe, so you don’t have to panic if you get it on your skin or kitchen counters. While platinum-cure silicone is also relatively harmless (some varieties are labeled for food or life casting), other common moldmaking materials such as tin-cure silicone or urethane are not. (NOTE: Since the company is very hush-hush about what actually makes up the SiliNOT! secret formula, I do not know if it might release any vapors or fumes that would be irritating or harmful to pet birds. In general, I advise not doing any kind of casting around birds.)
Eco-friendliness. This is the biggest draw for me personally: Given the number of casting workshops I run and all the things I sell commercially, I have constant guilt about the amount of waste I generate for creative projects. In most areas of life I’m an aggressive reduce/reuse/recycler and try to use organic materials instead of synthetics whenever possible, so a mold that’s reusable and compostable is very appealing.
Ease of use. It’s honestly pretty hard to mess this up -- just microwave according to the directions and pour. No measuring, no A/B mixture, no concerns about chemical contamination from latex or sulfur, etc.
Shelf life. Unlike silicones, which have a shelf life of anywhere from six months to three years depending on storage conditions, the SiliNOT! purports to be shelf-stable. It's compostable, so don’t bury it in your yard, but otherwise it appears that it could be kept on hand for years.
Cons
Bubbles. Honestly the most irritating thing about this stuff for me. I’m used to being able to see bubbles forming as I pour, tap them to the surface, and remove them. The fact that I poured four molds of the same object and never once got one without bubbles is super irritating.
Stickiness. I’m not a big fan of the tacky surface texture, and while I haven’t done any cold casting yet, I can imagine that it would be very difficult to clean out any pigment or mica powder that got where you didn’t want it. I probably wouldn’t use this for any kind of cold casting that required isolated colored areas or changing colors between casts.
Set time. The SiliNOT! may take longer to cool than a fast silicone would to cure when dealing with larger molds, so it’s not ideal for projects with a really tight turnaround. (But cosplayers would never be casting something the night before a con, right? We always plan ahead and never, ever procrastinate!)
Library life. The SiliNOT! may or may not structurally degrade over time the way urethane, latex, and tin cure silicones do, but I noticed even in my very limited casts that it was prone to having tiny bits of the mold (particularly at edges) stick and pull off. While I keep most of my platinum silicone molds for years and reuse them, I don’t feel that the SiliNOT! molds would hold up to repeated casting, and they’re far more sensitive to ambient temperature, so they’re probably best used for short term only. (I also wonder about the possibility of oil leaching out in long-term storage.)
Comparative Ranking
Ranking it against other mold-making materials, I’d place SiliNOT! below platinum-cure silicone in terms of performance, but maybe somewhere in the neighborhood of urethane and tin-cure silicone. It's definitely superior to latex. (Though to be honest, I'd rank Play-Doh above latex. I hate working with that stuff.)
Factoring in cost and environmental impact, it beats out urethane and tin-cure silicone. I'm still not sure if I'd rank it above platinum-cure silicone, though... Silicone costs much more and isn't eco-friendly, but the performance and lifespan is significantly better, so it still makes more sense for some projects.
Alginate is another type of material entirely, but in some ways SiliNOT! is comparable to it -- both are more cost-effective than silicone, both are biodegradable, both are skin safe, and both have long shelf lives. But SiliNOT! is easier to use for beginners than alginate, which has to be mixed to the right consistency and has an extremely short lifespan once poured.
Overall, I would recommend SiliNOT! for:
People who want accurate, non-shrinking molds but don’t have the budget for platinum-cure silicone
People who are committed to eliminating waste from single-use materials, and are willing to trade off a little performance for a more eco-friendly material
Projects with smooth surfaces and no indentations/sharp edges/undercuts where bubbles might stick (e.g. cabochons; simple geometric forms)
Projects where you need only one or two casts of something, rather than many casts from the same mold
Casting oddly-shaped pieces around which the mold needs to stretch in order to demold
Use with slow-curing resins that do not generate much heat
I would NOT recommend SiliNOT! for:
Extremely complex or detailed pieces, or pieces with a lot of surface texture that bubbles might stick to
Two-part molds
Projects requiring many identical casts out of the same mold
Molds that you intend to add to your library for future or repeat casting
Use with fast-curing resins, melted wax, melted Monster Clay, or any other material that emits heat
Cold casting with precise color application
My Overall Opinion
It's... okay? I will almost certainly keep SiliNOT! in my toolkit for certain specific applications. It's MUCH cheaper over the long term, I love the idea of recycling mold material, and there are some projects for which it will likely perform very well (those listed in the above bullet points). I will also admit that three days of working with it does not constitute a comprehensive familiarity with the product, and it might be the sort of thing that you get better at working with after more practice. (Just learning how to eliminate bubbles would go a long way toward making me adopt this for more projects!)
However, I don't quite buy the "better than silicone" tagline. It's definitely more difficult to get a perfect result, and there are some projects for which platinum-cure silicone is always going to be more reliable (e.g. high-temperature casting, mass production, large-scale life casting).
For those looking for a recommendation of whether or not to buy, I'd say look at your project budget and the applications for which you're going to be making molds, and let those factors guide which mold material you go with. People doing some kinds of projects are likely going to find this a godsend, while those doing different projects would probably hate working with it.
37 notes
·
View notes
Text
An old article, but amusing regardless.
First it was James Lileks and the Gallery of Regrettable Food. What were the photo editors on these cookbooks thinking?
I'm well aware the colour quality of old pictures degrades and yellows, to their detriment, but IMO the images on that website can't have looked very appetising even when new.
There are ways to assemble variegated foodstuffs on a plate that looks attractive, and then there are these.


Dimly-lit meals for one and Sad desk lunches are yet more shuddersome antidotes to lovingly-photographed food porn erotica (porn would be messy close-ups of eating it).
However, despite what the article suggests, food photography doesn't need "the highest-spec kit while dangling from light-fittings for just the right angle" to look good.
*****
Using a phonecam while out with your friends in a crowded pizzeria isn't going to give the best results, but then neither is a joyless packed lunch on a rainy Monday in February, even if shot with a $33,000 camera like this Hasselblad, and full studio lighting.
@dduane's hobby site European Cuisines (down for maintenance) did just fine for years with a Sony W17, a compact digicam with a superb Zeiss lens.

Here are Sony shots of an apple upside-down cake made with Beauty of Bath apples from our own tree (they really are pink all the way through) and a quiche Lorraine just out of the oven.


After a while I got a second-hand Nikon D40 DSLR; the money saved on second-hand let me afford an excellent lens, a top-of-the-line flashgun and that neat little flash which is so much better than the camera's built-in one.

Here's the Nikon's take on last year's roast-goose-and-all-the-trimmings Christmas Dinner, as well as bacon (corned beef is the Americanised version) and cabbage for St Patrick's Day.


Now we're mostly using HTC U11+ smartphones whose cameras are not only top-notch but have excellent low-light capability.

This is good, because our lighting has always been mostly natural daylight with occasional flash and reflector-screen assistance.
Here are U11+ images of soda bread done in a cast-iron casserole or Dutch oven, and Geflügelragout (a stew of roast chicken with red wine and lemon) with saffron-pumpkin noodles.


This has become Brightwood Vintner's Chicken in the Food and Cooking of the Middle Kingdoms project, and why not? It's delicious! Here's DD and U11+ in action, and the noodle close-up she was shooting in that pic.


None of the food we shoot is "styled" for photography with varnish for glossiness, paint for cream, machine oil for honey, microwaved cotton-wool for steam and lots of other cunning but inedible trickery.
Our stuff is all for eating - so much so that getting "photograph the food" and "eat the food" in the proper order can sometimes be a struggle.
Like these crumpets, for instance.

You would, wouldn't you?
I nearly did, giving DD conniptions because she hadn't photographed them yet, and the Kerrygold butter was melting Just Right...
In a choice between shooting Have To Eat images and Want To Eat ones, we'll stay on the Want To side of the fence, and if people looking at those pix also Want To take a bite out of their screens, we're getting the job done.
And we're not hanging from the light-fittings to do it... :->
#food and drink#food photography#food and cooking of the middle kingdoms#gallery of regrettable food#james lileks
79 notes
·
View notes
Text

How To Be Smart When It Is Over 100 Degrees...
DOG DAYS OF SUMMER!
There are certain things that smart people do (or don't do) when the temperature rises over 100 degrees.
1.Do not leave chocolate, dairy products, fresh flowers or fish in the car.
2.Do not lie in the sun and fall asleep.
3.Do not leave children or pets in your car. Not even for a minute. Not even with the window cracked open.
4.Do not walk your dog on pavement after the sun has been heating it up. The pads of his/her feet will burn.
5.Do not walk outside in bare feet. See number(4)above.
6.Do not use your oven and create more heat in your house. Use the barbecue or microwave.
7.Do not do strenuous work outside in the heat alone.
8.Do not travel with your dog in the back of your flatbed truck. The floor heats up fast, especially if it is metal, and the dog cannot escape it.
9.Do not leave compact discs on the seat or dash of the car.
10.Do not turn off the air conditioner in the house while you are at work if you have pets in the house.
11.Do not constantly turn the air conditioner on and off. Keep your house at a somewhat constant temperature.
12.Do not touch metal, or even dark plastic, car door handles, ignition switches, steering wheels, keys or stick shifts. Keep a small towel handy so you don't burn yourself.
13.Do not play sports outside without drinking plenty of water constantly.
14.Do check your car's battery often and make sure that water levels are adequate.
Tips:
1.The temperature inside a closed vehicle that has been sitting in our hot sun can reach over 200 degrees in a very short time. Please take the warnings about children and pets very seriously.
2.People who fall asleep in the sun, or who spend a great deal of time outdoors, run the risk of serious burns.
3.If you have to park your car outside, try to find covered parking.
3 notes
·
View notes
Text
Super easy 4 ingredient chocolate concrete recipe
All Purpose Flour – Good old plain, all purpose flour is perfect for this recipe. Bread flour also works well. Avoid using self raising flour as this will give you a lighter, cake-like result and not the concrete you’re looking for!
Butter – Salted butter works well for this recipe, but you can also swap out for oil or vegan butter.
Sugar – Regular caster sugar or granulated sugar is best. Sub with brown sugar for a deeper flavour and less sweetness.
Cocoa Powder – Make sure to use 100% unsweetened cocoa powder. If using a hot chocolate mix or Milo, up the amount to 50g / 1.75oz or around 7 tbsp
Pre-heat the oven to 180°C / 360°F. Add the all purpose flour, cocoa and sugar into a large mixing bowl and combine using a whisk or spoon.
Melt the butter in 10-15 second bursts in the microwave until melted. Pour into the flour mix and roughly combine.
Use your hands to really work the butter through the flour, breaking down any clumps. The mix will become crumbly like potting soil.
Pour into a square 8 in / 19 cm cake tin lined with baking paper. Press down firmly with your hands or the back of a spoon until flat and compact. Make sure to press the edges as well to avoid crumbling after baking.
Optional: Brush with water, then sprinkle a little extra sugar (1-2 tsp) over the top for an extra crispy crust.
Pop in the oven and bake for 20 minutes. Remove and pull out of the pan using the baking paper. Slice into squares and enjoy
12 notes
·
View notes
Note
What's your favorite thing to eat on Thanksgiving?
I eat whatever my parents make for me. But in the last few years I haven't actually had any turkey (except for a tiny, tiny portion of turkey in that box of store-bought mini-turkeys I found). My parents are vegetarians, so it's never occurred to them to cook turkey, etc., and they just have a few (large, store-brand) side dishes. But in the time since I have started reading Less Wrong, I have made some things myself.
I think I'm most proud of my pumpkin pie. It's a recipe my mom sent me, and I don't know if that says something about the family's cooking style (although I'm pretty sure that mom is a really great cook, so I guess I'm not that biased). Anyway, here it is:
1. Preheat oven to 375 F (190 C).
2. Prepare a 9″ pie plate (I prefer one with an aluminum rim so I can turn it over relatively easily once the bottom is filled).
3. Peel your pumpkin, cut it in half lengthwise, remove seeds, and cut it into chunks. Put it in a food processor (or blender if you want to cut it into smaller pieces) and purée until it's very smooth. (If you are not using a food processor, use a potato masher. The goal is for the purée to have the consistency of ice cream. You can adjust as needed for the texture of the pie later.) Pour into your pie plate, and use paper towels to push down on the purée until it is mostly compacted. Do not worry about it getting a smooth top.
4. In a separate bowl, add cream cheese, sugar, salt, and cornstarch. Microwave for 30 seconds to warm, then whisk together with electric mixer until smooth. Put a piece of wax paper between the bowl and the mixer so that the bowl doesn't get greasy or anything.
5. Pour half of the cheese mixture into the top of the pie. Add pumpkin and whisk together, then add remaining cheese mixture and whisk to mix it in, and then whisk again to distribute it evenly. (I was afraid there wouldn't be enough cornstarch to make a thick crust, but it got thick enough after the third whisking that it held together.)
6. Transfer the pie plate into the oven and bake for 50 minutes, then turn it over and bake another 50 minutes.
That's a lot of whisking. But it turned out pretty well!
Also, my mom's pie has a layer of apple pie on top. She doesn't have a food processor (or a potato masher) so she does it by hand, mixing and rolling the top layer out into sheets, then adding it to the bottom layer of the pumpkin pie. (She says the trick is to spread it as thin as possible, so it covers the crusty top layer of pie, and to make sure it's in one piece, so don't try to split it into slices to add to the pie.)
59 notes
·
View notes
Text
Momma Lang’s Reese’s Cup Cheesecake with Oreo Crust Recipe
I know you guys have been waiting for this! Especially @thegreenwichvillagemystic and @oldmanwithashield ...or @smolbendyhorn I can't remember which one of you said but either way, the message gets across.
Here it is! Without further ado!
Part 1: The Oreo Crust Part (can be used for loads more than just this cheesecake FYI)
Ingredients
22 Oreos, cream filling and all
5 tbsp unsalted butter, melted
Directions
In a blender, pulse all the Oreos into a fine crumb. Or if you wanna go old school and throw them in a Ziplock bag and beat them to a pulp with a rolling pin, that’s cool too. Just get them to a fine crumb.
Pour them into a large bowl. You should have roughly 2 cups’ worth (packed)
Add the melted butter and stir to combine. Smash up any large chunks that form.
Pour mixture into whatever ungreased pan you’re needing. Pat the crumbs down into the bottom and up the sides to make a compact, thick crust.
The mixture is gonna be thick and pretty wet, but if the mixture is super duper wet and not forming a nice crust, grind up 2 or 3 more Oreos and mix those crumbs in.
If this is for a baked dessert: pre-bake the crust per whatever filling recipe directions you’ve got. Mom usually pre-bakes for 8-10 minutes at 350°F.
If this is for a no-bake filling dessert: bake for 10-12 minutes at 350°F then cool crust completely before using unless your recipe says otherwise.
Part 2: The Cheesecake Part
Ingredients
Three (3) 8oz packages of regular cream cheese, softened (AKA at room temp)
1 cup granulated sugar
4 eggs at room temp
1 tbsp vanilla extract
¾ cup creamy peanut butter
½ cup heavy cream
A dozen mini peanut butter cups (or an equivalent with normal sized ones) cut up into decent bite sized pieces
Mom’s tip: throw your Reese’s cups in the fridge for 10ish minutes, and it’ll be easier to cut them later
Another tip from Mom: if you don’t want to use PB cups, you can use Reese’s pieces or chocolate and peanut butter chips.
My tip: PB cups are definitely the way to go! (unless you can get like the pumpkins or the eggs or Christmas trees because we all know those are better than the regular cups)
Directions
After taking care of your crust, set the oven temp to 325°F
Using a stand mixer on medium speed, cream together the cream cheese until it’s smooth.
Add sugar and vanilla extract and continue to mix on med-high speed for another couple of minutes, scraping down the sides of the bowl when needed until the mixture is smooth
Reduce speed to low and add eggs one at a time, mixing well after each one. Do not overmix.
Keep mixer speed on low, add peanut butter and heavy cream. Continue mixing until everything is completely incorporated.
Fold mini PB cups into the mix.
Spoon batter on top of crust in your springform pan and bake for one hour.
After that, turn oven off, crack the oven door open an inch and let cheesecake cool in the oven for 30 minutes.
After that, remove cheesecake from the oven and let cool for another hour or until it’s cool enough to put in the fridge to cool completely overnight.
Part 3: Ganache & PB Cup Toppings Part
Ingredients
1 cup (or 8oz) semi-sweet chocolate chips
½ cup heavy cream
30 mini peanut butter cups (or an equivalent with normal sized ones) cut up into decent bite sized pieces
Mom’s tip: this amount is just a suggestion since it’s for the topping. Put as much or as little as you want on top.
Directions
Using a medium sized heat safe bowl, combine the heavy cream and semi-sweet chocolate chips.
Heat in the microwave for 45 second intervals, stirring after each interval until the chocolate is smooth.
Pour ganache slowly on to the top of the cheesecake and gently smooth it on top.
Evenly sprinkle the top with the quartered PB cups pieces.
#scott's thoughts#scott lang#ant-man#momma lang#momma’s cooking#cheesecake#Reese’s cups#peanut butter#chocolate#peanut butter cups#good#desserts#recipe#ant man#antman
21 notes
·
View notes
Note
Do you have any one pot recipes? I’m a beginner level cook if you can call it that and I get so stressed out by too many pots and pans and mess
I don't really cook a lot of one-pot dishes the way you might be envisioning. My only one-pot dish is macaroni and cheese, but that recipe uses an instant pot. I think of shepherd's pie as a one-pot dish but it's actually a 3-pot dish (I wash the first two dishes while it's finishing in the oven in the 3rd dish).
If you're okay with two-dish meals, then these might be helpful. About 75% of my cooking these days come from one of these resources:
One Dish Kitchen - single portion meals. Her coq au vin is my favorite. I make it with mashed potatoes.
Cooking For One - from America's Test Kitchen. The beef and broccoli is my favorite here. (I found this book at my library and tried a few recipes first before buying my own copy.) I use microwave minute rice a lot.
I'm a big fan of risotto. Cook the protein (chicken, scallop, shrimp, whatever you like) in the oven and prepare the risotto stove-top in a sauce pan or a skillet. You'll need a second pot for stock/broth, but you can also do risotto in a pressure cooker/Instant Pot to cut down on the dishes.
I also like to do sheet pan dinners, where I roast a protein and veggies on the same baking sheet and then make a sauce stove-top while that's in the oven. I usually do salmon and broccoli with a lemon garlic sauce or chicken, asparagus, and potatoes with a butter sauce.
And it's not a sheet pan dinner, it's a skillet dinner but I love doing a porkchop in a skillet and when the meat is resting, sauteeing veggies in the same skillet with some additional butter or olive oil.
(My recipes for risotto, lemon garlic sauce, and butter sauce were from the internet but I've had them for so long that I can't find them online anymore. If you're interested, I'm happy to write them up and share! I think they're pretty easy - I found them when I was a beginner cook myself, having just moved out on my own 10 years ago.)
I was just gifted Compact Cooking and while I haven't cooked from it yet, all the recipes look good and manageable for a novice who doesn't want a lot of mess! You can find a lot of her recipes on Instagram and TikTok if you don't want to buy the book just yet.
6 notes
·
View notes
Text
So my American ass keeps being surprised every time she finds another friend with no microwave, so I have a set of questions I have attempted to make into a poll:
Do you have a microwave, if not do you have another small multi-purpose heating apparatus like a toaster oven or air fryer that you use similarly to how someone might use a microwave (speed/convenience/not heating the whole house/compact space), and is it (by your perception) normal for someone in your area/peergroup to have a microwave?
I probably missed or duped a combo but this is just a random thought anyway XD
4 notes
·
View notes
Text
Robert Pattinson being a Chaos Gremlin
My favorite article I’ve ever read is the one about Robert Pattinson trying to cook. Here is a taste of the chaos that ensued:
_____________________________________________________________
Last year, he says, he had a business idea. What if, he said to himself, “pasta really had the same kind of fast-food credentials as burgers and pizzas? I was trying to figure out how to capitalize in this area of the market, and I was trying to think: How do you make a pasta which you can hold in your hand?”
___________________________________________________________
Nevertheless, penne and water in the microwave for eight minutes. In the meantime, he takes the foil and he begins dumping sugar on top of it. “I found after a lot of experimentation that you really need to congeal everything in an enormous amount of sugar and cheese.” So after the sugar, he opens his first package of cheese and begins layering slice after slice onto the sugar-foil. Then more sugar: “It really needs a sugar crust.”
____________________________________________________________
He starts wrapping the whole thing up with more aluminum foil, and then compacts it, and then wraps it some more, and then squeezes it again. Suddenly he stops: “Can you actually put foil in an oven?”
I say yes, you can, but what you absolutely cannot do is put foil in a microwave. And he says cool, cool, and then he goes looking for his oven, which he’s never used before, and this is a nice house, so there are multiple options, and the one he settles on, well: It looks like another microwave to me. He assures me it is not.
_____________________________________________________________
article
2 notes
·
View notes
Text
Power Your Home With A 200 Watt Solar Panel: Save Money And Energy
Utilising cutting-edge technology and expert research and development, Sungold Solar has developed a wide array of durable and dependable solar solutions to meet your energy requirements.
Among these is our foldable 200 Watt solar panel, which is crafted from high-performance mono crystalline solar cells and is awarded Sungold’s top-grade quality rating. These panels achieve the highest possible efficiency enhancements through improved conductivity of their main grids and better light reflection capabilities with PERC technology.
These panels are most effective when fully exposed to sunlight. It's recommended to clean them monthly and keep them away from shadows cast by buildings and trees. Opting for a portable 200W solar panel is a wise decision for powering your RV as well (read more about our portable 200W solar panel).
The 200 Watt solar panels are designed to fulfil your energy needs for off-grid living at home, for camping or RV living, offering a dependable power source.
The 200W solar panel category falls into the mid-range segment for solar charging. These panels are capable of generating sufficient electrical power for various household appliances, including microwave ovens and LCD screens, among others. They can generate up to 900Wh in a day in states with peak sunlight (when the intensity of sunshine is greatest) between 4.5 and 5. Whereas, in states where the peak sun hours are between 3.5 and 4, our 200-watt solar panel can generate up to 560Wh in a day.
The TF-M-200w flexible solar panel product has successfully passed Sungold’s durability test. Its reliability and sturdiness have been confirmed, demonstrating that Sungold’s proprietary material provides adequate protection for the solar cells and supports a 5-year warranty. The TF-M-200W flexible solar panel is constructed from A-grade mono crystalline 166 solar cells, boasting a conversion efficiency of 22.8%, making it an ideal choice for homes.
Its perfect balance of power and compact size makes it an attractive option for a variety of uses, from residential rooftops to portable setups. This trend underscores a broader shift towards accessible and sustainable energy, paving the way for a more eco-friendly future.
Connect with Sungold solar to know more about how you can save more money and energy.
Visit our website :- https://www.sungoldsolar.com/200-watt-solar-panels/
1 note
·
View note
Text
The Future of Home Appliances: A Glimpse into 2030

As we approach the year 2030, the home appliance industry is poised for a transformative shift, driven by advancements in technology, sustainability, and personalization. Here's a glimpse into the exciting future of home appliances:
Smart Home Integration: The New Standard in 2030
By 2030, smart home integration will be the norm, with appliances seamlessly connecting to home automation systems. Imagine a refrigerator that not only tracks inventory but also suggests recipes based on available ingredients, sending instructions to a smart oven that preheats itself to the perfect temperature. Voice-activated controls and remote access via smartphones will make daily tasks effortless.
Advanced Features of Smart Appliances
- Inventory Management: Fridges will track what’s inside and suggest meals.
- Voice Control: Manage appliances hands-free with voice commands.
- Remote Access: Control your home devices from anywhere using your smartphone.
Energy Efficiency and Sustainability: A Green Future
Sustainability will be a key focus in the home appliances of the future. Eco-friendly materials, such as bamboo countertops and recycled glass backsplashes, will become increasingly popular. Energy-efficient appliances will be the standard, featuring innovations like solar-powered devices and advanced water filtration systems.
Eco-Friendly Living: Growing Your Own Food
Homeowners will be able to grow their own herbs and vegetables year-round using indoor gardens or hydroponic systems, promoting fresh, home-grown ingredients.
Personalization and AI: Tailoring Home Appliances to You
Artificial intelligence (AI) will revolutionize the way we interact with our home appliances. Smart ovens will suggest optimal cooking settings based on user preferences, while AI-driven thermostats will adjust temperatures to balance comfort with energy savings.
Healthier Living Through AI
- Personalized Recipes: Get suggestions tailored to your dietary needs.
- Health Monitoring: Appliances will help track and improve your health.
Compact and Multifunctional Designs: Maximizing Urban Living Spaces
As urban living spaces continue to evolve, compact and multifunctional appliances will become increasingly popular. Combination microwave-ovens and washer-dryer units will maximize functionality while minimizing space requirements.
The Rise of Minimalist Aesthetics
Minimalist aesthetics with clean lines and concealed storage solutions will create a sense of calm and organization in increasingly smaller living spaces.
Appliance Repair and Longevity: Ensuring Durability in High-Tech Homes
As home appliances become more advanced, the importance of reliable repair services will grow. Companies will offer extended warranties and specialized repair services to ensure that high-tech appliances remain functional for longer periods.
The Role of Repair in Sustainability
The ability to easily repair appliances will contribute to sustainability by reducing waste and extending their lifespan.
Smart Home Appliances Market Growth (2023-2030): What to Expect
The future of home appliances is an exciting prospect, with smart integration, sustainability, personalization, and compact designs shaping the industry. By embracing these trends, homeowners can create living spaces that are not only efficient and convenient but also aligned with their individual lifestyles and environmental values.
Read the full article
0 notes
Text
Customised Caravans: Crafting Your Perfect Adventure Home

In recent years, the popularity of caravanning has surged, with more travelers seeking the freedom and flexibility to explore on their terms. Whether it’s the appeal of the open road, the ability to stay in unique, remote locations, or simply the comfort of having a personal space wherever you go, caravanning offers a sense of adventure and independence. But what if the typical caravan doesn't meet your specific needs? This is where customised caravans come into play, allowing you to tailor your mobile home to fit your lifestyle perfectly.
Why Choose a Customised Caravan?
A customised caravan allows you to design a space that aligns with your preferences and travel requirements. Whether you’re a weekend traveler, a digital nomad, or someone planning a long-term road trip, a one-size-fits-all caravan might not meet your needs. Customising your caravan gives you control over:
Layout: Create a floor plan that suits how you live and travel. Want a larger kitchen for gourmet meals on the road or need extra storage space for sporting equipment? A customised layout can make it happen.
Amenities: From luxurious bathroom setups to solar panels, high-tech sound systems, or even work-from-home spaces, you can outfit your caravan with everything you need to stay comfortable and productive.
Personal Style: Inject your personality into your caravan’s design. Choose your preferred materials, colors, and finishes to make the interior feel like home.
Durability: If you're an off-road adventurer or travel through varying climates, custom caravans can be built with the appropriate materials and features to ensure durability and comfort in any environment.
Key Features to Consider for Customisation
Interior Layout and Space Optimization:
When designing a customised caravan, one of the most crucial factors is the layout. A well-thought-out design ensures efficient use of space while maintaining comfort. For instance:
Storage Solutions: Built-in cabinets, fold-out furniture, and under-bed storage.
Multipurpose Areas: Convertible dining tables that double as workstations or beds.
Kitchen and Dining Areas:
The kitchen is the heart of your home, even when it's on wheels. In a customised caravan, you can design the kitchen according to your culinary needs. Popular custom kitchen upgrades include:
Full-sized fridges or dual-energy refrigerators.
Additional counter space.
State-of-the-art appliances like induction cooktops, microwave ovens, and even small dishwashers.
Bathroom Design:
Not every off-the-shelf caravan offers full bathroom facilities, but with customisation, you can add a shower, toilet, and sink that fit your needs. You can opt for:
Compact but efficient wet rooms.
A luxurious shower with water-efficient heads.
Composting or chemical-free toilets for eco-friendly travelers.
Energy Efficiency and Sustainability:
More travelers are looking for sustainable ways to power their adventures. Custom caravans can be outfitted with:
Solar panels: Perfect for off-grid living, solar power can run lighting, appliances, and even heating systems.
Energy-efficient appliances: Opt for appliances with lower energy consumption to maximize the efficiency of your solar power or battery system.
Water recycling systems: Keep water usage minimal with greywater recycling for sustainability.
Off-Road Capability:
For those who enjoy traveling off the beaten path, you can customise your caravan for off-road adventures. Features like increased ground clearance, all-terrain tires, and reinforced chassis can turn your caravan into an off-road powerhouse.
Technology Integration:
Modern caravans are becoming more tech-savvy. Whether it's Wi-Fi, GPS tracking, or smart home systems, technology can make life on the road more convenient. Consider options like:
Smart lighting and climate control.
Entertainment systems with integrated sound and video options.
Remote monitoring of power, water levels, and other systems.
How to Get Started with Customising Your Caravan
Step 1: Define Your Needs
Before diving into design, think about how you plan to use your caravan. Will you be traveling full-time, or are you looking for a weekend escape? Do you need off-road capabilities, or will you mostly be using caravan parks? Understanding your specific needs will help shape the design.
Step 2: Set a Budget
Customised caravans can range in price depending on the level of customisation, the materials used, and the size of the caravan. Set a budget early and work with a builder who can help you stay within it while maximizing the value you get.
Step 3: Work with a Specialist
Find a caravan builder who specializes in custom designs. They will guide you through the process, from creating a floor plan to selecting materials and fittings.
Step 4: Enjoy the Process
Customising a caravan can be a creative and enjoyable experience. You're building your home on wheels, after all! Take the time to choose details that reflect your taste and make the space uniquely yours.
0 notes
Text
The Ultimate Guide to Modular Kitchen Design L Shape: Trends, Tips, and Inspiration
In today’s world, modular kitchen designs have transformed the way we look at kitchen spaces. Among the most popular choices is the modular kitchen design L shape, which is ideal for maximizing both style and function in compact and spacious kitchens alike. With the growing demand for modular kitchens in urban homes, the L-shaped design stands out for its versatility, efficiency, and aesthetic appeal.
Why Choose an L-Shaped Modular Kitchen Design?
When planning a kitchen layout, space optimization is key. The modular kitchen design L shape offers several advantages that make it a favorite among homeowners:
Space Efficiency: The L-shaped design allows the kitchen to fit snugly into the corner of a room, making the most of both wall space and floor area. Whether you have a small apartment or a large home, this design can be customized to suit your needs.
Better Work Triangle: The L-shaped layout creates an efficient work triangle between the stove, sink, and refrigerator. This setup minimizes the distance between key work areas, making cooking and cleaning more convenient.
Open Floor Plan Friendly: The L-shape allows for open floor plans and integrates seamlessly with adjoining dining or living areas. This makes it a perfect option for modern homes that favor open, airy layouts.
Maximizes Storage: By utilizing corner spaces with smart storage solutions, such as carousel units and pull-out shelves, the L-shaped modular kitchen design ensures that every inch of space is used effectively.
Ergonomics and Comfort: The layout of an L-shaped modular kitchen ensures smooth workflow and easy accessibility to all parts of the kitchen. This design is ergonomically friendly, reducing strain while working in the kitchen.
Customizing Your L-Shaped Modular Kitchen Design
One of the best things about a modular kitchen is that it can be customized to match your personal taste and requirements. With an L-shaped design, the possibilities for customization are endless:
1. Material Choices
Cabinet Finishes: Choose from a variety of materials such as laminates, acrylic, or wood veneers to give your kitchen a luxurious look. High-gloss finishes in neutral tones like white, beige, and grey are currently trending for a sleek and modern feel.
Countertops: Quartz and granite remain popular choices for countertops due to their durability and stylish appeal. These materials complement the L-shape layout and provide a clean, polished look.
Backsplashes: Subway tiles, geometric patterns, and bold colors are dominating backsplash designs for 2024. A stylish backsplash can be a game-changer in your modular kitchen, adding a splash of personality to your L-shaped space.
2. Lighting Solutions
Lighting plays a crucial role in creating the right ambiance in your kitchen. Pendant lights over a central island or task lighting under the cabinets ensure your modular kitchen is not only functional but also aesthetically pleasing. In an L-shaped kitchen, proper lighting can make your space look bigger and brighter.
3. Storage Innovations
An L-shaped kitchen design lends itself perfectly to modern storage solutions:
Pull-out Shelves: Great for corner spaces, pull-out shelves help you access stored items easily.
Deep Drawers: These are perfect for pots, pans, and larger kitchen gadgets. With smooth sliders and organizers, deep drawers make sure that storage is both stylish and practical.
Overhead Cabinets: If you're looking for extra storage without compromising on design, opt for overhead cabinets. They not only add additional storage space but also give a more cohesive look to your modular kitchen design.
4. Appliances and Technology
The integration of modern appliances is a hallmark of modular kitchens. Built-in microwaves, dishwashers, and smart ovens can be seamlessly incorporated into the L-shaped layout, making your kitchen not just beautiful but also high-tech and efficient.
Smart kitchen technology, such as touchless faucets, voice-activated lighting, and smart refrigerators, is revolutionizing how kitchens operate. You can integrate these features into your modular kitchen design to make cooking and entertaining easier.
The Trending Modular Kitchen Design L Shape in India
India has seen a surge in demand for modular kitchens, especially in metropolitan areas where space optimization is critical. The modular kitchen design L shape is particularly popular due to its adaptability to various kitchen sizes, from small apartments to large family homes.
1. Urban Apartments
In cities like Mumbai, Delhi, and Bangalore, where space is a premium, the L-shaped design allows homeowners to enjoy a fully functional kitchen without sacrificing style. The open layout merges the kitchen with the living or dining room, creating a fluid space that is perfect for entertaining guests.
2. Luxury Homes
For larger homes, the L-shaped modular kitchen is often paired with an island or breakfast bar. This setup provides additional workspace, extra seating, and a focal point for the kitchen. The island can also serve as a storage solution or a spot for casual dining, adding to the versatility of the design.
Making the Most of Your Modular Kitchen
To truly elevate your modular kitchen design, consider the following tips:
Stick to a Color Scheme: Neutral tones with bold accents are in vogue. You can add pops of color through your backsplash, cabinetry, or even appliances.
Utilize Smart Storage: Don’t underestimate the importance of clever storage solutions in maximizing the functionality of your kitchen. From pull-out pantries to vertical storage units, there are numerous options to make your modular kitchen both practical and aesthetically appealing.
Go Green: Eco-friendly materials and energy-efficient appliances are becoming increasingly popular. Not only do they reduce your carbon footprint, but they also contribute to a cleaner, more sustainable kitchen environment.
Final Thoughts
The modular kitchen design L shape is a smart, stylish choice for modern homes. Whether you’re dealing with a small space or a large open floor plan, this layout can be adapted to fit your needs. With its efficient work triangle, maximized storage solutions, and customizable features, the L-shaped kitchen design brings both functionality and beauty to any home.
To explore more innovative ideas and designs, visit Mr. Kitchen and start planning your dream kitchen today.
1 note
·
View note
Text
A Comprehensive Look at Samsung Appliances and Electronics

In today’s fast-paced world, the integration of technology into our daily lives has become essential, and appliances and electronics play a pivotal role in streamlining our routines. Samsung’s diverse range of products, from refrigerators and cooking appliances to cellphones and tablets, exemplifies innovation and quality. This article delves into the features and benefits of their offerings, showcasing how they enhance convenience, efficiency, and connectivity.
Refrigerators: A Blend of Style and Functionality

Samsung refrigerators stand out for their sophisticated design and advanced technology. Offering a variety of models, including side-by-side, French door, and top-freezer configurations, they cater to different kitchen layouts and user preferences. Key features include energy-efficient cooling systems that reduce electricity consumption while maintaining optimal freshness for food items. Smart technology integration in refrigerators allows users to control temperature settings remotely, monitor energy usage, and even get notifications when the door is left open. Standout models boasts a built-in water dispenser and ice maker, ensuring a steady supply of chilled water and ice cubes. Additionally, adjustable shelving and door bins offer customizable storage solutions, making it easy to organize groceries. The sleek exterior finishes, available in stainless steel and matte black, add a modern touch to any kitchen.
Cooking Appliances: Elevating Culinary Experiences

In the realm of cooking appliances, Samsung excels in delivering performance and versatility. Their offerings include ovens, cooktops, and ranges that cater to both amateur cooks and professional chefs. Convection cooking technology ensures even heat distribution for perfectly baked goods and evenly cooked meals. Many models include smart cooking modes that simplify meal preparation by providing precise temperature and timing recommendations. Cooktops offer a variety of options, including induction, gas, and electric. Induction cooktops are particularly noteworthy for their energy efficiency and rapid heating capabilities, while gas cooktops provide precise temperature control for various cooking techniques. Electric cooktops, with their smooth glass surfaces, are easy to clean and maintain. Ranges combine the functionality of ovens and cooktops into a single unit. Some models include dual-fuel options, offering the flexibility of gas burners with an electric oven.
Microwaves: Quick and Convenient Solutions

Microwaves have become indispensable in modern kitchens, and Samsung microwaves are no exception. With various sizes and configurations, including countertop and over-the-range models, these microwaves are designed to fit different kitchen spaces and needs. Key features include inverter technology, which provides consistent and even heating, and sensor cooking, which automatically adjusts cooking time and power levels for optimal results. Over-the-range microwaves double up as ventilation systems, eliminating the need for a separate range hood. This feature is particularly useful in compact kitchens, where space is at a premium. Additionally, the easy-to-use control panels and preset cooking functions make meal preparation effortless.
Washers and Dryers: Efficient and Effective Laundry Solutions

Samsung washers and dryers offer top-notch performance and efficiency, transforming laundry day into a hassle-free experience. Front-load and top-load washing machines are available, each with unique benefits. Front-load washers are known for their water and energy efficiency, as well as their ability to handle larger loads. Many models feature steam cleaning technology, which helps to remove stubborn stains and allergens. Front-load and top-load dryers complement the washers with advanced drying technology, such as moisture sensors that prevent over-drying and reduce energy consumption. Some models include steam cycles to reduce wrinkles and refresh garments. Samsung smart washers and dryers allow users to monitor and control their laundry remotely, providing convenience and flexibility.
TVs and Home Theaters: Life-like Details in Every Scene

Samsung smart TVs are loaded with innovative features to offer a delightful visual treat. Choose from LED OLED, and QLED TVs that highlight every detail brilliantly for realistic and crisp picture quality. Upgrade to 4K and 8K resolution to get a larger-than-life feel when watching action-packed scenes from the Super Bowl, your favorite movies, or sports re-runs. Samsung Home theater audio systems produce immersive bass and amplify every note, so be ready for goose bumps and vibrating walls when the speakers are on. Find several options in soundbars, speakers, and car audio systems.
Cellphones and Tablets: Cutting-Edge Connectivity

In the realm of electronics, Samsung Galaxy cellphones are a testament to technological advancement and user-centric design. Featuring high-resolution displays, powerful processors, and long-lasting batteries, these devices cater to the demands of modern life. The latest models come with advanced camera systems that deliver stunning photos and videos, while robust security features ensure data protection. Integration with other smart devices and seamless connectivity options, such as 5G and Wi-Fi 6, enhance user experience, making it easier to stay connected and productive on the go. Additionally, the user-friendly interfaces and customizable options allow for a personalized experience.
Tablets from Samsung provide portable computing for both work and entertainment. With high-resolution screens and powerful processors, Samsung Galaxy Tabs are ideal for tasks ranging from productivity applications to media consumption. Many models support stylus input, making them suitable for creative tasks like drawing and note-taking. Integration with productivity apps and accessories, such as keyboards and stands, further enhances their functionality, making them a valuable tool for both professionals and casual users.
Monitors: Crisp and Clear Visuals

Samsung monitors are designed to deliver exceptional visual clarity and color accuracy, catering to both professional and recreational needs. Whether for office work, graphic design, or gaming, these monitors offer a range of sizes and resolutions, including 4K and ultrawide options. Features like adjustable stands, multiple connectivity ports, and blue light filters contribute to user comfort and productivity. High refresh rates and low response times in gaming monitors ensure a smooth and immersive experience, while the professional-grade monitors provide accurate color reproduction for creatives.
Take Advantage of the Latest Technology with Samsung
Samsung’s extensive range of smart appliances and electronics exemplifies a commitment to quality, innovation, and user satisfaction. From the sophisticated design of their refrigerators to the cutting-edge technology of their cellphones, each product is crafted to enhance convenience, efficiency, and connectivity in daily life. By integrating advanced features and user-friendly controls, Samsung ensures that their offerings meet the diverse needs of modern consumers.
#samsung#refrigerator#cooking appliances#ranges#cooktop#microwave#wall ovens#washers#dryers#television#smartphone#monitor#speakers
0 notes
Last Seen Blogs

chocolateheart
it's your love that brings me HOME

gonoisilyironcollection
Untitled

odazai51
everything blue

ginnyn
I fall asleep drinking coffee

mindheartandsouldiaries
ᴋᴇʟʟᴀʙᴇʟʟᴀ