#coco peat soil
Explore tagged Tumblr posts
Visit Tumblr Blog
Explore Tumblr blogs with no restrictions, modern design and the best experience.
Last Seen Tumblr Blogs


Fun Fact
The average Tumblr user visits about 67 pages every month.
Text
Why Nathan Coir's Cocopeat is the Ultimate Choice for Thriving Plants and Gardens
Growing a good garden, whether it be for vegetables, herbs, or ornamental plants, requires the right soil. Nathan Coir's Cocopeat is an inventive and eco-friendly method to ensure that your plants receive the best care available. Its outstanding benefits have made it the preferred choice for local gardeners and horticulturists. The best choice for gardens and healthy plants is Nathan Coir's Cocopeat, which is explained in this article along with how it may help you grow plants to amazing heights.
What is Cocopeat and Why is It Essential for Plants?
Coir pith, another name for cocopeat, is a naturally occurring residue of coconut husks. It is a sustainable, lightweight, and extremely absorbent organic material. Cocopeat provides a loose, well-draining texture that is ideal for plant roots to flourish in contrast to conventional soil, which can become compacted and heavy. It prevents waterlogging, maintains root health, and gives the roots enough air while retaining moisture.
Nathan Coir’s Cocopeat is processed to ensure it is of the highest quality, making it a standout product in the market. It is available in various forms, such as blocks, powder, and compressed discs, making it easy to use in different gardening projects.
Benefits of Nathan Coir Cocopeat for Your Garden
Improved Aeration and Drainage: Plant root systems depend on enough airflow and drainage, which cocopeat offers. By avoiding root rot and water stagnation, it ensures that your plants receive the oxygen they require to flourish healthily.
Improved Moisture Retention: Because cocopeat retains moisture efficiently, you won't have to water your plants as often. For plants that need a steady supply of moisture but are vulnerable to overwatering, this is especially advantageous.
Sustainable and Eco-Friendly: Unlike conventional soil additives like peat moss, cocopeat is a natural, renewable resource.
Choosing Nathan Coir’s Cocopeat helps reduce your environmental footprint, making it a sustainable choice for your garden.
Perfect for Various Plant Types: Whether you are growing houseplants, vegetables, or flowers, cocopeat is versatile and can be used in a variety of gardening applications. It supports the growth of both indoor and outdoor plants, ensuring your garden flourishes year-round.
Free of Dangerous Chemicals: Nathan Coir's Cocopeat is a safe and non-toxic choice for both your plants and the environment because it is devoid of dangerous chemicals and pesticides.
pH Neutral: Most plants thrive in cocopeat because of its neutral pH level. It maintains the soil's equilibrium and encourages the best possible nutrient absorption for plant development.
How to Use Nathan Coir Cocopeat for Best Results
It's simple and quick to use Nathan Coir's Cocopeat in your yard. You can select from a variety of cocopeat goods based on your needs, including:
Cocopeat Powder: Perfect as a base for potting mixes, for beginning seeds, or for combining with other soil.
Cocopeat Blocks: Ideal for bigger garden beds or container plants, these compacted blocks swell when soaked in water.
Cocopeat Discs: These tiny, portable discs work well in smaller pots or for growing seedlings.
Simply combine cocopeat with your current soil to improve its texture and moisture-holding capacity. It can also be used as a stand-alone growing medium for container gardening or hydroponic systems.
Why Choose Nathan Coir’s Cocopeat Online?
The highest quality cocopeat is available online from Nathan Coir, guaranteeing that you will receive top-notch, freshly-made goods at your door. Nathan Coir offers a variety of products to meet all of your gardening needs, whether you're looking for cocopeat for plants, cocopeat powder, or a cocopeat soil mix.
. You can easily buy cocopeat online and have it shipped directly to you, saving both time and effort.
Cocopeat online shopping gives you access to a variety of pack sizes, whether you need a small amount for a few pots or large quantities for a garden or farm. Additionally, coco peat soil price is competitive, offering value for money given the long-lasting benefits it provides for your garden.
Conclusion
When it comes to healthy, thriving plants, Nathan Coir's Cocopeat is the best choice for gardeners looking for an eco-friendly, efficient, and reliable growing medium. From enhancing root growth to providing the ideal balance of moisture and aeration, Nathan Coir’s products offer everything your plants need to thrive. Whether you're a novice gardener or an experienced horticulturist, you’ll appreciate the benefits of cocopeat in maintaining a lush, healthy garden.
To experience the benefits firsthand, visit Nathan Coir’s website and order your coco peat online today. You'll see why this eco-friendly, sustainable product is a must-have for anyone serious about plant health.
#coco peat online#cocopeat online#coco peat soil price#cocopeat for plants#cocopeat powder#coco peat soil
0 notes
Text

Buy eco-friendly coco peat & pith soil online for thriving plants. Explore 100% eco-friendly dry coco peat on Amazon & our Official Website. Enhance growth with premium coco fiber soil.
#coco peat soil#coco peat online#coco peat amazon#buy dry coco peat#coco peat soil price#coco peat soil cost
0 notes
Text
whoever said coco coir is a great growing medium lied
#everything i grow in it dies and molds and it dries up too quickly#i want to like it. i really do. i want coco coir to work vs the fucking peat soil. but. it just doesnt
5 notes
·
View notes
Text


5/4/24 ~ Some new stuff I’m using this year. I’ve never used Coco Coir before today & I loooove it! So much product in a compact lil brick! And it’s repurposed natural material, so win win. I still used a little bit of my seed starting mix to mix in with it just because that’s all I know 😅😆
But I’m learning about the different medias/compost for planting!
I also got a bag of worm castings. Mixed some of it in there as well. We shall see how it does!
What do you use to mix in your media?
#soil health#soil#soil testing#horticulture#worm castings#coco coir#peat moss#compost#compost garden#organic matter#kiss the ground#microbes#indoor garden#sustainable gardening#container gardening#vegetable gardening#starting seeds#growing food#plant life#plant mom#veganuary#homesteading#gardening tips#organic garden
6 notes
·
View notes
Text
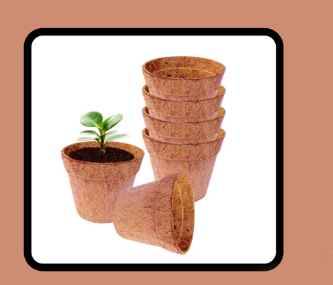
Coco Coir Pots
Title: Harnessing the Green Magic of Coco Coir Pots for Sustainable Gardening
Introduction: Coco coir pots, the eco-friendly alternative to traditional plant containers, are taking the gardening world by storm. These biodegradable pots, derived from coconut husk fiber, offer numerous benefits for both garden enthusiasts and the environment. In this blog post, we'll delve into the world of coco coir pots exploring their many advantages and how they contribute to sustainable gardening practices.
Understanding Coco Coir Pots: Coco coir pots, also known as coir pots or coir planters, are made from coconut coir, a natural fiber extracted from coconut husks. Unlike plastic or clay pots, coco coir pots are biodegradable and have a unique ability to enhance plant growth.
Advantages of Coco Coir Pots: Let's explore some of the key benefits of using coco coir pots in your gardening endeavors:
Biodegradability: One of the most significant advantages of coco coir pots is their biodegradability. These pots break down naturally over time, eliminating the need for disposal and reducing environmental waste.
Reduced Transplant Shock: When it's time to transplant your seedlings or young plants, you can plant the entire coco coir pot directly into the soil. This reduces transplant stress and minimizes root disturbance, ensuring a smoother transition for your plants.
Improved Aeration: The porous nature of coir promotes aeration and air pruning of roots. This leads to healthier root development, as roots are encouraged to grow within the pot and not become root-bound.
Enhanced Moisture Retention: Coco coir is excellent at retaining moisture, which means you won't need to water your plants as frequently. It provides a consistent and steady supply of moisture to the roots.
pH Neutral: Coco coir has a neutral pH level, making it suitable for a wide range of plants. You can easily adjust the pH to match specific plant needs.
Eco-Friendly Alternative: Choosing coco coir pots supports eco-friendly gardening. By opting for biodegradable containers, you reduce plastic waste and minimize the environmental impact of traditional plastic pots.
Versatility: Coco coir pots come in various sizes, making them suitable for different types of plants, from small seedlings to larger ornamental trees. They can be used in both indoor and outdoor gardening.
youtube
Additional Uses of Coco Coir Pots: Coco coir pots aren't limited to just planting. Here are some other applications:
Mulching: Coir pots can be used as mulch. When placed on the soil's surface, they help retain moisture, regulate soil temperature, and reduce weed growth.
Composting: When your coco coir pots are no longer needed, you can add them to your compost pile. They'll break down and enrich the compost with organic matter.
Craft Projects: The natural texture and appearance of coco coir make it a great material for various craft and art projects. Get creative and use coir in your DIY endeavors.
Conclusion: Coco coir pots are a game-changer for sustainable gardening. Their biodegradability, reduced transplant shock, and ability to improve plant growth make them a valuable asset for gardeners. By choosing these eco-friendly alternatives to traditional plant containers, you not only promote healthier plant growth but also contribute to a greener and more sustainable future. Whether you're an avid gardener or just starting out, consider making the switch to coco coir pots and witness the green magic they bring to your garden.
#Coir Dust#Coir Pith#Coco Peat#Long Type Grow Bag#Grow Slab#Coconut Coir Pith#Coir Pith Near Me#Pith Coconut#Coco Pith Near Me#Coir Fibre Pith#Coconut Husk Pith#Coco Coir Pots#Coco Soil#Coconut Fiber For Plants#Coco Pot#Coir Pots For Plants#Peat Grow Bags#Youtube
2 notes
·
View notes
Text

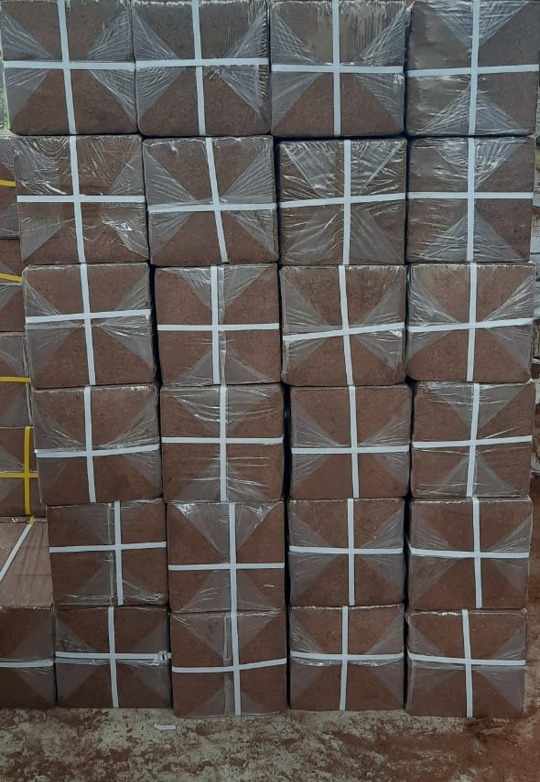
Large quantities supply for landscaping projects and golf course, Road landscaping, nurseies professional usage
Low EC
0-20 seeve
Cocopat chips
#coco peat#coconut#agriculture#peat moss#npk#Root barrier nurseries#landscape#fertilizer#nanpoo#garden soil#Salt barrier#garden#garden design#export
1 note
·
View note
Text

To Buy Coco Coir products in bulk or To get more information visit us:
www.factorysdepot.com
#Coco Coir Products for Gardening#Coco coir#Coconut Coir#FactorysDepot#Organic soil#Organic gardening#coco peat#coco coir brick#easy grow bag
0 notes
Text

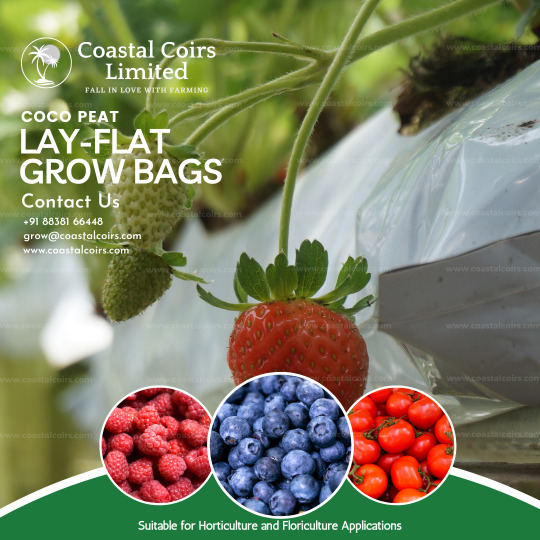
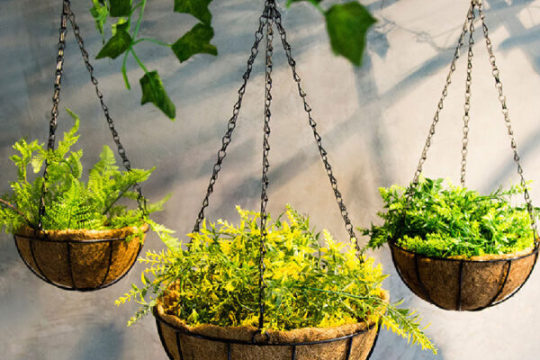
Discover the magic of gardening with Coco Peat Lay Flat Grow Bags!
~
Unleash your green thumb and nurture your plants to thrive with our revolutionary Coco Peat Lay Flat Grow Bags.
~
-> Eco-Friendly: Made from renewable and sustainable coconut coir, our grow bags are not only good for your plants but also for the planet! Reduce your carbon footprint while enjoying bountiful harvests.
-> Superior Drainage: Our grow bags feature excellent drainage properties, allowing excess water to flow freely while retaining the perfect moisture levels for your plants. Say goodbye to overwatering and root rot!
-> Versatile and Space-Saving: Whether you have a sprawling garden or a cozy balcony, our lay-flat grow bags are designed to fit any space. Utilize every inch efficiently and watch your plants thrive in a compact yet productive environment.
-> Root Aeration: Coco peat promotes superior root aeration, preventing root binding and stimulating healthier root growth. Give your plants the room they need to flourish and witness stronger, more robust plants that bear abundant fruits and flowers.
-> Easy to Use: Our grow bags are incredibly user-friendly, making gardening a breeze for beginners and seasoned enthusiasts alike. Just fill them with your preferred potting mix, plant your seeds or seedlings, and watch your garden come to life!
~
Experience the difference of Coco Peat Lay Flat Grow Bags – the perfect companion for all your gardening adventures!
~
Contact us to know more about coco coir pith,
WhatsApp : +91 8838166448 (or) https://wa.me/918838166448
Website : www.coastalcoirs.com
Mail : [email protected]
.
.
.
.
.
.
.
.
.
.
.
.
.
.
.
.
.
.
.
.
.
.
.
.
.
.
.
.
.
.
.
.
.
.
.
.
.
.
.
.
.
.
.
.
.
.
.
.
.
.
.
.
.
.
.
.
.
.
.
.
.
.
.
.
.
.
.
.
.
.
.
.
.
.
.
.
.
.
.
.
.
.
.
.
.
.
.
.
.
.
.
.
.
.
.
.
.
.
.
.
.
.
.
.
.
.
.
.
.
.
.
.
.
.
.
.
.
.
.
.
#coastalcoirs
#coastalcoirslimited
#cococoir
#coirpith
#cocopeat
#cococoirpith
#cocosoil
#soilhealth
#soillessmedium
#layflat
#layflatgrowbag
#layflatgrowbags
#opentopgrowbag
#opentopgrowbags
#growingmedium
#coirsubstrate
#substrate
#substratos
#cocopeatblocks
#coirpithblocks
#peatblocks
#hydroponicsubstrate
#hydroponicsupplies
#hydroponics
#gardensoil
#peatmoss
#spagnummoss
#peatblocks
#peatsubstrates
#coco coir#coco peat#coir pith#horticulture#hydroponics#growing medium#gardening#greenhouse#coco coir pith#coastal coirs limited#layflat#grow bags#growing soil#hydroponics bags
0 notes
Text
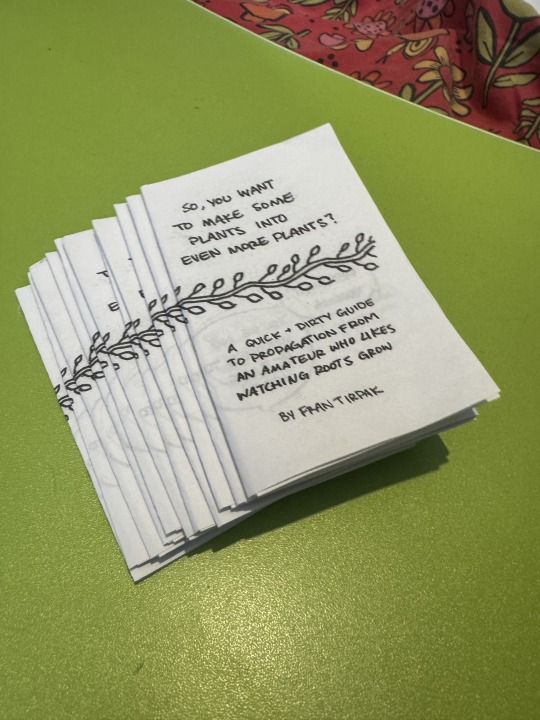


24-hour minizine (8 pages) about DIY propagation from leaf and stem cuttings (free to copy and distribute!! pls just take my name out if you change any content)
EDIT: thank you for all the love! check out @contentsunderpressurezine (instagram) for more of our stuff!
pdf download for print and read friendly versions on this ko-fi I just set up! pay what you wish, free to print and distribute
plaintext under the cut:
So You Want to Make Some Plants Into Even More Plants?
A Quick + Dirty Guide to Propagation from An Amateur Who Likes Watching Roots Grow. (by Fran Tirpak)
propagation - n.
"multiplication or increase, as by natural reproduction."
1. Prepare!
Important: Sterilize your shears w/ rubbing alcohol.
Wear gloves -- some plants can irritate your skin when cut.
Gather supplies: shears, gloves, soil medium, pot, glass jar.
Optional: plant food, rooting hormone, cinnamon, tealight.
^ we'll talk about these all more later on.
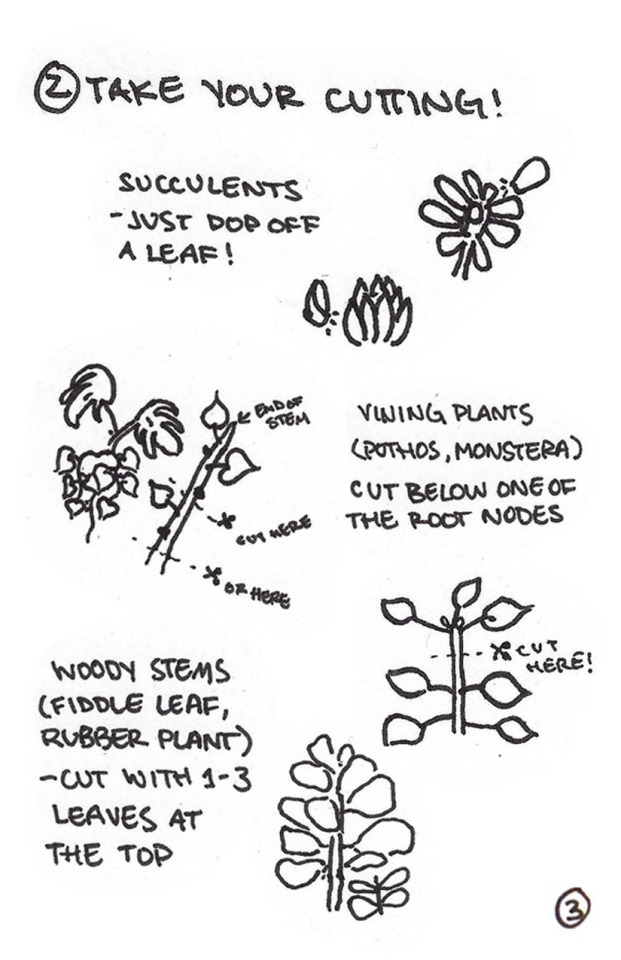
2. Take your cutting!
Succulents -- just pop off a leaf!
Vining plants (Pothos, Monstera), cut below one of the root nodes.
Woody stems (fiddle leaf, rubber plant) -- cut with 1-3 leaves at the top
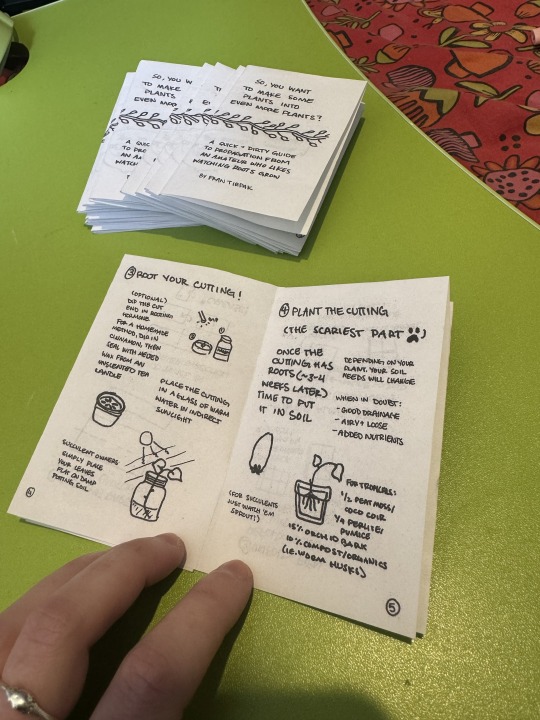
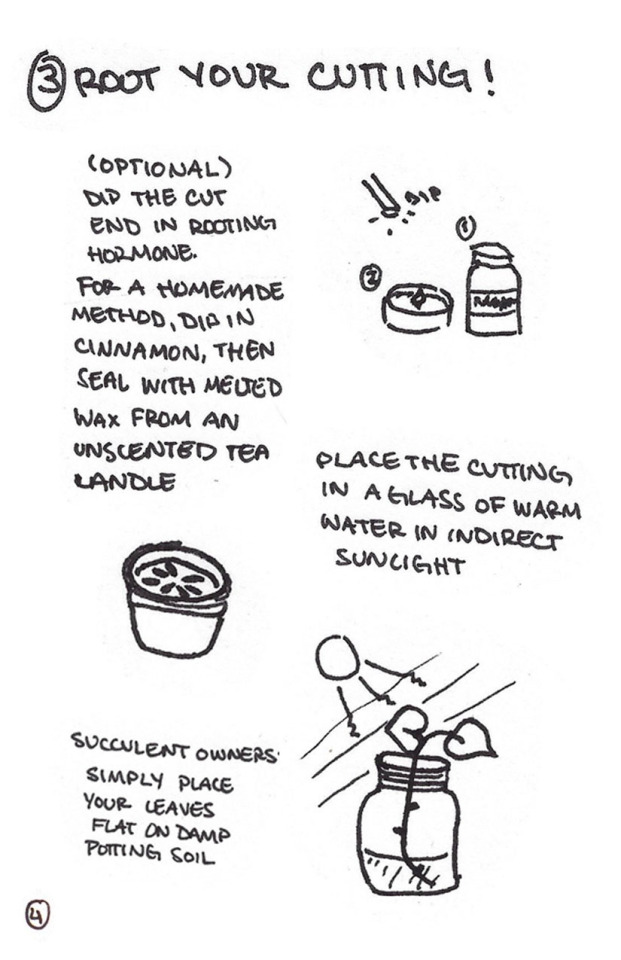
3. Root your cutting!
(Optional) Dip the cut end in rooting hormone. For a homemade method, dip in cinnamon, then seal with melted wax from an unscented tea candle.
Place the cutting in a glass of warm water in indirect sunlight.
Succulent owners: simply place your leaves flat on damp potting soil.
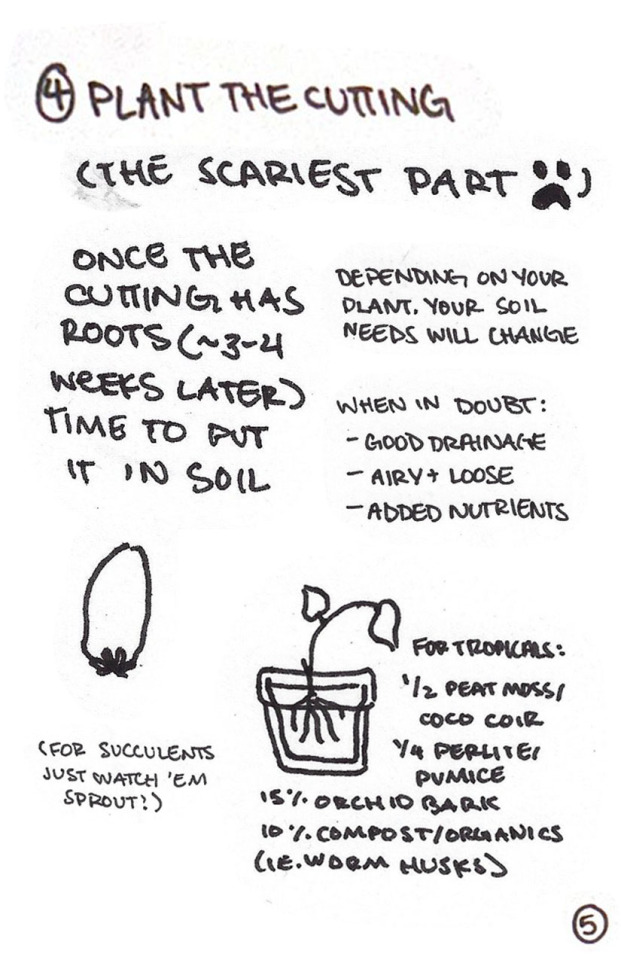
4. Plant the cutting
(the scariest part)
Once the cutting has roots (~3-4 weeks later) time to put it in soil.
Depending on your plant, your soil needs will change.
When in doubt: good drainage, airy & loose, added nutrients.
For tropicals: 1/2 peat moss or coco coir, 1/4 perlite or pumice, 15% orchid bark, 10% compost/organics (i.e. worm husks).
(For succulents, just watch 'em sprout!)
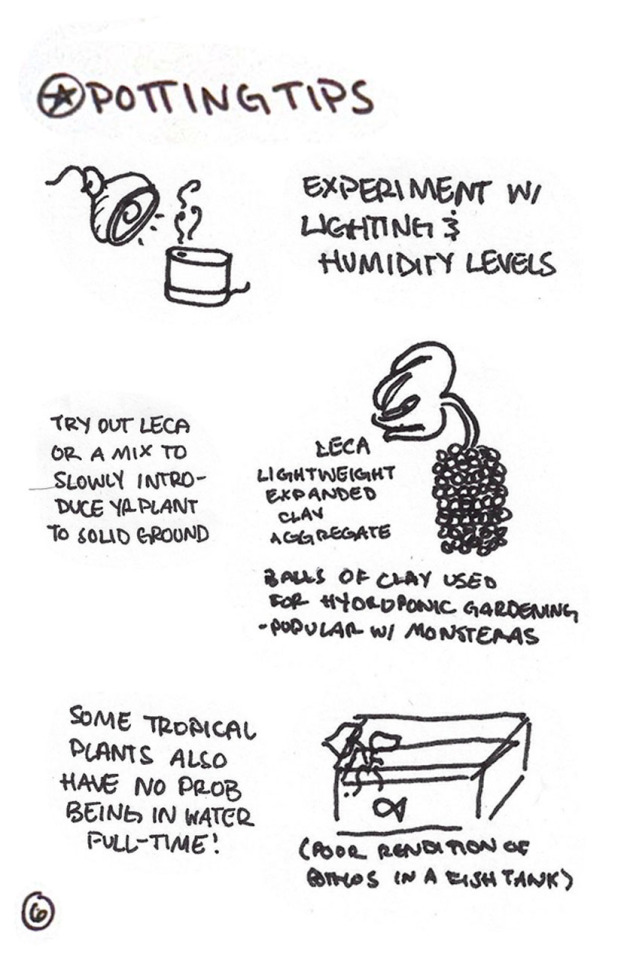
* Potting Tips
Experiment with lighting and humidity levels.
Try out LECA or a mix to slowly introduce your plant to solid ground.
LECA: Lightweight Expanded Clay Aggregate. Balls of clay used in hydroponic gardening - popular with Monsteras
Some tropical plants also have no prob being in water full-time!
5. Now you have a friend!
Pro tips: You can take props from anywhere (as long as you're responsible -- and sneaky).
There's no one way to care for a plant. Do your research, go with your gut, & have fun!
134 notes
·
View notes
Text
Shop Fine Cocopeat Powder for Better Gardening

Buy eco-friendly coco peat & pith soil online for thriving plants. Explore 100% eco-friendly dry coco peat on Amazon & our Official Website. Enhance growth with premium coco fiber soil.
#coco peat online#cocopeat online#coco peat soil price#cocopeat for plants#cocopeat powder#coco peat soil
0 notes
Text
Buy 100% Dry Coco Peat & Coco Pith Soil Online at Nathan Coir
Coco peat, made from coconut husks, adds a fresh dimension to gardening. All skill levels, from novices to experienced green thumbs, can benefit from its adaptability. This natural marvel promotes plant growth with its outstanding water retention and aeration qualities. Learn how coco peat transforms gardening methods in this investigation, from improving soil structure to fostering ideal circumstances for numerous plants. Accept coco peat's potential to be a sustainable, environmentally beneficial alternative that takes your gardening endeavors to new heights.
#coco peat soil#coco peat online#coco peat amazon#buy dry coco peat#coco peat soil price#coco peat soil cost#buy coco peat soil#coco pith price per kg
0 notes
Text
How to Use Coconut Coir Pith in your Garden?
Using coconut coir pith, also known as coco peat or coir dust, in your garden offers several benefits, including water retention, aeration, and soil conditioning. Here's a step-by-step guide on how to use coconut coir pith effectively in your garden:
Procure Coconut Coir Pith:
Purchase coconut coir pith from gardening stores, nurseries, or online suppliers. It is commonly available in compressed bricks or blocks.
Rehydrate the Coir Pith:
Place the compressed coir pith bricks in a large container or tub.
Add water to the container, allowing the coir pith to absorb moisture and expand.
Allow the coir pith to soak in water for several hours or overnight until fully rehydrated.
Mix with Soil or Potting Mix:
Once fully rehydrated, fluff up the coir pith with your hands to loosen it.
Mix the rehydrated coir pith with your garden soil or potting mix in a ratio of 1:1 or as desired. Alternatively, you can use coir pith as a soilless growing medium.
Use as Soil Amendment:
Incorporate the rehydrated coir pith into your garden soil as a soil amendment to improve its structure, moisture retention, and aeration.
Dig the coir pith into the soil to a depth of a few inches, ensuring even distribution throughout the garden bed.
Mulching:
Spread a layer of rehydrated coir pith on the soil surface around plants as mulch.
Mulching with coir pith helps conserve soil moisture, suppresses weed growth, and regulates soil temperature.
Seed Starting and Container Gardening:
Use rehydrated coir pith as a growing medium for starting seeds indoors or in seed trays.
Fill seed trays or pots with a mixture of coir pith and perlite or vermiculite for optimal seed germination and seedling growth.
Hydroponic and Aquaponic Systems:
Rehydrated coir pith can also be used as a growing medium in hydroponic and aquaponic systems.
Place the coir pith in growing containers or hydroponic trays and use it to grow plants without soil.
youtube
Watering and Maintenance:
Water your garden regularly to ensure adequate moisture levels, especially when using coir pith as a soil amendment or mulch.
Monitor the moisture levels in the soil and adjust watering as needed to prevent waterlogging or dryness.
Sustainable Disposal:
Coconut coir pith is a sustainable and biodegradable material. After use, it can be composted along with other organic waste to enrich the soil.
By following these steps, you can effectively use coconut coir pith in your garden to improve soil structure, retain moisture, and promote healthy plant growth.
#Coir Dust#coco coir pots#coco soil#coco peat#coir pots for plants#coco pith near me#coco pith#coco pot#coconut fiber for plants#coconut husk pith#coir fibre pith#Peat Grow Bags#Coir Pots For Plants#Coco Pot#Youtube
1 note
·
View note
Text


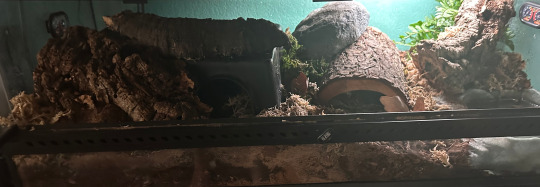
While I'm working on my Honduran Milks bioactive, I did wanna take the time to talk about Links Bioactive. Link is my overweight[He's working on it! <3] Male Emergency re-home Ball Python. I typically avoid this species, but he's been a fantastic little Unicorn for me. So lets talk about Link's enclosure and how it works! Link is in a 4ft x 2ft x 2ft PVC Enclosure- this is the *minimum* size this species requires to thrive. His substrate is made up of a layer of perlite sitting at the bottom of his enclosure, this layer of perlite acts as a drainage layer. This drainage layer, which catches excess water that seeps through the substrate. It also helps with catching potentially bad bacteria, and helps with your plants roots! The rest of the substrate sitting ontop of that layer of perlite is a mix of Ecogro organic topsoil, Coco fiber, and Sphagnum moss. I cannot stress this enough, but if you choose to do a bio-active enclosure PLEASE be sure to choose a organic substrate!! Fertilized substrate can be toxic to your animal, this includes manure-based fertilizers. To promote healthy growth, I choose to use Coco fiber and Sphagnum Moss. The Coco fibe[Coco peat] Is a safer way to promote healthy soil for both your plant, and your animals, while the Sphagnum Moss is fantastic at holding water and Nutrients for your plants. The arguably biggest and most important part of this enclosure is the cleanup crew. Your cleanup crew will break down decaying plant matter and your animals feces and return it to the soil, as well as cleaning bacteria growth. Bio-actives cannot function in the long-run without a cleanup crew. The cleanup crew I chose consist of Dairy Cow isopods[Porcellio laevis], and Temperate Springtails[Collembola sp.]. You can Mix-and match your Isopods and Springtails as long as its a species that can tolerate the humidity and temps your animal requires, HOWEVER! Its important to note your Isopod species. I chose not to mix Isopods in this enclosure as Dairy cows are kinda known for being aggressive. For plants, ball Pythons are incredibly Bulldozery animals and will trample much of your flora. Needing hardy plants that could survive being trampled and occasionally uprooted was a must for him, and after thought and research, I ended up settling on these: Golden Pothos, Snake plants, and Jade Pothos. Some just overall incredibly hardy plants that, since having them, I've found fantastic success with surviving Links night-time pathing and assaults. I also have a Philodendron [Monstera adansonii,] in there, providing cover and clutter around and over his hot hide. I'm proud of this plant surviving so far, to say I added it with a specific reason would be a goddamn lie lmao I just loved how cool it looked. The fact it's survived and adapted for as long as it has is a miracle in of itself, and I wish great health amongst this trooper of a plant. I deep water once a week to keep my plants healthy and the soil moist enough for my isopods to thrive, with occasional spraying staggered through the week. Overall, this is how Links Bioactive tank is settup! Is this the only way to set up a Bioactive tank? Certainly not! There's plenty of ways you can setup a Bioactive. Does your animal absolutely NEED a bioactive enclosure? For a lot of animals that answers going to be no! It doesn't. Bio-active vs Non-bio-actives have their pros and cons that, maybe Ill ramble about in a later post. And probably talk on what a Bioactive even is and go into much more detail than I did here about how it works. But I chose Bioactive personally because the long-term upkeep is less costly and labor-inducing, and I just love the looks of them. AndICanHaveAsManyGoddamnIsopodsAsIWant<3
#bioactive#vivarium#info dump#biology#ball python#reptile#isopods#plants#I got lazy towards the end and just started saying Bioactive#herpetology#snake#botony#horticulture
65 notes
·
View notes
Text
i have compiled some native plant gardening tips for those of whom are new to it based on my own experiences and trials and errors, so here goes:
if you're germinating seeds, dont use coco coir. it sucks. ignore anyone who tells you to use it. it doesnt hold moisture well at all and doesnt decompose well. look for a "seed starter" soil instead, it will have a bunch of beneficial nutrients n such to get the seeds and their roots going. if you're concerned about peat, there are plenty out there that don't have any, coast of maine comes to mind. I used to think I needed to grow them in a sterile env, mostly to prevent mold, but I find that nearly impossible to avoid, so on to my next tip:
you're better off trying to start your native seeds outside. even if you wanna use cell trays, thats fine (bring them in when it freezes though), but preventing mold when germinating inside, especially in your fridge with all your food you sometimes forget is there and gets moldy, i've found to be nearly impossible. granted, mold isnt always a bad thing, it can help eat the seed coating so the roots can grow, but this obviously isnt true for all seeds and especially not small seeds. outside is your best bet, I just find less mold grows out there. might be good to make a mini green house of sorts to keep your seed trays in, obviously thats unnecessary if you're growing them in the ground.
if you're like me and have no real ground space and only have a patio or balcony and have to grow everything in pots, I have a couple tips for you actually, but for now lets focus on winter protecting your plants. most suggest burying them under ground... im assuming like me that isn't really an option for you, so we're gonna come up with another solution. you're probably going to need to invest a good amount of money into this, depending on if you have the material around or not. but to start off:
huddle all your pots together. they can help insulate eachother better and keep eachother warm. i try to put the least cold hardy ones in the center, if you can, put them all together in a larger container like a bucket or something and cover it with lots of mulch. water sparingly and lightly, enough to wet the soil but not enough to drip through the bottom of the pot. you should be sparingly watering anyways in winter, but especially so here since they'll probably be in a container that doesnt drain unless you want to drill in holes on the bottom. try to make sure the pots dont touch the sides of the containers if they're plastic and fill in the gaps with mulch or something, plastic isnt the best material to use for pots regardless, unfortunately its the cheapest and most readily available and comes in varying sizes so I cant get mad at you for using it.
heavily mulch your plants. maybe put some straw on top of the mulch too if you have any. I used to think leaves were enough but there's too much airy space between them, you want to make the insulation as compact as possible. if you're wanting to make a place for bumblebees to hibernate i'd suggest making an entirely different leaf pile or something unrelated to your plants. (obv doesnt apply to ppl growing stuff in the ground bc you have the privilege of being able to sprinkle leaves wherever you want. bastard.)
invest in some burlap fabric and some cheap towels or blankets for even more insulation, the fuzzier the blanket the better imo, but it should be fine whatever you choose, just try not to get too thin of a fabric. the burlap and blanket/towel might not be necessary to use every day but definitely on days where its below freezing. these also will last you every year, assuming you take care of them right. cover the tops of pots but also wrap around the sides of them and maybe put a layer or two of burlap down on the ground under them, esp if they're on cold hard concrete.
if you have any plants with tuberous roots, they are more vulnerable to freezing if they're in a pot and will need extra protection or to be brought inside during a freeze, to not shock it with a temperature shift try putting the pot in the fridge if you can, otherwise again it might be good to try to make a mini green house of sorts, maybe turn one of those plastic window well covers into one? or put it in a garage if you have something like that. they also, maybe obviously but just in case, dont need to be watered as often since they have lots of water stored in themselves.
putting your pots really close to the walls of your house can also help keep them warm. not sure if its enough to prevent them from freezing but combined with everything else? well, it's survived many of my plants over the last couple years (though i didnt know about the tuber thing until recently and it explains so much why certain plants didnt make it >_>)
ok moving on from winter. lets go back to talking about pots, bc seriously if you can get your hands on ANYTHING besides a plastic pot, jump on it. they suck universally. they suck in winter and in summer. their only benefit is providing some humidity but that's not really something I personally need as someone in a temperate climate. also, the lighter the pot the better. dark plastic pots can cook the roots of your plants in the sun in summer so you have to be extra careful. also, the deeper the pot the better for native plants.
because you're growing native plants in pots, they're going to need a lot more extra care. native plants in the ground can pretty much be neglected since nature takes care of it all, but you have to provide the water, soil, fertilizer, etc. so lets talk about that:
you dont need to water every day necessarily, the old trick of watering when the top 1-2 inches is dry is your best method to go by. if you live in the midwest or northeast or anywhere it gets heavy rain, it would be good to give them a deep watering every now and then, I try to follow what the rain does and water at the same frequency as it. it would be good to water daily (maybe only a small amount if the soil is still somehow wet) on really hot days even though you dont have to water every day, like on days above 90 degrees. also the best time to water, especially in summer, is early in the morning, ideally some time before 8, 9 is ok but 8 is better imo bc it gives the roots more time to absorb the water before the sun evaporates it, and around 10 is when that starts happening. if you have to water at night, water early at night and try to avoid watering the leaves if you can as water left over on them overnight can cause mold, mildew or other diseases. if you have to water mid day, at least wait until the sun isnt directly on the plants so they can actually absorb some of the water.
since you have to provide your own water and cant rely on rain, you also have to provide your own fertilizer. I mean you already did before, but I mean liquid fertilizer. rain transfers all kinds of vitamins and minerals to the plants that receive it, but you're likely not getting nearly as much in your tap, and since your pots likely aren't being shat in by various woodland creatures, they're getting even less fertilizer. so you have to provide the fertilizers, both slow and liquid. I thought I could just get by with slow release but the plants seem to do better with liquid too, especially when in bloom. if you use slow release you dont need to use the liquid fertilizer as often, and you also likely dont have to use the liquid as frequently as it says on the bottle, since native plants generally require less nutrients to begin with, but of course this is something you'll probably have to test on your own to see how much your plants want and tolerate. I have a whole feeding schedule I can share if you want. some brands I've been using for liquid fertilizer are foxfarm (they have good soil too), microlife, and maxsea (technically a powder but you mix it with water) and for slow release is foxfarm again, jobe's organics, and lilly miller's. I'm trying to use as organic of materials as I can since I'm growing the plants for native wildlife and pollinators and I dont want to negatively effect them as much as possible. if anyone wants to know what products I use specifically hmu or leave a reply.
I trust you're able to figure out your soil situation on your own, but here's some tips just in case: try to avoid brands like miracle grow since I'm pretty sure it has inorganic materials in it, generally I'd aim for the most organic thing you can find, assuming you're growing native plants for the same reason I am, for nature. also, take those messages about well-draining soil seriously, you can use perlite but also some soils are just lighter than others, I find foxfarms is pretty light and drains well.
during winter, leave the plants as they are, dont cut them down. lots of bugs and animals have made nests or homes or have cocoons n such in there. you can cut it down in the spring when frost is nor longer a concern, but dont throw it in the trash either bc the bugs might still be sleeping in them but will be less vulnerable now that winter is gone.
ok that's all I can think of for now, I'll add on to this if I think of anything else, but hopefully this is helpful for someone out there :]
#gardening#native plant gardening#gardening tips#germinating#stratification#pollinator garden#patio garden#balcony garden
10 notes
·
View notes
Photo

Can You Make Soil Blocks Using Only Compost? Curious if you can make soil blocks using only compost? I tried it, and I've got the results. The idea came to me out of shear financial pragmatism. I usually make my seed-starting mix using 3 main ingredients: ...But the coco peat and the perlite cost money and have to be continuously re-purchased. The compost is free, and piles up (literally) on its own in the background. Would it be possible to make soil blocks completely from compost alone? Maybe I could reduce my soil block cost down to free. I was as curious as you are! So I tried it. A Note About Curing Compost If you're using homemade compost for your seed-starting mix, you'll want to make sure it's thoroughly sifted and then cured before using it. Unfinished / uncured compost can be chunky, buggy, and cause more plant burn than the finished stuff. It can also [...]
#regenerativegardening#soilhealth#learngardening#soilbuilding#organicgardening#gardeningforbeginners#desertgardening#growyourownfood#organicgarden#vegetablegardening#zone9a#tucsongardening#permaculture#gardener#arizonagardening#gardening
2 notes
·
View notes
Text
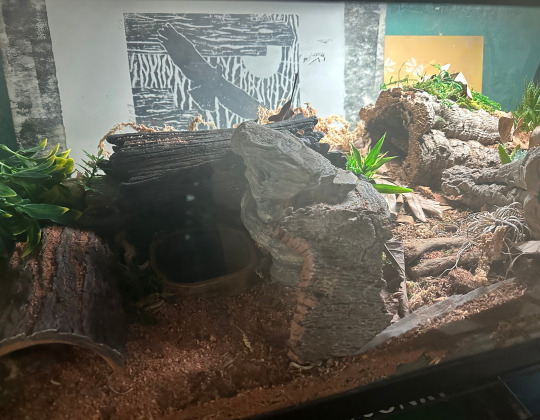

ball python, leopard gecko, and ranchula enclosures more details under cut
ball python: 40 gallon enclosure. newly bioactive, featuring a fern and isopod colony. couple inches of substrate mix (includes coco fiber, peat moss, fir bark, etc) topped with mosses, leaf litter, and cork bark. sits around 70-80% humidity. 2 hides, used to have 3 but she never used the last one. the uvb lamp is mostly for the plant, but i do like giving my animals a day/night cycle so its helpful for that too. heat mat is on the left side, and thats usually the hide she prefers to hang out in. i really like checking back and seeing the new holes the isopods have eaten into the bark :P
leopard gecko: 20 gallon enclosure. half sand-soil mix, half packed-soil mixed in with things like cork bark and other padding for variation, firmer in some places than others. the sand provides digging material, something he enjoys doing often... it always looks different when i check in. theres some leaf litter and mosses on the soil side purely for more texture variation. the humidity matches my room which tends to be around 30-40%. colorado is dry. 4 hides across the enclosure. 2 succulents under the uvb lamp.
egg is actually featured in the photo, see if you can find him
taranchula: very simple in comparison to the other two. just coco fiber and some leaf litter. he has set up in the log hide and is webbing it to his liking, doesnt leave often.
7 notes
·
View notes