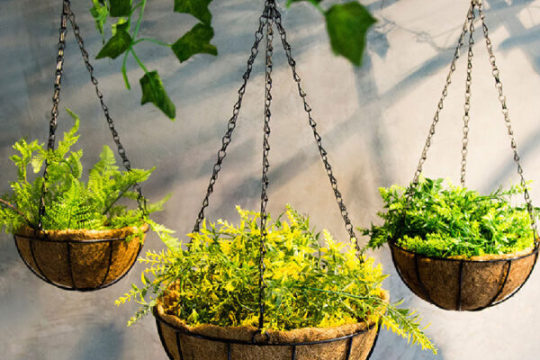
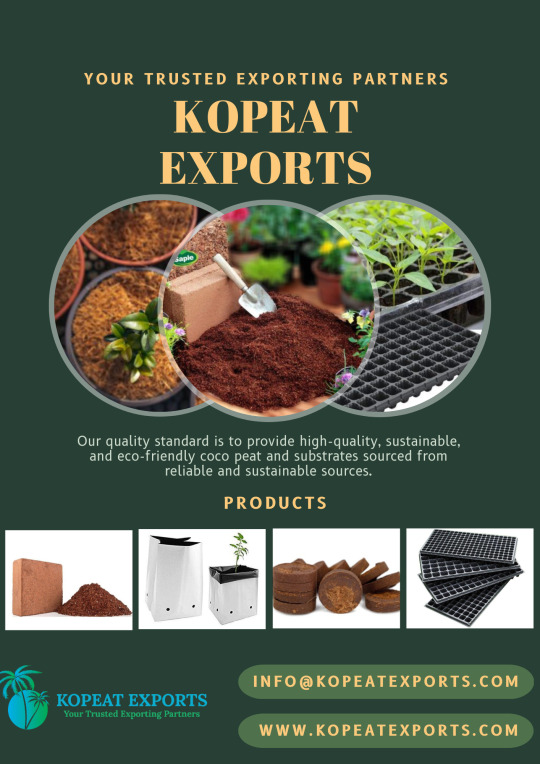
#Peat Grow Bags
Explore tagged Tumblr posts
Visit Tumblr Blog
Explore Tumblr blogs with no restrictions, modern design and the best experience.
Last Seen Tumblr Blogs


Fun Fact
After the announcement of the deal with Yahoo!, there were 170K signatures of unhappy Tumblr users petitioning to prevent the sale in 2013.
Text
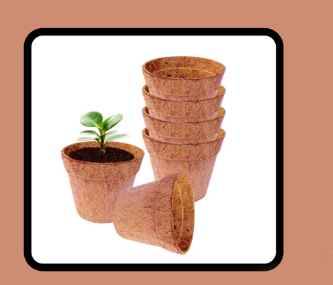
Coco Coir Pots
Title: Harnessing the Green Magic of Coco Coir Pots for Sustainable Gardening
Introduction: Coco coir pots, the eco-friendly alternative to traditional plant containers, are taking the gardening world by storm. These biodegradable pots, derived from coconut husk fiber, offer numerous benefits for both garden enthusiasts and the environment. In this blog post, we'll delve into the world of coco coir pots exploring their many advantages and how they contribute to sustainable gardening practices.
Understanding Coco Coir Pots: Coco coir pots, also known as coir pots or coir planters, are made from coconut coir, a natural fiber extracted from coconut husks. Unlike plastic or clay pots, coco coir pots are biodegradable and have a unique ability to enhance plant growth.
Advantages of Coco Coir Pots: Let's explore some of the key benefits of using coco coir pots in your gardening endeavors:
Biodegradability: One of the most significant advantages of coco coir pots is their biodegradability. These pots break down naturally over time, eliminating the need for disposal and reducing environmental waste.
Reduced Transplant Shock: When it's time to transplant your seedlings or young plants, you can plant the entire coco coir pot directly into the soil. This reduces transplant stress and minimizes root disturbance, ensuring a smoother transition for your plants.
Improved Aeration: The porous nature of coir promotes aeration and air pruning of roots. This leads to healthier root development, as roots are encouraged to grow within the pot and not become root-bound.
Enhanced Moisture Retention: Coco coir is excellent at retaining moisture, which means you won't need to water your plants as frequently. It provides a consistent and steady supply of moisture to the roots.
pH Neutral: Coco coir has a neutral pH level, making it suitable for a wide range of plants. You can easily adjust the pH to match specific plant needs.
Eco-Friendly Alternative: Choosing coco coir pots supports eco-friendly gardening. By opting for biodegradable containers, you reduce plastic waste and minimize the environmental impact of traditional plastic pots.
Versatility: Coco coir pots come in various sizes, making them suitable for different types of plants, from small seedlings to larger ornamental trees. They can be used in both indoor and outdoor gardening.
youtube
Additional Uses of Coco Coir Pots: Coco coir pots aren't limited to just planting. Here are some other applications:
Mulching: Coir pots can be used as mulch. When placed on the soil's surface, they help retain moisture, regulate soil temperature, and reduce weed growth.
Composting: When your coco coir pots are no longer needed, you can add them to your compost pile. They'll break down and enrich the compost with organic matter.
Craft Projects: The natural texture and appearance of coco coir make it a great material for various craft and art projects. Get creative and use coir in your DIY endeavors.
Conclusion: Coco coir pots are a game-changer for sustainable gardening. Their biodegradability, reduced transplant shock, and ability to improve plant growth make them a valuable asset for gardeners. By choosing these eco-friendly alternatives to traditional plant containers, you not only promote healthier plant growth but also contribute to a greener and more sustainable future. Whether you're an avid gardener or just starting out, consider making the switch to coco coir pots and witness the green magic they bring to your garden.
#Coir Dust#Coir Pith#Coco Peat#Long Type Grow Bag#Grow Slab#Coconut Coir Pith#Coir Pith Near Me#Pith Coconut#Coco Pith Near Me#Coir Fibre Pith#Coconut Husk Pith#Coco Coir Pots#Coco Soil#Coconut Fiber For Plants#Coco Pot#Coir Pots For Plants#Peat Grow Bags#Youtube
2 notes
·
View notes
Text

Coco coir yarn exporters in india
🌱 Sustainable, Strong, and Eco-Friendly! 🌱
Coco Coir Yarn is the perfect natural solution for your gardening, crafting, and home décor needs. 🌿
✅ Biodegradable ✅ Excellent water retention ✅ Mold-resistant
🌿 Use it for plant support, DIY projects, and more!
#Coco peat exporters in india#Coco peat growbag exporters in india#Coco coir yarn exporters in india#Pollachi semi husked coconuts exporter#Indian pollachi coconuts exporters#Fresh coconut exporters in india#Coco peat grow bag exporters & suppliers#Buffered Coco peat growbag exporters#Coir yarn exporters and suppliers in tamilnadu India
1 note
·
View note
Text
COCO HUSK CHIP BALES 4.5KG
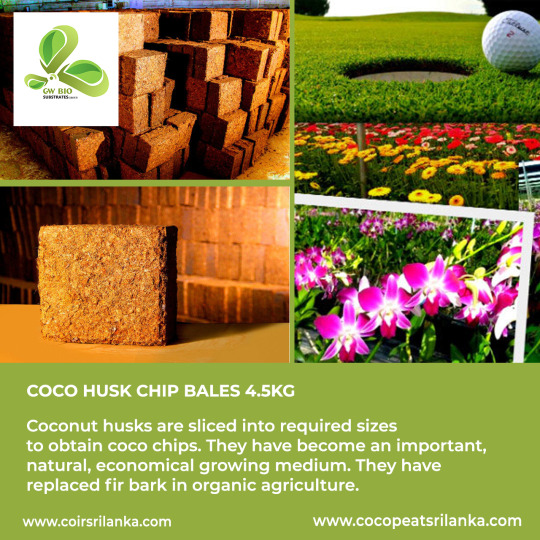
Coconut husks are sliced into required sizes to obtain coco chips. They have become an important, natural, economical growing medium. They have replaced fir bark in organic agriculture.
https://www.ceyloncocopeat.com/product.php?name=Coco-Husk-Chip-Bales-4.5kg
#Coco peat#Coir Products#Bio Substrate#Coir in Sri Lanka#Grow bag#Coco peat suppliers#Sri Lankan Coconut fiber#Coconut husk#coir products in Sri Lanka
0 notes
Text

To Buy Coco Coir products in bulk or To get more information visit us:
www.factorysdepot.com
#Coco Coir Products for Gardening#Coco coir#Coconut Coir#FactorysDepot#Organic soil#Organic gardening#coco peat#coco coir brick#easy grow bag
0 notes
Text

Elevate your gardening experience with Coastal Coirs Limited! ~ Introducing our game-changing Coco Peat Lay Flat Grow Bags, designed to transform the way you grow your plants. These innovative bags, crafted with care by Coastal Coirs Limited, offer a revolutionary solution for versatile and space-saving gardening. ~ Our Coco Peat Lay Flat Grow Bags provide the ultimate convenience and flexibility for gardeners of all levels. With their unique lay flat design, you can store these bags effortlessly, saving valuable space in your gardening area. When it's time to plant, simply expand the bag, and you're ready to create a thriving garden. ~ What sets our Coco Peat Lay Flat Grow Bags apart is their exceptional water retention capability. The coco peat material used in our bags ensures that your plants receive optimal moisture, preventing both under and overwatering. This means you can maintain a balanced environment for your plants to flourish. ~ The breathable nature of our grow bags is another key feature. They allow for proper airflow, promoting healthy root development and preventing root suffocation. Your plants will have the space they need to grow robust and strong, resulting in a vibrant and bountiful garden. ~ At Coastal Coirs Limited, we are committed to sustainability and eco-friendliness. By choosing our Coco Peat Lay Flat Grow Bags, you are opting for an environmentally responsible gardening solution. These bags are made from renewable and natural coco peat, reducing waste and supporting a greener planet. ~ Experience the Coastal Coirs Limited difference today and take your gardening to new heights. Our Coco Peat Lay Flat Grow Bags are perfect for various plants, from herbs and vegetables to ornamentals and flowers. Visit our website or contact us to explore how our innovative grow bags can help you create a thriving and sustainable garden. ~ Coastal Coirs Limited - Your trusted partner for innovative and eco-friendly gardening solutions. ~ Contact us for more details, WhatsApp : +91 8838166448 (or) https://wa.me/918838166448 Website : www.coastalcoirs.com Mail : [email protected] . . . . . . . . . . . . . . . . . . . . . . . . . . . . . . . . . . . . . . . . . . . . . . . . . . . . . . . . . . . . . . . . . . . . . . . . . . . . . . . . . . . . . . . . . . . . . . . . . . . . . . . . . . . . . . . . . . . . . . . . #coastalcoirs #coastalcoirslimited #cococoirpith #cococoir #cocopeat #coirpith #cococoirpith #peatblocks #cocoblocks #pithblocks #cocopeatblock #cocopeatforsale #manufacturing #pottingsoil #potmix #soillessfarming #layflatgrowbag #opentopgrowbag #growslab #hydroponics #hydroponicsupplies #hydroponicsfarming #peatfree #naturalsoil #growingmedium #casingsoil #growbags #hydroponicsgrowbags #gardensupplies
#coco coir#coco peat#coir pith#horticulture#hydroponics#gardening#growing medium#greenhouse#coastal coirs limited#lay flat grow bags#grow bags
0 notes
Text
We prepare high quality buffered and decomposed coco peat which is very essential for the plant growth. The coco peat is washed with additives to minimize its EC Value which helps to keep the soil loose and airy helping in better root growth. Call us at 7682927028 to order.
#Grow Bags online cheap#Vegetable Grow Bags online#Grow bags for vegetables#grow bags online#gardening tools and accessories#decomposed coco peat#home garden accessories
0 notes
Text
Native Gardening: A Guide for Cold Stratification
It's nearly January, which means that it's time for me to start stratification for my native seeds.
Many native seeds have a built-in dormancy mechanism which will prevent germination until it is broken either naturally by weather, or artificially via cold/moist stratification in the refrigerator. This is a guide for the refrigeration method.
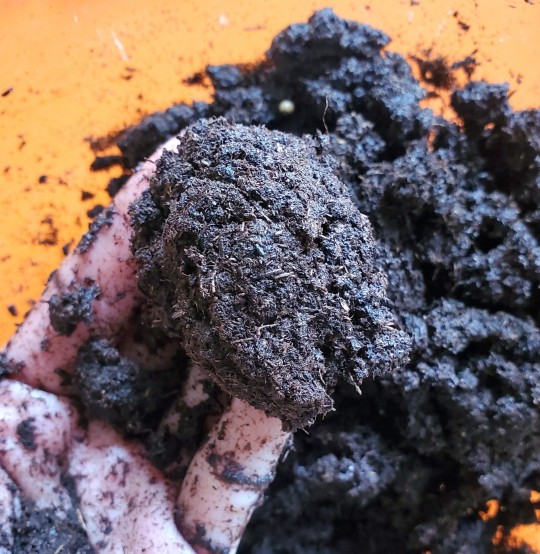
It's best done about 2-3 months before spring if you plan on starting the seeds indoors, or 2-3 months before your last frost date if sowing outdoors (depending on germination requirements). This year I'm using peat moss but you can substitute it with moist sand or damp paper towels.
Choosing Your Plants
One thing to consider before buying native seeds is how successful they will be once planted in your garden. The best way to determine this is by going outside and seeing what grows naturally in the yard.
For example, my yard has mostly shade-loving plants like the Common Blue Violet, Bloodroot, and Witchgrass, along with some hardier, more tolerant species like Blue Wood-Aster and Common Milkweed. Sun-loving plants like goldenrod are present but restricted to the edges of the property. Despite having no natural water source, I have seen a few water-dwelling species pop up as well.
This means that I have a pretty moist/shady backyard and that I should focus on species that either prefer these conditions or are very tolerant of them.
Remember to choose species that grow naturally in your biosphere. Some native seed vendors will provide range maps which will show you where certain plants exist in the wild. This is important because the entire point of native gardening is to support your local ecology and wildlife.
This year I'm raising Virginia Strawberry, Early Goldenrod, Sundial Lupine, Columbine, Spotted-Touch-Me-Not, Bloodroot, and Highbush Cranberry. In addition to pollinators like bees, wasps. and butterflies, these plants will be beneficial to songbirds, hummingbirds, and small mammals.
I always buy seeds from Prairie Moon Nursery. I've had great experiences with them and they even offer native range maps and germination instructions for each species.
Materials:
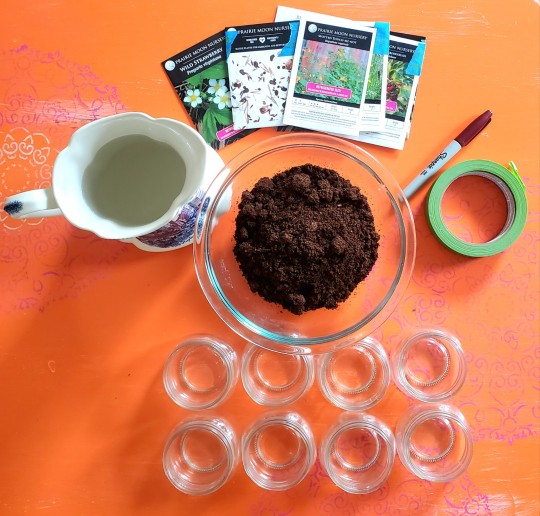
One bag of peat moss
A mixing bowl
A pitcher or measuring cup of water
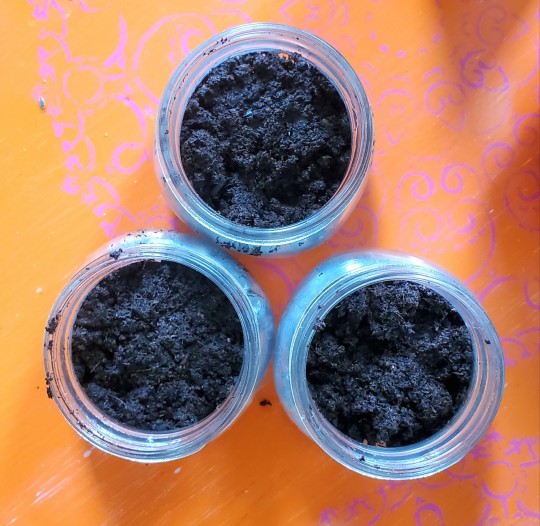
Lidded jars or sealable plastic bags (1 per species)
A permanent marker and painters tape for labels.
Seeds of your choosing
Instructions:
Fill your mixing bowl with peat moss.
Slowly add water and mix with your hands until the moss is moist but not soaked. You should be able to form it into a ball.
Press peat moss into each container.
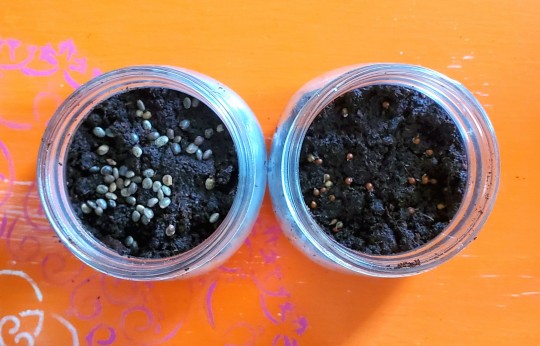
Sprinkle in the seeds. I covered the larger seeds with more peat moss, but the smaller seeds were just sprinkled on top so that I can actually find them when it's time to plant.
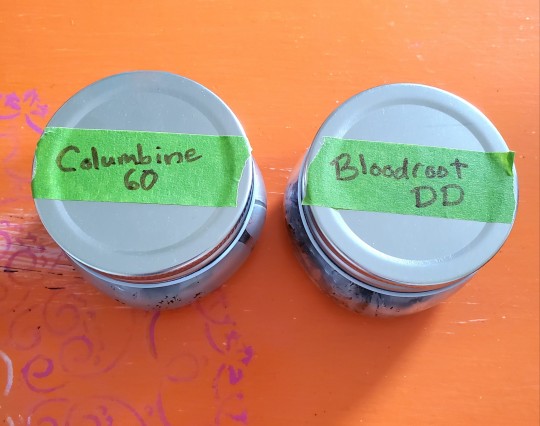
Seal containers and label each with the species name, length of time required in the fridge, (usually 60-90 days), and if it requires double dormancy.***
After this, place the containers in the fridge for 60-90 days, depending on the germination requirements. You should check on them weekly to make sure they don't dry out or grow mold. If a seed starts sprouting during stratification, remove it from the container and plant it in a starter pot.
After the 60-90 day period, the seeds will be ready to germinate. Move them into starter pots with soil or plant them directly into your garden bed.
I prefer starting my plants in Peat Pots, which are compostable and can be planted directly in the ground. This allows me to raise my seedlings indoors without the threat of wildlife or competition while preventing me from disturbing their root system when transplanting.
***Note on Double Dormancy
Some plants have double dormancy requirements for germination and can be more challenging to grow. This means that the plant will need a period of cold moisture, then warm moisture, and finally another period of cold moisture before they will germinate. Bloodroot, American Cranberrybush, and Spotted-Touch-Me-Not are all species that need double dormancy.
18 notes
·
View notes
Text


Calathea ornata
Information:
Common Name: Pinstripe plant, pinstripe calathea Botanical Name: Goeppertia ornata (formerly Calathea ornata) Family: Marantaceae Calathea ornata, also known as the pinstripe plant, is a tropical houseplant and is considered one of the most elegant types of calatheas. It's known for its wide, pointed dark green leaves marked with sets of thin stripes in creamy white or pink. The pinstripe plant grows best in bright, indirect light, moist soil, temperatures between 65 to 85 degrees Fahrenheit, and high humidity.
Tips to Care and Maintain Calathea ornata:
Give this plant adequate bright light to thrive.
Water the plant regularly so the soil stays lightly moist but not soggy.
Use a peat-based potting soil
Fertilize monthly throughout the growing season.
Light: Give your Calathea ornata medium to bright indirect light. This plant is a great option for a north-, east-, or west-facing window; the harsh direct light of a south-facing window can be too strong.
Soil: Calathea ornata will grow best in a loose, well-draining potting mix that holds onto moisture. A peat-based mix is ideal—you can make your own by combining 2 parts peat moss, 2 parts orchid bark, 2 parts perlite, and 1 part organic compost. Some growers prefer to use a ready-made potting mix designed for African violets for their calatheas.
Water: Water your Calathea ornata consistently so that the soil stays moist but not soggy. Overwatering can cause root rot, which can kill the plant. Avoid letting the soil dry out beyond the top inch or so between waterings.
Temperature and Humidity: Keep this tropical plant in a place with moderate temperatures and lots of humidity. If your space is particularly dry, group your plant in with other plants in your collection to help create a more humid microclimate, or run a humidifier nearby to add moisture to the air.
Fertilizer: Feed your Calathea ornata with an organic liquid houseplant fertilizer diluted to half strength every two weeks during spring and summer. Stop fertilizing in the fall, when the plant goes dormant for the winter. Resume fertilizing the following spring.
Pruning: Use sharp, sterilized shears or scissors to cut away any brown or shriveled leaves at the base to keep your Calathea ornata looking healthy. You can also trim away any browned or dried-out leaf margins while leaving the rest of the leaf on the plant. Take care not to cut away more than about a third of your plant's leaves to avoid damaging its growth.
How to Treat Pests
Calathea ornata generally isn't prone to many issues but it can be affected by houseplant pests like spider mites, thrips, whiteflies, and scale. The best way to avoid pests is to prevent them with a few best practices: Examine plants carefully for signs of pests before buying, quarantine plants that show signs of an infestation, and keep an eye on your plants to spot pests and eliminate them early. Treat insect pests with organic pesticides like neem oil or remove them with horticultural soap. Cut away badly affected portions of the plant, bag them up, and put them in the trash outside to keep them from affecting your other plants.
Common Problems With Calathea Ornata
Calatheas aren't the easiest houseplants to please, but most issues can be remedied by adjusting the plant's environmental conditions or watering more consistently. Here are some common problems with Calathea ornata and their causes.
Curling Leaves: Curling leaves are your plant's way of telling you it needs a drink. If your plant's leaves are curling, give it a good soaking. Keep an eye on the soil moisture to avoid drying out.
Leaves Turning Brown: Browning leaves can indicate a few different issues, including cold drafts, dry air, or too much sun. Consider your plant's conditions and make adjustments.
Leaves Turning Yellow: Yellowing leaves can mean your plant is getting too much water. In severe cases, they can be a sign of root rot. Cut back on watering immediately. If that doesn't help, repot your plant in fresh soil and cut away any black, rotten roots in the process.
#plantblr#plantcore#plant blog#naturecore#nature#plant photography#plants#plantbased#calathea ornata#botany#studyblr#biology#leaves#stripes#writerscommunity#spilled ink#dark academia#light academia#writers on tumblr#information#informative#shitpost#green#home decor#organic#photographers on tumblr#beautiful photos#photoblog#photooftheday#photography
24 notes
·
View notes
Note
Does potting soil leech badly when it’s outside in bags? I saw your post about the peat situation and took home an extra year’s worth of potting mix this week (I use about 3-4 50qts per growing season, and I know I’ll use it even if the tariffs end up doing nothing). I’m wondering if it’s worth it to buy enough for the next four years if the nutrients aren’t super mobile. I’ve never had a bag sit for longer than a year though— maybe I can get away with covering them with a tarp? I know stockpiling isn’t the best solution, but for this specific problem I feel like it’s doable as long as the mix doesn’t “expire”
Tbh almost any potting mix is not going to be super nutrient heavy, a lot of the time potting mixes are neutral bases for you to add plant-specific nutrients to as you grow. The main problem with storing potting mix over time is that parts of it can start to break down or it could become hydrophobic if allowed to get too dry. At my workplace we store old bagged potting mix for the next year and it's fine.
9 notes
·
View notes
Text

Plant Growing Post: Lupinus perennis sub. perennis
Hello everyone, with February coming around it's a great time to start thinking of growing. If you're like me and are into experimentation and love threatened species, consider growing the Northeast's only native lupine: the Sundial/Wild Lupine
Why is it important to grow this species? 1. It is the larval host plant for the Federally listed Karner Blue butterfly whose range once spread from parts of Wisconsin to Maine but is now restricted to very localized areas of Wisconsin, Michigan, and New York State. (Species survival is complicated due to restricted mobility and climate change). 2. The plant itself has also become incredibly rare in NJ, New York, and Pennsylvania due to land use changes and lack of natural fire regimes.

Why am I doing this? To hopefully teach people closer to existing Karner Blue (image above from inaturalist) populations with successful grow methods. Reddit guides were so snarky and rude I wanted to make a nicer guide. Also, personally, in NJ there are only 4 known populations of this lupine, historic populations were once more plentiful, and the Karner Blue may have existed here as well.
The natural habitat of Sundial/Wild Lupine is Oak-Savannah, these aren't necessarily rare but they're more common in acidic mountain tops and sandy barrens. The key growth factor needed for our native lupine is open canopy with enough sun to remain successful. I'm letting you know the native habitat to key you in on its tougher-to-grow features: infertile soils and a DEEP taproot.


Okay let's begin: I'm always a proponent of collecting wild local seed from native populations, unfortunately, local populations were on private land so I settled for a trusted seller who does genetic testing: Prairiemoon (ignore the Carex) but there are other local sellers in New England. Genetic testing is important because some nurseries will sell you hybrids which are not helpful to the Karner Blue and potentially invasive. I have grown wild lupine before but my dogs killed them so this was a new attempt.
Wild collected seeds require moist cold stratification for 60-90 days, though some will germinate with no stratification and my most successful germination came from scarification and quick stratification (the sellers germination process essentially). For this you want to place the seeds in between a sheet of sand paper and rub until the outer shell is nicked enough to allow water to penetrate.
Here is where inoculation comes in: members of fabaceae have a relationship with a bacteria which allows the roots to capture nitrogen from the air. Some places sell the specific inoculation but the bacteria is present in most soils. This is rather taboo on my end but for species like this I usually take some soil near an existing legumous species (where this bacteria is basically guranteed to be present) mix it with water and take a light amount of this water where I'll briefly soak the seeds in a shallow dish before stratification. This is optional but I've done this for years and have noticed better growth in my Fabaceae than those I haven't preformed this on. If you include too much silt in your liquid you will introduce harmful bacteria as well. Also, it's possible I'm not really doing much with this but better growers than I will correct me.
Finally cold stratification: place the seeds flat in a moist (not soaking wet) paper towel then place in a bag in the fridge for a minimum of 10 days. Once the seeds swell in size they're ready to plant (Day 0). Don't be like me and do this wayyyyyy too early by mistake.


I started my seedlings in a seed starting tray with peat to ensure germination, by [Day 5] they should begin to sprout. On [Day 9] the first leaves form and the taproot develops, you NEED to move them to a deeper pot quickly or else the taproot will be damaged. I got cloth deep root (10") pots and filled them with an infertile mixture (remember they derive nitrogen from the atmosphere) of peat and sand... you don't have to use peat, you can mix soil I just had a lot of peat left over. If you transfer everything correctly and not over water, the taproot will happily continue to develop as true leaves begin to form [Day 16 and 18 below]


I personally sit my plants on a south facing window and then give an additional 3 hours of LED lights after sunset. I've given them around 6-8 hours of direct light but I'm probably spoiling these plants because I'm growing them with my orchids. If you do this 10 days before last frost, you can leave it outside. I currently have 12 Lupines: starting at 90% seed viability, 18 seedlings (only tranferred 14), only two seedlings died after the first 15 days
Continued development: [Day 26] image below left- second leafing. [Day 29 Image 1] continued growth. Last image [Day 38] with third leafing. When it's time to plant out I recommend making sure you dig a hole as deep as the taproot and plant in full sun in dry soil.
I do not believe these make flower in the first year, like many lupines they go dormant in summer, this batch's survival is questionable because it's February. I'll keep everyone updated!


#gardening#lupinus perennis#native plants of the northeastern united states#sundial lupine#wild lupine#grow guide#please look into the karner blue there is another blogger on here with an excellent post about them#propagating native species#seed starting
2 notes
·
View notes
Text
How to Use Coconut Coir Pith in your Garden?
Using coconut coir pith, also known as coco peat or coir dust, in your garden offers several benefits, including water retention, aeration, and soil conditioning. Here's a step-by-step guide on how to use coconut coir pith effectively in your garden:
Procure Coconut Coir Pith:
Purchase coconut coir pith from gardening stores, nurseries, or online suppliers. It is commonly available in compressed bricks or blocks.
Rehydrate the Coir Pith:
Place the compressed coir pith bricks in a large container or tub.
Add water to the container, allowing the coir pith to absorb moisture and expand.
Allow the coir pith to soak in water for several hours or overnight until fully rehydrated.
Mix with Soil or Potting Mix:
Once fully rehydrated, fluff up the coir pith with your hands to loosen it.
Mix the rehydrated coir pith with your garden soil or potting mix in a ratio of 1:1 or as desired. Alternatively, you can use coir pith as a soilless growing medium.
Use as Soil Amendment:
Incorporate the rehydrated coir pith into your garden soil as a soil amendment to improve its structure, moisture retention, and aeration.
Dig the coir pith into the soil to a depth of a few inches, ensuring even distribution throughout the garden bed.
Mulching:
Spread a layer of rehydrated coir pith on the soil surface around plants as mulch.
Mulching with coir pith helps conserve soil moisture, suppresses weed growth, and regulates soil temperature.
Seed Starting and Container Gardening:
Use rehydrated coir pith as a growing medium for starting seeds indoors or in seed trays.
Fill seed trays or pots with a mixture of coir pith and perlite or vermiculite for optimal seed germination and seedling growth.
Hydroponic and Aquaponic Systems:
Rehydrated coir pith can also be used as a growing medium in hydroponic and aquaponic systems.
Place the coir pith in growing containers or hydroponic trays and use it to grow plants without soil.
youtube
Watering and Maintenance:
Water your garden regularly to ensure adequate moisture levels, especially when using coir pith as a soil amendment or mulch.
Monitor the moisture levels in the soil and adjust watering as needed to prevent waterlogging or dryness.
Sustainable Disposal:
Coconut coir pith is a sustainable and biodegradable material. After use, it can be composted along with other organic waste to enrich the soil.
By following these steps, you can effectively use coconut coir pith in your garden to improve soil structure, retain moisture, and promote healthy plant growth.
#Coir Dust#coco coir pots#coco soil#coco peat#coir pots for plants#coco pith near me#coco pith#coco pot#coconut fiber for plants#coconut husk pith#coir fibre pith#Peat Grow Bags#Coir Pots For Plants#Coco Pot#Youtube
1 note
·
View note
Text


LOOK!!!!
One of them I let. Get a lil big ngl. BUT I HAVE RADISHES! Since this year has had a cooler spring they didn’t bolt yet so I’m hoping for more to finish and for these to be tasty.
Not feeling so good abt the watermelon radishes tho. I think those have too long of a season for spring here. And I accidentally dumped way more seeds than intended in the grow bag 😔 oh well you love and learn
I’m uncovering half the seedlings in hopes they adjust to the air again and don’t dry out in those FUCKING PEAT POTS THAT ARE THE BANE OF MY EXISTENCE NOW. It might get cold tomorrow so I may cover them again but it’s nice today. So.
9 notes
·
View notes
Text
Planter Bags

They are made from 100% natural coco chips and coco peat (coconut chips and peat). They are an excellent eco-friendly growing medium in limited space. They are specially designed for organic green houses, home and sky gardening and for any other economical cultivation.
https://www.ceyloncocopeat.com/product.php?name=Planter-Bags
#Coco peat#Coir Products#Bio Substrate#Coir in Sri Lanka#Grow bag#Coco peat suppliers#Sri Lankan Coconut fiber#Coconut husk#coir products in Sri Lanka
0 notes
Text
Coir Products for Indoor Gardening - Factorys Depot
Factory's Depot is the home of high-quality Coco Coir Products for Indoor Gardening, We sell coco coir products in bulk packs.

#factorysdepot#Coconut coir#Coco coir#Hydroponic Gardening#Coco peat gardening#coco peat#easy grow bag
0 notes
Text

Transform your gardening experience with Coastal Coirs Limited!
~
Introducing our Coco Peat Open Top Grow Bags, the perfect solution for all your gardening needs. These eco-friendly grow bags are made from 100% natural and sustainable coco peat, providing the ideal environment for your plants to thrive.
~
Why choose our Coco Peat Open Top Grow Bags?
-> Superior water retention: Our grow bags have excellent water retention properties, ensuring your plants receive the right amount of moisture for optimal growth. -> Enhanced aeration: The open top design promotes better airflow and root development, allowing your plants to breathe and absorb nutrients efficiently. -> Nutrient-rich medium: Packed with essential minerals and organic matter, our coco peat grow bags provide a nutrient-rich foundation for healthy plant growth. -> Versatile and space-saving: Whether you have a backyard garden or a compact balcony, our grow bags are perfect for growing a wide variety of plants, including vegetables, herbs, and flowers. -> Environmentally friendly: By choosing our Coco Peat Open Top Grow Bags, you contribute to sustainable gardening practices and reduce your carbon footprint. ~ Experience the Coastal Coirs Limited difference today! ~ Get your hands on our high-quality Coco Peat Open Top Grow Bags and watch your plants flourish like never before. ~ Coastal Coirs Limited - Your trusted partner for sustainable gardening solutions. ~ Visit our website or contact us for more information. Let us help you create a green oasis in your home or garden. WhatsApp : +91 8838166448 (or) https://wa.me/918838166448 Website : www.coastalcoirs.com Mail : [email protected] . . . . . . . . . . . . . . . . . . . . . . . . . . . . . . . . . . . . . . . . . . . . . . . . . . . . . . . . . . . . . . . . . . . . . . . . . . . . . . . . . . . . . . . . . . . . . . . . . . . . . . . . . . . . . . . . . . . . . . . . #coastalcoirs #coastalcoirslimited #cocopeatgrowbags #opentopgrowbags #growwithcocopeat #ecofriendlygrowbags #sustainablegardening #naturalgrowingmedium #cocopeatgardening #healthyplantgrowth #gardenEssentials #greenthumbessentials #plantloversph #gardeninspiration #growyourown #gardengoals #indoorgardening #outdoorgardening #urbangardening #homegarden #balconygarden #terracegarden #gardeningsupplies #cococoir #coirpith #cocopeat #cocosubstrates #coir #water #sustainable #design #experience #growth #development #help #quality #like #environment
#coco coir#coir pith#coco peat#growing medium#gardening#greenhouse#horticulture#hydroponics#grow bags
0 notes