#buy dry coco peat
Explore tagged Tumblr posts
Visit Tumblr Blog
Explore Tumblr blogs with no restrictions, modern design and the best experience.
Last Seen Tumblr Blogs


Fun Fact
Tumblr is used by 21% of adults online aged 18-29 years.
Text
Buy 100% Dry Coco Peat & Coco Pith Soil Online at Nathan Coir
Buy eco-friendly coco peat & pith soil online for thriving plants. Explore 100% eco-friendly dry coco peat on Amazon & our Official Website. Enhance growth with premium coco fiber soil.
0 notes
Text
Are You Looking for the Best 100% Natural Coco Peat for Your Plants?
For gardeners looking to create lush, vibrant gardens, coco peat soil is an essential ingredient. Whether you’re cultivating flowers, vegetables, or houseplants, 100% natural and organic coco peat online from Nathan Coir is your perfect companion for sustainable gardening. Explore the benefits of this eco-friendly medium and see how it transforms your gardening experience.

Boost Plant Vitality with Coco Peat and Organic Manure Mix
When combined with homemade organic manure, coco peat soil enhances the growth and vitality of your plants. This blend provides superior moisture retention, good aeration, and excellent drainage. While commercial manure and other fertilizers can be added to further enrich the soil, it’s always best to follow the recommended ratios for each specific plant type. For larger plants, consider mixing in a small amount of soil or sand to improve stability and structure.
By choosing eco-friendly coco fiber soil, you're opting for a sustainable solution that promotes healthy plant growth while being mindful of the environment. Coco peat creates an ideal growing environment for a wide range of plants, making it a must-have for every gardener.
Why Coco Peat is Perfect for Hydroponic and Soil-free Gardening
Coco peat soil also serves as an exceptional medium for soil-less farming, especially in hydroponic systems. Whether you’re using tray-based setups or other similar hydroponic methods, coco peat supports strong root development while ensuring proper moisture retention. It’s lightweight, easy to handle, and a great alternative to traditional soil. For hydroponics or soil-free gardening, it’s a perfect choice.
Buy 100% Natural & Organic Coco Peat Online
For the best 100% organic and naturally grown coco peat available online, Nathan Coir is your go-to source.We offer everything from dry coco peat to potting mixes, ensuring that your garden gets the best foundation for growth. Check out our range of products and explore dry coco peat and potting mix on Amazon for the perfect gardening solutions.
Your One-Stop Home Gardening Shop
We offer an extensive selection of gardening products through our online home garden store. From premium-quality organic coco peat online to a wide range of plants and gardening tools, you’ll find everything you need for your garden. Our house plant shop online features a variety of plants that can brighten up any space. Whether you're setting up a new indoor garden or expanding your collection, we have just what you need for home garden online shopping.
Looking to order indoor plants online? You’ll love our wide selection of houseplants, from low-maintenance varieties to tropical beauties.We cater to all of your indoor gardening requirements, providing rapid and dependable delivery straight to your home.
Why Choose Coco Peat for Your Garden?
With its eco-friendly nature and versatile application, coco peat is an excellent choice for any gardener. By choosing organic coco peat online, you provide your plants with the best possible medium for growth. Whether you're potting houseplants, starting a vegetable garden, or setting up a hydroponic system, coco peat ensures your plants have the ideal environment to thrive.
Conclusion
At Nathan Coir, we pride ourselves on offering high-quality products that are both effective and eco-friendly. Browse our selection of organic coco peat soil, potting mixes, and more, and see how we can help you elevate your gardening experience. Whether you're new to gardening or a seasoned expert, our online store makes it easy to find everything you need for a successful garden.
#OnlineHomeGardenStore#Organiccocopeatonline#houseplantshoponline#homegardenonlineshopping#orderindoorplantsonline
0 notes
Text
CLITORIA TERNATEA PLANT
Clitoria ternatea-Sangu poo plant blue is an excellent houseplant, perennial herb. This plant is categorized under creeper, medicinal, ornamental plants and called revegetation species.
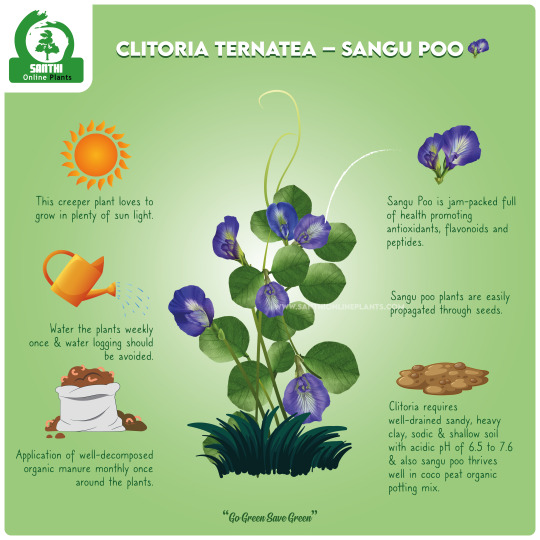
COMMON NAME: Butterfly pea or Sangu poo plant
SCIENTIFIC NAME:Clitoria ternatea
FAMILY: Fabaceae (Legume family)
SOIL: Grows well in organic potting mix coco peat/well-structured drained soil with nutrient rich. Neutral soil pH is required around 6.5 to 7
WATERING: Requires watering when topsoil is dry to feel.
PLANT HEIGHT: 5 to 8 inches
0 notes
Text

Clitoria ternatea-Sangu poo plant blue is an excellent houseplant, perennial herb. This plant is categorized under creeper, medicinal, ornamental plants and called revegetation species.
COMMON NAME: Butterfly pea or Sangu poo plant
SCIENTIFIC NAME:Clitoria ternatea
FAMILY: Fabaceae (Legume family)
SOIL: Grows well in organic potting mix coco peat/well-structured drained soil with nutrient rich. Neutral soil pH is required around 6.5 to 7
WATERING: Requires watering when topsoil is dry to feel.
PLANT HEIGHT: 5 to 8 inches
0 notes
Text
How To Prepare Your Garden for Rainy Season?

The hot summer will soon end, and the monsoon showers will hit the ground drenching the earth in fresh and cool water droplets. Both summer and rainy season offers a perfect atmosphere for the plants to grow. However, like in summer, gardening in monsoon also requires certain efforts. The humidity in the air during monsoon, along with, excess rain and wind, is an invitation to pest infestation and other issues. You must ensure you keep your garden safe and flourishing during monsoon. Thus, it is time to prep it before the rains hit the ground. Yes, it's time to head to the plant nursery and gather some essential supplies just like you did during summer, after all, it's worth it for your plant babies!
Getting your garden monsoon ready
The following are some of the tips to prepare your garden for the monsoon season :
Provide ample drainage
Experts at Ratanshi Agro-Hortitech, a leading plant nursery online, always recommend providing ample drainage for water. However, during monsoons, it calls for extra attention. Along with adding holes in your grower pots, you must check water logging due to constant and heavy rains. Water logging can prevent plants from growing as the roots do not receive oxygen. They will rot and die. Some other ways to ensure your plants drain ample water is to use cocopeat or a well-draining pot mix for the plants.
Give additional support to your plants
The bustling winds during monsoon can cause breakage of your garden plants. Hence, it is essential to prepare them for such circumstances. Some ways to ensure your plants do not bend with the wind are by regularly trimming the plants and tying up loose branches to sticks. You can also cover your plants to prevent the rain from damaging them.

Prune the plants
Pruning is a great way to prevent plants from growing in an unwanted direction. Trimming the plants and removing the dead leaves and stems allow the pants to grow properly. Pruning also prevents the branches from breaking due to heavy winds. Bushy and thick foliage withstands the wind better, especially during storms. You can get special pruning and cutting tools for your plants from a plant nursery in Mumbai, like Ratanshi Agro-Hortitech.
Mulching
Mulching your home garden during the end of summer is a great way to prepare the soil for monsoon and help it retains most nutrients.
Weeding
While monsoon is a great season to grow flowers and vegetables, the climate also calls for the growth of weeds. Weeding your garden regularly is essential during summer and monsoon. It helps the weeds from taking away the nutrients from plants. Additionally, you can ensure your garden is free of weeds by removing them when their growth starts using specialized tools available at a wholesale plant nursery in Mumbai.
Fertilize
The rains can cause heavy soil erosion washing away the top soil layers. You can use NPK fertilizers like rose fertilizer for your floral plants. Using organic compost available at the plant nursery in Byculla, like Ratanshi Agro-Hortitech, can help keep your soil fertilized.
Additional tips to prepare your plants for monsoon
Do not let the summer heat dry out your plants. Keep them adequately watered and ensure the soil is moist.
Lower the watering during the end of summer.
Keep a check on weed growth.
Maintain your garden by regular shearing and pruning.
Final thoughts
Monsoon can damage your plants with its heavy-hitting winds and showers. It is essential to perform routine checks for pest infestations, remove broken plant stems, water logging, etc. Fertilizing is another great way to ensure your plants receive the essential nutrients. If you want to purchase gardening supplies, like tools, rose fertilizer, coco peat, pot mix, and organic seeds online in India, visit Ratanshi Agro-Hortitech. You can buy their product online through their website or by visiting their plant nursery in Mumbai, India.
#wholesale plant nursery in Mumbai#plant nursery in Byculla#plant nursery in Mumbai#plant nursery online
0 notes
Text
Growing in Containers: What Kind of Soil Do I Use?
Garden soil is great for the garden, but what about container gardens? Can I use garden soil in containers? The answer to this question depends on what you are trying to grow. Garden soil is not always good for plants because it can be too heavy and dry out quickly.
Container plantings require a lighter, more porous mix of organic materials that will drain well and hold moisture. It's best to ask your local nursery if they have any recommendations or talk with an experienced gardener who has grown in containers before.

What kind of soil should I Use for container gardening?
"I prefer using a good potting soil. I mix it half and half with vermiculite to help drainage. I also use liquid fertilizer every two weeks."
"You can use any type of seed starting or potting mix for containers, but make sure you have one that contains vermiculite or perlite for good drainage. You should only water the plant when the top inch of soil is dry; if you water too frequently, you'll get root rot and kill your plants before they grow."
"You really don't need special soil for container gardening: plain topsoil will do fine (the key is to add at least 50 percent organic matter such as peat moss). you're planting in heavy clay soil, add some cedar mulch or gypsum to help lighten heavy soil. If the clay layer is only a few inches down, you could try loosening it with an iron bar (steel won't work because it reacts to soil). You can dig out the top 6-12" of your bed to make planting holes for containers." Also you can check the progardenman site for more details with review.
Should I add compost to the top layer or mix into the soil?
"If you plant directly into the soil you use for your container, I'd recommend mixing in about 1/4 volume of compost to start with. Another good idea is adding about 1-2 tablespoons per gallon of bone meal or bone meal to ensure that there's enough phosphorus. Bone meal also contains small amounts of other nutrients that are helpful to most plants. Really, the only downside you'd encounter by using straight potting soil would be if you really needed very rich topsoil."
Do I need any fertilizers? How often should I feed my containerized plants?
"Fertilizing needs will vary based on the age of the plant, how much light and warmth the container is receiving (which will affect water and nutrient uptake), and what type of soil you're using. You'll need to fertilize more often if your plants are in a rich potting mix with lots of added nutrients.
Less often if they're in plain topsoil or something like coco coir, which tends to be harder and require less maintenance. If your seeds haven't germinated yet or anything like that, there's no need for fertilizer until they get going."
"If you choose a good potting mix plus add compost at least annually, you can boost growth by misting each plant daily with a solution made from worm castings and other beneficial microorganisms."

What is the best way to Water my plants?
"Water your plants when they're dry until water runs out of the holes in the bottom of the pot, then let them drain completely before watering again. Never let plants sit in standing water or their roots will begin to rot, and never allow soil to dry out completely." "I use a cup but you can also buy ones that sink into your container once placed at the desired depth with an attached hose that releases just enough for each plant (just like when watering with a hose)."
How often should I Water my containerized plants?
"Hardiness of containerized plants depends on your particular growing conditions; if you live in a desert region, they need watering every day or two. More humid regions may only need watering once a week." "If you're growing with an automatic drip irrigation system, most people use one that makes sure to water the first plant for five minutes then the next for four minutes and so on until all containers are watered. You can also hand water each plant if it's easier for you.
Conclusion
The best advice I can give is to use soil that has plenty of organic matter. This will provide your plants with the nutrients they need, and it won't cause any problems with drainage over time because you're not adding something like peat moss or other additives that could clog up the potting mix.
A great idea for containers would be to start out by filling them 3/4 full of composting material (like leaves) before planting your seeds. You'll also want to make sure you water your container regularly so it doesn't dry out too much between watering! And remember, if you do decide on using an artificial fertilizer like Miracle-Gro or Peters 20-20-20 every now and then.
1 note
·
View note
Text


New succulents. ♥️
Tip: to those who bought their succulents that are already planted, check the type of soil the seller used. Most of them use a clay type of soil which is not good for the plants.
The roots will rot and become mushy and eventually the plant will die. So what I do is I remove the plants from their soil and wash their roots thoroughly. Then air dry them for 1-2days. After that you can plant them.
The soil mix should be fast-draining. My soil mix consist of: 70% pumice, 20% soil and 10% rice hull or coco peat. Or you can buy a cactus/succulents soil mix in a garden store.
When you plant your succulents, don't water them right away. Wait for 5-7days.
PS: the ones that are potted in the photos are some cuttings so it's fine to plant them right away.
14 notes
·
View notes
Text

Buy eco-friendly coco peat & pith soil online for thriving plants. Explore 100% eco-friendly dry coco peat on Amazon & our Official Website. Enhance growth with premium coco fiber soil.
#coco peat soil#coco peat online#coco peat amazon#buy dry coco peat#coco peat soil price#coco peat soil cost
0 notes
Text
Buy Coco Peat Online: Affordable and Convenient Gardening Solution

Buy eco-friendly coco peat & pith soil online for thriving plants. Explore 100% eco-friendly dry coco peat on Amazon & our Official Website. Enhance growth with premium coco fiber soil.
0 notes
Link
What is Cannabis Fertilizer?
How Do You Choose the right cannabis fertilizer?
Cannabis needs light, oxygen, and fertilizer to grow. Fertilizer can be made up of many organic and inorganic elements. Depending on the stage of growth a cannabis plant will require different ratios of these elements. Choosing a fertilizer designed specifically for cannabis is usually the easiest and best choice. Reefertilizer Grow and Bloom are designed for the vegetative and flowering stages of cannabis.
Does Cannabis Need Fertilizer to Grow Big Buds?
To get big buds, you need the right set of nutrients during the flower period. Flowering plants will require plenty of potassium but less nitrogen than before. Elements such as calcium and magnesium help produce dense buds. The difference between miracle-gro and Reefertilizer is that Miracle Gro was designed as a general fertilizer for many types of plants. Reefertilizer Bloom is blended to the specific nutritional needs of cannabis during flower. Helping you get those big thick buds.
What Nutrients Does Cannabis Need to Grow?
Plants all require the same types of nutrients, but each plant will have a preference for a certain ratio depending on its current needs. You should feed your cannabis plants a fertilizer that contains all major nutrients; nitrogen, potassium, and phosphorus. There are other essential nutrients that are required in smaller amounts. Plants will get some of these lesser nutrients from compost in the soil and trace amounts in tap water. But with a full spectrum cannabis fertilizer all the major and minor nutrients will be available.
What Are The Major Nutrients (N-P-K)?
When you buy fertilizer it should have 3 numbers on the front of the package. These numbers represent the ratio of the three major building blocks for plant growth; Nitrogen, Phosphorus, and Potassium. This is the NPK ratio. The “N” and “P” stands for nitrogen and phosphorus, the K represents the greek name for potassium.
Nitrogen plays an important role in plant growth, it helps develop new leaves and branches during the vegetative phase. During flower nitrogen takes a much lesser role while phosphorus and potassium are needed in higher amounts to help work on bud/flower development.
What’s a Good Cannabis Fertilizer Ratio?
The NPK ratio numbers represent the percentage by weight of each major nutrient. During the veg phase of cannabis your plants will need a higher percentage of nitrogen than potassium or phosphorus. For example, Reefertilizer Grow has an NPK ratio of 20-5-10 while bloom has a ratio of 5-30-20. During flowering your plants need a different ratio for their new focus on growing flowers.
Why are NPK numbers higher on synthetic fertilizer than organic? I answer that down below.
What Are Minor and Micro-Nutrients For Cannabis?
Nitrogen, phosphorus, and potassium are 3 of the 17 essential nutrients for plant life. The others are minor nutrients. They are required, but in a much smaller quantity. Calcium, magnesium, iron, manganese, and copper are just a few elements that cannabis will need to facilitate healthy growth. This is why I like to grow in soil, many of these trace elements are already present and available when the plants need them.
Which fertilizer works well for Cannabis?
The best fertilizer for cannabis growers is the one that best meets your situation requirements. Going fully organic and making your own compost teas and soil mixes will result in big healthy plants, but will require a lot of space, time, and experience to apply these techniques. Using a synthetic fertilizer like Grow and Bloom makes it easier to guarantee your plants are getting what they need with very little oversight. It’s also cheaper and easier to apply. Synthetic fertilizer is sometimes called “chemical”. In some circles the word chemical has a negative stigma around it, which is silly. All fertilizers are chemical in nature, water is a chemical. “Organic” fertilizer is made from natural sources like potash and compost that are broken down and applied to plants. Synthetic fertilizers are further processed so they are more concentrated, they are also faster acting since they take way less time to break down than organic.
What Are The Advantages of Using Powder Fertilizer for Cannabis?
Fertilizers will come in the form of a liquid or a powder. Both work well and the best choice depends on the grower. Different elements will react with each other when in a liquid form causing it to lose potency over time. Because of this you will see many different variations of liquid fertilizers with different nutrient ratios. All these liquid fertilizers need to be mixed to the correct ratio for whatever phase of growth your plant is currently in. What’s great about powder fertilizer is that you don’t need to mix several products together just to feed you plant. The powdered elements won’t react with each other when dry. A few scoops of Bloom mixed into water accomplishes the same as several bottles of liquid nutrients. Powdered fertilizer saves the grower time, prevents any guesswork, and utilizes far less packaging.
How Do I Use Cannabis Fertilizer?
When Do You Start Using Powder Fertilizer on Cannabis?
You’ll want to start feeding your plants with a diluted dose of fertilizer when they have developped 3 or 4 sets of leaves. Check out our blog post on “When should you start feeding your cannabis plants fertilizer”, it answers this question in more detail. As the plant grows it will require larger amounts of fertilizer to fuel that growth.
How Much powder Fertilizer Does Cannabis Need?
The amount of fertilizer your plants need depends on a few outside factors. Large plants will require more nutrients than smaller ones. The planter size is a good indicator of how big a plant will probably grow. Cannabis grown in soil can grow very tall since their roots can go deep into the ground. You need to feed your plants enough fertilizer that the soil around the roots is completely saturated. A small planter might need only 4L of nutrient water every feeding, while a plant in a 12 gallon planter will need more nutrient water to saturate it fully.
How often do I give fertilizer?
This depends on the grower preference, but in general you want to be feeding your plants at least once a week. We recommend feeding plants Reefertilizer Grow or Bloom once a week and watering with correct pH water as needed, this keeps it super simple. Others will split the weeks nutrients into two diluted feedings. Other growers like to feed plants two weeks on and one week off. Experiment with your plants and see how they react and what type of schedule you prefer. Reefertilizer is meant to be versatile in this respect.
Some big plants will need a feeding every few days. It depends on the needs of the individual plants. If you’re feeding a large plant once a week and it’s showing signs of a nutrient deficiency, as long as it isn’t being caused by a bad pH, you may need to feed them more often.
What’s The Feeding Schedule for Cannabis?
Take a look at the instructions of your cannabis fertilizer. They will give you the best recommendation on the feeding schedule. The Reefertilizer schedule is a gradual approach. Start low and increase the dose every week until you get to full dose. This helps prevent any fertilizer burn, and starting with lower doses at the beginning of flower helps reduce nutrient buildup.
How do I Feed Cannabis?
Feeding cannabis can be very simple. It usually involves mixing a liquid or powder into some water and pouring that around the base of your plants. With Reefertilizer Grow and Bloom you add a few scoops to some water and mix it up really well. It’s good to mix the powder with a small amount of water first to make sure it’s dissolved evenly, then add more water after. It’s good practice to measure the pH of the nutrient water, this will help prevent nutrient lockout. If the pH is not in the desired range (between 6 and 6.8 for soil), use a product called pH up or pH down to adjust it. Natural ingredients like lemon juice and baking soda will also lower or raise the pH.
How much fertilizer do I give?
If your unsure of how much you should be feeding your plants, start low and gradually increase the dosage every week. Don’t worry too much about over fertilizing your plants, that’s really easy to fix. If you see signs of fertilizer burn (brown tips and other symptoms), just flush your plants with extra water that week and start feeding them again when the soil is dry, but this time with a lower dose.
When do I stop fertilizing my cannabis plants?
You want to stop feeding your plants a week before harvest. During this time your plant will utilize the remaining nutrients and energy in the plant for bud growth. There’s a lot of debate on the topic of whether or not you should flush your plants with water during this period to leach nutrients from the soil and plant. Many professional growers say that flushing your plants a week before will improve the flavour and quality of your buds. Other professional growers say it doesn’t make a difference and they feed their plants right up to harvest. In my opinion, flushing can’t hurt so why not give it a try. Do your own experiments and see what you prefer after drying and curing the bud.
Do I Need to Flush powder Cannabis Fertilizer Before Harvest?
If you’re going to flush your plants before harvest, you need to use plenty of water. You want to use enough water to fill your planter 2-3 times. That means if your growing in a 5 gallon planter, you need to flush it with 15 gallons of water. Soilless growing mediums like coco coir or peat moss are easier to flush, so you can use less water than with soil. You can perform this flush once a week or more. I like to use a TDS meter to monitor the total dissolved solids in the flush runoff water. Each time I flush, that number should be getting lower. Don’t worry about using pH perfect water for flushing. Since you will be harvesting soon, it won’t make a difference.
What Else Do I Need to Know About Cannabis Fertilizer?
Is Too Much Fertilizer Harmful?
It can be easy to go overboard with fertilizers, but using more than what your plant can suck up will cause you problems. Depending on your plants size and the environment it’s in, there’s a finite amount of nutrients it can metabolise in a given period. Using too much fertilizer may cause nutrient burn and symptoms of excess or deficient nutrients. If you over fertilize it’s not the end of the world. A good flush can bring most plants back to a healthy state.
Why is There Growth or Bloom Fertilizer?
Cannabis plants have two major phases of growth; The vegetative stage and the flowering stage. The nutritional needs are slightly different during these two phases. Using the correct cannabis Bloom or Grow fertilizer will guarantee the correct level of nutrients the plant needs at that time.
Can Nutrients Make Cannabis Taste Bad?
Many things can affect the final taste of cannabis, most importantly the drying process and the curing process.
Many growers will say that if a cannabis plant is not flushed properly before harvest it will develop a harsh taste not stay lit when rolled into a joint. Flushing could be a factor but perhaps a minor one. Cannabis will definitely get a bad taste if it’s dried to quickly or not enough. A lot of harsh flavours come from chlorophyll which slowly breaks down during the curing process.
What’s The Difference Between Organic And Synthetic Nutrients?
Organic nutrients come from a direct natural source. Synthetic are produced from natural sources but processed further to be more concentrated. If you compare the NPK ratio of organic fertilizers and synthetic, you will notice the numbers on synthetic fertilizers are higher. This is because the higher concentration from the extra processing. Organic nutrients are slowly broken down by the root system. Since they are less concentrated, you need to apply them more often. Reefertilizer Start soil conditioner is organic and helps generate a healthy soil. This in tandem with synthetic fertilizers gives you the best of both worlds. Synthetic nutrients are immediately available to plants and can give them a real noticeable boost in growth. Synthetic is usually cheaper and easier to use, but care must be taken not to over fertilize plants.
What is Cannabis Fertilizer Burn?
Fertilizer burn happens when you feed your plants too high a concentration of fertilizer. If left untreated it can seriously damage or kill a plant entirely. Good news, fixing an overtilized plant is really simple and done soon enough your plant will bounce back quickly. To fix a plant that is over fertilized, flush the soil with 3 times the volume of the planter size. If you’re growing in a 5 gallon pot, flush with 15 gallons of water. What the water does is leach out any nutrient build up in the soil. After flushing, give your plant about a week to recuperate, then you can start feeding them again.
What is Nutrient Lockout?
Nutrient lockout occurs when the pH of the growing medium is in the incorrect range. Cannabis roots can only chemically metabolize nutrients if the soil is in a specific pH range. If the pH is too low or high, certain nutrients will be “locked out” and the plant will suffer from a nutrient deficiency even though they’re in the soil. Adding more nutrients won’t help and might cause a harmful build up in the soil. Most cannabis problems start from an incorrect pH. If you see signs of nutrient deficiency in your plants, the first thing to check is the pH. Measuring and logging the pH of the nutrient water is a good mesure to determine if you have a deficiency or a nutrient lockout.
How Do I Use Compost and Worm Castings as Fertilizer?
There are so many great things you can add to your soil that will help enhance growth and taste. Worm castings is basically worm poop, there’s also bat guano (also poop), and sheep manure (yes poop too), they are all great for adding to your cannabis soil. Typically you would mix the compost with a potting soil or a soiless mix like coco coir or peat moss. There are other things you can add that aren’t compost but benefit the roots. Using Reefertilizer Start in your soil will innoculate it with a helpful fungus. Adding perlite will help the soil hold oxygen and water.
Reefertilizer Start is an organic compost made from water hyacynth. It’s organic and fully renewable. It can be added to your potting soil mix along with other composts and manures. What these natural fertilizers do is slowly breakdown in the soil and feed your plants a variety of additional nutrients. These additions can affect the taste and quality of your weed and should be experimented with.
What About Slow Release Granular Cannabis Fertilizers?
Another option available are slow release fertilizers. These can be added to the soil, or sprinkled around the base of the plant. The only problem with them is that if you use too much, you’re going to have a hell of a time trying to flush them out. They are very popular for those who cannot tend to their plants on a weekly basis.
How Much Fertilizer do I give Autoflowering Cannabis Plants?
Autoflowering plants are ready to harvest sooner than photoperiod plants. Because of this they require less fertilizer overall. When it comes to autoflowers you’re best starting low and increasing a bit every week. If using reefertilizer a medium dose is the higest you should go.
The post Everything You Need To Know About Cannabis Fertilizer appeared first on Reefertilizer.
2 notes
·
View notes
Text
Bengaluru institute on a mission to improve turmeric cultivation through soil-less agriculture

Soil-less agriculture could be the solution to increasing the yield and quality of turmeric cultivation in India, says this Bengaluru-based expert
For CV Prakash — a former naval officer who is also recognised as an expert in soil-less agriculture — making turmeric (Curcuma longa) more profitable for the ordinary farmer has become a passion during lockdown. His ongoing Mission Turmeric 2021 aims to begin an “orange revolution”, he says, by teaching people to cultivate the spice in grow bags (large porous containers made of high density polyethelene) packed with coco-peat (made from the pith of the coconut husk) instead of soil, in shade houses. Introduced to soil-less agriculture after he migrated to Australia in 2000, Prakash brought his interest back to his homeland in 2008. He has trained over 10,000 people in cultivating different crops using hydroponics and other soil-free alternatives at his CV Hydro training centre, which functions under the auspices of Aggragannya Skills, Bengaluru. With the lockdown bringing things to a standstill last year, and being unable to travel to Australia as usual, Prakash finally had the time to research the cultivation of turmeric. “My friend had sent around eight kilograms of seed rhizomes of Tiger Claw Salem variety turmeric (grown in Erode) last February. I planted 60 grams of seed each in 100 grow bags, substituting coco-peat for soil. The results were amazing,” says Prakash.

Encouraging results
Analysis of the crop in its sixth month by the Eurofins Lab, known for its work in bio-analytical testing, showed a curcumin content of 5.91% — nearly double of what it would be in a nine-month growing cycle. “Normally Salem turmeric does not give more than 3% curcumin content, so this was an eye-opener,” says Prakash. Curcumin is a bright yellow phenolic compound that has been in the news for its potential to fight cancer. As a result, the demand from pharmaceutical companies for high curcumin turmeric has risen to 58% of the global market share in recent years, according to research cited by the Trade Promotion Council of India. . The increased yield was another breakthrough. “In the sixth month when we harvested the crop prematurely, we got 4.45 kilograms of turmeric from one single grow bag. At the end of the seventh month, we had 6.44 kilograms, and in the final harvest, we got 8.17 kilograms of turmeric from a single plant,” says Prakash. As a bonus, no traces of heavy metals were found, making the crop a saleable product from the get-go. “Erode farmers usually get 500-600 grams of turmeric per plant in conventional farming. Our method gives a bigger yield, and its high curcumin rate makes it a valuable cash crop for farmers,” says Prakash. “When you grow turmeric on a field, in a harvest of around seven tonnes, at least four tonnes are wasted due to poor quality or pestilence. In our method, not even a milligram of turmeric went bad. This has got to do with many factors, because soil-less agriculture is a very deep science. But I’m still not happy; the yield can definitely be 10-11 kilograms per grow bag,” says Prakash. A spicy curative - Turmeric is a staple of the Indian kitchen shelf. - This perennial herbaceous plant of the ginger family (Zingiberaceae) has many uses in South Asia, in both fresh and powdered form. - When it is not lending its nutty aroma to food as a spice, turmeric (also known as haldi or manjal) is a skincare ingredient and a key additive in traditional medicines for a diverse range of ailments. - During COVID-19 pandemic, its reputation as a panacea has gained credence, especially since turmeric-infused milk was recently listed as an immunity boosting food by the Indian Government. - India is the world’s biggest producer of turmeric, (centred in the states of Telangana, Maharashtra, Andhra Pradesh, Tamil Nadu, Karnataka, Arunachal Pradesh and Orissa ). At least 30 varieties of cultivars are grown in the country. - Approximately one million metric tonnes of turmeric was produced in 2020, with COVID-19 and unseasonable rains hitting the export market and pushing up prices locally.
Orange mission
Launched in January 2021, Mission Turmeric 2021 currently has a growing area of 1,28,000 square feet. Around 15 pilot projects featuring eight varieties of turmeric are underway in stretches of 500 and 1,000 square feet growing areas, while three ventures based on one acre each, are looking at commercial cultivation. “We have trained 18 people in Mission Turmeric 2021 through webinars, and have started a ‘watch and learn’ programme for people who could not make it to this year’s growing season (which began in May). I will be mentoring the applicants, besides sharing video lesson on all aspects, from pre-seeding to harvest,” says Prakash. Growers from different parts of India who are part of the project have to observe and report parameters like leaf length and width, stem diameter and height of the plant daily to Prakash. “All the monitoring is done by pure observation. I am a very conservative farmer; I believe you cannot remove the human from the equation in agriculture,” says Prakash. To encourage farmers, CV Hydro has been offering to buy back the turmeric, with rates ranging from ₹18 per kilogram of finger wet rhizomes up to ₹100 per kilogram for dry polished mother rhizomes.
CV Prakash has been researching the soil-less cultivation of turmeric at his training centre in Bengaluru. | Photo Credit: Special Arrangement; CV Hydro “If the cost of production is ₹12 per kilogram, and the wet turmeric finger rhizome is sold at ₹20, then the gross profit is ₹8 per kilogram in India. But international pricing of this miracle plant ranges from ₹500 to ₹5,000 per kilogram. The farmers can really earn well if they cultivate turmeric through soil-less agriculture,” says Prakash. Chennai resident R Srinivasan, who got interested in soil-less cultivation after trips to the US, attended a two-day course at CV Hydro to learn the technique. He has been using the method to grow tomatoes, cucumber and other greens for the past three years. “Soil-less agriculture helps the grower to maintain a healthy root zone. The full potential of the plant can be achieved with careful monitoring because it is easier to manage diseases during the cultivation,” he says. Niharika Deora of Mumbai decided to try soil-less agriculture after college studies and trained under Prakash. “I have already cultivated exotic flowers and vegetables on an 800-square feet plot on a building’s terrace. Soil-less agriculture isn’t labour-intensive, and can be a good business opportunity if done with the right skills and knowledge,” she says. Farmers agree though, that soil-less agriculture cannot be treated as a magic solution. Besides the high initial investment, the method requires practice in order to succeed. “Growers need to manage the various parameters more meticulously as compared to soil-based cultivation. And despite the good results, there is no premium pricing for the produce from hydroponics,” says Srinivasan. Having taught innumerable home growers about soil-less agriculture, Prakash says the results of Mission Turmeric showed him the importance of reaching out to the nation’s farming community. “More farmers should take up soil-less agriculture, because it can help them to grow healthier crops in the long run. This is the difference between lab and applied science,” he says.
Source link Read the full article
#agritech#Bengaluru#coco-peat#CVHydro#CVPrakash#growbags#hydroponics#interviewNahlaNainar#soil-lessagriculture#technology#turmeric
0 notes
Text
How to use coco pith block in your garden
Coco peat brick or block is an effective growing medium primarily used for soil amendments. The brick comprises of coconut husk particles, which is very beneficial to the gardeners and plant growers. The main benefit of coco peat offered by coco peat brick wholesaler is it boosts the retention of water. Besides, it offers aeration and comes with antifungal benefits while incorporating it in the soil.

Coco Pith Block/Brick
A pith block manufacturer grounds the coconut fibers and husk particles compress them in the form of bricks; as one can easily pack, store, market and handle the bricks. Thus, before starting with regular steps to use coco pith block, you should know how to use the product appropriately.
Steps to Use Coco Pith Brick/Block in Garden
Coco pith brick or block is useful as any growing medium for garden and potted plants. For this, you have to follow the mentioned steps once you buy it from coco peat brick wholesaler-
● You have to add the reconstituted blocks to planters by leaving 1inch space beneath the planter rim.
● Plant a seedling or seed in the middle area
● To sustain any plant for a long time, you must add soil and fertilizer while planting it in coco peat.
● To make the most, we recommend you adding one-fourth part of coco peat within the potting mix.
● Container gardens often dry out in less time. To avoid this situation, you must apply a 1-inch coco peat layer on the container soil for its retention.
Additional Caring Steps to Follow
● If you require a relatively higher amount of moisture, you have to add extra peat or vermiculite. This condition is applicable for woodland flowers and ferns.
● If your plants require drainage, you must add an additional amount of perlite and sand. This activity is essential for the plantation of succulents, cacti and lavender.
● If you have to retain the soil moisture or avoid the growth of weeds, you should use coco pith block as a mulch across your garden plants.

To conclude we should say that coco peat is a perfect growing medium for a wide range of plants whether you place them in the garden or as potted plants.
0 notes
Text
Coco Coir
Coco Coir Uncategorized
Gardeners are always looking for organic substances that will enrich the soil of their gardens. We all know about mulch and compost. Are you aware of Coco Coir?
What Is Coco Coir?
Coco Coir is an organic substance found between the shell of a coconut and the coconut itself. It is a byproduct of coconut fiber. Originally used in gardens in the 19th Century, the substance loss favor because of its low quality. The material degraded when used for short-term growing.
Manufacturing methods made it into a hardier product and soon it was recognized as an ideal organic, environmentally sustainable material for improving plant growth.
The process of manufacturing Coco Coir involves submerging the coconut husk into water and leaving it there for six months or longer to decompose.
Once cured, steel combs are used to remove the coconut fiber from the shells in a process known as defibering.
After the fiber has been collected, it is dried and then pressed into bricks, discs, coir pots, or bagged as loose mulch.
Types Of Coco Coir
Coco Coir brick.
There are three types of Coco Coir –- Coco Pith or peat, Coco Fibers, and Coco Chips.
Coco Pith or peat is similar to peat moss. However, it has a rich brown color. It is dense. So it can retain water extremely well.
Coco Fibers are stringy. In that state, oxygen can penetrate through it and reach the root systems of plants. The fiber itself is not very absorbent and will decay over time. This decreases how much air gets to the roots of the plants. Coco Fibers are hardy enough to be reused.
Coco Chips are small clumps of coir that combine the best properties of peat and fiber. The chips retain water and also permit air pockets to develop in the soil.
Advantages Of Using Coco Coir
Coco Coir stimulates quick harvests and big yields. When used in combination with the right nutrients in water, plants spend less time seeking food and more time growing.
It provides plenty of room for root systems for best air exposure. It offers a combination of great water retention, reliable drainage, and ideal aeration.
It has a neutral pH range. However, it fluctuates over time. So there is a need for nutrient support.
Coco Coir limits harmful pathogens and repels some pests. It boasts antifungal properties in the soil that keeps roots thriving.
It is a sustainable product. On average, a coconut tree produces 150 coconuts a year. Coco coir uses parts of the coconut that would otherwise go to waste.
When properly treated, it is durable, thus reusable.
Disadvantages Of Using Coco Coir
Coco Coir could have elements that can cause problems for plants. For example, its possible that the Coco Coir you are considering purchasing has high amounts of salt. Enquire as to how the Coco Coir you select was produced. If the husks were soaked in salt water, make certain that the manufacturer rinsed it with fresh water. If this can’t be determined or the manufacturer did not rinse it, it’s advised that you rinse it yourself.
At the end of the drying process, the coco coir might be treated with chemicals meant to kill any pathogens blooming within. The chemical residue could affect your plants. Read the product label or check the manufacturer’s website to learn more.
Finally, Coco Coir stores and releases nutrients as needed. However, it can hold calcium, magnesium and iron. Therefore, you may need to add substances that boost these nutrients.
You need to know that coco coir must be fed to the soil daily. Moreover, it is extremely difficult to overwater and it holds on to oxygen even when drenched.
How To Use Coco Coir
If you purchase Coco Coir bricks, then you will need to rehydrate it to turn it from a compact, lightweight block into a fluffy substrate. Some have used a large bucket or wheelbarrow to hold it while adding the water. Use warm water and slowly pour it over the brick. Add just a little water at a time to avoid overhydrating. It may take some time to soften the brick and expand the fibers.
Once ready, add to garden as a mulch to assist in conserving moisture. It is also an ideal potting soil medium and a great substance for starting seeds and seedlings.
If you buy Coco Coir, but don’t use it right away, store it in a sealable container for later use.
(Sources: morningchores.com, advancednutrients.com, powerhousehydroponics.com, and shineledlighting.com)
The post Coco Coir appeared first on LawnEQ Blog.
Powered by WPeMatico
The post Coco Coir appeared first on Expert Lawn Care and Landscaping of Texas.
from WordPress Hey, Come Visit Our Store!
0 notes