#choosing the right size in a sewing pattern
Explore tagged Tumblr posts
Visit Tumblr Blog
Explore Tumblr blogs with no restrictions, modern design and the best experience.
Last Seen Tumblr Blogs


Fun Fact
Tumblr’s reach among the 26-to-35-year-olds in the US is 11%.
Text
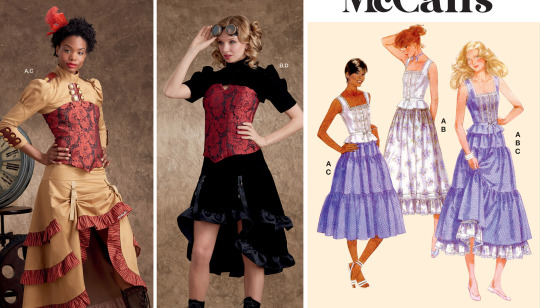
5 Tips for Using Sewing Patterns
Oh, my crafty friend, I’m thrilled that you’re diving into the magical world of sewing patterns! They’re like roadmaps to your creative dreams, guiding you to easily stitch-up masterpieces. Let me sprinkle some sewing pattern wisdom your way with these five tips that will have you dancing with joy in your craft room. Read and decode: When you first lay eyes on a sewing pattern, take a moment to…

View On WordPress
#5 Tips for Using Sewing Patterns#choosing the right size in a sewing pattern#how to read a sewing pattern#jesyanderson#learn to sew#learn to sew in dayton#needle ink and thread#patttren markings#sewin with patterns#sewing classes near me#sewing patterns tips#what do pattern markings mean
0 notes
Text
FREE POETSHIRT PATTERN
Some assembly required
Ok so. I made a sewing pattern that involves a lot of maths on the end users part - this is the only way I, a complete pattern making novice, can make this 100% size inclusive. Luckily it’s super simple and it just a whole bunch of rectangles.

Yes it’s written in cm. Bite me.
So to elaborate a bit:
It’s pretty straight forward. You plug in your own measurements in the places it’s needed.
Body x2: should be twice your either shoulder width or your widest point (if you’re more pear shaped you might want to use your hip width) by the length from your shoulder to about mid thigh* (you can make it as long or short as you want. This could probably also work as a shift pattern in a pinch). In one of the pieces, you should cut a slit in the middle, which as shown above should be about from your neck to your sternum.
Sleeves x2: these should be 2-3 times your bicep measure (this will determine the poofiness of the sleeves), by your arm length. Adding a few cm to the length can be a good idea here. I usually just round up to what seems most logical.
Cuffs x4: your wrist measure + 3-4cm of ease, by how ever long you want them - 5-10cm is a good place to start.
Collar x2: your collar measure** by however tall you want your collar. Keep in mind that it will be folded over.
Gussets
Oh glorious gussets. The whole reason this pattern works! But also where it gets a bit mathy
Sleeve gussets: these are square. The diagonal should be about 1/6 of your total armscye (all the way around). Rather a bit too small than too big - it can fuck up the fit (it did for me)
Shoulder gussets: these will depend wholely on how buff your trapezius muscles are. If your neck/shoulder is at a right angle, they’re not strictly necessary, but if you’re super buff, they’re very necessary. I’d say an average shoulder gusset is about 5-7cm, but it’s up to you.
Reinforcements
Again, these aren’t strictly necessary, but if you want your shirt to last it’s a good idea to put them in. You can choose to use between 5 and 10 total. These don’t need to be very big, they just go at any split in the fabric. About 2,5cm is good.
Instructions
I used these videos for assembly instructions
youtube
This is going to be hard without pictures…
youtube
youtube
*you can also keep the body as one piece, which should then be twice the length you want it. The slit at the neck will also have to be cut in the middle of the piece.
**your collar measure is the measurement at your neck going over your collarbone rather than tight to the neck.
446 notes
·
View notes
Text
Sewing Zero Waste Culottes from The Craft of Clothes
Zero Waste Culottes From The Craft of Clothes
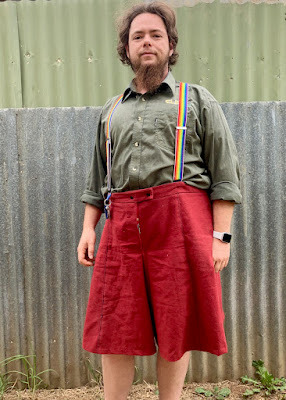
Behold! Fancy pants!
The pattern for these pants was one of my Christmas gifts. It comes from Liz at The Craft of Clothes, a zero-waste designer. I've really gravitated towards self-drafting and zero-waste sewing in the last couple of years, and this pattern has been on my list for a good six months, so I was excited to get into it.
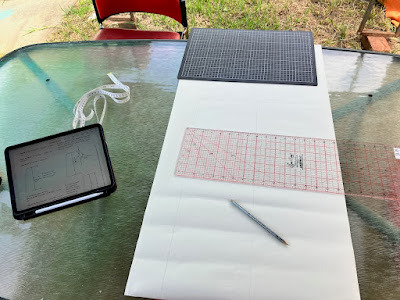
Drafting
The first step (after reading the pattern through twice) is drafting the pattern pieces.
My biggest starting hurdle was deciphering "the culottes are designed to sit on your waist" when choosing the correct pattern size. Most designers consider "the waist" to be the teapot - that is, the true waist. (It's easiest to find if you bend to the side and stick your hand in the crease - like you're singing "I'm a little teapot".) But some consider belly button height to be "the waist". I generally wear my pants at the latter height, and there's a good 2" circumference difference between those two for me.
I eventually decided to call my belly button my waist, on the grounds that that's where I prefer to wear my pants. It's also easier to take seams in than out, if I guessed wrong.
Decisions over, it was smooth sailing from there. Pattern drafting is not a technically difficult process, as long as you have good instructions, and Liz's patterns definitely fit that bill. But there's a lot of attention to detail required to make sure the end result is good. That sort of thing always makes me nervous. Fortunately there was only two pattern pieces to draft, and they're 98% straight lines and based off rectangles.
Interestingly, this is the first zero-waste pattern I've tried that has you draft pattern pieces to use. The others I've seen (most by the creator of this pattern - our library had a copy of her book, Zero Waste Sewing) have had you draw directly on your piece of fabric to create the layout. (In fairness, I didn't have to draft my own pieces. The pattern came with the option of self-drafting, printing on A4, or printing on A0.)
I much prefer the direct-draw method to faffing about with pattern pieces. But given that this pattern is designed to have the pieces tesselate, having a set of physical pattern pieces does make more sense. It's also got me wondering if I could successfully make a pair out of old jeans legs, using one leg per pattern piece. But then, I'm always looking for ways to use up my denim pile...
Sewing
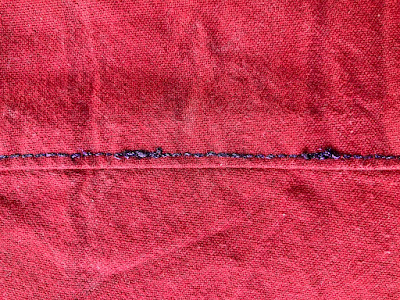
I prefer structure rather than flow in my butt coverings, so I was somewhat limited in my fabric choices for this first pair. (I know the fabric I really want to use, but I am being a sensible apprentice and trying things out on a nice-but-less-hideously-expensive fabric first.) Most of my stash acquisition has focused on stuff for shirts, since I wear those out faster than pants. I eventually settled on this nice brick red, 100% cotton, table cloth.
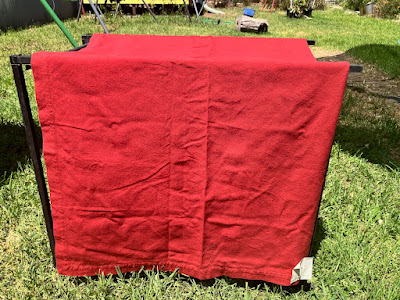
The picture is suffering from sun exposure. It's nowhere near this bright in person.
I laid out the pieces and huzzah! The fabric was just big enough! ... But only if I unpicked the hems (they're monsters, a full 3 cm/1.2" each side) and ironed them flat first. Thus, it was time for a marathon unpicking and ironing session.
After that was done, I checked the pattern fit again. Huzzah! I had enough space for all the pattern pieces, and not very much scrap left over once I'd cut them all out. (Of course, it was late and I wasn't paying as much attention as I should have been, so I didn't add an extra inch when I was forced to cut the waistband in two pieces. There was enough extra fabric that this was only an annoyance and not a complete disaster.)
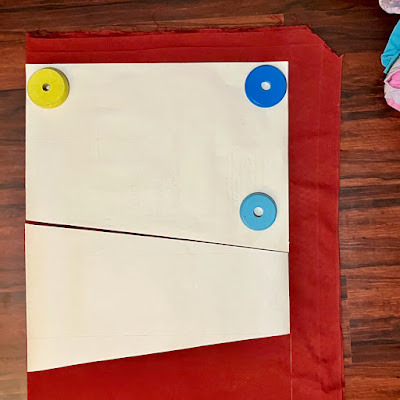
The fabric at the top is scrap. All but a few inches of the stuff on the right became waist bands and plackets.
Sewing was a fairly straightforward exercise, though it required enough brainpower that I completely forgot to take any progress shots as I went. Almost every step of the pattern comes with a diagram to show you what to do, which helped me immensely. So did having the seam allowances specified at each point, as there's three different ones used in different places.
That's not to say I didn't screw up, of course. While sewing the crotch seam, I somehow managed to close up the front of the pants entirely and leave a gap for the placket open at the back. (That will teach me not to double check the direction the pockets are facing before I pin and sew that seam. Maybe.)
I also made a highly decorative and completely awful to sew with choice for topstitching thread, which I quickly became too stubborn to stop using. So the topstitching is, uh, not great. But it is purple and sparkly, and if I'd had any sense at all I would have left it til last (or even done some sort of hand embroidery with it).
I was tricked by the first line of stitching being so easy. LIES. It was all lies.
Why should I have left it til last? Because it turns out that the culottes are, in fact, designed to sit on one's true waist. Which meant I had a two inch difference between what I needed to fit me, and what the waist measurement was. If I hadn't top stitched the panels, I could have simply ran another line of stitching down the seams that didn't have pockets in the way, and taken the waist in without much fuss or bother. Unfortunately, I didn't do that, so I was left with two choices.
Take out the topstitching and take in all the panels, bitching and moaning about the effort I went to and the number of times the topstitch thread broke while I was sewing the stupid sparkly goodness onto things.
Work out how to take the waist in by the necessary two inches, using only the crotch seam and maybe some darts or pleats or something.
Choice #1 would have been the logical, rational decision, so of course I went with option #2.
An hour and change of basting, pinning and unpinning the waistband, and completely forgetting how seam allowances work later, I managed to get a fit I was happy enough with. I ended up grading in a dart-like object at the centre back. (If I decide later that I'm not happy with the fit after all, I'll try out the modification for adding elastic to the back waistband that the pattern also includes. Probably while questioning my life choices and lamenting the amount of time I spend with a seam ripper in hand.)
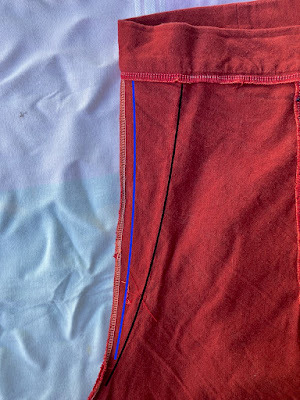
The original stitching line is in blue, the new one is in black.
After all that fitting woe, I wasn't in the mood to try buttonholes (my good machine, the one with the automatic buttonholer, is currently out of action). Instead I dove into my snap stash to close the placket.
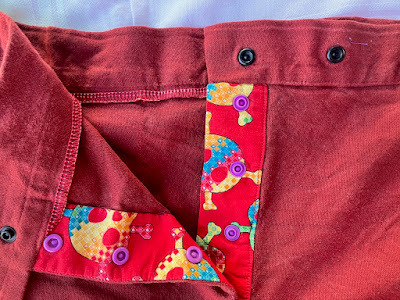
I love using bright, vivid colours for inner details. It's the sewing equivalent of wearing leopard print underwear.
A nice bonus of using the snaps is that I could put them through just the placket, leaving the fly front clean. This did make the placket pull slightly when I'm wearing the pants, exposing a trace of bright red. I fixed that by invisibly whip-stitching through the placket and outer fabric to hold everything in place. Next time I'll also double check the understitching, and topstitch the edge if needed, before installing the snaps.
Field Test and Adjustments
Trying stuff on as you go is all well and good, but nothing tells you what you really need to fix like being out in the field. I quickly discovered several things:
The waistband needs serious help to stay where it's supposed to be. Which, y'know, I did make a size larger than I should have. This was not surprising.
The crotch needs to either drop a wee bit or (preferably) rise a couple of inches. The latter will likely spoil the skirt-effect somewhat, but it will be far more comfortable for my legs.
I need a loop on the waistband to hold my keys.
For the waist woes, I had a few choices - 1) belt loops, 2) suspenders, or 3) add elastic to the back waistband. Belt loops are fiddly to make and sew on, but would solve the key-hanging issue. Suspenders technically wouldn't need any sewing changes, but the clip-on style are notorious for pulling off when you're doing things. And while the pattern includes instructions for adding elastic to the waistband, I wasn't confident it would do the job I wanted (I stick a fair amount of junk in my pockets and elastic can't always cope with the weight).
After some dithering, I went with the suspender option for this pair. I like the look of them, and the "floating" effect they give when they pull the waistband a bit above where gravity wants it to sit is extremely comfortable. But I didn't want to deal with clips always popping off. So I indulged in a quick side-quest of improving my suspenders, then sewed buttons into the waistband of the culottes.
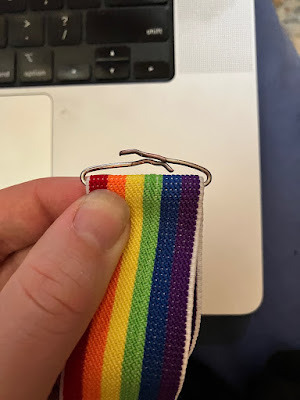
This used to hold the clips, but the wire was easy to bend flat with needle-nose pliers.
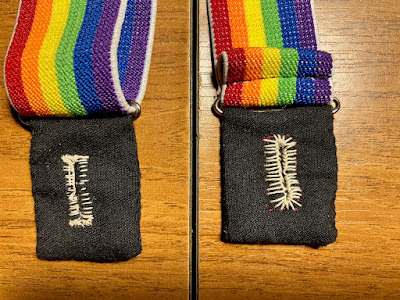
Gee, I wonder which buttonhole I did first?
Fashion Show
Overall, I'm quite happy with how it all came together. I'll definitely be making at least two more pairs - the "men's" version (less flare in the hems), likely out of recycled denim, and a pair in heavyweight stash linen.
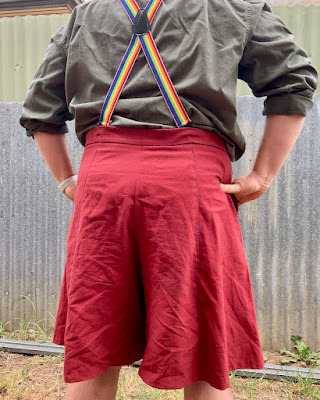
The back panel adjustment is basically unnoticeable.

They have great range of movement - maybe I need to make a workout pair?
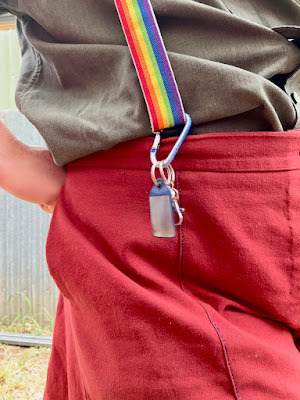
And I even have somewhere to hang my keys.
This post was originally published on my blog, Garak's Apprentice . I currently syndicate my content at Micro.blog, Tumblr, and Ko-Fi.

or Tip me via PayPal
132 notes
·
View notes
Text
Hey y'all! I was thinking about trying to share how I create my own plushie sewing patterns, and I'm sure I'll figure out more things to share, but the first thing I start with (once I decide what I want to make) is figuring out what the limiting factors are for the final product
Frequently, the limiting factor is minimum size; there is a minimum amount of width each piece has to have to be able to be turned right side out, so for things like the ant and the giant frog, the narrowest part of the ant legs and frog toes were drawn so that they could be turned right side out, and the rest was scaled to fit Sometimes, the limiting factor is maximum size. For me, this is usually because I have a specific fabric I want to use for the project and only have so much of it left, and must make the pattern small enough to fit the fabric I have. Occasionally, though, the limiting factor size-wise is the construction technique I am using for the plushie. If I am creating something with a fairly flat pattern made of the same pattern piece cut out twice, like the eel, Fred the Fish of Minimal Effort, or either of my frog patterns' bodies, where I am not using darts or gussets to create three dimensions, my size is limited by the stretch of the fabric. It's totally fine to use the stretch of the minky/fleece/other fabric to create the 3D shape, just make sure to take into account that it will only stretch so much, and that to get maximum stretch you'd need to overstuff it (making a plushie less soft). Also keep in mind that depending on your fabric, stretching it in one direction might make it smaller in the other direction One final thing to keep in mind is that your seams will not stretch as much as the rest of your fabric. With stretchy fabric, you can sometimes choose where to put your seams so that you can shape the finished plush as much by where it doesn't stretch as by where it does (this is a thing I know I have done but I can't remember off the top of my head which plushies I used it in, I'll take a look and share a picture of them if I remember)
#the person behind the yarn#long post#the pattern making process#idk if this is something y'all want me to share more about? let me know if you do#I'd love if more people created their own sewing patterns#and would happily share the things I've learned over the years so you can skip a few#'reinventing the wheel' type steps that tripped me up at the beginning lol
36 notes
·
View notes
Text
20dollarlolita pattern school step 3) prep and pattern selection.
NOTE: Here's a link to the pattern school discord. If this link has expired, please message me off-anon and I can send you one. I like to get to know everyone in the pattern school and so I don't let too many people in at once, so that I don't get overwhelmed.
So quick summary of where we were: Pattern School is a project that I'm working on in this blog, and that has an accompanying Discord server. The purpose of Pattern School is to teach people, though hands-on experience, the consistent conventions that sewing patterns use. It also teaches basics about how to transform patterns into designs that do what you want them to do. Pattern School is divided up into steps. Each step builds on the skills of the previous one, and each one teaches new elements.
Here's the pattern school tag, in chronological order.
In step 1, everyone follows a commercial pattern with notches, grainlines, and written instructions. This pattern is for something that is not fitted to a human body/is not multi-sized. In this step, we make sure that everyone has a basic foundation understanding of how commercial patterns are made. We choose a non-fitted item so that selecting the correct fit and adjusting for body shape is not necessary. If the student wishes, an additional challenge for step 1 will be to look at a pattern, see if it's usable in lolita fashion, and make good fabric and trim selections to make a usable lolita item.
In step 2, we take a pattern for pajama pants and use it to create bloomers. This step introduces the basics of pattern manipulation. We go into how to remove seam allowance, measure ourselves for fullness, and assemble a garment from a modified pattern. Once again, there is a challenge of choosing good trim and fabric options to build a usable lolita garment.
In step 3, we will be making a lolita or lolita-adjacent garment for ourselves. This garment will be a fitted item, and it will have a closure. What's a closure? Closures are something that opens and closes to allow the wearer to get in and out of the garment. Closures can be zippers, button plackets, hooks and eyes, IDK freaking magnets or something, if you want to put velcro as a closure then more power to ya, but your garment needs to have some kind of closure. I've made resources for how to put in zippers, but other closures are probably also acceptable. Pullover elastic is not a closure. We are making a garment for ourselves because it's a lot easier to make a fitted garment when you have the body you're using right there with you at all times. If you are always with another human being while you sew, you could probably use them, but the critical component is that you have the body accessible to you all the time.
This time, the challenge is also to make something that either can be part of your lolita wardrobe, or that forces you to choose and style something that has a lot of lolita fashion aesthetics. If you want to pick a lolita-adjacent concept, like Aristocrat or Fairy Kei, you're probably fine? If you're doing this on your own, the person who decides if you're cheating is you. If you're in the Discord, you can ask if something's acceptable and like 15 people will disagree with it before tagging me and then I make up an answer on the spot. I firmly belive that Ouji is just lolita with pants and doesn't need to be stated separately.
I previously made a very long list of garments that you can make EGL fashion with, but it's older and some of the patterns are out of print. So, here's a few hours of me going through the big 4 pattern website and finding stuff that has potential.
Dresses:

Left | Center | Right
So quick note: my image editing software kept refusing to function with images off simplicity.com, so we're going to alternate between funky screenshots and semi-competent images. I'm not sorry.

Left | Center | Right
Any time you're making a lolita dress from an existing dress pattern, you'll need to check that the skirt will hold our petticoats. Frankly, most of them don't. You've done the bloomer step, so you do have experience with this kind of modification, but I'll do a tutorial later about checking this and drafting your own skirt onto an existing bodice. For step 3, doing a commercial pattern for the bodice and then following a web tutorial for the skirt totally counts. What we're looking for in a dress pattern is the ability to mod it into a working lolita dress. Please note that Simplicity 8444 (the pirated-but-not-pirate lolita dress) and Simplicity s9735 (the “why'd you use Derpy-chan??”) dresses are not eligible for Step 3, as they are both elastic pullovers.


Top Left | Top Center | Top Right Bottom Left | Bottom Right
Blouses: However, Simplicity 8444 and s9735 both have blouses that work for step 3. If you want to build the JSK on your own and then follow the blouse pattern for step 3, you're good.
The McCall Titanic looking thing is a really fun blouse to make for this, and it's got a back zipper, so if you're not confident in your button-sewing then it's a good option.
Any button-up that goes all the way to the neck has some lolita potential. M8463 is actually pretty loliable on its own.

Top Left | Top Center | Top Right Bottom Left | Bottom Right
Vests are easy to make, don't take a lot of fabric (so you can use some really fancy fabric and have it not break the bank). You're going to have to find a good reference image for lolita but they're really good for ouji and aristocrat, so they get a category.
Top Left | Top Right Bottom Left | Bottom Right
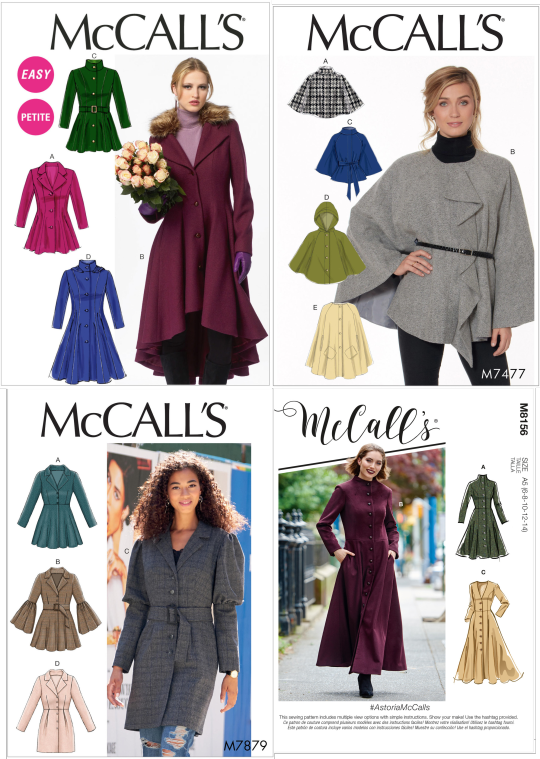
I've just always wanted to make my own lolita coat so they get a category. Once again, you're going to need to double check that the flare fits your skirts.
Left | Right
Welcome to the weird shit category. There's a costume shop near me that sells these funky bolero steampunk things and I've always wanted to put it in a coord, so it's on here. The other one is a top that you could probably use as the top half of a JSK, so if you want to make a coordinating skirt then you could have some fun separates. I think handmade lolita needs more coordinating separates. They're a real thing but I want them to be more common.
So that's in no way a complete collection of patterns you can use, but I hope that's got some kind of inspiration about pattern. My test garment was made off an etsy pattern. There's plenty of other patterns out there. This was just the fastest way for me to showcase some patterns that do work.
We'll do a little more about looking at style lines and finding how to understand this a little better in the future, but for now here we are.
58 notes
·
View notes
Text
Looking at blackout curtains to replace my current thin-ass regular curtains, hastily purchased at Walmart when we converted what was previously not a bedroom into my bedroom. My comfort would greatly benefit, as the sun shines directly through my southeast-facing window for most of the day, and the way my desk is set up I'm facing it when I'm using my computer, so I have to constantly avert my eyes (as I'm doing right now, lol). At night, there's a streetlight that doesn't shine through as much but still does, and would make sleep impossible if I had no curtains at all.
I'm working on making my bedroom an actual nice place to be, because the other day I came to the harrowing realization that I'm content to wallow in a foul neckbeard nest due to a complete lack of self-respect. For the reasons previously mentioned, I feel like good-quality blackout curtains would be a natural first step.
NOW, I'm conflicted between two options I have come across. One is a cheaper pair from Home Depot, costing $40 with free shipping, that I think should fit my window well (I still have to measure) without any trimming required.

However, I'm not huge on the drab colours, plain fabric and complete lack of patterned options. They're functional, inoffensively coloured and will probably fit my window, but that's about it.
THEN there's a pair from Ikea, certainly much larger than I need in length but available in a pattern I think would look great, with nicer-looking fabric (both are just polyester, though).

Now, the Ikea pair costs $99 before shipping, well over twice the price of the Home Depot set. I'd definitely have to trim them, and this is the only size they come in, so I'd be paying for fabric I don't need and would just be stowing away in the scrap bin. I'm not the best at sewing, either, so the hem would likely be ugly af. Still, despite all this, they are quite alluring... my brain says Home Depot, but my heart says Ikea...
I'm having a hard time choosing. Which do YOU think I should get? I have several hundred bucks in the bank rn and I haven't made a for-fun purchase since last spring at the latest aside from 2 or 3 <$15 Steam sale games, only eating out when the alternative is skipping a meal and not buying any clothes aside from neccesary socks and undies, so maybe the Ikea curtains could be justified? They're the price of, what, 4-6 fast food combo meals? My basement boy bills (only phone and pet food) are about $75 a month, give or take, which I easily overshoot with my part-time job. Still, it's a LOT of money in my world... asking for advice here. Should I stick with the budget option, or splurge on something prettier?
#interior design help#interior design opinion poll#blackout curtains#blackout curtains poll#poll#tumblr poll#tumblr polls#opinion poll#opinion polls
8 notes
·
View notes
Text
k, so. breakdown for titania.
first immediately is i know i want to alter the design from the anime. in the anime her skirt seems quite stiff and i also dont love the movement or silhouette of the whole set. i’m taking my main inspo for the silhouette and layering from the manga, and fabric inspo in coming from the new york city ballet’s midsummer nights dream and doujins
second concern is that i’ll need to build the top around a bra so there’s support. her top is in two sections, while i’ll cal the base and the tie for convenience. the base is quite short and tight, so i can easily (hahahaha help me) sew it over a good underwire bra, but i might have to go down a cup size. i shall figure this out once i’m satisfied with a pattern. but the tie will be fairly straightforward after i choose a fabric for it
for fabrics, i want something i can layer and build opacity with. i want it to be quite flowy and light, she’s supposed to be a fairy after all so i want a very ethereal fairy feel. also with the opacity, ideally it wouldn’t be fully plain stark white. i’d like something a little see through (not showing through fully, but that’s where layering comes in) because that’s the way it’s described in the light novels
her armbands do nothing for me in the original design so i’m going to add some kind of sleeve. i don’t know if i want something little or something big. maybe i’ll make a few options. i just want to add all the movement i can. i’ll have a canon compliant version too, but i also want my absolute dream version lmao
REMOVABILITY!!!!! v important!!!!!!!!!!!!! layered skirts are so hard to pee in you guys!!!!!!!! i’m going to have a miniskirt type thing at the bottom layer of the skirt (like when it’s torn) because 1) i want to be able to remove layers of the skirt for convenience without showing my entire ass and genitalia 2) i’d rather over-plan for the idea of maybe doing something with the torn outfit so at least i have it if i want it lol
drop waist!! which the canon design already has but asuna has a very long torso (matches kazuto’s long chicken legs) so i would like to accentuate the drop waist a little to make my torso look longer and make me look taller
tbh the wig is a nightmare. wigs long enough don’t come in the right colour so i think i’ll have to dye a rapunzel wig or something. i’ve found a couple of 60 inch wigs so hopefully i can run some experiments on my test wigs and try to perfect how to dye them
i want some strappy heels because as mentioned before i am short
genuinely don’t know what to do for jewellery. obviously i can’t take out my piercings so i’ll just wear silver and maybe some little pearls in my top holes and some cascade-y silver earrings on my bottom holes. and she has elf ears so i’ll need to add the plating to the top of them (also need to do it for oberon but i’m procrastinating him so hard because i need to redo everything)
#more for my own reference than anyone else’s#she’s been my dream cosplay since i was like 12#or 11. i don’t remember#since i was entirely too fucking young that’s for sure
2 notes
·
View notes
Text
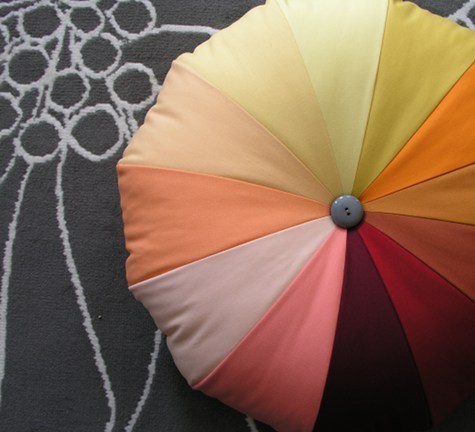
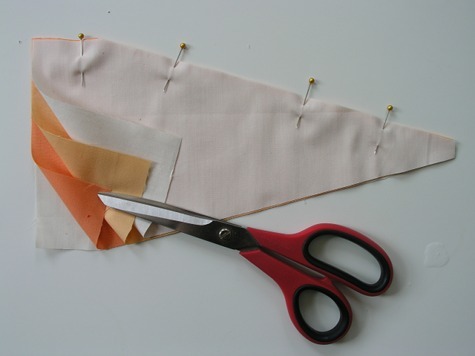
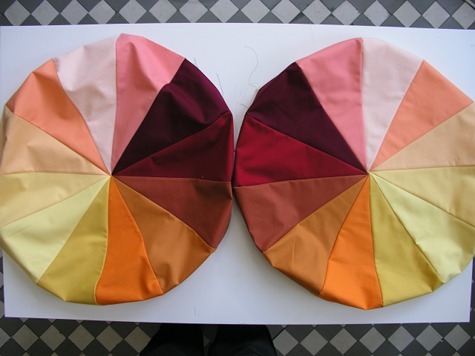
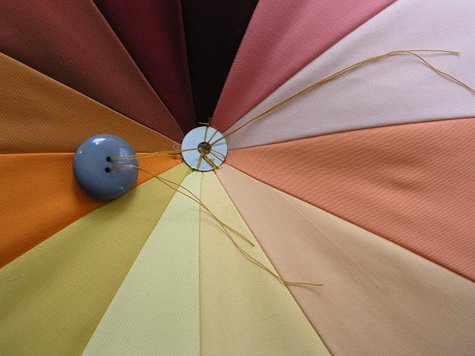
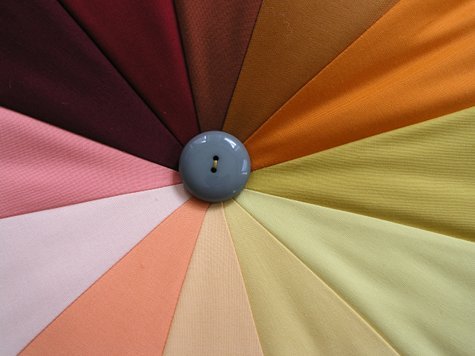
DIY Color Wheel Pouf
Project by Brett Bara:
Add a burst of color to your room with this crafty pouf! At 17” wide and 10” deep, it’s large enough to serve as floor seating or a foot stool. (And if you have pets, I have a feeling they may want to make this their new favorite spot!)
This project is a little challenging to sew, but it’s not too difficult, so if you’re comfortable with the basics of sewing, give it a try. You can make a colorwheel effect with a range of solid colors, or choose a variety of patterned fabrics for a louder patchwork effect. Medium-weight cottons work well for this design (check out quilting shops for great selections of solids and prints).
I love the idea of making a set of these poufs in a range of sizes, for a sculptural stack of cushions that will become a room element in their own right. Or if a pouf isn’t your thing, you can make this in a smaller size for a cute throw pillow for the sofa or bed. Let’s get started! –Brett Bara
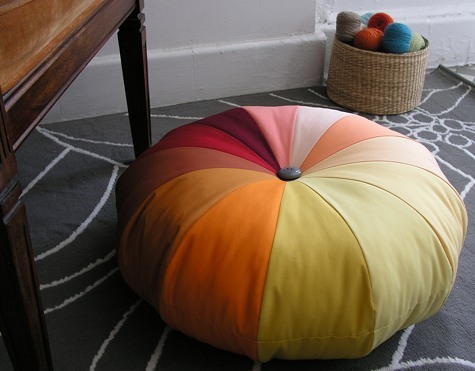
Finished Dimensions: 17” diameter by 10” tall
What You’ll Need
¼ yard each 12 coordinating fabrics (I used quilting cottons)
1 yard muslin
3 pounds fiberfill stuffing
2 large buttons (approximately 1 ½”)
2 flat metal washers, slightly smaller than your buttons
12” upholstery needle (get this where upholstery supplies are sold)
fishing line
sewing thread
hand sewing needle
sewing machine
sharp scissors
iron
1. Print the template
DOWNLOAD TEMPLATE HERE
Download and print the template above. This template will work if sized to any dimension, so you don’t have to worry too much about getting it to print to the exact size specified. (And if you prefer a smaller or larger pouf, just size the template accordingly!)
2. Cut & Arrange the Fabric
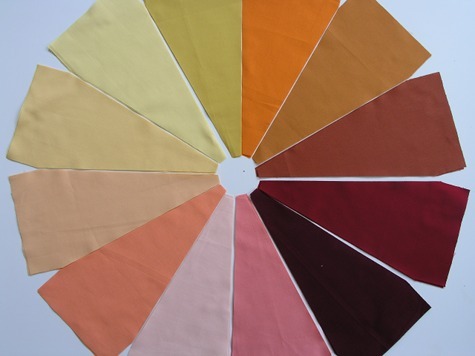
Using the template, cut 2 pieces from each of the 12 fabrics, and 24 pieces of muslin.
Arrange one piece of each of the 12 fabrics in the order you plan to assemble them.
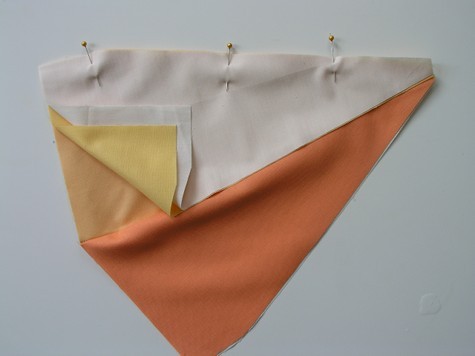
3. Assemble the Wedges
To stabilize the fabric and discourage stretching, a piece of muslin is sewn behind each piece of colored fabric. To do this, just align a piece of muslin on the wrong side of each piece of fabric, then sew them together as one as you assemble the pouf.
To sew the first two wedges together, make a little fabric sandwich with a piece of muslin, the first wedge right-side up, the next wedge right-side down, and another piece of muslin. Pin all four layers together along one side.
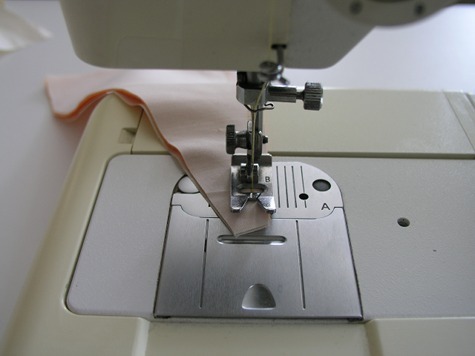
5. Sew the Wedges
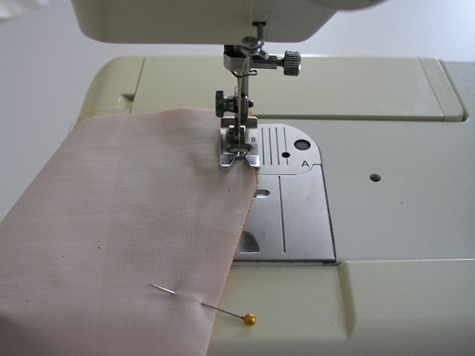
Beginning at the wide end of the wedge shape, sew the layers together using a ¼” seam allowance. Sew a gradual curve along the angle at the base of the wedge (rather than sewing a distinct point). Stop the seam when you reach the point.
6. Iron
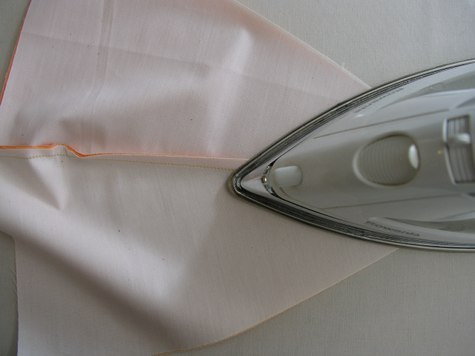
Iron the seam, pressing the seam allowance to one side.
7. Sew the Remaining Wedges
Place the piece you’ve just sewn right-side up on your work surface, and align the next color wedge right-side down, then place a piece of muslin on top of it. (Be sure to take a moment and double-check that you’re assembling the pieces in the correct color order; I found it was easy to get mixed-up and accidentally sew the pieces in the wrong order!)
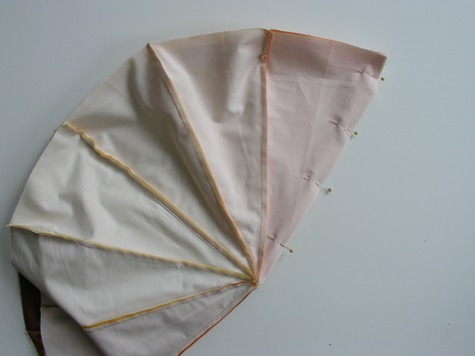
Continue to assemble the wedges in this order until you’ve assembled six wedges for a half-circle. Then, assemble the other half circle separately. When both half circles are assembled, place them together along the straight edge, and sew them together. (Assembling them in this way ensures that you won’t have a hole in the middle where all the points meet.)
8. Sew the Other Half

For the other half of the pouf, you must arrange the colors in the opposite direction as you did for the first half. To test if you have the order correct, lay out the pieces in the reverse placement, then place the first half right-side down on top of the pieces to be sewn. If the colors are matched up, you’ve got it right.
Sew the wedges for the second half in the same way you did for the first half.
9. Join the Two Halves
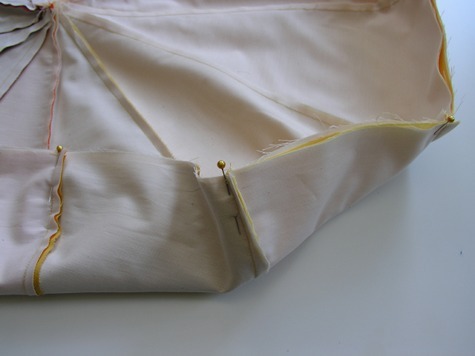
Pin the two halves with their right sides facing together, aligning the pieces so that the seams meet.
10. Join the Two Halves
Sew the two pieces together around the perimeter, ¼” from the edge. Leave an 8” opening to stuff the pouf, backstitching at the beginning and end of the seam so that it doesn’t unravel during the stuffing process.
11. Iron the Seam Allowance
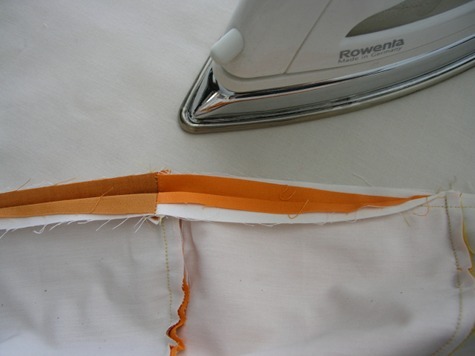
Turn the fabric under ¼” on each side of the opening and press. (Folding and pressing this edge will make it easier to sew the opening closed after the pouf is stuffed.)
12. Stuff the Pouf
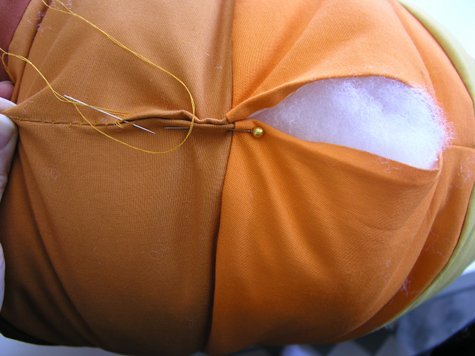
Stuff the pouf, pulling off handfuls of stuffing and adding them in smallish clumps (to avoid a lumpy appearance, it’s best to add the stuffing little by little). Take care to spread the stuffing into the far edges of the pouf so that each nook and cranny is fully stuffed.
When the pouf is nice and firm, sew the opening closed using a hand-sewing needle and matching thread.
14. Make the Tuft
(SAFETY NOTE: Be very careful when working with the long upholstery needle. I nearly poked myself in the eye as I struggled to push the needle through the pouf while leaning over it to observe – yikes – NOT a good method! Always insert the needle AWAY from yourself, not toward yourself!)
In this step, flat metal washers are used to hold the tufting in place in the center of the cushion. The tufting is sewn with fishing line because regular thread is not strong enough to withstand the pressure of the tufting. The buttons, which are decorative only, are added later.
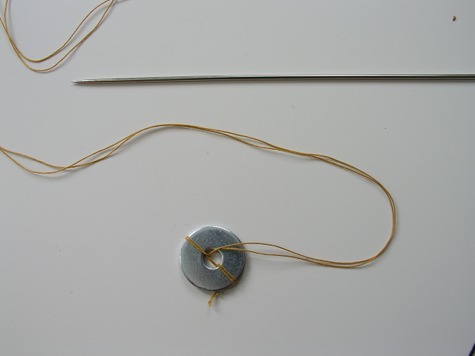
Thread an approximately 60” piece of fishing line (here I’m using heavy thread since fishing line wouldn’t show in the photos) through the long upholstery needle. Tie both ends of the fishing line onto one of the washers and loop it through the washer twice.
Insert the needle all the way through the center of the pouf, so that the washer lies flat against the center point of one side the pouf. On the other side, loop the thread through another washer.
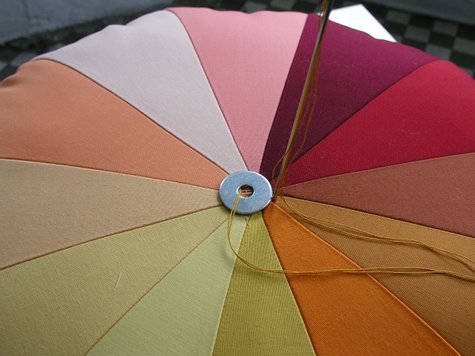
Looping through the center and around the edge of the washer, insert the needle back through the pouf and out through the center of the other washer. Pull the fishing line tight while pressing down on the top washer to create the tufted effect. Keeping the tension, insert the needle around the washer and back through the other side. (It’s helpful to have someone else lend a hand at this stage, though it’s not impossible to do yourself!)
Make a few passes with the needle and fishing line, each time looping through and around the washers. Tie off the line on one side, knotting it onto the washer.
15. Add the Buttons
Cut an approximately 30” piece of matching thread and loop it through the upholstery needle, doubling it. Insert the needle through the pouf, going through the center of the washers. Next, loop it through a button, then back through to the other side of the pouf. Finally, loop it through the other button. Tie the threads in a knot so that the thread is pulled taut and the buttons are nestled against the washers.
And poof — you’re done!

15 notes
·
View notes
Text
Learn How to Sew a Slip Dress with Flounce Sleeves and a Free PDF Pattern for Beginners!
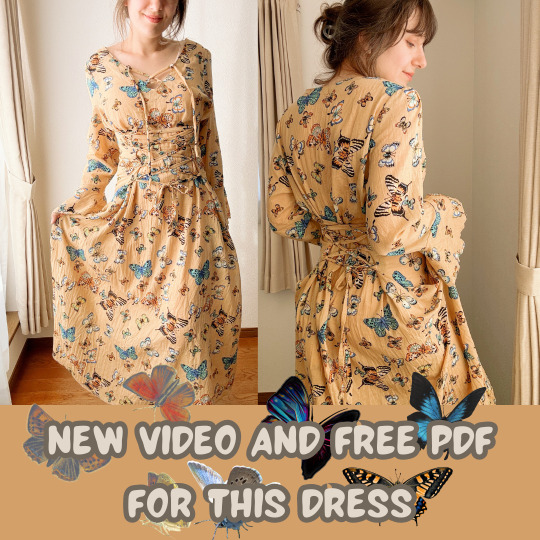
Do you love slip dresses? They are one of the most versatile and chic garments that you can have in your wardrobe. In this video, I will show you how to sew a slip dress with flounce sleeves, a corset waist tie, and pockets. You will also get a free PDF pattern in 5 sizes to download and print.
A slip dress is a simple and elegant dress that can be worn in many ways. You can dress it up or down, depending on the occasion and the season. A flounce sleeve adds some drama and flair to the simple silhouette. A corset waist tie accentuates your curves and gives you a flattering fit. And pockets are always a bonus, right?
In this video, you will learn how to:
Print out the PDF pattern and cut out the pieces according to your size
Sew the front and back bodice pieces together at the shoulders
Sew the front and back skirt pieces together at the sides
Sew the bodice and the skirt together at the waist
Sew the flounce sleeves to the armholes
Sew the neckline facing to the neckline
Sew the corset waist tie to the waist seam
Sew the pockets to the skirt
Hem the dress and the sleeves
You will also learn how to hack the pattern to create different styles of slip dresses, such as:
A basic slip dress without pockets and ties
A slip dress without sleeves
A mini dress with a ruffle
You will also get some tips on how to choose the right fabric and size for your slip dress, and how to style it for different occasions and seasons.
To watch the video, click on the link below. Don’t forget to like, comment, and share if you enjoy it. And if you want to see more videos like this, subscribe to my YouTube channel and follow my Tumblr blog.
Watch the video here
Detailed post with sizing guide and free pattern here
Happy sewing! 😊

8 notes
·
View notes
Text
Journeys in Amigurumi (Bingo Roll 1)
Spoiler: This was a challenge!
For my first roll of the bingo card, I got "make an amigurumi" - and as someone who is most comfortable with flat 2D projects with little sewing, I knew this one would really be taking me out of my comfort zone. I'm not happy when I have to sew, and I am incredibly not happy when I have to attempt embroidery.
I may not do a full blog post for each bingo roll, but as this is so completely new to me and a large part of this bingo is the journey, here we go!
For full disclosure, I've made ONE amigurumi project before this, and I haven't picked up the technique once since. So before we dive in - have a quick picture of where I started 12 years ago.
I had to dig some really old photo archives for this one.
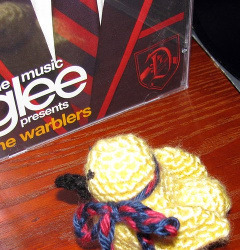
This lil' guy was made to be a warbler for my fandom at the time. I am sure he was based off a pattern, but it's unlikely I'll be able to find it now. I also don't think I know where this lil birb is anymore; he's gotten lost in the shuffle of moving a few times since.
Step 1: Research
Research - Before even choosing a pattern to begin this challenge, I wanted to first understand more about amigurumi, so I took to Youtube, which is my usual place to learn all things.
For my intro to amigurumi, I started with a few channels:
LePetitSaint Crochet, especially this Amigurumi fundamentals playlist; olliehollycrochet, especially this beginner tutorial video; For inspiration, I've also found Skein Spider
There are quite a few amigurumi channels out there - these are just a few that I enjoyed across my youtube dashboard.
The next step of research was finding a pattern, and I feel as though this is the part of the rabbit hole I am going to ADORE continuing to explore.
Step 2: Practice
Before I started "the" project, I wanted to first get a sense of the tension and play around with a project. Just something small. In effort to avoid buying more materials, I took to stash busting some of my scrap cotton. For the test piece, I found the pattern Octobuddy by the blog, Sweet Softies.
As someone with already pretty tight tension, working with a smaller hook took some getting used to, but I liked the way this pattern was written - he's an adorable little Octopus, but it also helped me get used to the shaping and stuffing process. I used household cotton balls since poly-fil isn't the type of thing I just have on hand. I did end up buying some for the final project.
This was a good exercise for me, as I started to feel comfortable with the actual crochet and using a tighter gauge. As I was sewing the eyes, I ended up pulling the cotton up or not being able to push the needle through. He was a bit overstuffed, or maybe I tried to assemble out of order, or maybe it's just my lack of sewing experience striking again.
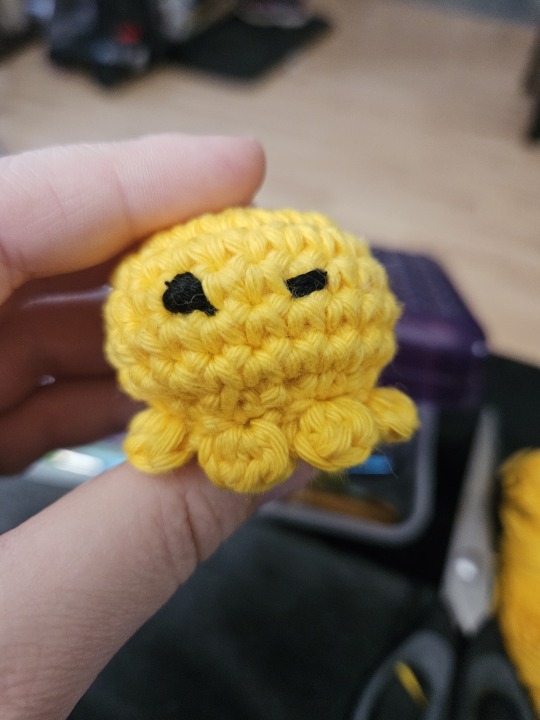
Beyond that, the hardest part was in fact the the embroidery of the eyes, and his are quite... something. I was not originally going for the wink, but as the two sides became less uniform, I decided to lean into it. They still turned out pretty shoddy, and I can NOT stand doing this. I told myself never again, but for another spoiler... I did it again.
My Octobuddy might still be a bit overstuffed, but he's super squishy and relaxing to squeeze, just like a stress ball, the perfect size for my palm. So he's been hanging with me at my work desk.
Step 3: Do the thing
I won't say I was ready for the next thing, per se, but I also wasn't getting anywhere just looking at the cool things that could be made with this technique. So why not jump right in?
For my actual pattern selection, I chose "Hubble" by Projectarian, available on ravelry. I love me an aquatic creature, and it called to me that not only was this pattern free, it also came with a beginner friendly pdf, quick reference, and an entire selection of written tips for the new-to-amigurumi crafter.
Squid time!
Again, I wanted to use up scraps, so my first challenge with this pattern was adjusting it for the yarn weight I had on hand to use. As a result, the eyes were made with a way too tight tension. The pattern called for some crochet for the sleeping pupil lines, but there was no way I was going to get my hook in there. For the second time, I took up a sewing needle and attempted embroidery. This time turned out a bit better than the Octopus. I adore how soft he looks with the brown cotton yarn I decided to use when I couldn't find black.
At some point in attaching the legs and tentacles, I did lose track of where I was - but that was on me since I got lazy with the stitch markers. It was so close to the end, I was able to wing it to decrease the final row and stitch up the center. Before then, I added a bit more poly-fil.
I chose not to add pom-poms at the end of the legs for the same reason as I didn't add tassels to the blanket I made. Being a mom of three dogs makes you super aware of the types of things the furbabies will get into. You should've seen their faces when I brought home the poly-fil.
But I'm ranting away and you haven't even seen him yet!!
Step 4: Finished Object!
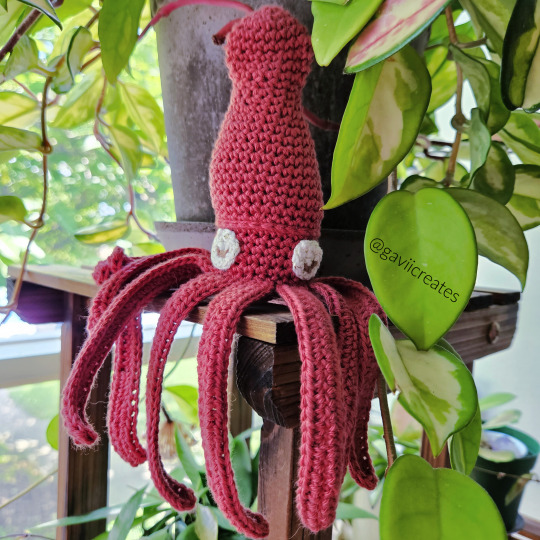
Body: Hobbii Rainbow Cotton 8/4 - Rosewood, 3.5mm Eyes: Hobbii Rainbow Glitter Gold 8/4 - Natural White, Hobbii Rainbow Cotton 8/4 - Light Brown, 2.00mm Legs and Tentacles: Hobbii Rainbow Cotton 8/4 - Rosewood, 3.25mm Pattern: Hubble the Squid by Projectarian I call him Hubblet since I made him so small. Sleeeepy squid baby.
Make an Amigurumi✔️
15 notes
·
View notes
Text
More thoughts on JackHarding A/B/O with Chick as an Alpha from a long line of Alphas and Jack an Omega who has spent a LOT of time hearing how he's not much of one because he looks and acts all wrong:
Jack, being an Omega, was expected to learn the homemaking arts. Which he refused to do whenever possible because he's getting in one ear that he needs to know them to get a mate and then hearing in the other he'll never get a mate because he's not the right kind of Omega, so he very intentionally refuses to learn anything he does not find immediately useful to himself. He's an excellent cook because he LIKES cooking, and he keeps a neat house because he likes it that way.
Chick, being from his ultra-Alpha family, was always told not to worry about homemaking things. He'll have a mate for that. But sometime before meeting Jack, he'd decided to figure some shit out for himself, and it turns out he enjoys several of the "Omega" homemaking skills including knitting and crochet and embroidery. He finds them soothing. He is a major proponent of teaching men to knit when they're in the hospitals during the war to give them something to concentrate on.
Chick can cook fine, but Jack's a better cook.
When Jack and Chick get engaged, Chick gets to work on a proper hope chest for Jack because he knows Jack doesn't have one and doesn't want to create it himself. He tells Jack the night he starts it because he doesn't want to make it in colors or patterns Jack doesn't like.
Jack makes the actual chest for all the linens. It's metal, not wood, made of various cuts of scrap from the forts. He gets Ken to help him cut it to size and line it with silk from an old parachute.
Jack ends up being so curious watching Chick make blocks for a bedspread that he asks Chick to teach him.
Turns out Jack enjoys quilting when it's something he chooses to do and isn't forced on him. He hates knitting. He's good at crochet. He enjoys cross stitch when the pattern is stamped on the fabric but hates working from a pattern. It reminds him too much of maps.
When Chick finally collapses from ignoring his gallbladder for weeks, Jack deals with the stress by crocheting, then embroidering a dunce cap. Chick gleefully wears it the moment it shows up at the hospital.
Chick's family are SCANDALIZED when they find out the monogrammed handkerchief Chick pulls out during a visit was monogrammed by their own son. He digs the knife in deeper by asking Jack to take out his, which has a tiny B-17 stitched into one corner and very lovely bunches of flowers stitched into the other corners.
When Jack gets pregnant, they work together on the christening gown. Jack sews it all. Chick makes all accessories. His family try to pretend like Jack did all the work in front of their asshole friends, and Jack DELIGHTS in correcting them. Chick delights in watching Jack correct them.
Jack's family is just happy Jack found someone who loves him as he is and think Chick is absolutely wonderful. They have Chick's permission to mention his family's Alpha bloodline to anyone who tries to scoff about how "I'm surprised Jack found someone. You know we love him, but he can just be a bit difficult." / "Well, Chick is from a long line of Alphas, so we guess he's just got a natural inclination to handle Jack." / "He's from a long line of what now."
#jackharding#a/b/o#masters of the air#gayle this is just expected mid-century gender roles with self-lubing buttholes#always has been#jack kidd#chick harding
2 notes
·
View notes
Text
All about sewing tools

Sewing Tools for Professional Results As with any profession or hobby, using the right tools can make all the difference in the world and can make the difference between amateur or professional results. Even if you’ve only sewn a few projects and collected some basic sewing tools, it may be time to learn about some of the advanced sewing tools designed to give your project that professional edge. Most sewing projects can be completed without the following tools, but as you improve and fine-tune your skills and develop an affinity for quilting, home decorating or clothing construction, you’ll find these tools indispensable for saving time, increasing accuracy and simplifying tasks Cutting Tools Needlework Scissors and Snips Small, 3"- to 5"-long needlework scissors or snips are indispensable for clipping close to the stitching line or trimming intricate areas of a project. They can be used wherever your large bent-handled shears can’t reach. Snips have spring-loaded handles. Keep a pair alongside the sewing machine, at-theready to cut stray threads. Rotary Cutter Used with a self-healing mat and a clear plastic ruler, rotary cutters are ideal for straight cuts in one or more fabric layers. Look for blades that can be easily removed and replaced and a handle that is comfortable. Rotary mats and rulers are made specifically for rotary-blade cutting, and the materials don’t dull rotary blades as other products might. Both the mat and the ruler feature gridlines and angles for cutting accuracy. See more about: rotary cutters Measuring & Altering Tools Grid Board Use a large grid board under the fabric and pattern to align the fabric grain while pinning and cutting. A padded grid board allows you to pin into it when stretching or blocking fabric. Some have ironing surfaces that are also helpful for fusing large fabric sections. Consider a rotating grid board if your space is limited. Mats and wide rulers used for rotary cutting are actually modified grid boards used both underneath and on top of the fabric. See “Rotary Cutter” above. French Curve or Fashion Ruler These rulers have a variety of curves to mimic the body’s curves and are used when altering patterns. It’s helpful for the simplest length adjustment and indispensable when actually changing the style of a garment. Depending on how you turn the ruler and what segment you use, one ruler gives you all the curves necessary to complete pattern lines when altering or drafting patterns. Marking Tools FabricMarking Pens The space-age chemicals used to make these clever pens become more high-tech every day. The disappearing ink allows you to mark most projects at the exact location needed—even on the fabric right side— without fear of staining or discoloration. Look for an ink color that is in high contrast to your fabric, and for accuracy select a fine tip. Choose a water-soluble pen for long-term projects, when you want the markings to remain until you remove them with water. Air-soluble pen inks disappear within a few hours and are ideal for fabrics that can’t be washed or dampened. Some air- and water-soluble pen manufacturers caution against exposing marked fabrics to sunlight or the heat of the iron because heat may set the ink permanently. Always test the pen on a scrap of the fabric before using it on your project. Pressing Tools Tailor’s Ham Resembling a ham, this pressing tool is used as a base or a mold when pressing curved or shaped seams. It’s available in several sizes and should be covered on one side in cotton and the other in wool. The ham’s curves are designed to mimic garment curves and are used to set the shape of collars, lapels, sleeve caps and more. Point Presser & Pounding Block The raised points of this wooden tool allow you to press deep into a corner without creasing the surrounding fabric. The base is used as a pounding block, or clapper, to flatten seams. Needle Board A flat, flexible board with a bed of short needles placed very close together, a velvet board or needle board is used for pressing napped fabrics, such as velvet and corduroy, without crushing the fabric’s pile. A lessexpensive, and less-effective, version of a needle board features a canvas backed fabric with a raised pile front that takes the place of the needles. Sewing Tools SewingMachine Needles Sewing needles are designed for the type of fabric, thread and stitches you’re using. Using the right size and type of needle will greatly improve your sewing success. For more information on choosing the best needle for your project . Tip: A stitching problem, such as skipped stitches or looping or shredding threads, at firstmay appear to be a problemwith themachine when actually it’s a call for a new or better-suited needle. Bodkin Used for drawing elastic, cord or ribbon through a fabric casing, bodkins are available in several different styles. The pincer is usually the shortest with teeth at one end designed to clamp down firmly on ribbon or elastic and pull it through a tubular casing. Longer versions have a safety pin style closure at one end, and the slimmest version, designed like a large sewing needle, has a large eye for feeding narrow cord in narrow casings. A bodkin’s ball-point end comes in handy for turning fabric tubes right side out. Point Turner A point turner is a hand-held, pointed plastic tool designed to poke into tight corners. For crisp, sharp corners and points, use this tool to push out the corners of collars and cuffs before pressing. The opposite end is flat or rounded; use it to hold open seam allowances while pressing, so you don’t burn your fingers.Basting Tape Much faster than hand basting with needle and thread, use narrow, paper backed basting tape to hold zippers, bias tapes and trims in place while stitching. Fray Preventer A drop of this liquid on the cut edge of a woven fabric will bond the edges and prevent the fabric from raveling. Before using, test the product on a scrap of the actual fabric, or in an inconspicuous area of the project. Allow the test piece to dry thoroughly. Then wash, dry and press it as you would the finished project, to be sure the product doesn’t discolor the fabric. Read the full article
5 notes
·
View notes
Text
Free Crochet Blanket Pattern (Scraps of Yarn Blanket)
(COPY BELOW)
FINISHED SIZE
Varies
Showing in finished size: 65” L X 42” W
YARN
Weight - #4 Worsted
Color: Assorted
Qty: (2) Balls per color of any combination
Showing In: (2) balls each of 7 shades of gray/white
MATERIALS
Yarn needle
HOOK
US N15/(10.00mm)
ABBREVIATIONS
Beg = Begin
Ch = Chain(s)
Cont = Continue
Dc = Double crochet
Rep = Repeat
Sc = Single crochet
Sp(s) = Space(s)
St(s) = Stitch(es)
PATTERN NOTES
Change color at the end of row.
To avoid having several loose ends to weave, use this joining technique: https://www.youtube.com/watch?v=EXBdlRMjO40
·Need color combination inspiration? Our Pinterest “Color Scheme” has 100 + photos: https://www.pinterest.com/guchet/color-schemes/
STEP 1: BLANKET GRID
With 2 strands of color #1 joined together
Ch any EVEN number until you reach your desired width.
Row 1: Dc in 5th ch from hook (sk sts count as 1 dc + ch 1), *ch 1, skip next ch, 1 dc in next ch*. Rep from *to* across to last ch. End with 1 dc in last ch (so 2 dc at end of row). Ending stitch count should be 2 less than original chain count.
Row 2: Ch 4 (counts as dc + ch 1), turn; *skip next dc, dc in next ch-1 sp, ch 1*. Rep from *to* across to last ch-1 sp, dc in last ch-1 sp. End with 1 dc in top of ch 3. Rep row 2 for a total of 5 rows.
Switch to color #2 and work another 5 rows.
Cont to work in stitch pattern, switching colors every 6th row, until desired length is achieved.
Note: Length of blanket will grow considerably, as the stitches will stretch a lot.
You will end with a “grid-like” piece of work.
STEP 2: CREATING & WEAVING CHAINS
You’ll be creating longs chains that will be weaved through each ch-1 space.
With 2 strands joined together
A. Join yarn to last dc made at lower edge. Determine number of chains needed by using the following calculations: Beg chain count_ x 5 Rows = ____ (Ex: 100 chs X 5 rows = 500 chs).
B. Create long chain.
C. Fasten off.
D. Thread chain through yarn needle.
E. Weave chain, from left to right, under and over 5 rows, in ch-1 sps to create woven appearance.
F. Fasten off.
Note: After creating the 1st long chain, you’ll have a better of idea of the exact number of chains you’ll need. Add or omit chs as needed for the remaining 5 row blocks.
G. Add next color to last chain made and create next long chain.
H. Continue to create long chains and weave into ch-1 sps, until you’ve reached the end.
STEP 3: BORDER
A. Work one row of sc down both sides of blanket or any edging that you choose (Showing with an additional 5 rows down each side in white).
OPTIONS/TIPS
If you have enough of (2) color left over, use 1st color to create 5 more rows to your blanket and the 2nd color to create your chain.
use 1st color to create rows down long side of blanket (See: White rows down both sides of my blanket) and the 2nd color to create your chain
If you have enough of EACH color left over, add fringes to each ch-1 space on short ends of blanket. Remember: The goal is to use up all your scrap yarn!
STEP 4: FINISHING
Sew in loose ends.
2 notes
·
View notes
Note
I havent been here for the quilting saga, very cool that you're done your squares, what were you going for with this quilt? Like what were ur quilt goals, why did u choose those fabrics? Is it meaningful or all just stuff you like?
This latest quilt is my scrap quilt, which means it's entirely made of fabric scraps from previous quilts I've made. Well, mostly from quilts I've made, plus one bag's worth of scrap fabric from a local quilt shop, plus a few scraps from various peoples' destashes I've been given over the years? So there wasn't really an overarching goal, per se, except to use up fabric scraps because I couldn't bring myself to throw them away but didn't have enough of any one color palette to make a cohesive quilt top. I put zero thought or effort into color distribution except to try to keep different pieces of the same fabric from touching each other, and I had a few very dark fabrics that stand out against my usual "everything is as bright as possible" color choices so I made sure those were distributed evenly across the quilt. As for the quilt pattern itself, it's made of two kinds of 12" blocks. Block A is made of six rows of 2.5" strips. I made them by sewing my 2.5" strips into a very long single piece of fabric and then cutting that into 12.5" by 2.5" rectangles, then sewing those together Block B is basically a 4 patch block, but the upper right and lower left squares are made of smaller 4 patch blocks. So it's two 6.5" squares and eight 3.5" squares per Block B. I chose those sizes because they were small enough to be easy to cut even out of small scraps and scaled well with each other to make a pattern I would not get bored sewing. Every few weeks I'd collect my fabric scraps, iron them, cut them down to those sizes and put them in the scrap quilt drawer until I had enough to make the quilt top I'm working on now
#ask away!#scrap management#I mean that said I did make some of my 6.5 and 3.5 inch blocks with crumb sewing#which means that instead of being a single piece of fabric it's a whole bunch of tiny irregularly shaped pieces sewn together#I also made a bunch of the 3.5 inch squares with half square triangles and quarter square triangles#because I got a tool thing that makes them super easy to cut#and had a lot of fun with that#most of the fabrics are kind of meaningful in that I can look at them and remember the quilts I made with those fabrics#some of them the memory is just 'I cannot resist a bin of scrap fabric at the local quilt shop'#but it's still a lot of memories!#and I'm really proud of myself for sticking to it for this long#I'm usually not the best with long-term crafting projects because I lose interest#but I worked on this a little bit at a time over the years#and now it's almost done!#I should look back and see when I made my earliest scrap management post so I can see when I started it
5 notes
·
View notes
Text
How to Choose the Perfect Holiday Placemats for Your Christmas Dinner
An integral part of Christmas dinner preparations is setting a festive and warm table. Besides protecting your table, placemats also help to set the mood for your holiday gathering. Getting the right holiday placemats for your Christmas dinner is sure to make your table shine and add warmth and elegance to your decor. However, there are just so many options that this task can be overwhelming in determining which would be the ideal placemats.
In this guide, we help you navigate the process of choosing holiday themed placemats that perfectly fit your Christmas dinner theme.

Determine the Theme of Your Christmas Dinner
Before buying placemats, choose the theme of your Christmas dinner. Are you a person who wants to go classic in red and green, a very modern minimalist style, or a winter wonderland setting? Your theme will be that which will guide the choices of colors, patterns, and materials for your placemats.
Classic Christmas: Use designs that come along with holly, Santa Claus, or snowflakes in red, green, and gold.
Modern Minimalist: Choose colored placemats in muted tones or having a low-key metallic tone.
Rustic Winter: Use placemats made from burlap or woven materials in natural earth tones.
Material Choice
The type of material in the Christmas holiday placemats affects functionality just as much as it determines the aesthetic aspect. Consider the following ones:
Fabric Placemats: These are perfect for creating a cozy and traditional feel and come in a wide variety of patterns and colors. Opt for machine-washable varieties to keep them clean.
Vinyl or Plastic Placemats: Perfect for the family with little kids since they are easy to clean and resistant to spills.
Bamboo or Woven Placemats: For a natural, earthy feel, consider adding a few woven or bamboo placemats to your table. This will fit a cabin theme well for winter.
Linens or Cotton Placemats: In formal and beautiful dining, linen or cotton can enhance the richness.
Size and Shape
Tablecloth, Runner and Placemat sets come in multiple sizes and shapes. However, these include rectangular, round, and oval-shaped. The shapes of your placemats depend on the shape of your dining table.
Rectangular Tables: Rectangular-shaped placemats can create a great fit and blend well.
Round-Shaped Tables: Use round-shaped placemats or small rectangular shapes that will not overlap with the other placemats.
Custom Tables: If your table has a very unique shape, use flexible materials or customize the placemats.
You also need to ensure that your placemats are wide enough to hold dinner plates, utensils, and glasses comfortably without crowding up the table.
Focus on Durability and Maintenance
The holiday season can be busy, so you’ll want placemats that are easy to maintain. Consider the following factors:
Washability: Check whether the placemats are machine washable or require spot cleaning.
Stain Resistance: Vinyl and coated fabrics are more resistant to stains and ideal for messy meals.
Durability: Quality materials ensure that your placemats can be reused for multiple occasions.
Coordinate with Dinnerware and Table Accessories
Your placemats should blend well with your dinnerware, tablecloth, and other matching accessories, such as napkins and centerpieces. For a balanced look, consider:
Match or contrast the colors lightly so that they do not clash.
Select patterns that either complement the dinner plates or add to the plates
If your dinnerware has intricate patterns, opt for solid-coloured placemats, and vice versa.
Incorporate Festive Details
Add even more Christmas magic to the dinner table by adding festive touch details in your placemat, such as;
Sewing snowflakes, trees, and more to them
Glitters, metallic effects, to luscious touches
Make it personalized, like putting the names of friends and family members, etc.
Think About Sustainability
If being green-friendly is a matter of interest, then eco-friendly made from recycled materials like cloth, bamboo, or organic cotton will be suitable options as they minimize the carbon footprints and can also beautifully enhance your table decor.
Set A Budget
With a good number of options available within almost all budget levels, the chances of buying affordable, functional, and good placemats without spending excessively are high. You must consider:
Investing in good-quality placemats to be reused for future events.
You can make your placemats for a personal touch but on a budget.
Test the Placemats Before Christmas
Once you have your placemats, test them out before your Christmas dinner. Set up your table the way you will set it. Ensure that your placemats fit the vision that you have for your table. This way, you will be able to adjust your placemats before the guests arrive, and everything is just right for your visitors.
Conclusion
Choosing the perfect Christmas holiday placemats for your dinner doesn't have to be overwhelming. Consider your theme, choose the right material, and coordinate it with your tableware, and you can create a festive and memorable dining experience. Placemats add a layer of protection and functionality while enhancing the visual appeal of your table.
We at Wear Sierra celebrate the joy of thoughtful designs that make your holiday moments special. Whether it is the festive spirit or everyday functionality, we strive to bring warmth and style to every corner of your life. Contact us now for more information!
0 notes
Text
Cut and Sew Services in Miami: High-Quality Custom Apparel Manufacturing
In the world of fashion and custom apparel, precision and craftsmanship are key to creating standout clothing pieces. Whether you're launching a new clothing line, looking to expand your brand, or need high-quality uniforms for your business, finding the right cut and sew services is crucial. At Miami Tees Online, we provide premium cut and sew miami, tailored to bring your vision to life with unparalleled quality and attention to detail.

What Is Cut and Sew?
Cut and sew refers to the process of producing clothing from scratch. Unlike traditional manufacturing methods where pre-made garments are simply printed on or modified, cut and sew allows for total customization from the initial fabric cut to the final stitching. This means you have complete control over the fabric, fit, design, and details, ensuring a fully customized piece that aligns with your exact specifications.
Whether you’re producing t-shirts, hoodies, jackets, or any other garment, cut and sew services ensure that every aspect of your clothing is tailored to your unique requirements. This process provides brands with the opportunity to stand out, offering garments that are distinct and reflect their personal style or brand identity.
Why Choose Miami Tees Online for Cut and Sew Services?
Miami Tees Online specializes in high-quality cut and sew services, offering a wide range of customizable options to meet the diverse needs of designers, entrepreneurs, and businesses. Here’s what sets us apart:
1. Customization at Every Step: From the selection of fabrics and materials to pattern making and garment construction, Miami Tees Online offers full customization. Whether you have a specific design in mind or need help developing one, our experienced team works with you throughout the entire process to create a final product that meets your vision.
2. Premium Fabrics and Materials: Quality begins with the fabric. We source only premium materials to ensure that your garments are not only stylish but also durable and comfortable. Our wide selection of fabrics allows you to choose the perfect option for your clothing line or project.
3. Skilled Craftsmanship: Our team of experienced seamstresses and designers are experts in the cut and sew process. We pay close attention to every detail, ensuring each garment is meticulously crafted to meet the highest standards of quality and fit.
4. Small and Large Production Runs: Whether you’re starting small with a limited collection or need mass production for a large order, Miami Tees Online can accommodate projects of any size. We offer flexible production options to suit the scale of your business.
5. Competitive Pricing: Custom manufacturing doesn’t have to come with a high price tag. Miami Tees Online offers competitive pricing without compromising on quality, making our cut and sew services accessible for businesses of all sizes.
The Cut and Sew Process at Miami Tees Online
Our cut and sew process is designed to provide a seamless and efficient experience, ensuring that your custom apparel is created with precision and care. Here's a breakdown of what you can expect:
Consultation and Design: We start by discussing your project goals and design ideas. Whether you have specific sketches or need help developing a concept, our team is here to guide you.
Fabric Selection: Choosing the right fabric is essential to achieving the desired look and feel of your garments. We offer a wide variety of high-quality materials to match your vision.
Pattern Making and Sampling: Our experienced pattern makers create precise patterns based on your design. Once the patterns are approved, we produce a sample garment to ensure everything aligns with your expectations.
Cutting and Sewing: Once the sample is approved, we begin the production process. Our skilled seamstresses carefully cut and sew each garment to ensure the highest level of craftsmanship and consistency.
Quality Control: Before your garments are shipped, we conduct a thorough quality control check to ensure each piece meets our high standards of excellence.
The Benefits of Cut and Sew Apparel
Opting for cut and sew services offers several advantages, especially for brands looking to differentiate themselves in the marketplace. Here are some of the key benefits:
Full Customization: Unlike off-the-rack clothing, cut and sew allows you to create garments that are unique to your brand. You have complete control over every aspect, from fabric and fit to design and details.
High-Quality Fit: Because the garments are custom-made, the fit is often superior to mass-produced clothing. This level of customization results in a more flattering and comfortable product for your customers.
Brand Identity: With cut and sew, you can create clothing that truly reflects your brand's identity and values. Whether you're going for a minimalist aesthetic or a bold, standout design, the possibilities are endless.
Durability: Custom garments produced through the cut and sew process are typically more durable, as they are made with care and attention to detail using high-quality materials.
Bring Your Vision to Life with Miami Tees Online
At Miami Tees Online, we pride ourselves on delivering high-quality, custom cut and sew services that help bring your ideas to life. Whether you're looking to create a limited edition collection or need large-scale production, our expert team is ready to assist you at every step of the way.
0 notes