#but if I make them flat fabric and sew them in place it's fine
Explore tagged Tumblr posts
Text
Fun fact I made these five years ago and I've had the "leave" heart hanging on my purse ever since! Editing this to add: these are super easy to make. Find any crochet heart pattern, make two of them, but when you finish the last round of each heart instead of fastening off sc around in the back loops of the last round (to get that right angle), then fasten off. Embroider one of the hearts, then sew the two halves of your un-valentine heart together. Add a keychain if you want to, hang it on your purse (or don't), and surprise whoever reads the keychain for (so far) five years lol

More un-valentine hearts to fill the void left by the absence of the real conversation candy hearts this year
#crochet#amigurumi#un-valentine#it occurred to me today I could weave/knit/crochet/macrame/quilt little like pride flag bracelets#to go around the strap of my purse#I'd do pins but I don't want the pin backs poking me#but if I make them flat fabric and sew them in place it's fine#my current purse is rainbow tie dye but I think I made these two purses ago?#I had to get a new purse when I got asthma because my inhalers would not fit in my old purse with my epi pen#and then I catastrophically broke my new purse one day (I do not know how)#and then I got my current purse! It's very sturdy surprisingly roomy and comes with attachments so I can hang it on my walker#I mean. I don't. But I could!#any time I leave the house the purse is on me so that my inhaler is Right There if I need it#also a lot of different kinds of salt pills. there's a lot of stuff in my purse#for a while it had a chicken plushie but then I found someone to give it to#I got sidetracked in the notes I don't remember why I went to reblog this#oh well I have added too many notes to go back now lol
425 notes
·
View notes
Text
Goth DIY: Altered Clothing part 1
Since some of you crafty goths were interested in seeing the clothing I've altered, I decided to compile it all in one place! I hope I can inspire your creations,give you ideas, and teach you new techniques. This will be a long post, since I've been making alterations to my clothing since high school, which also means some of these projects aren't as polished as others, since they were made when I was newer to DIY and have mistakes I've since learned from, but that's okay! Goth doesn't have to be polished and perfect, and don't let the fear of mistakes stop you from creating!
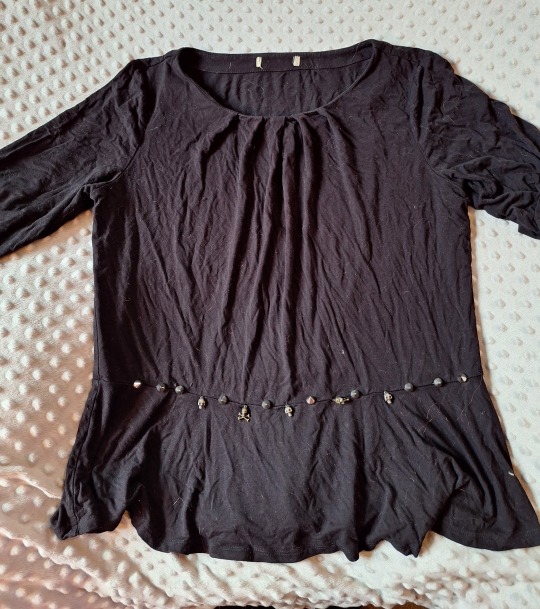
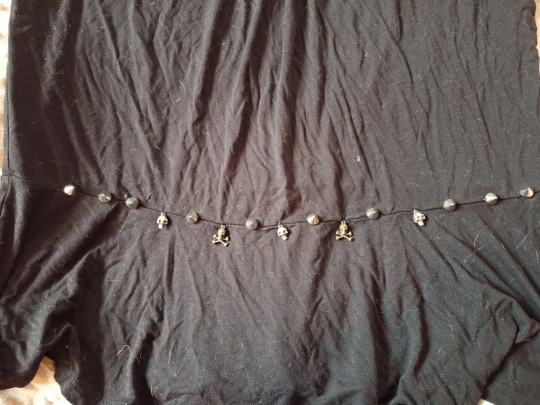
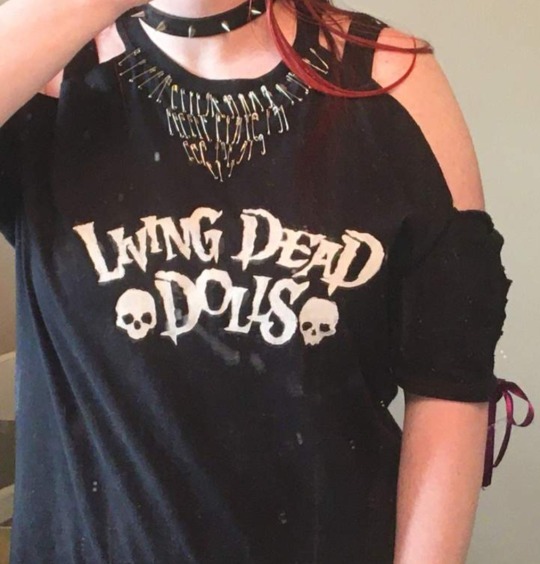
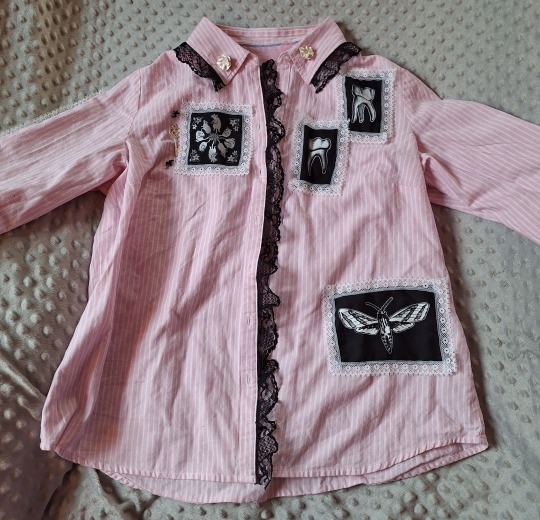
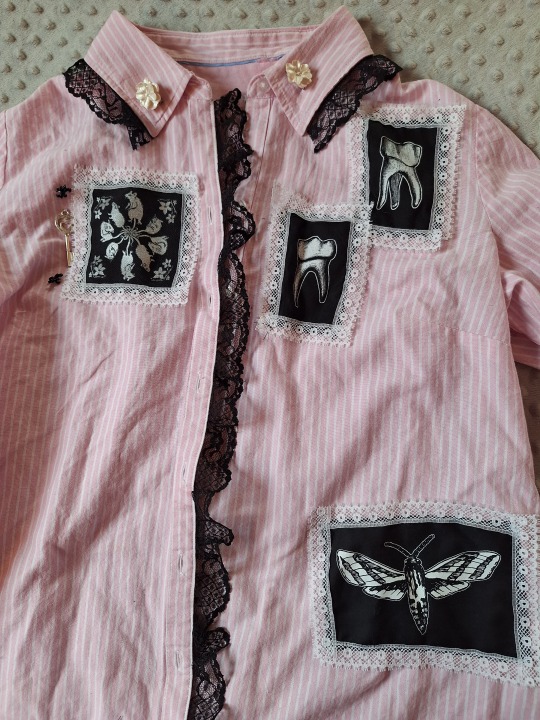
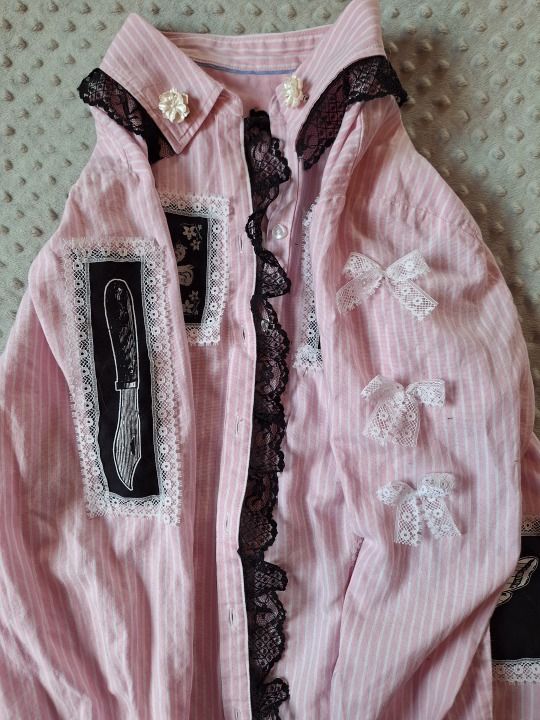
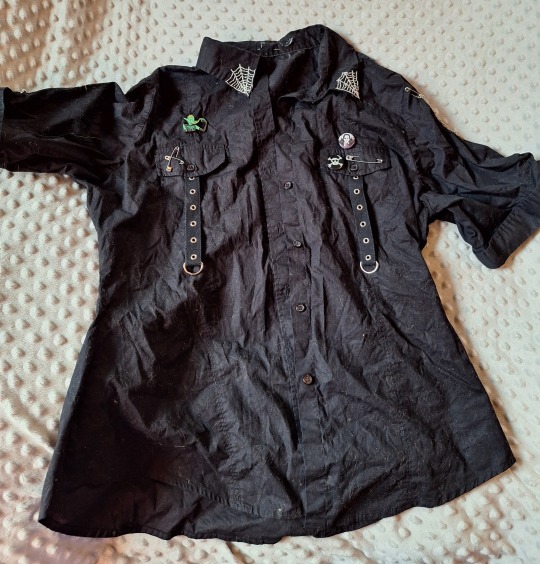
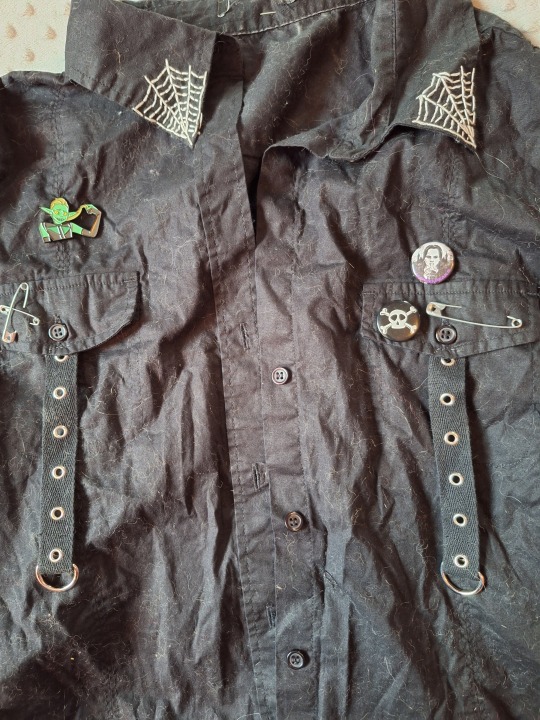
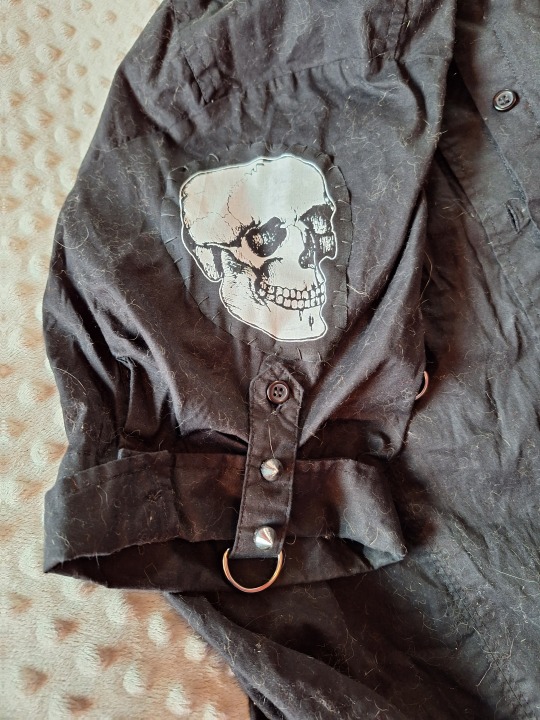
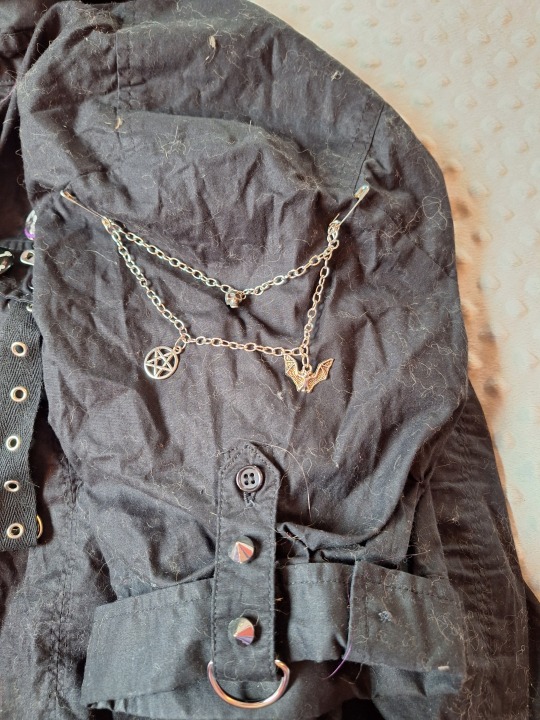
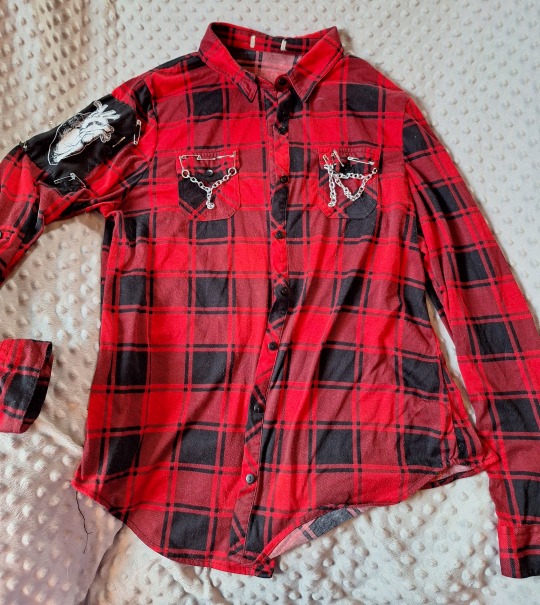
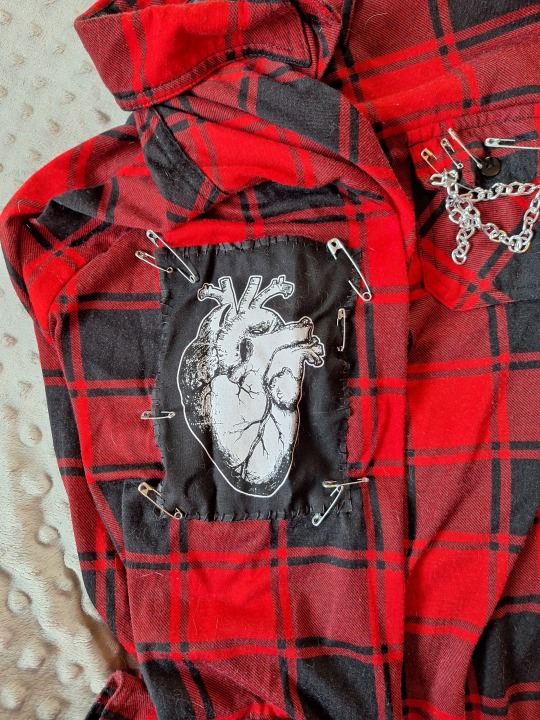
I've already done posts about the shorts and pants I've gothified, so part 1 will focus on t-shirts, camisoles, and button-up shirts. Part 2 will have sweaters, skirts, and dresses. Some alterations are as easy as adding safety pins or lace trim, and others involve more sewing. Lots of these are very beginner-friendly projects and take less than an hour. All of these items were completely plain when I got them--anything metal, lace, embroidered, or painted that you see was added by me. I'll add more about each garment in the image descriptions. As always, feel free to message me if you want better or more thorough instructions or DIY advice. I'm here to be a resource to my fellow crafters! <3
(Also, please pardon the cat hair and my hair on the clothes--I don't take perfect pictures. A couple pics are also old since those shirts are in storage so I could make room for my winter wardrobe, so you'll notice a change in backdrop and a dirty mirror.)
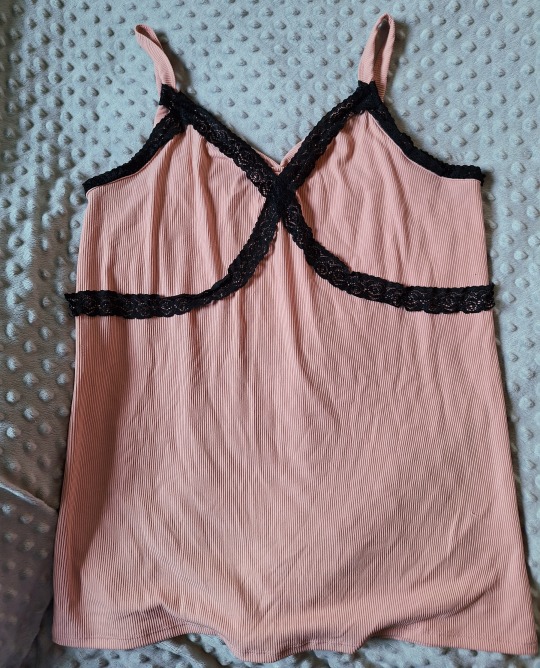
Let's start with t-shirts and camisoles! Use an old shirt, a thrifted shirt, a shirt from Walmart, etc.! I like to get plain unisex t-shirts from Walmart and paint on them using freezer paper stencils, bleach them, shred them, and/or add safety pins to them. The camis also came from Walmart, and I changed the necklines and added lace trim to make them cuter.
To make a sweetheart neckline on a cami, you can cut it, or you can just pinch the middle and sew it into place (I did that for all of them except the black and white one--that one ended up a little lower-cut than I meant it to, so I decided to stick with the pinching method). The lace trim I used on the black camis isn't stretchy, but still works just fine, as long as you pin it into place while you're wearing the shirt and stretch the shirt a bit as you sew to maintain stretch in those areas. Stretchy lace, like I used on the pink and red camis, works a bit better, but is harder to find. I still like pinning the lace while I'm wearing the shirt to get the placement down, but if you wear a bra, make sure you're wearing the one you plan on wearing with the shirt while placing the lace. I found it doesn't sit right with bras that fit a little differently than the one I based the placement on.
The long-sleeved Emily the Strange shirt has a neat detail, albeit a wonky one because my placement is a bit off sometimes. You'll notice two little striped triangles at the bottom. I cut slits in the shirt and added triangles of striped stretchy fabric, then sewed zippers over top of them to hide the seams and add extra detail. I also sewed the zippers on with red thread for contrast.
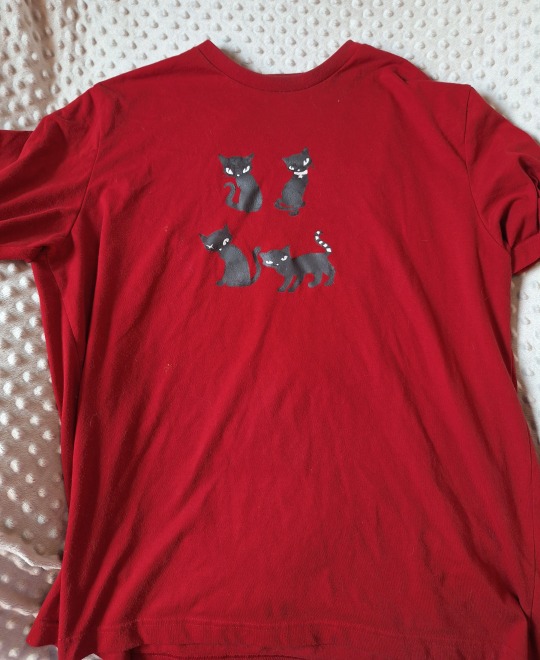
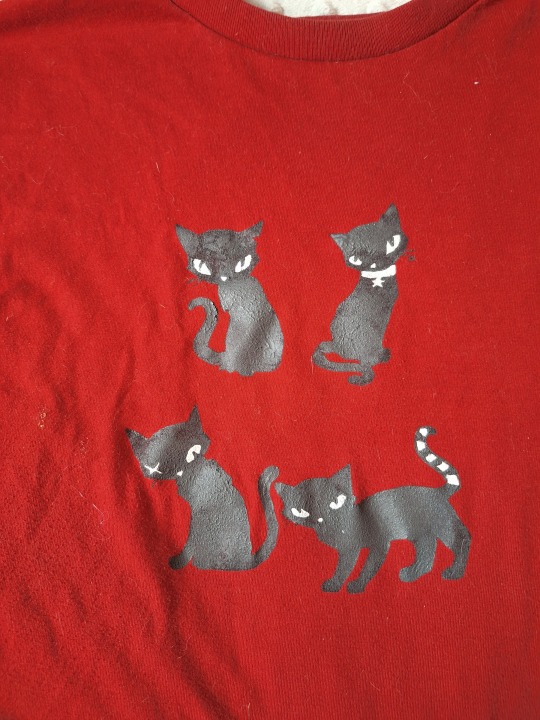
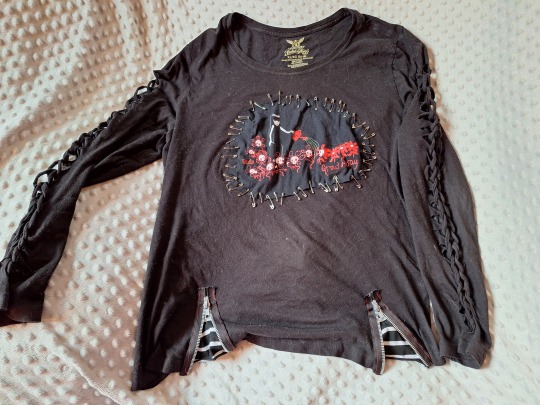
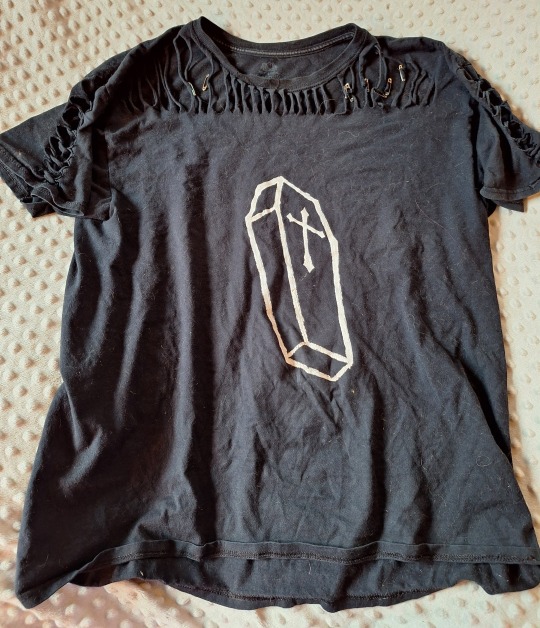
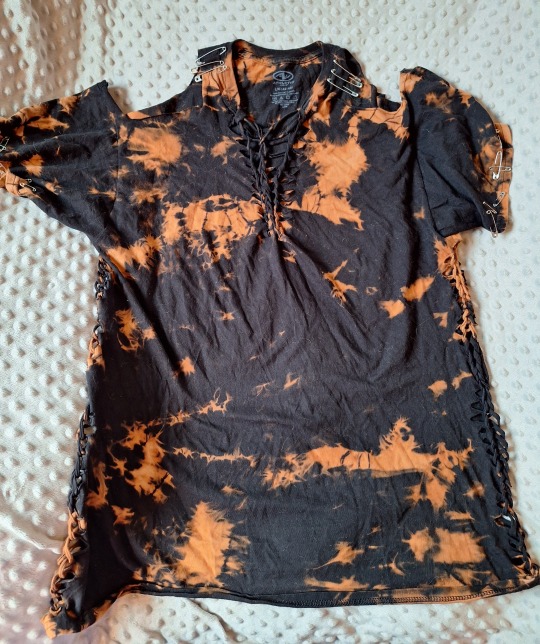
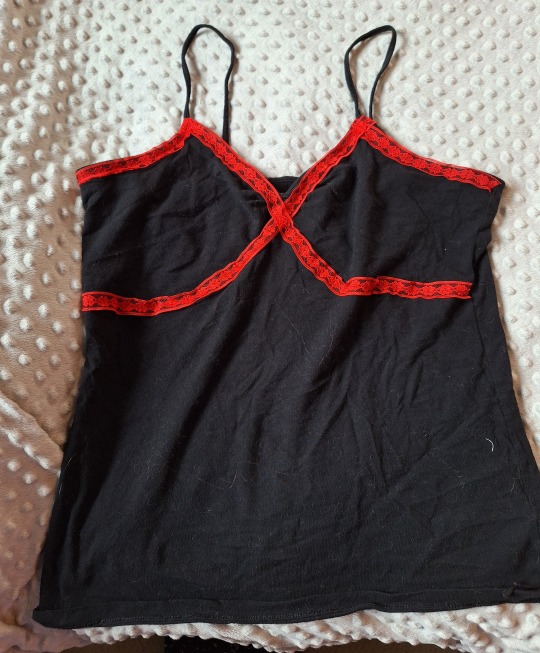
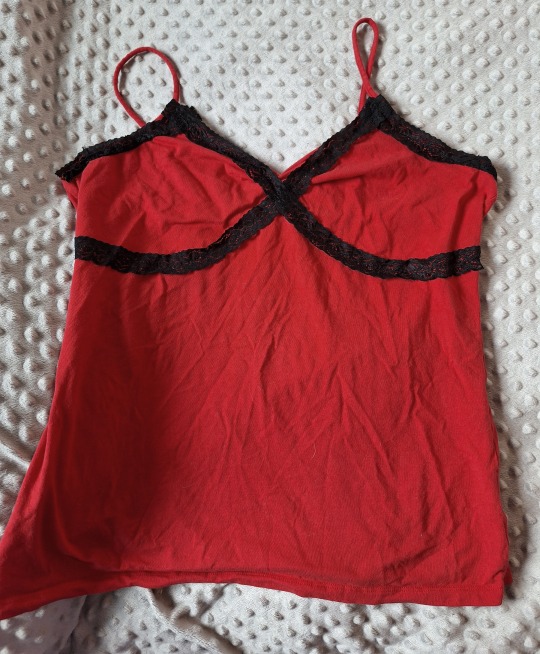
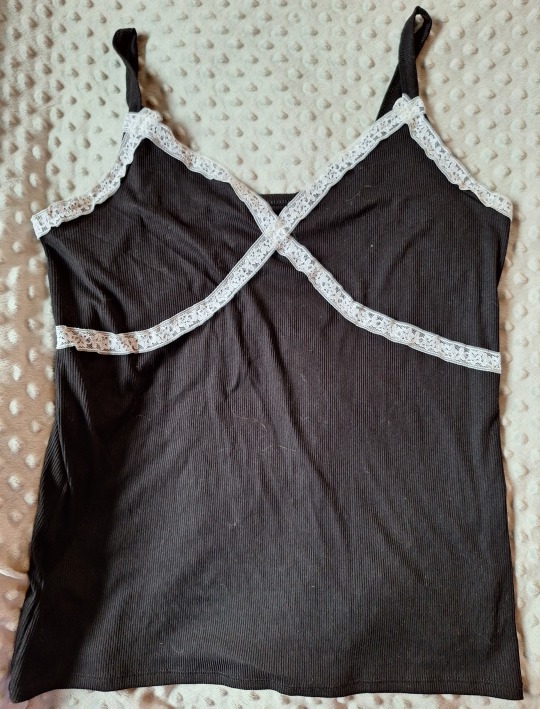
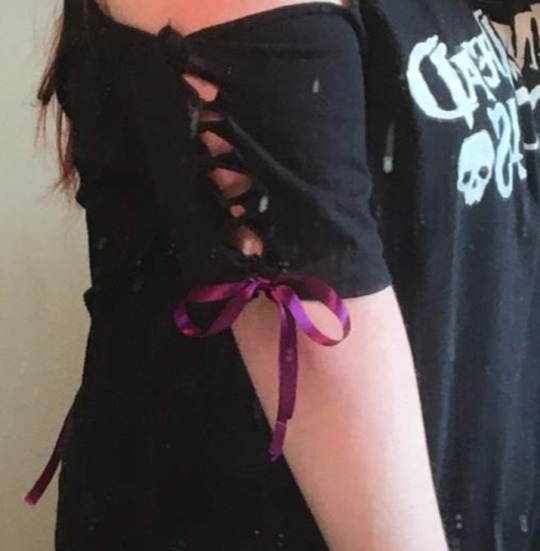
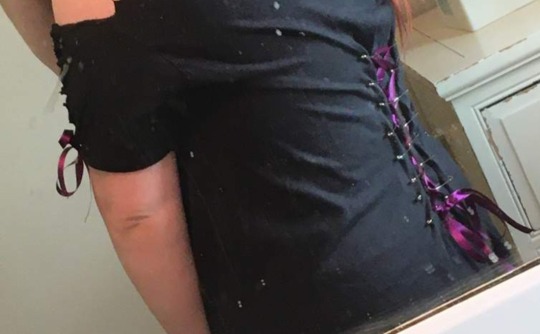
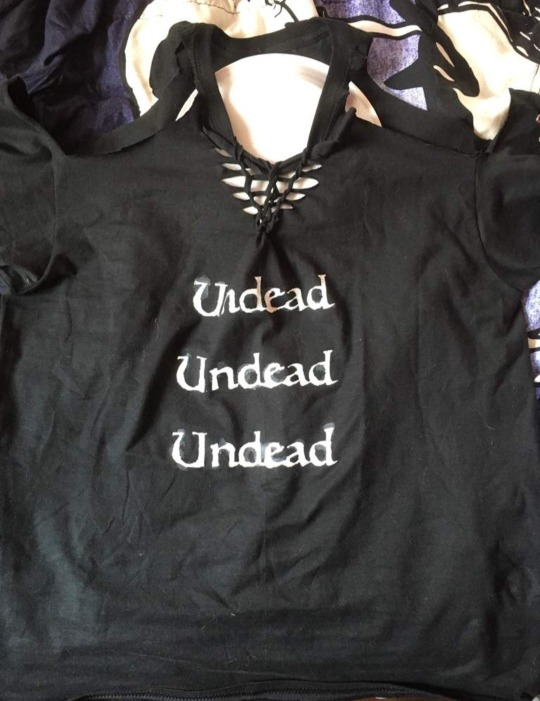
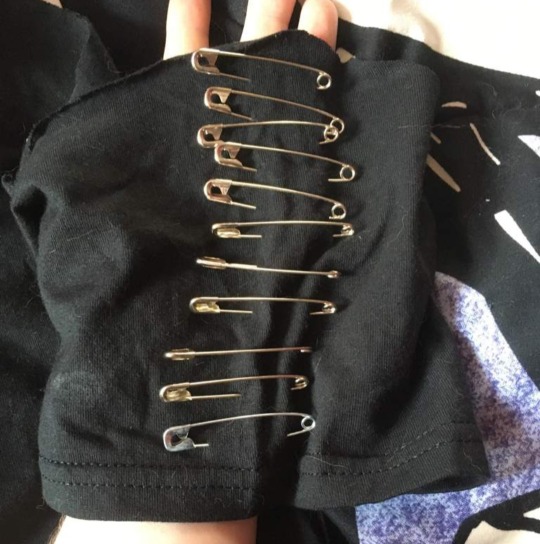
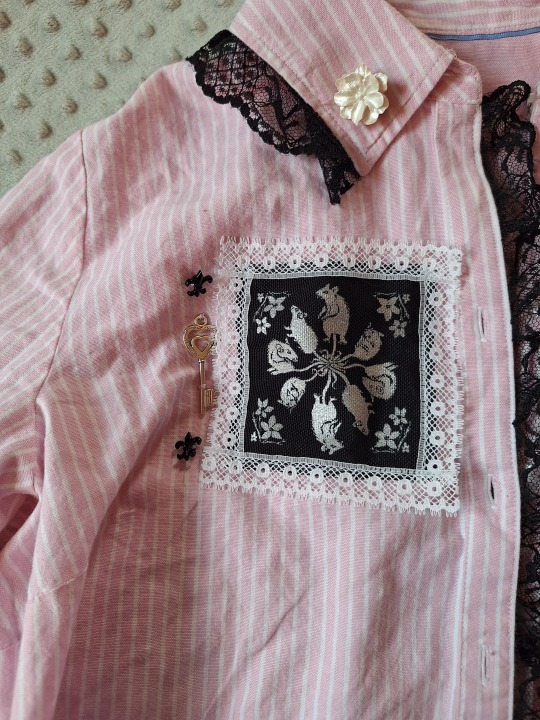
My button-ups are a bit more involved. I treat them like how I treat shorts--patches, lace, embroidery, pins, grommet tape, D-rings, charms, chains, oh my! The pink one is my most recent, and I'm so proud of it. All of the patches came from ToothxNail on Etsy, except the Rat King patch, which came from Katiewhittleart on Etsy. The flowers on the collar were buttons that I glued onto flat-back pins from a craft store (I used E6000 glue). Made super quick collar pins that I can remove when washing the shirt or put on something else when I want.
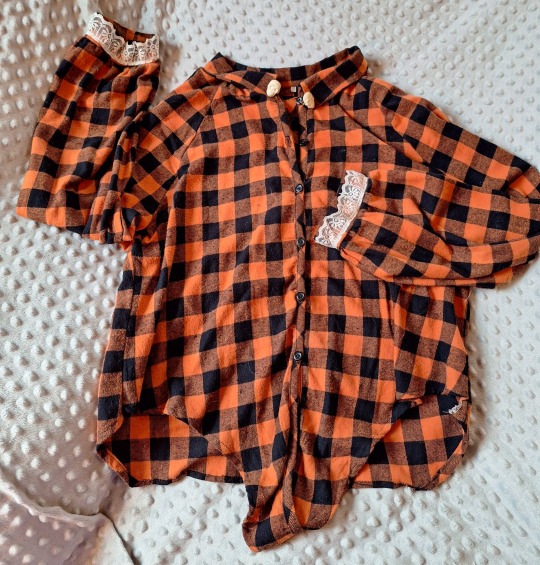
The orange button-up was by far the simplest. I just added lace trim to the cuffs and cropped it (it had been high-low, but I wanted to wear it tucked into a skirt and the long back was annoying me). I also added collar clips with a chain that I got at a craft fair, but that's more like styling an accessory with it than altering it, since I can just un-clip them.
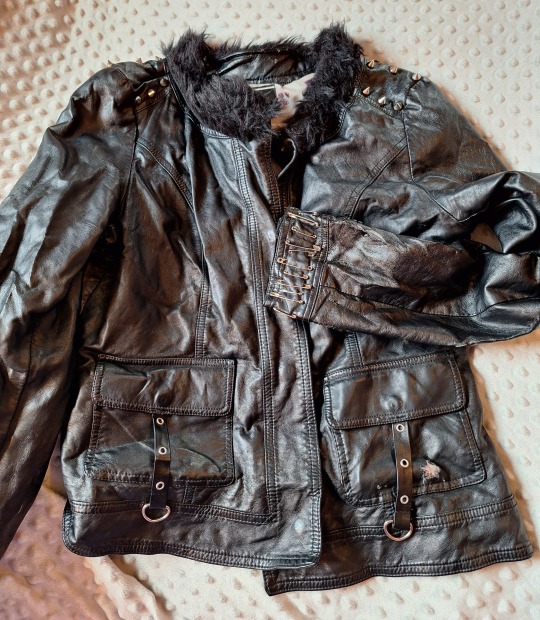
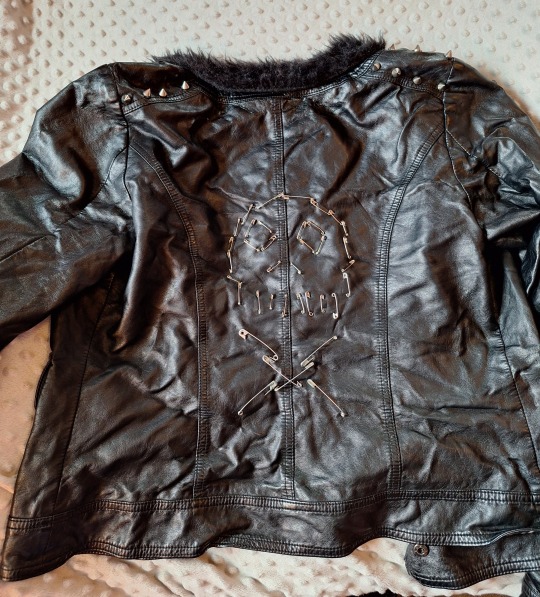
The leather jacket is old and doesn't fit well, so I don't wear it anymore, but I kept it because it was my first leather jacket. Adding the sew-on studs and faux-fur trim on the neck took the longest. You'll also notice that a mouse chewed a hole in the outer shell on the pocket.
Part 2
#diy advice from your local goth#goth diy#goth clothing#goth fashion#goth#gothgoth#goth subculture#diy fashion#diy#diy tutorial#goth tutorial#crafting#sewing#mine
104 notes
·
View notes
Text
Velvet ribbon necklaces and chokers
This is one of my favourite ways to make a necklace - extremely quick and simple but I think it looks beautiful. I use velvet ribbon but it would also work with satin ribbon and possibly lace, though that might not be sturdy enough. I personally don't like to use leather or faux leather because it can get very sweaty and uncomfortable, but you can absolutely use that too if you want! Craft shops also sell patterned or embroidered ribbon.
I've even done variants on this which were made from just a long strip of fabric which I hemmed along the edges.
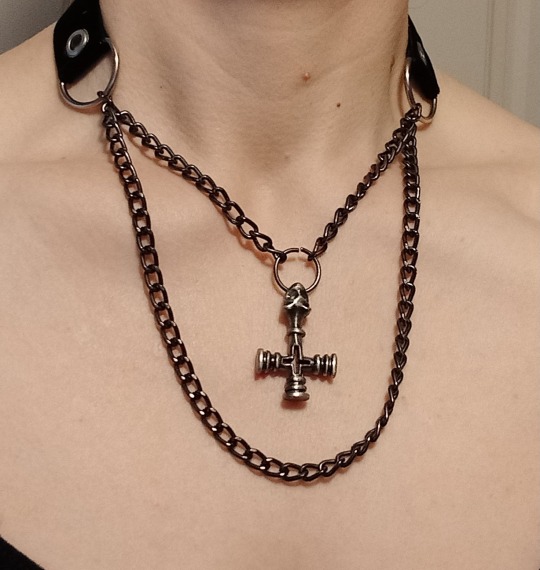
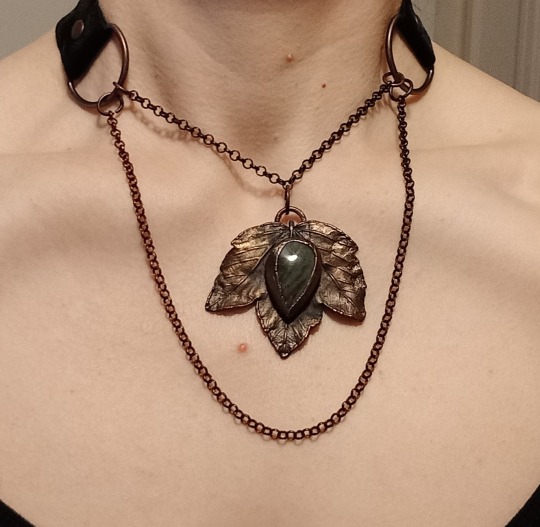
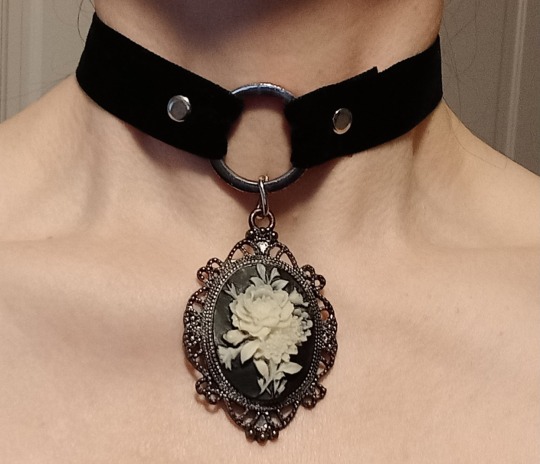
In addition to the ribbon you will need rivets or eyelets, d-rings or o-rings, and heavy snap studs to fasten them.
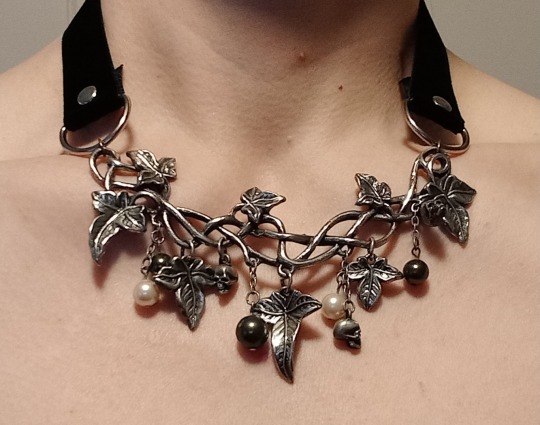
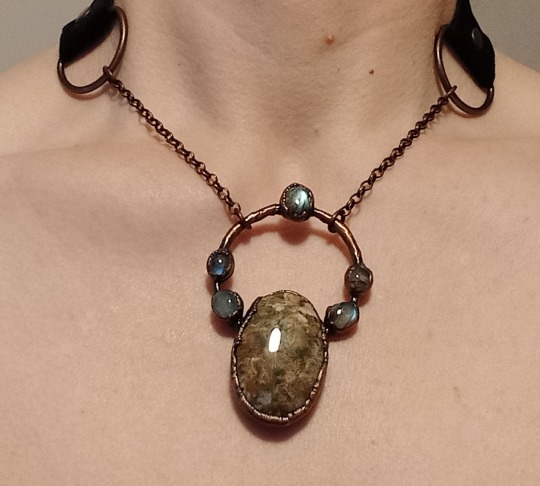
The pendants in these photos came from various places: the flower cameo was thrifted, the wolfs cross was bought from some alternative shop I don't remember the name of decades ago, the leaf and the large ocean jasper came from an Etsy shop called Enchanted Creations (link here) and the ivy is Alchemy Gothic.
For whatever reason I decided I didn't like the necklaces they came on so I remade them. The pendant parts and chains were attached using jewellery pliers and either jump rings or links of the chain if it was large enough.
Then all you need to do is loop your ribbon through the d-rings and poke a hole through both layers (I have a leather punch I tend to use but you can also use scissors) then secure it with either a rivet or an eyelet. You can buy these online or in craft shops, they're usually very cheap, come in various colours of metal and have instructions for how to put them together. They're fairly self-explanatory - one half on each side of the fabric and hit them with a hammer a few times. If using rivets make sure you put the pieces on the correct sides.
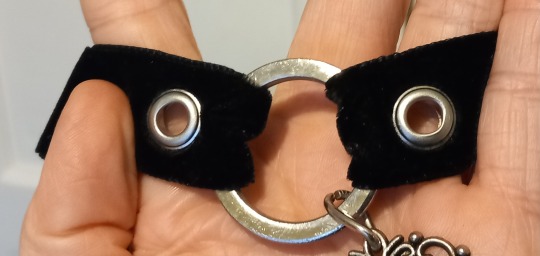

You could also use screw on spikes. Anything that will keep the ends together will work - obviously you could sew them too, but this looks neater (than my hand sewing anyway!) and gives a bit of extra visual interest.
To get the right length of ribbon I just put it around my neck making sure to overlap the ends then add a couple of centimetres extra for the folds. If the ribbon is synthetic (most of the the time they will be) use a lighter to singe the ends slightly. This will cause it to melt a little and prevent fraying. Please be careful when doing this! You don't need to put the ribbon *in* the flame, just close enough to heat it.
For fastenings I always use heavy snap studs. These make the fastening very secure and neat looking - it will lay completely flat to the back of your neck.

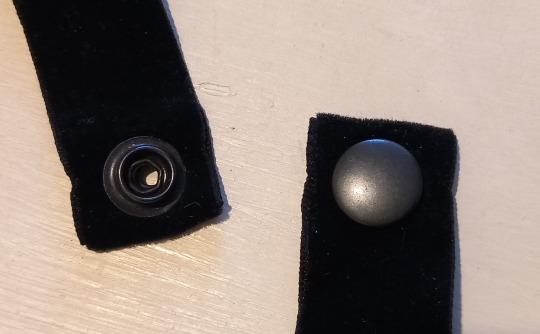
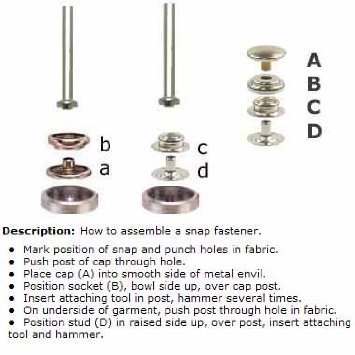
These studs come in 4 parts.
Again, double over the ends of the ribbon, poke a hole through both layers, put the correct pieces of the fastening on each side and hit them with a hammer a few times. These can likewise be bought online and come with a tool and instructions for use. The most important thing with these is to make sure all parts are facing the right direction so you can close them properly.
Here are some brief instructions I found online for how to use them.
Again, you don't have to fasten them the way I do, whatever way suits you is fine. Even a safety pin would work!
This basic method can be used to make collars too, I did a cyber collar a while back (full post here)

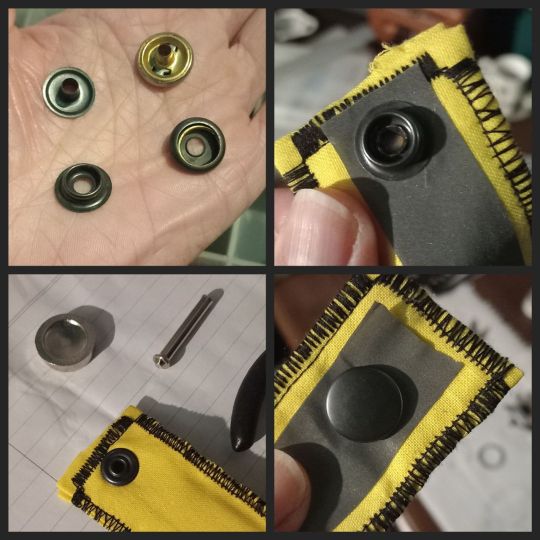

As I said above you can use any kind of ribbon you like, patterned or plain, or even a long strip of fabric, that's what I did for this collar.
You could cover it with safety pins, buttons, embroidery, fabric paint, whatever you like!
#goth diy#diy jewelry#goth jewelry#spiked jewelry#spiked collar#homemade jewelry#homemade#goth#gothic#gothic fashion#goth aesthetic#goth fashion#punk jewelry#punk aesthetic#alternative fashion#alternative#gothic jewelry#choker#goth choker#collar
38 notes
·
View notes
Text
Beatrice Build Log - The Petticoat and Ruched Skirt

Finally to the first visible layer! This skirt and petticoat were more complicated than they needed to be, once again due to the elliptical shape.
The Hoop Skirt / The Chemise and Corset

First thing that I did was gather up a really long length of poly organza into a waistband. The poly organza was a nightmare to cut and I deeply hated working with it (specifically the cutting - other than that, it was fine). Because of the elliptical shape, it falls higher on the back than the front. I evened out this hem on my dress form by eyeballing it relative to the hoops on the hoop skirt.

I also cut a ruffle - I think it was about 15 inches width or so. I should have been more precise in measuring lengths of the longer tier and the ruffle, because gathering this on to the upper ruffle evenly was a nightmare as well. This was also because my strips weren't all the same length (some were about 60 inches, some were 120) because I changed my mind about how i wanted to cut them after I began to struggle with the organza on the floor. More on the gathering in a minute, though. The above chaos pile is the floor next to my sewing machine while I was finishing the bottom hem of the bottom ruffle. This was an aesthetic step and not strictly required, because I actually did serge all edges of the ruffle, and I serged all non-selvage edges on the main length of the petticoat, so it will not fray.
More on gathering. I didn't take a picture, because I was frustrated. When I have to gather something this long, I prefer to gather in sections. I also tend to have more control and stability of gather stitches when I hand gather, so I did that. The bottom ruffle was 500 something odd inches. Gathering it by hand took me about 3 hours the first time, and I did that based off of math of what my top tier *should* be, without measuring. Well, I gathered wrong, as when I went to place the ruffle, it was too short. I cut out all my gathers, redid my math based off of the skirt measurement, and then gathered again, leaving one of the shorter panels ungathered so I could gather to fit the last of the petticoat.

In my opinion, this was more frustrating than the ruched skirt, although that might be because I had to do it twice.


This won't be the last time you see the green mockup fabric. I made a yoke for the top of the skirt to attach the ruched panels to.
This was more irritating math again, based off of measurements. At first, I was very confident I could just make these panels trapezoids, but I quickly realized shapes don't work like that, so I had to do pythagorean theorem math to get the yoke of the skirt to correspond to what I needed it to be based off of the bottom width of the hoop skirt. Another option that existed here was to have the ruching panels extend all the way up instead of making a yoke for them, but I didn't do this because I was worried about the weight (each panel is already 70 inches, there are 10 of them, and the bridal satin is heavy). Either way, you have to gather the excess at the top into the waistband, and for this one, I did pleats. This was to help control bulk at the hips.

Here are the pleats in question, that no one will ever see on the finished outfit, but that still look very lovely.

Next, I spent about 10 hours rhinestoning the flat ruched panel pieces. I applied well over 2000 rhinestones total for this part. I used my hot fix tool, but I'm planning on gluing rhinestones from this seller going forward because the hotfix glue specifically hates this poly bridal satin. The skirt loses rhinestones frequently, but that's also why I applied so many. When you rhinestone a project, you just have to be prepared to lose some.
Then I sewed the panels together. This sucked, because there were so many, and it was difficult at my desk. Above are some of the panels sewn together, and the rhinestone payoff. I listened to the umineko OST while I was working to help stay motivated.

I ruched the panels after they were sewn together. I did this by hand with a heavy duty upholstery thread. They're ruched by a 2.5 multiplier. To get the bottom hem right, I tried everything on, and adjusted the ruching so that it was sitting correctly. Then I locked it in place with my machine by sewing over.

I enjoy stitching in the ditch, so that's how I finished my waistband off. The finished skirt is pictured at the top of this post (I ran out of image uploads for this post). If you have any questions about the process that I didn't talk about, let me know.
Up next is the overskirt, which I started patterning yesterday but will probably take me a while to finish. I will post on that once I'm done with it.
8 notes
·
View notes
Note
SCOTTERMITE. QUICK. TEACH ME HOW TO MAKE PATCHES !!!!!!!! (i have been wanting to for a while and i think im gonna try tonight if i make it out alive. i have an idea of how to make them but i have seen the ones you make and i want mine to look as good as yours so uh hi)
hellomy sweet summer child. i don't think i want to get up to find pictures of anything but here's the gist:
you will need: - paint (i use white house paint, acrylics usually need multiple coats) - pen/marker (for use on lighter fabrics to draw a design rather than paint it) - fabric (i prefer black denim, you want minimal fluff & flat/even texture for cleaner lines) - sponge & stencil (optional- this is if you don't want to freehand paint the design. you can make your own stencils by printing out a design and cutting it out or tracing a design off a screen and cutting that out) (also good to have tape to secure your stencils to the fabric) - sewing needle & thread
pick a design - the more small and finnicky the design is, the harder it will be to paint, and the harder it will be to make a stencil/control the stencil when applying paint. if you're freehanding a design, you can paint it first or cut the fabric to size first. if you're using a stencil, you want to tape the stencil down so having enough fabric to do that is key regardless of how big the patch will be. with a stencil, gently dab vertically to minimize the paint that gets under the stencil. stencils will probably need multiple coats of paint.
cut it to size. denim frays a lot, and so do most fabrics, so if you want to go the extra mile when it comes to patches i would recommend hemming them. i tend to use some kind of bastardized version of a blanket stitch for this (google/youtube will help you with sewing).
when you want to apply it to something, you should pin it into place with two adjacent pins (ie one at the top and one at the bottom, or one on the left and one on the right) to lessen the amount of warping that might occur if you don't sew your patches on completely straight (which is fine-like half of mine have at least a little warping). for the actual stitch, i recommend going to youtube and looking for punk or metal patch sewing videos - i learned the technique i use from a metalhead's tutorial.
#hope this helps thumbs up#btw - i handsew everything. not the guy to ask concerning sewing machines
10 notes
·
View notes
Text
Okay so: here is a post for how to patch jeans because it’s awesome and cheaper and more sustainable than buying new jeans because it makes your jeans last way longer. And when you have an awesome pair of jeans that fit just right you really want to keep your jeans for longer. Also it looks cool. And it’s a pretty easy repair to do. Anyways.
Disclaimer I am not a sewing expert and this is just what works for me. This method only really works for the legs (usually knees because that’s what wears out the fastest usually), I don’t know how to patch the butt without making it look and feel weird.
A sewing machine works best for this but hand sewing should work too, it’ll just take longer and you’ll need to make sure you have good, small even stitches.
Cut a piece of fabric a couple centimetres wider than the hole you want to patch. A big rectangle is usually best even for a circle hole because it’s easier. The exact measurements don’t really matter it just has to be bigger than the hole and have room for hemming. It can be anything, but if you want to make the repair not too conspicuous take some denim of the same colour. You can cut fabric from old clothes that are no longer fixable or you can buy a bit from a fabric store.
Take a little bit of the fabric at the edge of your patch, fold it over and sew around the patch like that. This is called hemming and will prevent the patch from fraying and eventually even falling out of the stitches if the fraying gets bad enough.
Turn your pants inside out, flatten the leg you’re working on on a flat surface and place the patch, making sure to keep it as flat and even with the pants as possible. Pin the patch down, turn your pants back the right way to make sure it looks okay, adjust if needed, then turn them back inside out. If it’s the knee of the pants it’s usually fine to give a bit of extra room because it will bend with your knee.
Pick your thread colour. If you want it to blend in with the denim, pick a light gray for light blue jeans, a medium ish blue for regular blue jeans and a dark gray or black for black jeans.
Sew the edges of your patch to the pants. It’s really important to try to not sew the two sides of your pants together, so try to avoid it, but if it does happen you can just pick the stitches out and try again. Do this all around the patch.
Turn your pants back right side out. The edges of the patch are now attached to the pants, but the hole in the middle is still a fraying hole. Sew the edges just outside of where it frays to the patch.
If you want to be super extra certain of the strength, repeat the stitches in steps 5 and 6 two or more times.
If you want to, cut the frayed fabric away from the former hole in the pants.
And boom you now have patched your jeans!
77 notes
·
View notes
Text
Follow along while I make a messenger bag (and dissociate wildly for the next week and change)!
Apparently I didn’t get a picture of the side seams but that’s fine. I shoved the pocket bits out of the way and sewed up both side edges, then did some fiddly fake-felling where I have to kind of sew inside the pocket itself and get as close to the corner as I can given the limits of working with a domestic machine’s geometry. Then I box the corners (having marked them previously). I was cunning this time and shaped the raw edge of the pocket base to have 45 degree angles at each corner, which means that when I pulled the corner flat, the edges of the pockets just kind of snapped into place without a lot of unnecessary drama. This is a huge process improvement for relatively little effort.
Once the box corners has been stitched, it both catches the base of the pocket and forms the bottom corner of the bag. Again having been clever about using my angles when sewing up the pocket assemblage, everything kind of tucks in nicely and we get a nice tight tidy corner despite having some hella complicated fabric geometry going on.
Repeat on the other side and the exterior is damn near done - just needs the flap and straps sewn on. This fabric is pretty floppy but I’m using heavy canvas as the lining, so that should help stiffen up the structure.


#handmade#handmade bag#messenger bag#sewing#sewist#somerville#my art#purse#bag#fashion#craft#crafting#sewblr
4 notes
·
View notes
Text
Loki Cosplay part 5
Previously, on Loki Cosplay: https://www.tumblr.com/dailyshowchica/759378596990271488/loki-cosplay-part-4
All right, there aren't as many pictures in this update. Mostly, what I was doing was laying out the fabric and cutting out pattern pieces. I cut out all the pieces I needed for the coat, the chaps, the boot covers, and the tunic. This was a bit confusing, but I needed to be as efficient as I could with the black vinyl/fake leather. I had 2 reasons for that.
I bought all of the vinyl as remnants/on clearance, and I refuse to pay full price for it ($20/yard or more!)
It's plastic, and anything I waste is gonna end up in a landfill. I wish that wasn't the case, and I'd recycle if if I knew how. But, such is the current late-capitalist hellscape in which we live.
I ended up doing a bit of piecing on the chaps, but it's at the waistband, which will be covered by the tunic.
So, pieces cut out, I started with the most complicated piece: the coat. I cut it out twice, once in the black vinyl, and once in the green flannel lining.
I had the lapel/collar pieces laid out the wrong way, and ended up needing to recut them. Luckily, the larger, left lapel was large enough for me to recut it for the right side. So I only had to recut one lapel. Sewing things that are going to be 3D is tricky, so the bodice itself was the only thing I got done that day. I also had to iron it, to get the lapels flat. They're still pinned open, and I may end up tacking them in place.


Once I got the bodice done, it was time for the skirt. That's two wide panels on the left and right, and four, narrower panels in the back.
The panels themselves were easier, in that i just had to sew them up on 3 sides, then turn them right-side out. But then, I had to sew them to the bodice, and that was way harder than I expected. Four layers of rather thick fabric, at least, plus trying to make sure all the raw edges were folded inside. It took several tries, adjusting my sewing machine three times, and finally, basting with my sewing machine and doing the finishing by hand.


I could pin the skirt panels in, but sewing them in was obnoxious, I'm so glad it's fully assembled!
The detail work still needs to be done, but I plan to sew the chaps and boot covers next, to get most of the vinyl work out of the way first. But I'm gonna take a break for a day or two first!
PS- I didn’t want to make any more holes in the vinyl this I had to, so I traced the pattern pieces. There’s something called tailor’s chalk just for that purpose.
Do I have any? Nope! I used sidewalk chalk. It mostly worked fine.
6 notes
·
View notes
Text
Materials and Tools!
These are the materials and needed to create your own books, or just the ones I use. I will include alternatives that have worked for me as well.
Paper. This one is self-explanatory because you need paper to make a book. However, if you are not printing your own books, you could use other materials for an artsy touch. Generally, I use regular 11" x 8.25" copier paper because I simply got used to it.
A ruler. Crucial to measure and mark out places to make holes, and really, you need one for most things bookbinding.
Pencils. You absolutely need pencils. Marking out places to make holes and generally, you should just have a pencil on you.
A bone folder. These are just tools that provide a clean folded edge. Now, it does not necessarily have to be a bone folder. Truthfully, I have used the edge of a die, a butterknife, or just my fingernails before I got my own, and they worked as well as I needed them to. If you are making a book with signatures (a section of paper folded to make a unit), something to fold paper crisply is extremely useful.
A printer or access to a printer. Not really a material, but worth mentioning. This only applies if you are making a book with printed words or images in it.
Glue. PVA glue is what some bookbinders use, but Elmer's school glue works perfectly fine.
A large metal needle. This is for sewing the signatures together. I use a regular sewing needle that I bent so it is easier to maneuver, but preferably you should use one with a larger eye and a stronger build. Sewing needles can prove to be too flimsy and annoying.
Waxed thread. I use a roll of Japanese waxed thread that I happen to have in my home. However, a thick sewing thread or any strong enough thread can work. You can buy it pre-waxed, or wax it yourself, but I prefer the former.
An awl. Or, something similar to poke holes through 12-24 sheets of paper. For a while, I used a thumbtack and I found it worked really well.
A corkboard. Not strictly necessary, but especially useful as a surface to poke holes through paper into without damaging what is underneath.
Scissors. You have to cut a lot of string and occasionally paper throughout this ordeal.
A boxcutter. Not necessary, but helpful if you need to straighten out paper edges.
A paper trimmer, or access to one. I know my school has one and I used it often to trim some of the edges of my paper. It works more efficiently than a boxcutter for this matter, but having perfectly aligned edges of pages is difficult and often unnecessary, to be perfectly frank.
Cutting mat. A need especially if you're using the boxcutter as a tool.
Paintbrushes. I like having them in multiple sizes for convenience. They are mainly used for brushing glue onto the spine of your freshly made textblock, or used as intended to paint handmade hardcovers. (I used my finger to apply glue on the spine actually. A lot. It does work if you need it to.)
Fabric. You can use this to cover your book's cover. You might want to use a different texture, style, or color for the spine of the book.
Chipboard. I use this to make the two covers of the book, and also the spine. Basically, it's sturdy, compressed wood pulp. I use a 2mm or 80pt thickness.
Cardstock or construction paper. This is used for the inner part of the cover, covering the edges of the outside fabric. Can also be used as the backing material for the spine.
A bookpress. Again, not strictly a "material" but a tool. A real bookpress is two strong pieces of wood, connected on four corners by screws that you turn down to press the texblock of a book to lay flatter. Honestly, I do not have one of these. There are multiple tutorials on how to make them (Here and Here), but I use a bunch of very heavy books to lay flat on top of my pages.
If you have any other suggestions or recommendations, feel free to share in the comments or reblogs!
#materials#tools#bookbinding#bookmaking#bookbinding materials#book binding#ficbinding#fanbinding#arts and crafts#binding books#making books#books
4 notes
·
View notes
Text


Somehow I went from working on Entrapta to nearly completed on Perfuma in like two weeks.
Okay, I know how. I prepped their bodies at the same time and had Perfuma jump the queue for body repaints because I wasn't sure how to handle Entrapta's hair and wanted to experiment with rerooting on Perfuma since her hairstyle is more low stakes, and after I had rerooted her it felt like I was so far in I might as well finish... Plus I really wanted to be sure it was fine to reuse/mix the paint and that was a good call because I was repainting scuffed patches even today. I refuse to seal with varnish because all the ones I have come out way too shiny for skin, and I don't want to try to buy more, so I just spray with my adhesion improver to seal, plus all the layers of MSC I need throughout the faceup. It's not ideal, but I'm not planning to do more repaints after this series and they're just for display with clothing covering most of their joints.
For some reason, the pencil I used on her brows would always look good when I was working on them, and then when I came back the next day would almost have faded away, so I ended up painting them in after these photos but you'll have to wait for the final photos (hopefully tomorrow!) to see them. Putting the eyebrows on this custom also made me realize why I often don't click with Frankie dolls in person even if I love their concept: it's the forehead. The forehead is just too big and square. And it makes sense for a frankenstein, don't get my wrong! I just personally don't click with it, and it's not great for a human custom. If I had realized before I was doing the faceup, I probably would have tried to bring the hairline down a little, but you also can't start plugging in the middle of the forehead slope... I don't know. At least I understand what throws me off about the doll now.
The dress was super quick to throw together, I actually tried to make it look "nicer" by having it be two separate pieces like Mermista's and not just fabric marker like Glimmer's, but the fabric I used wasn't stretchy and the gapping from it actually looked worse than the marker. And again: not buying more supplies right now (although this time it's because the fabric store is over an hour away), so marker it is! At least making the dress was super fast compared to my hours spent patterning everything else I've tried to make.
Starting with Mermista and especially switching over to this doll, I changed my philosophy with what I was trying to accomplish. Researching Mermista I realized the official dolls for these characters (mostly Mermista and Catra) are actually very inaccurate to what they look like in the show, but the spirit was right so it never really occurred to me. As a result, I'm trying to do the best I can on doll scale with limited supplies, but I'm not worrying about things like adding the little keyhole to her neckline or cutouts in her straps. Her shoes are also going to be very, very different, but they're in the spirit of the original design, so I think they work well. I'm modifying Lagonna's shoes from the snack shack playset (it was on a very good sale!) by just adding the flower on the cross-strap from the original design and then filling up the heel with flowers. The original design is in flats, but since I'm modifying existing shoes for all these dolls, all of them are getting a boost up and I think she needs to keep that height to not look out of place. Also I don't want to try to cut the bottom of the shoe in half. Spirit of the original, remember!
The only thing I have left to do is sew together her shawl (I kind of forgot it existed until yesterday) and to finish styling her hair (it's drying right now and then I need to add the flowers), and then I'll be done for now! At some point I would like to make her a tiara like the rest, but I have no idea how to make a physical item that looks anything like what she wears in the show considering none of the pieces are connected to anything, much less on that scale, so it's shelved for now. She had multiple looks not wearing it and I can't decide if it would help or make the forehead situation worse, so it's shelved for now but on my running list of "would be nice one day"s.
Hopefully I'll have time to sew that robe and finish her hair tomorrow, and then I know I'm going to instantly want to take photos, so if that's not tomorrow then it's certainly coming some time this week!
1 note
·
View note
Text
How to Tailor Boxers
I’m making this because I recently looked for a guide for this and found absolutely nothing. Hearken to me, ye who have too much space in the front of your boxers, for instructions on how to make your men’s boxers actually fit—aka how to remove the huge flap in front.
1. Wash your boxers. Always wash fabric before working with it, and always wash clothes before wearing them.
2. Make sure they fit in the waist and leg. Elastic is quite forgiving, but they have to be comfortable. If there’s a sizing guide on the boxer packaging, go by your lower waist measurement. (Look at WikiHow or a tailoring guide to get that.)
3. Take a seam ripper or a pair of embroidery scissors and very carefully rip out the front center seam. Pull out all of the loose thread. Congratulations! You have reached the point of no return. You will now have two distinct flaps in the front of your boxers. This is fine.
4. Each of these flaps will have two layers of fabric, because men’s underwear is cool like that. Fold the edge of the fabric inward, iron it flat, and sew the layers together if you want it to look professional. You can also just sew them together without folding, but it might not look as good. (I went with the second option. It looks fine.)
5. Get yourself some pins, preferably long ones. Put on the boxers. Do not wear anything underneath. Say a prayer, fold the fabric flaps in, one over the other, and VERY CAREFULLY pin the edge of the exterior flap in place. Do NOT stretch the fabric. Using longer pins means that you can secure more fabric with fewer pins, reducing your chance of stabbing yourself in the vulva. This is sadly necessary, because if you wear anything underneath your boxers during this step, you’re almost certainly going to end up pinning it to the boxers.
6. Slip the boxers off, being careful not to dislodge the pins. Pin down the inner flap. Nurse any tiny stab wounds from the pins.
7. At this point you need to decide whether you want to sew by hand or use a machine. Pick whichever you’re comfortable with. I used a machine for everything, but I kind of wish I’d sewn the two layers together (step 4) by hand.
8. Sew along the pins, removing them as you go. If you’re sewing by machine, don’t forget to backstitch 2-3 stitches at the start and end. If you’re sewing by hand, don’t forget to double knot your thread, start the stitch somewhere where the knot won’t be uncomfortable or easily visible, and backstitch 2-3 stitches at the start and end. Pay special attention to the lower crotch area, where the stitch will meet a bunch of other seams. I secured my flaps with a straight stitch and reinforced them with a zigzag stitch similar to what was used in the original construction of the boxers.
9. Remove the pins. Put on the boxers for the moment of truth. If they don’t fit right, either modify from there or tear out the stitch and go back to step 5 to try again. If they fit, congratulations! You now have a well-fitting pair of boxers that does not have a ton of extra fabric at the front.
WARNING: once you’ve started tailoring your garments you cannot stop. Also you will get an extra little hit of dopamine every time you wear something you did any modifications on. Thank you and goodnight
197 notes
·
View notes
Text
Making an early 1900s corset cover
Hey everyone, I’ve been absent for so long and that has many reasons, my studies are definitely taking up so much more time than I had anticipated. I feel like I should mention that I am not studying dress history, so like I always say - costuming is a hobby of mine but please be aware that I might not always be 100% correct about things. But I am minoring in art history where we do occasionally talk about costumes so... it’s something? Anyways, a while ago I made a corset cover that I forgot to take pictures of when it was finished, so now I’m doing that. But first, this is what I was roughly going off of:

Having made some more complex things before I thought hey, this can’t be that hard? It’s basically just a bodice shaped piece of fabric with ruffles on. And surprisingly, I wasn’t that far off from the truth. I still severely underestimated the time that it took to sew all of those six pieces of ruffles on. That being said, here’s where I started:

Please excuse the fact that it’s not ironed, I was making it kind of in a rush.
I did make a mockup first that I tried on and made sure everything fits, but didn’t take a picture. Here you can see the mock up parts cut out of fashion fabric. I got out my french curve for the first time and was totally expecting to fail but it worked out really well! I used it to draw in all the curved lines. The reason only the back is curved and not the front is because I wanted the back to sit flat while the front would be gathered with a string and tied in the front, to help create that pigeon breast silhouette without having the back be puffy as well. As you can see, for that to work I’ve had to adjust the length of the side edges in the front so they had the same length as the curved ones.
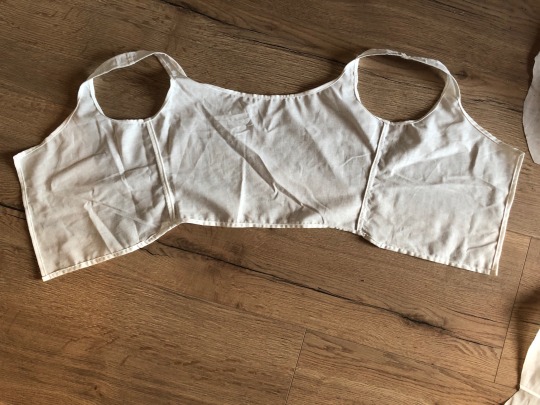
So then I sewed all the edges together and cleaned them up right after so I wouldn’t have to do that later when it’s done.

I then cut out some rectangular strips for the ruffles and folded over and stitched all edges but one - the one that would be ruffled. Instead, I did a running stich that I could pull on to gather it, and then machine stitch it to the rest. Here’s where I began to struggle: I didn’t really know how to attach the ruffle so it would look nice. I didn’t necessarily want the stitches to be on top, so I initially stitched it upside down to the fold it over but that didn’t work at all, so I had to take it all out again and just stitch it down normally.

I kind of just eyeballed where I wanted the ruffles to go, used a ruler to rougly make sure the ruffled pieces are the same length and tried putting them all about three centimeters apart. I do like how the ruffles curve up on the sides, I thought the finished piece looks so much better like this.

Like I said, I wasn’t super happy with the top stitching, and since I had some white ribbon left I used that to cover it up.
Then it was time to insert the string, aka that same white ribbon. I originally wanted to add a separate channel for that but I thought maybe I can just use the cleaned up edge for it. I used a bobby pin to get that ribbon through this makeshift channel but it worked.
So then I added the buttons and made little “buttonholes” out of thread and sewed five buttons in place.
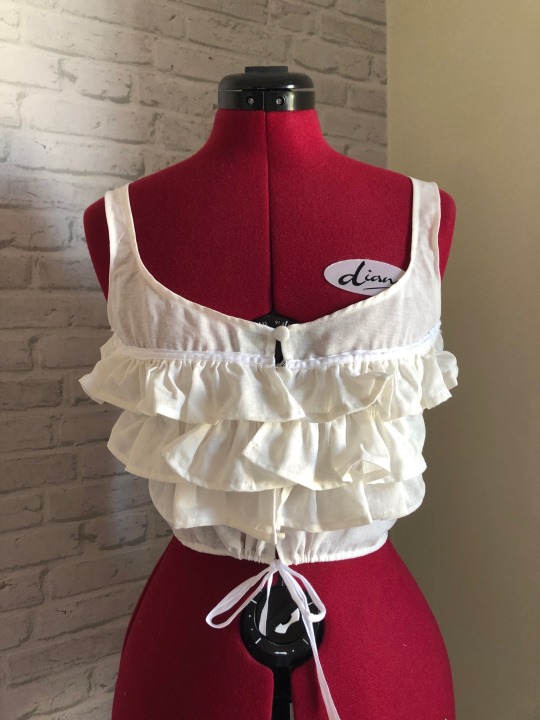

Here’s the finished piece. And you know what the ironic part is? It doesn’t fit me over a corset. And I have nothing but my own stupidity to blame. Thing is, I made this in order to wear under a dress that I’m going to make at some point, and I’m not really planning on wearing a corset with it (I want to modernize it a little), so I wanted something to help with the silhouette. So I never took my measurments in a corset, and I thought if I leave a little wiggle room it’ll be fine. No, learn from my mistakes and take your measurments! It’s not that big of a deal though because I did make it specifically with that dress in mind and having it fit over a corset would’ve just been a nice plus. And if I really try I can make it fit, it’s just a tiny bit small.
So, long story short, corset covers are great and not hard to make if you don’t make these obvious mistakes.
#fashion#historical fashion#fashion history#victorian#edwardian#sewing#edwardian fashion#victorian fashion#corset cover#mysewingadventures
126 notes
·
View notes
Text
Moonlight
I wrote a little something for @sliebman10 in the @hp-rarepairs exchange. Thanks to the mods for their hard work. It’s so appreciated.
How I picture Lavender is very much influenced by this beautiful art work by @constancezin.
pairing: Lavender/Parvati | rating: GA | <1k+
Summary: It was a random morning after a nightshift, but the moonlight revealed something beautiful to Parvati.
*** *** ***
It was six in the morning when Parvati was finally ready to end her shift at St. Mungo’s. The change-of-shift had been a quick affair, thanks to a rather uneventful and quiet night. Still, Parvati looked forward to simply falling into her bed, curling up against her girlfriend, and sleeping until the mouthwatering scent of a home- cooked meal would wake her up.
With a quick wave to Martha and Ron, Parvati stepped into the fireplace, hating the feeling of the short floo travel. She preferred Apparating but was far too tired and lazy to walk to the nearest apparation point.
As she stepped out into the dark living room, she noticed the distant sound of music coming from the end of the hall. Parvati didn’t turn on the lights but waited until her eyes adjusted to the dark, the full moon illuminating their flat enough that she could navigate her way to Lavender’s work room.
It wasn’t unusual that Lavender chose the early morning hours to work. She always did so when she worked on a particularly difficult piece that required all of her concentration, making sure that the expensive fabric wouldn’t get ruined by a sewing mishap.
As Parvati pushed open the door, she saw her girlfriend sitting at the desk where she designed her creations, scribbled down measurements, and organized her customer’s orders. Her blonde curls sat on top of her head, held together by a pink hair clip, some strands already escaping and falling into Lavender’s face.
The room was dark except for the lamp on Lavender’s desk and the bright moonlight shining through the large window leading out to their small balcony. With a small twist of her heart, Parvati remembered a time when the curtains had been shut tight against the silver light. Where mirrors had been removed or at least hidden away.
Parvati stepped into the room, alerting Lavender of her presence. Lavender looked up from her work, smiling up at Parvati who gave her a quick peck on the lips.
"How was work?" Lavender asked as she stood up and stretched her limbs. "You look exhausted."
"It was fine." Parvati fished out a thin folder from her bag. "Ron loved them by the way."
Lavender laughed, taking the folder and placing it back onto her desk. "Of course, he does. I think he would love anything I design for him as long as it doesn’t have lace and ruffles."
„He sure suffers from frilly trauma." Parvati smiled. "But really, he was very excited about it. You aren’t the most sought-after designer in Wizarding Britain for nothing, after all."
The song changed to something a little slower, something muggle and romantic, and suddenly Parvati wasn’t too keen anymore to sleep. She stepped around Lavender, switching off the lamp on her desk. "Dance with me?" she asked, offering Lavender a hand.
Lavender smiled and took Parvati‘s hand, who pulled her close. They swayed to the music, arms around each other and Parvati breathed in the scent of Lavender’s shampoo, her floral perfume and something both soothing and delicious that was entirely Lavender Brown.
Parvati kissed the exposed skin at Lavender’s neck, her kisses wandering from right under her ear, down her neck before her lips finally found Lavender’s. She enjoyed the way Lavender’s soft lips let her in, the way she tasted, and how the curve of her hips felt moving under Parvati‘s hands.
As Parvati broke the kiss she looked at her girlfriend and placed a soft peck over one of the scars that covered Lavender’s left side of her face, neck and even part of her chest. Years ago Parvati wouldn’t have dared to tell Lavender how beautiful she looked like this, bathed in moonlight. Now though, she could easily tell her, and Lavender would smile at the compliment.
It was impossible for Parvati to explain why right at this moment she thought about marriage for the very first time. But as they were surrounded by countless dress robes and wedding gowns for friends and other customers, Parvati imagined how she and Lavender would do each other’s nails and make-up, braid and style their hair. How beautiful their wedding dress robes would be, designed and made by Lavender. How Padma and her mother would do her wedding hennas.
Parvati thought about all of this and how their reception would be another legendary Gryffindor wedding. She didn’t know when she would ask Lavender to marry her, but she knew that she wanted to be with her beautiful best friend.
Forever dancing in the moonlight.
*** *** ***
You can also read this on AO3
15 notes
·
View notes
Text
1895 EPQ Project: Part 1
The Foundation Layer
SO basically, in the 1890s you had 2 options for the layer closest to the skin: a chemise and drawers or a combination of the two (handily named combinations). I chose to make combinations since apparently they are more economical in terms of time and fabric, and as a broke busy teenager this suits me just fine.
I wanted my combinations to have 'split' drawers that close with buttons down the centre front. I chose a pattern from an 1895 sewing manual and made my design based on the my pattern, contemporary adverts and extant garments. If you look closely, there's a teensy dotted line on the pattern, I decided this was an option for a low neckline and used that.
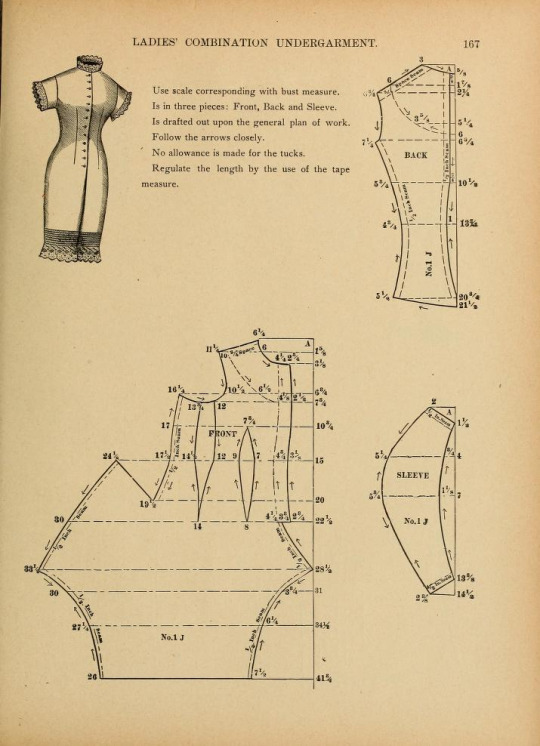
The pattern told me to use a 'scale corresponding with bust measure', however I don't really know 1) what that is, and 2) how to get one, so I decided to draft the pattern according to the scale given in the book and then fake it till you make it. I drafted the pattern pieces onto gridded pattern paper (honestly took me over an hour). I then marked the seam allowances and darts using a Frixion pen, which I cannot recommend enough because it comes right out when you iron it.
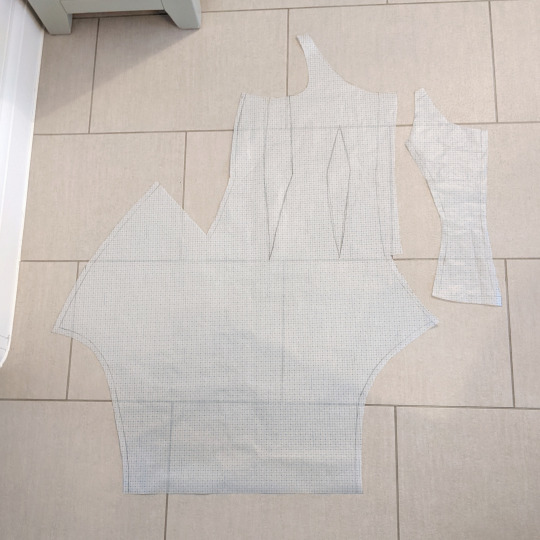
First I sewed the back pieces together with a French seam, then I sewed the darts. Next I sewed the fronts to the back piece at the sides and shoulders and flat felled it. This was the first point I could try it on and see if it fit, so naturally I did and naturally it didn't. So I re-sewed the darts until the fronts overlapped as they were meant to.

The next step was to sew the legs together up to where they meet and flat fell the seam. I then hemmed the raw edges of the split and gathered the rear flap (yes haha butt flap very funny) to fit the back panel.

Then it was placket time, babey. I used 8 buttons spaced 2 inches apart . As several extant garments I looked at used cloth covered buttons (these guys right here), I used plastic buttons covered in my fabric. I put the buttons on the left and the buttonholes on the right. Please don't look at them too closely, they are my second biggest weakness after hooks and eyes.
Then I sewed edging lace around the neckline, armholes and legs. I used reproduction lace from Etsy. Yes, it was expensive but it was really pretty so I didn't mind.
To sew it on (mini tutorial time):
Legs: I joined some insertion lace to some zigzag lace with a whipstitch. Then I top-stitched it to the fabric half an inch from the bottom, then folded the seam allowance into a hem and stitched it down (source)
Neckline: I topstitched the lace around 1/4 inches from the edge and trimmed the excess to about 1/8 inches and overcast it to the main fabric (source)
Armholes: I tacked the lace about 1/4 inches from the edge and then pinned and sewed bias binding on top through the lace. I then turned the bias binding to the wrong side and secured it with a whip stitch (source)


I meant to have pin tucks on the legs, but when I tried the finished combinations on they were already the right length so I couldn't have any.
And then it was done!
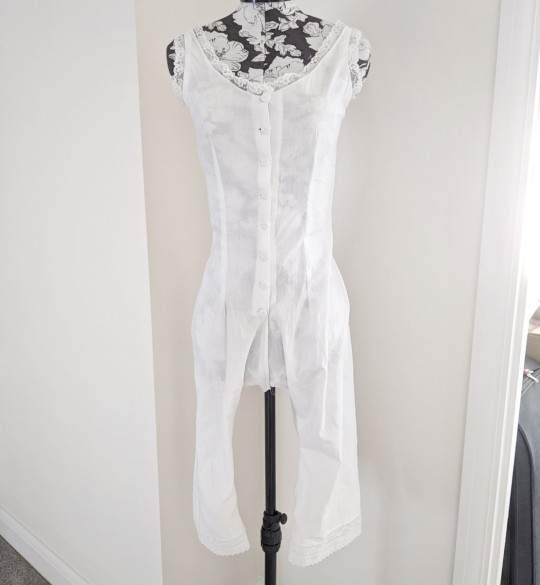
I'm really proud of this because this is by far the hardest garment I've ever made. Not necessarily the the physical putting together of it, but having to figure out the pattern and instructions myself. Even though there are a few places I wouldn't invite you to look at closely, I still like to think that someone, once, made some combinations that were much worse. And then they wore them every day.
My favourite part is the fact that this is school work. I get to work on my hobby then at the end of it I get a grade!
#this is long#historical costuming#historical clothing#historic fashion#historical dress#dress history#historical fashion#fashion history
26 notes
·
View notes
Photo
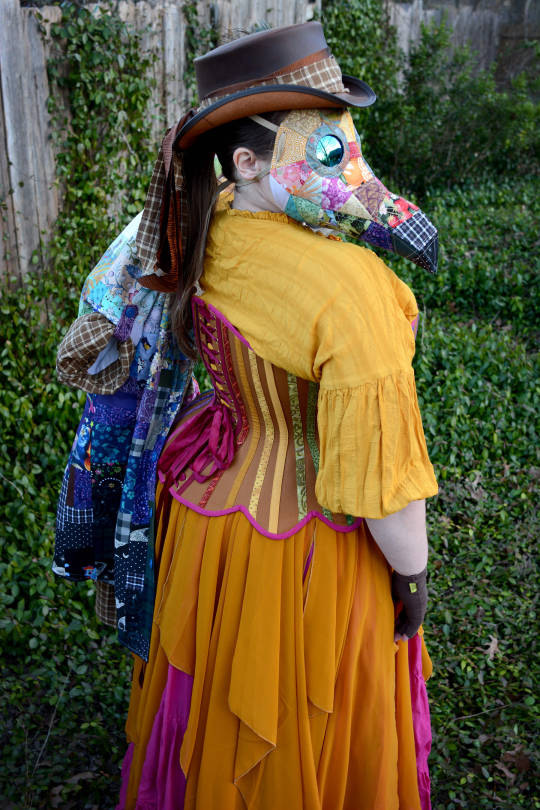
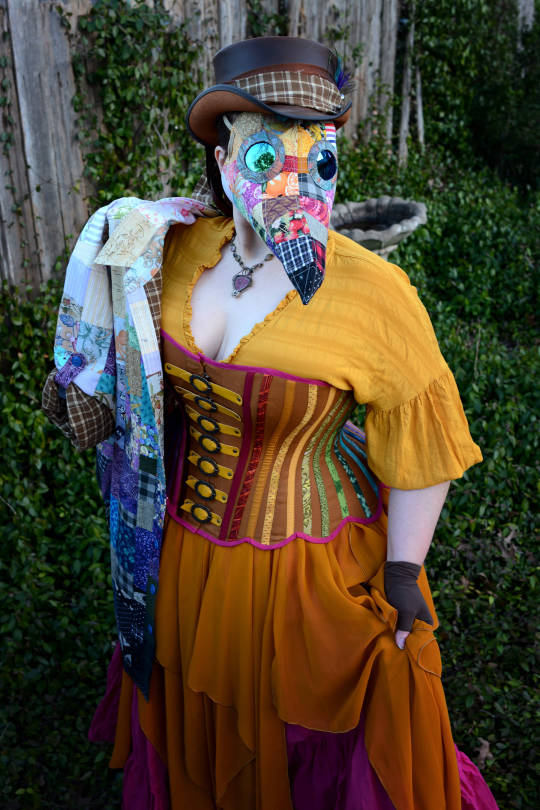

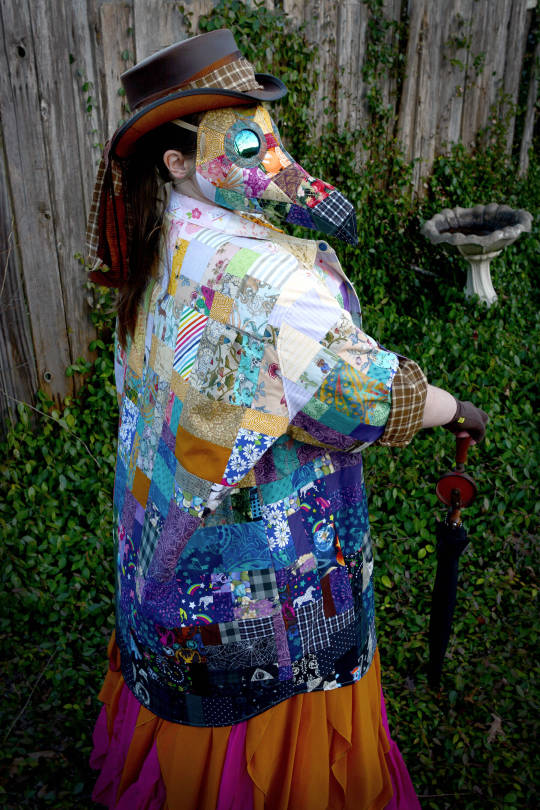

‘Mask’
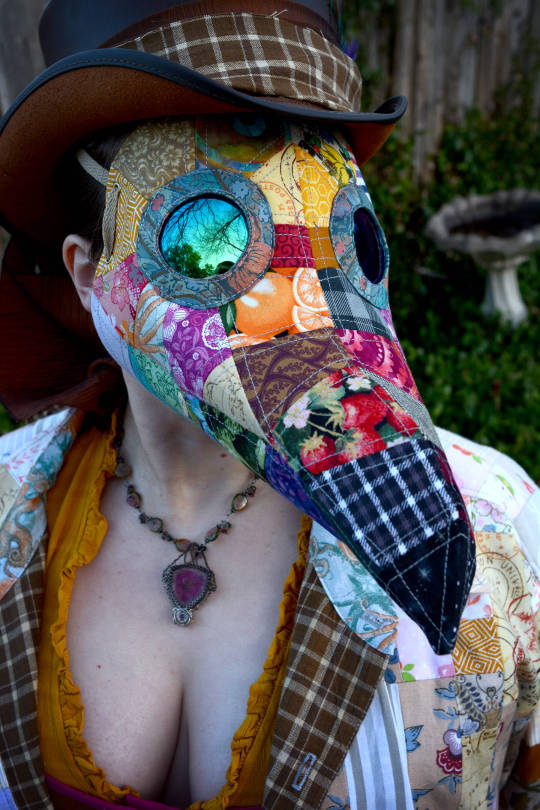
I just finished my entry for the 2021 Foundations Revealed costume competition and got it entered a few hours before the deadline. Whew. It’s been... a long week.
I came across a poem, ‘Mask’ by Beth Bachmann and had the sudden idea... “Hey, that costume competition was for a literature character this year, wasn’t it? I wonder when that ends...” 11 days. It ended in 11 days. And with the business still shut down and me in isolation, I decided... why not? What else am I REALLY going to DO with the next 11 days anyhow? Could a mask count as a character? Here’s to hoping it does!
I made a mask from the pattern by @mctreeleth and also a jacket pieced from the giant pile of cabbage left after making over a thousand face masks while in quarantine.
I started by pulling a pattern off my husband’s old patched 4XLT work shirt that has become my favorite house coat during the pandemic, so I had a fairly simple pattern to make out of the fabric I was going to piece.
My original plan was to have an ombre effect on the jacket, light at the shoulders to dark at the hem. When I started laying out the pieces, it ended up also having a rainbowy effect from reds on the left to blues and purples on the right. It took about two days to sort and cut all the pieces of fabric from the mask scraps - the largest is 4″x 5″, and I drew the line at the smallest being 2″x 2″. When I wasn’t sure in what order to put the brighter colors in terms of going from light to dark, I pulled out my phone and used it as a tool to look at them in greyscale mode, and went with what order they looked like they should go when the color wasn’t involved.
I pieced each panel over top of the pattern piece it was going to be on, and added a little extra for wiggle room, then thread traced each piece onto the panel, stay-stitched just under 1/4″ from the edge, and cut. I bagged out the bottom hem as I flat-lined each piece to stash fabric that had been too loosely woven for masks, but was perfect for lining fabric. I then joined everything together with french seams and boom - quilted patchwork jacket.
Making the mask took longer than I expected. Based on the amount of Bridgerton and Fate: The Winx Saga that played in the background while I was working, it took about 14 hours from start to finish.
Printing the mask pattern onto interfacing was brilliant - although trying the DIY scotch tape/interfacing trick didn’t go so well. The time it took me to unjam the printer isn’t part of the 14 hours. I did manage to print it onto a 8-1/2 x 11 commercial poplin meant for printing your own photos onto fabric to put into craft projects - then I added Heat ‘N’ Bond onto the backs before cutting out the pieces. That went wonderfully and made the mask pretty sturdy once it was finished.
For the most part, I followed the instructions that were with the pattern - but I did end up making a few changes:
I didn’t bother to top-stitch the bottom center seam. There’s no way to go all the way to the tip of the beak by machine, and nobody’s going to be looking at the bottom of the mask much anyhow. I just pressed the seam open very well on a sleeve board.
I didn’t add a fabric face strap - instead, I put two eyelets at the top and bottom of piece #10 after I was done and ran a lanyard through them with a cord lock, which worked very well.
On the round eye pieces, I edge stitched a line on the inside after flipping the lining around to the back side to keep everything smooth and in place.
Rather than folding the edge of the large circle down and pinning a ton of tiny pleats in place, I ran a line of small gathering stitches around the edge of the larger piece and used it like a drawstring to pull the large circle to the back side of the eye pieces and hold it in place. I ironed it well, and ran the gathering strings through the eyehole to the inside of the mask. I didn’t cut them off until after I had the eye pieces stitched down onto the mask. (I wish I’d taken a picture of this step, because it’s a lot quicker than the pinning - alas, it was 2 am and I didn’t think to.)
I didn’t slip stitch the eye pieces down onto the front of the mask. I pinned them in place, with pins situated kind of like spokes on a wheel. I edge stitched the eye pieces onto the mask by machine, walking the machine over each pin by hand. (Note - I was using an industrial sewing machine that handles thick fabric just fine and has a much heavier foot pressure than most home machines, so that probably helped this turn out well.)
If I were making this again, I would attach the bias for the eye holes from the front and fold it around to the back instead of the other way around - just for an aesthetic factor. It was a lot easier to make the final line on the bias look clean - which, sadly, will never be seen inside the eyepiece. The line around the bias inside the mask is the one part of mine that looks a bit messy.
Over-sized round “John Lennon” Sunglasses worked perfectly for lenses on this. After a while, they do fog up - I’m betting that wipes meant to keep the inside of goggles from fogging up will probably fix this.
I paired the jacket and mask with my pre-quarantine garb skirts and leather hat (shaped much like the quintessential illustration of a plague doctor), a shirt from my closet, and a cotton duck corset I had already finished as an experiment in color (Each external faux bone casing is in a different color radiating around half of the corset.) and also as an experiment in edge shaping - I made the corset extra-long, and then hand drew scallops around the bottom of the corset - not quite deep enough to count as tabs. I wanted to see if the bones were enough to keep these down and flat on the corset, or were they long enough they would flip up when worn? (Spoiler: They actually sit flat - yeay!)
Also learned on this project - when your husband is taking the photographs, and he is much taller than you, every picture that isn’t of your back will end up being a boob shot. XD
1K notes
·
View notes
Photo
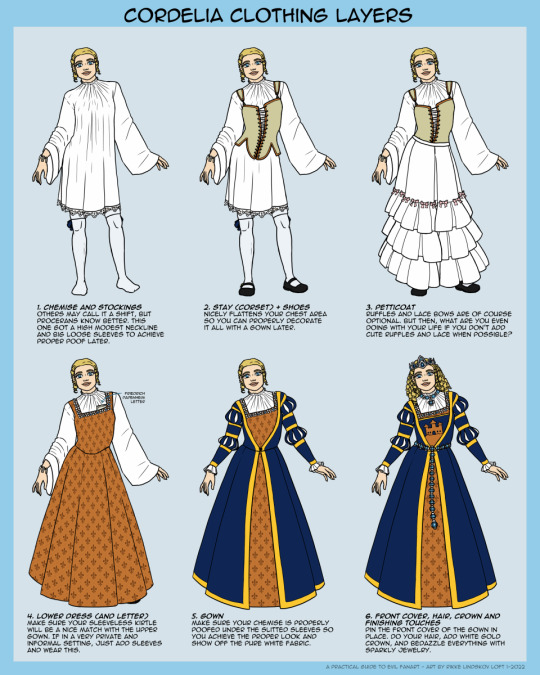
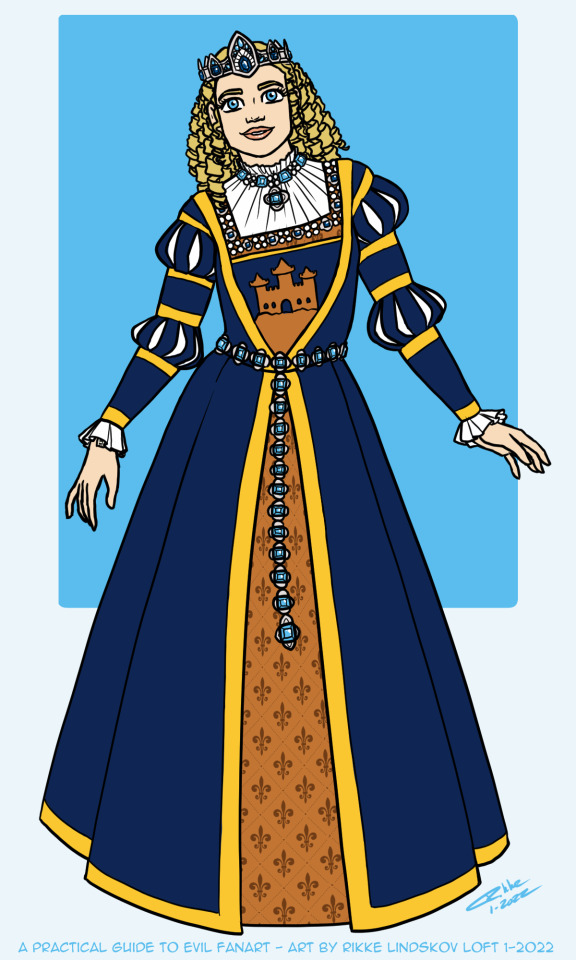
Cordelia clothing layers. (A practical Guide to Evil fanart)
Honestly, this one is all for me, and I geeked out. So, first of all, this is fantasy. I combined a lot of different historical inspirations from approximately the same century, to get the look I wanted.
This is roughly based on elements from Saxon Cranach dresses from between 1510 and 1540, as well as some Tudor and Elizabethan inspirations taken from around 1530 to 1580. The stay in particular is from the later part of the 16th century. Seeing how we know from Hakram’s excellent reading choices Procerans uses corsets – but everything else about them scream Renaissance inspiration – I figured we’d be talking early stays, that still are well within the Renaissance setting. Rather than much later Victorian corsets.
The ruffled petticoat might actually be the biggest historical deviation away from the general time period used for inspiration. They had petticoats around that century, but not with the ruffles. It just seemed so very, very Proceran. So yeah, one of biggest fantasy part in this due to being very out of time: The fluffy ruffled petticoat! Totally on par with the rest of Guide where one of the most modern parts also is the lace panties. ;)
More geeking out beneath the cut
1. Chemise and stockings. The stockings would be made from very finely knitted silk. Much more comfortable than is you sew stockings from fabric. The go above the knees and are fastened with lace garters.
Not pointed out on the image is the ratling tooth bracelet given to Cordelia by Friedrich Papenheim when she was quite young. In fact, she was so young it probably is a bit too small for her wrist now. Digging into it beneath her fancy sleeves.
2. Stays or corsets was used for quite a few centuries with very different goals. The early stays actually was not trying to give you a sexy hourglass figure. Rather the opposite, really. They worked to flatted out your chest into an – at the time extremely fashionable - cone shape. Body ideals change a lot in fashion…
3. I took a vote on Discord if Cordelia should be in white or blue. 3 voted for white. 13 for blue. And a couple of wonderfully mad souls started to argue for pastel pink to match Cat’s soon to be pastel fashion choices. These pink bows are for you lot. They may be hidden, but they’re there.
4. Lower dress and letter. Well, technically the letter from Friedrich Papenheim goes between the stay and the lower dress (called a kirtle). I figured it’d be much safer between these two pretty even and stiff layers, than if it went under the stay. Not sure what Cordelia is going to do now that she has two letters that are extremely near and dear to her. Double up on letters worn over her heart? Also, honestly Cordelia, you’re a weird and non-fashionable item short from Friedrich to form a proper rule of three.
5. Gown: If you look very closely, the bracelet is still just visible from beneath a sleeve.
6. Finishing touches: So yeah, the front part of the gown being pinned in place with needles is not something I’m making up. Someone not familiar with this style of fashion is in for a potentially pointy surprise if making a successful pass at a Proceran noble lady.
#a practical guide to evil#pgte#cordelia hasenbach#fanart#crown#fashion design#clothing design#artists on tumblr#gwennafran art
32 notes
·
View notes