#berenguer doll
Explore tagged Tumblr posts
Visit Tumblr Blog
Explore Tumblr blogs with no restrictions, modern design and the best experience.
Last Seen Tumblr Blogs


Fun Fact
Post activity is at the highest at 4:00 pm EDT; notes peak at 10:00 pm EDT.
Text

This is wren. I fell in love with the tiny details of these life like dolls. He's fully vinyl and anatomically correct.
I usually prefer dolls with closed eyes but something about their eyes captured my interest. The details on their arms, legs, and backs is impressive for a doll that isn't a reborn. At least in my opinion. This is my secret little interest.

#berenguer baby#berenguer doll#actually autistic#Berenguerbaby#Berenguerdoll#autism#adhd#bipolor#I appreciate art and much like reborn dolls I view these doll in a similar way#I'm nervous to share this#Baby dolls#dolls#Berenguer
3 notes
·
View notes
Text


Got a new brother for Gracie May! His name's Jamie.
2 notes
·
View notes
Text

Sierra doesn't mind being asked to help look after her baby sister Elena. She's so sweet and cute, even when she's asleep.


My mini Berenguer babies fit perfectly into this little wicker cradle I found at a doll show last month.

They're all dressed in clothes I made, and have little magnetic binkies that I bought just for them. These are Honeybug cutie pie pacifiers. I put small magnets inside the babies' heads to keep the binkies attached.
15 notes
·
View notes
Text
Prop 001 Build Thread


The reference came from the promo for the stage play this last spring. Eventually I plan on making the uniform from the play and the design has more visual interest than his vague blob of a onesie in cyber solider. Tactical onesie construction notes are under the cut.


I'm using a second hand baby doll from JC Toys that thankfully already came in a onesie with chupón. He's a soft bodied doll (plush body rubber head and limbs) to cut down on weight, and I think the model is the 14" Berenguer but I'm not positive.
The fabric is all just scrap from my cyborg cosplay (brushed poly suiting, patent wet look pvc, & voile) and some store bought deep red satin piping. I also found some great gold tone shank buttons that looked pretty close as well.
The only real addition to his uniform design will be some loops in the back of his onesie that will let me string him to some straps and wear as a backpack throughout the con. I guess if someone wanted it wouldn't be hard to convert him into a functional purse but a doll of this size wouldn't hold a lot.


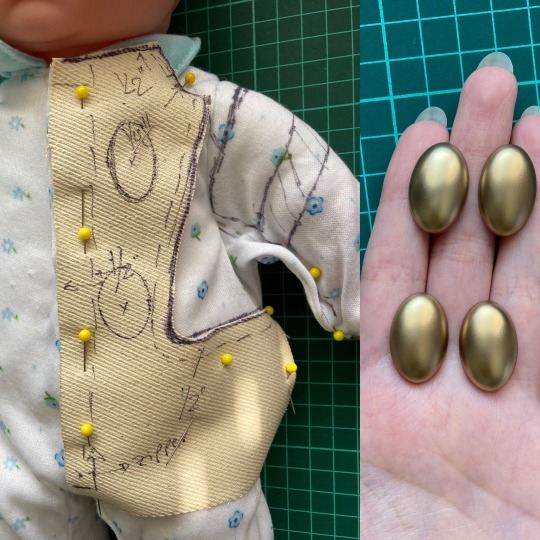

After washing and drying both Ivan and his clothes I got to work making a pattern and taking into account the lack of stretch the final onesie would have. I transferred the modifications to paper, added allowance and got to cutting my scrap fabrics.


Sewing prep was just gluing on prefab satin piping in place of hand basting along the cutouts of the onesie front. Sewing clips helped the glue adhere properly since the fabric is pretty dense and just sucks it up like a sponge.


The assembly was pretty straight forward, no fancy stitching just straight seams. The only proper sewing was spent on the sleeves and piped panel. The piped front panel is just an extension of the pants, with the remaining portion of the bodice siting around the apex of the tummy. It's attached by the second row of top stitching and again on either side of the lapped zipper. The zipper itself also got a small bar tack at the base to help reinforce the inseam area as well.

To keep from losing his chupón, there is a little scrap on ribbon sewn to his right shoulder. By chance this matched his piping and zipper so that was cool.

Because my pvc was a different weight than the poly suiting it needed to be fused to some scrap denim to avoid going lame. Though this may have been overkill because it required top stitching to keep the allowance from bulging. Overall it was fine, four part sleeves aren't all that fun even when tiny.


Once the sleeves were installed it was just a matter of sewing along the outer most edge, toe inset, and inseam. The neckline was folded down 1/2" and whip stitched from the inside. I also added the buttons at this point.


To help get the shape of the shoulders right and tie in with the adult stage play uniforms, I made some little shoulder pads. I also installed some mini sleeve heads using 4mm macrame cord to help retain the drape of the upper sleeve. There isn't a lot to work with since soft bodied dolls limbs are just seams without any bilk or structural integrity, the little guy needed all the help he could get.
The sleeve hems are just a basic single fold hem. The poly brushed suiting I'm using is like a bulkier, glorified felt so fraying isn't a big concern here but bulk is.
And here he is so far. Somehow a lot cuter than I thought a toy baby in a tactical onesie could be. He has four french tacks on the back for some clear straps and apart from sewing on his chupón, wig, and scarf he is good to go.
I'm waiting on his hair to come in, and the paint to dry on his chupón so that's what'll be in the next update.
6 notes
·
View notes
Link
Check out this listing I just added to my Poshmark closet: Berenguer La Newborn Boy Doll Anatomically Correct 14" Jointed Vinyl Blue Eyes.
0 notes
Link
Check out this listing I just added to my Poshmark closet: Berenguer Newborn 14" Realistic Baby Doll 2016.
0 notes
Link
Check out this listing I just added to my Poshmark closet: Berenguer Baby Girl Doll approx. 14" long.
0 notes
Link
Check out this listing I just added to my Poshmark closet: 1 baby first doll 1 Berengue Black Doll Lot Of 2.
0 notes
Link
Check out this listing I just added to my Poshmark closet: Vintage Berenguer Expressions Doll Yawning Baby.
0 notes
Link
Check out this listing I just added to my Poshmark closet: JC Toys Berenguer Lil Cutesies Baby Doll wearing owl outfit.
0 notes
Text


Close up of his face with his original hat.
0 notes
Text


Gracie May
2 notes
·
View notes
Text
Eyeswapping my A Life of Faith doll
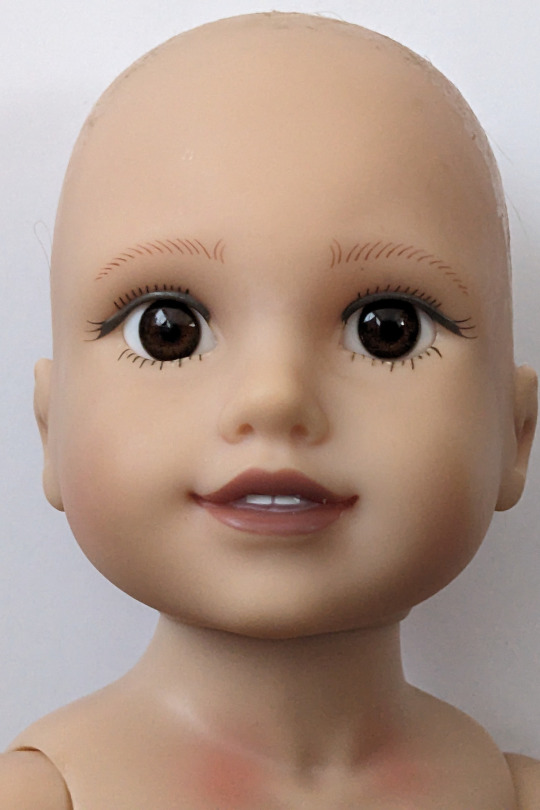
~*~*~ Before & After ~*~*~
This adorable little lady here is a doll from the doll brand A Life of Faith. The dolls were first released in 1998, and are based on characters from the Elsie Dinsmore book series, which was published in the 19th century. Since the dolls are no longer being produced, I had to acquire mine secondhand.
But they can sometimes be tricky to find without a certain very common condition affecting dolls: eyes that have changed color over time to red, orange, or purple.
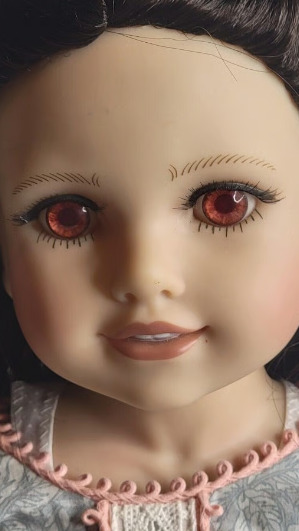

(Left: a Violet Travilla doll; right: a Laylie Colbert doll, both from A Life of Faith; both pictures taken from secondhand listings)
This is absolutely not the only brand that has that defect; My Twinn, Ruby Red Fashion Friends, and Berenguer Classmates are some others I've seen whose eyes turn a bright shade of red.
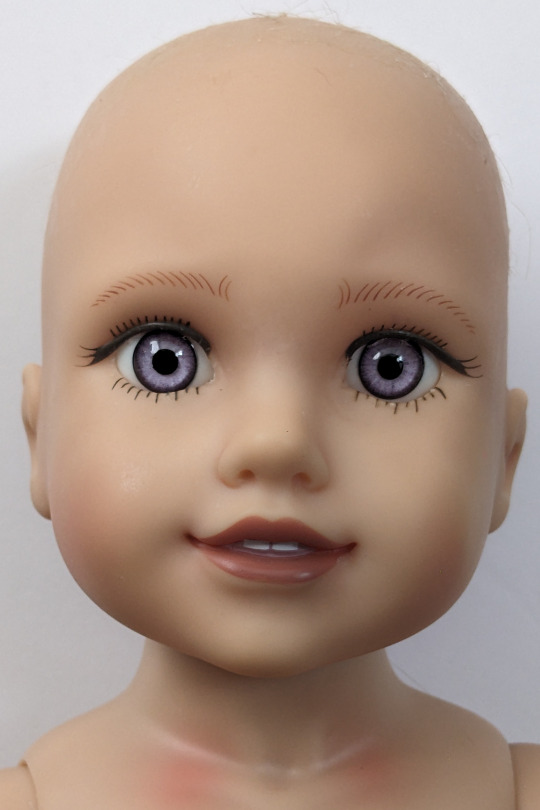
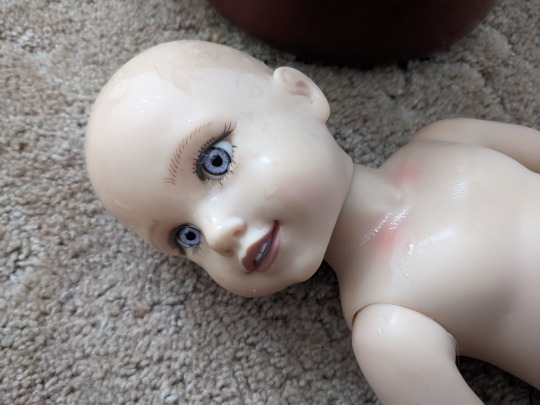
My new doll came to me in excellent condition, but with light purple eyes that I did not like. I planned on removing and replacing them the moment before I bought her. It turned out to be easy and surprisingly inexpensive.
When I received my doll, I could tell immediately that she had the right kind of vinyl that would make it easy to replace her eyes. I took photos of each step so that I could show precisely how you can do the same.
The first thing you will need to do is get yourself a pair of flat-backed oval glass eyes, size 20 millimeters, in the color of your choice. I used these eyes from CR's Crafts and I'm pleased with what I got, but I can also recommend Dolls By Sandie as a legit source of doll parts that I have purchased from in the past. This size of eyes is also commonly used in reborn baby dolls, so if you're wanting to shop elsewhere you can search for that type of supplier. But do not compromise on the 20 mm size. Too big and they won't fit in the socket at all; too small and they will move around in the socket.
What else you'll need:
A very small screwdriver, or a similar slender metal or plastic tool
A large pot of water, and a way to heat it up (ideally a stove)
A few extra large plastic sandwich bags; large ziploc style bags are what I used
Dry towels in case your doll gets wet
What you'll be doing here is using the water to heat up the head, which will make the vinyl soft and flexible. Then you'll use your screwdriver to pop out the original eyes. Then you'll heat the vinyl again and use your hands to insert the new eyes.
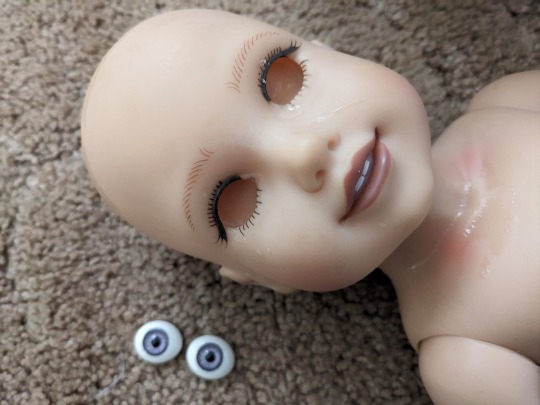
Warning..... there are pictures within this post of an eyeless doll. If that is something you don't want to see, do not continue reading this post.
.........
Start by heating up some water in your large pot. Make it about 8 inches deep.
While that heats, remove the doll's wig and peel off the eyelashes. If you want to put the lashes back on after the eye swap, keep them in a safe place where they won't get lost. Eyelashes have the tendency to stick to random things and get far away from you.
Removing the wig isn't absolutely mandatory, but I do recommend it. It will make the whole process much easier when you're not worrying about damaging it or keeping it restrained and out of the way. You can always glue it back on afterward.
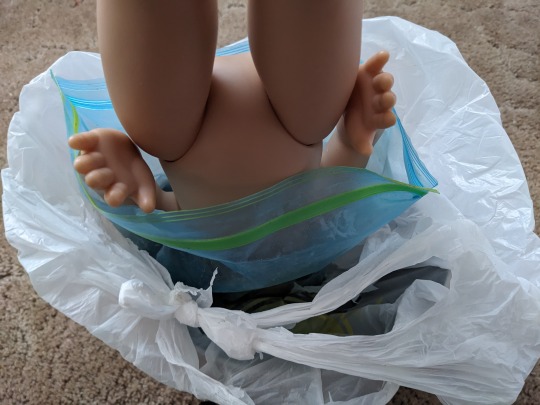
When the water is ready, get your doll suited up for the hot water plunge.
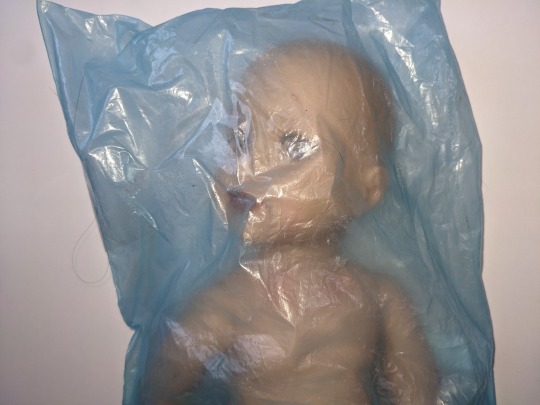
I covered her with two large plastic sandwich bags, then a plastic grocery bag. This will protect her from getting wet, while still allowing the vinyl of her head to heat up and become soft and flexible.
Bring your water to a boil, and then immediately turn off the heat and take the pot off the heat. Carefully bring the pot of hot water to a stable surface--I put mine down on the floor and sat there to work on my doll.
Turn the doll upside down and lower her head into the water. Make sure your water is deep enough to be level with at least her chin. Hold her there for about two minutes.
If your water is hot enough, the vinyl head should become warm and flexible.
Oops, she got a little bit wet. My bag leaked. If this happens to you, use towels to dry her off completely. Do not let her eye sockets get wet and remain wet, as this could let mold grow.
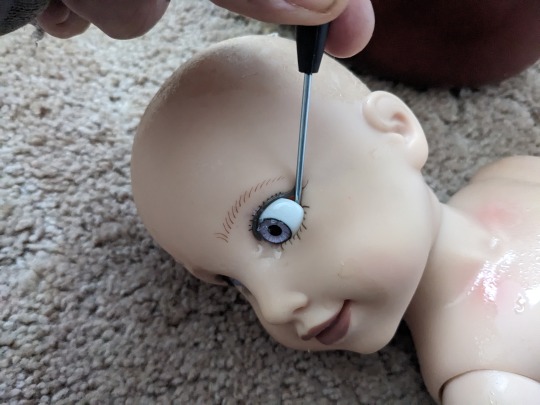
Working very quickly before the vinyl cools down, slip your screwdriver or other skinny tool into the eye socket behind the eye and pop it out. Be careful not to scratch her skin. If you're having trouble, put her back into the bags and heat up her vinyl a bit more.
Jeepers creepers! This is what you'll see after extracting them peepers.
Set the old eyes aside, and get the new eyes ready at hand. Then stick your doll back into the bags for 60 seconds to heat up the vinyl again.
Once she's warmed up again, it's time to insert the eyes.
The previous steps were the easy part. This is the tricky part that's hard to photograph in a helpful way. What I did was slip the top half of the eyes into the eye socket and then just pushed down hard on the eyes until the bottom halves popped into the socket.
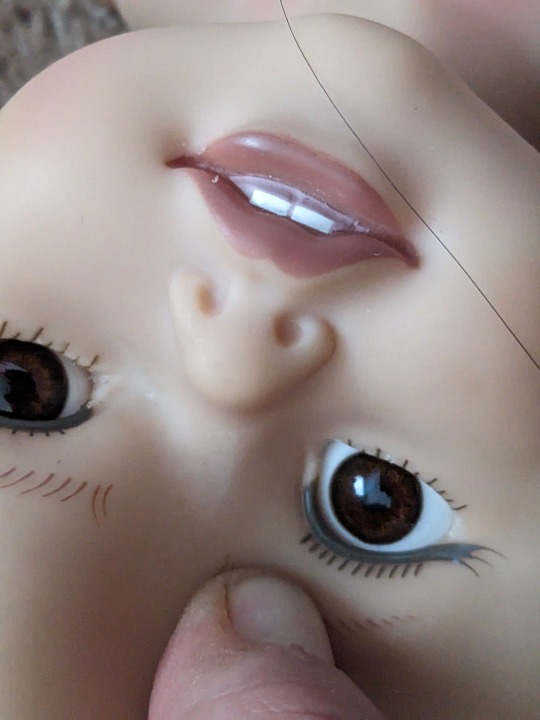
You may need to reheat the vinyl again after putting in the first eye and the second eye.
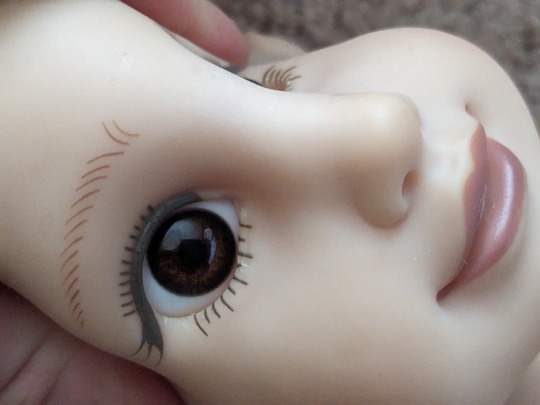
If that's not working, you can also try squeezing the head to stabilize it and push the eyes in that way.
As soon as they're in, you're done! Reattach the lashes and the wig if you took that off.
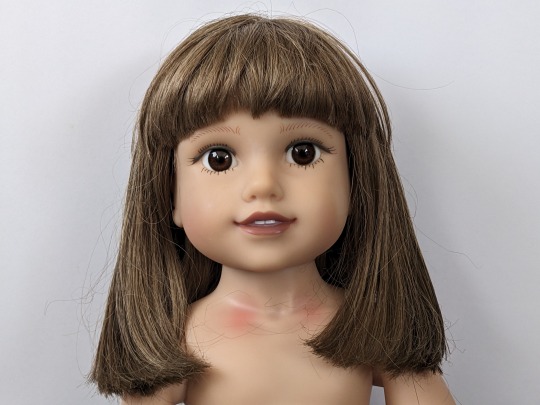
Success!
This is an older picture and she has since changed wigs, but I'm so happy with her new eye color. It gives her a completely different, more natural look.
7 notes
·
View notes
Link
Check out this listing I just added to my Poshmark closet: Vintage Berenguer Soft Body 8" Vinyl Doll Blonde Hair Blue Eyes w/ Outfit Bonnet.
1 note
·
View note
Link
Check out this listing I just added to my Poshmark closet: New Born Sleeping Berenguer Babies 19" Life Like Partial Vinyl Weighted Soft Bod.
0 notes
Text
Feb 1
I have some of that cosplay foam clay and now three Berenguer baby dolls and ideas... If I have energy I'm going to get in to the closet room and look for the one who's been around longer because if I'm getting out the baby customizing supplies I want to do all three at once.

I have other pictures but this one hopefully makes it obvious it's a doll because you know how the internet is. That was in a kit so it came blank but I really don't think for what I have planned I would have to strip the factory paint off the other babies which would be nice. I just have to find out.
If it works as intended I'll be on to something I'll have to say I don't take commissions for and if it doesn't work I'll again have something I won't take commissions for. You'll have to chose from what's there and like it.
What I need to do today is have a carefree making art day. Was able to cognitively keep myself from having a melt down over a minor mistake so I feel good about that.
Got some oil pastels, not Pentel hopefully a more adult brand, and odorless fake turpentine, and some brushes and canvasses to try something. I've been thinking about oil painting again but after my supplies got fucked up in storage I would have had to replace them. If I can make what I'm going to try work then it'll be less mess than before. There's no reason it shouldn't work technically.
Honestly I don't think I have any of my old oil paintings except for a couple I did in school. Spiritually they had to go. Artists know what I mean.
I really need to do a substantial art piece. Did some more sketches in the mechanical pencil book, printed out some more reference pictures, mostly Teddy and Robert from last year's tour, and I just need to art in color.
0 notes