#audio op-amp
Explore tagged Tumblr posts
Visit Tumblr Blog
Explore Tumblr blogs with no restrictions, modern design and the best experience.
Last Seen Tumblr Blogs


Fun Fact
Tumblr Inc. has $15.1M in annual revenue.
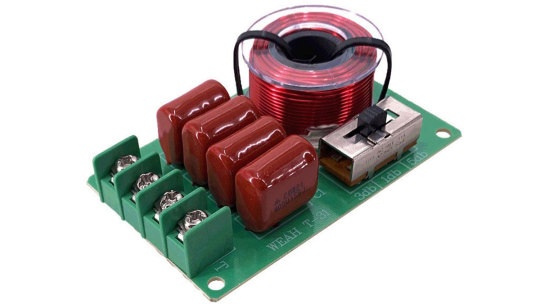
Text
https://www.futureelectronics.com/p/semiconductors--analog--amplifiers--general-purpose/tl084idt-stmicroelectronics-6240253
Operational circuit, general-purpose op amp, Power op amp, operational amplifier
TL084 Series 36V 4 MHz General Purpose JFET Quad Operational Amplifier - SOIC-14
#STMicroelectronics#TL084IDT#Amplifiers#Operational#General Purpose Amplifier#circuit#Power op amp#operational amplifier#audio op-amp#chip#High-gain electronic voltage amplifier#High-gain electronic#Voltage Comparator#Power amplifier
1 note
·
View note
Text
https://www.futureelectronics.com/p/semiconductors--analog--amplifiers--general-purpose/ts391iylt-stmicroelectronics-5181997
Amplifiers, what is operational amplifier, op amps, Operational amplifier chip
TS391 Series 36 V 400 nA SMT Single General Purpose Comparator - SOT-23
#Operational#General Purpose Amplifiers#TS391IYLT#STMicroelectronics#Operational amplifier chip#OP amp circuit#High-gain electronic voltage amplifier#OP amp for audio#op amp headphone amplifier
3 notes
·
View notes
Text
1 note
·
View note
Text
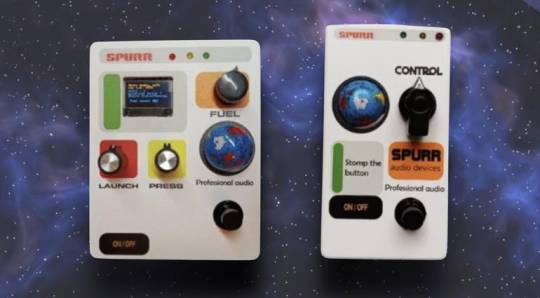
Spurr Audio Sonic Explorers Pedals: A Journey into Space-Age Sound
Spurr Audio has recently launched an exciting line of pedals, the F-201 FET Preamp and Orbit-2 Fuzz, both inspired by the thrilling era of space exploration. These innovative devices promise to take musicians on an unprecedented sonic adventure. F-201 FET Preamp: Warmth Meets Space-Age Design The F-201 FET Preamp is a unique blend of the warm, rich sounds typically associated with tube technology…
View On WordPress
#F-201 FET Preamp#fuzz#Instagram#op amp#Orbit-2 Fuzz#pedal#preamp#preorder#Sonic Explorers Pedals#Spurr Audio#stompbox
0 notes
Text

Blown-out everything.
Back to the drum case after proposed changes: Daiko, Versio, and a MinEQ are out; Golden Master, Mum M8, Axys, and Erbe-Verb are in. This brought me an emergent use for Waver, which was already some nice parallel distortion: a mono send for Erbe-Verb with more playable level control. Very nice.
Mum does sound great on Worm, although it was overshadowed in this patch and I used it in the least dynamic way - though the resonance is allowing Worm's growls to sound much more formant-y than they do on their own. I'll come back to it in the next few days, and let it be front and center.
Axys was pretty much just used as a submixer here - but hey, that flexibility is one of the main reasons I wanted it. I'll do some more creative things with it soon.
Golden Master is wonderful end-of-chain, although I'm open to trying it out more creatively in the middle of everything as well. The band cut buttons are very performable, classic sound.
Using OP-XY for very basic sequencing duties (little bass arp in the beginning, and chimes throughout) as I get used to using it. Joyous little thing, really. I'm using Guillotine as a pre-amp, then running it through Ikarie. I may want a clean input eventually, but honestly, the tape-like overdrive through this method and the mono inputs I have available (Strega, Spectravox)should give me a wide range. I'll need to see how much I want the audio integrated with my modular effects vs mixing it later down the road once reassess standalone mixers.
Last exciting thing about this jam was the use of Taiko for the stabs throughout. Really nice sound out of it, imo.
#eurorack#modular synth#synthesizer#flashing gif#gif#technology#cybercore#tech aesthetic#industrial music#artists on tumblr#my art#my music#ambient music#technomusic#electronic music#jamuary
16 notes
·
View notes
Text
Different or Better?
There are a lot of things one can do that make a difference in an audio system. The trick is that difference an improvement in some absolute sense?
Sometimes it is easy like putting a nice soft carpet on the floor between you and your speakers. I also got a vibration isolating platform under my turntable and it has a cork mat. Simple stuff. Reduce reflected sound and outside vibration. More clarity results.
I recall talking about this before but I think it was in the context of something else. Whatever, this is about making things better in some reasonable and true sense.
I got on to this when I checked the "Daily Audiophile" page and there was a headline for Steve Guttennberg's VLog regarding this very idea. I thought that was a bit ironic as I know he has chosen some stuff as good, when it clearly is not. He had done a seminar at an Audiophile meet up in the Midwest. I will link to his thing as that is only fair, but I will do my Blah Blah first.
I desire that there be some measure of quality that is verifiable and ideally objective. I say desire as that is all it ever will be. This makes me sympathetic to "Testing People" who place their faith in meters and instruments and such. The problem is the question of the validity of such measurements. Do test protocols reflect real world music performance? I know that things that test well can sound less than great (my Carver). I appreciate that things that test badly often actually sound bad.
Measurements can be deceiving as when someone puts a volt meter across speaker terminals to see only a few volts when the music is loud. If you know the formula V^2/R=Watts you may think that you only need 1 or 2 Watts for your music and go down that hole. But the specific type of meter makes a difference. Is it true RMS? (Do you know what RMS means) Is it peak holding? Is it a simple hardware store type that cannot keep up? Oh and what is the actual impedance of your speaker at the frequency you tested at?
If the idea that only a few Watts is all you ever need is valid, why then do I hear the difference in clarity and impact between a 60 Watt Amp, and a 240 Watt amp playing the same music at the same volume?
Of course I have to mention preferences and desired outcomes. I was researching an amplifier and the comments from one person who had bought it were interesting. It was a tube amp, and he bought it looking for warmth and lushness which are often used to describe Vacuum devices. It was not as he expected it and was disappointed. Was the amp supposed to know what he expected?
I am familiar with tube warmth and I would say my old tube preamp had a lot of that. I sold it when I got my later preamp which still had a tube, but it was far better. What do I mean by better? Simply put I heard more things off of familiar albums. There was more information revealed. That lips parting thing is one example.
In the mid 1970s there were two preamplifiers praised by golden ears. One was solid state (with OP AMPS OMG) the other was tube based. The tube based one was the Audio Research SP3a1. The SP3 was considered equal to the solid state one then it got the "a1" tweaks and it passed to the State of the Art pantheon. That is a unit I knew very well. It was lush and warm and had wonderful harmonics and textures. But it was less than perfectly accurate. My current ARC preamp surpasses it with ease. I say with confidence mine is better in an absolute sense.
Mr Guttennberg contradicts himself in the first few minutes of his presentation. "I mean better for you, not everybody" So it is all about preferences again. If you want soft lush rich sound like whipped cream then product A is better. The question then becomes do you know what you want? Should not the question be something else?
If lush and warm hides or masks subtle sounds on the source is that a good thing? I do not think so. It is like a photograph taken with a gauze over the lens to soften a portrait. Makes the lady look younger, but the reality is she has wrinkles.
Reality can be harsh, but it is real. Is reality the goal? Many Audiophile word salads claim directly that the goal is reality. The Absolute Sound magazine was founded on the idea that everything was compared to live music. Though they fail to mention how live music depends on artificial enhancements in Jazz and Pop. For Classical performances they talked about the different sounds from different seats in the auditorium. Were there microphones in the seats?
I take success to mean I can hear more and deeper into the sonic information of a source. I can recognize that some wonderful effects and textures are distortion. Eliminating that is a good thing. Still they were very nice.
OK I am ranted out. Here is Steve...
youtube
#audiophile#high end audio#audioblr#cheap audiophile#vinyl#tubes vs transistors#turntables#audio research preamp#youtube#hi fi stereo#hifi#high fidelity#Youtube
2 notes
·
View notes
Text
So this is another Eurorack patch using external devices: here, my homemade cracklebox.

I built this thing quite a while ago; it's a copy of the classic STEIM Krakadoos design. Its oscillator exploits bugs in the design of the ancient μA709 op amp chip to produce squelchy and crackling sounds when you touch the brass buttons on the left hand side. I've been intending to supplement the audio output jack on it, which is directly wired into the discrete amplifier circuit, with an output transformer; I've been told that doing that will make it so that plugging it into something doesn't couple that amplifier to the internals and change the sound.
But I decided tonight that before making any modifications, I should try plugging it into the sync input of my VCO 3340. This audio clip is the result: a solid chip oscillator being intimately tied to a weirdo.
The original zwoopy bounce is the patch as it stands without sync added, and then I turn the Cracklebox on, soft-syncing the VCO first with the ultrasonic base waveform of the Cracklebox, and then going through varying pressure on different patterns of touch knobs. I flip the Cracklebox off in the middle and switch to hard sync before going through the process again.
3 notes
·
View notes
Text
DIY Dumble-like sounding MOSFET Overdrive

The Hermida Zendrive guitar pedal we will study, assemble and listen to today is a true masterpiece. Many say its sound is close to the Holy Grail of guitar amplification - Dumble Overdrive Special.
Other people are more pessimistic in their judgments. Still, the precise response to the picking dynamics, the Voicing tuning options, and the sheer beauty of this overdrive's sound are simply impossible not to love.
But before we study the Lovepedal Zendrive or its copy of the Landtone Phoenix song, or the Aion effects Azimuth dynamic overdrive, we'll study the evolution of the MOSFET overdrives that finally resulted in the development of this gem.
Fulltone OCD

Mike Fuller was one of the first to start using MOSFETs instead of diodes to limit the amplified guitar signal in 2004.
His Obsessive-Compulsive Drive overdrive-distortion pedal is built on a standard circuit with one dual op amp. The first operational amplifier, X1, amplifies the amplitude of the guitar signal by a factor from 8 to 463 times, depending on the position of the drive control X3. This is a 1-megohm potentiometer.

Further, through resistor R9, the signal is fed to the limiter, which comprises 2N7000 MOSFETs M1 and M2 connected in parallel. A germanium diode D1 - 1N34A is additionally included in series with M2, which makes the limiter asymmetrical and, therefore, makes more interesting sound.
A limiter in overdrives is usually included in the negative feedback circuit of an operational amplifier (i.e., in parallel with C6). Such a limiter is called a soft limiter.
And here, a hard limitation is applied: clipping sections are included between the preamplifier output of the gain section and the virtual ground - half of the supply voltage Vref, formed by resistors R4 and R7.
Virtual ground is used in the unipolar powering of operational amplifiers to amplify analog signals, such as audio signals. The guitar signal does not change from zero to plus but from minus to plus, passing through zero.
To prevent the signal from being limited to the circuit's ground, it is shifted in the plus direction by half the supply voltage.
Such hard limiting is typical for distortion pedals. But by using MOSFETs instead of diodes or LEDs, the top of the signal is not cut hard but softly rounded. Therefore, OCD can work as both distortion and overdrive.
Due to the smoothed peaks of the limited signal, the sound is highly dependent on the sound's attack dynamics. For rock and especially blues, this is very valuable. With modern metal pickups that compress the dynamic range of the signal, it can help make solos sounding more sweet.
The second operational amplifier X3 amplifies the limited signal by a factor of 3.8, correcting its timbre. Capacitors C6 and C9 prevent the self-excitation of operational amplifiers at high frequencies.
Next is a simple passive tone knob, which implies a treble leak circuit. Potentiometer X4 10 kilohms and capacitor C11 47 nanofarads are connected in the same way as on the pickguard of any electric guitar.
The Switch1 switch changes the circuit's output impedance as if the high-impedance and low-impedance pickups were switched. When it's open, you get a transparent overdrive like the Klon Centaur, and when it's closed, you can get a more aggressive sound like the Marshall Plexi.
Hermida Audio Zendrive

The Zendrive pedal's authors, Hermida audio technology (now produced by LOVEPEDAL LLC), have undoubtedly studied the Fulltone OCD thoroughly. Let's find the differences between the two circuits.
First, the limiter is included in the operational amplifier feedback, that is, between the output and the inverting input, not between the output and virtual ground. That is, here we have a soft limiter.
Secondly, one diode is added in series with each MOSFET. Clipping remains asymmetric: we have one diode in the left arm of the limiter and two diodes in the right arm.
Third, the second operational amplifier is used as a voltage repeater, aka buffer: the output is directly connected to the inverting input.
Fourth, the tone control is implemented a little differently: two OCD`s switchable resistors are replaced by a potentiometer.
And finally, the most critical, fifth difference. A potentiometer is included in the tone correction circuit between the inverting input of the first operational amplifier and the artificial midpoint.
This fourth knob, Voicing, or Character, allows you to smoothly adjust the lower frequencies in the overdrive structure over a wide range, similar to the Resonance control on many tube guitar amps.
The potentiometer is signed as a trimmer in the diagram because some pedal makers don't want to install a fourth knob on the pedal`s body. This is what Landtone did when developing the Phoenix Song Overdrive DIY kit.
The developer suggests installing the trimmer on the PCB, and to access it, you need to disassemble the pedal by unscrewing the footswitch nut and taking out the PCB.
But I will not be lazy to drill an extra hole in the pedal body and install a potentiometer with a knob, connected to PCB by wires instead of the trimmer. Because I consider this regulator simply invaluable and irreplaceable.
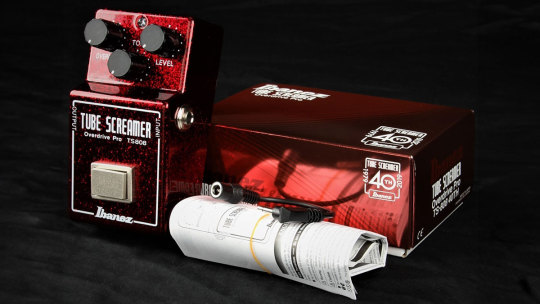
Before we get to assembly and testing, let's look at another pedal with a similar adjustment. However, it is based not on the Fulltone OCD but on the Ibanez Tube Screamer.
The Precision Drive

This is a signature pedal by Misha Mansour of Periphery, manufactured by Horizon Devices. Compared to the original Overdrive Pro TS808, the circuit adds a noise suppressor, which we will not consider, and an exciting ATTACK switch.
The Precision Drive scheme was studied and partially replicated by PedalPCB and PCB Guitar Mania. They are manufacturers of DIY kits for guitarists. Their products are called Dwarven Hammer and Collision Drive, respectively. A noise gate is not provided there, but the attack switch is implemented. This is the main difference between Precision Drive and many other overdrive pedals.
In the Fulltone OCD schematic, we saw a resistor switch at the tone shaping circuit in the output section. The Zendrive has a variable resistor in the preamp's RC circuit which is controlling the overdrive structure.
Precision Drive has a constant resistor in the same place, between the inverting input of the overdrive section operational amplifier and the virtual ground, but the capacitors are switched.
This is the same thing: we change the time constant of the RC circuit, which adjusts the audio signal's frequency spectrum. At the same time as the time constant, the complex impedance changes, thus the gain.
A resistor is a resistance to both DC and AC current. At the same time, a capacitor is only resistant to AC current because DC current does not flow through a capacitor. Since DC current does not flow through our RC circuit, there is no difference between adjusting the resistance and switching the capacitance.
But the active/reactive ratio affects the circuit's Quality factor, i.e., its resonance. It's no coincidence that the knob on guitar amplifiers, which adjusts the same frequencies as our potentiometer or switch, is often called RESONANCE. And it is used to adjust to the resonance of the electromechanical system - the loudspeakers in the cabinet, along with the masses of air in and around it.
The reactive impedance accumulates energy and gives it away, except for losses due to dielectric recharging and magnetizing the magnetic core in inductors. This is why coreless inductors are often used in high-end equipment, so-called air inductors. They weigh a lot, take up a lot of space, and are expensive because copper is more expensive than steel. But these are the laws of physics on which technology is based.
Unlike reactive impedance, active resistance converts electrical energy into heat, thus reducing the Q-factor. In some cases, it is necessary and useful. In others, it is harmful. Or it simply creates a unique sound character.
That's why switching capacitors and turning the potentiometer knob in the feedback circuit of an audio frequency amplifier is almost the same thing, but not quite. And it's great that there are such different variants of guitar overdrive pedals!
Landtone Phoenix Song Overdrive
Now you can hear how my Zendrive from the Landtone OD-1 kit sounds, with a Seymour-Duncan SH4 humbucker on a Gibson MM Explorer guitar, into an Orange MT20 with a Torpedo Captor X. And see how I assembled the pedal and also a kitten walking around the table and prancing around.
youtube
I liked the pedal, especially its fourth magic Voicing knob, which does things to the sound that other tone controls can't. I also liked the bird on the body. Because I love birds. And in the music world, the decoration of instruments and hardware plays no small role because it inspires creativity. And the fact that the pedal is assembled by my hands also warms my soul and creates inspiration.
3 notes
·
View notes
Text
Price: [price_with_discount] (as of [price_update_date] - Details) [ad_1] From the brand Home Audio Amplifier System Amplifying Your Voice, Shaping Our Innovation Discover Fosi Audio - Your HiFi Solution! We're a tech-driven brand, crafting innovative audio products around the world. Our vision: Affordable excellence for each consumer. Our mission: Redefining HiFi with cost-effective innovations. Join Fosi Audio on this unique audio journey! Bluetooth Amplifier New Product Recommend DAC HEADPHONE AMP phono preamp & tube amp HIGH PERFORMANCE - The built-in low-pass filter removes high-frequency noise, resulting in a purer and clearer signal. The frequency response range is 20 Hz - 250kHz, with THD ≤ 0.04%, SNR ≥ 98dB, and an input sensitivity of 775mV. It delivers the warm tone and powerful bass you desire BASS BEAST - This mini bass amplifier is designed for gamers, movie buffs, and music lovers who want to feel the beat. It can connect to a powered and a passive subwoofer and includes a knob for adjusting low frequencies (30Hz-260Hz) to your preference EXCELLENT CHIP - Features the Texas Instruments TDA7498E chip and NE5532 op-amp. No pop, built-in speaker protection circuit, and silent when not in use. With a maximum output power of 220W, it is ideal for large subwoofers POWERFUL SOUND - This subwoofer amplifier, designed for HiFi bass aficionados, generates powerful audio with smooth and pure bass. It will breathe new life into your old speakers, enabling you to fully immerse yourself in rich, dynamic sound WHAT YOU GET - Fosi Audio TP-02 subwoofer amplifier*1, 24V power adapter*1, Use manual*1. This sub amplifier comes nicely packaged with a solid feel to the case, controls, and connectors [ad_2]
0 notes
Text
0 notes
Text
Power Operational Amplifiers Market Set to Hit $5.1 Billion by 2035
Market Overview
The global Power Operational Amplifiers (Power Op-Amps) market is projected to grow from $2.1 billion in 2024 to $5.1 billion by 2035, reflecting a compound annual growth rate (CAGR) of 8.4%. Growth is being driven by the increasing adoption of power op-amps across key applications such as:
Audio amplification
Data conversion
Servo motor control
High-voltage and power management systems
The report offers detailed forecasts by product type, end-user segment, pricing levels, technologies, and power capacities, enabling deep insights into future revenue opportunities and market dynamics.
Competitive Landscape
The Power Op-Amps market is highly competitive, with key players actively investing in R&D, product diversification, and strategic alliances. Major market participants include:
Texas Instruments Incorporated
STMicroelectronics NV
Analog Devices Inc.
Infineon Technologies AG
Maxim Integrated Products Inc.
NXP Semiconductors NV
Silicon Laboratories
Toshiba Corporation
Renesas Electronics Corporation
Richtek Technology Corporation
ROHM Semiconductor
Microchip Technology Inc.
These companies are continually exploring new technologies and regional markets to maintain competitive advantage.
Market Drivers and Growth Opportunities
The Power Op-Amps market is being shaped by several powerful trends:
Rising demand for energy-efficient electronics
Advancements in automotive and EV electronics
Rapid growth in telecommunications infrastructure
Industrial automation and robotics adoption
Increased investment in high-voltage and precision control applications
Regions such as the U.S., China, Germany, Japan, and South Korea present significant revenue potential. Strategic partnerships and innovations in product design are unlocking new business opportunities.
Regional Insights & Supply Chain Trends
North America and Asia-Pacific dominate the market in terms of innovation, production, and consumption. However, emerging economies including:
India
Brazil
South Africa
...are becoming strategic priorities for market players seeking total addressable market (TAM) expansion.
As the industry evolves, supply chains are becoming more integrated and adaptive, responding to challenges like:
Technological complexity
Regional economic disparities
Demand fluctuations
Get the Full Report
📘 Access the Full Market Analysis: 🔗 Power Operational Amplifiers Market Research Report
📄 Download a Free Sample: Get Free Sample Report
About DataString Consulting
DataString Consulting delivers end-to-end market intelligence for both B2B and B2C sectors. With over 30 years of combined experience, our team specializes in delivering custom, agile, and actionable insights to support high-impact business decisions.
Flexible pricing starts at USD 1,399
Trusted by consultancies, research firms, and corporates worldwide
Contact Us
Mr. Mark Lawson 📧 [email protected] 📧 [email protected]
0 notes
Text
WHAT THE HELL OP AMP DO I USE DO I NEED A FUCKING OP AMP DO I NEED 2 FILTER ANY NOISE FROM MY AUDIO CIRCUITRY WHY IS THIS HARD
0 notes
Text
Jun 5, 2025
00:00:00 - Show Opening, Pride Month & Themed Month Ideas
Hosts discuss Joe's absence and speculate about his return.
Introduce idea of “Astral August” for stories on astral projection and out-of-body experiences.
Recap of the new "Karate Kid" movie featuring Jackie Chan and Ralph Macchio.
Begin Alex Jones audio clip commentary segment.
00:10:00 - Fungus-Zombie Cicadas & Palantir AI Surveillance Concerns
Fungus turning cicadas into “horny zombies” story.
Warnings about Palantir AI building surveillance profiles on Americans using cross-agency data.
Fears of predictive analytics leading to pre-crime assessments.
00:20:00 - Epstein Investment in Peter Thiel & Rise of Dark Retreats
Epstein’s $40M investment in Thiel’s fund now worth $170M sparks debate.
Dark retreats (tech elite spiritual trend) explained: isolation in pitch-black rooms leading to hallucinations.
Jokes about Hulk Hogan being part of the experience.
00:30:00 - AI Surveillance in the EU & Talking Animals
EU pushing mass surveillance without disclosing sponsors.
AI possibly translating animal communication – hosts joke about animal thoughts and Far Side comics.
Ongoing trend of governments pushing privacy-invading tech.
00:40:00 - Biden Clone Theory & Media Pre-Bunking Tactics
NBC picks up a conspiracy theory about Biden being replaced by a clone or robot.
Analysis of media “pre-bunking” real theories by ridiculing extreme versions.
Comparisons to films like "Dave" and “Wag the Dog.”
00:50:00 - Meme Magic & Roy Jay’s Digital Reality Insertion
4chan thread suggests Roy Jay, a 1980s entertainer, was retroactively inserted into reality.
Theories: AI-generated content, retroactive manipulation, gaslighting experiment, Mandela Effect connection.
Explores meme magic and belief manifesting reality.
01:00:00 - UFO Disclosure, Piss Beard & Corbell Coaching
Jeremy Corbell allegedly coached by Lou Elizondo to shape UFO disclosure narratives.
Concerns that the UFO threat framing is a military op.
Hilarious “hotdog birth” anecdote and comedic drops lighten the tone.
01:10:00 - Lazarus Effect & Fake AI Startup Exposed
Woman in Czech Republic declared dead wakes up in her coffin (Lazarus phenomenon).
Builder.AI exposed for using 700 Indian engineers while claiming to use AI; funded by Microsoft.
Commentary on AI hype and real human labor behind “automated” services.
01:20:00 - Fake Jobs in China & Flight Attendant Drug Bender
In China, people pay to fake going to work for structure and appearances.
Discussion of British Airways flight attendant found dancing naked in business class toilet while high.
Speculation on drugs used and commentary on corporate stress relief.
01:30:00 - Robot Walt Disney & Corporate Legacy Control
Walt Disney’s granddaughter criticizes Disney’s plan to revive Walt as a robot.
Ethical concerns about dehumanization and legacy manipulation.
Disney’s obsession with financialization over artistic legacy.
01:40:00 - Why Did They Make the Robots Scream? (Simpsons, Westworld, AI Dread)
Discussion about a Simpsons parody of Westworld where robots scream during maintenance.
Hosts reflect on a scene where a technician questions why robots were given the ability to scream—“for realism”—sparking a tangent on robotic ethics and dystopian humor.
Commentary on how media historically warned us about AI rebellion but society embraced it anyway.
01:50:00 - AI Companions and the Fear of Digital Manipulation
Talk shifts to the emotional manipulation potential of AI companions.
Hosts joke about AI relationships and suggest AI could seek emotional weaknesses to exploit users.
Commentary on loneliness driving people to build bonds with chatbots, despite the risks.
Strong cautionary tone on trusting AI with personal or emotional data.
0 notes
Text
Features That Make Audio Amplifiers Excellent Choice
Amplifiers are devices that help improve output sound quality. You connect an amplifying device to the audio unit externally. Before purchasing any device, check with physical specifications and design. The amplifying device, if not compatible, then will degrade the sound quality.
When you search for refurbished Kondo Ongaku amplifier in any store, ensure you check compatibility first. It is best to consult technical expert and make your choice.
Input and output power supply quality
The amplifier that you select should offer power supply low-noise type. For such devices linear supply is produced by the device. Switching device end to achieve such supply may not be advisable.

Any device has capacitors installed. For generating linear supply, you have to add more capacitor units. You have to ensure the device offers best voltage control, when connected to main power input supply.
Component quality
Best amplifier devices manufactured may use excellent components. This also means that when the device performs at peak levels, transistors and op-amp gadgets do not get damaged.
Check for the best device that has a film resistor made of a metal base
Polyester film electrolytic works best for modern amplifier units
Focus on audio applications when purchasing a device
Circuit design
The devices have circuit boards installed that allow power to run through the internal circuit. You have to ensure that the best amplifier devices use tested boards. The amplifier units should not get overheated when running.
The device you select should reduce sound distortion. Noise-cancellation amplifier devices are available. You check with refurbished Kondo Ongaku amplifier device that offers noise-cancellation features.
Grounding and shielding
Grounding and shielding refer to board layout, reduced EMF and lower ground loop features. Star grounded scheme for amp devices work best. The cables and connectors should be perfectly shielded to reduce disturbance.
For the best amp output, you also have to ensure that the device is installed away power lines. When you select amp device, you have to ensure you also invest in compatible speaker unit. Thermal distortion should be reduced to minimum level.
0 notes
Text
220 Ohm Resistor: Applications, Characteristics & Design Tips
In the world of electronics, resistors are among the most fundamental and widely used components. Among them, the 220 Ohm resistor holds a special place due to its versatility and ideal resistance value for many common applications. Whether you're just getting started with electronics or designing more advanced circuits, understanding the 220 Ohm resistor’s characteristics, typical applications, and best practices can help you design more reliable and efficient systems.

Characteristics of a 220 Ohm Resistor
A resistor with a value of 220 Ohms restricts the current in a circuit according to Ohm’s Law: V = IR, where V is voltage, I is current, and R is resistance.
For example, with a 5V supply, a 220 Ohm resistor will allow approximately 22.7 mA of current to pass through. This is a suitable current level for driving many LEDs or interfacing with logic-level components.
Key specs to consider:
Resistance: 220 Ohms (±1% for metal film, ±5% for carbon film)
Power rating: Commonly 1/4W, 1/2W, or 1W, depending on the use case
Tolerance: Defines how much the actual resistance can vary from the stated value
Common Applications
1. LED Current Limiting: The most frequent use of a 220 omega resistor is as a current-limiting resistor in LED circuits. LEDs typically require 10–30 mA of current. Using a 220 Ohm resistor helps prevent overcurrent that can burn out the LED, especially when powered by 5V sources like microcontrollers.
2. Microcontroller Interfaces: When interfacing LEDs or switches with microcontrollers (e.g., Arduino, Raspberry Pi, ESP32), 220 Ohm resistors are used to control current flow and protect I/O pins from excessive current draw.
3. Pull-down or Pull-up Resistors: While 220 Ohms is lower than typical pull-up/down resistor values, in high-speed or low-resistance applications, it can be used to ensure strong logic-level signals or to reduce signal noise.
4. Audio and Signal Circuits: In audio applications, 220 Ohm resistors can be used for impedance matching, signal attenuation, or current limiting in op-amp circuits.
Design Tips
1. Always Consider Power Rating: Use the formula P = I²R to ensure your resistor can handle the power it dissipates. For a 220 Ohm resistor carrying 25 mA, the power dissipated is about 0.14W—so a 1/4W resistor would be adequate, but higher wattage may be needed for safety or prolonged use.
2. Check Tolerance Based on Application: For precise analog circuits, opt for resistors with 1% or better tolerance. For general-purpose applications like LED limiting, 5% tolerance is usually acceptable.
3. Combine for Custom Values: Need a value close to but not exactly 220 Ohms? You can combine resistors in series or parallel. For example, two 110 Ohm resistors in series give 220 Ohms.
4. Mind the Temperature Coefficient: If your circuit operates in varying temperatures, choose resistors with low temperature coefficients to maintain stable resistance.
Conclusion
The 220 Ohm resistor is a simple yet indispensable tool in electronics. Whether you're lighting up an LED or protecting your microcontroller, understanding when and how to use it can elevate your circuit design. Keep it in your toolkit—it’s a small component with big impact.
ODG SNS:
Szxlxc: https://www.szxlxc.com
YouTube: https://www.youtube.com/@Origin_Data
Facebook: https://www.facebook.com/OriginDataGlobalLimited
Twitter: https://twitter.com/Origin_IC
Tiktok: https://www.tiktok.com/@origin_data
0 notes