#apply epoxy
Explore tagged Tumblr posts
Visit Tumblr Blog
Explore Tumblr blogs with no restrictions, modern design and the best experience.
Last Seen Tumblr Blogs


Fun Fact
Tumblr.com is the 103rd most visited website in the world.
Text
Tips for DIY Epoxy Resin and DIY Epoxy Resin Coverage and Cost Calculator
Skip to Calculator I’ve worked with epoxy resins for years. I started working with epoxy knowing I would invest a lot of time and money learning different techniques to develop patterns, produce durability, prevent yellowing, limit cracking, and stop warping. As a result, I get to offer top-of-the-line epoxy products to my clients. There are some trade secrets I want to keep to myself, but I…
#advice#apply#apply epoxy#at home#beginner#calculator#cost#coverage#custom#diy#do it yourself#epoxy#epoxy resin#fort valley#gal#gallons#houston county#how much#kathleen#middle georgia#near me#perry#pour#resin#resin countertops#resin table#tips#tools needed#warner robins#wood
0 notes
Text
I suck at textile stuff but I’m gonna start a mold embroidery project thing soon
#might go to craft store later but I want to nap first I’m so fucking tired#I’m gonna use like chalk pastels with some faux fur yarn and stuff and maybe use nylon so I can apply it to stuff#oh and black sequins bc I wanna do black mold#maybe some epoxy for like moisture
2 notes
·
View notes
Text
Non-Toxic Polymer Clay Jewelry Business in India
Non-Toxic Polymer Clay Jewelry Business in India Introduction The handicraft world welcomed a brave little thing — polymer clay. Polymer clay is the type of medium that has captured the attention of both the artists and the aspiring entrepreneurs alike, with its versatility and endless possibilities and it is a business in its own right. Using polymer clay to make jewellery, these enterprising…
#apply resin on polymer clay#basic polymer clay tutorial#diy polymer clay earrings#epoxy resin art jewelry#how to apply resin on polymer clay#how to use polymer clay#jewelry#polymer#polymer clay#polymer clay beginners#polymer clay charms#polymer clay diy#polymer clay for beginners#polymer clay jewelry#polymer clay jewelry making#polymer clay tutorial#resin jewelry#small business ideas#small business owner#uv resin jewelry for beginners
0 notes
Text

#Ganga waterproofing services. Hyderabad Waterproofing Services. Bathroom waterproofing services.#Bathroom#waterproofing#Leakproof#Tiles#cutting#Grooves making#Water washing#Cleaning#Drying#Epoxy Applying.
0 notes
Text
Epoxy Flooring
Epoxy floors are an ideal option for both indoor and outdoor settings. It is especially effective in high wear and high traffic areas as it extremely durable. As well as being very tough and low maintenance, epoxy floors look fantastic and come in an exciting range of colours and finishes.
0 notes
Text

Epoxy grout fills the gaps between the tiles and provides a glossy, high-quality finish. Learn how to apply epoxy grout the easily. It's ideal for tile installation.
0 notes
Photo


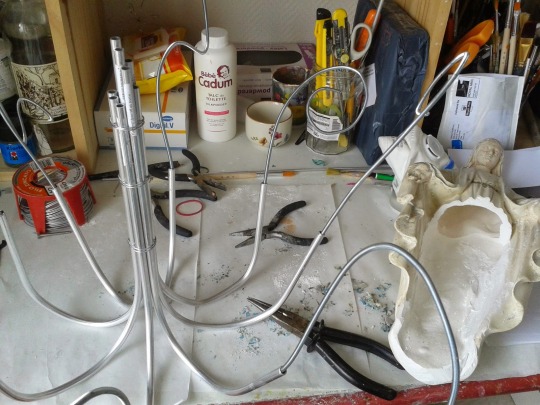


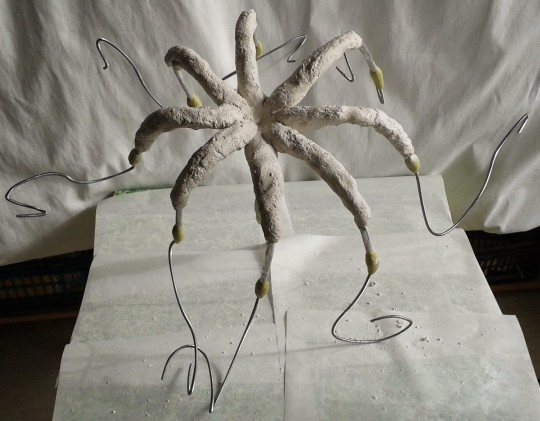


. . . all the tentacles complete — but no, the front one is not right! Some surgery required. Out comes the hacksaw, but only to the wire armature so the arm can be shaped into the correct curves. Then like Dr. Frankenstein I fasten it back together with staples and recover with more resin putty.
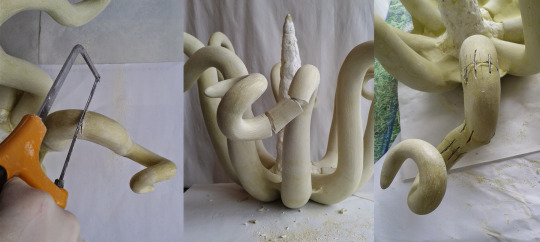
And now is time to sand . . .
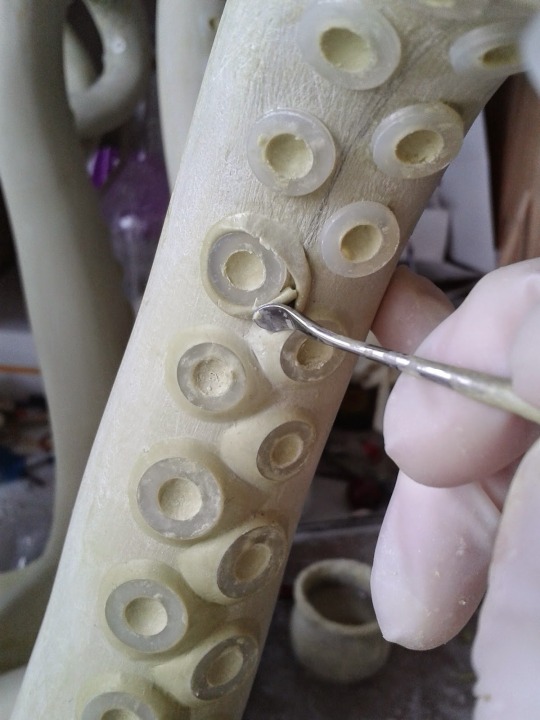
and sand and sand and sand until it is time for the little sucker cups . . . M2, M2.5, M3, M4, M5, M6, M8, M10, M12 white nylon washers
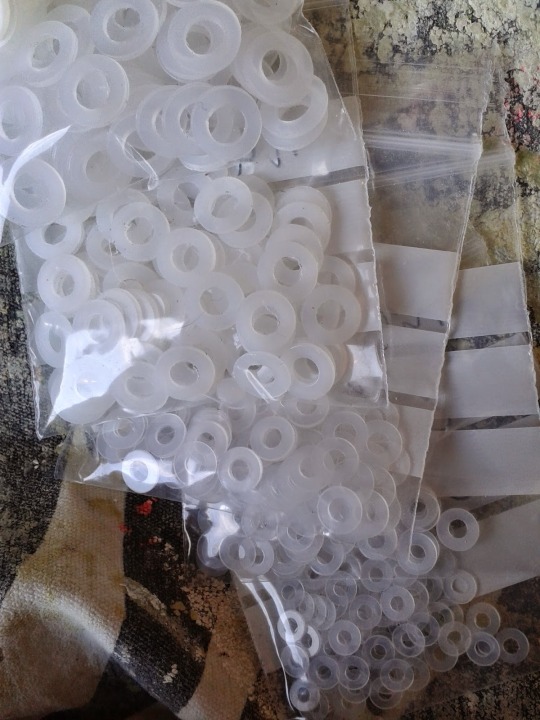
I pulled out my collection of plastic seals and off we went for days of cupping —15 days spent modeling the contours of each of the 663 suction cups


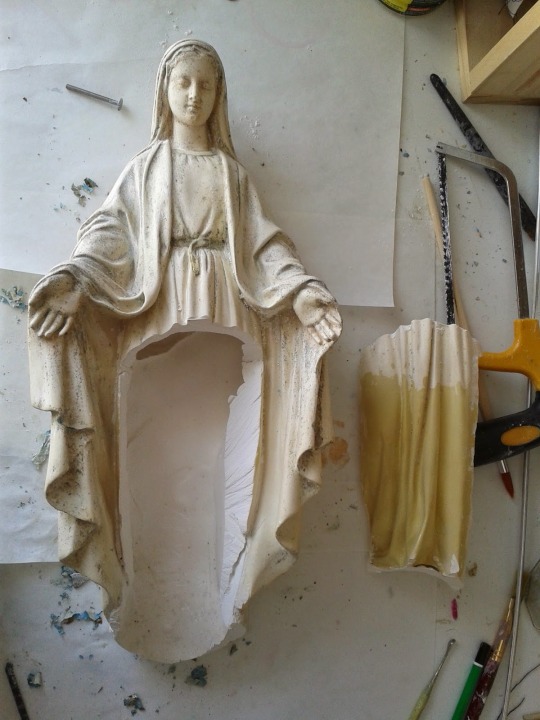
The Blessed Virgin had to be sanded very delicately to give it back some of its immaculateness.
The happiness of some is the dust of others.


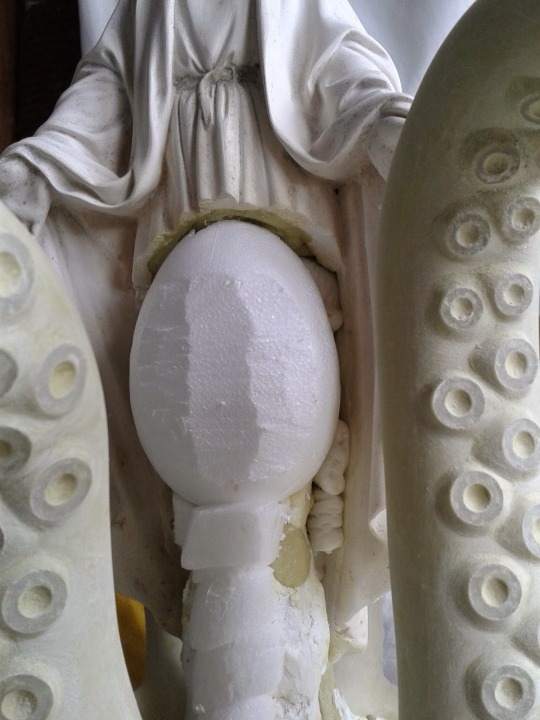
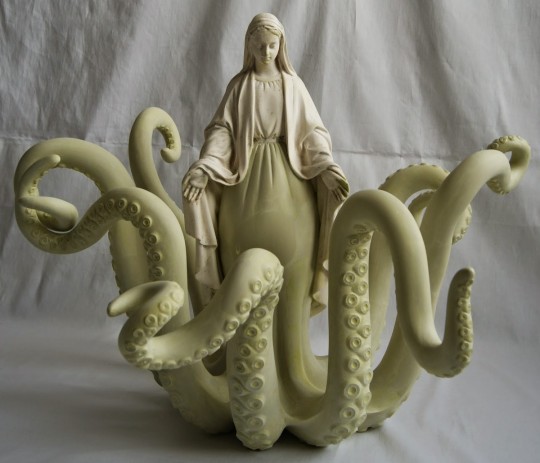

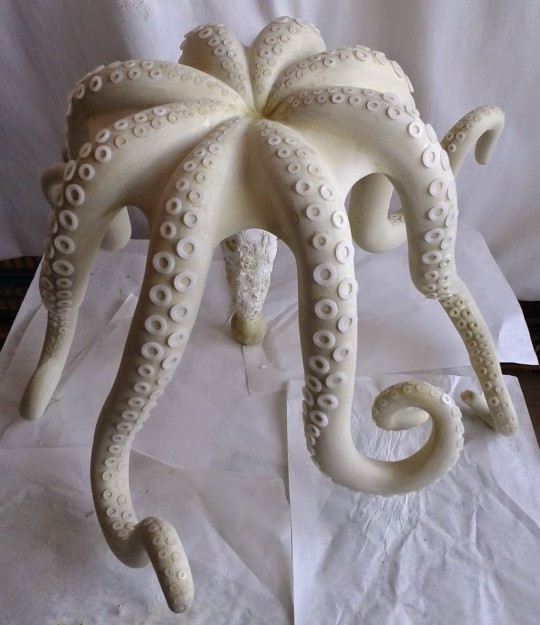
Take advantage of this white octopus, it seems that it is very rare to come across one. Shortly after I did my little experiments with paintings —
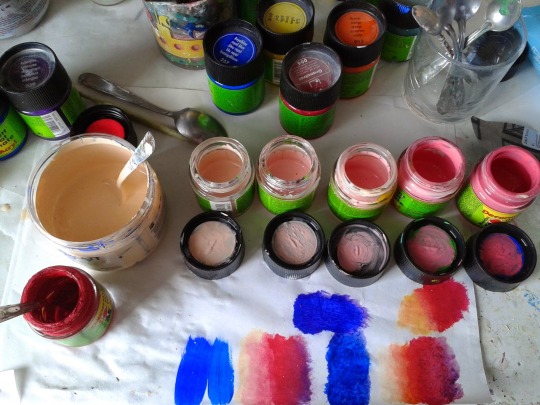
A few days to finish the color, but because it will have to go through a few coats of a special glossy glossy varnish, which makes the viscosity so good... mmm yum. Given the size of the room I could not apply it in one go. The drying takes between 24 and 48 hours, so it will probably take me a week to complete the application of this varnish-resin.

If your head is spinning too much, don't look at this indecent image.


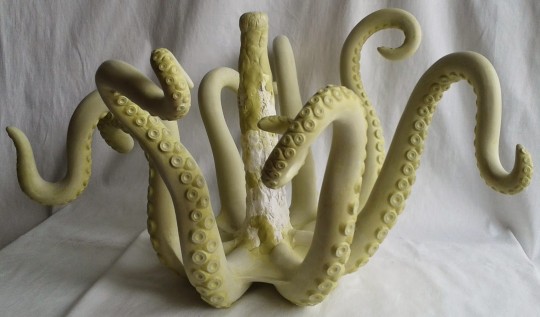
Soasig Chamaillard (French, b.1977)
Notre dame du poulpe (Our Lady of the Octopus) - recovery statue with illegible signature, aluminum wire frame, plaster strip, polystyrene, resin (epoxy putty), plumbing seals (plastic washers), acrylic paint, resin varnish - 47 cm high x 70 cm wide - 12 kg - work-in-progress March 20 to May 31, 2015
“I grew up in a Christian Western society. My perspective on life has been a result of my environment and background. The playful interaction of society’s many icons, physical transformations, and the resulting improbable combinations, have culminated in my vision of a woman’s role and place in our society. This inner questioning of a woman’s role, has led me to use one of the most sacred icons in my work, namely, the Virgin Mary. Initially, I begin with damaged statues, either donated or discovered in garage sales, which I then restore and transform. I surely do not mean to shock those who believe but rather to move those who see.” — Soasig Chamaillard
http://www.soasig-chamaillard.com/sculpture-sainte-vierge
https://www.instagram.com/soasigchamaillard/
http://chamailleries.blogspot.com/
https://www.facebook.com/chamaillard.soasig
#art by others#other's artwork#sculpture#Soasig Chamaillard#Madonna#tentacles#W.I.P.#found object#epoxy putty
22K notes
·
View notes
Text
EPOXYSHİNE - DRAGON+ (3)
Epoxy floor coating is not just a practical choice for enhancing the durability of your flooring; it's also a stylish solution that can transform any space. Whether you're a homeowner looking to revamp your garage or a business owner seeking reliable commercial flooring solutions, understanding the benefits of epoxy will help you make informed decisions. As you search for "floor polishing near me," consider how an expertly applied epoxy coating can elevate your interiors while providing a long-lasting finish.
Epoxy Floor Coating
Epoxy floor coating is a highly durable and resilient flooring solution that has gained popularity in both residential and commercial spaces. This type of coating is made from a combination of resin and hardener, creating a strong bond when applied to existing concrete surfaces. The result is a seamless surface that can withstand heavy foot traffic, chemicals, and abrasions.
One of the major benefits of epoxy floor coating is its versatility. It can be customized in various colors and finishes, including high-gloss and matte textures. This means that property owners can choose a look that complements their interior design while still providing the durability they require. Additionally, the smooth finish of epoxy makes it easy to clean and maintain, which is particularly advantageous in commercial settings.
Furthermore, the installation process for epoxy floor coating is relatively quick, often completed within a few days. However, it’s essential to hire professionals who have the expertise and equipment to ensure a flawless application. The right team will properly prepare the surface, allowing for optimal adhesion and longevity of the coating.
Floor Polishing Near Me
When searching for floor polishing near me, it's essential to find a service that not only meets your expectations but also understands the unique needs of your flooring. Professional floor polishing can revitalize old surfaces, restoring their shine and luster while protecting them from future wear and tear.
Many local companies offer specialized services in floor polishing that cater to various materials, including hardwood, tile, and concrete. A quick search in your area will yield numerous options, allowing you to compare prices, services, and customer reviews to find the best fit for your needs.
Additionally, hiring professionals for floor polishing ensures that the job is done correctly and efficiently. They use advanced equipment and high-quality products that not only enhance the appearance of your floors but also extend their lifespan. So, don't hesitate to reac
Commercial Flooring Solutions
Commercial flooring solutions are essential for businesses seeking to enhance their aesthetic appeal while also ensuring durability and functionality. The choice of flooring can greatly influence the overall atmosphere of a commercial space, leading to improved employee morale and customer satisfaction.
Among the various options available, epoxy floor coatings stand out due to their seamless finish and resistance to heavy foot traffic. These coatings not only provide a sleek look but also protect the underlying surface from wear and tear, making them ideal for warehouses, retail spaces, and industrial environments.
Moreover, businesses often explore additional options such as vinyl flooring, carpet tiles, and laminate surfaces to meet specific needs. Each of these materials offers unique advantages, allowing business owners to choose the most suitable flooring solution that aligns with their operational demands and aesthetic preferences.
Metallic Epoxy Floor
A metallic epoxy floor offers a stunning visual appeal that enhances the aesthetic of any space. The reflective properties of the metallic pigments create a unique look, resulting in a three-dimensional effect that can mimic a variety of surfaces, such as water, marble, or even molten metal. This type of flooring is especially popular in modern homes, showrooms, and commercial spaces, providing an eye-catching yet durable surface.
One of the significant advantages of a metallic epoxy floor is its durability. This flooring solution is resistant to stains, chemicals, and impacts, making it ideal for high-traffic areas. Additionally, it is easy to clean and maintain, which means that business owners and homeowners can save time and resources. The seamless nature of epoxy flooring also contributes to a hygienic environment, especially in spaces like hospitals or laboratories.
Installing a metallic epoxy floor can be a customized process, allowing property owners to choose their preferred colors and patterns. Whether you’re looking for a sleek, industrial look or a vibrant, artistic finish, this flooring solution can be tailored to meet your unique vision. By consulting with professionals, you can ensure that your metallic epoxy floor is installed correctly and maximizes its longevity and beauty.
598 notes
·
View notes
Text

HIIIIIIII my new dunmeshi fixation has resulted in me churning out a bunch of new charms for next month's cons :3 they r also available for preorder now AND i have a code for 10% off everything this month :D
✧ assorted little guys on glitter epoxy with a white u-shaped clasp, measuring 5.5cm-7cm depending on design :3
❥ code PREORDERPARTY for 10% off til april! 💕
i hope u like em!! 🥰
#dungeon meshi#dunmeshi#delicious in dungeon#chilchuck#falin#izutsumi#kabru#marcille#mithrun#senshi#laios#lets eat monsters together...........#store stuff#my art#tyyyyy <3
178 notes
·
View notes
Text
Well, I think I'm about done. It's not perfect, and I don't think I can make it such, with my skills and the design of the model I used. But it's what I can do.
The whole project has been A Struggle. The process being as follows:
Find 3D model online
Try to find someone to print it for me. Fail.
End up purchasing my own 3D printer.
Learn how to 3D print. Including figuring out resin and printer settings, supports, positioning, washing, curing, etc. Spend a whole three-day weekend trying to get a proper print. Each print take 4-8 hours depending on how I've sliced it. Multiple failures occur because I don't really know how to 3D print. Finally, after three days, have a print I can work with.
Use air-cure epoxy, a dremel, and pieces scavenged from failed prints to try to bring the model closer to accurate. While I am deeply thankful that someone made the 3D model, they clearly did so using a few photos and screenshots. There are multiple pattern errors. A whole sun is missing, and his little tail tip, too. Understandable mistakes made by someone who isn't quite Obsessed enough to go fishing for details.
I can fix some of this to a point, but it looks imperfect, and I can't fix some patterns being in the wrong order. I do my best. There is resin and epoxy dust everywhere.
Finally finish editing the model to the best of my ability. Start trying to apply color. Try gold leaf - fail. Try various gold paints - wrong hue, not shiny enough. Use an absurd amount of acetone to remove paint over and over. Finally settle on Montana Gold goldchrome spray; it has an almost mirror reflective finish, isn't weirdly yellow, and is the closest to the gorgeous artbook rendering I could find.
So. Now we're done. It's been like... two weeks? I am tired. And I have some more metallic paint on the way, so depending on how that compares to what I've got now, I may be stripping him and repainting again. But maybe not. The current paint isn't terrible.
Anyway. It was A Process. I hated it.
But I do think that the little bastard was worth it.

80 notes
·
View notes
Text
Carnotaurus sastrei sculpture
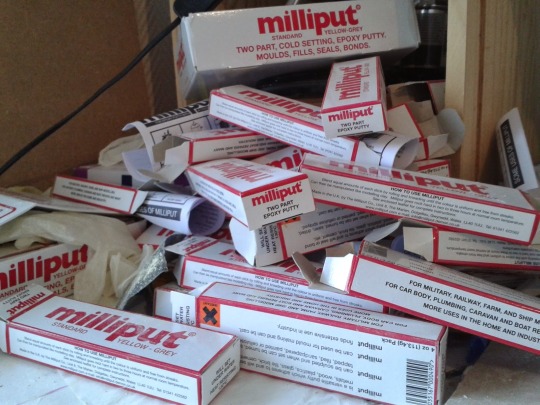
I've wanted to make a post about this sculpture's process, so I will take advantage of how Tumblr works to show photos of the phases and my experience using Milliput for the first time.
Unfortunately, I don't have photos of the exact beginning, but here's an image from a story I posted on Instagram. You can see that the sculpture is at a very early stage and is a general volume of what would later become the final figure, the whole inner part is made with aluminum foil, cardboard, and painter's tape, while the first outer layer is made with cold porcelain.
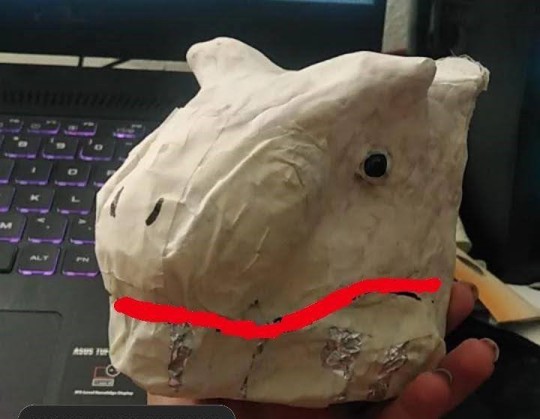
Once the bust was covered with cold porcelain and it had dried I could start sculpting the first details using Milliput, an epoxy mass that gives you 3 to 4 hours to sculpt and the truth is that I was pleasantly surprised because it allows it to work very well small details and is very easy to handle, the only thing I should have taken more into account is that once dry the Milliput gives a lot of weight to the figure.
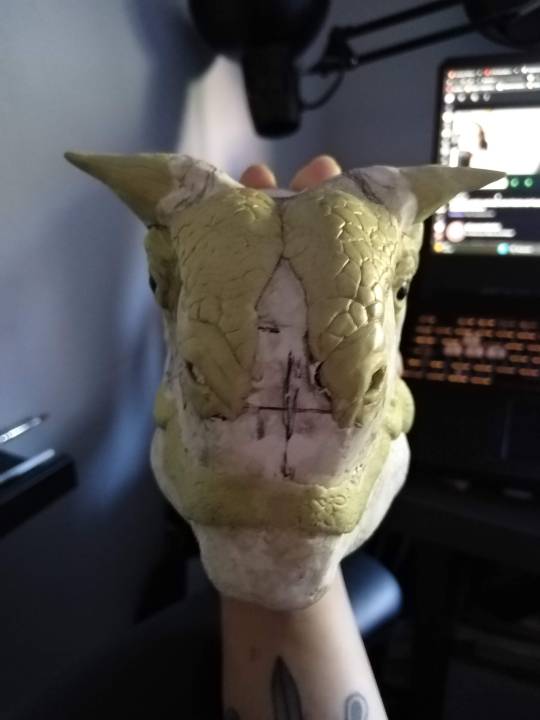

In this first phase of detailing I focused on working in those areas that were going to require more time due to the type of texture of each one. For example, in the eyes, there are a lot of folds and wrinkles, in the horns I wanted to achieve the growth of the keratin.
For the next phase, the whole part of the skin of the face, I was guided by the images of the study of the scales of the Carnotaurus of 2021_ The scaly skin of the abelisaurid Carnotaurus sastrei (Theropoda: Ceratosauria) from the Upper Cretaceous of Patagonia.
I also used them as a reference for the paleoart scales that in my opinion showed me very well or at least gave me an idea of how I could work the skin of my bust. For example one of my mains references while doing this sculpture was the art of Fred Wierum


Now how I've tried to apply what I search about the scales.

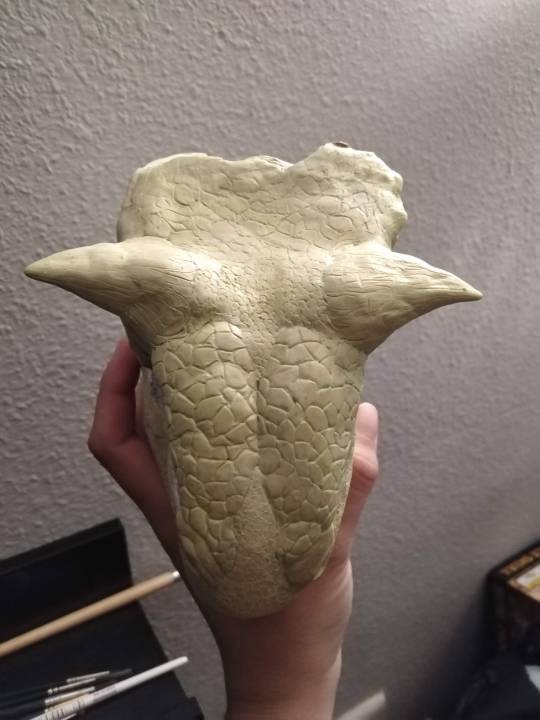
At first I was not sure if I was going to make a neck, but as I progressed with the sculpture I could see that I was going to need the neck to give it more shape and put it on a good base.
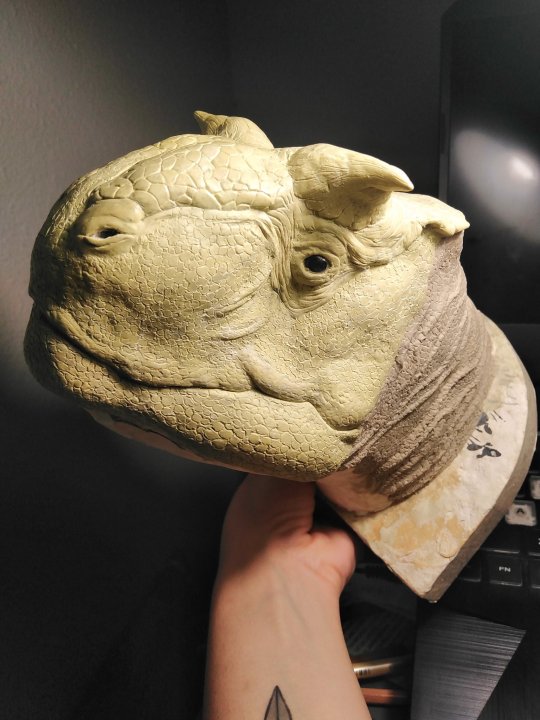
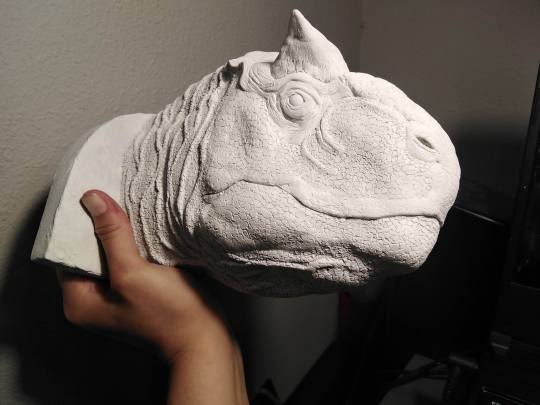
With all the sculpting part done It was time to prime the dino!

For the painting part of the bust I wanted to try to get away from the red and yellow that is usually painted, so I decided to do some research on the types of lizards that live in Argentina and see if any of them had a pattern and colors that would fit what I was looking for. In the end I discovered Fitzinger's tree iguana, an animal with very nice colors and pattern that moved away from the reds and mixed greens with oranges and blues.

Photo credit: Roman Montero
And finally, the complete sculpture!


So here it is, I am very happy with this bust and the learning process I have gone through to make it as correct as possible.
Hope you like it!
#art#animals#dinosaur#paleomedia#paleoart#science#carnotaurus#sculpture#milliput#paleontology#argentina
243 notes
·
View notes
Text
so. im sanding down the fake wood grain layer on my conksuck desk so that i can apply some damn paint and epoxy into this thing so its not constantly leaking particle board dust into my mouse and causing clogs (shhh i know its gonna be ugly as sin i just need this thing to be flat and not create dust by existing)
and i
am
so
out of shape
I'm like barely 50% of the way through and i feel like incredibly hot garbage
i will likely not be making the sunday deadline and chat's just gonna have to deal with stream being done at my kitchen table on the laptop
im so tired but i must keep sanding
328 notes
·
View notes
Note
hi! i hope you dont mind me asking a question about the pin manufacturing process as i know you are not personally involved in the actual physical production of your pins, but i was wondering if you knew why rainbow plated pins are always (or at the very least near always) soft enamel? is there something in the iodizing process that renders them incompatible with the way hard enamel is put in the pin frame? what makes epoxy different that allows it to be used? no worries at all if you can't answer, i was just curious :]
Hi there Anon, no worries, I love talking about pin stuff and I'd be happy to explain.
Pin manufacturing basically has two major components: enamel fill and metal plating. The order in which these take place is different depending on the type of enamel: hard or soft.
All pins start out as metal "pin blanks" or "embryos", without enamel or plating.
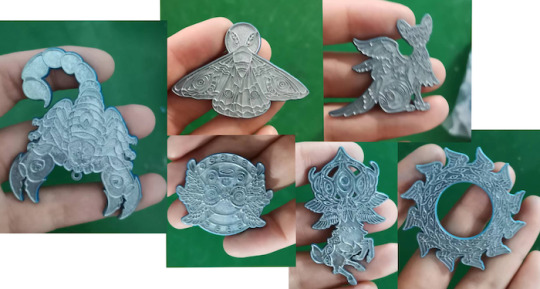
In hard enamel pins, the pins are overfilled with enamel and then polished down to a smooth surface. Below is an example of an in-progress hard enamel pin, notice how the enamel is spilling over in some places. After the enamel is polished the pin is plated, only certain plating options are available that would not affect the enamel.

In soft enamel pins, the plating comes first and then the enamel fill. Soft enamel pins are never polished so more plating options are available, such as anodized and dyed metal. Dyed metal is actually just paint that is sprayed onto the metal pin blanks: so you can imagine it would come off if the pin was polished, and could not be applied after the enamel is filled in.
The tradeoff is, because the enamel is never polished, soft enamel pins do not have a smooth surface. In the below image, the first two pins are hard enamel, and the third pin is soft enamel with rainbow (anodized) plating.

I prefer a smooth finish on my pins, I think it makes them feel more high quality. So what is a pin maker to do? Well after the enamel and plating is done, we can add a layer of epoxy over the surface of the soft enamel pin to give it that smooth finish.
In the below image, the gray pin is hard enamel and the indigo pin is soft enamel with epoxy.

So basically: hard enamel pins get enamel, polishing, then plating. While soft enamel pins get plating, enamel, and then optionally epoxy.
One last important difference I'll mention is cost, for anyone who is looking into making pins. Hard enamel pins are more expensive to make because of the polishing step. Soft enamel pins without epoxy are cheaper, but if you add epoxy the cost can be about the same as hard enamel because of the additional work needed.
Anodized plating can easily triple the cost of a pin because the materials are expensive, and they have a higher plating flaw rate, requiring the factory to make extras.
If you let me I'll easily continue talking about pin manufacturing, but I'll stop here for now ahahaha - hope that answers your question Anon!
For more details and videos, you can find a great article by WizardPins.
196 notes
·
View notes
Text


I made these shoes for my doll :)
They are not perfect, more like the first prototype... I used the instructions from the Hanon pattern book, meaning this was originally designed for Blythe. At this scale, for a 60cm doll, more details are needed for the shoes to look good. But it's okay, now he finally has one pair of leather shoes which is what I had in mind from the start.
Unfortunately glue got on the top of the shoes and stained the fabric pretty badly. But I guess it makes the shoes look worn? I only had two phase epoxy at home and it's a bit tricky to apply. But got something more suitable for crafts since.
#doll#dolls#doll photography#bjd#ball jointed doll#abjd#dollblr#legit bjd#doll sewing#bjd photography#bjd hobby#bjd doll#T&D Xiao Bei
9 notes
·
View notes
Text
A research team headed by Prof. Karl Leo at TUD Dresden University of Technology have developed an innovative, nature-inspired solution that could revolutionize the electronics industry: "Leaftronics." This innovative approach leverages the natural structure of leaves to create biodegradable electronic substrates with enhanced properties and offers a sustainable, efficient, and scalable solution to the global-waste problem. These findings have now been published in the journal Science Advances.Electronic devices, from toys to smartphones, consist of circuits. Specific substrates are used to manufacture these circuits. In commercial electronics, these are printed circuit boards (PCBs) made of glass fiber-reinforced epoxy resin.Most of these materials are not recyclable, let alone biodegradable. Given the sheer volume of electronic waste of more than 60 million tons per year (of which over 75% is not collected worldwide), there is an urgent need for sustainable alternatives.Previous research has focused on creating biodegradable natural polymers as materials, but these have faced problems with heat stability and resistance to chemicals. The inherent conflict between biodegradability, which requires loosely bound molecules and thermal or chemical stability, which demands tightly bound molecules, has long posed a significant challenge.Now, a team of researchers at the Institute for Applied Physics at TUD Dresden University of Technology, led by Professor Karl Leo, has taken a major step forward by developing "Leaftronics"—an approach that leverages the natural structure of leaves to create biodegradable electronic substrates with enhanced properties. Their findings offer a sustainable, efficient, and scalable solution to the global e-waste problem.
#solarpunk#solarpunk business#solar punk#biodegradable electronics#materials innovation#solarpunk futures
9 notes
·
View notes