#and you can see the outline if you turn on mxao
Explore tagged Tumblr posts
Text
ummm for some reason certain transparent ingame objects in my game are invisible now? they still have shadows, but the object itself is gone. it's like it's not showing alpha layers or something. has anyone had that issue before?
example: there was a cc bottle which upon placing only showed as the blurry drink itself floating around, no glass around it.
#ts4#sims 4#ts4 help#sims 4 problems#extremely annoying cuz it affects my lace curtains in the house#it's like all curtains are gone but there's just a faint shadow on the windows#and you can see the outline if you turn on mxao#all my graphic settings are set to the highest btw and i didnt change anything about them
17 notes
·
View notes
Text


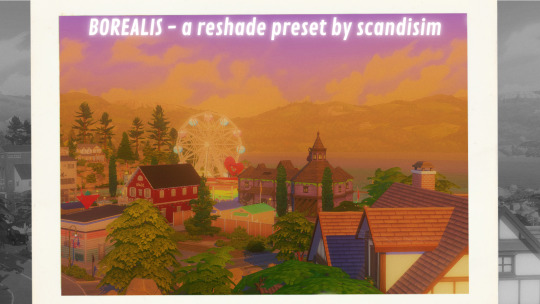
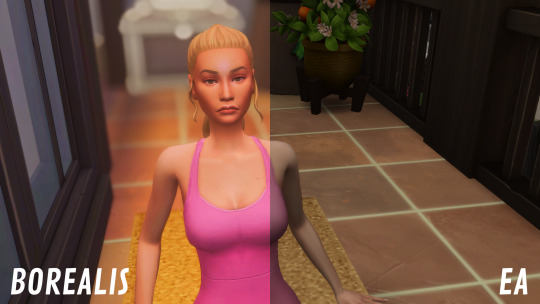
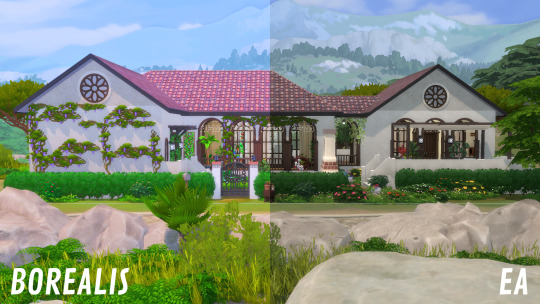
💫 BOREALIS 💫 a reshade preset
Hi! Here is the release of my preset that I have been working on for quite some time - Borealis. This preset was made using Reshade 4.9.1. It's quite a bright and saturated preset with lots of warmth. I've also included several hotkeys with different effects for screenshot purposes (because ~*~aesthetics~*~). See more on those below. Here is a variety of images taken in my game that utilizes Borealis. Also this is my first ever preset so please let me know if you run into any issues so that I can try to correct it ASAP. Enjoy!
Important things to know:
This preset was made using Reshade version 4.9.1. I cannot guarantee that it'll work or look the same using other versions. You can still access version 4.9.1 here. If you do try it with other versions and it works, great!
This tutorial by xurbansimsx on installing Reshade is great.
Borealis utilizes quint_MXAO which is what adds pretty shadows to your game. It can however be quite heavy on your computer. So I added a hotkey (SHIFT + F1) to disable it if you find it makes your game slow. Make sure edge smoothing is turned off for MXAO to work properly.
Recommended lightning and world mods:
Use these if you want the exact look pictured. These are what I have in my game. This is the CAS background that I currently use. I also use K-Hippie terrain mods.
milk thistle
squea cas lightning
no glo v2
no blu v2
Hotkeys for screenshots:
ADOF (qUINT_dof.fx) - blurry background effect - SHIFT + F2
Cartoon (Cartoon.fx) - cartoon black outline effect - SHIFT + F3
FilmGrain (FilmGrain.fx) - added film grain - SHIFT + F4
Bloom (qUINT_bloom.fx) - hazy effect - SHIFT + F5
Tonemap (Tonemap.fx) - desatured effect - SHIFT + F6
Terms of use:
Feel free to edit it to your desire for personal use. But do not reupload as your own is all I ask. Using it as a base and adding minor tweaks and changes and then uploading it as your own is not OK.
Available on my Patreon (public release February 24th).
#my cc#sims 4#the sims 4#sims#the sims#reshade#gshade#reshade preset#sims 4 reshade preset#simblr#custom content#sims 4 cc#s4cc#ts4cc#presets#sims community#cc
101 notes
·
View notes
Note
hi again!! tysm for answering my previous questions! i was able to download reshade, but i don't know where edge smoothing is located so i turn it off :( can you help me pls? is it in the game or on the reshade folders?
Hi there!
Edge Smoothing is in the game’s graphics options menu. It’s a little check box on the right hand side. You want to uncheck it.
It turns off anti-aliasing. Aliasing is when you see jagged lines around the outlines of things. It’s caused when there aren’t enough pixels available on your monitor to ‘draw’ or ‘render’ all the information contained in the models on-screen. That information will then be left out and make it look jagged.
Anti-aliasing attempts to smooth out those jagged lines by interpolating what it thinks should be there. There are lots of different methods of anti-aliasing, some more successful than others. The type of anti-aliasing usually called MSAA breaks ReShade’s ability to communicate with most games’ depth buffer (the depth buffer is what allows shaders like MXAO and DoF to work). TS4′s Edge Smoothing seems to be a form of MSAA, because it breaks that access to the depth buffer. So, we have to turn it off.
Of course, turning it off means we have those jagged lines again. Luckily, there are two anti-aliasing shaders in ReShade: SMAA and FXAA. You can use either or both of them as you need. SMAA tends to work better than FXAA in a lot of games. FXAA will blur the screen more than SMAA. Whichever you use, you’ll probably want to also use one of the sharpening shaders (and place it after/below the SMAA/FXAA shader in the load order) to counteract some of that blurriness, but if you do make sure you don’t set it too high or it will reintroduce some of those jagged lines (and too much sharpening never looks good anyway).
If you need anymore help just let me know!
28 notes
·
View notes
Note
can you show your editing process?

Here is a little step-by-step editing process! :o)
1. Reshade
I always use reshade when taking my pictures. I turn it off after taking the screenshots since it’s very heavy on my computer. I use Kindlespice’s Dove Reshade with all the base settings (including Depth of field and MXAO). You can get away with not using reshade if you don’t want/can, but I think it makes it a lot easier.
2. Resizing, cropping
Then, I open my pictures on my software (I use Photoshop CS6 but you can find free ones) and I run a simple action I made, which resizes the picture to 1100x619 pixels, adds a subtle oil paint effect and a light sharpen effect. If needed, I crop my picture into a square. You can do that easily without an action if you want to manually resize your pictures on your software.
3. Adjustments
I don’t always do this step but it can be useful. I play with the light settings, especially brightness and contrast.
4. Details
I like to draw some hair strands on my sims. In a new layer, I pick the color of the sim’s hair and use some hair brushes to add a few strands. Sometimes, I’ll add another layer to give more brightness or darkness to a picture (see here on the first pic, I added darkness in the top-left corner of the pic). I’ll also add some text if I’m not too lazy. I use a simple font and a two-pixels wide black outline to make it easier to read.
I hope this answers your questions! If you wanna know something else, please let me know and I’d love to help!
20 notes
·
View notes
Note
Which reshade settings are essential for a good look? Like which settings are the most important?

This (Sims 4) picture ^ above was taken with Reshade 3.0.8 and then only resized and sharpened in PS. These Reshade settings were used: DOF, FXAA, SMAA, MXAO, Cartoon, DPX, Gaussian Blur, Clarity, Curves, Levels, Ambient Light, and Bloom.
No settings are important, as it’s just what you prefer. The ones I bolded are what I use in most of my Reshade presets. Here is an explanation of them if you don’t know what they are:
DOF: This makes the background blurred and the foreground object not blurred. It basically gives some depth to pictures.
MXAO: Ambient occlusion. It adds shadows basically. When you use this, you have to turn off edge-smoothing and post processing for it to work.
FXAA: Edge smoothing/ anti-aliasing. Less effective than SMAA, but SMAA doesn’t work when you have some other Reshade settings active. This is useful to use alongside MXAO since you have to turn the in-game edge smoothing off for it.
Cartoon: Kinda gives an outline to objects. I just like it because when I sharpen and resize my final product, it gives a clean edge to everything.
DPX: You can change contrast, brightness, saturation, color and vibrance with this. It’s basically the exposure and most of the other adjustments part of PS.
Clarity: It’s a less intensive and more broad version of sharpening. It darkens already kind of dark areas and gives the illusion of small, but detailed shadows.
Bloom: This makes light sources brighter to emulate light. It extends light sources, makes them pour over and makes the illusion of a brighter light source. You can also change the color of the bleed in both ambient light and bloom setting. In the above picture, the bloom is the pinkish/purple bright light you see.
Ambient Light: This is kind of hard to explain. It’s somewhat similar to bloom, but it affects and lightens the whole area instead of using a light source like bloom does.
74 notes
·
View notes