#also this project is definitely a ravelry pattern
Explore tagged Tumblr posts
Visit Tumblr Blog
Explore Tumblr blogs with no restrictions, modern design and the best experience.
Last Seen Tumblr Blogs


Fun Fact
When “GIF” was named word of the year in 2012, Oxford Dictionaries U.S.A. credited Tumblr for pushing the word.
Text


Sylvia (our resident couch sloth) makes a great knitting buddy! She's the perfect shape to hold Gabe's project when they get up and walk away. (She is even a good sport when they inevitably get distracted and don't wander back for awhile.)
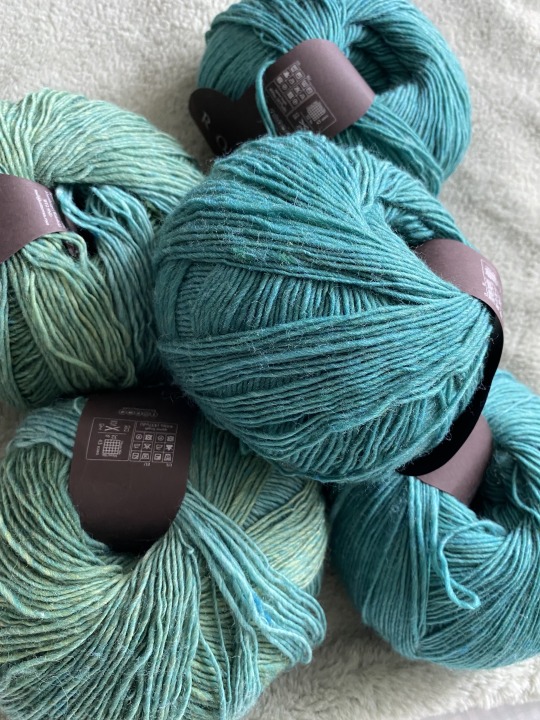
This project is an in progress shawl for our sister in law! It's being made with yarn from the Manos Del Uruguay Alegria line, specifically in the Waterlily color. It's hand dyed mix of Merino Superwash Wool and nylon. It's one of Gabe's absolute favorite yarn lines to work with!
Manos del Uruguay is a special brand of hand spun & dyed artisan yarns that supports rural Uruguayan women. Manos is a non-profit organization that was founded to give women jobs, allowing them to be independent & support their families while being able to live in their home villages. Go support them! Their yarn is so so soft and pretty.
#knitting#fiber art#fiber crafts#crafting#work in progress#polycraftory#gabe crafts#adhd crafting#queer artist#disabled artist#manos del uruguay#hand spun yarn#also this project is definitely a ravelry pattern#so hit us up if you want the link to that lol
3 notes
·
View notes
Text
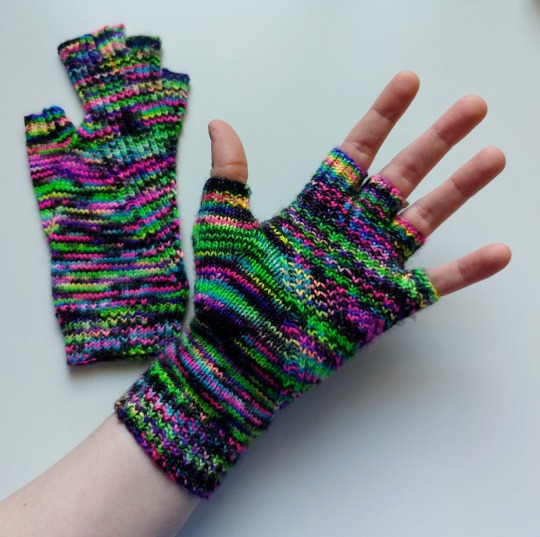
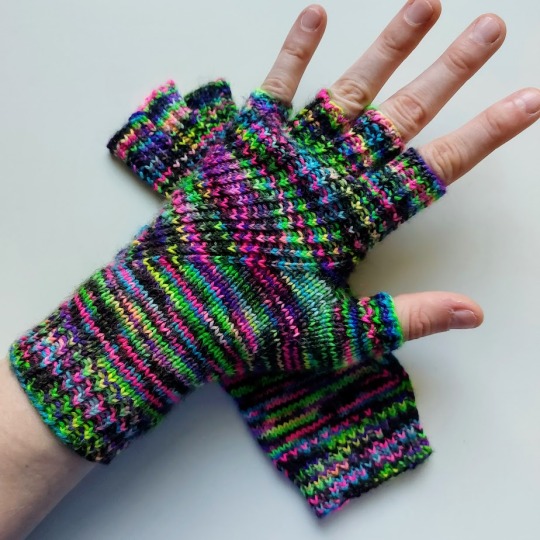
Straightforward Mitts by Mone Dräger, modified!
I made these with Dye Mad Yarns' Chester Sock base in Play for a Purpose (2023). The pattern linked above does not come with fingers, but a friend saw @ninalanfer's version modified to include half fingers and loved it. So, naturally, I had to Make These For Them :)
Huge shout-out to nina for generously linking me (an absolute finger-knitting noob) helpful patterns and notes for learning how to do fingers! It was super helpful and very appreciated, and now I feel Unstoppable!!
#knitting#my knitting#the link to the pattern is in the title line btw#it's on ravelry!#freebie!!#love that haha#straighforward mitts#mone drager#forreal thank you so much tumblr user ninalanfer!!#it was VERY helpful and i'm definitely going to make Normal Gloves using that pattern you mentioned!!#i made a TON of notes about how i modified these tbh#because 1. my (and my friend's) hands are Not 'women's small to medium'#2. i figured the wrist could be Longer#3. the thumb gusset could also be Larger (we have very splaying hands)#4. i wasn't QUITE to gauge but i was pretty close and#5. fingies#i did make the stephen west HERBIVORE shawl before this and that helped!!#first time using DPBs for an entire project#also first time using stitch holders!!#many firsts#friend has them now so i can poooost them!!
70 notes
·
View notes
Text
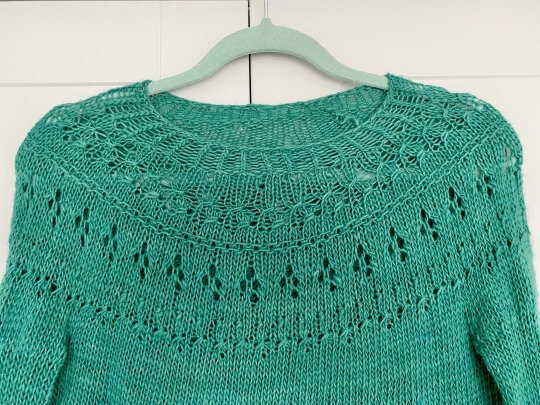
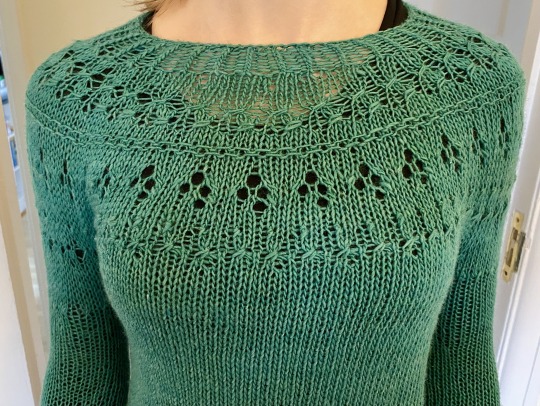
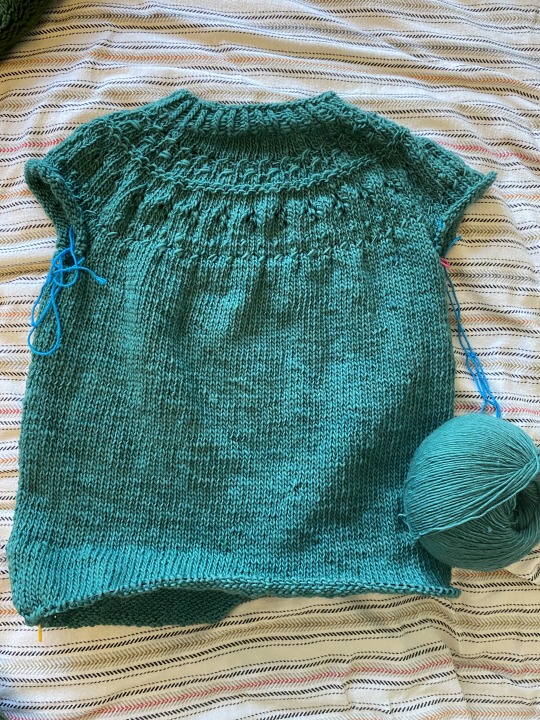
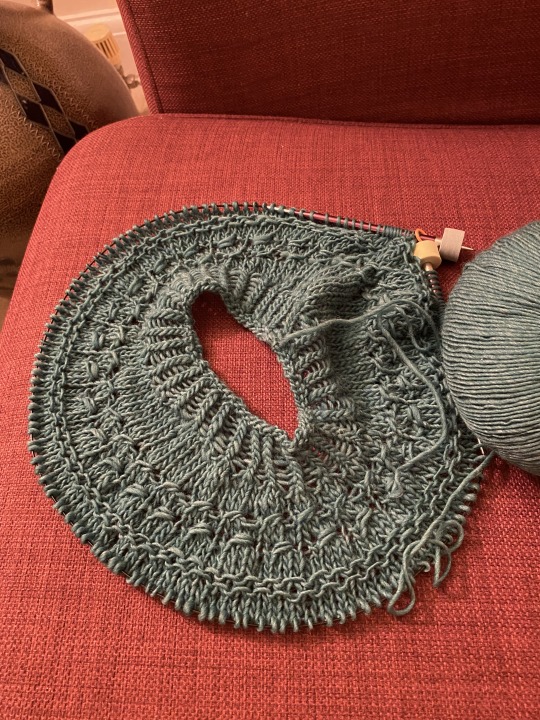
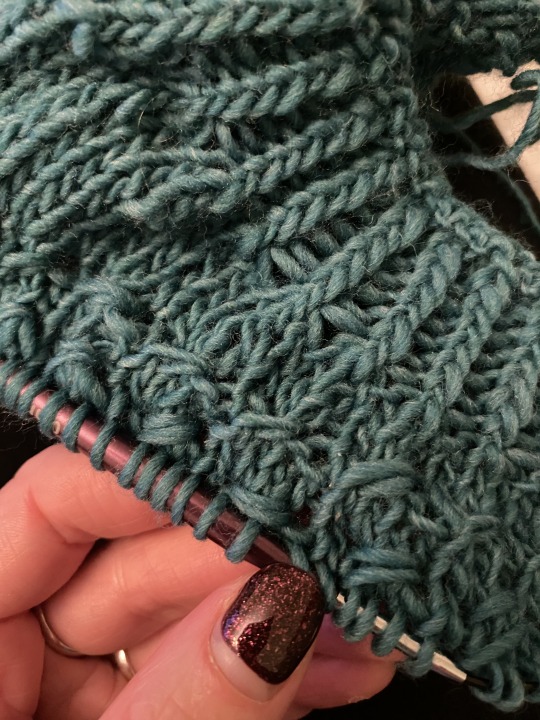
Cig Knits: A Rananculus
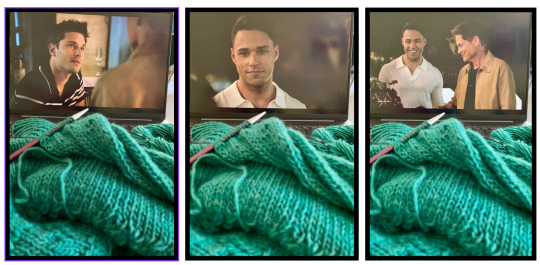
The Rananculus is one of the most popular patterns on Ravelry, so I thought I'd check it out for myself as a beginner who wanted to try lacework. Although it's notoriously oversized, I somehow managed to make myself the world's tightest version lol - despite getting gauge with my swatch?! But that might be because of the yarn I chose (for the colour vs. how it would behave because I'm a sucker for a good green and also an idiot). Or maybe I was knitting more tightly when I felt more pressure? Idk. Anyway, I went for Rowan Sock in Emerald. It's lovely and has still made for a wearable garment that fits - I just think if I knitted this again (which I want to!) I'd go for a DK wool and go up a size or two. Make an actual cosy jumper out of it.
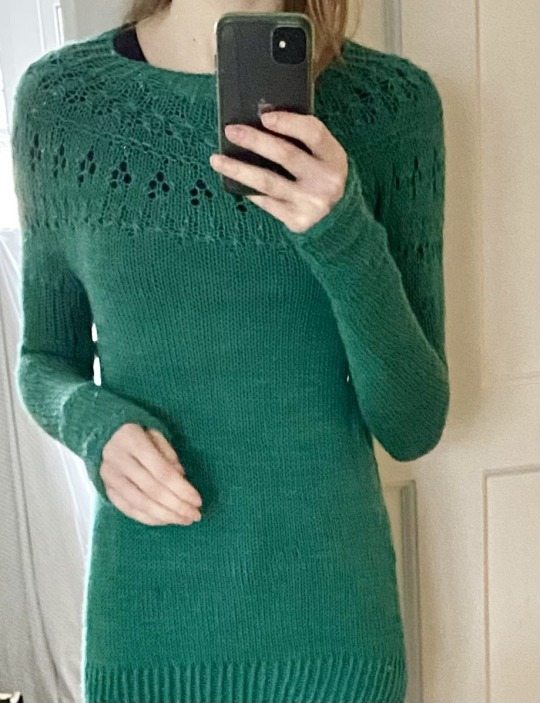
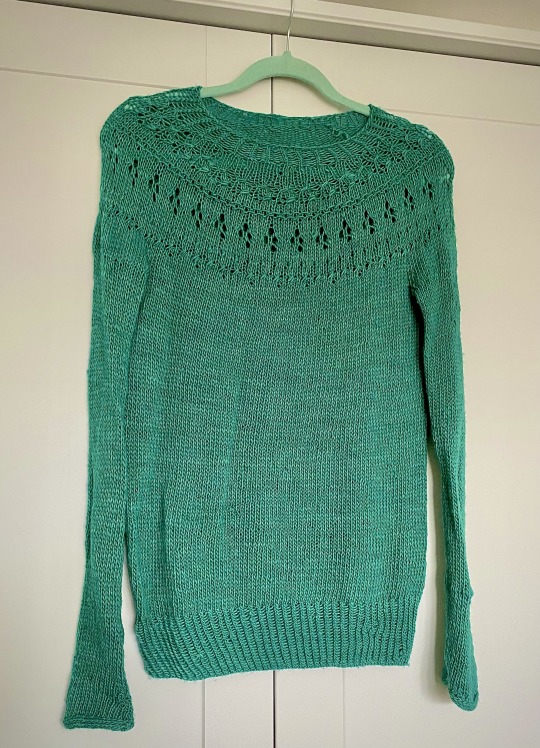
The yoke was exactly as engaging as everyone says, and then it's just stockinette in the round while watching Lone Star (a requirement). This is the first project I didn't have to frog at all?! But I put that down to following the tutorials on Youtube by Sundragon Tips and Tricks - I couldn't have done it without her. I loved this project for teaching me the logic of lace, and it's definitely made me a more confident knitter. (Tbh I've been stupidly confident from the start - far more than I have any right to be, but still, feel like I've earned some stripes with this!)
So, while I want to knit this again, what I really want to do is try my hand at more complex things. I'm currently knitting up my first cardigan - which is patchwork! I'll be tackling a button band, and that's extra fun because I get to choose buttons when I'm done! Can't wait!

#Cig knits#cig knitting#rananculus#rananculus pattern#knitting#beginner knitter#cig personal#knitters of tumblr
31 notes
·
View notes
Text
Hey there, new folks!
Since we just got to 1K followers today (and got a bunch of you at once!), it seems like a good time to update our "About Us" information ✨ We're always happy to answer questions about our work and projects, and we have regular polls to gather feedback as well as answering questions in tags, reblogs, and replies.
WELCOME TO OUR COZY HEARTH
Hi everyone! Hopefully you’re finding what you’re looking for here. It’s our goal, above anything else, to make people feel welcome, warm, and happy. Cozy Hearth Yarn Works hand-makes yarn crafts that are just right for you. Knitting was the original soul and inspiration of CHYW, but we’ve since pivoted into pattern design, hand-dyed yarn, hand-dyed spinning fiber, and more offerings to come. We’ve made custom commissions since the fall of 2015, and we opened our store some time after. We started selling yarn in the fall of 2019, fiber in the fall of 2022, and handspun yarn in the beginning of 2024! We’ve been through a lot of changes in the years since we started, and we’re proud to keep existing as a trans & disabled owned business.
WHAT DO WE DO?
We sell yarn in five different forms! We started with dyed-to-order designed & themed colorways, currently the Dathanna Colorway Series. We also offer ready-to-ship: limited edition colorways designed for seasonal holidays, one-of-a-kind skeins, and discounted “not-quite” skeins. In addition to these yarns dyed on commercially spun bases, we also sell handspun yarn, either in single skeins listed on the website or in larger batches ordered as custom commissions.
We sell spinning fiber currently in combed top form, in several different breeds of wool. We’re excited to diversify our fiber offerings, so please, if you have hopes/dreams/requests, don’t be shy about letting us know!
We sell knitting patterns through both Ravelry and Payhip - select the Knitting Patterns page on our menu for a full library of links. You can also buy pattern kits from our Products page, which ship with all the needed yarn and a printed copy of the pattern.
WHO ARE WE?
Kit (he/him) – born in 1989, homemaker and hearthkeeper, cat parent to Fiyero. Loves reading, music, coffee, lace, and interestingly textured yarns. Designer of patterns, yarns, and colorways. Runs all social media outlets for CHYW – if you’re talking to someone, it’s probably me!
Em (they/them) – born in 1991, baker and calligrapher, cat parent to Isaac. Loves podcasts, books, coffee, cabling, and high-definition yarns. Bookkeeping, shipping and logistics expert – a behind-the-scenes wizard who keeps us running!
32 notes
·
View notes
Text

My number one tip for instantaneously improving your knitting game is to wet block your projects. This thing is full of flaws but post wet block once I added the tassels it looks so good. It went from being a lumpy unappealing shape that wasn’t wide enough and hung awkwardly to looking exactly like the sample project on ravelry.
And like, the tassels definitely elevate this scarf but even without them it looked so so so much better post wet block. And it wasn’t even a good wet block! I was lazy and didn’t pin it in place because I wasn’t worried about shaping it and at some point during the night one or more of my cats nested in it and when I checked on it in the morning it had been kicked into a lumpy pile instead of drying flat… and you know what???? It STILL transformed the project.
(More wet block evangelizing under the cut. TL;DR: Wet blocking is good and you should do it. If you can afford it invest in an electric spin dryer.)
I feel like I’ve talked about this more than once but I think it’s because it’s really not obvious how much it changes finished fabric and projects. When you're a new knitter it's easy to work for ages and ages on a big project and then look at your finished result and feel discouraged when compared to the designer's photos because even though you followed the directions exactly it just doesn't look as good, and you assume it's because in some indefinable way the designer is a better knitter than you are. In reality it's often not technical skill! Often the only difference is you didn't wet block and if you did your project would immediately look exactly as good as the photo on the pattern.
I mean, sometimes you maybe actually did something wrong or your yarn choice isn't right for a project but imo if you followed the pattern correctly a LARGE percentage of it is in the finishing techniques.
It also doesn't help that at least in my experience when I was first starting out every time I saw wet blocking mentioned on someone's blog or in a book the author was complaining about it because it's, you know, kind of annoying. And I guess it is but it's fucking worth it.
Also it's 1000% less annoying if you can invest in an electric spin dryer. Most of what makes wet blocking kind of annoying is handling sopping wet fabric and even after you roll stuff in a towel and squeeze as much water out as possible it's still kind of unpleasant and also it can take a long time to dry. An electric spin dryer fixes 90% of that. It's a slightly expensive tool (roughly $150 USD on amazon) but I think it's one more people should know about because it makes wet blocking, and handwashing knits in general, so much easier. Nice for yarn dyeing too.
(Plus once you have one it makes hand washing commercially made clothes not a huge deal? Enzyme based soap + electric dryer basically makes hand washing clothes nearly as easy as a standard washer and dryer, and it'll drastically increase the lifespan of your clothes. Honestly I should probably make an electric spin dryer post at some point. I do not think enough people know about them. Not that I hand wash that much, but some stuff is worth doing.)
21 notes
·
View notes
Text
Update (10/11/24)
What I'm Into Now
MCU (Wanda Maximoff, Agatha Harkness)
Knitting
Progress (Writing and Knitting)
Not much to report this week writing wise, but I am so close to finishing a shawl that I've been working on (pic below)
This was a feat because this shawl is so freaking big and I've been working on it for like three weeks. I'm a pretty slow knitter and I've completed well over a hundred rows (all with many, many stitches) in a relatively (for me) short time frame
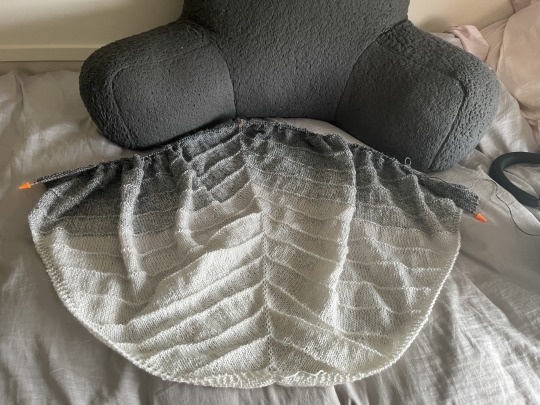
For those curious, this is the Boneyard shawl by Stephen West (pattern free on Ravelry) in Wheel of Alpaca from Hobbii yarn (colorway: Film Noir)
Fic Recs
There we go! I'm thinking about also doing knitting updates along with my writing updates as I tend to just do one or the other throughout the week. As the holidays approach, and I've decided to make my gifts this year, I'm going to be doing a lot of knitting. I'll continue the fic recs, or alternate them out with silly YouTube videos that I've been enjoying, as I watch a lot of YouTube when I knit. Either way, the fic recs are staying.
Agatha All Along thoughts under the cut.
BRO THE SCREAM I SCRUMPT
Let's work backward, shall we?
First of all, we been knew that Teen was Billy, but being on the cusp of confirmation still feels unreal. The sudden change between sweet teenager and Wiccan still felt natural and deserved after he watched Agatha kill Alice but at the same time horrifying. I haven't watched anything else with Joe Locke in it, but I gotta say, the guy can act.
The way Billy knocked Agatha out of her trance with her son's name and the little boy's voice so sweetly saying "mama"... *chef's kiss* We are going to get some more Nicholas Scratch in the future and I am here, ready to twist it to suit my fanfic purposes.
I love the appearance of Agatha's mom and her belief that Agatha was born evil, as well as the idea that once Agatha "latches" onto another witch's magic, she loses control. That's such a cool concept, and I can't wait to see how it plays out.
Jen and Agatha definitely have beef that goes way back, and I really hope we get an explanation for it.
The reappearance of the Salem Seven! Their re-intro was so creepy and I loved it so much.
I am going to vibrate out of my skin! I cannot wait for next week!
#cyan's weekly updates#writing progress#fic update#my writing#wanda maximoff#agatha harkness#mcu#agatha all along#knitting#fiber crafts#fiber arts#fibre arts#fibre crafts
7 notes
·
View notes
Text
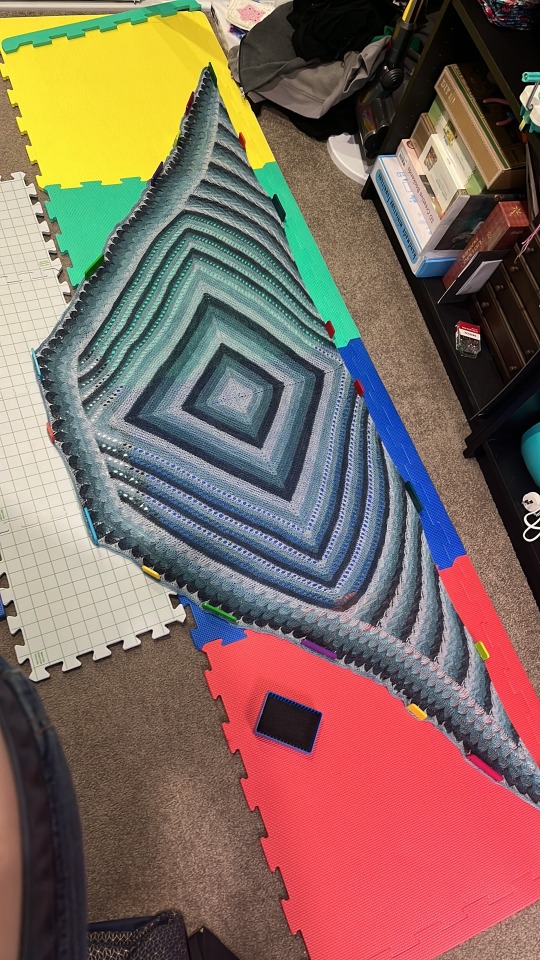
Geogradient Shawl is complete! I slowed down a lot at the end, but I accidentally added two extra rows between dip rows on clue 4. Looks like it blocked out alright and I honestly don’t mind how it looks so I’ve decided to keep it. I’ll add fringe once it’s dry and call it complete!
Anyway, more thoughts about this project under the cut
SO!
The pattern is.. not my favourite from Westknits, but definitely not a bad one. The pattern itself was decently written but there was a discrepancy between clues 1 and 2 regarding which colours to use. I’m not too upset about that because of the shitshow that was clue 1 but I do hope it gets updated eventually. Subsequent clues were updated, but I mostly went by the pattern and didn’t check the ravelry group all that much so I ended up using less colour C and D in the design as a result. Another part of the pattern that irked me somewhat was the right handed language used. This is pretty standard for knitting patterns but idk I was hoping a big designer like Stephen West would at least be able to use more neutral language so as to not confuse me lol. The original clue 1 was especially confusing as I had to construct it in the opposite direction.
The first two clues were a bit boring tbh. Westknits MKAL patterns always seem to be full of wacky stitches and cool colour play but this one felt like a slog until I got to clue 3. Again, I blame the part 1 shitshow for this and I do understand that it’d be a huge pain to have to rewrite an entire part of your pattern in a few hours. I adore the Granny Square alternative clue 1 and honestly wish I had seen it before deciding what to do with mine but oh well lol. Overall, pattern is ok. I already have a triangular shawl so I was hoping the would be a different shape, so clue 4 was a pleasant surprise!
Now when I got up to the horizontal floats and dip stitches, I was a bit wary because while they look pretty, I feel like this shawl is going to catch on eeeeeveeything. I don’t know how much I’ll wear it, it might be a special occasion kinda shawl.
The yarn I used was too thin. The result was nice and airy with a good drape, but it does make the floats and dips a little less impactful than I’ve seen on other finished geogradients. I didn’t buy a kit from my lys but my lys was selling kits of this yarn. Otherwise the yarn is lovely and soft. I have about 150g leftover (not including the scraps I plan to turn into fringe) so I’ll have to think of something to do with them. I don’t think they’re going to play ball with my other fingering weight scraps. It was also a bitch to frog and would get fuzzy at the drop of a hat thanks to the alpaca content.
Overall I enjoyed this project though. Would I do another MKAL? Probably not. At least not for a while. I think I’d rather wait for the design to be released first. But who knows? I am a slave to my FOMO and there was a lot of that in my geogradient shawl.
Would I make this pattern again? Honestly? Yeah. I think I’d do it with a thicker fingering weight yarn and probably with a proper merino (or merino/nylon at the very least) I’d also do the granny square variant clue 1 and probably the optional mohair part in clue 2 as well. I was a little peeved that optional mohair wasn’t listed in the initial materials but apparently that a weird unwritten rule of an MKAL- Stephen is just happy to drop this info mid project and assumes that every knitter has an extensive stash of yarn they can pull from. Especially mohair, which isn’t something that’s regularly produced in Australia (except for one farm in QLD) so it’s all imported and all expensive.
It’s a pity, because the mohair dares I saw looked gorgeous.
Anyway, I’ll add the fringe once it’s dry and probably won’t touch it again for 6 months. That’s another lesson learned: all the trendy patterns on ravelry are seasonal for the northern hemisphere so it’s not worth keeping up with them.
6 notes
·
View notes
Text
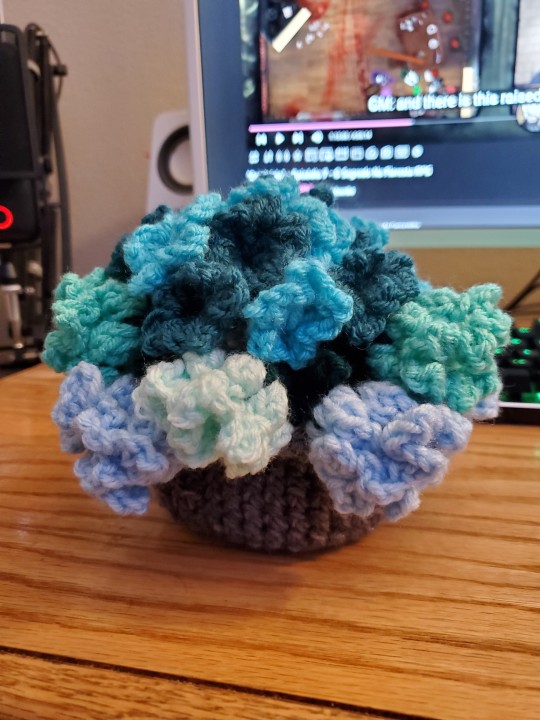
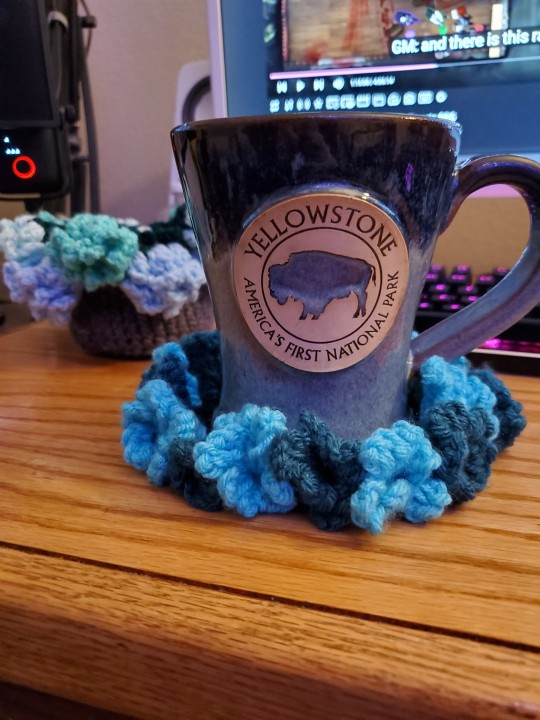
WOE PROJECT 6 BE UPON YE
every day my patience with pattern markers grows thin. i can and will write essays about this franken pattern project that i Am calling done for now but i might do some more work on in the future. SO this is two patterns of the same concept that ive put together because i was not going to fully reset because the first pattern was absolute ass. i truly do not know if the issue was with me or the pattern as they would call for stitches and then tell you how to do the stitch and it was a different stitch! and i made sure it wasnt a uk vs us terms issue but i still had issues! the dud coaster is the darker blue one my mug is pictured on i like how after a lot of trial and error i got the flowers to look flowerish but idk not a big fan of it waaaay to much effort trying to make the stitches work that ill never work it up again. the basket is very pretty honestly but to actually hold the coasters ive had to stuff it with all my yarn scraps that m hoping to one day maybe turn into my own cobbled together yarn? because without the stuffing it just collapses from the weight of the coasters which is why! this project may not be done as there is another basket tutorial m looking at (that goes with the other 2 coasters i made) that based on how it looks is flatter and might hold the coasters much better. but that is definitely a thing ill work up down the road and Probably not tomorrow as i do adore the little basket i have now. AND SPEAKING OF THE TWO OTHER COASTERS i love the flower pattern the whole coaster was a time sink because of how the leaves must be worked but it was so very worth it. from project 3 (tarot sleeve) i still have a skein and a half of that red and purple that if i ever work up more of this specific flower pattern i might see what that yarn gives me! although most likely ill just find another flower pattern to try (theres a tulip one m interested in) so that every coaster is a different flower and looks the most like a bouquet as i can get. unfortunately i used acrylic yarn so i am loathe to use these with hot mugs but time shall tell with the shit coaster if i can use it with hot mugs long term!
also this project took roughly 6 hours with all the frogging trying to make the original pattern work and in generally learning 3 new patterns! (last hour and a half from episode 5 all the way to an hour into episode 7)
season 2 thoughts so far
dude can the lil guys just get a break? joui almost died AGAIN BUT LIKE A DEATH SAVE HAD TO HAPPEN LIKE BRUH LEAVE HIM ALONE FSDJKHFS arthur has had the worst fucking time and honestly i would not be surprised if towards the end of the season he does a suicide run because hes lost everything and everyone but ivete and idk if thats enough to keep him from going insane. i just. i dont know how to put episode 6 into words besides that i am soooo glad to have made it out of that episode because it was Heavy. episode 7 has been chill for the most part. they kept talking about sucking hoses. they kept saying various party members needed to strip to prove they were gonna start trying to shoot each other again. pretty normal table top hijinks and a good place to end for the night/the project.
i honestly have no idea what m making next. part of me Wants to try making a cardigan but all i have is acrylic which is itchy. and i def dont have the skeins for a whole cardigan plus cardigans i feel like would take minimum 22 hours? and i dont really. wanna have a 20+ hour single project. i like my current insanity of having done like 40ish hours of projects this past month and none of them going over 10 hours (besides the wretched bag). time to go through my ravelry in a few days time and see if anything jumps as being interesting or if m gonna have to spin a wheel to pick a project.
#a ordem crochet#shedueling this to post sometime midday as i finished writting it up at like midnight and just. no. i am not posting a midnight update#it took like an hour to write this up yall#fiber art
0 notes
Text
three diys for spring
Much like in an old Western, I find that when the season begins to change my hands twitch to buy new things like a hardened cowboy wiggles his fingers over his pistol, prepared to draw at the slightest prompt. Like the cowboy, I'm perhaps too aware of my own trope: stuff has started to feel like a subculture. The unintentional mindfulness imparted by moving back home has allowed me to finally clearly assess how much stuff I've acquired through a half dozen moves over the last four years and a half dozen more international trips in that same time. I am tired of consuming out of instinct. I would like to extend the grace to my things to allow them to age, yellow, fray.
One thing that no one will tell you about becoming a more mindful consumer is how important it is to literally touch your stuff as much as possible. Feel the fabric of things that you already like, notice texture, stretch, structure. Note what motifs or characteristics that you gravitate towards, get your hands deep into the pockets, zippers, folds. Write everything down. When you know more about how your things are made and work, you know better how to fix them if they break, change them over time to suit evolving needs, and therefore extend their life over and over. To calm my trigger-happy hand hovering over my gun holster, twitching in anticipation of the instant gratification of new stuff, I've handmade some items I've had my eye on or refreshed items I already owned, and in the process created three unique pieces that are not only custom to my measurements, preferences, and personal sense of style, but I know how to repair, edit should my tastes change, and style.
1. Seulgi got bitten by a dog and now I have a new top
To be clear, the dog was just playing and she was definitely fine afterwards. Kitty sent me the video and I have to say, my intrusive thoughts won.
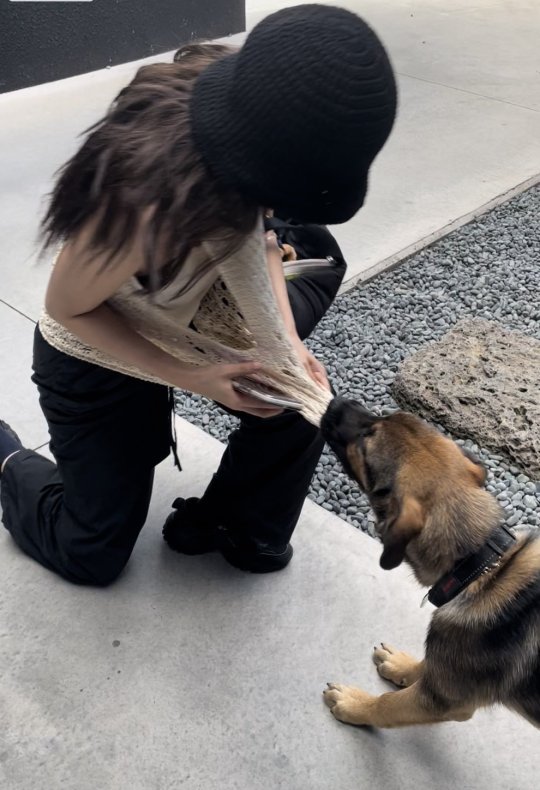

I broke the top down into characteristics that I liked: I liked the color, the open knit texture, and a less weighty yarn for wearing crocheted fabrics in warmer weather. I was getting bored of the 4/5.5mm that I had beaten to death for two large afghan projects last year, and wanted to attempt a mid-size crochet before investing in any finer yarn or hooks for some other projects I've had in mind. I'm still not a skilled enough crocheter to work more complicated things like wearables without a pattern, so I found this pattern online and bought it for $6. The pattern recommended a fingering weight yarn, but I found superfine to be difficult to source at the craft store rather than a specialty yarn store, so I bumped it up to a 3 / 4.0mm and hoped for the best. After some math to account for a lower wraps per inch, the top came together quickly.


I was surprised with how much I liked it, especially considering the amount of scrolling on Ravelry I had to do in order to find anything fitting my exact brief, and the copious edits I had to do to fix a poorly written pattern. It's not perfect (I quite obviously dropped a stitch on the left strap, but in my defense, that's my tote bag side so it'll never be seen), but I'm happy that I was able to create something inspired but not a carbon copy. Crochet also isn't replicable by machine and is labor intensive, so I was glad to make it rather than buy it from a producer with questionable ethics.
2. Reverse engineering
This project was more of an attempt at a 1:1 dupe than my first project, which is much more my typical modus operandi, but I'll rebut that the source material I was working from was of vastly different quality. I found this picture on Pinterest, and immediately thought, 'I could do that'.

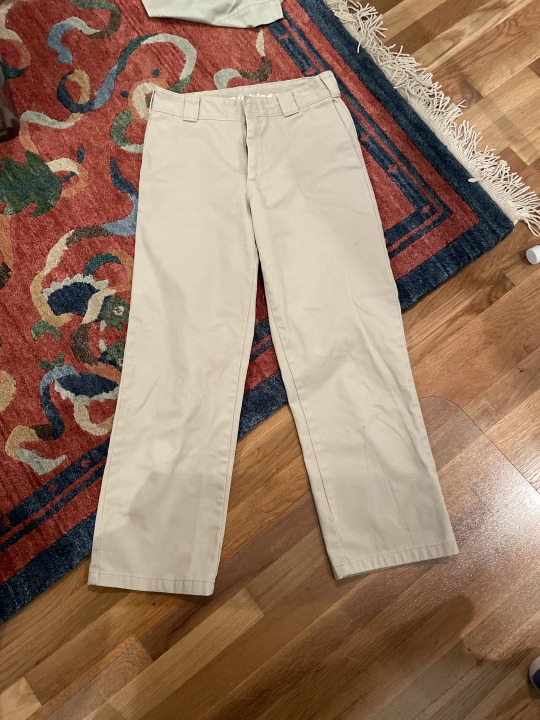
I already had the pants in mind when I set out to try this, meaning that I didn't need to wait for the right piece to materialize at the thrift store. I bought these khaki Dickies to wear for a weirdly smart-casual dress code internship a few years ago but hadn't reached for them in a while because of their awkward length and color, both of which I knew I could change if I attempted this DIY. They were also straight-leg, which I suspected the V-split hem would open up just the right amount for a gentle bell shape as in the reference picture.
One thing I knew would be a concern going into this project was the task of neatly hemming the awkward shape of the cutout, particularly the sharp inner corner. As the fabric tapered off, I wouldn't be able to sew it down and the corner itself was likely to fray. To remedy this, I added the tiniest strip of fabric, doubled over to create a clean edge, to extend the width of the hem so that both sides would overlap to reinforce the point. I also pressed and sewed the pleated inserts at this point, also requiring a bit of trial and error. Pleats this small decreased the length of the piece by about half, so I was using an entire yard of fabric to go around the circumference of the pant leg. Some Googling also taught me that a 1:2 mixture of vinegar and water, sprayed on and then ironed, helps keep pleats sharp and in place, so I had to let the inserts hang dry in my bathroom for a few days to let the smell dissipate.

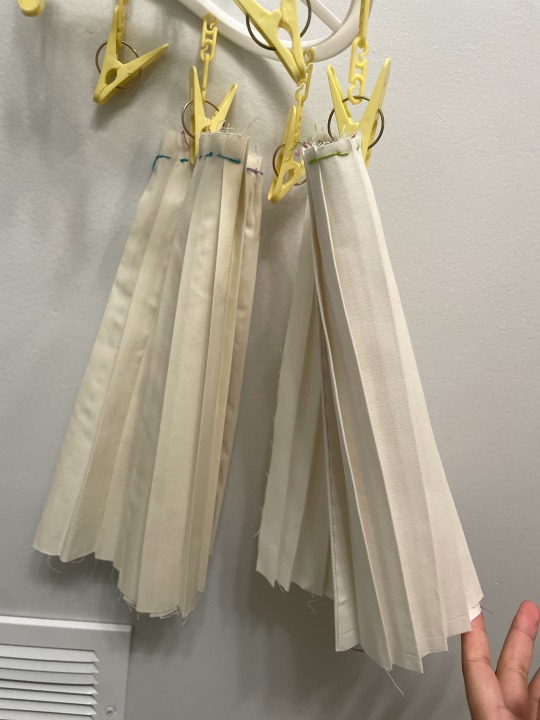
As you can see, I initially sewed the outside set of stitches on the hem (everything in this project was sewn by hand, because I just can't bring myself to invest in a sewing machine), assuming that when dyed black the stitches would disappear. Clearly, I was optimistic about this plan working, because they were incredibly haphazard. Despite being ugly, the shape of the cutout was coming together correctly, and I moved onto dying the pants black using synthetic fabric dye to account for the cotton polyester mix. The first round came out of the dryer an extremely underwhelming gray, but the second round, done on the stovetop, produced a dark gray that I was happy with as a lighter alternative to black for spring. However, this meant that the ugly black stitches running down either side of the V were extremely visible, and I ripped out the stitches and turned to iron-on hem tape to hold everything together and not have to compromise the overall effect, despite initially wanting to stay away from it for washability purposes.


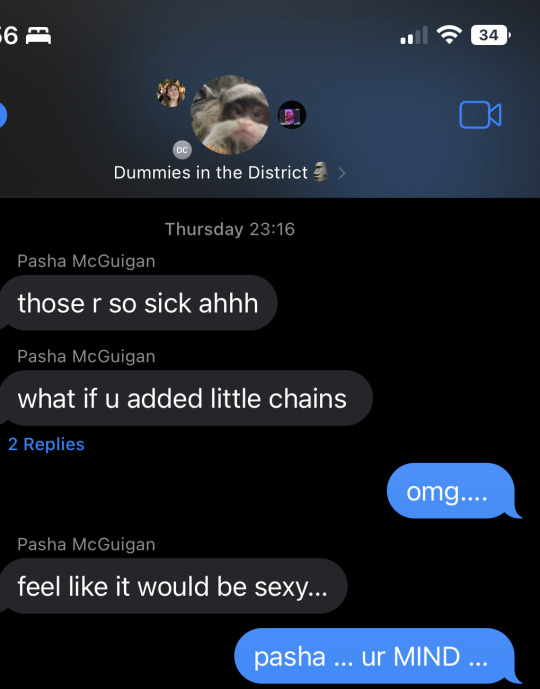
I attached the inserts by turning everything inside out and using the hem tape to attach the sewn edge of the pleats just above the V-cutout, hiding the seam and adding just about an inch to the length of the pants. At this point I was extremely satisfied with how everything was coming together. The final details were just the bows, which I was increasingly suspect of, all the way up until I attached them.
I already had a little bit of chain and sewed tiny loops onto the bit of loose hem on the inside of the V-hem so the join would be invisible. These are, in effect, crowdsourced pants.
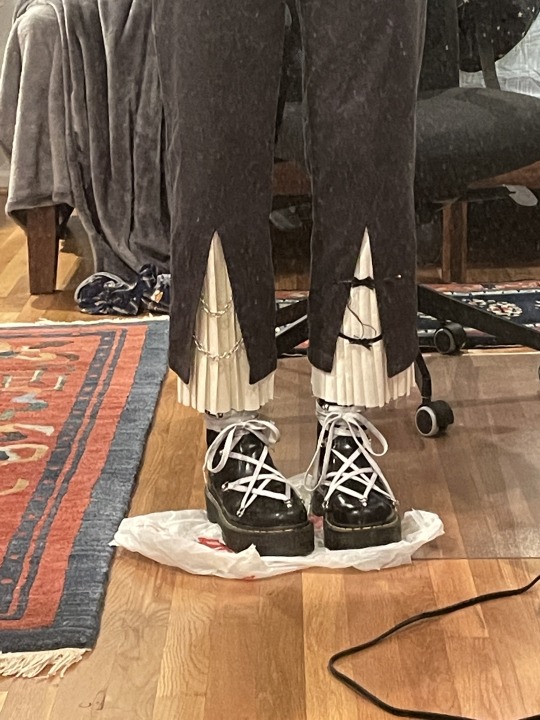

At time of post I still haven't decided which looks better, but again, knowing the construction of these will allow me to easily change from option to another, extending the wearability and life of these. The one downside is that I will likely have to spot clean these as much as possible, because any washing, machine or by hand, will totally destroy the pleats because I didn't starch them (I didn't have any, and I was getting sick of running to the store). Barring any major disaster, these will probably spend a few hours in the freezer between wears to kill any bacteria, a la Japanese raw denim enthusiasts. Should push come to shove, I can remove the bow/chain detail and repress the pleats using the vinegar trick because they're sown down, but please, no one wedding-guest-wearing-white me.
3. Reverse engineering, but make it /r/FashionReps hates me
This technically isn't something I did recently, but it's still one of my favorites. I saw someone on Tiktok wearing the Rick Owens Docs, and I didn't even have to Google them to know they would be impossible to find and exorbitantly expensive.
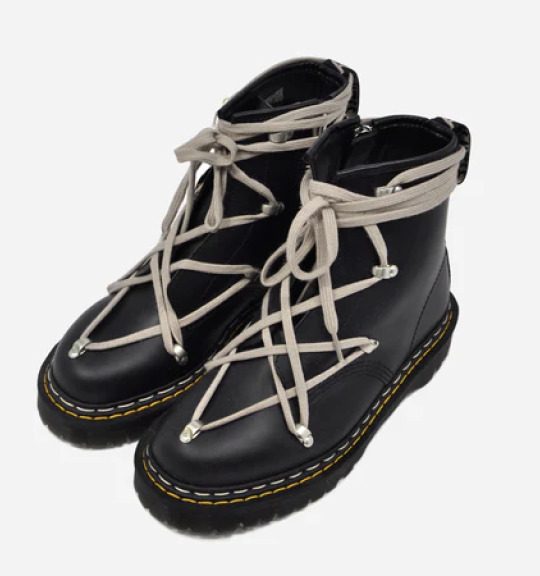
Instead, I kept an eye on Poshmark for a few months before finding a pair of white platform Chelsea Docs for $40. The white leather hadn't held up nicely in color but they were otherwise solid in wear and construction. I rubbed off the finish with some rubbing alcohol and painted them black using acrylic leather paint, effectively disguising any damage. I bought the longest white shoelaces I could find and got them to a dirty gray by soaking them in water with the tiniest amount of black paint. Working first with eyelash glue just to place the O-rings correctly, I laced them up and came up with these dupes.


This worked for a picture, but I had to bite the bullet and drill holes into the boots to screw the O-rings down instead of just gluing them (the coward's option). This ended being the right decision, because they sit much more nicely and are much sturdier. I ended up with a visually similar pair of boots for a tenth of the price that no one but a specific type of Rick Owens fashion chad would call me out for.
Because this isn't a recent DIY, I can report back that these have needed a little TLC after heavy wear to get them looking good again. I'm pretty rough with them, so leather paint sometimes cracks and expose the white at certain pressure points, which is a 10-second fix. The O-rings tend to break, especially at the toes, because they're not really meant to withstand the roughness of shoe-wear, but I have extras so I can replace them quickly. I cannot express how often I reach for these, and how important it has been that I can fix them myself.
4. Conclusion?
Touch your stuff. I'm so serious.
0 notes
Text
15 Free Crochet Towel Topper Patterns
Crocheting is a creative and enjoyable hobby, and free patterns of crochet towel toppers can provide the best beginner project for anyone who wishes to learn and boost their skills. So, if you want to start learning how to crochet kitchen dish towel toppers, then with these 15 crochet towel patterns with step-by-step instructions and a PDF guide, you can improve your skills. Many things in the kitchen play a significant role in our daily routine, and towels are among them. These towels are essential because they assist us with various duties, including covering, drying, and cleaning. So let’s take a look at all these towel topper pattern ideas that you can make and get yourself a colorful and textured towel topper to fix your towels in their respective areas.

Free Crochet Towel Topper Pattern for Kitchen
The pretty crochet towel toppers are just pretty enough to steal your hearts with their eye-catching designs and textures. They are perfect to crochet around the festive seasons with hues and are also used as a gift for your favorite ladies. Also, the patterns come with crochet buttons and hooks for easy fixation over the oven rods and more. Plus, they’re easy to follow for beginners.
Crochet Gingerbread Towel Topper Pattern
One of the things that people love to make around Christmas is crochet towel toppers, and there are many patterns for them. A gingerbread design has been created to shape this elegant and festive-inspired towel topper for your kitchens. Let’s check out the pattern instruction and details on the “Repeat Crafter Me” website.
Crochet Dish Towel Toppers Pattern
These colorful; crochet dish towels are summer-friendly, and you can crochet them at your home. The adorable dish towel topper has been crocheted with a hook and button on the top to make it easily hang around your spaces. Check out the pattern instruction and details on the “Posh Pooch design” website.
Easy Crochet Towel Topper Pattern
This gorgeous crochet towel topper is quick to make within a few minutes. It has a button to tie it around over your oven or the cabinets. Also, you can use it as the perfect gift for your dear and near ones. Just follow this easy pattern instruction on the “Megmade” website.
Crochet Pineapple Towel Topper Pattern
You can use various patterns to shape a lovely topper, and this pineapple topper is super cute and fun to get your hands on. The breezy pattern is quick and easy to work on, and the red color makes it chic and hot. A button tie-up makes it simply hand around your kitchen or whatever place you want. Check these free pattern details on the “Ravelry” website.
Crochet Double Layer Towel Toppers
This red, green, and white double-layer towel topper is best for Christmas to use as a perfect gift to exchange with your lovely ladies. It would look so beautiful and also would bring festive vibes to your spaces while hanging around. Check this pattern’s details on the “My Recycle Bags” website.
Crochet Summer Sundress Towel Topper Set
You are definitely going to lose your heart to this elegant and cute summer sundress towel topper. The blue dress with vibrant yellow flowers looks absolutely fun and beautiful as the towel topper. To make this design, check out this free pattern on the “Crochet Memo” website.
Crochet Hanging Ring Towel Holder
These ring-styled crochet hanging ring towel holders are quick, easy, and one of the most functional patterns to use when you need a towel topper or towel holder. Also, you can make any of the buttons and colors to use in your kitchen spaces easily. To make this, check all of the details on the “Naztazia” website.
Crochet Daisy Towel Holder Topper – Free Pattern
Here is another elegant idea for the fun-looking and gorgeous daisy holder toppers. The towel toppers have been crocheted in the ring style so that you can put them in. Moreover, the daisy flowers instead of the button make these holders look more pretty and fun. To make this, check all of the details on the “Delights Gems” website.
Bounding Towel Topper – Free Crochet Pattern
Here is another pattern for you to crochet a lovely towel topper for your kitchen. The towel pattern is bounding, so you can easily tie it up on your oven or the hanging pipes in the kitsch. Also, you can work up this chunky towel topper pattern. On the “Stitch11” website, you can check the instructions and all other details to make this pattern.
Crochet Towel Topper Pattern for Beginners
These delightful crochet towel toppers are so catchy that apart from being practical, they are absolutely going to add oodles of charm to your kitchen decor too. Plus, it’s elementary to try out beginners too. You can also use them as a perfect gift for your beloved ladies. So check out the details on the “Taylor Lynn” website to start making this pattern.
Basic Crochet Towel Ring Pattern
If you are distressed about losing your towel now and then, here is the best idea for making this easy and quick crochet basic towel topper for you. Also, it’s a very easy, simple, and quick pattern that you can make with the complete guide on the “Lemon Lane” website.
Crochet Towel Topper – Free Pattern
This is the coolest and the easiest towel topper that you can ever get. This is tiny in size, with a ring and a button to be tied up on the pipes. Also, you can quickly crochet it up, and the details of this pattern are available on the “Amanda Crochet” website.
Crochet Hanging Kitchen Towel Topper
Towel toppers should be fixed so that you can find them easily and use them during your busy hours in the kitchen. So get your towels to hang up around you using these cute and lovely toppers, which are super simple and fun to crochet with any easy pattern and in various colors. Check the details of this pattern on the “Naztazia” website.
Crochet a Towel Topper
Hang your towel over your ovens in beauty and style by crocheting this functional Crochet towel topper. Unlike the other towel toppers having one single big button, this one has two tiny buttons hanging over the road. Check the free pattern with all the important details on the “Crafting Shed” YouTube channel.
Crochet Towel Topper Beginners Pattern
Beginners should get their hands on the easy projects at the beginning of their practice, and this towel topper is the best plan to work on. All you need is your crochet hooks’ basic work to make this simple crochet towel topper. Check the details and complete instructions on YouTube to make this elegant design.
Also Read: 10+ Crochet Heart Patterns for Valentine’s Day
Conclusion
Now you know all of the different types of crochet towel toppers. It is time to select a pattern and get started. Even if you have never crochet before, these free pattern ideas are simple enough for beginners. Each one comes with a printable PDF and step-by-step instructions so you can floor along. So, select your pattern and start your crafting journey with these crochet towel toppers patterns.
Source:https://hariguide.com/free-crochet-towel-topper-patterns/
0 notes
Note
Different aspects of knitting have different types of patterns, so pick which direction you want to go! Cables? Lace? Intarsia? Fair Isle? You can also combine these. It also depends on what you want to make, because knitting pretty lace shawls is a different skill set than sweaters than teddy bears.
Also, the good patterns will have the instructions written out as well as the chart, so you can refer back and forth. The way the pattern is written will change depending on whether what you're knitting is in the round (on circular or double point needles), or if you're knitting something flat might skip the wrong side row (because every wrong side row is purled)
If you have a local yarn shop, they'll probably be willing to help you decode your pattern, and if you pick something popular on ravelry, there will definitely be progress pictures in the projects.
When I was starting out, I made a bunch of different scarves to play around, and then started with hats that get knit flat and sewn together. After that I started trying to incorporate one new thing in each project (ie, bias scarves, lace, cable,in the round, garment shaping)
A very helpful resource for me was my Vogue knitting 1989 which has everything from how to knit through to how to design a sweater. There's a few more baubles than are fashionable now, but it was great when I was just starting out and didn't know what to YouTube. I also got it thrifted for 10$ so it shouldn't be too hard to find. (It's on eBay for 20$ right now

I'm a newbie knitter, how do I read and follow patterns? I've only made like a scarf
--
Most patterns have a section where they define their abbreviations or chart symbols.
Knitting charts do tend to differ pattern-to-pattern. Sometimes, a blank square is a knit stitch, sometimes a purl. Cables look completely different in different ones. It can be rather annoying.
You can google most abbreviations. If you know the full name of something, you can find a youtube video showing how it's supposed to work.
Start with a paid pattern with good reviews or a book or something. Free patterns often have errors or minimal instructions or are just more confusing. Indie designers with only like 2 patterns often haven't written something as clear as the patterns by big, established names who spend a lot of money on tech editing. I prefer to look for less overhyped patterns, and I think it's wonderful to give new designers a chance... but if your worry is learning to follow patterns, this is not where I would start. (For example, I found a super cool vest pattern that I've cast on, and the pattern is reasonably well-written, but I've already found an error in the English translation that would be super confusing if you weren't experienced enough to guess what it meant. I sent a note and the designer thanked me and said this would be in a future update, but that doesn't mean it's already there right now.)
There are many Youtube channels that explain various knitting techniques. I'm fond of Nimble Needles, but there are plenty of others too.
32 notes
·
View notes
Photo


🚨[FREE PATTERNS]🚨
Merry Christmas, dear friends! 🤗 🎄
I hope you’re having an amazing Christmas eve in a family circle this year! 😍 You’ve been extremely supportive to me this year and really helped me to go through some bad things in my life, your sweetest words about my work inspires me to create more and more toys and patterns which at some point of my life became a really important thing for me 🤗 As I mentioned in my previous post, I had an amazing and so needed vacation, I can definitely tell that I feel much refreshed and now I’m very excited about next year’s projects! 🥰 Last year I made a little gift to you and to continue this Christmas tradition, there will be more gifts this year! 🥳
I’m very happy to announce that my Minion Bob, Evil Minion, Minion Tim and Minion Stuart crochet patterns are available as FREE downloads! 🎁 Currently they are available only in my Ravelry shop, but a little later they will be available in all of my other stores that support free pattern downloads!
Here is the link to my Ravelry shop -> https://bit.ly/3qljbXj 🤗
🚨It is important to remember that I do not provide support for my free patterns, but you’re welcome to create topics on any website or forum to discuss these patterns! Also, please remember that you can not post these patterns to your blog/website or make a video tutorials without my approval.
Merry Christmas and Happy New Year, dear friends! 🎄🎅🏼🎉
#AradiyaToys#handmade#amigurumi#crochet#kawaii#olka novytska#DIY#crochet pattern#crochet patterns#aww#crafty#cute#adorable#aradiya toys
11 notes
·
View notes
Note
Hey sorry to bother you but do you have tips for someone learning to knit?
its not a bother! my biggest piece of advice for learning any craft but especially knitting is to go Ham and make mistakes, grab a skein of the cheapest yarn from your local craft store or walmart or whatever and google "knit stitches" and just make a swatch of every stitch that catches your eye. even if you only do a few rows before frogging it. even if its Awful, just make something. this will help get your hands used to the actions and your brain used to reading patterns and charts before you start on an actual project.
plus at the end of it you can sew all your samples together and have a little lap blanket or shawl or whatever that you will be able to see your improvement between pieces on. and that you'll always be able to look back to while youre working on a project and go "Welp, the disaster im working on now is not anywhere Near as bad as this, so im definitely getting Somewhere,"
after you've done that or like, lets be honest, when you get bored of doing that, go to ravelry, use the advanced search feature, and just find a project that looks Fun. or that looks slightly above your skill level.
also, check around you for proper yarn shops, loke lil mom and pop things, not Joanne's or Michaels or whatever, the people there will be able to help you plenty and there are almost always classes running at them.
15 notes
·
View notes
Text
It really depends on your comfort and willingness for possible mistakes (but lots of great learning!)
My first knit garment was a pair of shorts which definitely had their fair share of mistakes but were a great learning experience. A sweater was my second project and I felt it gave me a great excuse to learn new techniques.
For first sweaters I would highly suggest the step by step sweater by Florence Miller on Ravelry. It is a very well written (in my opinion) pattern and is free to download (I am not sure if you need a Ravelry account or not 🤔). It has a decent size range. She also uploaded a free walkthrough of how to knit the sweater on YouTube.
Happy knitting!!
How long after starting knitting would you advise someone to wait before attempting to start knitting sweaters?
35 notes
·
View notes
Note
hello!! i recently started following you account because i think i want to get into crochet. i really like cross stitching and embroidery but i wanna try crochet, do you have any advice on where to start? i’m feeling a little overwhelmed with some of the stuff i see when i look up crochet kits.
Hi! I absolutely do have advice! First off, I can’t recommend Ravelry highly enough. It’s totally free and worth making an account so you have access to the best database of patterns (so searchable!!!) both free and paid, crochet and knit. That’s not where I’d start, though. For absolute beginners to crochet, I recommend mooglyblog. That link goes to their crochet abbreviations list, which shows you how stitches are written in patterns and links to tutorials on how to make the stitches, including photo and video tutorials. My grandma taught me chain stitch and double crochet and every single other stitch I learned I learned from mooglyblog. They also have some patterns that are great for beginners and very well explained. AllAboutAmi and OneDogWoof both also have some very well explained beginner projects with lots of photos. I honestly don’t think I recommend most crochet kits for beginners? I mean, the one I used for the crochet UFO was a great kit, but kits are usually pretty expensive, and the kind that come with a book + yarn + a hook, in my experience, don’t have very good quality yarn. The crochet pattern books in those kits can definitely be worth it (that’s how I got my horse pattern book) but I pretty much always use yarn that didn’t come with the kit. If you have an idea of a thing you’d like to make or the kind of thing you’d like to make (blankets, sweaters, stuffed animals, etc) I’d be happy to help you find a starter pattern and some yarn recs or post about it here asking for yarn recs. I know a lot of my mutuals and probably a lot of my followers are yarn people of one craft or another and they’ll have some great advice. Let me know if you have any more questions! I don’t crochet as much as I used to but it’s still a craft I love and I love talking about it and helping people get started crocheting
#ask away!#long post#crochet advice#links for crochet beginners#I am not affiliated with any of the linked things I just like them#I mean I do have a ravelry account and I do have some patterns on there but I didn't link to my patterns?#basically: this is not a sponsored post I'm just linking because all of those links were genuinely how I learned to crochet
25 notes
·
View notes
Note
Hi, you've inspired me to want to crochet a blanket and I was wondering if you know of any interesting blanket crochet patterns that don't get their interestingness from color.
@traveler-loves-you Hoboy, there are a lot! I could definitely start winging a bunch of links your way, just by going to Ravelry and sorting the blanket patterns by single color use, but I could also narrow that stuff down a bit, too. How big a blanket do you want to make? Do you want something center-out or built by going back and forth along the width? How texturey do you want it to get? Are you looking for just rectangular/square, or are you up for circular things (there's a spiral one I just stumbled across and I am actively restraining myself from jumping onto it before I try at least casting on for a Ring Shawl project).
4 notes
·
View notes