#after effects motion graphics tutorial
Explore tagged Tumblr posts
Visit Tumblr Blog
Explore Tumblr blogs with no restrictions, modern design and the best experience.
Last Seen Tumblr Blogs


Fun Fact
Kazakhstan’s Minister of Communications and Informatics has blocked the Tumblr site because it contained 60 sites of terrorism, extremism, and pornography in 2015.
Text
#motion graphics#motion graphics tutorial#after effects motion graphics#motion graphics for beginners#after effects tutorial#learn motion graphics#motion graphics tutorial for beginners#tutorial#after effects tutorial motion graphics#motion graphics tutorials#motion design for beginners#after effects motion graphics tutorial#motion design tutorial#motion graphics for starters#motion graphics full tutorial for beginners#motion graphics after effects
1 note
·
View note
Text

Working on new iterations from a 2016 trapcodeTAO project file. The same project file that lead to the recording of this youtube tutorial titled: " Let's Create a Scaled Dragon tail loop with Trapcode TAO in After Effects " *archived on @OBJKTcom: " Serpens collum "
#snake#loop#gif art#animation#animated#mesmerizing#oddly satisfying#calm#relaxing#motion graphics#after effects#tutorial#youtube#seamless#visuals#mood board#geometry#motion#hypnotic
44 notes
·
View notes
Text
Just take a moment to chill.
instagram
Everything I did in After Effects and all effects I used can be seen under the cut.
Used simple rotation animation on plants and fingers with loopOut("pingpong") expression so they would keep rotating back and forth for eternity. Added CC Bend It effect to each of them and keyframed them to bend a little. Pre-composed.
To make the smoke, I made a new composition and created a simple triangle. And applied these effects to it:
Grow bounds - Pixels 150;
Wave warp - Wave type Sine; Wave Height 100; Wave Width 200, Direction ~+69; Wave speed 0.5; Pinning - Left edge (make sure you pin it on the side where you want the smoke to come from);
Wave Warp 2 - Wave Type Circle; Wave Height 100; Wave Width 300; Direction ~+106; Wave speed 0.2; Pinning Left Edge;
Bezier Warp to distort the shape even more, adjust as needed;
And I slapped this smoke pre-comp on my main comp like it was nothing.
Overall effects I used on Adjustment layer over the whole project:
Noise - Amount 5%;
Posterize time - 12;
Roughen Edges - Border - 2; Edge Sharpness 5; Fractal Influence 1; Scale - 1000; Complexity 2;
Turbulent Displace - Amount 2; Size 100; Complexity 1;
Turbulent Displace 2 - Amount 30; Size 2; Complexity 2;
Not a whole lot, but it's something. Honestly documenting this will help me remember better on what I did because I forget how to do basic shit. Ha.
#art#drawing#illustration#artists on tumblr#artwork#animation#2d#2d artwork#2d art#2d animation#mograph#motion graphics#after effects#after effects tutorial#motion graphics tutorial#women in art#artists#digital art#artist of tumblr#digital arwork#digital artist#digital drawing#looping animation#animated
15 notes
·
View notes
Text
🎉 Launching April 1st 2024 ! 🎉
Get ready to upgrade yourself with design to animation ?
Start learning with Motion Pandey - animation, Motion Graphics.
Tutorials, tips & tricks and creative inspiration.
💡 Here's what you can expect:
In-depth tutorials covering everything from basic animation principles to advanced After Effects techniques.
Creative challenges and exercises to ignite your imagination and hone your skills.
Insider insights and behind-the-scenes peeks into the world of professional animation and motion graphics.
Engaging discussions on industry trends, software updates, and the future of animation.
YouTube :- https://youtube.com/@Motionpandey
#after effects#motion graphics#2d animation#video editing#design#learn animation#motion pandey#tutorial
2 notes
·
View notes
Video
youtube
How to Create 3D Text in After Effects
0 notes
Text
youtube
#After Effects tutorial#Social media post animation#Animation techniques#Motion graphics#Adobe After Effects#Design principles#Typography#Keyframe animation#Color theory#Engagement strategies#Digital creativity#Graphic design tutorial#Social media marketing#social media post animation after effects#motion graphics templates#adobe after effect tutorial in hindi#motion graphics#motion design#motion graphics designer#animated graphics#motion design studio#Youtube
1 note
·
View note
Text
youtube
#Youtube#how to make 3d cube animation in after effects#ms creative sense#how to animate 3d text in after effects#creating 3d text in after effects#3d text animation in after effects#after effects tutorial#after effects#after effects text animation#3d text#after effects 3d text#tutorial#element 3d tutorial#after effects logo animation#motion graphics
0 notes
Text
youtube
#how to make 3d cube animation in after effects#ms creative sense#how to animate 3d text in after effects#creating 3d text in after effects#3d text animation in after effects#after effects tutorial#after effects#after effects text animation#3d text#after effects 3d text#tutorial#element 3d tutorial#after effects logo animation#motion graphics#Youtube
0 notes
Video
youtube
Vertical Glass Shatter Logo Animation #Shorts
#youtube#logo animation#glass shatter#after effects#after effects tutorial motion design motion graphics logo
0 notes
Text
Text Effects Masterpost:
I've been meaning to do this for a minute now, but I wanted to share some resources of different font tutorials I've used throughout! This won't be a tutorial as to how I apply things but I could definitely stitch a video into this post if that would help!
☆ I do use DaFont to find all of my fonts! Sometimes the videos I do watch will suggest new fonts as well! I also do all of my text effects in photoshop!
☆ Spoon Graphics, ThaZero and PANTER are usually my go-to's! They offer easy, quick and most of all, free tutorials!
☆ Some fave videos:
Gradient Blur and Glowing Effect
3D Chrome for Beginners
Glowing Text - Strange Lights
Smoke Melted Effect
Motion Blurred Effect
☆ (This is gonna be a run on lmao) If you select the fx button after typing in your text, select stroke, change the color to gradient and pick a color you like, change the blending mode to any of these four options, you get a really cool outline effect! Crusty photos below:


20 notes
·
View notes
Text
if anyone wants them here is my collection of various after effects tutorials and resources
general tutorials
motion graphics
transitions
effects
typography
downloads - plugins, presets, overlays etc
75 notes
·
View notes
Note
[@distinguished-turtle-enjoyer ]
i actually have not stopped thinkin bout your bb!edit like,,,, its so good and scratches my brain right
how long have you been doin edits for? do have any tips for someone, who hypothetically, wants to start doin edits too? what programs do you use? how did you do the cool animated bits?
im so sorry for all the qustions 😭😭 i just think youre very talented and inspirational and i hope you have a good day ^_^
hi firstly oh my gosh you're literally so sweet i am gently shaking you i love you so much /p. secondly, i apologize for the long answer! (it's all under the cut. this got away from me. i'm so sorry apparently i have a lot to say.) (also you're so good about the questions i would constantly be asking one of my professors questions during class to the point where she said i didn't have to go "i have a question" every time i approached her)
i've been editing since 2016! around march/april, i think? loved it so much i went into film & video production in college as a major so i could do editing for a living. (i have done more motion graphics for my classmates than i have done edits outside of class assignments, BUT!)
the program i use is after effects - i started learning it when covid first hit the united states because i had nothing better to do with my time (other than music theory but i failed that bc my professor focused more on the history aspects than the actual theory soooo) and my ipad kept giving me the "no more storage" whenever i tried to use videostar lmao. (vs has, apparently, gotten a LOT of good updates, so if you're looking to start editing and have an ios system, i'd look into it! only downside is you have to pay for some of the cool stuff).
also the program i use for masking (i think i explain this later dwdw) is superimpose. i've been using it since 2014 and it's SO nice bc i can use my fingers to erase backgrounds & stuff instead of hoping i can get it to work correctly in ae or photoshop (photoshop my DETESTED i'll use it but i'll complain the entire time).
for people who want to start editing: tutorials on how your program works and how to do specific transitions are gonna be your best friend when you're first figuring things out! i forced a friend to literally walk me through how after effects worked when i was first figuring it out, and when i had swapped to videostar back in 2017/2018(?) i had watched a Lot of tutorials. that and played around a lot and figured things out on my own - which is also always a good way to start!! it's also totally valid to look at other people's edits for inspiration - most editors don't really care, as long as you don't flat-out remake their edit (some people don't like that!). i have a style insp folder on instagram where i save edits that i like so if i need transition ideas or i'm doing a different style, i can look there for inspiration. at the end of the day, as long as you're having fun with it that's all that matters!
also, starting simple is always okay!! my edits for a year were just me slapping gifs & video segments together on a timeline in cute cut pro bc imovie didn't load them lol & it'd crash every time i breathed. ++ it never hurts to ask people for feedback/constructive(!!!) criticism/etc! (also not to sound like everyone else but practice? good. it's so good. if i showed my 14/15y/o self some of the edits i can make now they would've passed out on the spot bc i was still trying to figure out transitions back then. programs can also sometimes make a difference in edits, but usually it's not super noticeable until you start getting to the Complicated Shit.)
a lot of popular programs i've seen are ones like video star (ios only), alight motion (android only), after effects (i recommend 🏴☠️ing it tbh, i only use it legally bc i had to use adobe programs for school), capcut, and i think some people still use sony vegas pro & maybe cute cut pro (i've heard it may have actually gotten better since i last used it in 2018)? i have no idea. programs also depend on whatever device you're using to edit on! since i've been using my laptop, i'm able to use after effects (it's computer-only), but when i used my phone/ipad to edit i used ccp & vs.
for the animation - it's a lot of cutting up the image and masking! more complex animations, like the one i had of leo walking down that red 'hallway' have several different layers that have been masked. (i removed the background & filled in the spot where leo originally was in two different apps - superimpose (taking leo out) & photoshop (filling in the bg)) in after effects, the way i've done this was mask out the specific thing i wanted to move (like an eye) and then put that mask on what i've called a "base" (not animated), and then stick a solid behind the base to match the color of the object. (some of my layers are not named appropriately; base 2 is the left arm & the four "SIX_[...]" layers are the mask/bandana tails)
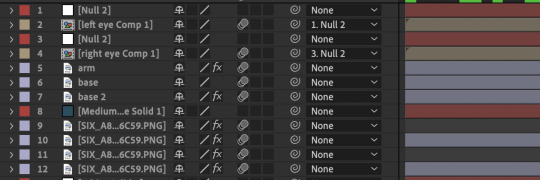

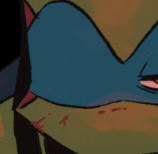
an example of this would be for any of the eye blink animations i did! this (above) is the same shot, with and without the eye - since it's masked out and i have the background solid behind it, it doesn't look too unnatural/have a black outline/mass where his eye should be.

what it looks like without the solid layer behind it ^ (the red lines are from the null layers - ignore that)
this is what my timeline looks like if it's a more simplistic animation - the only five things being animated here are leo & raph's eyes. (there's only this many layers bc it's two characters in one shot & i was also animating their pupils - typically, an eye-blink animation is about 4-6 layers for me (solid, base, mask, & null to animate with, 6 if i'm animating both eyes & 4 if just one))

in after effects, there's this really cool tool called the puppet pin that one of my friends (lovingly) yelled at me for not knowing about - which. yeah fair she wasn't wrong it's SUPER useful in animating, provided you chop up your image first. if you don't it's a mess.
(separated by layer vs i should've really put the mask tails & leo's head on separate layers and didn't bc that was the 2nd to last animation i had to do and i was losing my mind bc i wanted to be done with the edit lmao)

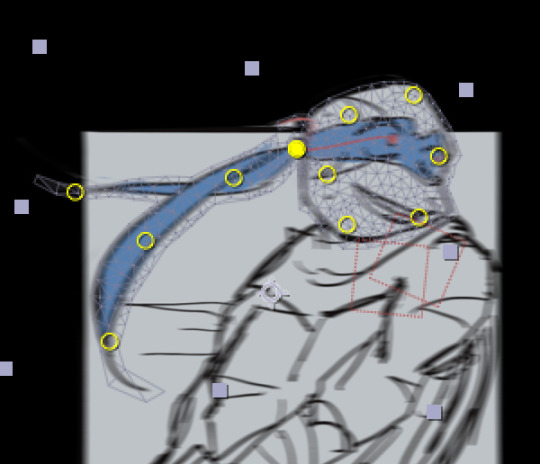
the way people animate depends all on their style (there's two common ways to do blinking animation - having the anchor point at the bottom of the eye, or the middle of it) and the program they use. it's been a while, but i could probably tell you how to do some basic animations on videostar still even though i've been doing them in after effects for about 2-3years now. ALSO the best way to have an animation be noticeable is to over-exaggerate it/make them Big - which, yes, can mean 'breaking bones' and having the limbs be a little wonky at the start. (if you want it to be realistic though go Just to the point where it looks uncomfortable lmao)
uhm. again i am so sorry that this is so long i THINK this is everything? if not: my inbox/dms are always open if you ever want to ask more questions, wanna follow up on something, etc etc!! (also if you ever start editing please send me your edits!!! i'd love to see them <3)
#this got away from me im SO sorry (just put this in google docs out of curiosity. 1255 words. i am so sorry for the essay.)#uhm. ANYWAY YES like i said if you have any other questions feel free to reach out!!! i am always alway willing to help people out#with stuff like this!!! i can talk your ear off though if this wasn't enough proof of that /j#if nothing makes sense it's bc i'm responding to this at like. 5am my time. so. my bad if there's typos i'm so sorry#like i think i saw this ask at 4:40ish am and i'm still making sure i've got everything covered and its like 5:32am LMAO#me when i dont sleep bc i have no routine now#ask box pals#art creds in the screenshots to trubblegumm !! <- tagging to be safe#still in shock at the amount of positive feedback im getting from my bb!leo edit like oh my god you guys are incredible ilysm /p#sorry i discovered in the middle of typing out my tags that you can edit them now after you've hit enter where am i.#also this is offtopic so its down here but i am Not complaining about doing more motion graphics than actual editing.#a bitch has won two awards for their motion graphics at festivals and i've been doing them for a YEAR#(laughs in the first time i ever did a real one i won a student award. idk how. but i DID and i won the pro category this year <3)#it would be nice tho to do more editing for short films tho :( had a professor tell me i was good at it.#i should rly start using my camera and shoot my own stuff and edit it huh. maybe i will eventually i have a few ideas.#anyway. i need to stop rambling abt my experience as a film student and go to bed i apparently need to be up in the morning but idk WHEN
9 notes
·
View notes
Text
Exploring the Power of Video Marketing: How a Video Marketing Agency in Jaipur Can Transform Your Business
Video has emerged as the most captivating tool for successfully attracting audience attention and disseminating information in the digital age. Video content is now a crucial component of every marketing strategy, whether it be for a product launch, brand narrative, tutorial, or testimonial. For businesses in Jaipur, tapping into this powerful tool with the help of a video marketing agency in Jaipur can offer tremendous benefits, driving engagement, conversions, and brand awareness.
The Importance of Video Marketing in Today’s Business Landscape
Video content has become more popular on social media platforms like Facebook, LinkedIn and YouTube. Video is expected to make up over 80% all internet traffic by 2025. Marketers are recognizing this and using video to engage with their audience.
Why Video Marketing Works:
High Engagement:
Combining visuals, sounds, and story-telling engages audiences in ways text or static images can't. According to research, viewers retain 95% more of a message if they watch it as a video than if they read the text.
Video Formats:
Videos come in a variety of formats to suit different platforms and audiences. Its flexibility makes it perfect for all stages of the buyer journey.
Improved SEO:
Video content increases your SEO ranking by increasing the time that visitors spend on your site. Search engines such as Google prioritise content that engages the user, and websites with videos are 53 times more prone to rank first in search results.
Increased Conversions:
Video marketing can increase conversions up to 80%. Potential customers are more likely than ever to purchase your product or service after seeing it in action.
Brand Storytelling:
Video storytelling is an effective medium that allows businesses to emotionally connect with their audiences. Videos can be used to showcase your company's values, journey or testimonials.

Why Businesses in Jaipur Need a Video Marketing Agency
Businesses from a wide range of sectors, including manufacturing, IT, real estate, tourism, and hospitality, are expanding in Jaipur. Businesses must use innovative marketing techniques to remain competitive in such a changing climate, and one of the best ways to do this is through video marketing. Here’s why businesses in Jaipur should consider working with a video marketing agency in Jaipur:
Professional Expertise
It takes more than shooting footage to create a high-quality video. It includes scriptwriting, storyboarding and filming. Editing is also involved, as well as optimizing content for various platforms. Video marketing agencies have specialized knowledge to make sure that the final video is professional and polished, from conception to delivery.
Access to the Latest Tools and Technology
Video marketing agencies use the latest equipment, software, and technology to create top-notch videos. These tools, such as drone footage, 4K camera, advanced editing software or motion graphics can improve the quality of your videos. Businesses can get these tools by working with a video marketing agency in Jaipur , without investing in expensive equipment.
Tailored Strategies
Video marketing agencies are not just interested in creating generic videos. They work closely to understand the unique goals of businesses, their target audience and brand message. A best performance marketing agency in Jaipur will tailor video content for your needs, whether you require explainer videos, brand storytelling, product demos or event coverage.
Local Market Understanding
Understanding the local market and culture is essential for producing effective video content. Video marketing agencies in Jaipur have a better understanding of Jaipur's business dynamics, audience trends and preferences. The agency can create content that is both local and universally appealing by using its local expertise.
Maximizing ROI
If done correctly, investing in video marketing will yield significant returns. A video marketing agency can help you maximize your budget and ensure that each video you create generates maximum ROI. It includes selecting the best platforms for distribution, optimizing your videos for SEO and tracking performance metrics in order to measure success.
Types of Video Marketing Services Offered by Agencies in Jaipur
Video marketing agencies in Jaipur provide several kinds of services that cater to the different demands of businesses. Depending on your business, goals, and target audience, you may leverage numerous types of video content to promote your brand.
Explainer Videos
Explainer videos are brief, interesting films that provide a clear and concise explanation of your product or service. They are perfect for companies that need to communicate technological solutions or complicated concepts. To help prospective clients better grasp their value proposition, an IT company in Jaipur, for instance, could utilize explainer movies to illustrate how their software solutions operate.
Product Demo Videos
Product demo films highlight the characteristics and advantages of your product. These videos are ideal for manufacturers, merchants, and e-commerce companies who want to showcase the distinctive features of their goods. A Jaipur furniture store might, for instance, produce a product demonstration film that demonstrates how to put together and use their items.
Testimonial Videos
Testimonials from customers give your brand more legitimacy and confidence. Businesses in Jaipur can gain the trust of potential clients by showcasing happy consumers who are sharing their positive experiences. Service-oriented sectors like healthcare, real estate, and hospitality can benefit greatly from testimonial videos.
Event Coverage
Festivals, business conferences, and lively events are some of Jaipur's most well-known features. By using video coverage, businesses can capture the enthusiasm and vitality of these events. In addition to being used as advertising, event recordings assist companies in showcasing their involvement and involvement in the neighborhood.
Social Media Videos
Short-form video content is more crucial than ever thanks to the growth of websites like Facebook, YouTube, and Instagram. Videos for social media are made to immediately attract attention and promote interaction. A video marketing agency in Jaipur can provide captivating social media content for several platforms, keeping your brand visible and relevant.
Animated Videos
Animation is a creative and adaptable medium that can be used to tell tales, describe procedures, or provide visually appealing material. For firms wishing to add a creative touch to their marketing campaigns or simplify complicated concepts, animated videos are ideal.
How to Choose the Right Video Marketing Agency in Jaipur
Selecting the right video marketing agency is essential for the success of your marketing efforts. Here are some tips to help you choose the best video marketing agency in Jaipur:
Portfolio and Experience
Look at the portfolio of the agency to determine the quality. Have they worked in different industries? They have produced different types of videos. If the agency has handled businesses like yours, it is likely that they understand your needs.
Client Testimonials
Look for testimonials and reviews from clients. Feedback from past clients can provide valuable insight into the agency's professionalism and communication skills, as well as its ability to deliver results.
Understanding of Your Industry
Working with an agency who understands your target audience and industry is important. The agency should be able create content that addresses your customer's pain points and speaks directly to them.
Creative Vision
The creativity of a video marketing agency is critical to the success and effectiveness of your campaign. You should look for an agency with innovative ideas, unique storytelling techniques, and fresh concepts.
Budget and ROI
Budget and expectations should be discussed upfront. Good agencies will explain their pricing structure and how they plan on maximizing your ROI. The goal is not just to produce videos, but to create videos that deliver results.
Keywordriser is a best video marketing agency in Jaipur, by video marketing keywordriser can unlock the full potential of this powerful medium. Whether you’re looking to build brand awareness, drive conversions, or educate your audience, video marketing offers a versatile and effective solution. It also provides many other services like digital marketing, website development, content creation etc. You can contact us today for more inquiry!
0 notes
Video
vimeo
Minimal Lower Thirds I Premiere Pro Motion Design from Antony Parker on Vimeo.
✔️ Get it here: templatesbravo.com/vh/item/minimal-lower-thirds-i-premiere-pro/55167959
Hello, Everyone!
Project features:
Premiere Pro CC2019 and above Simple duration control: Stretch title in timeline and choose duration In & Out animation Full Color control Tutorial included Free font included after purchase No plugins required Fully customizable titles Works with any Premiere Pro language (Expressions Universalized) Image and music track are not included Great soundtrack you can find here
TITLES FOR PREMIERE PRO / ESSENTIAL GRAPHICS PANEL / MOGRT
FINAL CUT PRO X & MOTION PROJECTS
AFTER EFFECTS PROJECTS
TITLES & LOWER THIRDS
OPENERS & PRODUCT PROMO (For After Effects)
MUSIC EVENT PROMO
STOMP INTRO
0 notes
Video
youtube
Elemento 3D: Cómo crear un efecto de desintegración de partículas
1 note
·
View note
Text
How to Create Stunning YouTube Videos with Basic Editing Skills

Introduction
In today’s digital era, YouTube has become a powerful platform for content creators, businesses, and influencers. Whether you want to start a vlogging channel, share tutorials, or promote a brand, video editing plays a crucial role in making your content stand out. But the good news is, you don’t need to be an expert to create visually appealing videos. With basic editing skills and the right approach, anyone can produce professional-quality content.
1. Planning Your Video Content
Before jumping into editing, it’s essential to plan your video structure. A well-organized script and storyboard can make the editing process smoother. Decide on the video type, format, and flow to maintain consistency in your content.
Define your goal – entertainment, education, promotion, etc.
Create a script or outline for a clear flow.
Gather necessary footage, images, and background music.
2. Choosing the Right Video Editing Software
Beginners should start with easy-to-use video editing software that provides essential tools without overwhelming features. Here are some top choices:
Adobe Premiere Pro – Industry-standard software for professional editing.
Blender – Great for animation and 3D video editing.
Adobe After Effects – Ideal for adding motion graphics and visual effects.
Adobe Animate – Best for 2D animations and transitions.
DaVinci Resolve – Offers free advanced color grading and editing tools.
For students looking to build expertise in software like Adobe Premiere Pro, After Effects, Blender, and Adobe Animate, several training institutes provide structured courses to master these skills.
3. Essential Video Editing Techniques
Even with basic skills, you can significantly enhance your video quality using these editing techniques:
A. Cutting & Trimming
Removing unnecessary parts and keeping only the essential segments improves video engagement. Jump cuts help maintain a smooth flow.
B. Adding Transitions & Effects
Simple transitions like fade-in, fade-out, and cross dissolve make videos more engaging. Visual effects through tools like VFX software enhance production value.
C. Color Correction & Grading
Adjusting brightness, contrast, and saturation creates a more cinematic feel. Color grading in Blender and Adobe After Effects can give your video a professional touch.
D. Background Music & Sound Editing
Proper audio balancing and background music enhance storytelling. Sound editing training helps in eliminating noise and improving sound clarity.
4. Optimizing Videos for YouTube
Editing is just one part; optimizing your video for YouTube’s algorithm ensures better reach and engagement.
Use Catchy Thumbnails – High-quality thumbnails attract more clicks.
Write Engaging Titles & Descriptions – Incorporate keywords naturally.
Add Subtitles & Captions – Improves accessibility and audience retention.
Optimize Video Length – Keep it between 5-10 minutes for better engagement.
Use Tags & Hashtags – Helps YouTube categorize your content better.
5. Exporting & Uploading in the Right Format
Ensure your video is exported in the highest quality without large file sizes. The recommended settings for YouTube are:
Resolution: 1920x1080 (Full HD) or higher.
Format: MP4 with H.264 codec.
Bitrate: 8 Mbps for HD and 12 Mbps for 4K videos.
Frame Rate: 24-30 fps for a cinematic look.
6. Practice & Improve Your Editing Skills
Learning video editing is a continuous process. The more you practice, the better you get. Exploring different styles and experimenting with effects can help you develop a unique editing approach.
For students eager to enhance their video editing skills, enrolling in a video editing training institute can provide hands-on experience and expert guidance. Institutes offer courses in Adobe Premiere Pro, After Effects, Blender, and VFX, which can be highly beneficial for aspiring editors.
Final Thoughts
Creating high-quality YouTube videos doesn’t require expensive equipment or professional experience. By mastering basic video editing skills and consistently improving, you can produce compelling content that stands out. With proper training in VFX, Adobe Animate, and Blender, you can further refine your skills and enhance your career prospects in the video editing industry.
If you're passionate about learning video editing, consider exploring training programs that provide in-depth knowledge and hands-on experience in leading software. Whether you’re in Yamuna Vihar, Uttam Nagar, or nearby areas, professional courses are available to help you excel in this creative field.
Start your journey today and bring your video ideas to life with professional-level editing! Visit us:
Suggested links:-
Adobe Premiere Pro
Adobe After Effects
#learn video editing#creative video editing#video editing services#video editing software#video editing#video editor#content marketing#Video editing course#Video editing course in yamuna vihar#video editing course in uttam nagar
0 notes