#adobe photoshop 2021
Explore tagged Tumblr posts
Photo
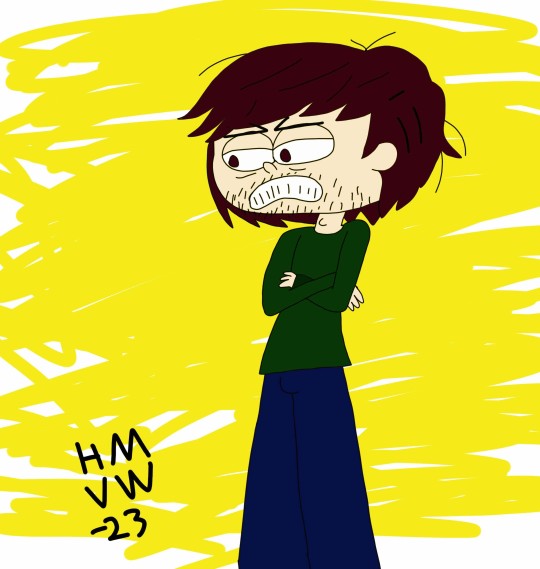
Here’s how I would look as a guy.
Not much different, except for the stubble and RBF.
#art#doodle#digital doodle#adobe photoshop#adobe photoshop 2021#thought experiment#gender bender#rbf#2023 art#hmvw2015#hannah van weelden#female artists on tumblr#artists on tumblr#more to come
3 notes
·
View notes
Text
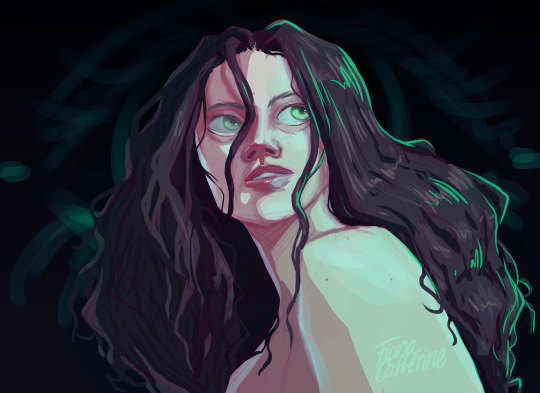


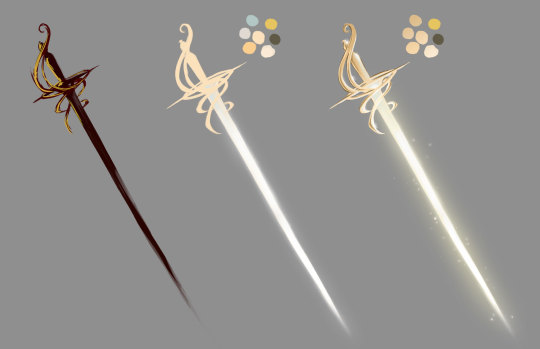
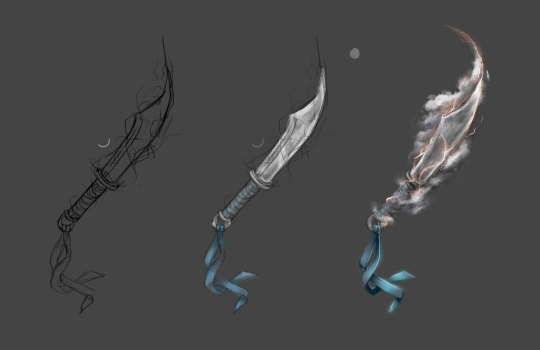
Digital Painting Dump - 2021
#adobe photoshop#digital painting#brushes#concept art#swordtember#studies#illustration#fantasy#zombiepunkrat#noai#2021 art
12 notes
·
View notes
Text
I’m finally done. This is as good as it will get since I lost a work day. I enjoy the card. (Front. Inside. Back)

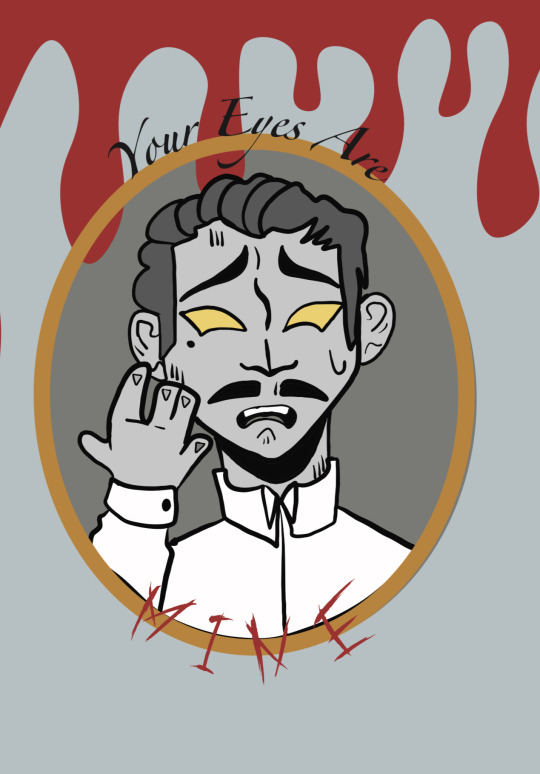

#arthur lester malevolent#john doe malevolent#malevolent#malevolent podcast#adobe illustration 2021#I hate adobe with all of my heart#I could’ve done this in ten minuets in photoshop#go to bed moth#moth making art
20 notes
·
View notes
Text
Here's the Science behind a Balanced Typography Logo Design

Balanced typography logo design is a technique used to create visually appealing logos by carefully selecting and arranging the typography or typefaces used in the design. The goal of balanced typography logo design is to achieve a harmonious balance between the different elements of the logo, including the typeface, color, size, and spacing.
You Just Imagine, We'll Enhance It!
If you're looking for a professional logo design for your new business or want to upgrade your existing business logo then we can help.
We're a graphic design company that specializes in creating custom logos, business cards, posters, and more. We have built an entire campaign around our design process to show people what they can expect and why they should work with us.
#design#logo#graphic design#logo design#illustration#minimalist logo#graphics#minimal logo#logobrand#typography#typo#adobe photoshop#adobe illustration 2021#adobeillustrator#adobe ai
2 notes
·
View notes
Text
the soldiers on reddit who keep fighting the adobe genuine message boss by updating the kill list constantly are so fucken brave i salute you for your service🫡
#is anyone else having trouble with adobe apps lately? or is it just me?#even the 2021 version i downloaded years ago ToT fell under line of fire ToT#but fear not the soldiers on the front have given me a kill list and now i can draw my blorbos kissing in peace#taro speaks#adobe#photoshop
1 note
·
View note
Text

#kashitij vivan institute#photoshop#image#googel#large images#background change#illustrator#Adobe Illustratorwelcome screen 2021#reffrence
0 notes
Text
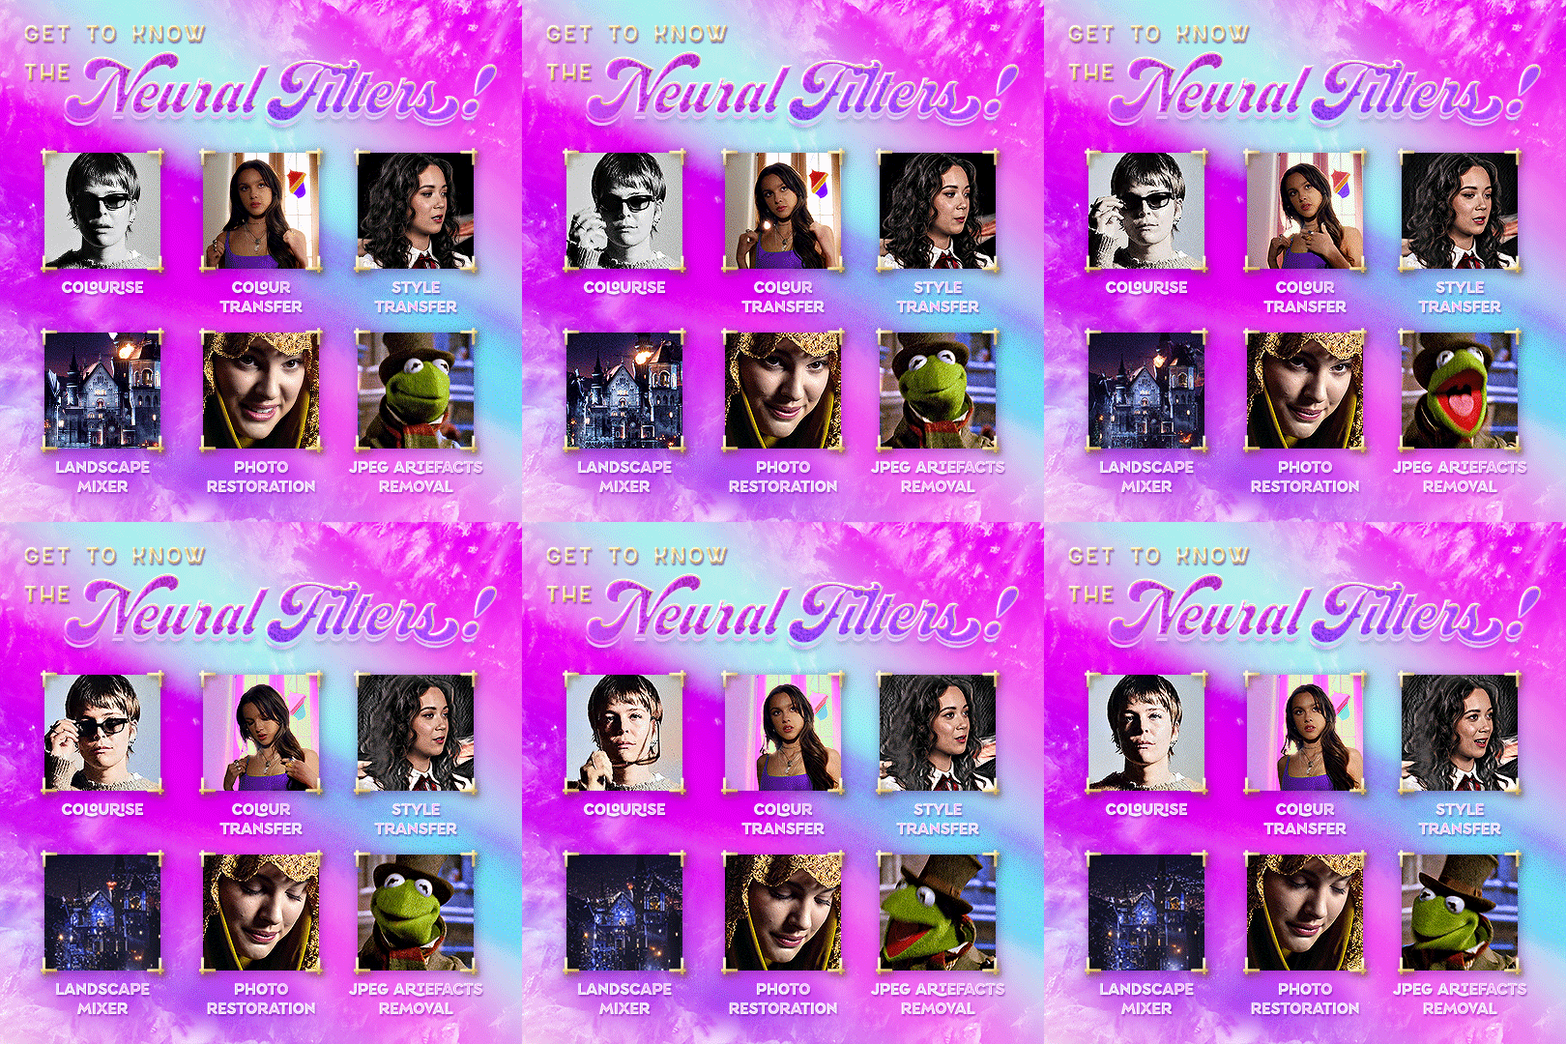


Neural Filters Tutorial for Gifmakers by @antoniosvivaldi
Hi everyone! In light of my blog’s 10th birthday, I’m delighted to reveal my highly anticipated gifmaking tutorial using Neural Filters - a very powerful collection of filters that really broadened my scope in gifmaking over the past 12 months.
Before I get into this tutorial, I want to thank @laurabenanti, @maines , @cobbbvanth, and @cal-kestis for their unconditional support over the course of my journey of investigating the Neural Filters & their valuable inputs on the rendering performance!
In this tutorial, I will outline what the Photoshop Neural Filters do and how I use them in my workflow - multiple examples will be provided for better clarity. Finally, I will talk about some known performance issues with the filters & some feasible workarounds.
Tutorial Structure:
Meet the Neural Filters: What they are and what they do
Why I use Neural Filters? How I use Neural Filters in my giffing workflow
Getting started: The giffing workflow in a nutshell and installing the Neural Filters
Applying Neural Filters onto your gif: Making use of the Neural Filters settings; with multiple examples
Testing your system: recommended if you’re using Neural Filters for the first time
Rendering performance: Common Neural Filters performance issues & workarounds
For quick reference, here are the examples that I will show in this tutorial:
Example 1: Image Enhancement | improving the image quality of gifs prepared from highly compressed video files
Example 2: Facial Enhancement | enhancing an individual's facial features
Example 3: Colour Manipulation | colourising B&W gifs for a colourful gifset
Example 4: Artistic effects | transforming landscapes & adding artistic effects onto your gifs
Example 5: Putting it all together | my usual giffing workflow using Neural Filters
What you need & need to know:
Software: Photoshop 2021 or later (recommended: 2023 or later)*
Hardware: 8GB of RAM; having a supported GPU is highly recommended*
Difficulty: Advanced (requires a lot of patience); knowledge in gifmaking and using video timeline assumed
Key concepts: Smart Layer / Smart Filters
Benchmarking your system: Neural Filters test files**
Supplementary materials: Tutorial Resources / Detailed findings on rendering gifs with Neural Filters + known issues***
*I primarily gif on an M2 Max MacBook Pro that's running Photoshop 2024, but I also have experiences gifmaking on few other Mac models from 2012 ~ 2023.
**Using Neural Filters can be resource intensive, so it’s helpful to run the test files yourself. I’ll outline some known performance issues with Neural Filters and workarounds later in the tutorial.
***This supplementary page contains additional Neural Filters benchmark tests and instructions, as well as more information on the rendering performance (for Apple Silicon-based devices) when subject to heavy Neural Filters gifmaking workflows
Tutorial under the cut. Like / Reblog this post if you find this tutorial helpful. Linking this post as an inspo link will also be greatly appreciated!
1. Meet the Neural Filters!
Neural Filters are powered by Adobe's machine learning engine known as Adobe Sensei. It is a non-destructive method to help streamline workflows that would've been difficult and/or tedious to do manually.
Here are the Neural Filters available in Photoshop 2024:
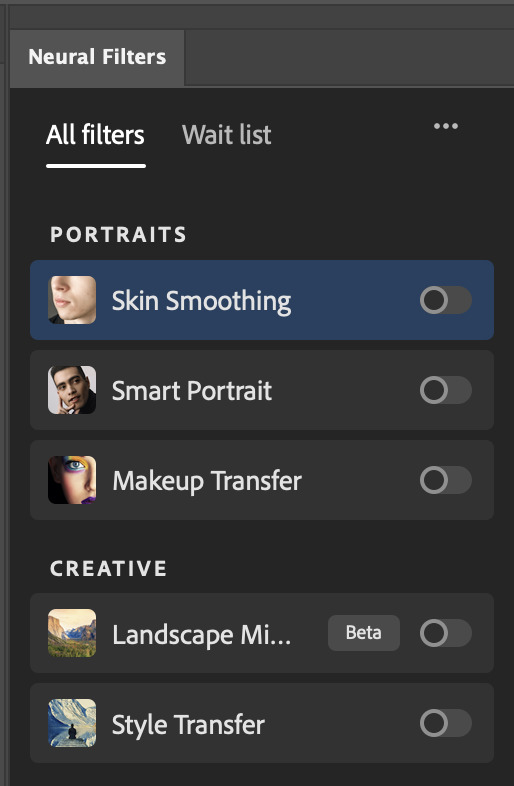

Skin Smoothing: Removes blemishes on the skin
Smart Portrait: This a cloud-based filter that allows you to change the mood, facial age, hair, etc using the sliders+
Makeup Transfer: Applies the makeup (from a reference image) to the eyes & mouth area of your image
Landscape Mixer: Transforms the landscape of your image (e.g. seasons & time of the day, etc), based on the landscape features of a reference image
Style Transfer: Applies artistic styles e.g. texturings (from a reference image) onto your image
Harmonisation: Applies the colour balance of your image based on the lighting of the background image+
Colour Transfer: Applies the colour scheme (of a reference image) onto your image
Colourise: Adds colours onto a B&W image
Super Zoom: Zoom / crop an image without losing resolution+
Depth Blur: Blurs the background of the image
JPEG Artefacts Removal: Removes artefacts caused by JPEG compression
Photo Restoration: Enhances image quality & facial details
+These three filters aren't used in my giffing workflow. The cloud-based nature of Smart Portrait leads to disjointed looking frames. For Harmonisation, applying this on a gif causes Neural Filter timeout error. Finally, Super Zoom does not currently support output as a Smart Filter
If you're running Photoshop 2021 or earlier version of Photoshop 2022, you will see a smaller selection of Neural Filters:

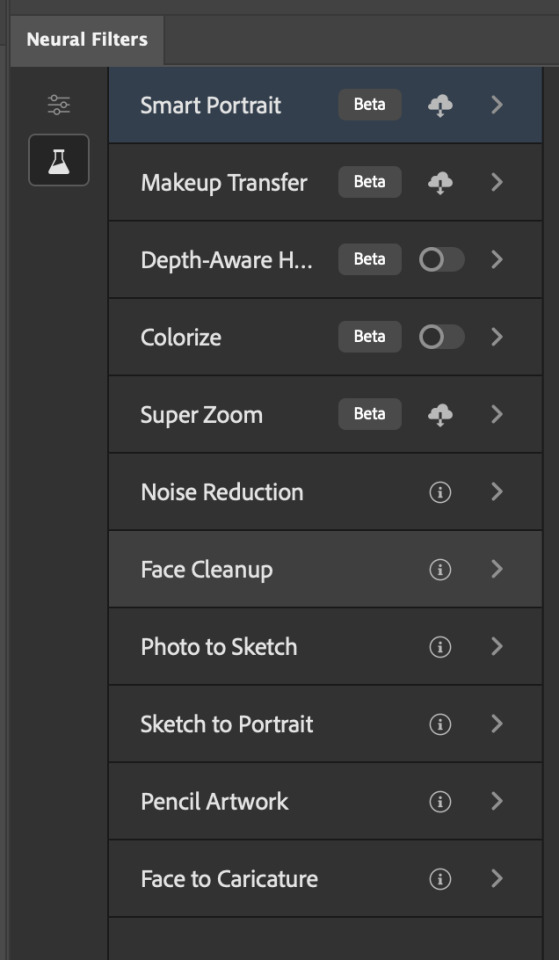
Things to be aware of:
You can apply up to six Neural Filters at the same time
Filters where you can use your own reference images: Makeup Transfer (portraits only), Landscape Mixer, Style Transfer (not available in Photoshop 2021), and Colour Transfer
Later iterations of Photoshop 2023 & newer: The first three default presets for Landscape Mixer and Colour Transfer are currently broken.
2. Why I use Neural Filters?
Here are my four main Neural Filters use cases in my gifmaking process. In each use case I'll list out the filters that I use:
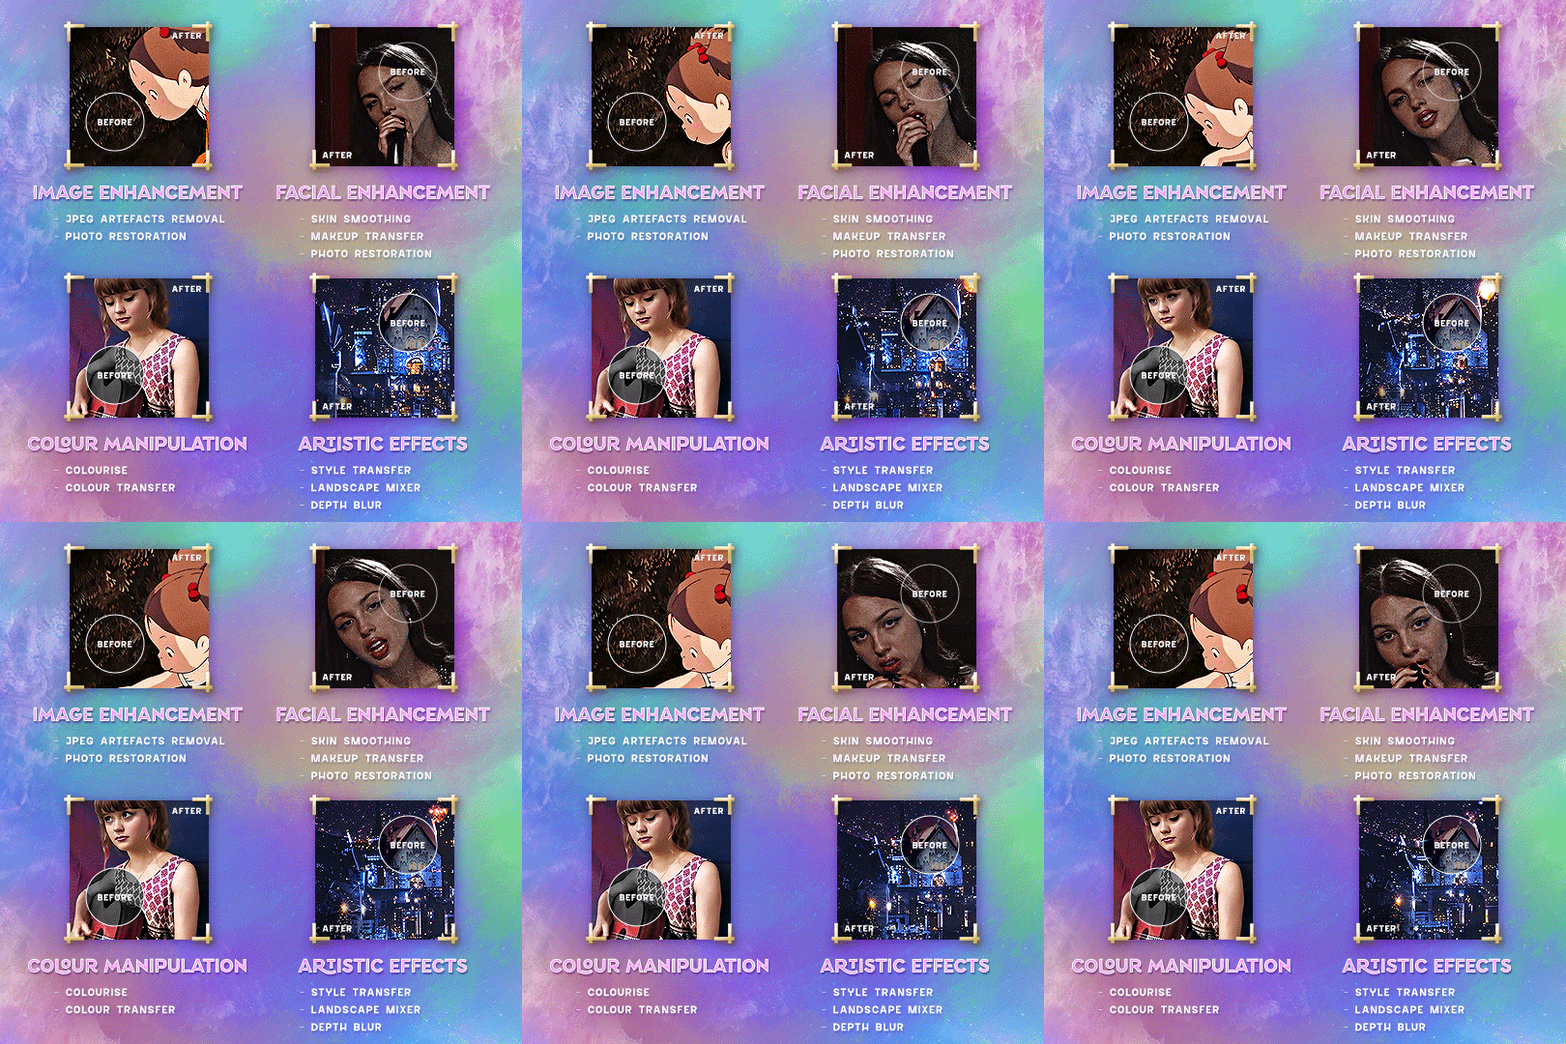
Enhancing Image Quality:
Common wisdom is to find the highest quality video to gif from for a media release & avoid YouTube whenever possible. However for smaller / niche media (e.g. new & upcoming musical artists), prepping gifs from highly compressed YouTube videos is inevitable.
So how do I get around with this? I have found Neural Filters pretty handy when it comes to both correcting issues from video compression & enhancing details in gifs prepared from these highly compressed video files.
Filters used: JPEG Artefacts Removal / Photo Restoration
Facial Enhancement:
When I prepare gifs from highly compressed videos, something I like to do is to enhance the facial features. This is again useful when I make gifsets from compressed videos & want to fill up my final panel with a close-up shot.
Filters used: Skin Smoothing / Makeup Transfer / Photo Restoration (Facial Enhancement slider)
Colour Manipulation:
Neural Filters is a powerful way to do advanced colour manipulation - whether I want to quickly transform the colour scheme of a gif or transform a B&W clip into something colourful.
Filters used: Colourise / Colour Transfer
Artistic Effects:
This is one of my favourite things to do with Neural Filters! I enjoy using the filters to create artistic effects by feeding textures that I've downloaded as reference images. I also enjoy using these filters to transform the overall the atmosphere of my composite gifs. The gifsets where I've leveraged Neural Filters for artistic effects could be found under this tag on usergif.
Filters used: Landscape Mixer / Style Transfer / Depth Blur
How I use Neural Filters over different stages of my gifmaking workflow:
I want to outline how I use different Neural Filters throughout my gifmaking process. This can be roughly divided into two stages:
Stage I: Enhancement and/or Colourising | Takes place early in my gifmaking process. I process a large amount of component gifs by applying Neural Filters for enhancement purposes and adding some base colourings.++
Stage II: Artistic Effects & more Colour Manipulation | Takes place when I'm assembling my component gifs in the big PSD / PSB composition file that will be my final gif panel.
I will walk through this in more detail later in the tutorial.
++I personally like to keep the size of the component gifs in their original resolution (a mixture of 1080p & 4K), to get best possible results from the Neural Filters and have more flexibility later on in my workflow. I resize & sharpen these gifs after they're placed into my final PSD composition files in Tumblr dimensions.
3. Getting started
The essence is to output Neural Filters as a Smart Filter on the smart object when working with the Video Timeline interface. Your workflow will contain the following steps:
Prepare your gif
In the frame animation interface, set the frame delay to 0.03s and convert your gif to the Video Timeline
In the Video Timeline interface, go to Filter > Neural Filters and output to a Smart Filter
Flatten or render your gif (either approach is fine). To flatten your gif, play the "flatten" action from the gif prep action pack. To render your gif as a .mov file, go to File > Export > Render Video & use the following settings.

Setting up:
o.) To get started, prepare your gifs the usual way - whether you screencap or clip videos. You should see your prepared gif in the frame animation interface as follows:

Note: As mentioned earlier, I keep the gifs in their original resolution right now because working with a larger dimension document allows more flexibility later on in my workflow. I have also found that I get higher quality results working with more pixels. I eventually do my final sharpening & resizing when I fit all of my component gifs to a main PSD composition file (that's of Tumblr dimension).
i.) To use Smart Filters, convert your gif to a Smart Video Layer.
As an aside, I like to work with everything in 0.03s until I finish everything (then correct the frame delay to 0.05s when I upload my panels onto Tumblr).
For convenience, I use my own action pack to first set the frame delay to 0.03s (highlighted in yellow) and then convert to timeline (highlighted in red) to access the Video Timeline interface. To play an action, press the play button highlighted in green.

Once you've converted this gif to a Smart Video Layer, you'll see the Video Timeline interface as follows:

ii.) Select your gif (now as a Smart Layer) and go to Filter > Neural Filters
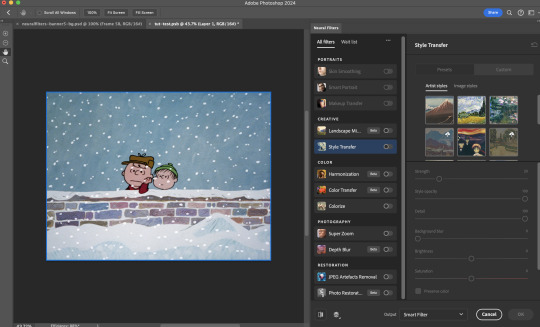
Installing Neural Filters:
Install the individual Neural Filters that you want to use. If the filter isn't installed, it will show a cloud symbol (highlighted in yellow). If the filter is already installed, it will show a toggle button (highlighted in green)
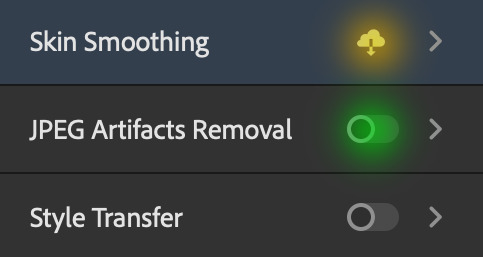
When you toggle this button, the Neural Filters preview window will look like this (where the toggle button next to the filter that you use turns blue)

4. Using Neural Filters
Once you have installed the Neural Filters that you want to use in your gif, you can toggle on a filter and play around with the sliders until you're satisfied. Here I'll walkthrough multiple concrete examples of how I use Neural Filters in my giffing process.
Example 1: Image enhancement | sample gifset
This is my typical Stage I Neural Filters gifmaking workflow. When giffing older or more niche media releases, my main concern is the video compression that leads to a lot of artefacts in the screencapped / video clipped gifs.
To fix the artefacts from compression, I go to Filter > Neural Filters, and toggle JPEG Artefacts Removal filter. Then I choose the strength of the filter (boxed in green), output this as a Smart Filter (boxed in yellow), and press OK (boxed in red).
Note: The filter has to be fully processed before you could press the OK button!
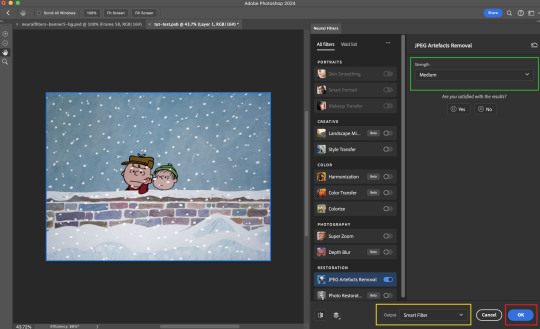
After applying the Neural Filters, you'll see "Neural Filters" under the Smart Filters property of the smart layer

Flatten / render your gif
Example 2: Facial enhancement | sample gifset
This is my routine use case during my Stage I Neural Filters gifmaking workflow. For musical artists (e.g. Maisie Peters), YouTube is often the only place where I'm able to find some videos to prepare gifs from. However even the highest resolution video available on YouTube is highly compressed.
Go to Filter > Neural Filters and toggle on Photo Restoration. If Photoshop recognises faces in the image, there will be a "Facial Enhancement" slider under the filter settings.

Play around with the Photo Enhancement & Facial Enhancement sliders. You can also expand the "Adjustment" menu make additional adjustments e.g. remove noises and reducing different types of artefacts.

Once you're happy with the results, press OK and then flatten / render your gif.
Example 3: Colour Manipulation | sample gifset
Want to make a colourful gifset but the source video is in B&W? This is where Colourise from Neural Filters comes in handy! This same colourising approach is also very helpful for colouring poor-lit scenes as detailed in this tutorial.
Here's a B&W gif that we want to colourise:

Highly recommended: add some adjustment layers onto the B&W gif to improve the contrast & depth. This will give you higher quality results when you colourise your gif.
Go to Filter > Neural Filters and toggle on Colourise.
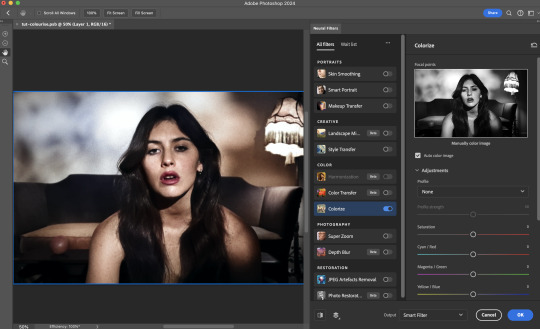
Make sure "Auto colour image" is enabled.
Play around with further adjustments e.g. colour balance, until you're satisfied then press OK.
Important: When you colourise a gif, you need to double check that the resulting skin tone is accurate to real life. I personally go to Google Images and search up photoshoots of the individual / character that I'm giffing for quick reference.
Add additional adjustment layers until you're happy with the colouring of the skin tone.
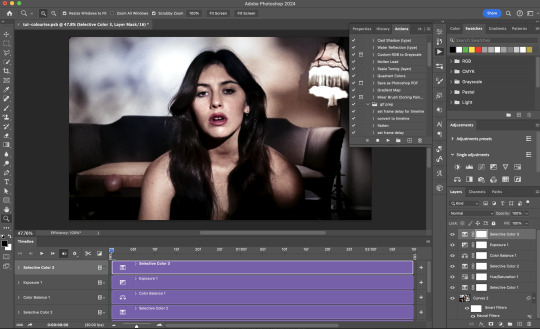
Once you're happy with the additional adjustments, flatten / render your gif. And voila!

Note: For Colour Manipulation, I use Colourise in my Stage I workflow and Colour Transfer in my Stage II workflow to do other types of colour manipulations (e.g. transforming the colour scheme of the component gifs)
Example 4: Artistic Effects | sample gifset
This is where I use Neural Filters for the bulk of my Stage II workflow: the most enjoyable stage in my editing process!
Normally I would be working with my big composition files with multiple component gifs inside it. To begin the fun, drag a component gif (in PSD file) to the main PSD composition file.
Resize this gif in the composition file until you're happy with the placement

Duplicate this gif. Sharpen the bottom layer (highlighted in yellow), and then select the top layer (highlighted in green) & go to Filter > Neural Filters

I like to use Style Transfer and Landscape Mixer to create artistic effects from Neural Filters. In this particular example, I've chosen Landscape Mixer
Select a preset or feed a custom image to the filter (here I chose a texture that I've on my computer)
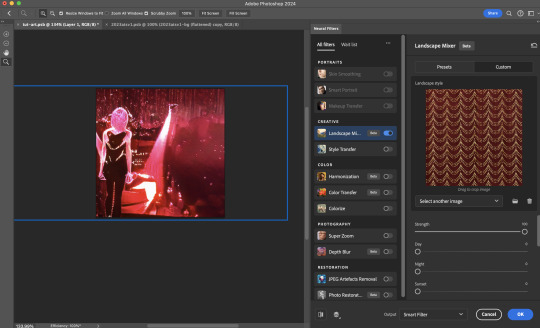
Play around with the different sliders e.g. time of the day / seasons
Important: uncheck "Harmonise Subject" & "Preserve Subject" - these two settings are known to cause performance issues when you render a multiframe smart object (e.g. for a gif)
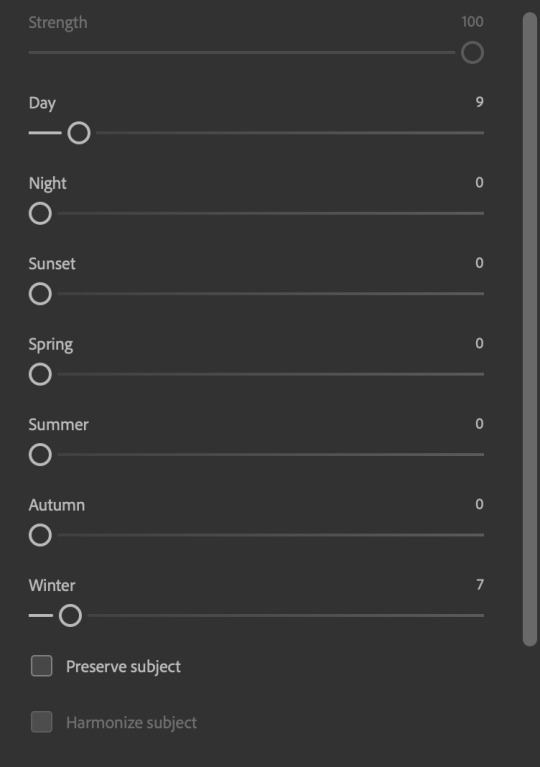
Once you're happy with the artistic effect, press OK
To ensure you preserve the actual subject you want to gif (bc Preserve Subject is unchecked), add a layer mask onto the top layer (with Neural Filters) and mask out the facial region. You might need to play around with the Layer Mask Position keyframes or Rotoscope your subject in the process.
After you're happy with the masking, flatten / render this composition file and voila!

Example 5: Putting it all together | sample gifset
Let's recap on the Neural Filters gifmaking workflow and where Stage I and Stage II fit in my gifmaking process:
i. Preparing & enhancing the component gifs
Prepare all component gifs and convert them to smart layers
Stage I: Add base colourings & apply Photo Restoration / JPEG Artefacts Removal to enhance the gif's image quality
Flatten all of these component gifs and convert them back to Smart Video Layers (this process can take a lot of time)
Some of these enhanced gifs will be Rotoscoped so this is done before adding the gifs to the big PSD composition file
ii. Setting up the big PSD composition file
Make a separate PSD composition file (Ctrl / Cmmd + N) that's of Tumblr dimension (e.g. 540px in width)
Drag all of the component gifs used into this PSD composition file
Enable Video Timeline and trim the work area
In the composition file, resize / move the component gifs until you're happy with the placement & sharpen these gifs if you haven't already done so
Duplicate the layers that you want to use Neural Filters on
iii. Working with Neural Filters in the PSD composition file
Stage II: Neural Filters to create artistic effects / more colour manipulations!
Mask the smart layers with Neural Filters to both preserve the subject and avoid colouring issues from the filters
Flatten / render the PSD composition file: the more component gifs in your composition file, the longer the exporting will take. (I prefer to render the composition file into a .mov clip to prevent overriding a file that I've spent effort putting together.)
Note: In some of my layout gifsets (where I've heavily used Neural Filters in Stage II), the rendering time for the panel took more than 20 minutes. This is one of the rare instances where I was maxing out my computer's memory.
Useful things to take note of:
Important: If you're using Neural Filters for Colour Manipulation or Artistic Effects, you need to take a lot of care ensuring that the skin tone of nonwhite characters / individuals is accurately coloured
Use the Facial Enhancement slider from Photo Restoration in moderation, if you max out the slider value you risk oversharpening your gif later on in your gifmaking workflow
You will get higher quality results from Neural Filters by working with larger image dimensions: This gives Neural Filters more pixels to work with. You also get better quality results by feeding higher resolution reference images to the Neural Filters.
Makeup Transfer is more stable when the person / character has minimal motion in your gif
You might get unexpected results from Landscape Mixer if you feed a reference image that don't feature a distinctive landscape. This is not always a bad thing: for instance, I have used this texture as a reference image for Landscape Mixer, to create the shimmery effects as seen in this gifset
5. Testing your system
If this is the first time you're applying Neural Filters directly onto a gif, it will be helpful to test out your system yourself. This will help:
Gauge the expected rendering time that you'll need to wait for your gif to export, given specific Neural Filters that you've used
Identify potential performance issues when you render the gif: this is important and will determine whether you will need to fully playback your gif before flattening / rendering the file.
Understand how your system's resources are being utilised: Inputs from Windows PC users & Mac users alike are welcome!
About the Neural Filters test files:
Contains six distinct files, each using different Neural Filters
Two sizes of test files: one copy in full HD (1080p) and another copy downsized to 540px
One folder containing the flattened / rendered test files
How to use the Neural Filters test files:
What you need:
Photoshop 2022 or newer (recommended: 2023 or later)
Install the following Neural Filters: Landscape Mixer / Style Transfer / Colour Transfer / Colourise / Photo Restoration / Depth Blur
Recommended for some Apple Silicon-based MacBook Pro models: Enable High Power Mode
How to use the test files:
For optimal performance, close all background apps
Open a test file
Flatten the test file into frames (load this action pack & play the “flatten” action)
Take note of the time it takes until you’re directed to the frame animation interface
Compare the rendered frames to the expected results in this folder: check that all of the frames look the same. If they don't, you will need to fully playback the test file in full before flattening the file.†
Re-run the test file without the Neural Filters and take note of how long it takes before you're directed to the frame animation interface
Recommended: Take note of how your system is utilised during the rendering process (more info here for MacOS users)
†This is a performance issue known as flickering that I will discuss in the next section. If you come across this, you'll have to playback a gif where you've used Neural Filters (on the video timeline) in full, prior to flattening / rendering it.
Factors that could affect the rendering performance / time (more info):
The number of frames, dimension, and colour bit depth of your gif
If you use Neural Filters with facial recognition features, the rendering time will be affected by the number of characters / individuals in your gif
Most resource intensive filters (powered by largest machine learning models): Landscape Mixer / Photo Restoration (with Facial Enhancement) / and JPEG Artefacts Removal
Least resource intensive filters (smallest machine learning models): Colour Transfer / Colourise
The number of Neural Filters that you apply at once / The number of component gifs with Neural Filters in your PSD file
Your system: system memory, the GPU, and the architecture of the system's CPU+++
+++ Rendering a gif with Neural Filters demands a lot of system memory & GPU horsepower. Rendering will be faster & more reliable on newer computers, as these systems have CPU & GPU with more modern instruction sets that are geared towards machine learning-based tasks.
Additionally, the unified memory architecture of Apple Silicon M-series chips are found to be quite efficient at processing Neural Filters.
6. Performance issues & workarounds
Common Performance issues:
I will discuss several common issues related to rendering or exporting a multi-frame smart object (e.g. your composite gif) that uses Neural Filters below. This is commonly caused by insufficient system memory and/or the GPU.
Flickering frames: in the flattened / rendered file, Neural Filters aren't applied to some of the frames+-+
Scrambled frames: the frames in the flattened / rendered file isn't in order
Neural Filters exceeded the timeout limit error: this is normally a software related issue
Long export / rendering time: long rendering time is expected in heavy workflows
Laggy Photoshop / system interface: having to wait quite a long time to preview the next frame on the timeline
Issues with Landscape Mixer: Using the filter gives ill-defined defined results (Common in older systems)--
Workarounds:
Workarounds that could reduce unreliable rendering performance & long rendering time:
Close other apps running in the background
Work with smaller colour bit depth (i.e. 8-bit rather than 16-bit)
Downsize your gif before converting to the video timeline-+-
Try to keep the number of frames as low as possible
Avoid stacking multiple Neural Filters at once. Try applying & rendering the filters that you want one by one
Specific workarounds for specific issues:
How to resolve flickering frames: If you come across flickering, you will need to playback your gif on the video timeline in full to find the frames where the filter isn't applied. You will need to select all of the frames to allow Photoshop to reprocess these, before you render your gif.+-+
What to do if you come across Neural Filters timeout error? This is caused by several incompatible Neural Filters e.g. Harmonisation (both the filter itself and as a setting in Landscape Mixer), Scratch Reduction in Photo Restoration, and trying to stack multiple Neural Filters with facial recognition features.
If the timeout error is caused by stacking multiple filters, a feasible workaround is to apply the Neural Filters that you want to use one by one over multiple rendering sessions, rather all of them in one go.
+-+This is a very common issue for Apple Silicon-based Macs. Flickering happens when a gif with Neural Filters is rendered without being previously played back in the timeline.
This issue is likely related to the memory bandwidth & the GPU cores of the chips, because not all Apple Silicon-based Macs exhibit this behaviour (i.e. devices equipped with Max / Ultra M-series chips are mostly unaffected).
-- As mentioned in the supplementary page, Landscape Mixer requires a lot of GPU horsepower to be fully rendered. For older systems (pre-2017 builds), there are no workarounds other than to avoid using this filter.
-+- For smaller dimensions, the size of the machine learning models powering the filters play an outsized role in the rendering time (i.e. marginal reduction in rendering time when downsizing 1080p file to Tumblr dimensions). If you use filters powered by larger models e.g. Landscape Mixer and Photo Restoration, you will need to be very patient when exporting your gif.
7. More useful resources on using Neural Filters
Creating animations with Neural Filters effects | Max Novak
Using Neural Filters to colour correct by @edteachs
I hope this is helpful! If you have any questions or need any help related to the tutorial, feel free to send me an ask 💖
#photoshop tutorial#gif tutorial#dearindies#usernik#useryoshi#usershreyu#userisaiah#userroza#userrobin#userraffa#usercats#userriel#useralien#userjoeys#usertj#alielook#swearphil#*#my resources#my tutorials
509 notes
·
View notes
Text
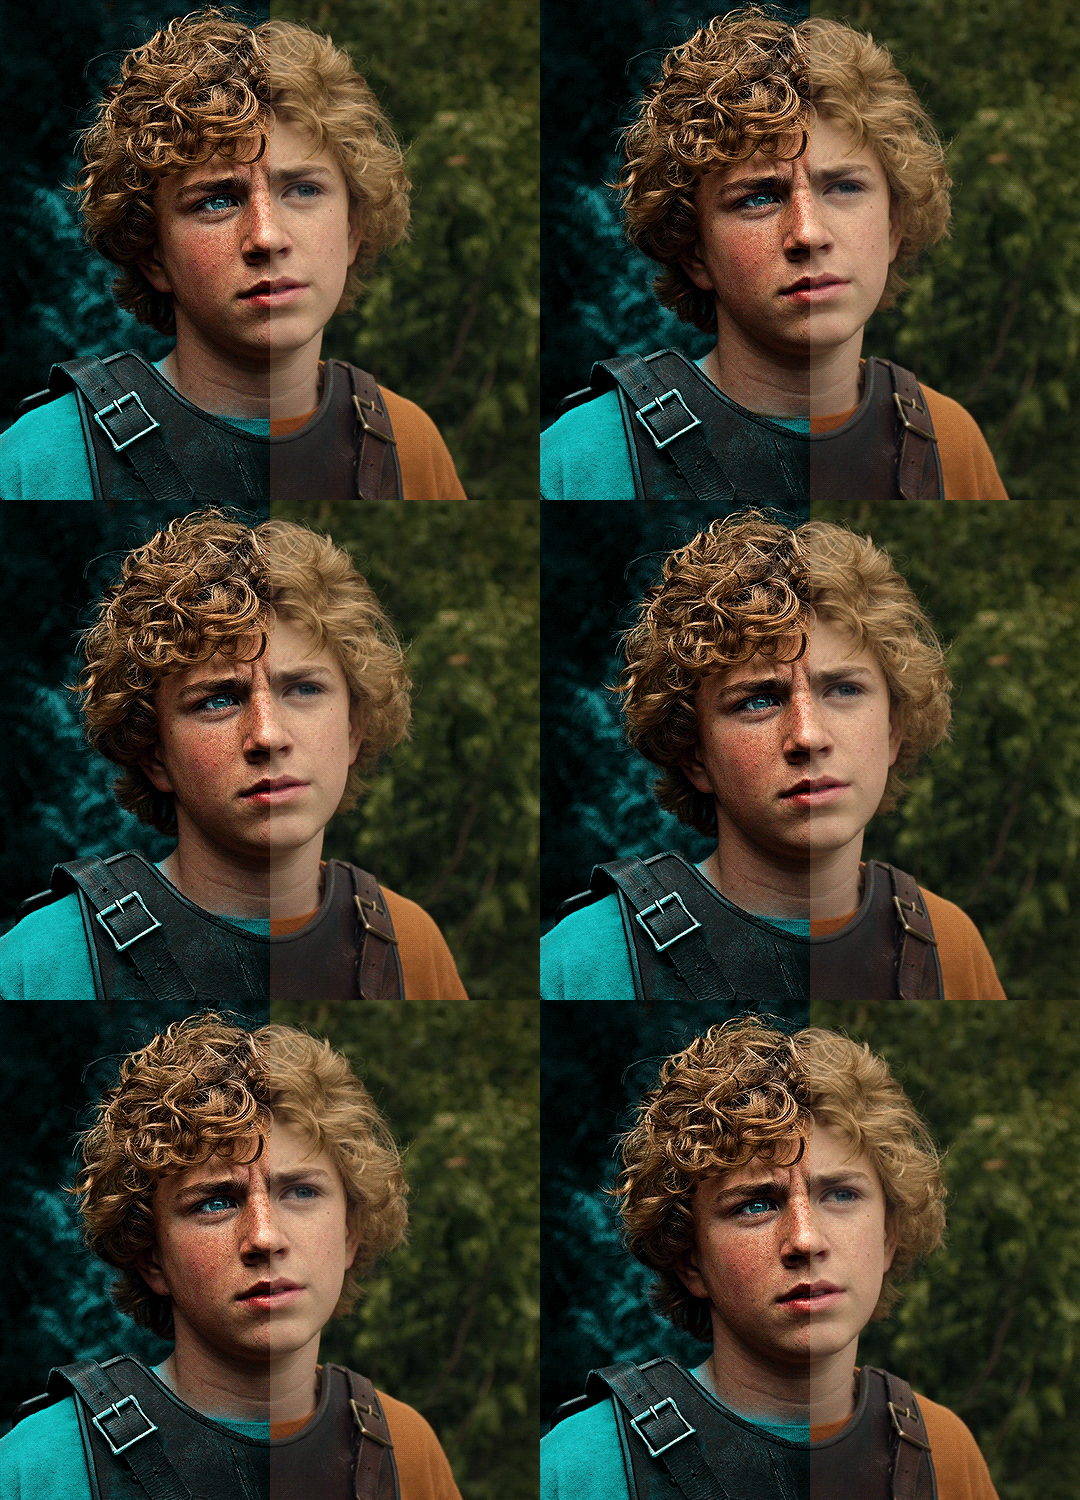
The silent art of gif making
The gif above has 32 layers plus 6 that aren't shown because this is part of a larger edit. I wanted to share it to give everyone a glimpse of the art of gif making and how long it usually takes for me to make something like this. This one took me about an hour and a half but only because I couldn't get the shade of blue right.
I use Adobe Photoshop 2021 and my computer doesn't have a large memory space (I don't know what to call it) so usually most of psds get deleted because I'm too lazy to get a hard drive. It doesn't really bother me that much because I like the art so when it's done, it's done. Off to somewhere else it goes.
Here are the layers:

Everything is neat and organized in folders because I like it that way. I prefer to edit it in timeline but others edit each frame. There's a layer not shown (Layer 4 is not visible) and it's the vector art. Here it is:
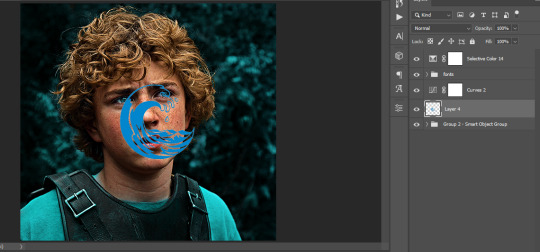
Now it is visible. I don't plan to make this a tutorial, but if you're interested I'd love to share a few tricks about it. I'm pretty new to the colors in gifmaking but the rest is simple to understand. Here, I just want to show how much work it takes to make it.
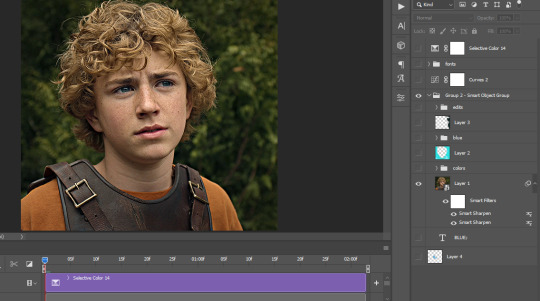
I opened Group 2 and here's the base gif. I already sharpened and sized it correctly but that's about it. Let's open the base coloring next.
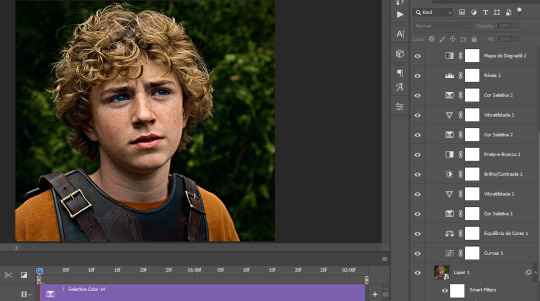
Yay! Now it looks pretty! The edits are in Portuguese but it doesn't matter. There's a silent art of adding layers depending on how you want the gif to look but you get used to it. The order matters and you can add multiple layers of the same thing (for eg. multiple layers of levels or curves or exposure).
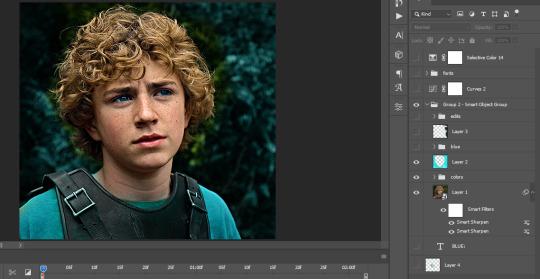
This was pretty much my first experiment with coloring so I don't know what I'm doing (this happens a lot with any art form but gifmaking exceeds in DIYing your way to the finished product) but I didn't want to mess up his hair, that's why the blue color is like that. Blue is easy to work with because there's little on the skin (different from red and yellow but that's color theory). I painted the layers like that and put it on screen, now let's correct how the rest looks.
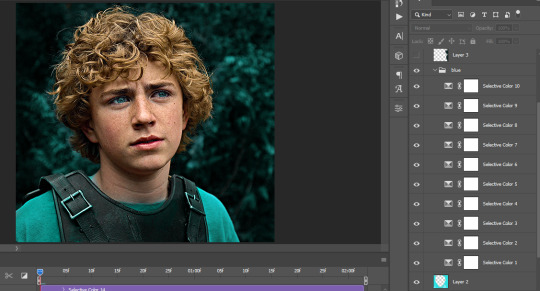
I was stuck trying to get the right teal shade of blue so yes, those are 10 layers of selective color mostly on cyan blue. We fixed his hair (yay!) we could've probably fixed the blue on his neck too but I was lazy. This is close to what I wanted so let's roll with that.
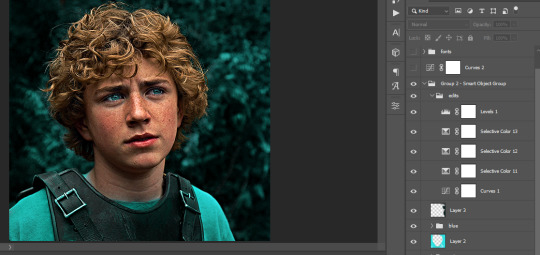
BUT I wanted his freckles to show, so let's edit a little bit more. Now his hair is more vibrant and his skin has red tones, which accentuates the blues and his eyes (exactly what I wanted!). That lost Layer 2 was me trying to fix some shadows in the background but in the end, it didn't make such a difference.
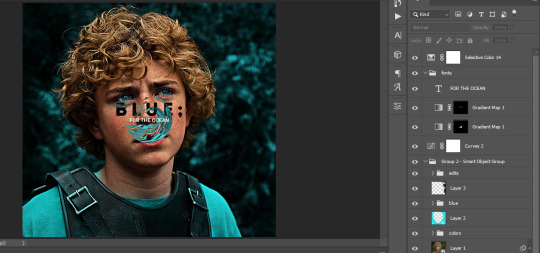
This was part of an edit, so let's add the graphics and also edit them so they're the right shade of blue and the correct size. A few gradient maps and a dozen font tests later, it appears to be done! Here it is:
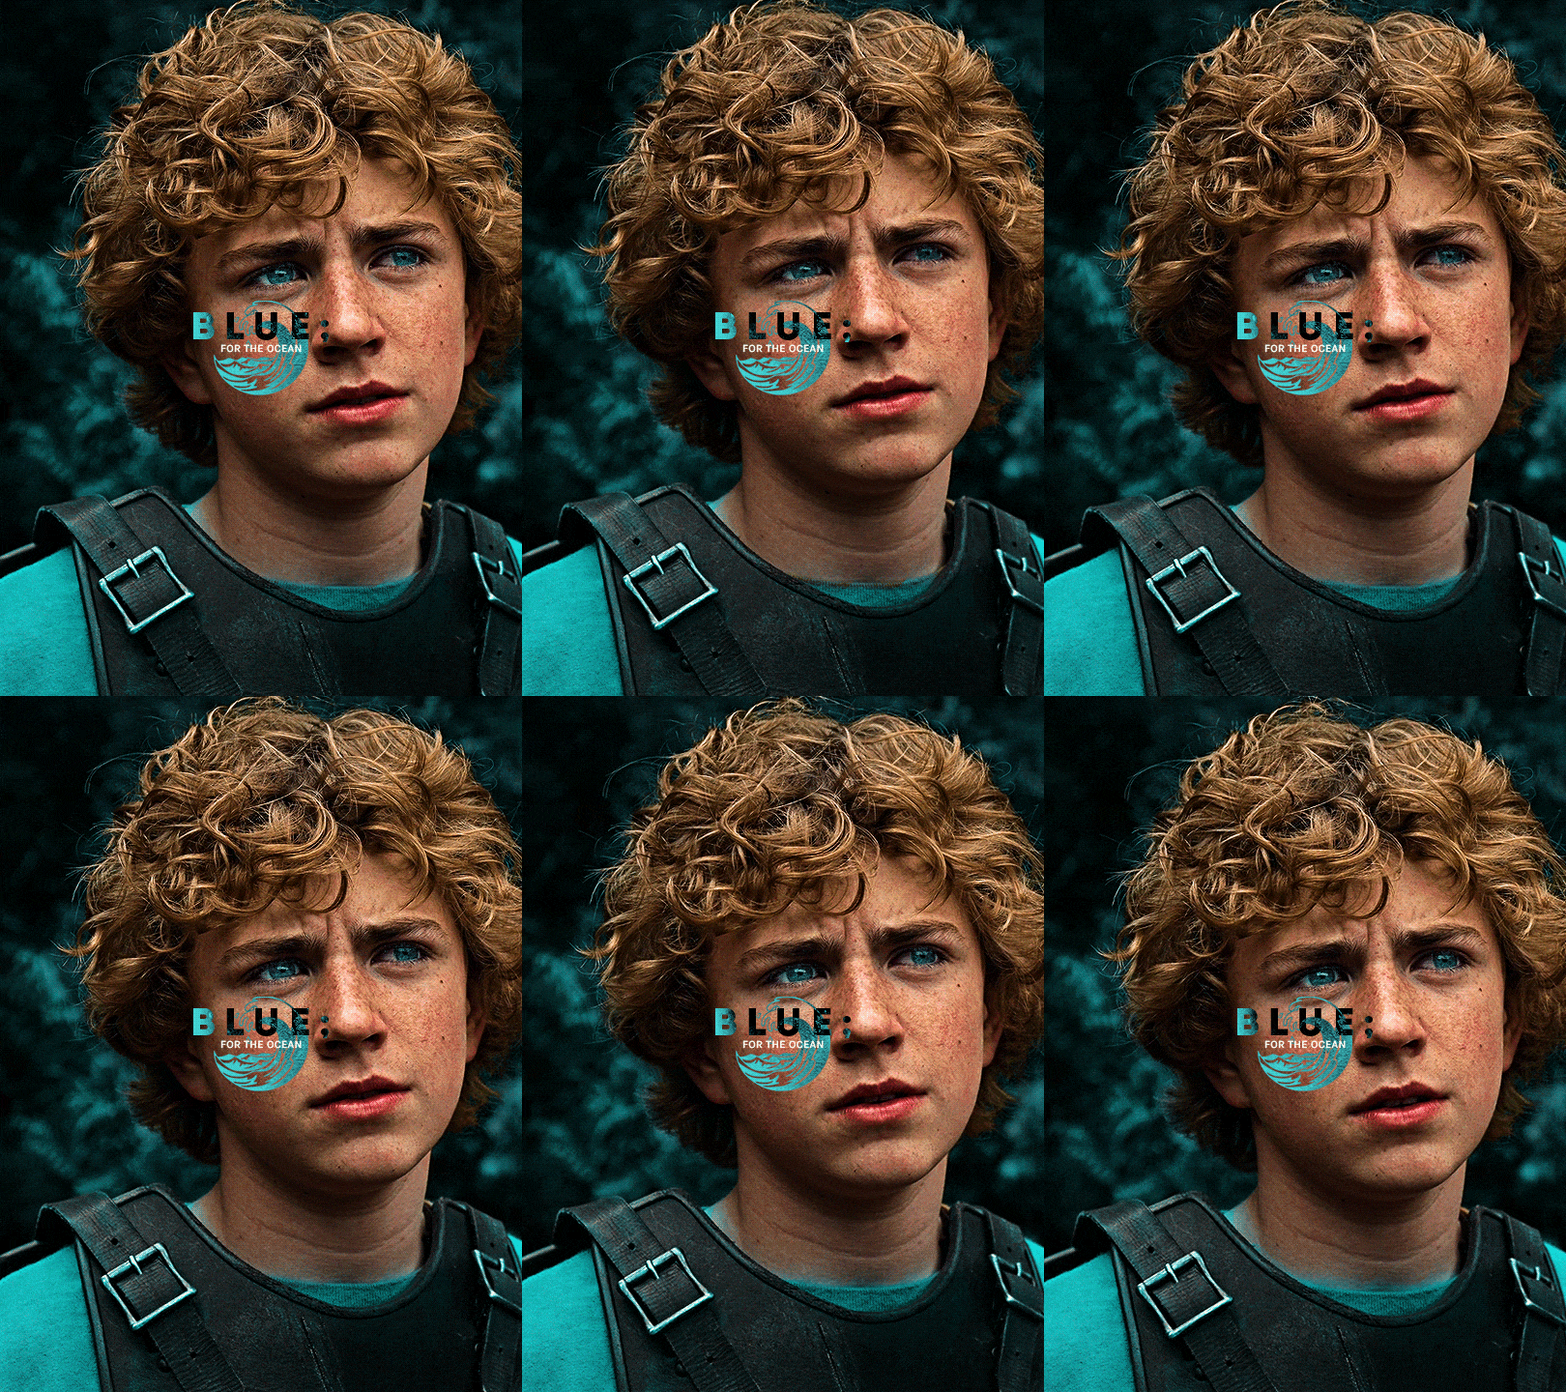
Please reblog gifsets on tumblr. We gifmakers really enjoy doing what we do (otherwise we wouldn't be here) but it takes so long, you wouldn't imagine. Tumblr is the main website used for gif making and honestly, we have nowhere to go but share our art here. This was only to show how long it takes but if you're new and want to get into the art of gif making, there are a lot of really cool resource blogs in here. And my ask box is always open! Sending gifmakers all my love.
#gif making#gif tutorial#resources#completeresources#y'know what that post yesterday got me into this#i love creativity so i send all my love to gifmakers#this is HARD#my tutorials#tutorials
408 notes
·
View notes
Text

To the end of the line.
Captain America: the Winter Soldier, the Movie Poster We Should Have Gotten (Redbubble)
Inspiration and non-titled version below cut:
No title version:

This is my magnum opus! A GIANT photo manipulation of at least 12 source images, painstakingly taken apart and put back together in Photoshop. at one point this beast had over 80 layers! I am surprised my computer didn't crash!
Inspired by the Iron Man 3 and Thor: the Dark World posters wherein the love interest is posed like a Damsel in Distress.
Since Bucky IS CapSteve's damsel in all 3 movies!

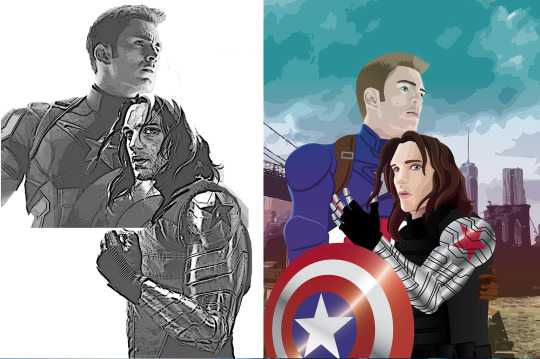
^ my original digital sketch (featuring my FAVORITE Bucky drawing OF ALL TIME by @evankart!) and first attempt at a digital drawing using adobe illustrator (to be fair to 2021 me, I had been using illustrator less than a year at that point and would have just done it in Photoshop originally if it wasn't a project for one of my Graphic Design college classes) I used it for a magazine spread in my capstone (My paper was about queerbaiting in the MCU click to read on Ao3!) See the rest of the illustrations here!
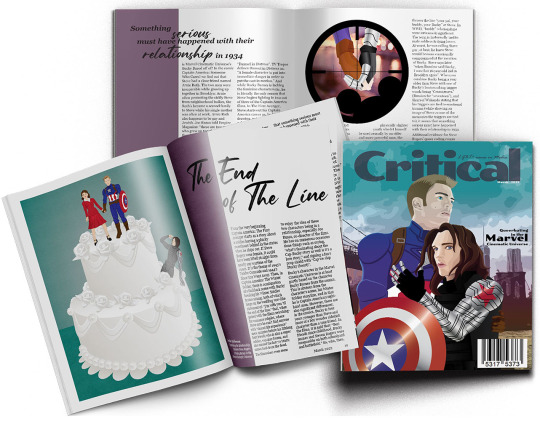
When i saw the @catws-anniversary event, i KNEW I had to do it! Prompts: Devotion, Reunion, Schoolyard and battlefield, Favorite Stucky scene (missing scene lol)
#catws#catws10#catws anniversary#bucky barnes#steve rogers#stucky#captain america#winter soldier#stevebucky#my art#best friends since childhood#catwsedit#marvel cinematic universe#damsel in distress#movie poster#give cap a boyfriend#mcu#to the end of the line#reunion#devotion#schoolyard and battlefield#missing scene#favorite scene#favorite Stucky scene#photoshop#photo manipulation#digital art#photoshop wizard
275 notes
·
View notes
Text
Amazon Alexa is a graduate of the Darth Vader MBA

Next Tuesday (Oct 31) at 10hPT, the Internet Archive is livestreaming my presentation on my recent book, The Internet Con.

If you own an Alexa, you might enjoy its integration with IFTTT, an easy scripting environment that lets you create your own little voice-controlled apps, like "start my Roomba" or "close the garage door." If so, tough shit, Amazon just nuked IFTTT for Alexa:
https://www.theverge.com/2023/10/25/23931463/ifttt-amazon-alexa-applets-ending-support-integration-automation
Amazon can do this because the Alexa's operating system sits behind a cryptographic lock, and any tool that bypasses that lock is a felony under Section 1201 of the DMCA, punishable by a 5-year prison sentence and a $500,000 fine. That means that it's literally a crime to provide a rival OS that lets users retain functionality that Amazon no longer supports.
This is the proverbial gun on the mantelpiece, a moral hazard and invitation to mischief that tempts Amazon executives to run a bait-and-switch con where they sell you a gadget with five features and then remotely kill-switch two of them. This is prime directive of the Darth Vader MBA: "I am altering the deal. Pray I don't alter it any further."
So many companies got their business-plan at the Darth Vader MBA. The ability to revoke features after the fact means that companies can fuck around, but never find out. Apple sold millions of tracks via iTunes with the promise of letting you stream them to any other device you owned. After a couple years of this, the company caught some heat from the record labels, so they just pushed an update that killed the feature:
https://memex.craphound.com/2004/10/30/apple-to-ipod-owners-eat-shit-and-die-updated/
That gun on the mantelpiece went off all the way back in 2004 and it turns out it was a starter-pistol. Pretty soon, everyone was getting in on the act. If you find an alert on your printer screen demanding that you install a "security update" there's a damned good chance that the "update" is designed to block you from using third-party ink cartridges in a printer that you (sorta) own:
https://www.eff.org/deeplinks/2020/11/ink-stained-wretches-battle-soul-digital-freedom-taking-place-inside-your-printer
Selling your Tesla? Have fun being poor. The upgrades you spent thousands of dollars on go up in a puff of smoke the minute you trade the car into the dealer, annihilating the resale value of your car at the speed of light:
https://pluralistic.net/2022/10/23/how-to-fix-cars-by-breaking-felony-contempt-of-business-model/
Telsa has to detect the ownership transfer first. But once a product is sufficiently cloud-based, they can destroy your property from a distance without any warning or intervention on your part. That's what Adobe did last year, when it literally stole the colors from your Photoshop files, in history's SaaSiest heist caper:
https://pluralistic.net/2022/10/28/fade-to-black/#trust-the-process
And yet, when we hear about remote killswitches in the news, it's most often as part of a PR blitz for their virtues. Russia's invasion of Ukraine kicked off a new genre of these PR pieces, celebrating the fact that a John Deere dealership was able to remotely brick looted tractors that had been removed to Chechnya:
https://pluralistic.net/2022/05/08/about-those-kill-switched-ukrainian-tractors/
Today, Deere's PR minions are pitching search-and-replace versions of this story about Israeli tractors that Hamas is said to have looted, which were also remotely bricked.
But the main use of this remote killswitch isn't confounding war-looters: it's preventing farmers from fixing their own tractors without paying rent to John Deere. An even bigger omission from this narrative is the fact that John Deere is objectively Very Bad At Security, which means that the world's fleet of critical agricultural equipment is one breach away from being rendered permanently inert:
https://pluralistic.net/2021/04/23/reputation-laundry/#deere-john
There are plenty of good and honorable people working at big companies, from Adobe to Apple to Deere to Tesla to Amazon. But those people have to convince their colleagues that they should do the right thing. Those debates weigh the expected gains from scammy, immoral behavior against the expected costs.
Without DMCA 1201, Amazon would have to worry that their decision to revoke IFTTT functionality would motivate customers to seek out alternative software for their Alexas. This is a big deal: once a customer learns how to de-Amazon their Alexa, Amazon might never recapture that customer. Such a switch wouldn't have to come from a scrappy startup or a hacker's DIY solution, either. Take away DMCA 1201 and Walmart could step up, offering an alternative Alexa software stack that let you switch your purchases away from Amazon.
Money talks, bullshit walks. In any boardroom argument about whether to shift value away from customers to the company, a credible argument about how the company will suffer a net loss as a result has a better chance of prevailing than an argument that's just about the ethics of such a course of action:
https://pluralistic.net/2023/07/28/microincentives-and-enshittification/
Inevitably, these killswitches are pitched as a paternalistic tool for protecting customers. An HP rep once told me that they push deceptive security updates to brick third-party ink cartridges so that printer owners aren't tricked into printing out cherished family photos with ink that fades over time. Apple insists that its ability to push iOS updates that revoke functionality is about keeping mobile users safe – not monopolizing repair:
https://pluralistic.net/2023/09/22/vin-locking/#thought-differently
John Deere's killswitches protect you from looters. Adobe's killswitches let them add valuable functionality to their products. Tesla? Well, Tesla at least is refreshingly honest: "We have a killswitch because fuck you, that's why."
These excuses ring hollow because they conspicuously omit the possibility that you could have the benefits without the harms. Like, your tractor could come with a killswitch that you could bypass, meaning you could brick it at a distance, and still fix it yourself. Same with your phone. Software updates that take away functionality you want can be mitigated with the ability to roll back those updates – and by giving users the ability to apply part of a patch, but not the whole patch.
Cloud computing and software as a service are a choice. "Local first" computing is possible, and desirable:
https://pluralistic.net/2023/08/03/there-is-no-cloud/#only-other-peoples-computers
The cheapest rhetorical trick of the tech sector is the "indivisibility gambit" – the idea that these prix-fixe menus could never be served a la carte. Wanna talk to your friends online? Sorry there's just no way to help you do that without spying on you:
https://pluralistic.net/2022/11/08/divisibility/#technognosticism
One important argument over smart-speakers was poisoned by this false dichotomy: the debate about accessibility and IoT gadgets. Every IoT privacy or revocation scandal would provoke blanket statements from technically savvy people like, "No one should ever use one of these." The replies would then swiftly follow: "That's an ableist statement: I rely on my automation because I have a disability and I would otherwise be reliant on a caregiver or have to go without."
But the excluded middle here is: "No one should use one of these because they are killswitched. This is especially bad when a smart speaker is an assistive technology, because those applications are too important to leave up to the whims of giant companies that might brick them or revoke their features due to their own commercial imperatives, callousness, or financial straits."
Like the problem with the "bionic eyes" that Second Sight bricked wasn't that they helped visually impaired people see – it was that they couldn't be operated without the company's ongoing support and consent:
https://spectrum.ieee.org/bionic-eye-obsolete
It's perfectly possible to imagine a bionic eye whose software can be maintained by third parties, whose parts and schematics are widely available. The challenge of making this assistive technology fail gracefully isn't technical – it's commercial.
We're meant to believe that no bionic eye company could survive unless they devise their assistive technology such that it fails catastrophically if the business goes under. But it turns out that a bionic eye company can't survive even if they are allowed to do this.
Even if you believe Milton Friedman's Big Lie that a company is legally obligated to "maximize shareholder value," not even Friedman says that you are legally obligated to maximize companies' shareholder value. The fact that a company can make more money by defrauding you by revoking or bricking the things you buy from them doesn't oblige you to stand up for their right to do this.
Indeed, all of this conduct is arguably illegal, under Section 5 of the FTC Act, which prohibits "unfair and deceptive business practices":
https://pluralistic.net/2023/01/10/the-courage-to-govern/#whos-in-charge
"No one should ever use a smart speaker" lacks nuance. "Anyone who uses a smart speaker should be insulated from unilateral revocations by the manufacturer, both through legal restrictions that bind the manufacturer, and legal rights that empower others to modify our devices to help us," is a much better formulation.
It's only in the land of the Darth Vader MBA that the deal is "take it or leave it." In a good world, we should be able to take the parts that work, and throw away the parts that don't.
(Image: Stock Catalog/https://www.quotecatalog.com, Sam Howzit; CC BY 2.0; modified)

If you'd like an essay-formatted version of this post to read or share, here's a link to it on pluralistic.net, my surveillance-free, ad-free, tracker-free blog:
https://pluralistic.net/2023/10/26/hit-with-a-brick/#graceful-failure
#pluralistic#alexa#ifttt#criptech#disability#drm#revocation#nothing about us without us#futureproofing#graceful failure#darth vader MBA#enshittification
288 notes
·
View notes
Note
hi! i was wondering if you have any advice/certain programs or anything you use for making gifs, because there’s something i really want to make but i have zero experience 💔💔
hello hello!
ah, yes, I have a TON, let's hope this ADHD girlie can give a somewhat concise description lmao. I will answer this publicly, in case it's useful for anyone else.
Software I use:
To make the screenshots: - for single scenes: KMPlayer 12.22.30 (the newer versions are trash) - for shorter videos, or something you want to get all the screenshots out of Free Video to JPG converter is awesome.
To make the gifs: - Adobe Photoshop 2021 (I don't recommend much later versions, because of the Cloud connection they have)
General gif-maker wisdom: "we spend more time on making sure that something looks serviceable, not pixelated, and good quality, than to get it moving and shit" - Confucius, probably
Useful stuff to make your life easy:
- Squishmoon's action pack for sharpening your screenshots. You can also find their detailed use explained here. - If you are planning to gif Wicked, some scenes are a bit tricky, ngl. But I have two PSDs that you can use, while you're perecting your own craft, and you can edit and update them to make them more "you".
A neutral PSD for mostly indoors and lighter scenes | download

A blue-enhancing PSD for darker scenes | download
Some info on videos to use: - always, always (ALWAYS) use at least HD videos. Otherwise your gif will look like shit. This should be ideally at least 720p in resolution, but go with 1080p for the best results. Coloring gifs in 1080p is easy, but... - if you want to go pro *rolls eyes*, you could go for HDR (2160p) quality. However HDR is a mf to color properly and I would not recommend it for a beginner. When you extract frames from an HDR video, the image colors will end up being washed out and muddy so you will always have to balance those colors out for it to look decent, however, the quality and number of pixels will be larger. If you ar okay with making small/medium sized images, then stick with 1080p. (Storytime, I spent a lot of time making HDR screenshots, only for me to realize that I really hate working with them, so I'm actually considering going back to 1080p, despite that not being "industry standard" on Tumblr lmao. I'm not sure yet But they take up so much space, and if you have a laptop that is on the slower side, you will suffer.)
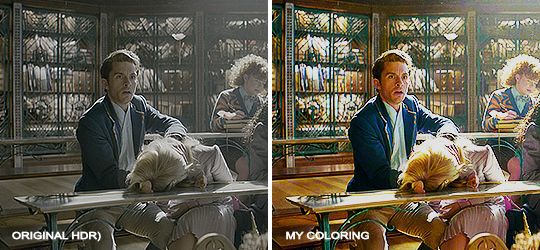
See the below example of the image differences, without any effects. You will probably notice, that HDR has some more juicy detail and is a LOT sharper, but well... the color is just a lot different and that's something you will have to calculate in and correct for.

The ✨Process✨
Screencaptures
I like to have all screenshots/frames ready for use. So as step one, you need to get the movie file from somewhere. This should definitely be a legal source, and nothing else (jk).
Once I have the movie. I spend a lot of time making and sorting screencaps. Since I mostly work in the Wicked fandom only atm, that means I will only need to make the frames once, and thats awesome, cause this is the most boring part.
For this, I let the Video to JPG Converter run the whole movie while I was aleep, and by morning, it created gorgeous screenshots for me and my laptop almost went up in flames.
You need to make sure you capture every single frame, so my settings looked like this:

Screenshots do take up a lot of space, so unless your computer has a huge brain, I suggest storing the images in an external drive. For Wicked, the entire movie was I think around 200k frames total. I reduced that to about 120k that I will actually use.
And then I spend some time looking through them, deleting the scenes I know I won't do ever (goodbye Boq, I will never gif you, I'm so sorry :((( ) and also, I like to put them into folders by scene. My Wicked folder looks like this:

If you don't want this struggle and you only need a few specific scenes, there is this great tutorial on how to make frames from KMPlayer. Note that some of the info in this tutorial on gif quality requirements and Tumblr's max allowance of size and # of frames are outdated. You are allowed to post a gif that is a maximum of 10 Mb and 120 frames (maybe it can be even more, idk, said the expert) on Tumblr. But the process of screencapturing is accurate. Also ignore the gifmaking process in this tutorial, we have a lot easier process now as well!
Prepping the images
I have a folder called "captures", where I put all of the specific screenshots for a set I want to use. Inside this folder I paste all the shots/scenes I want to work on for my current gifset, and then I create subfolders. I name them 1, 2, 3, etc, I make one folder for each gif file I want to make. Its important that only the frames you want to be in the gif are in the folder. I usually limit the number of images to 100, I don't really like to go above it, and usually aim to go lower, 50-70 frames, but sometimes you just need the 100.
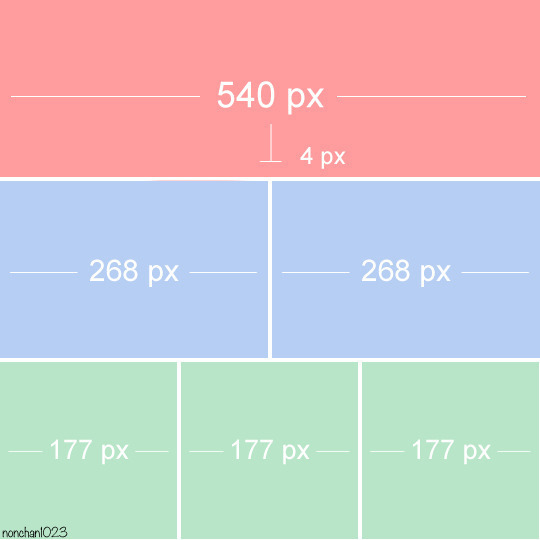
Sidetrack, but: Keep in mind that Tumblr gifs also need to be a specific width, so that they don't get resized, and blurry. (Source) Height is not that important, but witdth is VERY. But since there is a limit on Mb as well, for full width (540px) gifs you will want to go with less frames, than for smaller ones.
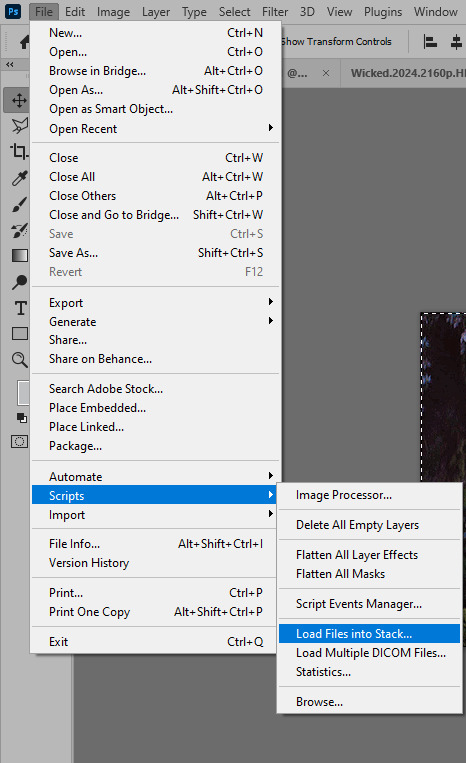
Once you have the frames in folders, you will open Photoshop, and go to: File > Scripts > Load files into stack.
Here you select Folder from the dropdown menu, and then navigate to the folder where you put the frames for your first gif. It will take a moment to load the frames into the window you have open, but it will look like this:

You click "OK" and then it will take anther few moments for Photoshop to load all the frames into a file.
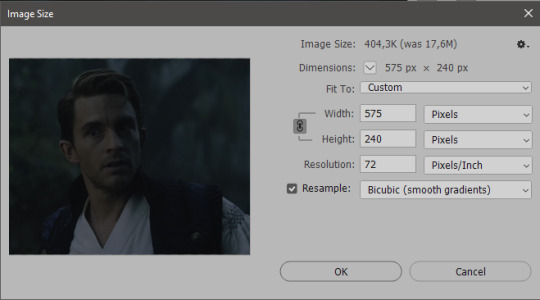
But once that's done, and you have the frames, you next have to resize the image. Go to Image > Image size... When you resize in Photoshop, and save as gif, sometimes you do end up with a light transparent border on the edge that looks bad, so, when you resize, you have to calculate in that you will be cutting off a few pixels at the end. In this example, I want to make a 268px width gif. I usually look at heights first, so lets say I want it to be a close-up, and I will cut off the sides, and it will be more square-ish. So I set height to 240px. Always double check that your width doesn1t run over your desired px numbers, but since 575 is larger than 268 (can you tell I'm awesome at math?), I should be good. I click OK.
Next, you have to crop the image. Go to Image > Canvas size... At this point we can get rid of those extra pixels we wanted to drop from the bottom as well, so we will make it drop from the height and the width as well. I set the width to 268px, and the height to 235px, because I have OCD, and numbers need to end with 0 or 5, okay?
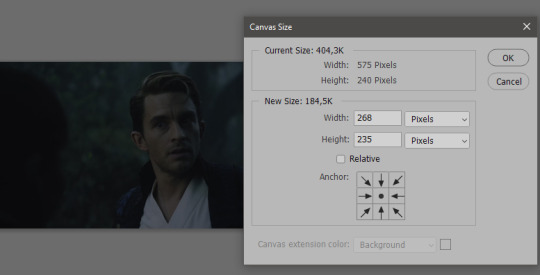
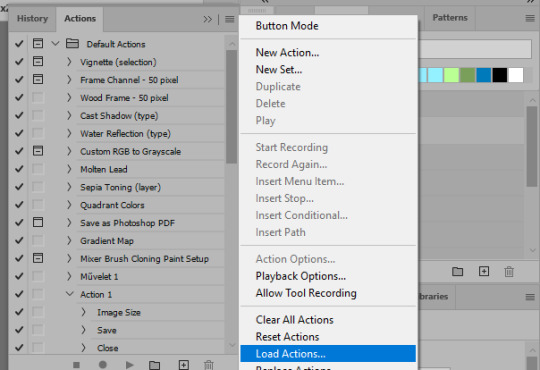
And now, the magic happens! First, go to Window > Actions to have the actions window show up. While you're at it, in the Window menu also select Timeline (this will be your animation timeline at the button) and also Layers. Once you have the Actions window showing up, on the menu in the upper right corner click the three lines menu button, and from the list select "Load Actions". I hope you downloaded the Squishmoon action pack from the start of this post, if not, do it now! So you save that file, and then after you clicked Load, you... well, load it. It will show up in your list like so:
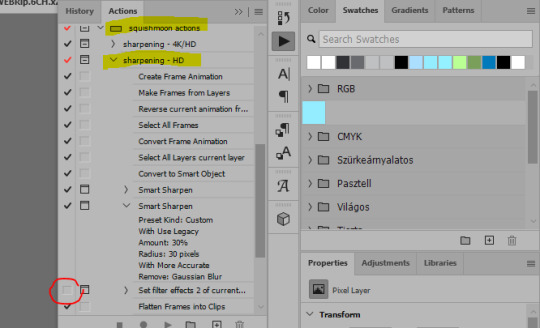
You will want to use the sharpening - HD one, BUT I personally like to go, and remove the tick from the spot I circled above, so leave that empty. This will result in the image having more contrast, which is very much needed for these darker scenes.
When you have that, you select the action itself like so, and click the play button at the bottom. The action will do everything for you, sharpen, increase contrast and also, create the gif and set the frame speed. You won't need to edit anything, just whatever window pops up, click "OK"

Now it should all look like something like this:
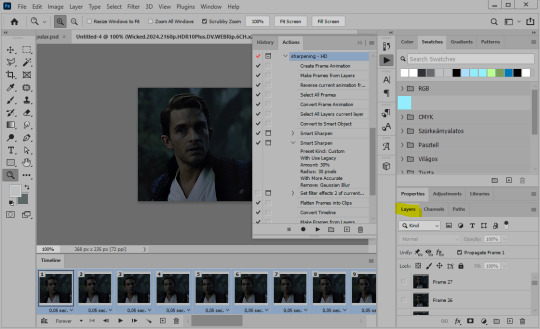
In the Layers window on the side, scroll all the way up to the top. The frame on the top is your last frame. Every effect you want to add to the gif should go to here, otherwise it won't apply to all frames. So at this point I open my PSD for darker scenes, and pull the window of it down, above the gif I'm working on like so:

And then I grab the folder I marked with yellow, left click, hold the click down, and drag that folder over to my current gif. And bamm, it will have the nice effect I wanted! You can click the little play button at the button to see a preview.

Once you have it sorted, now its time to extract it, but first, here's our before and after view:


Now, if you are happy with this, you can just save and close.
If you want to add subtitles, you can do that as well either manually with the text tool (remember, to add as the TOP layer as we did with the coloring) or you can use a pre-set PSD for that as well, here's mine.
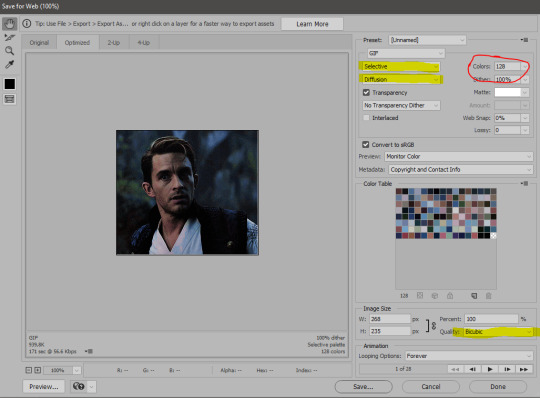
Now, we just need to export it. Go to File > Export > Save for Web (Legacy) and copy my settings here. Others may use other settings, but these are mine, so! I hope you are happy with them :3
In this case, for colors, I picked 128 colors, because on dark sscenes you can get away with using less colors, and the larger that number is, the bigger the filesize. If you use lighter images, you will need to bump that shit up to 256, but that will make your file larger. You can see at the bottom of the screen, how large your file will end up being. So long as you are under 9 Mb, you should be good :3
Conclusion
Look, Gif making and Photoshop in general is a bit scary at first. There are a lot of settings you can mess around on your own, a lot to play with, and also a lot can go wrong. This is a very basic tutorial, and also my current process and preferred coloring. However if you look at "gif psd" or "gif tutorial" or similar tags on Tumblr, you can find a LOT of great resources and steps, for many-many things. Usually people are not too antsy about sharing their methods either. You make 4-5 gifs, and you will have the steps locked down, and then it's all about experimenting.
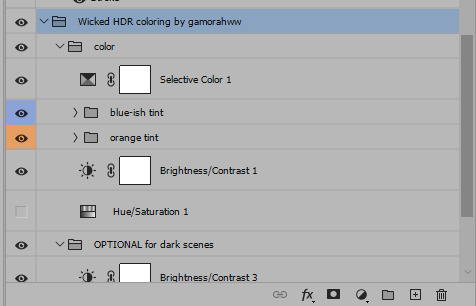
After you have some muscle memory, your next step should be to explore what is inside a PSD coloring folder that you use. Open them up, try clicking around, click the little eye, to see what happens if they are turned off, and double click them, and play around with the sliders, to see what each does. Most people on Tumblr don't really know what each one does, we all just pressed a few buttons and got really lucky with the results, lol.
If anything is unclear, don't hesitate to ask, I'll gladly help!
Good luck <3
33 notes
·
View notes
Text
Anon anterior, por privado nos enviaron esto: https://www.artistapirata.com/adobe-photoshop-cc-2021-v22/
Pd: En el primer comentario vienen links y password
8 notes
·
View notes
Note
girlieee i wanna know what software you use to edit your pictures and are the buff notifications a .psd template? 😩
hi angel!! 🫶🏼 i actually have an editing tutorial for my screenies from wayyy back! you can find it here :D i use adobe photoshop 2021 to edit and honestly, i don’t really do much 🙂↕️ i highly recommend installing gshade/reshade presets tho! they do most of the heavy lifting when taking my screenshots 🫡 the buffs are actually the in game ones that i took a screenshot of, cropped and paste onto my gameplay screenies! i used to use .psd templates but i found it tedious 😭 i think most of the buffs/sentiments/notifications i have on my screenies are screenshots of the in games ones :D
hope this helped! if you want more details, just shoot me another ask/dm and i’ll be more than happy to help <3
9 notes
·
View notes
Note
https://mysoftwarefree.com/adobe-photoshop-2021-free-download-v1084/
downloaded photoshop, after effects and other programs from this website and so far i have 0 issues
ur a life saver OMG thank you!! ♥️
12 notes
·
View notes
Text


Ribbons One, Ribbons Two, + Clockwork ARTS 2348 - Photoshop Study 09 ∘ 2021 Adobe Photoshop
3 notes
·
View notes
Note
Hiii! I was wondering if you do any editing to your pictures besides using reshade !! I love how your screenshots look <3
Hello! My editing is pretty simple. I use Adobe Photoshop 2021, Topaz Clean and Analog Effex Pro plugins.
First I crop my picture and run all-in-one action from this pack to make it look crisp and smooth like this:
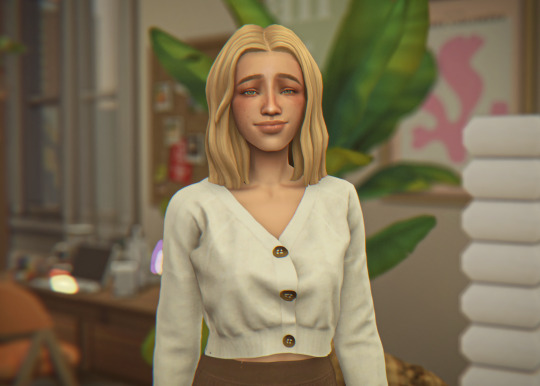
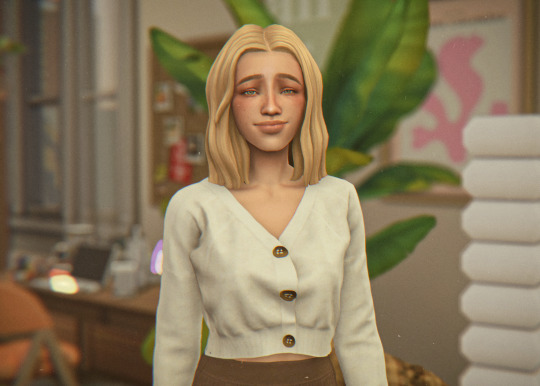
next I apply Analog Effex Pro 2 plugin (i play around with different filters from picture to picture depending on what I want to achieve so i don't have any go-to presets). It's such a lifesaver tool providing a wide rage of editing options. I go with basic adjustments, film type, and dust and scratches to get smthn like this:
At this point if I feel like going extra I may apply color grading or use some @wooldawn's actions

For an outdoor shot that would be it, but if the picture was taken indoors like this one I enhance lighting by, well, paining it. Here's what I do: first create an empty layer, fill with color black and change blending mode to soft light. Then take large soft brush (color white), paint areas where you imagine the light source is and apply gaussian blur (set the radius to high values to make the edge of dark and light areas smooth). Lower the opacity to 15-30%

Here's what I get in the end. Hope that was helpful
76 notes
·
View notes