#User Interface Development
Text
India's Leading SEM & PPC Services for Growth
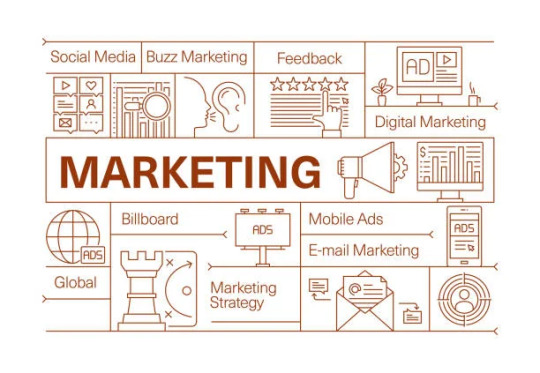
In the dynamic landscape of online business, where visibility is paramount, partnering with the right Search Engine Marketing (SEM) and Pay-Per-Click (PPC) service can make all the difference. Nivedita, a trailblazing force in the digital marketing sphere, stands out as the preeminent SEM & PPC company in India, propelling businesses to new heights with its unparalleled expertise and cutting-edge strategies.
In the realm of SEM & PPC, Nivedita emerges as the beacon of excellence, guiding businesses to unprecedented digital success. Our commitment to innovation, transparency, and results sets us apart, making us the go-to partner for businesses aspiring to conquer the online space.
India's Leading SEM & PPC Services for Growth
Boost Your Online Presence
At Nivedita, we pride ourselves on our seasoned team of Search Engine Marketing and Pay Pre Click specialists service. Our experts delve deep into the intricacies of digital marketing, keeping abreast of the latest trends and algorithms. With a wealth of experience, we bring a nuanced understanding of the ever-evolving digital landscape, ensuring that your campaigns are not just current but also future-proof.
One size doesn’t fit all in digital marketing, and Nivedita understands this implicitly. We craft bespoke SEM and PPC strategies, meticulously tailored to meet the unique needs of your business. Our approach is not just about increasing clicks; it’s about optimizing for conversions, ensuring that every penny you invest translates into tangible results.
In an industry often clouded by ambiguity, Nivedita sets itself apart through transparency. Our comprehensive reporting system provides you with a clear view of your campaign performance, fostering trust and ensuring that you are always in the loop.
#Search Engine Marketing#Pay-Per-Click Services#Ad Campaign Management#Keyword Research#Google Ads Optimization#Online Advertising#SEM Strategy#PPC Analytics#software development#user experience#user interface development#web development#custom software solutions india#software company#pay per click#digital marketing
0 notes
Note
My friend is making an arcade racer and I've been playtesting his builds for him. He didn't go into it thinking it'd be easy but there's a ton of things he didn't at all realize would be a headache going into it. Obviously all games are hard to make but some are more apparent about their daunting nature. Which genres are deceptively difficult even if reasonably possible by a small indie team? What surprised you when you hit the big leagues?
Whenever I do solo dev work, the feature that always takes the longest and tends to require the most work to get something playable by actual players is the UI. Building out the gameplay features is always a lot of fun, but you can only go so far by fiddling with variables and restarting. There's always a significant amount of UI groundwork that needs to be done in order to make a game playable at all, just because of how much information needs to be conveyed to the player.
Whenever I build support into a game for different characters, cars, tracks, loadouts, etc. then each of those options needs its own way to choose that option from a list of available choices. That display must show a lot of information to the player so she can make an informed decision (e.g. this car has fast acceleration, that one has high top speed, this other one corners well, etc.), which all requires an intuitive screen layout, information presented, and so on and so forth.

Small-team dev also tends to build more system-driven games because it's more dev-time-efficient than creating single-use narrative-driven content. The tradeoff is that system-driven content also requires significantly more UI to convey all of that information to the player. This means games with a lot of options for players to choose tend to require a lot of UI work, which is something many hobbyists don't think about when starting.
[Join us on Discord] and/or [Support us on Patreon]
Got a burning question you want answered?
Short questions: Ask a Game Dev on Twitter
Long questions: Ask a Game Dev on Tumblr
Frequent Questions: The FAQ
39 notes
·
View notes
Text
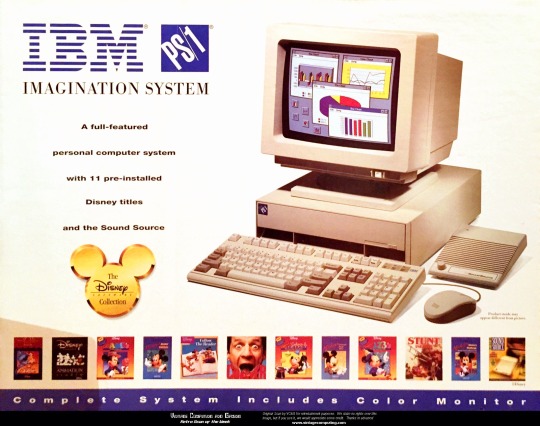

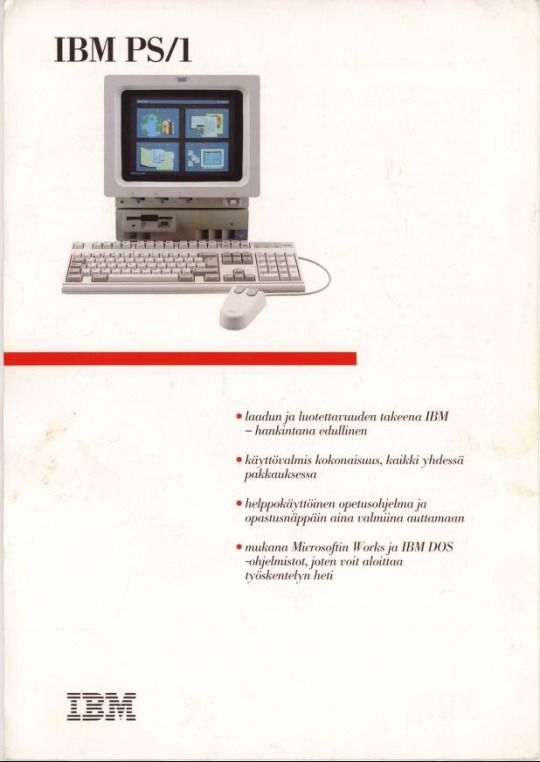
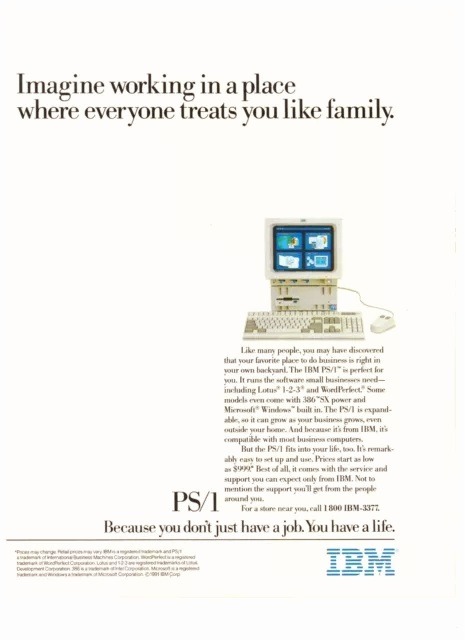
🇺🇲 Step back in time and explore the fascinating journey of the IBM PS/1—a pioneering computer that revolutionized personal computing in the late 1980s and early 1990s!
💻 The IBM PS/1, short for Personal System/1, marked a significant milestone in the evolution of home computing. Launched by IBM in 1990, this innovative machine was designed to bring the power and versatility of IBM's business computers into the homes of consumers.
💾 With its sleek and compact design, the IBM PS/1 was a departure from the bulky and intimidating computers of the past. It featured a built-in monitor, keyboard, and mouse, making it a convenient all-in-one solution for home users.
⚙️ Under the hood, the IBM PS/1 boasted impressive specifications for its time, including an Intel 80286 or 80386 processor, up to 16MB of RAM, and a variety of storage options ranging from floppy disks to hard drives. This formidable hardware allowed users to run productivity software, play games, and explore the emerging world of multimedia with ease.
💡 One of the most notable features of the IBM PS/1 was its user-friendly interface, which made it accessible to users of all skill levels. With its intuitive graphical user interface and pre-installed software, including IBM's own software suite and educational programs, the IBM PS/1 opened up new possibilities for home computing.
📈 Despite facing stiff competition from other manufacturers, the IBM PS/1 enjoyed moderate success and helped pave the way for the widespread adoption of personal computers in homes around the world. Its influence can still be felt today in the countless households that rely on computers for work, entertainment, and communication.
🚀 The IBM PS/1 may have been a product of its time, but its legacy lives on as a testament to the transformative power of technology. As we continue to push the boundaries of computing, let us not forget the humble beginnings of the IBM PS/1 and the role it played in shaping the digital world we know today.
#old technology#techtime chronicles#companies#tech#technology#old tech#technews#information technology#corporations#electronics#ibm pc1#ibm pc#ibm#ibm corporation#computer science#computing#computers#made in america#made in usa#intel 80286#intel#intel 80386#hardware#software#software development#computer#floppy disk#innovation#information#user interface
26 notes
·
View notes
Text
DEVLOG #11 - Updated UI
Almost a week has passed since the latest announcement and I managed to get some work done.

For now the main menu and textbox will look the same, as I think they still look good even with the updated UI, but I'll consider redoing them in the future for the complete game.
The rest has changed considerably! The menus now have much more personality and are quite colorful, acting like a sort of personal diary/notepad for Hannah. Everything works as intended (I'm only missing the "confirm" screen and the language selection button) but I had to put the credits screen on hold until I reach a point when I know exactly who to credit.

I'd like to change a few things, maybe work more on the music, add sfx and have only custom made backgrounds. I also plan to polish the writing a bit, mainly in the first part of the game which people found pretty boring, but hopefully it's just a matter of deleting a few sentences, so that I can still use the translations from last year. I feel bad for all the people who helped me and still can't see their work put to use because I felt too overwhelmed to continue the project. Certainly I wasn't in a good place mentally but I have to admit that Tyrano's unwillingness to collaborate wasn't helpful. Yes, the only reason this game even exist is because of that engine and I'll always be grateful for that, but its strenght of being so easy for beginners was also its weakness.
I'm still a newbie in game development in general and with Ren'Py, but after my first Ren'Py project "Sprint down memory lane", I already learned so much and I'm able to design and code UIs that I never even thought were possible to do!
As I probably already wrote in the past, the main protagonists of this game have been my OCs for years so I want to write this game's story by myself at all costs, which means it probably won't be the best so let me apologize in advance! I'm just stubborn, I want to be able to do everything and asking for help feels like cheating, although it totally isn't. I'd like to collaborate with a writer in the future to bring my stories to life, I know I'll definitely enjoy the process more if I won't have to worry about people disliking my writing ^^"
Anyway, I digress! This is all I can show you for now and I won't hide that I'm so proud of myself, comparing these screenshots to the current demo! Next I'll add all the text in the game (which will be so, so much easier this time around T.T) and then polish it as best as I can. In the meantime, I should think of a plot for this year's Yuri game jam...
See you soon!!
#game development#yuri game#devlog#visual novel#female protagonist#ui#user interface#ui ux design#renpy visual novel#renpy
3 notes
·
View notes
Text
🧺 || 1

soo...i decided to try and make my own game..and im still creating character sheets and supposedly UIs of the game. BUT DANG, IT'S ACTUALLY HARD 😭😭😭🤙🤙 anyway, here's a UI i did for my game. idk if I'll continue this but imma still try cuz im actually enjoying this ✨✨
#game#ui#user interface#hand drawn#drawing#programming#game development#game dev blog#ibispaint art#artists on tumblr#gamedev
2 notes
·
View notes
Text
Today, I need to do some work for our project in university.
The task: create a pc game for blackjack and I am creating the GUI for that, which sounds easier than it actually is.
The first working prototype has to be done next week and I still struggle to create the player lobby and the game room itself.
And because this isn't enough of stress, my brain is simply tired right now and I would rather sleep another two hours than sit in a dark room (the weather is shitty right now, no sun, only rain and dark clouds) and stare at a screen.
My boyfriend is also part of the team and he is currently sitting at the unit tests for the API and the game logic. Normally, we wanted to do something together over the weekend, but right now, I don't know if we are able to finish work until today evening...
Fingers crossed!
I hope, I can update on that later on.
@thetruearchmagos @yourfriendlywriter
#computer science#programming#computer games#developer#computer science student#general user interface#blackjack
4 notes
·
View notes
Text
Just put up a rambley, conceited blog post on my site about a topic I'm way too invested in for no good reason.
Check it out please and let me know what you think!
4 notes
·
View notes
Text
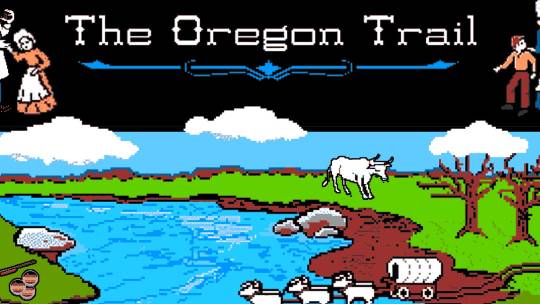
Comparative Analysis: The Design and Impact of "Oregon Trail" and "Papers, Please"
Introduction
In the world of video games, few titles manage to transcend the boundaries of entertainment to offer profound insights into the human condition and historical contexts. “Oregon Trail” and “Papers, Please” are two games that do just that, using the medium to educate and provoke thought through the lens of resource management and ethical decision-making. This essay explores the…
View On WordPress
#"game design#educational games#ethical decision-making#game analysis#game development#game mechanics#indie games#interactive storytelling#narrative games#Oregon Trail#Papers Please#player agency#resource management#user interface design#video game education
5 notes
·
View notes
Text
RenderDoc the block
Today I solved the blocking issue in my Macana OpenGL project. I did it using RenderDoc, an open-source graphics debugger suggested to me by a colleague.
Since I'm a complete noob at RenderDoc (and not very proficient at OpenGL either), it took me awhile to gain traction. I didn't use the tool very effectively. But the key virtue of a good debugger is that helps users visualize what's going on. Somehow in the flood of details, I noticed that my problematic texture (which didn't have mipmaps) used a filter intended for mipmaps. And that proved to be my issue.
Meanwhile, I'm making progress configuring my new Linux Mint environment. I finally got the Cinnamon panel (analogous with the Windows taskbar) configured the way I like. I must've spent hours; it seems to me the Cinnamon UI could be a lot more intuitive.
Also I discovered I had 2 copies of LibreOffice: one installed from Apt and another installed from Flatpak. I only need one copy, so I'm removing the older (Apt) install to free up disk space.
#disk space#opengl#debugging#open source#computer graphics#accomplishments#free tools#textures#panel#linux mint#libre office#flatpak#duplication#software development#user interface#uninstall#war stories#traction#weird bug
2 notes
·
View notes
Text
I make a stupid decision to decide to make a (fic) writing app, cheers
Well now, I know there's like tons of them out there in the market. A lot of them are good! And even free (or have pretty good free versions)! A reddit thread I found have a few very good ones, you guys can check it out! (I'll add my own two cents later :3)
But look, the only thing I want to do, is to have a place when I can throw my ideas into a list (like what I'm did in my notes app) then auto convert it to a document when I feel like I want to write it. None of them (or at least, what I saw/found) have it!
To do that, I set up a Google Form-Google Sheets system so I can just fill in the form when I get some thoughts™. Then when I feel like I want to add another WIP to my ever-growing list of WIPs, I'll just open the associated sheet, see what idea I would like to write, then create a Google Docs and copy/paste the idea there.
Easy, right? Problem solved?
No, not really. For me, there're a few problems with this.
───── ⋆⋅☆⋅⋆ ─────
The Problem(s)™
The process of opening Google Forms takes forever to load (depending on my Internet) and I have a goldfish memory. What are the odds that I forget my ideas by then.
(Just use phone notes app then) But I'm in the mood to type my fic in a computer 😔😔 I don't wanna copy my prompt there to a doc via phone, or worse, retype it out. There's like 4 steps there at least! I'll lose my motivation by then!
Google Sheets has this problem where the text refuses to wrap properly if you add a long text (my ideas are sometimes a few hundred words of rambling y'know). So whenever I decided to grace the sheet with my presence, I'll need to reformat the wrap if I wanna read what I wrote. That's 1 whole extra step.
I'll need to open at least two tabs here, 1. my sheet file, 2. open a new docs file
Look, they're all pretty minor inconveniences imo, but I'm 1. a lazy mf and 2. a tired mf
So, I made a decision any sane person with a job and 0-energy would do - I thought "Hey, why don't I make my own?".
───── ⋆⋅☆⋅⋆ ─────
And thus begin the brain-storming
Ok, look I'm not that good at UX/UI designing. I figure that should be the first step so I went and watch a few video and stumbled upon Juxtopposed's world's shortest UI/UX design course (it's pretty great, do check it out!). Simple, quick, concise - perfect.
First, I started with designing the user flow. I planned out a general idea of what I want my app to do and how it would flow from there starting from the landing all the way to when users save their work and exit the app.
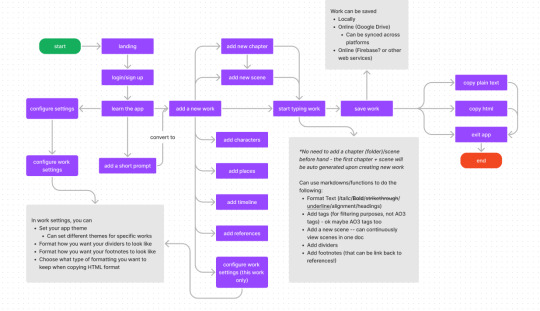
Boy, I sure hope I did that correctly.
This generally is made up of user actions (except for landing). You may notice how it's mostly AO3 focused because yes, I'm using this just for AO3 - as in I stopped using fanfiction.net, Wattpad and Quotev a long time ago.
I did get some inspirations for some of the features from other existing apps. Like:
Scriever - it's paid, but most people say it's a godsend but personally, I've never tried it. I think it pioneered the scenes idea tho.
Manuskript - Free open-sourced version of Scriever basically! They also have words and phrase frequency analyser and I think that's pretty neat!
MyStory.today - I like the idea that you can edit and view multiple scenes at once but the writing UI itself feels kinda clunky? It feels bothersome to add a new scene below my current one. But free version is enough and that's pretty nice. Oh yeah, not sure if it's just me, or it's kinda laggy
Wavemaker - ok this actually a great one! Everyone should give it a chance! But again, too complicated to just add one simple idea when I just wake up for instance.
Story Plotter - This one is nice. It actually have a idea to story button but, why are there... so many things... to choose before I can start writing the story. Granted, all of them are optional and you can just spam skip... a whole 7 times (unless it's a freeform, in that case, 4 times). But this provides a nice idea to combine more than 1 ideas into one plot tho. Also, not my style
Campfire - Is nice, there's so much things you can customize! But well, the free version can be quite limiting, like what if I need more than 25k words :(
Notion - Ok, here me out, it's not a great idea to write multi-chapters long fics here exactly without some amount of setting up too. BUT I love the markdown system here and I wanted to include it.
Do try some of them out, maybe you'll find your new writing app soulmate, who knows?
So... about the user flow diagram
I'm making this app because of two main features, ok maybe three, that I want to make my life easier and make me happier.
The ideas being converted and directly stored in my writing doc.
Being able to use markdowns to type unlike google docs *squint eyes*
Copying the whole chapter in HTML so I can just throw it in AO3 and click update without worrying about forgetting the formatting OR having to go to those docs to HTML converters.
And a secret fourth thing to maaaaaybe include things like chats, boxes, and other workskin related things
Oh, yes and how could I forgot, syncing progress across multiple devices
So I want to implement auto-save features (well, at least when you're connected to the internet, else it'll save locally first). The database I'm thinking to store these should be the user's own google drive (but that would required the user to sign in to their drive first).
Inversely, I'm thinking if the user did edit the doc in the drive, it should reflect in the app too, so I'll need to think about that. But the idea is that one chapter should be stored in one doc, and then separated by a scene separator symbol (I'll figure this out) to break it into scenes in the actual app. That may be a bit messy to edit in docs though so maybe a traditional folder + docs might suffice but then, there's also a space constraint, where there is too much scenes. That's probably where the web services come in.
───── ⋆⋅☆⋅⋆ ─────
And, oh! another diagram!
Ok look, the user flow made perfect sense to me while I was making it. After looking at it again while writing this... In hindsight, I should also make a screen/page flow diagram, or sitemap, so here it is! So- ta-da~!
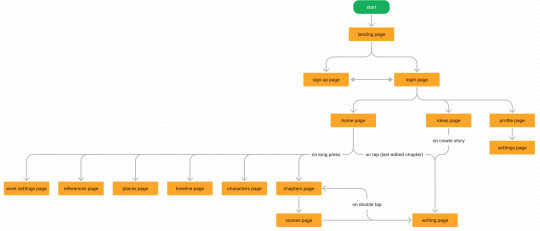
So this should be the whole flow of screens for the app. There may be more screens in the future but for now I think this should be it!
The app mainly just consist of -
The home page - which displays ALL your works/books
The ideas page - which is basically my notes app for, well, ideas, word vomit, random shower thoughts about how much you want a fictional character to be xxx
The writing page - which will be the main working space, the rest of the pages like references, characters, places, timeline, chapters and individual scenes can be accessed easily from this page too
The profile page - well, it's your profile! Access your profile settings, change themes, work space settings or what you want to copy in your html here - maybe add friends for collabs and betas in the future? We'll see
───── ⋆⋅☆⋅⋆ ─────
And that's it! ...For now
Oh my god, I'll admit, this post went on longer than I expected haha. That's all that I have to share for now! Next up, I'll get started on the wireframing process (moodboards? hunting down apps? reddit???? ok nevermind, reddit sounds like a bad idea). I know I kept calling it app, but I think I want it to have an app, windows, (macs?) and web version.
Thanks for making it this far and reading it all!
#writing app#app planning#app development#fic writing#writing tools#brainstorming#userexperience#user interface#app ideas#this is me procrastinating#on actually doing my wips
2 notes
·
View notes
Text
User Interface Development in India

User Interface developer India: In the realm of digital innovation, creating captivating and seamless user interfaces (UI) is paramount. Among the plethora of options, “Nivedita” stands out as a beacon of excellence, offering top-tier UI and front-end solutions in India. From crafting intuitive interfaces to optimizing performance and embracing the future of digital design, Nivedita stands as a testament to India’s prowess in the realm of UI and front-end development. Collaborate with Nivedita to elevate your digital presence and leave an indelible mark on the digital landscape.
User Interface Development in India
Crafting Seamless Digital Experiences
Crafting Intuitive Interfaces for Optimal User Engagement
Nivedita takes the lead in crafting UI solutions that transcend the ordinary. With a keen eye for detail and a commitment to user-centric designs, the company ensures that every interface it creates is intuitive and engaging. From websites to applications, Nivedita elevates user experiences to new heights.
ptimizing Performance Through Innovative Front-end Technologies
Staying ahead of the curve, Nivedita leverages cutting-edge front-end technologies to optimize performance. Through the seamless integration of CSS, HTML, and JavaScript, Nivedita ensures that websites and applications load swiftly and operate seamlessly. This dedication to performance optimization contributes significantly to a positive user experience.
Unleashing Creativity While Ensuring Functionality
Nivedita strikes the perfect balance between creativity and functionality. The company’s UI and front-end solutions are not just visually appealing; they are also designed to enhance usability. Nivedita understands that aesthetics alone are not enough – the true measure of success lies in how well a design facilitates user interactions and accomplishes its intended purpose.
#UI development India#Frontend developer services#India UX design#Interface programming#User Interface Development#Front-end Solutions#UI Design India#web development india#custom software solutions india#website design services#ppc services#search engine optimization
0 notes
Text
🌟 Hello Tumblr Community! 🌟
I'm excited to announce that I'm new to Tumblr, and I can't wait to dive into this vibrant platform! 🚀
Over the coming days, I'll be exploring the amazing world of Tumblr, getting to know all of you, and sharing my thoughts and interests. 🤗
To kick things off, I wanted to share my first discovery – some fantastic blogs that focus on UI/UX trends and the latest updates. As someone deeply passionate about Experience design and development, these blogs hold a special place in my heart:
Pepper Square: This blog is a treasure trove of UI/UX inspiration, offering insightful articles and stunning visuals. It's a must-follow for anyone in the UI/UX design field like me.
Growth Design: Stay updated on the newest design trends and get tips on creating user-friendly interfaces.
Nielsen Norman Group: Dive into the world of interactive design with this blog, which features interactive prototypes and innovative ideas.
Built for mars: For in-depth analysis of UX case studies and usability testing, look no further.
UX Planet: Explore the intersection of design and psychology for a deeper understanding of user behavior.
Feel free to drop by and say hi, and if you have any recommendations or tips for a Tumblr newcomer like me, I'd love to hear them! Let's connect, share, and inspire each other. 🌈✨
Here's to a fantastic journey on Tumblr! 🎉👋
#NewToTumblr #UIUX #DesignTrends
5 notes
·
View notes
Text
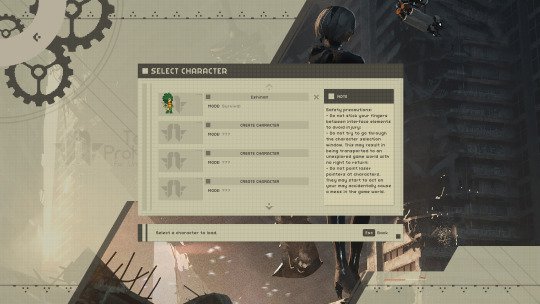
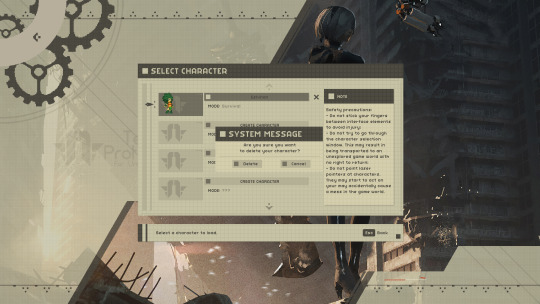
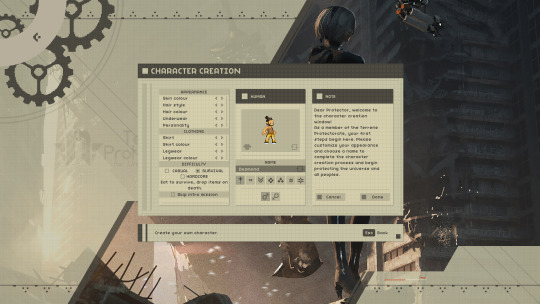
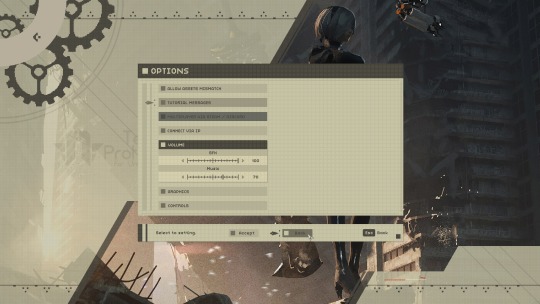
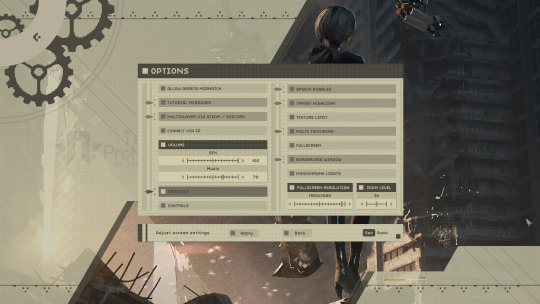
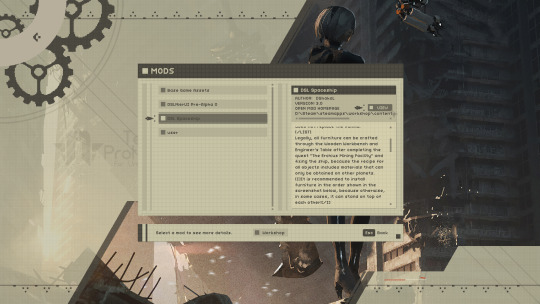
DSL NierUI Alpha 0.4A
В свете последних событий, происходящих в моей стране, я приняла решение выложить в общий доступ мои наработки для мода DSL NierUI на случай, если со мной что-то случится. Это не финальная версия мода и были изменены лишь элементы главного меню. Если я не смогу закончить этот мод, надеюсь, кто-то больший энтузиаст, чем я, сделает это...
Всем мирного неба над головой... 🇮🇱
···················································································································
Что нового:
Новый курсор;
Новые звуковые эффекты для загрузочного экрана, главного меню и щелчков по кнопкам;
Новый загрузочный экран;
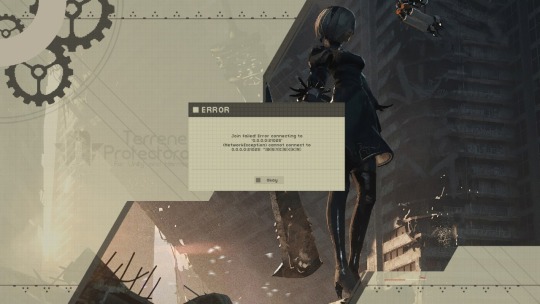
Новое главное меню, а также окна выбора персонажа, создания персонажа, удаления персонажа, окно мультиплеера и ошибки при неправильном вводе данных, окно настроек, включая настроек графики и управления, а также окно модификаций.
Дорожная карта:
Редизайн HUD:
- полоса здоровья, выносливости и голода, иконки статуса;
- чат;
- панель действий;
- иконки бокового меню;
- панель игрока и группы;
- компас;
Внутриигровые окна инвентаря, заданий, кодексов и пр.;
Радиосообщения и интро.
···················································································································
Язык: Английский.
Список изменений:
0.2A: Переработаны окна настроек графики и управления;
0.3A: Переработано окно модификаций и внесены другие мелкие доработки в окна настроек графики и управления, а также структуру файлов для уменьшения размера мода;
0.4A: Переработано окно создания персонажа и внесены мелкие правки в код и структуру файлов.
Установка: Перенести папку с модом "DSLNierUI Alpha 0.4A" в папку “mods” в директории игры.
Известные проблемы:
Так как мод создан для работы с разрешением экрана 1920x1080, то при использования мода с другим разрешением, элементы интерфейса могут "расплыться";
Мод создавался для чистой версии игры, поэтому может не поддерживать работу с большинством модов, как-либо затрагивающих интерфейс;
Так как это ранняя версия мода, то некоторые изменённые элементы интерфейса могут находиться там, где они не должны быть (новая кнопка на ванильном окне, ползунки и т. д.).
Благодарности:
PlatinumGames – за игру Nier: Automata и дизайн игрового интерфейса, взятого за основу для этого мода;
Неизвестному автору темы для Rainmeter в стиле Nier: Automata;
Lownine – за оригинальный арт, использованный для фона в главном меню;
littlevulpine – за помощь с кодом для загрузочного интро;
Light – за идею с шестерёнками на текстуре главного меню.
···················································································································
Прогресс разработки 0.5А:
Исправлено расположение кнопок "Done" и "Cancel" в окне создания персонажа, изменена иконка для скрытия одежды персонажа;

Исправлено положение кнопок "Delete" и "Cancel" в окне удаления персонажа;
Исправлен некорректный экран загрузки, где проигрывался только один фрейм из сорока (и как я это упустила?);
Все конфиги, отвечающие за работу главного меню, были заменены на патчи для адаптации мода работать с другими модификациями и уменьшения его размера;
Иконки статусов эффектов и цвет названий эффектов были переделаны;
Были переделаны шкалы здоровья, энергии и голода, удалена панель персонажа из-за ненадобности;
Новая иконка приглашения в группу;
Окно приглашения в группу было переделано;

Новые рамки редкости предмета.

···················································································································
Разрешения:
Загрузка на другие сайты: -
Изменение/исправление файла: +
Преобразование файлов в другие игры: -
Использование активов для других модов: -
···················································································································
Скачать: X
Сайты, где можно найти мод: X
···················································································································


youtube
2 notes
·
View notes
Text
After trying Magit for a bit, I ended up doing my own simple+minimal thing for Git in Emacs, built on a generic function I wrote. The only piece I'm using from Magit is the with-editor package.
I wrote a function which pops open a buffer to run a command. The buffer is named after the full command. I can supply context which is added to the buffer name after the command, or override the name entirely. The buffer is created if it doesn't already exist. By "pops open", I meant the same way that for example the help buffer is popped open, with `pop-to-buffer` - I call it `pop-to-command`.
(I actually have two variants of the function - one runs the command in a raw terminal emulator buffer, and one runs it in an Eshell buffer with terminal emulation. Both use the Eat terminal emulator package. I use the Eshell+Eat variant for this, because it keeps my keybinds+UX more consistent+ergonomic, has TRAMP integration, and lets the with-editor package do its magic.)
(Because I'm using Evil for the greater efficiency+ergonomics of vi-style modal keybindings/UX, I wrap the base function to add a modal nicety: When the command starts, the buffer is put into vi "insert" state (or the "Emacs" state in the case of no-Eshell-just-Eat variant), so that I can interact directly with the command. When the command terminates, the buffer is automatically put into vi "normal" state, so that I automatically return to the keybinds I use for switching/manipulating Emacs buffers, windows, etc.)
I then have a wrapper function to run Git commands with that pop-to-command function, using the current buffer's Git repository as the context.
So let's say I'm editing a file inside a Git repo I have cloned at `~/code/my-cool-project`, I save some changes, and I'm ready to stage them. I hit a keybind, and Emacs pops a buffer named `*eshell: git add -p (~/code/my-cool-project)*`. Since it's running `git add -p`, I am just using the normal Git CLI to review and stage hunks. Same knowledge and muscle memory that works outside of Emacs. Same diff view as outside of Emacs, which would be worse than Magit but lets me reuse better-than-Magit diff improvements like git-delta and difftastic. In the very rare event that I need the granularity of the "e" action in `git add -p`, that opens in my current Emacs instance thanks to with-editor. (Naturally I also have keybinds for the "-p" versions of git checkout, git reset, and git stash.)
When I'm ready to commit, I hit another keybind, and Emacs pops a buffer named `*eshell: git commit (~/code/my-cool-project)*`. Thanks to with-editor, that immediately opens the commit message for editing in Emacs itself, in the same window. When I'm done editing, my normal "save and close" keybind makes the commit - I can also quit without saving to abort the commit. (I monkey-patched with-editor using Emacs' "advice" so that if I save and then quit as two separate Emacs commands, the change is still left saved in Git's COMMIT_EDITMSG file even though the commit isn't made, as would normally happen with any other editor.) Naturally, I have a separate keybind for `git commit --amend`.
Magit automatically always shows the staged diff in a separate buffer while writing/amending a commit. I don't normally need that, but it's really nice to have when I do. I get this on-demand because I have two more keybinds: one for `*eshell: git diff (<current-repo>)*` and one for `*eshell: git diff --staged (<current-repo>)*`. Or sometimes I just leave the `*eshell: git add -p (...)*` buffer open until I'm done commiting.
Of course I also have keybinds for other git commands that I regularly want: git log [-p], git reflog, git pull, git push [--tags] [--force], and so on. Anything I use often enough to get annoyed by the handful of keystrokes it takes me to open Eshell and execute that command from a fuzzy-find on my shell history. (The only Git operation I don't handle this way is blame - I use the built-in vc-annotate for that, configured to wrap lines instead of truncating. The indirection of Eshell-running-Git-running-a-pager doesn't bother me with diffs and logs, but it bothers me in blame due to the different patterns in reading/navigation/search/copying. Also the color-coding by age is nice, and the step-back-through-blame-history feature is one I find valuable when I have to do code archeology to figure out the cause or intent of code which doesn't make sense.)
I have a nice keybind for `quit-window` in these run-one-command buffers which doesn't make sense in normal Eat and Eshell buffers. (Because I'm using Evil, this nice keybind is the mere "q" in vi "normal" state, which overlaps wonderfully with the "q" that you get in the default `less` pager when doing `git log` and so on. So for example I just hit "q" once to quit the log command and once more to quit the window - so I keep the benefits of totally decoupled composition where these pieces don't have to understand/track/assume anything about each other, while still getting something so ergonomic and intuitive that I never notice any delays, mistakes, or cognitive load.)
For me this approach covers basically all the value that I would get from Magit, without any of the rare-but-annoying latencies that I sometimes hit with Magit (or common-and-annoying latencies that I always hit with Magit when using Emacs in Termux on my Android phones). I sorta, theoretically, very very very rarely, miss the ability to just put my cursor on a diff hunk and stage/unstage it with a key stroke, or drill down into the diff for just one commit when already looking at a log. But I basically don't miss it - because it would only save me a few seconds and a handful of keystrokes. I don't miss Magit automatically reusing the diff buffer for staged and unstaged diffs, making it impossible to see both side-by-side. I really don't miss Magit asking me to save the file every time I asked for a Git diff. So I gain some value this way too.
I have some desire to eventully put the pop-to-command functions into their own package on the Non-GNU ELPA, and maybe do the same with my minimal Git wrappers if there's demand.
5 notes
·
View notes
Text

Whether you're creating a website or an app, every icon in your interface should have a function. Icons are present to conserve screen space. They're also there to help your users. Icons, when used effectively, may assist you in guiding people naturally through a process without depending on excessive copy. When done incorrectly, they can be confusing to your consumers, leading them down the wrong routes and ruining their experience with your product.
#UI/UX Designer#icon usability#icon usability tips#icon usability guidelines#tips for icon usability#what are icons in website interface#icons in user experience#importance of icons in user experience#user-friendly icons#hire UI/UX designer#web development company#hire dedicated web developer#software development company
3 notes
·
View notes
Text
A Checklist : 10 Things You Need To Do Before Your Website Redesign

Introduction
1. Define your goals
Any company or organization that wishes to boost its online presence and accomplish its objectives must first update its website. Setting attainable goals that are in line with the organization's overarching aims and vision is crucial before starting a website overhaul.
Identifying the precise issues or difficulties that your current website is facing is the first step in identifying your goals for a website redesign. This could be due to a number of factors, including an out-of-date design, bad navigation, sluggish page loads, little traffic, low conversion rates, or any other problems that are impairing the functionality of your website.
You must develop realistic goals that address the issues once you have identified them. For instance, if your website receives little traffic, your goal can be to double it within the first six months of its existence. Similar to this, if your website has a high bounce rate, you might want to reduce it by 20% during the first three months of introduction.
2. Research your audience
User research can be conducted in a variety of ways, including surveys, interviews, focus groups, and even website analytics analysis. You can utilise this study to understand user motivations and goals when they engage with your website, as well as to uncover user pain spots and frustrations.
You can then develop an experience that is suited to the requirements and preferences of your audience using the knowledge obtained through user research. Site navigation, content organisation, messaging, graphic design, and other elements are included in this. You can boost customer satisfaction, boost conversions, and enhance engagement by creating an experience that speaks to your audience.
It is crucial to remember that user research should be a continuous process rather than a one-time event. In order to make sure that your website continues to satisfy the demands of your audience, it is crucial to stay up to date with changes in user behaviour and preferences.
3. Research the competition
Competition analysis is a crucial step in the process of redesigning a website. You may learn a lot about what is and isn't working in your sector by looking at the websites of your competitors. You may use this information to position your website to stand out from the competition and make better educated design decisions.
While examining the websites of your rivals, there are several things to keep an eye out for. Think about their layout and design first. Look at how they produce a visual experience by combining colour, text, and pictures. Consider how you may incorporate any distinctive design elements or features that they employ into your own website.
After that, think about their content strategy. Examine the content they are producing, such as blog posts, videos, or podcasts, and take into account how conversions are being sparked by and users are being engaged by it. Look at their messaging's tone and voice, and think about how you can develop a comparable tone that appeals to your own audience.
Then, think about how they use it. Examine the layout, navigation, and overall usability of their website. Consider how you may build a more streamlined and intuitive user experience by keeping an eye out for any pain points or frustrations that consumers may have.
4. Understand what makes your site unique
The process of redesigning your website must start with an understanding of what makes it special. It's critical to understand what makes your website stand out from the competition and how to make the most of those distinctive qualities.
Start by thinking about the value proposition of your website. What do you provide that nobody else does? What makes your website the first place your target market visits? Think about the goods or services you give, the advantages you offer, and the issues you help your customers with. This will assist you in identifying the distinctive qualities and traits that distinguish your website.
You can utilise this knowledge to inform your design choices once you've determined what makes your website distinctive. For instance, you might want to prominently promote your unique selling propositions on your homepage or develop a unique feature that makes you stand out from the competitors. You can build a website that stands out from the competition and appeals to your target audience by concentrating on these distinctive traits.
5. Define your visual style
One of the most important steps in the website redesign process is defining your visual style. Making a design style guide is necessary to ensure that your website has a unified appearance and feel and to guide all of your design decisions.
Start by researching current web design trends and selecting those that complement the personality and messaging of your brand. Think of elements like font, colour scheme, iconography, and imagery. You want to develop a visual aesthetic that appeals to your target market and reflects the personality of your business.
Create a design style guide that specifies how each visual component should be used once you've determined the visual components that will make up the design style of your website. This manual will act as a point of reference for all of your design choices and guarantee that your website has a unified and consistent aesthetic.
6. Decide on your Content
When updating your website, there are numerous areas of content to take into account. Make sure you decide on your website layout, the kind and volume of information you'll use, and how you'll SEO-optimize that content. Also, think about the platforms and technologies you'll employ moving forward, as well as how you'll manage content. You'll have a better idea of the content you need to produce, how it should be structured and presented, and how to optimise it for search engines before beginning your website redesign. This will speed up the design process and guarantee that the material on your website is interesting, pertinent, and SEO-optimized.
7. Map out your Navigation
It's essential to make your navigation system simple to use and understand while developing it. Visitors should be able to easily navigate your website and find the information they're seeking for in a timely manner. Maintaining consistency in your navigation across the entire website is also crucial. Make sure that each navigational item is clearly and concisely labelled, and that it is arranged in a logical sequence.
Think of creative methods to make your navigation more appealing to increase user engagement. Sticky navigation, mega-menus, and dropdown menus are all effective ways to keep visitors on your website and entice them to explore more of its contents. Also, you may utilise calls to action (CTAs) in your navigation to nudge users into carrying out particular tasks, like subscribing to a subscription or completing a purchase.
8. Create a Sitemap
It's crucial to build a sitemap before you begin the design process. This entails creating an outline of every page and area of your website that will be included in the redesign. This procedure aids in finding any content gaps and guarantees that all crucial pages are included in the makeover.
The hierarchy of your material should be taken into account while designing your sitemap. Create subpages and sections that are linked to your homepage after which. To establish a logical flow and make it simple for users to traverse your website, group comparable pages together.
You can use your sitemap as a roadmap for the development and design phases after you've developed it. The sitemap will ensure that all pages are included in the development process and will aid developers in understanding the structure of your website. The sitemap can be used by designers to develop wireframes and design concepts that complement the organisation of your website.
9. Wireframe your Pages
Create a rough sketch of the overall design and structure of each page before beginning to wireframe it. Either by hand or with specialised wireframing software, this can be accomplished. Pay close attention to where important components like headers, footers, navigation menus, and content areas are placed. Think about how these components will appear on various screen sizes and devices.
Once you've created a basic wireframe, it's crucial to test prototypes with users. Making a rudimentary, interactive prototype of your wireframe enables people to browse the website as they would in the finished product. This can help you discover any usability problems or potential areas for improvement while also providing you with insightful information about how users interact with your website.
Pay attention to how visitors move through your website, where they get stuck, and where they have trouble accessing content while conducting user testing. Make changes to your wireframes and improve your design using this feedback.
10. Prepare for Launch
Launching your website is the next step after designing and developing it. Check that everything on the website is functioning properly before attempting to accomplish it. Make sure to conduct an SEO audit to optimise your pages, and have a strategy in place for testing and evaluating the redesign's effectiveness.
Conclusion:
Make sure you have a thorough plan in place before you begin because redesigning a website may be a challenging undertaking. Make sure you cover all the bases and have a successful launch by using this checklist. If you adhere to this checklist, your website makeover will be a positive and gratifying experience.
#website redesign#websitedevelopment#small business website design#checklist#website developers#user interface#user experience#ui ux development services#uiuxservices
5 notes
·
View notes
Last Seen Blogs