#Tempura fryer
Explore tagged Tumblr posts
Visit Tumblr Blog
Explore Tumblr blogs with no restrictions, modern design and the best experience.
Last Seen Tumblr Blogs


Fun Fact
25% of US internet users with an annual income of $80-100K use Tumblr.
Text
Sushi Robots: Revolutionizing the Art of Sushi Making
Sushi the iconic Japanese dish has been a lot of prominence. But crafting sushi by hand can be time consuming and also requires a lot of skills chefs To meet the growing demand while maintaining quality technology has steeped in amazing solution sushi robot. In this guide you can learn everything about the sushi robots as they are designed to automate the sushi making process delivering best quality sushi with efficiency.

The sushi robot
Just like moving ramen advertising light box s sushi robot is completely changing the sushi making industry by automating various tasks that were traditionally done by hand. From forming rice balls to slicing fish the robots can replicate the precision of a skilled expert. It can also help you speed up the production like no other. The automation is especially beneficial for large scale sushi production like restaurants grocery stores and catering services where consistency and efficiency is important.
Benefits of sushi robots
One of the best parts about sushi robots is the ability to produce sushi quickly and consistently. In a busy restaurant manual sushi preparation can be really slow, especially during the peak hours. The sushi robots can just prepare hundreds of sushi pieces per hour allowing you to serve more customers in less time. The sushi robots ensure that every sushi roll is made with precision. Every piece is uniform in size and shape which improve its presentation and taste. The level of consistency is difficult to achieve manually even with experienced chefs. Hiring and training skilled experts can be expensive. By integrating the robots into the kitchen, you can reduce labor costs without compromising on quality. Additionally robots can work long hours without fatigue reducing the need for multiple shifts.
How do robot work?
The robot will first start by forming the sushi rice into perfectly shaped portions. It shapes the rice into compact ovals while for marquee rolls it flattens the rice onto a sheet of nori. In some models the robot will also help you in adding toppings like fish or vegetables. For marquee rolls the robot will roll the nori and pile into a tight uniform roll. Furthermore, robots will also allow customization allowing you to choose different shape size and styles of sushi depending on the menu. Whether it's a small bite sized pieces or large portions or robot can adjust to your preferences.
So above all you need to know that sushi robots are transforming the sushi making process by bringing speed consistency and efficiency to kitchens globally.
To know more about this products visit our website https://sanseidou.co.jp/en/
#noodle boiler machine#gyoza cooking machine#Mini Japanese Bread Crumbs Panko Maker#noodle making machine#moving ramen advertising light box#Tempura fryer#presure ramen soup pot#sushi robot#煮麵爐#自動煎餃機#製麵機
1 note
·
View note
Text
The Best Tempura Fryer for Kitchen
New Post has been published on https://thekitchnpro.com/the-best-tempura-fryer-for-kitchen/
The Best Tempura Fryer for Kitchen

Tempura fryer is an essential part of any kitchen. They’re not that expensive or difficult to use, as long as you choose the right one for your needs. So how do you pick the right tempura fryer? I’m glad you asked! Check out these top picks from my expert review team below, and find out how to pick the best tempura fryer based on all of your needs and wants!
GoWISE USA Electric Deep Fryer
The GoWISE USA Electric Deep Fryer is one of our favorites for its simplicity, durability, and affordable price point. This deep fryer features a see-through window that gives you easy access to your food as it fries. A handy basket lifts out with ease so you can dump your food in seconds. A carry handle on top makes it easy to take your hot food with you on picnics or camping trips! At under $30. We think it’s a great choice for anyone looking for an electric model of tempura fryer at an excellent price point. It even comes in fun colors like red, green, yellow, blue, orange, and white! It has all of the basic functions needed for frying.
It heats up quickly, cools down quickly after use, runs quietly without any smoke or odor. And there are no complicated settings to mess around with. We think it’s ideal if you’re just getting started with cooking but don’t want to shell out big bucks for a fancy gadget that does more than what you need it to do. We recommend washing by hand rather than placing it into the dishwasher since some users have complained about surface scratches caused by dishwasher detergent. One last pro tip: make sure never submerge any electrical parts in water because damage may occur due to electrical shock or fire hazards.
Presto CoolDaddy Cool Touch Deep Fryer
If you’re looking for a fast, easy way to make crisp, delicious tempura, look no further than the Presto CoolDaddy Cool Touch Deep Fryer. It has a viewing window and an adjustable thermostat. So you can keep an eye on things without fear of burning. The detachable handle makes it easy to carry to and from your kitchen table, and a 2-liter oil capacity means that you won’t be running out before dinner is done. It even has a removable oil filtration system to ensure that your fried foods are crispy while minimizing messy clean-up!
Grab one of these fryers if you want healthy, delicious tempura with minimal effort! What else do we like about it? For its price, you’d expect nothing more than a propane tank and tongs. But there’s actually a deep-frying thermometer as well as strainers built into two sides of the appliance itself! Cooks love how effortlessly their food comes out perfect every time and reviewers say that only rarely do they need to re-oil between batches.
Presto GranPappy Electric Deep Fryer
The Presto GranPappy Electric Deep Fryer can be used to fry up to 3 pounds of chicken, fish, pork chops, sausage, onion rings, and more. The removable chafing dish can also be used on its own as a chafing heater when serving your fried foods. This unit is made of stainless steel with a nonstick cooking surface that is very easy to clean after use. It has an adjustable thermostat for temperature control and a removable cord storage compartment. The Presto GranPappy Electric Deep Fryer retails for around $50 online.
Cuisinart Cordless Electric Deep Fryer
The Cuisinart Cordless Electric Deep Fryer is one of our favorite fryers. Although it’s on the expensive side, you can’t deny that it does an excellent job of cooking your food. It heats up very quickly and produces perfect results every time. The Cuisinart features an auto-shutoff timer to make sure you never over-cook your food. And a removable tray for easy cleanup although there are still some small nooks and crannies that might be tricky to get out.
Plus, it has a capacity of two quarts enough to easily cook enough fried foods for dinner plus leftovers. This particular model comes in stainless steel, which looks sleek and professional in any kitchen. However, if you’re not too concerned about presentation then we highly recommend checking out other models on our list that feature nonstick surfaces; they’re great at reducing oil splatter when you remove fried foods from them! All in all, if you’re looking for something high quality but don’t want to sacrifice usability or convenience then this is definitely worth considering.
Waring Pro DF280 Professional Deep Fryer
There are so many different kinds of fryers on today’s market it can be hard to choose which one is right for you. The Waring Pro DF280 Professional Deep Fryer is designed with specific features that make it great for frying just about anything, including seafood, fries, chicken, and vegetables. There are dual baskets that will allow you to fry up to 3 pounds of food at a time. You can easily control temperatures with its digital thermostat control. When you first receive your Waring Pro DF280 Professional Deep Fryer it comes with an automatic food basket lift for convenient use. If you want a great deep fryer that will give years of reliable service then look no further than Waring Pro’s DF280 Professional Deep Fryer.
Chefman Electric Deep Fat Fryer
If you’re looking for a way to fry your foods without using cooking oil, then it’s worth checking out Chefman Electric Deep Fat Fryer. This appliance is an electric deep fryer that allows you to cook several different types of food at once. It has a capacity of 6.5 liters, which means it can easily hold enough ingredients for three or four people. So you can prepare snacks or small meals with ease. Thanks to its heating system, you get high-quality results with very little oil. It comes with digital controls so you can adjust cooking temperatures quickly and precisely. Giving your fried food just what it needs in order to come out delicious every time.
0 notes
Text

🍤✨ Sprøde Tempurarejer i Airfryer! ✨🍤
Vil du have en sundere og lige så lækker version af dine yndlings-tempurarejer? Prøv at lave dem i en airfryer! Perfekt til frokost eller middag, med mindre olie og samme fantastiske smag.
Ingredienser:
400 g rejer, pillet og renset
120 g tempuramel
180 ml iskoldt vand
1 æg
1 tsk bagepulver
Salt efter smag
Sådan gør du:
Bland tempuramel, bagepulver og salt.
Tilsæt iskoldt vand og æg, og rør forsigtigt.
Dyp rejerne i dejen.
Forvarm airfryeren til 180°C.
Tilbered rejerne i 8-10 minutter.
Tip: Hold dejen kold for ekstra sprødhed! 🧊
0 notes
Photo
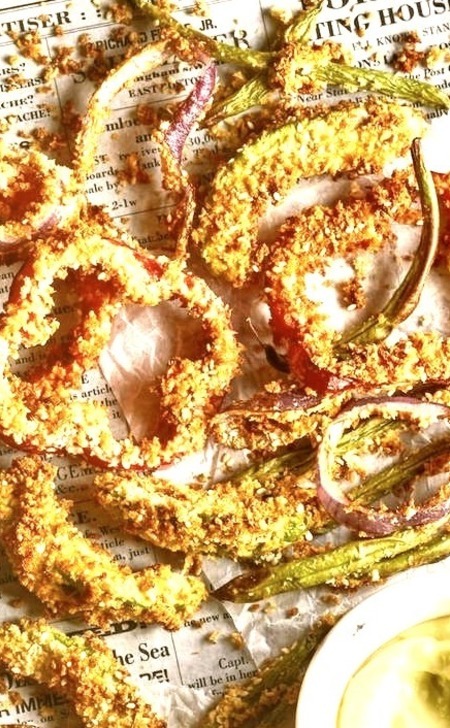
Air-Fryer Tempura Veggies Recipe As an appetizer or snack, these homemade air fryer tempera mixed vegetables are delectably airy and crispy. Serve with any dipping sauce or on its own. 2 eggs, 1/2 cup whole asparagus spears, 1/2 cup all-purpose flour, 1/2 cup avocado wedges, 1/2 cup sweet pepper rings, 1/2 teaspoon ground black pepper, 1/2 cup zucchini slices, 1 cup panko bread crumbs, 1/2 cup whole green beans, 1/2 cup red onion rings, 2 tablespoons water, 2 teaspoons vegetable oil, 1/2 teaspoon salt divided or more to taste
1 note
·
View note
Photo

Air-Fryer Tempura Veggies As an appetizer or snack, these homemade air fryer tempera mixed vegetables are delectably airy and crispy. Serve with any dipping sauce or on its own.
0 notes
Photo

Air Fryer Shrimp Tempura Recipe Use your air fryer to make shrimp tempura for a wholesome alternative. Serve with the dipping sauce recipe provided or with sweet chili sauce.
0 notes
Photo

Recipe for Air Fryer Shrimp Tempura Use your air fryer to make shrimp tempura for a wholesome alternative. Serve with the dipping sauce recipe provided or with sweet chili sauce. 1 pound large shrimp - peeled deveined and tails left on, 1 egg beaten, 2 tablespoons soy sauce, 1 tablespoon oyster sauce, 1 tablespoon chopped scallions, 1/2 cup all-purpose flour, 1 teaspoon white sugar, 2 tablespoons sherry, 1 teaspoon lemon juice, 1/2 cup club soda, 1/2 cup cornstarch, 1/2 teaspoon ginger stir-in paste, 2 tablespoons rice wine vinegar
1 note
·
View note
Photo

Zucchini Appetizer - Air-Fryer Tempura Veggies These homemade air fryer tempera mixed vegetables make a deliciously light and crispy appetizer or snack. Serve as-is or with any dipping sauce.
#air fryer tempera#vegetable pieces#panko mixture#tempura veggies#tempura air fryer veggies#vegetables#air fryer
0 notes
Text
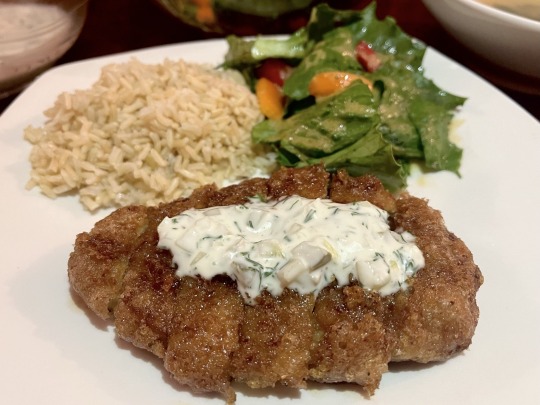
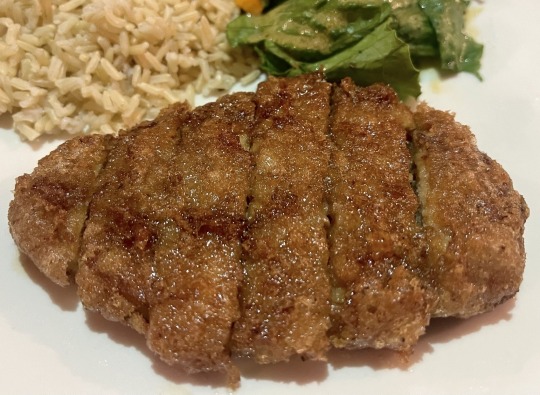
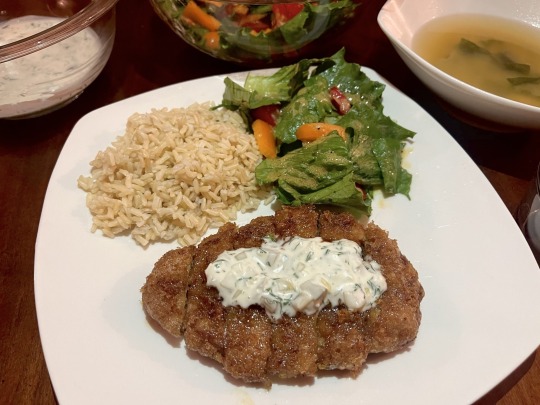
[ID: A fried 'chicken' cutlet topped with tartar sauce and served with rice and a green salad; bowls of tartar sauce and miso soup are in the background. End ID]
チキン南蛮 / Chicken nanban (Japanese fried chicken with sweet-savory sauce)
Chicken “nanban” (南蛮; "barbarian" or "foreign") is a classic example of 洋食 (yoshoku)—Western-style food adapted to a Japanese palette. Chicken breast is breaded, deep-fried, and coated in a mixture of soy sauce, sugar, and vinegar to create a crispy, tangy, savoury-sweet dish.
The method of breading and deep-frying used in making chicken nanban, tempura, and other Japanese dishes was introduced by the Portuguese during the Muromachi period (16th century). Chicken nanban itself, however, is far more recent: Nao-chan diner in the Miyazaki Prefecture of Kyushu is credited with having invented it in the 1950s. Nao-chan's version of the dish does not include tartar sauce, but it is often added to provide a sharp, creamy complement to the savoury chicken.
Chicken nanban works well as a main dish served with sides of rice, soup, or salad. If you're using pre-made chicken breasts, it comes together in around half an hour.
Recipe under the cut!
Patreon | Tip jar
Serves 4.
Ingredients:
For the chicken:
4 Gardein chicken breasts, or other chicken breast substitute, thawed
1/4 cup (30g) all-purpose flour
2 Tbsp potato starch or cornstarch (optional)
2 Tbsp egg replacer (I used Bob's Red Mill)
Water
Pinch kosher salt
A few cracks of black pepper
Oil to deep fry
For the nanbanzu / 南蛮酢 (nanban sauce):
3 Tbsp Japanese soy sauce, such as Kikkoman's
3 Tbsp rice vinegar
3 Tbsp granulated vegetarian sugar
1 1/2 Tbsp mirin (for a low-alcohol version, use aji-mirin; for an alcohol-free version, replace with 1/2 Tbsp rice vinegar and 1 Tbsp sugar)
For the tartar sauce:
1/2 cup vegan mayonnaise
1/2 tsp mild Dijon mustard
2 tsp rice vinegar
1 tsp dried ground shiitake mushroom, or kombu dashi powder
1 tsp vegetarian sugar
A few small sweet pickles or 1 Japanese or Persian cucumber, diced
1/2 small yellow onion, minced
Pinch kosher salt
Pinch of MSG
Minced dill or parsley (optional)
If you eat eggs, you can replace the first five ingredients with 1/2 cup Kewpie mayo (キューピーマヨ).
Instructions:
For the nanbanzu / 南蛮酢 (nanban sauce):
1. Heat sugar and soy sauce in a small pot over medium-low heat until simmering, stirring to dissolve.
2. Add vinegar and mirin and heat for another 30 seconds. Remove from heat.
For the tartar sauce:
1. Mince the onion. If you prefer, you can submerge the minced onion in cool water for 10 minutes or so and then drain to remove some of its sharpness. Seed and mince the cucumber.
2. Whisk mayonnaise, mustard, sugar, salt, black pepper, MSG, rice vinegar, and mushroom powder together to combine. Add onion and cucumber and stir. Top with herbs. Refrigerate while preparing the chicken.
For the chicken:
1. Mix flour, starch, salt, and black pepper together on a plate or cutting board. In a small bowl, combine egg replacer with water according to package directions and allow to thicken.
2. Fill a deep fryer or medium-sized pot with several inches of a neutral oil and heat it to 340 °F (171 °C). A chopstick placed in the oil should slowly form small bubbles around its tip.
3. Coat chicken breasts with egg replacer; if it is too thick, you may need to whisk in an additional 1-2 Tbsp water.
4. First deep fry. Carefully lower one chicken breast into the oil and fry without disturbing for about 2 minutes, until the egg coating on the bottom side is cooked through and lightly golden brown. Flip over and continue to fry for another 2 minutes. Use chopsticks or a slotted spatula to remove the chicken breast onto a wire cooling rack or paper-towel-lined plate.
5. Use a slotted spoon to remove any bits of batter from the oil and re-check the temperature. Repeat with each chicken breast.
6. Second deep fry. Increase the heat slightly to raise the temperature of the oil to 355 °F (179 °C). Re-fry each chicken breast for about a minute, flipping once halfway through. Set aside.
7. Coat with nanban sauce. Place the fried chicken breasts in a shallow rimmed baking dish or tray and spoon most of the nanban sauce over them, turning over several times to coat. Reserve the rest of the sauce for serving.
8. Slice each chicken breast widthwise and transfer to an individual serving plate. Serve with additional nanban sauce, tartar sauce, rice, a green salad, or soup.
110 notes
·
View notes
Text
I know it's not like real cooking if I'm heating up frozen veggies and pouring campells curry sauce over it and heating it in the pan and putting frozen shrimp tempura in the air fryer but I did make my own rice with chicken broth to put the veggie curry over and it was very tasty. I am very proud of myself cause like. It's me TRYING to give myself proper nutrients and meals with the limited skills and resources I have while also trying to learn. I am happy with myself for doing that tbh so please look at my dinner that I'm very proud of cause it looks legit

#also my mom is a great cook and she always told me that it's okay to have my sides by frozen veggies and premade mashed potatoes and stuff#like the point is that it's not a processed tv dinner I'm TRYING#and I need to build confidence in handling cooking equipment#so this is my best plan rn before I start feeling good enough to actually cook cook things#also the campbells curry pouches are lowkey kinda good???#not spicy enough in the slightest but they're tasty
9 notes
·
View notes
Text
there are many benefits for owning an air fryer (I am eating tempura)
6 notes
·
View notes
Text
The Art of Noodle Making: Exploring the Benefits of Noodle Making Machine
Noodles are completely beloved staple In a plenty of cultures known for their amazing deliciousness and versatility. Whether you enjoyed in soups stir fries or salads noodles offer endless possibilities for creativity in your kitchen. With the advent of technology, noodle making has truly evolved making it easier than ever before to create fresh homemade noodles at home. In this guide you can learn everything about noodle making machine and why you should invest in one.

The appeal of fresh noodles
Before you invest in noodle boiler machine it's really important for you to understand the appeal of fresh noodles. Fresh noodles have a unique texture and flavor that dried noodles simply cannot match. They are completely soft chewy here and can be customized to suit personal tastes. Making noodles from scratch can be a rewarding experience but it can also be time consuming and labor intensive. This is where noodle making machines come in the picture. The machines simplify the process allowing you to enjoy the taste and quality of fresh noodles without the stress.
Benefits of noodle making machine
Traditional noodle making requires a lot of time and effort from mixing the dough to rolling out and cutting it by hand. A noodle making machine automates all of the process saving a lot of time in the kitchen. Most of the machines can even prepare noodles in minutes making them a perfect choice for you as a busy household.
One of the most challenging parts of making noodles by hand is achieving consistency in thickness and shape. And noodle making machine ensures uniformity producing perfectly shaped noodles every time. This consistency can truly improve the appearance of your dishes and also improve the overall cooking process.
With a noodle making machine you can completely experiment with different types of flour ingredients and flavors. Whether you want to make whole wheat noodles spinach infused noodles or just even gluten free options the machine allows for customization that meets your diet preferences.
So above all you need to know that noodle making machine is a valuable addition to your kitchen making it easy for you to enjoy fresh homemade noodles at home. With plenty of benefits like time saving consistency and customization the machines allow you to unleash your culinary creativity. By understanding how to choose the right and you can elevate your cooking experience and bring the joy of fresh noodles to your loved ones.
To know more about this products visit our website https://sanseidou.co.jp/en/
#noodle boiler machine#gyoza cooking machine#Mini Japanese Bread Crumbs Panko Maker#noodle making machine#moving ramen advertising light box#Tempura fryer#presure ramen soup pot#sushi robot#煮麵爐#自動煎餃機#製麵機
1 note
·
View note
Text
The Best Tempura Fryer for Kitchen
New Post has been published on https://thekitchnpro.com/the-best-tempura-fryer-for-kitchen/
The Best Tempura Fryer for Kitchen

Tempura fryer is an essential part of any kitchen. They’re not that expensive or difficult to use, as long as you choose the right one for your needs. So how do you pick the right tempura fryer? I’m glad you asked! Check out these top picks from my expert review team below, and find out how to pick the best tempura fryer based on all of your needs and wants!
GoWISE USA Electric Deep Fryer
The GoWISE USA Electric Deep Fryer is one of our favorites for its simplicity, durability, and affordable price point. This deep fryer features a see-through window that gives you easy access to your food as it fries. A handy basket lifts out with ease so you can dump your food in seconds. A carry handle on top makes it easy to take your hot food with you on picnics or camping trips! At under $30. We think it’s a great choice for anyone looking for an electric model of tempura fryer at an excellent price point. It even comes in fun colors like red, green, yellow, blue, orange, and white! It has all of the basic functions needed for frying.
It heats up quickly, cools down quickly after use, runs quietly without any smoke or odor. And there are no complicated settings to mess around with. We think it’s ideal if you’re just getting started with cooking but don’t want to shell out big bucks for a fancy gadget that does more than what you need it to do. We recommend washing by hand rather than placing it into the dishwasher since some users have complained about surface scratches caused by dishwasher detergent. One last pro tip: make sure never submerge any electrical parts in water because damage may occur due to electrical shock or fire hazards.
Presto CoolDaddy Cool Touch Deep Fryer
If you’re looking for a fast, easy way to make crisp, delicious tempura, look no further than the Presto CoolDaddy Cool Touch Deep Fryer. It has a viewing window and an adjustable thermostat. So you can keep an eye on things without fear of burning. The detachable handle makes it easy to carry to and from your kitchen table, and a 2-liter oil capacity means that you won’t be running out before dinner is done. It even has a removable oil filtration system to ensure that your fried foods are crispy while minimizing messy clean-up!
Grab one of these fryers if you want healthy, delicious tempura with minimal effort! What else do we like about it? For its price, you’d expect nothing more than a propane tank and tongs. But there’s actually a deep-frying thermometer as well as strainers built into two sides of the appliance itself! Cooks love how effortlessly their food comes out perfect every time and reviewers say that only rarely do they need to re-oil between batches.
Presto GranPappy Electric Deep Fryer
The Presto GranPappy Electric Deep Fryer can be used to fry up to 3 pounds of chicken, fish, pork chops, sausage, onion rings, and more. The removable chafing dish can also be used on its own as a chafing heater when serving your fried foods. This unit is made of stainless steel with a nonstick cooking surface that is very easy to clean after use. It has an adjustable thermostat for temperature control and a removable cord storage compartment. The Presto GranPappy Electric Deep Fryer retails for around $50 online.
Cuisinart Cordless Electric Deep Fryer
The Cuisinart Cordless Electric Deep Fryer is one of our favorite fryers. Although it’s on the expensive side, you can’t deny that it does an excellent job of cooking your food. It heats up very quickly and produces perfect results every time. The Cuisinart features an auto-shutoff timer to make sure you never over-cook your food. And a removable tray for easy cleanup although there are still some small nooks and crannies that might be tricky to get out.
Plus, it has a capacity of two quarts enough to easily cook enough fried foods for dinner plus leftovers. This particular model comes in stainless steel, which looks sleek and professional in any kitchen. However, if you’re not too concerned about presentation then we highly recommend checking out other models on our list that feature nonstick surfaces; they’re great at reducing oil splatter when you remove fried foods from them! All in all, if you’re looking for something high quality but don’t want to sacrifice usability or convenience then this is definitely worth considering.
Waring Pro DF280 Professional Deep Fryer
There are so many different kinds of fryers on today’s market it can be hard to choose which one is right for you. The Waring Pro DF280 Professional Deep Fryer is designed with specific features that make it great for frying just about anything, including seafood, fries, chicken, and vegetables. There are dual baskets that will allow you to fry up to 3 pounds of food at a time. You can easily control temperatures with its digital thermostat control. When you first receive your Waring Pro DF280 Professional Deep Fryer it comes with an automatic food basket lift for convenient use. If you want a great deep fryer that will give years of reliable service then look no further than Waring Pro’s DF280 Professional Deep Fryer.
Chefman Electric Deep Fat Fryer
If you’re looking for a way to fry your foods without using cooking oil, then it’s worth checking out Chefman Electric Deep Fat Fryer. This appliance is an electric deep fryer that allows you to cook several different types of food at once. It has a capacity of 6.5 liters, which means it can easily hold enough ingredients for three or four people. So you can prepare snacks or small meals with ease. Thanks to its heating system, you get high-quality results with very little oil. It comes with digital controls so you can adjust cooking temperatures quickly and precisely. Giving your fried food just what it needs in order to come out delicious every time.
0 notes
Text
Figured out how to air fry tempura. Im becoming guy who wont shut up abt his air fryer
6 notes
·
View notes
Text
one thing that's hard about being an adventurer is all the favorite foods i can't have anymore. i no longer have daily access to pickled ginger tempura batter and a deep fryer. im not allowed to combine raw ground meats of different kinds behind the waffle house counter. the closest cherimoya is probably thousands of miles away.
2 notes
·
View notes
Note
could i get some food recs for Osamu Dazai from BSD?? /nf. i prefer salty foods and that are quick/easy to make if possible cause my energy to do things is usually low. . . sorry if that's vague !!
Of course, sweet dove. I did my best on the easy part, but I fear I might not have done well. As for salty, I think I was able to do all except two or so recipes that were more savory (just about 2 recipes are sweet, simply added because I was highly inspired).
hiroshima okonomiyaki
salted caramel manhattan
coconut shrimp
bang bang shrimp egg rolls
spicy crab sushi roll
air fryer crab rangoons
shrimp tempura
chocolate espresso cookies
spam musubi with egg
#dazaikin#bsdkin#bsd kin#fictionkin#fictionhearted#fiction kin#dazai kin#other kin#otherhearted#otherkin#kintype#kin#kin community#kin stuff#kin blog#alterhumanity#alterhuman#nonhuman
6 notes
·
View notes