#Secure password managers for self-host
Explore tagged Tumblr posts
Visit Tumblr Blog
Explore Tumblr blogs with no restrictions, modern design and the best experience.
Last Seen Tumblr Blogs


Fun Fact
Tumblr Inc. has $15.1M in annual revenue.
Text
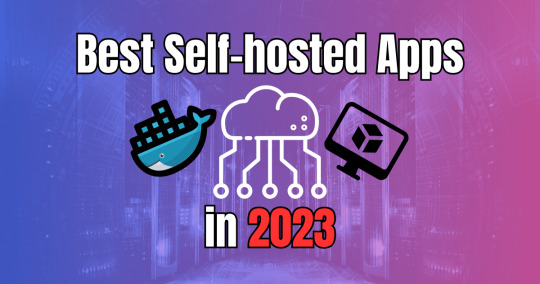
Best Self-hosted Apps in 2023
Best Self-hosted Apps in 2023 #homelab #selfhosting #BestSelfHostedApps2023 #ComprehensiveGuideToSelfHosting #TopMediaServersForPersonalUse #SecurePasswordManagersForSelfHost #EssentialToolsForSelfHostedSetup #RaspberryPiCompatibleHostingApps
You can run many great self-hosted apps in your home lab or on your media server with only a small amount of tinkering. Let’s look at the best self-hosted apps in 2023 and a list of apps you should check out. Table of contentsWhy Self-hosting?Plex: The Media Server KingJellyfin: Open Source Media FreedomEmby: A Balanced Media ContenderNextcloud: Your Personal Cloud ServiceHome Assistant:…
View On WordPress
#Best self-hosted apps 2023#Comprehensive guide to self-hosting#Docker containers for easy app deployment#Essential tools for self-hosted setup#In-depth analysis of self-hosted platforms#Manage sensitive data with self-host#Raspberry Pi compatible hosting apps#Secure password managers for self-host#Self-host vs. cloud services comparison#Top media servers for personal use
1 note
·
View note
Text
#Playstation7 Security backend FireWall Dynamic Encryption, NFT integration CG’s and Online Store, Game download, installation and run processes.

Creating a comprehensive backend system for a console that integrates security, encryption, store functionality, NFT integration, and blockchain encoding is an extensive task, but here’s a detailed outline and code implementation for these components:

1. Security and Firewall System with Dynamic Encryption
The security system will need robust firewalls and periodic encryption mechanisms that update dynamically every 5 minutes and every 30th of a second.
1.1 Encryption Structure (Python-based) with Time-Based Swapping
We’ll use the cryptography library in Python for encryption, and random for generating random encryption keys, which will change periodically.
Encryption Swapping Code:
import os
import time
import random
from cryptography.fernet import Fernet
class SecuritySystem:
def __init__(self):
self.current_key = self.generate_key()
self.cipher_suite = Fernet(self.current_key)
def generate_key(self):
return Fernet.generate_key()
def update_key(self):
self.current_key = self.generate_key()
self.cipher_suite = Fernet(self.current_key)
print(f"Encryption key updated: {self.current_key}")
def encrypt_data(self, data):
encrypted = self.cipher_suite.encrypt(data.encode())
return encrypted
def decrypt_data(self, encrypted_data):
return self.cipher_suite.decrypt(encrypted_data).decode()
# Swapping encryption every 5 minutes and 30th of a second
def encryption_swapper(security_system):
while True:
security_system.update_key()
time.sleep(random.choice([5 * 60, 1 / 30])) # 5 minutes or 30th of a second
if __name__ == "__main__":
security = SecuritySystem()
# Simulate swapping
encryption_swapper(security)
1.2 Firewall Setup (Using UFW for Linux-based OS)
The console could utilize a basic firewall rule set using UFW (Uncomplicated Firewall) on Linux:
# Set up UFW firewall for the console backend
sudo ufw default deny incoming
sudo ufw default allow outgoing
# Allow only specific ports (e.g., for the store and NFT transactions)
sudo ufw allow 8080 # Store interface
sudo ufw allow 443 # HTTPS for secure transactions
sudo ufw enable
This basic rule ensures that no incoming traffic is accepted except for essential services like the store or NFT transfers.
2. Store Functionality: Download, Installation, and Game Demos
The store will handle downloads, installations, and demo launches. The backend will manage game storage, DLC handling, and digital wallet integration for NFTs.

2.1 Download System and Installation Process (Python)
This code handles the process of downloading a game, installing it, and launching a demo.
Store Backend (Python + MySQL for Game Listings):
import mysql.connector
import os
import requests
class GameStore:
def __init__(self):
self.db = self.connect_db()
def connect_db(self):
return mysql.connector.connect(
host="localhost",
user="admin",
password="password",
database="game_store"
)
def fetch_games(self):
cursor = self.db.cursor()
cursor.execute("SELECT * FROM games")
return cursor.fetchall()
def download_game(self, game_url, game_id):
print(f"Downloading game {game_id} from {game_url}...")
response = requests.get(game_url)
with open(f"downloads/{game_id}.zip", "wb") as file:
file.write(response.content)
print(f"Game {game_id} downloaded.")
def install_game(self, game_id):
print(f"Installing game {game_id}...")
os.system(f"unzip downloads/{game_id}.zip -d installed_games/{game_id}")
print(f"Game {game_id} installed.")
def launch_demo(self, game_id):
print(f"Launching demo for game {game_id}...")
os.system(f"installed_games/{game_id}/demo.exe")
# Example usage
store = GameStore()
games = store.fetch_games()
# Simulate downloading, installing, and launching a demo

store.download_game("http://game-download-url.com/game.zip", 1)
store.install_game(1)
store.launch_demo(1)
2.2 Subsections for Games, DLC, and NFTs
This section of the store manages where games, DLCs, and NFTs are stored.
class GameContentManager:
def __init__(self):
self.games_folder = "installed_games/"
self.dlc_folder = "dlcs/"
self.nft_folder = "nfts/"
def store_game(self, game_id):
os.makedirs(f"{self.games_folder}/{game_id}", exist_ok=True)
def store_dlc(self, game_id, dlc_id):
os.makedirs(f"{self.dlc_folder}/{game_id}/{dlc_id}", exist_ok=True)
def store_nft(self, nft_data, nft_id):
with open(f"{self.nft_folder}/{nft_id}.nft", "wb") as nft_file:
nft_file.write(nft_data)
# Example usage
manager = GameContentManager()
manager.store_game(1)
manager.store_dlc(1, "dlc_1")
manager.store_nft(b"NFT content", "nft_1")
3. NFT Integration and Blockchain Encoding
We’ll use blockchain to handle NFT transactions, storing them securely in a blockchain ledger.
3.1 NFT Blockchain Encoding (Python)
This script simulates a blockchain where each block stores an NFT.
import hashlib
import time
class Block:
def __init__(self, index, timestamp, data, previous_hash=''):
self.index = index
self.timestamp = timestamp
self.data = data
self.previous_hash = previous_hash
self.hash = self.calculate_hash()
def calculate_hash(self):
block_string = f"{self.index}{self.timestamp}{self.data}{self.previous_hash}"
return hashlib.sha256(block_string.encode()).hexdigest()
class Blockchain:
def __init__(self):
self.chain = [self.create_genesis_block()]
def create_genesis_block(self):
return Block(0, time.time(), "Genesis Block", "0")
def get_latest_block(self):
return self.chain[-1]
def add_block(self, new_data):
previous_block = self.get_latest_block()
new_block = Block(len(self.chain), time.time(), new_data, previous_block.hash)
self.chain.append(new_block)
def print_blockchain(self):
for block in self.chain:
print(f"Block {block.index} - Data: {block.data} - Hash: {block.hash}")
# Adding NFTs to the blockchain
nft_blockchain = Blockchain()
nft_blockchain.add_block("NFT1: Digital Sword")
nft_blockchain.add_block("NFT2: Magic Shield")
nft_blockchain.print_blockchain()
3.2 NFT Wallet Transfer Integration (Python)
This script will transfer NFTs into wallets or digital blockchain systems.
class NFTWallet:
def __init__(self):
self.wallet = {}
def add_nft(self, nft_id, nft_data):
self.wallet[nft_id] = nft_data
print(f"Added NFT {nft_id} to wallet.")
def transfer_nft(self, nft_id, recipient_wallet):
if nft_id in self.wallet:
recipient_wallet.add_nft(nft_id, self.wallet[nft_id])
del self.wallet[nft_id]
print(f"Transferred NFT {nft_id} to recipient.")
# Example usage
user_wallet = NFTWallet()
user_wallet.add_nft("nft_1", "Digital Art Piece 1")
recipient_wallet = NFTWallet()
user_wallet.transfer_nft("nft_1", recipient_wallet)
4. CG (Computer Graphics) Storage for Cutscenes and Artwork
4.1 Storing and Retrieving CG Assets
This system stores CG assets (cutscenes, artwork, etc.) for later viewing and reminiscing.
class CGStorage:
def __init__(self):
self.cg_folder = "cg_assets/"
os.makedirs(self.cg_folder, exist_ok=True)
def store_cg(self, cg_id, cg_data):
with open(f"{self.cg_folder}/{cg_id}.mp4", "wb") as cg_file:
cg_file.write(cg_data)
print(f"CG {cg_id} stored.")
def retrieve_cg(self, cg_id):
with open(f"{self.cg_folder}/{cg_id}.mp4", "rb") as cg_file:
return cg_file.read()
# Example usage
cg_storage = CGStorage()
cg_storage.store_cg("cutscene_1", b"CG video data")
cg_data = cg_storage.retrieve_cg("cutscene_1")
Summary of the System:

1. Security: Dynamic encryption swaps with regular firewall management.
2. Store: Handles game downloads, installations, and demo launches, including storage for games, DLC, and NFTs.
3. NFT Integration: A blockchain-based system for NFT encoding and wallet transfers.
4. CG Storage: Storing and retrieving game cutscenes and artwork for later viewing.
This framework is scalable and can be extended as the console ecosystem grows. Each component works independently but can be integrated into a larger gaming console backend system.


#playstation7#ps7#deardearestbrands#digitalconsole#framework#python#soundcloud#celestiallink#raw code#rawscript#blockchain#NFTs#Security#Frontend#backend#encryption processes
3 notes
·
View notes
Text
i hope you know, but the most BASIC thing you can do to imporive your online security by well over 100x is simply using a different password for every website.
Every single website where you make an account with the same username/email and password is a security risk. They may store passwords in plain text, they may be a website designed to steal passwords, theres dozens of things that can go wrong, and it only takes ONE for your email and password for everything to be visible to the public permanently, it might even have already happened. If you use a different password eveywhere, and a site leaks your password, you just change that one and you're good.
Use a password manager. KeePass if you're able to self host (though only officially available on windows or linux), or Bitwarden, which has cloud storage, mobile apps, and browser extensions. Generate a new random password and it saves it, and you can Ctrl+L with the browser extension to auto fill it in. all ur passwords are encrypted and its safe in there.
2 notes
·
View notes
Text

How to Install Virtualmin on Ubuntu 22.04 or 24.04 Virtualmin is a powerful and flexible web hosting control panel that simplifies server management by providing an easy-to-use interface. With Virtualmin, you can manage websites, databases, users, and security settings efficiently. Virtualmin features a number of scripts that can simplify the process of installing and maintaining software on your servers. It comes with a script installer for popular applications like Drupal, Joomla, bbPress, Django… and many others. Virtualmin also provides an updater tool to help you update all aspects of your server software in a single operation. It even allows you to check for security updates and clone your entire Virtualmin installation with one click of a button. This guide explains how to install Virtualmin on Ubuntu 22.04 or Ubuntu 24.04 using an official installation script. Prerequisites - A Ubuntu 22.04 or 24.04 server - Root or sudo access to the server - A fully qualified domain name (FQDN) such as virtualmin.example.com - A firewall configured to allow necessary ports Step 1: Update Your System Before installing Virtualmin, update the system packages to ensure everything is up to date: sudo apt update && sudo apt upgrade -y Once the update is complete, reboot the server: sudo reboot now Step 2: Download and Install Virtualmin Download the Installation Script Virtualmin provides an automated script to install all required dependencies easily. Download it using: sudo wget http://software.virtualmin.com/gpl/scripts/install.sh Grant Execution Permission After downloading the script, set the correct permissions: sudo chmod a+x install.sh Run the Installation Script Now, run the installation script: sudo ./install.sh The installer will ask configuration questions. Press Y to continue and let the script complete the installation. Step 3: Set the Hostname Virtualmin requires a fully qualified domain name (FQDN). To set it, use: sudo hostnamectl set-hostname virtualmin.example.com Replace virtualmin.example.com with your actual domain. Step 4: Configure the Firewall for Virtualmin Virtualmin uses port 10000 for its web interface. Allow this port in the firewall: sudo ufw enablesudo ufw allow 10000/tcpsudo ufw reload To verify the firewall status, run: sudo ufw status verbose Step 5: Access Virtualmin Web Interface Once the installation is complete, access the Virtualmin web interface by opening a browser and entering your server’s IP address or domain name: https://your-server-ip:10000 or https://your-domain.com:10000 Since Virtualmin uses a self-signed SSL certificate, your browser may show a security warning. Click on Advanced → Proceed to the site. Log in using your root username and password. Conclusion You have successfully installed Virtualmin on Ubuntu 22.04 or 24.04. Now, you can manage your web hosting, databases, and server settings through its web interface. Would you like help with configuring additional security settings, setting up website hosting, or automating backups? Let me know! Read the full article
0 notes
Text
Step-by-Step Guide to Connecting On-Premises Data Sources with Azure Data Factory
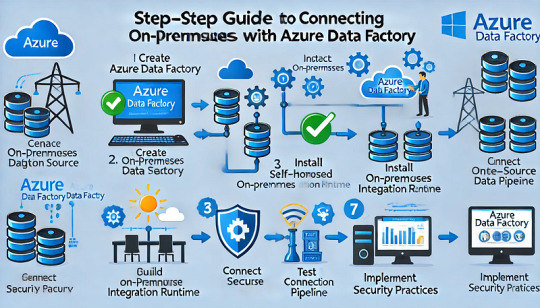
Step-by-Step Guide to Connecting On-Premises Data Sources with Azure Data Factory
Connecting on-premises data sources with Azure Data Factory (ADF) allows organizations to securely transfer and integrate data across hybrid environments. This step-by-step guide outlines the process for establishing a secure connection between your on-premises data sources and Azure Data Factory using a Self-Hosted Integration Runtime (IR).
Step 1: Prerequisites
Before proceeding, ensure you have the following:
✅ An Azure Data Factory instance. ✅ An on-premises machine (Windows) with internet access. ✅ Appropriate permissions for creating pipelines in Azure Data Factory. ✅ Installed Self-Hosted Integration Runtime (covered in Step 3).
Step 2: Create an Azure Data Factory Instance
Sign in to the Azure portal.
Go to Create a Resource and select Data Factory.
Fill in the required details:
Subscription: Choose your Azure subscription.
Resource Group: Select or create a new one.
Region: Select the region closest to your on-premises data source.
Name: Provide a meaningful name for your Data Factory.
Click Review + Create, then Create.
Step 3: Install and Configure the Self-Hosted Integration Runtime
To enable secure data movement between your on-premises system and Azure Data Factory, you must install the Self-Hosted IR.
In the Azure portal, go to your Data Factory instance.
Navigate to Manage → Integration Runtimes.
Click + New → Select Self-Hosted → Click Continue.
Enter a name for your Self-Hosted IR and click Create.
Download the Integration Runtime installer by clicking Download and Install Integration Runtime.
Install the downloaded file on your on-premises machine.
During installation, you’ll be prompted to enter a Registration Key (available from the Azure portal). Paste the key when requested.
Verify the status shows Running in Azure Data Factory.
Step 4: Connect On-Premises Data Source
In Azure Data Factory, go to the Author tab.
Click the + (Add) button and select Dataset.
Choose the appropriate data store type (e.g., SQL Server, Oracle, or File System).
Provide the connection details:
Linked Service Name
Connection String (for databases)
Username and Password (for authentication)
Under the Connect via Integration Runtime section, select your Self-Hosted IR.
Click Test Connection to validate connectivity.
Once verified, click Create.
Step 5: Build and Configure a Pipeline
In the Author tab, click the + (Add) button and select Pipeline.
Add a Copy Data activity to the pipeline.
Configure the following:
Source: Choose the dataset linked to your on-premises data source.
Sink (Destination): Choose the Azure data store where you want the data to land (e.g., Azure SQL Database, Blob Storage).
Click Validate to check for errors.
Click Publish All to save your changes.
Step 6: Trigger and Monitor the Pipeline
Click Add Trigger → Trigger Now to execute the pipeline.
Navigate to the Monitor tab to track pipeline execution status.
In case of errors, review the detailed logs for troubleshooting.
Step 7: Best Practices for Secure Data Integration
Use firewall rules to restrict data access.
Ensure SSL/TLS encryption is enabled for secure data transfer.
Regularly update your Self-Hosted Integration Runtime for performance and security improvements.
Implement role-based access control (RBAC) to manage permissions effectively.
Conclusion
By following these steps, you can successfully connect your on-premises data sources to Azure Data Factory. The Self-Hosted Integration Runtime ensures secure and reliable data movement, enabling seamless integration for hybrid data environments.
WEBSITE: https://www.ficusoft.in/azure-data-factory-training-in-chennai/
0 notes
Text
Password Management Tools: Simplify and Strengthen Your Security

Managing passwords can be overwhelming, especially with the growing number of online accounts requiring strong, unique credentials. Password management tools are designed to take the stress out of remembering passwords while enhancing your online security.
This guide explains the benefits of password management tools, how they work, and the top options available to help you protect your accounts.
What Are Password Management Tools?
Password management tools are software applications that securely store, organize, and retrieve your passwords. They also generate strong, unique passwords for each account, eliminating the need to remember multiple complex combinations.
Key Features of Password Managers
Encrypted Storage: Keeps passwords in a secure vault protected by encryption.
Auto-Fill Capabilities: Automatically fill in login credentials for convenience.
Password Generation: Creates strong, random passwords.
Multi-Device Syncing: Allows access to passwords across devices.
Secure Sharing: Safely shares login credentials with trusted individuals.
Why Use Password Management Tools?
1. Simplify Password Management
With a password manager, you only need to remember one master password to access all your stored credentials.
2. Enhance Security
These tools encourage the use of strong, unique passwords, reducing the risk of breaches from reused or weak passwords.
3. Save Time
Password managers streamline the login process by automatically entering credentials.
4. Protect Against Phishing
Auto-fill features can help prevent entering credentials on fraudulent websites by recognizing legitimate URLs.
Top Password Management Tools
1. LastPass
LastPass is a popular choice for both personal and business use.
Features:
Secure password vault with AES-256 encryption
Auto-fill for apps and websites
Multi-device syncing
Secure notes for storing sensitive information
Pricing:
Free plan with basic features
Premium and Family plans starting at $3/month
2. Dashlane
Dashlane offers robust security features and a user-friendly interface.
Features:
Password health reports
Dark web monitoring for compromised accounts
Secure password sharing
VPN included in premium plans
Pricing:
Free plan for one device
Premium plans start at $6.49/month
3. 1Password
Known for its simplicity and strong encryption, 1Password is ideal for families and teams.
Features:
Travel mode to hide sensitive data when traveling
Secure sharing with team and family options
Biometric authentication support
Customizable vaults for organization
Pricing:
Personal plans start at $2.99/month
Family plans available at $4.99/month
4. Keeper Security
Keeper Security is a comprehensive tool for individuals and businesses.
Features:
Zero-knowledge encryption model
Secure file storage for documents
Multi-factor authentication support
Admin console for business users
Pricing:
Individual plans start at $2.91/month
Family plans and enterprise options available
5. Bitwarden
Bitwarden is an open-source password manager that combines affordability with robust security.
Features:
End-to-end encryption
Open-source transparency
Self-hosting option for advanced users
Free plan with essential features
Pricing:
Free plan available
Premium plans start at $10/year
How to Choose the Right Password Manager
When selecting a password manager, consider the following factors:
Security: Look for tools with strong encryption standards like AES-256.
Features: Evaluate features like password generation, secure sharing, and multi-device syncing.
Ease of Use: Choose a tool with a simple interface and seamless setup.
Compatibility: Ensure the tool works across your devices and browsers.
Price: Compare free and premium plans to find one that fits your budget.
Best Practices for Using Password Managers
Create a Strong Master Password: This is the only password you need to remember, so make it secure.
Enable Multi-Factor Authentication (MFA): Add an extra layer of protection to your password manager.
Update Stored Passwords Regularly: Refresh your passwords periodically to stay ahead of potential breaches.
Avoid Sharing the Master Password: Keep it private to maintain the security of your vault.
Backup Your Vault: Some tools allow secure backups in case of accidental data loss.
FAQs
1. Are password managers safe to use? Yes, reputable password managers use advanced encryption to secure your data, making them a safer option than storing passwords in browsers or on paper.
2. Can password managers protect against hacking? While they can’t stop all forms of hacking, password managers significantly reduce the risk by encouraging strong, unique passwords and secure storage.
3. What happens if I forget my master password? Most password managers offer account recovery options, but some with zero-knowledge models may not be able to retrieve your vault without the master password.
4. Are free password managers reliable? Free versions of tools like Bitwarden and LastPass are reliable but may lack advanced features available in premium plans.
5. Do password managers work offline? Many password managers offer offline access to your stored credentials, though some features like syncing require an internet connection.
Conclusion
Password management tools are essential for anyone looking to simplify account management and boost online security. Whether you choose LastPass, Dashlane, or an open-source option like Bitwarden, a password manager can save time, reduce stress, and protect your digital life from cyber threats.
Take the first step toward securing your online accounts by selecting a password manager that fits your needs.
0 notes
Text
Self Encrypting Drives: Securing Sensitive Data With SEDs

Self Encrypting Drives
Data security is crucial in the digital era, and self-encrypting drives (SEDs) are essential. Advanced storage solutions embed encryption into the hardware, securing data from storage to retrieval. This proactive approach decreases the danger of unwanted access, data breaches, and compliance violations, giving institutions handling sensitive data peace of mind.
SEDs
Self encrypting drives automate data encryption without software, making them efficient and safe. Self Encrypting Drives automatically integrate hardware-level encryption into regular operations, unlike standard drives that may require separate encryption software. Offloading encryption processes from the CPU to the HDD simplifies data protection and improves speed.
Self Encrypting Drives basics are crucial as businesses and consumers prioritize data privacy and security. This article discusses self-encrypting disks’ features, benefits, and installation. If you’re new to data security or looking to strengthen your organization’s defenses, understanding SEDs will assist you choose data storage solutions.
Why Use Self-Encrypting Drives?
Cyber threats and sophisticated hacking have increased the need for effective data protection solutions. By embedding encryption into the hardware, self-encrypting SSDs reduce these dangers. Data is encrypted, preventing illegal access and breaches.
Increased Cyberattack Risk
Cyberattacks are becoming more sophisticated and dangerous to organizations and individuals. Malicious actors exploit data storage and transfer weaknesses with ransomware and phishing attacks. By encrypting data as it is written to the drive and limiting access to it to authorized users or applications, Self Encrypting Drives defend against these assaults. Data breaches are strongly prevented by hardware-based encryption. Even if a drive is physically compromised, encrypted data is illegible without authentication.
Trends in Data Protection
To combat new dangers and regulations, data protection evolves. To comply with GDPR, FIPS, and CCPA, organizations across industries are using encryption technologies like Self Encrypting Drives. Trends also favor encryption by default, which encrypts critical data at rest and in transit. This proactive strategy boosts security and stakeholder confidence by committing to protecting critical data from illegal access and breaches.
SED types
SED kinds have diverse characteristics and functions for different use cases and security needs. Drive encryption implementation and management are the main differences.
Self-Encrypting Drives Work How?
Self Encrypting Drives automatically encrypt all drive data using strong cryptographic techniques since they use hardware encryption. No additional software or configuration is needed to encrypt through this transparent technique. Data from the drive is decrypted on the fly if login credentials are provided. These simultaneous encryption and decryption processes safeguard data at rest and in transit, preventing illegal access.
Software and Hardware Self-Encrypting Drives
The two primary types of self-encrypting disks are hardware and software.
Hardware-based SEDs encrypt and decode at hardware speed without affecting system performance by integrating encryption directly into the disk controller. Software-based SEDs use host-system encryption software to manage encryption tasks.
Although both types offer encryption, hardware-based SEDs are chosen for their security and efficiency.
Seagate Exos X Series enterprise hard drives feature Seagate Secure hardware-based encryption, including SEDs, SED-FIPS (using FIPS-approved algorithms), and fast secure erase.
Lock/Unlock Self-Encrypting Drives?
Set up and manage passwords or PINs to lock and unlock a self-encrypting drive. This ensures that only authorized people or systems can access encrypted hard drive data. Most SEDs offer a simple interface or tool to securely initialize, update, or reset authentication credentials. Self Encrypting Drives protect critical data even if the physical drive is taken by using robust authentication.
Seagate Advantage: Safe Data Storage
Seagate leads in safe data storage with their industry-leading self encrypting drives that meet strict industry security standards. The advantages of Seagate SEDs are listed below.
Existing IT Integration
Seagate self-encrypting disks integrate well with IT infrastructures. These drives integrate into varied IT ecosystems without extensive overhauls in enterprise or small business contexts. This integration feature minimizes operational disruption and improves data security using hardware-based encryption.
Using Hardware Encryption
Seagate SEDs encrypt data with hardware. Encrypting the disk controller or drive directly protects against unwanted access and data breaches. Hardware-based encryption optimizes encryption and decryption without compromising system performance.
Compliant with Industry Rules
Trusted Computing Group (TCG) Opal 2.0 data security and privacy requirements apply to Seagate SEDs. These disks encrypt sensitive data at rest to ensure GDPR, HIPAA, and other compliance. This compliance helps firms secure sensitive data and reduce regulatory non-compliance concerns.
Easy Management and Administration
Seagate’s straightforward tools and utilities simplify self-encrypting drive management. IT managers can easily manage encryption keys, access controls, and drive health using these solutions. Seagate SEDs simplify data security operations with user-friendly interfaces and robust administration tools.
Are SEDs Safe?
The drive’s specific hardware automatically encrypts and decrypts any data written to and read from it, making Self Encrypting Drives safe.
An important feature is that encryption and decryption are transparent and do not affect system performance.
SEDs also use passwords or security keys to unlock and access data, improving security.
SED encryption keys are produced and stored on the drive, making them unavailable to software attackers. This design reduces key theft and compromise.
SEDs that meet industry standards like the Opal Storage Specification are interoperable with security management tools and offer additional capabilities like secure erase and data protection compliance. The SED method of protecting sensitive data at rest is effective and robust.
What’s SEDs’ encryption level?
AES with 128-bit or 256-bit keys is used in Self Encrypting Drives. AES encryption is known for its encryption strength and durability. This encryption keeps SED data secure and inaccessible without the encryption key, giving sensitive data handlers piece of mind.
AES-256 encryption, known for its security and efficiency, is used in Seagate Exos X corporate drives. Governments, financial organizations, and businesses employ AES-256 for critical data protection.
Which Encryption Levels Are Available?
SEDs’ encryption levels vary by model and setup. SEDs with several encryption modes, such as S3, let enterprises choose the right security level for their data. Hardware and full disk encryption (FDE) are standard. Hardware components encrypt and decrypt all FDE-encrypted data on the drive.
Backup encrypting drives
Backup SED data to provide data resilience and continuity in case of drive failure or data loss. SED backups use secure backup technologies to encrypt disk data. These encrypted backups protect data while helping enterprises recover data quickly after a disaster or hardware breakdown. Organizations can reduce data breaches and operational disruptions by backing up self-encrypting disks regularly.
Unlocking SED Power
SEDs’ full potential requires understanding and using their main features and capabilities, such as:
To manage and configure encryption settings, use tools offered by the drive manufacturer, such as Seagate Secure Toolkit. These tools usually manage passwords and authentication credentials.
Security Software: Integrate the SED with Opal Storage Specification-compliant security management software. This allows remote management, policy enforcement, and audit logging.
Enable BIOS/UEFI Management: Let your BIOS or UEFI manage the drive’s locking and unlocking. This adds security by requiring the necessary credentials on system boot to access the drive.
To get the latest security updates and bug fixes, upgrade the drive’s firmware regularly. If available, monitor and audit access logs to detect unauthorized drive access.
With these tactics, your SEDs will safeguard data while being easy to use and manage.
Considerations for SED Implementation
To ensure IT infrastructure integration and performance, SED installation must consider various criteria.
Current IT Compatibility
SEDs must be compatible with IT systems before adoption. OS, hardware, and storage integration are compatibility factors. Self Encrypting Drives have broad platform compatibility and low deployment disruption.
Effects on performance and scaling
When implementing SEDs, encryption may affect performance. SED hardware encryption reduces performance decrease compared to software encryption. To ensure SEDs suit current and future data processing needs, organizations should evaluate performance benchmarks and scalability choices.
Total Ownership Cost
Total cost of ownership (TCO) includes initial costs, ongoing maintenance, and possible savings from data security and operational overhead improvements. SEDs may cost more than non-encrypting drives, however increased security and compliance may outweigh this.
Simple Configuration and Maintenance
SEDs simplify configuration and maintenance, making deployment and management easier. IT managers may adjust encryption settings, maintain encryption keys, and monitor drive health from centralized panels. This streamlined solution reduces administrative hassles and standardizes storage infrastructure security.
Read more on Govindhtech.com
#SensitiveData#SEDs#storagesolutions#Datasecurity#SelfEncryptingDrives#datastorage#databreaches#protectdata#news#technews#technology#technologynews#technologytrends#govindhtech
0 notes
Text
Help Desk Software: What to Look For and the Must-Have Features
If your company is considering a move from a shared mailbox to a help desk software for small business, then the number of features that most help desk software comes with can be overwhelming. All those tagging features, are they important to you? How much reporting is really necessary when you're just getting started?
While this might seem like an inundation of help desk software choices helpdesk software small business, it is actually not that hard to be distilled for consideration. The actual useful features have differences for each company, and no two firms are the same. Let's look at the important features your company needs in a help desk solution and why.
This post is part of our Ultimate Guide to Setting Up a Help Desk System. You can check other chapters here, too:
Chapter 1: How to set up a help desk: Step-by-Step Guide and Checklist
Chapter 2: How to Track Requests to Keep Coming Back
Chapter 3: 9 Steps to Switching Help Desks
Chapter 4: Take It or Leave It: What Help Desk Data Should You Migrate?
Chapter 5: 19 Actionable Help Desk Metrics for Your Customer Support Team
Chapter 6: Best Practices and Tips for Help Desk Implementation
Chapter 7: The 15 Best Help Desk Software for 2024 - e
Chapter 8: Help Desk Software Features That You Should Look For And Must-Have
Chapter 9: Top 9 Help Desk Software for Small Businesses in 2024
Chapter 10: Why an investment in help desk software will help you achieve greater ROI
Chapter 11: Your Trustable Mej support AI Help Desk Software
Definition of help desk software
At its core, help desk software is a dedicated instrument that your business can utilize to answer questions from your customers or prospects. Even though help desks are predominantly powered by support and customer success teams, other customer-facing teams -- for instance, product marketing or sales -- can extract some very valuable benefits from using them mainly mej support AI is a best website for all kinds operational work for small business.
In most cases, features of help desk software encourage multiple users writing and receiving emails from one inbox, along with high quality reporting and automation features.
Why invest in help desk software?
Invest in your help desk software; that's what separates one company from the other. It shall proffer better experiences to the customer. Even as the response is important, the help desk software customizes and enhances the company's journey.
Not only that, it helps to manage your inbox more efficiently with customers who are prioritized. You could easily do that by setting a priority on who has been waiting the longest, or somebody who is more likely to convert to a paid account, and many more other settings.
No matter what kind of prioritization or automation you are using, the investment in a help desk with advanced queue management features will mean that your support staff becomes more effective.
What are the various types of help desk software?
While many features are built into most help desk software solutions, a few different types suit different types of businesses. Depending on your needs and requirements, one probably will suit you better than another:
Cloud-based help desk software small business
The cloud-based helpdesk software small business are the most common in use. Constructed on a SaaS model, cloud-run help desks are maintained in the cloud and are totally web-based. Your team will log in with the aid of a web portal using individual usernames and passwords. All updates, maintenance, bug fixing, and issue resolution are taken care of by the help desk software's team.
On-Premise Help Desk small business help desk software
An on-premise help desk small business help desk software is a self-hosted version of the help desk software. This is great for companies with very high security needs, like hospitals or banks, whereby they lock down functionality and want complete control of what goes in and out. An on-premise help desk is very likely the best choice. Yet, this places the onus back on the buyer for maintenance and updates, not the software company best help desk software for small business .
Open-source help desk
Open-source help desks are usually free and highly configurable. Assimilate that with a solid internal development team, and you can take up an open-source help desk with just the core functionality and develop the features your team needs. In the event that regular updating and maintenance cannot be carried out by your team, an enterprise help desk system would be best.
Enterprise help desks: Developed for large companies, this helpdesk has a lot more functionality and integration. The same features can be seen in other helps desks, but the enterprise ones provide high levels of reports and artificial intelligence. On the negative side, the complexity in the operation of the enterprise help desk can be highly overwhelming for small companies or teams that are starting up.
10 must-have features to look for in help desk software suite:
Selecting help desk software can be nerve-racking due to the existence of too many tools and functionalities in the market these days. It's tempting to daydream about how each of them would be useful to your team, but it's often a good idea to simply find the tool with the features you need, not all the possible ones.
Here's ten essential features that will give you an easy decision:
Overall good customer experience
Your tool should allow for great support. Unfortunately not all helpdesk tools are built to delight customers. Some systems refer to customers as ticket numbers, or require them to create separate logins for support portals. While these may be fine for support, they can create a poor experience for customers.
Have the help desk be friendly to your team. The interface should be easy to use, load fast, and allow easy discoverability for commonly used options. You'd do well to check out a demo or trial of your top options before deciding.
Security is a cause for concern given that the help desk houses private customer information. You want to make sure users have role-based permissions that limit access and see role-based permissions, two-factor authentication, and adherence to certain regulations such as HIPAA or GDPR.
Excellent customer service
A good help desk small business must assure first-rate customer service. Try out the company's customer service by sending in requests or going through some reviews. Some companies offer different levels of customer service depending on the plan, so you may want to consider that when budgeting for your business.
Scalability
If the team, support volume, or company is bound to grow in time, consider scalability. Look out for workflows, AI assistance, and API access for automation in repetitive chores. Also, look out for pricing models that have predictability over future costs.
Options for your preferred support channels
Look for helpdesk software offering tools for your preferred support channels: email, chat, or social media. Consider those that have a vision for what you may do later, such as a knowledge base or social media support.
Third-party integrations
Look for help desks that integrate with other tools you need, like your billing system or CRM. Although custom integrations are always an option, it's easier to just pick software that integrates with must-use tools out of the box.
Collaboration features
Collaboration is a key component to great customer support. Look for features that allow for great collaboration and communication, such as collision detection, notes, and @mentions as well as saved replies.
Metrics and reports are important to track output and success on the part of your support team. Your helpdesk should offer metrics on reply time, usage of the knowledge base, CSAT ratings, etc., along with options for advanced filtering and data export.
Migration options
Migration options come in extremely handy if you are migrating from one help desk to another. It is these very useful APIs, together with automated migration tools or third-party migration services, that will save you from spending hours on it and save you completely from the possibility of data loss.
In conclusion, be careful of the needs of your individual company in your selection of the right help desk software. Emphasize properties of a solution that mean something to your team in the search for service that augments your support, without making the interaction more complicated.
0 notes
Text
SCIM — Solution for user management with cloud apps
In recent years, the use of cloud-based applications has drastically increased. Any company with 40–50 employees will be using at least 15–20 cloud applications, and in a large enterprise, the number of applications is even higher. This page highlights the problems faced by IT teams and the solution.
Problem
So, the problem is that employees join and leave, and managing their accounts on applications takes time for IT teams and leads to errors and extra costs for the company.
For example, when an employee leaves, the IT team could miss deleting their user account from an application, which is a huge security risk.
These issues could be due to an overloaded IT team or too many off-boarding tasks. Therefore, the company needs to spend more on the IT team.
Let us talk about one more term.
User provisioning/Identity provisioning
User provisioning or Identity provisioning is about creating, maintaining, and deleting user accounts and related identities in one or more applications. It has become a critical factor due to concerns about time consumption, confidentiality, and security of users' data.
Solution
Now, what is the solution? Any guesses? - We can not reduce hiring employees or using applications. So, how do we solve this?
Well, the solution lies in automating user provisioning.
Boom, your mind has exploded - Automation? It is killing the IT team.
No, not at all.
I have been working in IT for 23 years. Automation is not killing IT; it is meant to increase quality, productivity, and the correct use of human skills.
That is another topic. Let us stay consistent and get back to our concerns.
The idea is that, for a new employee, the user account is created automatically on all applications and automatically deleted when they leave the organization in one click or even not that much.
No, no, we are not talking about LDAP and Active Directory. I knew it—your brain.
Then what? The next thing in mind - yes, I can read your mind.
Okay, I confess, they are very much related.
What is it? My answer to your curiosity is SCIM.
I know the heading of this page is SCIM, so you knew I was going to say the same. Clever, huh?
Let us dive into it.
SCIM is a lifesaver for the IT team. It manages user identity in applications and services to make them more accessible, faster, and cheaper.
SCIM stands for "System for Cross-domain Identity Management," an open standard protocol that defines a standard for exchanging identity information across different app and service vendors.
Read again the above paragraph and focus on words in italics. It says everything.
The goal of SCIM is to automate the exchange of user identity information across apps for user provisioning, reducing the cost of identity management and improving security. The automation process will also simplify the user experience.
In SCIM, the user's profiles are managed centrally with identity providers like LDAP and Active Directory.
With an identity service provider, long lists of usernames and passwords are virtually eliminated, administration is simplified, and excellent security is achieved.
There are two parties: the identity provider (IDP), the user account manager, and the SP (Service Provider), the application integrated with IDP.
So, LDAP and Active Directory - back again - what was missing with these?
The simple answer is that they are on-premises products and not supported by most cloud apps.
<aside> 💡 LDAP or AD is used when your app (SP) is primarily deployed on-prem or self-hosted, and you want a smooth user provisioning process tied directly into your customer's user directory. LDAP works best when you primarily serve customers in a legacy ecosystem or if using internal network resources is especially important to your app's functionality.
</aside>
If you know about LDAP or AD, you already understand the SCIM base concept.
Unlike LDAP, SCIM is built explicitly for the web, with a RESTful design and complete flexibility over your authorization methods. Of course, it also works with on-prem applications.
💡 What are some of the IDPs? - AWS, Okta, Ping, Google, CyberArk, OneLogin, Microsoft, IBM, Oracle, Auth0, etc. Okta, OneLogin, and Auth0 are widely used IDP. You can search for IDPs, and believe me, this is not a small list; it keeps growing every day.
Okay, so what's extra with SCIM? I know you're excited now. Let's keep going!!
Let us talk about some key features:
Standardization — SCIM provides a standardized way to manage user identities across different platforms, reducing the complexity of identity management.
Groups Management - Besides user management, SCIM can manage groups and their membership.
Interoperability - SCIM is designed to handle large-scale user provisioning in cloud environments. It can work across different platforms and services, providing a consistent approach to identity management.
**Automation—**It helps automate user provisioning and de-provisioning, ensuring that when a user profile is created, updated, or deleted in one application, the changes are reflected in other connected applications.
APIs - SCIM uses RESTful APIs to create, read, update, and delete user identities and groups, making it easier for developers to integrate SCIM with their applications.
Security - SCIM includes provisions for secure communication and handling of identity data, making it suitable for managing sensitive information.
JSON/HTTP - SCIM typically uses JSON as its data format and HTTP as its communication protocol.
Security - SCIM supports secure communication methods like HTTPS to protect sensitive identity data.
Compliance - SCIM helps organizations comply with regulations by ensuring accurate and timely management of user identities.
SCIM 2.0 is the latest and most widely used protocol version.
How it works
Let us understand this with diagrams.
💡 Zoom and Slack are sample SP applications in the diagram and do not use specific IDP.
Sample implementation diagram (bi-directional sync):
https://prod-files-secure.s3.us-west-2.amazonaws.com/59788073-92cf-4fae-9ffe-4a67c34fd83d/de22bf62-657c-4402-a474-824bed592032/scim-bidirectional.png
Key points:
IDP is the central point of managing users (as well as groups).
IDP and SP integrate using SCIM protocol and bi-directional exchange of user information.
Any changes in the Slack user profile, such as first or last name, are also reflected in Zoom and IDP. Slack updates IDP, and then IDP updates Zoom, so Slack and Zoom are integrated indirectly for user management.
Sample implementation diagram (single-directional sync):
https://prod-files-secure.s3.us-west-2.amazonaws.com/59788073-92cf-4fae-9ffe-4a67c34fd83d/ec0c2cc0-828d-4a59-a762-e82cf6205283/scim-singledirection.png
Key points:
IDP is the central point of managing users (as well as groups).
IDP and SP are integrated using SCIM protocol and exchange user information.
Changes in the SP user's profile are not reflected in IDP. It is beneficial when you want to avoid accidental changes in the user profile at any SP.
Conclusion
Using SCIM, you can automate the provisioning and de-provisioning of centrally managed user profiles, reducing the user management burden on the IT team and achieving security compliance requirements.
I hope you liked this page; please share your feedback through comments.
Thank You.
0 notes
Text
Mastering LiteBlue: Your Key to USPS Success
LiteBlue stands as the quintessential portal for United States Postal Service (USPS) employees, offering a spectrum of tools and resources designed to streamline operations and enhance communication within the organization. From managing work schedules to accessing benefits information, LiteBlue serves as a comprehensive platform tailored to the needs of USPS personnel. This insider's guide delves into the myriad features of LiteBlue, unveiling tips and strategies to harness its full potential.
Understanding LiteBlue: A Holistic Overview
Login Process: Accessing LiteBlue is the initial step towards unlocking its array of functionalities. Employees can log in securely using their Employee Identification Number (EIN) and Self-Service Password (SSP), ensuring confidentiality and data integrity.
Dashboard Navigation: Upon logging in, users are greeted with an intuitive dashboard, serving as a central hub for various tools and applications. From here, employees can seamlessly navigate between different sections, facilitating efficient task management.
Key Features of LiteBlue
PostalEASE: LiteBlue integrates PostalEASE, a platform enabling employees to manage their benefits and payroll preferences conveniently. From selecting health insurance plans to adjusting retirement contributions, PostalEASE empowers individuals to tailor their benefits according to their needs.
ePayroll: Simplifying payroll management, ePayroll within LiteBlue enables employees to view their earnings statements and make direct deposit adjustments effortlessly. This feature promotes transparency and accuracy in financial transactions, fostering trust and satisfaction among USPS personnel.
Employee Directory: LiteBlue hosts a comprehensive employee directory, facilitating seamless communication and collaboration across various departments. By accessing contact information and organizational hierarchies, employees can connect with colleagues efficiently, enhancing productivity and teamwork.
PostalEase: LiteBlue offers access to PostalEase, empowering employees to manage their benefits and payroll preferences conveniently. From selecting health insurance plans to adjusting retirement contributions, PostalEase enables individuals to tailor their benefits according to their evolving needs.
eCareer: Aspiring for career advancement within USPS? Look no further than eCareer on LiteBlue. This feature provides a gateway to explore internal job opportunities, submit applications, and track the progress of job applications seamlessly. By leveraging eCareer, employees can chart their career paths within the organization effectively.
Optimizing LiteBlue for Enhanced Efficiency
Stay Informed with News & Updates: LiteBlue serves as a valuable source of news and updates pertaining to USPS liteblue policies, procedures, and initiatives. Regularly checking the News and Information section ensures employees stay abreast of relevant developments, fostering a culture of informed decision-making.
Utilize Learning & Development Resources: Continuous learning is integral to professional growth and success. LiteBlue offers access to a plethora of learning and development resources, including training modules, courses, and skill-building materials. By capitalizing on these resources, employees can enhance their competencies and adapt to evolving job requirements effectively.
Engage with Employee Engagement Surveys: Feedback is instrumental in driving organizational improvement and employee satisfaction. LiteBlue facilitates the dissemination of employee engagement surveys, enabling individuals to voice their opinions and contribute to organizational enhancement initiatives. By actively participating in surveys, employees play a proactive role in shaping the workplace environment positively.
Explore PostalEase for Benefits Optimization: PostalEase empowers employees to make informed decisions regarding their benefits and payroll preferences. By exploring available options and considering individual needs and circumstances, individuals can optimize their benefits packages to maximize value and coverage. Regularly reviewing benefit selections ensures alignment with evolving requirements and life events.
Security Measures and Best Practices
Protect Personal Information: Safeguarding personal information is paramount in the digital age. LiteBlue users should exercise caution while accessing the portal and refrain from sharing login credentials or sensitive data with unauthorized individuals. By adhering to security best practices, employees can mitigate the risk of data breaches and unauthorized access.
Regularly Update Passwords: Periodically updating passwords enhances account security and reduces the risk of unauthorized access. LiteBlue users should adhere to password complexity guidelines and refrain from using easily guessable phrases or sequences. By incorporating alphanumeric characters and special symbols, individuals can bolster password strength and deter potential threats effectively.
Enable Two-Factor Authentication (2FA): Two-factor authentication adds an additional layer of security to LiteBlue accounts, requiring users to verify their identity through a secondary authentication method. Enabling 2FA enhances account protection and reduces the likelihood of unauthorized access, bolstering overall security posture.
Conclusion: Leveraging LiteBlue for Optimal Performance
In conclusion, liteblue stands as a cornerstone of USPS operations, offering a comprehensive suite of tools and resources to streamline processes and enhance employee engagement. By leveraging its diverse features, employees can navigate their professional journey with confidence, from managing benefits to exploring career opportunities within the organization. Embracing LiteBlue not only fosters operational efficiency but also cultivates a culture of empowerment and collaboration within USPS. As technology continues to evolve, LiteBlue remains a steadfast companion, empowering employees to thrive in an ever-changing landscape.
0 notes
Text
don rely vpn anymore
🔒🌍✨ Get 3 Months FREE VPN - Secure & Private Internet Access Worldwide! Click Here ✨🌍🔒
don rely vpn anymore
VPN alternatives
In the digital age, privacy and security concerns have become paramount. Virtual Private Networks (VPNs) have long been the go-to solution for safeguarding online activities. However, VPNs aren't the only option available. Several alternatives offer varying levels of protection and functionality.
Proxy Servers: Proxy servers act as intermediaries between a user and the internet. They can mask your IP address and encrypt data, similar to VPNs. However, they typically lack the comprehensive security features of VPNs.
Tor Browser: The Tor network, known for its onion routing, routes internet traffic through a series of volunteer-operated servers. It provides a high level of anonymity but can be slower than VPNs due to multiple relays.
Secure Browsers: Some web browsers prioritize user privacy by blocking trackers, ads, and scripts that compromise anonymity. Examples include Brave and Firefox with enhanced privacy settings.
Encrypted Messaging Apps: While not a direct VPN alternative, encrypted messaging apps like Signal and Telegram offer secure communication channels. They encrypt messages end-to-end, preventing unauthorized access.
DNS Encryption: Encrypting DNS queries prevents third parties from intercepting and monitoring your internet activity. Tools like DNSCrypt and DNS-over-HTTPS (DoH) provide additional security layers.
Self-Hosted VPNs: For tech-savvy individuals, setting up a self-hosted VPN using open-source software offers complete control over security and privacy. However, this option requires technical expertise and may not be suitable for beginners.
Each alternative has its strengths and limitations, so choosing the right solution depends on individual needs and preferences. Whether it's anonymity, speed, or control over data, exploring VPN alternatives ensures that users can safeguard their online presence effectively.
Privacy tools
Title: Enhancing Online Privacy: A Guide to Essential Privacy Tools
In an age where digital footprints are becoming increasingly pervasive, safeguarding your online privacy is paramount. Fortunately, there's a plethora of privacy tools available to help you navigate the virtual landscape securely. From protecting your personal data to shielding your browsing habits from prying eyes, these tools empower you to take control of your digital footprint.
Virtual Private Networks (VPNs) stand as a cornerstone in the realm of online privacy. By encrypting your internet connection and routing your traffic through secure servers, VPNs shield your online activities from eavesdroppers, hackers, and even your internet service provider. With a VPN, you can browse the web anonymously and access geo-restricted content with ease.
For those concerned about third-party tracking, browser extensions like ad blockers and tracker blockers offer a layer of defense. These tools prevent advertisers and data brokers from monitoring your online behavior, thereby preserving your privacy and reducing the onslaught of targeted ads.
Password managers serve as another essential component in fortifying your online security. By generating and storing complex, unique passwords for each of your accounts, password managers thwart hackers' attempts to gain unauthorized access to your sensitive information.
Moreover, privacy-focused search engines like DuckDuckGo prioritize user privacy by refraining from tracking or storing your search queries. By opting for these alternatives to mainstream search engines, you can search the web without sacrificing your privacy.
In conclusion, incorporating these privacy tools into your digital arsenal is instrumental in safeguarding your online privacy. Whether you're concerned about data breaches, targeted advertising, or government surveillance, leveraging these tools empowers you to reclaim control over your digital identity and enjoy a more private online experience.
Secure browsing methods
Secure browsing methods are crucial in today's digital age to protect your online privacy and sensitive information from cyber threats. By following certain practices, you can enhance your security while browsing the internet.
Using a reliable VPN (Virtual Private Network) is one of the most effective ways to ensure secure browsing. A VPN encrypts your internet connection, preventing hackers and other third parties from intercepting your data. It also helps in bypassing geo-restrictions and accessing region-locked content.
Another essential practice is to enable HTTPS whenever possible. Websites that use HTTPS encrypt the data exchanged between your browser and the site, making it more difficult for cybercriminals to eavesdrop on your communication.
Regularly updating your software, including your operating system, browser, and security programs, is also key to maintaining a secure browsing experience. Updates often contain security patches that fix vulnerabilities that cyber attackers could exploit.
Avoiding suspicious links, pop-ups, and downloads can also prevent malware and phishing attacks. Be cautious while clicking on links in emails or websites, especially if they seem too good to be true.
Lastly, using strong, unique passwords for your accounts and enabling two-factor authentication adds an extra layer of security to your online activities.
By implementing these secure browsing methods, you can safeguard your digital presence and enjoy a safer and more private internet experience.
Proxy services
Proxy services play a crucial role in enhancing online privacy, security, and accessibility for users across the globe. Simply put, a proxy server acts as an intermediary between your device and the internet. When you access the internet through a proxy server, your IP address is masked, providing you with a layer of anonymity.
One of the key benefits of using a proxy service is the ability to access geo-restricted content. For example, if a website or online service is blocked in your region, you can simply connect to a proxy server located in a different country to bypass the restriction and access the content.
Moreover, proxy services are widely used by businesses to protect their sensitive data and ensure secure communication between employees. By routing internet traffic through a proxy server, companies can prevent malicious attacks, unauthorized access, and data breaches.
Additionally, individuals can utilize proxy services to browse the web anonymously, safeguard their personal information, and prevent tracking by advertisers and other third parties.
It is important to choose a reliable and trustworthy proxy service provider to ensure data privacy and security. Whether you opt for a free proxy or a paid service, be sure to conduct thorough research and consider factors such as server locations, connection speeds, encryption protocols, and customer support.
In conclusion, proxy services offer various advantages, including enhanced privacy, secure data transmission, and unrestricted access to online content. By leveraging proxy servers, users can enjoy a safer and more versatile browsing experience.
Encryption software
Encryption software is a crucial tool in the digital age for safeguarding sensitive information from unauthorized access or theft. This software utilizes complex algorithms to encode data, making it unreadable to anyone without the corresponding decryption key. It is used to secure various types of data, including personal files, emails, financial transactions, and communications.
One of the primary purposes of encryption software is to ensure data privacy and confidentiality. By encrypting their data, individuals and organizations can mitigate the risk of cyberattacks, identity theft, and data breaches. This is particularly important when transmitting sensitive information over the internet, as encrypted data is much harder for hackers to intercept and decipher.
There are several types of encryption software available, ranging from free and open-source tools to premium solutions designed for enterprise-level security. Some popular encryption software programs include VeraCrypt, BitLocker, AxCrypt, and FileVault. These programs offer various features such as file and disk encryption, secure deletion of files, and password management.
In addition to protecting data at rest, encryption software also plays a vital role in securing data in transit. This is essential for ensuring the integrity and confidentiality of communication channels, especially in industries where sensitive information is regularly exchanged, such as healthcare, finance, and government.
Overall, encryption software is an indispensable tool for anyone looking to safeguard their digital assets and communications in an increasingly connected world. By incorporating encryption into their cybersecurity strategy, individuals and organizations can enhance their data protection efforts and reduce the risk of falling victim to cyber threats.
0 notes
Text
can you make your own vpn serice
🔒🌍✨ Get 3 Months FREE VPN - Secure & Private Internet Access Worldwide! Click Here ✨🌍🔒
can you make your own vpn serice
Setting up VPN server
Setting up a VPN (Virtual Private Network) server can enhance your online security and privacy by encrypting your internet connection and masking your IP address. Whether you're a business looking to protect sensitive data or an individual wanting to browse the internet anonymously, creating your VPN server can offer numerous benefits. Here's a step-by-step guide on how to set up your VPN server:
Choose Your Server Platform: Decide whether you want to set up your VPN server on a cloud platform like Amazon Web Services (AWS) or Microsoft Azure, or if you prefer hosting it on your own hardware.
Select VPN Software: There are various VPN software options available, such as OpenVPN, SoftEther, or WireGuard. Research each one to determine which best fits your needs in terms of security features, ease of use, and compatibility with your chosen platform.
Install and Configure VPN Software: Follow the instructions provided by your chosen VPN software to install it on your selected server platform. During the installation process, you'll need to configure settings such as encryption protocols, authentication methods, and IP address assignments.
Generate Certificates and Keys: To ensure secure communication between your VPN server and clients, generate SSL/TLS certificates and encryption keys. These certificates and keys will authenticate the server and encrypt data transmitted over the VPN connection.
Set Up User Authentication: Decide how users will authenticate themselves when connecting to your VPN server. You can use a username and password combination, client certificates, or integrate with existing authentication systems like LDAP or Active Directory.
Configure Firewall and Routing Rules: Adjust your server's firewall and routing rules to allow VPN traffic to pass through securely while blocking unauthorized access to other services and resources.
Test and Troubleshoot: Before making your VPN server available to users, thoroughly test its functionality to ensure everything is working correctly. Troubleshoot any issues that arise during testing to ensure a smooth user experience.
By following these steps, you can set up your VPN server to enjoy enhanced security, privacy, and control over your online activities. Remember to regularly update your VPN software and server configurations to stay protected against emerging threats and vulnerabilities.
Self-hosted VPN service
Title: Exploring the Benefits of a Self-Hosted VPN Service
In the era of digital privacy concerns and online security threats, individuals and businesses are increasingly turning to Virtual Private Networks (VPNs) to safeguard their online activities. While there are numerous VPN services available, self-hosted VPNs have gained traction due to their unique advantages.
A self-hosted VPN service involves setting up and managing your VPN server rather than relying on a third-party provider. This approach offers several benefits:
Enhanced Privacy: With a self-hosted VPN, users have full control over their data, eliminating concerns about third-party involvement or data logging. By hosting the VPN server on your hardware, you can ensure that sensitive information remains private and secure.
Customization: Self-hosted VPNs allow for greater customization to meet specific needs and preferences. Users can configure security protocols, encryption methods, and server locations according to their requirements, providing a tailored VPN experience.
Increased Security: By managing the VPN server independently, users can implement stringent security measures to protect against cyber threats and unauthorized access. This level of control enables constant monitoring and immediate response to any security vulnerabilities.
Cost-Efficiency: While third-party VPN services often require subscription fees, setting up a self-hosted VPN can be more cost-effective in the long run. Once the initial setup is complete, users only incur minimal expenses for maintenance and upkeep.
Reliability: Self-hosted VPNs offer greater reliability and stability since users are not dependent on the infrastructure or servers of external providers. This autonomy ensures consistent performance and uptime for uninterrupted VPN connectivity.
Despite these advantages, it's essential to acknowledge that setting up and maintaining a self-hosted VPN requires technical expertise and ongoing effort. Users must possess adequate knowledge of networking, server administration, and security practices to ensure optimal functionality and protection.
In conclusion, a self-hosted VPN service offers unparalleled control, customization, and security, making it an appealing choice for individuals and organizations seeking to fortify their online privacy and safeguard sensitive data.
DIY VPN solution
Title: Crafting Your Own VPN: A DIY Solution for Enhanced Online Privacy
In an era where online privacy concerns are paramount, many individuals seek effective ways to safeguard their digital activities from prying eyes. Virtual Private Networks (VPNs) have emerged as a popular solution, offering encrypted connections and anonymity while browsing the internet. While numerous commercial VPN services exist, some tech-savvy users prefer to take matters into their own hands by creating their DIY VPN solutions.
Building your VPN may sound complex, but with the right tools and knowledge, it can be a rewarding endeavor. One of the primary advantages of a DIY VPN is the heightened level of control and customization it provides. Users can tailor the VPN configuration to their specific needs, ensuring optimal performance and security.
To embark on this DIY journey, you'll need a few essential components. First and foremost, a dedicated server or virtual private server (VPS) acts as the foundation of your VPN infrastructure. Popular VPS providers like Amazon Web Services (AWS) or DigitalOcean offer affordable options suitable for hosting your VPN.
Next, select an appropriate VPN protocol such as OpenVPN or WireGuard, both known for their robust security features and ease of setup. Install the chosen protocol on your server and configure it according to your preferences, including encryption settings and server locations.
Additionally, consider installing a user-friendly VPN management interface like Algo or Streisand, which streamlines the setup process and provides a graphical interface for managing your VPN.
Once your DIY VPN is up and running, you can enjoy the benefits of enhanced privacy and security across all your devices. Whether you're browsing the web from a coffee shop or accessing sensitive information while traveling, your self-hosted VPN ensures that your online activities remain shielded from prying eyes.
In conclusion, while commercial VPN services offer convenience, a DIY VPN solution empowers users with greater control and customization options. By building your VPN, you not only enhance your online privacy but also gain valuable insights into network security and administration. So why wait? Take control of your digital privacy today with a DIY VPN solution.
Personal VPN server creation
Title: The Ultimate Guide to Creating Your Own Personal VPN Server
In an era where online privacy and security are paramount, setting up your personal VPN (Virtual Private Network) server has become a crucial step in safeguarding your digital presence. A personal VPN server offers numerous benefits, including enhanced privacy, secure data transmission, and unrestricted access to geo-blocked content. Here's a comprehensive guide on how to create your own personal VPN server:
Choose Your Platform: Select a platform to host your VPN server. Popular options include cloud-based services like Amazon Web Services (AWS), DigitalOcean, or using a spare computer at home.
Select VPN Software: Decide on the VPN software to install on your chosen platform. OpenVPN, WireGuard, and SoftEther are popular choices known for their security and performance.
Set Up Your Server: Follow the instructions provided by your chosen platform to set up and configure your server. Ensure to choose a secure password and enable firewall settings for added security.
Install VPN Software: Install your selected VPN software on the server following the provided documentation. Configure the software settings according to your preferences, including encryption protocols and server location.
Generate Certificates and Keys: Generate SSL/TLS certificates and encryption keys required for secure communication between your devices and the VPN server. Follow the instructions provided by your VPN software documentation.
Configure Client Devices: Install the VPN client software on your devices, such as computers, smartphones, and tablets. Input the server details and certificates/key files generated earlier to establish a secure connection.
Test Your Connection: Verify the functionality of your VPN server by connecting to it from different devices and accessing various websites. Ensure that your IP address is masked and your internet traffic is encrypted.
Maintain and Update: Regularly update your VPN software and server operating system to patch any security vulnerabilities. Monitor server logs for any suspicious activity and take necessary precautions.
By following these steps, you can create your personal VPN server, empowering yourself with enhanced online privacy and security wherever you go. Take control of your digital footprint and enjoy a safer browsing experience with your custom VPN solution.
Building custom VPN server
Title: How to Build Your Own Custom VPN Server: A Comprehensive Guide
In today's digitally interconnected world, concerns about online privacy and security have become paramount. Virtual Private Networks (VPNs) offer a robust solution to safeguard your internet activities from prying eyes. While there are numerous VPN services available, building your own custom VPN server provides greater control and customization options. Here's a step-by-step guide on how to set up your personalized VPN server:
Choose Your Platform: Decide on the operating system you want to use for your VPN server. Popular choices include Linux distributions like Ubuntu or CentOS, or you can opt for Windows Server if you're more comfortable with a Windows environment.
Select VPN Protocol: Determine which VPN protocol you want to use. OpenVPN is widely favored for its security and flexibility, although alternatives like WireGuard are gaining popularity for their performance benefits.
Set Up Server: Install the necessary software on your chosen platform. For OpenVPN, this typically involves installing the OpenVPN package and configuring it according to your preferences.
Generate Certificates and Keys: Create cryptographic certificates and keys to authenticate users and secure VPN connections. This step ensures that only authorized individuals can access your VPN server.
Configure Firewall and Routing: Adjust your server's firewall settings to allow VPN traffic and configure routing to ensure seamless connectivity between client devices and the VPN server.
Test Connectivity: Before deploying your custom VPN server, thoroughly test its connectivity and performance to identify and resolve any potential issues.
Deploy Server: Once you're satisfied with the setup, deploy your custom VPN server either on-premises or on a cloud platform like Amazon Web Services (AWS) or DigitalOcean.
Secure Server: Implement additional security measures such as enabling two-factor authentication and regularly updating software to protect your VPN server from potential threats.
By following these steps, you can create a custom VPN server tailored to your specific requirements, providing enhanced privacy and security for your online activities. Remember to regularly maintain and update your server to ensure optimal performance and protection against evolving threats.
0 notes
Text
VeryUtils Web File Manager is a best File Sharing and Cloud Storage Management Application
VeryUtils Web File Manager is a best File Sharing and Cloud Storage Management Application.
In today's digital landscape, the efficient management of files and seamless collaboration are essential for individuals and businesses. Introducing VeryUtils Web File Manager, a robust application designed to revolutionize your file sharing and cloud storage experience.

✅ Empowering You to Create Your Own File Sharing Platform
VeryUtils Web File Manager offers you the opportunity to establish your own fully-featured, self-hosted file sharing and hosting website in minutes, without requiring any coding or server management knowledge. With just a few clicks, you can set up your platform using our intuitive installer and comprehensive documentation, providing you with a hassle-free solution to your file management needs.
✅ Key Features for Optimal Performance and Functionality:
Discover a multitude of features tailored to enhance your file management experience:
Effortless Installation: Install VeryUtils Web File Manager within minutes, without the need for coding or server knowledge, thanks to our user-friendly installer.
Exceptional Performance: Experience lightning-fast performance and page load times, ensuring smooth navigation and seamless user experience.
Collaborative Sharing: Facilitate collaboration by allowing users to share files and folders with multiple collaborators, fostering productivity and efficiency.
Real-Time Upload Status: Monitor the progress, status, and estimated time remaining for all current uploads, providing you with valuable insights into your file transfers.
Secure Shareable Links: Create publicly shareable links for files and folders, complete with optional expiration dates, passwords, and permissions, ensuring maximum security for your shared content.
Responsive Design: Enjoy a fully responsive interface that seamlessly adapts to desktops, mobile devices, tablets, and more, ensuring accessibility across all platforms.
Customization Options: Personalize your platform with pre-built light and dark themes or create your own using the appearance editor, allowing you to reflect your unique brand identity.
Integrated Cloud Storage: Easily store user upload files on various cloud services and providers, including Amazon S3, DigitalOcean, and Dropbox, for enhanced reliability and flexibility.
Comprehensive Authentication System: Utilize a fully-featured authentication system, including social login options and account management features, ensuring secure access to your platform.
Granular Permissions and Roles: Employ a sophisticated permission and role system to control user access and actions across your site, ensuring maximum control and security.
Intuitive User Interface: Enjoy a seamless user experience with natural drag-and-drop features, integrated context menus, and advanced search functionality, allowing for effortless file management.
Extensive Documentation: Access in-depth documentation covering installation, features, and customization options, providing you with comprehensive guidance every step of the way.
✅ Tailored Solutions to Meet Your Unique Needs
At VeryUtils, we understand that every business has unique requirements. That's why we offer custom development services based on VeryUtils Web File Manager, ensuring that our solution aligns perfectly with your specific needs and goals. Whether you're interested in purchasing our software or require customized solutions, our team is dedicated to providing you with the support and assistance you need to succeed.
✅ Get Started Today
Ready to elevate your file management and collaboration experience? Visit the VeryUtils Web File Manager website to explore our features, request a demo, or inquire about custom development services. With our intuitive interface, robust features, and unparalleled support, VeryUtils Web File Manager is the ultimate solution for individuals and businesses seeking a powerful yet user-friendly file management platform.
✅ Contact VeryUtils today to unlock the full potential of your file sharing and cloud storage endeavors,
0 notes
Text

How to Install Virtualmin on Ubuntu 22.04 or 24.04 Virtualmin is a powerful and flexible web hosting control panel that simplifies server management by providing an easy-to-use interface. With Virtualmin, you can manage websites, databases, users, and security settings efficiently. Virtualmin features a number of scripts that can simplify the process of installing and maintaining software on your servers. It comes with a script installer for popular applications like Drupal, Joomla, bbPress, Django… and many others. Virtualmin also provides an updater tool to help you update all aspects of your server software in a single operation. It even allows you to check for security updates and clone your entire Virtualmin installation with one click of a button. This guide explains how to install Virtualmin on Ubuntu 22.04 or Ubuntu 24.04 using an official installation script. Prerequisites - A Ubuntu 22.04 or 24.04 server - Root or sudo access to the server - A fully qualified domain name (FQDN) such as virtualmin.example.com - A firewall configured to allow necessary ports Step 1: Update Your System Before installing Virtualmin, update the system packages to ensure everything is up to date: sudo apt update && sudo apt upgrade -y Once the update is complete, reboot the server: sudo reboot now Step 2: Download and Install Virtualmin Download the Installation Script Virtualmin provides an automated script to install all required dependencies easily. Download it using: sudo wget http://software.virtualmin.com/gpl/scripts/install.sh Grant Execution Permission After downloading the script, set the correct permissions: sudo chmod a+x install.sh Run the Installation Script Now, run the installation script: sudo ./install.sh The installer will ask configuration questions. Press Y to continue and let the script complete the installation. Step 3: Set the Hostname Virtualmin requires a fully qualified domain name (FQDN). To set it, use: sudo hostnamectl set-hostname virtualmin.example.com Replace virtualmin.example.com with your actual domain. Step 4: Configure the Firewall for Virtualmin Virtualmin uses port 10000 for its web interface. Allow this port in the firewall: sudo ufw enablesudo ufw allow 10000/tcpsudo ufw reload To verify the firewall status, run: sudo ufw status verbose Step 5: Access Virtualmin Web Interface Once the installation is complete, access the Virtualmin web interface by opening a browser and entering your server’s IP address or domain name: https://your-server-ip:10000 or https://your-domain.com:10000 Since Virtualmin uses a self-signed SSL certificate, your browser may show a security warning. Click on Advanced → Proceed to the site. Log in using your root username and password. Conclusion You have successfully installed Virtualmin on Ubuntu 22.04 or 24.04. Now, you can manage your web hosting, databases, and server settings through its web interface. Would you like help with configuring additional security settings, setting up website hosting, or automating backups? Let me know! Read the full article
0 notes
Text
Securing the Web3 World: Safeguarding the Future of Decentralized Internet
The advent of Web3 has brought forth a new era of decentralized internet, empowering users with unprecedented control over their data and digital interactions. As this exciting frontier unfolds, it becomes imperative to address the challenges of security and privacy in this evolving landscape. In this blog post, we will explore the key aspects of securing the Web3 world and delve into strategies and best practices to ensure a safe and trustworthy digital environment for all users.
I. Understanding Web3 and its Security Landscape
To effectively secure the Web3 world, it is crucial to understand its fundamental concepts and the unique security challenges it poses. Web3, often referred to as the "decentralized web," leverages blockchain technology, smart contracts, and decentralized applications (dApps) to enable peer-to-peer interactions and eliminate intermediaries. However, this paradigm shift introduces new vulnerabilities such as smart contract exploits, identity theft, and decentralized storage risks that need to be addressed with robust security measures.
II. Embracing Strong Authentication and Identity Management
In the Web3 world, strong authentication and identity management play a pivotal role in securing user interactions. Traditional usernames and passwords are no longer sufficient. Implementing multi-factor authentication, biometric verification, and decentralized identity solutions like self-sovereign identity (SSI) can enhance security and protect users' digital identities from unauthorized access.
III. Securing Smart Contracts and Decentralized Applications
Smart contracts are at the core of Web3 applications, enabling automated execution of transactions and agreements. However, they are susceptible to coding bugs and vulnerabilities. To mitigate these risks, developers must adopt best practices like formal verification, code audits, and security testing. Additionally, users should exercise caution when interacting with decentralized Applications, carefully examining the code, and verifying the authenticity and reputation of developers.
IV. Protecting Decentralized Storage and Data Privacy
Decentralized storage platforms such as IPFS (InterPlanetary File System) offer enhanced privacy and resilience compared to centralized counterparts. However, data security remains a concern. Encrypting sensitive data, adopting data access controls, and leveraging zero-knowledge proofs can bolster the security of decentralized storage systems, ensuring that only authorized entities can access and manipulate data.
V. Building Resilient Infrastructure and Network Security
The distributed nature of Web3 introduces a unique set of infrastructure and network security challenges. Implementing robust encryption protocols, utilizing decentralized hosting solutions, and regularly monitoring and auditing network nodes can help safeguard against DDoS attacks, sybil attacks, and other threats that can compromise the availability and integrity of the decentralized network.
VI. Nurturing a Culture of Openness and Collaboration
Securing the Web3 world is a collective effort that requires collaboration among developers, users, and researchers. Encouraging bug bounties, establishing decentralized governance mechanisms, and fostering an open and transparent community can facilitate the identification and resolution of security vulnerabilities, thereby ensuring the long-term security and viability of the Web3 ecosystem.
As the Web3 world continues to evolve, securing this decentralized landscape becomes paramount. By embracing strong authentication, securing smart contracts, protecting decentralized storage, and nurturing a culture of collaboration, we can build a secure foundation for the future of the decentralized internet. Let us seize the immense potential of Web3 while ensuring the safety and privacy of its users, paving the way for a truly decentralized and trustworthy digital world.
0 notes
Text
not a great poll for opsec but eh. I think you missed Googles password manager I dont really know anythign about it though and ew google, ofc
also wasnt lastpass the one that turned out to handle a security incident really badly?
I usually recommend people bitwarden, not self hosted. flame me
if one more service denies a new password for being "not strong enough" and then requires "8 characters" and some bullshit i will start burning down server racks at random
155 notes
·
View notes