#RadioButtons
Explore tagged Tumblr posts
Visit Tumblr Blog
Explore Tumblr blogs with no restrictions, modern design and the best experience.
Last Seen Tumblr Blogs


Fun Fact
Tumblr.com is the 103rd most visited website in the world.
Text
Create Stylish Radio Buttons and Checkboxes with CSS!
🔘 Elevate your form design with custom radio buttons and checkboxes using CSS! Learn how to create visually appealing and user-friendly form elements without any JavaScript. Plus, make sure your HTML structure follows best practices for accessibility and usability. Watch our short tutorial now!
#CSS#WebDesign#FrontEndDevelopment#TechTutorial#RadioButtons#Checkboxes#HTMLStructure#FormDesign#WebAccessibility#Usability#CSSStyling#TechEducation#CodingTutorial#WebDevelopmentTips
1 note
·
View note
Text

So, I tried to create a radio button that is auto customizable. The most important things to remember from the video:
the difference between the different parameters:
fg color: the color of the dot inside the radio button when it is selected, and the label associated with the radiobutton, even if it is not selected
bg color: background color of the label associated with the radio button
select color: the background inside the radio button
the radio buttons have same variable but different values
the select color + background color = the main app window background color
the color of the dot of selection to the background of the app: when the background is "purple", the color is white, and when it is "gold", the color is black
0 notes
Note
hi dear author. how goes it? I had a coding ?. If I wanted to allow players to have a character with two different colored eyes, how would I go about that? I imagine I would have to set a boolean for each eye?
Depends on how you do your character creator, and also how often you plan on referencing eye colour in your text.
If it's something you plan to do a lot, you could set two separate variables for the eyes. This example is going to use dot notation, which requires initialization in the StoryInit passage, but if you wanted to skip that you could theoretically also write the variables as two separate ones, such as $eyecolour_right and $eyecolour_left.
:: StoryInit
<<set $eyecolour to { "right": "brown", "left": "brown", }>>
:: Character Creator Right Eye <label><<radiobutton "$eyecolour.right" "grey" checked>> Grey</label> <label><<radiobutton "$eyecolour.right" "blue">> Blue</label> <label><<radiobutton "$eyecolour.right" "green">> Green</label> <label><<radiobutton "$eyecolour.right" "hazel">> Hazel</label> <label><<radiobutton "$eyecolour.right" "brown">> Brown</label> <label><<radiobutton "$eyecolour.right" "black">> Black</label> Left Eye <label><<radiobutton "$eyecolour.left" "grey" checked>> Grey</label> <label><<radiobutton "$eyecolour.left" "blue">> Blue</label> <label><<radiobutton "$eyecolour.left" "green">> Green</label> <label><<radiobutton "$eyecolour.left" "hazel">> Hazel</label> <label><<radiobutton "$eyecolour.left" "brown">> Brown</label> <label><<radiobutton "$eyecolour.left" "black">> Black</label>
This would print like this (if the player selects brown and green)
You look in the mirror at your $eyecolour.right and $eyecolour.left eyes.
You look in the mirror at your brown and green eyes.
To avoid weird writing when referencing eye colour in your text if the player's eyes are the same colour (you wouldn't want the above statement to end up as "You look in the mirror at your brown and brown eyes"), you could do an if statement like this:
You look in the mirror at your <<if $eyecolour.right is $eyecolour.left>> $eyecolour_right<<else>>$eyecolour.right and $eyecolour.left<</if>> eyes.
If the player selected grey for both options, it would print like this:
You look in the mirror at your brown eyes.
You could also take it one step further and make a widget.
:: Widgets <<widget "eyes">> <<if $eyecolour.right is $eyecolour.left>>$eyecolour.right <<else>>$eyecolour.right and $eyecolour.left<</if>> eyes<</widget>>
Then in your passage it would look like this:
You look in the mirror at your <<eyes>>.
And it would print like this:
You look in the mirror at your brown eyes.
Or this:
You look in the mirror at your brown and green eyes.
Hope that helps!
20 notes
·
View notes
Text
i dont have a devblog yet because i dont have a title so uhhh
13/06/25 - untitled if game devlog
approximately 10 hours were spent working on (untitled), broken up by constant bathroom breaks and sandwich making. a lot of time was spent looking at tutorials and the twinery cookbook and pdf guides and just so. many. resources. oh my god.
1.3k words written
set up character creation
set up character profile (+stat meters! the scary thing!)
set up codex
learnt how to use checkboxes and radiobuttons
learnt how to use the beautiful and sexy include macro to add optional character creation options
added another custom macro by ChapelR (new meters) and finally put their notify macro to use
spent way too long looking up german surnames
I know I'm not done with the character creation part yet (I still want to add the option for tattoos and piercings and am toying with the option of unnatural hair/eye colours) but I think that it's set up nicely so I can add in and tweak specific bits really easily.
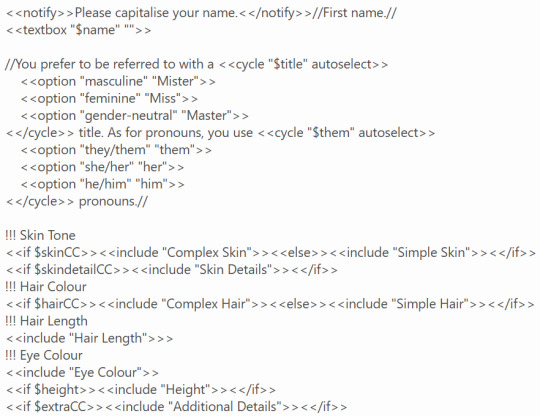
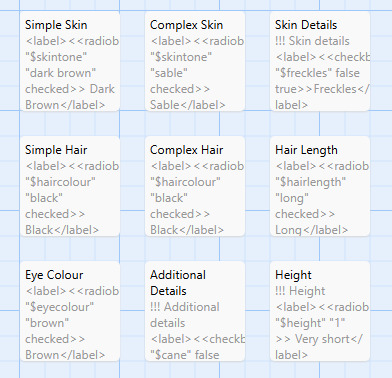
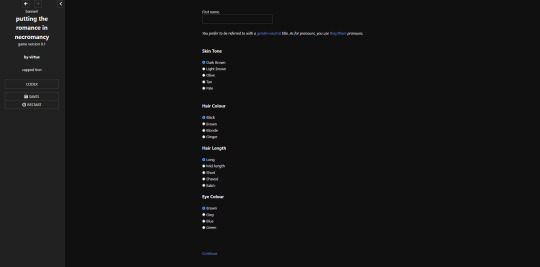
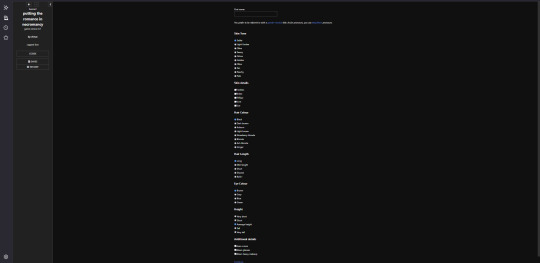
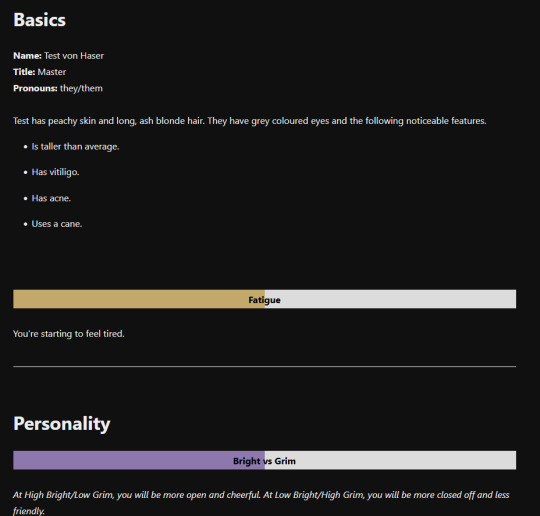
(in order: the code used for the character creator / the various categories included / what the character creator looks like at its simplest / what the character creator looks like at its most complex / profile with description + two meters)
If I want to add a new category of descriptors, I can just make a new passage and then include it in as an optional or mandatory thing. Plus, I know that some people love in-depth character creation and others hate it so. It's the best of both worlds :3
ALSO IF THERE ARE BETTER WAYS TO CODE THIS, UM. WHOOPS. I'M STILL FIGURING IT ALL OUT.
#sorry its not skyrim or tes i really dont have anywhere to put this#i guess my art blog but i prefer to keep that just for my art#long post#ALSO DON'T TALK TO ME ABOUT HOW MY PRONOUNS ARE SET UP. ITS VERY SCUFFED. IF YOU COULD SEE HOW THEY ARE IN FULL OHHHH YOU'D WEEP.
3 notes
·
View notes
Note
Hello Manon hope you're well! I was wanting to ask for a little bit of coding advice if at all possible? I don't know if you know of Brushmen's code collection to make Twine look like Choice script. I was hoping you would know a way to do something similar in the sense of wrapping the choices in boxes the way they did (similar to how choicescript does.)
Hiya Anon,
Of course! Happy to help.
Yes, I'm familiar with the template, thought I hadn't noticed the update... It is now meant for more intermediate users, it seems.
The source code does provide what is needed to make it happen (which is essentially a custom macro in JavaScript, with some extra CSS to make it pretty). You will need to download the projectfiles.zip from the page, extract it, find the choices.js and choices.css files inside the src folder, and add the code to your project. You can also find examples of how the "<< choice_shown >>" macro is used in the story folder.
However, if you just want to make it look more like ChoiceScript as in rather than

you want

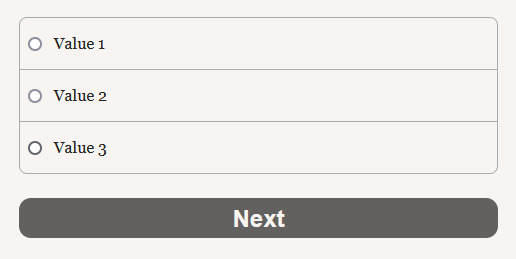
You will need to choose another SugarCube macro: << radiobutton >>. Essentially, code your radiobuttons for the choices (and wrap each of them in a < label> for accessibility), and wrap the whole in a < div> for the styling. Don't forget the button for confirmation!
< div class="choices"> < label><< radiobutton "$choice" "value" autocheck>> Value 1< /label> < label><< radiobutton "$choice" "value2" autocheck>> Value 2< /label> < label><< radiobutton "$choice" "value3" autocheck>> Value 3< /label> < /div> << button [[Next]]>> /* More code if necessary */ << /button>>
You will need to remove the spaces... Tumblr otherwise eats the code...
Then we move on to the StyleSheet:
.choices label { padding: 11px 8px 12px; display: block; border-color: #a9acaf; border-style: solid; border-width: 1px 1px 0px 1px; } .choices label:first-child { border-top-width: 1px; border-top-right-radius: 8px; border-top-left-radius: 8px; } .choices label:last-child { border-bottom-width: 1px; border-bottom-right-radius: 8px; border-bottom-left-radius: 8px; }
That's for the radio button. We target the label, because it's the easiest and it takes into account the whole option block (radiobutton and text). The second and third code is to round the borders.
And if you want the button:
.macro-button { clear: both; display: block; width: 100%; font-size: 1.5em; font-weight: bolder; font-family: -apple-system, sans-serif; margin: 1em auto; color: #f7f4f1; background-color: #626160; border: none; border-radius: 0.5em; padding: 6px; }
And so you get:
#coding support#sugarcube#twine#coding in twine#interactive fiction#i want to make a template that looks like ChoiceScript now...
14 notes
·
View notes
Text
0 notes
Text
Knowledge 27.1
Sonic's layer changes from A to B via the mid loop switcher. The switcher after the loop sets it back to A.
https://chargedmagazine.org/2020/04/the-physics-behind-sonic-the-hedgehog/
This simulation shows a simple model of a looping coaster. To avoid too complicated calculations, a circular form is assumed; inlet and outlet, if existing, are rectilinear. These conditions are unsuitable for a real looping coaster, as they would cause sudden and extreme changes of the acting forces; the risk of injury for the passengers would be considerable. Frictional forces and self-rotation of the ball are neglected.
Essentially, three cases can be distinguished:
If the initial height of the rolling ball is at most as large as the radius, the result is a periodic oscillation like that of a pendulum. In this case, inlet and outlet make little sense; they are consequently omitted.
If the initial height is greater than the radius of the circle, but less than 2.5 the radius, the ball, after transition to the circular path, will first roll upwards on the right side, but will then lift off and fall down.
If the initial height is at least 2.5 the radius, the ball will do a rollover and roll to the outlet.
The control panel on the right side allows the essential parameters to be set. The first button brings the simulation into the initial state. You can start or stop and continue the simulation with the other button. Two radiobuttons allow you to choose between 5× and 50× slow motion. Four input fields are available below, for the circle radius, the initial height, the gravitational acceleration, and the mass. The input must be completed with the Enter key; entries outside the permitted range will be modified. In the lower part of the control panel you can set, among other things, whether the velocity vector is to be drawn in. Furthermore, there is a selection option whether weight force and contact force or tangential and radial force are to be displayed. Finally, you can specify whether the total force and the corresponding parallelogram of forces should be visible.
If we take these numbers and plug them into the equation for centripetal force, we get:
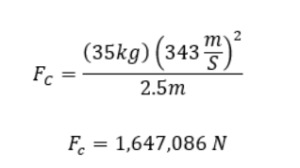
Woah! Looks like it’ll take a lot of force for the speedy blue hedgehog to clear this small loop at the speed of sound.
Now, we did the calculations and found a force, but is there a way for us to find the maximum radius of a loop Sonic can travel even if we don’t know the centripetal force? In fact, there is! We’ll just need a little extra help from another concept from our friend Newton.
youtube
youtube
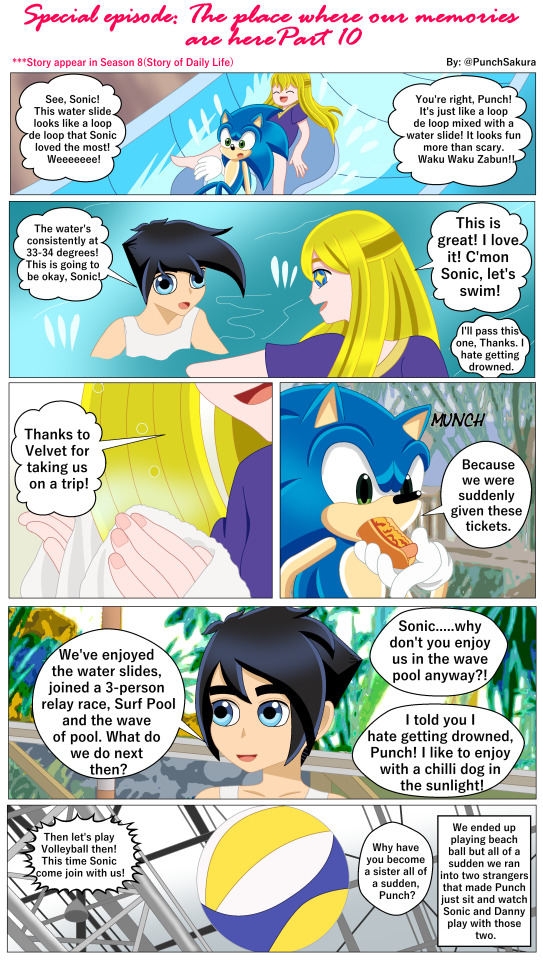
In basic terms, a wave pool is a swimming pool that artificially creates large waves. You can often find them in indoor and outdoor water parks, leisure centres, and centres specifically focused on surfing, such as Bristol Wave Pool. Wave pools imitate the movement of waves formed in the ocean, allowing individuals to surf within a controlled environment.
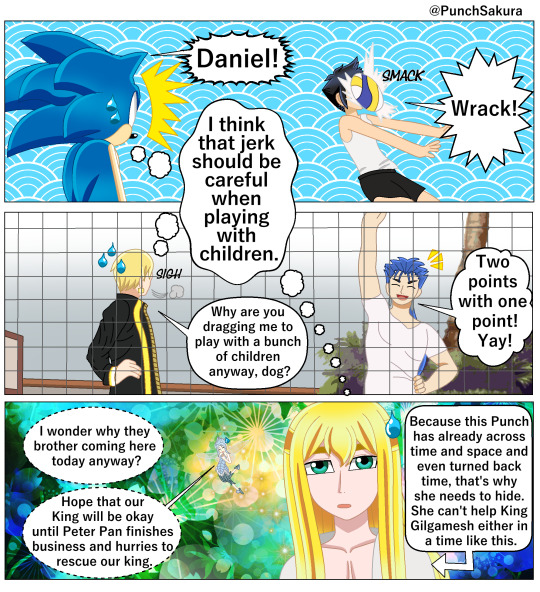
#sakuraswordly#tsubasa of phantasia comic#tsubasa of phantasia knowledge#tsubasa of phantasia#Tsofph Danny Phantom#Punch Whalen#Sonic Crowe#tsofph Season 8(Story of Daily Life)#tsubasa of phantasia 11#sonic physic guide#surf pool#Youtube
0 notes
Text
(C#) windows form開發小技巧

概述
為了方便,我們經常會將一些功能做成小工具來做一些常用的檔案處理,但是windows form跟我們習慣寫的網頁即使元件很像,使用方式卻不太一樣,故將一些網頁表單常用的功能或技巧整理下來,避免開發上因為不熟悉造成進度緩慢的問題。
清空表單
程式碼如下:
private void ClearAllFields(Control.ControlCollection control){ foreach (Control childControl in control){ if (childControl is TextBox textBox){ textBox.Text = string.Empty; } else if (childControl is ComboBox comboBox){ comboBox.SelectedIndex = -1; } else if (childControl is CheckBox checkBox){ checkBox.Checked = false; } else if (childControl is RadioButton radioButton){ radioButton.Checked = false; } else if (childControl is NumericUpDown numericUpDown){ numericUpDown.Value = numericUpDown.Minimum; } else if (childControl is DateTimePicker dateTimePicker){ dateTimePicker.Value = DateTime.Now; } else if (childControl is CheckedListBox checkedListBox){ checkedListBox.Items.Clear(); } } }
網頁的form是有原生的reset()方法可以清空input值的,但windows form 沒有,所以我們得要自己撰寫一個function來對表單常見的元件做清空,因為每種元件的清空方式不一樣���以需要各別處理,這段程式碼可以重置大部分我們常見的表單元件。
上傳檔案
windows form似乎是沒有寫好的上傳元件,所以我們只能透過按鈕觸發讀取檔案的動作,先附上整段的程式碼再來細部解說
private void button1_Click(object sender, EventArgs e){ OpenFileDialog openFileDialog = new OpenFileDialog(); openFileDialog.InitialDirectory = "C:\\"; openFileDialog.Filter = "(*.xml)|*.xml"; openFileDialog.FilterIndex = 1; openFileDialog.RestoreDirectory = true;
if (openFileDialog.ShowDialog() == DialogResult.OK){ string selectedFilePath = openFileDialog.FileName;
fileNm = openFileDialog.FileName; accessSetting = XmlHelper.DeserializeFromXml<AccessSetting>(fileNm); var temp = accessSetting.Option.Select(o => o.Name); foreach (var item in temp){ checkedListBox1.Items.Add(item); } } }
是代表點擊button1按鈕時觸發的事件,在windows form內可以雙擊兩下設計界面自動建立這個事件的監聽器。
openFileDialog.InitialDirectory = "C:\\";
代表指定開啟檔案的預設目錄,若是要預設成開啟檔案所在的目錄,則可以使用
openFileDialog.InitialDirectory = Environment.CurrentDirectory;
if (openFileDialog.ShowDialog() == DialogResult.OK)
代表讀取檔案成功時才執行後續的動作。
CheckedListBox的選項寫入與讀取
假設我們有一個叫做accessSetting 的 array儲存了每個選項的名稱(key)跟我們邏輯上要處理的值(value),我們需要將這個temp設為全域變數(不寫在事件function內),這樣才可以讓不同的事件讀取跟寫入選項。
我們可以用
foreach (var item in accessSetting){ checkedListBox1.Items.Add(accessSetting.Name); }
的方式將選項加入checkedListBox
再用類似
foreach (var item in checkedListBox1.CheckedItems){ var temp= accessSetting.Option.FirstOrDefault(o => o.Name == item.ToString()); }
去剛剛讀取檔案時儲存的全域物件內提取我們所需要的value做處理。
結論 因為平常都是開發網頁功能居多,這次突然回來開發windows form���點邏輯轉換不過來,會覺得很多功能都應該有預設的function去處理,但仔細去爬了別人的文才發現這些都要自己做,也讓我體會到其實瀏覽器的設計跟框架真的默默的幫我們做掉了許多原本須要自己處理的事件跟邏輯,希望把常用到的功能一個一個記下來後以後在開發上可以更順暢,效率更高。
0 notes
Video
youtube
https://www.youtube.com/watch?v=Ep0EFm7xmMM&t How to add checkbox in contact form 7 | Checkboxes, radio buttons, and menus #contactform #contactform7 #checkboxes #radiobutton #menu
0 notes
Text
youtube
Tkinter GUI in Python | Radiobutton in python | tkinter library | window form in python | हिंदी में https://youtu.be/B5uxV8CdLKM #TechAlert #technology #python #howto #programming #Program #tkinter #howtocode #tutorial #tech #WindowApp #app #love
#Tkinter GUI in Python | Radiobutton in python | tkinter library | window form in python | हिंदी में#https://youtu.be/B5uxV8CdLKM#TechAlert#technology#python#howto#programming#Program#tkinter#howtocode#tutorial#tech#WindowApp#app#love#Youtube
2 notes
·
View notes
Link
0 notes
Link
1 note
·
View note
Text
PHP RadioButton ve Checkbox Kullanımı
PHP RadioButton ve Checkbox Kullanımı
Merhaba, bu yazımda PHP RadioButton ve Checkbox Kullanımı konusundan bahsetmek istiyorum. Bir veri tabanından çektiğimiz verilere göre ekrana nas��l seçilmiş olarak getireceğimizi göreceğiz PHP RadioButton ve Checkbox Kullanımı Bu yazımızda veri tabanından aldığımız verilere göre page loadda RadioButton ve CheckBox nasıl seçili olarak getireceğimizi göreceğiz. PHP Radio Checkbox Checked Tabi…

View On WordPress
#PHP#PHP Radio Checkbox Checked#php radiobuttın checked#PHP RadioButton Kullanımı#PHP RadioButton ve Checkbox Kullanımı
0 notes
Note
If you're not answering coding questions then please feel free to let this ask dissolve in the Ether. I was wanting to know if it was possible, when setting a variable in radio button, to set other variables along with it for example: Say I'm allowing MC choose a type of horse on a radio button, is it also possible to set a variable within that, dependent on the type of horse. So if player chooses a $horsebreed that is a smaller breed it would set the $horsesize to small. Then if they choose a $horsebreed that is medium size, the $horzesize would = medium. (Sorry if I made next to no sense.)
So, a few things to think about here:
01. What are you using this for and does this double up on information?
Basically, are you setting two variables where one will do the trick?
For example, say you have a situation where you have different results based on the size of your horse. If you only have 3-4 choices of horse, you could just reference the horse breed itself in your if statement to get different results.
<<if $horse <= 2>>[result for the small horse] <<elseif $horse is 3>>[result for the medium horse] <<elseif $horse >=4>>[result for the large horse<</if>>
in this case I've assigned each horse a number and I am using those instead of strings. 1 and 2 are small horses, 3 is the medium horse, 4 and higher are large horses.
02. Do you need to store descriptive words in your variable?
Generally speaking, you want to avoid using strings (words) in your variables due to how the game history functions. Having too many will slow your transition passages down.
If you assign the breed a number, then you can use that to generate a descriptive passage with a widget when you need it.
This thread has more information on this and may be helpful.
Alternatively, if you really need to set two variables with one radio button, there's some code to make that happen at the bottom of the thread linked above.
You could also set the second variable on the following passage depending on what the player's first choice was (this will only work properly if the player can't navigate backwards to where their original choice was made). Something like this:
First Passage
Horse <label><<radiobutton "$horsebreed" "falabella" checked>> Falabella</label> <label><<radiobutton "$horsebreed" "hanoverian">> Hanoverian</label> <label><<radiobutton "$horsebreed" "dutch draft">> Dutch Draft</label> [[Next.|Second Passage]]
Second Passage
<<if $horsebreed is "falabella">> <<set $horsesize to "small">> <<elseif $horsebreed is "hanoverian">> <<set $horsesize to "medium">> <<else>> <<set $horsesize to "large">> <</if>>
If you intend to have a lot of variables for your horses, I would definitely look into using property access so you can store multiple points of information on the same variable rather then creating multiple variables for the same thing. It could look something like this:
[put in your StoryInit passage]
<<set $horse to { "breed:" "falabella", "size:" "small", }>>
[setting breed with a radio button]
Horse <label><<radiobutton "$horse.breed" "falabella" checked>> Falabella</label> <label><<radiobutton "$horse.breed" "hanoverian">> Hanoverian</label> <label><<radiobutton "$horse.breed" "dutch draft">> Dutch Draft</label> [[Next.|Second Passage]]
[setting size on the next passage]
<<if $horse.breed is "falabella">> <<set $horse.size to "small">> <<elseif $horse.breed is "hanoverian">> <<set $horse.size to "medium">> <<else>> <<set $horse.size to "large">> <</if>>
11 notes
·
View notes
Text
Tkinter GUI in Python | Radiobutton in python | tkinter library | window form in python | हिंदी में
https://youtu.be/B5uxV8CdLKM
TECH ALERT youtube channel
#TechAlert #technology #python #howto #programming #Program #tkinter #howtocode #tutorial #tech #WindowApp #app #love
#Tkinter GUI in Python | Radiobutton in python | tkinter library | window form in python | हिंदी में#https://youtu.be/B5uxV8CdLKM#TECH ALERT youtube channel#TechAlert#technology#python#howto#programming#Program#tkinter#howtocode#tutorial#tech#WindowApp#app#love
1 note
·
View note