#Programs like photoshop for mac free
Explore tagged Tumblr posts
Visit Tumblr Blog
Explore Tumblr blogs with no restrictions, modern design and the best experience.
Last Seen Tumblr Blogs


Fun Fact
The Tumblr office adopted Tommy, an 11-year-old Pomeranian.
Text
back to basics
mostly free resources to help you learn the basics that i've gathered for myself so far that i think are cool
everyday
gcfglobal - about the internet, online safety and for kids, life skills like applying for jobs, career planning, resume writing, online learning, today's skills like 3d printing, photoshop, smartphone basics, microsoft office apps, and mac friendly. they have core skills like reading, math, science, language learning - some topics are sparse so hopefully they keep adding things on. great site to start off on learning.
handsonbanking - learn about finances. after highschool, credit, banking, investing, money management, debt, goal setting, loans, cars, small businesses, military, insurance, retirement, etc.
bbc - learning for all ages. primary to adult. arts, history, science, math, reading, english, french, all the way to functional and vocational skills for adults as well, great site!
education.ket - workplace essential skills
general education
mathsgenie - GCSE revision, grade 1-9, math stages 1-14, provides more resources! completely free.
khan academy - pre-k to college, life skills, test prep (sats, mcat, etc), get ready courses, AP, partner courses like NASA, etc. so much more!
aleks - k-12 + higher ed learning program. adapts to each student.
biology4kids - learn biology
cosmos4kids - learn astronomy basics
chem4kids - learn chemistry
physics4kids - learn physics
numbernut - math basics (arithmetic, fractions and decimals, roots and exponents, prealgebra)
education.ket - primary to adult. includes highschool equivalent test prep, the core skills. they have a free resource library and they sell workbooks. they have one on work-life essentials (high demand career sectors + soft skills)
youtube channels
the organic chemistry tutor
khanacademy
crashcourse
tabletclassmath
2minmaths
kevinmathscience
professor leonard
greenemath
mathantics
3blue1brown
literacy
readworks - reading comprehension, build background knowledge, grow your vocabulary, strengthen strategic reading
chompchomp - grammar knowledge
tutors
not the "free resource" part of this post but sometimes we forget we can be tutored especially as an adult. just because we don't have formal education does not mean we can't get 1:1 teaching! please do you research and don't be afraid to try out different tutors. and remember you're not dumb just because someone's teaching style doesn't match up with your learning style.
cambridge coaching - medical school, mba and business, law school, graduate, college academics, high school and college process, middle school and high school admissions
preply - language tutoring. affordable!
revolutionprep - math, science, english, history, computer science (ap, html/css, java, python c++), foreign languages (german, korean, french, italian, spanish, japanese, chinese, esl)
varsity tutors - k-5 subjects, ap, test prep, languages, math, science & engineering, coding, homeschool, college essays, essay editing, etc
chegg - biology, business, engineering/computer science, math, homework help, textbook support, rent and buying books
learn to be - k-12 subjects
for languages
lingq - app. created by steve kaufmann, a polygot (fluent in 20+ languages) an amazing language learning platform that compiles content in 20+ languages like podcasts, graded readers, story times, vlogs, radio, books, the feature to put in your own books! immersion, comprehensible input.
flexiclasses - option to study abroad, resources to learn, mandarin, cantonese, japanese, vietnamese, korean, italian, russian, taiwanese hokkien, shanghainese.
fluentin3months - bootcamp, consultation available, languages: spanish, french, korean, german, chinese, japanese, russian, italian.
fluenz - spanish immersion both online and in person - intensive.
pimsleur - not tutoring** online learning using apps and their method. up to 50 languages, free trial available.
incase time has passed since i last posted this, check on the original post (not the reblogs) to see if i updated link or added new resources. i think i want to add laguage resources at some point too but until then, happy learning!!
#study#education resources#resources#learning#language learning#math#english languages#languages#japanese#mandarin#arabic#italian#computer science#wed design#coding#codeblr#fluency#online learning#learn#digital learning#education#studyinspo#study resources#educate yourselves#self improvement#mathematics#mathblr#resource
703 notes
·
View notes
Note
Hello!
I absolutely love your edits and gifs. I was thinking about making edits/gifs too but I'm not sure where to start : ( Would you be able to share some resources? Or any tips you have for someone that's just starting out? I'm not even sure where to download the videos from :/
Thank you in advance!
hello!! omg thank you so much for liking my gifs 🥹🫶🫶
Of course! In this post I'll share some tips that I think are helpful when making gifs, specially from asian dramas (mostly chinese and korean)!
Where to download k/cdrama videos?
dramaday (korean media only)
mkvdrama (korean, chinese, japanese, thai etc)
avistaz.to (they have the most complete catalog of asian dramas but you can only have access to the files if you register and they open for registration only every now and then so if you want to join, you have to have a invite or wait till they open)
2. Where to make gifs?
Mostly, the gifs on this website are done using Adobe Photoshop but I think for the past few years there is a lot of users who use Photopea which is an online (and free) version of photoshop.
3. How to make gifs?
Well, I think there's a some ways of making gifs but the 2 most common are through screencapping and using vapoursynth. Before I knew how to use and install vapoursynth I used the screencap method a LOT so I totally recommend you to begin giffing using the screencap method before you try other ways of giffing. Also, with this method, you can use on both Photoshop and Photopea.
In this gif tutorial made by @kylos you can learn how to install the program mpv to take screencaps and how to make gifs using the captures.
There's this complete guide on how to gif made by @cillianmurphy that is very helpful.
Also, this comprehensive giffing tutorial by @redbelles is great!
But if you want to know how to gif using vapoursynth (if you are an MAC user), i totally recommend this how to install post and COMPREHENSIVE GIFFING TUTORIAL (vapoursynth + ps cc 2018) post, both from my beloved @dingyuxi 🫶
If you don't have Photoshop and want to make gifs using Photopea, I think this and this tutorials will be great for you.
4. How to color?
Coloring gifs is something very personal to each gifmaker but if you want to know how to start doing it, i recommend you these tutorials:
becca’s mega coloring tutorial by @nataliescatorccio
coloring tutorial by @magnusedom
simple gif colouring for beginners by @kinnbig (specially focused on east & south east asian skin tones)
Finally, I recommend you looking at the resource directory from @usergif because they have a collection of tutorials and resources that are very handy when making gifs!
If you have any particular question from how I gif, I will gladly answer!
200 notes
·
View notes
Note
I have started to become more and more fascinated with older computers as time has gone on, and now I want to potentially own one of my own. The oldest one I have access to is a laptop from 2013 I had shared with my mom that's running Windows 7, lol. I was thinking I wanted to go a decade or two further back, like late 80's up to 2000. Do you have any potential recommendations? No OS preference, but I do have a huge interest in older digital art programs, so anything that has something like that built in/has some available for it would be ideal. Thanks so much.
I'm not an expert on art programs, but that I do know is that every machine with Windows comes with Microsoft Paint while Macs usually don't have any built-in editor, but you can get other programs (Photoshop, Kidpix, etc) for both platforms. (Also, I've heard there's a lot of art programs for the Amiga platform, but that's a very expensive platform to get into from what I've seen).
As for the computer itself... the best place to start is probably asking around and seeing if anyone you know has an old machine in their garage or basement gathering dust that you can have. Something like that would be easily accessible and would be a good starting point, as you haven't invested much (if anything) into it and it's probably going to be something commonplace enough that you can get the basics down and use it as a jumping point. Something like that would most likely be a 90s PC or possibly an 80s eight-bit machine like a Commodore 64 or Apple II if you're really lucky.
Anyway, I guess the point of my rambling is whatever other people around you might have would most likely be an easily accessible starting point. Then as you explore more you can decide things like "okay, I'd like to experiment more with portables" or "wow, I really like this specific drawing program, maybe I can find something that runs an even older version." This hobby has been something I've been into for a decade+, so there's plenty of time to explore and learn about new things.
If anyone else has suggestions, please feel free to add on to this post, I just put what came to my mind here.
33 notes
·
View notes
Note
here very quietly asking for reaper rindo
Unfortunately, I am unable to work on Reaper Rindo since I was doing it in After Effects but had been having problems with the rendering/my computer being able to handle it. Then I just couldn't afford Adobe Creative Cloud anymore, (the full package because I was using InDesign, illustrator, and the audio program) so I had to scale back to only Photoshop since that's the program I use the most with work ���� I really liked the visual novel style of NTWEWY, and how I incorporated it with the reaper rindo story. Still, I'm not sure how to do that anymore or what free or cheap video editors/motion graphic programs I can use (if you have any suggestions for Mac let me know, I would prefer free programs because I don't have the budget to buy a program right now..)
I think I'll have to find another visual media, but I feel like if I jump to another one it won't be as impactful...and I just don't have the bandwidth to figure things out with Reaper Rindo right now, sorry!! I do want to finish it and have some great ideas, but it will be a while likely...

21 notes
·
View notes
Text
Alright guys so I printed out a scale copy based on my original size for the quilt and, uh, it was big. Like, this wouldn't fit on a twin-sized bed big. So I've reduced the size a bit to something more manageable! (CD for scale, please ignore the other stuff in the room lol)

The new size will be approximately 52" high by 35"-ish wide.
Since I'm trying to make this as precise as possible I spent the evening struggling with math, lol. If people know any free, Mac-friendly programs I would appreciate it, haha. I made a mockup in Photoshop that I *think* is more exact but we won't know until I start assembling because, have I mentioned this before, I am terrible at math, lol.
I made the mockup in this way because I can use the magic wand tool to get the precise measurements of what each of those pieces are, knowing that I'll need to add a 1/4 inch seam allowance to everything.
Based on my estimates I think I'm going to need the following approximate yardage (assuming the bolt is 40" wide cotton):
1/4 yard maroon for borders
1/4 yard red for borders
1/4 yard blue for squares
1/4 yard gold for squares
1/2 yard blue background
1 yard black for trims and binding
1/2 yard red bird
1/2 yard zebra white
1 yard red orange
1/2 yard magenta
1 yard gold
1/2 yard light yellow
1/2 yard green leaves
1/2 yard bark brown
+ assorted golds, gauzes, etc.
I'm going to a quilt show tomorrow to do some initial color and fabric scouting, wish me luck! I'll be sure to take pics of anything I bring home and keep you all posted. :)
#let's build a quilt#rin sews stuff#measuring....#math is the bane of my existence#why was astrophysics easier than figuring out simple math estimates lol
7 notes
·
View notes
Note
Hey!! How do I get into making gifs? Any tips for a beginner? I literally know nothing about it just that the I'd like to start. Also is not having photoshop a big obstacle?
Hi there! Yeah I can give you some tips to get started! Keep in mind I use windows to make my gifs and not a mac.
So to get into gifmaking you don't need to have photoshop. If you find that you enjoy making gifs I do recommend you look into getting photoshop (and there are ways of getting it without paying *raises pirate flag*) but to start there are several online programs you can use.
Here's a few that i've used before I learned how to do it in photoshop:
photopea
ezgif
giphy
imgflip
makeagif
This is an excellent tutorial to using photopea to make gifs
Each one of those will allow you make a basic gif. For complex coloring, sharpening, layouts, typography, blending, etc you'll want to upgrade to using photoshop because the quality is just way better and you can do so much more but when you're just wanting to get start all of these websites are great places to learn.
I also recommend learning how to take screencaps because I find it's a lot easier to make gifsets using screencaps than it is to try and screen record, cut, and upload videos.
My recommendation for screencapping is KMPlayer. It's a video player that you download to your computer and has a very easy way to save screencaps. Then you can just upload the jpgs into whatever program you're using to make gifs.
I made a basic gif making tutorial using photoshop and kmplayer here if you want to take a look at it.
Basic gifmaking steps:
Get your video. You can download it through pirating sites or use dvds or screen record. I download from sites like soap2day.to.
Take screen caps of the specific scene you want to gif OR cut your video to just the scene you want
Upload either clip or jpgs into the chosen program
Set the speed
Do any trimming of the scene and/or cropping the sides you want to do
If your program allows you (some don't) you can sharpen it, brighten the colors, add text
Then just save it as a .gif
Some other things:
The higher quality video, the better quality gif. 1080 is better than 720. Try to get a nice quality video if you can
Some websites will have a watermark on it that can't be removed so keep that in mind. Another reason why I prefer using photoshop.
Try to keep the gif either the same speed as the episode or just a little slower. Too fast isn't good.
That's all I got for now! If you have any other questions please feel free ask! I'd be happy to help with anything!
109 notes
·
View notes
Text
In light of recent events, I'd like to recommend Photoshop alternatives for current Adobe users. Photopea is an in-browser recreation of Photoshop, and it's free! If you're familiar with Photoshop's UI this will be easy to get used to. It's somewhat less refined than PS but it's a surprisingly competent replacement.
Clip Studio Paint Pro is an excellent program for all kinds of digital art, with a one-time perpetual license for Windows and Mac for about $20-25 when it's on sale, so it's worth waiting for Black Friday or holidays. (Any mobile options for CSP are subscription only and they stink.)
GIMP is a powerful photo editor that is completely free and open-source! It works on Windows, GNU/Linux, and MacOs. Its UI can be a bit difficult to work with at first, but if you're looking for a PS replacement, GIMP is PS without the AI.
Hopefully this helps artists who want to keep the rights to their work, at least until Adobe gets their crap together.
#adobe#adobe photoshop#adobe creative suite#adobe creative cloud#photoshop#Ps#csp#Photopea#Photo pea#clip studio paint#clip studio#clip studio pro#clip studio paint pro#gimp#gnu image manipulation program#digital art#artist on tumblr#artists on tumblr#digital artist#art on tumblr#drawing#illustration#artwork#small artist#photo edit#editing#photography#Image editing
9 notes
·
View notes
Note
What software to you use for recolor?
I use Pixelmator Pro, it's only for Mac. But it's cheaper than paying for photoshop. It costs $40 and is only one payment. Not a subscription like Adobe does with its products.
Just for the record, I bought this program because my job often involves making edits (I'm a photographer/social media manager). That's why I bought this one, but I know you can find cheaper or free programs that can also do the job.
I do suggest that you make your research on what they can do before you decided on one. There are some programs that cannot do certain things.
7 notes
·
View notes
Text
Y'all I love free software so much y'all don't even know. Have a list of my favorite free programs I have used lately when creative juices are flowing:
Gifs:
Giphy Capture: Very very easy to use (you will figure it out in no time). You can't recolor anything here, but I've found the compression options allow me to retain enough quality that I am not repulsed by the idea of posting gifsets made with this tool. They will never be as pretty as recolored gifs made in photoshop, but if you just want to make a scene and it not look horrid, this shit will get it done with a learning curve that's as flat as they come (Mac only tho sadly).
ezgif.com: Swiss army knife of gif making in your browser. You can crop, add effects, adjust brightness, saturation, hue, etc., trim, cut frames, and optimize file size. You can upload a set of images to turn into a gif, upload a gif you've already captured to edit it, or upload and video clip and render and edit into gifs all in your browser.
Davinci Resolve (18.5 Beta) - I am very excited about this one. Davinci Resolve is a professional-quality video editing software available for free for personal uses. It is stuffed full of video recoloring options, and they recently added gif rendering. This means you can recolor a whole scene all at once, split it into clips representing each gif in your set, then batch export a whole scene of short clips as gifs at the same time after adding text, cropping, cutting frames, and recoloring them as desired. Compression options on export are minimal right now, but I'm hoping as this new tool develops and moves out of beta... *rubs hands together evilly*.
Video:
Davinci Resolve - As above—professional-quality video editor available for free for personal use. Tbh the video editor pre-shipped with your OS will get you real far, but this one has a plethora of options you won't find in there, and typically will not ever find for free at all.
Ffmpeg - Need to batch convert .mkv files to .mp4 because your various softwares or maybe your PLEX server isn't playing nice??? ffmpeg has your back! If a command line is too intimidating though you can always go with Handbrake (if you can stumble your way through a command line though—ffmpeg will convert a whole season of TV to .mp4 before handbrake finishes a single episode).
Art:
Autodesk Sketchbook - I have had this puppy for a very very long time—I had it when it was actually a one-time purchase desktop app back in the day and I paid $50 and it was worth it. HOWEVER, Autodesk Sketchbook is now completely free! You can use everything I paid $50 for when I was like 16 years old for free! It runs on phones and tablets too! There are a lot of awesome free digital art tools (i.e., ye olde classic GIMP) or ones you can get for very cheap one time purchase, but this is just a free one I am fond of.
49 notes
·
View notes
Note
I really like your gifs that I've seen in the X-Men Evolution tag. I was wondering, how do you make gifs? What program do you use? Thanks for your time.
Hey there! I first learned how to make them using photoshop, but I honestly don't know if my old mac could handle trying to run it.
I use a free program called GIMP.
You screencap the part you want to make a gif > open as layers in order > export as .gif tutorial
And that's it! I would take the time to edit and colorize them more but my computer literally overheats, so I do what I can lol. There are tutorials for photoshop out there, too!
3 notes
·
View notes
Text
Demystifying Digital Images and Video: Formats, Tools, Copyright, and More.
Introduction
In today's digital age, images and videos have become an integral part of our daily lives. From personal photographs shared on social media to professional content uploaded on platforms like YouTube and Twitch, understanding the intricacies of image and video file formats, codecs, and manipulation tools is essential. This blog post aims to provide a comprehensive overview of these digital elements, focusing on the definitions of common file types, export settings for popular broadcasting platforms, image manipulation tools, and the critical aspects of image copyright.
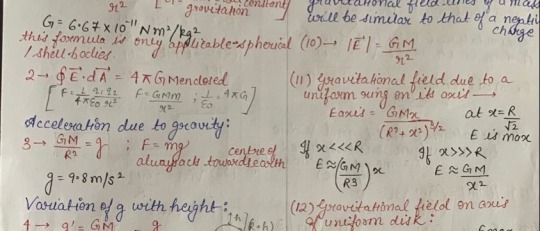
Definitions of Commonly Used Image and Web Video Formats, Wrappers, and Codecs
Image Formats:
JPEG (Joint Photographic Experts Group): JPEG is the most widely used image format for photographs and digital images. It uses lossy compression, which reduces file size while maintaining reasonable image quality.
PNG (Portable Network Graphics): PNG is preferred for images with transparent backgrounds or crisp, high-quality graphics. Unlike JPEG, it uses lossless compression.
GIF (Graphics Interchange Format): GIFs are a popular choice for short, looping animations and simple graphics. They use lossless compression and support transparency.
TIFF (Tagged Image File Format): TIFF is a versatile format commonly used in professional photography and graphic design. It supports lossless compression and maintains high image quality.
BMP (Bitmap): BMP is a Windows-native format known for its lack of compression. It results in large file sizes but retains image quality.
Video Formats and Codecs:
MP4 (MPEG-4): MP4 is a widely supported video format that uses the H.264 codec. It offers a balance between quality and file size, making it ideal for streaming and sharing on the web.
AVI (Audio Video Interleave): AVI is an older format that supports various codecs. It is not as efficient as MP4 in terms of compression and is used less frequently nowadays.
MOV (QuickTime Movie): MOV is a format developed by Apple and is popular among Mac users. It can use various codecs, such as H.264 and ProRes, for high-quality video.
MKV (Matroska): MKV is an open-source container format that can contain videos with a variety of codecs, making it highly customizable.
Export Settings for Popular Broadcast Platforms
When it comes to sharing images and videos on popular broadcasting platforms like YouTube, Twitch, and Facebook, selecting the right export settings is crucial for optimal quality and compatibility.
YouTube: For video content on YouTube, the recommended format is MP4 with H.264 video codec and AAC audio codec. The ideal resolution is 1080p (1920x1080) or 4K (3840x2160) for higher quality. These settings balance quality and compatibility across devices.
Twitch: Twitch also prefers the MP4 format with H.264 video and AAC audio codecs. A resolution of 720p (1280x720) or 1080p is recommended, depending on the viewer's internet speed and quality preferences.
Facebook: Facebook accepts a wide range of video formats, including MP4 and MOV. However, MP4 with H.264 video and AAC audio codecs is a reliable choice. The resolution should be adapted to the target audience and device capabilities.
Commonly Used Image Manipulation Tools and Techniques
Image manipulation tools are essential for enhancing and editing images. Here are some commonly used tools and techniques, along with their purposes:
Adobe Photoshop: Photoshop is a versatile image editing software that can be used for tasks like retouching, color correction, and compositing.
Adobe Lightroom: Lightroom is perfect for photo organization and enhancement, with features like exposure adjustment, color grading, and batch processing.
GIMP (GNU Image Manipulation Program): GIMP is a free alternative to Photoshop, offering similar features for image editing and manipulation.
Canva: Canva is a user-friendly online tool for creating graphics and social media content. It simplifies design tasks for non-designers.
Cropping and Resizing: These techniques are fundamental for adjusting image dimensions and removing unwanted parts of an image.
Image Copyright Essentials
Artists and content creators must be aware of copyright laws to protect their intellectual property. Key copyright essentials include:
Ownership: Creators automatically own the copyright to their work upon creation, but registration provides additional legal protection.
Fair Use: Fair use allows limited use of copyrighted material without permission for purposes like criticism, commentary, news reporting, and education.
Licensing: Creators can license their work under specific terms, such as Creative Commons licenses, allowing others to use their work while respecting their rights.
Public Domain: Works in the public domain are not protected by copyright and can be used freely.
DMCA Takedowns: The Digital Millennium Copyright Act (DMCA) enables copyright owners to request the removal of infringing content from online platforms.
Attribution: When using copyrighted material, proper attribution is often required to credit the creator.
Conclusion
Understanding digital image and video formats, codecs, export settings, image manipulation tools, and copyright essentials is essential for content creators, whether amateur or professional. By adhering to best practices and legal guidelines, creators can ensure their work is of high quality, reaches the right audience, and is protected from unauthorized use. Whether you're a budding photographer, a vlogger, or a graphic designer, the knowledge presented in this blog post can serve as a valuable resource to navigate the digital content landscape successfully.
References
Reference list
Arts Law Centre of Australia 2010, Copyright - Arts Law Centre of Australia, Arts Law Centre of Australia.
Attorney-General's Department 2022, Copyright basics, Attorney-General’s Department.
Image Manipulation: The What, How, and Why 2021, Clipping Path Campus.
Image Processing: Techniques, Types, & Applications [2022] n.d., www.v7labs.com.
Video File Formats, Codecs, and Containers Explained | TechSmith 2018, Welcome to the TechSmith Blog.
By: Juan Gutierrez.
4 notes
·
View notes
Note
hi emily! i love the way you make gifs (methods? techniques? idk jksnadjk) and i wanted to ask you for sharpening / grain / finishing touches tips or tricks because whenever i upload them the qualities are just eh :< (could it be dimensions problems?) i'm a mac + ps cc user! thank you so much in advance! or i'm sorry for asking if this is a weird request to make
hi!!! first of all thank you so much for liking my gifs!!! and absolutely don't feel weird i'm more than happy to help! (or try to help lol) apologies in advance if this is kinda rambling ;p
also you asked about being worried about dimensions so here are the standard dimensions for tumblr photosets!
1. overall quality
so first of all i highly recommend the (free!) program vapoursynth! it's a free program for mac that basically preserves the quality of your video. for pc users i believe avisynth is the closest equivalent.
for whatever reason, photoshop deteriorates the quality of your gif when you crop, so you can use vapoursynth to crop without losing quality! vapoursynth also has a denoise feature with can be great for grainy/lower quality videos to help smooth things out!
i had a lot of trouble downloading vapoursynth originally so feel free to ask questions if need be and i'll try to help! but also although i highly recommend vapoursynth it's not by any means necessary it's up to you!
here are some tutorials for installing & using vapoursynth (google has lots more if these aren't helpful!): x x x
2. sharpening
okay so sharpening is highly subjective based on what you like, so i'll just show you how i do mine!
first of all you can sharpen in vapoursynth, but i prefer to sharpen completely in ps! i sharpen in 3-4 steps.
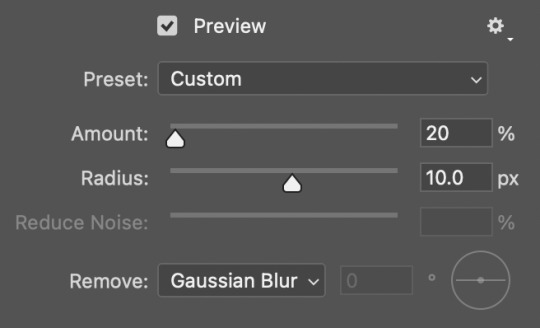
step 1: smart sharpen filter
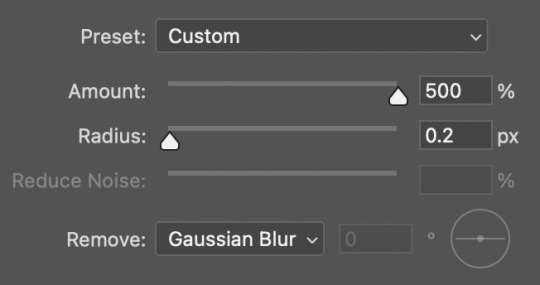
step 2: smart sharpen filter (again)
i usually adjust the "20" value per gif to see what looks best!
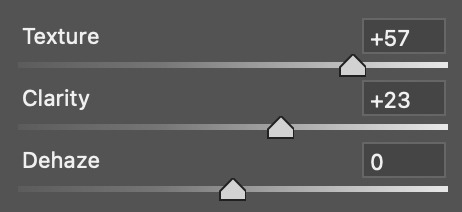
step 3 (sometimes): camera raw filter
you can find camera raw filter under the same "Filter" drop down menu as filters like sharpen and noise! sometimes this helps and sometimes it doesn't so i only use this sometimes!
once you click on the camera filter it should pop up a window; under the "Basic" drop down menu you should see "Texture" and "Clarity" sliders
IMPORTANT: Like the smart sharpen filter, using the "Clarity" slider can end up lightening the skin of subject of the gif, so if you use it it's important to correct any lightening you do with filters!
Here is the tutorial I used to learn how to use the camera raw filter!
(Also if you want to do reduce grain in your gif w/o vapoursynth: You can use the "Detail" drop down menu in the camera raw filter to reduce noise!)
step 4: high pass
Last thing I always do to sharpen is add a layer of high pass! Here is good a tutorial on sharpening with high pass! I usually use the same setting as OP does in their tutorial (4)!
Like with other forms of sharpening, this can also lighten skin so be careful to correct any lightening that happens!
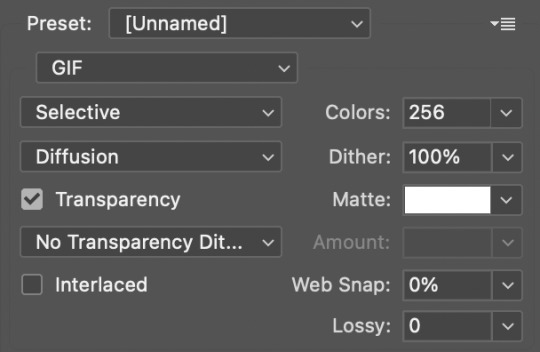
3. exporting
how you export will also affect gif quality! here are my export settings:
4. misc tips and tricks
okay so if all else fails here some things you can try to improve overall quality!
make the gif smaller! gifs can only have 256 colors, so the bigger your gif, the more colors it's going to need to look smooth. if you're making a gif that keeps coming out grainy try bumping down the size!
shorten the gif! the longer the gif the more grainy it's going to get. even shortening it by a few frames can make a big difference, play around with the length and preview in the editor to see if the quality improves!
less vibrancy/less colors! this one pains me because colors and vibrancy are the hallmark of most of my gifs, but admittedly cranking the vibrancy up can also crank the grain up. if you're struggling with grainy gifs try changing the colors to be a bit less intense and/or less diverse to see if it helps!
less sharpening! again, this one pains me bc i like a good sharp gif, but using a lot of smart sharpen particulary can make your gif grainy, so you can try lowering the values of your smart sharpen to see if the helps at all!
change the speed! if you save via timeline, photoshop will automatically set fps to 0.07, but imo faster gifs tend to look a bit higher quality for whatever reason. my usual speed is 0.05 (or 0.03 for ts files or any 60fps videos) this is a matter of opinion though but it's worth looking into if you haven't!
hide it with noise! often i add noise for aesthetic but tbh sometimes i do it just to hide that the gif is actually not that hq lol. this works best your gif is just a little grainy but if it's super grainy the noise will just make it worse.
EDIT: Just remembered also, make sure you're downloading videos in the highest quality you can! If something is available in 4k for example you need to download it in MKV format not the MP4 format to the highest quality! I use 4k video downloader for anything from youtube, and in general MKV format will give you the highest quality!
Also, if you gif from .ts files you need to deinterlace them! You can do this with vapoursynth fairly easily by selecting a preprocessor filter when in the resizer menu!
~
That's about all I can think of off the top of my head. Hopefully at least something here was able to help you! If not, or if you have questions, please feel free to reach out again!!
2 notes
·
View notes
Text
got my income for the month the other day and after 6+ months of not being able to make digital art the way i'm used to with my specific accessibility needs because of physical health symptoms with my hands, i was finally able to buy myself a new Paint Tool Sai license today, since a little while back i successfully installed an optional Windows 10 operating system on my Macbook (Sai doesn't run on Mac, at least not Version 1 which is what i need and have been using for over a decade) that i can switch back and forth between whenever and i am so so so so happy and relieved about it and so fucking excited to get to draw digital lines the way im used to drawing them after trying so many other similar programs and failing to find anything that worked exactly the same as Sai's basic built-in pen stabilizer 😭😭😭😭😭😭
i was able to quickly test out my (also ancient lol) art tablet with it and make sure everything works and it doesnt lag or anything like that and its perfect its exactly like i've always used it, i remembered which pen stabilization number setting i've been using for years and like.
dude. i know i sound dramatic right now LMAO but i CANNOT sketch or draw properly on traditional paper or sketchpads anywhere near what i can do in Sai because of all my tremors and shakiness and sudden muscle movements that make accidental lines and all that. and when i drew just one regular brush stroke in Sai and felt it move like im used to and got that super smooth sensation of 'pretty much just drawing like im holding a pencil/pen but with the shakiness of my lines improved'....almost cried a lil not gonna lie fjsgdgsgdhsgshf its been so many months and i've put so much mental energy into researching how to do that whole windows installation on my 2012 era macbook and somehow did that without completely messing it up and then having to wait until a month where i have enough extra money to buy the official version (Sai is so important 2 me and the most accessible digital art program i've ever used for my specific hand problems and i've used it for so long that i am only comfortable using the officially licensed version of it, yknow?) and also theres just something so nice about finally being able to use it again a few days before my birthday even though that timing wasn't on purpose...
AHHHHH im just so relieved. i feel like im free to just be able to make sketch pages and draw stuff whenever i have free time to and i have an idea in my head again and i havent felt that in so long and it was making my depression so much worse....and also because i've been doing my best to adapt to the similar but different settings in Clip Studio Paint, i have 2 really nice digital art programs with a lot of cool and useful features between the both of them now that i can use to like, mix and match with my art!! which is awesome!! i think Clip will mostly be used by me now for more graphic design type projects since Sai's always been my core art program, but i'd love to experiment with drawing/sketching/painting pieces in Sai and then plopping them into Clip and adding some extra fun effects or background elements or even just easier to repeat patterns with its' huge free-to-use resource library for like stamps and texture effects and more photoshop-y things like that.
ANYWAYS!! im just rambling to myself because im so happy and relieved to have My Art Program back so i thought i would share since its rare for me to feel as happy and excited and get some sense of normalcy back in any capacity these days, being immunocompromised and stuck in my house as long as i have been the past 3 years and counting. it has been a good amount of time since i've felt like i have A Victory To Celebrate and i hope that feeling lingers as long as it can 🥹✌️
2 notes
·
View notes
Note
Hi, hope you're alright. Sorry for the random question, I was just curious about if you have an FAQ area or something where you share what systems you use for your game?
I currently use a desktop Mac and I'm looking into starting my own YouTube channel for my sims gameplay and other games I play. And I would really appreciate whatever advice or recommendations you have.
Wish you all the best success and continuous growth with your channel, socials and everything ☺️
hey!! Congratulations on starting your Youtube journey!! That's so exciting! I wish you all the success!! Would love a link to support once you get it all set up! Always happy to help!
The programs I use to video Edit and Record are
Capcut X
OBS Studios X
Free Music
YouTube Music
YouTube Videos for Copywrite free music (sometimes they have channels that make copywrite free music videos specifically for this you can screen record those and just export the audio through Capcut )
Paid Music
These you will pay monthly but you get all of their music free to use. Also if you cancel after the video is posted you will still be covered for that video as well in case you changed your mind on them
Epidemic sound X
Slip Stream Music (what I currently Use) X
Thumbnail Editing
Programs I use for editing thumbnails
Photoshop X (or any free Photo editing software like Gimp X )
Canva X
I hope this helps some!
1 note
·
View note
Text
The Best Photo Editors for Windows and Mac: A Comparison
Introduction
Choosing the right photo editor is crucial for achieving professional-quality images. With a plethora of options available, finding the best photo editor for your needs can be overwhelming. This blog post will compare some of the best photo editors for Windows and Mac, highlighting their key features and helping you make an informed decision.
Adobe Photoshop
Overview
Adobe Photoshop is the industry standard for photo editing, known for its comprehensive set of tools and features. It's available for both Windows and Mac, making it a versatile choice for photographers and designers alike.
Key Features
Advanced Editing Tools: Includes tools for retouching, compositing, and digital painting.
Non-Destructive Editing: Uses layers and masks to preserve the original image.
Extensive Plugins: Supports a wide range of plugins for added functionality.
Integration with Adobe Suite: Seamlessly integrates with other Adobe products like Lightroom and Illustrator.
Pros and Cons
Pros: Powerful features, industry standard, extensive resources and tutorials.
Cons: Steep learning curve, subscription-based pricing.
Adobe Lightroom
Overview
Adobe Lightroom is a popular choice for photographers due to its powerful editing capabilities and photo management features. It's available for both Windows and Mac and is designed to handle large volumes of photos efficiently.
Key Features
Non-Destructive Editing: Preserves original files while making adjustments.
Photo Management: Excellent for organizing and cataloging photos.
Batch Processing: Allows for quick edits to multiple photos simultaneously.
Presets: Offers customizable presets for consistent editing styles.
Pros and Cons
Pros: Easy to use, great for batch processing, integrates with Photoshop.
Cons: Subscription-based pricing, fewer advanced editing tools compared to Photoshop.
Affinity Photo
Overview
Affinity Photo is a powerful and affordable alternative to Photoshop, offering a comprehensive set of photo editing tools. It's available for both Windows and Mac and is known for its high performance and user-friendly interface.
Key Features
Advanced Editing Tools: Includes tools for retouching, HDR merging, and panorama stitching.
Non-Destructive Editing: Uses layers and masks for flexible editing.
One-Time Purchase: No subscription required, making it a cost-effective option.
Compatibility: Supports PSD files and other common file formats.
Pros and Cons
Pros: Affordable, powerful features, one-time purchase.
Cons: Fewer resources and tutorials compared to Adobe products.
GIMP
Overview
GIMP (GNU Image Manipulation Program) is a free, open-source photo editor available for Windows and Mac. It's a popular choice for those looking for a powerful editor without the cost.
Key Features
Advanced Editing Tools: Includes a wide range of tools for retouching, compositing, and graphic design.
Customizable Interface: Highly customizable to fit your workflow.
Plugin Support: Supports a variety of plugins for added functionality.
Community Support: Strong community support with plenty of tutorials and resources.
Pros and Cons
Pros: Free, powerful features, customizable.
Cons: Steeper learning curve, less polished interface.
Conclusion
Choosing the best photo editor depends on your specific needs and budget. Adobe Photoshop and Lightroom are excellent choices for professional photographers, offering powerful features and seamless integration. Affinity Photo is a great alternative for those looking for a cost-effective solution with robust editing capabilities. GIMP is ideal for beginners or those on a tight budget, providing powerful tools for free. By understanding the strengths and weaknesses of each option, you can select the photo editor that best fits your workflow and helps you create stunning images.
0 notes
Text
Using Canva For Your Social Media Creative

When we first heard about Canva, we didn’t take it too seriously. Sure, you could use Microsoft Paint or Adobe Photoshop (which both cost money) but that wasn’t very helpful for everyday situations like creating social media posts. Then came Canva which made designing simple and even fun! Here are four reasons why you should start using Canva for your social media creative needs:
Canva is a powerful design app, and it’s free.
You can use Canva to create Facebook, Twitter, and Instagram posts for your business.
It’s a powerful design app and it’s free, but it also has some limitations:
Canva is not as expensive as Photoshop. If you want to get the most out of Photoshop, then you will probably have to spend some money on classes or tutoring sessions.
Canva is easy-to-use but there is a learning curve involved if you want to become an expert user. You will have more options with Adobe Photoshop than with Canva when it comes time for advanced editing (like removing blemishes). However, both programs offer simple features that allow users without much experience in graphic layout design applications an opportunity to produce great results quickly without much effort on their part – which makes these programs ideal choices for those looking for quick solutions!
Canva allows you to create social media posts from scratch, or use pre-designed templates.
Canva is a popular design tool that allows you to create social media posts from scratch, or use pre-designed templates. You can also create your own templates and then customize them as needed.
You can use Canva for different types of social media platforms and posts, like Instagram Stories or Facebook cover photos.
Canva uses a drag-and-drop system that makes you feel like a designer.
Canva is a web-based graphic design tool that uses a drag-and-drop system that makes you feel like a designer. It’s easy to use, even if you’re new to creating graphics or building websites. Canva makes it easy for anyone to create professional designs and share them on social media.
You can start by browsing through their pre-designed templates and images or upload your own images, text, and shapes from scratch. You’ll find hundreds of thousands of free images available on the site, but if none of them work for what you need, then there are also plenty of paid options available in the marketplace as well (prices range from $1 – $10).
Now when I say “drag and drop” I mean it! There isn’t any technical knowledge needed here at all – anyone can do this! If you want something more advanced such as adding text boxes around specific areas of an image then this feature has been created with ease in mind too; just click on the icon above wherever it says “Type Here” when selecting your template (this indicates where you want something added), select which type of box should be placed there (such as paragraph text box) then just click inside this area before typing away!
You can use Canva on your desktop, tablet, or mobile device.
Canva is an online design tool that you can use to create all kinds of graphics, including infographics, memes, flyers, and social media graphics. You can use it on any device that has internet access and a browser—that includes your desktop computer (Windows or Mac), your tablet (iPad or Android), and even your smartphone.
Downloading your designs is quick and easy, and you can use them on multiple platforms.
Once you’ve created a design, downloading it is quick and easy. You can even download multiple designs at once for use on multiple platforms.
You will love Canva for creating designs in less time and with less money than other alternatives.
Canva is a web-based design software that allows you to create social media posts from scratch, or use pre-designed templates. It has over 1 million paid users and over 40 million downloads across all platforms.
Canva is powerful enough for professional designers and easy enough for beginners. With Canva, you can create marketing graphics like infographics, sales ads, and social media posts. You will love Canva for creating designs in less time and with less money than other alternatives.
Conclusion
So, if you’re looking for a new way to spice up your social media posts, we think Canva is a great option. It has plenty of templates and tools to make your next graphic creation quick and easy. Plus, we love that it is completely free!
We often recommend using Canva to clients who don’t want to spend the money on having an agency manage their social media. Our team always uses a combination of tools along with a content calendar that ladders up to a larger marketing plan. Social is just one piece of the puzzle and if you need professional help, Reversed Out is just a call away.
Takeaway: Did you know there are some great tools out there to help you create more content for social media?
Contact Us
At Reversed Out Creative, we understand the challenges and opportunities presented by AI disruption. Our team of experts specializes in web design, SEO, graphic design, and digital marketing services. Reach out to us through our contact form to learn more about navigating the evolving job market and embracing the potential of AI. Together, let’s shape a future that combines human ingenuity with the power of AI.
Content source: https://reversedout.com/using-canva-for-your-social-media-creative/
#Social Media Platforms#Social Media Posts#Social Media Marketing in Cincinnati#Social Media Management Cincinnati#Social Media Marketing Events
0 notes