#Portable Sewing machine
Text
Sew Simple: Easy Tips for Fast Clothing Mending with Portable Electric Machines
Hello there, fashionistas and do-it-yourselfers! 🙂😊 Today I want to talk about a situation we’ve all been in: you’re running late for an important event and guess what? A seam pops, a button falls off, or — heaven forbid — the zipper goes on strike! Sound familiar? 😨😱 Well, fear no more because I’m about to share some tips that will help turn you into a sewing superhero with your trusty portable electric sewing machine. So grab yourself a cuppa (no judgement here) and let’s get started on the world of easy clothing repairs! 😊

Now I know what you might be thinking: why should I bother with one of these when I could just take my clothes to a tailor? Well my friend, let me paint you a picture. You’re on holiday in a foreign city when disaster strikes — the hem comes down on your favourite pair of trousers. Are you really going to spend precious hours of your trip trawling through Google trying to find someone who can fix it? Pack one of these babies in your suitcase instead and you’ll have that hem back up in no time so you can get back to enjoying your holiday stress-free! 😊😉🤗
Check out this electric portable sewing machine over here!
Alright, let’s start working! 😀 Here are some easy-to-follow tips for using your portable electric sewing machine for quick clothing repairs:
Be Prepared: Always carry a small kit with you that contains basic sewing supplies like needles, thread, and scissors. This way you will be ready to fix any wardrobe malfunction that comes your way.
Know Your Machine: Take some time to get to know your sewing machine. Read through the manual, practice threading the needle, and try out different stitches. The more comfortable you become with your machine, the faster you will be able to do these quick fixes.
Start Simple: If this is something new for you, begin with simple projects such as sewing buttons back on or mending small tears. Once confidence is gained move on to more complicated fixes like hemming pants or re-sewing seams.
Take Your Time: Sewing requires patience and accuracy. Do not rush when making repairs — take all necessary measures needed for every stitch to look tidy and hold together well. Remember that it takes much longer before a properly done repair falls apart than after one which was executed carelessly.
And there we have it — easy-peasy-sewing! 😃 Armed with these useful tricks and armed with our trusty portable electric sewing machine — we shall turn into masters of fastening garments in no time at all! 🤗 So when disaster strikes next just remember not to freak out — grab your apparatus & stitch away! 🙂 Enjoy your sewing work! 😊
For your convenience, you can access and purchase an electric portable sewing machine by clicking right here!
#sewing machine#sewing clothing#Portable Sewing machine#Sewing made simple#easy sewing#Beginner friendly sewing#Sewing on the go
0 notes
Text
I was going to sew a hat to procrastinate on writing but I was stopped in my tracks by the fact that I would have to iron some fabric in 98f heat.
#chit chat#living in a hundred year old house is so fun#air conditioning does not exist here and i am not turning on the heat machine#by the power of portable swamp cooler we have managed to get it down to 85f in certain rooms#but that’s still too hot to be ironing#and i threw it in the dryer and it came out with more wrinkles :(#sewing problems
3 notes
·
View notes
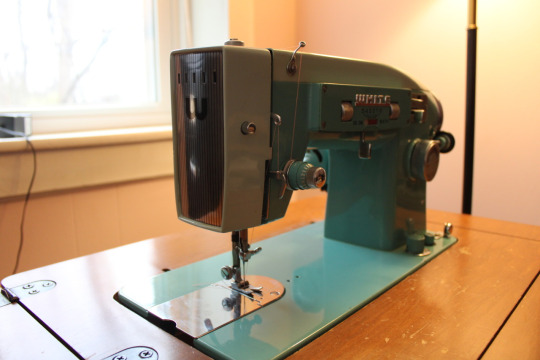
Text
Today I got to use a 70+ yr old sewing machine that was so well designed and in such good condition that putting down a line of straight stitches felt like performance art. It’s apparently the first portable sewing machine Singer ever made and fuck dude you can FEEL how proud of it they were. Look at this thing it’s gorgeous like it’s got sleek black enamel and fucking golden filigree and a fucking GOLDEN SEAL for crying out loud. Don’t get me wrong. I love my mostly-plastic sticker-covered little modern starter machine. It was one of the most meaningful gifts anyone’s ever given me and it’s done everything I’ve ever asked it to. But this 301A legitimately feels like A Piece Of Industrial Design and it’s crazy that it feels as good as it looks. It belongs in a castle. I hope this thing runs forever and based on how well built it is I wouldn’t be surprised if it did.

1K notes
·
View notes
Text
anyway just travelled for over an hour to not make it to the thing i was going to and just immediately returning home for another trip of over an hour
0 notes
Text
#Mini Sewing Machine#mini sewing machine#portable mini sewing machine#best mini sewing machine#easy home mini sewing machine#magicfly mini sewing machine#personal development#love#business#companies
0 notes
Note
If I may ask: what make and model of sewing machine is it?
It's a 1950's Singer portable, made in Scotland

240 notes
·
View notes
Text
Hooking rugs that look like dogs
Here's how I do it:
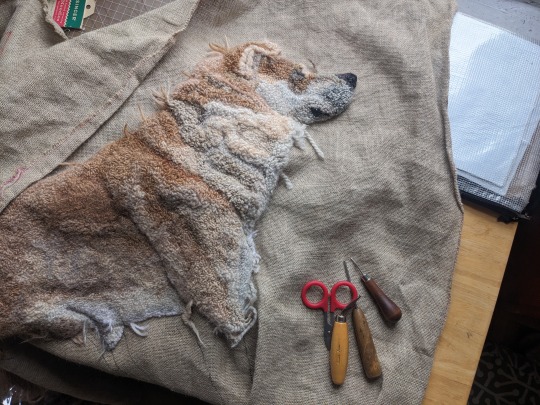
The process I use is called rug hooking (not latch hook or punch needle or tufting, though it is the forerunner of the latter two techniques). Rugs are hooked by pulling loops of fabric strips or yarn through the holes of a base fabric with a coarse open weave, like burlap, or linen, or rug warp. The loops are pulled through the fabric with a squat-handled hook whose business end is shaped like a crochet hook. There are no knots and the loops aren't sewed down in any way. The whole thing stays put just by the tension of all those loops packed together in the weave of the foundation fabric.
This isn't a true detailed tutorial but a walk-through of my particular process. The same information is on my web page, emilyoleary.com .
I hook with yarn, rather than with cut strips of wool fabric, which is what many rug hookers use. I can get a looser, more organic distribution of loops with yarn than I could with wool strips, which are hooked in neat lines.
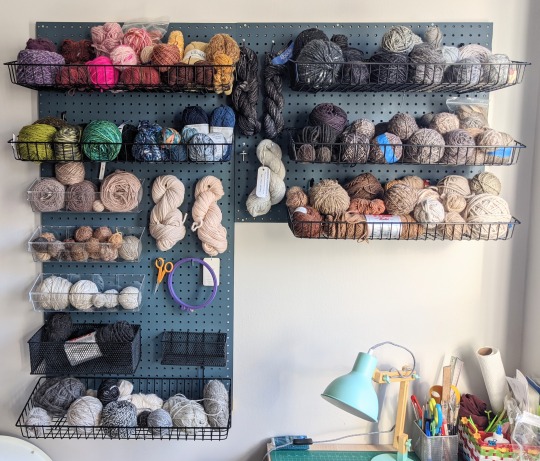
Mostly I use wool yarn. In terms of yarn weight, I can use DK, worsted, or Aran. If I'm using thicker yarn, I leave more holes un-hooked; if I'm using finer yarn, I hook more densely or double up lengths of it. I particularly like using single ply yarns (like Brown Sheep Lamb's Pride or Malabrigo Worsted). I don't keep count, but I think I usually use around two dozen types and colors of yarn per dog.
This is my yarn wall in my apartment. Mostly brown and gray yarn!
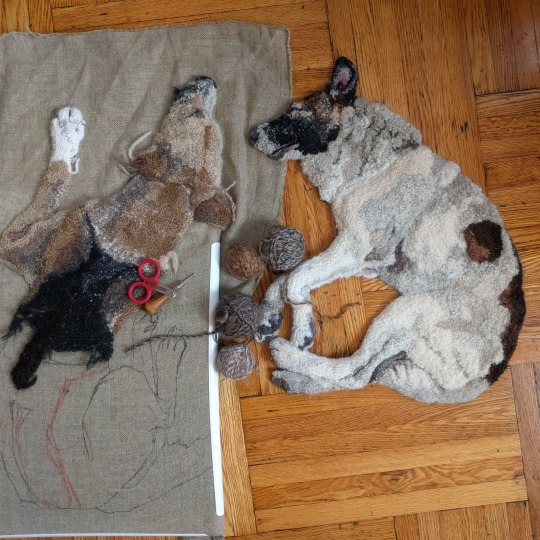
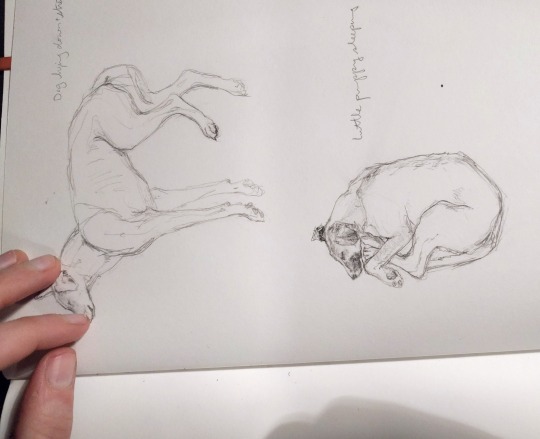
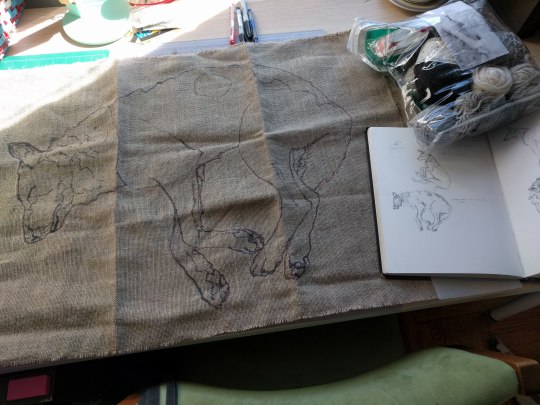
I start from a small drawing in my sketchbook, then I head to FedEx office to use a copy machine, blowing up the drawing repeatedly and experimenting with how big the dog rug should be.
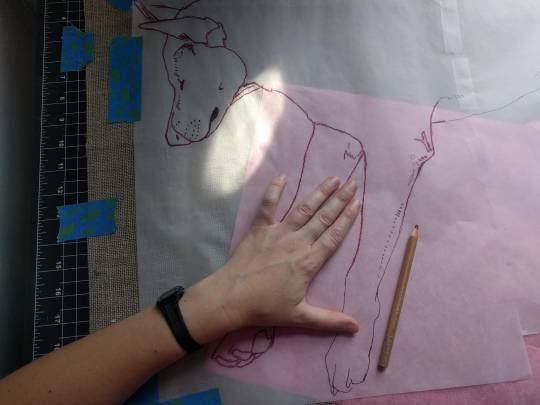
After transferring the image onto my linen, I immediately go over it with Sharpie, because the Saral is really difficult to see and really easy to rub off.
The rug is held taut by a PVC quilting frame that I set on my lap.
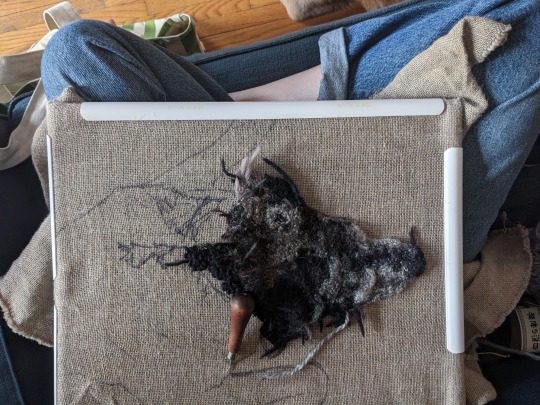
I push my hook down through the fabric with my right hand and my left hand stays below the fabric and guides the yarn while I pull it up and through with the hook. Not every hole in the fabric is hooked. Hooking every hole would make the rug too dense. I do hook pretty densely, though-- If you pick up one of my rugs you’ll see they have a slight curl to them, which is because they’re hooked pretty tight. I'm using all different weights and types of yarn, so it's a challenge to keep the overall tension even.
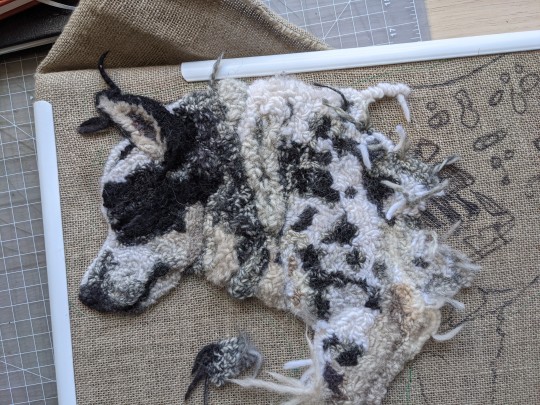
I hook my loops at varying heights to create a very low relief. Sometimes I trim the loops to make them fluffier or wispier or to shape a particular part. I look at a reference photo while I work and pull out and redo sections a lot.
My q-snap frame can accommodate the growing dog rug. I have extenders to make it bigger and I can clamp around my hooking.
The back of a rug looks like lines of little stitches. The lines are little worm trails snaking around because lines of hooking are not supposed to cross over each other. It's important to start a new length of yarn rather than cross over a stitch you already made! I read this when I first started and took it to heart. It makes it much easier to undo and redo hooking if you have to (and I redo sections A Lot). It also keeps the back from getting too bulky and resulting in uneven wear on the back of a functional rug that gets floor use.
When I’m done hooking everything I turn the rug over and brush watered-down Sobo glue on the edges of the dog, making sure to get one or two of the outermost lines of hooking. I do a couple coats of this thinned out glue. I'm careful not to use so much that it seeps to the front of the rug. When the glue is dry I cut the rug out, but I don't cut so close that the loops don't have any linen to keep them in.

It generally takes me at least several months to finish one dog rug. My hooking frame and yarn bag are very portable (though bulky) so I can hook out and about at coffee shops or the library or a brewery if there's enough space and light.
Hooking in the wild makes me an ambassador for making things in general and rug hooking in particular. I answer people's questions and always emphasize how relatively easy it is to get started hooking. Sometimes I get anxious that other people will hook rugs that look like mine but better, but I think that working in a traditional medium means you should share your knowledge for the good of the craft.
165 notes
·
View notes
Text
I think telling people to learn how to sew garments when they care about fashion sustainability is not particularly useful. Sewing your own clothes is expensive, super time intensive, and it actually takes a really long period of practice to get good enough that what you make doesn't look wonky. If you're sewing garments that aren't constructed well enough for long term use or that you don't like enough to wear, it's actually way worse sustainability-wise than buying something professionally done. The most sustainable garment is one you love and wear for years, no matter the fabric content.
that said, i actually do really think it's valuable to know how to sew generally and have a machine around, for those times that stitching comes apart, when you want to improve a garment by adding pockets, or general repair. For example, I had a grocery pannier fall apart, so I removed the panel that was the issue:
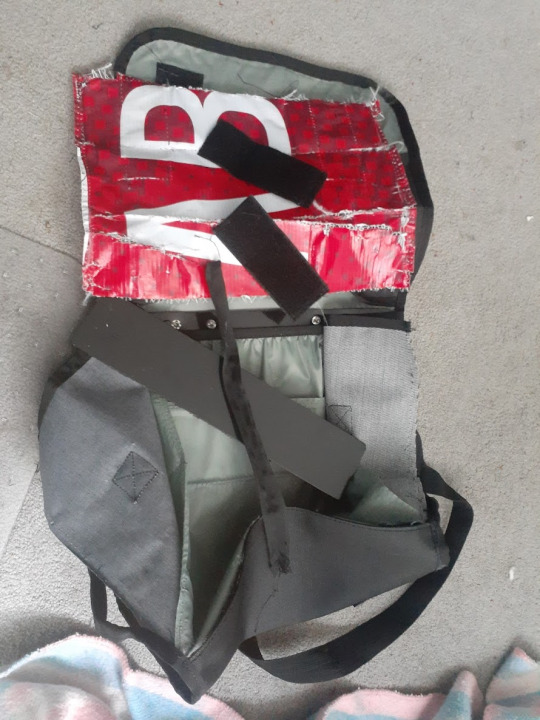
and I intend to sew a new piece from my dog's feed bag on in its place. I'm hoping it's not a difficult replacement; anyone who can sew a rectangle could probably do it. Thus I've rescued at least one thing from the landfill. I also was able to add side panels to some underwear I bought that was too small, thus making them large enough to wear. They aren't pretty, but if you return clothes they basically get thrown out, so this way they can be used before that happens (and it's underwear, so it doesn't have to look pretty, it just needs to be functional).
Machines can be expensive or they can be cheap, depending on what you want. My new Brother machine that I got from Sears back in 2017 cost me probably $150, and it works well enough for most things. It's also pretty light and portable.

You can also get fully functional older machines via Facebook Marketplace. My machine Pamela cost me $85, and she works great, though she is NOT portable and weighs like 45 lbs lol. But she'll sew through anything.
A lot of older machines you can get for $50-$100, and honestly even if they just have a straight stitch, that works for 85% of garment construction applications and nearly 100% of all touch-up applications.
Anyway, while I've been loving sewing clothes, I don't think you should do it unless you're passionate about it. But I DO think everyone should know how to sew and have a machine around for those times you need it. Hand sewing is fine sometimes, but other times a sewing machine can turn an 30 minutes-long frustrating hand sewing job into a 30 second machine job.
#sewing#sustainability#i use my machines so much for things outside of making clothes#everyone should have one
61 notes
·
View notes
Note
You’ve officially convinced me to buy some cheap felt and make a few plushies how dare you /lh
That's excellent! But I would recommend working with cheap fabric over felt. Felt can be frustrating and it tears easily if you try to work it inside out. Also it's better sewn with strands of embroidery floss or thick crochet string. [I use a blanket stitch. Look at the jester shoes on my plushies to see how that looks.]
And as an aside; for anyone who attempts my DCA pattern- it's actually a decent first project because you'll learn how to
-Work on things on the wrong side and turn them right side out. And add features by putting extra pieces into a seam. Which is basic plushie stuff.
-Do a small amount of applique and see how you feel about it. [Some people find it frustrating.]
-Sew buttons on.
-The bare bones of how pants are constructed.
-Use stuffing and make doll joints by leaving parts pinched/sewn and without any.
-Make a crude ruffle.
It's a nice quiet hobby that's fairly portable. And at the end of it you have a little guy.
None of this pattern requires a machine and if the fabric you get is thin, then it'll just put up less resistance when sewn by hand.
HOT TIPS
- Do not sew hand-dyed-type batik fabric with a needle and thread. It looks like regular cotton but it's very dense.
- Best place to get a sewing machine is Goodwill. Look for the heaviest metal machine you can find. Singer and Kenmore are the best. And places still exist to get them tuned up and fixed if needed.
- When stuffing tear small bits of fluff and poke them into little crevices with a chopstick or similar. Don't over-stuff. Keep it light.
- Ignore tutorials that sew stretch fabric on a regular sewing machine. You won't get good or durable results. You need a Baby-Lock sewing machine for stretch fabric. Turn your current t-shirt inside out and look at the seams. It makes a four thread seam just like that.
- Slick fabric paint needs a minimum of four hours to cure. Don't try to cheat this, you cannot touch it until it's dry. If you're painting on something that's not flat; pin it to some Styrofoam like you're dissecting a frog to prevent accidents.
- Always wash fabric before use. It's okay to stomp cotton/poly around in the shower with whatever soap comes off you hair and just hang dry. Don't use the finished edge of the fabric for anything. Just cut it off and pitch it.
- Paper clothing patterns can be ironed flat on the lowest setting. Go quick and don't push hard.
ALSO - You guys can always ask me anything if you get stuck! My grandma and my mother taught me the basics and I figured out quite a bit on my own. :)
33 notes
·
View notes
Note
Hiya! Do you have advice on how to learn how to quilt? I've been wanting to learn but it seems like a lot. I don't have a sewing machine either which seems important? Thanks!
well i also think a sewing machine seems important! but if getting a sewing machine is not in your five year plan you can find stuff to do. like whole-cloth quilting—quilting as in the stitches through the sandwich of quilt top+batting+backing; if you quilt on whole cloth it's not too different from embroidery. or you could try english paper piecing, which can create really beautiful precise designs with tricky angles and Y-seams. hand sewing is slow (boo) but very portable and quiet (yay). i have really enjoyed hand quilting smaller stuff.
overall the whole process is indisputably a lot but if you start small you'll probably enjoy it! i went from two 7"×7" potholders last summer to a ~36"×10" table runner last fall to a 44"×44" baby quilt this spring (still in progress) (racing the baby)
otherwise my advice is 1) do something that compels you design- or materials-wise 2) do something with a purpose (fucking around and learning is a purpose) 3) go on the quilting subreddit or to local quilt shows 4) tragically a cutting mat, long clear ruler, and rotary cutter are really worth it but probably get a sewing machine first 5) an iron is even more important than a sewing machine tbh.
35 notes
·
View notes
Note
Hi! I just saw your post about crocheting even though your hands hurt, and was hoping for some advice. I've had some sort of unspecified spondyloarthropathy for about 16 years, so I'm used to dealing with feet and knees and shoulders but all of a sudden it's in my hands too, and I'm terrified. Putting aside that I'm a musician and this threatens my livelihood and independence, I can't stand the idea that it's going to take away 90%of the things I do for fun, aka crafting. What do you do to keep crocheting through the pain -- or, even better, do you have any tips for working around it? Special hooks I can look for? I knit too, have you gotten into that enough to have needle or pattern recommendations? Do you do any sewing? I'm looking for help, but mostly I'm looking for hope.
if this makes little sense I'm sorry, I've had a migraine all day but I wanted to answer and not forget. I'll edit this later if it's necessary
compression gloves are the actual love of my life. they help my finger joints so much. kt tape as well, my shoulders start to kill me, specially when I started knitting.
for crochet, I know some people put tennis balls on the grips of their hooks to make them more ergonomic. there's also ergonomic hooks but I haven't tried them yet.
knitting: I usually hold my needle and knit (as in move the yarn) with my right hand. I find that this gives me cramps in my shoulder and hand. moving my yarn with my left hand and holding my needle with my right helps me relax both my hand and shoulder, as well as keep a straighter back. knitting is also way easier on my hands than purling since we're at it.
sewing: I absolutely love it, my joints don't. for sewing patches or smaller bits of fabric onto another what really helps me is keeping the fabric taut using an embroidery ring. it helps me make less of an effort with my hands. if you don't have a sewing machine but are looking to buy one, don't buy one of those small, portable ones. I did and I never use it because between having to squint my eyes and manouever with my hands, my body detests it
finger knitting is also really fun to keep your hands busy. if I'm having a really bad pain day but feel restless, I'll usually grab a thick yarn and make a finger knit panel. it can take me hours to finish a small square but it's quite pain free and makes me happy
collage is such a fun technique if you like drawing and painting but find that your hands are kind of failing you. for me, at least, it helps take off the pressure of having to make a neat, clean piece of art , you know
mostly, remember to stretch, take breaks, drink water, be kind to your body. there's no shame in doing your hobbies in bed, laying down, or in ways that aren't necessarily "pretty" or functional; it's okay to do your hobbies for the sake of having fun with them
hope this has helped you and not extremely confuse you <33
80 notes
·
View notes
Text
A follow-up to how cheap they can make a sewing machine:
[Original post]
Okay, but,
How expensive can they make a sewing machine?
So, if we start out with a "cheap" machine, what happens when we go up in price.
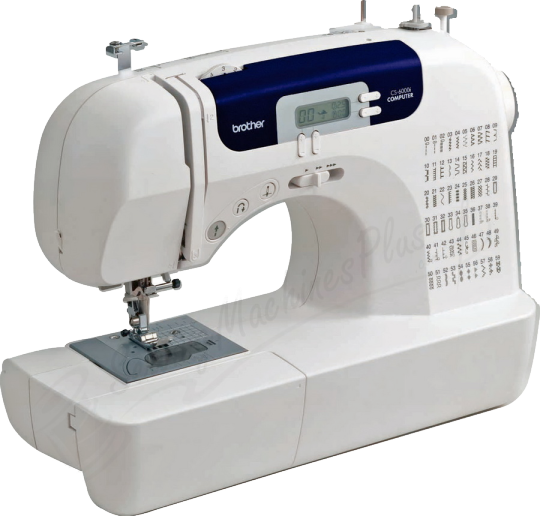
Welcome to the Brother CS4000. It's a computerized machine and usually runs at like $130 right now. It does all kinds of cool things! The only thing that it doesn't do is last very long.
Well, here's what happens if you take it apart and take out all the circuit boards:

No, there's no missing central component.
If you've never taken a sewing machine apart, this might not look wrong, so let me explain.

This is a Singer Izek, and the same machine with the plastic outer casing removed. Inside, there's a metal frame that all the components are attached to.
See, most modern sewing machines are plastic on the outside, but the plastic is just a cover. The insides have a frame, and the mechanism can function without the shell at all.
That Brother up there doesn't have a frame at all. Everything that should bolt to the frame is just attached to the plastic housing. This is a problem for a lot of reasons. Notably, if the machine is being held up by flexible plastic, then there's no way for the machine to be consistent and precise. Also, the plastic shell serves as a protection, like a bike helmet for your sewing machine. When the components are attached to the outside, your machine becomes very fragile, because hitting or tapping the outside of the machine is the same as hitting or tapping the inside. This is why we don't allow newborn babies to ride bicycles, btw.
Even in a metal-frame machine, there's going to be plastic parts. Putting plastic parts in a sewing machine makes it quieter, more portable, and cuts down on maintenance. People don't fucking do the maintenance anyway, so finding ways to reduce it is going to help the machine run well longer.
Unfortunately, most machines are sold in boxes, where the person selecting the machine has to make a choice by reading the outside of the box. This means things like "This machine has 4672 stitches!" looks good and "this machine has 12 stitches but its brain is not basically exposed to the elements," doesn't. Any description of superiority that requires a human to explain it instead of a catchy tagline just isn't going to sell.
So, when you're looking at the Brother CS 4000 and the Baby Lock Zest, they're about the same price. The Zest has like 12(?)ish stitches, half of which are double-action (the same stitch but it goes forwardbacky instead of just forward) and no width control, and the CS 4000 has more technology in it than we took on the first manned trip to the moon, you might ask why they're the same price. Well, in the Zest, they cut down the features like easy bobbin setting, number of stitches, complexity of internal cams, and other features that you get in higher end machines.
In the CS 4000, they just got rid of...you know...the insides. The. The important parts. Imagine a car where there's no chassis and they just glued the engine to the underside of your hood.
Not all plastic machines are the same.
Anyhow, since I'm possibly unique in the world of budget lolita sewing blogs to be able to make a post about the most expensive sewing machines possible, I'm willing to try to undertake that expedition. Stay posted.
#remember that if you can't make it nakey ten it's not a quality machine#no hate on people who use them but it's nto a quality machine#because it can't get nakey
234 notes
·
View notes
Text

September 1977. 'The Genie portable machine does so much to make sewing easy that it definitely classifies as a heavyweight.'
94 notes
·
View notes
Text
EPP Tutorial: How To Make A Mobtagon!

Since @legendary-chemistry asked about it, here's how I make my English Paper Piecing hubris rosettes!
EPP is a style of hand-quilting where you assemble your design from small geometric shapes. The shapes are first cut from cardstock or heavy paper (the "paper pieces"), and then fabric is basted directly to the paper. You sew these pieces together along matching sides to create your quilt. It allows for very crisp, precise piecing, is extremely modular and much more portable than machine quilting, and (most importantly for me as a chronically ill person), is something I can work on even when I'm too tired to get out of bed.
I was trying to create a very specific effect (Shigeo "Mob" Kageyama's psychic aura), which involves a double round of paper piecing and some less common shapes. Here's the process!
The Paper Pieces: These are 45-degree triangles. You can make them any size, but I use triangles with a length of 1 inch along the longer two sides. Most EPP templates you can find are for 60-degree triangles, so you'll either need to find commercial 45-degree diamond pieces and cut them in half or make your own from stiff cardstock. I made my own! Some people use cereal boxes; I just bought some card, but it's helpful if it's a slightly heavier weight because it will hold up better to repeated use. Be very careful when cutting them out; the pieces are so small that even a slight discrepancy can really throw things off. If any pieces look especially wonky, just toss 'em!
(If people want more details on how I created my paper pieces I can try to provide, but be warned that the answer is basically "Entered a fugue state and brute-forced it with a pair of dividers and little else")
Basting: Before you can sew your triangles together, you will need to baste (temporarily attach) your fabrics to the paper pieces. There are several methods for this. Here's the one I use.
Cut strips of fabric wide enough that they extend beyond your paper pieces on both sides; I use 1.5 inch strips for my triangles.
Using a glue stick, gently tack the paper pieces down onto the fabric strip, leaving roughly a quarter-inch between them. These are just a few triangles for sample purposes, but when I was working on the body of the piece I would work in sets of 12 rosettes. For each rosette I needed four triangles of the darkest color, two of the lightest, and two of a medium shade, so I would prepare batches of 48 and 24 pieces respectively.

Snip the triangles apart. I like to keep them sorted by color for ease of organization.

Grab a basting thread and a needle! These are temporary stitches that will be removed, so I like to use a contrasting color so I can easily see them to take them out. You can also use fabric glue for basting, but I find that messy and unpleasant, so I don't.
The most important thing about basting is that you need to fold the edges in following the same order for every piece! That way all your little central 'ears' are pointing in the same direction and will slot together neatly. Otherwise you will have mismatched pieces that don't want to play nice with each other and you will be sad.
So! With the triangle pointing towards you, fold the seam allowance on the short side snugly over the paper piece. Then fold the seam allowance on the lefthand long side over that
Run your needle and thread through the folded-over section 2 or 3 times to lock the fold in place


Flip the triangle and fold over the rest of the seam allowance on the side you've already anchored. Then fold over the remaining side. You will have a little pointy ear! Make sure it is pointing to the right, then put a couple of stitches through this fold as well.


Secure the remaining point in the same way, then snip the thread

Now do this to every other triangle in your stack! It goes surprisingly quickly once you get the hang of it!
I've hit the image limit (and am also melting from my curse), so stay tuned for a follow-up reblog with assembly instructions!
82 notes
·
View notes
Text
easy home mini sewing machine
✿ Unique Extension Table The attached extension table makes you accessible to work more on small design and stabilizes the machine as well. mini sewing machine was designed with mini size and one stitching type which match the introductory home sewing demand. It's movable and suitable for sewing multiple featherlight and thin fabrics.
✿ Double switch and Two- Line Design This unique mini sewing machine features a pedal switch and a drive button switch. It’s up to you which one you want to use. The featured two- line design( nethermost line and face line) gives you high- quality sewing for your systems.
✿ Double vestments and Two pets Two mode speed with options, can be acclimated the speed to decelerate or gormandize. Great for freshman, for making differences to apparel and home embellish particulars children and neophyte with low speed to use.
✿ Automatic Bobbin Rewinding Function The top drop- in bobbin is easy to wind automatically, and also you can get further bobbins to replace. It's easy to rewind a new bobbin by following the primer or our operation videotape.
✿ Foot Pedal Operation Electrical sewing machine with bottom pedal. Concentrated your sewing with both hands and control the speed with Foot ✿ Pedal.
#easy home mini sewing machine#mini sewing machine#portable mini sewing machine#best mini sewing machine#magicfly mini sewing machine#personal development#business#love#companies#small business#entrepreneur#corporate#jobs#startups
0 notes
Last Seen Blogs

alwaysbecontaminated
and i wish i could change it

cfg-silent-aim-download-us
👑 cfg silent aim download (trainer updated) UHNS

lizzielikeborden
multi-fandom :)

busterbruhs
ramuda is holding our manga volumes hostage

pegastims
.。.:*☆