#PROCESS CRICUT DESIGN SPACE
Explore tagged Tumblr posts
Visit Tumblr Blog
Explore Tumblr blogs with no restrictions, modern design and the best experience.
Last Seen Tumblr Blogs


Fun Fact
Tumblr’s reach among the 26-to-35-year-olds in the US is 11%.
Text
How to Install Cricut Design Space: All Devices Covered!
Are you wondering how to install Cricut Design Space on your device? Well, getting the Cricut software on your compatible device is no longer a daunting task, as I have simplified the process of downloading and installing the app much easier.
Believe it or not, I’ve performed these installation tasks multiple times. Because I’ve been switching my laptops and other mobile devices quite frequently, I have been repeating the procedure. But this repetition has its benefits. That’s why I know the best and easiest way to download the Cricut app, and I’m here to share it with you.
By the end of this blog, you’ll have the knowledge to download and install the Cricut software on various devices. I’ve got you covered whether you’re using a Windows, MacBook, Android, or iOS device. So, let’s get started without any further delay!
How to Install Cricut Design Space on a Computer?
Ready to install the Cricut Design app? Great!!😍 Now, you must know something before installation. I mean, you need to check whether your device is capable of running this software or not. Thus, ensure your Windows or Mac has 4GB of RAM and a 2GB free disk. Apart from these, use the latest operating systems, such as Windows 10 or later and macOS 11 or later. Once your device meets these criteria, you can follow the steps below.
For Windows
Here’s how to download Cricut Design Space on Microsoft Windows:
On your Windows computer, go to the Start menu in your taskbar.
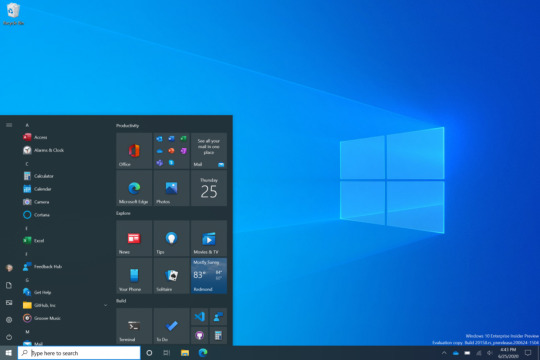
Then, search the browser name you are using.
Now, enter the URL design.cricut.com on the browser search bar.
After that, you will need to press the Enter key on your keyboard.
Next, go to a page where you need to navigate to a checkbox and click on it.
Also, select the Download tab and download the Cricut app immediately.

Once you downloaded the app, you have to go to the Downloads folder.
In order to install it, you have to double-click on it to install it.

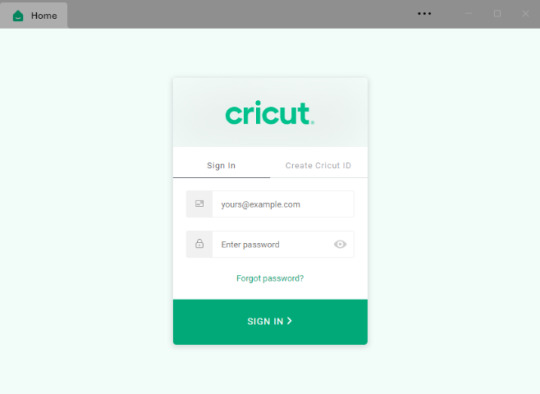
Wait until your installation is done. Once done, sign in with your Cricut ID and password.
For Mac
Here’s how to download Cricut Design Space on Mac:
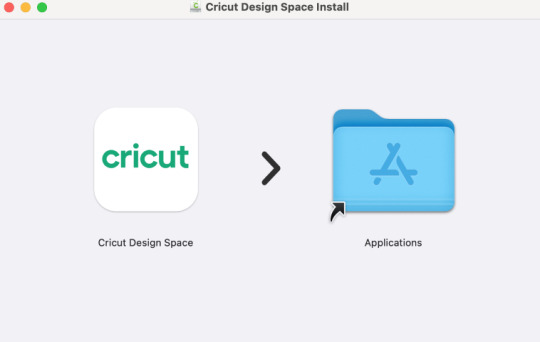
Open the browser on your MacBook and visit cricut.com/setup on the browser’s search bar.
Once you get to Cricut’s page, you should select the checkbox.
Hit the checkbox, and it will activate the Download button.

Next, you click on the Download.
Once downloaded, you have to move to the Downloads folder.
Now, find the .dmg file and double-click on the .dmg file to install the program.
For installation, drag the Cricut icon to the Applications folder icon.
How to Install Cricut Design Space on a Phone?
Thanks to Cricut, you can now use your Cricut software on your mobile device, too. So, whether you are an iOS user or Android, I’ve got you covered! Before you proceed, let me tell you your mobile phone must meet some criteria. For example, if you are an iOS user, you should have an iOS 15 or later version. Besides, use Android 10.0 or higher if you use an Android device. Now, let’s delve into the steps below:
For Android
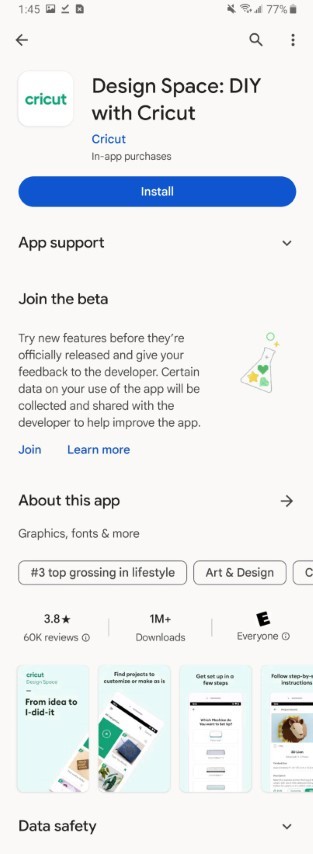
You need to launch the Google Play Store on your Android to download the Cricut program.
Next, under the search bar, you should type “Cricut Design Space.”
Then, you will need to seek the apps presented in the given result below.
Now, press right on the Install button to get the app on your device.
For iOS
Launch the App Store on your iOS phone and search for Cricut Design Space using the search bar located at the top.

Now, you will find the relevant result in the suggestions below; you have to select the Design Space app.
Here, you should click on the Get tab to install the app.
If prompted, you will have to confirm the download using an iTunes password.
Now, I have explained the steps on “how to install Cricut Design Space” on Windows, Mac, Android, and iOS in a stepwise manner. I hope you found them simple and quick.
FAQs
Question 1: What app do I need to use my Cricut?
Answer: In order to use the Cricut machine, you will need its companion software, i.e., Cricut Design Space. This app is free to download and supports four devices: MacBook, Windows computer, Android, or iOS. However, the software is incompatible with Chromebooks or Unix/Linux computers. The software is a must for Cricut users. Otherwise, you can’t work on your machine.
Question 2: What comes with Cricut Design Space?
Answer: The Cricut app is a platform where users are supposed to create, edit, and modify their designs. However, the software provides 1000+ free access to fonts, images, and ready-made projects. Also, it comes with a Cricut Access subscription, which is not free. Users can buy this subscription to avail themselves of the more advanced projects and other stuff to use in their projects to create masterpieces.
Question 3: What do I need to install Cricut Design Space?
Answer: If you want to download and install a Cricut Design app on your computer and mobile device, then you should have a compatible device. In order to check the compatibility, make sure your computer has 4GB of RAM and 2 GB free disk. In addition, you need the latest operating system running on your system, such as Windows 10 and MacOS 11. Besides, if you are using it on iOS and Android, then you should have iOS 15 and Android 10.0 later.
Final Words
To conclude, I suppose you have understood how to install Cricut Design Space in a couple of minutes. I think it was quite easy to download the software and then install it on the computer. Similarly, the installation steps for phones were also too simple and quick. But always make sure that your device meets the basic requirements for running this software. I have already mentioned them above in the blog; go and check them out.
#DOWNLOAD CRICUT DESIGN SPACE#HOW TO INSTALL CRICUT DESIGN SPACE#INSTALL CRICUT DESIGN SPACE#PROCESS CRICUT DESIGN SPACE
0 notes
Text
Indispensable Tools For Successful Farming🥰
From tractors and irrigation systems to fertilizers and spreaders, there is a wide range of tools available for successful farming. Each of these implements offer unique benefits for farmers and provide an efficient way to increase crop yields(more)

#ethical hacking tools#english lessons advanced speaking#learn english speaking in hindi#english to hindi vocabulary#learn english speaking#c#fundamentals for absolute beginners#online english speaking classes#english lesson#ending#english speaking#speaking english#increase english vocabulary#biotechnology principles and processes#succulent#murli sharma hindi dubbed movies#cricut design space tutorials for beginners#succulents
1 note
·
View note
Note
Hello! I was wondering what company you use for your sticker sheets? I bough one from your Ko-Fi shop and really like the quality, and the pricing you were able to sell at is waaaaaay more reasonable compared to any of the companies I've seen and used myself. Is it a POD company, or a mass purchase of them to sell on your own?
Thank you for your time if you're able to respond!
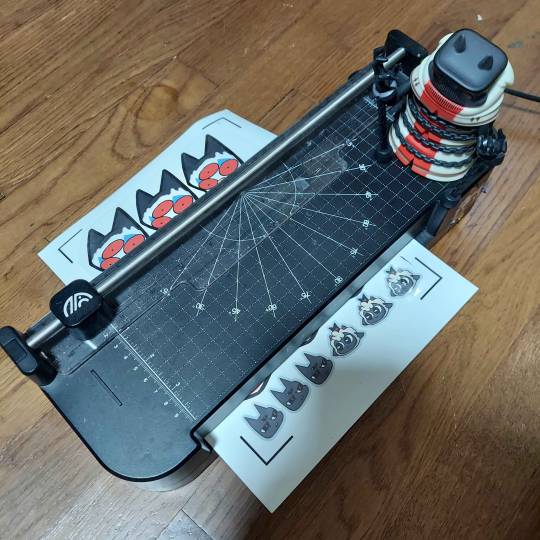
I'm really glad you like the quality, because I actually make them by hand at home! (Please forgive the lighting, my bedroom is my office lmao.)
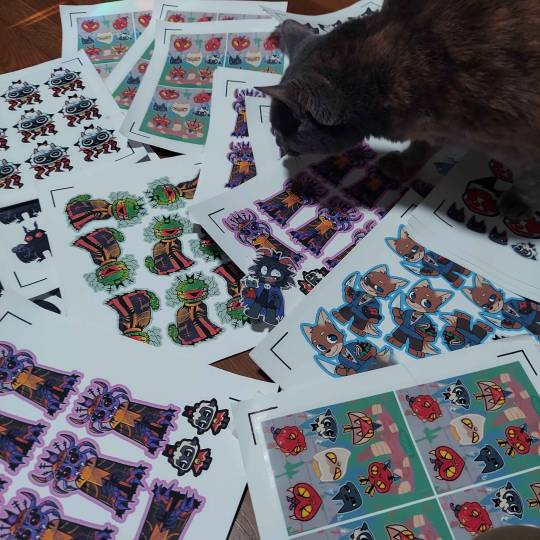
I don't use a company (and Idk what a POD company is sorry!) but making them at home gives a lot more freedom of stock, just be wary it can be very time consuming depending on how many you need to make.
I've had other people ask before, so here's a rundown of how I make my stickers at home: At most you'll need:
Printer
Sticker paper (this is the type that I use)
Laminator and lamination paper (the lamination paper that I use.) You can also use adhesive non-heat lamination paper if you don't have a laminator, gives you the same result, just be careful of bubbles. You will get double your worth out of a pack because we are splitting the pouches to cover two sticker sheets.
Your choice of a sticker cutting machine or just using scissors.
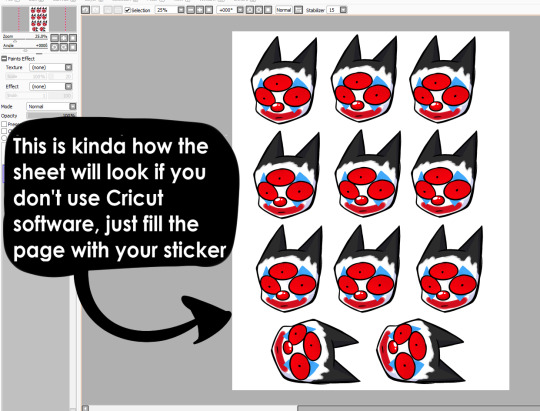
First, I use Cricut's software to print out the sticker sheet with the guidelines around the corners so the machine can read it. If you do NOT have a Cricut machine, open up your art program, make a canvas of 2550x3300 and fill it up with your sticker design with some cutting space between them. This the 8.5x11 size for the sticker page.
I usually have bleed selected so the cut comes out cleaner. Tip for non-Cricut users below: Increase the border around your sticker design to fake the 'bleed' effect for a cleaner cut.
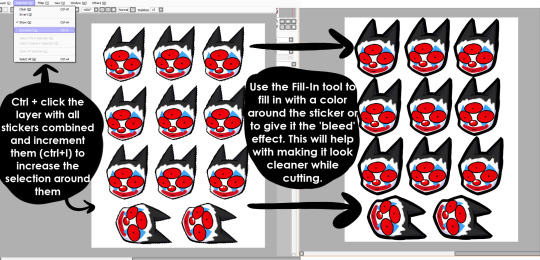
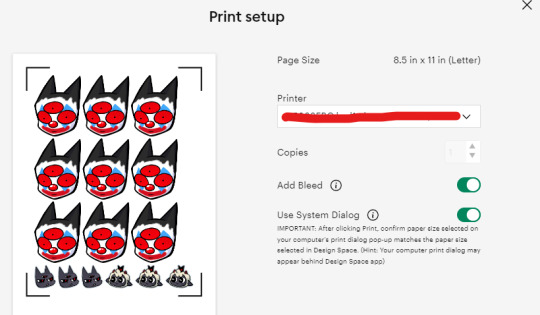
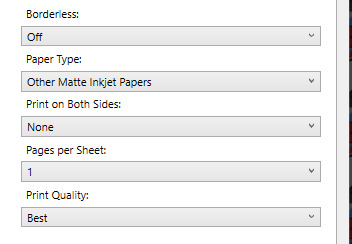
These are the print settings I use for my printer. I use the 'use system dialogue' to make sure I can adjust the settings otherwise it prints out low quality by default. Make sure if you're using the above paper that you have 'matte' selected, and 'best quality' selected, these aren't usually selected by default.
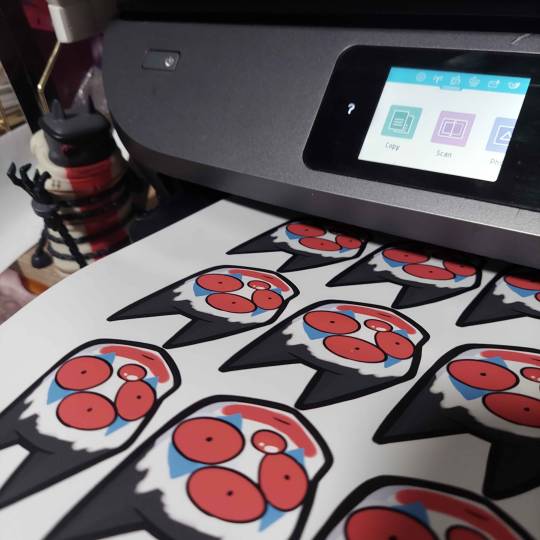
So you have your sticker sheet printed! Next is the lamination part. I use a hot laminator that was gifted to me, but there is no-heat types of lamination you can peel and stick on yourself if that's not an option.
(This is for protection and makes the colors pop, but if you prefer your stickers matte, you can skip to the cutting process.)
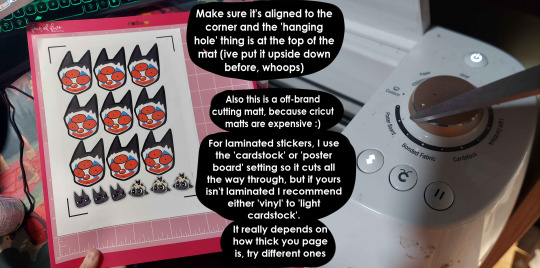
Important for Cricut users or those planning to get a Cricut: You're going to cut the lamination page to cover the stickers while also not covering the guidelines in the corners. First, take your lamination page and lay it over the sheet, take marker/pen and mark were the edges of your stickers are, and cut off the excess:
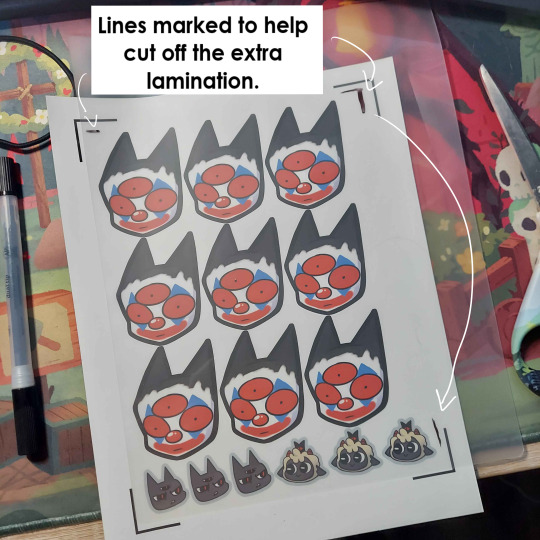
(I save the scrap to use for smaller stickers or bonuses later on)
After you've cut out your lamination rectangle, separate the two layers and lay one down on your sticker sheet over your stickers with matte side down, shiny side up. (Save the other sheet for another sticker page)
The gloss of the lamination will prevent the machine from reading the guidelines, so be careful not to lay it over them. It also helps to cut the corners afterwards to prevent accidentally interfering with the guidelines.

Now put that bad boy in the laminator! (Or self seal if you are using non-heat adhesive lamination)
Congrats! You now have a laminated page full of stickers.
For non-cricut/folks cutting them out by hand: this is the part where you start going ham on the page with scisscors. Have fun~
Cutting machine: I put the page on a cutting mat and keep it aligned in the corner, and feed it into the machine. For laminated pages I go between 'cardstock' and 'poster board' so that it cuts all the way through without any issues, but for non-laminated pages or thinner pages, I stick for 'vinyl' and 'light card stock'. Kinda test around.
Now I smash that go button:

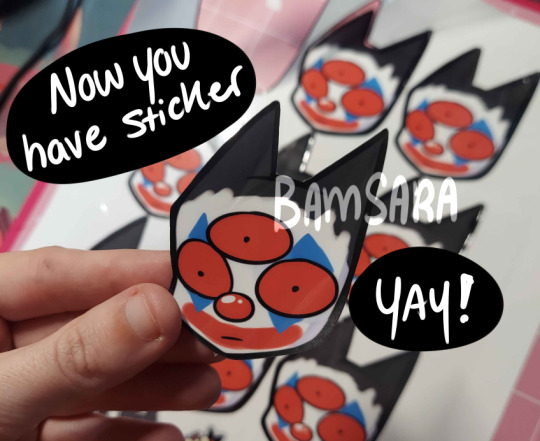
You have a sticker now!
The pros of making stickers at home is that you save some cost, and you have more control of your stock and how soon you can make new designs. (I can't really afford to factory produce my stickers anyway)
However, this can be a very time consuming, tedious process especially if you have to make a lot of them. There is also a LOT chance for some errors (misprints, miscuts, lamination bubbles, ect) that will leave you with B-grade or otherwise not-so-perfect or damaged stickers. (Little note, if you have page mess up in printing and can't be fed into the cricut machine, you can still laminate it and cut it out by hand too.)
I have to do a lot of sticker cutting by hand, so if you don't have a cricut don't stress too much about it. I have an entire drawer filled to the top of miscuts/misprints. I keep them because I don't want to be wasteful, so maybe one day they'll find another home. Sucks for my hand though.
But yeah! This is how I make my stickers at home! Hope this is helpful to anyone curious
1K notes
·
View notes
Text
this is the one. the most popular fic in the harry potter fandom. the fic that got me into fanfiction. the fic that i sobbed to for months after reading it.
i tried to bind this three separate times over the last two years and bro the first two sucked ASS. it was legit the very first fic i tried to typeset which is like, not the greatest thing to start off with LMAO. it looked funky, i hadn’t fixed any of the spacing, my footers didn’t match the text font or size. it was very much a baby binding.
the second one was my first time using a cricut and there is a very steep learning curve w the cricut, especially in creating designs that aren’t too complex or too plain. i tried to copy one of the popular printable book jackets and omg i spent weeks modifying my designs and printing and reprinting on my cricut and it looked like trash when i was done.
so finally, we have come to this.


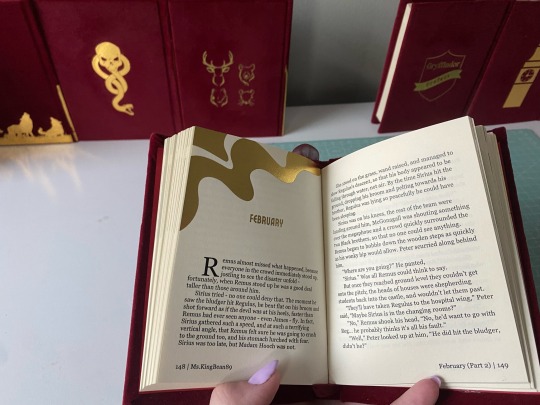
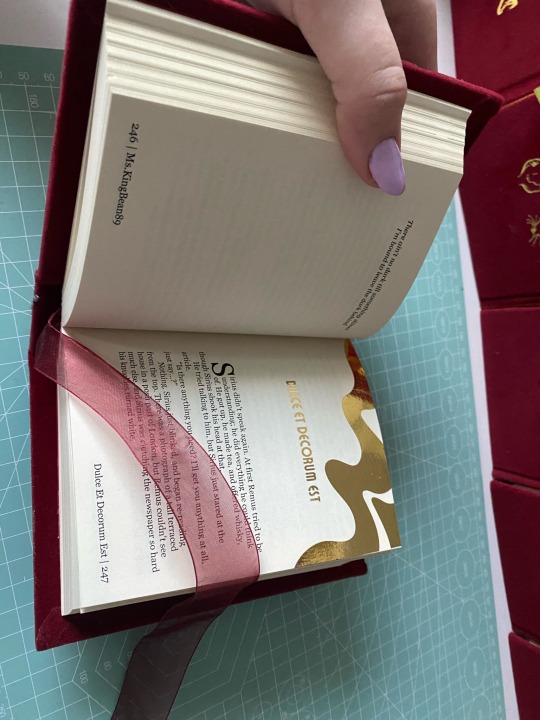
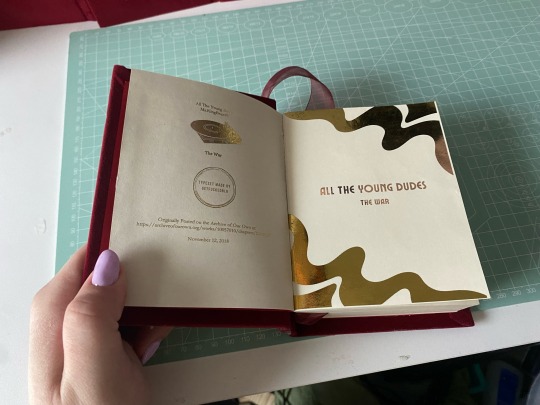
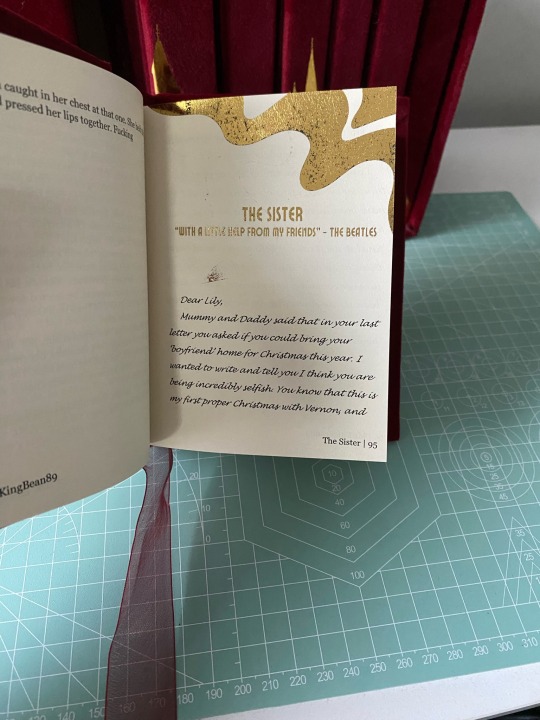

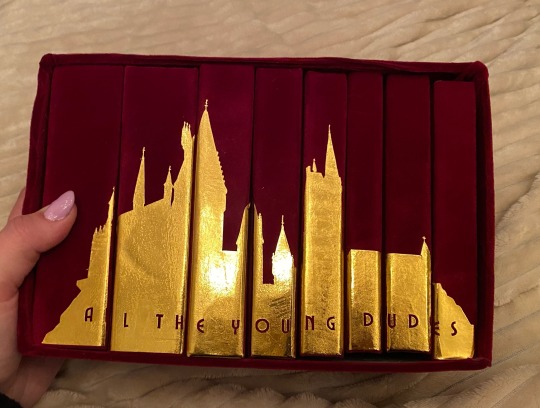
i got really into quartos during the winter and was like omg the editing process for this would be so much more manageable if i broke it down into years! so then i did lol. it allowed me to customize each chapter into sections so i could add the chapter title to the footers, and break down graphics into separate years so i didn’t have 100 pages in one canva file. it was just a lot easier to feel accomplished having broken it down bc this fic is a MONSTER.
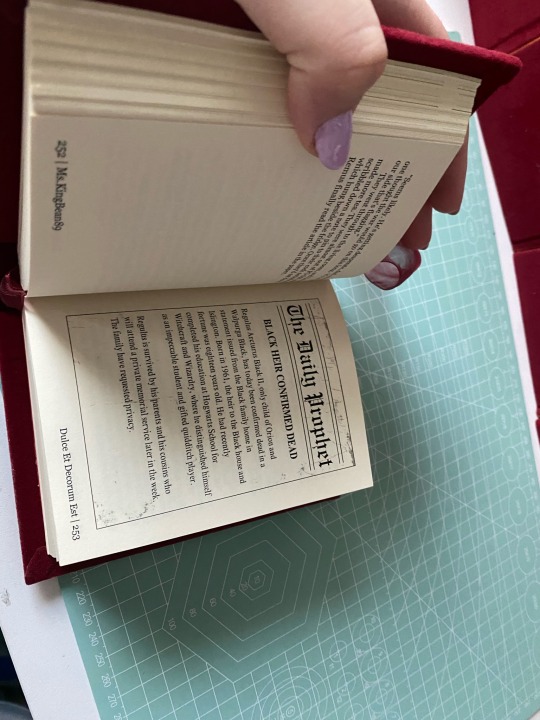
every chapter heading is the same - just the swirl. i gilded all the chapter titles using toner reactive foil and my laminator (she broke in the middle of this project. i ended up having to buy another laminator, and about 3 packs of foil from icraft. this is my most expensive fic binding to date🫠). i included the songs ms.kingbean put at the top of every chapter, and the bootleg tapes and christmas special.
i am seriously so proud of how this turned out, and can’t believe it’s actually done. sorry this is super long, but this really was a labor of love. they’re not perfect, i’m still really bad at measuring and cutting straight lines, but i’m satisfied. really satisfied.
#fanfiction#harry potter#harry potter fanfiction#bookbinding#ao3 fanfic#fanbinding#wolfstar#atyd#atyd marauders#atyd fanart#atyd fandom#remus lupin#sirius black#grant chapman#bound in peel and stick velvet flocking#chipboard#and gold htv#fucking hell it’s DONE!!#typesets in my drive#free for personal use#don’t sell fics!!
174 notes
·
View notes
Text
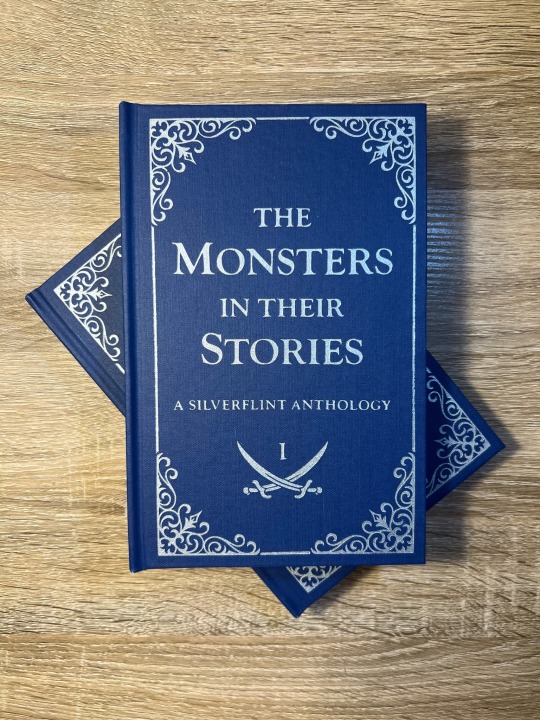
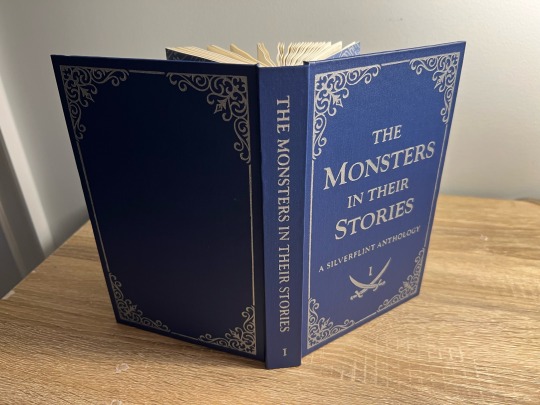
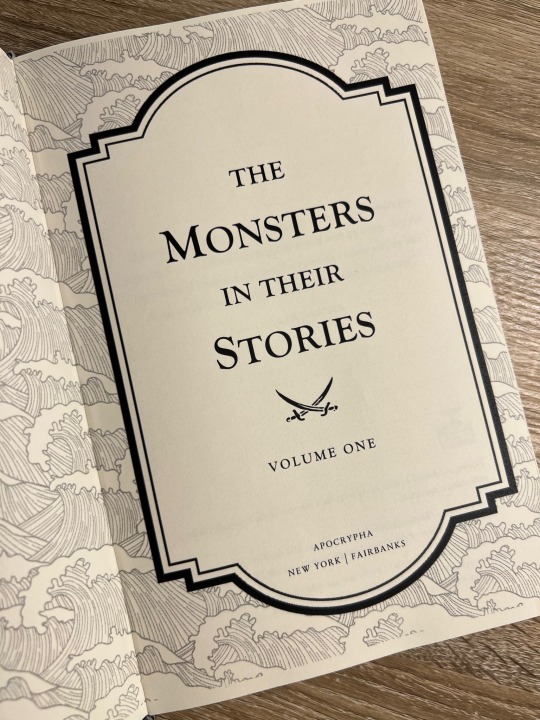
My First Fanbind! A Black Sails Fic Anthology Series
It took me a year (and a lot of anxious research) before I worked up the courage to bookbind fanfiction, and after months of on-again-off-again work, my first fanbind is finally done!
I knew that if I was going to bookbind fic, I had to bind something from the Black Sails fandom, aka the fandom and show that have had the biggest impact on my life. Y'all, I almost went into academia to study slavery in the 17th-18th century Caribbean because of this show - when folks say this show rewires your brain chemistry, they are NOT kidding. THEE show of all time. Happy 10th anniversary to Black Sails! This fandom is small but mighty. May we continue to get our hearts and souls blasted to smithereens by this show for many years to come.
Ao3 abounds with magnificent Black Sails oneshots, so I decided to put together an anthology of my favorite Silverflint fics under 20k, which I split into two volumes. Included are works by @justlikeeddie, @vowel-in-thug, @balloonstand, @annevbonny, @francisthegreat, @nysscientia, and more! Thank you, thank you all, you brilliant wonderful people, for gracing the Internet with such amazing writing. When I read the fics in these anthologies I want to fling myself into the sun.
More on the design and binding process below the cut!
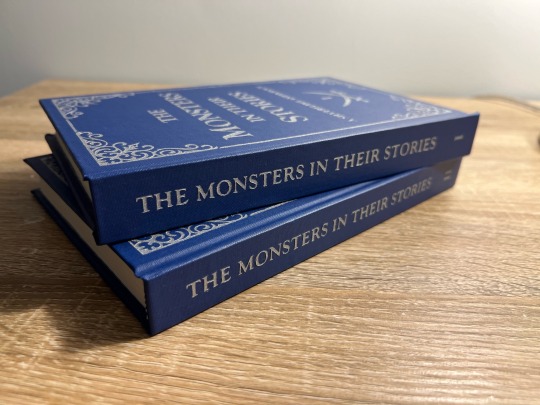
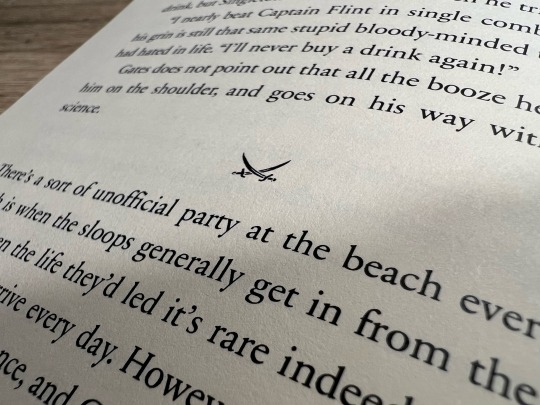
Vol. 1 Page Count: 270 (12 fics) Vol. 2 Page Count: 248 (11 fics) Body Font: Sabon Next LT (10.5 pt) Title Font: Goudy Old Style Other Fonts: IM Fell English, pirates pw
The typeset (which I did in Word) took a while, mainly because I'd never done it before. Manually adjusting the hyphenation line-by-line was especially tedious. After making these books, I abandoned Word in favor of InDesign, in large part because InDesign gives you way finer control over your justification and hyphenation settings.
Regarding my actual design choices, I'm happy with how the ocean motif on the title page turned out (it's not the same pattern as my endpapers, but they're complimentary) and I'm very fond of my divider dingbats, which are little swords! Goudy Old Style was a fun title font to use, since it's the font that Black Sails uses as its logo. The stories in Vol. 1 are divided into parts based on what Silver WAS at that point in the show (cook, quartermaster, or king), and Vol. 2 is split up into comedies, histories (AUs set in the canon universe) and tragedies - befitting Black Sails' Shakespearean ~vibes~.
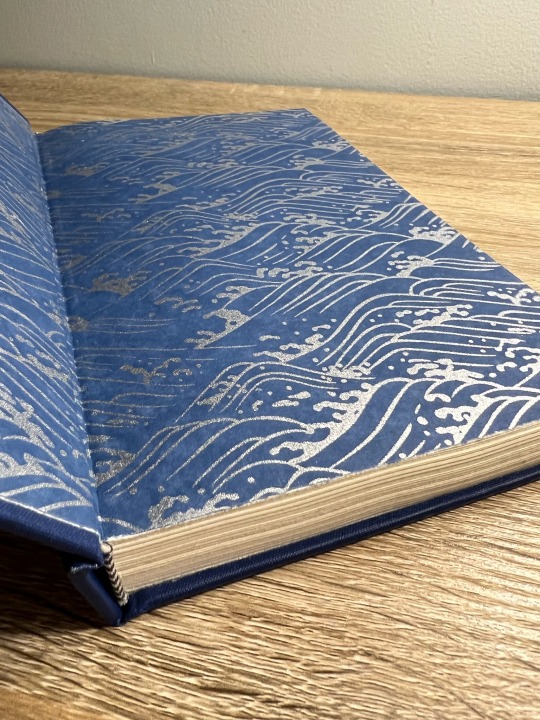
I stuck to a flatback binding, as I wasn't feeling quite ambitious enough to try rounding and/or backing. I've learned that I ~Anakin Skywalker voice~ hate sanding, enjoy folding/sewing, and don't LIKE edge trimming but enjoy the results enough to make it worth it.
The real adventure was decorating the cover, which remained bare for months. After agonizing over Illustrator and experimenting unsuccessfully with HTV and lokta paper embossing, I ultimately turned to using stencil vinyl to paint on the designs. There was a bit of seepage under some of the stencils, but I was able to scrape off the excess with my Cricut weeding tool without damaging the coated surface of the bookcloth (probably Arrestox Blue Ribbon from Hollander's). Even though it was very time-consuming, I'm so happy with the end result of the stenciled paint job and I intend to stick with stencils for my foreseeable future binds.
Are there things I would change? Sure. It was humid out when I printed, so the pages have got a wave. There’s an extra two pages in Vol 2. that I have no idea how I missed, and I got a line of glue in the middle of one of my Vol. 2 endpapers. I’m pretty sure I didn’t case in quite right, since my endpapers pull away from the case at the spine. I think the inner margins are a bit too big, and despite going line-by-line there’s still some wacky justification spacing in the typeset. But man, am I proud of these books! It is so satisfying to learn a new skill - MANY new skills, if we’re being honest - and to make something both beautiful and practical. If I’m still binding in two years or so, I can see myself redoing the typeset in InDesign, cutting out the existing text block, and reusing the cases. I’m also already planning for Vol. 3, which will be Silverflint Modern AUs.
Thanks for reading!
#bookbinding#fanbinding#ficbinding#my books#black sails#silverflint#fanfiction#bsanniversary#10yearsblacksails#10bsfest
297 notes
·
View notes
Text
An update on my edition of @pseudophan's phookbook- I've just finished converting all the measurements into the Canadian measuring system- that is to say, cups, tablespoons, and teaspoons aside from the drinks which are still in milliliters rather than liquid ounces because Canada switches between measuring systems depending on the purpose 🍁🍁🍁 🇨🇦🇨🇦🇨🇦
I'm sharing the files because I have no doubt there are others in Canada or the USA who would like to print the phookbook but don't want to convert all of the measurements themselves, and I don't blame them because it took me 11 hours! Great respect to Nora for having converted everything to the UK system for D&P's sake to begin with, as I found the process of converting measurements incredibly annoying and I imagine it would have felt much worse on a tight deadline.
Something to note is that my cover design is intended for clothbound books using iron on vinyl; if you intend to have this bound in paper, use the original cover design by @leegallyeevil. For cutting the iron on vinyl I use Cricut design space, but I imagine silhouette machine software is similar enough. I've set the size of this book at 21.67 cm in height but do as you please; the cover design files are large enough to be high quality at any reasonable size.
12 notes
·
View notes
Text
How to Use Cricut Pens? (Easy Steps!)
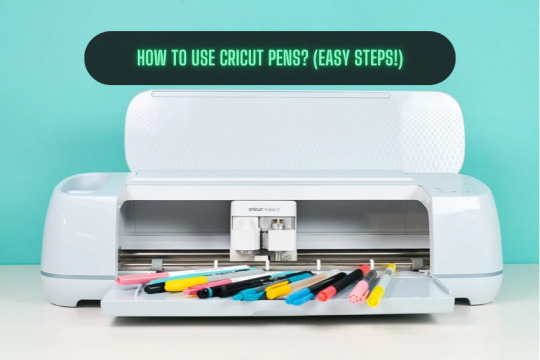
If you are a Cricut user, then surely you know that this brand makes some smart tools and machines. You know about its capabilities and how useful it is. But did you know that apart from cutting materials, you can use pens to simplify the crafting process significantly? But how to use Cricut pens? Cricut machines are not only used for cutting different shapes out of paper or vinyl. These machines use pens to create doodles, illustrations, and intricate designs. However, you need to know some basic steps you need to perform when you are designing your projects to make them better.
Using the pens is easy and straightforward, but the important thing is that you know the process. Read this blog to discover all about Cricut pens and what projects you can make with them.
What Types of Cricut Pens Are Available?
All of the current Cricut machines can use a pen, whether Maker, Explore, or Joy. The Maker and Explore machines have interchangeable pens, and Joy has a lineup of small pens. Joy pens are incompatible with other machines due to their unique, smaller size. Before you proceed with how to use Cricut pens, here is the list of pens that you can use with the machine:
Fine Point Pens
This has an F stamped on it for fine, has a 0.4mm tip, and comes in multiple colors.
Extra Fine Point Pens
These are finer, and the pens are just 0.3mm thick.
1.0 Pens and Markers
They have a thickness of 1.0mm and can be called markers, too.
Gel Pens
Gel Pens have a roller ball instead of a tip and are 0.8 mm in size.
Glitter Gel Pens
It has a roller ball and is 0.8 mm in size.
Calligraphy Pens
These pens have a gray barrel and have C stamped to denote calligraphy.
Infusible Ink Pens
It has a 1.0mm tip, and it is used for sublimation and infusing the ink on the surfaces.
How to Use Cricut Pens: Easy and Simple Steps
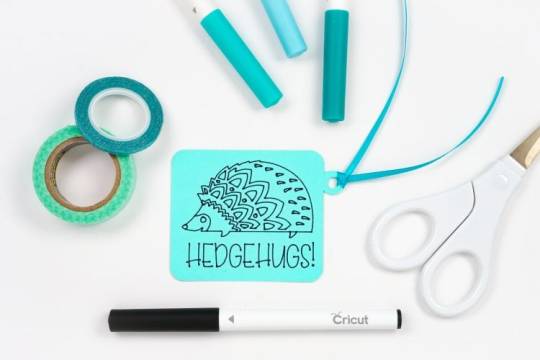
Placing or installing pens is easy, but if you are a beginner, then it will be a new thing for you. Always use the pens carefully, and pens should always be fitted to the clamp A of the cutting machine. Here, I am going to show you something different about using Cricut pens to create a simple gift tag. Now, let’s look at the below process to understand how to use it:
First, go to the Design Space and click on a new project to create a design.
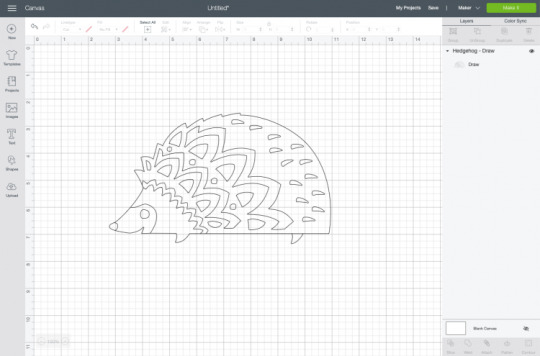
Then, create a design, or you can choose a text that you want to use with your pen. Cricut Design Space has its own vast library of images for your DIY projects.
Now, remember you have to draw, not cut the image. So, go to the Edit toolbar, and from there, select the Draw option in the Layers panel.

When you click the colored square box next to the line type dropdown, you can select the type of pen and choose the Fine Point pen.

After you have completed drawing your design, it is time to add text. In the Font menu, you can filter by Cricut Writing fonts. Choose the writing style font.
You can insert a shape into your Canvas. Then, using the Align tool, you can change its size and color and move it to the back of your Canvas.
Next, select your drawing and text layer and click Attach on the right-hand side of the Layers panel.
On the preview screen, your image will appear on the mat. Click Continue, and in the Make screen option, select the material you are using. Here, I am using cardstock. The Cricut Design Space app will prompt you to insert your pen, and you can use a fine-point blade.
In the last step, you have to insert your mat into the machine, and your machine will draw and cut the tag.
Conclusion
Now you know how simple it was to learn ‘how to use Cricut pens‘.? In this post, I have explained the types of pens and how you can craft your project with the pen. After reading this blog, you can choose a pen for your project, load it into the machine, and start crafting. Start crafting with your pen and unlock the full potential of the machine.
FAQs
How Do You Load the Pen Into Cricut Machine?
When you open the machine, you will see two clamps: Clamp A and Clamp B. To load the pen into your cutting machine, open Clamp A and insert the pen into it. Gently press the pen into the clamp until it fits properly, and you hear a click sound. Then, close the cover, and you are ready to use the machine.
What Are Cricut Pens?
Cricut makes different types of pens, which are great ways to add drawn or handwritten details to your projects. Cricut pens come in different sizes and can be easily loaded into the machine. This can be used for various creative projects, such as writing on gift tag cards or adding doodles.
What Is the Difference Between Cricut Pens and Markers?
A Cricut pen usually has a fine tip, which allows it to create a thinner line, compared to a marker, which has a thick tip and creates a thicker line. Pens are ideal for writing detailed text, signatures, or fine lines within a design, whereas markers are better for filling large areas with color.
Source: How to Use Cricut Pens
#how to use Cricut pens#cricut design space download#cricut design space app#cricut maker#cricut joy#cricut pens
3 notes
·
View notes
Text
Why Is My Cricut Not Connecting? (Quick Fixes)
Cricut machines are one of the most useful tools for crafters, which makes it easy for them to create complex designs and projects. However, users may become extremely frustrated as a result of connectivity problems. It is important to comprehend the causes of these issues. This will enable you to troubleshoot them more successfully. This blog will look into the query, “Why is my Cricut not connecting?” alongside the typical causes of connectivity problems for your machine.
Method 1: Check the Connection of Devices
Cricut machines can connect either via a USB cable or with the help of Bluetooth. Knowing how each connection type works is essential for troubleshooting connectivity issues.
USB Connection

The USB that you are using must be in good condition; otherwise, you will have trouble connecting it to your machine. Plus, you must ensure the wire is correctly plugged into your computer and the machine. A malfunctioning cable or port could be the cause of the connection loss. An alternative USB cable or port might help fix the problem.
Bluetooth Connection
With the Bluetooth option, you can have a wireless connection to your machine. Just ensure that you turn on Bluetooth on your device. If your machine’s name does not appear in the list of available devices, then you should try the following steps:
Restart your devices: Sometimes, a simple restart of your device can resolve the issue. So, start with that.
Forget the device: If that does not work, you can try forgetting the device. To do this on your computer or mobile device, go to Bluetooth settings, find your machine model, and select “Forget.” After that, try to reconnect again.
These steps often answer the question, Why is my Cricut not connecting?
Method 2: Update Design Space or Operating System
Another main factor in connectivity issues is software compatibility. You need to make sure that both the app and the device’s operating system are up to date. Older software often leads to connectivity problems.
Updating Design Space
To check whether the app is updated or not, follow the below steps:
On Windows
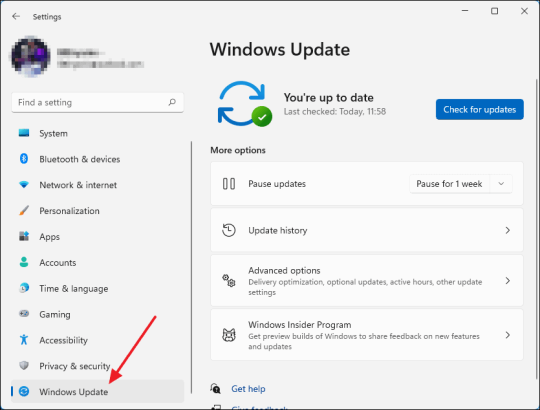
You need to open the app and then need to click on the three horizontal lines in the top left corner. Once there, go on to select “Check for updates” and click OK. Your app will be updated if you have some older versions.
On Mac
If you have a Mac, open the app and click on “Design Space” from the menu bar. Afterward, select the “Check for updates” option. If updates are available, go ahead and install them. Once installed, you must restart the application. This way, you can resolve the issue related to why is my Cricut not connecting.
Method 3: Diagnosing the Network Settings
Network settings can mainly impact wireless connectivity. You must ensure that your antivirus software does not block the firewall settings for the Cricut Design Space app. If found positive, you might need to adjust your firewall settings so that the app can communicate through the network.
Method 4: Check the Firewall Settings
Sometimes, you need to configure the firewall settings properly so that the machine can connect properly. In order to do that, follow the below steps for Windows and Mac.
Windows
First, you need to go to the Control Panel, then to System and Security, and from there you must open Windows Defender Firewall. Once you reach there, check for the option “Allow an app through Windows Defender Firewall.” Click on it and ensure the app is allowed.
Mac
On Mac, go to System Preferences, then Security & Privacy, and then Firewall. Once there, select the Firewall option and ensure that the Design Space software is allowed. Adjusting these settings can help answer why is my Cricut not connecting.
Method 5: Ensure Your Device Is Compatible
You will have to make sure that your computer or mobile device meets these minimum system requirements for using Design Space. If your operating system has insufficient RAM or processing power, you might have difficulty connecting or might not connect altogether.
Method 6: Checking System Requirements
The minimum system specs for the application include:
Windows: Windows 10 or later, and at least 4 GB RAM or more.
Mac: macOS 10.12 or later, and at least 4 GB RAM or more.
Mobile: iOS 12 or later or Android 5.0 or later.
If your device does not fulfill these requirements, you should consider upgrading your hardware or changing the device that connects your machine.
Troubleshooting Steps
If you still face trouble with the connectivity, then follow these quick and simple steps:
Restart your machine: Turn off your machine and wait a few seconds. Then, turn it on again. This will surely solve the issue.
Reset Bluetooth settings: If you are using Bluetooth, reset your device’s Bluetooth settings and try to reconnect. It should fix the problem.
Reinstall Design Space: Uninstall the app and reinstall it. Reinstalling will ensure a fresh start, and hopefully, you will be able to reconnect again.
Conclusion
In short, connectivity issues with your Cricut machine can arise from various factors, including connection type, software compatibility, network settings, and device compatibility. Following the tips and suggestions mentioned above, one can address the question, “Why is my Cricut not connecting?”
Just remember to check your connections, and ensure that the software is updated, also make sure your device meets the necessary requirements. With these methods, one can enjoy a seamless crafting experience with their machine.
FAQs
1. What should I do if my Cricut machine doesn’t turn on?
Ensure that your power cord is securely connected to both the machine and the electric outlet. If using a power strip, try plugging directly into a wall outlet. You should also check the power cord for any visible damage.
2. How can I improve Bluetooth connectivity with my Cricut?
Make sure that your machine is within range of your device and that Bluetooth is enabled. Restart both devices and try forgetting the machine in the Bluetooth settings before reconnecting.
3. What are the minimum system requirements for Cricut Design Space?
For Windows, you need Windows 10 or later with at least 4 GB RAM. For Mac, macOS 10.12 or later with 4 GB RAM is required. Mobile devices should run iOS 12 or Android 5.0 or later.
4. How do I check for updates in Cricut Design Space?
On Windows, open the app and click the three horizontal lines in the top left corner to select “Check for Updates.” On Mac, click “Design Space” in the menu bar and select “Check for Updates.“
5. What should I do if my Cricut App is crashing?
Try reinstalling the app to ensure a fresh start. Also, check for software updates and clear your device’s cache to improve performance.
Source: Why Is My Cricut Not Connecting
#why is my cricut not connecting#cricut design space#cricut design space app#cricut design space software#cricut design space download#cricut machine setup
3 notes
·
View notes
Note
Hey! Just wanted to say your costume work is so stunning and detailed I love all the embroidery and designs on the fabrics. I was curious about the type of fabric you use for gales camp clothes. Do you have any recommendations for velvet fabrics and I’m curious about the process for drafting the pattern! :3
Hey thank you! I used cotton velvet for mine - it tends to be sturdier and more structured than, say, silk velvet, which is very drapey. The pattern for the tunic itself was pretty easy - basically I found a shirt at a thrift store that had roughly the shape I wanted, took it apart, and tweaked it from there haha. Same thing for the pants really. If you mean the pattern for the embroidery itself, that was trickier - I took some real close screenshots in game and then drew over the design in Procreate, and from there manipulated them so they'd fit the proportions of my pattern pieces (collar and hem are straight lines, so that was straightforward; the collar was much more finicky and I had to do a lot of slight nudging around the curve). Then I could import them into Design Space and cut 'em out with the Cricut.
2 notes
·
View notes
Text
Why Is My Cricut Not Connecting: Common Causes and Solutions

If you’ve been using Cricut machines for a while, you’ve likely faced this issue: Why is my Cricut not connecting? A common error can annoy and create obstacles to your tasks. If you are experiencing the same problem, you do not have to worry about it. If you know the exact cause of this error, you can fix it easily.
This blog post will discuss all the connection-related issues on your crafting machine and the solutions you can use to solve them. Depending on your machine, the problem can be related to the USB cable or Bluetooth. Sometimes, it is hard to find the issue, and you may need to reset the connection.
Main Causes of Cricut Machine Connection Issues
If you are having trouble connecting your machine to your computer, it is important to find out the reasons behind the problem – Why is my Cricut not connecting? You need to understand the problem to resolve it. Here, we are going to explain the common issues that users face, and it will help you detect the error on your device and fix it.
If your internet connection is poor, you cannot connect your Wi-Fi and machine.
Sometimes, the Design Space app issue can occur if you have a problem with your internet connection or the software has a technical error.
If you are using an overused cable, it can cause difficulties in connecting your machine and the device.
If you are trying to connect your device wirelessly and the system and machine are not within range, an error can also occur.
If any other device is already connected to your PC, it can face problems while connecting.
Outdated firmware can cause the error, too.
Check for corrupt and cache files; viruses can also interfere with your machine and cause this error.
Why Is My Cricut Not Connecting to PC: Top 3 Solutions
Now you know the reasons why your crafting machine is facing this error. To fix it, you need some quick and effective solutions. After learning it, you can troubleshoot your issue with these methods:
Solution 1: Ensure Bluetooth is ON on Your PC
You may face the issue if your device and machine are far apart. If too many devices are already connected, finding your machine and connecting will be difficult. After knowing this problem, you can fix it through these steps:
To start the process, make sure your machine and device are within range. They should be close if you want to establish a wireless Bluetooth connection.
Then, you have to open the Settings option on your PC.
On the following screen, head to the Devices option.
After that, check if Bluetooth is turned ON or not.
Click the Add Bluetooth or other device option, and your computer will scan for available machines.
In the next step, a list of devices will appear on your screen.
Next, choose your machine model, and it will pair with your device.
Also, you have to enter a PIN code – 0000 if asked.
The connected message will appear on the screen when the connection between both devices is established.
Solution 2: Check Your Internet Connection
Very often, when your machine is not connecting to your system, it is caused by an external issue, such as an internet connection. While using the machine, you have to make sure that you have a stable network and that your device is properly connected to the internet.
To connect your machine to a Wi-Fi network, you can use a wireless adapter:
First of all, turn on your machine and enable the Wi-Fi option.
Then, confirm that both devices should be paired with the same network.
Go to the Settings menu on the machine’s LCD screen.
After that, you have to click the Wireless button.
A list of wireless networks will appear on the PC’s screen.
Next, choose the network you want to connect with and then enter your Wi-Fi password.
If the network is not listed, click Add Network to manually enlist your network. Enter the password and connect.
Solution 3: Make Sure Design Space Is Updated
Make sure you have the updated version of the Cricut Design Space app installed on your device. If you are having trouble opening the software, try uninstalling it and then reinstalling it on your PC. A fast and reliable internet connection is essential to download the software.
To download it on the desktop, follow the below steps:
Go to your browser, then search design.cricut.com. And click on the Download button.
Then, click twice on the software file to install it.
A window will appear asking if you trust the application. Press the Yes button to accept the terms and conditions.
The file will then be installed on your device. Please log in using your Cricut ID and password.
Finally, the app icon will be added to your Windows desktop computer.
FAQs
What are the main reasons behind my Cricut not connecting?
There are multiple reasons that could lead to this connection problem. Make sure your computer and the crafting machine are connected to a stable wireless network. If not, then try restarting your Wi-Fi. If you use a USB cable, verify that the cable is securely connected to your device, and the machine. Also, update the Design Space app to the latest version.
How do I reset my Bluetooth connection?
Sometimes, even after trying all the solutions, you cannot fix the Bluetooth connection issue. In such cases, reset is the best method to do:
First, open your device and go to Bluetooth settings.
Then, look for available Bluetooth devices.
Next, click on your machine from the list and select Unpair to remove your device.
Now, you should tap on the right-side icon on the machine. You will see the option Unpair or Forget to disconnect it.
Can I easily solve Cricut connection problems?
Yes, you can easily solve your connection problem. To fix these issues, you have first to find the specific cause of the error. Once you identify it, you can resolve it by taking the basic steps. If you have tried all the solutions and still nothing works, then try to reset your crafting machine.
Visit: cricut.com/setup cricut setup Cricut Design Space download
Source: Why Is My Cricut Not Connecting
#why is my cricut not connecting#cricut machine setup#cricut setup#Cricut Design Space Software#cricut design space app#cricut design space download
2 notes
·
View notes
Text
Cricut Not Connecting to Bluetooth: 5 Effective Solutions

All Cricut machines have Bluetooth connectivity to connect to all types of computers and smartphones. Sometimes, you may face the error message “Cricut not connecting to Bluetooth. “There can be various reasons for this issue, such as compatibility, restrictions, distance between your devices, configuration, and more.
Many factors can cause connectivity problems. To know all the solutions, explore this write-up and find the best method to eliminate this wireless connection error.
Solution 1: Unpair and Restart Your Device
You may face this issue if your machine is far from your device. In this case, you’re going to follow the steps to resolve your connectivity issue:
Firstly, unpair the machine from all devices.
Then, unplug the machine from the main power.
After that, restart your computer or mobile phone.
Next, plug in back your machine and power it on.
Ensure your machine is within 15 feet of your device for Bluetooth connectivity.
Also, confirm that Wi-Fi and Bluetooth are enabled on your device.
Make sure your device has the latest version of the Design Space app.
Click on the Add Bluetooth or other device option.
Now, select the Bluetooth option and wait for the computer to scan your machine.
You click on your machine from the result and pair your machine.
Solution 2: Check for a Firewall or Antivirus Software
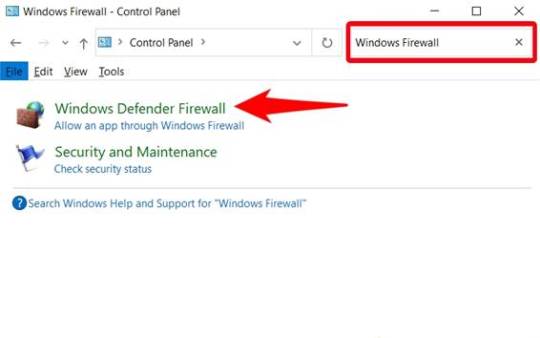
The Windows Firewall on your system or antivirus on your phone can stop the machine. Follow the steps below to solve the Cricut not connecting to Bluetooth issue:
To begin, go to the search bar and type Windows Firewall on the search field.
After that, you must agree to give permission to the app through the Windows firewall.
Then, go to the Windows Firewall settings and select the option to Change Settings.
Next, you have to move to the list and click the Design Space software checkbox.
After that, select both the private and public options.
If the option for the app registered does not show, choose to Allow another app option.
Hence, move to the installation folder of your Cricut software.
Solution 3: Remove the Other Device
If your device is already connected with the other device, it can face issues while connecting. Therefore, you need to remove the other device by following the below steps:
Start by pressing the Start menu and choose the Settings option.
Next, open the Devices window by selecting its option.
After that, choose the device you want to remove from your computer and hit the Remove Device option.
Then, confirm the action by choosing the right option.
Finally, you can pair your machine to see if the issue of Cricut not connecting to Bluetooth has been resolved.
Solution 4: Update the Software
The issue can arise even when the machine’s software is outdated. Here are the steps to update your machine’s software:
Start by pressing the Windows and X buttons together on the keyboard.
When a list of options appears on your screen, click the Device Manager option.
In the device manager screen, select the option of the machine and right-click on it.
After that, choose the Update Driver Software option.
Once your driver is updated, try to complete the Bluetooth pairing process.
Solution 5: Check for Device Compatibility
Check the system requirements on the Cricut official website (Cricut.com/setup) to verify your device’s compatibility.
Android: The app is compatible with Android 10.0 or the latest version but only on mobile devices and tablets. It is not supported on Chromebooks. Some qualified devices include Samsung Galaxy, Google Pixel, LG, G, K or V series, Motorola Droid, and One Plus.
iOS: The app is compatible with iOS or later on iPhones, iPads, and iPods.
Windows or Mac: The software can be used on Windows or Mac computers.
First, click the Design Space icon on your desktop.
Then, go to the Start menu, open the file location, and right-click.
Now, open the “Properties” section. In the Properties window, select the Compatibility tab.
Final Thoughts
In conclusion, this issue of Cricut not connecting to Bluetooth can be fixed with this troubleshooting guide. There can be various reasons, such as if your machine has connection issues, is far away, or has outdated software.
Remember to stay patient while resolving these issues. With persistence, you can overcome these problems, enjoy wireless connectivity, and work seamlessly with your machine.
FAQs
How do I connect Cricut machine to my Mac?
To connect a machine to a Mac, you can use Bluetooth or a USB cable; here, if you want to connect with Bluetooth, then follow the steps:
Turn on the machine and make sure it is within the range of 10-15 feet of the computer.
After that, go to System Preferences and choose the Bluetooth option.
Now, check if the Bluetooth is on and choose your machine from the list.
Next, follow the prompt to complete the pairing process.
Why is my Cricut machine not connecting to Bluetooth?
If your crafting machine is not connecting to Bluetooth, there are many reasons like:
Make sure your machine is within 15 feet of your device.
Check the power and whether it is turned on or not.
And check if the Bluetooth device is turned on.
Make sure your device’s Wi-Fi is turned on.
Update your Design Space to the latest version.
Make sure your system has all the minimum system requirements for running the Design Space app.
Unpair your machine from all devices, restart your device, plug it back into the machine, and then re-pair it.
How do I reset my Cricut machine using Bluetooth?
The steps to reset the machine using Bluetooth are as follows:
First, unpair the machine from all devices.
Then, unplug the machine from the power.
Now, restart your computer or mobile device.
Next, plug the machine back in and turn it on.
After that, move the machine within 15 feet of your computer or mobile device.
Make sure your computer or mobile device’s Wi-Fi and Bluetooth are on.
Lastly, update the Design Space app to the latest version.
For more information visit: how to setup cricut maker cricut new machine setup
Source: Cricut Not Connecting to Bluetooth
#cricut not connecting to bluetooth#Cricut Design Space app#Cricut Design Space software#cricut new machine setup#cricut.com/setup
2 notes
·
View notes
Text

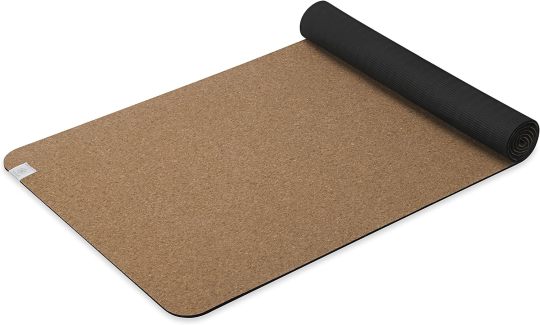
So I painted my yoga mat... I'm including the process and credits below the cut.
So, I have been wanting a cork yoga mat for a while. Do I need one? No. Will I pick up yoga again for a month and then quit? Hopefully not, but likely yes.
Every time I get back into yoga, I start looking at cork yoga mats because they're grippier and also very very pretty. The only problem is... they are friggin' expensive.

I first was attracted to cork yoga mats because of some of the really amazing designs, but I can't afford this shit. Instead, I settled for a cheaper cork yoga mat that is plain, and I thought that if I saved up enough money and still cared about yoga enough to buy a fancy one, I would.
But then I got to thinking... could I paint my yoga mat? And the answer is yes, yes I can.
I originally got the idea when I read online of other people doing this to their rubber and PVC mats, so you do not need a cork mat to do this!
Buying the Mat
Even an inexpensive cork yoga mat is still far more than I've ever spent on one before, so I had to choose wisely. I ended up choosing the Gaiman cork yoga mat, which is about 5mm in thickness. It's roughly 68 x 24 inches. One thing I had read is that cork mats can get quite heavy, but this one is pretty lightweight while still being cushy. I was really tempted to use it right away, but I didn't want it to get dirty or oily before I painted it.
The Design
I am not an artist. I cannot draw well enough to freehand something confidently. What I do have is a Cricut Maker. If you don't know what a Cricut Maker is, it's an ill-advised purchase that I got secondhand and is actively ruining my budget. Depending on the model, it can cut out designs on a variety of materials, such as vinyl or infusible ink and can even tool leather. I used cardstock for this project to cut out stencils.
There are many free SVG templates out there as well as images created by other Cricut Makers that are only .99 each. There are many, many other places where you can purchase designs as well, or you can create your own! I am not talented enough to create my own design.
I tried several free SVGs, didn't like them, and then stumbled on this on Design Space, the Circut Maker program/shop. To quote Macklemore, "But shit, it was 99 cents!"
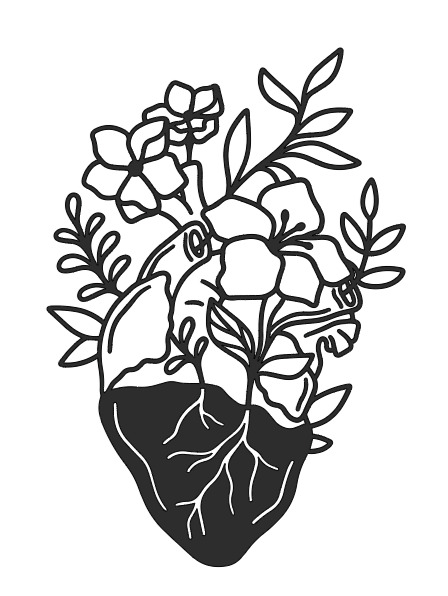
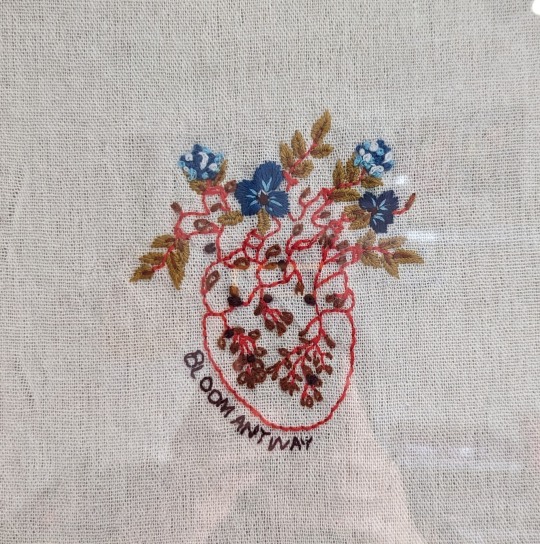
The image was designed by GlamSVG by Emylia and the inspiration came from an embroidery pattern by Emily June, which you can find HERE. I went through an embroidery phase during quarantine, and I have mine hung on the wall. I look at it daily.
I had to resize this image to fit my yoga mat, which ended up being 24 x 36". Because I cut the stencil out of cardstock, I had to segment everything into 8.5x11 pieces, cut, weed, and then piece it all back together on the mat. Once I had all the pieces, I stuck them to transfer paper to keep the floating segments in place. I organized and labeled everything so I could put it back together again easily. It looked like this:
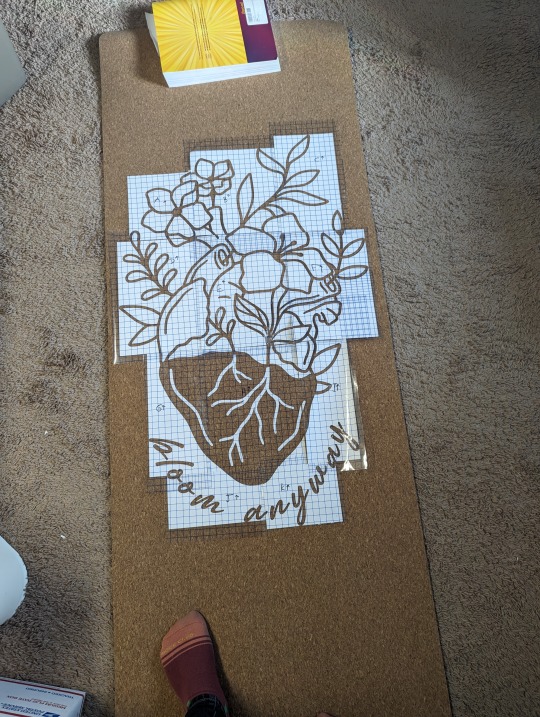
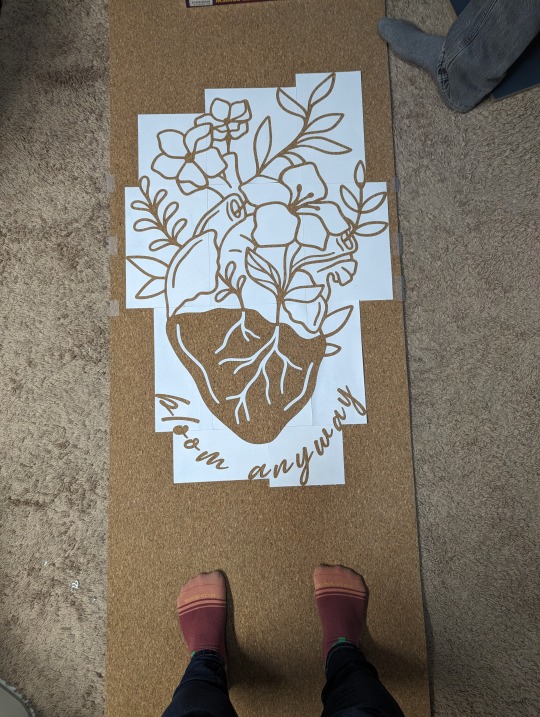
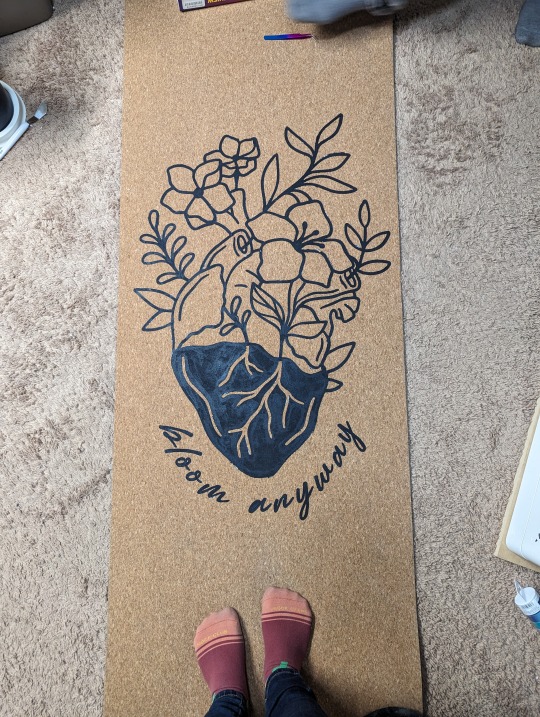
Once it was assembled, I sprayed the backs with temporary adhesive so the stencils would stay down. I removed the transfer paper and began painting the outline. I did end up losing a couple of the floating pieces (see the letter O and the leaf on the far right side), so I had to freehand some of it. Overall, the stencil turned out great!
I had a variety of success with the temporary adhesive. Because I bought a more inexpensive mat, I soon discovered how not durable it is. The 'temporary' adhesive pulled up small pieces of cork after I removed the stencil. This was partially my fault, since I didn't pull up the stencil as I went. Still, there were pieces that were going to lift anyway. This revealed that the cork is only one layer, but fortunately, each piece of cork that lifted was quite small and unnoticeable, and the thread behind it matched in color. It wasn't ideal, but I could live with it.
Some of the cardstock became permanent fixtures on the mat, which I then had to paint over. Also, some of the stencil didn't stick at all, so I had minor bleed through. Problems all around! But it still turned out nicely!
I need to preface that I have never painted anything before. Well, that's a lie. I've painted a wall, and six years ago I had a Bob Ross themed birthday party. The SO, however, is the son of an artist and taught me about mixing acrylic. His first tip was to test out colors. I used Paint.Net and came up with this mock-up:
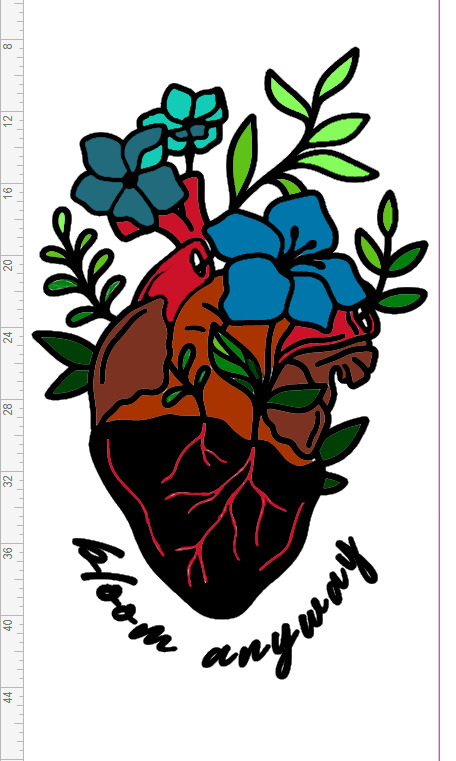
I knew I wanted the heart anatomy to be shades of red, so that was easy. The flowers were harder. I tried my favorite colors, like yellow and purple, but it didn't sit right visually. I turned to Canva Color Wheel to help me find complementary colors to the shades of red I wanted to use. That's how I came up with the pretty blues. To mix the colors, I used ColorHexa to show me the percentage of CYMK I needed.
Here are some progress shots:
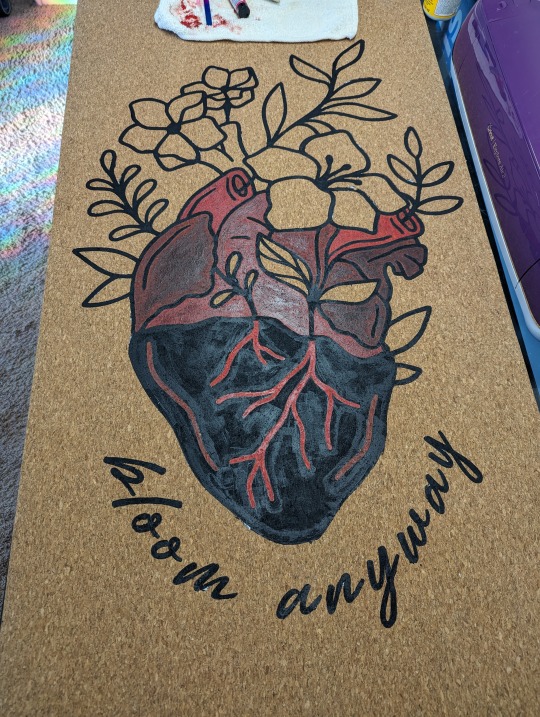
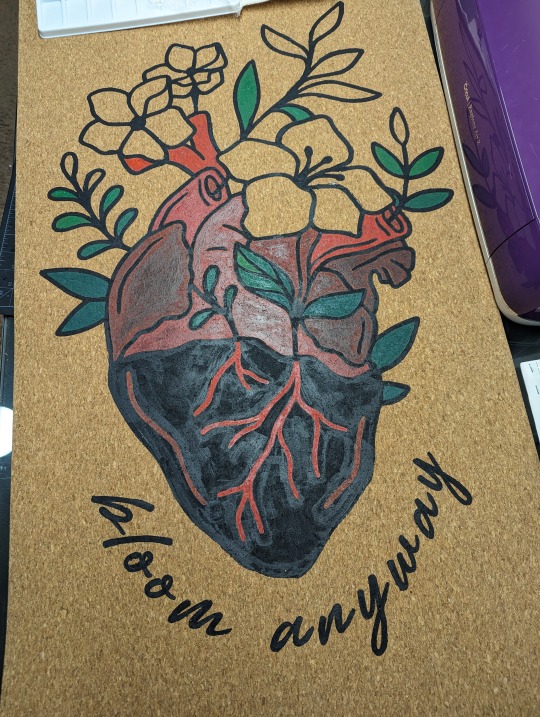
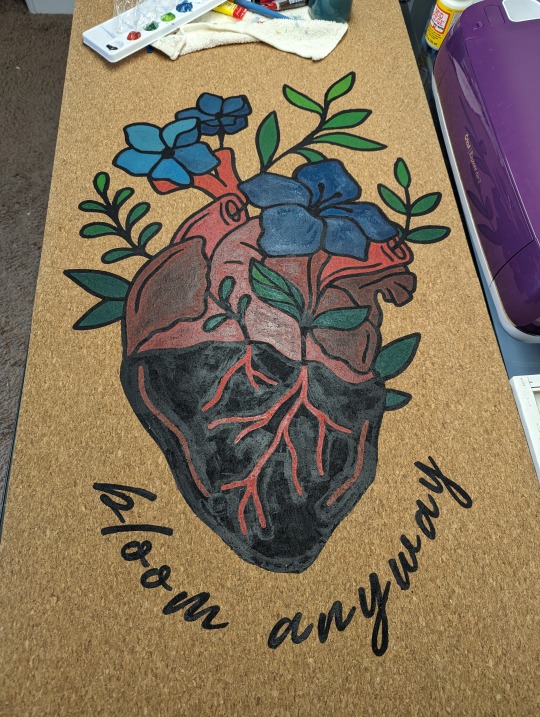
I'm super happy with how it turned out! My color mixing didn't turn out exactly like the mock up, but I love the results. The last step was to let it dry for at least 48 hours. Then I set it with Mod Podge Acrylic Sealer.
I chose Mod Podge since it's non-toxic, and I will be putting my face on it. Also, my dogs walk on it while I do yoga. They think it belongs to them. :) Knowing now that there is only 1 layer of cork, I do worry how it'll hold up to dog nails over time.
Lastly, the real test was to see if it would roll, and it does! So now I just need a yoga strap, and I'm good to go!
17 notes
·
View notes
Text
Fanbinding 4: Cover
Current project: A Choriambic Progression
Previously: Part 1, Part 2, Part 3
Disclaimer: still new at this. Please don't judge me. And also this is just what I do and really when it comes to some of the smaller details, that's personal choice and stuff you'll decide once you get going and know what you wanna do with it!
This is the most...personal/particular part of the whole process! A lot of what I do here is making stencils with my Cricut Joy.
1.) I go into Cricut Design Space, start a new project, and throw down the title and author name. I know my machine is small and my mat is 4x6 inches so I make sure the font fits within that space.
2.) Select a font and size...Not gonna lie, Cricut Design Space has very...frilly fonts. It's hard to find fonts that are dramatic enough that I also know will cut the way I need it to.

I have to do this twice, once for the cover and once for the spine. The spine will obviously need different dimensions!
3.) Then I cut out a bit of permanent vinyl, then load it up on my mat, and run it through my machine!


4.) Once that's done, I cut around the title and name so I can better see the size and decide where best to stick it.
5.) then I peel and stick!
6.) From there, I choose a paint pen I like (for this I used copper) and I trace the stencils. (I also had to use a Cricut tool to pick out some of the vinyl that got stuck between letters)
7.) I give it a few minutes to stay in place and dry.
8.) then: peel!
9.) I also use a Modge Podge spray to protect it.
10.) Once it's all dry (or in this case, I got impatient and did this part while waiting for the paint to dry lol), I pick out my book corners and fit them around the corners and hammer them down!


And that's done!
I'm no pro or anything but hey...I can make a book! 😁
12 notes
·
View notes
Text
grabs patreons and shakes them
Patreons! I haven't gotten the patreon website to load yet to make the posts but I wanted some feedback on the future of stickers
I've been thinking about making sticker/print benefits an every-other month basis reward instead of every month. Sending out stickers monthly is very time consuming in all areas, since I have to physically make each one (I use a cricut at home, so I don't order the stickers, but I have to order the paper and ink and shipping supplies and wait for them) and can be frustrating when things take a while to ship or end up lost in the mail + the overall process.
And to be honest, it's getting a harder to afford things for supplies to make and ship everything with inflation right now, and while I've been told to do so, I'm really not a fan of having to raise my prices.
So if possible! I'd like to be able to start doing more other benefits, like clay crafts, youtube videos (speedpaints, cosplay crafts, traditional painting, art tutorials ect). I'd like to more often consistently update my patreon with more varied posts, especially of things I'd like to work more on. Also, sticker designs are fun and I'd still like to do them, but this would also give me the time and space to actually make a stock of them and make them more easily available on kofi without having to become a patreon, so past stickers are available.
If I can get Patreon to load, I'll have a poll over there as well as update posts, but some feedback would be appreciated!
165 notes
·
View notes
Text
Cricut Explore Air 2 Bluetooth Connection: Simplified Guide

Hi there! Are you looking for a Cricut Explore Air 2 Bluetooth connection? If so, then I’ve got you covered! I’ve always preferred connecting my Cricut via Bluetooth. Do you know why? Because I can’t have my computer and Cricut on the same table☹️. I had to keep them separately, so I had no option but to use a Bluetooth connection. Besides, I hate dealing with those clumsy wires. However, I don’t think anyone would like those messy wires😅.
Well, now getting to the point: I am a professional crafter who loves making DIY projects on Cricut. As an avid Cricut user, I am here to teach you how to connect your Cricut Explore Air 2 Setup via Bluetooth. If you are ready, let’s dive in!
Cricut Explore Air 2 Bluetooth Connection on Computer
If you want to connect your Cricut cutting machine to a Windows or Mac computer, follow the steps below. Ensure you have placed your Cricut and computer within 10 to 15 feet. After that, you are ready to go😍!
For Windows
Here are the simplified steps to connect Cricut to a Windows computer using Bluetooth:
The first thing you have to do is turn on your Bluetooth. To do so, navigate to the Start menu from the taskbar.
And click on the Settings (Gear icon).
Then, open the Devices option.
Make sure you need to turn it on and click Add Bluetooth or other device.
After that, you have to move further and select Bluetooth.
Afterward, wait a while and see if your computer has detected your Cricut machine.
Now, you will notice that your Cricut model is visible. The process is the same for all Cricut models.
Finally, your Cricut machine has been paired with a Bluetooth connection.
Launch the Cricut Design Space software and navigate to New Product Setup to confirm whether your Cricut is connected. There, you will see whether your Cricut is connected.
For MacBook
Here are the simplified steps to connect Cricut to your Mac system using Bluetooth:
Under the Apple menu, you will find an option called System Preferences; you have to select it.
Afterward, you will need to look for the Bluetooth app.
Now, you should launch the Bluetooth app and check whether your Bluetooth is on or off.
Once Bluetooth is turned on, you must wait for it to detect your Cricut machine.
When the machine is detected, select the Pair tab to connect your Cricut with your MacBook.
Finally, you have paired your Cricut to your Mac.
To confirm, return to your Cricut Design Space and then Cricut New Product Setup. There, Cricut will show you that your device is connected during setup.
Cricut Explore Air 2 Bluetooth Connection on Mobile
Connecting your Cricut Explore Air 2 to your smartphone or tablet is also possible. All you need is a compatible device to install the Cricut app on it. Therefore, it is recommended that you use a compatible device only. If you are a Windows user, you must have Android 6.0 or later. If you are using iOS, you have to use iOS 11 or later.
Note: Your mobile device should be within the range of 10 to 15 feet from the Cricut machine.
For Android
Here are the simplified steps to connect Cricut to an Android phone using Bluetooth:
On your Android phone, swipe below and click the gear icon to open your Settings.
Once you have entered your phone Settings, go to the Bluetooth option.
Now, turn on your Bluetooth.
Wait and see until your device finds your nearby Cricut machine.
Once it finds the Cricut machine, you have to click on it to pair.
Finally, the Cricut Explore Air 2 Bluetooth connection is done.
For iOS
Here are the simplified steps to connect Cricut to an iOS phone using Bluetooth:
Go to your iPhone and open the Settings app.
Now, turn on the Bluetooth by tapping on the toggle button.
Wait and let your iPhone look for your Cricut model.
Once detected, click on it to pair.
Now, you have connected your Cricut to your iOS device in no time.
So, weren’t those steps easy for you? I think it would be much better for beginner crafters who will be connecting their Cricut for the first time. That’s all for this guide on the Cricut Explore Air 2 Bluetooth connection. Happy crafting!😃
FAQs
What do I need to connect my Cricut Explore Air 2 to computer?
If you are connecting your Explore Air 2 machine via Bluetooth, you need a computer with in-built Bluetooth features. You also need a Cricut machine of any model. In addition, you should have a flat surface like a table or a floor to position your machine. Despite this, if you are connecting your Cricut via Bluetooth, you should have a USB cable instead of Bluetooth.
Can I connect all Cricut models to Bluetooth?
Not all Cricut models have Bluetooth connectivity. The Cricut Explore, Cricut Maker Setup, Joy, and Venture series are easily connectable via Bluetooth because they have built-in Bluetooth. However, older Cricut models, like the Explore One machine, require a wireless Bluetooth adapter. In short, all Cricut models except the Explore One can be connected using Bluetooth.
Why is my Cricut not connecting?
If your Cricut machine is not connecting to your device, you might need to check the following points:
If you are connecting it to the USB cable, check whether your cable is damaged.
You can change the USB port on your computer. If the issue persists, you need to replace the USB cord.
If you use Bluetooth, ensure you have placed the device and machine within 10 to 15 feet of each other.
For more information: cricut.com/setup app cricut design space download
Source: Cricut Explore Air 2 Bluetooth Connection
#Cricut Explore Air 2 Bluetooth Connection#cricut explore air 2 setup#cricut explore one setup#how to setup cricut explore#cricut new product setup#cricut design space software#cricut design space download
2 notes
·
View notes
Text
How Do I Set Up My Cricut Maker? [Ultimate Guide]
Buying a new Cricut Maker can be overwhelming for all of us. Initially, setup can be daunting, but once you do it, you will love the overall process. However, you can easily set up any Cricut machine without needing much assistance.
The post is all about how do I set up my Cricut Maker. Through this write-up, we will see the items while unboxing the new Cricut Maker. Further, you will explore the Cricut Maker and its types. Afterward, we will explain the complete process of setting up your Cricut Maker machine.
What Do You Get in the Cricut Maker Box?
Unboxing a new product is always an exciting task. While unboxing the Cricut Maker machine, we got several items that we will be discussing here. However, you always have the option to select the bundles when you buy the machine from Cricut's official website.
Following are the items that you get in the box of the new Cricut Maker:
Apart from these, you will get the following:
The best thing is that we get the blades and tools along with the new Cricut machine. These blades allow us to try various products before buying more blades.
How Do I Set Up My Cricut Maker on a Computer?
When we talk about setting up Cricut Maker machine, it means we want to connect it to our devices like computers or mobile phones. However, there are certain ways to connect these machines to our devices. For example, we can connect our Cricut Maker to our computer or phone via Bluetooth or USB cable. So, it is the users’ choice to choose which way is the most suitable for them.
Below, we explain how to set up Cricut Maker. This method is only applicable for Windows or Mac users only:
How Do I Set Up My Cricut Maker on a Mobile?
Here's how to set up your Cricut Maker on Mobile devices with iOS or Android operating systems:
Cricut Maker is the most advanced and versatile in Cricut's lineup. However, the box contains various items that you can use to make several projects uninterruptedly. In this write-up, we explained the Maker and its features in detail. It helps the users to get an overview of machines so that they can use them without any hassle. After exploring the Maker cutting machine, the blog found out how do I set up my Cricut Maker.
FAQs
Question 1: Can I set up the Cricut Maker easily?
Answer: People think the setup is daunting, but this is not the case. Cricut machines are just like printers. The only difference is that Cricut has blades to cut. However, when you go through the notice period, you will find the setup is too easy and complete in less time. While setting up, you will need to download and install the Design Space app. This app will guide you through the further setup process, making it easy for beginners to set up the machine in one go.
Question 2: How do I connect my mobile phone to my Cricut?
Answer: Here, we are going to show you the method to connect your mobile device to the Cricut machine. Here, we are using iPhone or iOS devices. So, ensure you have an iOS device.
Question 3: Can I use the Cricut without its software?
Answer: No, you must use the Cricut Design Space app to send your design to your Cricut device. The machine is the companion for your Cricut cutting machine. Without this machine, you can't cut anything. However, the Design Space is essential for creating intricate designs and then sending them to the machine. Also, the app is the only way to maintain communication between your computer and Cricut.
Visit: cricut.com/setup
cricut.com/setup
Source: https://cricutmakersetup.wordpress.com/2023/10/21/how-do-i-set-up-my-cricut-maker-ultimate-guide/
#cricut explore air 2#design space setup#cricut maker#cricut.com/setup#cricut.com design space#cricut.com/create#cricut.com sign in#design cricut.com download#digital design
2 notes
·
View notes