#Non-Adhesive Materials
Explore tagged Tumblr posts
Visit Tumblr Blog
Explore Tumblr blogs with no restrictions, modern design and the best experience.
Last Seen Tumblr Blogs


Fun Fact
Total funding amounts to $125.3M.
Text
Fabric highlights: Microsuede


I get a lot of questions about material choices, so I thought it would be cool to do little overviews of my favorite materials! (since to be honest, i pretty much just rotate between 3-4 fabric types haha)
Starting with microsuede, my all time favorite and most used material choice. Microsuede is a faux suede made from lots of tiny polyester microfibers split and combined together. its similar in feel to natural suede but distinctly different in its overall fabric drape. It can sometimes have stretch, but usually its a non-stretch fabric. (also not to be confused with microfiber!! mircofiber fabric is similar but its much softer, its the material that cleaning wipes for glasses/screens are used of.)


Some of the advantages of microsuede is its a thick, sturdy fabric. Personally I find it a very friendly fabric due to its thickness and body. Its a great choice if you want something to have some heft to it and structural support. It presses well and can hold folds like the dickens. Its both easy to work with and easy to make a garment that looks nice out of imo. It comes in all kinds of weights from apparel to upholstery. I've personally never used heavy duty, true upholstery weight microsuede so I cant speak much to that, I tend to use microsuedes intended for apparel.

Another great advantage of microsuede is it has an inherent, mottled texture. this is great for making simpler, color blocked designs still have visual interest.


It also takes to adhesives well due to the fuzzier texture, meaning the glues can grisp with more surface area (you just might have to press it in a bit, its still a poly fabric so its not the easiest thing to get hot glue to stick to but by god it can be done).


But microsuede is not a one-size-fits-all fabric. One, the stiffness it has can be a downside if you want a more flowy drape, it would rather fold and crease than flow. Two, its a pain to paint or use HTV on, the fuzzy texture is a downside here. Three, It can also show needle holes if you have to seam rip depending on what you used. You can use a universal needle on microsuede dependings on the weight (I usually do). But its still a thick fabric so be sure not to use too thin of a needle, i also have luck using medium pressure and a walking foot. but all the same ive lost many a needle to microsuede via snapping.
Another thing is personally i find that due to its texture, it looks more homespun and rugged, as such I would hesitate to use it if i wanted a costume to look more regal or formal (i still used it on thistle though lol so its all about the particular use-case)
I source my microsuedes from Big Z primarily (like literally 90% of the time) but I also use fabric wholesale direct, and jo anns, who despite their markups does have some very nice quality suedes, i love their stretch suedes in particular.
I love microsuede. its probably my favorite fabric to use and I will even change my plans on a costume just to use it!
156 notes
·
View notes
Text
questions to answer about your tav that have nothing to do with baldur's gate at all and are dubiously set in some ambiguously modern period
(you can also answer these questions about unrelated non-baldur's gate OCs if you want because it is a free world that we live in)
what smiley face would they use the most if they had a phone
regular morning beverage (and snack) order
how lactose intolerant are they and if they were lactose intolerant would this stop them from consuming lactose products
if they went to a modern day university what would they get their bachelor's in and do they enjoy it
instrument they wish they could play but can't
hobby or interest they are most embarrassed about
do they watch free-to-air tv
do they collect anything and what is it
do they prefer sweet or savoury foods
what are they allergic to
story of their first kiss (if applicable)
if they were at a corporate or school-sanctioned group bonding event and someone asked them to say one fun fact about themself what workplace appropriate fact would they choose
signature perfume (you can name a real perfume or just name some fragrance notes)
how late do they leave their gift shopping before birthdays / christmas / any other event where gift-giving is required
what mundane human job would they have in modern society to pay the bills and do they like it
given a bag of fruit-flavoured candies which fruit flavour of candy is their favourite and which one do they vehemently dislike
pick a random mild injury illness or miscellaneous ailment for them to consistently or periodically struggle with (e.g. bad knee, hay fever, bad acne). or don't
everyday task they must do but struggle with or simply hate
their top 3 songs on repeat
preferred adhesive item for general use (e.g. gluestick, sticky tape, blu tack)
do they use duolingo and what's their longest streak
social media platform of choice, if any
what material do they prefer for their coasters
how do they close their emails
how do they address groups of people in group chats or in person
favourite farm animal. (has to be an animal found on a farm)
name a toxic trait of theirs that is really just a beige flag at best
movie snack, if applicable
if you dared them on the spot to get a tattoo and they're not allowed to think about it what would be the first thing that came to their mind
if you met them, you the human person reading this, would you get along
709 notes
·
View notes
Note
Hi, I was wondering if I could request a fic?
So where I work irl next door is a beauty salon and it's called Doll and Dash and has a comically large digital clock that you can see from the window when you peek in and has a gurney bed type thing I guess that is used for doing lashes. One of the big things is on a sign in the door it says and I quote "for the safety of our dolls we don't take walk ins" I find this salon to be very creepy
Anywho, I was wondering if you could write about a beauty salon that is a front for whumper to actually turn unsuspecting whumpees into real dolls. Including restraints, gags, non con drugs, and all the whumpy dumpy stuff.
Hi Anon! I would absolutely LOVE to write this for you! I hope I did it justice, here you go!

Dolled Up
Whumpee stepped inside the beauty salon. They had made the appointment about a week ago, and they were hoping the session would give them a confidence boost that, according to Caretaker, they sorely needed. As they opened the door, a bell rang and a beauty tech came to greet them.
“Hello hello, welcome to Dolled Up!” the tech said, smiling brightly, “what’s your name?”
“Whumpee,” Whumpee answered, “am I too early?”
“Whumpee, Whumpee…” the tech searched on their tablet, “ah! I see you right here. No, you’re right on time, come back with me please. Whumper is all ready for you.”
Whumpee shyly followed the tech through a door and into what looked like an operating room. Someone else approached them.
“Welcome, Whumpee,” the person said, “my name is Whumper, and I'll be taking care of you. Won't you sit down?”
Whumper gestured to a padded gurney. Whumpee had never been to a beauty salon before, so they supposed this was normal. They approached the gurney and sat down on it.
“So, um, how does this work?” Whumpee asked.
“Oh it's just as the name implies,” Whumper said, snapping on gloves, “can I offer you a drink? It's on the house.”
Whumper held out a glass of some kind of sparkling drink. Whumpee hesitated.
“It’s non-alcoholic, unless you'd prefer that of course,” Whumper giggled.
“Oh, in that case.” Whumpee took the drink and sipped it, “thank you.”
“You're very welcome, my dear.”
Whumper set about taking facial measurements of Whumpee. Whumpee tried to hold still, but they were getting very tired all of a sudden. They found themselves swaying to the side. Whumper slid a hand behind their back and gently lowered them onto the gurney, repositioning their legs so that they were completely laying down.
“There we go,” Whumper said, “now we can actually get started.”
“Wha…wha did you…?”
“Your eyes are stunning, and your hair is gorgeous, as is your complexion. Your attire however… it needs an overhaul. No doll of mine needs to dress like this.”
Whumpee should be panicking, and they were trying to, but whatever they had just drank was keeping them calm and pliant on the gurney.
“Assistant, please get everything ready,” Whumper said.
The beauty tech- if that was even their profession- nodded and locked the door. They went to a closet in the corner while Whumper started to strap Whumpee down to the gurney. Assistant came back with a tray of various materials and instruments.
“S-stop-" Whumpee pleaded feebly.
“Dolls don't talk,” Whumper said, tapping Whumpee's nose.
Assistant held Whumpee's mouth open while Whumper sprayed some kind of adhesive foam inside. It bonded to every surface of their mouth. Assistant then held their mouth closed while Whumper smeared a strong, clear adhesive over their lips.
“Mm! Mm!”
“Shhh,” Whumper said.
They wheeled Whumpee into the next room. It was a giant walk-in closet, filled to the brim with different clothes and accessories.
“Something to match their eyes,” Whumper said to themselves, looking at all the different racks.
They eventually pulled out a beautiful, lacy blue dress with matching Mary Jane shoes and hosiery. They also grabbed some blue ribbons and little lacy gloves. As they did so, Assistant took Whumpee's body measurements.
“That outfit should be a perfect fit,” Assistant said.
“I know it is,” Whumper said, “get them out of those clothes, won't you?”
Assistant nodded, wheeling Whumpee behind a curtain. They produced a body suit that was perfectly matched their skin tone. They removed the straps keeping them in place, then started to change them into the suit. Whumpee tried to resist, and in their drugged haze they also tried to remove the gag, but they were unsuccessful on both counts.
The suit was adhesive on the inside, the fingers were sewn together, and there was just one single zipper on the back that only someone not wearing it could reach.
“Mmm!” Whumpee vainly tried to pull it off, but it was stuck tight.
“There there, pretty doll,” Assistant cooed, cupping Whumpee's cheek.
Whumper came back and fitted the new clothes onto Whumpee. Everything was somehow perfectly tailored to them.
Assistant applied makeup to their face, even going so far as to put lipstick on over the clear adhesive.
“Now, let's get you in your display case,” Whumper said.
Placing them back on the gurney, Assistant and Whumper took Whumpee down an elevator into an enormous basement. There waiting for them was a large box that looked like the ones old china dolls would come in, only this was big enough for a human to fit inside. In addition, the box had several padded cuffs inside.
Whumper lay Whumpee in the box. Whumpee could barely move enough to try and climb out. Assistant started fixing the padded cuffs to their limbs and torso.
“Mmm…” Whumpee protested.
“I think they're ready,” Assistant said.
“I agree. Let's get them packed up.”
The clear lid of the box was sealed shut. Inside the box there could be heard the gentle hum of a vent. It dispensed both oxygen and more of the drug into Whumpee's system. The box was loaded onto a rolling cart and brought into a storage room. Rows and rows of boxes lined the room, each with a very high price tag. Whumpee’s box was set down next to another “doll’s”.
“Don't worry little doll, we'll find the perfect owner for you,” Whumper said.
That was the last thing Whumpee heard before drifting off completely.
Patreon
Ko-Fi
Redbubble
Tags: @mythixmagic @infinityshadows @fishtale88 @thelazywitchphotographer @the-beasts-have-arrived @princessofonwardsworld @surplus-of-sarcasm @memepsychowhowantsuperpower-blog @electrons2006 @just-a-space-rabbit @telltaletoad
@sorry-i-spaced
#whump#as requested#writeblr#writing#creative writing#snippet#drugging#kidnapping#restrained#gag whump#doll whump#dollmaker whumper#multiple whumpers#drugging whump
64 notes
·
View notes
Text
Since this response got out of hand, I'm giving it its' own post.
It's dangerous to ask a maker (artist?) about their processes @lonewolflupe @ulchabhangorm. But since you're curious, please accept my very first:
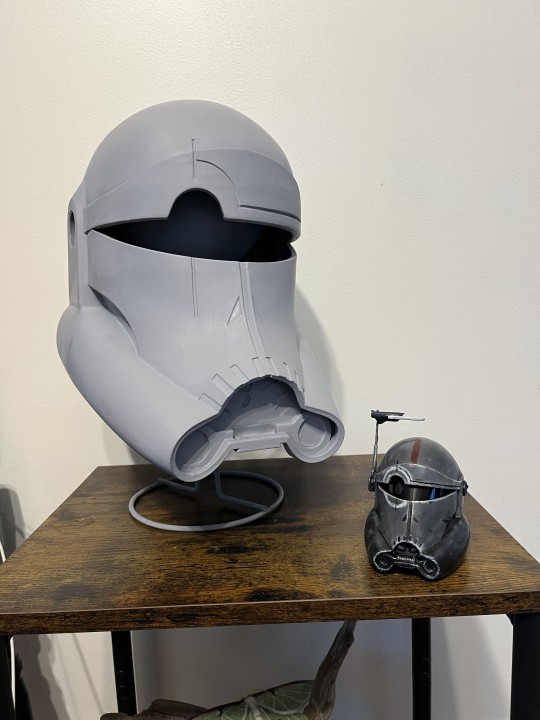
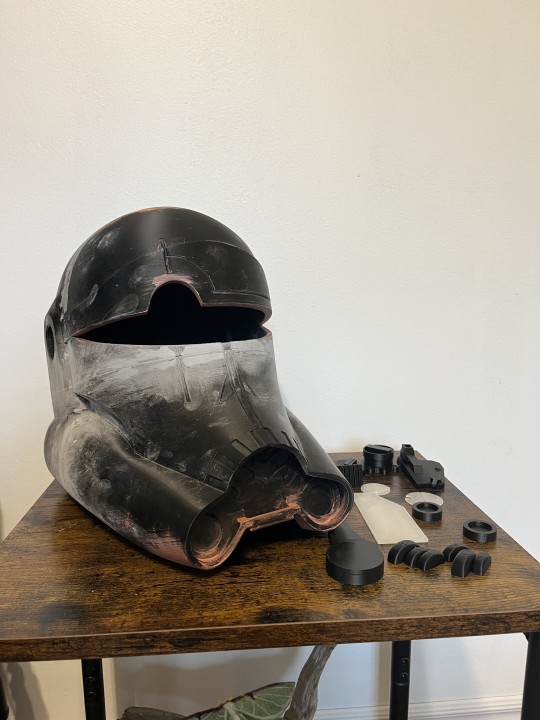
All of the pictured things were 3D printed by me on my FDM printer (Bambu Labs A1), including the teeny helmets. The non-helmet bits are pieces of Tech's armour. I'm currently building a Tech kit for 501st Legion approval. I "like" Crosshair and Scorch the most, but I am "most like" Tech. /sigh
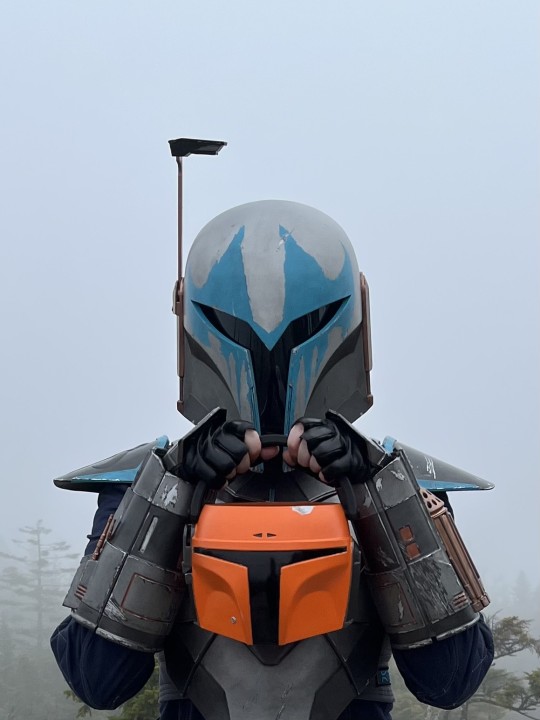
I do! (Mostly) All of the armour parts of Archers' kit were 3D printed and finished by me on my FDM printer, with the exception of my pauldrons which were resin printed by someone else, but finished by me. I initially began making the kit for a Halloween costume, challenged by a coworker to a work-Halloween costume contest, but ended up meeting a couple vode from the Mando Mercs club (MMCC). I was invited (gently coerced?) to complete the kit to their standards and join the club. I'm in that process now, but still have a few things to finish before I gain Official Member status. 🙂
I made a lil' Boba candy bucket!!
3. I mostly print with PLA+. I can print with PETG, ABS, and other materials but my printer is running inside a spare room and I'm not set up with an enclosure or awesome ventilation yet to print with materials which off gas more toxic VOCs. Although PETG would be stronger for a buy'ce that is going to be worn PLA+ works just fine for most folks who are not in very hot conditions. (PLA will sag and melt in high heat) . The first time I wore my full kit, I was at work, and did a full day of fieldwork in it. The whole kit survived apart from one of the thrusters on my jetpack which I accidentally busted off while putting it back in the kit box (adhesive failure, I should have used hardware but I was in a rush to finish it before Halloween) . All fixed now! PLA would be just fine for printing teeny and/or decorative helmets. Just don't toss full size ones onto the floor off of a shelf (ask me how I know).
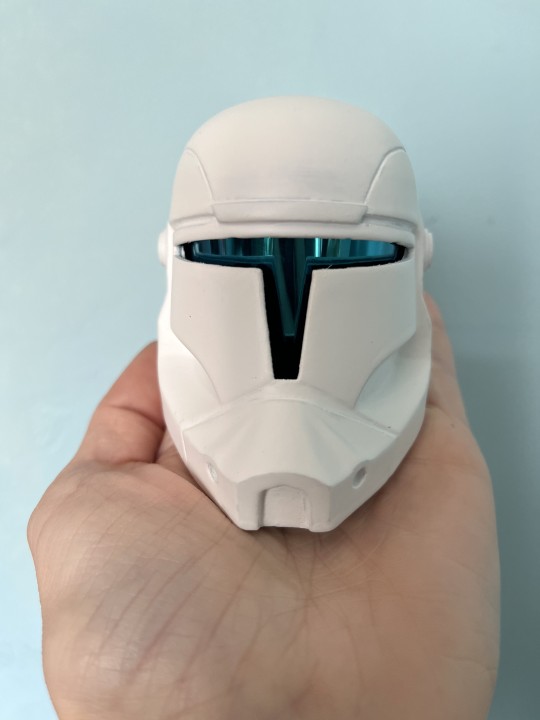
4. You can get STLs for clone helmets in all the places you'd expect (cults, thingiverse, etc) and from vendors on Etsy. Be careful, though, some of those files are stolen, and some are REALLY terrible and inaccurate. I usually avoid 'free' files, as for things as complex as helmets often end up being more costly in other ways, or are just not the quality I want. Galactic Armory has a nice selection of clone helmets (I have..... all of them. /embarrassment). Marko of Mystery Makers has really great Bad Batch (and other SW) helmets. He always tries to go a step beyond other modelers with his designs, both with functionality and accuracy. The Crosshair and RC helmet in my original post are both printed from Mystery Makers files. The RC helmet is the closest to the game design available, and the Cross helmet has a super cool functional rangefinder (like the different lenses are there and flip up and down, not just the whole rangefinder stalk moving). The Tech helmet is printed from Galactic Armory files, as are the rest (with the exception of Archers helmet which is AlterEgo, if I recall). The teeny helmets are printed from the full size files, just scaled down to 25%. I wouldn't' try to print these on an SLA/LCD resin printer, because the supports would be a nightmare I think, but it works just fine on an FDM printer. The most difficult part is printing the teeny greeblies for them which are super teeny at 25%. I almost always end up breaking the lil' rangefinder stalks, and am pretty sure I've lost the tusks for Rex's helmet more than once.
Cross WIP (Mystery Makers) with teeny (30%) Cross (Galactic Armory) 💙 Guess how many times I broke that teeny rangefinder stalk? Yeah. Four. 😖
Likewise, guess how many times I broke and lost the SUPER TEENY antennae on Tiny Tech's helmet? 😫
5. The visors in the full size helmets are generally welding/grinding replacement shields (Hobart brand, usually - available on Amazon). They are dark enough to obscure the wearers face and can be fairly easily cut to shape and installed. Tech's visor and goggle lenses are cut yellow acrylic, and in my original post still have the protective backing on them as they aren't 'officially' installed yet - which I why you can't see through them.
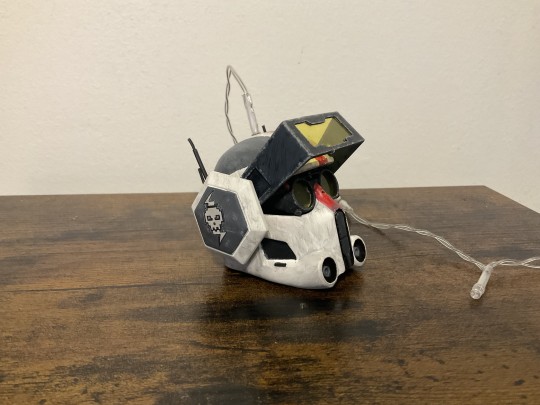
The visors for the full-size RC boys are more complicated. I believe the exact details of how I’ve been taught to do it are considered proprietary 🥺😏. To achieve the “Flirtation Mask” effect, two visors, a diffuser, and a strip of LEDs are installed in a very secret, not so secret, way. I’m working on a Scorch bucket, full size, and will have help to do this for the first time. Stay tuned. 😆 For the teeny helmets I use automotive window tint for the visors. It's easier to cut and bend into tiny shapes to fit inside the helmets. I got some blue stuff for the commando helmets, which should look cool once I install the lights. 😎
Teeny Gregor bucket WIP, with blue window tint FLIRTATION MASK 💙
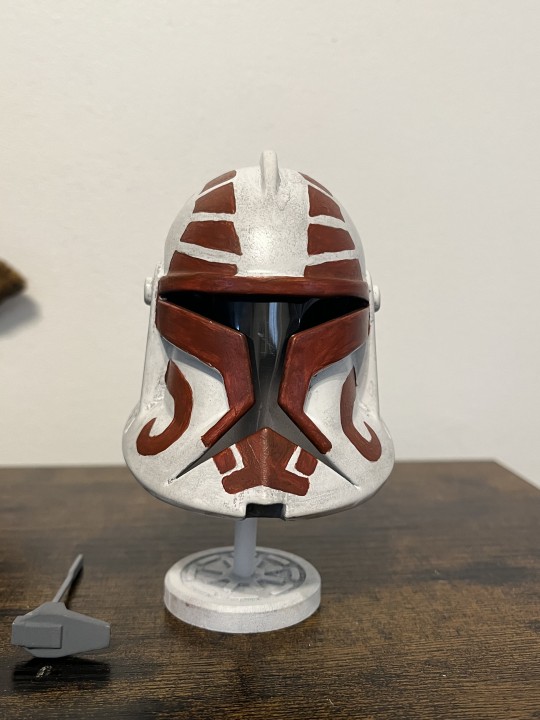
6. The lil helmet stand under teeny Keeli (which I'm making for @eobe) is printed from a file from Galactic Armory. It's been through the ringer, because I use it to hold all the little helmets while I'm spray painting them and letting them cure. It did look nice when it was newer, and has the republic cog on the base. There is also a wall-mounted version which I have printed to hang Archer's helmet. I'll probably make more for the other helmets eventually.
7. VPLs (Visible Print Lines) are the enemy! As an MMCC member, it has been drilled into me that VPLs are evil and must be vanquished with extreme violence. I try to finish everything (with the exception of the flexi things people keep asking me to make) to an excellent standard with no VPLs - including the teeny helmets.
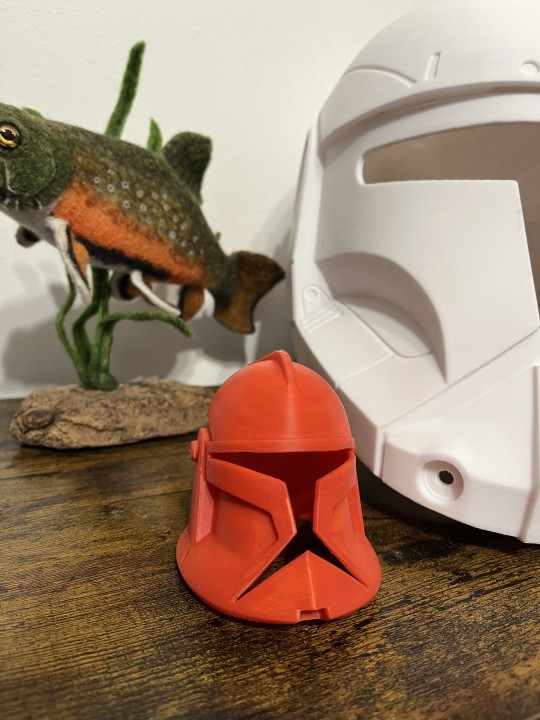
Raw Phase 1 (Animated) clone helmet and RC (Scorch) helmet). My printer does an excellent job, but still there are VPLs to be dealt with!
8. This question - how to get rid of VPLs could warrant it's own post. There are SO MANY techniques - some good, some NOT - but which ones you use depends largely on your print characteristics and what you intend to do with it. A lot of people lately have been recommending bathing the entire piece in a Bondo spot putty and acetone slurry several times until the lines are filled. I DO NOT recommend doing this for a piece that you intend to wear. I experimented with this and found out that after a small amount of wear the bondo likes to expel your paint in large chips, leaving ugly bondo-red spots behind. It would probably work ok for decorative pieces though. Other people have used UV curing resin to coat pieces to fill VPLs. It works, but UGH that stuff is toxic to touch and breathe, and it needs to be properly washed and cured, and cured some more. It's also much more difficult to sand than automotive body work products (which in all fairness are also toxic to breathe and touch - WEAR YOUR PPE).
My general process for armour pieces is to remove supports and then roughly sand (120 grit) only the really rough spots (like things that were overhangs or had a lot of supports). Sanding happens with a combination of sanding papers, sanding sticks, and needle files - depending on the piece. I then adhere pieces together (if they were printed in pieces like some of the larger full-size helmets) with plastic bonder. Seams are filled with Bondo plastic metal or EverCoat depending on the piece and I often plastic weld and staple the inside for strength. The seams are then sanded smooth. After I'm happy with the smoothness of the seams the entire piece will get 2-3 coats of automotive high-build filler primer (from a rattle can, though I have used the 1:4 mix stuff and brushed it on - I'd only recommend this with a large piece as that stuff REALLY fills things in quick - including the things you don't want it to) and a wet sand to 320 grit. At this point most of the print lines are filled, but stubborn areas, such as the top of the dome may still necessitate more coats. I generally end up applying 5 coats of filler primer, wet sanding between them. Following the final coat of filler primer, I'll wet sand again to about 400 grit (much more if we're going for the Beskar finish which needs a SUPER SMOOTH finish to work) and then put on a coat of regular primer. Black for helmets that will be dark (Most of the CF99 boys), and white for the other clone helmets. At this point they should be completely VPL free and ready for greebly installation and the "real" paint job. This process takes me at least a few days on full-size helmets as the paints have to cure between sanding and reapplication, and painting has to happen outside in good conditions. It's not inexpensive, but it is the most efficient and long-lasting way to do it, in my experience.
Cross helmet WIP. You can see the seam just under the visor cut out. This one printed in three pieces and needed ALL the seam filling and sanding. The pinkish and grey stuff are body fill products to fill in rough spots and seam lines. If you look at the last photo - of the same helmet - you can see they did a decent job of hiding that there was a seam. 😊
9. I use a lot of automotive products and paint. Since all my full size helmets are mean to be worn they need to be finished to a fairly high standard and be relatively tough. Archer's helmet body was finished entirely with Rustoleum brand filler primer and four layers of metallic paints (all rattle cans). The blue on the front was a Montana brand acrylic rattle can, and the copper parts (ear caps, rangefinder stalk) were enamel paint (Alclad copper) airbrushed on. The weathering - chips and scratches - were achieved by layering on a liquid latex medium between coats, so that when it was peeled off it revealed small bits of the coats beneath. It gives the damage a more realistic look than painting silver 'scratches' on after the fact. This liquid latex medium can be used to give the paint applied to clone helmets the chipped look to their painted designs as seen in the animation. It's a little more challenging to do in small scale though. After all the top coat paints are applied, I'll seal them in with a clear layer of satin or gloss sealant (rattle can). After that, I'll go over the entire piece with an acrylic black wash to make it look "dirty" and worn. 😅. After all that process, padding, visors, and electronics (HUD lights, fans, voice amps) are installed if needed. The whole thing is pretty time-consuming. I now understand why quality finished helmets cost as much as they do. My teeny helmets are all finished as I described above in the VPL section, but I use acrylics hand-painted on with a brush to apply the designs. In the animation versions of these helmets, particularly in TBB, the helmets all look like they've been (roughly) hand painted, so this technique works ok, I think. I apply the chipping and weathering at edges with dry brushing acrylics. I could apply a liquid latex mask and airbrush them, but eh. I'm using these little guys as fairy light "lanterns". They're super cute with the light showing a bit through the visors, particularly Tech. :)
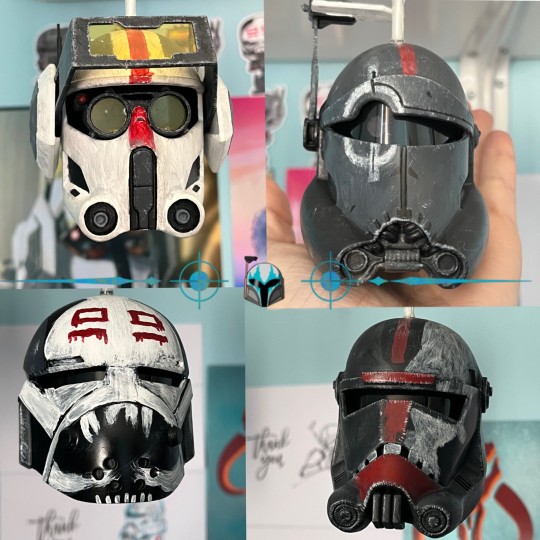
The Teeny Batch boys that I've got finished. Echo is coming, he just needs his top coat and weathering. :D
Lil' Keeli almost finished, with his unfinished rangefinder. Have not broken the stalk yet! /cheer 🎉
10. Acrylics brand? Hmm... I've used the Montana Gold rattle can acrylics which some of the MMCC mandos seem to like. I'm not sure if the ones I got were duds, but I wasn't super impressed. The cans did a lot of spitting and messed up my paint a few times. My brush on acrylics are Liquitex or Golden. Both can be thinned and airbrushed, and are more costly than cheap crafting brands but are more highly pigmented and last longer (plus the finish is nicer).
11. Base colour is whatever primer I finish with - white or black, depending on what color the final piece will be. For Mando helmets, the base colour is a metallic silver, so that when I peel off the liquid latex layers, the pint chips down to “bare metal/beskar”. Since clone helmets are plastioid, the base colour for them remains white or black.
12. I finish with a rattle can sealant. Satin finish usually, but that depends on the look you want. Always try to stick with the same brand of primer, paint, and sealant. Different brands have different chemistry - accelerants and so on, and can, and often do react with one another. The frustration of having to sand down a piece that was almost finished cannot be described.
To avoid paint heartache, always also paint in good conditions. Temperature, humidity, wind, etc can all ruin you day and paint job. Please also always wear your PPE!
13. Are they? I hope they are. They sure are a labour of love, and much work - but it makes me happy to make them and to look at them. 😅
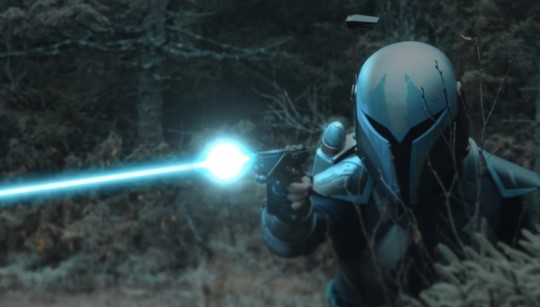
I'm very fond of Archer's buy'ce, and the whole kit really. It was the first one I 'finished' (every mando's kit is an ongoing WIP - forever), and the process of making it kept me focused on something positive during a rough time in my life. Wearing it is super fun! Ibic Manda!


WOW that got lengthy, so sorry! I had ALL the questions when I started, and a lot of the info you need is hard to find or in bits and pieces all over the internet. If you have any other questions, feel free to ask! I can only share my experience, but I have spent a huge amount of 2024 working on these for what that's worth. 🫣
#star wars#the bad batch#tbb crosshair#chaos squad#mandalorian oc#star wars oc#tbb#3d printing#tcw keeli#tcw gregor#tbb tech#tbb hunter#tbb wrecker#clone force 99#Archers Chaotic InfoDump Series
34 notes
·
View notes
Text
Mycotech: The Indonesian Startup Biofabricating novel materials from mushrooms

Called Mycotech Lab, the company was inspired by tempeh, the traditional Indonesian food made from fermented soybeans, and came up with its own technology to grow its ethical and carbon-friendly mycelium-based materials.

Mycotech Lab decided to experiment with the fermentation process used to make tempeh to make a new fabric out of the complex root structure of mushrooms, otherwise known as mycelium. It was a lengthy trial-and-error process that kicked off in 2016, but “finally, we found one mushroom with a mycelium that can be made into binding material,” said Erlambang Ajidarma, head of research at the startup, in conversation with Reuters.

The final product, developed with fungus grown on sawdust that then gets scraped off and dried and cut into different sizes, is Mylea, a fibrous but tough material that acts just like the real thing. It’s waterproof, pliable, durable, and most importantly, is far more sustainable than existing plastic-based synthetic leathers or carbon-intensive real leather made from hide.
Mycotech also uses natural dye extracted from roots, leaves and food waste in the region to colour their leather alternative, which again is a process that is far less polluting than traditional tanning processes used for real cowhide that leaves behind solid and liquid waste that contains chromium and other hazardous compounds.
Since its inception, Mycotech has managed to grow its client base with no marketing budget because the demand for sustainable alternatives has grown alongside awareness of the damaging effects of animal-based materials in the fashion industry.
We the Fungi

Bio Binderless Board | Sustainable non-adhesive binder board from Mylea™ byproduct to meet modern architectural and design standards
Biodegradable Solid-Composite | Utilizing mushroom mycelium that grows and is shaped into desired form and utilities.
#solarpunk#solarpunk business#solarpunk business models#solar punk#startup#reculture#indonesia#mushroom materials#materials innovation#solarpunk innovation
82 notes
·
View notes
Text
CIA Agent Nathanial Ford
Agent Nathanial Ford, a master of disguise at the CIA, sat at his meticulously organized workbench, surrounded by an array of tools and materials: silicone molds, fine human hair, a palette of skin tone pigments, and dental caps. His latest mission required him to infiltrate a high-stakes criminal syndicate in Moscow, Russia—a role that demanded not just linguistic fluency but an entire physical transformation to match.

The assignment was to pose as Dimitri Ivanov, a mid-level operator within the syndicate known for his dealings in illicit arms. Nathanial's task was to gather intelligence on the syndicate's connections with corrupt government officials. To become Dimitri, Nathanial would need to master not just the Russian language, but also the specific Moscow dialect, characterized by its sharp intonations and swift, clipping pace.
First, he focused on the facial hair. Years ago, Nathanial had undergone a beard transplant to enhance his ability to grow thick, authentic facial hair. For this role, he needed Dimitri’s signature look: a dense, well-groomed beard that was slightly graying at the edges. He began with a testosterone regimen weeks prior, ensuring his natural beard matched the density and style needed, then dyed it to achieve the perfect salt-and-pepper effect.
To achieve Dimitri’s receding hairline, Nathanial underwent a temporary hairline modification using a technique involving electrical follicle manipulation. This non-invasive procedure adjusted the growth patterns of his hair to mimic a receding hairline, creating a natural appearance without the need for prosthetics like a bald cap. He carefully blended his natural hair with additional strands that matched the texture and color of Dimitri’s hair, ensuring a seamless appearance.
Next, he prepared the ear and teeth prosthetics. Dimitri had distinctly large, lobed ears—a feature that could draw attention if not replicated accurately. Using silicone molds, Nathanial crafted oversized ear prosthetics that attached with special adhesive strong enough to integrate with his skin for extended periods. The teeth were another critical aspect; Dimitri had a noticeable gold cap on one of his upper molars. Nathanial created a set of dental caps, including the gold one, which could be worn comfortably for days and would withstand detailed scrutiny.
Adjusting his height was the next step. Nathanial was naturally 5'10", but Dimitri was known to be a slightly imposing 6'1". Using specially crafted shoe lifts that fit inside his boots, Nathanial managed an additional three inches without compromising his ability to walk naturally. This adjustment required Nathanial to practice Dimitri’s walk, which was a confident, slightly lumbering gait that suggested years of physical labor.
Once the prosthetics were ready, Nathanial applied them himself and tested them extensively to ensure they remained securely attached to his body. Sometimes, the prosthetics were worn for so long that his skin began to integrate with them, a testament to their durability and his commitment to the role.
The final touches involved accessories that would round out Dimitri’s persona: a vintage Soviet watch, a worn leather wallet containing family photos and membership cards to various local establishments, and a set of keys to a nondescript, slightly rusty Volga sedan.
As Nathanial reviewed his transformation in the mirror, fully morphed into Dimitri Ivanov, he practiced his dialect again, ensuring every inflection and nuance was just right. The reflection showed not a CIA agent, but a Moscow native, ready to delve deep into the dangerous underbelly of Russia's criminal world. His preparation complete, Nathanial was ready to step into a life that was not his own, armed with nothing but his wits and his impeccable disguise

#bodyswap#transformation kink#body possession#body transformation#male body swap#skin suit#body swap#undercover agent#disguise transformation#spies in disguise
59 notes
·
View notes
Text
PIN TUTORIAL.
So. You want pins of your favorite band/cartoon/oc/funny thing to put on backpacks/jackets/pants BUT you're broke and/or have no means to Acquire Pins. You find yourself thinking must Man do i need to make these???? And the answer is yes. Sadly, one either needs to purchase items to have items or make items to have items. I know, i know. It's unfair. It'll be alright, though. Fear not, beloved internet user, for i have The Easy Solution to Your Problem. For thee. Let me hold your hand passionately.
What you'll need is:

Safety Pins - you can buy them for hella cheap in packages with Many Of Them. I'm probably not from your country so you'll have to look for them yourself online or in a store) Pair of Scissors - for cuttin' Plastic - Any kind as long as it's thick enough. reutilize something that would go to the trash, if you can. I'm using an old fanta bottle i stole from dad's pepper pot from the garden. you could also used those hard ish plastics from boxes too or packages. It doesn't have to be transparent, but that's recommended. Some sort of Glue - I recommend hot glue. I did not, however, have hot glue, so I used a two-part resin for fixing pipes instead. If it works it works. You can use anything as long as it secures the safety pin to the plastic. The Pin Content - I'm using STICKERS. i bought 200 6 months ago and have many left overs. You could also use a drawing you made or a cutout from a magazine and tape it to the plastic with transparent packaging tape.
That's all you need. However, if you'd like to make your life a bit easier, it'd be nice to have in hand:
tape - for tapin' razorblade - for scrapin' pen - for Penin'
See. easy. doesn't need a lot. I must say that since i'm a craftsperson i have More Materials laying about than the average arguably human population, but that's pretty much it.
tutorial with pictures continues under the read more. selfie under read more too with them on a cool jacket. here are the results so you know what you're getting into. Ooooo you want to make pins so bad oooooooo

TLDR: glue Pin Content onto the plastic, glue the safety pin to that next. Pic IDs added.
STEP 1.
Stick the thing you want to pin on the plastic. I'm using stickers, but you can use the non adhesive stuff. You can tape a piece of paper to the plastic with transparent duct tape. Just make sure to leave a margin on all sides.

STEP 2.
turn the plastic sheet around. Mark where the Up part of the sticker is and where you want the safety pins to go. This part is optional, but it helps making sure you're not going to put the pins in the wrong position. I didn't do it on my last batch and they turned out fine.
STEP 3.
Secure the plastic to your work surface using tape to keep it still while you work. Again, optional, but it'll help keep the thing straight if your plastic is bent like mine.

STEP 4.
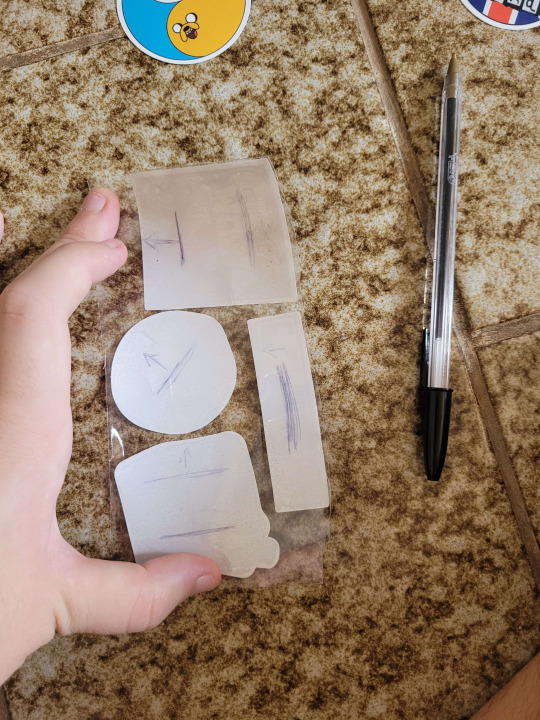
Scratch the surface of the plastic so whatever gluing method you use actually works. The surface shouldn't be smooth or else it'll be hard to glue. You can use anything to scratch it. I did a criss cross pattern as shown in the picture.

STEP 5.
Glue the pins to the scratched surface.
In my case it was done in two steps since the resin needed time to dry. I made a hard base to secure the pin and waited for two hours for that to dry. Then i put a small layer of resin over the part of the safety pin that doesn't open and waited for it to dry again.
This would be miles easier if you used hot glue. Just hot glue the pin to the plastic, making sure to keep the movable part free.


STEP 6.
Cut the pins! If you taped them to the plastic instead of using premade stickers then make sure to leave more plastic to the sides. so it doesn't fall off. They're done. You now have pins.

If you want to go above and beyond, you can cover the pin with a thin layer of clear nail polish to make it impermeable and more durable, but i'm all out of clear nail polish, so i didn't do it.
RESULTS PART 2.

That's it. That's all. Have fun!
#pins#enamel pins#DIY#adventure times#rock#alternative#grunge#punk#tutorial#art supplies#safety pins#cheap stuff#tutorials#artists on tumblr#diy craft#this took so many tries until i figured out the stupidest and easiest way possible to make it lmao#anyways yeah#enjoy#yayyyy
50 notes
·
View notes
Text
Cosplay ear fins tutorial
I made ear fins for an Eridan cosplay, and a lot of people asked how I made them. I haven’t seen anyone else doing the same method I used, so I thought I’d share.
I started out with some wire. I don’t know the exact gauge off the top of my head, but I don’t think it particularly matters as long as it’s thick enough to hold its shape but thin enough to shape with your hands/pliers. Cutting up a sturdy wire coat hanger would probably give you workable material.
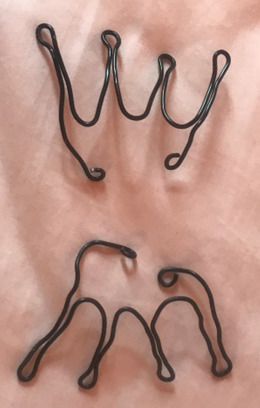
Here are the bases I made. I put some paper over my ears first and sketched a loose outline to get the size I wanted, but I didn’t end up following it too closely. It was mostly a lot of trial and error. I decided on four tines for each ear fin, but you could do a different amount or longer tines if you want. I used round nose and needle nose pliers to shape the wire, but I mostly used my hands and you could probably do this project without pliers if you don’t have them. The ends are curled to avoid stabbing myself in the ear with wire. You want the ear fins to go in front of your ears, and then the wire at the ends loops around the back of your ears to hold them in place. Getting this right took a lot of trying them on and adjusting them, but I eventually got them to where they would stay on without any adhesive but didn’t squeeze my ears too badly.
Next, cut up some old pantyhose/tights to get nylon material. You don't need too much material for this, so sock-style pantyhose would be enough. I happened to have some old tights with holes in them so I just cut out some non-holey pieces. I used black tights since it was the closest I had to gray. You’ll color over these later, but try to get a base shade as close to your desired ear color as possible to make things easier later on. I wouldn’t recommend buying new tights in the exact color you want since that’s expensive and wasteful, so you’ll probably be choosing between black, beige, and maybe white, but just keep in mind that you’ll have to color over it and the coloring method isn't completely opaque. Like, don't use black tights if you want white ears.
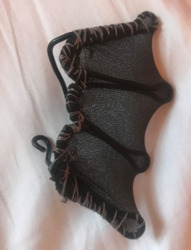
Stretch the nylon over the wire bases. I used a roughly square piece of nylon for each ear and folded it in half, then scrunched the excess to pull it tight and used binder clips to hold the material in place. Then use a thread in the color you want the ears to be and sew along the whole open edge of the nylon, anchoring it to the wire frame as shown below. Keep the nylon stretched tight over the tines while sewing so it has those divots in between tines. Cut off excess material and sew the raw edges down.
Try the ears on again and adjust as needed.
Paint the fabric with Mod Podge (I used matte but I think other finishes would work too.) Take extra care to spread the Mod Podge around the sewn edges to really glue things in place. Wait for the Mod Podge to dry on the nylon. This creates a hard, chalkboard-like surface that you can color on, but keeps some of the transparency of the nylon. I used a combination of chalk, pastels, and eyeshadow powder to color the ears. If you’re going for ears that match your skin tone, foundation powder would probably work. I was just using whatever art supplies I had around, but any powdery pigment should do the job.
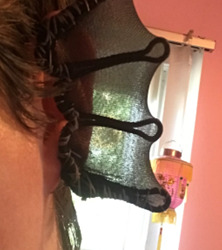
I started with white chalk all over the surface to lighten the black color into grey. Then I used white pastel to make highlight lines on the top of each tine and black pastel to make shadow lines below each tine. This added some definition and made the tines look more three dimensional. I filled the spaces between tines with some purple pastel, which I blended into the grey shade with my finger. I then put a layer of shimmery purple eyeshadow over it to give it a nice sheen.
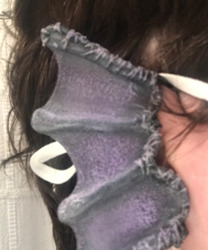
Once you’re done coloring the ears, seal the whole thing with some hairspray and you’re ready to go! You could probably also add some earrings to them if that’s the look you’re going for.
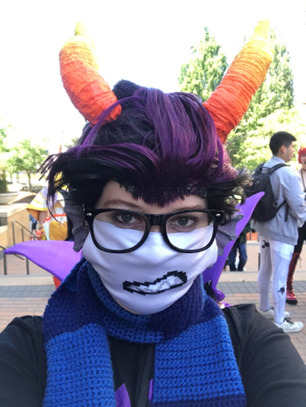
Here’s my final result! I was able to wear a mask with them and they were relatively comfortable to wear all day. Let me know if you have any questions and if you try this tutorial, definitely send me pictures of the results!
#cosplay#cosplay tutorial#cosplay tips#mermaid#sea dweller#eridan ampora#feferi peixes#the condesce#meenah peixes#homestuck cosplay#my posts#ear fins#undyne
115 notes
·
View notes
Text
Update on the fanbinding dissertation: surprise first bind!
This week, I met with the book conservator of my university's library, who used to organise (very popular) bookbinding workshops a few years ago. When I showed up with my list of questions on materials and techniques, she had a leftover bookbinding kit ready for me, so I technically bound my first book! Everything was already cut and measured, and I had both The Expert and a great powerpoint to help me do it, so my upcoming attempt at fanbinding still feels like its own thing, but this was officially the first hands-on moment of autoethnography for this project, and I'm so happy with my tiny tiny blank book 😌💜✨


The curator was incredible — she mentioned a few distinctions between bookbinding and conservation techniques (like hiding knots in the spine vs keeping knots easily accessible between the pages for future restoration needs), had tips on where to find supplies locally, and recommended two volumes I've added to my bibliography/reading list:
Johnson, Arthur W., The Thames and Hudson Manual of Bookbinding (London: Thames and Hudson Ltd, 1978)
Smith, Keith A., Non-Adhesive Binding: Books Without Paste or Glue, second edition (Fairport: Sigma Foundation, 1992)
#god i love libraries GO TO YOUR LOCAL LIBRARY AND TALK TO THE PEOPLE 💜#fanbinding dissertation#fan studies#fanbinding#bookbinding#research#dissertation#libraries#resources#tbr#autoethnography
18 notes
·
View notes
Text
✨INNOVATIVE MATERIAL - TALONGAMES PS5 Controller Grip Skin is designed for optimal touch with multi-textured grip, made from ultra-comfortable slip-resistant polymer material.
💕UNRIVALED QUALITY - Durable Controller Grips with an integrated molding structure ensure performance and longevity, providing full protection for your controller. [Note: Air out the grip sticker for 48 hours to eliminate odor.]
🎁EXCELLENT FEEL, PERFECT CUTTING - Maximum grip achieved through advanced 3D scanning and laser technology. The 0.6mm thickness offers a comfortable grip and supports your palm perfectly.
🎉EASY TO APPLY - Pre-cut Controller Grips can be applied in under 3 minutes using 3M removable adhesive, allowing for easy cleaning and replacement. Various options are available to meet user needs.
💖YOUR BEST CHOICE - Specially designed for the PS5 DualSense Edge Controller, aimed at enhancing your gaming experience! WARNING: The non-slip material inside the controller may leave residue; please stick according to your needs.
5 notes
·
View notes
Note
Do you have any idea on what materials one might use when making big fake feathers?
I'm currently thinking about some kind of polyester and non-glossy paint and then somehow drawing on the feathery texture. Do you have any thoughts?
One of the most successful techniques I saw was actually using EVA/cosplay foam!! There was this super impressive video of a woman who made ten giant wings for this Mother Miranda cosplay, and what she did was buy sheets of 1mm black cosplay foam, cut them into the feather shapes, then do the details by heat-pressing them (heating up EVA foam makes it pliable, so you can carve or imprint in details and textures. I've done it myself when I made an Ancient Egyptian deshret and chest piece). I believe she also used a dremel and a hot knife to shape the feathers in a more natural-looking way, but that's a more advanced technique and you can generally carve EVA foam (carefully!!) with a regular craft knife too.
I'd find you the video, but I saw it on TikTok two years ago and I no longer have a TikTok account. I'm sure you can still find the video by looking up "Mother Miranda cosplay wings" or something similar though, it was a really popular cosplay.
Once it's heat-pressed and textured, then you should be able to seal it and paint it.
As for painting, I'd recommend not using straight acrylic paint unless the feathers are going to be fairly immobile. Acrylic paint is cheap and great for colors, but can crack when the material is moved or bent. Instead, mix acrylic paint with a quick-drying adhesive (SFX artists use a medical adhesive called Pros-Aide, but craft glue should work too) in about a 40:60 to 30:70 ratio (less paint, more glue). This will retain the pigments of the paint, but will make it more flexible and pliable when dry, and less likely to crack. If you're using a glue that dries clear, though, make sure to mix your colors before adding the glue, since the white glue will lighten the pigment when wet but will dry darker.
You could also try airbrushing the paint on (either with actual airbrush paints, or very diluted acrylic) for a softer, more natural look, but that obviously hinges on you having an airbrush and I have no idea if you do.
That's what I can offer now, though i might have more suggestions if you gave me a few more details about the project? And what resources you have available to you? Different materials are good for different things (does it need to last a while or is it just for one event? is it meant to be functional or just decorative? if it's a cosplay, are you recording a video or walking around a convention with it?) and there's a lot of tech-MacGyvering that can be done when you're working with limited resources, but I have to know what those resources are first lol.
8 notes
·
View notes
Text

Bio-inspired materials showcase potential for protective equipment and textiles
Bio-inspired materials (BIM) are synthetic materials whose structure and properties are similar to natural materials or living matter. These materials have the potential to advance structural materials, textiles and protective equipment due to their durability and self-healing properties. Dr. Vanessa Restrepo, assistant professor in the J. Mike Walker '66 Department of Mechanical Engineering, and her team at the Bio-Inspired Materials (BIM) Lab aim to create bio-inspired materials with enhanced behaviors by focusing on the nature of proteins to develop the sacrificial bond composites (bonds that break before the main structural link is broken) utilizing non-linear adhesive materials. This article was published in Materials & Design.
Read more.
10 notes
·
View notes
Text
The Structural Structure Of The Aluminum Honeycomb Perforated Acoustic Panel Is A Perforated Panel And A Perforated Back Panel
Acoustic panels are classified by structure
① Sound-absorbing tip
Sound-absorbing wedge is a special sound-absorbing structure material for strong sound-absorbing field. It is formed and cut by porous (or fibrous) material to make a cone or wedge-shaped sound-absorbing body, which is firm and not deformed. The sound-absorbing wedge is suitable for strong airflow environments. The main object is high-quality anechoic chambers. The absorption of low frequencies is more effective, and it can eliminate standing waves and meet the requirements of eliminating echoes. The low-cut-off frequency sound absorption coefficient is greater than 0.99. Compared with ordinary sound-absorbing wedges, V-shaped and W-shaped sound-absorbing wedges made of polyester have the characteristics of small size and more reasonable price.
② Diffuser
In addition to all the functions of a flat sound-absorbing board, the diffuser sound-absorbing board can also conduct sound waves at different angles through its three-dimensional surface, eliminating the blind area of sound waves during the diffusion process, improving sound quality, balancing sound, thinning accents, and weakening treble , to compensate for the bass.
product structure:
A three-dimensional triangular or cylindrical groove is opened on the front of the MDF, and a structural sound-absorbing material with a circular hole on the back, the surface is painted (color can be selected according to customer requirements), and the fire-proof sound-absorbing cloth is pasted on the back.
Application range:
TV station, cinema, opera house, concert hall, conference center, gymnasium, audio room, home, shopping mall, hotel, karaoke, lounge, restaurant, etc.
③Aluminum honeycomb perforation
The structural structure of the aluminum honeycomb perforated Acoustic panel is a perforated panel and a perforated back panel. The aluminum honeycomb core is directly bonded to an aluminum honeycomb sandwich structure by high-quality adhesives. A layer of sound-absorbing cloth is pasted between the honeycomb core, the panel and the back panel. Because the honeycomb core in the honeycomb aluminum panel is divided into many closed cells, the air flow is blocked, the sound wave is hindered, the sound absorption coefficient is increased (can reach more than 0.9), and the strength of the sheet itself is improved, so that the size of a single sheet can be Make it bigger and further increase the degree of freedom of design. According to the indoor acoustic design, different perforation rates can be designed, and the sound absorption coefficient of the combined structure can be controlled within a certain range, which not only achieves the design effect, but also can reasonably control the cost. By controlling the perforation diameter and hole distance, the perforation rate can be changed according to the customer's requirements. The maximum perforation rate is less than 30%. The hole diameter is generally ∮2.0, ∮2.5, ∮3.0 and other specifications. The perforation requirements for the back panel are the same as those for the front panel. High-quality non-woven and other sound-absorbing materials.
Previous: Acoustic Panels Are Classified By Structure
Next: How To Install Acoustic Panels? How To Fix It On The Wall?
2 notes
·
View notes
Note
i'd love to know #9 or #20 for the bookbinding ask meme (or whatever you want to answer!) 💕 love your work!
thank you! 🥰
9. How would you describe your binding style?
I was going to say 'chaotic!' because it feels like I jump between binding types and styles all the time, and then I thought about it, and actually I think I'm going to say: minimalist
I like very simple, pared back designs, so many of my HB bindings are full cloth bindings - out of something like 30 hardbacks I've done maybe 7 as semi or quarterbound (don't quote me on that, I haven't counted) - for a simple look. I like pairing an unassuming outer with a flashy endpaper. I also like doing self-ended books a lot, in which case the endpaper is the same paper as the text block, and funny enough those hardbacks tend to have a little bit more going for them on the outside. :) my paperbacks and pamphlets are also all very simple, and I looove doing pamphlets because there's no glue involved and I can put one together in an hour (or the length of about 1 episode of some tv show in the background). on rare occasions I get an idea for a full out flashy binding but what I consider 'full out flashy' is often still very minimalistic compared to what a lot of other binders are doing!
20. If you had to give past!you one advice about bookbinding what would it be, and is it the same advice you give newbies?
when I wrote this question I didn't think I'd have to answer it myself, lol. I feel like I'd absorbed enough advice from other binders before I started, and also thought a lot about what would be sensible (as this is not the first time I've thrown myself head first into a new crafting hobby) that I don't really feel like I need to give my past self any advice. however, what I will say and what I do say to everyone who's ever approached me about getting into bookbinding: do NOT stress about tools or materials or about making the first book perfect!
bookbinding tools can be DIYed the whole way through, and you can use your shitty copier paper to print on or repurpose paper from an old notebook or you can straight up take apart an old hardback that you were going to bin anyway and re-use the boards. the only things you truly need in order to get started are:
sharp knife
something to punch holes with (stick a needle in a cork and glue a coin on the other end, voilà)
thread of some kind, and a sewing needle
adhesive of some kind
some kind of board (backs of notepads or sketchpads, will do)
perhaps some wrapping paper to use as covering material
some kind of working surface (for over a year I just used my bed. I currently use my floor.)
for a press, put the book under a stack of heavy books. couple of bricks. bag of rocks. sit on it. I got cheap chopping boards from ikea and a set of G clamps (F clamps also popular).
everything else is just icing on the cake. my first books were usable, not pretty. some of my first books I never showed anyone because they were both ugly and non-functional as books.
for me the goal is to have fun making something, learning new binding methods as I go, and building a physical archive of fics I've enjoyed. I don't need every binding I make to be a masterpiece, I need it to be functional and hold up to the sands of time. for me, simpler is often better.
20 questions about bookbinding ask meme
17 notes
·
View notes
Text
Step-by-Step Guide on How to Roll the Perfect Joint for Beginners
Rolling a joint is one of the most popular and classic ways to enjoy cannabis. For beginners, learning how to roll the perfect joint can feel intimidating, but with a little practice, you'll soon be rolling like a pro. This step-by-step guide will help you master the basics of Rolling joints, ensuring a smooth, even burn and an enjoyable smoking experience.
What You'll Need to Roll a Joint
Before we dive into the steps, make sure you have the following materials on hand:
1. Rolling Papers
The right rolling paper is key to rolling a perfect joint. You can choose from different materials like hemp, rice, or wood pulp. For beginners, hemp papers are a great choice because they’re sturdy and easy to handle. Start with 1 ¼ size papers, which are ideal for standard joints.
2. Cannabis
You'll need your preferred strain of cannabis. Grind the cannabis evenly so that it burns smoothly and consistently.
3. Grinder
A grinder will help break down your cannabis into an even consistency, which makes rolling easier and improves the burn of your joint.
4. Filter/Crutch (Optional)
A crutch, also called a filter or tip, adds structure to your joint and prevents loose pieces of cannabis from getting into your mouth while smoking. You can make your own filter from a small piece of thick paper or buy pre-made filters.
5. Flat Surface
A clean, flat surface to roll on will help you keep things tidy and organized.
Step-by-Step Guide to Rolling the Perfect Joint
Step 1: Grind Your Cannabis
Start by grinding your cannabis. Use a grinder to break it down into a fine, even consistency. If you don’t have a grinder, you can break the cannabis apart by hand, but this can result in uneven pieces that may cause the joint to burn unevenly. Aim for a fine but not powdery texture.
Step 2: Fill Your Rolling Paper
Once your cannabis is ground and your filter is ready, take your rolling paper and place it on a flat surface or in your hands. Hold the paper with the adhesive strip facing up and toward you.
Sprinkle your ground cannabis evenly along the length of the paper. If you’re using a filter, place it at one end before adding the cannabis.
Aim to distribute the cannabis evenly, with slightly more in the middle. This helps create a cone shape, which is easier to roll and provides an even burn.
Step 3: Shape and Roll the Joint
Now it’s time to start rolling. Gently pick up the paper and cannabis, holding it between your fingers. Use your thumbs to start shaping the joint by rolling the paper back and forth between your fingers.
This motion helps pack the cannabis evenly and creates a cylindrical or cone shape, depending on how you distribute the weed. Take your time with this step; the more even the shape, the better your joint will burn.
Once the cannabis is shaped, begin tucking the non-adhesive side of the paper into the roll. Carefully roll the paper around the cannabis, keeping it tight but not too tight, as this can restrict airflow and make the joint difficult to smoke.
Step 4: Seal the Joint
After you’ve rolled the paper around the cannabis, it’s time to seal the joint. Moisten the adhesive strip with your tongue and press it down to seal the joint. Be sure to moisten the adhesive evenly to avoid gaps, which could cause the joint to unravel.
After sealing, use your fingers to gently pack the joint by tapping the filter end against a hard surface. This ensures the cannabis is evenly distributed and packed tightly for an even burn.
Step 5: Twist the End
Once the joint is sealed, twist the open end of the joint to close it. This prevents the cannabis from falling out and helps keep the joint tightly packed. You can twist it tightly for a slow burn or leave it slightly loose if you want the joint to burn more quickly.
Step 6: Light and Enjoy
Your joint is now ready to smoke! Hold the joint by the filter and light the twisted end while taking a gentle puff. Rotate the joint as you light it to ensure an even burn. Once it’s lit, inhale slowly and enjoy.
Pro Tips for Rolling a Perfect Joint
Start Small: As a beginner, try rolling smaller joints with less cannabis until you get the hang of it. This will make it easier to practice your technique.
Use a Grinder: Grinding your cannabis ensures a more even consistency, which results in a smoother, more consistent burn.
Don’t Roll Too Tight: While you want your joint to be firm, rolling it too tight can block airflow, making it difficult to smoke. Aim for a balanced roll that allows air to flow smoothly.
Practice Makes Perfect: Rolling a joint is a skill that improves with practice. The more you roll, the better your joints will get, so don’t be discouraged if your first few attempts aren’t perfect.
Conclusion
Learning how to roll the perfect joint is an essential skill for any cannabis enthusiast. With a little practice and patience, you’ll be rolling smooth, even joints in no time. Remember to choose the right papers, grind your cannabis evenly, and take your time shaping the joint. Whether you're rolling for a solo session or to share with friends, a well-rolled joint will enhance your smoking experience and allow you to enjoy your cannabis to the fullest. Happy rolling!
2 notes
·
View notes