#Image Preprocessing
Explore tagged Tumblr posts
Visit Tumblr Blog
Explore Tumblr blogs with no restrictions, modern design and the best experience.
Last Seen Tumblr Blogs


Fun Fact
Tumblr has a 66 index score for customer satisfaction in the US.
Text
#Object Detection#Computer Vision#Object detection in computer vision#object detection and image classification#Image Preprocessing#Feature Extraction#Bounding Box Regression
0 notes
Text
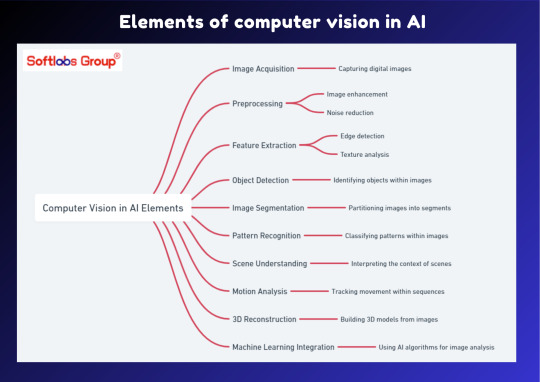
Explore the fundamental elements of computer vision in AI with our insightful guide. This simplified overview outlines the key components that enable machines to interpret and understand visual information, powering applications like image recognition and object detection. Perfect for those interested in unlocking the capabilities of artificial intelligence. Stay informed with Softlabs Group for more insightful content on cutting-edge technologies.
0 notes
Text

"Forgive me, Father, I have sinned."
Cardinal!Thrawn
See all images on Patreon
Our process involves refining images to achieve a desired outcome, which requires skill. The original images were not of Thrawn; we edited them to resemble him.
#star wars#thrawn#grand admiral thrawn#satire#ai images#parody#au#thrawn thursday#patreon#photoshop#preprocessing#post processing#art by pm
14 notes
·
View notes
Text
it is in times like these that it is helpful to remember that all of medical science that isn't like, infectious disease, but PARTICULARLY psychiatry is a bunch of fake ass idiots who dont know how to do science, and when you hear about it on tiktok, it's being reinterpreted through somebody even dumber who is lying to you for clicks. as such you should treat anything they say as lies.
u do this wiggle because it's a normal thing to do.
anyways i looked at this paper. they stick people (n=32) on a wii balance board for 30 seconds and check how much the center of gravity moves. for AHDH patients, it's 44.4 ± 9.0 cm (1 sigma) and for non ADHD patients its 39.5 ± 7.2 cm (1 sigma)
so like. at best the effect size is 'wow. adhd people shift their weight, on average, a tiny bit more than non-adhd people, when told to stand still'.
in summary, don't trust tiktok, and:


every once in a while i learn some wild new piece of information that explains years of behavior and reminds me that i will never truly understand everything about my ridiculous adhd brain
#they scan the brains also but 1) the effect is weak 2) the analysis isn't blinded at all so#i don't know enough about brain imaging but if it's anything like 2d image analysis#i could get whatever result you wanted at any strength by changing how i preprocess the data.#and frankly. the neuroscience psychiatry people don't give me a lot of hope that they know or understand that
60K notes
·
View notes
Text
DXO Pure Raw 4
Comparing DXO Pure Raw 4 to Topaz Photo AI version 2.4 in my real world comparison using it as a pre-processor to Adobe Camera Raw and Photoshop. The Problem Unfortunately it has come to my attention that all of my software licenses are expiring this month. That includes DXO Pure Raw 3, and all the Topaz products including Gigapixel, and Photo AI. The two stand alone products Sharpen AI and…

View On WordPress
#books for sale#Colorado photography books#Colorado wall art#DXO#DXO Pure Raw#DXO Pure Raw 4#photo preprocessing#photography books#photography software#Pictures for sale#preprocessing#raw image conversion#raw images#raw photography#raw processing#Software#software testing#sofware comparison#Topaz 2.4#Topaz Photo AI 2.4
0 notes
Text
finally went and started looking into nightshade because it sounds. dubious. apparently the project's full title is "nightshade: protecting copyright". it is absolutely wild that a bunch of internet communists saw that and went "yeah this is a good thing, we should totally rally around this"
#txt#copyright law hardly benefits individual artists.#it DOES benefit companies like disney‚ warner brothers‚ etc. that already have copyright over all the art they would ever need.#yknow ~the billionaires~ and ~the corporations~ y'all like to harp on about? that's them.#even if you think this endeavor is worth it.#this team does not have your best interests at heart.#anyway i say it's dubious bc#1. i am VERY skeptical of the idea that enough data will be 'poisoned' to make a difference#2. ive seen computer vision ppl point out that perturbations like nightshade's can be overridden with just basic preprocessing#(like resizing images) that scientists would be using before training anyway.#‘ai’
1 note
·
View note
Text
updated stage settings: (that literally no one asked for!)
assumes knowledge of photoshop and a working vapoursynth. if you don't use vs, you can replicate with mpv - though sharpening will most likely need to be stronger, since i use finesharp in vs.
when using mpv/screencaps, i recommend importing as a dicom file! it loads faster and is a little clearer in my opinion. when using screencaps, only crop once. if you need to change the dimensions, zoom, etc., i would undo to the full size you imported at or it will lower your quality.
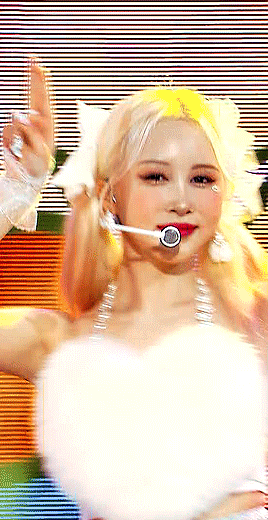
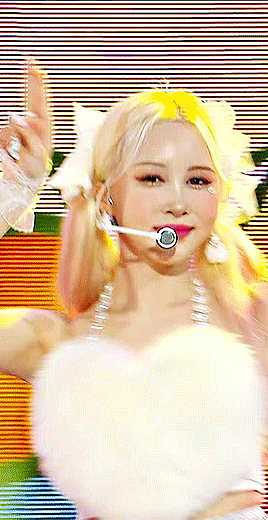
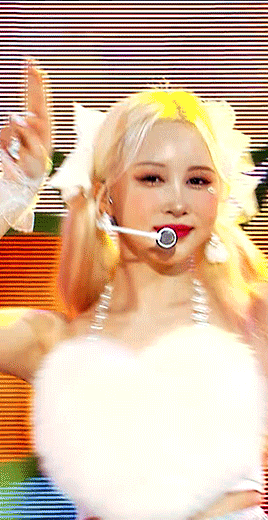
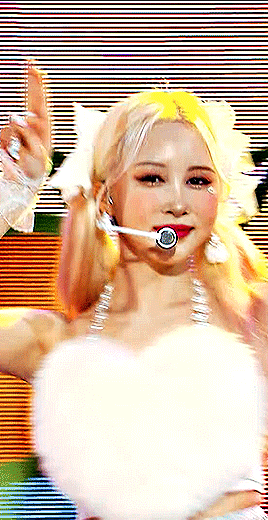
examples: an ending fairy of cravity's seongmin, and a typical stage set gif (using a close-up) of tripleS's kaede. shows the steps, effects, and goals of sharpening and coloring, but does not share psds or actions since i recommend using your own unique sharpening and coloring style. psds cannot be provided (i didn't save them) but i will share my actions if asked to! the actions i used are the two i almost always use (with a few exceptions) on stage gifs.
no keep reading because it ruins formatting (2 images side by side), so apologies for the incredibly long post!
ending fairy:
run through vapoursynth, resized (540 x 420) and sharpened with finesharp set to 0.7 (the last # in the fs code). not preprocessed, as i wanted the normal speed and exported it with a .04 frame delay!

sharpened using my stage sharpening action (4 diff smart sharpens)

colored using levels (using the eyedropper on what i want to be pure black), and curves (done to add contrast, using only the rgb channel)

colored (prev step still visible) using exposure, with the exposure upped and gamma around .90. also used brightness and contrast to get the look i wanted, while also keeping highlights in a range that i can edit (going too bright or too high contrast makes my later adjustments less effective)

colored (prev steps visible) using hue/saturation (adjusting the hue, saturation, and lightness (to the negatives) of reds and yellows), and selective color (fine-tuning tone of reds and adjusting whites)

colored (prev steps visible) using selective color (adding back some white and adding cyan to it), and hue/saturation to further fine-tune (red + yellow), and brightness and contrast to get the final brightness and contrast/clarity i wanted.

the original (resized and with vs finesharp) masked over the finished

close-up:
run through vs, resized (268 x 490), preprocessed 60fps slow, and sharpened with a finesharp of 0.7


sharpened using my master mv sharpening (i changed the gaussian blur 500 from .04 to .03, + the unsharp mask is set to 50% opacity)

colored using levels (on what i want to be pure black, her hair by her ear in this case), and curves (unlike seongmin's which just adjusted rgb, i also changed the blue and green channels! i do this when it is not an ending fairy but several close-ups to try to make the coloring more consistent across lighting changes (i also do it on more challenging lighting from other sources))

colored with exposure (prev steps visible), with exposure upped (+) and gamma adjusted (~.90), and brightness and contrast to get the look i want (same highlight forethought as before)

colored (prev steps visible) with hue/saturation (adjusting hue, saturation, and lightness of reds and yellows), selective color (fine-tuning tone of reds and adjusting whites)

colored with selective color (adding back whites and adding cyan to them), hue/saturation to further fine-tune, and brightness and contrast to get the final look and clarity

optional, but nice for multi-shot sets: another hue/sat above your last brightness contrast, only adjusting background colors for cohesion when paired with the other gifs of the set


also optional: change speed to be faster, depending on the look you want. i tend to use ezgif.com/speed and do 105% speed
the original (resized, vs finesharp, preprocessed to 60fps slow) masked over the finished gif. the one on the right has been adjusted with ezgif at 105% speed


14 notes
·
View notes
Text
Top 7 AI Projects for High-Paying Jobs in 2025
7 AI Projects for High-Paying Jobs in 2025. Along the way, I’ve realized that the best candidates for AI and Data Science roles aren’t always the ones with top degrees or fancy universities. It’s the ones who show a genuine passion for the field through creative projects.
For example, one candidate built a personal stock prediction model to learn and shared it online—simple but impactful. These projects showed initiative and problem-solving skills, which hiring managers value more than technical expertise. I landed my first internship by showcasing similar projects.
In this article, I’ll share AI project ideas ideas for High-Paying Jobs that will help you stand out, along with tips and tools to get you started on your journey.
Table of Contents
1. Credit Report Analysis Using AI
Traditional credit scoring models often fail to assess those with thin credit histories, such as young people or immigrants. The dream project is to create an AI-based credit report analysis system leveraging alternative sources of existing data like the presence of social media (ethically and considering user consent), online transaction history, and even utility bill payments to provide a comprehensive perspective on an individual’s creditworthiness.
Example
Many companies in the financial sector use AI to speed up document processing and customer onboarding. Inscribe offers AI-powered document automation solutions that make the credit assessment process easier. Your project would involve:
Data Collection & Preprocessing: Gather data from diverse sources, ensuring privacy and security.
Feature Engineering: Identify meaningful features from non-traditional sources.
Model Building: Train models such as Random Forest or Gradient Boosting to predict creditworthiness.
Explainability: Use tools to explain predictions, ensuring transparency and fairness.
The frameworks and tools for this project would include Python, AWS S3, Streamlit, and machine learning techniques, offering a deep dive into the combination of AI and financial systems.
2. Summarization with Generative AI
In today’s information-overloaded world, summarization is a vital skill. This project demonstrates the power of Generative AI in creating concise, informative summaries of diverse content, whether it’s a document, a financial report, or even a complex story.
Consider a tool like CreditPulse, which utilizes large language models (LLMs) to summarize credit risk reports. Your project would involve fine-tuning pre-trained LLMs for specific summarization tasks. Here’s how to break it down:
Generative AI: Explore the key challenges in summarizing large, complex documents, and generate solutions using LLMs.
Training the Model: Fine-tune LLMs to better summarize financial reports or stories.
Synthetic Data Generation: Use generative AI to create synthetic data for training summarization models, especially if real-world data is limited.
By taking on this project, you demonstrate expertise in Natural Language Processing (NLP) and LLMs, which are essential skills for the AI-driven world.
3. Document Validation with Vision AI
Know Your Customer (KYC) processes are essential for fraud prevention and adherence to financial regulations. This is a Vision AI project that automates the document validation in the KYC process. Think of things like AI-powered Optical Character Recognition systems that scan and validate details from documents like your passport or driver’s license. This project would involve:
Data Preprocessing: Cleaning and organizing scanned document images.
Computer Vision Models: Train models to authenticate documents using OCR and image processing techniques.
Document Validation: Verify the authenticity of customer data based on visual and textual information.
This project demonstrates your expertise in computer vision, image processing, and handling unstructured data—skills that are highly valuable in real-world applications.
4. Text-to-SQL System with a Clarification Engine
Natural language interaction with the database is one of the most exciting areas of development in AI. This works on a text-to-SQl project that will show us how to make a text to an SQL query, with which we will be able to query a database just the way we query it. The Clarification Engine, which you’ll build to address ambiguity in user queries, will ask follow-up questions whenever a query is ambiguous. The project involves:
Dataset Creation: Build a dataset of natural language questions paired with SQL queries.
Model Training: Use sequence-to-sequence models to convert natural language into SQL.
Clarification Engine: Develop an AI system that asks follow-up questions to resolve ambiguity (e.g., “Which product?”, “What time frame?”).
Evaluation: Test the model’s accuracy and usability.
Incorporating tools like Google Vertex AI and PaLM 2, which are optimized for multilingual and reasoning tasks, can make this system even more powerful and versatile.
GitHub
5. Fine-tuning LLM for Synthetic Data Generation
In such situations where there is no or extremely limited access to real data due to sensitivity, AI data becomes indispensable. In this project, you will tune an LLM to generate synthetic-style datasets using the nature of a real dataset. This is a fascinating space, particularly since synthetic data can be used to train AI models in the absence of real-world data. Steps for this project include:
Dataset Analysis: Examine the dataset you want to mimic.
LLM Fine-tuning: Train an LLM on the real dataset to learn its patterns.
Synthetic Data Generation: Use the fine-tuned model to generate artificial data samples.
Evaluation: Test the utility of the synthetic data for AI model training.
This project showcases proficiency in LLMs and data augmentation techniques, both of which are becoming increasingly essential in AI and Data Science.
6. Personalized Recommendation System with LLM, RAG, Statistical model
Recommendation systems are everywhere—Netflix, Amazon, Spotify—but creating a truly effective one requires more than just user preferences. This project combines LLMs, Retrieval Augmented Generation (RAG), and traditional statistical models to deliver highly personalized recommendations. The project involves:
Data Collection: Gather user data and interaction history.
LLMs for Preference Understanding: Use LLMs to analyze user reviews, search history, or social media posts.
RAG for Context: Implement RAG to fetch relevant data from a knowledge base to refine recommendations.
Collaborative Filtering: Use statistical models to account for user interaction patterns.
Hybrid System: Combine the outputs of the models for accurate recommendations.
This project will showcase your ability to integrate diverse AI and data science techniques to build a sophisticated recommendation engine.
7. Self Host Llm Model Using Ollama, Vllm, How To Reduce Latency Of Inference
Hosting and deploying an LLM efficiently is an essential skill in AI. This project focuses on optimizing the deployment of an LLM using tools like Ollama or VLLM to reduce inference latency and improve performance. You’ll explore techniques like quantization, pruning, and caching to speed up model inference, making it more scalable. This project involves:
Model Deployment: Choose an open-source LLM and deploy it using Ollama/VLLM.
Optimization: Implement strategies like quantization to improve inference speed.
Performance Monitoring: Evaluate the model’s performance and adjust as needed.
Scalability: Use load balancing to manage multiple concurrent requests.
By completing this project, you’ll prove your expertise in LLM deployment, optimization, and building scalable AI infrastructure.
Conclusion
Break into a six-figure AI and Data Science career with these 7 projects. The goal is not to just get these projects done but to have the concepts in your head and the communication skills to explain your approach.
Consider documenting your projects on GitHub, and writing about your experiences in blog posts; not only does this help showcase your skills that you are interested in and willing to take the initiative.
Remember, in this rapidly evolving field, staying updated with the latest tools and techniques is crucial. Check out resources like NucleusBox for valuable insights and inspiration. The world of AI is vast and full of opportunities—so go ahead, dive in, and build something truly impactful!
2 notes
·
View notes
Text
Unlock the other 99% of your data - now ready for AI
New Post has been published on https://thedigitalinsider.com/unlock-the-other-99-of-your-data-now-ready-for-ai/
Unlock the other 99% of your data - now ready for AI
For decades, companies of all sizes have recognized that the data available to them holds significant value, for improving user and customer experiences and for developing strategic plans based on empirical evidence.
As AI becomes increasingly accessible and practical for real-world business applications, the potential value of available data has grown exponentially. Successfully adopting AI requires significant effort in data collection, curation, and preprocessing. Moreover, important aspects such as data governance, privacy, anonymization, regulatory compliance, and security must be addressed carefully from the outset.
In a conversation with Henrique Lemes, Americas Data Platform Leader at IBM, we explored the challenges enterprises face in implementing practical AI in a range of use cases. We began by examining the nature of data itself, its various types, and its role in enabling effective AI-powered applications.
Henrique highlighted that referring to all enterprise information simply as ‘data’ understates its complexity. The modern enterprise navigates a fragmented landscape of diverse data types and inconsistent quality, particularly between structured and unstructured sources.
In simple terms, structured data refers to information that is organized in a standardized and easily searchable format, one that enables efficient processing and analysis by software systems.
Unstructured data is information that does not follow a predefined format nor organizational model, making it more complex to process and analyze. Unlike structured data, it includes diverse formats like emails, social media posts, videos, images, documents, and audio files. While it lacks the clear organization of structured data, unstructured data holds valuable insights that, when effectively managed through advanced analytics and AI, can drive innovation and inform strategic business decisions.
Henrique stated, “Currently, less than 1% of enterprise data is utilized by generative AI, and over 90% of that data is unstructured, which directly affects trust and quality”.
The element of trust in terms of data is an important one. Decision-makers in an organization need firm belief (trust) that the information at their fingertips is complete, reliable, and properly obtained. But there is evidence that states less than half of data available to businesses is used for AI, with unstructured data often going ignored or sidelined due to the complexity of processing it and examining it for compliance – especially at scale.
To open the way to better decisions that are based on a fuller set of empirical data, the trickle of easily consumed information needs to be turned into a firehose. Automated ingestion is the answer in this respect, Henrique said, but the governance rules and data policies still must be applied – to unstructured and structured data alike.
Henrique set out the three processes that let enterprises leverage the inherent value of their data. “Firstly, ingestion at scale. It’s important to automate this process. Second, curation and data governance. And the third [is when] you make this available for generative AI. We achieve over 40% of ROI over any conventional RAG use-case.”
IBM provides a unified strategy, rooted in a deep understanding of the enterprise’s AI journey, combined with advanced software solutions and domain expertise. This enables organizations to efficiently and securely transform both structured and unstructured data into AI-ready assets, all within the boundaries of existing governance and compliance frameworks.
“We bring together the people, processes, and tools. It’s not inherently simple, but we simplify it by aligning all the essential resources,” he said.
As businesses scale and transform, the diversity and volume of their data increase. To keep up, AI data ingestion process must be both scalable and flexible.
“[Companies] encounter difficulties when scaling because their AI solutions were initially built for specific tasks. When they attempt to broaden their scope, they often aren’t ready, the data pipelines grow more complex, and managing unstructured data becomes essential. This drives an increased demand for effective data governance,” he said.
IBM’s approach is to thoroughly understand each client’s AI journey, creating a clear roadmap to achieve ROI through effective AI implementation. “We prioritize data accuracy, whether structured or unstructured, along with data ingestion, lineage, governance, compliance with industry-specific regulations, and the necessary observability. These capabilities enable our clients to scale across multiple use cases and fully capitalize on the value of their data,” Henrique said.
Like anything worthwhile in technology implementation, it takes time to put the right processes in place, gravitate to the right tools, and have the necessary vision of how any data solution might need to evolve.
IBM offers enterprises a range of options and tooling to enable AI workloads in even the most regulated industries, at any scale. With international banks, finance houses, and global multinationals among its client roster, there are few substitutes for Big Blue in this context.
To find out more about enabling data pipelines for AI that drive business and offer fast, significant ROI, head over to this page.
#ai#AI-powered#Americas#Analysis#Analytics#applications#approach#assets#audio#banks#Blue#Business#business applications#Companies#complexity#compliance#customer experiences#data#data collection#Data Governance#data ingestion#data pipelines#data platform#decision-makers#diversity#documents#emails#enterprise#Enterprises#finance
2 notes
·
View notes
Text
Machine Learning: A Comprehensive Overview
Machine Learning (ML) is a subfield of synthetic intelligence (AI) that offers structures with the capacity to robotically examine and enhance from revel in without being explicitly programmed. Instead of using a fixed set of guidelines or commands, device studying algorithms perceive styles in facts and use the ones styles to make predictions or decisions. Over the beyond decade, ML has transformed how we have interaction with generation, touching nearly each aspect of our every day lives — from personalised recommendations on streaming services to actual-time fraud detection in banking.

Machine learning algorithms
What is Machine Learning?
At its center, gadget learning entails feeding facts right into a pc algorithm that allows the gadget to adjust its parameters and improve its overall performance on a project through the years. The more statistics the machine sees, the better it usually turns into. This is corresponding to how humans study — through trial, error, and revel in.
Arthur Samuel, a pioneer within the discipline, defined gadget gaining knowledge of in 1959 as “a discipline of take a look at that offers computers the capability to study without being explicitly programmed.” Today, ML is a critical technology powering a huge array of packages in enterprise, healthcare, science, and enjoyment.
Types of Machine Learning
Machine studying can be broadly categorised into 4 major categories:
1. Supervised Learning
For example, in a spam electronic mail detection device, emails are classified as "spam" or "no longer unsolicited mail," and the algorithm learns to classify new emails for this reason.
Common algorithms include:
Linear Regression
Logistic Regression
Support Vector Machines (SVM)
Decision Trees
Random Forests
Neural Networks
2. Unsupervised Learning
Unsupervised mastering offers with unlabeled information. Clustering and association are commonplace obligations on this class.
Key strategies encompass:
K-Means Clustering
Hierarchical Clustering
Principal Component Analysis (PCA)
Autoencoders
three. Semi-Supervised Learning
It is specifically beneficial when acquiring categorised data is highly-priced or time-consuming, as in scientific diagnosis.
Four. Reinforcement Learning
Reinforcement mastering includes an agent that interacts with an surroundings and learns to make choices with the aid of receiving rewards or consequences. It is broadly utilized in areas like robotics, recreation gambling (e.G., AlphaGo), and independent vehicles.
Popular algorithms encompass:
Q-Learning
Deep Q-Networks (DQN)
Policy Gradient Methods
Key Components of Machine Learning Systems
1. Data
Data is the muse of any machine learning version. The pleasant and quantity of the facts directly effect the performance of the version. Preprocessing — consisting of cleansing, normalization, and transformation — is vital to make sure beneficial insights can be extracted.
2. Features
Feature engineering, the technique of selecting and reworking variables to enhance model accuracy, is one of the most important steps within the ML workflow.
Three. Algorithms
Algorithms define the rules and mathematical fashions that help machines study from information. Choosing the proper set of rules relies upon at the trouble, the records, and the desired accuracy and interpretability.
4. Model Evaluation
Models are evaluated the use of numerous metrics along with accuracy, precision, consider, F1-score (for class), or RMSE and R² (for regression). Cross-validation enables check how nicely a model generalizes to unseen statistics.
Applications of Machine Learning
Machine getting to know is now deeply incorporated into severa domain names, together with:
1. Healthcare
ML is used for disorder prognosis, drug discovery, customized medicinal drug, and clinical imaging. Algorithms assist locate situations like cancer and diabetes from clinical facts and scans.
2. Finance
Fraud detection, algorithmic buying and selling, credit score scoring, and client segmentation are pushed with the aid of machine gaining knowledge of within the financial area.
3. Retail and E-commerce
Recommendation engines, stock management, dynamic pricing, and sentiment evaluation assist businesses boom sales and improve patron revel in.
Four. Transportation
Self-riding motors, traffic prediction, and route optimization all rely upon real-time gadget getting to know models.
6. Cybersecurity
Anomaly detection algorithms help in identifying suspicious activities and capacity cyber threats.
Challenges in Machine Learning
Despite its rapid development, machine mastering still faces numerous demanding situations:
1. Data Quality and Quantity
Accessing fantastic, categorised statistics is often a bottleneck. Incomplete, imbalanced, or biased datasets can cause misguided fashions.
2. Overfitting and Underfitting
Overfitting occurs when the model learns the education statistics too nicely and fails to generalize.
Three. Interpretability
Many modern fashions, specifically deep neural networks, act as "black boxes," making it tough to recognize how predictions are made — a concern in excessive-stakes regions like healthcare and law.
4. Ethical and Fairness Issues
Algorithms can inadvertently study and enlarge biases gift inside the training facts. Ensuring equity, transparency, and duty in ML structures is a growing area of studies.
5. Security
Adversarial assaults — in which small changes to enter information can fool ML models — present critical dangers, especially in applications like facial reputation and autonomous riding.
Future of Machine Learning
The destiny of system studying is each interesting and complicated. Some promising instructions consist of:
1. Explainable AI (XAI)
Efforts are underway to make ML models greater obvious and understandable, allowing customers to believe and interpret decisions made through algorithms.
2. Automated Machine Learning (AutoML)
AutoML aims to automate the stop-to-cease manner of applying ML to real-world issues, making it extra reachable to non-professionals.
3. Federated Learning
This approach permits fashions to gain knowledge of across a couple of gadgets or servers with out sharing uncooked records, enhancing privateness and efficiency.
4. Edge ML
Deploying device mastering models on side devices like smartphones and IoT devices permits real-time processing with reduced latency and value.
Five. Integration with Other Technologies
ML will maintain to converge with fields like blockchain, quantum computing, and augmented fact, growing new opportunities and challenges.
2 notes
·
View notes
Text
In the subject of data analytics, this is the most important concept that everyone needs to understand. The capacity to draw insightful conclusions from data is a highly sought-after talent in today's data-driven environment. In this process, data analytics is essential because it gives businesses the competitive edge by enabling them to find hidden patterns, make informed decisions, and acquire insight. This thorough guide will take you step-by-step through the fundamentals of data analytics, whether you're a business professional trying to improve your decision-making or a data enthusiast eager to explore the world of analytics.
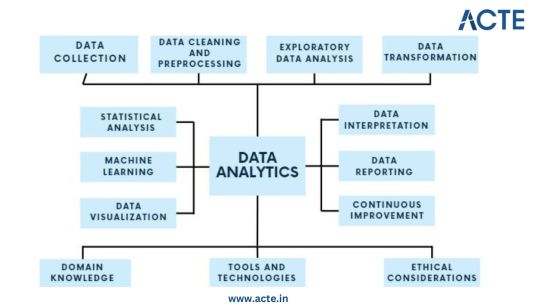
Step 1: Data Collection - Building the Foundation
Identify Data Sources: Begin by pinpointing the relevant sources of data, which could include databases, surveys, web scraping, or IoT devices, aligning them with your analysis objectives. Define Clear Objectives: Clearly articulate the goals and objectives of your analysis to ensure that the collected data serves a specific purpose. Include Structured and Unstructured Data: Collect both structured data, such as databases and spreadsheets, and unstructured data like text documents or images to gain a comprehensive view. Establish Data Collection Protocols: Develop protocols and procedures for data collection to maintain consistency and reliability. Ensure Data Quality and Integrity: Implement measures to ensure the quality and integrity of your data throughout the collection process.
Step 2: Data Cleaning and Preprocessing - Purifying the Raw Material
Handle Missing Values: Address missing data through techniques like imputation to ensure your dataset is complete. Remove Duplicates: Identify and eliminate duplicate entries to maintain data accuracy. Address Outliers: Detect and manage outliers using statistical methods to prevent them from skewing your analysis. Standardize and Normalize Data: Bring data to a common scale, making it easier to compare and analyze. Ensure Data Integrity: Ensure that data remains accurate and consistent during the cleaning and preprocessing phase.
Step 3: Exploratory Data Analysis (EDA) - Understanding the Data
Visualize Data with Histograms, Scatter Plots, etc.: Use visualization tools like histograms, scatter plots, and box plots to gain insights into data distributions and patterns. Calculate Summary Statistics: Compute summary statistics such as means, medians, and standard deviations to understand central tendencies. Identify Patterns and Trends: Uncover underlying patterns, trends, or anomalies that can inform subsequent analysis. Explore Relationships Between Variables: Investigate correlations and dependencies between variables to inform hypothesis testing. Guide Subsequent Analysis Steps: The insights gained from EDA serve as a foundation for guiding the remainder of your analytical journey.
Step 4: Data Transformation - Shaping the Data for Analysis
Aggregate Data (e.g., Averages, Sums): Aggregate data points to create higher-level summaries, such as calculating averages or sums. Create New Features: Generate new features or variables that provide additional context or insights. Encode Categorical Variables: Convert categorical variables into numerical representations to make them compatible with analytical techniques. Maintain Data Relevance: Ensure that data transformations align with your analysis objectives and domain knowledge.
Step 5: Statistical Analysis - Quantifying Relationships
Hypothesis Testing: Conduct hypothesis tests to determine the significance of relationships or differences within the data. Correlation Analysis: Measure correlations between variables to identify how they are related. Regression Analysis: Apply regression techniques to model and predict relationships between variables. Descriptive Statistics: Employ descriptive statistics to summarize data and provide context for your analysis. Inferential Statistics: Make inferences about populations based on sample data to draw meaningful conclusions.
Step 6: Machine Learning - Predictive Analytics
Algorithm Selection: Choose suitable machine learning algorithms based on your analysis goals and data characteristics. Model Training: Train machine learning models using historical data to learn patterns. Validation and Testing: Evaluate model performance using validation and testing datasets to ensure reliability. Prediction and Classification: Apply trained models to make predictions or classify new data. Model Interpretation: Understand and interpret machine learning model outputs to extract insights.
Step 7: Data Visualization - Communicating Insights
Chart and Graph Creation: Create various types of charts, graphs, and visualizations to represent data effectively. Dashboard Development: Build interactive dashboards to provide stakeholders with dynamic views of insights. Visual Storytelling: Use data visualization to tell a compelling and coherent story that communicates findings clearly. Audience Consideration: Tailor visualizations to suit the needs of both technical and non-technical stakeholders. Enhance Decision-Making: Visualization aids decision-makers in understanding complex data and making informed choices.
Step 8: Data Interpretation - Drawing Conclusions and Recommendations
Recommendations: Provide actionable recommendations based on your conclusions and their implications. Stakeholder Communication: Communicate analysis results effectively to decision-makers and stakeholders. Domain Expertise: Apply domain knowledge to ensure that conclusions align with the context of the problem.
Step 9: Continuous Improvement - The Iterative Process
Monitoring Outcomes: Continuously monitor the real-world outcomes of your decisions and predictions. Model Refinement: Adapt and refine models based on new data and changing circumstances. Iterative Analysis: Embrace an iterative approach to data analysis to maintain relevance and effectiveness. Feedback Loop: Incorporate feedback from stakeholders and users to improve analytical processes and models.
Step 10: Ethical Considerations - Data Integrity and Responsibility
Data Privacy: Ensure that data handling respects individuals' privacy rights and complies with data protection regulations. Bias Detection and Mitigation: Identify and mitigate bias in data and algorithms to ensure fairness. Fairness: Strive for fairness and equitable outcomes in decision-making processes influenced by data. Ethical Guidelines: Adhere to ethical and legal guidelines in all aspects of data analytics to maintain trust and credibility.
Data analytics is an exciting and profitable field that enables people and companies to use data to make wise decisions. You'll be prepared to start your data analytics journey by understanding the fundamentals described in this guide. To become a skilled data analyst, keep in mind that practice and ongoing learning are essential. If you need help implementing data analytics in your organization or if you want to learn more, you should consult professionals or sign up for specialized courses. The ACTE Institute offers comprehensive data analytics training courses that can provide you the knowledge and skills necessary to excel in this field, along with job placement and certification. So put on your work boots, investigate the resources, and begin transforming.
24 notes
·
View notes
Text
3rd July 2024
Goals:
Watch all Andrej Karpathy's videos
Watch AWS Dump videos
Watch 11-hour NLP video
Complete Microsoft GenAI course
GitHub practice
Topics:
1. Andrej Karpathy's Videos
Deep Learning Basics: Understanding neural networks, backpropagation, and optimization.
Advanced Neural Networks: Convolutional neural networks (CNNs), recurrent neural networks (RNNs), and LSTMs.
Training Techniques: Tips and tricks for training deep learning models effectively.
Applications: Real-world applications of deep learning in various domains.
2. AWS Dump Videos
AWS Fundamentals: Overview of AWS services and architecture.
Compute Services: EC2, Lambda, and auto-scaling.
Storage Services: S3, EBS, and Glacier.
Networking: VPC, Route 53, and CloudFront.
Security and Identity: IAM, KMS, and security best practices.
3. 11-hour NLP Video
NLP Basics: Introduction to natural language processing, text preprocessing, and tokenization.
Word Embeddings: Word2Vec, GloVe, and fastText.
Sequence Models: RNNs, LSTMs, and GRUs for text data.
Transformers: Introduction to the transformer architecture and BERT.
Applications: Sentiment analysis, text classification, and named entity recognition.
4. Microsoft GenAI Course
Generative AI Fundamentals: Basics of generative AI and its applications.
Model Architectures: Overview of GANs, VAEs, and other generative models.
Training Generative Models: Techniques and challenges in training generative models.
Applications: Real-world use cases such as image generation, text generation, and more.
5. GitHub Practice
Version Control Basics: Introduction to Git, repositories, and version control principles.
GitHub Workflow: Creating and managing repositories, branches, and pull requests.
Collaboration: Forking repositories, submitting pull requests, and collaborating with others.
Advanced Features: GitHub Actions, managing issues, and project boards.
Detailed Schedule:
Wednesday:
2:00 PM - 4:00 PM: Andrej Karpathy's videos
4:00 PM - 6:00 PM: Break/Dinner
6:00 PM - 8:00 PM: Andrej Karpathy's videos
8:00 PM - 9:00 PM: GitHub practice
Thursday:
9:00 AM - 11:00 AM: AWS Dump videos
11:00 AM - 1:00 PM: Break/Lunch
1:00 PM - 3:00 PM: AWS Dump videos
3:00 PM - 5:00 PM: Break
5:00 PM - 7:00 PM: 11-hour NLP video
7:00 PM - 8:00 PM: Dinner
8:00 PM - 9:00 PM: GitHub practice
Friday:
9:00 AM - 11:00 AM: Microsoft GenAI course
11:00 AM - 1:00 PM: Break/Lunch
1:00 PM - 3:00 PM: Microsoft GenAI course
3:00 PM - 5:00 PM: Break
5:00 PM - 7:00 PM: 11-hour NLP video
7:00 PM - 8:00 PM: Dinner
8:00 PM - 9:00 PM: GitHub practice
Saturday:
9:00 AM - 11:00 AM: Andrej Karpathy's videos
11:00 AM - 1:00 PM: Break/Lunch
1:00 PM - 3:00 PM: 11-hour NLP video
3:00 PM - 5:00 PM: Break
5:00 PM - 7:00 PM: AWS Dump videos
7:00 PM - 8:00 PM: Dinner
8:00 PM - 9:00 PM: GitHub practice
Sunday:
9:00 AM - 12:00 PM: Complete Microsoft GenAI course
12:00 PM - 1:00 PM: Break/Lunch
1:00 PM - 3:00 PM: Finish any remaining content from Andrej Karpathy's videos or AWS Dump videos
3:00 PM - 5:00 PM: Break
5:00 PM - 7:00 PM: Wrap up remaining 11-hour NLP video
7:00 PM - 8:00 PM: Dinner
8:00 PM - 9:00 PM: Final GitHub practice and review
4 notes
·
View notes
Text
Mastering MATLAB: Solving Challenging University Assignments
Welcome to another installment of our MATLAB assignment series! Today, we're diving into a challenging topic often encountered in university-level coursework: image processing. MATLAB's versatility makes it an invaluable tool for analyzing and manipulating images, offering a wide array of functions and capabilities to explore. In this blog, we'll tackle a complex problem commonly found in assignments, providing both a comprehensive explanation of the underlying concepts and a step-by-step guide to solving a sample question. So, let's roll up our sleeves and get ready to do your MATLAB assignment!
Understanding the Concept: Image processing in MATLAB involves manipulating digital images to extract useful information or enhance visual quality. One common task is image segmentation, which involves partitioning an image into meaningful regions or objects. This process plays a crucial role in various applications, including medical imaging, object recognition, and computer vision.
Sample Question: Consider an assignment task where you're given a grayscale image containing cells under a microscope. Your objective is to segment the image to distinguish individual cells from the background. This task can be challenging due to variations in cell appearance, noise, and lighting conditions.
Step-by-Step Guide:
1. Import the Image: Begin by importing the grayscale image into MATLAB using the 'imread' function.
image = imread('cells.jpg');
2. Preprocess the Image: To enhance the quality of the image and reduce noise, apply preprocessing techniques such as filtering or morphological operations.
filtered_image = medfilt2(image, [3 3]); % Apply median filtering
3. Thresholding: Thresholding is a fundamental technique for image segmentation. It involves binarizing the image based on a certain threshold value.
threshold_value = graythresh(filtered_image); % Compute threshold value binary_image = imbinarize(filtered_image, threshold_value); % Binarize image
4. Morphological Operations: Use morphological operations like erosion and dilation to refine the segmented regions and eliminate noise.
se = strel('disk', 3); % Define a structuring element morph_image = imclose(binary_image, se); % Perform closing operation
5. Identify Objects: Utilize functions like 'bwlabel' to label connected components in the binary image.
[label_image, num_objects] = bwlabel(morph_image); % Label connected components
6. Analyze Results: Finally, analyze the labeled image to extract relevant information about the segmented objects, such as their properties or spatial distribution.
props = regionprops(label_image, 'Area', 'Centroid'); % Extract object properties
How We Can Help:
Navigating through complex MATLAB assignments, especially in challenging topics like image processing, can be daunting for students. At matlabassignmentexperts.com, we understand the struggles students face and offer expert assistance to ensure they excel in their coursework. If you need someone to do your MATLAB assignment, we are here to help. Our team of experienced MATLAB tutors is dedicated to providing comprehensive guidance, from explaining fundamental concepts to assisting with assignment solutions. With our personalized approach and timely support, students can tackle even the most demanding assignments with confidence.
Conclusion:
In conclusion, mastering MATLAB for image processing assignments requires a solid understanding of fundamental concepts and proficiency in utilizing various functions and techniques. By following the step-by-step guide provided in this blog, you'll be well-equipped to tackle complex tasks and excel in your university assignments. Remember, at matlabassignmentexperts.com, we're here to support you every step of the way. So, go ahead and dive into your MATLAB assignment with confidence!
6 notes
·
View notes
Text
Seeing Beyond the Pixel: An Introduction to Digital Image Processing
Have you ever stopped to wonder how that blurry picture from your phone gets transformed into a crystal-clear masterpiece on social media?
Or how scientists can analyze faraway galaxies using images captured by telescopes? The secret sauce behind these feats is Digital Image Processing (DIP)!
Imagine DIP (Digital Image Processing) as a cool toolbox for your digital images. It lets you manipulate and analyze them using powerful computer algorithms. You can think of it as giving your pictures a makeover, but on a whole new level.
The Image Makeover Process
DIP works in a series of steps, like a recipe for image perfection:
Snap Happy! (Image Acquisition) - This is where it all starts. You capture the image using a camera, scanner, or even a scientific instrument like a telescope!

Person taking a picture with smartphone
Picture Prep (Preprocessing) - Sometimes, images need a little prep work before the real magic happens. Think of it like trimming the edges or adjusting the lighting to ensure better analysis.

Person editing a photo on a computer
Enhance Me! (Enhancement) - Here's where your image gets a glow-up! Techniques like adjusting brightness, contrast, or sharpening details can make all the difference in clarity and visual appeal.

Blurry photo becoming clear after editing
Fixing the Funky (Restoration) - Did your old family photo get a little scratched or blurry over time? DIP can help remove those imperfections like a digital eraser, restoring the image to its former glory.

Scratched photo being restored
Info Time! (Analysis) - This is where things get interesting. DIP can actually extract information from the image, like identifying objects, recognizing patterns, or even measuring distances. Pretty cool, right?
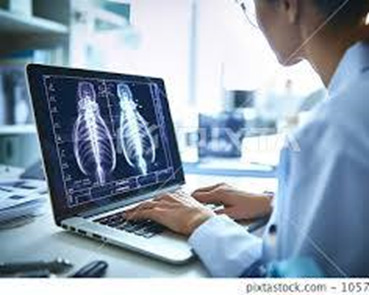
Xray being analyzed by a doctor on a computer
Size Matters (Compression) - Ever struggled to send a massive photo via email? DIP can shrink the file size without losing too much detail, making it easier to store and share images efficiently.

Large image file being compressed
Voila! (Output) - The final step is presenting your masterpiece! This could be a stunningly clear picture, a detailed analysis report, or anything in between, depending on the purpose of the image processing.

Highquality image after processing
Real World Wow Factor
DIP isn't just about making pretty pictures (although that's a valuable application too!). It has a wide range of real-world uses that benefit various fields:
Medical Marvels (Medical Field) - DIP helps doctors analyze X-rays, MRIs, and other medical scans with greater accuracy and efficiency, leading to faster and more precise diagnoses.
Cosmic Companions (Astronomy) - Scientists use DIP to analyze images from space telescopes, revealing the secrets of stars, galaxies, and other wonders of the universe. By enhancing faint details and removing noise, DIP allows astronomers to peer deeper into the cosmos.

Space telescope capturing an image of a galaxy
Eagle Eye from Above (Remote Sensing) - Satellites use DIP to monitor Earth, tracking weather patterns, deforestation, and other environmental changes. By analyzing satellite imagery, researchers can gain valuable insights into the health of our planet.

Satellite image of Earth
Unlocking Your Face (Security Systems) - Facial recognition systems use DIP to identify people in images and videos, which can be used for security purposes or even to personalize user experiences.
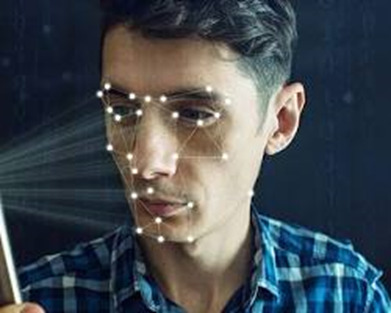
Facial recognition system unlocking a phone
Selfie Magic (Consumer Electronics) - Your smartphone uses DIP to enhance your photos, automatically adjusting brightness, contrast, and other factors to make your selfies look their best.

Person taking a selfie
The Future's Looking Sharp
DIP is constantly evolving, thanks to advancements in Artificial Intelligence (AI). Imagine self-driving cars using DIP for super-accurate navigation in real-time, or virtual reality experiences that seamlessly blend real and digital worlds with exceptional clarity. The possibilities are endless!
So, the next time you look at an image, remember, there's a whole world of technology working behind the scenes to make it what it is. With DIP, we can truly see beyond the pixel and unlock the hidden potential of the visual world around us.
References:
Gonzalez, Rafael C., and Richard E. Woods. "Digital image processing." Pearson Education India, 2008.
Jain, Anil K. "Fundamentals of digital image processing." Prentice-Hall, Inc., 1989.
National Institute of Standards and Technology (NIST). "Digital Image Processing: An Introduction." https://www.amazon.com/Introduction-Digital-Image-Processing/dp/0134806743
U.S. Department of Energy (DOE). "Image Processing and Analysis." https://www.baeldung.com/cs/energy-image-processing
Patel, Meet, et al. "Image Processing Techniques in Medical Field: A Literature Review." Journal of Medical Physics, vol. 40, no. 4, 2019, pp. 140001. https://www.ncbi.nlm.nih.gov/pmc/articles/PMC3782694/
#artificial intelligence#coding#machine learning#python#programming#digitalimageprocessing#dip#image
3 notes
·
View notes
Note
hi if its alright with you can I please ask your stage gif process 🩵 (I don't mind if its not too detailed but if you use vapoursynth or topaz or anything)
hiii! omg thank u for wanting to know 🥺🥺 i actually use two methods, depending on the source file (and how lazy i feel). either vapoursynth or mpv. i'll show u both!
long, the example gif has a flashy background, somewhat clear. i hope.
i source from .ts files on k24hr or twitter, fancams, and then the youtube version (which i then run through handbrake before vs or mpv) if there's absolutely no other choice. i try to avoid show music core because its backgrounds make sharpening hard, but i'm using one from there for this tutorial :) i will also use beyond live / blu-ray files when available (i.e. 4th world tour gifs i did of twice)
vapoursynth:
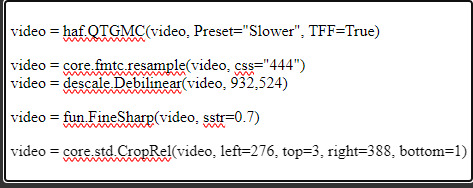
-> only use the deinterlace (60 slow) when it's 1080i 30fps! i use this on files from k24hrs. if the file is already 60 fps (i.e. those from srghkqud on twitter), i don't deinterlace or preprocess. i use finesharp on .7 any time i use vs!
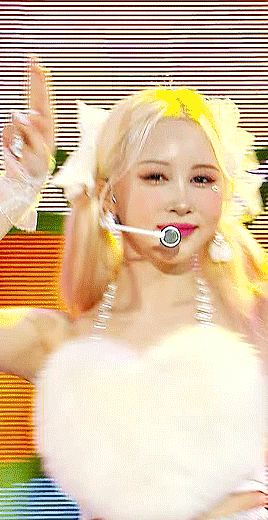
this gif is 268 x 520 px! i leave the delay at .02 and set frame rate to 60fps. on the left, it is just changed to 60fps and run through vs with the above settings. the gif on the right is sharpened!
i change my sharpening settings on every stage (and most other sets as well)! i use an action, and then adjust by the background and quality of the source! this is using my stage sharpening - but i have removed a smart sharpen and reduced opacity of other filters i use on different (clearer) files!
show music core has these really visible leds in their background, so sharpening it tends to be harder! i avoid using my 500px smart sharpens when it looks like this, and use high pass and bigger radius smaller amount smart sharpens!

sharpening settings for above: 8.0 high pass on soft light blending (40% opacity), 241 .2 smart sharpen (60% opacity), 15 15 smart sharpen (50% opacity) i should also note that on really really pale stages, i use camera raw filter to fix whites / highlights before i add the other sharpening! this does really slow down export time and can be frustrating, so i reserve it for then!
then i color! sometimes i use ezgif (which hasn't lowered quality that i've noticed) to adjust the speed, if i feel it needs it! this gif has a fine speed so i've left it as is, but i normally speed up gifs by 120% on their speed feature to make the choreo look a little faster!

left: unsharpened except vs finesharp, colored right: sharpened, colored
my coloring focus is always restoring skin, everything else is pretty much purely stylistic. i try to leave colors in the background the same! i do really like making blonde hair pinker or more toned (since they're often yellow, i always make a point of essentially toning their hair for them - i.e. tsuki in dang! set)
when i color the rest of the set, i keep the first gif open next to it to make sure everything matches! i normally copy and paste the coloring group and adjust as needed :D
also, i check how it looks in tumblr on desktop + mobile, since web safe colors adjust the look of your gifs a lot (the ones with the little dots in the middle are web safe, everything else isn't) and try to fix what doesn't look quite right. i also ask my friends if something is wrong but i'm not sure what (mainly nini (@withyouth) so shout out to her for putting up w/ me, a big part of the stage gif process)!
mpv: -> i press 'd' and make sure it is deinterlacing (again, only 1080i ones get deinterlaced)! and then i screencap. i followed this guide on setting up mpv, and always use minimal compression settings for everything i screencap.
-> i turn my files into dicom files (you can just rename them on mac, on windows it is multistep) and then scipt->load multiple dicom files (faster than loading image into stack and, in my opinion, clearer too)!
for windows: -> alt+d in your screencap folder, cmd. enter. type ren *.* *.dcm into the window. enter. close the command window!
i make my frame animation + frames to layers. once it is on the timeline, i go ahead and crop before i do anything else. i tried to make the cropping like the vs gif, but it's not identical!
sharpening: since i didn't use finesharp, i can add more in ps. this is my normal stage sharpening with nothing added or removed!

left: deinterlaced, screencapped, cropped right: deinterlaced, screencapped, cropped, sharpened -> 8.0 high pass (soft light, 65%), 500 .3 smart sharpen, 241 .2 smart sharpen (60% opacity), 15 15 smart sharpen (50% opacity)
coloring: same one as the vs gifs!
comparison:
left: vapoursynth, fully complete right: dicom, fully complete
i normally use mpv, but sometimes i don't feel like waiting on the screencaps, or i think finesharp will add texture + depth that the original doesn't have (too smooth of a filter, whatever) so i use vs! my taeyeon mr. mr. and le sserafim rock ver. sets were both done via vapoursynth, though the sharpenings are different from each other and what it shown here (i change sharpening a lot, and sometimes by set... sorry.. KJHDFGJKH)!
anyways i hope this was helpful!!! thank u for asking it means a lot u want to know!! if u want more stuff answered or shown, u can always ask :D and i hope it's clear 😭😭 i know i ramble a lot
#ask#anon#m:tutorial#niniblr#useroro#awekslook#userdoyeons#rosieblr#tuserflora#<- u all can ignore i just thought i should tag ppl KHDFKJGH#flashing tw#long post#resources
26 notes
·
View notes
Text
A little output
I spent my lunch programming rather than eating, which is very typical of me when I get deeply involved in a project. I must make sure I don't fall into that obsession trap again, which has caused many burnouts in the past! 😅
My current task was to get the new generation machine to spit items out onto a connected belt. This was mostly straightforward, though it was a little tricky getting my head around supporting rotation.
Ultimately it came down to making things simple. Machines can either have an input or an output, or both. Since the side with which the machine accepts either inputs and outputs is defined at the prefab level (i.e. it's fixed based on what I set the model to), I just had to write some code to shift those input/output 'sides' depending on which of the 4 possible directions the model was placed in.
As far as handling exactly where the machine should look for an input / output belt, I kinda cheated a bit on this one.
The reason this was a little more complex is because machines can have a footprint of more than just 1x1, they can be 2x2 as well. A 2x2 machine will have a inputs / outputs on specific grid positions around its outside perimeter. How do I allow for this whilst enabling rotation of the placed object?

This. This is my cheat.
The little blob in the above image is an object that represents which grid position I want the machine to look for a belt (specifically an output belt). Because this blob is a child object of the machine, when the machine rotates - so the blob does too. At runtime, when I configure the machine, I can simply read the real-world position of the blob to get its grid coordinates. Neat!
It's easier to see top-down here:
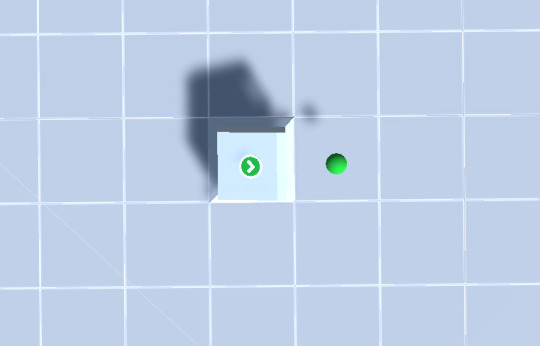
The machine lives at grid position [6,4] and the blob lives inside the machine object at position [1,0]. Translated to absolute world position the blob lives at [7,4] - exactly where I need to be checking for belts!
I'm sure there are much better ways of doing this, but this was a pretty straightforward solution that only requires a tiny amount of preprocessing when the object is first placed, after which no additional calculation is needed.
With the positioning and belt-lookup code added, it was just a case of writing up a short Machine class, from which I derived a special 'InputMachine' class that only spits out items of a specific type.
The result you can see below!
Where is this all leading?
I suppose it's a good a time as any to review my future plans for these developments. What good are little prototypes without some larger goal in mind?
In one of my earliest posts I details the kind of game I'm hoping to make. Mechanically it's not super complicated, but it required figuring out some of the technical stuff I've been showing in recent posts - namely conveyor belts and moving items around.
I'm hoping to create a game that fits in the automation / factory genre. You'll be playing the role of someone setting up an automated factory that has been deposited and unpacked on a remote asteroid. You place down drills (inputs) that dig and spit out raw materials into your factory, and you move these around and process them in various machines in the name of science!
As I said this isn't the most complex of concepts. From a programming complexity point of view some of the legwork has already done (problem solving belts, specifically). There are areas that still need consideration, but looking over what's left to come I'm quietly confident it falls within my skill set to execute.
A cut down the middle
I expect anybody familiar with game development is aware of the term 'vertical slice'. It refers to the practice of developing a small segment of a product, but to a very polished state that could be considered represetative of its final form.
You see this a lot in game development. Particularly at conferences and exhibitions where publishers want to whip up excitement about games that could be years away from release. But there should be some delineation between a vertical slice for a trailer, and a playable vertical slice. I'm aiming for the latter.
In order to decide how to put something like that together, I need a broader understanding of the scope of the game. A vertical slice should demonstrate all the key concepts in the game, but leaving room to expand those ideas later without changing the core experience too much. It doesn't have to look like the final game either, though I would like to put some effort in there where possible.
I'll probably end this post here for now, but I'll probably detail out the main efforts I'm likely to be aiming for in order to reach this vertical slice. I will, of course, continue posting updates when I can with more details about the game's development.
And if you read this far and found some small measure of interest in here, thanks for your time and have yourself a great day! 😊
5 notes
·
View notes