#I'll just toggle the setting for that post
Explore tagged Tumblr posts
Visit Tumblr Blog
Explore Tumblr blogs with no restrictions, modern design and the best experience.
Last Seen Tumblr Blogs


Fun Fact
Hackers stole 65M passwords from Tumblr in 2013.
Text
The university protests are the result of so many complex socio-political and economic factors, and I genuinely don't want to minimize the presence of other influences
But at the same time, it is REALLY hard not to look at the liberal and republican response to college students exercising their First Amendment rights and hear the sound of decades of authoritarian parenting standing over you and yelling "look what you made me do!"
#this is fine to reblog btw#like if I want to ensure something cannot be reblogged#I'll just toggle the setting for that post#i genuinely do not care if folks want to reblog my venty or personalish posts#in fact folks doing exactly that has led to some great conversations and sharing of resources and knowledge over the years#so like#if you see a certified BBotB OP post and you're capable of reblogging it?#go right on ahead and view that as consent from me#if I ever decide to take that consent back then I will change the setting on the post I feel is getting out of hand
17 notes
·
View notes
Text
How cutiesai made 14 Days With You
I've received quite a few requests in the past asking how I made 14DWY, what resources I used, how I organised my lore, etc. — so I figured I'd make one big post and share it with everyone else as well! It features a buuunch of helpful stuff I wish I'd known when I first made 14DWY, so hopefully this will help others too!
⚠ This is all copied & pasted from a Discord post I made back in early 2024! I'll also be adding to it over time, so feel free to check back every so often! ^^

What engine do I use?
14DWY uses the Ren'Py engine!
There are two preinstalled games (called "Tutorial" and "The Question") that give you a basic rundown on how to use the program!!
Zeil Learning's video called "Ren'py Tutorial For Beginners" is also a good place to start for those who have no idea where to begin with Ren'Py!
I also really recommend these Ren'Py resources:
Lemma Soft Forums
Ren'Py Discord server
Ren'Py subreddit
Zeil Learnings, ElaineDoesCoding, Visual Novel Design, and Ess Ren'Py Tutorials on YouTube
Searching through the "Ren'Py" tag on itch.io for community-made assets and resources (make sure to give credit if you use someone's asset(s))!
Feniks and Wattson offer some really helpful stuff!!
Not Ren'Py related, but helpful for creating a VN:
Obsidian and Notion for planning and worldbuilding
Visual Studio Code and Atom (comes preinstalled with Ren'Py iirc?) for scripting/coding
Pixabay and Pexels for royalty-free images and stock photos
DOVA-SYNDROME for music
Clip Studio Paint (paid) and Krita (free) for drawing
Toyhou.se to store your littol guys (If you need an invite code, I have over 300 to give away lmao ^^ Send in an ask to @cutiesigh if you'd like one!)
An itch.io account to upload your game for free and share it with others
General tips to keep in mind:
Make games for fun, not for fame. Too often, I see new developers create VNs with "trending tropes" because they see how successful it is and want the same level of popularity. As harsh as it sounds, this only makes your game feel hollow and superficial, and players will notice.
When using Ren'Py, it's better to have multiple .rpy files rather than putting everything into one large file!! It makes organising and finding things easier, and if something gets corrupted... at least you won't lose everything!
Plan everything beforehand, but give yourself room to expand and implement new ideas.
Start small and slowly expand over time. Don't start off with an overly ambitious project, as it can be disheartening when you put all this effort into something just for it not to gain any traction. Also, be grateful for your earliest supporters, as they're the ones who will lift your project off the ground!!
This is a personal preference, but I recommend starting off with itch.io as your main distribution platform. Most storefronts take a cut from your donations and revenue, and sites like Steam require a $100 fee just to publish your game on their platform. Itch is free, and you can even toggle off revenue sharing in your profile settings! (I like to keep it at 10% though, because I'm grateful for everything the site provides ♡)
If you ever need help with Ren'Py, you're always welcome to join the 14DWY Discord server and ping me in the help channel!
469 notes
·
View notes
Text
A QUICK GUIDE TO AO3 CUSTOMIZATION FROM SOMEONE WHO KNOWS NOTHING ABOUT CODING

ft adding pink to everything and my secret to writing long comments
note: I originally posted this to twt but if that place burns in a fiery pit I spent too long on this for it to disappear, so I'm putting it here too :)
so many people know way more about this than I do, but this is a step-by-step walkthrough of the changes *I've* made, and hopefully it works as an introduction people can build from for whatever they'd like to do
There are a lot of images in this post! (click to enlarge)
to start, AO3 skins
site skins change how the AO3 website appears when logged in (even on mobile), mine is pink and blue!

I'll have my skin turned off throughout the post so the guides appear as they will for you
to create, edit, and view skins, go to the "skins" tab from the left-hand menu. you can also view public site skins from there or from the button in the preferences.


public site skins are made by other users. i would really encourage previewing and exploring them to become familiar with the possibilities (maybe you just want to use one of them and now you're done!)
to create your own skin
on the skins page, click "create site skin"
if you don't know CSS (same), use the wizard! clicking on the "?" will give more information about each option
I only use the colours section you'll see a link right there for hex codes I use pink as a header colour and bue for accent but lots of people change the background colour and that looks really cool!
submit


The next step (optional!!!) is to add CSS from a public skin to your own. I use "ByLine" by Branch. this separates the tag categories and adds spacing to make them easier to read.
here is a before and after using the fic "Landslide" by @roosterbruiser as an example


to see the CSS of a skin, click the title
copy all the text below the CSS heading
in the skin creator/editor press the custom CSS option and paste all the text into the CSS box


you can have both wizard and custom CSS settings, in mine you can see the header and accent colours as well as the CSS

level up: USERSCRIPTS
userscripts are small pieces of code that modify a website. for AO3, this may involve adding shortcuts and buttons or even advanced tagging functions (computer people, I'm so sorry if this is wrong, I'm trying). I use Greasy Fork and Tampermonkey.
This is how I write long and formatted comments!
Greasy Fork is an archive of userscripts and Tampermonkey is a browser extension and userscript manager. You don't need to use these two in particular. please use your common sense when downloading anything or adding permissions to your browser.
Greasy Fork guide on installing scripts
Install Tampermonkey on Chrome
there are TONS of user scripts for AO3. This is another good opportunity to explore all the possibilities. there are lots of more complicated options I haven't explored.
scripts for AO3

i use this floaty review box
and this comment formatting
EDIT: if you use chrome you might need to turn on developer mode in your chrome extension manager - you can google "tampermonkey developer mode" and it should explain that :)
to install (once you have Tampermonkey installed):
open the script you want in Greasy Fork and press install
Tampermonkey will open, press install again


clicking the Tampermonkey extension will let you toggle scripts on and off, and opening the dashboard will let you view, edit, and delete scripts


i find i can only have a few turned on at a time before they cancel each other out, but that depends on which ones you're using and someone more savvy might be able to fix that
how to use the floaty review box - write more comments!
there will now be a "floaty review box" button at the top of the work, it will open a floating text box you can move anywhere on the page. highlighting any text and pressing the insert button will paste the text with italics into the box


anything you type in the review box will appear in your comment at the bottom of the page!
if you have also installed the comment formatting script, you'll be able to highlight any text in your comment and use the new buttons above the comment box to format it

thats all ive got! Hopefully this is a good starting point to get familiar with some of the terms and basics for skins and scripts <3
if you want some inspo for how to comment on fics i made a whole fic rec list on twitter based on comments I've left, it's here. i have a masterlist of recs there mostly for darklina/reylo and similar ships.
the tag #reading with ru has cod recs and me talking about books
:)
#please no one follow me from this im never helpful otherwise#ao3 skins#ao3#fanfic#ao3 community#fandom#ao3 resources#im sorry if the image quality is awful lmk if I should clarify any of the text!#floating comment box#floating review box#ao3 guide
847 notes
·
View notes
Text
Was recently reminded by my friend @teeg of just how much info Facebook collects to track you, and I want to share how to make that harder for them with the rest of you.
If you still have facebook/can't get rid of it (for any reason- we're not here to judge today) then you're going to want to clear your off-Meta activity.
You read that right, Meta tracks what you do off it's apps as well. It tracks other apps and websites that you use- whether you connected them to Facebook or not, AND places you visit IRL and when you visited. This includes not just stores and other businesses, but also allegedly includes hotels, schools and hospital/doctors offices. (I'm unfortunately unable to confirm the last three for myself as I didn't look closely at mine before deleting- and it's been years since I've graduated or stayed at a hotel, and months since I've been to a doctor. If anyone cares to confirm in the notes I'll update this post.)
This post will show you how to clear your off-Meta activity. (You'll also want to toggle off Ads data permissions, but I'll make another post about that later.)
First, go to your Profile Icon, then to Settings and Privacy to get to your Settings.


Once in Settings you're going to click See more in Accounts Center. On desktop it should be in a box on the upper-left of the page.

Once in Accounts Center you're going to click Your information and permissions, then Your activity off Meta technologies at the bottom of that window.


Once in the Your activity off Meta technologies window you're going to notice at the bottom three buttons, Disconnect specific activity, Clear previous activity, and Manage future activity.

You're going to want to first clear your previous activity and disconnect future activity. This will also automatically clear any activity that would be under the Disconnect specific activity tab, as it's just for picking and choosing what activity to delete.


An added benefit to this is that it will also clear out some of the data Meta uses for its AI programs- not all, but hey- that's something.
Also, even if you can't delete your Facebook account, I urge you to please delete/uninstall the app from your phone as that's the #1 best way to keep it from tracking you everywhere you go IRL and online. That said, if you delete no other Meta app from your phone- make sure to delete FB messenger- it's literally the worst one, but that's another post, which I'll hopefully get to after the FB ads one I promised above.
Stay safe out there, and remember- fuck Facebook.
#facebook#social media#zuckerberg#mark zuckerberg#threads#fuck facebook#fuck meta#meta#facebook tracking#off-meta activity#us politics#delete facebook#facebook is done
337 notes
·
View notes
Text
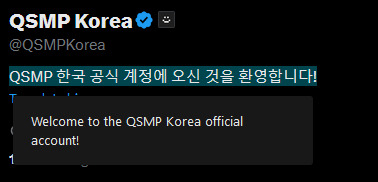
I know a lot of people on qsmpblr use Tumblr mobile, but if you do use browser Tumblr then I would recommend the Simple Translate extension. Because Tumblr doesn't have built in translation like Twitter, there's less fans posting in their native language, instead most people just use English.
Simple Translate is an extension that allows you to translate text that you highlight into a target language. (It uses Google Translate API, but so does Twitter so the translation quality is pretty much the same).
Firefox Extension | Chrome Extension

When you highlight text in another language, a translate icon appears, when you click on it a panel containing the translation of the text appears.

You can also change the settings of the extension so that the translation panel automatically appears when you highlight text in another language.

Here's some more examples using the official QSMP Twitter accounts, you do not need to change the settings of the extension to translate from different languages into your target language.
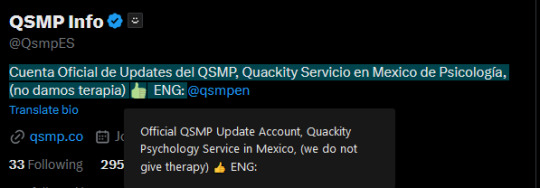
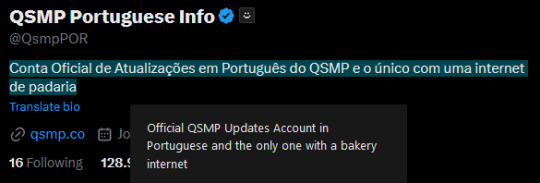

(All of these match the translations given when using the "translate bio" button on Twitter directly.)
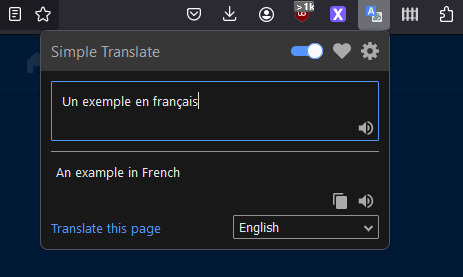
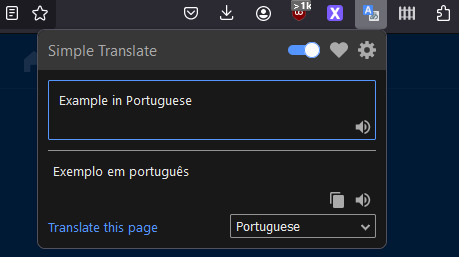
You can also access a translation box using the icon in the toolbar, any text you enter can be translated to the language selected in the drop-down menu (meaning you don't need to open a new tab to use Google Translate).
Some settings explanation and other stuff under the cut. Not super important but I figured I'd add it anyways.

There is an option to use DeepL API as opposed to Google Translate (it's another translation tool, there is free access to the API with a limit of 500,000 characters/month, and a pro version for unlimited access).
Whatever the target language is set as is what text you highlight will be translated into. There is another option for a second target language, I'll explain that further down.

This option changes how you view the translation panel, the first option (default) has the icon appear when you highlight text (as seen in the first image of the post), the second option has the translation panel appear automatically when you highlight text, and the for third option the panel and icon won't automatically appear, but can still be accessed by right-clicking the highlighted text and selecting "translate selected text".
The checkbox below these options means that if the text you're highlighting is already in your target language, the translation icon and panel will not appear, it can again still be accessed by right-clicking what you've highlighted and selecting translate.

This option appears twice, in both the Web-page section (for translating selected text) and the Toolbar Popup section (for the translation box in the toolbar popup).
The web page option, when toggled on, means that when you select text that is in your target language, the translation panel will translate into the second target language that has been selected. If the checkbox for "do not display if translation is not required" is toggled on, you can only view the translation from Target -> 2nd Target by right-clicking to translate selected text.
The toolbar popup version of this option is used to automatically switch the language in the toolbar translation box when you input something in your main target. (ie. second target set to French means that when you input English text in the translation box it will switch the translation setting from "(detect language) -> English" to "English -> French").
There are also settings to change the style and size of the translation button and panel.
Side note: Mixed language messages (not containing your target language) will only translate one of the languages, you can work around this by highlighting the different languages separately.
Links again if you don't want to scroll all the way back up
Firefox Extension | Chrome Extension
#if you use twitter and want to crosspost this feel free#but please link to this post and perhaps paste the post text into the alt text of the screenshot#so people can translate the post text from english to their own language (or honestly feel free to translate it yourself and post that too)#qsmp#qsmpblr#qsmptwt#i think this could also maybe be useful for tweets that arent detected as another language so the translate option doesnt appear?#idk i dont use twt much#idk if anything like this has been posted before tbh#i just enjoy seeing people speaking in their native languages over on qsmptwt and when it occasionally happens here too#and i think itd be pretty cool to see it more on qsmpblr#tiggady tags#also i figure it could be useful translating from english into ur native lang!!! forgot to mention that in the post
787 notes
·
View notes
Note
Hi! How you doing the combination in the titles? Can you do a tutorial please! Thanks!
Hello @elvisbdoll 🫶🏻
~ Firstly, I'll share the link from where I learnt to do that. It is explained in a very easy and short way here.
~ You need to use Tumblr web on your phone or laptop for this idk why it doesn't work on the app.
~ I'll also explain below in my own detailed way, hoping that this becomes easy for anyone who follows my posts and wants to know how I do it😁

• Website for the Gradient Text :
TEXT COLOR FADER
• Detailed process of how I use customised gradient text on Tumblr :
( Pay attention to the colors that I have used in the steps as well as the screenshots to understand better. The markings on the photos are to make it easier to spot what I'm talking about. )
.
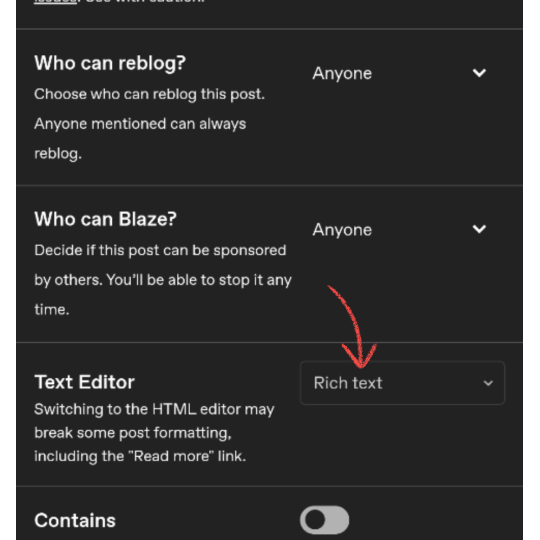
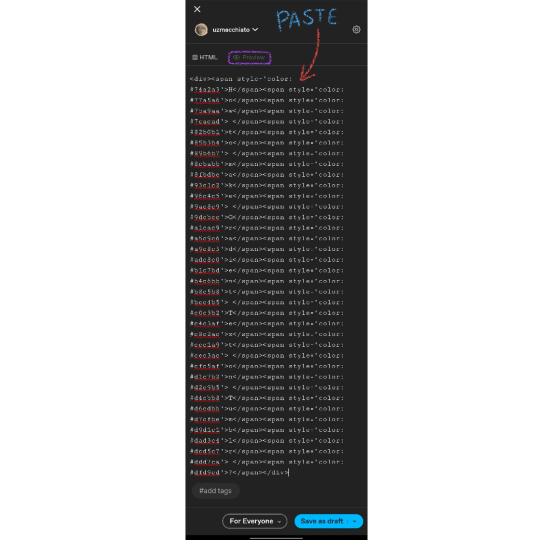
1. Create a post on Tumblr by writing the text you want to make a gradient of and save it as a draft. In the draft → Go to the Settings wheel and in the Text Editor section select HTML which is required by Tumblr to read a coded* text.
* ( The colors of the Gradient text are basically coded into text on the Website I shared above. Hence, changing into the HTML type here will help Tumblr recognise that coded text and turn it into a normal Gradient colored text. )


2. You will see a coded version of the text you wrote which is encoded between <h1>...your text...</h1> for my text in the photo below. You can toggle between HTML & Preview to see the coded and uncoded(normal) version of the text. Copy the normal version of the text from the Preview mode that you want to turn into gradient.

3. Visit the Website in the link I've shared above.
.
A: is the part where you paste the text you just copied and want to change into a Gradient.
B: is the number of colors you want to use in the gradient.
C: is the part where you put the color codes (HEX/RGB) or just swipe to get the desired color from the color wheel.

4. I pasted the text in the text box and made the changes that I need to do to get the gradient I want in the next part. I used 4 colors and put the Hex codes for the Teal and Beige colors. Once you're done click on "Generate Color Coded Text"

5. On the next page you'll get to see a preview of the text and the coded text in the box below. Click on Select All and Copy the coded text.
If you want to make any changes you can go back by clicking on "Create a new fade" and you will be taken back to edit the current gradient.

6. Go to the draft and delete the existing text to avoid mixing the coded text with it. Stay on the HTML mode rather than Preview mode.
Paste the coded text while you're on the HTML mode of the draft (the codes are really long depending on the number of colors and length of the text)
After pasting in HTML mode click on Preview and you're DONE.
Other than that you can edit the text style after pasting here into the basic styles provided by Tumblr — bold, italic, Chat, Intended, etc.

Final Result : How to make Gradient Text on Tumblr ?
I hope this was helpful😭 I love editing the text and making it match my dividers, so this is magic for me. You can DM me if you need any more help understanding this.
Thank You❤️
#gradient text#Gradient Text tutorial#asks answered#asks#ask answered#uzmacchiato_asks#custom text color#tumblr tutorial#ask
108 notes
·
View notes
Note
hi i'm sorry to bother you but do you have any tips on giffing dark indoor scenes? yours always look so good!
hi there! not a bother at all :) i can definitely try to explain the steps i usually take under the cut!
this tutorial will assume that you already know the basic steps of gif-making — if you don't, there are lots of great tutorials floating around on this site that can help you out! :)
here's the gif i'll work with to explain my steps, the bottom being the original and the top being the coloured/brightened version.

before we start, a general tip i recommend keeping in mind: if you want to brighten a dark scene, you'll want to get your hands on the highest quality download you can find. 1080p is decent, but if your laptop can handle 2160p 4k hdr files* without sounding like it's about to explode, that'll get you even better results!
(*colouring hdr 4k files requires a different set of steps — the scene will appear washed-out on photoshop, so you need to make sure that you don't end up whitewashing anyone if you do choose to work with this type of file.)
since most of my downloads are 1080p, i'll use this type of file in this tutorial.
the first step of my gifmaking process with 1080p files is almost always the same no matter what scene i'm giffing. i make a brightness/contrast layer and set the blending mode to screen:

now my gif looks like this:

depending on the scene and how washed out it looks after this layer, i'll play around with the opacity. for this gif, i didn't touch the opacity at all. use your best judgement for this, because every scene is different!
i find that dark indoor scenes are usually tinted in yellow or green. one of my first goals is to try to fix the undertone of this scene before focusing on brightening it any further. i go to colour balance for this, and play around with the midtones, shadows, and highlights.
again, every scene is different, so the amount to which you use colour balance will differ, but for this specific scene, my goal was to neutralize the yellow. i focused particularly on the midtones and shadows of the colour balance layer, moving the scales to the opposite of the reds.


doing so will help with neutralizing the yellow. the only reason i moved the scales towards magenta and blue (therefore making it a bit more red than less) rather than green and yellow in shadows was because i wanted a darker contrast in the blacks. moving them to green and yellow made the overall scene more yellow since there were so many dark spots that shadows affected. (you'll see what i mean when you start experimenting with your own gif — this part of the process really just depends on your preferences!)
our gif might not look that much better yet, but it will soon! our best friend channel mixer is gonna help us out. for an in-depth post about how to use this adjustment layer, i recommend checking out this tutorial.
i'm someone who prefers to make more than one layer for the same adjustment layer for a reason i can't even explain (i just find that it helps me stay more organized). so don't think of this process like i can only use this layer once so i MUST fix it NOW. you can create multiple layers of the same adjustment layer, because every layer on top will affect the ones underneath it.
since my priority is getting rid of the yellow tint, i went to the Blue section of the channel mixer and increased it in all of the scales:

this step alone has helped us out so much, because look at our gif now!

not only does the background look less yellow, but so does izzy's skintone.
now i'm going to focus on trying to brighten the scene even more without destroying the quality. the levels layer can actually help out a lot with this.

the amount to which i move each toggle differs per scene, and i think experimenting depending on your gif works best for this layer.
side note: i prefer not to use the ink droppers on the side because the contrast in the result usually ends up feeling too strong for my preferences, but if you find that this works better for you, then go for it! basically, the first dropper with the black ink should be clicked before you select the darkest part of the scene that you can find, and vice versa for the third dropper with the white ink — click it, and then select the brightest part of your scene.
curves is the next layer that does fantastic work! unlike the levels layer, i do actually use the ink droppers for this. it's the same concept, with the first dropper being used on the darkest part of the scene, and the third dropper on the brightest.
try to think of curves as something that not only further brightens your scene, but also helps with the colour neutralizing process.
i grab the first dropper, then click the darkest parts of the gif that i can see. depending on the undertone of the blacks that you're clicking on, the tint of your gif might actually change significantly. this is why i prefer to click once, then undo the action if i don't like what it gives me. izzy's leather jacket was the sweet spot for this gif.
when i'm satisfied, i make another curves layer and use the third dropper to click the bright/white parts of the scene. for this gif in particular, the lights in the background were a good fit because they carried a yellow undertone — this meant that my curves layer actually helped to further neutralize the yellows in the scene as a whole!


(i manually dragged the curves graph upwards for the third dropper to make it brighter. i don't need to do this if the dropper does this for me automatically, but since the lights were pretty bright, it only changed the tone of the scene and didn't increase the brightness — hence the manual step.)
pat yourself on the back, because this is what our gif looks like now!

this is good, but it's not great — there's still just a bit too much yellow in the scene for my liking (sorry, i'm picky! :P)
i created another channel mixer layer and played with the toggles until i was satisfied:


ta-da! the gif as a whole is much less red/yellow now:

this is when i start fixing the colouring now — namely, his skin tone. selective colour will be your best friend here. i wanted to make his face just a tad brighter and less of a yellow-ish magenta shade, so i focused on the reds and yellows.


then, out of habit, i created another selective colour layer and took out more of the "yellow" in the whites to make them whiter, and increased the black (just by +1, since the contrast is pretty good enough already).


note: i switched to "absolute" for these two colours. basically, relative = less vibrant colour manipulation, and absolute = more vibrant/stronger colour manipulation. i prefer to stick to "relative" for fixing skin-tone since "absolute" can be a bit too strong for that.
our gif looks like this now!

his face looks brighter and much less yellow, so i'm satisfied!
this next step is not mandatory at all — again, i'm just picky and despise yellow-tinted scenes. i personally believe that indoor scenes that are yellow/green tinted make them look more dark than they actually are, so i do my best to get rid of these colours.
i also don't always do this, but for this gif, i just simply went to hue/saturation, selected the yellows from the drop-down menu and decreased its saturation.

be careful not to do this too much. depending on the quality of your download, this can significantly decrease your gif quality. i tend to worry less about this when i'm working with 2160p files, but again, those files require an entirely different set of steps when it comes to brightening/colouring.
since this was a 1080p file download (and one that was actually less than 1GB, oops, don't do that), i played it safe and decreased it by -39 only.
note: you also want to be cautious of colour-washing skintone when it comes to this step. i find that another selective colour layer can help perfect the skintone in case the yellow drains out of it too much, but skip the hue/saturation step if it's too difficult to work with — better to be safe than sorry.
anyway, this is the final gif!

that's usually what i do when it comes to colouring dark indoor scenes! i hope this tutorial makes sense, and if you have any further questions, don't hesitate to reach out! :)
#tutorial#gif tutorial#resources#completeresources#coloring tutorial#allresources#dailyresources#userraffa#userdean#uservivaldi#alielook#usercats#usermoonchild#usernaureen#userbarrow#userabs#useraish#useralison#userisaiah#*mytutorials#i am so sorry if this is incoherent#it’s so hard to explain things coherently 😫
756 notes
·
View notes
Note
re: the tumblr ai stuff, please don’t wipe your blog!! your blog has been so important to me and many others as a place of authentic light and beauty and i would hate to lose it forever 💕
there is a way to download the contents of a tumblr blog (it’s in settings, i don’t remember rn, but i’ll find it if you need it) maybe you could upload to another site or a personal site?
i know this is very serious, and i hate how we are unwillingly contributing to synthetic art, but the world would be poorer for me without your pictures <3
Thank you. Your words mean a lot to me.
This is a dilemma for me. I have loved doing this blog and going out to look for pictures and interesting things to bring here has given me motivation and meaning through years of struggle with depression and several kinds of grief. Going out to look for pictures has put me in situations where I have seen incredible beauty, much of which I never really managed to capture. Also, the many warm and kind messages I've received from people all over the world have given me heart and made me feel less meaningless as a person and more connected. Sometimes I've been criticized for buying the checkmarks and giving money to Tumblr but I wanted to do what I could because Tumblr has been my one happy and safe place online. But now this. To me AI in relation to creativity is just a way for well-to-do but untalented people, the proverbial tech bros, to profit from other people's hard work and creativity. It has no redeeming value in relation to creativity and is actively harmful to artists of all kinds. <trying to figure out how to put a read more link here> I don't even count myself among the real creatives, artists and writers and others who have worked hard and put years into honing their crafts, into learning to translate their hearts and unique spirits into their creative expression. I just see beautiful things and take pictures of them. But it would still make me sick to see AI works based on my pictures, on these times and places that have meant so much to me. Recently I saw a set of cat 'photos' on here that everyone was reblogging and exclaiming over but that to me seemed to just be AI art that was more convincing than most. As time goes on more and more output of AI is going to be almost indistinguishable from real works and unscrupulous people will pass them off as real, getting credit for what was actually created by others. Whether they profit from them becomes almost irrelevant at that point because what's worse is that we will have less and less sense of what is real. And as some have pointed out AI will now also be scraping from AI, muddying the waters further from here on in. This is an apocalypse of sorts, an apocalypse of creativity, ultimately likely to kill the joy of artistic endeavor for many who would otherwise produced brilliant, beautiful, funny, and/or shockingly original things. I'm still parsing and dissecting my thoughts and feelings about what Tumblr has done and how to react. Staying and leaving my blog up feels like consent. I am not confident in the integrity of anyone connected with scraping sites for AI. I'm not convinced that a little toggle in settings is going to make much of a difference in the long run. On the other hand I like posting here and I have received enough messages over the years to know that my blog is a positive influence on some lives. I was looking forward to May and June and posting pictures of the incredible beauty of eastern Pennsylvania in those months. And I was planning on making a side blog for posting some poetry I've been working on. It will break my heart to leave.
I haven't decided yet. Believe it or not this whole thing has given me awful physical symptoms. I'll let you know when I decide. Thank you again for your kind and lovely note!
#ask#ai#tumblr#thank you#sigh#the whole you’ve already been assaulted so you may as well stay and be assaulted more isn’t the great argument you think it is
254 notes
·
View notes
Text
okay sooo i made some sketches for a few of the sprites i'll be using, some of which i'm gonna show here, as well as thinking about the code edits i'll need to do for this project. i don't want to just redraw a shimeji to look like SQQ, i want him to act and move in character, so i have a whole bunch of edits to do

some of my notes:
i'm not yet sure how many sprites some animations will require so i'm not putting in a final number, or numbering which sprites will be used for what animation, but i'm going to throw out an estimate that the final sprite count will be about sixty-ish.
i mostly have all my animations already planned out. i know what i want them to look like and know how to do it, but there's a few i still need to think about, like one of the multiplying animations. i considered just getting rid of the one i have no ideas for, but i'll think on it some more. i'm open to suggestions too
i'm considering if i should code and draw in interactions with other shimejis already. it's a bit of a far off idea but i might make a Binghe or maybe even Liu Qingge or Shang Qinghua? who knows. anyway it'd be fun to make some interactions between them. i could even add a tutorial for adding more "romantic" interactions since i want to leave this area open for shippers. if i make it that is
"pet" - yes you can pat Shizun on the head. it makes him embarrased but he likes it.
i'd like to make this an incredibly intricate shimeji with a lot of animations but i'm worried about the performance. they may not be Chrome level RAM eaters, but they're not the lightest and i don't want to create something which people won't get to enjoy
i'm still considering where to host the files. thought about maybe hosting them on a patreon account (for free. the Shizun Distribution System does not demand payment for what it does) but i'm, again, open to suggestions
i'm making this for the Shimeji-ee DESKTOP SOFTWARE FOR WINDOWS. i've never used things like the shimeji chrome extension nor do i own any apple devices. i don't know how to work with these. HOWEVER, if there's someone who DOES know how to work on those, feel free to make versions compatibile with apple or with browsers, BUT only if those versions ARE DISTRIBUTED FOR FREE AND CREDIT ME AS THE CREATOR. i want as many people as possible to enjoy my shimejis
two long idles, one of which i'm showing the sketch for. in the notes i wrote down "looping" and "sound" - while it may be a project that i do not realize in the end, i thought it would be cute to make an animation where Shizun plays the guqin and add sound to it. there would have to be the option to toggle animation sounds, and another to loop that animation, but i thought it would be absolutely adorable to make a sort of music player out of that animation, allowing the user to add a downloaded copy of their playlist into the files. imagine - you're sitting at your computer, studying, working or filing your taxes or whatever, and Shizun's on your screen, doing his thing, providing background music for whatever it is you're doing. cute, no? but this feels like the sort of thing that might get annoying or make your computer turn into a jet engine from overworking. so, for now this is staying a concept. the animation will be present, that much i guarantee but all that other stuff might not show up
OKAY, SO. as you might have noticed i have three designs. i sorta changed them since i made the first post about this, because as it turns out my computer screen doesn't actually display bright colours all that well. might have to fiddle with the settings on it more. anyway this time i coloured looking at my tablet screen so they should be more accurate to what i wanted. i decided that my previous design didn't look like mint chocolate chip ice cream enough <3
so, i'd like you guys to tell me which design is your favourite! i have mixed feelings about design no. 3 because, while pretty, it's kinda too detailed. i just know i'd get sick of redrawing it so i might simplify it further for the finished product
here's the designs!

*slight correction: the eye colour is not final! i left the sketch in on those parts and forgot to actually draw the finished design for the eyes. i don't have the time to correct that at the moment, however. sorry! for a closer look at how the eyes might look like, see previous design
#svsss#scum villains self saving system#scum villain#shen qingqiu#shen yuan#chibi art#shimeji#my art#shizun shimeji#< new tag for sorting posts about this project
29 notes
·
View notes
Text
BG3 Photomode Tutorial #3: Otis_Inf Camera Tools
Chapter 0: Overview
Chapter 1: Script Extender Debug Console
Chapter 2: Scene Manipulation
Chapter 2.5: More Scene Manipulation
Chapter 3: Otis_Inf Camera Tools
Supplement: Mods and Resources
Instead of talking about ReShade, I'm going to talk about the awesome Otis_Inf BG3 Camera Tools. These will allow you to pause the game, move the camera around, and add some depth of field effects using ReShade and an addon.

If you want to know about ReShade and basically have a video version of what I'm going to cover, check this video here. This video is where I learned pretty much everything about these tools. If you like watching over reading, go for that!
What you need to use these tools:
ReShade - @moriarfer reported some issues with 6.4.1 (latest as of this post) and downgraded to 6.3.3 to resolve that issue. If you're worried, download from that 6.3.3 link (links to the ReShade site.) Either way, you should grab the "Addon" version for IGCS.
Otis_Inf Baldur's Gate III Photomode Tools v1.0.23 (latest as of this post) - It's behind a Patreon for $5.50 USD a month. Note that sometimes it breaks after a major update and Patch 8 is Soon (tm) so ... buyer beware.
IgcsConnector - note that when you install ReShade, you can select IgcsConnector as an addon when you go through the wizard. However, you can also download it from here: IGCS Connector - I personally use v2.5.1 but 2.5.2 should be fine if you're running ReShade 3.x. If you're running ReShade 4.x, go for 2.5.3. Scroll to the bottom to see your options.
Installing ReShade
For installing ReShade, I recommend that video, but the Wizard guides you through it pretty easily. If you don't know what shaders to get, stay tuned for another post on that. There is one configuration you may have to make if you've never got ReShade working in BG3 before, and that's the Depth settings.
Installing IGCS
The video also covers IGCS but truth be told, it's easy to install manually if you didn't do it with the ReShade Wizard. Download that zip for IGCS and extract it to your Baldur's Gate folder. If you installed ReShade with the wizard, it will likely have a structure like I have. If you didn't, it may be slightly different.


ReShade Depth Settings
When you run ReShade for the first time in BG3, you may need to configure the Depth settings. This is easy to do if you have the DisplayDepth shader installed. It should be installed by default, if I recall.
Toggle that on and check your settings: just make sure that the Reshade Depth Input is Reversed. You can check if it looks okay - a setup with characters in a foreground should look like this while DisplayDepth is toggled on:

Make sure to uncheck DisplayDepth when you're done so the game looks normal.
Camera Tools!
At last! The fun stuff!
There's no "installing" them. You extract archive and you have a standalone program that injects code to unlock the camera. As such, it may be flagged as a virus by certain virus scanners. Be assured, if you got it from the Patreon, it is safe.
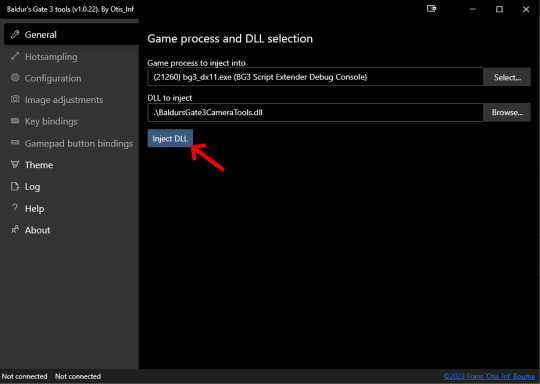
For best results, run the tools (IGCSClient.exe) after you've started BG3 and at least loaded the start menu. And then press Inject DLL. Once you do that successfully, the button will change from "Inject DLL" to "Re-Hook XInput".
I personally use the keyboard/mouse, but it is possible to configure the buttons with a controller under "Gamepad button bindings". I will not be teaching you that, however.
Let's start with the essentials to take a single shot. I use the default keyboard settings so I'll be using those.
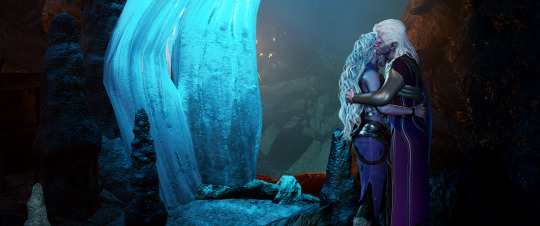
You can start a scene or just find a nice place or animation in the game you like and set up a shot. Once you find a shot you like, press 0 on the NumPad to freeze time.
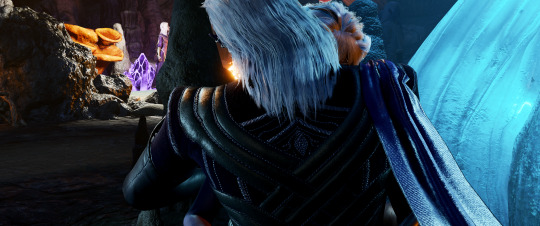
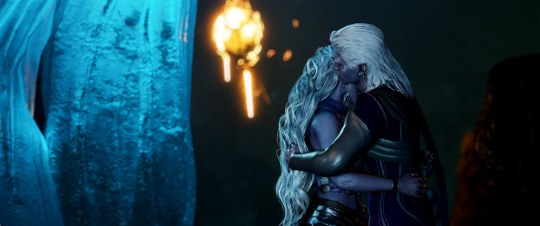
I'm going to have my Tav, Coranzan, hug his sister, Z'ress so I'll pause it mid-animation so I can take as many shots as I like from as many angles as I like.
I've frozen time and the default camera shows this, which isn't particularly interesting to me.
Here's some default controls for your reference:
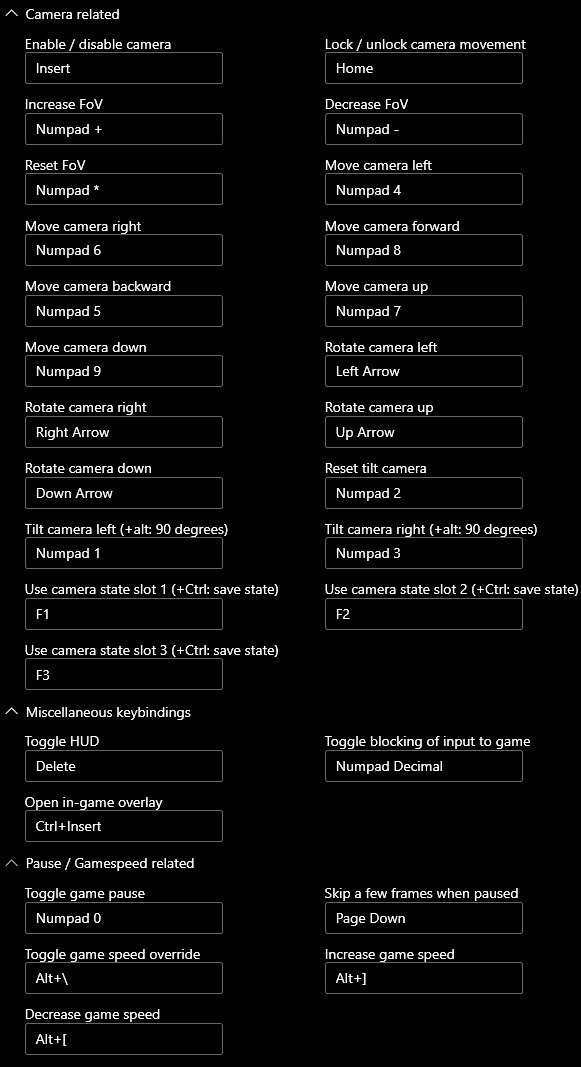
TL;DR:
8456 on NumPad is WASD
7 and 9 on NumPad is Up/Down
1 and 3 on NumPad Rotate Left/Right
2 on Numpad resets rotation
Up/Down/Left/Right arrows on Keyboard Rotate the Camera
NumPad + and - Increases and Decreases FoV
NumPad 0 Pauses/Unpauses
Delete on Keyboard Removes the HUD
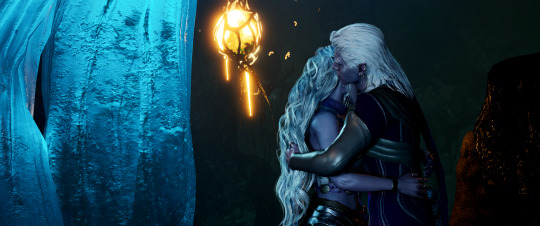
So I let's press Insert to unlock the camera and used Up/Down/Left/Right arrows and 8/4/5/6 on NumPad to move the camera to their side.
This is okay, let's work with this. I would like them to be a bigger focus in the shot. So I'm going to Increase the FoV with + on the NumPad until I get what I like. I'll have to adjust with a Arrow Keys and 8/4/5/6 NumPad as I do that.
Alright this is okay. Let's make the backdrop nice and soft. By default you need to open ReShade using Home. By default you should get something like this, which may vary depending on your settings - don't worry about that too much for now. For now got ahead and click on the Addons Tab and then click Start depth-of-field session.


Depending on the settings, your game might look really blurry - don't worry, that's normal:

Most of the settings I do not regularly change, so if you want to copy the numbers as a starting point and slowly modify them, you totally can. But this will get very long if I get into each of the settings. So here's my "quick and dirty" depth of field settings. Some settings like Blur Type may drastically increase the time that it takes to render a shot, as a heads up.
Let's focus on a couple numbers for now:
Max bokeh size: This is basically the amount of "blur" you want to add to distant objects. If you increase the number, the double-images get further apart. If they're VERY part apart, the background will be EXTREMELY blurry.
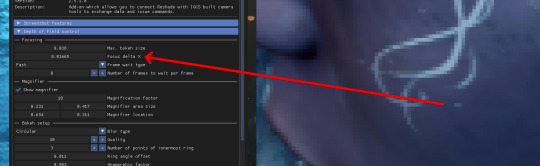
Focus delta x: This controls the plane where the image maintains focus. If you increase the number, the foreground characters/objects will slowly come into focus. If you go too far, they will lose focus again. So we need a tool to help us with that to ensure details stay focused: The magnifier.
Magnifier: Check Show Magnifier and adjust the location numbers to change its left/right, up/down values. Pick something to focus on like an eye or some other tiny detail. Now adjust the magnification factor to zoom in on that detail.
I know Coran's tattoo pretty well so I'm going to get these two points from his tattoo to line up:
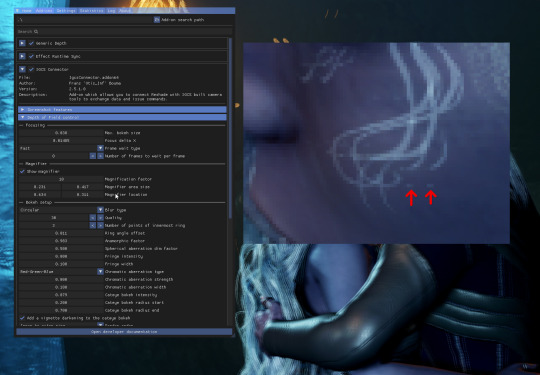
So I just need to modify the Focus Delta X to line them up like so:
Now that we've done that, we can see that their faces are nice and clear but there's double images for the fireflies and the like. These will become nice soft blurry bubbles when we render the shot.

So now you're going to want to click the Start Render button at the bottom of this section:

Once you click on that a bar should appear in the top left and the double-images should disappear. It should start blurring the background more as the meter increases.

And once it's done, you can simply press the ScreenShot key and it shoulder render a screenshot using ReShade. If I recall correctly, this will be the Baldur's Gate III executable folder, but if you click the Settings tab, you can change it.
The resulting screenshot should be nice and soft in the background and focused in the foreground with perhaps a bit of smoothing on features like hair:
Before rendering:

After rendering:
Some other options I'll go over briefly:
Hot sampling: This gives you the ability to resize the window beyond what you monitor can see for extremely high resolution shots. I generally don't do this unless I want to do a detail shot like an extreme closeup or some mark/scar or something.
Configuration: If it's taking you WAY too long to move the camera because you increased the FoV to zoom way in, slide the options in the left column around, it really helps.
Image Adjustments: check Higher LODs for distant objects to have better rendering.
And that covers most of the tools. I may add another couple supplementary posts after this of some mods that I use and the shaders that I use in ReShade.
But for now, I believe I have at least briefly covered the major points, but it could be that I've glossed over some details. If you're struggling, please let me know.
Thanks for reading! Please send me any questions and I'll be happy to help in the comments, DMs, Discord, or whatever you need!
#mog's bg3 virtual photography tutorial#bg3 photomode#bg3 photography#bg3#bg3 virtual photography#baldur's gate iii#baldur's gate 3#mog's vp tag
32 notes
·
View notes
Text
Sims3SettingsSetter thing
OLD POST REALLY SORRY IF YOU BOOKMARKED THIS I'M DUMB LMAO
NEW: https://www.tumblr.com/sims3fiend/764382296987025408/sims-3-settings-setter?source=share
---
Was bored ripping my hair out trying to do optimizations so I made this instead of anything actually worthwhile. For now it's mostly just a novelty. Rushing it out as I'm at work 4x12hrs starting tomorrow :)
This is a ALPHA IT SHOULD BE SAFE BUT IT MIGHT ALSO NOT BE. Speedwriting this post as I've gotta go sleepy.
Ignore the strange names for things i-it's an alpha.
Simsfileshare
To use, have an ASI loader like this or maybe this and shove it into the folder where the sims 3 exe is. Press insert to toggle
What it does:
Renderer Flags:
This was the original idea and what this was solely going to be. I found a function that set things like wireframe and other renderer things, so I made a script for it.
Some useful things it can do are turning drop shadows off, which is nice for reshade as it lets you do a better looking AO. Some people might find the pips, scene boxes, etc. useful but idk. Some of it is neat to look at I guess.
Game Values:
Just the one for now, max lots, it's still effected by the weird range/frustum cull thing that effects shadows, so outside of that range extra lots wont load. These are going to be static values that can be edited ingame. There's a few other ones I've found like ObjectSizeCullFactor but I need to properly test them. I'll also add some informational ones that can't be changed like loaded object count, etc.
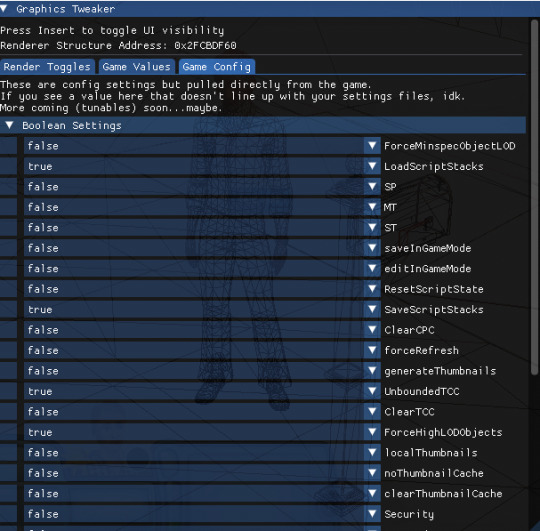
Game Config:
This is where things went off the rails…
I'm hooking two functions here to grab and set boolean and string config values directly as they're called in memory, which is important as some are overridden or altered, or aren't listed in the files at all (ForceHighLODObjects my beloved). Currently it lists mostly everything in the SGR file and some ini settings. The boolean stuff is a pretty sure bet, the strings might be overwritten elsewhere idk. Please keep in mind that some of these settings can be very damaging to your game and sanity, do not use ones you don't recognize on a save you love.
To enable the config overwrite, tick the box next to it and hit save. They won't do anything unless the box is checked.
I'll be adding tunables (like LightingCommon) into the list… eventually. Currently they're a little… weirdly/interestingly/uniquely written in the decomp'd functions I've been looking at, so I haven't been able to get their values. There's probably a really simple way of doing all of this in one of the dlls or packages or something but idk. If you know lmk.
I'll also probably try and find the in memory location of some of them, so they can be changed ingame without the need to restart.
Issues:
If you have any problems/info please message me either on discord(fleshtexture) or tumblr ! Keep in mind it's still an ALPHA (or whatever) and I haven't really tested it that extensively.
Known problems:
Config sorting is yucky
Code looks yucky, weird names for things, don't look until I rewrite!
There was a freezing issue due to how I was hooking d3d9 but I think I fixed it? Idk I've never used imgui before.
#sims 3#sims 3 mods#ts3#sims3#another rambling post#auuuuuuuuhhh#im forgetting something idk#goodnight
59 notes
·
View notes
Text
On Tumblr
I will not be moving. I'm fed up with AI but its a system that has poisoned every other site already, and poisoned the internet at large. Other than turning off the toggle and being mad that its happening again, I'm more than aware that my control over my work has already become increasingly flimsy on the internet landscape. Frankly, our data was scrapped through search engines long before tumblr asked for a cut of the pie just due to its public nature. So its hard to care that much by yet another site doing such, but its especially frustrating given how long tumblr did resist many of the temptations of data selling. Additionally, tumblr as a site handles content differently than others. A deleted blog's posts can still circle indefinitely due to the nature of how reblogs work. Deleting everything offers little protection, and moving anywhere else is just an additional ticking clock until similar happens, has already happened, or the sites are so new and flimsy that if you pay attention at all you can already see cracks ghosting along their design or operation. However it should be noted this frustrating move comes directly after another gross mishandling of privacy, site protections, and frankly a bafflingly public display of bigotry at the hand of the site CEO. It has been truly horrific that not only is this a consistent problem, but its one that comes at the tail end of a, frankly, much more upsetting action. I guess if I ask anything its to not let the existence of this new problem completely overwrite those events. Basically, I'm tired. More accurately I'm just fed up. AI scrapping is a problem I get very little say in, that's really the whole issue with its use of scraping as training method- the lack of say. I'm not a paying customer who can revoke support for a product, I'm just another individual experiencing the 'content' equivalent of a pickpocket. Glaze and nightshade are not fullproof solutions, nor do they 'poison' data sets in the way people might believe they do. Its an evolutionary arms race, but one with rollback and a billion different hydra heads. So yeah- I'll just grit and bare it and keep my money to myself. That said, for the people who truly want other options, I have other accounts on Twitter (Consistently used, although I talk and share less) and Bluesky. (Don't particularly like)
Sorry that the modern internet continues to suck!
151 notes
·
View notes
Note
I hope your day is as amazing as you.
What would happen is soap was Makarov's son who run away to live with his Scottish Aunt? He knows Russian and how Makarov operates and wants to stop it, that is why he joined up. What would happen with the team and Makarov finding out?
Have a lovely rest of the year. I hope it is restful and relaxing
i actually love this prompt so much !! thank you, and i hope you are doing well :)
-
The first thought in Soap’s head upon being passed a photo of his father isn’t of revenge or abhorrence like he thought it might be—it’s wondering if Ghost notices the tremble in his hand as he’s given the picture.
His second thought is that he must have, because Ghost isn’t even looking at the photo pinched between his fingers.
He’s looking right at Soap.
“Makarov,” Price supplies, though Soap needs no introduction. He’s more familiar with the task force’s newest target than he’d like to be.
But he’d been waiting for this. Soap had been surviving out of spite and the hope that maybe one day he might finally reach this point. That maybe he could be the one to put a bullet in his father's skull for all he's done.
Ghost’s eyes continue to bore into the side of his face up until a passive dismissal from Price, and even then there’s a second set of footsteps behind Soap as he leaves the bar.
His shadow only lets him get as far as the elevator of the run-down hotel they're posted up in for the time being, before the emergency stop toggle is pulled just as the doors slide shut and the car moves upward.
Soap is suddenly shoved up against a wall, Ghost's forearm pressed to his throat while a handlerail digs into his spine. He could fight the lieutenant off, he could—but Soap’s senses tell him it'd be futile. That whatever it is Ghost wants from him would be inescapable, inevitable, no matter how hard he tries.
"You know something," Ghost says, barely loud enough to be heard over the blaring elevator alarm. His eyes are intense, dark—and for a moment Soap is in full understanding of the fear Ghost's enemies carry for him.
"Not sure what you mean, sir," Soap replies. And maybe a part of him knows exactly what it is Ghost is talking about, but a louder majority is panicked. Confused.
Soap's throat is squeezed tighter. A threat, from his own lieutenant.
"About Makarov," Ghost grunts. "I saw your face when you looked at that photo. There's something you're not saying, MacTavish, and I reckon you'd spit it out before I make you."
Soap's eyes go wide, never having even thought of Ghost picking up on his expression. Never having even thought there was an expression. He feels his heartbeat jump pace, thumping in his throat as he struggles to swallow. This isn't how he'd imagine telling anyone his place in this. Who he really is.
In all honesty, he hadn't imagined it happening at all, mostly because he wished for it to never have to come up.
But perhaps Soap should've known that Ghost is too smart for that to be possible.
"Don't think you'd believe me if I told you," Soap rasps. He knows it's the wrong answer for Ghost, but he's not quite sure what else he could say.
Thankfully, Ghost doesn't suffocate Soap further, though he doesn't budge his hold yet, either. Not as he hisses, "Try me."
Soap screws his eyes shut, huffing air through his nose to brace himself for whatever reaction he'll receive. For whatever reaction he doesn't want to wait on.
"I'm—" Soap sighs his uncertainty, his voice quivering, "Makarov is my father."
Though Ghost scoffs, Soap can feel some of the pressure on his windpipe mercifully lift. "Bullshit he is. Why would you be hunting him?"
Soap finally begins to scrabble at the thick forearm at his throat. "I ran away when I was old enough. He... he made me do awful things for him, LT, and I—can you please just let me go?" Tears sting the corners of Soap's eyes. "I'll explain everything, I just—"
Ghost suddenly frees him, and Soap doubles over, heaving in gasping breaths as he rubs at his neck and collarbone. The alarm stops ringing as Ghost pushes the emergency toggle back in place, and the car begins moving again.
It's a blur, being led to Ghost's hotel room, but he's appreciative to not have to think about his steps as Ghost drags him along and seats him on the foot of the made bed.
Soap opens his mouth to let his explanation begin tumbling out, but Ghost shushes him before he gets the chance.
"I'm getting Price, Gaz, and Laswell before you say anything," Ghost tells him. "Whether you like it or not, I'm not keeping this secret from the team if it'll help us take down your f—Makarov's operation."
Soap understands, he does—but that doesn't mean it hurts any less to hear the distrust in Ghost's voice that Soap had only recently managed to work away.
Ghost pauses in the doorway, and for a hopeful second Soap thinks he's changed his mind.
"I'm sorry," he says instead, before turning and heading back into the hallway.
The door clicks loudly shut, the electronic lock mechanism resetting. Soap sighs, feeling his shoulders slump uncomfortably low as he waits. He suspects he has a night of storytelling ahead of him, now.
If only he'd been more careful.
*
The team takes in the new information better than Soap had anticipated.
Ghost says nothing the entire time. Asks no questions and offers nothing more than a grunt or huff to acknowledge what's being said. Soap only hopes his walls haven't been permanently rebuilt.
Price takes the information in stride, just as Laswell does. They both ask questions that pertain more so to their current mission, poking and prodding to see if any of Soap's personal intel could help them find more and easier success in the near future.
Gaz sits with him and tells Soap it changes nothing about who he is. That because he's still fighting for the right cause, nothing else matters—not his past nor paternity.
Soap is just grateful that beyond his confrontation with Ghost in the elevator, no rash decisions have been made otherwise in the face of this revelation.
But after everything—Soap just wants to sleep. He just wants space.
It takes longer than Soap would’ve liked for it to happen, but it does eventually. He’s finally allowed to leave the room and shuffle to his own, though not before Price catches his arm in the hallway, once Gaz and Laswell have both disappeared, Ghost’s door having long since been shut.
“This isn’t to say I don’t trust you to do it,” Price says, “but if it comes down to it, Soap—you can’t hesitate.”
Can’t hesitate to kill Makarov, Price means.
“Of course, sir.” Soap nods. In no world does he need to be told to take action. “I understand. No second-guesses.”
Price hums. “Good,” he says, and pats Soap’s shoulder. “Now rest up, sergeant. Lots of work still to do.”
Soap nods again and bids Price goodnight before finally slipping into his own room. He barely takes the time to toe off his shoes and shed his jacket before collapsing onto the bed, more than ready to curl up and sleep for an eternity.
But alas, as Price had said—there’s still plenty left to do.
#ask#i realize i’ve left out makarov finding out#but that is because i could not decide what would happen#and i apologize for that and thank you for this prompt anyhow#because i enjoyed writing this#simon ghost riley#john soap mactavish#kyle gaz garrick#captain john price#kate laswell#task force 141#writing
217 notes
·
View notes
Note
i feel sooo dumb asking this but how do u make the text a color gradient on ur posts / a color you actually want?? i feel like the colors we have available are soooo drab

aw no don’t feel dumb for asking,, we all start somewhere & i’m super happy to help ૮꒰ྀི⊃´ ꒳ `⊂ྀི꒱ა !! ( as i was once in your shoes as well & had to figure it out all on my own with a bunch of v v v helpful posts from like 5-6 yrs ago T^T )
this is gonna be really long bc i wanna be as transparent & as helpful as possible so be warned pfftttjsfhdjh

but yes i so agree w/ you that the very minuscule, very . . . neon . . . colours aren’t really to my tastes either T^T so for colour picking i normally find a picture to use for a general ~vibe~ ( ie. the gif in my pinned, i took a still and uploaded it to this website [https://imagecolorpicker.com] & individually picked a light to dark green gradient i was happy with ^^ )
however you could also generate a gradient you’d like from this website [https://coolors.co] & randomize it until you get a colour scheme you fw (˶˃ ᵕ ˂˶)
oooooor you could just manually go through various pinks, blues, greens and purples on this website [https://htmlcolorcodes.com/color-names/] & pick a light to dark gradient all by yourself ദ്ദി ˉ͈̀꒳ˉ͈́ )✧
as for actually colouring the text, this website has been my holy grail for like a year now [https://www.stuffbydavid.com/textcolorizer] and it’s v straightforward. just input what your text is in the textbox, pick the gradient effect ( for my post I used the three coloured gradient ) , input the hex codes of the colours you selected going from light to dark ( or vice versa if you wish )
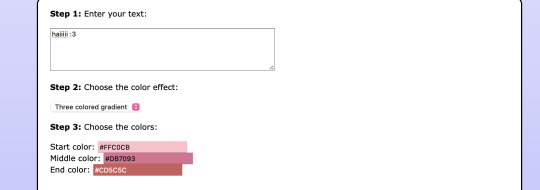
do not bother with anything from “step 4”, look at the preview of the text and if you’re happy with it , copy the entire box from the HTML code section.
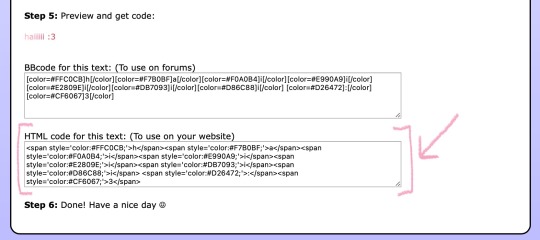
then you’re gonna open tumblr and create a new post but instead of directly pasting it on, you have to click the gear icon on the top right to toggle settings and go to text editor and click the ‘HTML’ option which will bring you to the coding ( i think ? T^T )
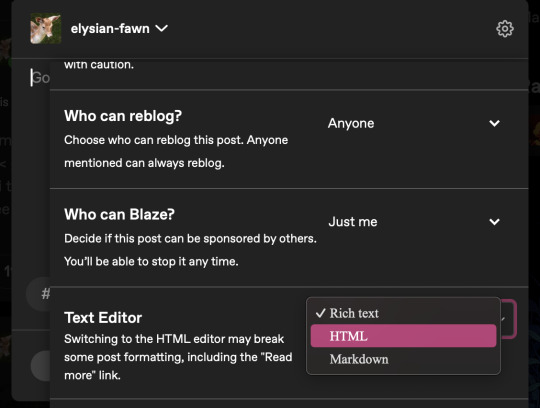
& that’s where you’ll want to paste what you copied earlier , and if you don’t want to change the font you can click “preview” and see if you’re happy w/ it & save the draft and add to your post as normal once you toggle back to "rich text".
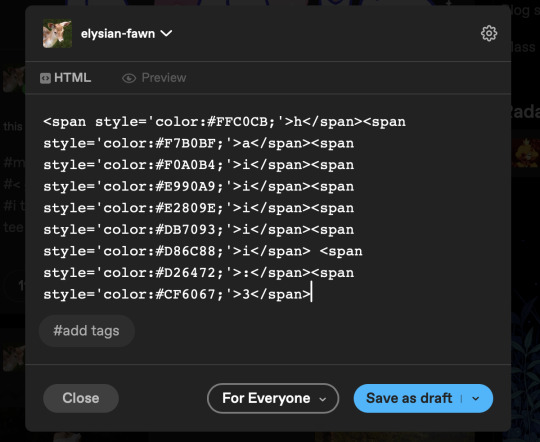
& the final result should look like this : haiiiii :3
however, if you are like me, and want that extra little flourish, you can literally just search up " font copy and paste " and like go to the first site or wtv & type in your text and copy the font you wish.
however it gets a little convoluted and time consuming in regards to pasting it (if you use a gradient), because you have to individually replace each standard font letter with the desired font letter like so until the entire word is replaced w/ ur desired font ^^
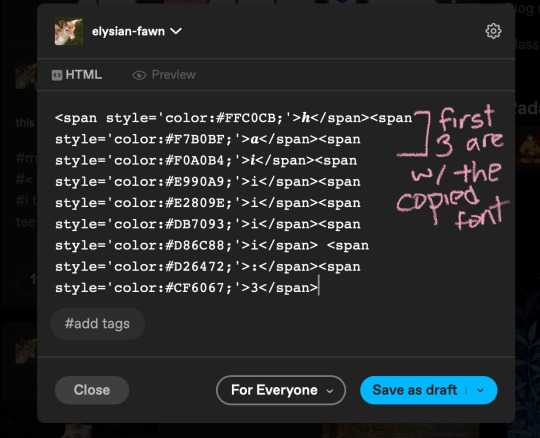
& the final result should look like this : 𝒉𝒂𝒊𝒊𝒊𝒊𝒊 :3
but, if you only do a solid colour it's much easier to replace the text as in the html side it'll look like " <span style='color:#DB7093;'>haiiiii :3</span> " & you can easily replace the whole text [ in this example "haiiiii :3" ] in just one easy paste [ with "𝐡𝐚𝐢𝐢𝐢𝐢𝐢 :3" in its stead ]
ALSO ! my biggest tip would be to make two separate drafts bc it gets so confusing for me personally when i see the coding for the large text wall on the rest of my post. so what i do is just make a separate draft of the coloured text, copy the final result then paste it onto the draft i'll actually post ₍ ᐢ.ˬ.ᐢ₎
very slight disclaimer though, i majority use tumblr/format my posts on the desktop version, so i'm not entirely sure if this is applicable on mobile ( in regards to the html toggle on tumblr ). regardless i hope this was straightforward & easy to follow nonnie ,, here's to gracing tumblr w/more visually appealing posts 2025 o( > ᗜ < )o ₊˚⊹ ᰔ

#𓂃 𓈒 𓏸 𝚒𝚗𝚋𝚘𝚡 𓆟 • . ˚#this is a very imperative skill set to have when writing fanfic so you can have a visually appealing layout#. . . speaking from experience . . . don’t ask ໒꒰ྀི๑﹏๑// ꒱ྀིა
29 notes
·
View notes
Note
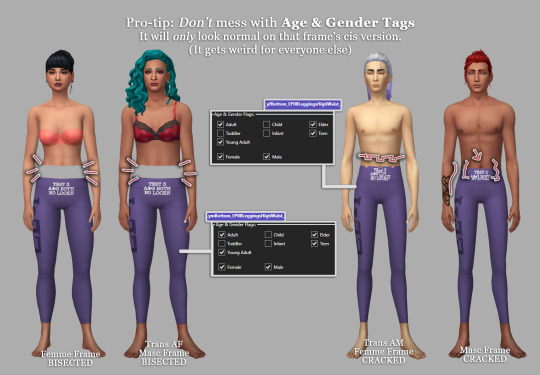
Hi Xan hope your week is well !! I've been heavily referencing your guide to making clothes for trans sims and it's really helpful ! But I'm having issues with the pants specifically T_T I made my leggings for both fem and masc frames and followed your recommended flags and I'm having gaps on the waistband for both FTM and MTF sims :pensive: unsure if it's a mesh issue or a flag issue for me honestly :( thank u in advance !!
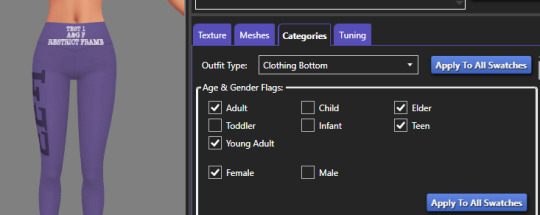
Hey there @suzukipc! Pants are tricky. Accessory leggings/tights don't have a mesh, so they shouldn't have any gender-issues--they're just smacked on the body--but leggings as pants do. I'd have to see your files to be sure, but if you mean Skin Tight Pants (Leggings in S4S), that might be a mesh issue, due to the way they're made--but tagging can factor in? Let me put something together...
(4 hours later) ...Okay. In trying to figure out how to help, my answer turned into...a tutorial. Sorry about that! So, here we go:
Troubleshooting: Tagging Trans Sim Bottoms
So. These leggings are from Discover University, made for AF Frame. (Note the Age & Gender flag, set to Female. That's the base they were built on, not who can use them. I'll get back to what this does.)
I've made 3 copies, and tagged them all different ways to show what would happen. Dragging Carmen and Erik back into this, guest-starring Roxie as cis control:
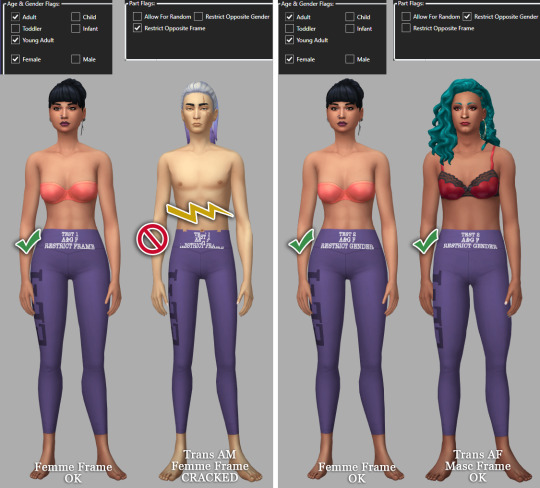
Roxie's fine either way, because her frame and gender match. Carmen is okay-ish, but Erik is...not. AF-Frame meshes break on trans-masc Sims, essentially shoving their hip-bones into their ribs. We saw that in the tutorial, so no surprise there.
For science, let's do the same thing with the AM version of this same mesh, with Henry as control this time.
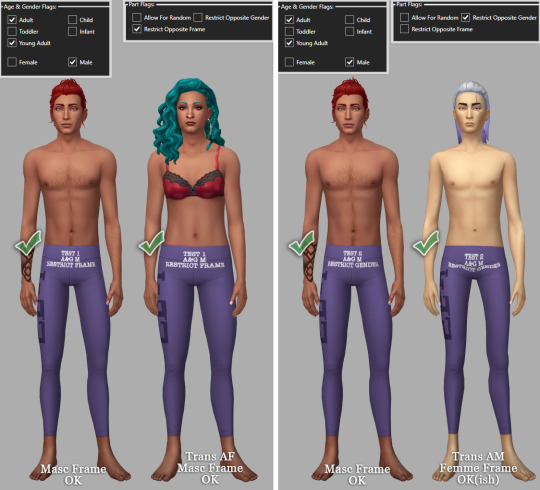
Generally okay? Carmen's hips are in AM position, which looks fine. Erik really never win with pants, but that's the best we get most times. At least his torso is intact! (This is why I recommend using AM Frame if there aren't meshes for each Frame. It works well enough.)
I've gone over all this before--but there is one thing I didn't cover. Remember the Age & Gender tags I mentioned earlier? Some creators check both genders here, and the results are...not great if the mesh is based on the body, which is the case with leggings. The game (best as I can tell) tries to enforce the mesh's original Frame, with weird results for everyone. Here's what happens when you toggle both genders under A&G: AF Mesh, and AM Mesh.
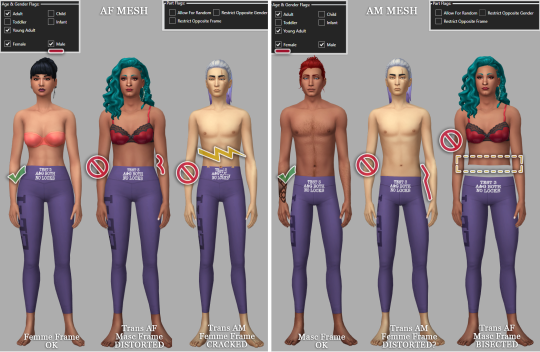
So, AF mesh: Carmen now has a bubble butt, love-handles, and weirdly skinny AF-Frame legs. Erik's waist is cracked, again. (Sorry, Erik.) AM Mesh: Erik has AM-Frame legs and hips--and Carmen has become a magician's assistant. (Sorry, Carmen.) Note that Roxie and Henry are fine, because their gender and frame match the meshes. Can't break something made for them.
But if it's not for them? It'll break them too.
It's even worse on fullbody meshes...but that's an aside, and I'll post about it another time. I feel compelled.
If you see your problem here, hopefully you have your answer! If not, that's okay. Just send us another message and I'll have a look at the files for you, if you like. (I promise not to send you another tutorial. ;B)
To everyone else: if this helped you, remember to share. Never know who might need the info. Thanks for reading, and Happy Simming. :3
#asks#inclusive asks#suzukipc#sims 4 studio#s4 tutorial#ts4 tutorial#s4 cas tutorial#ts4#simblr#the sims 4#curse you thorough testing#this did take 4 hours#and 6 meshes and 5 game loads#so hopefully it helps someone
16 notes
·
View notes
Text
I was asked by @x-littlemoth how I do my VGP and I explained the basics here! This is a continuation of that tutorial with my own personal methods! For this tutorial you'll need this mod (in addition to the ones mentioned in the last post):
CharLi This is an excellent lighting mod that allows you to spawn individual lights and adjust their color, brightness, rotation, etc.
And here are some other mods I recommend, though they aren't necessary!:
Additional Portrait Presets I can explain more about why adjusting FOV or rotating the camera 90 degrees is useful below, but these presets save you the effort of tweaking yourself! Photomode Expression Megapack No tutorial needed, this just adds extra facial expressions you can select in photomode! Works exactly the same as the vanilla one and doesn't replace anything.
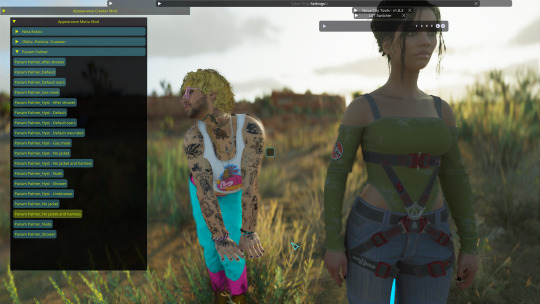
Appearance Creator Mod (ACM) I won't cover this one here because there is already a wonderful tutorial by PinkyDude who explained it way better than I ever could which you can check out right here! Briefly, this allows you to swap/toggle clothes, accessories, etc. on NPCs.
If you'd like any additional suggestions for pose mods, clothing mods, etc. or wants to know any mods I'm using I am very WCIF (where can I find) friendly so anyone can free to ask me any time! Additionally, if anyone would like a tutorial on my editing process, I pretty much just use my phone and a free app (and sometimes a paid app but that's not necessary) feel free to ask, I'd be happy to share :)
Let's get into the tutorial under the cut! ^^
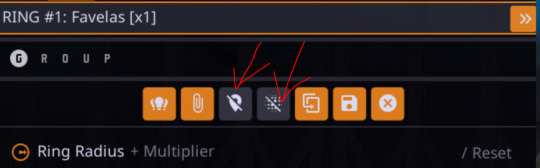
Okay, let's continue editing our photo of Viktor and V using CharLi! So, open your CET menu and look for the CharLi menu and open it up. First thing I tend to do is go over to the settings tab (the gear) and shut off chromatic aberration and volumetric fog. This is all up to personal taste though, so do what looks best to you! Now, return to the main tab (click the light bulb) and let's spawn a light! Personally I always prefer to start with 1x as the others tend to be way too bright for most scenes. Play around with choosing whichever type of light you like.
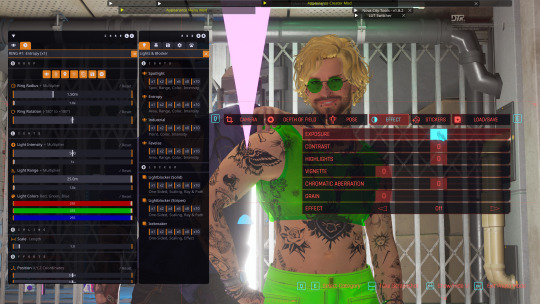
In the end, I went with the type called Favelas as my main light source. Go ahead and play around a bit with the rotation, intensity, and other sliders.
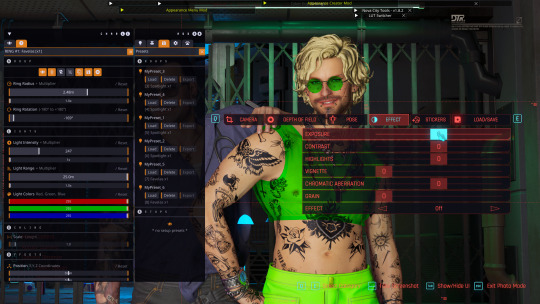
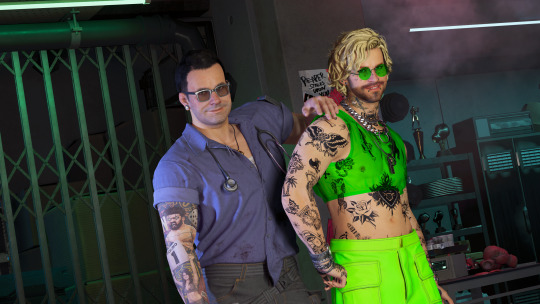
Here's what I ended up settling on! I try to make sure that the character's aren't washed out or too dark and I try to make my first light light the characters fairly evenly. Now, for depth and flavor, let's add a second light! This time I chose spotlight and I adjusted the colors until I achieved a relatively blue color.
One last thing, for each of your lights go ahead and toggle these two badboys off. That will hide both the physical light object and the pink tracker so they don't clutter up your photo.
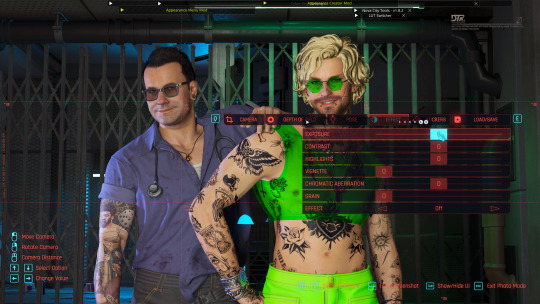
Adjusting the angles a bit more to my own tastes, here's what I'm left with without any external editing!
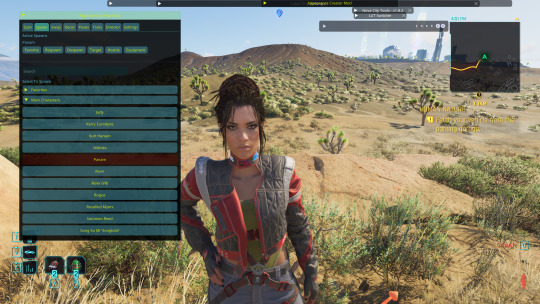
Now, let's try and outdoor photo! Following the steps in the last tutorial, I am going to teleport to my location of choice (I am using a teleportation preset found in PinkyDude's Roadtrip Through The Badlands AMM location addon). While here, I switch my Nibbles replacer to Fem because I'm gonna take some pics with Panam! Now that I'm here, I notice that the lighting out here could be better! I tend to adjust my weather and lighting outside of photomode because it doesn't always shift correctly in it. To make sure everyone is lit correctly, I tend to pick the character with the darkest skin or clothing that will be in my scene and spawn them from the spawn tab. I'll choose Panam, of course!
Note: Going to the tools section and selecting freeze target can help keep your spawned companion from walking away but I forgot to do that here lol For weather conditions, I like to choose light clouds. This makes the sky look nice and it also softs harsh shadows. This is up to personal taste and the mood of your scene though! Additionally, if you want more weather states and deeper control, you can use the Nova City mod. For now, let's just play with the vanilla weather settings.
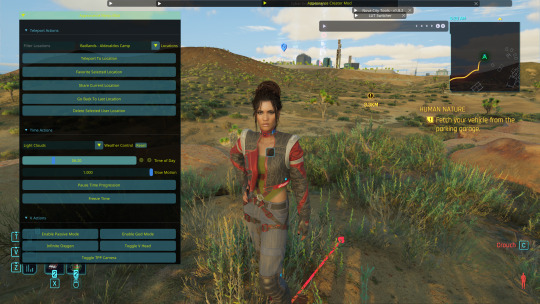
I tend to prefer the look of early morning the best, but again this up to taste! I would definitely recommend avoiding middle of the day though as the harsh lighting can greatly overexpose your image while also muting colors. Now that we've got all that set up, let's banish her just like we did Viktor in the first tutorial. Unlike Viktor, this Panam clone won't respawn (the real Panam is safe and sound, this won't affect her). Now let's return to photomode (and ignore my boy's goofy Us Cracks pose). Follow the steps to set up your replacer just like in the first tutorial. Now that I have my replacer swapped out to Panam, I am going to remove her jacket using one of the built-in presets (for swapping outfits with ones not listed in AMM see the AMC tutorial linked above). To do this I am going to go to tools > target replacer > scan and then scroll to the drop-down and list and pick the one I want to use. Let's keep the harness but remove her jacket!
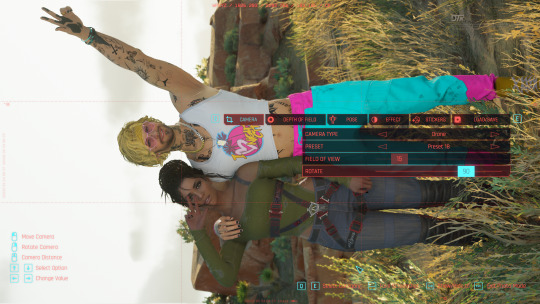
From here, choose whatever poses you like, set up CharLi however you wish, and now let's try taking a portrait shot! This is where those presets come in handy. If you downloaded them, go ahead and flip through to the portrait ones at the end and select the one you like best. Otherwise, let's set this up ourselves! To do this, I will go to Camera tab in photomode and set my rotation to either 90 or -90 degrees. This allows you to fit more into the shot while also allowing your portrait to be higher quality because it fills up the whole screen instead of being a tinier image with a lot of empty space on the sides. Next, I'm going to adjust the field of view. The lower the field of view, the less your image is distorted. While distortion can be nice for some styles and atmospheres, I tend to prefer a lower FOV for my portraits. I tend to prefer to set my FOV lower then 20 but higher than 10. Here I've chosen 15!
Now you can play around with the angles and take your photo! Here's the unedited one I got in the end:
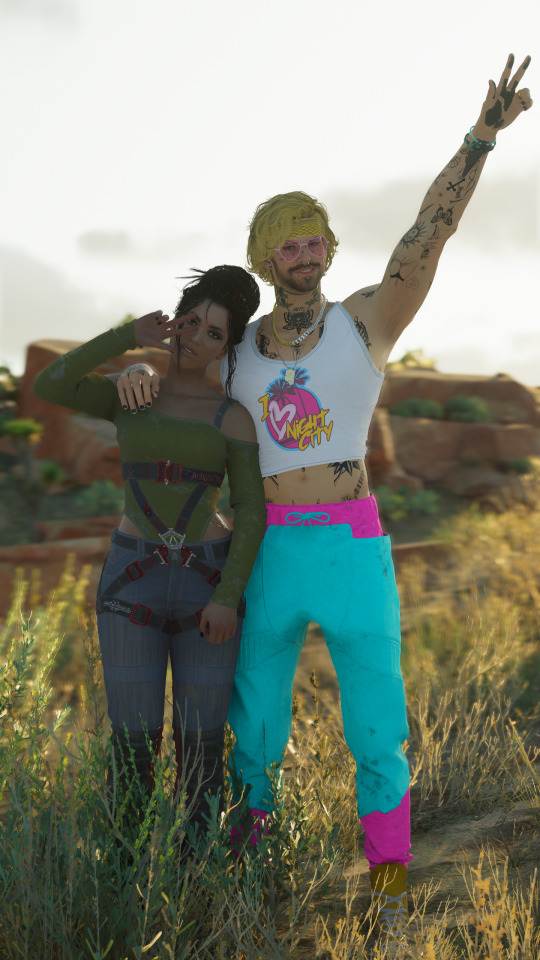
If you have any questions definitely feel free to ask! This is certainly not the only or even the "best" way to do it, this is just my personal way :) Have fun!
21 notes
·
View notes