#I’m out of modpodge
Explore tagged Tumblr posts
Text

DAY 5, THE FINAL DAY
IM SO EXCITED!!!
This day was focused on last minute sewing and finishing up the gauntlets!! My little sister actually came over and helped out a lot! Which was so fun because I got to teach her how to spray paint and texture with paint!
In all seriousness I think this project means so much more because of the moments I got to make with my sister 💚 she’s so creative and I’m really glad I got the opportunity to show her a different side of creativity. I taught her how I did the wings/back pack and then after I built the gauntlets, she pretty much decorated them all by herself and I’m so happy to show off her work!


We did the same process as day 4, more Modpodge and spray paint! And then my sister did all the texture and glittering, too!
I’ve never pointed it out before but on the tops there are two compartments I incorporated inside, this is where the fog machine and battery pack for the LEDs go!


While she was focused on texturing, I went ahead and sewed on the buckles to my harness!


And with all these things done, I was 100% finished with all the making of my cosplay… all that’s left is the final try on…
So stay tuned for the final reveal which I will release later today!!!
#maccadams#tf fanart#transformers#transformers fanart#transformers artist#maccadam#transformers art#transformers g1#peaskikiart#ACIDSPLASHED#cosplay build#transformers cosplay#tfconla#tfcon#tfcon 2025#Acidstorm
7 notes
·
View notes
Text
Zelda EOW cosplay log: circlet
After giving up on the staff, which was already another means for me to take a break from sewing, I got started drafting the circlet
I had some Eva foam from another cosplay ish project that didn’t go very well due to inexperience, so that seemed the most logical choice. I forgot how annoying it is cutting Eva foam though… the “headband” part was easy since I could use my rotary cutter, except the length I needed was longer than my ruler, so there’s a wobbly bit from where I had to scoot my ruler. Didn’t feel like cutting out another piece, so it’ll have to do ¯\_(ツ)_/¯
Studied some screenshots and Sketched out the gem and metalwork bits on paper to get an idea of relative sizing between all the pieces. That damn pvc conduit ended up coming in handy here—I pressed down onto the foam and traced the indent for the gem. Cutting the crescents was realllly fiddly bc I was using scissors. But idk if I could’ve gotten those curves otherwise with an xacto knife
Only on the smaller bits did I think to transfer my sketch onto the foam instead of eyeballing it. My “transfer” method was poking pins along the outline into the foam, kinda like for pumpkin carving. Nice and clear and easy to follow with the scissors without having to worry about painting over anything

I thought I read somewhere that Eva foam can be sandpapered ? So I tried doing that to fix the uneven edges. Idr what grit level sandpaper I used. I mostly used a nail file board actually lol
Somehow I lost my circle gem piece, so I had to cut another one out and sand that :/ I don’t have proper primer so i figured I’d just spray a little modpodge on it to give me a workable surface to paint on. It didn’t occur to me that the pieces were so small that they’d fly off bc of the aerosol blast, so I had to find those in the dark ground bc I keep forgetting to tell the landlady that the outdoor lightbulb is out
I ended up mostly kinda mopping up the modpodge that was left on the parchment paper to get it nice and covered. Then I remembered I should grab a scrap to prime for when I test out paints. Was smart enough to hold the foam with a clothespin so no more glue would get on my hand. A day later It does kinda look like a nice subtle topcoat on my nails though :3 let it dry overnight so I could play some hades 2 and bc I didn’t want to fiddle with mixing paints at like 10pm
The next evening I tested out the paints. At the store I’d been between one metallic red shade and another, and I’d gotten the one that hadn’t seemed Too bright red. This was a mistake. It’s indeed a lovely garnet color, but that’s not quite light or red enough for this. Mixed with a little red looked pretty good. The gold metallic was perfect straight out of the bottle
Also tested whether to use black or white as a base coat. Going with white to keep things brighter

✨The next day ✨
Got my base coat of white on

(Using some weird Catholic local newspaper that some lady who lived here before me still has delivered to catch the mess lol)
First coat of gold. Probably should’ve made sure my sponge was fully dry before painting on the gold… I’m using makeup sponges since they’re denser than the sponge brushes I got for cheap a while ago. Repeating to myself Trust the Process Trust the Process so I don’t get neurotic about how sloppy it looks rn….

Okay yeah second coat is looking a lil better. Added a Little more red to the mix for the gem. I like how the shade looked overall, and especially layered over the other. I dont need another coat on the gem but def will for the gold stuff

Third coat, now we’re talkin. That’s good enough for the crescent pieces, but I think I’ll give the band another coat tomorrow. Testing my gloss sealant on the back of one of the smaller crescents after putting the first coat on the gem to see how that looks

Im planning on using satin modpodge finish though bc it’s an aerosol spray and bc I think that’d contrast nicely and subtly with the glossy. But the glossy is a normal spray bottle, and I wasn’t careful the first time I used it so it got clogged…I usually borrow the spray top from something else, but it’s not the same diameter as the bottleneck so I have to hold it weird :/ I should just buy a replacement nozzle fjsjdhd. But since the pieces are so small I’m just unscrewing the nozzle, taking it out and letting a few drops of sealer fall onto a plastic lid from something or another, then dabbing it on with a sponge
Now that I’m more like Live blogging and not posting about stuff I’ve already done I think I’ll end the post here lol
2 notes
·
View notes
Photo


NaClYoHo Day 10!
[Description: Three images; the top image is Dearborn the tortie looking at a bin full of Christmas-themed decor, puzzles, ornaments, etc. The lefthand bottom image is a fabric cornucopia stuffed with fabric produce, a handmade Thanksgiving decoration, and the righthand bottom image is a clear plastic container with two layers to it, full of the same decorations and sitting on a closet shelf.]
It doesn’t seem like much, to be honest. The goal for the day was to clean out my closet shelves and reorganize them, and that’s four shelves of various holiday decorations, keepsakes, athletic equipment, etc. that needed sorting. But I realized I really did want/need to get some new containers; I wanted to basically turn the shelves into a chest of drawers.
So I put on Decoder Ring’s latest episode about Andrew Wyeth, “The Great Helga Heist”, and took some measurements and went off to the Container Store to see what I could find. But it turns out that a 22″x14″x10″ container is remarkably hard to come by and the ones that do exist are expensive, so I ended up just buying one $30 container. I may go back for a second one eventually because I do like those two-level containers, but I’ll probably wait until the next time I get a coupon.
I do think it’s worth it to finally have all my Christmas decorations in one place, and I’ve taken one of the old Christmas containers and put the Halloween decorations into it; I’m sorry to get rid of the old Halloween box I’d made, which was a USPS box covered in modpodged papel picado flags, but modpodge gets sticky after a while and it really was time.
In any case, I got one and a half shelves organized, which is something, and it took a full hour-long podcast to walk to Container Store, pick up the box, walk home, and transfer everything over, so there’s that. I can get on the rest tomorrow.
83 notes
·
View notes
Text
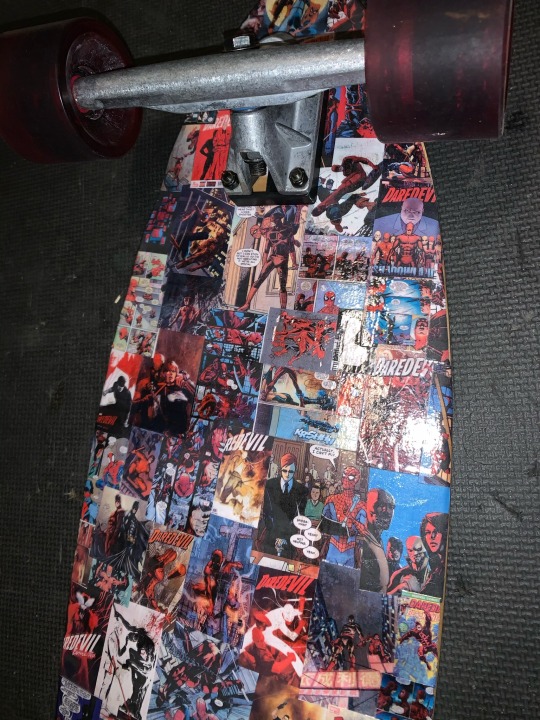


Behold: what happens when you don’t want to do your work and you get a blank longboard directly after getting into the Daredevil fandom!
Made with lots of comic book covers and modpodge. I’m pretty proud of how she turned out👍🏻
#art#maybe?#daredevil#and also lots of spiderman#matt murdock#i named her murdock#i also affectionately call her red#peter parker#longboard#marvel
33 notes
·
View notes
Text
Update I ran out of yellow so I’m going to put modpodge on it and then cover it with stickers as soon as possible. It’s just streaky at least
I’ve decided on painting my canes (I have two named Glados and core) yellow and purple in reference to 1. Glados having a yellow eye and the ego core (I have a weird attachment to that guy okay?) being the purple one and 2. That old punk shoelace symbolism of yellow being part of the anti racism movement and purple being about standing with the queer community.
Dunno just thought it’d be fun to share
15 notes
·
View notes
Photo



AAA I’m so glad people are curious about my cosplay ????
The staff was really easy, I only used stuff I had laying around! I do all my cosplay stuff at my moms place cause I don’t have any materials or paint at my own apartment and I left it there so she took some pictures for me :)
For the stick itself I used an old curtain rod that I covered in masking tape and painted.
For the head I took a wine bottle cork and cut it until the thinner part fit into the hollow stick. Then I shaped some aluminium foil into a head, inserted the cork into its “neck” and secured it all with masking tape.
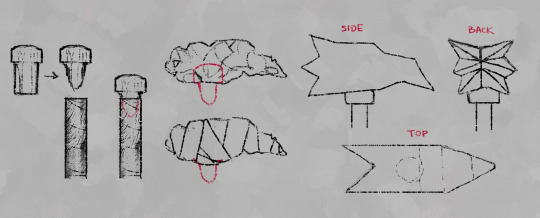
When the base was done I cut four pieces of craft foam (just the cheap stuff you can buy at any craft store) - two identical but mirrored pieces for the sides, one for the top (remember to fold it along the side pieces to get the right length), and one for the bottom.
I glued the side pieces to the base with a glue gun, padded the spaces left with smaller pieces of foam, and then glued on the top and bottom, matching the edges to each other. Then I cut out a lot of small uneven triangles that I glued like six little tents for the spikes on the back. Finally I wrapped several strips of foam around the cork, leaving space for the curtain rod, and then covered the whole thing in wood glue, paint and modpodge.
I got the wig from aliexpress, and was basically just really lucky with the quality. It was super cheap, but I paid a lot for customs :/ I think I’m gonna order from coscraft or smth next time.
Let me know if yall wanna see more of this kind of stuff! I could record the process on tiktok or something next time if there’s a demand for it. I know explaining it with just words is really confusing :>
45 notes
·
View notes
Text
Office Halloween - so much work, so little time.
Well.. it’s raining today, so I’ve had to change my crafting plans from spray-painting cardboard ‘fencing’ to building a floral arrangement out of stryofoam I scavanged out of the work-place dumpster.
I was going to use it to make ‘cross’ headstones but this works out perfectly and costs me nothing. So I’m all for it.
My first hand at making a ‘wedding arch’ - we’ll see how it ends up going.
First order of business is gluing the styrofoam pieces together. Which went fairly well, actually. I was afraid the hot glue would melt it.
Now it’s making a black protective coat underneath with modpodge and black acrylic paint to keep the little balls from ending up everywhere ....
Then I have a SHIT TON of flowers to make. Fortunately they’re easy. And maybe some big black leaves to round it all out. A few plastic skulls - and we’ll have a wedding arch. I still have to figure out how to prop it up, but that’s a problem for tomorrow.
#OOC#Mun at least has an office of people who are willing to participate this year#now the stress is just making sure everthing's DONE since I'm the one building all the props
3 notes
·
View notes
Photo

Starfall Mountains
Alternate title: Reasons Not to Buy the Dirt-Cheapest Acrylic Paints You Can Find I normally do like to keep an inexpensive stash of acrylic paint around because even though acrylic paint is not a medium I dabble in often, it much like fabric/puffy paint can come in surprisingly handy. And every once in awhile I will use it for it's intended purpose just to stretch my artistic muscles. Well, one of my art students recently started asking questions about acrylic painting and through giving them what advice I could (knowing arguably too much about acrylic painting for someone that rarely if ever does so) I felt that familiar artistic itch settle into my brain. And then I remembered that between my own one-off projects and a couple that my mom borrowed my small paint stash for, the stash that I had is down quite a few tubes that are just completely gone/empty. And what colors are left (mostly browns and greens, maybe a yellow) are not terribly pretty or useful colors. Thus my wandering art supply eyes started watching for some cheap acrylic paints to add to and replenish the stash. And admittedly to a certain extent, I wanted to take the rare occasion to take a stab at making a proper painting, partly just to see if I could do it and partly so I wouldn't just be throwing my student to the wolves with my advice. I found such paints in the form of an 8-pack set of 9.5 ml. tubes from Dollar General. The set was $4. Now, I know and can accept that this set was not meant to be artist-quality by any stretch of the imagination whatsoever. What bothers me is that my pre-existing stash was a very cheap set that was probably at best meant to be student-quality paint (and there's a good chance that's being generous) and you can get craft paint from Walmart for less than $1 for much larger tubes, and both options are more pigmented than these paints were. Do not be fooled by the results before you; I am fortunate enough that I have a moderate amount of artistic skill, pretty good knowledge of the medium (at least for someone that doesn't use it often), and I've done enough experimenting and encountered enough problems before to be comfortable trying to power through and work with what I had. If I were a humble beginner with much more limited knowledge of art supplies and how to use them, I highly suspect this would be one of those supplies capable of turning someone away from that type of art supply, if not art as a whole, in its entirety. If you've ever used finger paints for kids--you know how in the container and one congealed drop of the paint it looks like a nice, solid color, but then when you start to spread the paint around it's way more transparent and you have to really commit to get the color pay-off you were expecting? That's an accurate description of these paints. The thing is that they aren't totally lacking in pigment. They're about as pigmented as cheap watercolors or gouache. The problem with that is that they are still acrylics at the end of the day--the paint binder is a plastic, which means they dry relatively quickly and typically will not reactivate after they've dried. So if you want the same experience but a medium that's easier to work with, watercolor or gouache would be a better option. But it gets weirder. I noticed that these acrylics dry a little on the slower side compared to what I'm used to, which is a mixed bag. It helped with blending a little, but it also made the lack of pigment more frustrating, as it meant I had to wait longer for the paint to dry between layers, which I needed in order to make sure I was A. covering the canvas and B. getting the color payoff I wanted. Additionally, it is probably a very good thing that I was using a small 4"x6" canvas board and not one of the 8"x10" canvases I have on hand, because the size of the paint tubes combined with the lack of pigmentation means I very likely would've run out of one or some of the colors. (Almost definitely I would have run out of white because white is always my most overused color). To a certain extent, I did expect to have to layer and do a lot of "put paint on, cover it up. put paint on, cover it up, put paint on--" you get the idea. Acrylics, even when they are better pigmented, can be a more challenging medium to work with because of the aforementioned quicker drying time. But even so I feel like the work I had to do to get good color pay off, decent coverage of the canvas, and smooth blending all at once was still a little more than I should've had to put in. The most egregious and obvious offenders of this would be the orange behind the mountains and the snow/ice caps on the mountains, the latter of which I'm still not totally happy with, but I kept going back and forth with it and eventually just said "y'know, that looks pretty okay, I'm tired of messing with it, and I'd love to not use up the entire tube of white on this one small painting, so I'm done with that." The orange I think turned out fine, though the transition between it and the rest of the sky is a little harsh for my liking. (I'd say it doesn't match the reference photo but that's not really fair as overall I took quite a few intentional and unintentional creative liberties between my reference photo and the final product.) Anyway. Once I had layered enough various shades of purple and bluish-white on this thing to make an eggplant and blueberry salad jealous and fed myself up with the mountains, it was 4 a.m. and I was tired and so I decided to let what I had dry overnight and then finish it the following day. I did wrap my tiny 6-well palette up in a plastic baggie to preserve the mixed paint that hadn't already dried just in case I looked at the painting with fresh eyes and couldn't help but touch it up some more. But fortunately, that didn't happen. Instead, I used some washi tape to make a mask over the mountains and then broke out a bottle of white ink to splatter some stars across the sky, because I knew the white acrylic paint was a serious risk that was likely to not work out the way I wanted it to. (In this case. I have used white acrylic paint before that would've probably worked just fine using the same splatter method, but I didn't want to take the risk with how not-pigmented this white was.) And then I went in with white gel pens to emphasize a few stars, add some white spots in that I wasn't able to do with the paint, and I did end up adding a little extra highlight to some of the mountains in the vain hope of making them look a little better. This is where the title comes in; I think I got a little carried away with the highlight on the mountains vs. the stars in the sky, and so instead of the traditional "snowfall/snowy" mountains, I thought calling them "starfall" mountains might make more sense based on the visuals. One that was done and I was confident that everything was dry, I went over the whole thing with some gloss-finish ModPodge (which smells horrible by the way; the matte-finish ModPodge has a way less offensive smell to me), in two coats, and then re-applied my gel-pen signature in the top corner because for some reason the ModPodge just kinda wiped it off. I don't like ripping on a supply so hard, and I'm sure if you look at some other supply tests of mine that it's pretty obvious I try very hard to give the benefit of the doubt when I can. These just disappointed me on so many levels. Don't get me wrong; the end product still turned out decent, but that's because I more or less know what I'm doing. As I said before, I'm not confident that a beginner wouldn't be totally frustrated by these paints. And yet I can't deny that they're probably fine for younger kids that don't really care about proper acrylic painting, and that's really who they're probably for anyway. If nothing else, I can say this experiment has pushed me towards getting a better quality, wider color-selection set of acrylics to keep in my stash, because I really don't see these working out as a good stash set for me. It's going to be a tricky decision though, because I want something that'll give me the option to do a proper acrylic painting like this if I want to, but has a price I can justify even if I don't use the paints terribly often. So we'll see how that turns out for me further down the road. I really don't think I'll ever be primarily an acrylic painter (not because of this particular experience--there's just something missing that doesn't draw me into the medium like other mediums have drawn me in before), but sometimes you get an artistic itch and you just have to scratch it, and I have to admit that I don't think I've fully satisfied this itch just yet, so there may be more acrylic paintings to come out of me yet. ____ Artwork © me, MysticSparkleWings ____ Where to find me & my artwork: My Website | Commission Info + Prices | Ko-Fi | dA Print Shop | RedBubble | Twitter | Tumblr | Instagram
2 notes
·
View notes
Text
Some tips:
- I found two coats of modpodge worked pretty well. If your modpodge is on the old side, it’s going to have bubbles and weird solid lumps. Make sure to take care of these and smooth the modpodge over while it’s still wet. I used glossy finish modpodge; feel free to experiment with other finishes and even the aerosol can version, which I was interested in but didn’t want to shell out for in the end.
- I used a wide sponge brush and found that I liked it. Make sure you keep the strokes consistent and in the same direction. Let the modpodge completely dry between coats. The modpodge will collect on the edges of your canvas. If you are brave, you can scrape the modpodge off the edges. I am not brave, and I’m okay with the weird ridges left behind on my canvas edges. You might not be, so just be aware.
- if you have holographic stickers, the glossy finish modpodge will preserve it pretty well, but it will only be holographic in the direction you spread the modpodge with your brush. For me, I did a side to side motion, so my holo stickers are still nice and shiny when I move my canvases from side to side; up and down, they still have some holo properties, but it’s a little matte. (Could aerosol modpodge have fixed this issue? Maybe. Someone else try it and let me know :P )
- cheap papery stickers will try to curl up on the edges. I didn’t catch this in time to try and stop it so I have no idea how to fix it but I imagine checking your stickers and gently pressing them down as they dry might help. Bc once they dry, there is no pushing them down without some damage, and additional modpodge layers will just get stuck under where the sticker curls and create a bigger problem. (This happened for me with some non-sentimental stickers so I’m not too torn up about it, but if you have paper stickers instead of vinyl or laminated or some other kind of plasticky sticker, be aware!)
- modpodge can take up to four months to fully cure, and during that time it can get sticky, especially if left in an overly warm area. If you need to store your canvases, put wax paper between them and other surfaces, because sticky modpodge will pick up just about any particulate or texture and that can damage your sticker masterpiece.
And this is all the wisdom on this project I have to impart. Go forth, sticker-insecure friends!
Friends. Beloveds. Fellow hoarders of stickers specifically, especially those of us too afraid to actually stick them to things for fear of losing them:
I have discovered (or else was told and forgot and remembered much later and thought it was my own idea) that you can purchase flat canvases of whatever size you wish, and place your stickers thereupon, and cover the whole piece with a couple layers of modpodge, and you will have a lovely art piece ready for display.


Behold my spoils so far. Maybe more detailed pics and as many links as I can dig up later, but for now, know that it works, that it has cured my sticker anxiety, and I’m about to get a whole lot hoardier about stickers in general now
14 notes
·
View notes
Photo
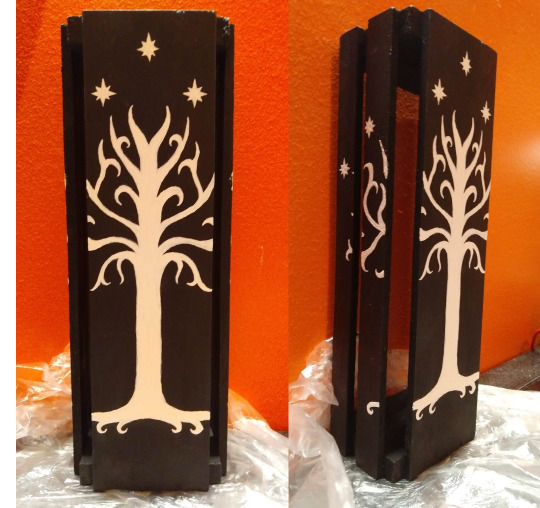
My mom and I got a Starbucks set for Christmas that came in this really ugly red crate made of cheapo wood. I grabbed it thinking I might use it for letters, but I hated the color with the rest of my room. I started using it as a cell phone stand for my new desk, because putting my phone on that makes it the perfect height to watch videos without straining my neck while working at the table.
Decided to paint it black to match the table. Once it was black, I felt like it looked too plain and I wanted to jazz it up a little bit. Decided to paint the White Tree of Gondor on there just for fun, and I like how it came out. A modpodge layer is going on top of this to seal it when it’s thoroughly dry so that it doesn’t chip.
I love LOTR but I would say I’m not as knowledgeable about a lot of the lore as most of the fanbase. This would be the first object I’ve owned to signify my connection to the series besides books and dvds.
1 note
·
View note
Text
WORKING TOWARDS/PLAN FOR CRITIQUE:
In preparation for critique, since my “3D” attempt didn’t work out, I am hoping to develop the element wet materials & makeup, and to pursue a couple of feedback comments. I’m starting to struggle a little bit on how to best develop, or refine my work between now and summative, and am hoping to ‘push’ it enough between now and then. I really hope to get the best out of this crit so want to try out some things and ask for some advice.
- I had the suggestion to strip the work back a bit in terms of scale/things, as my formative read to some as clumpy and bunched together, and that there were intricate moments that were working that were lost. So I have a work that has is slightly smaller in scale that I have been working on to show.
- I also had the suggestion of having an accompanying work, as a series in a way, on a wall, included in the install. So I have a smaller work that I have also been working on, that I will install with this other work - to get a sense of how that works, and the reading on that.
Documentation:
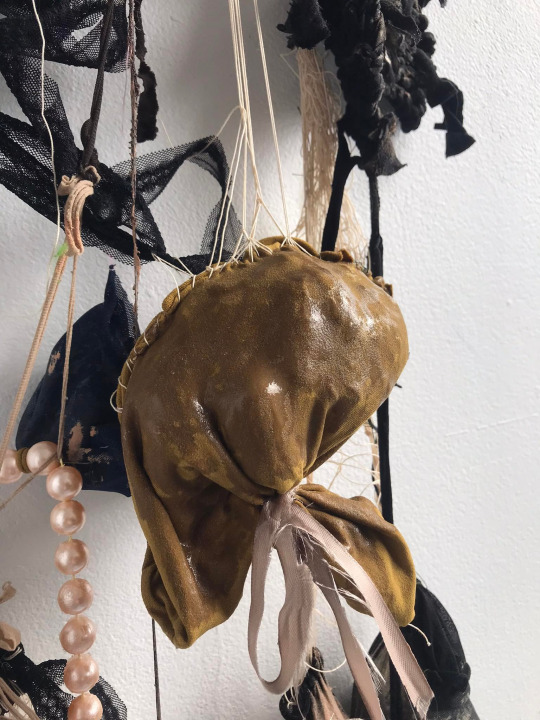
^ Development of ‘wet materials’ being experimented with - I loved how this mix of glue/modpodge settled on this part of the work. I like the difference in texture that it offers, and the wetness and liquid aesthetic that it communicates. I think that this may be perceived as ‘gross’ yet also ‘intriguing’ - which further relates to the push and pull, and the challenge of notions femininity.

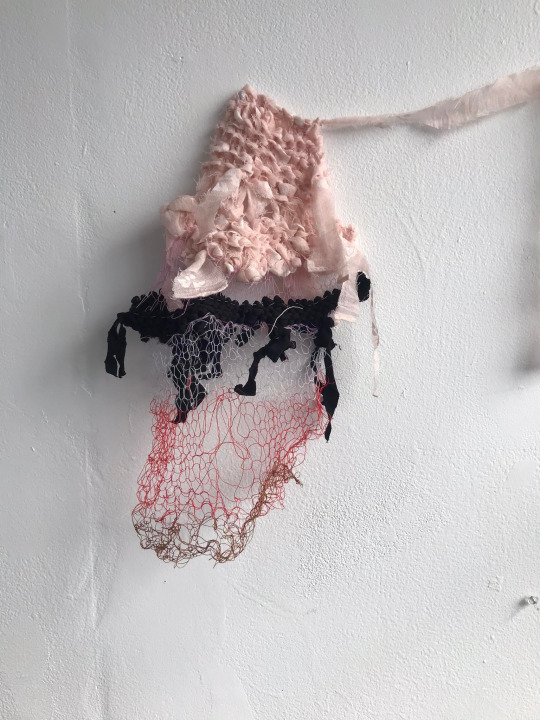
^ Latest small scale piece of knitting before adding the “bag” and “decadence” elements to it. I really liked how the fine thread looked cellular (bodily).
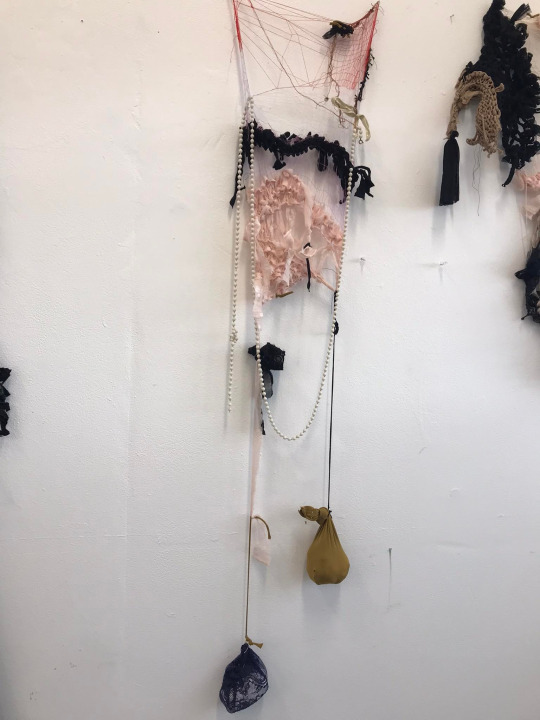
^ Development of the accompanying work ^
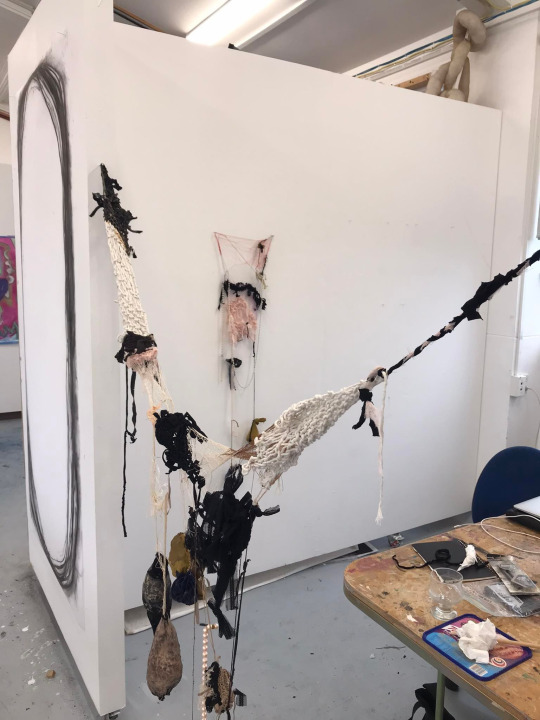
^ The two new works I am currently refining to show for critique, shown in a similar way that I am thinking for install.
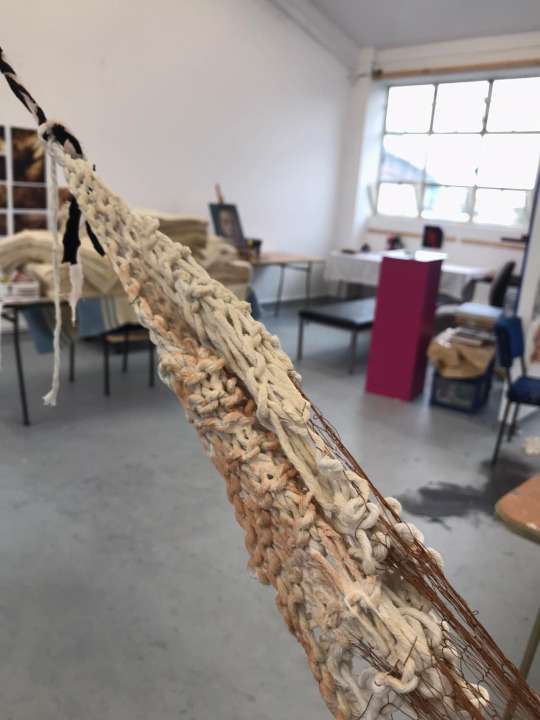
^ Detail photo of the development of makeup being used as a medium.
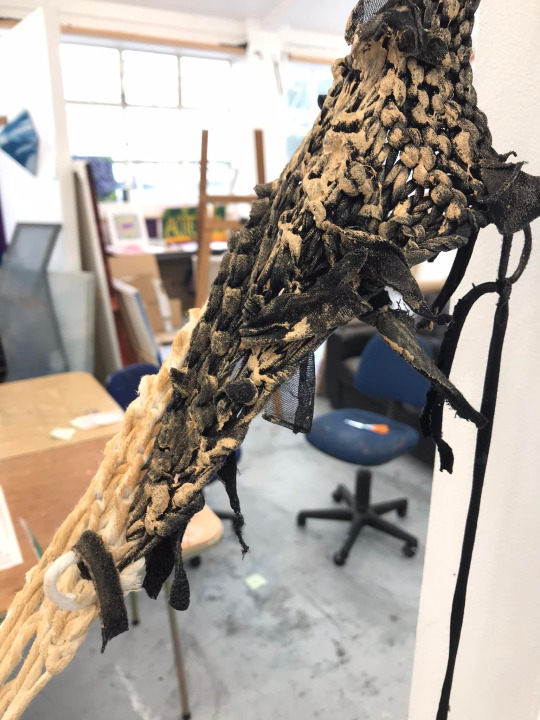
^ Another detail of the wet/makeup medium engaging with the stocking material in this part of the work.
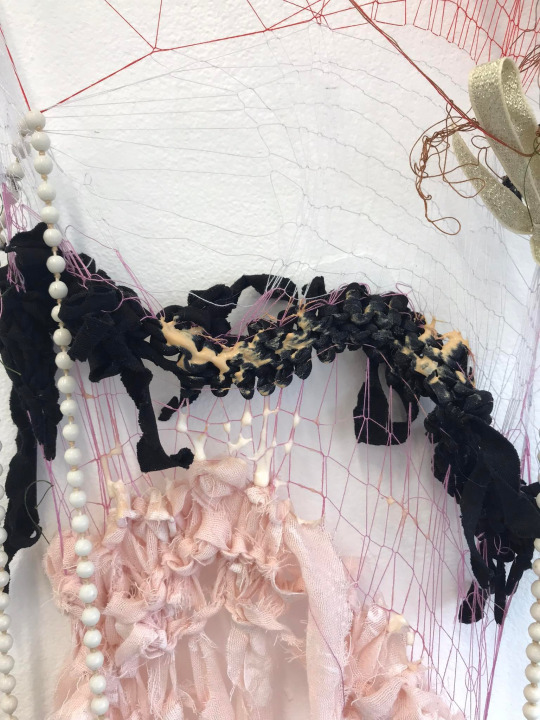
^ Detail of start of a new development in accompanying work ^
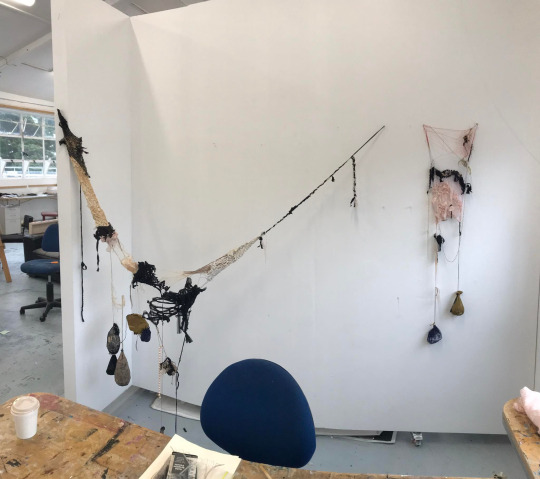
^ Final stage that the works reached before installing for crit ^
Im content with the development of my practice and pretty happy with what I am showing for critique. I’m excited to hear some feedback and some advice for whats next.
0 notes
Text


Working my way through decorating the twins’ helmets for fall! I’m using stickers and eventually ModPodge to seal it all. Carrie also has a Velcro piece for bows because I have waited my entire life to put bows on someone and everyone looks at me funny when I put bows on the boys.
They’re adjusting beautifully so far, could not give less of a fuck about the bands being on them. With any luck, they’ll be out of them by the new year.
#adventures in newborn land part deux#hashtag twinning#plagiocephaly#cranial band#little ice man#little care bear
4 notes
·
View notes
Video
youtube
#plaidcrafts #modpodge #madewithcricut For today's video, I'm joining some awesome crafters for the 5 under $5 challenge! This playlist is all about the tiered tray, and it's of course, Christmas themed 🎅 Most all of my crafts were made using things I've had on hand for some time, so basically for zero dollars, but I do detail what you can find at Dollar Tree to make them for under $5. Gotta love a cheap way to make some cute Christmas decor This playlist is hosted by @Crafty Cove and @Farm Charm Chic and is co-hosted by @6 kids & a glue gun Here are their links: Missi: https://www.youtube.com/channel/UCUXtsNYbYNQInEbR191QJsA Emily: https://www.youtube.com/c/FarmCharmChic Amanda: https://www.youtube.com/channel/UC2AicvWuQ9K_M9ydqNj0fXg And the playlist link: Go check out what all the crafters are up to :) **FYI - I am partnered with Amazon and several other sites that provide affiliate links. As an Amazon Associate, I earn from qualifying purchases. This helps support my channel :) Those links will be marked with an asterisk * for identification. ** Thanks for coming by y'all! I would love if you would consider subscribing and helping me to grow my channel, my goal is to reach 1K by 2022 ❣️ Favorite Products: *Try Amazon Prime Free for 30 days! - https://amzn.to/3ktu8UI *Folk Art Home Decor Wax - https://amzn.to/3s5Ue2D *Surebonder Glue Sticks - https://amzn.to/3m6Ngtl *Permanent Vinyl - https://amzn.to/3yyi49z *Cricut Explore Air 2 - https://ift.tt/3aispM8 Filming on LG Stylo4+ Editing in VideoPad Pro Microphone - Maono * https://amzn.to/3saXWI0 Studio Lighting (Similar) * https://amzn.to/3fQaRKL Miscellaneous and Affiliate Links: Broke Girl Aesthetic Merch: https://ift.tt/3mtuTgG Buy me a "coffee" - https://ift.tt/3Dj4j0w Beebeecraft YouTube Program: Get Free Products by doing videos for us, you will get the chance if you have more than 100 subscribers. If you are interested, please click the following link to contact us: https://ift.tt/3CaMujX Get SVGs, fonts, sublimation prints, and more at Creative Fabrica: https://ift.tt/3AipuOb Crafthouse SVG: Get 10% off with code BrokeGirlAesthetic https://ift.tt/3iFI7pg Join the Cricut Affiliate Program! https://ift.tt/3BhChlu Take your graphics game to another level with Canva: https://ift.tt/3uPhH9n My Vinyl Direct - Tons of affordable vinyls, blanks, HTV and so much more. Get a $5 off coupon with this link! http://bit.ly/3bl6a9Y Check out TubeBuddy, the coolest Youtube plugin for creators https://ift.tt/3lhhsB6 Sign up for Fetch with my code "45TB4" and get 2,000 points when you snap your first receipt! Email: [email protected] [email protected] Work From Home! Legit WAH site with good pay :) https://bit.ly/workathomeBGA Find me on: brokegirlaesthetic.com IG @brokegirlaesthetic Snapchat @BrkGrlAesthetic TikTok @brokegirlaesthetic Twitter @AestheticBroke Facebook @brokegirlaesthetic #diy #brokegirlaesthetic #diyhomedecor #youtubecreator #diydecor #diycraft #cheapdiydecor #craftingintexas #centexcrafters #TexasDIYer #DIYinTexas 0:00 - intro 0:13 - jenga block mini presents 2:34 - dollar tree snake wreath 4:56 - 5 under $5 challenge info 5:50 - craft stick pine tree 7:40 - crafting with baby! (challenge intermission) 10:33 - dollar tree and scrap fabric gnome 16:55 - bead garland w/dollar tree ornament 23:09 - final look and outro
0 notes
Text
Knock, Knock
Anybody home? It’s been a few days since I’ve bothered the ol’ blog. Is there anyone left out there in the magical interweb land? Wave so I can see you. I’ve been busy around here trying t send summer on its way. I whacked down the wilting sunflowers and cleaned up some tangled areas of the flower beds. I emptied a couple of porch pots and I’m eyeballing the containers on the railings. Everything is still blooming like crazy, but most of it is getting leggy and tired looking. The front beds are still glorious, and I check the pumpkins daily to give them a pep talk and a drink. I’ve been doing a little cooking and a little crafting and I’m here to share two of the easiest things I’ve done all week.
Behold, the poor man’s danish.

I made a batch of those for Sunday brunch and it was fast and easy. I’m not kidding - you just use canned crescent roll dough! If you’ve got any flavor of jam handy, as well as a bit of cream cheese and powdered sugar then you’re in luck!
Open the tube of crescent rolls but DON’T unroll them. Just cut into 8 equal rounds. Please don’t judge the sorry state of my baking mat, it is well-used.

Pat those out into about 3 inch rounds, leaving yourself a bit of a lip around the edges to hold the filling.

Then plop some cream cheese mixture on each one, followed by a teaspoon of your jam. Slide them into a 375 oven and let the magic happen.

Mix a little powdered sugar with milk and drizzle it over the tops, and sprinkle with almonds if you like ‘em.

I think these were even better cold than they were warm. It didn’t take long for them all to disappear. Here’s the recipe: Danish:
1 can (8 oz) refrigerated crescent rolls
1/3 cup cream cheese spread
3 Tbsp powdered sugar
8 tsp lemon curd (or your favorite jam) Glaze: 1/2 cup powdered sugar
3 tsp milk Heat oven to 375°F. Remove dough from can; do not unroll. Cut dough into 8 slices. Place 2 inches apart on cookie sheet. Press each slice into 3-inch round, leaving ridge around outer edge. Mix cream cheese spread and 3 Tbsp powdered sugar. Spoon about 2 teaspoons cream cheese mixture on center of each dough round; spread slightly. Top each with 1 tsp lemon curd. Bake 12 - 14 minutes or until golden brown. Cool 5 minutes on cookie sheet; remove to serving plate. Mix 1/2 cup powdered sugar with enough milk for desired drizzling consistency. Drizzle glaze over pastry. Serve & enjoy! So that’s that, could it be any easier. I think a raspberry center would be really pretty, I’ll do that next time. Aside from filling our tummies I’ve been filling the garage with my projects. I’m working on a couple of Halloween/Autumn pretties but I’m also working on bits and pieces for the house. Here’s something that was super easy and also pretty darn cheap. Two of my favorite things.
See the framed quote behind that chair? It took very little time or money.

You start by deciding how large you want your print. Mine is 18 x 24. I probably could have gone larger but I’m going to group it with other prints (I think) so I controlled myself. I printed it at Staples as an engineering print/blueprint for just $1.97 . You can use just about any photo or document, as long as it’s got a lot of white in it. I tried to use other photos and they wouldn’t print. I typed up that quote in PicMonkey and used a gray font. Super simple. Anyway, then you go to your local home improvement store and have some wood cut for you. I knew that I’d need plywood the same size as my print, and some 1 x 2′s for the frame - 18 inches across, and 22 inches for the sides (allowing for the width of the top piece). You guys, I almost did math! A huge piece of plywood runs about $14, but if you roam around the lumber area and find the shelving materials you can get a much smaller piece for just a few bucks. I think my piece was about $6.50. Have the cranky guy at Lowe’s (or wherever) cut it exactly the way you want it. Leonard at the Mt. Juliet Lowe’s has just about had it with me and my pink tape measure. Last time I was in there he asked, “Where is your hubby?” like I needed permission to buy wood. I told Mickey I almost responded, “In the coma where I put him, you next?” But I left happy with the bits and pieces for my project.

The first thing I did was stain the 1x2 sections and set them aside to dry.

By the way, I should mention that I used a can of MinWax stain that was already on a shelf in our garage, and because I’m a woman of a certain age who colors her roots - I had gloves handy.

While the sections of your frame dry, go ahead and attach that engineering print to your plywood. I’ve seen Pinterest tutorials that suggest using everything from ModPodge to glue sticks. I used a spray adhesive that Mickey had in the garage for attaching his photos to mats for the fair photo contest. It was really easy.

Don’t worry about perfect edges. your frame will cover it. Once the 1x2 bits are dry, nail those suckers together!

Then you can place that frame on top of the plywood print, flip it over, and nail it together.

As you can see, I stained the edges of my plywood too - you can paint yours white, stain it, leave it, whatever looks best to you. I just sort of swiped it since I wanted a rustic, barn wood sort of feel. That’s it. The hardest part was waiting for the stain to dry.

So there you have it, part of what kept me busy this week - stuffing my face and bothering Leonard at Lowe’s. I’m already cooking up more fun, so stay tuned.
I think I’ll go out and sweet talk the pumpkin vines one more time before I hit the showers and call it a night. The cats are at the window on raccoon watch and the mister is dozing off in front of the tv. Life is good here on the Pullen spread. Hope you’re having a lovely evening. XOXO
1 note
·
View note
Photo

Trying some paint I discovered today while tidying the craft paint aisle at the store today. I’m going to do a similar design like I made on the one in the last pic. This paint is supposed to be fully cured after four days and 30 minutes in the oven, rather than the 28 days for the Dishwasher Safe Mod Podge I’d used on the other one. Hopefully this one will turn out like I see it in my head. Once cured I’ll run them both through the dishwasher to test their durability. #octopuspainting #octopusart #glasspainting @decoart @michaelsstores #makeitwithmichaels #modpodge (at Michaels Stores) https://www.instagram.com/p/CQr4-BMj7mC/?utm_medium=tumblr
0 notes
Photo


Ezra cosplay update pt. 1 as I wait for the modpodge to dry. Cut down a leather jacket from the thrift store and trimmed it with faux shearling from Joann's for the bolero. Decided not to fully line it even though the shearling was very cheap because I intend to wear this in Atlanta in September and I don't want to pass out. Also, the leather is so soft, it'd feel wrong to cover it up. Still needs additional detailing. After several failed attempts with other materials, I've decided to go the classic route and make the shin armor out of craft foam. Sealing it with modpodge, and then spray painting it. The satchel was the first thing I made, out of leftover leather from Rey's bracelet that I made last year. It was my first time really working with leather, so the edges are a little sloppy, but I'm quite pleased with how it turned out. It's held together with hot glue though, so I'm not too sure how functional it will be... I got the lightsaber hilt for $6 off Amazon. I might do some weathering, but all in all I think it looks quite good for the price (let's not talk about the blade, which I removed....)
19 notes
·
View notes