#I don't usually work that much editing picture on photoshop
Text

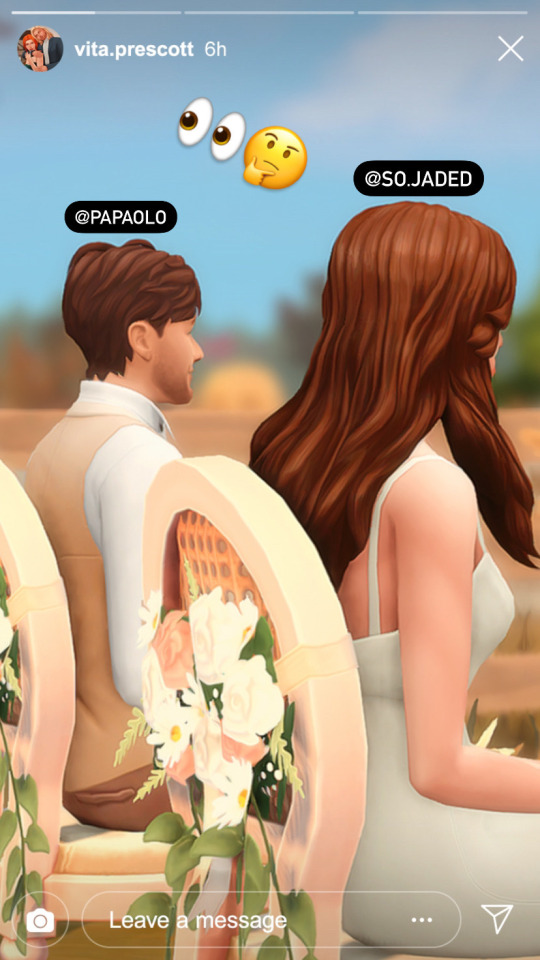
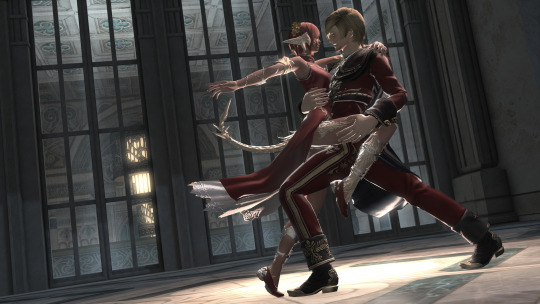
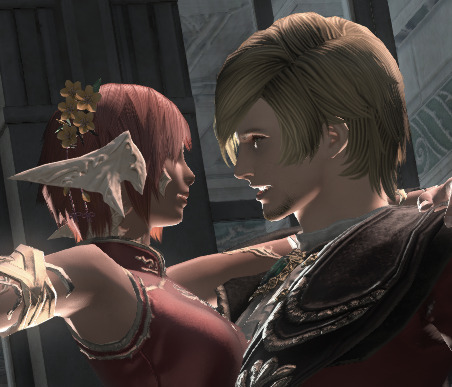
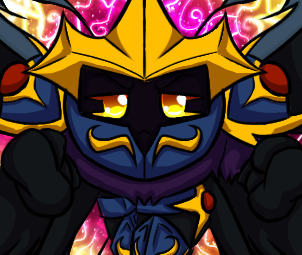
the boy wonder: dick grayson!
aka: my design of him (casual), his nightwing costume, and his robin costume!
part 1/? because I'm planning to draw my headcanons of the rest of the family too! 💙💙, my headcanons and thought process below the cut ꒰⑅ᵕ༚ᵕ꒱˖♡ (I'm insane) (I'm gonna ramble a lot)
FIRST !! His casual outfit (+ other small things) (this is going to be very long)

first things first i wanted him to be very blue because it helps me differentiate each sibling (+ steph) and have a color pallette because I'm not a character designer at all and if you ask me to combine colors I'll cry in agony, so Dick obviously got blue!! HOWEVER I didn't want to give him bright BRIGHT blue because i wanted dick to look, not soft? but approachable. I hc him to work with kids, maybe as a teacher or as an instructor, because I can't see him as a cop at all (aside from undercover maybe, which if i remember correctly is why he was a cop in the first place) in the long-term—and so I used colors that are mostly soft / not very bright because they're not very stimulating for kids or could distract them too much, and can also tend to be sorta soothing / calming ?? soft colors can help kids focus and soothe them
which is what brings me to my other point, which was drawing with small details to make him look more welcoming and approachable and not threatening at all, at least not as dick grayson, was giving him bushy eyebrows, messy hair and big(?) eyes!! there's not big explanation to that, just that when giving him small details like those i try to follow the theme i gave him in the first place
Aside from that, I like to think his bad fashion sense is a conscious decision. As in he knows how to dress properly, and he can design good suits, but he consciously chooses obnoxious things or things that don't match just for the giggles. Why not. (I'm a firm believer that Discowing should come back it was a great suit). He dresses very well but some days he will show up at the Manor looking like an unicorn threw up on him and being a walking fashion crime and acts unaware to it. Why not.
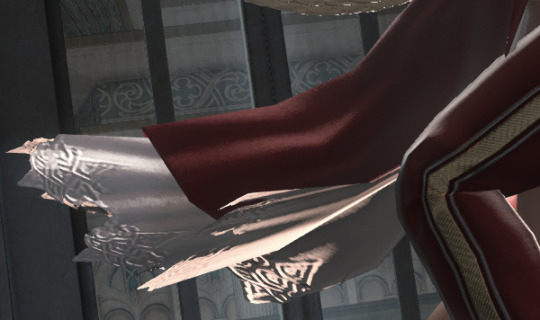
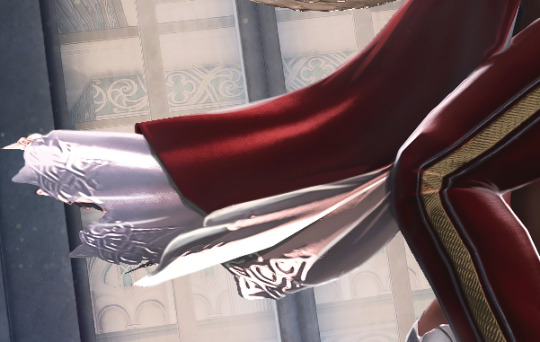
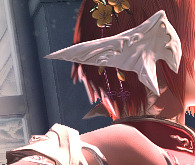
Other small thing is the necklace!! i was going to draw it to be a four-leaf clover but couldnt draw it so it just ended like that. It has a picture of himself + his fam, a picture that Tim took, so Dick edited Tim's face into the photo with photoshop so in the middle of it there's Tim's floating face
I also hc Dick with another height! I know he's 5'10", which is close to 178cm if I'm correct, but I actually hc him to be shorter, and to be small since he was a kid but having The Growth Spurt when he was around or so! It's only a few cms, I just hc him to be 174cm lol, it's only a 4 cm difference
Last thing which is totally self-indulgent, those dark spots on Dick's neck, knuckles and elbows are because I hc him to have insulin resistance! Because I do since I was a kid, and because why not. I looked it up and it's apparently called 'Acanthosis nigricans' (im fully healthy btw dont worry 👊), I just wanted Dick to have it
I also hc Dick to be genderqueer and bi&demisexual but that has nothing to do with his design
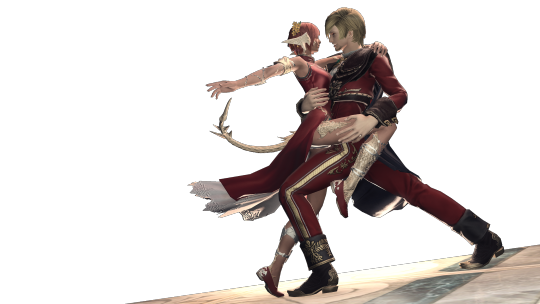
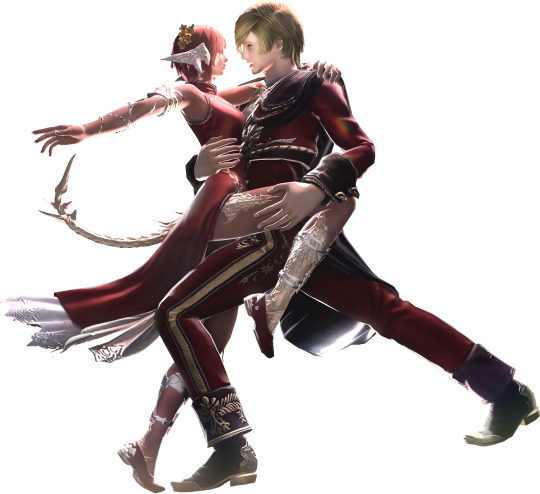
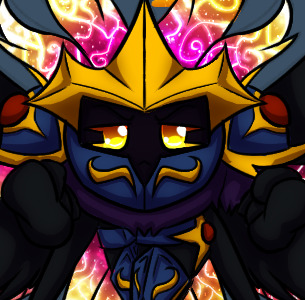
Now!!! Nightwing!!!!!

This was more easier and there's not a lot of different things, but I added some things I like,
Since Dick has long hair, and I'm a firm believer of the fact that hairstyles change how someone can perceive you/recognize you (or maybe I just have bad memory and can't memorize faces at all), I made him tie his hair but also have it a bit more messy, to change from his usual hair look (which is leaving his hair down)
Aside from that, I just added more blue to his suit by adding a few things, his collar (which is the best part of his discowing suit!!!!!!! aside from the colors!!!!), and gave him back his gauntles which I can't draw so they look strange! That, and I gave him a belt with small.bags??? things??? (HOW ARE THEY CALLED IN ENGLISH) where he keeps some stuff he needs like smoke bombs etc etc, they're not filled with those trinkets and are very light so they won't bother him when he does his flips, and it's tied very well so it won't fall off (it happened). so now he can store things on his belt and on his gauntlets instead of his sticks that I forgot how they're called in english
and now...... The Child (aka Devil incarnate)

Following the same theme of looking approaching and good and blahblah but even more. I made his hair curlier because unlike Older Dick who actually tries to brush it and fails miserably, when he was younger he didn't care and climbed every single furniture in the Manor whenever Alfred tried to force him to brush it, inspired by the fact I used to hate to brush my hair as a kid
He also has those dark marks because of the insuline resistance, and I gave him knee pads (?) because there's no way Bruce would let him out like that with only That costume as protection. Overall I didn't change a lot from the canon design?
He's also short, because why not. It makes it funnier to think about being a criminal and a literal 8 year old who barely reaches a bit above ur hip beats your ass. i wouldn't show my face ever again .
I also hc that he Put the fear of god into the rogues gallery (i dont remember how theyre called as a group in english im gonna cry). while Jason did that with the gotham criminals(not rogues, but others, he was cute and all but also very VICIOUS against them, especially those who messed with kids . robin gave him the magic but the magic to break their collarbones, but this isnt about him), Dick was very very VERY annoying to them. the Joker hates him because Dick loudly says how the Joker sucks as a clown and has an obnoxiously long list of every single way the Joker fails as a clown. The Riddler hates him. Penguin hates him. Everyone hates him. They hear a kid laugh and are like '😨 ROBIN' even though Robin is now an adult man. he gave them ptsd. u know that creepy kid laugh? thats exactly how dick laughed to creep them out. it also creeped out the gotham criminals but Dick was specially mean to the gotham rogues . imagine being one of them and after going through the nightmare that is meeting an 8 year old (truly traumatizing) that later kicked ur ass, is hearing robin get sleepy and having to go home because he has a bedtime. a kid with a bedtime beat you. a kid who has to go to school and has to learn how to count to 1000 beat you. I would cry
A small thing I like to think even if it's not included is that in one of his pockets he keeps candies !! both for him and for kids he saves with batman. Batman checks he's not eating all of them because what's worse than an angry and hyperactive eight year old is an angry and hyperactive eight year old mid-sugar rush. no one recovered after that night.
That's all !!!! THANK U FOR READING MY RAMBLES!!!!! kisses u in the cheek /p
#dc#art#batfam#fanart#mimi art ( ◜‿◝ )♡#batman#dc comics#dick grayson#dc robin#dc nightwing#nightwing#nightwing dc#dick grayson nightwing#dick grayson fanart#batfam fanart#artists on tumblr#ibispaint art#robin dc#robin fanart#nightwing fanart#MY SON MY DAUGHTER MY CHILD#when he was a child he was the antichrist but he calmed down once he grew up (he didnt)#(he just learnt how to hide it because he's now a big brother and totally normal)#i say as i add 'eldest daughter syndrome ' into my dick grayson headcanoms#batfam headcanons
31 notes
·
View notes
Text
Digital Altars📱🔮
Altars are considered a key element of witchcraft for deity worship, elemental, planetary or ancestral connections, or spell work. However, they can be costly, you may not have the space for it, or you may be in the broom closet. But you don't need a physical altar, you don't even need physical tools. Digital altars are a great way to worship deities in the case you’re unable to set up a physical altar. There are heaps of alternatives if you’d like to get creative with it.
Some people doubt the integrity of digital altars, however I believe they gain metaphysical energy as they’re created, which can be used for witchcraft. Think about emoji spells for example!
Digital altars are different to digital shrines, which are similar in concept, but different in purpose. Shrines are more of a permanent honouring of a being, and they don't necessarily have to be used actively. Meanwhile altars are for active worshiping, when you’re actually giving an offering or trying to contact that deity. However, digital altars can also function as a shrine, depending on use!
Below are 19 different options for digital altars (but I'd suggest using multiple!)
Image/Collage Altars
Picrew Altar Sketch (by Camade)
This game was designed specifically for creating altars suitable for sacred spaces to perform deity worship, to connect with ancestors, and to be a witch’s working table. After saving it you can edit the picture frames to add pictures of your deity, your family or any other being. It has a lot of variability so it’s great for creating multiple altars very quickly in a consistent aesthetic.
Here’s a link to one I made the other day, using colours and imagery to suit my purpose. This is probably the easiest of the options, while also being the most versatile. However, there are limitations as you can't really make it specific to your chosen deity unless you edit the image later.
Canva / Morpholio / Photoshop
These allow for creating single image collages to set as your phone or laptop background with crystals, cardinal directions, deity images, candles, wands or any other altar tools, along with quotes, intentions and prayers. This can be as subtle or structured as you want, making it helpful for closeted witches.
You can use the collages you create for wallpapers on your laptop or phone, or you could get them printed out and stick them on your wall!
In-Game Altars
Minecraft
On Minecraft you can built entire structures as an altar or shrine, but you’re limited with decorations unless you install a mod. Mods can give you a lot of room to be creative and have a strong aesthetic. Alternatively, you can build just one room and line it with books, add an enchanting table, potions, diamond/emerald blocks, brewing stands, cauldrons and more, using the standard texture pack.
@gailcraft was kind enough to speak to me about her experiences using altars on Minecraft. She usually uses her Minecraft altars to function as a travel altar or when her physical altar hasn’t been cleansed, mainly as a visual representation of her physical altars rather than an actual workspace. When using her Minecraft altar, she generally keeps it strictly digital, writing out prayers on signs and giving in-game offerings of food and potions which correspond with the deity.

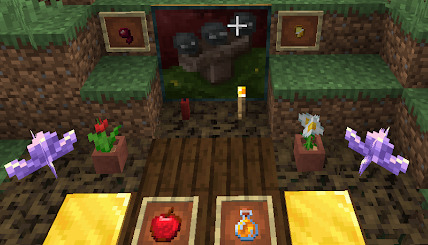
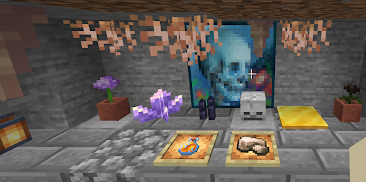
As you can see in the images she’s provided, she’s created a cottage-like structure to house her main digital altar to serve as a safe space, decorated with candles, crystals and plants inside. She has separate deity altars for Hades and Persephone, decorated with skull paintings, gold, spiders eye, crystals, flowers, a skeleton skull, lanterns and the aforementioned offerings in picture frames.
These are great altar alternatives as they don’t require much maintenance or energy, and are suitable for witches who are unable to have a physical altar or who travel a lot.
Another really cool idea for digital altars by @neonswitchhouse is to make digital spell jars by placing items in chests that may best represent your purpose, and you can specify this by writing intents on signs above the chests.
An added bonus is that you can design a skin for your avatar to look like yourself, and you can get pets like wolfs or cats.
Animal Crossing
New Horizons has so much potential for digital altars as it’s super customisable. You can dedicate an entire room in your house to witchcraft, decorating it with a glowing magic-circle flooring, candle wallpaper, candles, stonework kitchen sets, gothic mirrors, decorative bottles, cauldrons, brick ovens, pillars, stone and candle chandeliers. They also have divination sets with crystal balls, incense, bones (in the form of dinosaurs) and a whole load of other decorative options. The main issue is that collecting all of these is time-consuming unless you purchase them online. You can make offerings by placing items that correspond with your deity in your room.
There are heaps of examples of this. @spookynerdghoul has one here and @blomi-isle has one here. Alternatively @ostarasghost has a dedicated corner which you can see here.
You could also make an outdoor altar space, or multiple all around your island. You can create patterns to put on the floor as runes or sigils that correspond with your intent, if you’re looking to do spellwork or deity worship in-game. You could make offerings through art by creating patterns and placing them on stands.
There’s even a zodiac-themed item set that you can create by wishing on shooting stars. You can customise and dress up your avatar to wear cute witchy clothes too, or download outfits from their online section that other players have designed.
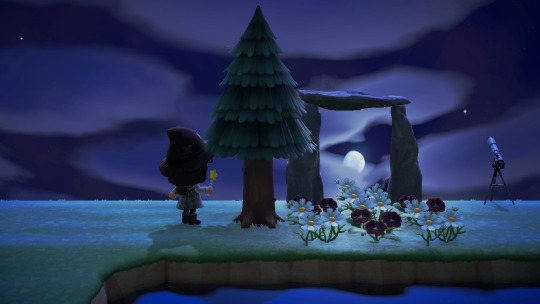
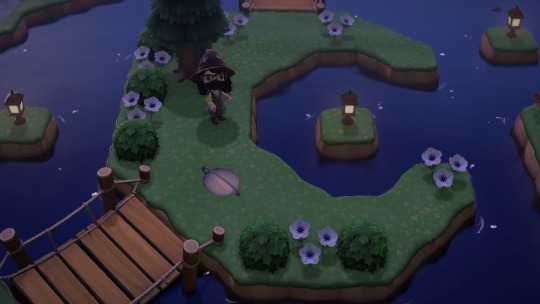
On my island, I have one section with a stonehenge which lines up with the full moon, as well as a separate rocky-section with some candles and a skull-hat, and a crescent moon island with a pattern of Saturn that I created, but I encourage you to go more full-out than I did!

Stardew Valley
@baduhennasravensraven classifies these as shrines, but I’d like to show it as an example as a potential altar. They’ve set up multiple sheds to serve as shrines/temples for different deities! You can see images in their post here.
Like for Minecraft, you do needs mods to get the full experience, but again you can make digital spell jars by growing the plants that best represent your purpose and placing them in with items that may best represent your purpose.
Sims / Avakin
I’ve grouped these together because they’re similar, but in both you can design and decorate houses in a 3D virtual world.
Again, expansion and stuff packs are needed to use Sims to the fullest, but you can find some great ones by @simdertalia here and here, or one by @lycheesmods here. Some more of the relevant ones are the Magic School mod (fair warning: it’s Harry Potter inspired) and the Paranomal pack, where you can have ghosts as roomates and perform a séance.
Here's an example altar made on Avakin by @onixdace. I'm not that familiar with this program, but it looks similar in concept to other house-design/decoration games.
Hollowmoor
@hollowmoor-game is a steam game still in the works with a planned release in 2023. I’m not sure yet of specific ideas in using it as a digital altar, but I’m sure it’ll be great, and I’ll update this post when it does come out.
According to their page, “As a budding young Witch or Wizard you’ll need to manage your farm and explore the mystical world to gather your ingredients. Brew potions! Forge enchantments! Complete orders for the townsfolks and learn their stories! Bring magic back to Hollowmoor!”
It seems promising! I believe it’s similar in concept to Stardew Valley and Animal Crossing, so I’m sure you could form a digital altar in the same way in Hollowmoor once it’s released.
Abstract Art Altars
Dream AI
[Edited 10 Dec 22] I’ve recently become aware AI art generators steal from creators online and I no longer endorse this method. Instead I recommend using art apps like CSP, playing a devotional playlist and drawing or painting what comes to mind to create an abstract piece of your own for a specific purpose. This way, in very low opacity, you can write out your intention and add images to be displayed subliminally on your altar.
Dream AI is an artificial intelligence art-creating app. You can use this to make an abstract artistic altar by typing in words like your deities name and their associations or a short prayer or intention, use the outcome as an altar by making it your phone background. You can also set a base image to inspire the art with your deity of choice, making a sort of subliminal image of that deity within the creation. This is helpful for closet witches, you can just claim you like the art the AI produced if anyone asks.
Alternatively, you can use the art as a digital offering by posting it on your tumblr altar captioned with a prayer, like @crazyskirtlady has here. Check out her page for more examples of techno witchcraft!
Mixed Media Altars
Notion
Notion is a great organisational app where you can add a mix of photos, gifs, text, embedded videos, music and playlists onto a page, making for a multi-media style altar. You can also store resource notes and links for any research you do.
@caduceussky and @arabellascraft were both kind enough to walk me through how they use their Notion altars!
@caduceussky has multiple different altars for different uses, like for deities and spirits, productivity, work-life balance, and prosperity spells that she uses in conjunction with physical altars, depending on convenience and her personal preference.
For deity/spirit work, she typically sets up her Notion altar first as a placeholder while she’s working on setting up a physical altar, then she treats it like a travel altar. She also use Notion for spell altars that have to do with work and study, since she uses her laptop for those, with separate pages set up for certain spells, sort of like digital spell jars.
For deity/spirit altars, she plays a devotional playlist while setting up the altar and adds a photo of a candle and photos of the deity/spirit or their associations like a collage. Digital offerings can go here, too, such as devotional writing or art. It can also be used as a journal to write her experiences and lessens she’s learnt from the deity/spirit.
For spell altars, she writes her intention at the top of the page, and any additional manifestations underneath. Similar to her deity/spirit altars, she includes photos of associations of the spell’s intentions, and sigils specific to the spell.
@arabellascraft uses her Notion altar for spontaneous rituals and spellwork as her physical altars are generally temporary. She meditates to her Notion altar or leaves a note, for example for gratitude.
She practices Irish folk traditions, one of which being having a moment of reflection and prayer when you first see the new moon of the month. Having her Notion altar in her pocket makes practicing this simple as it’s portable, however, one weakness is that there’s a lack of a physical connection. On the up side, the ability to embed playlists into Notion keeps her in the spiritual mindset rather than having to go back and forth in Spotify.
There’s about to be a Notion AI too, with the function of brainstorming assistance. This means you can type in something such as “What can I do to increase my mindfulness,” and a list of related answers and ideas will be produced, or “Write a poem about the God Apollo,” and the AI will generate one for you. You can join the waitlist here.
Phone App Altars
#Self-Care
This game includes a digital altar with a function to integrate your personal experiences by setting objects to a meaning, memory or realisation, like a journal. It also has organising functions to put objects away from you altar when you’re done with them and bring them back out when you’d like to display them again.
You can gain objects for your altar by performing in-game tasks like putting away laundry, fill-in-the-blank word activities with your choice of affirmations or life tips, simple puzzles, and gain tarot cards by picking a daily tarot card. You can also light a candle and type in an intention!
It does take a while to collect enough objects to display for a particular purpose, but if your digital altar is going to be your main altar, this one is a good long-term option.
The app is customisable to a certain extent with colours and designs, but some of the fancier stuff you have to pay for (like nicer backgrounds and patterns).
Here’s an image of my current altar on this app after about a week of use, along with an image of the main page.


Discord
On Discord, you can join a public server with custom categories to use as digital altars, such as this one by @homeiswherethehearthis. Alternatively, you can create a private server with chat rooms for various areas of worship and then post pictures/gifs and write prayers there.
With Discord altars, you can write messages to your deities, send them pictures, links to articles or books about them, as well as send them offerings of your creations. It’s a great way to have a massive private or shared space dedicated to your deity.
Further, you can add Discord bots that can do divination for you, as suggested by @lyresstrings in this post, such as a pendulumn bot, a daily tarot bot, or a horoscope bot. There’s even one that states the current moon phase!
Notes App
In the standard Notes app you can create folders for specific deities, and inside each folder, add notes daily, with images, links, song names and lists of correspondences to that deity. Further, you can write letters to your deity within the notes app, as well as intentions, wishes, and things you’re greatful for.
A great feature of this app is that you can actually lock your notes with a password just incase you’re worried about someone going through your digital altar.
This one is a good option to use in conjunction with a Collage altar if you make it your phone background.
Pinterest Shuffles
Pinterest Shuffles is a sister app of Pinterest, but instead of boards, it’s like scrapbooking. It’s an amazing tool for creative expression with a similar vibe to what Polyvore used to be.
The altars you can make with this are similar in concept to collage altars but the uses are specific to phones, meaning you can only make phone wallpaper images. With Shuffles, you can incorporate images directly from your Pinterest boards, which is great if you already have a deity board and want to condense it into a single image to set your wallpaper.
You can add text with intentions and prayers, or you can just use symbols of your deity of choice. I’d suggest making multiple of these, all with different intentions, so you can change your wallpaper based on what you’re asking of the deity for that day and worship on-the-go just by looking at your lock screen.
I made one as an example which you can view here. This is currently my home screen wallpaper! I added symbols of Saturn such as a clock, skeleton, herbs, capricorn, the world tarot card, the shrine of Saturn in italy, a crow, the number 3, karma, saturn-related texts, and my favourite images of Saturn.
Social Media Altars
Tumblr Blogs
This is probably the most common digital altar, mainly because of the massive witchcraft presence on Tumblr, and the ability to make multiple secondary blogs for each deity.
You can reblog general posts that remind you of your deity, images, gifs, spells, associations, prayers, emoji spells and more. However, are often considered to be more shrine-like activities. You can turn it into an altar by creating posts with digital offerings such as art and collages captioned with text spells, emoji spells, or prayers/worships (as inspired by @crazyskirtlady), or write poems for your deity.
Blogs are totally customisable, and you can change the designs with pictures, music, fonts and more. One important thing to note with secondary blogs is that you cannot initiate social functions like DMs, comments, even following and liking, and you can never change your secondary blog into a primary blog (trust me, I’ve tried. I made the mistake of making this account a secondary blog, now I can’t interact with any of you unless you reach out first).
The tagging system is a little weak though, and it can be difficult to search through all your posts and reblogs, so I suggest if there’s anything you want to keep track of, you have a separate space for it, such as on Notion.
Pinterest Boards
With Pinterest, you can create multiple boards for different deities or spirits, adding images that remind you of those beings from what others have posted. Finding inspiration is super simple! You can add images of representations of your deity, like food, clothes, crystals, art, sculptures, elements, animals, objects and more.
Instagram
In the same sense as creating a Pinterest board, you can dedicate an entire Instagram account to your deity. You don’t have to follow anyone, and can keep it on private, or you can share it publicly. You can post your offerings, photos of things you come across in every-day life like images of the sun, the ocean, trees, plants, bugs and more.
Be careful with this option, however, as you can’t just download photos from Pinterest and post them without credit. This option is more appropriate for art you’ve created yourself and documenting your experiences with captions, poems, emojis, short letters, gratitudes, and intentions.
Musical/Playlist Altars
Spotify
One post by @asatroende got me thinking about how apps like Spotify can be used as digital altars by creating playlists with songs you associate with a deity as a form of prayer. Some examples other than normal music includes subliminals, podcasts, instrumentals, and white noise sounds. If you add a short ambient candle sound in the middle of the playlist, this can aid in visualising a candle, making your prayer or offering, then it
You can add a picture of your deity as the album cover and add an intention or emoji spell in the description to customise it further. Spotify also allows you to make folders, and insert multiple playlists within those folders, which is great it you have multiple deities you’d like to make altars for.
An added bonus is that if you have a Notion altar, you can embed this playlist into it!
For my Spotify altar for Saturn, I added Sleeping At Last’s ‘Saturn’ from Atlas I, a 1:24 minute candle sound, then the planetary/space sounds recorded and posted by NASA called ‘Nasa - Saturn’. This way, I can get in the mindset, make my devotional prayer to the candle visualisation, then mediate to the sounds of Saturn for 30 minutes. I used an emoji spell as the description, and used an image of Saturn eclipsing as the cover.
Apple Music
I’m not a user of Apple Music, but I’m sure it can be used in a similar way to Spotify. If you have the free version, you can only add songs that you own to a playlists. To get around this you can use a youtube-to-mp3 converter to get ambient sounds, subliminals and more. However, this isn’t necessary, and you can just include music you own that reminds you of your chosen deity.
Virtual Reality Altars
Oculus
One last idea is if you have the technology and setup for it, you can create an altar in a VR game or space. Unfortunately, I wasn’t able to find any practical examples of this one.
—————————————
Special thanks
I’d like to give a big thank you to @gailcraft, @caduceussky and @arabellascraft for giving me permission to talk about their personal digital altars, and for providing me with information regarding them. A further thank you to @gailcraft for providing me with images to share with you all. Go check them out!
Here’s the explanation for baby withces:
Some people doubt the integrity of digital altars, however I believe they gain metaphysical energy as they’re created, which can be used for witchcraft. Think about emoji spells, for example!
Digital altars are different to digital shrines, which are similar in concept, but different in purpose. Shrines are more of a permanent honouring of a being, and they don't necessarily have to be used actively. Meanwhile altars are for active worshiping, when you’re actually giving an offering or trying to contact that deity. However, digital altars can also function as a shrine, depending on use!
Altars can be used for multiple purposes, for deities, patron planets, ancestors or general spirit work. Some people have one altar for everything, or separate their altars to keep these purposes separate, minimising the ‘cleansing’ you may have to do between each ritual.
Traditionally altars include tools to represent, the four elements, the cardinal directions, genders (although this is sort of being phased out), and offerings. The sub-categories of these are where you can get creative in the representations. More on that in a future post!
#digital altar#digital witchcraft#techno witchcraft#altar inspo#altar tools#witch#witchcraft#witches of tumblr#witchblr#witch aesthetic#digital shrine#altar#deities#diety#cyber spells#baby witch#beginner witch#beginner witchcraft#pop culture witchcraft#deity work#animal crossing#picrew#minecraft#stardew valley#hollowmoor#notion#original content
769 notes
·
View notes
Note
i'm sorry to bother you, i just came across your blog and i'm so shocked with how amazing your sims look. i play sims 3 but my sims look pretty average and my screenshots don't look great, can you please if it's possible explain how your sims look so beautiful like this? (specifically this post hiddenspriings/742135415348330496) like, how do your sims look that good? is that a default skin? and how do they have those shadows on their faces etc, is that editing or reshade? can you please explain deeply? i'm sorry i'm asking for many things, i'm just a noob and i really get confused looking at these beautiful posts wondering how to make my sims look cool like that too!!
I don't even know where to start asdfghjkl 😅 developing a sim style is honestly a journey and when I joined simblr my sims looked like potatoes too, it takes time and effort to actively work on that 'skill' if I might call it that. With that often comes the dissatisfaction of your progress and how your sims look, and sometimes you just have to stop yourself and enjoy the ride, without looking around at what others are doing. Anyways, into actual 'tips':
I think you need to figure out where you stand when it comes to cc (it's not really a need but it's gonna help I guess). I like the look of very simple maxis match skins (I have those linked on my resources page) and very often alpha makeup cc layered on top. I personally don't really like how alpha skins look like on my sims (they usually have much more depth to them but since I’m not into that I can’t recommend anything) so everything you see on them - highlights, blushes, shadows etc. is just makeup cc. For those I recommend: blushes 1 2 3 4 shadows & highlights 1(!) 2(!) 3 4 5 6 7 8 9 (+ tifa’s stuff here). Add them on top of each other and bam! suddenly your sim isn’t so flat faced anymore (little note here, I often use ‘blushes’ as shadows as well depending on their placement ;)
If you are interested in what I personally use as defaults check my resources page. I also have all the skins and eyes cc I use linked there. My advice would be to also check other simblrs’ resources as well, there are some well hidden gems there that otherwise I wouldn’t be able to find on my own.
But If you are new to sims 3 you might ask: hey, how do you layer cc if you can only apply one for the category in cas? Well...Get yourself nraas master controller if you haven't already. With that mod you can increase the number of sliders which give you freedom of creating more diverse looking sims and assign multiple makeup per location. I won't explain how to do it here as there are multiple guides online, just google your question :) - I even saw great guides on youtube! It might seem like a lot at first but believe me, nraas along with its many modules will save you a lot of time and hussle.
Lastly, part of the posting process here on simblr is editing and I cannot lie that my sims don’t benefit on that. I use reshade with mxao which enhance colors and shadows (check my f.a.q page for links) and smooth out pictures further with photoshop tools.
Now I’m gonna expose myself a little, this is from left to right: the oldest sim in my folder currently (I’d say this is my late 2022 style), my newest sim and my newest sim with reshade on (but no further editing).
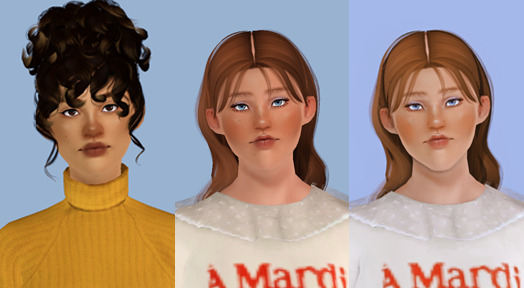
It’s a shame I don’t have access to my very first sims in sims 3 to really compare them but I think even here you can see the difference. So do not get discouraged, it will take a time and dedication like any other hobby but you’ll get where you want to be eventually :)
37 notes
·
View notes
Text
The audience of the stream is watching Leo move about the set checking a laptop, tablet, and his phone all sitting on a desk with a blue gaming chair. He was also swapping his models outfit, not sure which would fit with whatever he was about to talk about.
He finally chose a full Lou Jitsu jumpsuit, with gloves, platform shoes, and shield glasses worn over his usual mask. He plopped back into the chair and poses with his one of his ligs crossed over the other, and leaning onto his left hand.
"Sorry 'bout starting the stream while I wasn't ready. I found some amazing news, and wanted to track down as much actual facts, to make sure I had everything correct." He leans over to the laptop to set something up. Once he was satisfied he turns back to facing the camera.
"So, it's fairly obvious we're big Lou Jitsu fans here, so imagine our surprise to hear about someone attempting to claim his supposed left behind fortune. Because people for some reason think he's dead, and not just trying to live peacefully somewhere." Leo clicks on something, and a news article pops up.
"Woman claims to be Lou Jitsus 'long lost' Daughter/Granddaughter."
"Either the Lady couldn't keep her story straight, or whoever wrote this kept getting conflicting evidence. Part of why I wasn't quite ready. Had to check is with my journalist sis to see if she could help get things straight." He clicks over to something else and a different article takes the place of the previous one.
"Woman attempts to steal fortune of Lou Jitsu with faulty Scam. Surprised by the results!"
"So to set the scene better, this lady shows up out of nowhere, claiming she's, let's see by age... Daughter! Of Lou Jitsu. I don't know how she planned to have this work with modern DNA matching and everything, but she apparently refused to do a DNA test to prove this. If this was literally 30 years earlier she wouldn't have to worry, but I guess she didn't bank on people asking so many questions." He gets rid of the article, and brings up a badly edited birth certificate. "Seems she believed she could just wave around a doctored Birth Certificate, and some flimsy 'photographic evidence' that looked like they were put together in a bootleg photoshop program."
A couple of pictures appear on screen, they were obviously edited pictures of Lou Jitsu "holding" a baby, or child. Then a couple with a little girl that looked very off, the lighting didn't match between the girl, and Lou.
"Yeah, this didn't fly with the people at the banks, or whichever government offices, she had attempted go to, especially since there was a different thing blocking her from succeeding in this sham of a scam." Leo looks proud of himself for that slight word play. Something is thrown at him from off screen, and he glares at whoever threw it before continuing.
"You see, Lou Jitsu had set up an interesting set of security questions and or tests for getting access his bank accounts. He did include a DNA matching test as a last ditch security, but it never got that far. No she got caught at a slightly obscure set of security questions that required you to answer a random on set inside joke from one of Lou Jitsus first movies!" Leo laughs and spins in his chair a couple times. He stops and brings up a new document.
"Okay, so this is a copy of the security tests list we got ahold of, as you can see," He points at a spot near the top that's highlighted, "Lady didn't get very far into the security tests. Yeah there are alot of them, he apparently set this up not long before completely disappearing from the limelight. Though why there's so many tests is anyone's guess! Maybe it's just to annoy whoever attempts to fake their way into his accounts?"
Leo thinks it over a bit before muting the mic and shouting off to the side, then waiting for an answer, where he nods his head, and talks to whoever's off screen, with a couple of odd gestures and head tilts. After a couple minutes he unmutes the mic.
"So, just asked Dee a couple questions, and while we can only speculate why Lou make such a complicated set of tests, what we do know is that the tests were actually updated a few years back. So Lou is still out there, and he knows the Lady made this attempt. And has filed a lawsuit against her! That will be an interesting day in court!!" He quickly stands up and throws his arms up in the air with jazz hands.
After sitting back down he swaps out the documents still on screen with a couple of pictures of the Lady's headshots from getting arrested for attempted fraud, and scam. Her name is blurred out.
"This is the Lady, we don't want to give out her name since she either has a very unfortunate name, or she would only give them a very crude name instead of her actual name. Plus some places can't legally tell the names of people who were arrested, so let's go with that." Leo reads some notes on the laptop then added, "And she might have a record already, but we can't read or find any legal documents that confirm or deny this."
The pictures are taken off the screen, and the lighting changes.
"Well, there's not much more of that incident that's public, so let's move on to something else Lou Jitsu related! They've announced a new special anniversary movie bundle! And we have some info on the special bonus features!" Leo announces, and brings up some graphics for this movie bundle.
The stream continues from there, and even though some people in chat are still shouting questions about the scammer lady segment, they get ignored and buried under other things spammed in the chat. Especially since donation notifications were disabled for the stream.
-------------------
Masterpost
#VTurtles!#vtuber au#rottmnt au#tmnt au#rottmnt leonardo#rottmnt leo#rise leonardo#rise leo#lou jitsu#rottmnt fanfiction#tmnt fanfiction#rottmnt#tmnt#teenage mutant ninja turtles#rise of the teenage mutant ninja turtles#tmnt 2018#rise tmnt#rise of the tmnt#rottmnt lou jitsu
24 notes
·
View notes
Text
Mkay, time for my in-depth review of Zuko's scar in the live action ATLA, because I'm a lil salty.
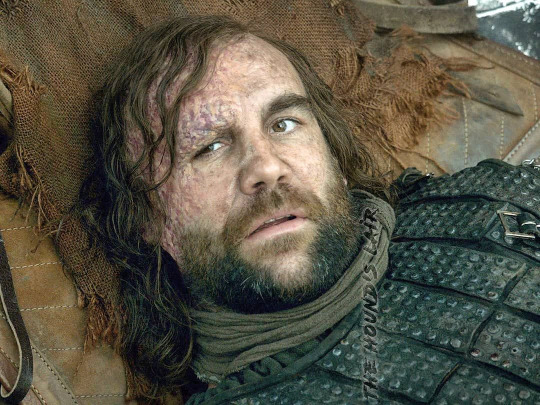
This is the first shot of Zuko we see, and my first impression is: this isn't the best makeup. The first thing that stands out is the flatness of the scar. It's unrealistic, because burn scars usually heal in a lumpy way, it's called hypertrophy. See the burn scar from the Hound (Sandor Clegane) in GOT:
That lumpiness is super important for making skin appear like it had been burned by fire and healed over! But because it's not really there in Zuko's face, it just looks like he got a bad sunburn:

I understand Zuko doesn't need a super deformed face, or enormous textures in his scar, but we basically have just flat skin right now, and it doesn't sell 'bad scar' at all. The makeup should've been somewhere between those two things.
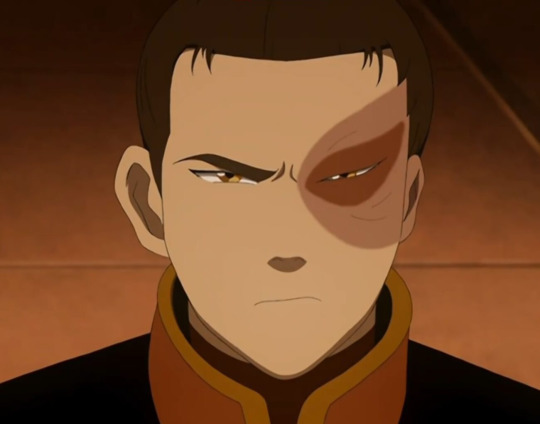
The second thing is the general inaccuracy of the scar itself. I'm not gonna nitpick how it doesn't go as far down his cheek, or how it's not affecting his left eyelid, but there are some major things I am gonna mention. In the animated show, his left eyebrow was burned away because the fire contacted the skin underneath it, and then went over that, up into his forehead:
Here's a crappy edit I made where the brow is mirrored, you can see how much the scar extends over it.
But in the makeup, it looks like the fire either stopped directly at the underside of his brow, or it did burn his skin under the brow, but the brow grew back somehow. It looks weird. Because the brow is still present, there's less contrast to draw your attention to the scar and subconsciously say 'this isn't normal'.
Here are two other edits I did:


This is what I'm talking about when I say the brow (and height of the scar) drastically changes how Zuko looks. He looks so much closer to the animated version now, but he's still free to emote because his eye isn't affected at all, and his brow could still move normally. It also helps give him that harsher appearance, which people tend to say exists with the ponytail hairdo! But it would also work great with his long hair look, which would soften everything anyways.
(For the second edit, I also tweaked the ear a lil bit.)
When it comes to the colours of the scar, I'm undecided. In the OG show, they probably had to change the colour of his scar so much to indicate there was even a scar in the first place, because it would've been annoying to add tons of line detail for the animators to deal with instead. At the same time, the live-action show could tone it down a lil bit. But it doesn't look bad, per se.
The third observation I have is Zuko's ear. If you look in the animated show picture above, his left ear (your screen right) is smaller than his right ear, because it's scarred over. I don't think it's practical to have that kind of effect in the live-action show, because it would mean even more CGI (they'd literally need to paint out the real ear, and then replace the ear with a digidouble ear). But if you look at the trailer capture, you'll see the scar colour doesn't even extend to his ear at all!
If you open the picture in photoshop, the scar around his eye and cheek has a reddish hue, but the skin on his ear is the same colour as the skin that isn't scarred. This isn't a cherry-picked sample, the hue is the same in each entire area. As soon as you stop sampling the ear and start sampling the cheek, it drops right into the reds/oranges:

I think the ear coming away unscathed might be a little unrealistic too, considering the scene where Zuko is burned by Ozai currently looks like this:

The fire is obviously going around the sides of his face, not just going directly into it and then bouncing away. It's kinda brushing around. With a scene like this I would expect the ear to have some kinda damage. Is it because they toned down the overall scar so much that any apparent damage on the ear would become nonexistent? Maybe. But right now, the scar just looks like a blob on his face, instead of a spot where fire actually flowed around.
And I just wanted to point out something else I've seen, not in the trailer, but in the fandom. Because I'm already tired of seeing it, it's dumb. Basically I was on a forum and I saw someone say 'if you want something like Two Face from Batman, this is the wrong property to ask for that'. I thought it was super unreasonable because nobody is asking for this:
And nobody is having a 'meltdown', like some other dishonest peeps are saying! People are just mildly upset that the actor's skin looks like it's been coloured in with dye, and there's almost zero hypertrophy to actually telegraph the fact that it's definitively a scar.
So those are my thoughts.. The scar is barely serviceable, they kinda dropped the ball imo.
Don't get me wrong, I totally understand the ~hollywood need~ to make things super toned down so you can see actors' glamorous faces or whatever, but some additional scar makeup wouldn't have harmed his ability to emote or anything. They didn't even need to do anything to his eye.. Just fix the overall first impression the scar gives, which would've worked with the stuff I mentioned above. So I'm not sold on 'it's to show the actor's face better' as an acceptable reason. It's an explanation sure, but it's just not good enough to justify the difference to me.

#if there's another explanation for this i'd love to hear it! i follow some of the news but i miss a lot of interviews/press junkets#atla#atla live action#zuko#atla zuko#atla netflix#dallas liu#burn cw#injury cw#body horror cw
61 notes
·
View notes
Text
hello friends! 🌷
recently i got an ask on how i edit my instagram screenshots and here in gemville, all you have to do is ask and you shall receive my child
fun stuff under the cut!
this guide will be divided into two parts: how i take & edit my gameplay screenshots and how i edit my simstagram posts

before we get into the actual tutorial, here are a list of things that i use to help me take better screenies :)
gshade
i'm using an older version of gshade because - thanks to my procrastination - i never updated the version before everything went to shit.
2. presets!
i switch around between presets a lot lmao but for the most part, i use ellcrze's gshade preset for my family dynamics save, sunset n vinyl for my globetrotter save & sim download pictures and a modified boho dreams for my tjol legacy save (first post coming up soon!) sometimes i use lithium for cas pics too :p click here for a somewhat detailed explanation lol
3. tab mode camera mod
this camera mod is a godsend and makes taking screenshots soooooo much easier! 😌 i highly recommend getting this mod!!!

i think i mentioned this before in an ask - i edit my screenshots in photoshop before posting them on tumblr :D i don't really do much, just running a few actions and cropping my screenies. gshade does most of the work for me lol
this tutorial by @buglaur is insanelyyyy helpful omg i based my entire editing process on her tutorial, except for the colouring part because i'm lazy hehe
here's an example of my screenshots before and after editing (cropping the screenshot and running some actions)! there’s not much difference because as i said earlier, gshade will basically carry your entire editing process 💀

sometimes i put text in my pics like these screenies below :) i mainly use these two fonts - winkle and lemon milk :D
and that's about it for part one! now it's time for

here's what you neeeeeed
1. photoshop
i'm using a 🏴☠️ version of photoshop that i got from a somewhat sketchy website but it runs great so i'm not complaining 💀
2. instagram post template and instagram story template
a HUGEEEE thank you to @windslar for sharing the instagram story template link 😭 she is such an inspiration to me 💛
3. the actual instagram app
this is how i add text and emojis to my simstagram posts lol
disclaimer: i am NOT a photoshop expert. there's probably an easier way to do what i'm about to show you, but this works for me and i don't really mind the steps hehe
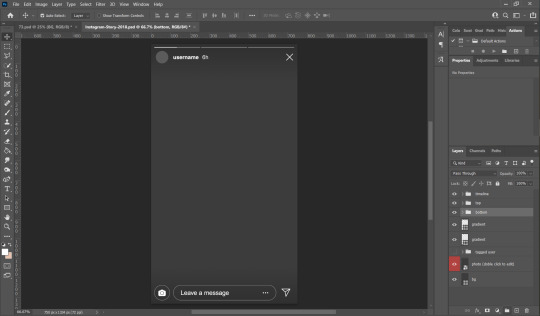
first things first, you're gonna want to open the psd files on photoshop and it'll look like this, depending on which file you opened
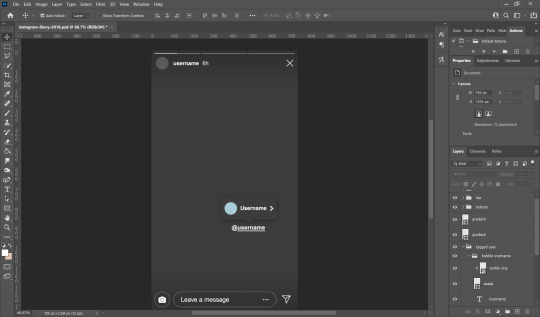
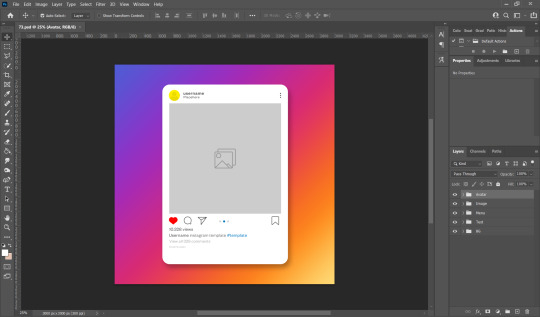
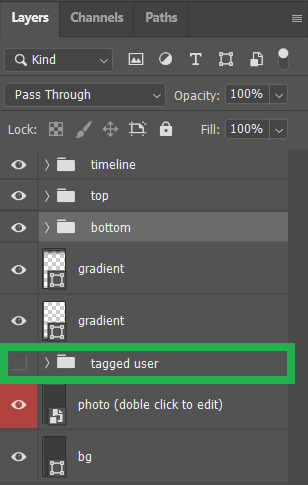
i usually just hide the layers that i don't need so in this case i'll hide the tagged users layer from the story psd and the bg layer from the post psd.

these are the layers that i hide but you can also leave them on if you want hehe totally up to you my dude. then you'll end up with something like the pics below

now we move on to the profile pictures! so what i do is i click these layers (shown below) and go 'file > place embedded > selected picture'

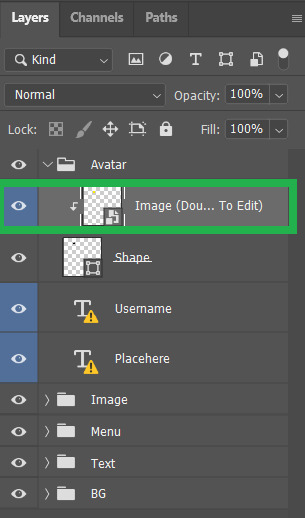
once you do that, you'll end up with something like this (below)! use 'ctrl + t' to resize your picture to fit into where the profile picture would go.


right click on the layer of your selected picture and click 'create clipping mask'. then you can hit 'ctrl + d' to adjust the picture to your liking!
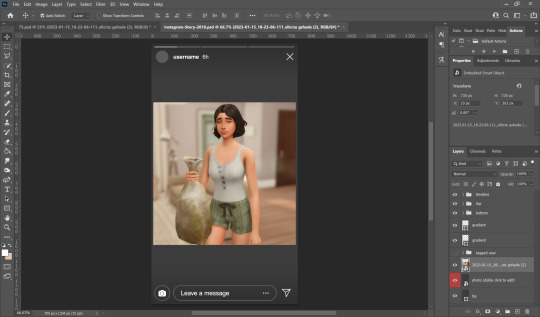
now for the actual pictures for the posts. click on these layers (shown below) and go 'file > place embedded > your selected picture'


now all you have to do is 'ctrl + t' to resize your pictures, right click on the layer of the selected picture and click 'create clipping mask' then 'ctrl + t' again to adjust the pics!
after this whole process, i'll export my pics to my family dynamics folder on my desktop and queue it up on tumblr! :D sometimes my simstagram story posts have text and emojis like these ones below

all i did was upload the pics to google drive, download it to my phone, add text/emoji on the actual instagram app then saving the story to my phone... a lot of work but i don't really mind <3
aaannnnddd that's it!!!! i can't believe i made this guide 😭 hopefully this helps :D english isn't my first language so apologies for any grammar/spelling mistakes i've made in this post 🙈 feel free to ask any questions and i'll try my best to reply to you asap!!
181 notes
·
View notes
Note
if it's okay, would you mind sharing your art process? your style is SO gorgeous dude. keep it up spardacest nation!!!
Thank you so much anon, and of course!
I kinda posted about it on twitter a while ago, but for anyone not also on there, here's a paraphrasing of what I said there!
(under a cut bc it's gonna get a bit long)
(speedpaint video from procreate mostly bc like I also said in that post, it's one of the few pieces I've done entirely on procreate and thus entirely recorded kdfjhdk I usually don't do the sketching + painting parts on there but every now and then I get lazy and want to get it all done quick in one program lol! It's not as good as it would look if I were using krita to render (which is what I normally use) but it gets the idea across decently of what it is that I do)
The short version of my process is:
sketch, clean up sketch for lineart, then flat colors, then paint over the flats (i make the flats my shadows and paint on the light), then a multiply layer for skin details (like lips, eyebags, etc), then an overlay layer for skin transparency details (red over the ears/nose/fingertips etc), then i do hair over the lineart, then a multiply layer with the contact shadows in a light beige/grey/neutral tone on top of everything else, and then i unify layers, paint over the details, and color correct the HELL out of it
The longer version is:
SO, first of all, I will say, my entire process for a finished/fully redered piece is pretty scattered and uses a lot of different apps, because after many years of trying out different drawing apps I found that I just worked better when I could incorporate the parts I liked best from each individual one rather than having to adapt to another app entirely!
In total, what I use is: autodesk sketchbook and procreate for the first half I do on my ipad, then krita and photoshop on my computer when I'm actually rendering (but any photo editing app instead of ps will do, I'm just used to photoshop bc that's what I learned as my first drawing app WAAAY back in the day lol), and then meitu on my phone for color filters (also any phone editing app with filters in it will do), AND also optional just for references: blender and daz3d on computer + magicposer on my phone
The actual step by step of what I do:
First of all, if I want to do a detailed, well rendered piece I will start by getting my references ready. That means either just grabbing a screenshot from the game if it's like, a simple portrait, or a photo reference, taking a picture of myself in the right pose/lighting, and if it's something more complex I will recreate the scene in Daz3D to simulate a realistic lighting, OR even just blender (i have the game models for the dmc characters downloaded, so I can just pop them in, pose them and change the lighting to get a realistic idea of what shadows their faces will cast in that specific angle/lighting.)
Note: references are pretty essential to me, and there's nothing to be ashamed about for using them! Personally I don't struggle a lot with the drawing/sketching part of art, but my tiny little pea brain cannot fathom how to make an object 3D in my mind, and how to visualize shadows realistically... thus the reliance on 3D programs to do that for me, and then all I have to do is draw what I'm seeing lol. My art improved significantly ever since I started making 3D refs so I could get /exactly/ what I needed - there's still a lot of leeway you need to learn though, because as realistic as the lighting will be in a rendering program, you'll never really get a fully natural looking image, as far as stuff like the body stretching/squishing/pulling when it's in movement, facial expressions, folds in clothing/fabric, etc... so really it's more a guide than something meant to be followed 1:1.
Then, once I'm confident I know exactly what I'm gonna draw/have the idea in my head, I start sketching it in sketchbook. Not really getting very in depth, just blocking out rough shapes - I like sketchbook and to be on my ipad for that because it feels very reminiscent of traditional sketching on paper to me, which while I'm not super confident on my traditional art abilities, I do get the most natural/fluid/non-stiff figures out that way.
Then when I think I have the general idea ready, I export the sketch layer as a png and import it into procreate - which is where I kinda start picking at the sketch and polishing it like i'm carving it out haha. Lots of liquify tool, flipping the canvas to check if it's even, blending out some of the lineart to help out with the rendering later, and then polishing up what was once the sketch into serviceable lineart. I usually reimport it back into sketchbook at this stage - while I like procreate for drawing I don't love the brushes I can use for lineart there, and so I usually only draw the "base" naked figure in there - when I'm in sketchbook I use a hard pencil to refine the details, then on a separate layer add all the things "on top" like hair, clothing, etc - usually I can get it pretty easily in one go, and once I'm satisfied I erase the naked body under the clothes and unify the lineart layers.
Then I will just do the flats with a hard brush, turning the lineart layer into an overlay layer and coloring things in with the shadow colors.
At this point, I export the file as a psd and import it on my computer - I give it a once over in photoshop first to see if there needs to be any adjusting (like whether any layer that has an effect needs to have a different effect, if all the colors look right since the ipad screen isn't the most faithful, if i wanna change the background color, etc), and once I think it's ready enough, I open it up in krita, where I do the actual bulk of the painting/rendering (as to why specifically krita: it's because I've gotten very comfortable with the brush/painting brush dynamics there and cannot seem to get as good results anywhere else, it's just the goldilocks spot of a brush for me haha.)
If anyone's curious, here's the brushes I usually use for painting:
The one in the middle is my go to painting brush, left one for tinier/more refined details, right one for blending out soft shadows (though I learned the hard way to not overuse it, or it will look like I went ham with an airbrush tool lol).
(I don't change any of the settings on these brushes, so if you wanna try out the exact ones I use! Just fresh off how they come out the app haha)
I paint on the lights on top of the shadows, and just focus on that for the time being - once I'm done with the basic painting, I'll make a separate multiply layer for details like lip color, eye waterlines, makeup if there is any, eyebags, etc, and then adjust the opacity until it feels right - then I'll make an overlay layer with skin translucency details (like, when you hold your hands in front of a light and see the tips of your fingers become bright orange - many parts of your body are always a bit translucent to the blood underneath, specifically parts where the skin is thin like noses, cheeks, joints, knuckles, etc, and I found it makes the character look a lot more alive to add that subtle coloring in) - then usually I do hair on a separate layer on top of the lineart (because that way I can add small flyaways, more details, etc, and just use the lineart as a guide)
After that, I'll usually make a multiply layer on top of everything where I'll add contact shadows in a neutral color (usually pretty pale, it'll be darker anyway since it's multiply), and once I feel like I've rendered everything out properly, I save the psd and re-open it on photoshop.
In photoshop, I'll mess around with the layers a little bit more (changing hue/saturation, opacity, etc), fuck around with the background to make it look pleasing, and once I'm happy with it, I'll unify the layers and start color correcting - usually by duplicating the unified layer and messing with the curve/hsl of the image and then changing the opacity of that edited layer until it's as strong or muted as I want it to be - then I also edit the RGB curves individually and adjust the opacity of that also (because I just really like how it ends up looking if I give a bit of a red/warm tint to the shadows lol), and at that point often I will reimport the finished image into procreate for some finalizing touches! Like, blending out shadows that came out too harshly, painting over anything that came out not the way I wanted it, redefining the lineart if it got messy during painting, and adding any extra small detail that might have gotten lost like catchlights, hair shines, hair flyaways, tears, etc. I also do one last round of flipping the canvas and liquify if needed!
At this point, I export the finished image both to my computer and my phone - on my phone I open it up on the photo editing app, and add a bunch of different color filters - I don't hesitate from going completely balls to the walls here, and just kinda applying as many filters as will make an image look pleasing to my eye.
Once I think it looks good, I'll export the edited image to my computer - and then open both the version without filters and the one with them on photoshop, and use the filtered version as an opacity layer, and adjust it until it doesn't look as crazy anymore lol.
One last step I recently started incorporating was also changing the image to grayscale after I'm done, and doing one last round of curves in greyscale to make sure the values look right, and nothing is getting too lost because the values are too similar (because i know i get a bit swept up in getting repulsed by harsh contrasting lighting and can end up washing out all of rendering if I don't check myself kjdfgk)
AND that's it!
Yes it's a pretty long and chaotic process, but it's coming from years of trial and error and realizing I can just let myself fo whatever makes me happier with the results, and I don't have to stay constrained to one program if I don't like every tool it has to offer/don't have to accept the final image fresh off the painting app as the "finished" image with no adjustments allowed after, lol. I don't find it takes a lot more time than if I didn't do it this way, but YMMV.
Hope this was helpful and sorry for taking so long to explain! I just wanted to give a thorough explanation dfhdkhkx
#asks#sorry i know its a bit chaos hfdgd#but i hope its helpful anon! thanks for asking#also for anyone wondering#no i am not paying for ps lmao#fuck adobe#it is always morally correct to pirate adobe products people#if you have an alternative photo editing app you like best youre welcome to use it#but if youre too used to photoshop. everything is free on the internet if you know where to look#i also wouldnt recommend meitu bc it feels like a pretty sketchy app all things considered#im just too lazy to care to change my go to app but i would look for a different phone app#p sure theres billions that let you add funky color filters instead#actually i think you could use photoshop camera raw filters for that too#its just way too intensive of a process for my tiny potato computer and it feels a lot faster + seamless on phone
13 notes
·
View notes
Text
continuation to this tutorial under the cut
we continue colouring. next, onto the Curves layer! just like with Levels, choose white dropper and pick a light spot. this will be mine:
again, that's far too white, i only want to brighten up the scene a bit, so i will be changing Curves layer's opacity to 15% and this is what i got:


the gif now has a bit of brightness and blueish tone from the Curves, but not too much!
use Selective Colour layer to correct any colours you would like in your gif! i usually use it to bring back the colour of the characters' skin by changing Reds: Black to a higher number. in this case i added +20. i will also move the Selective Colour layer down under the Levels layer because i'd like for it to be more intense.

next, please use the Gradient Map layer from my psd. i cannot remember where i learned it from, but i always use this one in my gifs, while only changing the opacity of it sometimes. it ranges from 20% to 60% on my edits. it adds contrast to the gif.

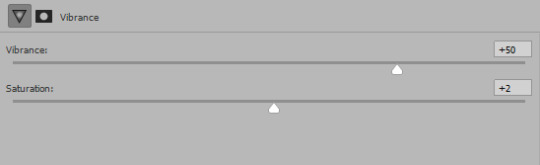
now, the last layer is Vibrance. as you pointed out, i really like to make gifs that are vibrant and colourful. my usual Vibrancy setting is +50 in Vibrance and +2 in Saturation, but you can play around to see what works best for you.
great, if you completed this step, you are done with colouring the way i do it! personally i will be erasing a bit of Levels layers on the left side of the gif cause the character's belly skin looks too light, but you don't need to worry about that for now.
Optional step: Captions
if you want to make a subtitle text layer, click the Type tool. then click on the picture and drag the tool on it.
type your text, choose a colour and a font. then change the font's setting to bold and italic

add a Layer Style by clicking on fx button > Stroke

enter these settings:
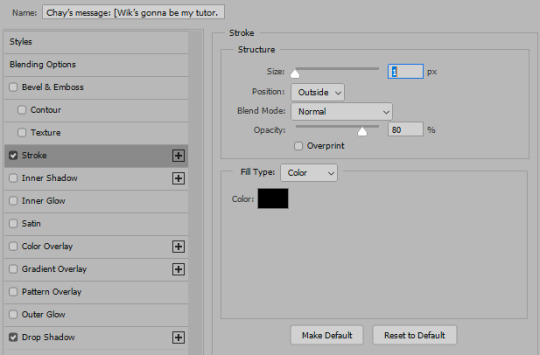
Click on Drop Shadow in this window and enter these settings > Click OK to save


here, we have a caption!
7. Saving the gif
click the Save action. check the end of the timeline to see if you have any blank layers, and delete them if you do.

go to File > Export > Save for Web (Legacy)

these are my saving settings. most gifmakers use Diffusion, but i prefer Pattern cause i like the way it looks on the mobile better (especially in cases when my gifs are grainy).

click Save and name your gif. and you are done! hopefully i explained what you asked well, but english in not my first language and etc, i also am a whole damn idiot and not highly competent in the giffing field. sorry if anything in confusing! please send another ask or a message if you have questions darling <3 here is my result
also i collected many cool tumblr photoshop tutorials so i recommend going through my giffing tag too!
18 notes
·
View notes
Note
noooo what??? What's photoshop doing with AI?? I swear if Ibis or procreate do smth similar-
YA, idk how their ai works? So idk how much is stolen art and pictures... I understand the idea for it, its supposed to be used to fill in areas of a picture in photo editing buuuttt I don't trust ai...
I'm hoping drawing centric applications won't add anything like this since ppl don't usually use it for photo editing
22 notes
·
View notes
Text

Just for fun, I figured it'd be interesting to post a "before and after" comparison, with the raw picture straight from the game on the left (before shaders) and my final edit on the right.
I don't always do this, god I don't have enough time in the day to do this for every photo I take and in retrospect I could have probably spent my afternoon in better ways yesterday, but I think some shots really deserve the extra effort.
So if that sounds interesting to you let me show you a breakdown of what goes into a shot like this!
When I decide bring a picture on the editing table, usually first and foremost I take a photo of the environment by itself, and a chromakey photo of just the characters of the foreground (I eventually cut out the rest of the floor by hand). These will come in handy for adjusting the elements of the picture independently later.

What I'll probably touch up on first is smoothing out polygons. Shoulders, knees and other joints tend to create unnatural sharp angles when bent too much, and muscles like the thigh here can't accurately simulate the way human muscles flex. Not to mention the body horror going on with that thumb.


While I'm at it, I painted over some parts of the model where the lighting got confused, and made it look a little more believable, like on the fingers of Wilan's hand here.
The biggest reason I did a photoshop pass however is the skirt. Everyone who has ever tried to pose with skirts, robes or capes knows that FFXIV isn't really built for handling cloth, and there's a lot of negotiating involved to make it look decent. I sent more time than I care to admit trying to get the best approximation possible, smoothed it out with Liquify and then painted over folds that didn't quite look believable and details that clipped in awkward places.
While I was painting over polygons, there were a handful of places where I couldn't avoid some clipping, and certain spots were more noticeable than others. For all the spots where the 3D models really wouldn't behave I resorted to just fix it manually.
Once that's done, I went over the lighting. Gpose's three posable lights did most of the work, but I still went in to take care of some details. In most places I just painted over additional highlights on shiny material, or I added subtle touches of rim lighting to make the pose more readable.


And then, for something less subtle, I sometimes just add more rim light for no other reason than to make the pose more dramatic or to further make it pop from the background. This is a photo with a strong pose and sense of motion, so it's worth taking the time to highlight it.
(speaking of which, the base pose I used for this shot was done by Nhagiri, even though as I almost always do when I use pre-made poses I spent plenty of time adjusting it and calibrating it to my two specific OCs)
This shot had pretty intense and dramatic back-light too, so since FFXIV's graphic engine usually calls it a day early when it comes to draw ground shadows I've just painted it myself.

And most importantly, the lighting was very carefully set but I couldn't manage to properly light up their faces without messing with the overall light and shadow contrast. So I carefully mixed in a different photo with better lighting on their faces, and then calibrated the luminosity and exposure to make sure they'd be the the centerpoint of the shot.

Well that's about it for the models, now off to the color correction.
Most of it was done in photoshop but a lot of the heavy lifting was made by shaders. My go-to presets are @owlincense's CandleBlooms (formerly known as Purple Cocoon), which I've used in pretty much every single one of my photos and can't recommend enough. For this shot in particular I've used her Tourmaline Colorful preset.

It looks great already, but I have some further touches in mind for the specific mood I'm looking for for this scene and I don't want to mess to mess with the shaders' interface to achieve them, so post-editing it is.
First of all I've adjusted the tonality of the background to be colder and more bluish and a tiny bit less saturated, while accentuating the reds of the two characters, bumping up slightly their saturation and contrast.
I've also manually simulated bright light coming from the main hall in what's hopefully a convincingly seamless fashion, reinforcing the light source and making the strong highlights and shadows feel more justified, and a vignette to darken the far edges of the composition.

Just a little dash of particles caught in the light as the last touch, and that's about it! Wilan and Delen can enjoy their passionate tango, in a little quite corner to themselves, just outside the bustle of the celebration in the main hall.
15 notes
·
View notes
Text
Sims get to know me
Thanks for tagging me @oasivy @duusheen @citruswhim @zosa95🤗
What’s your favourite sims death?
Death by chicken/rabbit. The idea that something so harmless looking could be so deadly 😬
Alpha CC or Maxis Match?
Match. Maybe a tiny bit of mix. Alpha is nightmare fuel...
Do you cheat when your sims gain weight?
No. But I make my sims heavier because I don't like them looking like bodybuilders after going for a jog 🙄
Do you use move objects?
Yes!
Favorite mod?
There are so many good mods, but I have to choose MCCC. I won't play without it.
There once was a time when MCCC was broken for a longer time, and I couldn't figure out how to change my sims clothes 🙈
First expansion/game/stuff pack you got?
Get to Work, Outdoor Retreat, Romantic Garden
Do you pronounce “live mode” like aLIVE or LIVing?
aLIVE
Who’s your favorite sim that you’ve made?
Most of my favorite sims have actually born in my game 🤔 I somehow made parents that had very likable kids 😂
Idk, maybe Sam or Laila.
Have you made a simself?
Yes.
What sim traits do you give yourself?
Loner, Hot-Head, Foodie.
Which is your favorite EA hair color?
Dark brown.
Favorite EA hair?
The one that came with Eco Lifestyle, space buns with bangs.
Favorite life stage?
Infant, YA
Are you a builder or are you in it for the gameplay?
I have 0 building skills, so my only choice is gameplay 😕
Are you a CC creator?
No. But I can make recolors and simple poses.
Do you have any simblr friends/a sim squad?
I have met some fantastic people here. But the lone wolf in me usually kills all social relations 🤪
What’s your favorite game? (1, 2, 3, or 4)
2 and 4
Do you have any sims merch?
I don't have any official merch, but I have 3 knockoff plumbob pins.
Do you have a YouTube for sims?
Nope.
How has your “sim style” changed throughout your years of playing?
There was a time when I didn't use skin details and rarely used in-game sliders. I just chose a random preset from the ones that EA had provided, and that's it 🙈 I have become much more picky.
What’s your Origin ID?
BakerSimmer
Who’s your favorite CC creator?
That would be quite a long list 🙈
How long have you had a simblr?
Since 2016
How do you edit your pictures?
ReShade + Photoshop - Crop -> image size -> personal pst -> topaz
What expansion/game/stuff pack do you want next?
Hobbies! I want bands, pottery, sewing, homemade cosmetics, skateboarding, windsurfing, snooker, etc.
What expansion/game/stuff pack is your favorite so far? Seasons.
A comparison of a sim made in 2019 and a makeover I gave her in 2022 (I gave her a 2023 hair and eyeshadow because I had deleted the others ones 😅)

I tag @bunnithechubs @kazroze @katverse
26 notes
·
View notes
Text
Get to know you- Sims Style
Get to know you- Sims Style
@simbury tagged me
What’s your favorite Sims death?
Axe throwing. I can't remember who made it. But it's fun.
Alpha CC or Maxis Match?
I don't have a preference. If it looks good in my game, I use it.
Do you cheat your sims weight?
No. They can eat or jog to their heart's content.
Do you move objects?
All the time.
Favorite Mod?
It's hard to pick a favorite. The Clothing Tool. I can get my Sims new clothes without making them go downtown to buy them.
First Expansion/Game Pack/Stuff Pack?
For Sims 1 either Livin' Large or Hot Date. For Sims 2, University. For Sims 3, whichever was the actual second one - generations? For Sims 4, Get to Work.
Do you pronounce live mode like aLIVE or LIVing?
Alive.
Who’s your favorite sim that you’ve made?
Mitzi and Jeff. They lived in a trailer house and had a hippie van. In Sims 1. I miss them.
Have you made a simself?
Yes. She lives with her grand-daughter, just like me.
Which is your favorite EA hair color?
Hmmmmm. Black? It shows less flaws, maybe.
Favorite EA hair?
I usually don't put EA hair on Sims I make. Probably the long straight ones since lots of cc long hairs jut out from the Sim's front and that bugs me.
Favorite life stage?
Toddlers. They are so darn cute.
Are you a builder or are you in it for the gameplay?
I like to do both. Usually, I build a house for my family and move them in and then get too busy playing them to do much in finishing furnishing and decorating the place. If it's a building contest, I get it done, furnished, and decorated.
Are you a CC creator?
Yes. I spent far too long only creating and now I'm having so much fun playing my game instead. I'm still working on my projects, just not one after the other anymore.
Do you have any Simblr friends or a Sim Squad?
Yes. Over the years, I've met some wonderful people in the Simming Community.
Do you have any sims merch?
No. Someday I will either crochet or sew up the Freezer Bunny.
Do you have a YouTube for sims?
No.
How has your “Sims style” changed throughout your years of playing?
My Sims and lots used to be all grunge-y most of the time, then they lived kind of got caught between medieval and now-a-days. Now my people live and look whatever the mood strikes me for that Sim.
Who’s your favorite CC creator?
I have favorites. With a S. There are so many people that make such great stuff that I can't narrow it down to just one.
How long have you had Simblr?
2013. I ignored it for years, though. Only came on tumblr to see what you all were doing.
How do you edit your pictures?
With Photoshop. I just crop my screenshots down, add words if necessary, save, and go on my merry way.
What expansion/ gamepack is your favorite?
I'm not sure. Like stuff in all of them.
Tagging @mdpthatsme @riekus13 @kim-simpearls @moocha-muses @13pumpkin31 @thimblesims @lina-cherie and anyone else that hasn't done this yet.
12 notes
·
View notes
Note
Im still confused
Right now I'm drawing my OC's as Kirby characters 💀
Topaz is bandana dee
Tranquillity is meta knight
And Jayden is going to be king dedede
oohhhh Noice!
also sorry it took me a bit- I have... quite a few projects I'm shoving myself into...
aaannyyyway lemme try and go into more detail (sorry about the last explanation not helping) using this WiP of phosphor
once the color and lineart is in, I usually go immediately into shading (Phosphor is the exception to this rule, as her wings and horns require a lot more work than just colors)
with the shading, I usually go with a somewhat dull purple, doing cell shading to start with.
and then I change the layer with the purple to 'multiply' and mess with the opacity until I get it how I like
thats only half the shading though! afterwards, I copy the shading layer and paste it in above, making sure its aligned with the original layer, and then I throw it through a gaussian blur
the difference is subtle, but I like how it gives just a tiiinny bit more depth to the shading :3
but after that, I move into one of my favorite parts- the shiny bits! the highlights aren't done that much differently from the shading, honestly.
I start off with just some white on another layer, but unlike the shading, I only do it on the shiny kinds of materials, in Phosphor's case, her armor. I'll also sometimes do it with fur, and definitely hair, but in the case of astrals I usually leave their fur and feathers alone unless I'm doing some REALLY dramatic lighting.
but once the highlights are drawn, I just do the same as I did with the shading- except instead of a multiply layer, I change it to overlay
ta daaa!
tbh though, unlike most of my shading methods, I like to boost the shiny on phosphor even more (since she's, ya know, a goddess of starlight lmao)
So in that case, I do the same as I do with the shading layers- I copy past a second shiny layer in! it takes a little more editing to get just right though than the shading.
First, I lower the opacity of the new layer- don't want it toooo shiny!
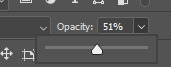
for this specific pic, I think 51% opacity is the sweet spot.
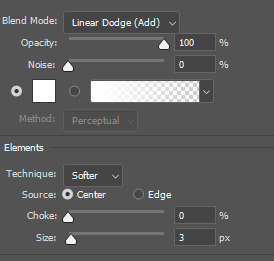
and then I go into the layer settings, and slap an inner glow in! usually set to white and overlay (or in this case, Linear dodge) again
and then, on the same layer, I slap on an outer glow! this time white (again) with overlay (again)
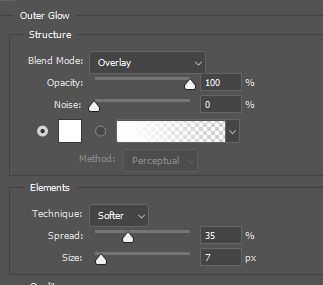
usually the opacity kinda depends, along with the spread and size. it all depends on how large of a picture you're working with- same with the gaussian blur for the second shading layer!
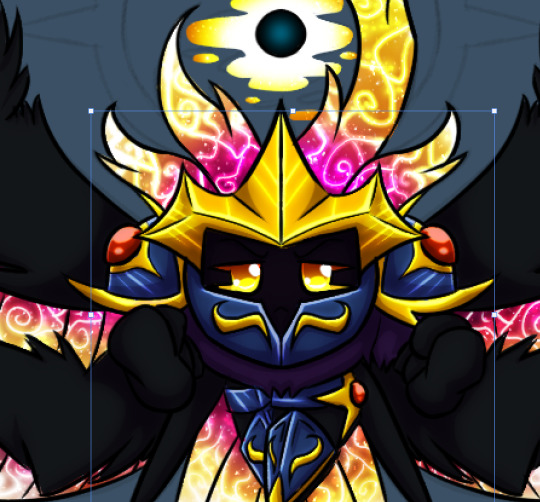
aaand now we have this! admittedly, I think the highlights are missing something, but this is pretty much it! mind you, how this all works/looks also depends on what art program your using! I'm personally using photoshop, so the layers and interface is going to look pretty different from someone using, say, Krita, or Sai. buut that pretty much covers it! admittedly, I'm probably also going to be playing around with the highlights for a little bit, as I'm not too sure about how the gem bits look, but that's pretty normal lmao.
hope this helps answer your question! :3
#god this took a while to type out and shit lmao#anyway good luck! :3#ask response#ask inbox#kirby#kirby oc#kirby oc tournament#lady phosphor#sketch#wip#work in progress#knight oc#how to
4 notes
·
View notes
Text
Sims get to know me Tag
Thanks to @simlishpiadina for tagging me.
1. What’s your favourite sims death?
- FEED THE COWPLANT

2. Alpha CC or Maxis Match?
Maxis Mix with only MM hair - smth I can't stand at all is Alpha jeans textures lmao
3. Do you cheat when your sims gain weight?
- Sims gain weight? Lol I don't really play much gameplay
4. Do you use move objects?
In rare occasions that I build something, definitely
5. Favorite mod?
- As a CC hoarder definitely More colums in CAS
6. First expansion/game/stuff pack you got?
I have no idea tbh, maybe it was Vampires?
7. Do you pronounce “live mode” like aLIVE or LIVing?
- Living for sure but I never really say it lol
8. Who’s your favorite sim that you’ve made?
- Has to be the Shadow the Hedgehog inspired Sim I haven't made public yet ^^
9. Have you made a simself?
Yes, she can be seen in some of my old CC posts (from when I was like...16-18 maybe?). Also working on a new one.
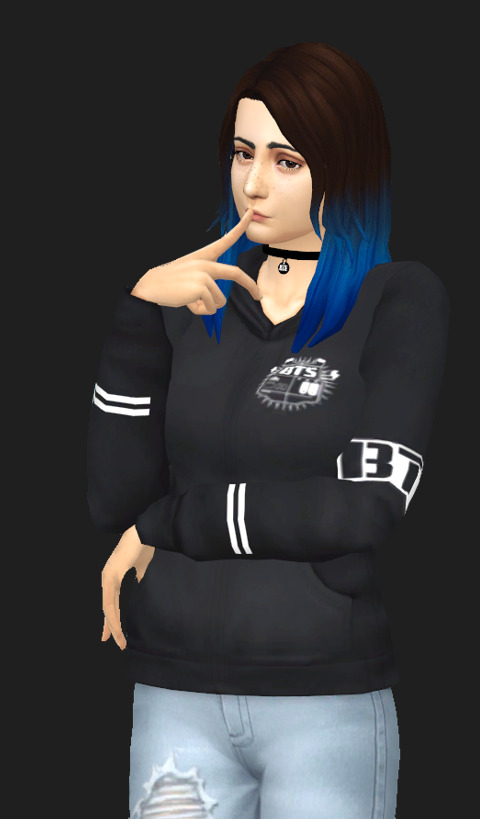
10. What sim traits do you give yourself?
- As my Bio says Gloomy, Loner and Geek ^^
11. Which is your favorite EA hair color?
- Red, like I have in real-life :)
12. Favorite EA hair?
- Highschool Years braided ponytail
13. Favorite life stage?
- As a Sim creator YA lol
14. Are you a builder or are you in it for the gameplay?
- Neither, basically CAS only xd
15. Are you a CC creator?
- Yes! I can't do models at all tho, Blender is such a pain
16. Do you have any simblr friends/a sim squad?
- I recently joined @cozyacres Discord but not really
17. What’s your favorite game?
- I can't decide on one, Fire Emblem is one of my favorites, especially Awakening or Fates, currently I enjoy Genshin Impact a lot (Xiao is best boi <3) and (sadly) I play a lot of League of Legends lmao
18. Do you have any sims merch? Nope
19. Do you have a YouTube for sims?
- I would love to, but I currently have one for League of Legends modding: https://www.youtube.com/c/yoruqueenofnight
20. How has your “sim style” changed throughout your years of playing?
- I think I went from full Alpha to full Maxis Match, then I switched to MM with Alpha hair and then to MM hair again. I still like Alpha hair and also clayified hair but I have so much CC that Alpha kills my PC kinda.
21. What’s your Origin ID? YoruQueenOfNight - I share my Sims on there too.
22. Who’s your favorite CC creator?
- @trillyke @simandy @pralinesims @crypticsim @moonmoonsim for a bit of variety ^^
23. How long have you had a simblr? I started in 2017
24. How do you edit your pictures?
- I usually like to get multiple shots of a Sim but I don't edit that much at all. I like to sometimes match Sims into a background. I also do some sort of collages I guess. But someone that helped me a lot is Piximperfect on Youtube, he has amazing Photoshop tutorials.
25. What expansion/game/stuff pack is your favorite so far?
- I don't play too much but I love Pets
26. What expansion/game/stuff pack do you want next?
- Maybe more Occults like fairies, horse could be cool too
I don't know who to nominate, so whoever sees this and wants to, go ahead :D
8 notes
·
View notes
Note
Dude i love your whats the way to cheta burger (i hope i got the title right) but I was wondering what are your processes of taking pictures (or are they pictures) of your traditional art to post because man do i struggle
Thank you! I liked that one a lot, it has such vibes.
Yeah, they're pictures!
I either use my old (like 2015) digicam and edit the pictures with an ancient pirated version of Photoshop, or I just use my phone and edit it there. I'm certain there's good apps for it as well.
A huge part of this is how high res the camera is, because that's how you capture fine lines and grain. I bought an expensive-ass Pixel solely because of its camera. My digicam is a Nikon Coolpix L840 and is like 8 years old but still good for my purposes. I'd say they are about equal in terms of results with the Nikon being slightly better quality and the Pixel being much more convenient because it doesn't need a memory card and I can edit most stuff right there.
Lighting matters. I prefer photographing 2D art flat, with good overhead lighting, OR photographing it upright with light from both sides. Natural light is best for color of course but isn't always possible.
Rarely I will actually scan things with a friend's ancient scanner.
How reflective your paper or your medium is will affect lighting an absolutely bonkers amount, so you may have to move yourself and your art around to keep it from reflecting. Really shiny stuff may need a scanner.
You lose depth with shaded stuff when editing, scanners are best for that if you can access one, but they are not necessary unless you're aiming for prints or a fine art thing.
Here's a raw pic from the Pixel, then the edit:

Acceptable loss of some tone IMO for being done in my hand in about 30 seconds.
Crop first always, darks or lights outside the piece will fuck with your fine tuning real bad.
With black and white work, desaturate the image before you do anything more, to remove all color from whatever lighting you have.
For this image of Dried Pickle Man, I then went in and fine tuned it in the phone. In order: boosted Highlights, tinkered with White Point a bit, meddled with Contrast a bit. If your phone can't do that, the equivalents in my version of PS would probably be Levels, then Brightness/Contrast. Maybe Curves?
This barely needed to be touched since the blue came out accurate:

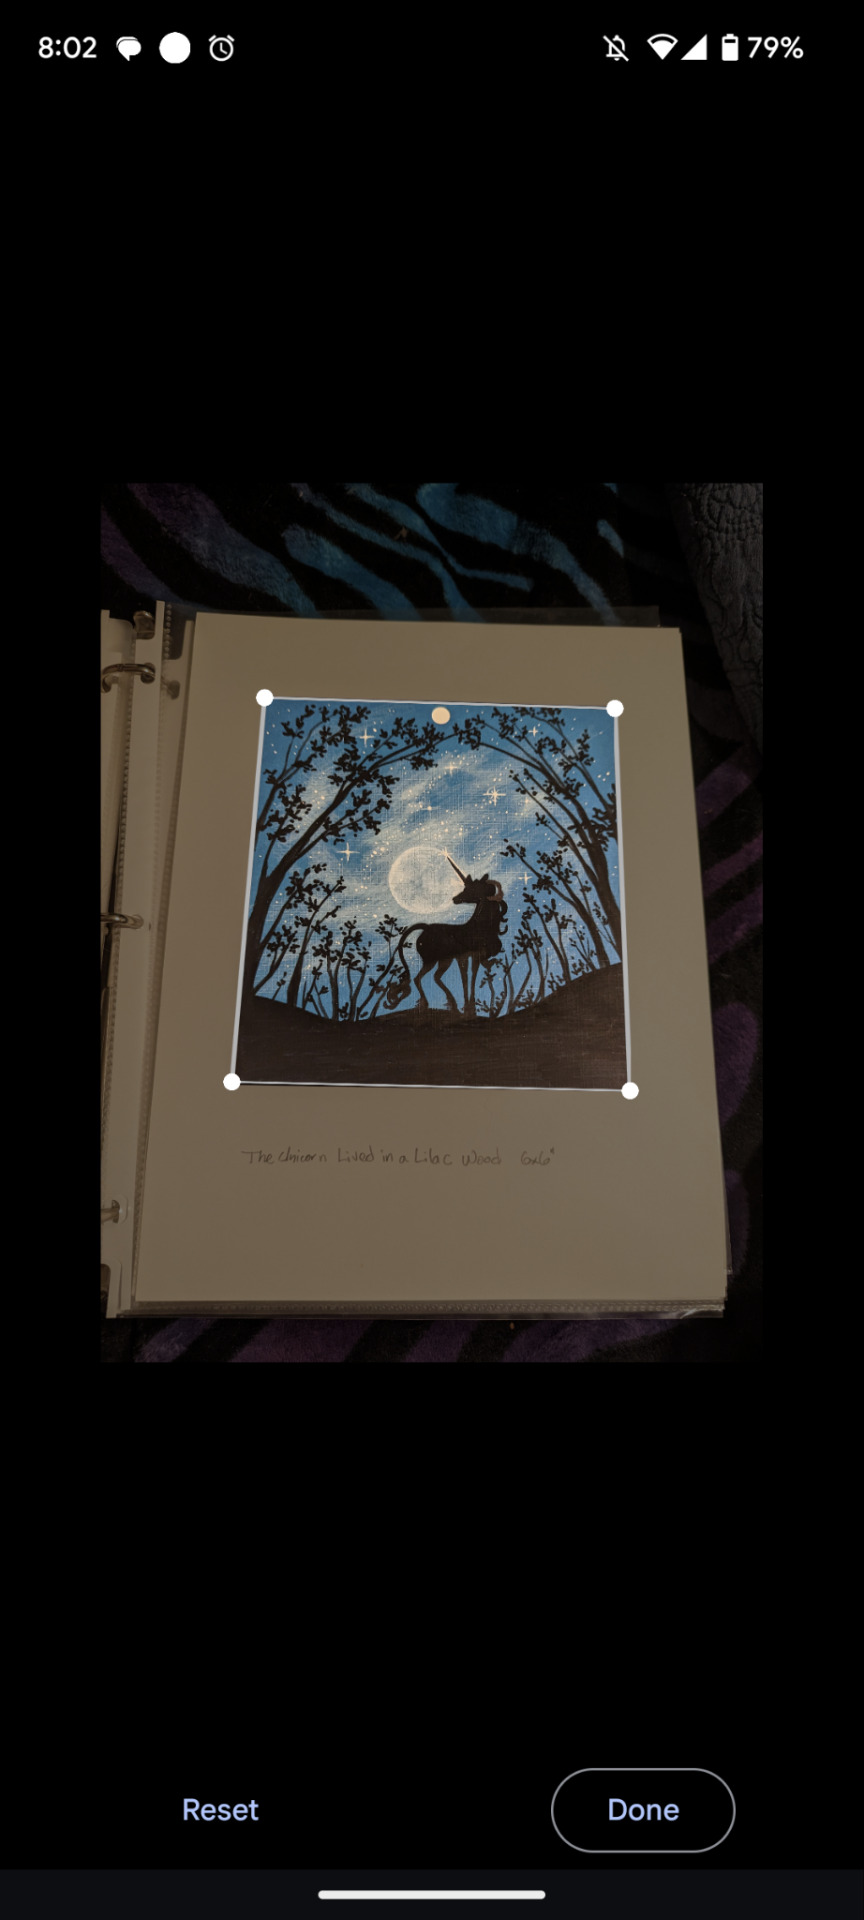
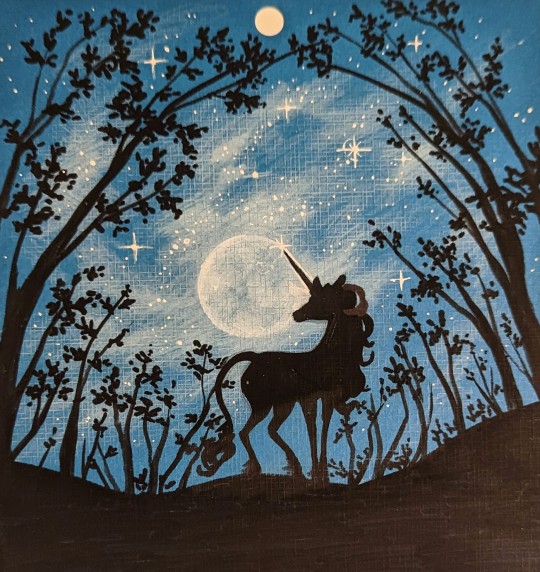
This is the original, what it looks like to adjust the skewed edges, then the end result after a tiny tweak to contrast and white point. On the lower right of the last image is where the ink was throwing back some light. This could be fixed in PS or probably avoided with scanning but since I am only documenting these for sale and for my own enjoyment they don't need to be incredible.
Again, a lot depends on having an okay camera, but Which Way to Cheetah Burger was taken 2 phones ago with a POS Samsung and looks fine at internet size and resolution. I edited it in PS I THINK.
I don't know how any of this would do if I wanted to do prints but just to document your stuff it's usually fine.
I hope this helps!
11 notes
·
View notes
Note
hi, i love your gifs! just out of curiosity how do you make them? i tried making a few just for fun and it just didn't work at all so i'd love to know your process 🙃
Thank you so much!
This is a long one, but I hope it answers the question. I have shown the processes in both Adobe photoshop (which I usually use) and photopea which is a free online photoshop tool.

First of all, go to File and then hover over Import, then Video Frames to Layers
Once it's loaded, you should get a pop up like this:

and then you just move the little arrows below the timeline until you have the section you want. The frame on the screen is what the bigger arrow points to. As you move the little ones around, it will show what the little one are on before snapping back to the big arrow. You don't need to have it perfect. You can always cut out the frames you don't want later.
Very important to note is to click on Limit To Every _ Frames and make sure the number is 2. Sometimes you have repeated frames and this is the quickest way to get rid of them. Repeated frames can create a much larger file size or a gif that stutters and pauses.

Next, you cut the frames down as shown. You don't have to, but you can also remove the extra layers that you don't need.
Then it's the fun part. The editing.

(the recording wouldn't show the editing tabs)
Now you can change the brightness, the contrast, the colours. Anything you want. First, find a frame where the subject of the gif is in focus. Tip for using curves is to find the brightest and whitest part of the picture and use the eyedropper in curse to set that point to white. Then find the blackest part and make that black. (photopea does not appear to have this function, so you might just have to play around and hope for the best). In Hue/Saturation, modify the colours individually. This gif is of a character in front of a fire which throws off a yellow light. Increasing the contrast tens to saturate the colours. To see exactly what colours you are modifying, drag the saturation all the way up to see the colour. Then drag the slider down until you reach your desired result.

Then you can crop as you want. Sometimes it will take a moment to load.
The next part is to sharpen the gif. You don't have to again. I have done many without sharpening, although sometimes the sharpening does make the gif better.

First you need to convert the frame animation into a video timeline. There is a button in the corner of the timeline that looks like three bars with a pointer in the middle. It may pop up with a message, but just click OK.
Next, select all the layers including your editing layers. In the Filter tab, click Convert for Smart Filters. If a message pops up, click OK. This will condense all the layers into a single layer. You can check to make sure the animation still plays by pressing the space bar or by dragging the pointer along the timeline. You MUST convert it to a video timeline before converting for smart filters. If you don't, the animation will not play.

Now, pull down the Filter tab again and go to Sharpen > Smart Sharpen.

It will pop up with a tab that looks like this. ^ Drag this tab to the side of your screen so that you can see the gif as well. You can then play around the the amount and the radius until you reach something that works for you.
Photopea does not appear to do this either. I can't quite tell if the sharpening is working or not.
After that, you can add text or do further editing if needed. You can crop it again, whatever you like.

To export as a gif, go to File > Export > Save for Web (Legacy). Alternatively, you can click Alt + Shift + Ctrl + S.

It might take a minute to load. You should have this pop up. This is where I usually change the size. To post a gif or photo on Tumblr, your file needs to be 9.5MB. I know it tends to say 10, but every time I try to post a gif larger that 9.5MB, it would tell me it was too big.
I usually resize my gifs to a height of 450px. Sometime if the file size is very small (eg. <4MB) I will make it bigger. Just below your image on the left side is a number (eg. 29.4M). This is the file size. Once this number is below 9.5M, it is small enough to be posted on Tumblr.
Photopea does not have a timeline, so making a gif is a little different. I would also advise roughly cutting down you gif a a video editor so you roughly have what you want. You can still delete the layers.
Editing is the same as it is in photoshop.

To export, go to File > Export as > GIF

The gif will start playing. You can modify the speed, the size, rename it etc. Then just click save and it will download.
These are the gifs made.


These first two were made in photoshop, the last in photopea.
To conclude, photoshop produces clearer higher quality gifs, but is also very expensive. Photopea can produce gifs that are equally usable, although the quality might be lower.
Photoshop also provides more freedom with the gif. You can make two separate gifs and put them together after converting to a timeline, adding the smart filter and copying and pasting one of them onto the other.
I am perfectly happy to provide more tutorials for gifmaking. Just drop by my ask box.
:)
7 notes
·
View notes
Last Seen Blogs

sorrylady0409-blog
Sans titre

sorridodijade
Hey Jude

sophia-der-tod-und-ich-kino
Sophia, der Tod und ich (2023) Stream Deutsch kostenlos

sophiepothie1388
wormy-deelie

chivalrous-capricorn
kíll thís lσvє