#I FINALLY GOT AN HD VERSION OF THE MOVIE TO GIF
Explore tagged Tumblr posts
Visit Tumblr Blog
Explore Tumblr blogs with no restrictions, modern design and the best experience.
Last Seen Tumblr Blogs


Fun Fact
Tumblr was created by web developers David Karp and Marco Arment.
Text


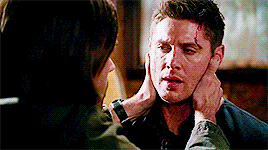
Some of my favorite Symbrock scenes that were ridiculous and absolutely necessary to my mental health.
#venom the last dance#symbrock#venom#my gifs#I FINALLY GOT AN HD VERSION OF THE MOVIE TO GIF#venom using its tongue as a healing salve#same energy as venom using a kiss to get back to eddie in the first movie#didn't need to happen but that symbiote likes to be extra when it comes to eddie#also i bet eddie felt that tongue slither all the way up his throat and had war flashbacks
84 notes
·
View notes
Text
Backlog Reviews 2024: Resident Evil 2

Platform: Gamecube
September 8th, 2024-October 6th, 2024
(Previous review)
Well, here we are again, fellers! I ACTUALLY completed a game again!
Well, for LeonA/Claire B, at least.
So my journey with Resident Evil TECHNICALLY began in 2022, where I randomly watched some videos about it while home alone for a day or two…And I had a nightmare that night about zombies breaking into the house and me having to punch them(not in an awesome way, though, more like a "crying and screaming while flying my fists" kinda way). This was probably also provoked by me hearing some noises that caused me to do a "sweep" around the house with a fairly meaty cane before I went to bed, but RE DEFINITELY caused the zombies.
But anyway, that nightmare kinda stuck with me, so I determined to play the Classic Resident Evils to conquer those lingering feelings. To rise above that fear that made me jump at shadows that night…

And my first attempt failed, because I tried to play Deadly Silence on an emulator to circumvent the tank controls, and it did NOT go well, so I ended up dropping it by the time I finally got to that house with the plant.
I was still determined to finish at least ONE, though, so I put RE2 on my backlog list for 2023, didn't get around to it because of reasons stated in my 2023 lookback, and rolled it over to 2024, figuring I'd get to it around September/October time.
Part of why I chose to do the Gamecube version was because of Control mode C, which put the move forward option on a trigger, instead of D-Pad Up like usual, but then something amazing happened this April:
I retried Deadly Silence on an actual DS Lite, swallowing my pride on tank controls, and finished both campaigns. So now, rather than going into RE2 blind to the references and history, moving on a trigger like a jackass, I got to experience it AS a sequel, tank controls and all.

And in that context, I love it! It's a step up in every way from RE1, yet you're JUST familiar enough going in that you can feel the shared DNA. The pre-rendered backgrounds are certainly pixelated as hell, but on a slightly older TV like mine, the characters and objects blend into those environments perfectly!

I argue that there's a certain "grit" to things shot or rendered in non-HD formats. Our eyes compensating for details lost by the old methods truly helps visuals that would be somewhat ho-hum in HD, and that applies here.
The setting of an art museum-turned-police station was also an inspired choice, given these limitations. An important part of these types of games is to choose an interesting and distinct locale to set yourself loose in. Metroid is typically set on an abandoned alien planet or space ship, Batman: Arkham Asylum chose, well, an old-ass asylum, and RE1 used a mansion since they're known for having secrets and puzzles, per most media.
So, combining a mansion-like art museum, with the weapons you'd find in a police station? It's unique, and honestly brilliant, and helps get you into the shoes of a rookie cop surviving the worst first day on the job imaginable, or a sister desperately seeking out her lost brother.

Corny as it may sound, the atmosphere from the setting, combined with the grit for the old pre-renders, genuinely made it feel like I'd been dropped into a horror movie, but I was playing the "smart" character. The one who actually acts rationally in a scenario like this. And the near constant isolation led to this feeling of dread, like I wasn't sure what was gonna come out to get me next. And in Claire's case, while Mr. X was actually barely in it until the end, I felt watched.
The heebie-jeebies are MAJOR in this game, in a way that they honestly just weren't in RE1. The addition of previously cleared hallways getting new zombies kept me guessing in this game, and scares like zombies coming in through a door transition, or Mr. X on a monitor literally RIGHT around the corner…Whew, there's a reason I played this game mostly at night.

There's also the conspiracy angle to all of this, as you read various documents about how much Umbrella is covering their tracks, consequences be damned. You get a feeling that you're uncovering something that could get you killed if you go public about it, but you can't ignore the "reality" around you.

Oh, there I go getting immersed, but how can I NOT be with how nicely the controls were handled? They just felt a bit tighter this time. Maybe the DS Lite's D-pad is smaller than the Wii Classic Pro I used for this game, but walking and running down long hallways had less "drift" than when I played RE1, and it overall just feels better.
Definitely glad I have this controller for RE3 as well.

Well, that's the good stuff, so what DIDN'T I like?
Well, you can get kinda lost in this game, especially in Claire's B scenario. And while I praise their grit, the lack of clarity in some backgrounds can cause this problem to rear its ugly head, because sometimes the background obscures important objects. There is a shine effect for SOME things, but it probably could've been used a bit more to cut down on backtracking. I DID have to use guides for some things, and I rarely felt like I was the stupid one for not noticing them.

This especially rears its head towards the ending of Claire's B scenario, where you have to:
Power up the train, so you gotta get the plugs, then you gotta find this room in the back, completely obscured by the stairway, to put the plugs in, then you gotta fight mutated Mister Sex, but none of your weapons affect him! Oh, but thankfully, Ada got us a rocket launcher, so somehow, you gotta pick that up VERY slowly and carefully, even though he's RIGHT ON YOUR ASS, and can interupt your pick-up animation!
So, you one-shot him, then you race your ass back to the train platform, get rid of all the naked zombies so you can open the gate, then get back into the train so you can get outta here.
ALL IN UNDER 5 MINUTES.
And then the real ending…Is shit, I'm sorry.
The A scenario ending was nice because it let you sit for a minute with what happened, but also had a hopeful note to end on. You entered the world of survival horror, and now, you just escaped it. Sure, it was an FMV, but YOU did the action.
But here, though?

William Birkin's final squid form just needs to get shot a few times, then an FMV does all of the action! Maybe this was cool as shit in 1998, but it did NOT age well, especially with these FMVs where the lip sync is off most times, and everyone moves like they're in Sonic 06.
Like, sure, the animation for the in-game cutscenes…Makes me question why Sonic Adventure's in the same year are looked down on so much, but they blend in better than THESE things.
youtube
Hell, the voice acting, which is actually fairly decent for most of the game, takes a dip in quality for the FMVs. Probably the most poorly aged part of the game.
Wait, forgot about tonal whiplash: the ending theme.
youtube
So, overall, a good game that holds up WAY better than it probably should, given its technical limitations, but not flawless.
8/10


And now, after I take a quick break, I will be playing through the first Halo through the Master Chief collection on PC! See ya then!

3 notes
·
View notes
Photo


God of War (Playstation 2):
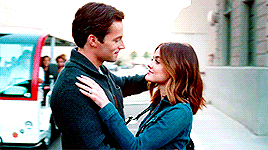
“Third God of War game that I’m reviewing, and it’s finally the first game. I have reviewed the two games for the PSP, so this one had to happen eventually. I have finished this game some weeks ago, but for some odd reason I forgot to review it right away. I’ve started to play this game some months ago. However, I didn’t finished it right away, because I wasn’t really feeling the game. The first level is such a miss and hit to the point that I wasn’t even planning on continueing it. Still, I decided to give the game another try, and fortunatly things got so much better. That second level really made me want to continue with the game and finish it. This is your pretty standard God of War game. You play as Kratos, and you can use your iconic blades to attack. You will get a bunch of different power-ups that will help you A LOT. You will even get a new weapon, in case you don’t want to use his blades. The story is really interesting and intense. This game acts like an origin story for Kratos. You'll learn of the reason behind the color of his skin, and how he will become the God of War. It’s kind of a simple story, but it’s an entertaining one. Graphics wise, I think this is a stunning game. The character models may not look incredible, but the levels and the scenery are gorgeous. If you play this game and you want the best experience possible, then get the HD version for the Playstation 3. Another thing that I like about this game is the difficulty. This is not a very challenging game, so you won’t get frustrated easily. Overall, this is a fun game and you should give it a try. It’s a fun game with a decent story.
PS: the footage of this gifset isn’t mine. You can find the original video in HERE. “
Games Reviews | Movie Reviews
5 notes
·
View notes
Text

I posted 4,261 times in 2022
75 posts created (2%)
4,186 posts reblogged (98%)
Blogs I reblogged the most:
@true-king-of-monsters
@glamurina-vibes
@tokufan400
@retrogamingblog2
I tagged 116 of my posts in 2022
#panda's thoughts - 42 posts
#youtube - 31 posts
#bayonetta 3 - 5 posts
#panda's posts - 4 posts
#bleach tybw spoilers - 4 posts
#bleach spoilers - 4 posts
#naruto spoilers - 3 posts
#bayonetta 3 voice change - 3 posts
#bayonetta voice change - 3 posts
#mature - 3 posts
Longest Tag: 109 characters
#that's technically baragon from godzilla: final wars (millenium era) and not og baragon (showa era) but still
My Top Posts in 2022:
#5
Almost Every Gaming Youtuber in the late 2000's: "Hey did you know Sephiroth and his theme song, One Winged Angel, are overrated? Kefka from Final Fantasy VI is a MUCH better villain and his theme, Dancing Mad, is WAY better and has more depth?"
Me, after rewatching the Cloud VS Sephiroth fight in Advent Children for the tenth time: "What's that? I can't hear you over this awesome guitar riff dude. Guy just sliced a building in half!"
31 notes - Posted November 30, 2022
#4
I really miss having good talks about nerd stuff without it devolving into mudslinging. Doesn't matter if their take on a subject is widly different from mine (not politically though, I know where I stand on that), I would still like to have a fun discussion about it.
Like, a discussion talking about fanservice in anime, how both men and women are portrayed in that regard, is it damaging the image of anime and so forth. That would be cool but no, it always comes back to the dreaded "culture war" eventually. Pathetic.
47 notes - Posted October 15, 2022
#3
More of "I have a type yes":

See the full post
54 notes - Posted October 16, 2022
#2
So Konami just had it's first Silent Hill related...anything that wasn't a pachinko machine in...hold up
*checks notes*
10 years! Holy shit it's been that long...and no, P.T. doesn't count...kinda. Anyway, to make up for it (and probably for Contra: Rogue Corps) they decided to go ALL OUT with this franchise with 3 games, a movie (oh goody), a interactive series (could be fun?) and lots of merch.
First up is a remake of the classic Silent Hill 2. While I rather had seen a remake of the first game (that technically got a re-imaging on the Wii but still) as I think SH2 still holds up really well it is cool to see the game with next-gen graphics.
If they keep the rest of the game intact and add more stuff and locations (and fix the combat) this might be, not a replacement but a good version of the game to enjoy. Especially because the only proper way to play the original SH2 is either the PS2 version, the PC port or the Xbox version with extra content added. Don't go for the HD Collection on this one guys.
Next up are 2 brand new SH games: Silent Hill Townfall and Silent Hill F. Nothing is really know about these yet (except that F takes place in 1960's Japan) so we only got 2 teaser trailers but they look pretty dope either way.
youtube
See the full post
63 notes - Posted October 20, 2022
My #1 post of 2022

See the full post
124 notes - Posted October 15, 2022
Get your Tumblr 2022 Year in Review →
1 note
·
View note
Text
Smokey brand Movie Reviews: Knuck If You Buck
I finally got to see Sonic the Hedgehog 2! I missed it in theaters because of various ailments and had resigned myself to the VOD release but the internet is a funny place and i found an HD copy of this thing online. Like, this thing is still in theaters and i just screened it on my couch, in my underwear. Sometimes, I love the future. Though it was a little disappointing watching this thing on my computer, i must say, i enjoyed the f*ck out of it. But why did i enjoy it? IS it the best video game movie, ever? Is it a decent Sonic film? I got answers and thoughts. IF you’re interested, read on!
The Good
Ben Schwartz is the best Sonic we have to date. All love to my Sonic, Jaleel White, but Schwartz kills it in this role. There is a genuine sincerity in how he approaches this version of the character and it’s hard to fins fault in his choices.
Idris Elba is amazing as Knuckles. I thought he was a little stiff at first but then i realized that’s just Knuckles. He’s a stiff dude. It’s in his character and Elba knew when to lean into that. He did a great job with some of the levity, too. I damn near lost all of my sh*t with the Badnik steps.
Colleen O'Shaughnessey does her thing as Tails, which she’s done for years. O'Shaughnessey became the voice of tails eight years a go. I can’t hear anyone else playing the character so i am exceedingly glad that Paramount didn’t try to force in a “tar” for this role. It wouldn’t be Miles if they did.
Jim Carrey is Jim Carrey. He’s going to do his Jim Carrey thing and it’s always entertaining. It’s sad he’s “retired” now but he chose a solid role to go out on.
This film looks really good. Sega has pulled out all the stops to make this movie compete with other effect blockbusters and it rally shows. I am super glad they got bullied into redesigning Sonic because i shudder to thing what that Knuckles would look like.
I have to say, this is some solid Sonic world building. The universe this live action take is crafting, has my attention and i want to see so much more of it. I’ve been a Sonic fan since i was a kid, like five or six years old, and seeing my beloved Blue Blur getting such a rich narrative on the big screen feels my inner child with such joy.
SUPER SONIC!
I have to say, all those little references to the franchise were awesome. Chili dogs, buttcopters and wall climbs, Green Hills Zone ringtones, Robotnik’s Mean Bean, G.U.N, Sanic; My fanboy heart was all in a tizzy with so many goddamn easter eggs.
“That movie is the wooooooooorrrrst!”
Project Shadow.
The Meh
The writing is a bit derivative but this is a movie for kids so it’s okay. Like, i wasn’t mad that this isn’t “Citizen Kane but with a hedgehog” but i feel like it could have used another pass over that script.
The Bad
The human parts derail this movie is the most uncouth way imaginable. The whole wedding plot is unnecessary and i cannot stand the sister character. Loud Black Woman is my least favorite movie trope and she was just going in on that sh*t hard.
Those human parts absolutely wrecked the pacing. This movie is over to hours long and it feels like it, but that’s because there are so many superfluous and useless human scenes. You could shave a whole half hour off this thing if you withe cut the wedding or just condensed it. I mean, Shemar Moore’s character absolutely disappeared with, like, an hour left to go. Why was he even in this thing??
The Verdict
Sonic the Hedgehog 2 is a fun time and a really good video game film. It’s not super profound or going to change your life after seeing it but it’s enjoyable and accessible. There is a whole world growing before our eyes and we get to experience that through some outstanding performances from Ben Schwartz, Idris Elba and Colleen O'Shaughnessey. Jim Carrey hams it all the way up as Eggman and ate every second of that sh*t up. At the end of the day, this is a movie for kids and fans but it’s surprisingly earnest with it’s message. It’s a little long in the tooth and A LOT of the human scenes could have been but but, all in all, i think it’s worth a watch. Sonic the Hedgehog 2 is a great example of how to make a video game into a film and i hope Sonic 3 is just as good.
1 note
·
View note
Photo


- ̗̀ How to Make Gifs with Photoshop and KMPlayer (Very Detailed) by quirkyresources © ̖́-
♡ All my tutorials ♡
Hi! I'm no expert, but I've been making gifs for at least like four or five years, and over that time I've learned a lot, so I want to share that stuff :) Also, someone requested that I teach them how to gif. I hope this helps!
This tutorial will teach you how to create simple but quality gifs, like the ones in the gifset above! Those gifs are all from TV shows, but it should apply to giffing almost anything. I’ll be using KMPlayer and Photoshop.
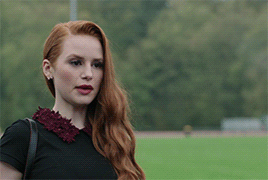
This is the gif I’ll be showing how to create, as an example:
If you have any questions at all, please feel free to message me here :) And I’m somewhat new to writing tutorials, so if you notice that I got something wrong, please let me know. Thanks!
Please like/reblog if this is at all useful to you. Thank you so much if you do!
You need:
KMPlayer (link below)
Photoshop (I'm using CC 2017, but I think any version with the timeline should work)
A video to gif (recommended source below)
A sharpening action (recommendations below)
A PSD / or to know how to color gifs (recommendations & tips below)
I'll go over:
How to buy/download PS, download KMPlayer, and download a video!
Taking screencaps in KMPlayer
Importing the screencaps into Photoshop
Cropping and timing the gif, organizing layers, etc.
Adding a PSD or tips for coloring it yourself
Adding subtitles & learning font settings
Saving for web
Posting to Tumblr
Various tips along the way!
The tutorial is under the cut. Have fun and good luck! ♥
[Note: If a photo looks too small, right click it and choose "open in new tab"]
Step 1: getting Photoshop, KMPlayer, and quality videos
Get Photoshop: I was able to buy my Photoshop, so I don’t have any free downloads to recommend, I’m sorry! But there are plenty of other Photoshop blogs on tumblr that can help with this stuff :) And there are some deals from adobe that might help you afford it if you want to buy it instead. They had a great one for college students that totally helped me. Anyways, if you can get it somewhere/somehow, here are the next steps...
Download KMPlayer: Here's the link (it's free!): kmplayer.com You can use it to watch videos, but in this case we use it to take screencaps of them to use for gifs.
Get your video: If you’re going to download a movie or show, I recommend getting torrents from thepiratebay.org and using μTorrent to download them. (Here's a tutorial for how to download stuff with it.) Be careful with viruses and stuff, though! When you look for a video, try to get one that's as HD as you can find, meaning one that is 720p or 1080p! That tells you what the height of the frames will be, in pixels. They are usually big files, but should be much better quality than others. Also, try to find videos that do NOT have network logos or ads on them!! They can make gifs look pretty bad, and it takes some serious cropping to get rid of them, which then makes it look even less quality.
Step 2: taking your screencaps Open your video in KMPlayer. (Open KMPlayer and press CTRL O.) Get to the exact scene/clip you want to gif. (Tip: it's hard to find the exact place you're looking for, so I recommend using your right/left arrow keys to skip through a little at a time.)
Once you're at the part of the video you want to gif, press CTRL G. This brings up the "frame extraction" window. This is where, as you can probably guess, you extract the frames for your gifs! Here are the settings I use:

I use these exact settings almost every time, except for the image format section. I go between JPEG and PNG. I use JPEG if I'm making a smaller gif (like 268px width or less) and I use a PNG if I'm making a larger gif (like 540px width.) This is because (or at least I've heard) PNGs are the highest quality option, JPEGs are the middle, and bitmaps are the lowest (don't use them!!) The only downside is that the higher the quality, the higher the screencap's file size. So use PNGs sparingly if that matters to you.
You can also change the "prefix" of the screencap filenames.
After figuring out all of these settings, click "start"! Then press play on the video, play until the end of what you're giffing, and press "stop" and pause it.
Then, in the frame extraction window, click the "open" button that’s to the far right of the "extract to" bar. This will open up the folder location of your new screencaps.
Step 2.5: organizing your screencaps What you'll want to do now is organize the screencaps into separate folders for each individual gif. This is something that's good to do whether it's all from one scene or you're doing a compilation of different clips. This is because, when you upload the screencaps into PS, it's best to have them in their own little folders!
(Tip: Personally I use 75 frames or less in each gif. This is because that’s the limit on the sharpening action I use, but I also think it's a good amount to stop at.)
Step 3: importing your screencaps into Photoshop
Next, we're finally going to move the screencaps you took into Photoshop. Yay!
Open file > scripts > load files into stacks. (Tip: Sometimes this function doesn't work on certain Photoshop downloads. If this is the case for you, here's a tutorial on how to get around that!) This brings up this window:

Click "browse" and find the folder with the screencaps you want for your gif. Select all of them and click "open". Then click "ok" and wait for them to load. Each screencap will load as its own layer in the layers panel, which is what you want to start with.
Step 4: changing the screencaps from layers into frames in the timeline
Once they're all loaded as layers, go to window > timeline. This brings up the timeline!
At this point, things should look something like this:

Now we can start using the timeline! In this method we convert the layers into frames that live inside the timeline, which we’ll use to make the gif move.
First click on the button in the middle of the timeline panel that says "create frame animation" right here:

Then click on the little three bars icon on the top right corner of the timeline. Click "make frames from layers" on the thing that pops up .
It depends, but you might need to reverse the frames (if it imports them in backwards). So just click on that three bars icon again and click "reverse frames".
Step 5: cropping the gif
It's really important to know the Tumblr dimensions! If you have a gif that doesn't fit the dimensions most Tumblr users view it at it can get distorted.
So the width dimensions you should use are:
A row of just one: 540px wide
A row of two: 268px wide each
A row of three: 177px & 178px & 177px
A super helpful explanation of good dimensions to use is this one made by karazorel. It's very close to the way I do it.
So to crop it, go to the crop tool (duh, sorry) and enter in the dimensions you want into the area I highlighted here:
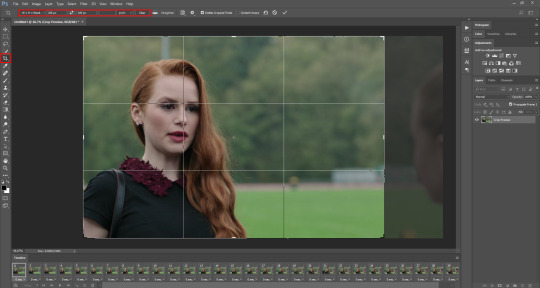
Here's what the gif looks like so far:
You'll probably notice it moves really fast and stops moving after playing once. That's because we haven't gotten to the step to fix that yet. But that's next!
Step 6: timing, looping, etc.
Timing: Select all of the frames. You can do this by selecting the first frame, holding shift, and clicking on the last frame. Now click the little arrow next to where it says "0 secs." under any of the frame previews right here:

Click on "Other..." and type "0.14" into the text field. That represents the number of seconds, or usually the fraction of a second, that each frame will play for. (It's "0.14" in this case because of the way we entered the settings in KMPlayer in the "Frames to Extract" section. The number depends on what you enter there.) Press enter/okay.
Looping: Next change the looping setting from "once" to "forever". Here's where I'm talking about:

Step 7: sharpening the gif frames
This step can either be done at this point (before coloring it) or later (right after coloring it.) I go back and forth on which is better, and different people say different things. So just play around with it!
I use this sharpening action. It can sharpen up to 75 frames, which is a really good amount in my opinion.
Once you have a sharpening action downloaded, go back to Photoshop and go to window > actions. Click this little menu button, then click "Load Actions...".
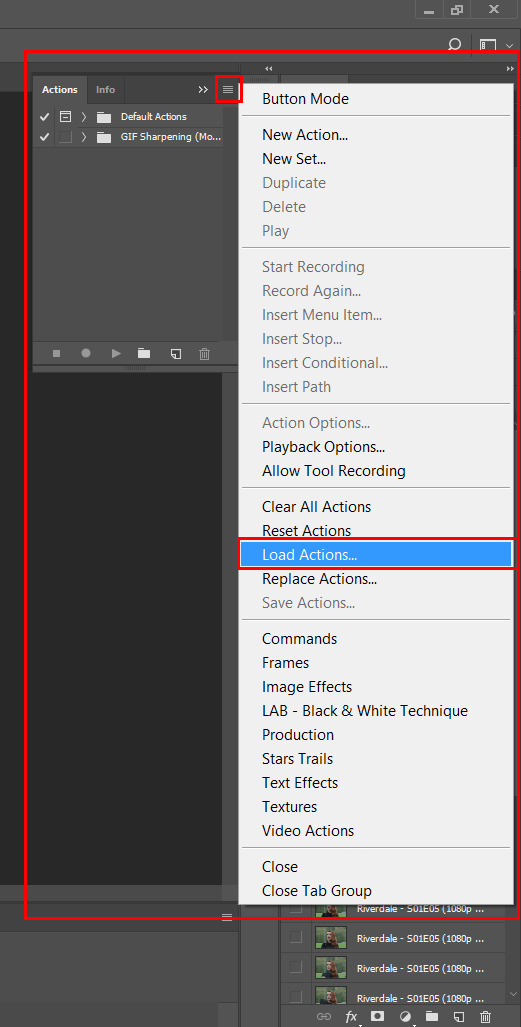
In the window that pops up, choose whatever sharpening action you downloaded and open it. This will load it into your actions panel!
Next, click the menu button on the upper right corner of the timeline panel and click "Flatten Frames Into Layers". Now there will be a new set of layers that are labeled Frame 1, Frame 2, Frame 3, etc. Keep those, and then you can delete the OLD set of layers. (That can significantly lower the file size, and it doesn’t mess anything up if you do it right!)
Now select the very first frame in the timeline, labeled "1", and select the corresponding layer, labeled "Frame 1".
Then open the sharpening action's folder within the actions panel and select the folder labeled with the number of frames you have in your gif. For example, I have 18 frames in my gif, so I selected the folder labeled "18 frames". Or at least that's the way they labeled things in the action I'm using. You may have to explore yours to figure it out.
Then click the play button on the actions panel:

Now that should have sharpened all of your frames/layers! Woohoo! Here's what the gif should look like by now, all cropped, timed, looped, and sharpened:

If this way of sharpening doesn't work for you, here are some other gif sharpening tutorials:
How to use sharpening actions in Photoshop CC by peacelovegifs
Gif sharpening tutorial by manofsteel.co.vu
Sharpening for Photoshop CC by completeresources
Sharpening all gif frames at once by thosetutorials
Sharpening masterpost by itsphotoshop
Gif sharpening action tutorial + download by themazerunnrs
Step 7.5: grouping your layers (a baby step!) A bonus step that I recommend you do is to put all your layers into a group to keep things neat. Just select all of them and press CTRL G.
Step 8: adding a PSD and/or coloring it yourself!!
Here's the fun part! Now you can let out your creativeness with the coloring. It takes a LOT of practice to get good at this, trust me. I've been doing this for YEARS and I still hate my results sometimes. But if that happens to you, too, don't let that stop you from trying again! (God, I sound like a motivational speaker or something, sorry!)
Here’s some background on PSDs for beginners, but you can totally skip this bit...
"PSD" stands for "Photoshop document", meaning a file you make or edit in Photoshop (sorry, kind of self explanatory). On Tumblr, when people talk about PSDs, they're usually referring to a document with layers that add effects (mostly adjustment layers) to a gif/photo/graphic, etc. Also referred to as a "coloring". They usually include things like brightness/contrast, vibrance, curves, selective color, etc. People post these so you can download them and use them for your own work! (Just don't repost and claim as your own. Not cool, man.)
All you have to do is download the file, open it in Photoshop, make sure you have the layers panel open (windows > layers), and drag the PSD file's window on top of your file's window, but keep them separate so you see both at once. Then drag the PSD file's group of layers (but not the background!) over to your file.

(Then you can close the PSD window.) Then on YOUR file, mess around with the adjustment layers and stuff to change it to whatever you want it to look like. I usually edit mine like crazy!
Anyways, here are what your options are.
Finding a PSD (and then I recommend editing it to however you like it)
Here are places to find some great PSDs on Tumblr! (FYI, some are tag pages with sections for PSDs, with different types to choose from. So look around.)
QuirkyResources (Navigation) (Yup, shameless self-promo!)
QuirkyResources (My PSDs)
CompleteResources
ItsPhotoshop
ChaoticResources
YeahPS
DrunkandColoring
AresColoring
That's just a few of my favorite sources, so message me if you want more recs! :)
Coloring it yourself
I'm not going to do a full-on coloring tutorial right now, but here is my tag for those made by other people!
Basically you should learn how to use the most important adjustment layers: curves, brightness/contrast, selective color, color balance, hue/saturation, vibrance, levels, exposure, and gradient maps. At least those are the ones that I use the most and find super useful. Many of the tutorials in that coloring tutorial tag I just linked go over how to use those. So check them out!
In this case, I used my current fave PSD by dracoharry. (I’ve noticed it works on most shows I gif, so it’s super useful! I actually used it for all of the gifs in the gifset I made for this post.)
Here are the layers I kept hidden/showing:

FYI, I changed the layers' settings and whatnot a bunch.
And here’s what my result was:

Step 9: adding text & learning font settings (optional)
This is usually when I add text to the gif, if relevant.
There are various fonts and settings you can use for this, but to make things easier, here's a font PSD by adorkablelena. It’s for subtitles/quotes. I recently started using it. It's really cute! If you're not into it though, here's my tag for other font PSDs you can check out.
When you find a font PSD you like, open it and drag it into your document the same way you would with a regular PSD.
Select the text tool and replace the text with your quote. (Tip: Try not to misquote or misspell things if you can help it! I've done it and it sucks when that happens. Ugh.)
As far as colors go... For the primary quote I make the text white, and the secondary quote I usually make it yellow (#ffde00). And if there is a third I'll use some shade of orange, and anything after that I just use whatever I can make look the best. The stroke color I use varies sometimes, but I usually use black (#000000).
Finally, select the move tool (V) and make sure "smart guides" are turned on. To check this, go to view > show > smart guides, and make sure it's checked. Now when you drag around the text (select its layer first), you can see little purple vertical/horizontal guides pop up when you drag the text to the center of either direction. For the subtitle we're making, we want it to be centered horizontally and close to the bottom of the gif, but not too close. Also, if you have more than one line of text, just press enter somewhere in the text that splits it into similar-sized lines. Here's an example of all of this stuff put together:

Step 10: saving for web
There are a lot of settings to remember and play around with when saving for web, and specifically for Tumblr.
First, go to file > export > save for web (legacy).
Here you'll see a lot of settings to choose from, but they're not as intimidating as they may look!
Here are my usual settings:

Red highlight: There are multiple options in the top drop down list in the area I highlighted that are good to use. I usually use “Adaptive”, but “Perceptual” and “Selective” are good options too. In my experience, the rest make your gif look pretty gross. For the drop down list under that I choose "Pattern". This arranges the pixels in a pattern, and I like the look of that more than the two other viable options, ”Diffusion” and “Noise”.
Orange highlight: This is where you choose the number of color shades that are in the gif. I use the top amount allowed, 256, because this achieves the highest quality possible! If you need to make the gif's file size smaller, you can lower this amount, but I don't recommend it. If it's a B&W gif you can sometimes get away with using less and have it still look just as quality.
Yellow highlight: Looping options: Forever. Very important! Like I showed earlier, you can also set this setting before you get to the "save for web" option. Either way, this makes it so the gif loops forever.
Green highlight: Gif size! As I mentioned earlier, there is a limit for Tumblr. This example is a pretty small gif (592.9K) and the current file size limit on Tumblr is 3MB. Tumblr seems to change this limit a lot though, so you may want to look that up once in awhile to stay up to date.
Turquoise highlight: Always check the box next to “Convert to sRGB”. I just learned that this setting is important. It basically keeps the vibrance intact when you take it from Photoshop to Tumblr. Read a much better explanation here! :)
Then just click "Save...", choose the file location, and press "Save" again.
Step 11: uploading/posting to Tumblr
Now, last but not least, it's time to upload it to Tumblr! I probably don’t need to explain this, but I’m going to anyways. It's super-duper easy. Just go to your dashboard and click on this button:

Then the post creation window pops up, and just go on from there. Upload your images/gifs, drag them around to arrange them however you like, and add a caption if you want.
(Tip: Don't forget to add tags! It's super important to add tags if you want people to actually find your post. Only the first 5 tags show up in the main Tumblr tag-search results (ugh wtf, right?) but sometimes the other ones you add will show up on the general search page. I don't really get how to explain it or how it works tbh, sorry! But I do know that many fandoms have developed their own tagging-language to find people's posts more easily (and avoid spam) which is very useful once you figure it out. For example, if I was posting a gifset of Cheryl Blossom from Riverdale, I'd tag it with things like "riverdaleedit" and "cherylblossomedit" and maybe "madelainepetschedit". So basically the name of the show/character/actor/ship plus "edit", no spaces. Or an abbreviation of any of those, like "spnedit" or "dwinchesteredit". I hope that at least makes a little sense? As far as the amount of tags that will show up on individual blogs, I'm not positive, but I believe you can use up to 30. After that the post won't appear on the tag's page. Grrr.)
Then, of course, just post it! I recommend saving it as a draft and then posting it at a time when a lot of people are likely to be on Tumblr. (There's research done on this timing!)
THE END! :D
I really hope that was at least somewhat helpful. Sorry if it was annoying that I went into sooo much detail, I just thought I should explain everything so it would make sense to most people, especially total beginners. Again, if anyone has any questions at all, you can absolutely ask me here! Or let me know if you think I got anything wrong, I would definitely want to fix it! Thanks for reading, and please like/reblog ♥ I’d really appretiate it!
#photoshop tutorial#completeresources#itsphotoshop#chaoticresources#yeahps#tutorials#gif tutorials#gif making#how to make gifs#gif making tutorial#mine#mine: tutorials#peachresources#riverdale#riverdaleedit#coloring tutorial#sharpening tutorial#photoshop tips#ps tips#photoshop 101#ps 101#500
632 notes
·
View notes