#Gosari-namul
Explore tagged Tumblr posts
Visit Tumblr Blog
Explore Tumblr blogs with no restrictions, modern design and the best experience.
Last Seen Tumblr Blogs


Fun Fact
There are dozens of funny blogs to kill time on Tumblr.
Note
During his lunch with jae gyeong shin yu is talking about someone being bitten by a snake while picking bracken i feel like that's important?? He didn't finish his story but i think it must be a memory from his past life
So first I looked up what the heck bracken is (from Wikipedia):
In Korea, bracken (sometimes referred to as 'fernbrake' in Korean recipes) is known as gosari (고사리), and is a typical ingredient in bibimbap, a popular mixed rice dish. Stir-fried bracken (gosari namul) is also a common side dish (banchan) in Korea.
It's edible fern, in Canada we call these "fiddleheads" when we eat them.
Scene you are talking about:

This has been mentioned prior, way back when they visited the mountain in Ep 3 we had this very strange scene, where Shin-yu says "I am Groot" and then Hong-jo orders him food:


And she just repeats, "I am Groot." (and then names him in her phone after that) I thought that scene was really weird because Groot is a tree, not a fern, but maybe Hong-jo does remember his past life somehow and knew he didn't like bracken?
I wonder if Hong-go was the one bitten by a snake, because that would explain why he didn't finish the story and she's always out picking herbs for her shaman duties.
Anyway, I have no answers but I feel like this will come back up!
43 notes
·
View notes
Text
youtube
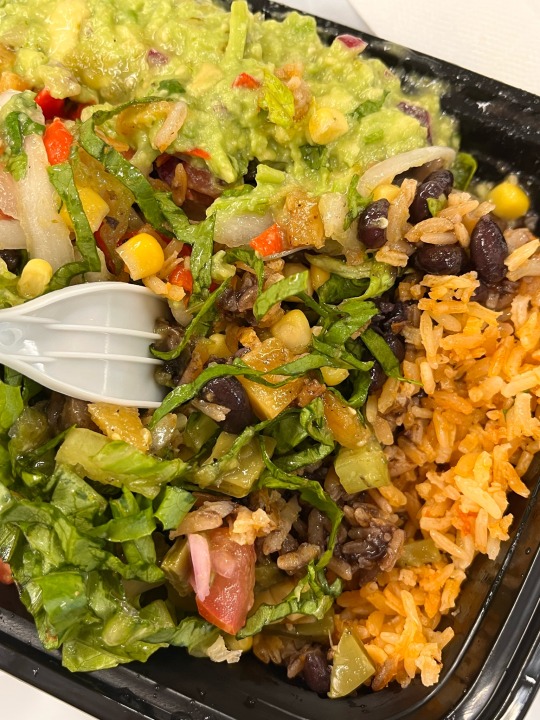
Bibimbap
비빔밥
Rice mixed with vegetables, meat, an egg, and chili pepper paste
Today’s recipe is bibimbap, a super-popular Korean dish you might have heard about already! It’s made of a bowl of rice, sautéed and seasoned vegetables (namul: 나물), a bit of hot pepper paste (gochujang: 고추장), and usually a bit of seasoned raw beef, too (yukhoe: 육회).
Bibim (비빔) translates as “mixed,” and bap (밥) means “cooked rice,” so bibimbap literally means “mixed rice.” Before eating it you’re supposed to mix everything all together.
There are many variations on this dish, from simple to elaborate, and this recipe I’m showing you today is for one you could consider “classic” bibimbap. If you ordered bibimbap in a Korean restaurant, you would probably get something like this dish, with regional variations. I’m also going to show you bibimbap prepared and served in a heated stone or earthenware bowl called dolsot-bibimbap (돌솥비빔밥). “Dolsot” means “stone pot” in Korean, and this version is well-known for the way the bowl makes a layer of crispy, crackling rice on the bottom of the bibimbap.
Even though we mix up bibimbap before we eat it, each ingredient needs to be prepared with care and individuality, bringing out their unique flavors, textures and colors so they come together beautifully in the bowl and deliciously in your mouth. The different ingredients aren’t random, they’re chosen because they balance, harmonize, and offset each other.
This recipe isn’t quick and easy, it takes some time to make. But if you’re really in a rush you can make a great bibimbap with the soybean sprouts, spinach, and carrot (or red bell pepper, or both), and gochujang, toasted sesame oil, and an egg— those items are unskippable!
I’m going to share some more bibimbap recipes on my website in the future, and you’ll see how many different variations there are. This version is a little different than the version in my cookbook, because I make a quick and simple soup with the bean sprouts. When I started my YouTube channel, bibimbap was one of the first recipes I made, because it’s such an essential dish in Korean cuisine. So I’m happy to remake the video now in HD with much better editing and instruction. I’ve been building up to this video by remaking videos for the ingredients, too. I remade yukhoe, and sigeumchi-namul, and my yukagaejang video has a lot of detail about preparing the mountain vegetable fernbrake.
So if you’ve been following my videos, you’re now ready to be a bibimbap master! Ready? Let’s start!
Ingredients (serves 4)
5 cups cooked short-grain rice
12 ounces soy bean sprouts, washed and drained
8 ounces of spinach blanched and washed with the excess water squeezed out by hand
1 large carrot
1 large red bell pepper
1 large zucchini
1 English cucumber
3 to 4 green onions, chopped
½ pound fresh lean cut of beef (fillet mignon, flank steak)
4 ounces fernbrake (gosari), fresh or soaked from ½ ounce dried gosari (details below)
1 ounce dried bellflower roots (doraji), soaked in cold water for 18 to 24 hours.
4 eggs
kosher salt
vegetable oil
toasted sesame oil
toasted sesame seeds
garlic
soy sauce
honey (or sugar)
Korean hot pepper paste (gochujang)
How to prepare dried fernbrake (gosari) for use
If you have presoaked or fresh fernbrake you can use it straight away, but if you have dried fernbrake you’ll need to get it ready to eat. It’s fast if you have a pressure cooker, but if you don’t it will take some time.
With a pressure cooker:
Wash ½ ounce of dried gosari and boil it with 5 cups of water in a pressure cooker for 30 minutes.
Drain and rinse in cold water a couple of times.
Drain. It should make 4 ounces.
In a pot on the stove:
In a large saucepan add ½ ounce of dried gosari to 7 cups of water. Bring to a boil over medium-high heat and boil for 30 minutes. Cover and let stand until cool, about 2 to 3 hours.
Rinse the fernbrake a couple of times, drain and put in a bowl. Cover with fresh cold water and let soak for at least 8 hours or overnight in a cool place, changing the water 2 or 3 times during the soaking.
Taste the gosari: It should be soft. If it’s tough, boil it again in a fresh pot of water for about 20 minutes and then let it sit, covered, until soft.
Drain. It should make 4 ounces.
Make rice
If you have a usual method for making rice or have a rice cooker, go ahead and make 5 cups of rice like you usually do. But here’s how I do it on a pot on the stove. 2 cups of dried rice makes about 5 cups of cooked rice.
Rinse 2 cups of rice in cold water and scrub the wet rice with your hand. Rinse and drain until the drained water is pretty clear.
Put the rice in a heavy-bottomed pot. Add 2 cups of water, cover, and soak for 30 minutes.
Cook over medium high heat for 7 to 8 minutes until the surface is covered with abundant bubbles that are spluttering noisily and look like they’re about to overflow the pot. Turn the rice over a few times with a spoon and cover the pot again.
Turn the heat to very low and simmer for another 10 minutes until the rice is fully cooked and fluffy. Remove from the heat.
Fluff the rice with a spoon to release excess steam. Let the rice stand, covered, at room temperature to keep it warm.
Prepare and cook the ingredients for bibimbap
I like to get a big platter and then put each vegetable on it as they’re ready. I think it looks really pretty, but you don’t have to do this. When all vegetables are prepared and ready to use, the platter looks pretty delicious!
Soybean sprouts:
Put the soy bean sprouts in a pot and add 4 cups water and 2 or 3 teaspoons salt. Cover and cook for 20 minutes over medium high heat. Take out the sprouts with tongs and put them into a bowl, leaving about ½ cup of sprouts in the pot with the water you used to boil them. This is the soup to serve with bibimbap later.
In a bowl, mix the sprouts by hand with ½ teaspoons salt, 1 teaspoon minced garlic, and 2 teaspoons toasted sesame oil. Put them on the large platter.
Spinach:
Cut up the blanched spinach a few times and put it in a bowl. Mix by hand with 1 teaspoon garlic, 1 teaspoon toasted sesame oil, ½ teaspoon kosher salt, and 1 teaspoon sesame seeds. Cover and put it next to the soy bean sprouts on the platter.
Other fresh vegetables:
Cut the carrot into matchsticks, put them in a bowl, and mix with a pinch of salt. Let stand for 5 to 10 minutes until sweating.
Cut the red bell pepper into halves, deseed, and slice into strips. Put them in a bowl.
Cut the zucchini into matchsticks and mix with ½ teaspoon kosher salt.
Cut the cucumber into halves lengthwise and slice thinly crosswise. Mix with ¼ teaspoon kosher salt.
Beef:
Cut the beef into matchsticks and put them in a bowl.
Mix with 1 tablespoon minced garlic, 1 tablespoon soy sauce, 1 tablespoon honey, 2 teaspoons toasted sesame oil, and 1 teaspoon sesame seeds with a spoon.
Cover and keep in the fridge until ready to use.
Mountain vegetables:
Cut the fernbrake (gosari) a few times into bite size pieces. Set aside.
Put the bellflower roots (doraji) in a large bowl. Add 1 or 2 tablespoons salt. Rub for a minute to wilt slightly and release some of the bitterness. Rinse them in cold water a couple of times and drain. If you find some roots are too thick, split them lengthwise. Set aside.
Let’s cook!
Heat up a pan over medium high heat. Squeeze out excess water from the carrot. Add a few drops of cooking oil to the pan and sauté the carrot for 1 minute. Put it on the platter next to the soy bean sprouts and spinach. Clean the pan with wet paper towel or wash it.
Heat a few drops of cooking oil in the pan and squeeze out the excess water from the cucumber. Sauté with ½ teaspoon minced garlic and a few drops of toasted sesame oil for 30 seconds. Put it on the platter. Clean the pan.
Heat up the pan with a few drops of cooking oil. Add the red bell pepper and sprinkle a pinch of salt over top. Sauté for 30 seconds. Put it on the platter. Clean the pan.
Heat up the pan and squeeze out excess water from the zucchini. Add a few drops of cooking oil and sauté with 1 teaspoon minced garlic, 1 tablespoon chopped green onion, a drop of toasted sesame oil for 1 minute until slightly softened. Put it on the platter. Clean the pan.
Heat up the pan with a few drops of cooking oil. Add the bellflower roots and sauté for 2 to 3 minutes. Lower the heat to medium so as not to brown them. Add 1 teaspoon minced garlic and a drop of toasted sesame oil. Stir for another minute until a little softened. Put it on the platter. Clean the pan.
Heat up the pan. Add a few drops of cooking oil. Stir the gosari for 2 minutes until a little softened. Add ½ teaspoon of minced garlic, 2 teaspoons soy sauce, and 2 teaspoons sugar, and keep stirring for another minute. Put it on the platter.
Serve
Here are a couple of ways to serve: bibimbap in a regular, shallow bowl, and dolsot-bibimbap in a stone or earthenware bowl.
In a regular, shallow bowl
Reheat the soybean sprout soup.
Divide the cooked rice into 4 portions. Each portion will be a little more than 1 cup of rice.
Put the rice in each of 4 bowls and arrange the vegetables and beef on the rice. Top with a raw egg yolk and gochujang. If you prefer your eggs and beef cooked, use a fried egg sunny side up and slightly pan-fry the beef before putting them on the top of rice.
Sprinkle the bibimbap with the sesame seeds and drizzle with sesame oil to taste.
Ladle the soup to a small bowl and sprinkle some chopped green onion over top.
Serve right away with more hot pepper paste on the side, and maybe kimchi too.
Dolsot-bibimbap in a hot earthenware bowl (ttukbaegi) or hot stone bowl (dolsot)
Reheat the soybean sprout soup.
Put a few drops of toasted sesame oil in the bottom of each of 4 earthenware bowls. They should be big enough to hold 4 to 6 cups each.
Divide the rice among the bowls. Arrange the vegetables and beef on the rice. Top each serving with a raw egg yolk and 1 tablespoon gochujang. If you prefer your eggs and beef cooked, use a fried egg sunny side up and slightly pan-fry the beef before putting them on the top of rice.
Set each pot on a burner. Heat over medium high heat until you hear a ticking, crackling sound coming from the rice.
Sprinkle the bibimbap with the sesame seeds, drizzle with sesame oil to taste.
Ladle the soup to a small bowl and sprinkle some chopped green onion over top.
Serve right away with more hot pepper paste on the side and maybe kimchi too.
Eat
Gently but firmly mix everything together in the bowl with your spoon. Try not to crush the more delicate ingredients.
Eat with your spoon.
Posted on Sunday, January 6th, 2008 at 11:14 pm. Last updated on September 18, 2022.
#bibimbap#bibimbap recipe#dolsot bibimbap#돌솥비빔밥#비빔밥#homemade bibimbap#hot stone bowl bibimbap#how to eat bibimbap#how to make bibimbap#how to make dolsot bibimbap#Korean earthenware bowl bibimbap#korean food#Korean Mixed Rice with Meat and Assorted vegetables#Korean mixed rice with vegetables and meat#Korean recipes#Korean stone pot bibimbap#rice mixed with vegetables#spicy mixed rice#stone bowl bibimbap#Youtube#kfood#korean#food#foodie#recipe#bts#rm#jin#suga#jhope
6 notes
·
View notes
Text


Recent grub that has nourished me physically and mentally. While putting this together I realized I am essentially 85% rice...
🏡 Top row, home goodies: mom’s beautiful bibimbap vegetables and cucumber kimchi, including my all-time favorite gosari namul (fern); the most comforting greens soup with rice; homemade mango sticky rice which was exceptionally easy to make after having nearly 5 cups of rice leftovers from a chuseok potluck.
🏥 Middle row, hospital goodies: harvest bowl buffet at the dining hall; a poke bowl with inari AND soft tofu + beets, an up and coming regular in my veg rotation; a bowl from one of the many many halal carts stationed around campus. I swear by this one particular guy - his rice is so saffrony and rich, he uses some sort of sweetly/cinnamon spiced tahini sauce, and his falafel portioning is so generous.
🌆 Bottom row, city goodies: on the hunt to find my favorite panang curry in town. Nothing has beat my favorite that I’ve had in Ithaca but this one was more than sufficient on a very drunken night; a chipotle-style burrito bowl place near the school offers grilled pineapple and cacti (nopales) as add-ons and overall has extremely fresh veggies, absolutely insane; last but not least the best vegan pho I’ve ever had - intensely flavorful broth and a good portion of tofu and veggies that comes with.
0 notes
Text
Watch "💥지금까지 왜! ✔명절나물3가지를 힘들게 만들었는지 후회했어요💯" on YouTube
youtube
Korean's favorite namul 3 - Doragi mean ancester - Spinach namul - Gosari namul and also koreans love jimiche whis is dried pollack muchim/side dish so this 3 namuls and jinmiche and Jeon / pancake with Kimchi knows you can say you know Korean food base ♡
0 notes
Text
@davidhatter
"Aaaaand, done." Mu-yeol said, switching off the heat. He flipped the kkaennip-jangtteok onto a cutting board to cut it into rectangles. Once transferred onto a plate he brought it over to the table where the rest of the 'full proper Korean dinner' dishes sat.
He'd been telling David he'd do it sometime, show him just how much food you're supposed to make even for two people. The point was to keep the side dishes ,the banchan, in your fridge and have them for sometimes over a week.
Mu-yeol pointed to everything.
"Obviously, the star, rice and soup. The soup is dubu-jogaetguk (두부조갯국), tofu and clams. You've had buchu kimchi before. I made sweet sour, and spicy wild mushrooms and other plants I foraged from the forest. This is gosari-namul (고사리나물). Mul- it's got that weird Korean L-slash-R sound, like my name. So like, English 'L', good, close enough. Hobak jeon (호박전), which is just pan-fried zucchinis. And chamchi-gimbap (참치김밥). Very, incredibly important you get that pronunciation right. Chamchi. CHAM. Not jjam."
It was very likely that those two sounds, not meaningfully distinct in English, sounded exactly the same to Hatter's ears just now.
"Oh, you know." And he did his best David-impression. "Tuna kimbap."
you can't just SAY things like that || hatfish
24 notes
·
View notes
Photo

고사리나물 / Gosari-namul / Stir-fried fernbrake side dish
1 note
·
View note
Text
Gosari namul (Korean fernbrake sidedish)
Soaked another batch of fernbrake to make “gosari namul” (”gosari” is fernbrake in Korean, & “namul” is a general term for edible grasses/leaves).

Okay, so. .. the last time I used fernbrake was to make yookgaejang in the instant pot. They became so soft after being cooked for 25mins. However, on stovetop, I had totally underestimated how long it’d take to ‘cook’ the fernbrake =S it took a long time.............

. . . continue boiling on low-medium heat for like 1.5 hrs o_O

Anyway, after cooking till it’s almost ready, I took it out of the pot, got rid of the water in the pot, & then I added soy sauce, rice syrup, a little bit of water & sesame oil to braise the fernbrake for another ~30mins or so.

Close to 2 hrs of cooking, this sidedish is done~

Sprinkled some sesame seeds on top before serving.
This can be served hot(/warm) or cold. I’ve tried it both ways & I prefer the cold version more. Or maybe bcos I had it cold overnight, so I ate it when it was shortly out of the fridge. I don’t know... when it was fresh & warm, the fernbrake was soft. After being chilled, the texture became a little more firm, & I found the flavour to be deeper/richer upon refrigeration. So up to you, I guess! Either way, it was delicious, & I will definitely make this again!
0 notes
Text
Stone Bowl BiBimBap
Hi! Dolsot Bibimbap is one of the most popular Korean foods among visitors to Korea. Today I will show you how to make this delicious food at home. This is my updated version of bibimbap recipe that I posted years ago. I had to delete my original bibimbap video on Youtube. To make the bibimbap video again, this time I made it even better by adding some other ingredients and show you how to make stow bowl bibimbap in details. I hope you like my upgraded version of bibimbap. 🙂
Yield: 2-3 Servings
Short Korean Lesson
Dol (돌) = Stone
Cheol (철) = Metal
Video Instructions
Main Ingredients:
Fernbrake Side Ingredients:
2 Cups Soaked Fernbrake
½ Cup Onion
1 Tbsp Soy Sauce
1 tsp Garlic, Minced
1 tsp Olive Oil
1 tsp Sesame Oil
Beef Ingredients:
Sauce Ingredients
Directions
In my opinion, bibimbap is all about good sauce. Whatever vegetables and other sides you put in your bibimbap, the sauce makes your bibimbap taste good. To make good bibimbap sauce, mix 3 Tbsp of hot pepper paste, ¼ tsp of soy sauce, ¾ tsp vinegar, 1 tsp of sugar, ½ tsp sesame oil, ¾ tsp of sesame seeds and ½ tsp of minced garlic. If the sauce is too thick, add about 1 Tbsp of water.
Next, let’s marinate the ground beef. In a bowl, mix ½ cup of ground beef, 1 tsp of soy sauce, 1 tsp of sugar, 1 tsp of cooking wine (optional), 1 tsp of sesame oil, ½ tsp of minced garlic, 2 pinches of salt, and 2 pinches black pepper all together.
Set it aside while you prepare the other ingredients. You can substitute the beef with mushrooms or firm tofu.
We call fernbrake ‘gosari’ in Korea. If you buy dried gosari, soak a handful in water overnight. If it is still not soft the next day, then boil it in water until it becomes soft.
We need 2 cups of softened gosari. Ready to use gosari can also be found in Korean grocery stores.
Cut the gosari into 3-inch long pieces, you can also slice up ½ cup of an onion to add to it.
In a pre-heated pan, add the gosari, onion, 1 Tbsp of soy sauce, 1 tsp of sesame oil, 1 tsp olive oil, and 1 tsp of minced garlic. Fry it for 10 minutes on medium-high. Then, the sogari namul is done.
Along with the gosari namul, I will also use about 1 cup each of musaengchae (korean radish side) and sigeumchi namul (Korean spinach side),
bokkeum kimchi (fried kimchi) (or chopped fresh kimchi), and kongnamul muchim (Korean soy bean sprout side) for today’s bibimbap recipe. These are typical ingredients that can normally be found in bibimbap, but seriously there is no rule for it, so you can grab whatever Korean sides or vegetables you have on hand for your bibimbap.
Now, let’s prepare some vegetable ingredients for better color, flavor, and nutrition. You can pick your favorite vegetables, but these are the common vegetables we use for bibimbap in Korea.
I will chop ½ cup worth of onion, ⅓ cup worth of carrot, ⅓ cup worth of zucchini, and ¼ cup worth of green onion into 2-inch long thin strips. The similar size of the vegetables makes your bibimbap look more neater when you assemble the dish.
Wipe a heated pan with an oiled paper towel to slightly grease the pan. Fry the onion with 1 pinch of salt for 3 minutes on medium-high.
After 3 minutes, remove the onion from the pan and do the same thing for the green onion. Fry it for 1 minute. The next one is zucchini for 2 minutes.
Fry the carrot with a pinch of salt for 2 minutes. I fried all the vegetables separately for a better appearance. However, many times, I just fry all the vegetables together at once in the same pan. For example, I start to fry the onion, then add carrot and zucchini, then add the green onion, and so on, based upon the cooking time of each vegetable.
Finally, fry the marinated beef for about 3 minutes on meidum-high.
We are getting closer to the end of the preparations. Cut about ½ cup worth of roasted dried laver into thin 2-inch strips with scissors.
Some people add the eggs raw, but if you want them cooked, fry them now. So, all the ingredients for bibimbap are ready now. Now, it is time for the fun.
To make deliciously crispy rice on the bottom of your stone bowl, as you get in a Korean restaurant. 😉 Drizzle 1 Tbsp of sesame oil on the bottom surface of your stone bowl for bibimbap. Swill it around your bowl so that the oil will be spread out evenly on the bottom. Make sure to get the oil about 2 inches off the bottom.
Put about 1¼ cups of freshly cooked short grain rice in the bowl and spread it on the bottom. I press down gently on the rice so that it cooks better with the sesame oil and becomes crispy golden brown later.
On top of the rice, put some of each ingredient that we prepared earlier.
It already looks very colorful and tasty.
Put your fried egg in the center of the bowl.
Place your stone bowl on your stove top and start to cook it on high. Depending on your stove temperature, the time can be slightly different, but it should be done in 5-6 minutes. When it is almost done cooking, you will hear this sizzling sound from the bottom of your bowl. That means your rice is getting crispy.
After 5 minutes, steam will come out of the bowl with a crazy amazing smell. Put your desired amount of bibimbap sauce in your bowl.
Mix everything with the sauce and eat. Please be careful not to burn your mouth. It is hot. When I mix it, I carefully leave a thin layer of rice at the bottom of the bowl undisturbed so that it continues cooking to get crispy. If you mix it into your bibimbap, you will not get much, if any, crispy rice.
Please try my bibimbap recipe and share your story with us. 🙂
Source: http://aeriskitchen.com/2019/02/bibimbap-ë¹ë¹ë°¥/

0 notes
Text
If A Sorcerer Falls In a Forest || Hatfish
baenxietydad:
`
Marlin felt strangely shy and embarrassed to answer because they were all words Mr. Hatter probably wouldn’t know so he’d have to explain most of them. He answered though, he’d asked after all.
“Oh, you know. Just. Korean stuff. Kimchi, kimbap, mussammari — uh, veggies wrapped in pickled radish paper tied shut with strings of chives —, fried zucchini, spicy pickled onions, seaweed salad, soy-braised potatoes, doraji muchim and gosari namul when I can find what I need for it, those are the more traditional ones that you rarely will find at a Korean restaurant. There’s kkakdugi, gim gyeranmari; sorry, I don’t know why I’m using Korean words as if they mean anything to you. But yeah. I keep him stocked.”
It was true, Hatter didn’t understand some of the words Mr. Bae was using but that was fine. Some of them sounded vaguely familiar, like he had heard of them but couldn’t remember wear. If they were the words used for those foods then why not use them? He wasn’t a proper chef, trained in a school or by anyone other than trial, error, and the community around him, so he didn’t know a lot of stuff.
But he liked to learn, even at his age.
“It’s not your fault I’m unworldly,” he replied with a shrug and a smile. Hatter continued to search around, noting the reagents around them and trying to remember what he had come here for. “That’s nice though. I’m sure he appreciates that compared to whatever they’re serving in the food halls.”
23 notes
·
View notes
Text
Stone Bowl BiBimBap
Hi! Dolsot Bibimbap is one of the most popular Korean foods among visitors to Korea. Today I will show you how to make this delicious food at home. This is my updated version of bibimbap recipe that I posted years ago. I had to delete my original bibimbap video on Youtube. To make the bibimbap video again, this time I made it even better by adding some other ingredients and show you how to make stow bowl bibimbap in details. I hope you like my upgraded version of bibimbap. 🙂
Yield: 2-3 Servings
Short Korean Lesson
Dol (돌) = Stone
Cheol (철) = Metal
Video Instructions
Main Ingredients:
Fernbrake Side Ingredients:
2 Cups Soaked Fernbrake
½ Cup Onion
1 Tbsp Soy Sauce
1 tsp Garlic, Minced
1 tsp Olive Oil
1 tsp Sesame Oil
Beef Ingredients:
Sauce Ingredients
Directions
In my opinion, bibimbap is all about good sauce. Whatever vegetables and other sides you put in your bibimbap, the sauce makes your bibimbap taste good. To make good bibimbap sauce, mix 3 Tbsp of hot pepper paste, ¼ tsp of soy sauce, ¾ tsp vinegar, 1 tsp of sugar, ½ tsp sesame oil, ¾ tsp of sesame seeds and ½ tsp of minced garlic. If the sauce is too thick, add about 1 Tbsp of water.
Next, let’s marinate the ground beef. In a bowl, mix ½ cup of ground beef, 1 tsp of soy sauce, 1 tsp of sugar, 1 tsp of cooking wine (optional), 1 tsp of sesame oil, ½ tsp of minced garlic, 2 pinches of salt, and 2 pinches black pepper all together.
Set it aside while you prepare the other ingredients. You can substitute the beef with mushrooms or firm tofu.
We call fernbrake ‘gosari’ in Korea. If you buy dried gosari, soak a handful in water overnight. If it is still not soft the next day, then boil it in water until it becomes soft.
We need 2 cups of softened gosari. Ready to use gosari can also be found in Korean grocery stores.
Cut the gosari into 3-inch long pieces, you can also slice up ½ cup of an onion to add to it.
In a pre-heated pan, add the gosari, onion, 1 Tbsp of soy sauce, 1 tsp of sesame oil, 1 tsp olive oil, and 1 tsp of minced garlic. Fry it for 10 minutes on medium-high. Then, the sogari namul is done.
Along with the gosari namul, I will also use about 1 cup each of musaengchae (korean radish side) and sigeumchi namul (Korean spinach side),
bokkeum kimchi (fried kimchi) (or chopped fresh kimchi), and kongnamul muchim (Korean soy bean sprout side) for today’s bibimbap recipe. These are typical ingredients that can normally be found in bibimbap, but seriously there is no rule for it, so you can grab whatever Korean sides or vegetables you have on hand for your bibimbap.
Now, let’s prepare some vegetable ingredients for better color, flavor, and nutrition. You can pick your favorite vegetables, but these are the common vegetables we use for bibimbap in Korea.
I will chop ½ cup worth of onion, ⅓ cup worth of carrot, ⅓ cup worth of zucchini, and ¼ cup worth of green onion into 2-inch long thin strips. The similar size of the vegetables makes your bibimbap look more neater when you assemble the dish.
Wipe a heated pan with an oiled paper towel to slightly grease the pan. Fry the onion with 1 pinch of salt for 3 minutes on medium-high.
After 3 minutes, remove the onion from the pan and do the same thing for the green onion. Fry it for 1 minute. The next one is zucchini for 2 minutes.
Fry the carrot with a pinch of salt for 2 minutes. I fried all the vegetables separately for a better appearance. However, many times, I just fry all the vegetables together at once in the same pan. For example, I start to fry the onion, then add carrot and zucchini, then add the green onion, and so on, based upon the cooking time of each vegetable.
Finally, fry the marinated beef for about 3 minutes on meidum-high.
We are getting closer to the end of the preparations. Cut about ½ cup worth of roasted dried laver into thin 2-inch strips with scissors.
Some people add the eggs raw, but if you want them cooked, fry them now. So, all the ingredients for bibimbap are ready now. Now, it is time for the fun.
To make deliciously crispy rice on the bottom of your stone bowl, as you get in a Korean restaurant. 😉 Drizzle 1 Tbsp of sesame oil on the bottom surface of your stone bowl for bibimbap. Swill it around your bowl so that the oil will be spread out evenly on the bottom. Make sure to get the oil about 2 inches off the bottom.
Put about 1¼ cups of freshly cooked short grain rice in the bowl and spread it on the bottom. I press down gently on the rice so that it cooks better with the sesame oil and becomes crispy golden brown later.
On top of the rice, put some of each ingredient that we prepared earlier.
It already looks very colorful and tasty.
Put your fried egg in the center of the bowl.
Place your stone bowl on your stove top and start to cook it on high. Depending on your stove temperature, the time can be slightly different, but it should be done in 5-6 minutes. When it is almost done cooking, you will hear this sizzling sound from the bottom of your bowl. That means your rice is getting crispy.
After 5 minutes, steam will come out of the bowl with a crazy amazing smell. Put your desired amount of bibimbap sauce in your bowl.
Mix everything with the sauce and eat. Please be careful not to burn your mouth. It is hot. When I mix it, I carefully leave a thin layer of rice at the bottom of the bowl undisturbed so that it continues cooking to get crispy. If you mix it into your bibimbap, you will not get much, if any, crispy rice.
Please try my bibimbap recipe and share your story with us. 🙂

Source: http://aeriskitchen.com/2019/02/bibimbap-ë¹ë¹ë°¥/
0 notes
Link
Wonderful Vegan Food!
“Gosari-namul” or ‘stir fried Bracken’ is a Korean traditional side dish. If you gather young Gosari(bracken) in Spring and dry them, you can eat them all year round. It is a food not to be missed every holiday and ceremony, and it is also an important ingredients of yukgaejang and bibimbap. Some say Gosari has a ‘meat’ flavor and texture so Korean people ate them when they couldn’t afford to buy real meat like beef or pork. Gosari(Bracken) has a unique flavor, which fits well with soy sauce and sesame oil.
As it takes time to cook dried Gosari, Gosari Namul is recognized as difficult dish to make. However, American slow cookers make it much easier to cook Gosari. This is also the way I invented from living in the United States for 11 years. There are many Korean traditional foods that need a long cooking time, and it is interesting that you can easily cook most of them using American slow cookers.
#gosai namul#fernbrake#sitr-fried bracken#vegan#healthy food#korean cooking#slowcooker#namul#idea kitchen
1 note
·
View note
Text
Stone Bowl BiBimBap
Hi! Dolsot Bibimbap is one of the most popular Korean foods among visitors to Korea. Today I will show you how to make this delicious food at home. This is my updated version of bibimbap recipe that I posted years ago. I had to delete my original bibimbap video on Youtube. To make the bibimbap video again, this time I made it even better by adding some other ingredients and show you how to make stow bowl bibimbap in details. I hope you like my upgraded version of bibimbap. 🙂
Yield: 2-3 Servings
Short Korean Lesson
Dol (돌) = Stone
Cheol (철) = Metal
Video Instructions
Main Ingredients:
Fernbrake Side Ingredients:
2 Cups Soaked Fernbrake
½ Cup Onion
1 Tbsp Soy Sauce
1 tsp Garlic, Minced
1 tsp Olive Oil
1 tsp Sesame Oil
Beef Ingredients:
Sauce Ingredients
Directions
In my opinion, bibimbap is all about good sauce. Whatever vegetables and other sides you put in your bibimbap, the sauce makes your bibimbap taste good. To make good bibimbap sauce, mix 3 Tbsp of hot pepper paste, ¼ tsp of soy sauce, ¾ tsp vinegar, 1 tsp of sugar, ½ tsp sesame oil, ¾ tsp of sesame seeds and ½ tsp of minced garlic. If the sauce is too thick, add about 1 Tbsp of water.
Next, let’s marinate the ground beef. In a bowl, mix ½ cup of ground beef, 1 tsp of soy sauce, 1 tsp of sugar, 1 tsp of cooking wine (optional), 1 tsp of sesame oil, ½ tsp of minced garlic, 2 pinches of salt, and 2 pinches black pepper all together.
Set it aside while you prepare the other ingredients. You can substitute the beef with mushrooms or firm tofu.
We call fernbrake ‘gosari’ in Korea. If you buy dried gosari, soak a handful in water overnight. If it is still not soft the next day, then boil it in water until it becomes soft.
We need 2 cups of softened gosari. Ready to use gosari can also be found in Korean grocery stores.
Cut the gosari into 3-inch long pieces, you can also slice up ½ cup of an onion to add to it.
In a pre-heated pan, add the gosari, onion, 1 Tbsp of soy sauce, 1 tsp of sesame oil, 1 tsp olive oil, and 1 tsp of minced garlic. Fry it for 10 minutes on medium-high. Then, the sogari namul is done.
Along with the gosari namul, I will also use about 1 cup each of musaengchae (korean radish side) and sigeumchi namul (Korean spinach side),
bokkeum kimchi (fried kimchi) (or chopped fresh kimchi), and kongnamul muchim (Korean soy bean sprout side) for today’s bibimbap recipe. These are typical ingredients that can normally be found in bibimbap, but seriously there is no rule for it, so you can grab whatever Korean sides or vegetables you have on hand for your bibimbap.
Now, let’s prepare some vegetable ingredients for better color, flavor, and nutrition. You can pick your favorite vegetables, but these are the common vegetables we use for bibimbap in Korea.
I will chop ½ cup worth of onion, ⅓ cup worth of carrot, ⅓ cup worth of zucchini, and ¼ cup worth of green onion into 2-inch long thin strips. The similar size of the vegetables makes your bibimbap look more neater when you assemble the dish.
Wipe a heated pan with an oiled paper towel to slightly grease the pan. Fry the onion with 1 pinch of salt for 3 minutes on medium-high.
After 3 minutes, remove the onion from the pan and do the same thing for the green onion. Fry it for 1 minute. The next one is zucchini for 2 minutes.
Fry the carrot with a pinch of salt for 2 minutes. I fried all the vegetables separately for a better appearance. However, many times, I just fry all the vegetables together at once in the same pan. For example, I start to fry the onion, then add carrot and zucchini, then add the green onion, and so on, based upon the cooking time of each vegetable.
Finally, fry the marinated beef for about 3 minutes on meidum-high.
We are getting closer to the end of the preparations. Cut about ½ cup worth of roasted dried laver into thin 2-inch strips with scissors.
Some people add the eggs raw, but if you want them cooked, fry them now. So, all the ingredients for bibimbap are ready now. Now, it is time for the fun.
To make deliciously crispy rice on the bottom of your stone bowl, as you get in a Korean restaurant. 😉 Drizzle 1 Tbsp of sesame oil on the bottom surface of your stone bowl for bibimbap. Swill it around your bowl so that the oil will be spread out evenly on the bottom. Make sure to get the oil about 2 inches off the bottom.
Put about 1¼ cups of freshly cooked short grain rice in the bowl and spread it on the bottom. I press down gently on the rice so that it cooks better with the sesame oil and becomes crispy golden brown later.
On top of the rice, put some of each ingredient that we prepared earlier.
It already looks very colorful and tasty.
Put your fried egg in the center of the bowl.
Place your stone bowl on your stove top and start to cook it on high. Depending on your stove temperature, the time can be slightly different, but it should be done in 5-6 minutes. When it is almost done cooking, you will hear this sizzling sound from the bottom of your bowl. That means your rice is getting crispy.
After 5 minutes, steam will come out of the bowl with a crazy amazing smell. Put your desired amount of bibimbap sauce in your bowl.
Mix everything with the sauce and eat. Please be careful not to burn your mouth. It is hot. When I mix it, I carefully leave a thin layer of rice at the bottom of the bowl undisturbed so that it continues cooking to get crispy. If you mix it into your bibimbap, you will not get much, if any, crispy rice.
Please try my bibimbap recipe and share your story with us. 🙂
Source: http://aeriskitchen.com/2019/02/bibimbap-ë¹ë¹ë°¥/
0 notes
Photo

Just Pinned to COMFORT FOODS: https://cookaccess.com/korean-temple-cuisine-gosari-namul-stir-fried-fernbrake/ Korean Temple Cuisine: Gosari-namul (Stir-fried fernbrake: )Date: 2018-07-07 22:38:21 ... https://www.pinterest.com/pin/773634042217076637 https://www.pinterest.com/r/pin/773634042217076637/4766733815989148850/49d5a1308575263a1f365f66a1a2247030635ab00cffe927cd24d613ca83594b
0 notes
Text
Thử thách với món cơm trộn thịt bò sống của Hàn Quốc
Những tin đồ của thức ăn tươi sống chắc chắn sẽ “đổ gục” trước món ăn này.
Cơm trộn Hàn Quốc là món ăn không còn xa lạ, tuy nhiên cơm trộn thịt bò sống thì vẫn còn khá lạ lẫm với khách du lịch khi đến xứ sở kim chi. Trong muôn kiểu cơm trộn Hàn Quốc thì cơm trộn với thịt bò sống là món đặc trưng nhất, có tên gọi bibimbap yookhwe, được bán trong các nhà hàng truyền thống.
Vẫn những nguyên liệu quen thuộc trong món cơm trộn, từng phần nhỏ namul (rau trong tô cơm) như dưa chuột, bầu, nấm thái mỏng, giá đậu nành, rong biển, gosari (thân cây dương xỉ), kim chi củ cải sợi… sắp đều bên trên cơm trắng. Rau được xào sơ qua. Điểm nhấn của món ăn chính là loại thịt bò tươi sống của Hàn Quốc, thái sợi nhỏ đặt bên trên các loại rau. Thịt bò trộn với nước tương, tỏi băm và vừng để khử mùi. Cuối cùng, trứng gà sống là nguyên liệu không thể thiếu trong tô cơm.
Giống những món cơm trộn khác, khi ăn thực khách phải cho tương ớt Hàn Quốc dùng riêng trong món cơm trộn vào. Loại tương này khá cay, vì vậy hãy nếm thử trước khi quyết định cho toàn bộ vào tô cơm. Sau đó trộn đều tất cả đồ ăn. ��ây là công đoạn quyết định cơm của bạn ngon hay dở. Nếu trộn không đều tay, cơm sẽ có vị mặn, nhạt không đều, hoặc chỗ không có thịt, chỗ quá nhiều thịt bò và trứng gây ngán. Ăn đúng kiểu Hàn Quốc là sau khi trộn đều, thực khách phải ép chặt cơm xuống đáy tô rồi mới múc từng muỗng.
Đồ ăn phụ gồm kim chi trắng – loại kim chi không muối với tương, kim chi truyền thống, bánh hẹ, cá cơm khô, xà lách và nước giá trụng thêm tí hành, vị hơi lợ… Không hiếm người từ chối món này vì sợ thịt bò còn sống, tuy nhiên nếu là tín đồ của thức ăn tươi sống, thực khách sẽ nghiện ngay vị béo vừa phải của thịt và trứng sống hòa quyện với vị cay của tương ớt Hàn Quốc. Nhờ sự chế biến khéo léo của đầu bếp, mùi tanh của thịt bò được khử triệt để.
Theo tương truyền, ngày xưa món ăn này chỉ dành cho các quan chức trong triều đình nên cách trình bày cũng “sang chảnh” hơn hẳn các món cơm trộn khác. Cơm được đặt trong thố đồng màu vàng, nặng trịch thay vì tô đá thông thường.
Phố cổ Jeonju, cách Seoul khoảng 2 tiếng 20 phút đi tàu là nơi chế biến món này ngon nhất Hàn Quốc. Nếu không có thời gian ghé Jeonju, du khách có thể thưởng thức cơm trộn yookhwe ở nhà hàng Gogung (Cố Cung), tầng B1, tòa nhà Ssamji-gil, Insadong.
Vi Yến
Nguồn: http://ift.tt/2fAnopR
Thử thách với món cơm trộn thịt bò sống của Hàn Quốc Ngu?n:
Duyên Dáng Việt Nam.
Xem khuyến mãi Global Resources
0 notes
Text
"Aaaand soup should be done," Mu-yeol said, turning the heat off.
He had had been telling Hatter that, eventually, he'd make a proper Korean dinner for him -- a pared down version with half the number of banchan he'd normally keep on hand, but the idea's there. You got your rice, your soup, and your side dishes, some made from foraged forest ingredients. In a fortunate coincidence, Mu-yeol's one day off from both the Hollow clinic and Pixie's happened to be a day that Hatter scheduled himself off work. That was a perfect excuse to actually do it today, wasn't it?
He moved comfortably through Hatter's kitchen (aided by the magical kitchen itself) to grab what he needed to portion everything out.
As if sensing it was time to eat, Karen woke up from his nap on the couch and chirped, running over to the table and making 'pleeeeeeease' eyes. Mu-yeol rolled his eyes but grabbed a plate a put a small amount of rice, gosari-namul, and one rosebay willowherb leaf jeon flavored with ground elder on it for the squirrel.
"Aish, you're so spoiled. Do you even remember how to hunt and forage?"
Karen chirped at him before digging in.
"Omo. Rude." He shook his head at Karen before turning to Hatter. "Well, now that the squirrel's been fed."
@davidhatter
An Almost Intentional Misunderstanding || Hatfish
24 notes
·
View notes
Text
If A Sorcerer Falls In a Forest || Hatfish
davidhatter:
Hatter nodded and smiled, accepting this answer easily. As far as he knew Mr. Bae was a bartender and he just assumed he was either off for the day or didn’t have to go in to work until later. It didn’t occur to him that there was another job he could have been on the clock for.
He peered around, trying to remember why he had even come that way in the first place to have tripped. Still listening to Mr. Bae, he chuckled, glancing his way to acknowledge what he was saying.
“What do you make him?” he had to ask, the kitchen witch in him curious.
`
Marlin felt strangely shy and embarrassed to answer because they were all words Mr. Hatter probably wouldn’t know so he’d have to explain most of them. He answered though, he’d asked after all.
“Oh, you know. Just. Korean stuff. Kimchi, kimbap, mussammari — uh, veggies wrapped in pickled radish paper tied shut with strings of chives —, fried zucchini, spicy pickled onions, seaweed salad, soy-braised potatoes, doraji muchim and gosari namul when I can find what I need for it, those are the more traditional ones that you rarely will find at a Korean restaurant. There’s kkakdugi, gim gyeranmari; sorry, I don’t know why I’m using Korean words as if they mean anything to you. But yeah. I keep him stocked.”
23 notes
·
View notes