#Gaussian distribution
Explore tagged Tumblr posts
Text
It's a bell curve
12K notes
·
View notes
Text

The Science Research Diaries of S. Sunkavally, p 534.
#Andes#iodine#thyroid hormone#Gaussian distribution#anatomic position of the heart#size of the adrenal gland#stress#mixed diet#autopsy#thyroid nodules
1 note
·
View note
Text
Known at the time as "the law of error", the formulation derived from the analysis by the German mathematician Carl Friedrich Gauss of errors made in the measurement of "true" physical quantities – for example, planetary positions in astronomy.
"In the Name of Eugenics: Genetics and the Uses of Human Heredity" - Daniel J. Kevles
#book quote#in the name of eugenics#daniel j kevles#nonfiction#law of error#formulation#derived#analysis#gaussian distribution#carl friedrich gauss#errors#measurement#astronomy
0 notes
Text
since we're now back on tour with both, i'd like to know the kääryboo distribution on tumblr six months after eurovision
explain in the tags if it's changed since eurovision or if it's still the same, or if you have some other sort of funky relationship with the fandom(s)
#käärijä#joker out#poll#a#i'm expecting either kä heavy or gaussian distribution#but i may be very surprised
94 notes
·
View notes
Text
still thinking about “la curva (kurwa) di Gauss!”
#it’s shaped like a boob…#‘i gave you a 3 because at a 4 i can do it and at a 5? god.’#if i was still in a statistics class i would reference this when talking about gaussian distribution#txt#andrzej sapkowski
6 notes
·
View notes
Text
@alora-vlinder
18K notes
·
View notes
Text
Consider how dumb the average person is,
Now consider that means half the population is dumber than that
Now consider that there are so many axes by which we can measure intelligence that it suffers the curse of dimensionality, ergo the population is distributed along the surface of a high-dimensional hypersphere and while the average normalized magnitude of any point's intelligence is 1, the mean of all points would be at the origin (re: 0), so maybe think about that and treat people with more dignity and kindness
1 note
·
View note
Text
There is no such thing as AI.
How to help the non technical and less online people in your life navigate the latest techbro grift.
I've seen other people say stuff to this effect but it's worth reiterating. Today in class, my professor was talking about a news article where a celebrity's likeness was used in an ai image without their permission. Then she mentioned a guest lecture about how AI is going to help finance professionals. Then I pointed out, those two things aren't really related.
The term AI is being used to obfuscate details about multiple semi-related technologies.
Traditionally in sci-fi, AI means artificial general intelligence like Data from star trek, or the terminator. This, I shouldn't need to say, doesn't exist. Techbros use the term AI to trick investors into funding their projects. It's largely a grift.
What is the term AI being used to obfuscate?
If you want to help the less online and less tech literate people in your life navigate the hype around AI, the best way to do it is to encourage them to change their language around AI topics.
By calling these technologies what they really are, and encouraging the people around us to know the real names, we can help lift the veil, kill the hype, and keep people safe from scams. Here are some starting points, which I am just pulling from Wikipedia. I'd highly encourage you to do your own research.
Machine learning (ML): is an umbrella term for solving problems for which development of algorithms by human programmers would be cost-prohibitive, and instead the problems are solved by helping machines "discover" their "own" algorithms, without needing to be explicitly told what to do by any human-developed algorithms. (This is the basis of most technologically people call AI)
Language model: (LM or LLM) is a probabilistic model of a natural language that can generate probabilities of a series of words, based on text corpora in one or multiple languages it was trained on. (This would be your ChatGPT.)
Generative adversarial network (GAN): is a class of machine learning framework and a prominent framework for approaching generative AI. In a GAN, two neural networks contest with each other in the form of a zero-sum game, where one agent's gain is another agent's loss. (This is the source of some AI images and deepfakes.)
Diffusion Models: Models that generate the probability distribution of a given dataset. In image generation, a neural network is trained to denoise images with added gaussian noise by learning to remove the noise. After the training is complete, it can then be used for image generation by starting with a random noise image and denoise that. (This is the more common technology behind AI images, including Dall-E and Stable Diffusion. I added this one to the post after as it was brought to my attention it is now more common than GANs.)
I know these terms are more technical, but they are also more accurate, and they can easily be explained in a way non-technical people can understand. The grifters are using language to give this technology its power, so we can use language to take it's power away and let people see it for what it really is.
12K notes
·
View notes
Text
i must say my body pain is a lot better since ending accutane but theres still these lingering effects that are annoying the fuck out of me since they wont go away. like yeah i can walk without limping again but my hip pain is still JUST ENOUGH that i cant walk without being painfully aware of the fact that i am walking. i can walk with zero heel pain again except when i stand up after a long time then i can feel my heels in pain again. like im not as absolutely bowled over by this anymore but its still present and its annoying as fuck like just go away already
#brot posts#then again this is also how the pain started - just little annoyances that i could power through without much effort#so maybe it’ll be the last thing to go then#gaussian distribution of pain intensity like this is just it fizzling out now#anyway besides all that my wrist is flaring up#which is separate from all this bc my wrists were the one thing my accutane shit never affected#so rn my wrist is actually the worst pain in my whole body not my hips or ankles#but its still so annoying to have to walk around with so many braces and wraps on me#my hip pain does get worse when i dont wear my brace so im like well maybe then i should wear it !!#maybe its helping me heal better !!#but its so annoying to wear it in conjunction with my wrist brace
0 notes
Text

The Research Diaries of S. Sunkavally. Page 200.
#centrifugation theory#toxins#small populations#genetic variability#Fechner's Law#drug testing#large intestine#anatomy#vitamin deficiency#enzye size#Gaussian distribution#satyendra#thoeretical biology#cursive handwriting#manuscripts#notebooks
0 notes
Text

Thank you @cobbbvanth for asking me for this; I’ve never been more flattered! ☺️ I’ve only been making gifs for a little more than 2 years, so I’m really still only figuring Photoshop out, and my colouring owes everything to other people’s tutorials (some of which can be found here). To be honest, I was only asked some tips, but I have no clue what to include and what to leave out; so, here’s my complete (if random) colouring process.
NOTE: This is a colouring tutorial, not a gif-making one. The tutorial that taught me everything I know about that (and to which I am eternally grateful) is this one by @hayaosmiyazaki.
I. SHARPENING My standard sharpening settings are:
One Smart Sharpen filter set to Amount: 500 | Radius: 0,4
A second Smart Sharpen filter set to Amount: 10 | Radius: 10
One Gaussian Blur filter set to Radius: 1,0 and Opacity: 30%
One Add Noise filter set to Amount 0,5 | Distribution: Gaussian
II. BASIC COLOURING This is the part where I add most of the adjustment layers available and just play around with them. Obviously different settings work for different scenes, but I do have some standard ones.
Brightness/Contrast I usually up the Brightness to +10-30, and the Contrast to about +10.
Curves
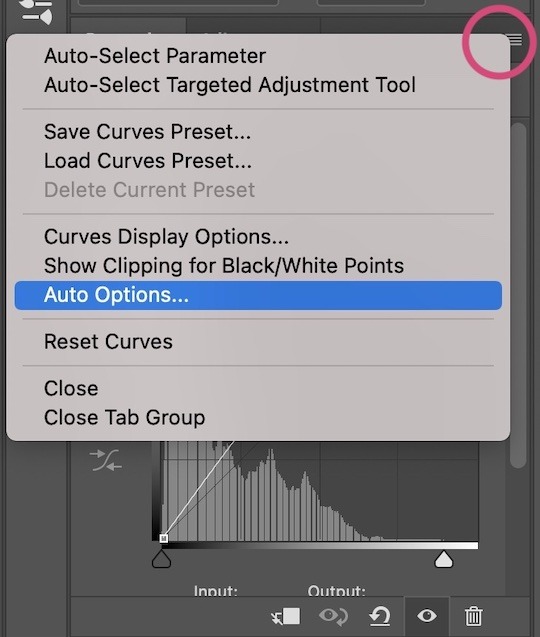
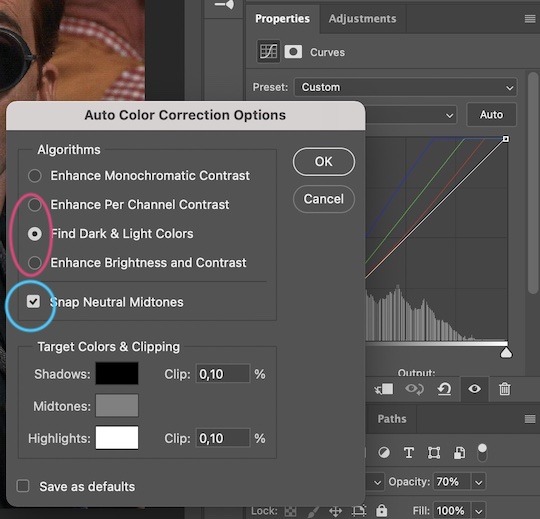
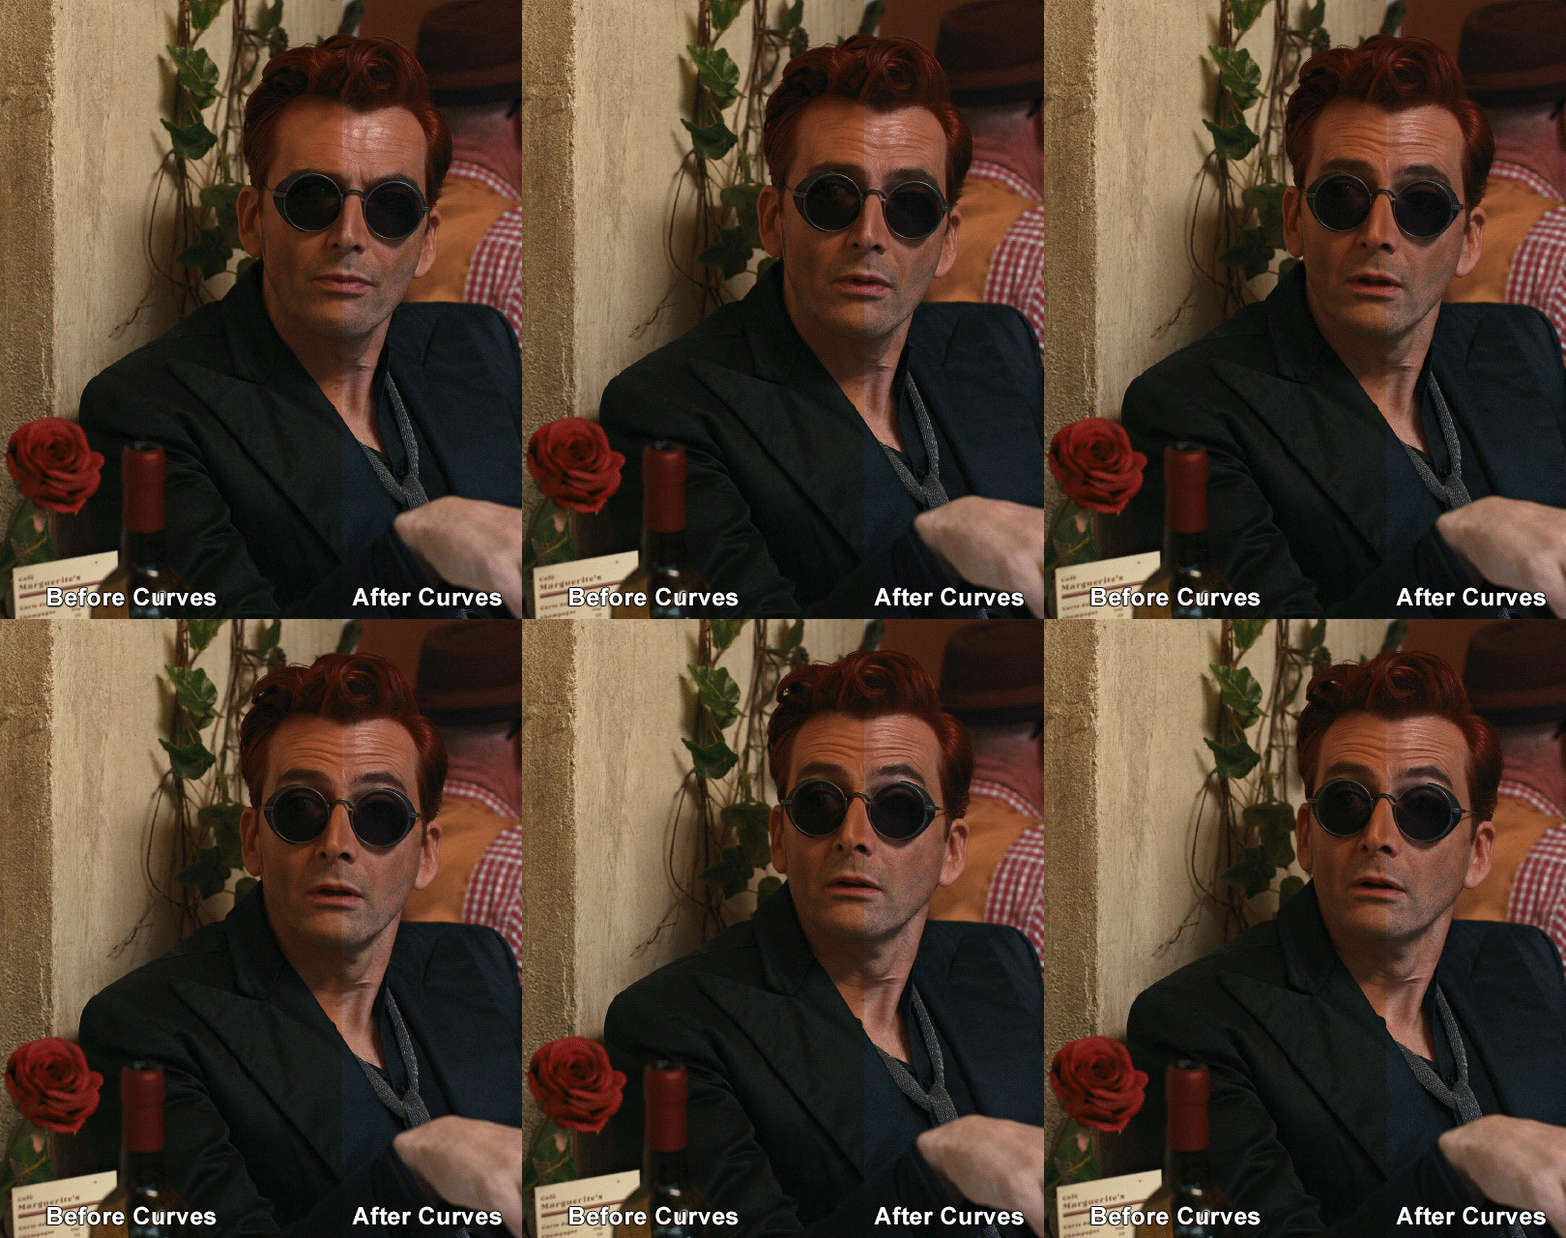
For the first Curves layer I go to Auto Options > Enhance Brightness and Contrast, and then adjust the opacity until I’m happy.
I might repeat the above step if the gif still looks too dark to me.
I add another Curves layer, I go to Auto Options and this time I pick either Find Dark & Light Colors or Enhance Per Channel Contrast, and check or uncheck the Snap Neutral Midtones option, until I see something I like. I will then adjust the opacity.
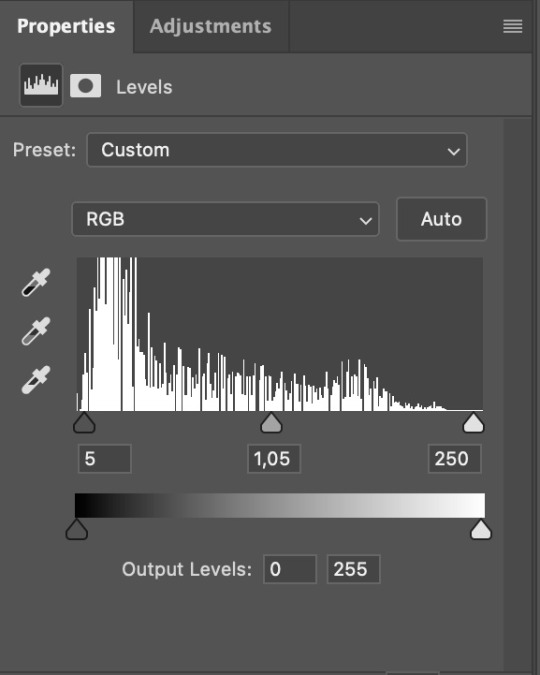
Levels I add a Levels layer that usually looks something like this:
Exposure I add an Exposure layer, where I usually set the Offset to around -0,0010.
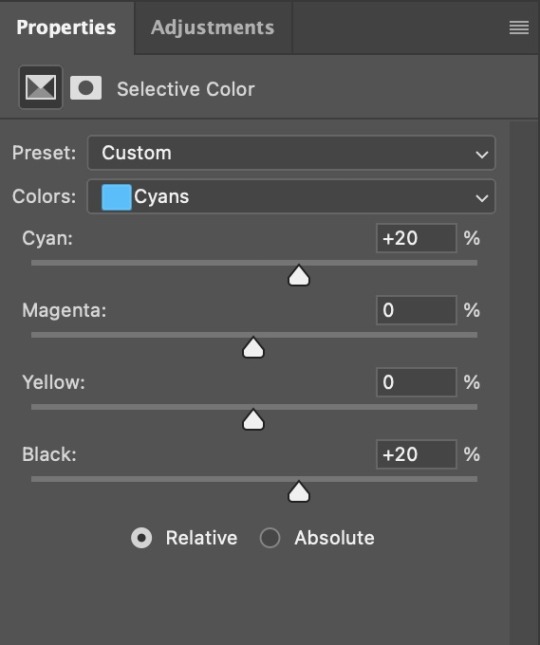
Selective Color To make the faces look okay, I create a Selective Color layer, select the Reds and usually add some Cyan (+10-20%) and play around a little (±5%) with Magenta and Yellow too. I might also add another layer, select the Yellows and make slight tweaks there too.
III. FUN COLOURING About colour manipulation: PiXimperfect just uploaded a tutorial that explains everything so much better than I ever could, so I highly recommend you go watch it. It’s made for static images though, and things are more complicated with moving images, so I also recommend @sabrinaacarpenters’s tutorial.
The reason I usually go for a softer colouring is that a more vivid one requires a lot of patience and precision, and I honestly can’t be bothered. Instead, I try to tweak the colous only a little, so that the edges can be a little rough without it looking too wrong.
One thing to remember is that each gif is different, and there isn’t one foolproof way to do this, so you will need to use a different technique depending on the gif you’re working with.
Okay, so, after I’ve decided what colour I want my background to be:
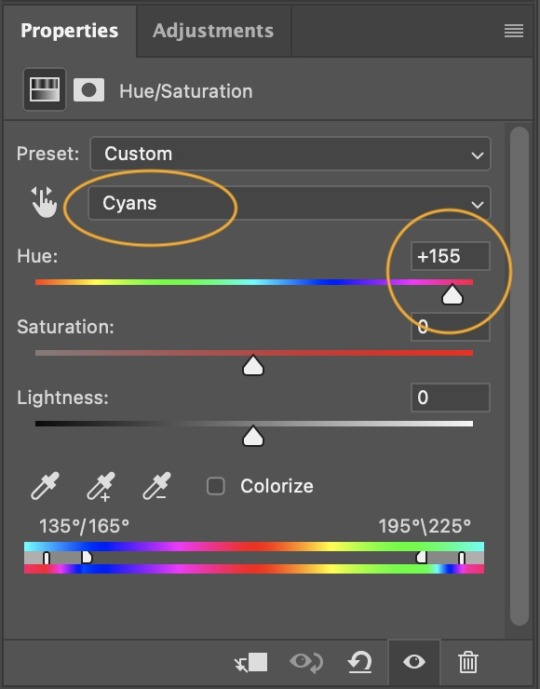
1. I create a Hue/Saturation layer and change the greens, cyans, blues and magentas to that colour. That’s easy enough, since it doesn’t mess with the face colour. I then set the blending mode to Color. If your background doesn’t include any yellow or red, you might be done here, like in the case bellow:
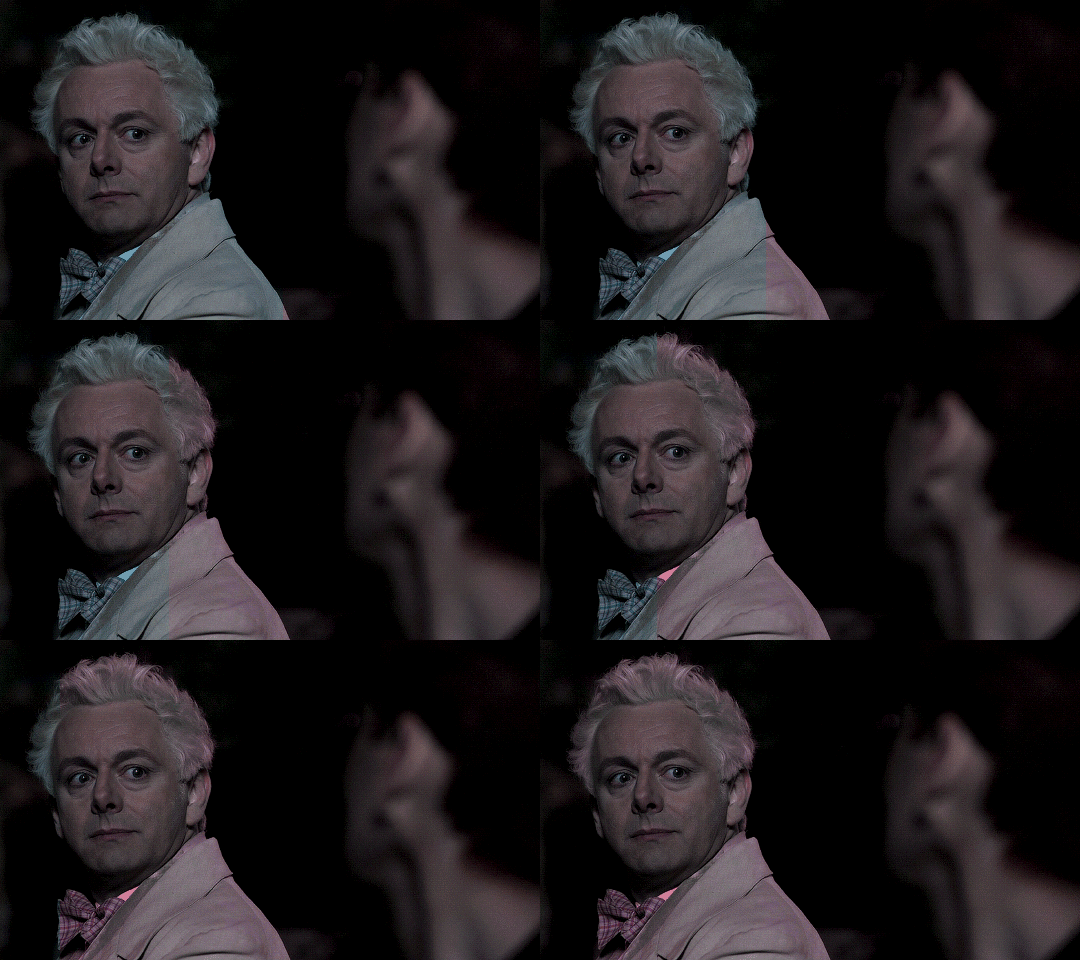
2. To change the yellows and reds, I create a new Hue/Saturation layer, select the yellows/reds, move Saturation to 100 (temporarily) and then play around with the sliders until the face colour isn’t affected. I then change it to whatever I’ve chosen and change the blending mode to Color.
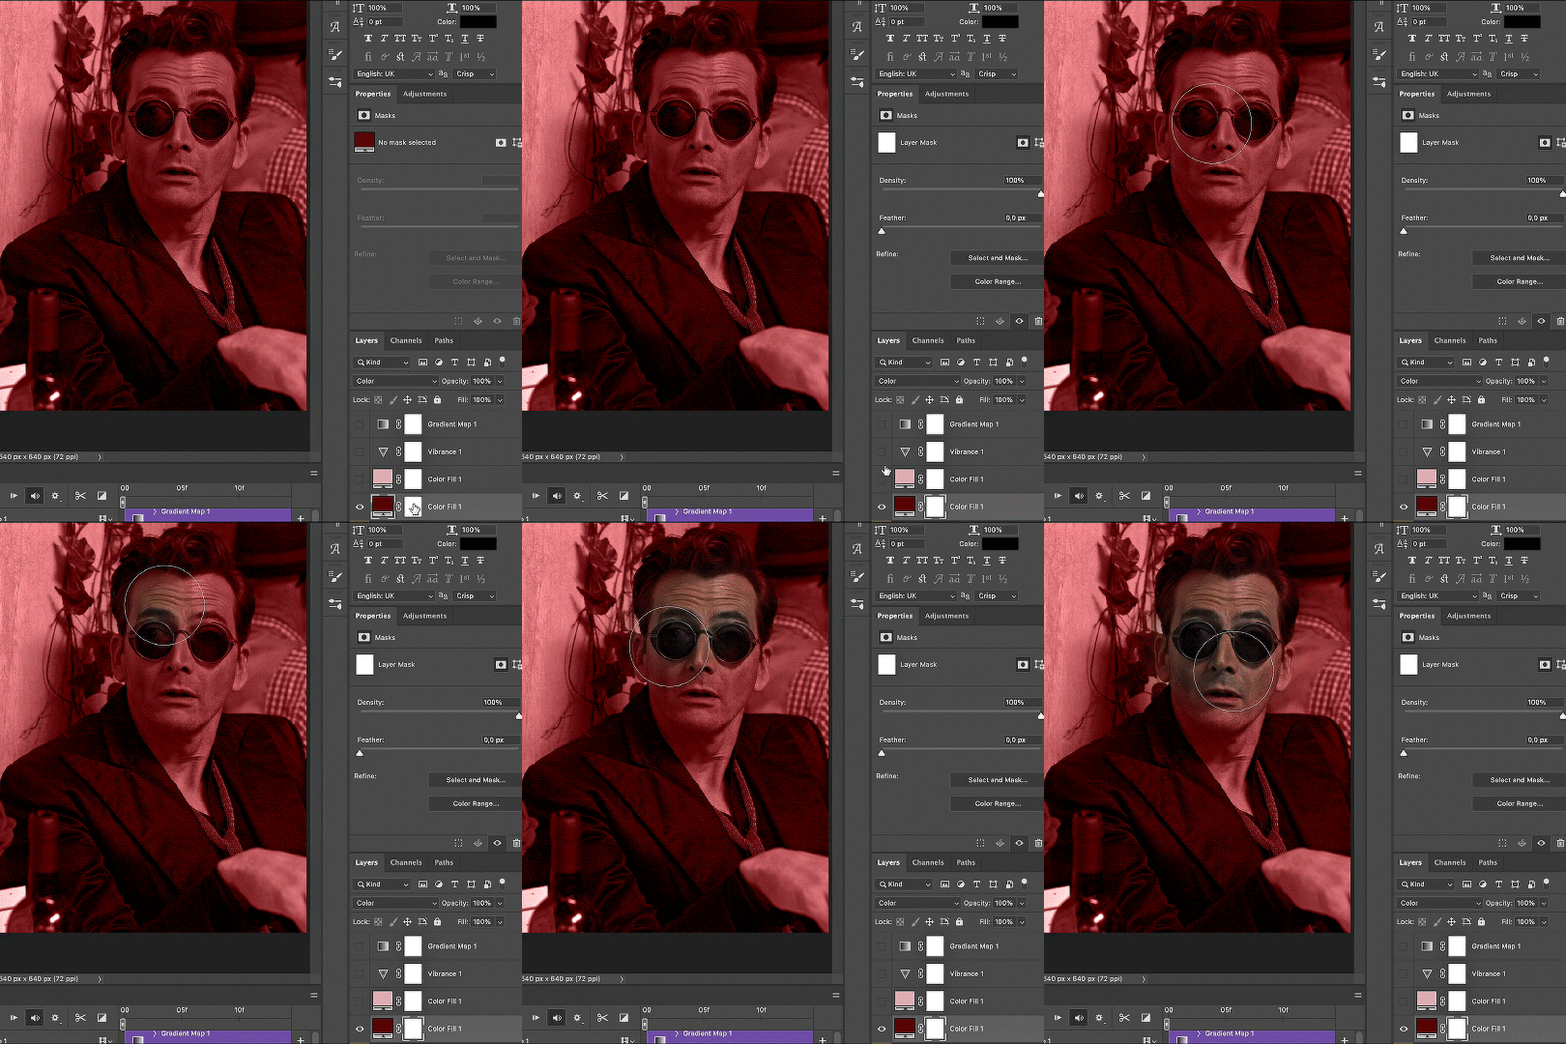
3. If for whatever reason step 3 doesn’t work (the background is white or black for example, or just too red), I might create a Solid Color layer set to whatever colour I want, set the blending mode to Color and then select the layer mask and carefully paint with a soft, black brush over the people’s faces/bodies. I will then lower the Opacity, to whatever looks smooth enough. If there’s a lot of movement in your gif, you might have to use keyframes (see sabrinaacarpenters's tutorial linked above). However, my main goal is to avoid using those; that’s why I try my hardest to tweak around as many Hue/Saturation layers as needed and not have to create a solid color layer.
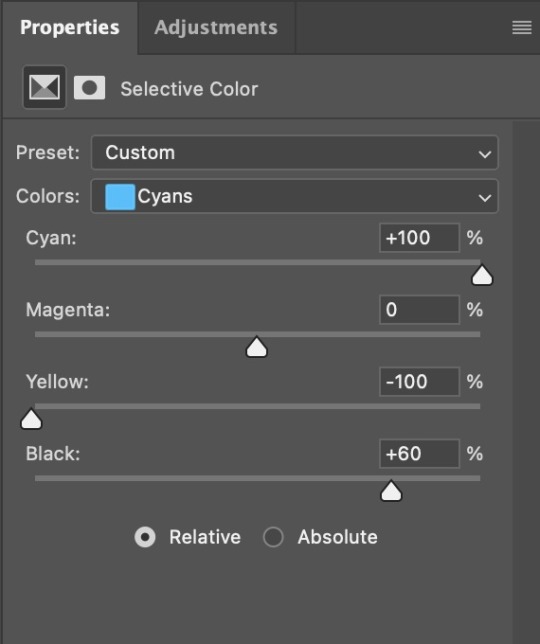
4. Once my background looks the colour I want it, I might add a Selective Color layer that matches my background color and then try to make it look more vibrant. For this Aziraphale gif below for example, I’ve selected the Cyans and then set Cyan to +100%, Yellow to -100% and Black to +60, then created another one, selected the Cyans again and then set Cyan to +20 and Black to +20.
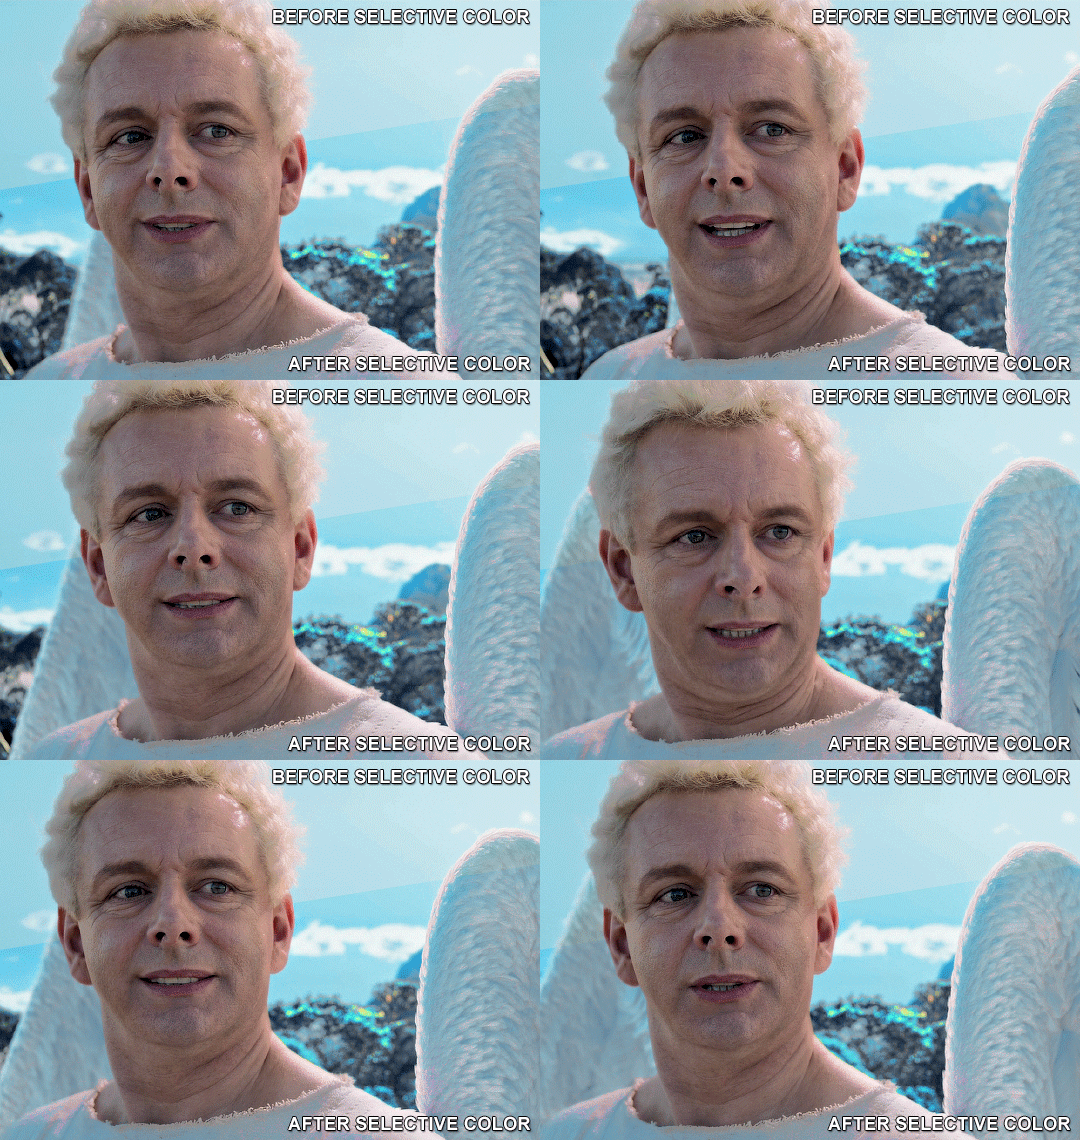
5. If the gif has a white area, I create a Solid Color layer with a colour that matches the rest of the background and then set the Opacity low. I might also create a Selective Color layer, increase the Black and then play around with the colours.
IV. FINISHING TOUCHES
I create a Vibrance layer and set the Vibrance to around +30 and the Saturation to about +5.
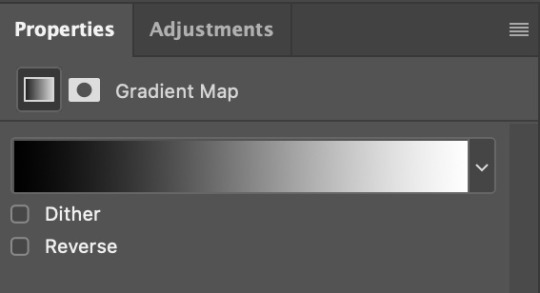
I create a black and white Gradient Map layer (with black on the left end of the spectrum and white on the right), set the blending to Luminosity and the Opacity to about 20-30%.
AAAND that’s about it I think! This ended up way too long and perhaps a little incoherent. I tried to make it as general as possible, so you might have to mix and match for best results. Feel free to ask me for further explanations about any one of these steps, and please tell me if you want me to go through the colouring of a specific gifset (although, as I said, I'm by no means an expert). Happy gifmaking!
#gif tutorial#allresources#completeresources#dailyresources#photoshop tutorial#minee#tutorial#tutorial*#chaoticresources#uservivaldi#userdanahscott#usersanshou#userfanni#userbuckleys#userrobin#tuserjen#userdavid#userzaynab#tusermimi#thingschanged#tuserju#usertj#userhallie
356 notes
·
View notes
Text

ben affleck smoking.png

mocking me
#i love breeding projects#also don't mind the multigaze project up there at over 300 eggs#when statistically the expected value for that would be 200. I'm the increasingly smaller and smaller tail of the gaussian distribution
5 notes
·
View notes
Note
How do you simulate a championship, actually? (Your post really made me curious ab it lol) Do you like go through all the possible points and positions each driver can get in these last 11 races and then calculate the probability or something?
Yes! So I only calculated Lando and Max’s possible places saying that Lando’s average placing would be P2 and Max’s P3 accounting for the fact that the McLaren is the fastest car. I then used a Gaussian distribution centered on 2 and 3 respectively with a standard deviation of 2 to give me race results, made sure they weren’t placing in the same result, and transferred that to points and then a points difference. I then calculated that points difference over 10 races and 3 sprint races and determined whether the difference was overcome for Lando to win the championship! I then ran the simulation 10 million times and calculated how often Lando won, which was 4.33% of the time.
Of course you could poke countless holes in my simulation, it doesn’t take into account fastest lap point (mostly because I figured the likelihood of one getting it would be equal to the likelihood of the other getting it so they cancel out), nor does it account for possible DNFs or grid penalties, and I could run it with a greater standard deviation for Max considering Red Bull seem less reliable at the moment. But all in all, I think it’s robust enough for what we needed to figure out!
95 notes
·
View notes
Note
Hello! You've probably heard this a billion times but after searching around on your blog without much luck I thought I'd ask: how do you create the sort of slightly hazy, grainy 'anime'-esque overlay/filter in your pieces? I love how it looks like a hand drawn cel or a shot from an 80's animated film - 'impeccable vibes' as the kids would say 😁. Keep up the gorgeous work, I always adore seeing your OCs on my dash ❤️☺️
Hey! Thank you so so much!
I add a Noise filter on top of the art when I'm done. Sometimes I find a noise overlay to add on (the clip studio asset store has a bunch), but when I'm not feeling lazy I do it in Photoshop because I like the results best. Here's how:


You can change the amount of noise to whatever you think looks best. Most of the time I set the distribution to Uniform, but sometimes I do Gaussian too.
Hope this helps and that you enjoy your TV fuzz!
123 notes
·
View notes
Text
FAR: Frequently Asked Resources
Editing/Computer Specs
What Reshade/Gshade do you use? sumahama What are your computer specs? processor: AMD Ryzen 9 7950X 16-Core Processor graphics card: GIGABYTE GeForce RTX 4080 Super Windforce ram: 32 GB How do you edit your pics? crop image to desired size (i like using ratio 7x9) use the “smooth sharp(no topaz)” action from here use the “super smooth” action from here use the “add on: richness” action from here (adjust intensity) use the “bright and saturated” action from here (adjust intensity) Add Noise (settings amount: 2.5% distribution: gaussian)
Mods
essential for gameplay: health care redux basemental drugs dine out reloaded brawl override control any sim less intrusive sims grannies cookbook oni's food mods child birth mod RPO (formally known as woohoo wellness) cute romance wicked whims more kisses kiss and grind steady sit
other useful mods: UI cheats MCC CAS columns Better BB TOOL
WCIF?
all answered WCIF's can be found here. I am WCIF-friendly, if you see something and want to know where to find it please send an ask (anon or not). replies on post won't be answered cause I can't actually link in them.
How do you find cc?
I follow a few CC Finds blogs, check the ccfinds and ts4 cc tags on tumblr often, google search, and check pinterest.
21 notes
·
View notes