#Firefox download for window 10
Explore tagged Tumblr posts
Visit Tumblr Blog
Explore Tumblr blogs with no restrictions, modern design and the best experience.
Last Seen Tumblr Blogs


Fun Fact
Tumblr was named as a finalist in Lead411’s New York City Hot 125 in Aug 2010.
Text
diy ao3 wrapped: how to get your data!
so i figured out how to do this last year, and spotify wrapped season got me thinking about it again. a couple people in discord asked how to do it so i figured i'd write up a little guide! i'm not quite done with mine for this year yet because i wanted to do some graphics, but this is the post i made last year, for reference!
this got long! i tried to go into as much detail as possible to make it as easy as possible, but i am a web developer, so if there's anything i didn't explain enough (or if you have any other questions) don't hesitate to send me an ask!!
references
i used two reddit posts as references for this:
basic instructions (explains the browser extension; code gets title, word count, and author)
expanded instructions (code gets title, word count, and author, as well as category, date posted, last visited, warnings, rating, fandom, relationship, summary, and completion status, and includes instructions for how to include tags and switch fandoms/relationships to multiple—i will include notes on that later)
both use the extension webscraper.io which is available for both firefox and chrome (and maybe others, but i only use firefox/chrome personally so i didn't check any others, sorry. firefox is better anyway)
scraping your basic/expanded data
first, install the webscraper plugin/extension.
once it's installed, press ctrl+shift+i on pc or cmd+option+i on mac to open your browser's dev tools and navigate to the Web Scraper tab

from there, click "Create New Site Map" > "Import Sitemap"

it will open a screen with a field to input json code and a field for name—you don't need to manually input the name, it will fill in automatically based on the json you paste in. if you want to change it after, changing one will change the other.
i've put the codes i used on pastebin here: basic // expanded

once you've pasted in your code, you will want to update the USERNAME (highlighted in yellow) to your ao3 username, and the LASTPAGE (highlighted in pink) to the last page you want to scrape. to find this, go to your history page on ao3, and click back until you find your first fic of 2024! make sure you go by the "last visited" date instead of the post date.

if you do want to change the id, you can update the value (highlighted in blue) and it will automatically update the sitemap name field, or vice versa. everything else can be left as is.
once you're done, click import, and it'll show you the sitemap. on the top bar, click the middle tab, "Sitemap [id of sitemap]" and choose Scrape. you'll see a couple of options—the defaults worked fine for me, but you can mess with them if you need to. as far as i understand it, it just sets how much time it takes to scrape each page so ao3 doesn't think it's getting attacked by a bot. now click "start scraping"!


once you've done that, it will pop up with a new window which will load your history. let it do its thing. it will start on the last page and work its way back to the first, so depending on how many pages you have, it could take a while. i have 134 pages and it took about 10-12 minutes to get through them all.
once the scrape is done, the new window will close and you should be back at your dev tools window. you can click on the "Sitemap [id of sitemap]" tab again and choose Export data.

i downloaded the data as .xlsx and uploaded to my google drive. and now you can close your dev tools window!
from here on out my instructions are for google sheets; i'm sure most of the queries and calculations will be similar in other programs, but i don't really know excel or numbers, sorry!
setting up your spreadsheet
once it's opened, the first thing i do is sort the "viewed" column A -> Z and get rid of the rows for any deleted works. they don't have any data so no need to keep them. next, i select the columns for "web-scraper-order" and "web-scraper-start-url" (highlighted in pink) and delete them; they're just default data added by the scraper and we don't need them, so it tidies it up a little.

this should leave you with category, posted, viewed, warning, rating, fandom, relationship, title, author, wordcount, and completion status if you used the expanded code. if there are any of these you don't want, you can go ahead and delete those columns also!
next, i add blank columns to the right of the data i want to focus on. this just makes it easier to do my counts later. in my case these will be rating, fandom, relationship, author, and completion status.
one additional thing you should do, is checking the "viewed" column. you'll notice that it looks like this:
you can't really sort by this since it's text, not formatted as a date, so it'll go alphabetically by month rather than sorting by date. but, you'll want to be able to get rid of any entries that were viewed in 2023 (there could be none, but likely there are some because the scraper got everything on your last page even if it was viewed in 2023). what i did here was use the "find" dialog to search the "viewed" column for 2023, and deleted those rows manually.
ctrl/cmd+f, click the 3 dots for "more options". you want to choose "Specific range", then "C2:C#". replace C with the letter of your viewed column (remember i deleted a bunch, so yours may be different) and replace # with the number of the last row of your spreadsheet. then find 2023, select the rows containing it, right click > delete rows.
it isn't super necessary to do this, it will only add at most 19 fics to your count, but the option is there!

alright, with all that done, your sheet should look something like this:

exposing myself for having read stardew valley fic i guess
now for the fun part!!!
the math
yes, the math is the fun part.
scroll all the way down to the bottom of your sheet. i usually add 100 blank rows at the bottom just so i have some space to play with.
most of these will basically be the same query, just updating for the relevant column. i've put it in a pastebin here, but here's a screenshot so i can walk you through it:

you'll want to use lines 3-10, select the cell you want to put your data into, and paste the query into the formula bar (highlighted in green)

so, we're starting with rating, which is column E for me. if yours is a different letter you'll need to replace all the E's with the relevant letter.
what this does is it goes through the entire column, starting with row 2 (highlighted in yellow) and ending with your final row (highlighted in blue, you'll want to change this number to reflect how many rows you have). note that row 2 is your first actual data row, because of the header row.
it checks each row that has a value (line 5), groups by unique value (row 6), and arranges in descending order (row 7) by how many there are of each value (row 8). finally, row 10 determines how many rows of results you'll have; for rating, i put 5 because that's how many ratings there are, but you can increase the number of results (highlighted in pink) for other columns depending on how many you want. this is why i added the 100 extra rows!
next to make the actual number visible, go to the cell one column over. this is why we added the empty columns! next to your first result, add the second query from the pastebin:

your first and second cell numbers (highlighted in yellow and blue) should match the numbers from your query above, and the third number (highlighted in pink) should be the number of the cell with your first value. what this does is go through your column and count how many times the value occurs.
repeat this for the rest of the rows and you should end up with something like this! don't judge me and my reading habits please

now you can go ahead and repeat for the rest of your columns! as i mentioned above, you can increase the amount of result rows you get; i set it to 25 for fandom, relationship, and author, just because i was curious, and only two for completion status because it's either complete or not complete.
you should end up with something like this!

you may end up with some multiples (not sure why this happens, tagging issues maybe?) and up to you if you want to manually fix them! i just ended up doing a find and replace for the two that i didn't want and replaced with the correct tag.
now for the total wordcount! this one is pretty simple, it just adds together your entire column. first i selected the column (N for me) and went to Format > Number > 0 so it stripped commas etc. then at the bottom of the column, add the third query from the pastebin. as usual, your first number is the first data row, and the second is the last data row.

and just because i was curious, i wanted the average wordcount also, so in another cell i did this (fourth query from the pastebin), where the first number is the cell where your total is, and the second number is the total number of fics (total # of data rows minus 1 for the header row).

which gives me this:

tadaaaa!
getting multiple values
so, as i mentioned above, by default the scraper will only get the first value for relationships and fandoms. "but sarah," you may say, "what if i want an accurate breakdown of ALL the fandoms and relationships if there's multiples?"
here's the problem with that: if you want to be able to query and count them properly, each fandom or relationship needs to be its own row, which would skew all the other data. for me personally, it didn't bother me too much; i don't read a lot of crossovers, and typically if i'm reading a fic it's for the primary pairing, so i think the counts (for me) are pretty accurate. if you want to get multiples, i would suggest doing a secondary scrape to get those values separately.
if you want to edit the scrape to get multiples, navigate to one of your history pages (preferably one that has at least one work with multiple fandoms and/or relationships so you can preview) then hit ctrl+shift+i/cmd+option+i, open web scraper, and open your sitemap. expand the row and you should see all your values. find the one you want to edit and hit the "edit" button (highlighted in pink)

on the next screen, you should be good to just check the "Multiple" checkbox (highlighted in pink):

you can then hit "data preview" (highlighted in blue) to get a preview which should show you all the relationships on the page (which is why i said to find a page that has the multiples you are looking for, so you can confirm).

voila! now you can go back to the sitemap and scrape as before.
getting tag data
now, on the vein of multiples, i also wanted to get my most-read tags.
as i mentioned above, if you want to get ALL the tags, it'll skew the regular count data, so i did the tags in a completely separate query, which only grabs the viewed date and the tags. that code is here. you just want to repeat the scraping steps using that as a sitemap. save and open that spreadsheet.
the first thing you'll notice is that this one is a LOT bigger. for context i had 2649 fics in the first spreadsheet; the tags spreadsheet had 31,874 rows.
you can go ahead and repeat a couple of the same steps from before: remove the extra scraper data columns, and then we included the "viewed" column for the same reason as before, to remove any entries from 2023.
then you're just using the same basic query again!
replace the E with whatever your column letter is, and then change your limit to however many tags you want to see. i changed the limit to 50, again just for curiosity.
if you made it this far, congratulations! now that you have all that info, you can do whatever you want with it!
and again, if you have any questions please reach out!
56 notes
·
View notes
Text
YouTube Downloads through VLC: Step by Step
So this guide to easily downloading off YouTube is super helpful, but there's enough important information hidden in the reblogs that (with the permission of OP @queriesntheories ) I'm doing a more step-by-step version.
Please note: these downloads will be in YouTube quality. My test video download is coming through at 360p, even though the video I'm starting from is set to 720p. They're legible, but they won't look great on a TV. For high visual quality, you'll want to seek out other methods.
This guide is written for Windows 10, since that's what I can test on. It's been tested on Firefox, Chrome, and Edge (which is a Chromium browser, so the method should work in other Chromium browsers too). So far, I haven't tracked down a way to use this download method on mobile.
BASIC KNOWLEDGE:
I'll try to make this pretty beginner-friendly, but I am going to assume that you know how to right-click, double-click, navigate right-click menus, click-and-drag, use keyboard shortcuts that are given to you (for example, how to use Ctrl+A), and get the URL for any YouTube video you want to download.
You'll also need to download and install one or more programs off the internet using .exe files, if you don't have these programs already. Please make sure you know how to use your firewall and antivirus to keep your computer safe, and google any names you don't recognize before allowing permission for each file. You can also hover your mouse over each link in this post to make sure it goes where I'm saying it will go.
YOU WILL NEED:
A computer where you have admin permissions. This is usually a computer you own or have the main login on. Sadly, a shared computer like the ones at universities and libraries will not work for this.
Enough space on your computer to install the programs listed below, if you don't have them already, and some space to save your downloaded files to. The files are pretty small because of the low video quality.
A simple text editing program. Notepad is the one that usually comes with Windows. If it lets you change fonts, it's too fancy. A notepad designed specifically to edit program code without messing it up is Notepad++, which you can download here.
A web browser. I use Firefox, which you can get here. Chrome or other Chrome-based browsers should also work. I haven't tested in Safari.
An Internet connection fast enough to load YouTube. A little buffering is fine. The downloads will happen much faster than streaming the entire video, unless your internet is very slow.
VLC Media Player, which you can get here. It's a free player for music and videos, available on Windows, Android, and iOS, and it can play almost any format of video or audio file that exists. We'll be using it for one of the central steps in this process.
If you want just the audio from a YouTube video, you'll need to download the video and then use a different program to copy the audio into its own file. At the end of this post, I'll have instructions for that, using a free sound editor called Audacity.
SETUP TO DOWNLOAD:
The first time you do this, you'll need to set VLC up so it can do what you want. This is where we need Notepad and admin permissions. You shouldn't need to repeat this process unless you're reinstalling VLC.
If VLC is open, close it.
In your computer's file system (File Explorer on Windows), go to C:\Program Files\VideoLAN\VLC\lua\playlist
If you're not familiar with File Explorer, you'll start by clicking where the left side shows (C:). Then in the big main window, you'll double-click each folder that you see in the file path, in order - so in this case, when you're in C: you need to look for Program Files. (There will be two of them. You want the one without the x86 at the end.) Then inside Program Files you're looking for VideoLAN, and so forth through the whole path.
Once you're inside the "playlist" folder, you'll see a lot of files ending in .luac - they're in alphabetical order. The one you want to edit is youtube.luac which is probably at the bottom.
You can't edit youtube.luac while it's in this folder. Click and drag it out of the playlist folder to somewhere else you can find it - your desktop, for instance. Your computer will ask for admin permission to move the file. Click the "Continue" button with the blue and yellow shield.
Now that the file is moved, double-click on it. The Microsoft Store will want you to search for a program to open the .luac file type with. Don't go to the Microsoft Store, just click on the blue "More apps" below that option, and you'll get a list that should include your notepad program. Click on it and click OK.
The file that opens up will be absolutely full of gibberish-looking code. That's fine. Use Ctrl+A to select everything inside the file, then Backspace or Delete to delete it. Don't close the file yet.
In your web browser, go to https://github.com/videolan/vlc/blob/master/share/lua/playlist/youtube.lua
Click in the part of the Github page that has a bunch of mostly blue code in it. Use Ctrl+A to select all of that code, Ctrl+C to copy it, then come back into your empty youtube.luac file and use Ctrl+P to paste the whole chunk of code into the file.
Save the youtube.luac file (Ctrl+S or File > Save in the upper left corner of the notepad program), then close the notepad program.
Drag youtube.luac back into the folder it came from. The computer will ask for admin permission again. Give it permission.
Now you can close Github and Notepad. You're ready to start downloading!
HOW TO DOWNLOAD:
First, get your YouTube link. It should look something like this: https://www.youtube.com/watch?v=abc123DEF45 If it's longer, you can delete any extra stuff after that first set of letters and numbers, but you don't have to.
Now open VLC. Go to Media > Open Network Stream and paste your YouTube link into the box that comes up. Click Play. Wait until the video starts to play, then you can pause it if you want so it's not distracting you during the next part.
(If nothing happens, you probably forgot to put youtube.luac back. coughs)
In VLC, go to Tools > Codec Information. At the bottom of the pop-up box you'll see a long string of gibberish in a box labeled Location. Click in the Location box. It won't look like it clicked properly, but when you press Ctrl+A, it should select all. Use Ctrl+C to copy it.
In your web browser, paste the entire string of gibberish and hit Enter. Your same YouTube video should come up, but without any of the YouTube interface around it. This is where the video actually lives on YouTube's servers. YouTube really, really doesn't like to show this address to humans, which is why we needed VLC to be like "hi I'm just a little video player" and get it for us.
Because, if you're looking at the place where the video actually lives, you can just right-click-download it, and YouTube can't stop you.
Right-click on your video. Choose "Save Video As". Choose where to save it to - I use my computer's built-in Music or Videos folders.
Give it a name other than "videoplayback" so you can tell it apart from your other downloads.
The "Save As Type" dropdown under the Name field will probably default to MP4. This is a good versatile video format that most video players can read. If you need a different format, you can convert the download later. (That's a whole other post topic.)
Click Save, and your video will start downloading! It may take a few minutes to fully download, depending on your video length and internet speed. Once the download finishes, congratulations! You have successfully downloaded a YouTube video!
If you'd like to convert your video into a (usually smaller) audio file, so you can put it on a music player, it's time to install and set up Audacity.
INSTALLING AUDACITY (first time setup for audio file conversion):
You can get Audacity here. If you're following along on Windows 10, choose the "64-bit installer (recommended)". Run the installer, but don't open Audacity at the end, or if it does open, close it again.
On that same Audacity download page, scroll down past the installers to the "Additional resources". You'll see a box with a "Link to FFmpeg library". This is where you'll get the add-on program that will let Audacity open your downloaded YouTube video, so you can tell it to make an audio-only file. The link will take you to this page on the Audacity support wiki, which will always have the most up-to-date information on how to install the file you need here.
From that wiki page, follow the link to the actual FFmpeg library. If you're not using an adblocker, be careful not to click on any of the ads showing you download buttons. The link you want is bold blue text under "FFmpeg Installer for Audacity 3.2 and later", and looks something like this: "FFmpeg_5.0.0_for_Audacity_on_Windows_x86.exe". Download and install it. Without this, Audacity won't be able to open MP4 files downloaded from YouTube.
CONVERTING TO AUDIO:
Make sure you know where to find your downloaded MP4 video file. This file won't go away when you "convert" it - you'll just be copying the audio into a different file.
Open up Audacity.
Go to File > Open and choose your video file.
You'll get one of those soundwave file displays you see in recording booths and so forth. Audacity is a good solid choice if you want to teach yourself to edit soundwave files, but that's not what we're here for right now.
Go to File > Export Audio. The File Name will populate to match the video's filename, but you can edit it if you want.
Click the Browse button next to the Folder box, and choose where to save your new audio file to. I use my computer's Music folder.
You can click on the Format dropdown and choose an audio file type. If you're not sure which one you want, MP3 is the most common and versatile.
If you'd like your music player to know the artist, album, and so forth for your audio track, you can edit that later in File Manager, or you can put the information in with the Edit Metadata button here. You can leave any of the slots blank, for instance if you don't have a track number because it's a YouTube video.
Once everything is set up, click Export, and your new audio file will be created. Go forth and listen!
#reference#vlc media player#youtube downloader#youtube#uh what other tags should i use idk#how to internet#long post
178 notes
·
View notes
Note
Called my ageing, takes 10 minutes to run Firefox, windows 32 bit laptop a good girl last night when I was trying to download a rom. Hello objectum community I guess 😭 (she did let me download the rom in the end ty queen)
be niceys to your computer and they will do anything for u <33
20 notes
·
View notes
Text
Alright. I'm making this post because I was unpleasantly surprised to find Microsoft had forcibly downloaded an """"ai assistant"""" onto my computer (called Copilot), and because finding a site that actually told me how to kill it for good -- in clear, truly step-by-step terms -- was way harder than it needed to be.
Preface: this is only relevant if you're running Windows 11.
Here is your target:

If you see this logo on your taskbar -- or... have Edge installed on Windows 11 -- you've got Copilot. You can't delete it on its own, Microsoft has integrated it into the OS as best they can. The most you can do is disable it (instructions for which are at the very end of this post).
So... to REALLY get rid of it you need to uninstall Microsoft Edge, because it's a part of/reliant on Edge. A lot of bells and whistles of Windows are also reliant on Edge, like widgets, but I never use those. I use my PC almost exclusively for gaming, and I don't want this slimy "ai" shit on my computer. I use Firefox anyway. Edge can go die as far as I'm concerned.
Here's the actual steps, copy-pasted from a website that took me way too long to find. It also really makes my browser chug for some reason, which is why I'm copy-pasting the whole thing. If you still want to look at the site itself, put it in reader view as fast as you can (link to site).
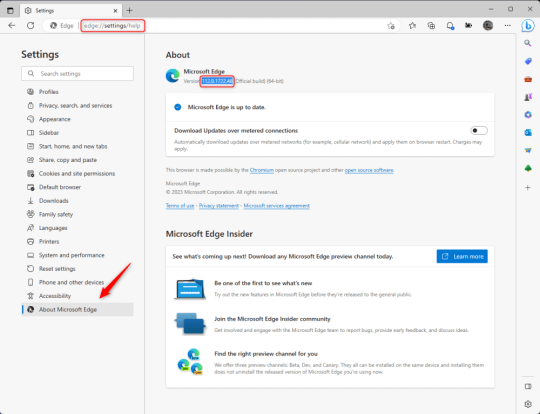
1.) Open Microsoft Edge, type "edge://settings/help" in the address bar, and then press Enter.
2.) Click "About Microsoft Edge" at the bottom of the left-hand pane. Copy the version number at the top of the screen, under Microsoft Edge.
3.) Press Windows Key + S to open Windows Search.
4.) Type "Command Prompt", right-click the result, and then select "Run as Administrator".
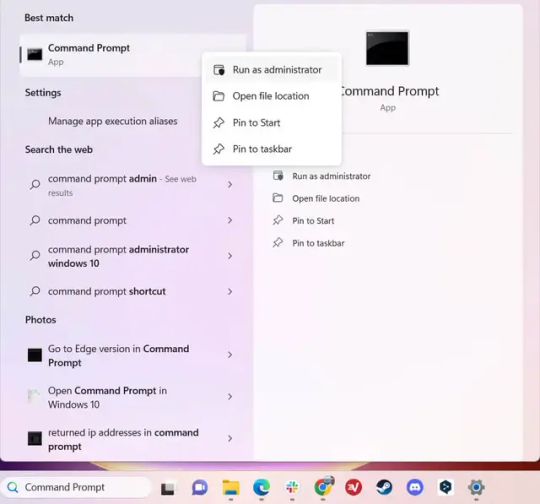
5.) The User Account Control (UAC) prompt will appear. Click "Yes".
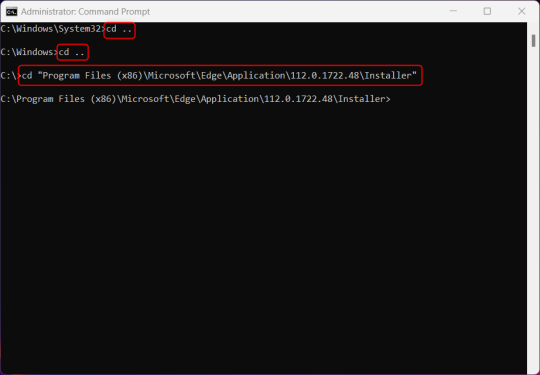
6.) Navigate to Edge’s “Installer” directory by using the cd command. Depending on which directory your Command Prompt opens in by default, you may need to use the "cd .." command to go back a level or two.
Once ready, run this command:
cd “Program Files (x86)\Microsoft\Edge\Application\Version Number\Installer”
Replace "Version Number" with your actual version number copied earlier.
7.) Next, run this command to uninstall Microsoft Edge:
setup –uninstall –force-uninstall –system-level
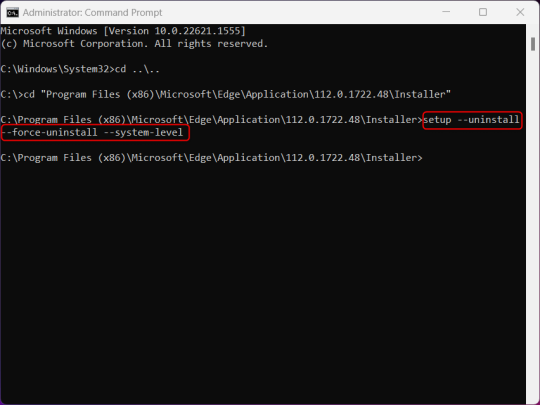
((It will look like nothing happened! Don't worry!))
8.) Restart your PC for the changes to take place.
((HOWEVER, Windows will try to reinstall it the next time your PC updates (or whenever it feels like it lol) so there's a second half to this))
1.) Press Windows Key + R to open Run.
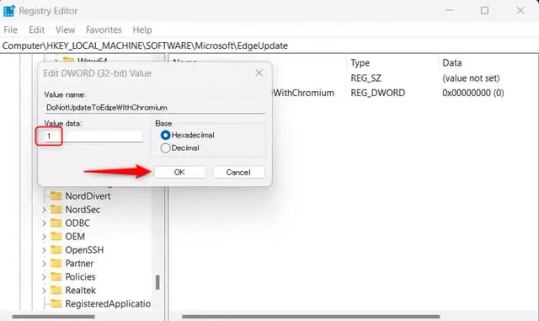
2.) Type "regedit" in the text box and click OK to open the Registry Editor.
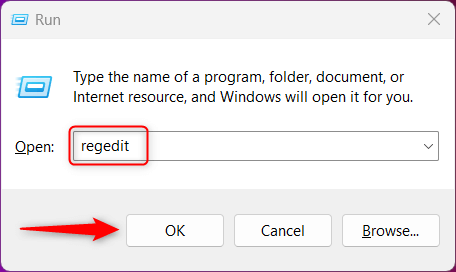
3.) The User Account Control (UAC) prompt will appear. Click "Yes".
4.) In the Registry Editor, navigate to HKEY_LOCAL_MACHINES\SOFTWARE\Microsoft.
5.) Right-click the "Microsoft" folder, hover your cursor over "New", and then select "Key".
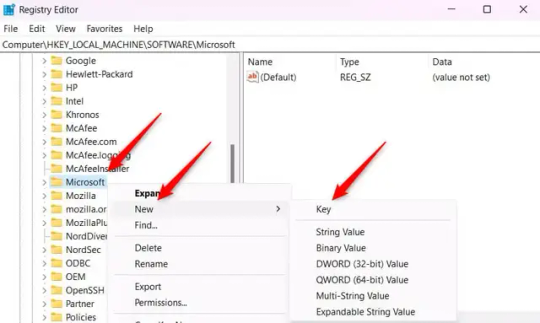
6.) Rename the new Key to "EdgeUpdate".
7.) Right-click EdgeUpdate, hover your cursor over "New", and then select "DWORD (32-bit) Value".

8.) Right-click the new value, which is currently named "New Value #1".
9.) Select "Rename" from the context menu.
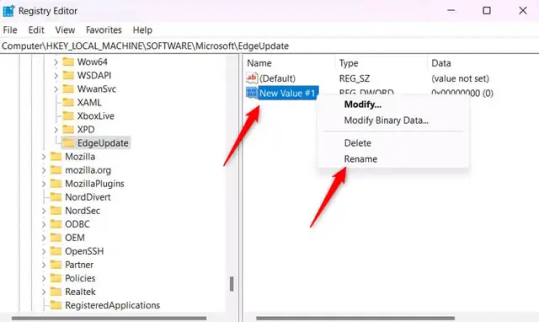
10.) Rename the value to "DoNotUpdateToEdgeWithChromium".
11.) Right-click the newly-named DoNotUpdateToEdgeWithChromium value and select "Modify" from the context menu.
12.) The Edit DWORD (32-bit) Value window will appear. Change the Value data to "1" and then click OK.
((You are now free. If you ever run into a really serious, unavoidable issue with your OS that's clearly a result of Edge being gone, you can redownload it like a regular app. But you should be fine.))
((And, if for some reason you want still want Edge around but just want the copilot thing gone, here's what you do:
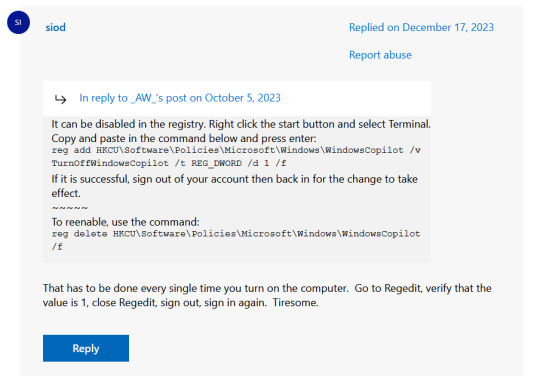
The command, for ease of copy-pasting: reg add HKCU\Software\Policies\Microsoft\Windows\WindowsCopilot /v TurnOffWindowsCopilot /t REG_DWORD /d 1 /f
You can't actually truly delete Copilot (without deleting Edge), only disable it. And as the reply says, you do have to do this every time you turn the computer on. I haven't tested that myself, but I believe it. I assume/hope that excludes just waking the computer up after it goes to sleep, but I don't know for sure.))
119 notes
·
View notes
Note
hi magz, you seem to know a lot about technology. is there any good free anti-virus software you would recommend for the average person to use? no worries if not. thank you
If on Windows 10 - 11 For personal computer (not enterprise n servers) ...
Average Windows user should use Windows Defender and Windows Security (default built-in), turn on setting. update every so- so often. and let run checks every once while.
As Windows default currently better for Personal, than most anti-virus, unlike decade ago - where windows defender was subpar n malwarebites free was best-ish for personal. have change.
most important part actually everything else beside anti-virus !
so follow other digital privacy + safety guides have recommend for other parts. especially for browser n downloads, as that how most malware come thru. (some other reccs should be in magz pinned post, some need update info tho) example:
use adblockers, most recc ublock origin. not adblock plus free version, as those allow ads by companies that pay them. -
Use mullvad browser even if not have VPN, for incognito. -
For firefox users, check "Arkenfox - firefox hardening wiki" especially 'extensions' section (especially especially ublock origin part of 'extensions') - but would not recc average person use arkenfox as-is, just check some infos n change browser few settings that are ok with change. Only use arkenfox.js if really really prefer privacy security more than... anything (not most people). -
n if are worry of security n malware more - use virtual machines on computer or tailsOS on USB stick, whenever do risky stuff. for most virus risk, won't memory of what do, n not infect whole PC. -
edit: oh yah @instantmessage remind. VirusTotal exist for scan malware links, files, n sus stuff. n can be use with browser. (people also use those for send queries on if something for real a virus, on reddit.)
Other operating systems? other time.
58 notes
·
View notes
Text
how to block tags on ao3 permanently (for both mobile and desktop):
1) if you don't already use firefox as your browser, download and switch to it. there's a ton of tutorials out there on it and it's super easy to move your bookmarks and such over, so i won't go into detail on that here. (links: desktop - ios - android).
2) download and add tampermonkey to your extensions.
3) download ao3 savior and ao3 savior config. when you click install script, it should open up a second window with tampermonkey, where you will click install again.
4) the scripts will download really fast. once you're done, check if they downloaded by clicking on the tampermonkey icon on your browser, and then the dashboard. it should show your installed scripts now!
5) restart your browser (close all tabs and/or just close firefox if you're on mobile).
6) reopen your browser and go to tampermoney's dashboard again, where you can see your installed scripts.
7) click edit on the ao3 config *savior* script. the icon should look like a square and pencil.
8) scroll down until you find the tagBlacklist part. there are already three tags added there as an example (['dobby', 'jar jar binks', '*mimes']).
9) get rid of those and add in your own tags, making sure they match the same format as the examples. asterisks work as ANYTHING, meaning that if you never wanted to see [any character]/reader again, you would put '*reader' as a tag. this would also include anything like 'strong!reader' or 'male!reader' though, so be careful with how you word it. here is an example of what my blacklisted tags look like:
tagBlacklist: ['Harry Potter *', 'Reader-Insert', '*Reader', 'Reader*', 'Dean Winchester', 'Sam Winchester'],
10) if you wanted to exclude every [any character]/reader fic again EXCEPT for a certain pairing or fandom, then you'll head over to the tagWhitelist section. here, any tags you add will always make a work shown, even if they contain tags from your your blacklist. you can also do this with authors in the authorWhitelist section!
11) decide if you want to see when a fic is blocked for you/if you want to see why a fic is blocked. if you just want the fics to be hidden without any warning, then change showReasons and showPlaceholders to true. if not, leave it as is.
12) put // in front of any of the sections that you don't want to mess with right now. for instance, if you don't have any authors you want to blacklist, put // in front of authorBlacklist to make sure it doesn't run the examples for now. you can always get rid of the // later on if you want to add something and make it run again.
12) click on file, then save. go over to ao3 and check if the tags you have blocked are hidden. if they're not, move to the next step.
13) if the tags you have muted are still showing up, try changing them a little. for instance, 'harry potter - j.k. rowling' fics kept showing up for me until i changed it to just 'harry potter *'. you should also try restarting your computer/phone to see if that works. if nothing works even after trial and error, feel free to dm me and i'll try to help you out personally!
14) enjoy never having to filter out anything you hate ever again (unless you come across a new tag that you want to add to your block list) :>
the og tutorial i made some tweaks to is here. credits to the author of that one! <3
#ao3#archive of our own#tutorial#ao3 tutorial#fandom things#fandom#writers on tumblr#writeblr#writblr#lumi's posts
5 notes
·
View notes
Note
computer/firefox anon, no questions this time. just my undying thanks! as tumblr users say, i am kissing you on the mouth etc etc. huge thank you to you and everyone else who added stuff in the replies or reblogs — i feel much more confident about this now<33. tldr: y’all are awesome, thanks a bunch!
happy to help! and i think i said this deep down under the read-more in the first response to your Linux ask, but it's worth highlighting--@compusever's advice to get a Windows 10 or 11 Home laptop and do what you can with the privacy settings is not AT ALL incompatible with trying Linux or eventually replacing Windows with it. once you've booted up the computer from an installation USB drive, most distros will offer a temporary "preview" version of the OS that runs from the USB drive without changing anything on the computer. you can try Ubuntu, mess around, see if you like it, wipe the USB drive, put Mint on it, and try that; if you go for the full install you can dual-boot and keep Windows around in hard-drive quarantine in case you need it.
in other words, you don't have to take the entire plunge all at once! but i suspect that if you don't have pre-existing desktop UI preferences, and you strongly prefer a device that won't pester/spy on/micromanage you, a beginner-friendly Linux will be easier to use than any of the current versions of Windows.
btw, here's the install guide for Mint: https://linuxmint-installation-guide.readthedocs.io/en/latest/ compared to the Ubuntu one, which goes out of its way to be friendly and dead simple, the Mint guide is... a lot closer to what you can expect from most Linux tutorials, lmao. i especially love that the very second step explains a bit about why it wants you to check that the file didn't get corrupted in the download process, immediately starts providing commands you can copy into a Linux terminal to generate cryptographic checksums, and only then adds a "how to do this on Windows" link... to a forum post with commands you can paste into a Windows terminal. (meanwhile, Ubuntu gives you a download link and then displays an unobtrusive "here's how to verify the file if you want" with a one-off command and a link to more info.) even the friendliest Linux tends to be built on the labor of absolute nerds who are into this stuff as a hobby, and they are very helpful, but be warned that they often have a wildly skewed frame of reference about what "normal computer use" consists of.
51 notes
·
View notes
Text
what your desktop browser of choice says about you
google chrome: you either started using it due to its popularity or your first device was a chromebook/android phone. you've thought about switching a few times but it sounds like a pain. you don't think about this browser thing much at all
microsoft edge: why should you download something else? it works fine. might've been a bit weird at first, but you've gotten used to it. a browser's a browser.
safari: same as edge, but you buy apple products. who hurt you? did you get peer pressured into the apple ecosystem? or do you have more money than sense?
firefox: you read some posts about how firefox is better and actually made the switch. it wasn't that hard. every night you pray to the ublock origin devs.
internet explorer: you hate change. you haven't even upgraded to windows 10. nobody's taking what you're used to away from you.
opera: you saw some ads for an alternative browser and actually made the switch. it looks nice, you guess. you don't care much about the whole security privacy mumbo jumbo firefox fans talk about, you just think it's neat.
brave: you care about the privacy stuff, but firefox wasn't cool and hip enough for you. chromium isn't a dealbreaker. you might be a cryptobro or a libertarian.
vivaldi: you will design the perfect browser from scratch. you will assemble the perfect aesthetic experience to maximize your enjoyment and productivity. the gods will weep once your masterpiece is finished.
a browser not listed here: well aren't you a little hipster. you love fucking around with your computer to make it just right. you haven't gotten an update in 2 years.
opera gx: Do not interact with me.
19 notes
·
View notes
Note
did you follow any sort of guide when reskinning your computer to vista?
No, but most programs I use have individual guides, Ive put everything below for anyone interested. Make sure to create system restore points before and inbetween, please note Im not a computer guy in the least. I do not have my Windows 10 PC's best interest in mind, and Im actively trying to kill this laptop any way I can.
Start Menu: Vistalike skin on Open Shell. Files are at the bottom of the thread Login: Custom Logon Hook skin for Vista (UNSTABLE, NOT RECOMMENDED. Make sure Ctrl+Alt+Delete is enabled) Theme: Aero10 I use the Vista (shiny) variant. Not compatible with certain screen resolutions. DWMBlurGlass (for window color/opacity) may occasionally stop, I just reapply when it happens. If the program suddenly doesn't open, restarting usually does the trick. Taskbar: StartIsBack for UI, Open Shell for texture + start button. SIB's trial expiration only affects the start menu which I'm already using Open Shell for so its basically free. Uncheck all Switching tab options. For texturing, I just screenshotted a part textured by SIB and made it the taskbar texture on Open Shell. If the taskbar gets mangled for any reason restart File Explorer on Task Manager. Start buttons are an edited version of this, with added space to the right since it overlapped my taskbar items.

Firefox theme: Rinfox only works for Firefox 115/115ESR. Installation guide is in the "rinfox" folder. Extra info. Reshacker directions were in 2 different places so I'll put it all below (RUN AS ADMINISTRATOR):
IE icon (do this first): File > Open > Open firefox.exe > Icon Group tab > Replace icons 1, 2, 5, 32512 with ie.ico either from rinfox's chrome > images folders or just download it online idc Enabling aero: [^ first 3 steps done] > Manifest tab > delete these lines: ```xml <supportedOS Id="{8e0f7a12-bfb3-4fe8-b9a5-48fd50a15a9a}"/> <supportedOS Id="{1f676c76-80e1-4239-95bb-83d0f6d0da78}"/> <supportedOS Id="{4a2f28e3-53b9-4441-ba9c-d69d4a4a6e38}"/> ``` Press compile (Green play button on the right) > Save > Restart Computer
Extras: Win7 tray icons and network flyout (Close enough for me) Customtube / Startube for V3 WLM 2009 Vista Media Player Vista Paint Battery Mode 7 + Taskbar Tweaker Winaero Tweaker (has a lot of Legacy options) Longhorn Sidebar for Rainmeter Windhawk Extentions: Aero Flyout Fix Aero Tray Win32 Tray Clock Experience
#(Smirk) But if a technologically illiterate man such as myself can do it... I believe anyone can#If SIB catches onto the fact Im not paying for their product and puts those gay frowny faces on my taskbar I'll punch my monitor in.
14 notes
·
View notes
Note
How hard is Linux to use?
When I had windows 10 on the laptop I am using to type this right now, my hard drive read as having 24.6~ Gb. 24.6~ Gb was taken up by windows updates and was reserved for updates.
I now have Linux Debian 12. I magically have 21 Gb worth of storage on this hard drive
It took one afternoon and a usb stick to download and use. It was so easy despite what I was doing, although it might have been easier because I told it to nuke all of my old files. This thing could barely run more than one tab of firefox, and now Im running OBS on it. It's so worth your time to get.
6 notes
·
View notes
Note
Also you mentioned a VPN, but are there any free ones? Specifically like a Firefox extension or something like that? I can't pay money for one, and i'm gonna switch to Firefox soon anyways (long story). Also ik I said this before but thx for the kitties :D
I'm not very knowledgeable on PC VPNs but I found this article linking some
What you've got to be aware is that if they're free they're always gonna have limitations.
For your phone I'm only knowledgeable on Android. Opera has a built in limited VPN. It works only on the Opera browser though.
However I've found an app that basically works as a VPN for your whole phone
It's limited in servers and I recommend you keep checking the VPN symbol from time to time as after a while it automatically turns off the VPN I think but it works for all apps that use your location which is really good.
I went looking and found this one that has a bunch more server options
It can have very long ads but that's the price for being free. Using it right now and it works 👍
I've now also tried this third option
At first it may appear like it has more options than the last one but don't be fooled! Most of the servers are premium. It does have better options if you want your location to be the US or Canada but that's mostly it. The Super Unlimited Proxy is better for European server options.
Well that's what I found for free! I hope it helps even if I know it's probable that you have an Apple device instead of Android because that's the US norm. —_—
#ask#Anonymous#VPN#Resources#Also no worries!#Don't be embarrassed by your ask#We all feel down sometimes and it wasn't something bad to vent#I don't feel burdened by your ask. I quite enjoy trying to help people.
51 notes
·
View notes
Text
how to download (and mirror and transcribe) youtube videos
so the news that google is deleting inactive youtube channels was a miscommunication -- "Additionally, we do not have plans to delete accounts with YouTube videos at this time" (source, emphasis mine). but i hope this was a wake up call that archiving videos (and other content) you care about is really important. buy hard drives, save, reshare. videos dont stay up forever. youtube isnt forever.
i know how difficult it is to get into downloading videos, with how all youtube to mp4 websites seem to be broken. this post compiles general guides on how to manually download youtube videos (among other actions) through python programs. it's simple if you just follow the steps and constantly search the errors you encounter. i will also detail how i personally do it with my windows 10 pc, in case you use the same tools.
remember: your search engine, reddit, github, and help commands are your best friends.
* downloading youtube videos
reddit yt-dlp guide
original yt-dlp guide
how to download the best quality mp4
how to download videos from a search result
how to use command prompt
what is command prompt? this is a windows application where you navigate folders and run programs. you just type a command and hit enter. ctrl+c ends a command/program, ctrl+s pauses it (pressing any key unpauses)
how do i navigate folders? the basic commands are so: a) cd "[path]" to change directory (always put path and link names in double quotes so they are processed properly), b) cd .\.. takes you to the previous folder (ex: if you're in C:\folder A\folder B and run cd .\.. you go to C:\folder A), c) you can go to other drives by typing the letter and colon (ex: if you are in C:, typing D: then entering takes you to your D drive). this is important because where your python programs are stored is where you have to run them.
how to run python programs through cmd prompt? a) download the latest version of python. b) use pip to install programs. c) make sure you have also downloaded a program's dependencies (analogous to "pre-requisites"). d) type the program name then the command.
make sure to always update python and pip.
how to use yt-dlp to download youtube videos
how to get download yt-dlp? this guide worked perfectly for me. make sure to download all python programs in the same folder.
navigate to the folder you installed yt-dlp
the following are examples of commands you can use:
yt-dlp -h -- get a list of all commands
yt-dlp "[link]" -- download video as is (often in webm format)
yt-dlp "[link]" -f "bestvideo[ext=mp4]+bestaudio[ext=m4a]/best[ext=mp4]/best" -- download the highest quality mp4 video (highest possible in mp4 is 1080p)
yt-dlp -x --audio-format mp3 "[link]" -- download audio only as mp3
yt-dlp -i "[playlist link]" -- download a full playlist (you may also use the best quality command here)
yt-dlp -i "[playlist link]" --playlist-items [range] -- download range of playlist items
look at the guides at the top of this section for my ideas of what you can do with yt-dlp. you can even use yt-dlp to download from other websites
note: if you want to download instagram reels, you must include: --cookies-from-browser [firefox / chrome / etc] -- choose your browser
** mirroring youtube videos to archive.org
github tubeup guide: "tubeup uses yt-dlp to download a Youtube video (or any other provider supported by yt-dlp), and then uploads it with all metadata to the Internet Archive using the python module internetarchive."
this guide shows you how to install and use the program. this is an easy way to archive videos with the proper metadata -- do not archive videos en masse
the mirrortube archive.org community
*** transcribing videos
transcribing youtube videos w/o downloading: application
transcribing any downloaded video: openai guide
extra1: searching videos
ive seen confusion on how to naviagte youtube search these days. i know!!!! here are some tips:
changing search options to search by upload date shows *ACTUAL* results, rather than suggestions.
the same google tricks work on youtube: google tricks guide
using yt-dlp to search can be helpful to search youtube more precisely
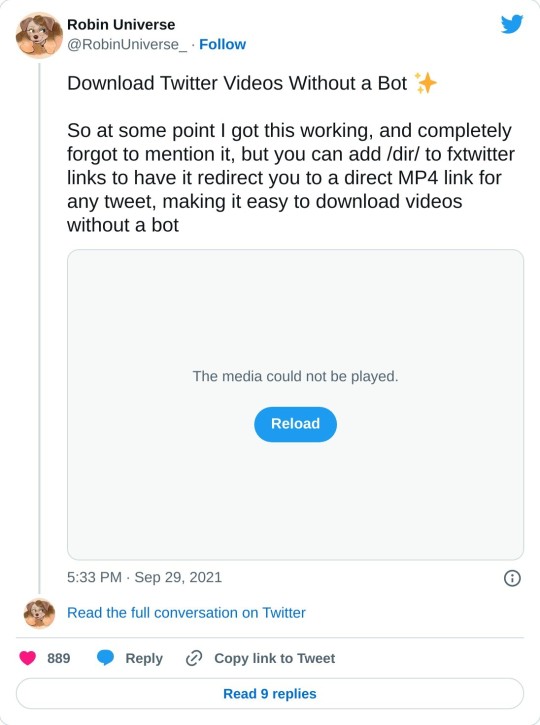
extra2: downloading twitter videos online
i use this regularly, so i thought id also share.
76 notes
·
View notes
Text


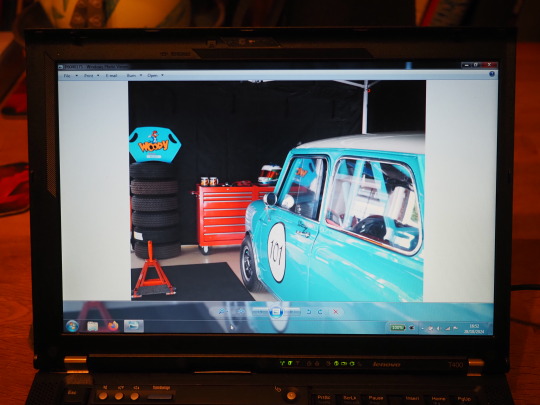


28.10.24
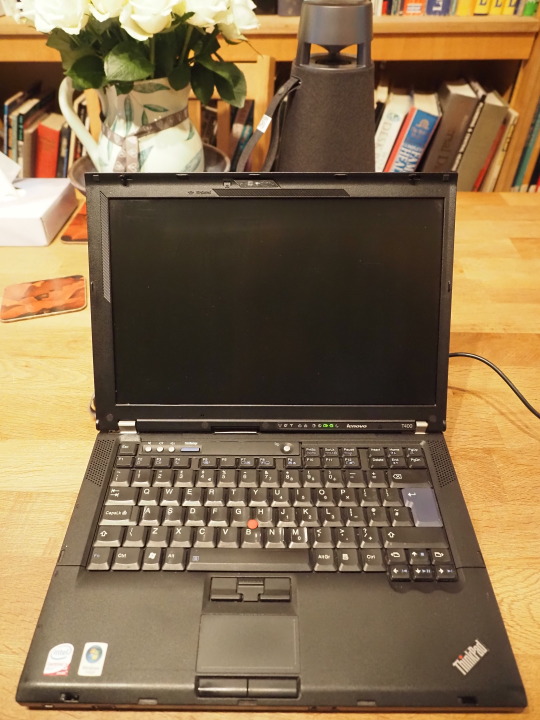
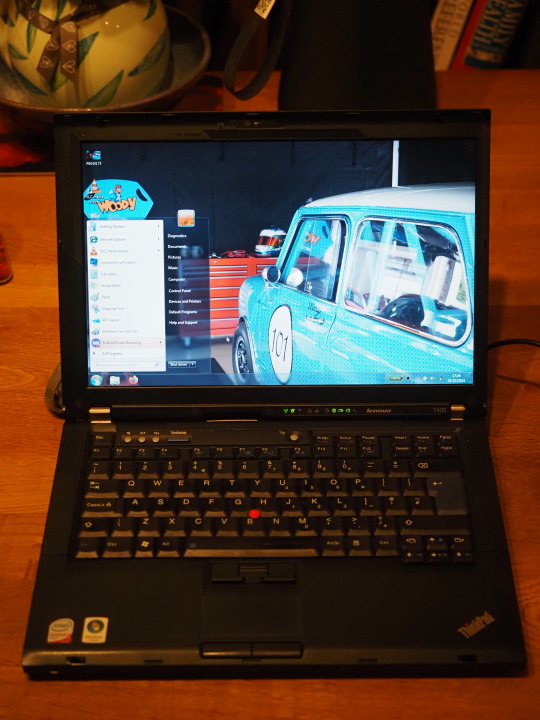
Chris asked me to try and help his friend Woody with a laptop problem.
The laptop, which is a Lenovo ThinkPad T400 from 2008 has been used for car diagnostics for many years.
Woody wanted to upgrade the diagnostic software, but found that the laptop wouldn't connect to the internet.
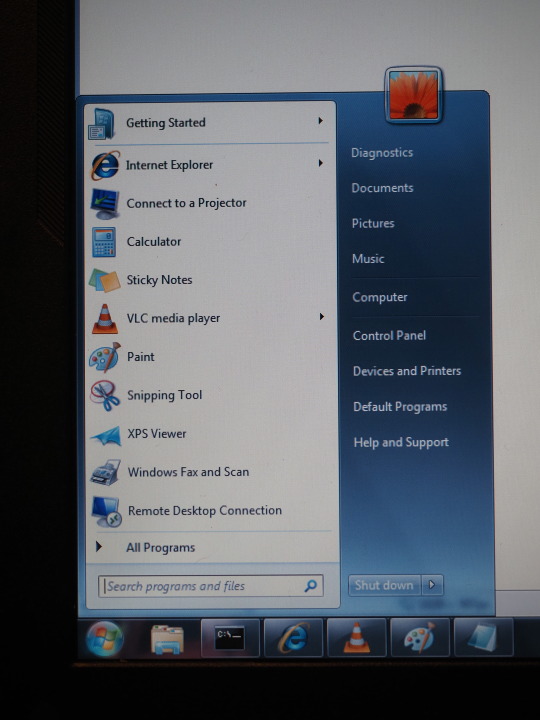
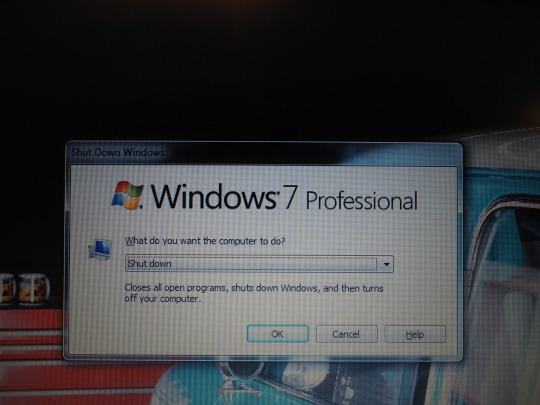
When I examined the laptop, I saw that it was running Microsoft Windows 7, which had never been updated since it was installed in 2015. The machine had previously ran Windows Vista (2007).
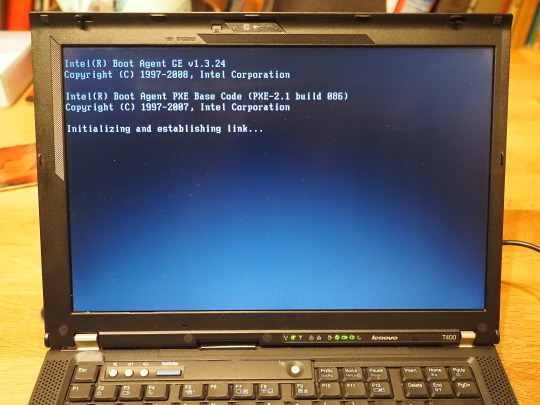
This meant that it was running Internet Explorer 8 which ended support in 2020 and is known to have many security flaws which make it basically unusable.
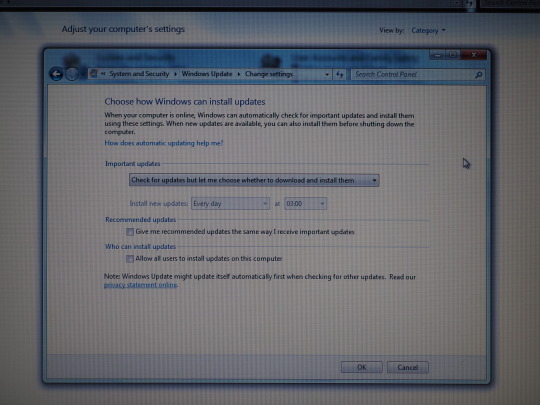
The laptop had been configured to disable automatic update. It is likely that automatic updates would no longer work in any case because they depend on the underline Internet Explorer Browser.
I managed to install a version of Mozilla's Firefox Browser, one that still supports Windows 7 by downloading it onto a USB stick on a different computer.
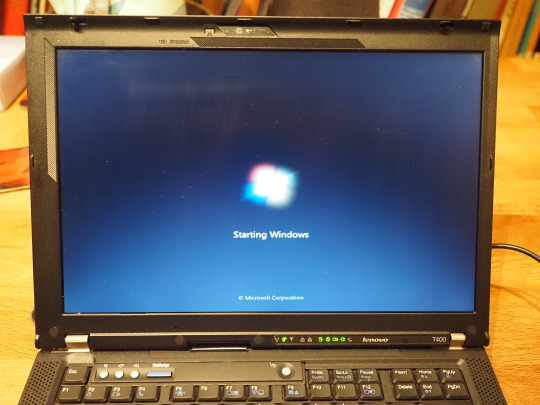
I installed the 32-bit version of Firefox 115 ESR, which is the last supported version for Windows 7. I chose the 32-bit version because this edition of Windows 7 is 32-bit instead of 64-bit.
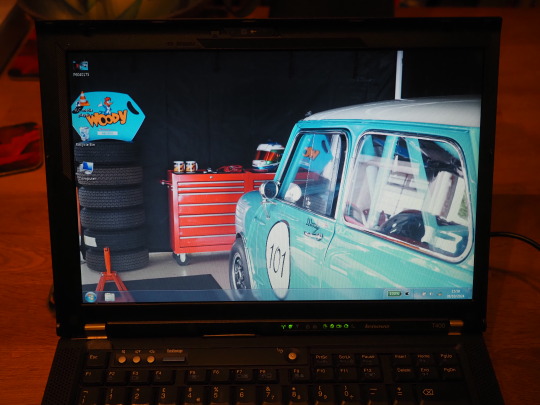
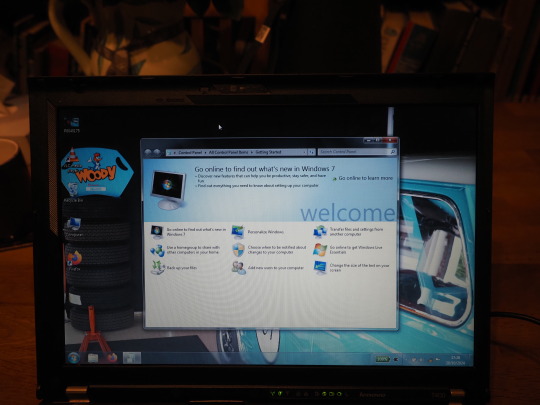
Using Firefox, I successfully connected to the internet and played a YouTube video, which you can see in the video below.
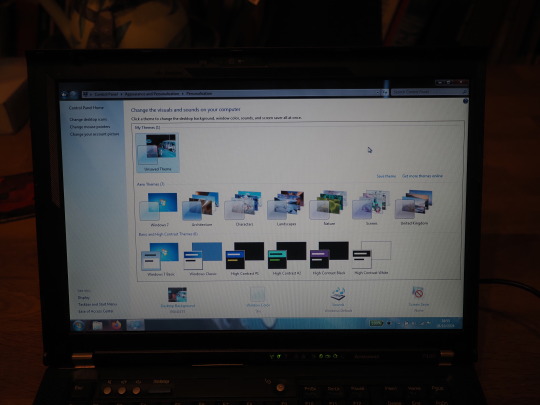
I also had a look at the various themes that the user could apply to the look and feel. Windows 7 was the last version to feature a user selectable Classic theme and system sound effects!
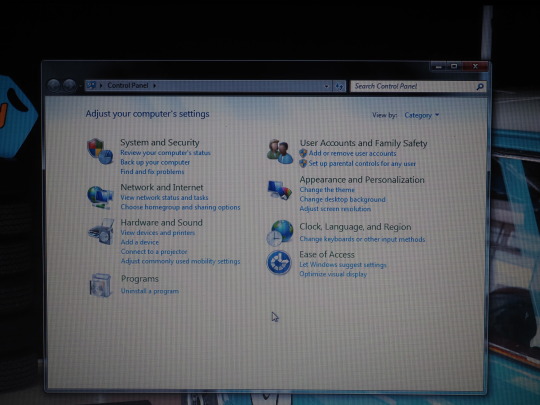
The default theme was called Aero. Also featured in Vista, this theme featured translucency, glass effects that required a decent PC at the time of its release.
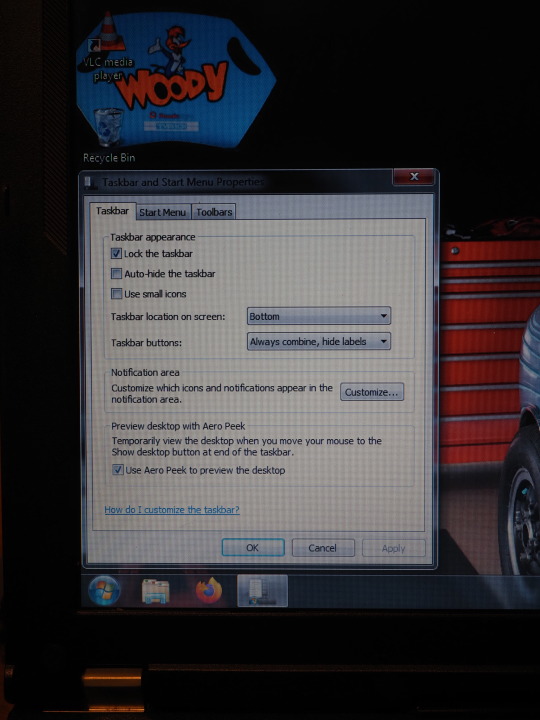
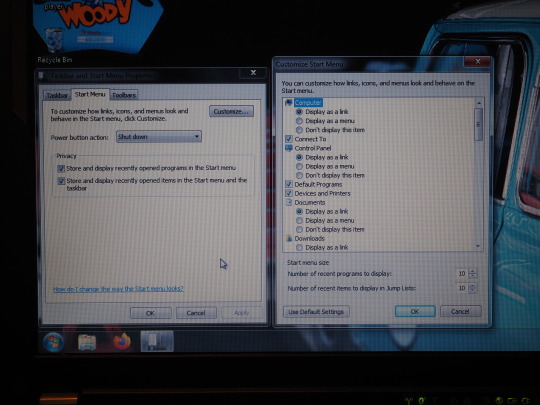
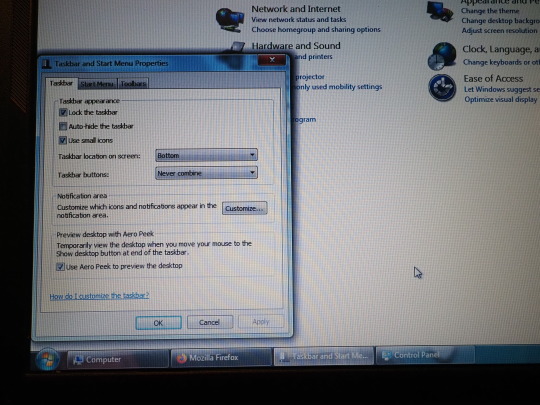
The taskbar in Windows 7 was called the 'Super bar' as it allowed for pinning applications by default and was larger in size than previous versions. This could all be configured in the properties dialogue, which would be moved into the settings in Windows 10.
I gave the laptop back to Chris to give to Woody. He will now be able to download and install the updated diagnostics software.
Ideally, Woody should upgrade the laptop to a later version of Windows such as Windows 8.1 or 10, but even if he doesn't, it should still continue to work provided he does not connect it to the network.
It was fun trying out Windows 7 once again.
https://en.wikipedia.org/wiki/Windows_7
Windows 7 was released in 2009 and was a successful operating system like Windows XP which was released in 2001!
Windows 7 intended to fix the issues in Windows Vista.
Its development started in 2006, with a beta release in 2008 under the codename Vienna. Its first and only service pack (SP1) came out in 2011.
Windows 7 used the Vista kernel, which is still used today as a base for compatibility in all later versions of Windows.
Mainstream support for Windows 7 ended in 2015 and extended support ended at the start of 2020.
Chris took the Lenovo laptop back to Woody and they successfully downloaded the diagnostics software through the Firefox browser and it worked perfectly.
A complete success!
5 notes
·
View notes
Note
You are the mutual I know who uses linux, and I have a half-broken dinosaur of a laptop I want to see if linux would make usable again.
Its 8+ years old, cannot connect to the internet for a reason that may be software related or might not(its a mystery), and has other various issues.
My use of it would Primarily be as a on-the-go text & html editor and if I can get the internet running on it then also firefox as well. Maybe some offline emulation of some older games or a simple linux supported drawing program but that isnt essential.
The question is Thus: If I download a linux mint installer and copy to a flashdrive(presuming you can download the file without it starting to set up the OS instantly), is that all thats necessary to upload linux mint onto a laptop that has no internet capabilities?
Also which version of linux mint should I use? I see there are several. This laptop 3 years ago ran windows 10 ok enough to boot up chrome and use the internet, but now it takes like 15 mins to finish loading enough that you can open programs, as a metric.
Thanks and hope you have a nice day!
Yes, most linux distros will run on a machine that age, and with a surprising degree of vitality. Game emulation should work just fine, unless the computer was very low power even for 2015.
On a mech that old, I'd suggest just checking if the tiny wire for the wifi card has popped loose over time. They are snap-on wire heads that don't lock, so especially with laptops, disconnections like that happen.
Your wifi card should look a lot like this:

I've circled the two tiny ports, and drawn arrows to identify which cables. The whole wifi card will be about an inch across, and is the ONLY thing that uses those kind of wires, so it's very identifiable.
Linux mint is designed to install offline, and includes a wide variety of open source and generic drivers for just.... so much hardware. When you begin installation, it will ask you if you want to use, "third party, private and proprietary drivers." If you say yes, it will want an internet connection to download those drivers. If you say no, it will install entirely offline without issue.
As for which version: the only difference is the visuals. I, personally, like XFCE because it has very minimal visual noise. Everything is simple rectangles with sharp corners and clear boundaries. This lack of visual flair also means it uses the least resources to run the OS, leaving more hardware power available for actual tasks. However, it's a very intimidating desktop. If you liked Windows XP but haven't enjoyed much since, grab XFCE.
If you are a Mac/apple user, I actually recommend Kubuntu instead of Mint, because it has the most similar interface visually and will cause the least transition pains. Kubuntu has equally if not even more robust hardware support to Mint, as both of them are built on top of the Ubuntu framework.
For everyone else, I suggest starting with Mint Cinnamon. I have actually, with no reservations, had way better results teaching confused retirees to run Cinnamon than Windows or Mac. It's a very user friendly interface.
The start bar search, for example, literally just shows results for files/programs installed to your computer, none of this bs about integrated web searching.
As for installation tools:
You must burn the ISO file to the flashdrive as a bootable disk, rather than simply copying the file to it. I'm sure you know that; it's the same for installing windows. But! People often forget that detail and wonder why their computer keeps booting to windows instead of the installation media.
I personally use LiLiUSB because I'm stuck mentally in the year 2014 which is when it stopped updating. For a more sane approach, try Balena Etcher. Or whatever bootable drive software you like; it doesn't really matter. You just need to make the drive bootable before installation.
47 notes
·
View notes
Text

A few small tweaks for anyone like me who's sticking with Windows 10 to make things feel a little less flat, it inherited that design from Win8 and it was boring on day 1.
It's not much but it's nice! Thread below with a few summaries! (messily ported from a bsky thread x.x)
Improved cursors by Posy! These are some of the best - Windows' default cursors are awful.
youtube
As terrible as Win11 is, the new design language is way better than Win10's, and it's a shame Win10X was never released. I use a bunch of icons from 11 and 10X (there are downloads for them all over the place), so for instance that isn't Win11's Paint on the taskbar, that's just Paint .net with a custom icon! There are also some custom icons in the same style made by people on places like DeviantArt.
Some system icons can be changed by IconPackager, it's paid but I did everything in the 30 day trial. My Desktop icon reverted after a Windows update but eh
The taskbar tweaks are Start11 for the taskbar blur, centered icons & Start menu & orb. It's paid; Classic Shell does mostly similar and is free, but different Start menus and no centered taskbar
I also use 7+ Taskbar Tweaker to ungroup programs, min/max with the scrollwheel, and space-out the tray
The widgets in the top left are Rainmeter. The temperature & network widget was customised messily from someone's public script - the temp widget needs another program called Core Temp to run.
The lil desktop Mitch is by @heyitsbumblebee!! there was space on my taskbar & he's so cute!
x.x errata - putting a png on your taskbar CAN be done with Rainmeter, but I think this was actually a custom taskbar texture under Start11 come to think of it
ANYWAY XD
Wanna remove something stubborn like Edge, or Copilot showed up? * Geek Uninstaller Want to use the same mouse & kb on two different computers? * Synergy Animated wallpaper? * Wallpaper Engine Play windowed games with integer scaling? * Lossless Scaling Own the games you buy? * GoG
Why are there two Firefoxes? The first one is Floorp, Firefox fork with Workspaces, just with a custom Firefox icon.
The second is regular Firefox's Private Browsing exe, which I use for searching (I use Startpage over Goog) cos otherwise I never end up closing the tabs. Just ditch Edge!
Xbox controllers work pretty much as-is with most games if you wire them. PS controllers use DS4Windows. I've given up with Bluetooth, just stick a cable in, far more reliable.
Anyway hope this thread of niche QoL stuff helped someone! ^ ^ Win10is still solid, just pretty it up a bit!
6 notes
·
View notes
Text
New employer (bought the company I worked for) forced us to get new laptops running Windows 11 (yuck), won’t let me download Firefox and require us to use Edge (double yuck), won’t let me dig around in the settings to disconnect the stupid search bar from the internet, and insist that it’s normal for the NEW laptop to lose 10% battery in 20 minutes (bc they won’t let me kill all the stupid bloatware).
I hate this.
6 notes
·
View notes