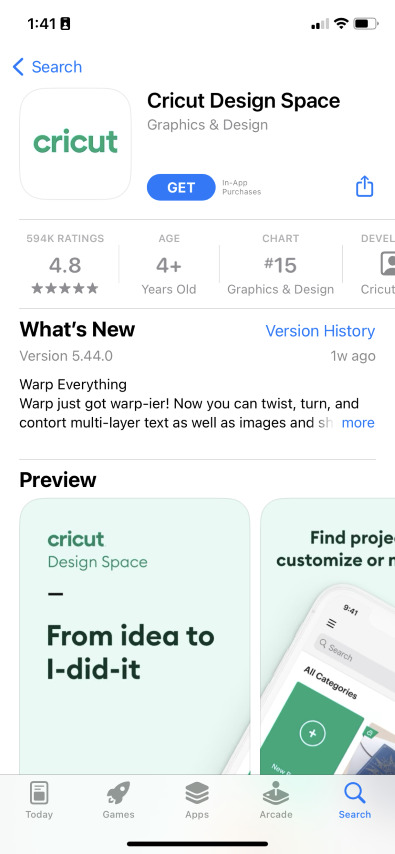
#Download Cricut Design Space
Explore tagged Tumblr posts
Visit Tumblr Blog
Explore Tumblr blogs with no restrictions, modern design and the best experience.
Last Seen Tumblr Blogs


Fun Fact
Tumblr has a low social media market share in South America.
Text
How to Update Cricut Design Space 2025?
Are you a Cricut machine user eager to explore the new updates in its app? If so, then you are in the right place. The new Cricut Design Space update introduces major upgrades to features and the interface, enhancing user-friendliness. In addition, many issues that users were facing previously have also been fixed.
Since the announcement of the update, many Cricut enthusiasts around the world have been looking forward to hearing about the new updates to the app. If you are also one of them, then it would be worthwhile to take a look at the new updates.
Keep reading to get detailed information about everything you need to know.
Cricut Design Space Update: What's New!
Let's take a look at the major changes and new updates in the Cricut app.
In addition, there are some other minor updates you can see in the new update.
How to Update Cricut Design Space app?
These are the methods you need to follow to update Design Space on a computer and smartphone.
Computer
These steps will help you complete the update on both Windows and Mac devices.
Smartphone
With the help of these steps, you can complete the update on Android smartphones/tablets and iPhones & iPad.
Resolved Issues and Updates for Better Crafting
With the new update, ample problems have been fixed to make the app more intuitive and user-friendly. Here are some prominent fixes.
Frequently Asked Questions
How to Download Latest Cricut Design Space?
The brand has recently launched the Design Space for Desktop Beta (v9.8) version. To download it on a Windows or Mac device, you need to update the OS version first, then visit the official website to get the latest driver. In addition, to install the app on a phone, go to the App Store, search for the product, and select Download. Ensure that you are downloading the app only from the official website.
How to Install Latest Cricut Design Space 2025?
Here are the major steps you need to follow to install the app on a Windows system.
How to Download New Cricut Design Space 2025 on iOS?
Follow the below steps if you want to download the new Cricut app on an iPhone or iPad.
Visit: cricut.com/setup www.cricut.com/setup login
Source: https://cricricutdesigncut.wordpress.com/2025/03/20/how-to-update-cricut-design-space-2025/
#design space setup#digital design#cricut setup#cricut setup for pc#cricut setup for mac#cricut setup create account#cricut setup explore air 2 setup#setup cricut design space setup#install cricut design space app#cricut design space app#cricut design space login#cricut design space download#cricut design space setup#cricut design space software#download cricut design space#cricut.com/setup#cricut.com/setup windows#cricut.com/setup explore air 2 setup#cricut.com/setup mac#www.cricut.com/setup#www.cricut.com/setup login
0 notes
Text
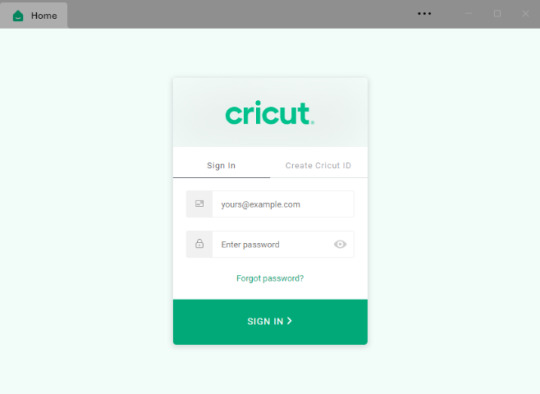
To download Cricut Design Space, visit Cricut.com sign in to your account. Once logged in, navigate to the “Design Space” section or click on “Apps” in the menu. Select “Download” for your operating system — either Windows or macOS. Follow the on-screen instructions to install the software on your computer. After installation, launch Cricut Design Space and sign in with your Cricut ID. This allows you to access your projects, create new designs, and connect to your Cricut machine for cutting, scoring, and more. Make sure your device meets the system requirements for smooth operation.
0 notes
Text
How to Install Cricut Design Space: All Devices Covered!
Are you wondering how to install Cricut Design Space on your device? Well, getting the Cricut software on your compatible device is no longer a daunting task, as I have simplified the process of downloading and installing the app much easier.
Believe it or not, I’ve performed these installation tasks multiple times. Because I’ve been switching my laptops and other mobile devices quite frequently, I have been repeating the procedure. But this repetition has its benefits. That’s why I know the best and easiest way to download the Cricut app, and I’m here to share it with you.
By the end of this blog, you’ll have the knowledge to download and install the Cricut software on various devices. I’ve got you covered whether you’re using a Windows, MacBook, Android, or iOS device. So, let’s get started without any further delay!
How to Install Cricut Design Space on a Computer?
Ready to install the Cricut Design app? Great!!😍 Now, you must know something before installation. I mean, you need to check whether your device is capable of running this software or not. Thus, ensure your Windows or Mac has 4GB of RAM and a 2GB free disk. Apart from these, use the latest operating systems, such as Windows 10 or later and macOS 11 or later. Once your device meets these criteria, you can follow the steps below.
For Windows
Here’s how to download Cricut Design Space on Microsoft Windows:
On your Windows computer, go to the Start menu in your taskbar.
Then, search the browser name you are using.
Now, enter the URL design.cricut.com on the browser search bar.
After that, you will need to press the Enter key on your keyboard.
Next, go to a page where you need to navigate to a checkbox and click on it.
Also, select the Download tab and download the Cricut app immediately.

Once you downloaded the app, you have to go to the Downloads folder.
In order to install it, you have to double-click on it to install it.

Wait until your installation is done. Once done, sign in with your Cricut ID and password.
For Mac
Here’s how to download Cricut Design Space on Mac:
Open the browser on your MacBook and visit cricut.com/setup on the browser’s search bar.
Once you get to Cricut’s page, you should select the checkbox.
Hit the checkbox, and it will activate the Download button.

Next, you click on the Download.
Once downloaded, you have to move to the Downloads folder.
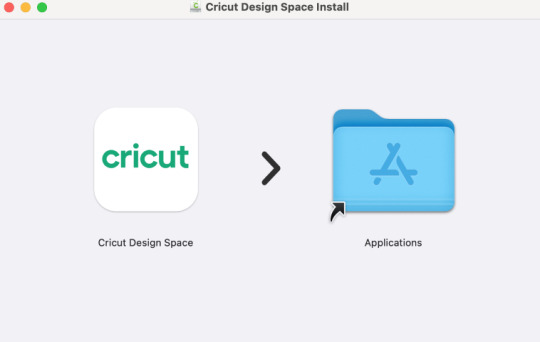
Now, find the .dmg file and double-click on the .dmg file to install the program.
For installation, drag the Cricut icon to the Applications folder icon.
How to Install Cricut Design Space on a Phone?
Thanks to Cricut, you can now use your Cricut software on your mobile device, too. So, whether you are an iOS user or Android, I’ve got you covered! Before you proceed, let me tell you your mobile phone must meet some criteria. For example, if you are an iOS user, you should have an iOS 15 or later version. Besides, use Android 10.0 or higher if you use an Android device. Now, let’s delve into the steps below:
For Android
You need to launch the Google Play Store on your Android to download the Cricut program.
Next, under the search bar, you should type “Cricut Design Space.”
Then, you will need to seek the apps presented in the given result below.
Now, press right on the Install button to get the app on your device.

For iOS
Launch the App Store on your iOS phone and search for Cricut Design Space using the search bar located at the top.

Now, you will find the relevant result in the suggestions below; you have to select the Design Space app.
Here, you should click on the Get tab to install the app.
If prompted, you will have to confirm the download using an iTunes password.
Now, I have explained the steps on “how to install Cricut Design Space” on Windows, Mac, Android, and iOS in a stepwise manner. I hope you found them simple and quick.
FAQs
Question 1: What app do I need to use my Cricut?
Answer: In order to use the Cricut machine, you will need its companion software, i.e., Cricut Design Space. This app is free to download and supports four devices: MacBook, Windows computer, Android, or iOS. However, the software is incompatible with Chromebooks or Unix/Linux computers. The software is a must for Cricut users. Otherwise, you can’t work on your machine.
Question 2: What comes with Cricut Design Space?
Answer: The Cricut app is a platform where users are supposed to create, edit, and modify their designs. However, the software provides 1000+ free access to fonts, images, and ready-made projects. Also, it comes with a Cricut Access subscription, which is not free. Users can buy this subscription to avail themselves of the more advanced projects and other stuff to use in their projects to create masterpieces.
Question 3: What do I need to install Cricut Design Space?
Answer: If you want to download and install a Cricut Design app on your computer and mobile device, then you should have a compatible device. In order to check the compatibility, make sure your computer has 4GB of RAM and 2 GB free disk. In addition, you need the latest operating system running on your system, such as Windows 10 and MacOS 11. Besides, if you are using it on iOS and Android, then you should have iOS 15 and Android 10.0 later.
Final Words
To conclude, I suppose you have understood how to install Cricut Design Space in a couple of minutes. I think it was quite easy to download the software and then install it on the computer. Similarly, the installation steps for phones were also too simple and quick. But always make sure that your device meets the basic requirements for running this software. I have already mentioned them above in the blog; go and check them out.
#DOWNLOAD CRICUT DESIGN SPACE#HOW TO INSTALL CRICUT DESIGN SPACE#INSTALL CRICUT DESIGN SPACE#PROCESS CRICUT DESIGN SPACE
0 notes
Text
Cricut Connect Bluetooth: Easy Guide for Computer/Smartphone
Hey peeps! Are you looking for a Cricut Connect Bluetooth guide? If so, you are in the right place. As you are here, I am sure you recently bought a new Cricut machine. It could be any model, such as Cricut Explore, Maker, Joy, or Venture. That is not a big deal, but the thing is that all of these require you to set up the Cricut machine. And for the Cricut setup, you must first connect it to your device. Although you can connect your Cricut via a USB cord, I will only discuss how to connect Cricut to Bluetooth.
Whether you use a computer or a smartphone, I, as a professional Cricut enthusiast, will cover everything from teaching you the steps to connecting your Cricut to a compatible device. If you are ready, let’s dive in!
Cricut Connect Bluetooth to Your Computer
Are you ready to connect your Cricut to your computer? If yes, make sure your device has a Bluetooth feature. Once you are certain that your device can connect via Bluetooth, follow the instructions below to establish a connection between your Cricut and computer (Mac and Windows).
Windows
Unbox your Cricut product if you haven’t done it yet.
Now, place your Cricut machine on a flat surface like a table or floor.
Then, ensure a distance of 10–15 feet from the computer.
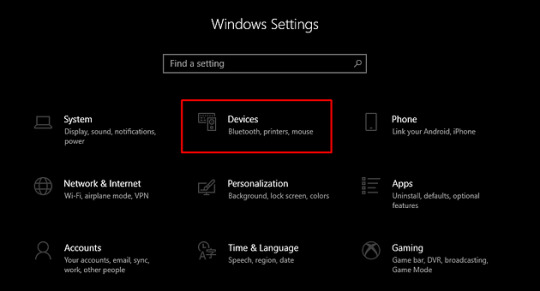
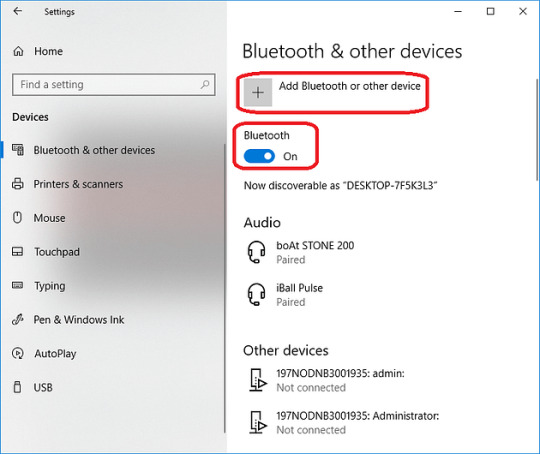
Next, you have to press the Windows + I keys on the keyboard to navigate to Settings.
When navigating to Settings, you have to select Devices.
Now, turn on the Bluetooth.
Then, select the Add Bluetooth or other device.
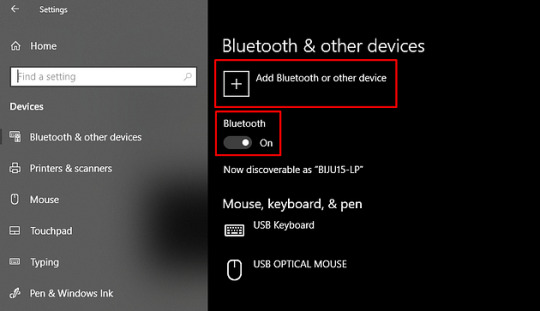
Afterward, select Bluetooth and wait for your Cricut model to be detected on the list.
Once it is detected in the list, select the Cricut model and go ahead.

Finally, you have established the connection on your Windows computer.
macOS
Like Windows, the first 3 steps are the same for all devices.
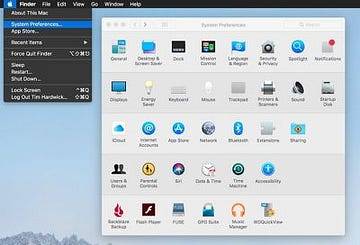
After that, you need to navigate to the Apple menu and choose System Preferences.

Find your Bluetooth option on your Mac.
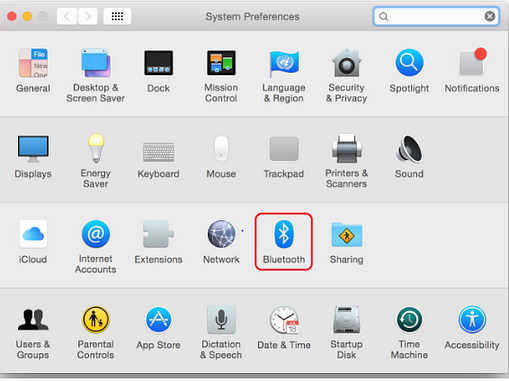
Then, confirm whether your Bluetooth is turned on or not.
Lastly, you have to tap on your Cricut model from the given list.
Cricut Connect Bluetooth to Your Smartphone
Everyone uses different kinds of smartphones. Some people use iPhones, and some still use Android. But can we really use Cricut on our smartphones? The answer is yes. You only have to ensure that your device meets all the minimum system requirements. However, if your device is running the latest operating system, you are good to go. Now, let’s connect our Cricut on Android and iOS using Bluetooth.
Android
To connect on an Android device, you must go to Phone Settings.
Then, navigate to the Bluetooth option.
Now, turn on your Bluetooth to Cricut connect Bluetooth.
Once done, you have to choose the Bluetooth module that is shown on the list.

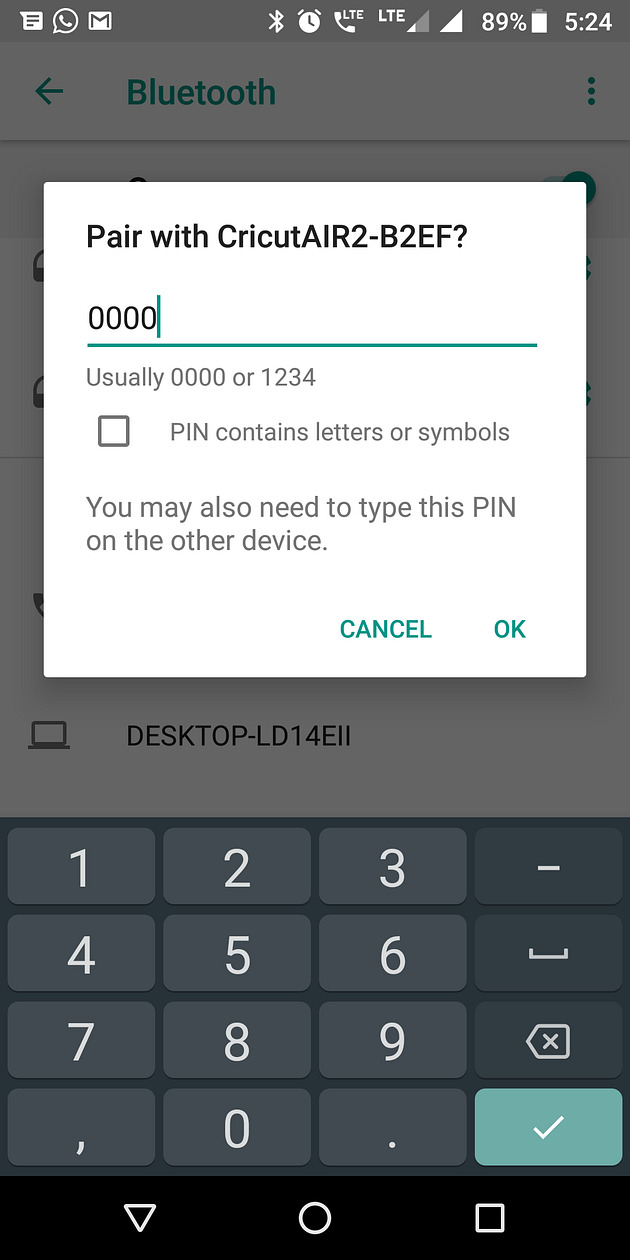
iOS
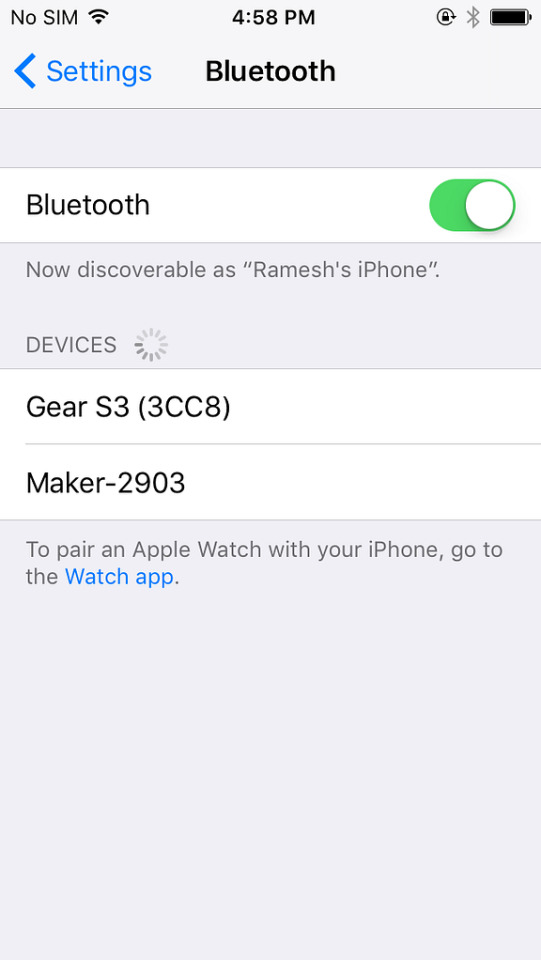
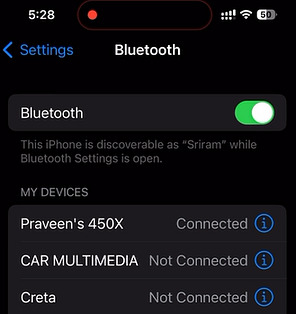
Navigate to your Settings.

Then, turn on the Bluetooth and look for your Cricut machine.
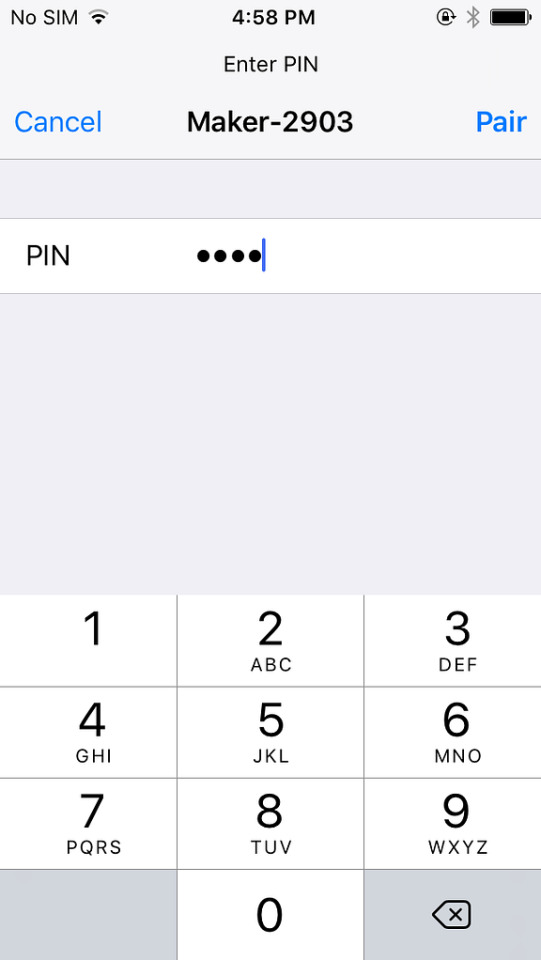
When a Cricut machine is found on the list, you will want to select it to pair.
Then, you have to enter four digits of PIN: 0000.
Lastly, tap on the Pair option.
By now, you should have understood how to connect Cricut to Bluetooth. I have explained the steps for all platforms, including Windows, Mac, iOS, and Android. All the easy steps will be helpful for novice crafters. All the best!
FAQs
Question 1: Why do I need Cricut connect Bluetooth?
Answer: You will need to connect your Cricut to Bluetooth to set up the machine. Setting up the machine is the first step everyone needs to do when getting a new Cricut machine. After setting up the machine, you will be able to use it. In short, you need to connect your Cricut to a computer or smartphone via Bluetooth so that you can control it with a device. That’s all!
Question 2: Why is my Cricut not connecting to my iPhone?
Answer: If your Cricut product is not connecting to your iPhone device, you need to check the following points:
Check whether your device is compatible or not
Verify the distance between your iPhone and the Cricut machine
Check the Bluetooth
Make sure you have the latest operating system on your device.
Question 3: Can I Cricut connect Bluetooth to an iOS device?
Answer: Obviously, you can! No matter which Cricut machine you use, you can connect it to your iOS device using Bluetooth. Bluetooth is the only way to connect your mobile device; otherwise, you can’t connect it using your USB cable. In a nutshell, you can easily establish a connection between your Cricut and iOS device via Bluetooth.
Source: Cricut Connect Bluetooth
Visit here For more Information: cricut.com/setup
You tube
Pinterest
#Cricut Connect Bluetooth#how to connect cricut to Bluetooth#cricut.com/setup#cricut explore 3#download cricut design space#design space cricut#Cricut design Space
0 notes
Text
How to Pair Cricut to Phone: A Step-by-Step Guide
Since my college days, I was an over-enthusiastic kid who loved taking up challenges, and that’s when my teacher introduced me to the Cricut machine. For the past few years, Cricut Inc. has been manipulating the market by producing high-quality crafting machines and other essential supplies. All of their models come with sharp blades that can cut around 100 to 300+ materials within a few minutes.
To make the DIY ideas a reality, users need to download Cricut Design Space on their devices and connect both devices. Cricut cutting models are compatible with Windows, Mac, iOS, and Android devices. Before starting any project, users should have all the details on how to pair Cricut to phone. Stay tuned to this blog till the very end as you will get the entire process of connecting a Cricut cutting machine to a smartphone wirelessly.
How to Pair Cricut Machine With an Android Device?
One of the common features of all craft plotters is that they come with Bluetooth connectivity features. It simply means that the user can pair the devices with each other without a USB cable. If you are an Android user but don’t have any idea about the wireless pair process, take a look at the steps written below:
In the opening stage of how to pair Cricut to phone, check that your machine is on and under the range of 10-15 ft of your mobile device.
After that, unlock or turn on your phone and scroll down its home screen.
Now, hold on to the Bluetooth icon for a few seconds, and if it is off, then turn it on.
Next, you will get to a list of devices shared under the Available Devices section.
Then, choose your Cricut model and enter your PIN code (if asked).
After entering the code, click OK and wait for a few minutes.
Finally! Your device pairing is now complete, and get your favorite designs from your Cricut machine.
How to Pair Cricut to Phone (iPad/iPhone)?
Just like the Android device, iOS users can also pair up their device with a Cricut cutting machine within a few seconds. Intending to learn to pair the Cricut machine to a phone, they need to have a look at the details given below.
First, unbox your Cricut product and keep it within a 10-15 ft range of your iPhone.
Second, switch on your mobile device and open the Settings tab.
After the tab is open, select Bluetooth and enable it.
Following this, choose your Cricut product name from the list under Devices.
Now, enter the PIN code (0000), click the Pair option, and your pairing will be completed.
With the help of the above-said details, everything about pairing mobile devices with craft plotters via Bluetooth must have become clear. In addition, the user also had the chance to pair the devices via a USB cable. To learn the accurate process, refer to the section below.
How to Pair Cricut to Phone Using a USB Cable?
In addition to the post, the DIYer also got the option of pairing up their mobile device with Cricut with a USB cable. To smoothly finish the process, they need to follow the steps given below:
The first step of the process is to unbox the USB cable and craft machine.
Afterward, take the one end of the USB cable and insert it inside your mobile USB port.
Now, insert the other end of the cable into your Cricut machine very carefully without damaging the wire.
Next, turn on your craft machine with the power button lit up white.
At this point, you need to go back to the Cricut New Product setup page, and your devices will be shown as paired.
Conclusion
To make the best quality DIY projects, all the users must have complete knowledge of how to pair Cricut to phone. There are two methods by which the user can pair up their devices (wired and wirelessly) with a snap of a finger. Without a doubt, they need to be very cautious while pairing up the devices and making any DIY project out of it.
Frequently Asked Questions (FAQs)
Question: Why Is My Cricut Not Connecting to My Phone?
Answer: Here are the solutions you should follow to resolve this problem:
Check that your phone is connected with a stable WiFi connection without any signs of loose wire connection.
You are choosing the incorrect machine while connecting it to Bluetooth.
Check that your device is fulfilling the system requirements and insert the USB cable properly inside the port.
Question: What Projects Can I Make With My Cricut Machine?
Answer: The list of do-it-yourself projects that your Cricut machine will be able to make out of various materials are as follows:
T-shirts
Cards
Mugs
Tote bags
Hats
Coasters
Wood signs
Banner
Photo prop
Question: How Do I Pair Cricut Machine to My Android Device?
Answer: Take a quick scan at the blow pointers to come across the steps of pairing Cricut with an Android device:
Check that your craft plotter is on and within 10-15 ft of your mobile.
Now, go to Settings and enable your device’s Bluetooth.
Following this, choose your model name from the list and enter the PIN code inside the blank.
Read more: install cricut design space app
Cricut.com setup windows
cricut.com/setup mac
Source: how to pair Cricut to phone
#how to pair Cricut to phone#cricut.com/setup mac#Cricut.com setup windows#install cricut design space app#www.cricut.com/setup login#cricut design space download#download Cricut Design Space
0 notes
Text
How to Make Cards on Cricut Maker: A Complete Guide
If you haven’t tried creating stunning cards with your Cricut Maker machine yet, now is the time to start! This guide will show you step-by-step how to make cards on Cricut Maker. It is perfect for beginners and covers everything you need to know to get started with card-making.
When I first got my Cricut Maker, I felt a little daunted by the idea of making cards. But after learning the process, I made over five cards in just one weekend, and it was a blast! Over time, I have discovered a lot of tips and tricks for card-making with Cricut, and I will be sharing them all with you in this guide.
I will cover how to use Cricut Design Space to design your card, what supplies and tools you'll need, and step-by-step instructions for making the card. Just follow along with the guide until the end, and you will be all set!
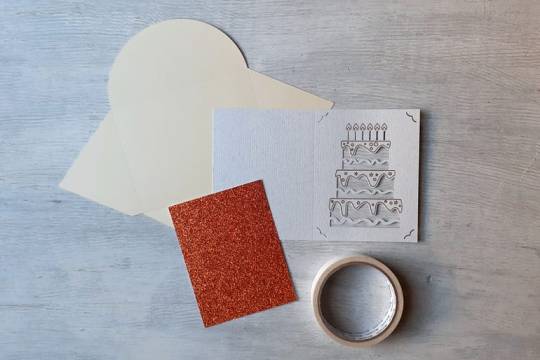
Step 1: Supplies and Tools Required
Here are the main supplies you will need to create cards with your Cricut Maker machine:
● Cricut Guide
● Cricut Maker
● Cardstock (white, copper glitter, and cream color cardstock)
● standard grip cutting mat
● Adhesive or double-sided tape
● Cricut Fine Point Tip
● Cricut Design Space
Now that you have collected all the essential tools and materials to make your Cricut paper card at home let's move on to the process of creating this project.
Step 2: Upload an SVG Card Design to the Cricut App
As explained below, you have to use the Cricut app to learn how to make cards on Cricut Maker.
First, download and unzip an SVG of the card design, then open the Cricut software.
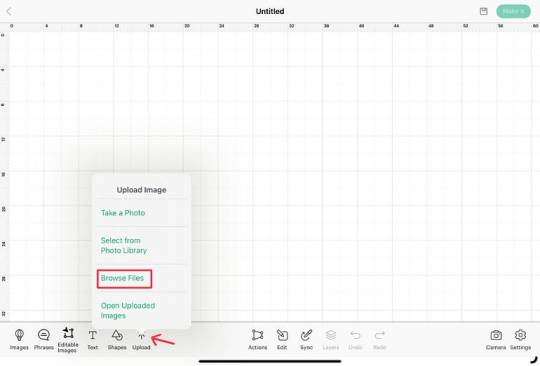
After completing the process of uploading an SVG card design in the Cricut Design app, now proceed to the following step.
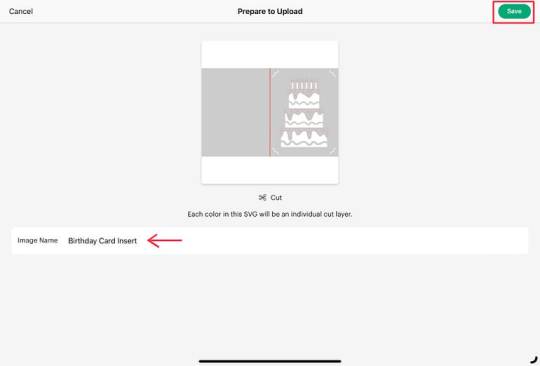
Step 3: Change the Cut Score and Pen Settings
Let’s make some changes before sending your design to cut.
Tap the Layers panel and select the title that shows the cake tires. After that, open the Edit menu and then choose the Basic Cut>Pen option from the drop-down menu.
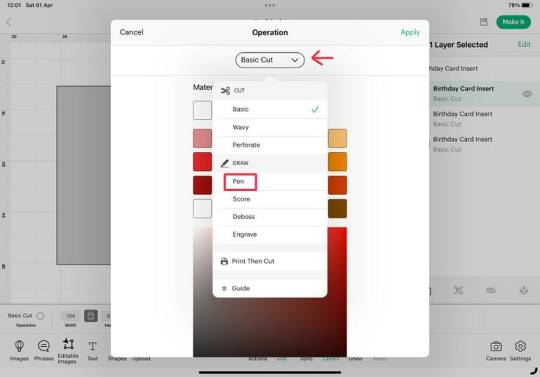
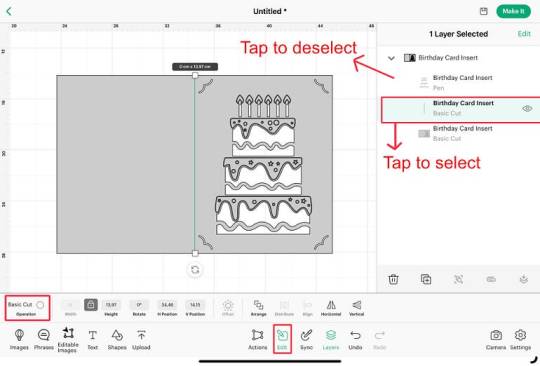
3. Select the entire design and tap the Attach button from the Layers panel. Once everything is in place, click Make It.
Once you have adjusted your settings according to your DIY project, you can proceed to the next step.
Step 4: Cut the Card Design on Your Cricut Maker
To learn how to make cards on Cricut Maker, follow these steps to select the appropriate cut settings and load materials onto your machine.
After tapping the Make It button, select the Mat option if prompted.
2. After that, select the option Browse All Materials and search for cardstock.
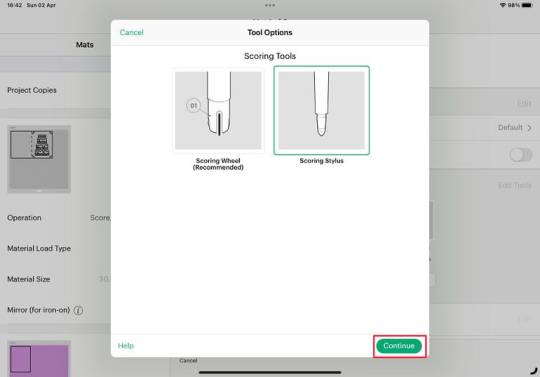
4. Follow the prompts to load the stylus into Cartridge A and the Fine Point Blade into Cartridge B.
5. Insert the cardstock onto the cutting mat and press the “C” button to start cutting.
After cutting the card design on your Cricut Maker machine, proceed to the next step to complete the procedure for this project.
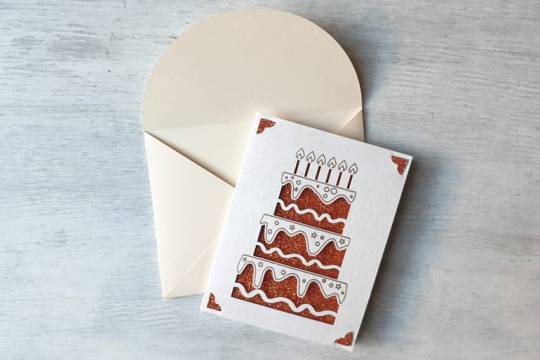
Step 5: Assemble the Card
So far, I have almost covered how to make cards on Cricut Maker. Let’s finalize the card. First, fold the card right side out from the score line.
Apply the red cardstock on the card.
2. Use the Cricut trimmer to cut cream-colored cardstock to create an envelope.
Final Words
The Cricut card project is incredibly popular for different occasions, like birthdays, weddings, anniversaries, etc. Anyone with a Cricut machine will likely want to make cards. If you’ve followed this guide from the beginning, you now have a good idea of how to make cards on Cricut Maker. Keep practicing these instructions to create card projects on Cricut Maker like a pro!
Frequently Asked Questions
Can you make a card on Cricut without a mat?
Yes, you can make your favorite card without a mat on Cricut Maker; you just have to follow the instructions below.
First, insert the desired card design into the Cricut Design Space.
2. After that, select the size of the card design and click on the Make It option.
3. Then, choose without a mat, and then Browser All Materials & Cardstock.
4. Finally, cut out the design with a Cricut Maker and assemble it.
How do I write on a card with Cricut Maker?
You can try following these steps to write on the card with Cricut Maker:
Open Cricut Design Space, select the font and type your text.
2. Change the Material Load Type to On Card Mat and select the material.
3. Insert the Cricut pen into clamp A and start writing.
Can I use the Print Then Cut function on Cricut Maker to make cards?
Yes, the print-then-cut function on the Cricut Maker is perfect for creating colorful designs on your cards. Simply create your design in Cricut Design Space, select Print, then Cut, and print out your design. After that, cut it out and assemble the parts to create your cards.
Source: how to make cards on Cricut Maker
how to make a card on Cricut
Visit here For more Information: Cricut.com/setup
Cricut explore 3
download Cricut design space
#how to make cards on Cricut Maker#how to make a card on Cricut#cricut.com/setup#cricut maker 3 bundle#cricut explore 3#design space cricut#download cricut design space#2024
0 notes
Text
8 Best Cricut Pens to Enhance Your DIY Projects
To complete any project, all crafters must have the best Cricut pens. That crafting item will help you give a personal touch as it will highlight every aspect of the project. Being an experienced crafter, this crafting tool plays the same role as others, creating projects that look more attractive and eye-catching.
To brush up on the creator's skills, the company keeps launching new pens with several features that make them unique. They have these crafting supplies for every task, whether writing or drawing. Apart from that, their Cricut pens are compatible with all craft plotters and work on all kinds of fabrics.
Want to learn more about this crafting time? Then you should probably check this guide, as it will help you see new models.
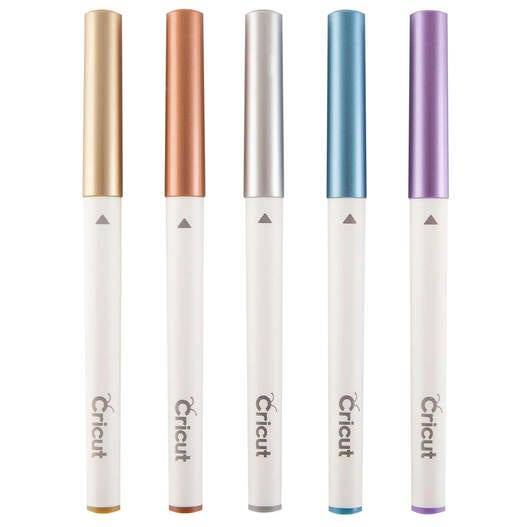
1. Pen Set, Metallic (5 ct.)
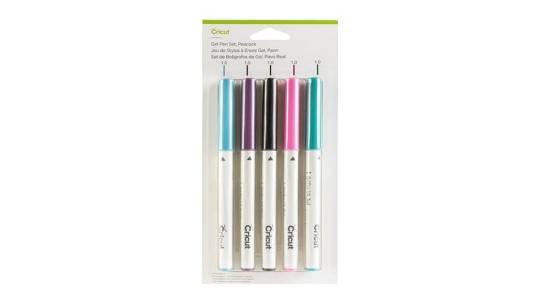
2. Gel Pen Set, Peacock (5 ct.)
3. Opaque Gel Pens 1.0 mm
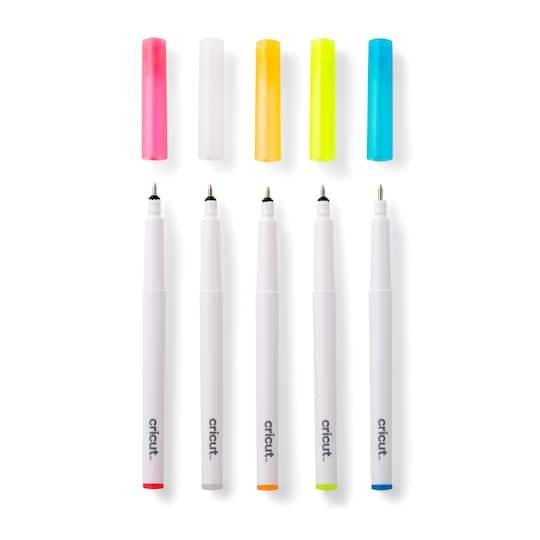
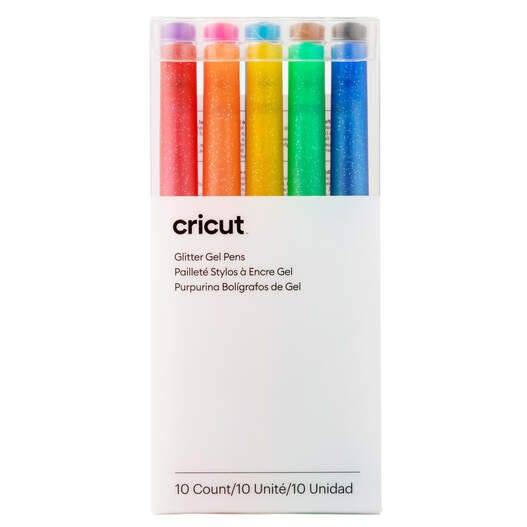
4. Glitter Gel Pen 0.8 mm, Rainbow (10 ct.)
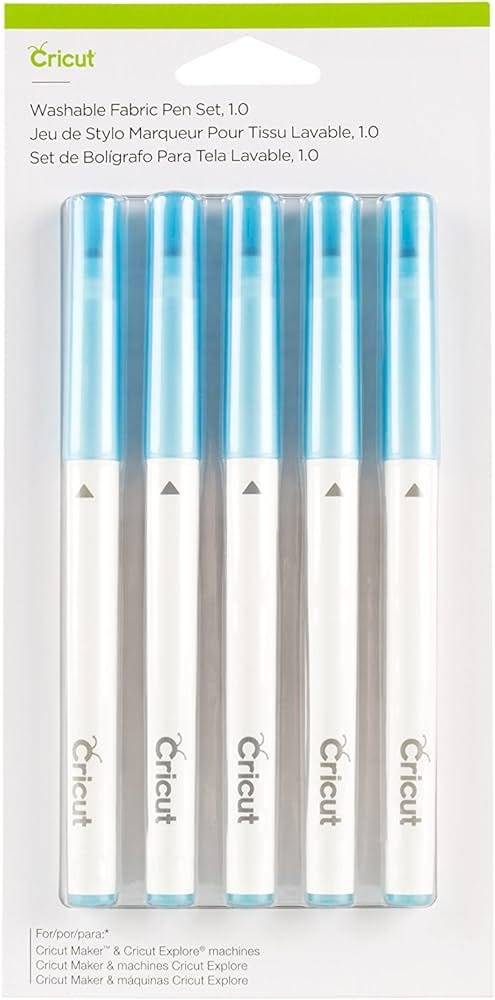
5. Washable Fabric Pen Set
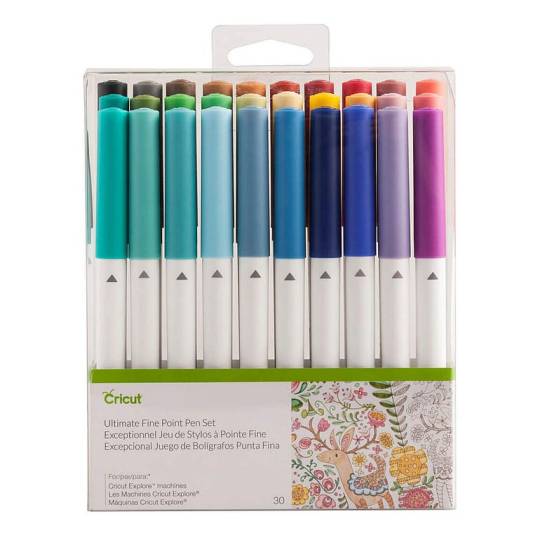
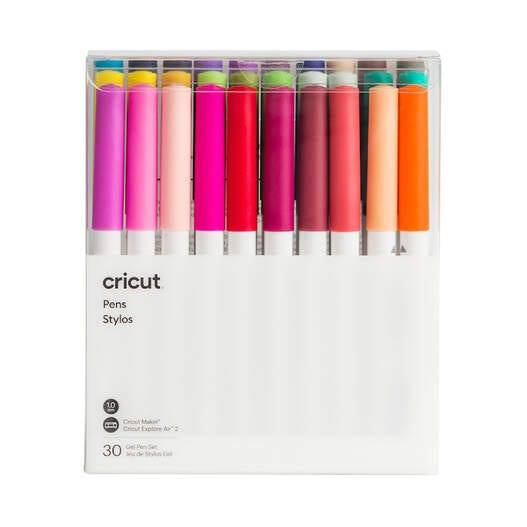
6. Ultimate Fine Point Pen Set (30 ct.)
7. Ultimate Gel Pen Set (30 ct)
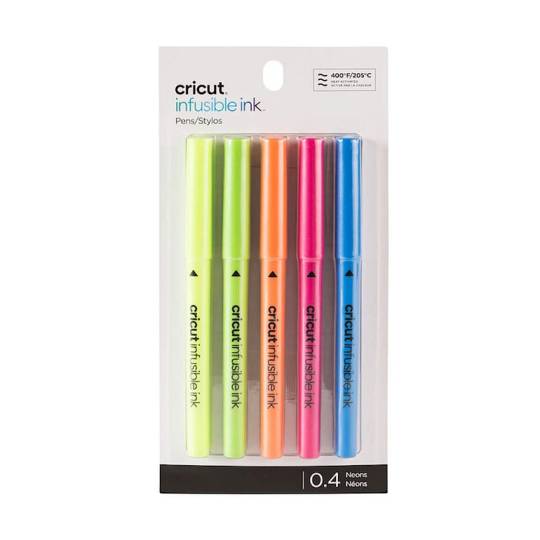
8. Infusible Ink Pens (0.4), Neons (5 ct.)
It was fun to learn something new about one of the crafting supplies as it will help you make the DIY craft more fun and easy. However, you will decide which model to use while making any craft. Moreover, you should also choose the correct one among the best Cricut pens list.
Frequently Asked Questions
Question: How Do I Insert a Pen Inside My Cricut Machine Clamp?
Answer: Go through the process and learn about inserting a pen inside the Cricut clamp:
1. Unlock the clamp by pushing it upwards and then remove the pen cap.
2. After that, slowly insert the pen and ensure it is placed correctly inside the clamp.
3. Lock the clamp and start your cutting machine for designing and writing purposes.
Question: How Should I Store My Cricut Pens?
Answer: Follow these tricks to store the pens and to increase the Cricut pen’s life: 1. Cover the pen with its cap and keep it upside down after using it.
2. After that, store it inside the organizer in the correct position without forcing it.
3. Don't mix the pen with sharp items; otherwise, it will damage the outer side.
Question: How do you use Cricut Pens on Pillow Cover Blanks?
Answer: Follow the steps and make the design with the best Cricut pens on pillow cover blanks:
First, draw your design on Cricut Design Space and cut it with the cutting machine.
2. Second, prepare the blank by setting the temperature and timing and applying the design on the blank.
3. Third, cover the design with butcher paper, and when the heating is complete, enjoy your fully-designed pillow cover.
Source: Best Cricut pens
Visit here for more Information: cricut.com/setup
Cricut maker 3 vs explore 3
design space Cricut
#best Cricut pens#cricut.com/setup#cricut explore 3#download cricut design space#design space cricut#2024
0 notes
Text
How to Install Cricut Design Space App? [Ultimate Guide]
The Cricut app is of great importance to Cricut machines. Since the Cricut is a lovely DIY cutting machine, users should know what it takes to set up a brand new Cricut machine. So, hello, you all are here to learn the connection process for the Cricut product. I am a daily crafter, and I often need to set up my brand-new Cricut machines. Therefore, I came up with this guide to teach you the steps involved. So, I will explain how to install Cricut Design Space app on your operating system.
To learn more, read this entire blog and try installing the software yourself. Let me tell you briefly about the Cricut app. This app or software is a Cricut product that you must download and install on your device to access your Cricut machines. Without this, you can’t set up your machine.
How to Install Cricut Design Space on a Computer (Windows/Mac)?
First, we will discuss the installation of Design Space on computers such as Windows and Mac. Since users commonly use the desktop, these steps will be easy to perform. Let’s have a view.
The first step is to check if your devices have a stable internet connection.
Then, navigate to the cricut.com/setup on a suitable internet browser.
Now, find your Design Space app as per your operating system.
After that, you’ll see a window with a Download option; click on that option.
Next, let the app complete downloading.
Then, visit your Downloads folder to get the Design Space app.
Move to the folder and double-click on the file to extract it.
Allow the installation to run.

Next, sign in to your Cricut account with the help of your Cricut ID.

If you are a beginner, you must create a new Cricut ID.
Finally, the Design Space app will be added to your desktop. Then, you can proceed with your machine and start your first cut project.
How to Install Cricut Design Space on a Mobile (Android/iOS)?
After the desktop, it’s time to learn about the Design Space’s installation on a mobile device such as your Android or iOS. So, if you want to set up the Design Space on a mobile device, follow these steps.
First, move to the App Store or Play Store on your Android or iOS device.
Then, search for the Cricut Design Space app in the search bar.
Now, click on the Get/Install button for the app to download.
After that, your app will download on your Android/iOS device.
Next, launch the Cricut app when it is finally installed.
Now, sign in to your Cricut account by using your Cricut ID details.
New users should create a new Cricut account if they don’t have one already.
These are the simple steps on how to install Cricut Design Space on your mobile device. That’s how you can get the Cricut app on your mobile.
How to Setup Cricut Machine on Your Computer (Windows/Mac)?
Before starting to use your Cricut app, you are required to set up the Cricut machine so that you can install the app and use your devices effectively. So, below are the simplified steps to set up your machine on a computer device.
In the first step, connect your Cricut craft machine to a power supply.
Then, power on your Cricut machine.
Now, you need to connect your machine to your computer, such as Windows or Mac.
After that, select a connection method to connect both of your devices- USB or Bluetooth.
Next, heat to an internet browser and navigate to the cricut.com/setup website.

Finish the setup by using the on-screen directions.
Lastly, use your Cricut login ID to log in to the Cricut software.
When you are done with that, you can try a test cut with your Cricut machine. If you want to learn more about the machine, you can move to the cricut.com.
How to Setup Cricut Machine on Your Mobile (Android/iOS)?
If you want to set up your Cricut product on a mobile device, you can do it easily by downloading a Cricut app. Let’s see how.
Initially, connect your Cricut machine to a power source and power it on.
Then, move to Google Play or the App Store on your mobile device to install the Cricut Design app.
Now, open the app once it’s installed.
After that, use your Cricut ID and password to sign in to your Design Space.
All the beginners can create a new Cricut account if they don’t have one.
Next, go to the menu and tap on the Machine Setup option.
Then, choose your Cricut’s model to continue.
Go with the on-screen directions to complete the setup.
When you are done with the setup, your Cricut product will tell you that the setup is finished, and you can continue for a test cut.
Conclusion
You learned how to install Cricut Design Space app on your desktop or mobile device. You can use these steps to set up your Cricut machine. Cricut has its own website, cricut.com/setup, which is dedicated to the Cricut app. You can visit the official website and download the Cricut software. You can use it on all devices except for Chromebooks. So, when you know everything about the setup, go ahead and create a test cut with your Cricut using the Design Space app.
Visit - Cricut.com/setup
Install cricut design space app
Cricut Design Space
Cricut.com setup mac
#cricut.com setup mac#cricut design space login#cricut design space download#cricut design space app#cricut design space setup#cricut.com/setup mac#cricut explore air 2#how to setup cricut explore#cricut design space for mac#cricut new machine setup#Install Cricut Design Space App#How to Install Cricut Design Space App#Download Cricut Design Space#Cricut Design Space App
0 notes
Text
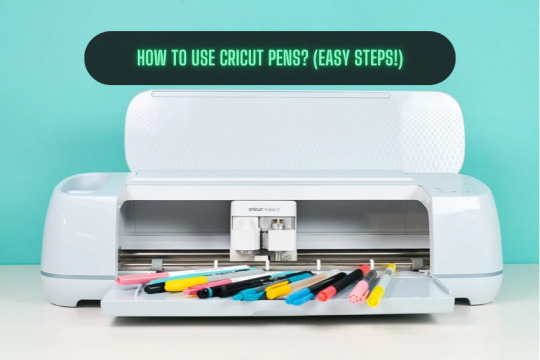
How to Use Cricut Pens? (Easy Steps!)
If you are a Cricut user, then surely you know that this brand makes some smart tools and machines. You know about its capabilities and how useful it is. But did you know that apart from cutting materials, you can use pens to simplify the crafting process significantly? But how to use Cricut pens? Cricut machines are not only used for cutting different shapes out of paper or vinyl. These machines use pens to create doodles, illustrations, and intricate designs. However, you need to know some basic steps you need to perform when you are designing your projects to make them better.
Using the pens is easy and straightforward, but the important thing is that you know the process. Read this blog to discover all about Cricut pens and what projects you can make with them.
What Types of Cricut Pens Are Available?
All of the current Cricut machines can use a pen, whether Maker, Explore, or Joy. The Maker and Explore machines have interchangeable pens, and Joy has a lineup of small pens. Joy pens are incompatible with other machines due to their unique, smaller size. Before you proceed with how to use Cricut pens, here is the list of pens that you can use with the machine:
Fine Point Pens
This has an F stamped on it for fine, has a 0.4mm tip, and comes in multiple colors.
Extra Fine Point Pens
These are finer, and the pens are just 0.3mm thick.
1.0 Pens and Markers
They have a thickness of 1.0mm and can be called markers, too.
Gel Pens
Gel Pens have a roller ball instead of a tip and are 0.8 mm in size.
Glitter Gel Pens
It has a roller ball and is 0.8 mm in size.
Calligraphy Pens
These pens have a gray barrel and have C stamped to denote calligraphy.
Infusible Ink Pens
It has a 1.0mm tip, and it is used for sublimation and infusing the ink on the surfaces.
How to Use Cricut Pens: Easy and Simple Steps
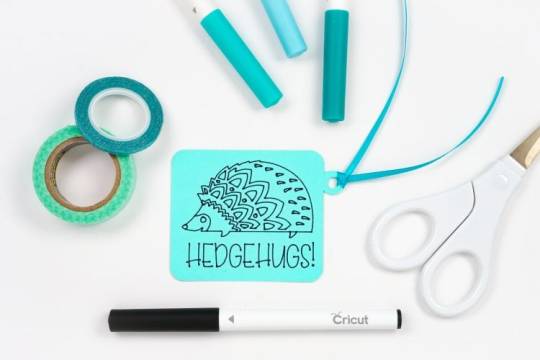
Placing or installing pens is easy, but if you are a beginner, then it will be a new thing for you. Always use the pens carefully, and pens should always be fitted to the clamp A of the cutting machine. Here, I am going to show you something different about using Cricut pens to create a simple gift tag. Now, let’s look at the below process to understand how to use it:
First, go to the Design Space and click on a new project to create a design.
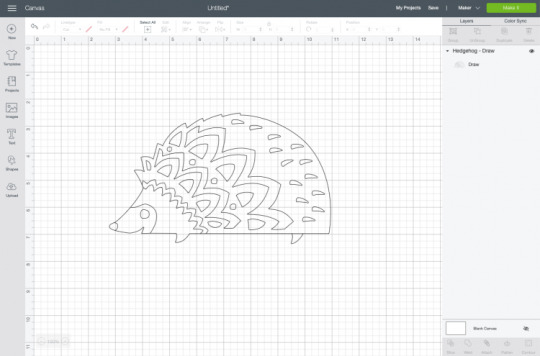
Then, create a design, or you can choose a text that you want to use with your pen. Cricut Design Space has its own vast library of images for your DIY projects.
Now, remember you have to draw, not cut the image. So, go to the Edit toolbar, and from there, select the Draw option in the Layers panel.

When you click the colored square box next to the line type dropdown, you can select the type of pen and choose the Fine Point pen.

After you have completed drawing your design, it is time to add text. In the Font menu, you can filter by Cricut Writing fonts. Choose the writing style font.
You can insert a shape into your Canvas. Then, using the Align tool, you can change its size and color and move it to the back of your Canvas.
Next, select your drawing and text layer and click Attach on the right-hand side of the Layers panel.
On the preview screen, your image will appear on the mat. Click Continue, and in the Make screen option, select the material you are using. Here, I am using cardstock. The Cricut Design Space app will prompt you to insert your pen, and you can use a fine-point blade.
In the last step, you have to insert your mat into the machine, and your machine will draw and cut the tag.
Conclusion
Now you know how simple it was to learn ‘how to use Cricut pens‘.? In this post, I have explained the types of pens and how you can craft your project with the pen. After reading this blog, you can choose a pen for your project, load it into the machine, and start crafting. Start crafting with your pen and unlock the full potential of the machine.
FAQs
How Do You Load the Pen Into Cricut Machine?
When you open the machine, you will see two clamps: Clamp A and Clamp B. To load the pen into your cutting machine, open Clamp A and insert the pen into it. Gently press the pen into the clamp until it fits properly, and you hear a click sound. Then, close the cover, and you are ready to use the machine.
What Are Cricut Pens?
Cricut makes different types of pens, which are great ways to add drawn or handwritten details to your projects. Cricut pens come in different sizes and can be easily loaded into the machine. This can be used for various creative projects, such as writing on gift tag cards or adding doodles.
What Is the Difference Between Cricut Pens and Markers?
A Cricut pen usually has a fine tip, which allows it to create a thinner line, compared to a marker, which has a thick tip and creates a thicker line. Pens are ideal for writing detailed text, signatures, or fine lines within a design, whereas markers are better for filling large areas with color.
Source: How to Use Cricut Pens
#how to use Cricut pens#cricut design space download#cricut design space app#cricut maker#cricut joy#cricut pens
4 notes
·
View notes
Text
How to Calibrate Cricut Explore Air 2? (Full Guide!)
Cricut Explore Air 2 is a worthwhile machine for crafters who want to make pro-level crafting projects. The machine offers precise cuts for more than 100 different types of materials, including Cricut Smart Material, leather, wood, glass, metal, etc. With its easy-to-use interface, the machine allows users to work on DIY projects even if they are novices. Moreover, sometimes crafters may need to perform Cricut Explore Air 2 calibration before a cut.
Calibration is a process that helps set the machine’s blade to cut the design accurately without any flaws. Many users don’t know the procedure and struggle to get the perfect cut. If you have the same problem, then the follow-up blog will provide you with all the information about calibrating your machine.
Cricut Explore Air 2 Calibration on Windows/Mac
If you are using your Cricut Explore Air 2 machine on a computer, then the following is the extensive guide that will help you perform the calibration process.
Step 1: Selecting the Printer
Open the ‘Cricut Design Space app‘, sign in to your account, and then click on the Settings option.
Then, follow the path Machines > Machine Calibration, and select Cricut Explore Air 2.
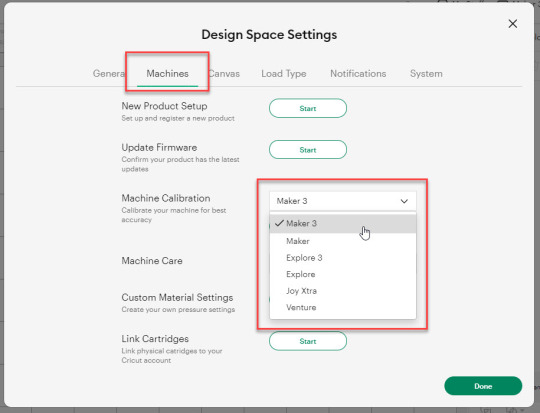
After selecting your crafting machine, click on the Start option.
Depending on the machine you choose, you will be asked to complete the calibration; select the Print Then Cut option.
In the next step, choose what you like to use with your printer machine for the process.
After that, click on the Continue option.
Step 2: Starting the Calibration Cut
Now, you should place the printed calibration sheet on the mat, position it perfectly, and select the Continue option.
For the next step, ensure that your machine is ON and connected to your computer using USB or Bluetooth. Select the machine from the drop-down menu, insert the cutting mat into your crafting machine, and click Go.
Furthermore, the device will start scanning the markings for the calibration.
After the cutting is complete, check if the cut-makings are touched without unloading the mat from the machine. (If the markings are touched, then choose the Yes option in the app and select Continue to move to the next step.)
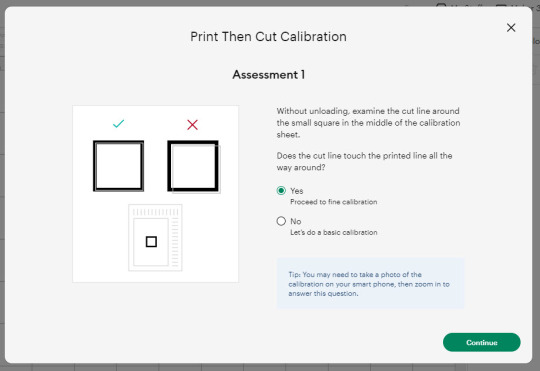
Note: If you choose the No option, then the machine will perform a cut for the next time for the accurate cut.
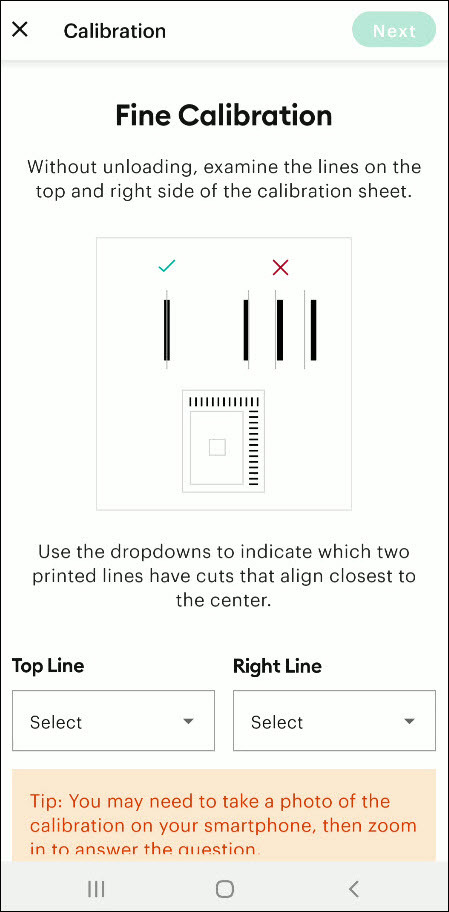
Also, the machine will start the calibration cut at the top and side of the page.
Now, check if the markings are correct without unloading the mat from the device. (The cut should be on or before line 1 and on or before line 21.)
If your cut meets all the conditions, choose the line closest to the center of the printed lines, the same as the following image; when you are done, select the Continue option.
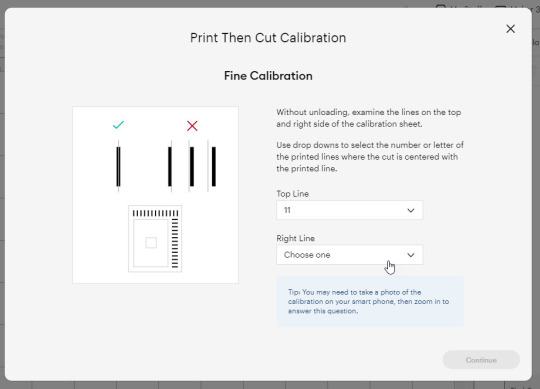
In the next step, the Cricut Explore Air 2 machine will perform a confirmation cut around the large sheet. When this step is complete, unload the mat from the machine and remove the calibration sheet; now, you need to answer the final question on the app.
You need to choose Yes, cut is close enough to the center if you are happy with the cut. (Select no and follow the further process if you are not happy with the cut.)
Cricut Explore Air 2 Calibration On iOS/Android
The follow-up method will allow you to Calibrate your Explore Air 2 machine without any hassle. So, let’s begin the process.
Step 1: Connecting the Printer to Your Machine
Start by signing into your Cricut account on the app and selecting the menu option from the upper right corner.
After that, tap on Settings and then select Print Then Cut Settings.
Also, tap on the Calibration.
Next, you have to choose the Send to Printer, or I have a calibration sheet option.
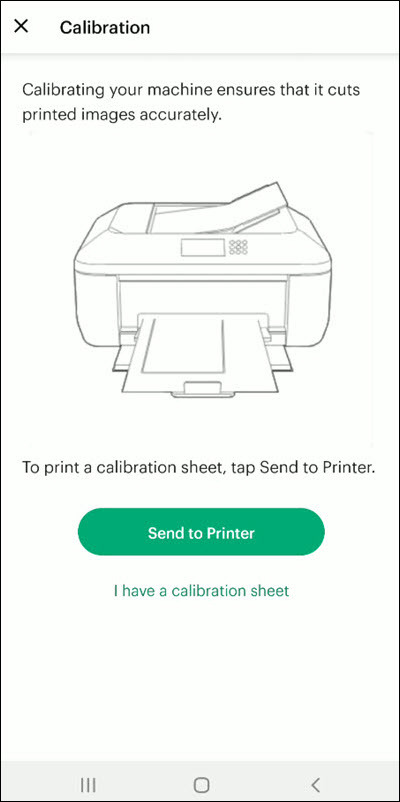
Now, the preview of the calibration sheet will appear on the screen (it can be a little different depending on the device you are using.)
Afterward, tap “Select a printer” and select the printer device you are using. Then, choose Next.
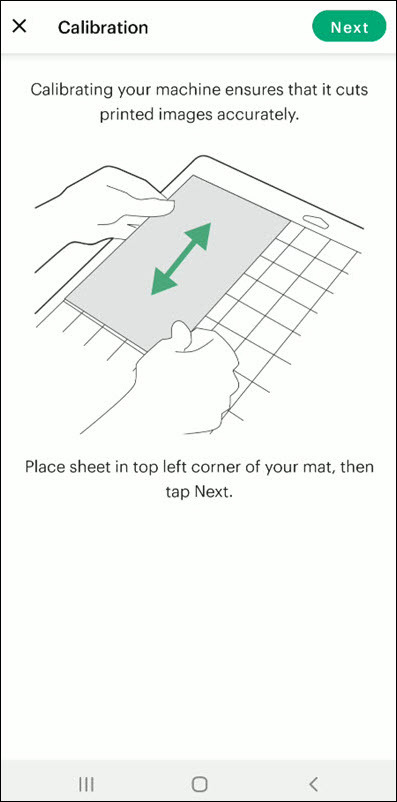
Step 2: Perform Sheet Calibration Process
After that, take the printed calibration sheet, place it onto the machine mat perfectly, and select Next.
Specify the appropriate material setting for your machine.
Then, after loading the mat into the machine, press the Go button on it.
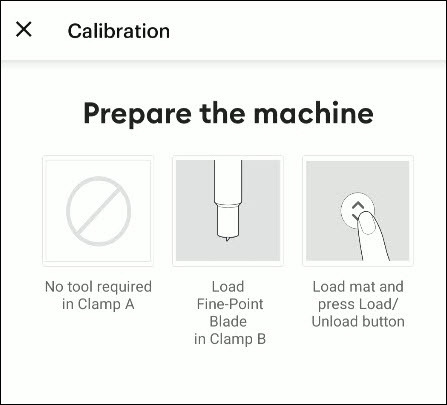
Also, the machine will look for the marking for the calibration and then start the cutting process near the small square.
Afterward, without unloading the mat from the machine, check for the cut to ensure the cut touches the marked lines all the way around. (If the lines touch the cut, then tap Yes in the app, then select Next to proceed with the next step.)
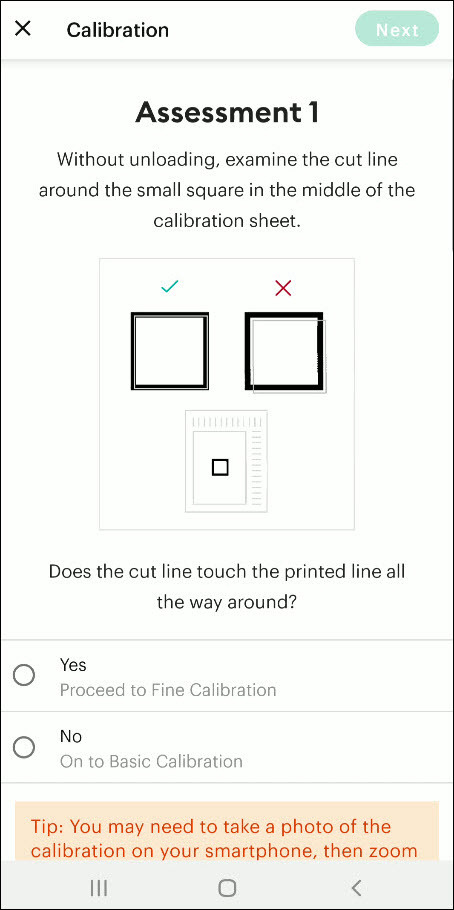
However, if you select the No option, then the machine will try to cut close to the top and sides of the page. (Once done, look closely without unloading the mat; there should be a cut before line 1 and on or after line 21.)
If the cut meets these lines, you need to specify which cut is closest to the center of the printed lines and the right side of the calibration sheet.
Once you are done, select Next to move forward.
After that, keep following the instructions on the screen to complete the procedure.
Once the process is complete, you can start cutting materials on your machine.
Final Words
Cricut Explore Air 2 calibration is the best way to get the pin-point cuts. These methods will help you to perform the calibration process on computer and smartphone devices. With these methods, you cannot only calibrate your Explore Air 2 but also any other cutting machine of the brand. Furthermore, if you have any doubts regarding the procedure or have any issues, then it would be good to ask for more assistance and guidance.
Frequently Asked Questions
Why Is My Cricut Explore 2 Not Cutting Properly?
Cricut Explore machines are known for their flawless and fast-cutting results. Sometimes, it is due to the material you are trying to cut on your device. Also, in some cases, the machine faces technical issues. To get your machine out of this problem and start cutting properly, you can use the calibration procedure. The process to calibrate your machine is simple.
Why Should I Calibrate My Cricut Machine?
However, the cuts can sometimes be misaligned due to various reasons. Crafters can calibrate their devices to get the blades and cuts aligned to their initial position. After the calibration, the machine starts to provide flawless cuts once again. However, the calibration process is a little complex and differs from device to device. So, you must know the whole process before performing it.
What Is the Thickest Setting on Cricut Explore Air 2?
We all know that Cricut cutting machines are known for their fast and flawless cuts, even for intricate designs. Thus, the Cricut Explore machine can cut a wide range of materials of a certain thickness. If you want to cut the wood, metal, leather, etc., then your machine can cut up to 2mm. However, different materials need to use specific blades to get the desired results.
Source: How to Calibrate Cricut Explore Air 2
#how to calibrate cricut explore air 2#cricut design space app#cricut design space download#cricut design space software#cricut machine setup#cricut explore air 2 setup
2 notes
·
View notes
Text
Cricut Design Space Setup: A Full Guide for Computer/Mobile
Cricut Design Space is like a boon for crafters who use machines of the same brand. It offers tons of free resources and ready-to-make projects that enable users to create jaw-dropping crafts even without any prior experience. Plus, by setting up the Cricut app with cutting machines, users can head start their crafting journey.
The Cricut Design Space setup process is easy, but steps vary for different OS. So, ready to learn how to do it? Follow the detailed guide to understand the entire process.
System Requirements to Download Cricut App
Before you start setting up the Design Space on your PC or smartphone, you must learn about the compatibility criteria. Here are the steps you can follow.
Cricut Design Space Setup on a Computer
The instructions below will provide a thorough understanding of downloading and installing the driver on a computer. Follow the steps carefully to complete the setup on your Mac and Windows.
Step 1: Downloading and Installing the Software
Step 2: Setting up a Cricut Machine on Windows
Cricut Design Space Setup on a Smartphone
The follow-up methods will allow you to download and install the Design Space app on a smartphone. You can use the method for both iOS and Android devices. In addition, you will learn how to set up the machine.
Step 1: Downloading and Installing the Application
Step 2: Setting up Your Machine
Note: With the help of the methods mentioned here, you can complete the app setup on your device quickly. If these methods are unable to complete the setup process, then make sure to reach out for additional help.
Frequently Asked Questions
Why Can’t I Complete Cricut Design Space Setup?
There could be many reasons why the app installation fails. These are some of the common reasons for that.
Do I Need a Computer for Cricut Design Space?
It is not mandatory to have a computer to use the Design Space app. The apps are compatible with multiple operating systems and work perfectly on mobile phones. If you are a user of an Android or Apple smartphone, then you can easily install the app on your device. However, to download the app, your device must meet the app system requirements. So, before installing the app, make sure to check the criteria to avoid facing any problems.
Why Should We Use Cricut Design App?
Those who use the Cricut cutting machine use the Design Space app to complete the setup process. In addition, it helps users create stunning designs and customize ready-to-make templates for their crafts. In addition, it allows users to operate the machine and prepare it for the cut. So, if you are using the machine or planning to use one, then you must download the app. Apart from that, you can use the software to craft designs even if you are not using its machines.
Visit: cricut.com/setup www.cricut.com/setup login
Source: https://cricricutdesigncut.wordpress.com/2025/03/03/cricut-design-space-setup-a-full-guide-for-computer-mobile/
#design space setup#digital design#cricut design space setup#cricut.com/setup#cricut setup#www.cricut.com/setup login#cricut design space#download cricut design space#cricut design space download#cricut.com setup mac#design.cricut.com/setup#cricut explore air 2 setup
1 note
·
View note
Text
How to Connect Cricut Joy to Computer? (Full Guide)
Wants to Learn ‘how to connect Cricut machine and you want to connect it to a computer‘? You can do it effortlessly with the help of this article. This machine is more compact than other Cricut cutting machines. With a sleek appearance and amazing results, Cricut Joy is the choice for many crafters. As a Cricut user and a professional crafter, I’m here to guide you with it. Let’s learn how to connect Cricut Joy to computer.
When it comes to connecting Cricut Joy to a computer, this machine doesn’t support a USB connection. Therefore, you have only one option for connection – Bluetooth. So, I’ll tell you about the Bluetooth connection on your Windows and Mac computers. Let’s get ready with the process.
Minimum System Requirements for Cricut Joy
Before you connect a machine to your computer, check whether your computer and machine are compatible. Why does this matter? You might know that Cricut runs a software called Design Space. This software has some minimum system requirements for a device that is added to it. So, let’s check out those requirements.
For Windows
For a Windows system, Design Space needs Windows 10 or 11 or the latest versions with an AMD processor or an equivalent one. It should also have a minimum of 2GB RAM, good free storage, and compatibility with Firefox, Microsoft Edge, and Google Chrome.
For Mac
For a Mac computer, Cricut Design Space needs a 14.x or newer operating system. Also, an Intel or equivalent processor. It should also have 2GB RAM and 300 MB storage. When you know the most important requirements, let’s dive into the steps involved in connecting your machine to a computer.
How to Connect Cricut Joy to Computer (Windows and Mac)
To connect your machine to your computer, you need to follow the steps given below. Here, you’ll see the steps for Windows and Mac computers.
For Windows
To connect your machine to a Windows computer, check out the given steps. As you already know, Cricut Joy doesn’t support USB, so we’ll stick to the Bluetooth connection.
To start, unpack your machine and collect all the accessories from the machine’s box.
Then, install your machine at least 10-15 feet away from the computer.
Now, connect the machine to a power source and turn it on.
After that, go to the Start menu and hit the Settings option.
Next, you should click on the Devices option.
In the next step, ensure that Bluetooth is ON.
Moving forward, hit the “Add Bluetooth or other device” option.
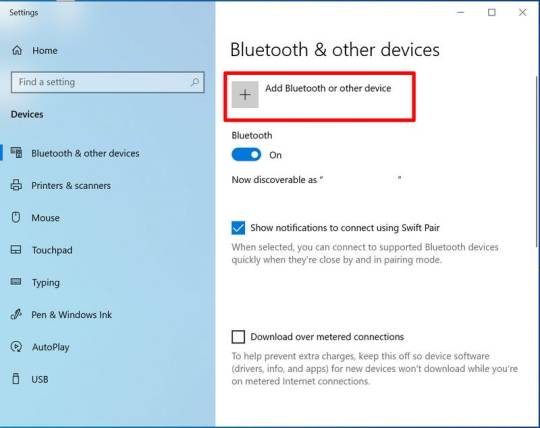
Also, tap on the Bluetooth and let the computer search for your machine model.
When the machine appears on the screen, select it and let it connect.
Lastly, your devices are paired with Bluetooth connection.
That’s how to connect Cricut Joy to computer. When you know everything, it’s time to try the connection for your devices.
For Mac
If you’re a Mactonish, below are the steps for connecting your crafting machine to your Mac.
To get started, connect your Mac to a power cord.
Then, install your machine on a flat surface and keep it at least 10-15 feet away from your Mac.
Now, go to your Apple menu and select System Preferences.
After that, locate the Bluetooth option on the Mac.
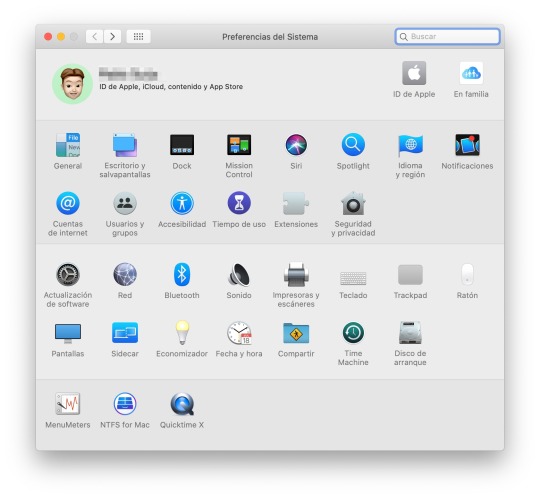
Also, check whether Bluetooth is ON.
In the next step, choose your machine from the list of available devices.
Finally, your machine is paired with your Mac.
That’s how to connect your machine to a Mac computer. Finally, you can start creating projects with your brand-new machine. Now, let’s take a look at the steps for a Mac computer.
Conclusion
Finally, you know how to connect Cricut Joy to computer. Start creating your DIY projects quickly. This machine is excellent for beginners and for DIY pros. The only thing you need to care about is the minimum system requirements for the Design Space software. Besides that, this tiny tool is travel-friendly and works well for you. The crafting machine can become your companion when you need it.
FAQs
How to Download Cricut Design Space on Computer?
To get the Design Space software on a computer, follow these steps:
To start, launch a browser and navigate to https://cricut.com/setup.
Then, accept the Terms of Use and its Privacy Policy.
Now, hit the Download button on the screen.
After that, let the file download under the Downloads folder.
Next, visit the Downloads folder and find the app file.
Double-click on the folder to open it.
In the next step, run the installation and continue with the on-screen directions.
Finally, sign in to your account.
Can I Connect My Cricut Joy to Computer via USB?
No, you can’t use a USB to connect your machine to your computer. It doesn’t support USB. However, you can use a Bluetooth connection to set up a connection between your machine and your computer.
How to Connect Cricut Joy to Windows 11?
You can connect a machine to Windows 11 via a Bluetooth connection. Go to your laptop and search for Bluetooth and other devices. Then, turn on the Bluetooth option. Now, let your laptop locate your machine. Then, choose your machine’s name from the list of devices and let the pairing happen.
Source: How to Connect Cricut Joy to Computer
#how to connect Cricut Joy to computer#cricut design space download#cricut design space app#cricut design space software#cricut joy setup
2 notes
·
View notes
Text
How to Use Cricut Infusible Ink for Smooth & Vibrant Projects

Do you love crafting shirts and other fabric materials? Then, you can learn how to use Cricut infusible ink. Cricut has released a new material called infusible ink that bonds with fabric, unlike iron-on vinyl that sits on top.
Infusible ink is a transfer process where the colors from a transfer sheet are directly applied to the blank surface. Unlike heat-transfer vinyl, the ink does not sit on top of the surface. It is directly applied to and absorbed by the fibers. Read the blog to explore everything about infusible ink.
What Is Cricut Infusible Ink?
Infusible ink is a special kind of material that is super easy to use. However, the important thing you need to remember is the supplies needed to make these projects. You can make t-shirts and tote bags that are safe for machine washing, drying, ironing, and steaming. Wash them with mild detergent and cold water to preserve the design.
How to Use Cricut Infusible Ink: 5 Easy Steps
Here are the steps to begin your project. First, let’s list the materials you will need.
Step 1: Supplies and Tools Needed
Before you learn how to use Cricut infusible ink, you will need some art supplies and materials to start your project. Check the list of materials below and gather them.
You can choose a Cricut Maker, Explore Air 2, Explore 3, and Joy.
Cricut EasyPress 2
EasyPress mat
Infusible ink transfer
Lint roller
Butcher paper
Cardstock
SVG text
Design Space
After gathering all the materials, you need to start creating your project. Let’s get started with the step-by-step instructions:
Step 1: Create a Design for Your Project
First, open the Design Space and click on New Project. Once the file is open, upload the SVG text file, select all the letters, hit the Weld option, and weld them together. Then, size it and place it on the background design. Select both layers, slice them, and delete the unneeded pieces. Make sure to mirror your design. You are ready to send it to your machine for cutting.
Important Note: You need to mirror your design before you send it to the cutting machine.
Step 2: Load the Sheet on Mat
Place the infusible ink transfer sheet on the StandardGrip mat with the liner side down. Under the materials section, go to Browse All Materials and search for the infusible ink transfer sheet from the list of materials. To cut with the machine, you need to load the mat and blade into a machine and hit the Go button.
Step 3: Weed Out the Design
After cutting the design, flip the mat over and remove the extra part with the weeding tool. To separate the cutout design, roll it, use your fingers or tweezers to remove the negative pieces around it, and leave the design. Cut the clear liner so it does not extend beyond the edge of your heat press heat plate.
Step 4: Prep the Tote Bag
Once you place a blank on top of the EasyPress mat, position the sheet of cardstock inside the blank to protect your mat and project. Before applying your design to the tote bag, use a lint roller to remove lint and debris from the entire surface. Cover the blank with butcher paper, which must be larger than the heat plate. Preheat the tote bag to remove any moisture and wrinkles that cause unwanted effects.
Step 5: Apply the Infusible Ink
Place the cut design on the material and use the heat press to transfer it. Then, put the design on a tote bag and apply pressure with the machine to transfer it to the material. Finally, allow the tote bag to cool completely before removing the transfer paper.
Tips to Know Before Starting Your Project
Now, you know the process of using infusible ink, but there are some tips you should remember while working with infusible ink.
When you handle an infusible ink material, make sure that your hands are dry and free of oil; otherwise, it will stick to the sheet.
If you are preparing your base material for the design application, it is recommended that you set up your press machine with the right temperature and pressure.
Do not reuse butcher paper for multiple projects. This is because it protects your design from transferring to another blank material.
Summary
This blog covers everything you need to know about infusible ink and how to use Cricut infusible ink. This material allows you to easily create a permanent and seamless design that becomes part of the fabric, and you can craft many projects with it.
You can use ink on various materials, including apparel, bags, pillows, covers, hats, and ceramics. Follow the above guide, and you can simply start crafting with Infusible ink.
FAQs
Which Is Better Infusible Ink or Iron-on Vinyl?
Infusible ink is often preferred over iron-on vinyl for its seamless, permanent designs. It can create a more permanent and vibrant result, especially light-colored materials. Iron-on material is better suited for dark fabrics or when you need more texture and layers for different materials stacked on top of each other.
How Long Does Cricut Ink Sheet Last?
The infusible ink is supposed to last a lifetime. The heat press machine permanently transfers the ink to the blank material and does not flake, peel off, or wrinkle. However, the ink has a shelf life, so using it within the time limit is important. If you want it to last a lifetime, you can protect it from moisture by using the carrier sheet and washing the material with a mild detergent.
Can I Use Infusible Ink Sheets on Regular Paper?
No, you should not use Infusible Ink sheets on regular paper. If you want to use paper with Infusibe ink, you need to use laser copy paper, which is designed to withstand high heat and has a special coating to prevent it from transferring to another part of the project. The ink is designed in such a way that it can absorb the heat, and the design will get transferred to the material.
Visit: Cricut.com/setup Cricut setup www.cricut/setup
Source: how to use cricut infusible ink
#how to use cricut infusible ink#cricut design space download#cricut design space app#cricut design space software#Cricut setup
1 note
·
View note
Text
How to Connect Cricut via Bluetooth (Setup Guide)
Connecting a Cricut machine with a Bluetooth connection is an easy task, trust me. I’m Anna, a full-time blogger and marketing strategist. I know my hobby doesn’t match my profession, but yeah, I make DIY projects, too. The past few years have been wonderful for me as I started doing different things, and crafting is a small part of it. With time, I became interested in blogging, so here I’m teaching you how to connect Cricut via Bluetooth. I know you all have a Cricut machine, or maybe you’ll get one very soon. But my job is to make you aware of its connection and setup procedure. Let’s dive straight into this blog and check everything here.
How to Connect Cricut via Bluetooth to Desktop?
If you’re a desktop user, you can easily connect your Cricut to it via Bluetooth. To start the connection, look at the steps below and learn how to connect a Windows and computer via Bluetooth.
Windows
To connect your Cricut product to a Windows computer via Bluetooth, look at the steps below to start the connection.
To get started, ensure that your Cricut is at least 10–15 feet away from your Windows PC. Also, check if both the devices are ON.
Then, verify your system for the Bluetooth connectivity.
To check, launch the Device Manager option and search for the Bluetooth Radios option.
But, if your PC lacks the Bluetooth feature, you can easily get a Bluetooth adapter from the market.
Then, head to the Control Panel on your device.
Next, head to the Devices and Printers option.

Under the Devices and Printers option, hit the Add a device/Add a Bluetooth device option.
Now, allow your Windows PC to detect your Cricut model.
Then, select the Bluetooth option and double-click on it.
After that, type the pairing code of your device; if you don’t know the code, just type “0000.”
Next, click on the Next button.
In the last step, your pairing will be complete.
Finally, the Bluetooth connection between Cricut and Windows PC is complete. And you know how to connect Cricut via Bluetooth.
Mac
Mac users don’t have to worry. There are options to connect a Cricut to a Mac via Bluetooth, too. Proceed with the on-screen steps below to set up the connection.
To start, make sure that your machine is at least 10–15 feet apart from the Mac.
Move to the System Preferences option and find the Bluetooth option.
Now, turn on the Bluetooth option on your Mac.
After that, pick your Cricut model from the list.
Next, tap on the Pair option to connect both of your devices.
Now, enter “0000” when asked and hit the Pair button.
Your Bluetooth connection is complete now.
That’s how you can connect your Cricut via Bluetooth on a Mac system. If you want to learn about the connection method on a mobile device, continue reading here.
How to Connect Cricut via Bluetooth to Mobile?
Here are the options for mobile phone users to connect their devices with a Cricut machine. Let’s follow the steps below and finish the connection.
Android
All Android users should follow the steps mentioned below to complete the Cricut connection on it. Check the steps here.
In the first step, ensure that your machine is only 10–15 feet apart from your mobile device.
Now, open the Settings on the home screen.
After that, tap on the Bluetooth option; if it’s not ON, turn it ON.
Next, you will see all the available devices.
Thereafter, choose your Bluetooth name and allow the pairing.
Once you see an option to enter the PIN, you can enter “0000” or “1234.”
Then, you have to hit the Done option.
When you complete the pairing process, you’ll see your Cricut under the pairing devices.
In the last step, the procedure is over.
Use these steps to connect Cricut via Bluetooth to an android device. Download and install Cricut Design Space and enjoy designing.
iOS
Moving to the iOS users, below are the steps to connect your Cricut to an iOS device. Check the steps below to continue.
In the beginning, ensure that your Cricut machine and iOS devices are within a distance of 10–15 feet.
Now, open the Settings app.
After that, search for the Bluetooth option.

If you see the option OFF, turn it ON.
Next, you’ll see a list of Bluetooth devices.
Then, the pairing process will begin.
Thereafter, you’ll see a prompt to enter the code, enter “0000” or “1234,” and hit the Done button.
When your window asks you for permission, tap on the Allow button to continue.
That’s how you can connect your Cricut to an iOS device via Bluetooth.
Conclusion
You have learned how to connect a Cricut machine using Bluetooth to all your devices. Now, it’s the time to take action and move forward with the Cricut machine to create something unique. With the help of Cricut Design Space, you’ll be able to create unlimited designs and go ahead in your crafting journey. However, a Bluetooth connection is not necessary; you can go for another connection method, such as a USB cable method. That’s all for today. Have a good crafting!
FAQs
How to Connect Cricut Machine to Bluetooth?
To connect Cricut products to Bluetooth, let’s follow the steps below:
First, keep your Cricut not more than 10–15 feet away from your device.
Now, open the Device Manager option on your PC.
After that, head to the Control Panel option.
Next, look for the Devices and Printer option.
Then, click on the Add a device option.
Thereafter, allow your PC to recognize your Cricut model.
Now, select your Bluetooth device and allow pairing.
Then, click on the Next button.
Finally, the printing is complete.
How Do I Get Cricut Design Space on My Device?
The Cricut Design Space software plays a vital role in the Cricut setup. You need to visit Cricut’s website at cricut.com/setup and search for the Cricut Design Space option. Now, you’ll see the Download button, hit that. Then, you can get the app’s file in your Downloads folder. Also, if you’re a mobile user, you can simply download and install the Cricut Design app.
How to Connect Cricut to Computer With USB?
USB connection is one of the simplest methods to connect your Cricut machine to a computer via USB. In order to connect your devices, you will need to take a USB cable and connect one end to the computer’s port and the other end to the Cricut’s USB port. That’s how you can connect your devices easily with a USB cable..
Source: connect Cricut via Bluetooth
Visit here For More Information: Cricut.com/setup
You tube
Pinterest
#connect Cricut via Bluetooth#Cricut.com/setup#Cricut explore 3#Cricut Design Space#Download Cricut design space
0 notes
Text
Do you take your crafts seriously? Cricut is a perfect machine that allows you to craft with your heart. So, use the machine and employ all your crafting skills to end up with a wide range of personalized and professional handmade items. Also, download and install the Design Space software to add more creativity to your project. Go to cricut.com/setup and get the software right away. Once you make a unique and attractive project, give it a professional touch and take your crafting skills to a commercial level. Cricut Design Space Login You can utilize online platforms to sell them and make some extra bucks while staying in the comfort of your home.
#Cricut Design Space#cricut design space login#cricut design space download#cricut design space for mac#cricut design space app#cricut design space setup#cricut software#cricut.com setup windows#cricut.com/setup windows#cricut.com/setup#cricut.com sign in#cricut.com/create#cricut.com design space#design cricut.com download
2 notes
·
View notes
Text
Why Won’t Cricut Design Space Open on My Computer: Fixed
Are you wondering why won’t Cricut Design Space open on my computer? Are you encountering issues when opening Cricut Design Space? Don’t worry, you are not alone. Many users face this issue when they try to open Cricut Design Space. Several reasons can cause this problem, including third-party software interference, incorrect network settings, and corrupt files.
In this guide, you will get the answer to your question – why won’t Cricut Design Space open on my computer? We are sure you will be able to open Cricut Design Space on your computer after reading this guide. So, without wasting your valuable time, let’s delve into it.
Why won’t Cricut Design Space open?
How to Fix Cricut Design Space Won’t Open Issue
In order to fix Cricut Design Space won’t open issue, follow the steps given below:
Step 1: Confirm Your Computer Meets the Minimum System Requirements
Your Windows or Mac computer should meet the minimum system requirements for using Cricut Design Space. If it doesn’t, it could be the reason why won’t Cricut Design Space open on your computer. Upgrade your device to meet those requirements.
Below are the minimum system requirements for using Cricut Design Space:
For Windows
Operating System: Windows 10 or later*
CPU: Intel™ Dual-Core or equivalent AMD® processor
RAM: 4GB
Disk Space: Minimum 2 GB of free disk space
Connection: An available USB port or Bluetooth connection
Display: Minimum 1024px x 768px screen resolution
Internet connection: Minimum 2-3 Mbps Download and 1-2 Mbps Upload
For Mac
Operating System: macOS 12 or later*
CPU: 1.83 GHz
RAM: 4GB
Disk Space: Minimum 2 GB of free disk space
Connection: An available USB port or Bluetooth connection
Display: Minimum 1024px x 768px screen resolution
Internet connection: Minimum 2-3 Mbps Download and 1-2 Mbps Upload
Step 2: Restart Your Device
A simple restart can fix lots of problems. When you restart your device, it clears out temporary files and frees up memory. In order to restart your device, follow the steps given below:
For Windows
To restart your Windows device, follow these steps:
Firstly, click the Start button.
Then, select the Power icon.
Choose Restart.
For Mac
To restart your Mac, follow the steps below:
Click the Apple menu in the top-left corner of the screen.
Then, choose Restart.
Step 3: Force Reload Cricut Design Space
You can also fix Cricut Design Space won’t open issue by forcing a reload. Sometimes, slow speed can cause the Cricut Design Space won’t open issue. A force reload can solve the problem.
In order to force reload Cricut Design Space, follow the steps given below:
Open the Cricut Design Space app.
Then, find the system menu in the top left corner.
After that, select the View option.
Lastly, select Force Reload from the dropdown menu.
If your Cricut Design Space still won’t open on your computer, move to the next step.
Step 4: Uninstall and Reinstall Cricut Design Space
Whether the Cricut Design Space is out of date or has had an issue, you can fix these most common errors by simply uninstalling and reinstalling it. Here are the steps on how to uninstall and reinstall Cricut Design Space.
How to Uninstall Cricut Design Space?
If you want to uninstall Cricut Design Space from your computer, follow the steps below:
For Windows
Firstly, make sure that Design Space is closed. If it is not closed, the application will not be uninstalled properly.
Select the Start icon and search for Programs.
Then, choose the option Add or remove programs. This will open the Apps & features window.
Type Cricut in the search field and choose Cricut Design Space from the list.
After that, select the Uninstall button.
A pop-up will show up on the screen asking, “Are you sure you want to uninstall Cricut Design Space?”. Select OK to uninstall Cricut Design Space.
The system will finish the uninstallation process. If prompted, restart your computer.
For Mac
Open the Finder and select Applications.
Then, drag the Cricut Design Space from the Applications to the Trash.
After that, right-click on the trash and select Empty Trash. You can also open the trash, click on the gear icon, and then select the Empty Trash option.
Next, click Empty Trash to confirm that you want to permanently delete the trash items.
Finally, the system will finish the uninstallation. If prompted, restart your Mac.
How to Reinstall Cricut Design Space?
Here are step-by-step instructions on how to reinstall Cricut Design Space.
For Windows
Go to the official Cricut Design Space website: Cricut.com/setup.
After that, type your machine model in the search field and select your device.
Select the checkbox confirming you agree to Cricut Terms of Use and Privacy Policy. Then, click on the Download button.
Once the downloading is complete, double-click the file in your browser or Downloads folder.
If a window opens asking if you trust the application, confirm that you trust the app.
Now, an installation progress window will appear.
Next, sign in with your Cricut ID and password.
Finally, you have successfully reinstalled Cricut Design Space on your computer.
For Mac
Visit the Cricut Design Space website: cricut.com/setup.
Then, enter your Cricut machine model in the search field and select your device.
Next, check the box to agree to Cricut Terms of Use and Privacy Policy. Then, click the Download button.
Select a location to save the file (By default, it will show the downloads folder). Click Save to start the download.
Now, the file download will start.
When the download is finished, go to the downloads folder. Then, double-click on the downloaded file.
A new window will appear. Drag the Cricut icon into the Applications folder icon to start the installation process. After this, Cricut Design Space for Desktop will be automatically added to your Applications folder.
Then, double-click on Cricut Design Space in your Applications folder in order to launch Design Space for Desktop.
A window will appear asking if you want to open the application downloaded from the internet. Click the Open button to continue.
Lastly, sign in with your Cricut ID and password. With this, you have successfully reinstalled Cricut Design Space on your Mac.
Conclusion
If you are wondering why won’t Cricut Design Space open on my computer. Don’t worry; you are not the only person facing this issue. Many Cricut Design Space users encounter this issue at some point. The Cricut Design Space won’t open issue can be caused by several reasons. The good thing is you can fix it easily in a few minutes.
By following the above-mentioned steps, you will be able to fix Cricut Design Space won’t open issue quickly. Make sure your Windows computer or Mac meet the minimum system requirements, restart your device, and force reload Cricut Design Space. If the issue is still there, try uninstalling and reinstalling Cricut Design Space.
Thank you for reading this post. We hope you find this guide helpful in understanding why won’t Cricut Design Space open on your computer and how to fix Cricut Design Space won’t open issue. Please stay connected with us for more tips and guides to make the most of your Cricut.
Source: why won’t Cricut Design Space open
#why won’t Cricut Design Space open#cricut design space won't open#cricut design space download#cricut design space app#cricut design space software#Cricut Setup
0 notes