#Double Bottom chart pattern
Explore tagged Tumblr posts
Text
"Mastering Technical Analysis: A Comprehensive Guide to Analyzing Price Charts, Indicators, and Patterns for Informed Trading"
Mastering technical analysis is a crucial skill for anyone looking to navigate the financial markets. Technical analysis involves studying historical price data and trading volumes to forecast future price movements. While it doesn’t predict future events or fundamental changes in a company, it provides valuable insights into market sentiment and potential price trends. Here’s a detailed guide…

View On WordPress
#Backtesting#bollinger bands#candlestick patterns#Chart Patterns#Continuous Learning#Discipline#Double Bottoms#Double Tops#Fibonacci Retracements#Flags and Pennants#Head and Shoulders#Moving Average Convergence Divergence (MACD)#moving averages#Price Charts#Psychology#Relative Strength Index (RSI)#Risk Management#Risk-Reward Ratio#Stop-Loss Orders#Support and Resistance#technical analysis#Timeframes#Trading Strategies#Trends#triangles
0 notes
Video
youtube
Mastering the DOUBLE BOTTOM FOREX TRADING for Maximum Gain 2023
#youtube#youtube trending#Double Bottom Pattern Explained#Trading Strategies with Double Bottom#Identifying Double Bottom Reversals#Double Bottom Chart Pattern Tutorial#How to Spot Double Bottoms in Forex#Double Bottom Candlestick Patterns#Double Bottom Trading Signals#Double Bottom vs. Double Top Differences#Double Bottom Formation Analysis#Successful Double Bottom Trading Tips#Double Bottom Pattern for Beginners#Real Examples of Double Bottom in Stock Market#Double Bottom Breakout Strategies#Double Bottom Technical Analysis Guide#Common Mistakes in Double Bottom Trading
0 notes
Note
Your stained glass window vest is STUNNING! Are you willing to share your pattern, or its source if it's available for purchase?
Thank you ! I'm going to take the opportunity for a permanent answer post to this question since I've given the pattern in dozens of comments ever since I started posting about the project, but obviously that isn't a convenient way for people to find the information !
Tracery Vest by Kathleen Sperling aka Wipinsanity on Ravelry and on her own website
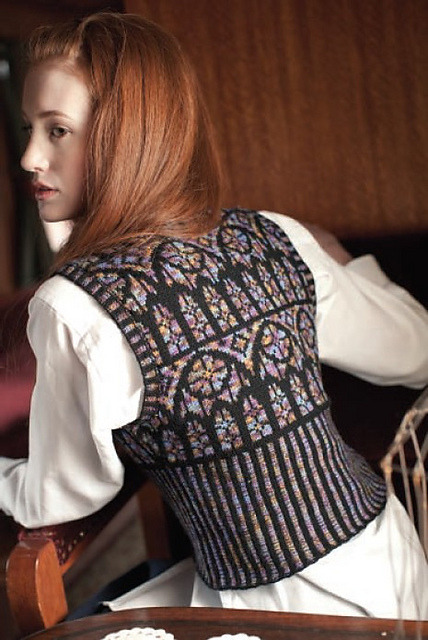

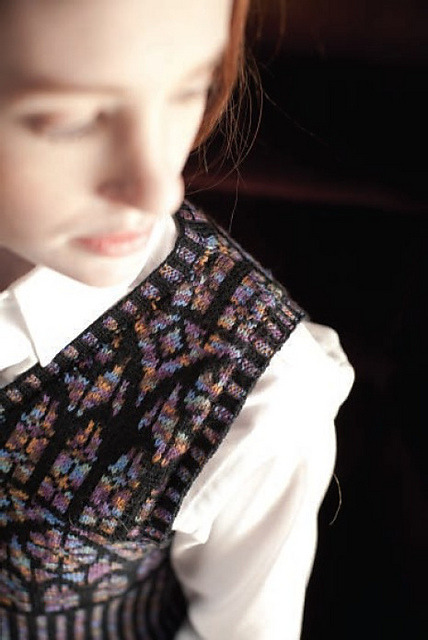
As you can see the shape of the garment itself is a bit different from what I did. The ribbing in the original makes for a nice fitted silhouette, but I'm quite short in the burst and not hourglass shaped at all, so I made some alterations. I reduced the corrugated ribbing to half of its length, and added a few rows of colourwork to close the ribbing lines into an archway pattern. Then, I added one repetition of the windows at the bottom of the pattern chart, before returning to the pattern instructions as if I'd just finished the ribbing section. I also changed the bind-off in pattern into a stretchy bind off in order to keep the armholes and neckline a little looser. I also added a central double decrease every other row for the vneck.
There you go ! Def more info than you asked for but I hope you don't mind me using your ask as a jumping-off point.
Cheers everyone !
2K notes
·
View notes
Text
Unlock the Secrets of Trading with Top Chart Patterns! Explore the world of chart patterns with Funded Traders Global. From understanding the basics of technical analysis to recognizing common chart patterns like head and shoulders, double tops, and flags, our blog equips you with the knowledge to enhance your trading skills. Discover advanced patterns like pennants, wedges, and harmonic patterns, and gain practical tips for effective trading. Improve your risk management, pinpoint entry and exit points, and combine chart patterns with technical indicators. Start your journey towards trading success today with Funded Traders Global!
#Advanced Chart Pattern#and Descending Triangles#and mini trading#Ascending#Basics of Technical Analysis#Benefits of Recognizing in Chart Pattern#Bullish and Bearish Flags Pattern#candlestick#candlestick Pattern#career in forex trading#chart patterns#classic reversal pattern#common chart patterns#cup and handle pattern#Double top and double bottom patterns#drawdown#financial markets#Forex trading financial freedom#FTG#ftg prop firm#ftg trading#Funded Traders Global#Gaps#Harmonic Patterns#Head and Shoulders Pattern#how to scale into a forex trade#Macro#Master the Market with These Top Chart Patterns for Trading#mastering Forex trading#micro
0 notes
Text
Discover the power of double top and double bottom patterns, click the link to unlock the secrets!
#double top pattern#double bottom#m pattern#w pattern#tradingstrategy#chart patterns#pattern trading
0 notes
Text
How To Commerce The Inverse Head-and-shoulders Sample
With the investor loosing interest in investing in shares, the volume drops and the inventory worth starts to decline. The heart trough is the deepest and the opposite two are of roughly the same depth. An inverted Head and shoulders pattern occurs when the price of a security drops marking the bearish pattern and reaches the bottom level. Then the bullish development kicks back in and pushes the worth upwards.
In this case, the inventory's price reaches three consecutive lows, separated by momentary rallies.
This breakdown ought to be convincing, occurring on robust volume and coinciding with momentum indicators pointing towards sturdy bearish momentum.
If the value advance preceding the top and shoulders top is not long, the following worth fall after its completion may be small as nicely.
All expressions of opinion are subject to vary without discover in response to shifting market circumstances.
Some progress on the US debt ceiling talks is lifting the general market mood. The Relative Strength Index indicator turned bearish, warranting that additional downside is expected, whereas the 3-day Rate of Change , continues to slide beneath its neutral level. Futures and futures choices buying and selling includes substantial risk and isn't appropriate for all investors. Please read theRisk Disclosure Statementprior to buying and selling futures merchandise.
Figuring Out The Pinnacle And Shoulders Trading Pattern
The neckline can additionally be an essential part of the pinnacle and shoulders sample as it is the stage of resistance that merchants use in order to set up the world vary to put orders. So, to find the neckline, first, find the left shoulder, head, and proper shoulder. Then connect the low factors after the left shoulder with the low after the head, which creates the neckline.
youtube
youtube
It can be difficult for newbies to determine the altering developments.
Is Your Risk/reward Enough?
Chart patterns Understand the method to learn the charts like a professional trader. Live streams Tune into day by day live streams with expert merchants and transform your buying and selling abilities. A catalyst is something that can move traders or buyers to buy or promote a stock. That’s as a outcome of you must use this sample to discover out a significant change in development. Ascending triangle pattern need a lot of traders to see the sample, so they act accordingly and the price sample plays out.

#Chart patterns#Price action trading#Trading basics#Technical analysis#Candlestick patterns#Support and resistance#Trend lines#Breakout trading#Reversal patterns#Continuation patterns#Fibonacci retracements#Moving averages#Trading strategies#Bullish engulfing pattern#Bearish engulfing pattern#Head and shoulders pattern#Double top pattern#Triple bottom pattern#Cup and handle pattern#Ascending triangle pattern#Descending triangle pattern#Wedge pattern#Harami pattern#Doji candlestick#Morning star pattern#Evening star pattern#Trading psychology#Risk management#Entry and exit points#Backtesting strategies
0 notes
Text
|DOUBLE TOP AND DOUBLE BOTTOM|CHART PATTERNS| TECHNICAL ANALYSIS|
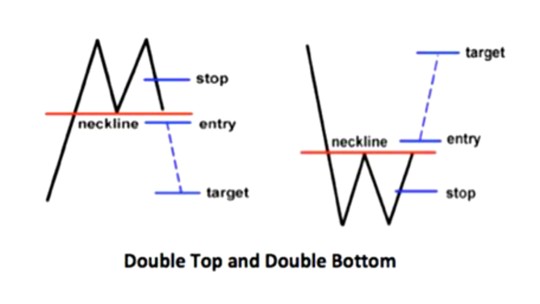
Double top and double bottom are common chart patterns used in technical analysis to identify potential trend reversal points in the stock market. The double top pattern occurs when a stock price reaches a high point twice and fails to break above it, forming two peaks at approximately the same price level. On the other hand, the double bottom pattern occurs when a stock price reaches a low point…
View On WordPress
1 note
·
View note
Text


Design process for the gloves to go with my cowl and hat...
Since the back of the hand will have the White Tree of Gondor, for the palm side we're going with a Star of Elendil as the best I can find for Arnorian iconography. The full-sized star is seven-pointed like the ones all the Dunedain of the North wear in LOTRO... :-D For the little red border at the bottom of the panel I went with five-pointed stars because I just do not have enough stitches there to fit in seven points. Anyway, the large star is somewhat inspired (but rendered down to two colors because this is for double knitting, not intarsia) by the one on Halbarad's Grey Company cloak (upper right in the photo) and the red border with multiple small stars is inspired by Candaith's Grey Company gloves with the knuckle-stars (lower right in the photo). I did a swatch of the red border to make sure that would actually come out looking like stars and...yeah, I think it'll work.
I had forgotten I ordered some red yarn for these (Gloss Fingering in Cranberry) along with the gold and white to match the cowl and hat; the red is to match the coat that I'll be wearing the whole set with and it's meant for a wee accent color alongside the two main colors...I might also use it for the cuffs and/or the fingers? Maybe just half of the fingers! :-D For reference, here is the full chart and what the prototype of these double knit gloves, which I'm basing the pattern on, looked like:


#knitting#knitblr#double knitting#lotr#lotro#lord of the rings#lotr crafts#ranna knits#double knit gloves#gondor and arnor gloves#gloves of the reunited kingdom
18 notes
·
View notes
Text
Notes on the multicolored doily
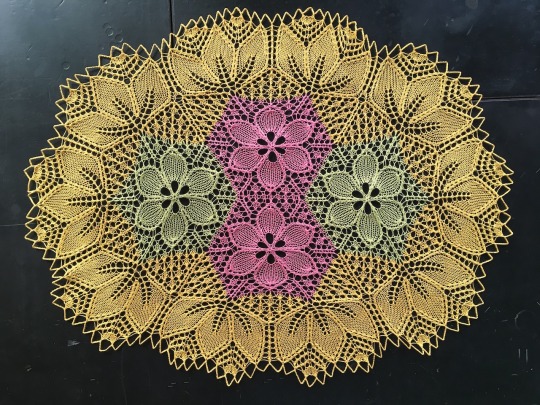
Ovale Decke: Ravelry link, Ramona French charts
Knitted using three colors of crochet cotton, on US size 2 (2.75mm) needles. Finished dimensions about 24x18 inches.
The hexagonal units are reasonably straightforward to knit, although I had some questions about the chart. There’s a triple YO that turns into 7 stitches, which is clearly visible in pictures of the finished doily, but which is charted in a way that looks like it would result in two groups of three and a single stitch. Historic Niebling patterns tell you to alternate knits and purls in the same stitch for those huge increases, but I usually alternate knits and YOs instead. It makes fewer twists in the yarn.
Then there’s a round of purl stitches, and I can’t figure out why. The pictures from the original magazine don’t seem to have them, and some of the Ravelry projects don’t have them either, but some do. At what stage of things was this variation introduced? It is a mystery. I swatched it both ways, and decided to leave them out.
Ultimately, I made my own version of the chart, and used that. Here it is, for the record. In the hexagon chart, I included every round, because there are a couple of things that happen on even-numbered rounds, and I didn’t want to lose track of them. The border charts use the more standard notation of only showing odd-numbered rounds.

The 1x1 cable crosses may have all gone the same direction in the original, but I decided to mirror them, and also to not do them as actual cables. Instead, I did a mock cable that I think of as a Fake Decrease, but which is maybe officially called a Twisted Stitch (or Traveling Stitch?) and which I got very tired of by the time I was at the end of the border. All the border leaves are outlined in these crossed stitches as well. There are a lot of them. Bah.
I made four hexagonal units and grafted them together. Then I put all the remaining stitches onto a 24 inch needle, and considered the border.
The hexagon sides each have 17 stitches. In between the groups of 17, you either add a YO or you don’t, depending on whether that corner is convex or concave. I made a little diagram for both the 4-unit and the 9-unit versions, to show the placement of the in-between YOs.
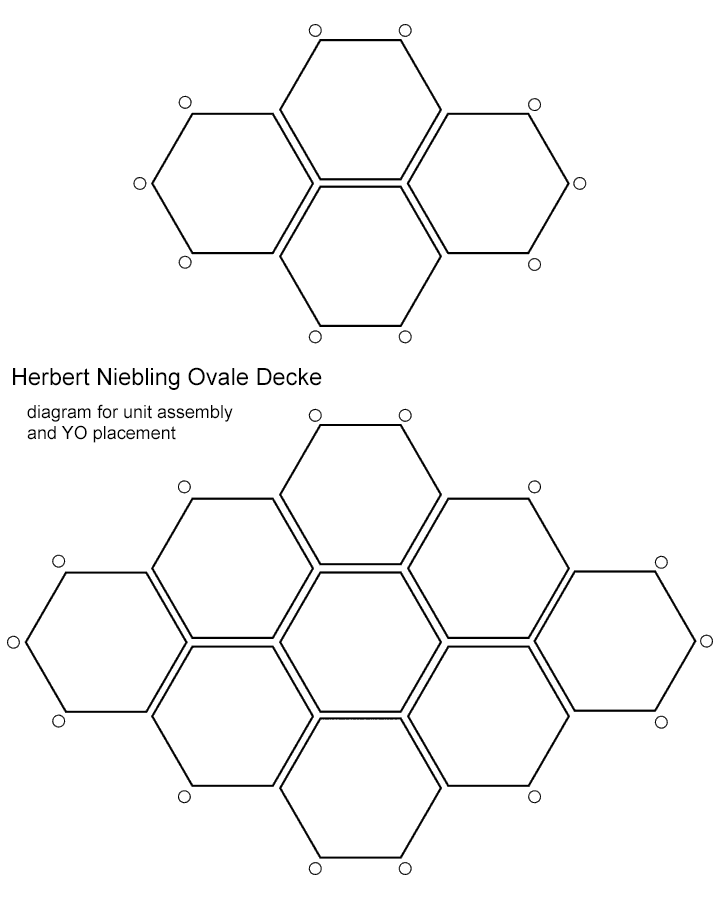
I used several different colors of stitch markers to keep track of which places had the YOs and which ones didn’t. The YOs eventually expand into the triple-leaf shapes, but at first they’re easy to lose sight of.
I re-charted the border as two parts, A and B, and made a few small tweaks. When you’re using chart A, instead of repeating the chart exactly, you work whichever bits apply: the leaf increases happen at the corners where you’ve added a YO, and the former hexagon sides are gradually decreased away.
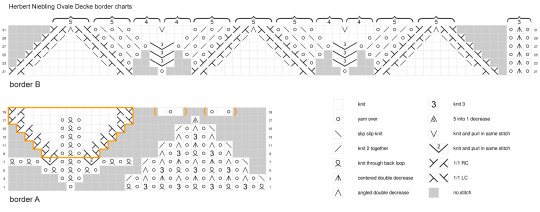
So you work rounds 1-8 of chart A, knitting any ktbl stitches through the back loop on the plain rounds as well. Starting with round 9, the part of the chart inside the orange outline gets repeated three times. Those sections get much wider very quickly, and it didn’t take very long before I had to switch to a 32 inch needle. And eventually to wish I had a 40 inch one.
On round 19, there are some places in between the leaf sections where there’s one stitch, and some places where there are two. To start chart B, you need three stitches in between the leaves, so you either do one YO (in between), or two YOs (one on either side). On round 20, I decided to knit those single in-between YOs through the back loop, because they seemed a bit too open and gappy. I suppose that more or less turns them into a M1.
I used two different double decreases, as follows:
The angled double decrease is slip 1 stitch, knit 2 together, pass the slipped stitch over: the central stitch ends up on the bottom of the stack, and the diagonal decrease lines are emphasized.
The centered double decrease is slip 2 stitches together knitwise, knit 1, pass both slipped stitches over: the central stitch ends up on top, and the vertical line is emphasized.
The 5-into-1 decrease goes like this: first you slip 2 stitches knitwise, exactly like you would for a ssk. Knit the next 2 stitches together, and pass one of the slipped stitches over. Then move the stitch over to the left needle, and pass the next working stitch over it. Move it back to the right needle, pass the other slipped stitch over it, and you’re done.
Chart B is pretty much normal lace knitting (except for the interminable 1x1 crossed stitches). After round 31, the marked groups of stitches are gathered with crochet chains in between.
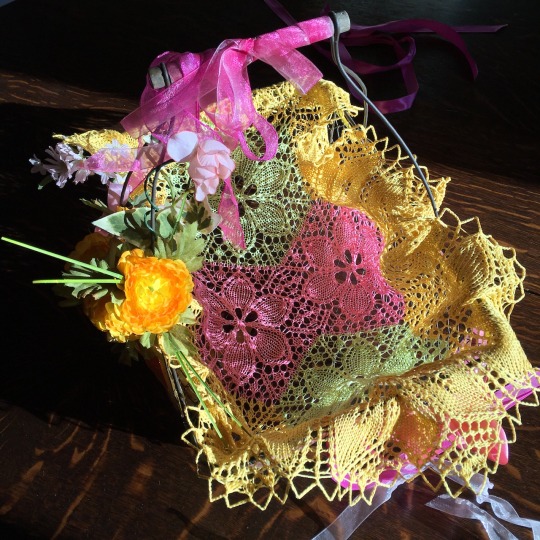
The ones on Ravelry all seem to be diamond-shaped, but I blocked mine into more of an ellipse, and it’s kind of interesting to see how it distorted the central hexagons. Dealing with all the loose ends was exactly as terrible as you think it was. Writing the notes took nearly as long as the actual knitting. Hooray!
#knitting#doilies#in which I attempt to explain my methods#charts#long post#Herbert Niebling rides again
95 notes
·
View notes
Text
Part 8 of A Treatise of Embroidery, crochet, and knitting with illustrations
By George C. Perkins, Anna Grayson Ford, and M. Heminway & Sons Silk co circa 1899


Please note, this book was written in 1899, and as such uses a racist term to refer to the dyes that were used for the thread. If you'd like to read more about this period in time, the term, and the stereotypes that the Victorians had, I've actually linked the wikipedia article here that goes more in depth. It's not the end all be all of it, but it's a good starting place for anyone wanting to educate themselves on the topic.
The alt text for the page on the left containing the actual embroidery pattern is written below:
Page 31. Lessons in Embroidery.
This is the chart for the embroider by letters/numbers diagram on this page.
La France Rose. (Pink.) Flower: 580 is shade number 1, 581 is 2, 0582 is 3, 582 is 4, 583 is 5, 584 is 6, 585 is 7, 586 is 8, 0432 is 9, and 432 is 10.
Leaves and stems.
Green:
570 is Shade letter A, 571 is B, 572 is C, 573 is D, 436 is E, 437 is H, 438 is I, 439 is K.
Old Red: 233 is M, and 234 is O.
Rose Design.
Materials. — M. Heminway & Sons' Oriental Dyes, Japan and Spanish Floss.
La France Rose. — 580 to 586, 0432, 432, a645, 0645. Leaves. — 570 to 573, or 0428 to 430, or 436 to 439 Japan Floss ; 233, 234 Japan Floss. Scallop. — 691 Spanish Floss ; also 370 Japan Floss.
Description. — Work the top petals of rose with 0582, 582, shading darker underneath where the leaf turns over with 584, 585. The turn-over leaves make of the lighter shades, 580, 581. A very little of green, 0432 and 432, can be used with effect in one of the lower petals, running the green into the light pink. Also in the fallen petals of rose use these greens with yellow, a645, 0645.
Leaves. — Shade the same as Design No. 138 on page 37, using the red-brown, 233 and 234, for thorns and stems.
Scallop. — Long and short buttonhole with 691 white Spanish Floss, shading with 370 Japan Floss.
In any La France design containing buds just bursting, use darkest shades of pink, 585, 586
There is an illustration of a doily captioned Design No. 239— Double Rose. 22 inch. It has three large roses and one small one paired with one of the larger ones flowing clockwise around the doily. there are also some petals shown scattered from one of the roses as well.
There is also a diagram for the rose captioned Spray of Design No. 239. Showing Slant of Stitches. The stitches curve in the direction of the leaves and petals. I will list off the shade letters/numbers as follows:
The stem begins in D with a thorn done in O emerging on the right, and another one a ways above it emerging on the left. A small sprig of three leaves emerge from the right.
Starting from the upmost leaf which is curled and emerges from the leftmost side of the sprig, we will go row by row.
1st Row, the furled underside of the leaf: A 2nd row onwards, the upper side of the leaf: C, B. 3rd Row: B, C. 4th Row: M, D.
Next leaf, Sprig tip leaf, rows from tip to base:
1st Row: C. 2nd Row: B, A, B. 3rd Row: B, A, A, C. 4th Row: M. 5th Row: C, D, D.
last leaf, bottom leaf but the rightmost leaf on the sprig.:
1st Row: D, A. 2nd Row: C, D, B. 3rd Row: B, B, B, A. 4th Row: A, A. 5th Row: M.
Back to the main stem, we go upwards and there is a thorn done in M just before another sprig emerges from the left. This one does not have any lettering so I would go by the previous pattern or improvise. It does show the lines of the stitches curving with the leaf.
The Stem continues in D with two more thorns on the right side done in M. The receptacle of the flower, aka the green part where the petals emerge from, starts in M and then transitions to C.
There are sepals, the tiny leaves around the flower base, with one on either side. The tips are twisted to reveal the underside and done in A, while the bases are done in B.
Onto the actual rose,
Right bottom outer petal which is opened and nearly totally sideways, done in rows working upward from the bottom to the top.
Row 1: 10, 4, 2, 2. Row 2: 9, 3, 5, 5, 3. Row 3: 5, and the curled over top part of the petal is 3.
Left Bottom outer petal:
Row 1: 2, 3, 7, 6. Row 2: 5. Row 3: 2, 4, 4, 7.
onto the next set of petals, there are three this time emerging from the bottom two:
Left outer Petal:
Row 1: 3, 7, 6. Row 2: 2, 5, 6. Row 3: 2, 4, 3. Row 4:3. Row 5: 3, 5. Row 6: 5. Row 7 has just a slight furl to it which is done in two.
Center Outer Petal:
Row 1: 3, 2, 3, 4. Row 2: 3, 4, 4, 3, 5, 6. Row 3: 5, 6. Row 4 is alternating furled and unfurled bits: 3 unfurled, 3 furled, 2 unfurled, furled and has no number but is likely 3.
Right Outer Petal:
Row 1: 7. Row 2: 5. Row 3: 4. Row 4: 3, 2. Row 5: 2.
Next row of petals, we'll be going right to left this time because the rightmost petal is actually sort of cutting in front of the previous petal and the center outer petal that we just did.
Right Center Petal, both sides furl and join at the center in a point, the left furl says 2, so I would guess the right one is also done in that as well even though it's not numbered.
Row 1: 6, 5, 7. Row 2: 5, 4. Row 3: 2.
Center Petal:
Row 1: 6, 7. Row 2: 5, 5, 4. Row 3 2 is a furled edge that goes diagonally upwards towards unfurled 3, 4, 3 is the unfurled tip of the petal, 2 furled rightmost bit diagonally upwards towards unfurled 3.
Left Center Petal. The edge of this one is completely furled and goes diagonally upwards to a point and comes down. It is done in shades 3 and 2. For the rest of the petal:
Row 1: 5, 6. Row 2: 3, 5. Row 3: 4. Row 4: 4. Row 5: 3.
Now there are three petals left to do and they emerge at a diagonal offset from the previous 3. With the next set, each petal is wider than the previous one, and the first petal is the small centermost petal of the rose while the next two are the outer petals, with the last one emerging from the center of the second to last petal and the corner of the Right Outer Petal we did earlier.
Center Petal: Row 1: 5. Row 2: 3, 4. Row 3 is furled but has no number, I'd go with either 2 or 3 judging from elsewhere in the diagram.
Center Outer Petal:
Row 1: 2, 2, 3.
Outermost petal:
Row 1: 4. Row 2: 3. There is some slight furling around the 3 which is unfurled, one of which is labelled 1. *******
The next few updates will be single page updates since the alt text is very long!
21 notes
·
View notes
Text
Chart Chaser: A Trader’s Obsession with Technical Analysis on MintCFD

In the realm of online trading, a “Chart Chaser” is a trader who relies heavily on technical analysis. These traders obsessively study charts, patterns, and indicators to identify the optimal entry and exit points for their trades. While some traders focus on market news or economic fundamentals, Chart Chasers believe that the key insights lie within the patterns and trends shown in the data itself. For users on MintCFD, adopting the Chart Chaser approach can be rewarding, especially given the wide range of tools and various trading chart patterns available on the platform.
The Allure of Following Trends in Charts
Chart Chasers are drawn to technical analysis because it offers a visual and data-driven way to understand market behavior. By studying price movements, volume, and indicators, they look for recurring patterns, such as Double Bottoms, Head and Shoulders, and Moving Averages, which they believe can predict future price action. With the MintCFD trading app, traders have access to advanced charting tools that make it easy to become a Chart Chaser, allowing for in-depth analysis and strategy development.
Key Tools on the MintCFD Platform for Chart Chasers
MintCFD’s platform is rich with tools tailored for those who take a technical approach. Here are some essentials for the dedicated Chart Chaser:
Real-Time Charting Tools: MintCFD offers detailed, real-time charts that provide instant insights into price movements. For a Chart Chaser, these charts are invaluable as they capture every shift and trend in the market, allowing them to act quickly based on the latest data.
Diverse Chart Patterns: From Candlestick charts to Line charts, MintCFD provides several options, enabling traders to switch between patterns based on their trading style. For instance, Candlestick patterns are often favored by Chart Chasers because they reveal price action in detail, helping traders identify trends and reversals.
Technical Indicators: Popular indicators, such as the RSI (Relative Strength Index), MACD (Moving Average Convergence Divergence), and Bollinger Bands, are available on MintCFD to help Chart Chasers confirm their hypotheses. These indicators can signal overbought or oversold conditions, momentum changes, and potential trend reversals.
Custom Alerts: MintCFD’s alert system lets Chart Chasers set notifications based on specific price movements, helping them act on technical signals even if they’re not actively monitoring their screens. This way, they never miss a crucial trade opportunity based on their analysis.
Benefits and Pitfalls of Being a Chart Chaser
For those who love data, becoming a Chart Chaser offers unique advantages, but it also comes with some potential pitfalls. Here’s how to manage both on the MintCFD Platform:
Benefits: Technical analysis is highly data-driven, meaning decisions are based on objective data rather than emotional responses. By relying on chart patterns and indicators, Chart Chasers can create highly structured strategies with specific entry and exit points. With MintCFD’s intuitive tools, they can continuously refine their methods and explore different indicators.
Pitfalls: Focusing solely on technical analysis can lead to “analysis paralysis,” where a trader over-analyzes and hesitates to act. Additionally, ignoring market news and economic factors may leave a Chart Chaser blind to important influences. MintCFD offers market news and insights alongside technical tools, helping Chart Chasers balance their analysis with a broader context.
Master the Market on MintCFD Trading App: Stop Over-Analyzing and Start Thriving as a Chart Chaser
To succeed as a Chart Chaser without getting caught in a loop of over-analysis, it’s essential to have a plan and set clear criteria for entering and exiting trades. MintCFD’s watchlists and alert systems can help keep track of multiple assets without overwhelming yourself with constant analysis. Having a set of “go-to” indicators and patterns also helps prevent information overload.
Final Thoughts
For traders who thrive on technical data, becoming a Chart Chaser can be an exciting and rewarding journey. MintCFD is an ideal platform for these traders, with its robust charting tools, real-time indicators, and customizable alerts. While it’s easy to get caught up in the details, the best Chart Chasers know when to step back and trust their analysis. By balancing data with a disciplined approach, MintCFD users can make the most of their technical strategies and succeed in the dynamic world of trading.
Take control of your trading journey with the MintCFD Trading App
#mintcfd#cfdtrading#cryptotrading#onlinetrading#tradingstrategy#tradingsignals#forextrading#forexstrategies#cryptoinvesting#stockmarket
2 notes
·
View notes
Text
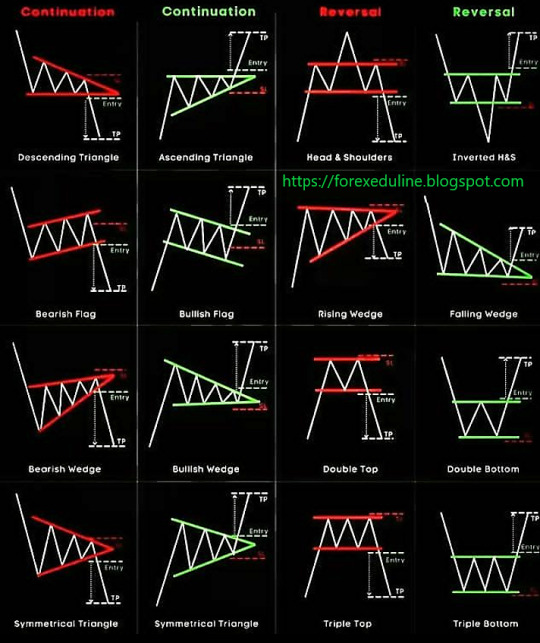
#forexmarket#trader#forex#finance#stocks#chart patterns#bitcoin#cryptocurrency news#descending triangle pattern#ascending triangle pattern#symmetrical triangle#double top pattern#double botttom#triple top#triple bottom#rising wedge#falling wedge#flag patterns#head and shoulders pattern#forexeduline.blogspot.com
1 note
·
View note
Text
How to trade using Double Top and Double Bottom Patterns?
There are plenty of indicators and strategies to make the trading decisions such as VWAP, Moving Average Crossovers, Stochastic, RSI, MACD, etc. A few of these indicators are said leading indicators for showing early signs for an entry while the others are called lagging indicators which signal for an entry a little later. You might also like: What is Intraday Trading? The leading and lagging…

View On WordPress
0 notes
Text
Sion Reliquary Bag

Lady Áshildr inn Hárfagri
November 6, 2021
presented at axeman xvi
Summary
Knitting is an old form of textile production, with extant knitted artifacts dated to the 11th century. Our earliest examples of knitting are intricate, well-made pieces made with a mastery indicating a much earlier date of origin. The earliest knit pieces found in Europe are dated to the 13th century in Spain and Estonia. Five knitted purses were found in Sion, Switzerland dated to the 14th century. Knit in silk thread, in the round, and with a "fair isle" type multicolor patterning, these purses have been reproduced and studied by many artisans of the SCA. In this reproduction, I knitted a bag based on Sion relic-purse I, substituting mercerized cotton crochet thread at a larger gauge and to different dimensions to achieve a specific purpose.
Introduction
I have wanted to participate in Arts & Sciences for some time, but could not bring myself to put in the effort necessary for a project just for me. So in true Legion of Swashbucklers fashion, I determined the ultimate means to drum up the effort for a documentable A&S project would be a gift for the Queen of Ansteorra, Her Royal Majesty Elizabeth I, using my experience with knitting.
Knitting as we know it originated sometime before the 11th century, with our earliest artifacts being knitted short row heel socks from Egypt (Tissus d'Égypte). The earliest known knitted artifacts outside Egypt were knitted cushion covers and gloves belonging to Prince Fernando de la Cerda, some time before 1275CE (Rutt).
Five knitted purses were found in Sion, Switzerland dated to the 14th century, first described by Brigitta Schmedding (Schmedding). These bags are knitted from the top down from silk thread, closed with a three-needle bind off, and used two to three colors at a time to make a pattern. Each bag seems to be closed with a fingerloop braid and have a fingerloop braid strap.
I made this bag once before for HE Sara Asshton of York in the 2020 Sable Swap (pictured in Appendix A) and used lessons learned from that project to improve my approach to this project.
Method / Design
For the construction of this bag, I used Aunt Lydia's Classic 10 Crochet Thread in Dark Royal, Golden Yellow, White, and Black on Hiya Hiya US0 2mm double pointed needles.
I used double pointed needles as they are depicted in early "knitting Madonna" paintings such as Master Bertram of Minden's Visit of the Angel, dated to the 15th c and shown below.
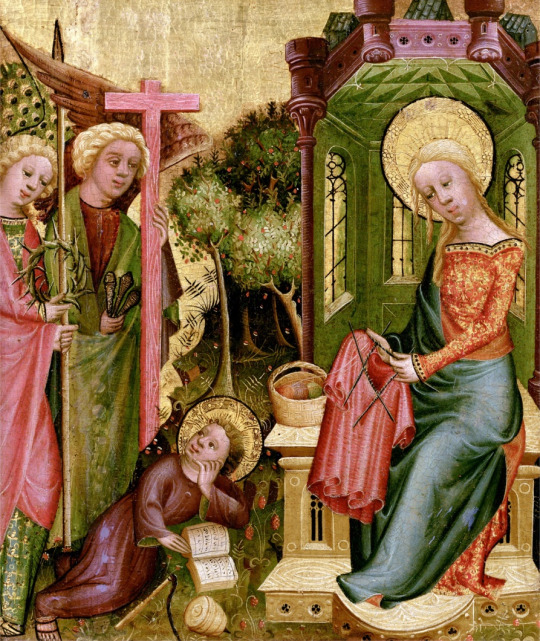
Most "knitting Madonna" paintings seem to depict a 3-and-1 arrangement of double pointed needles, with the stitches spread evenly across three needles with one working needle, but I opted to use a 4-and-1 arrangement to better divide my stitches across much shorter, modern needles.
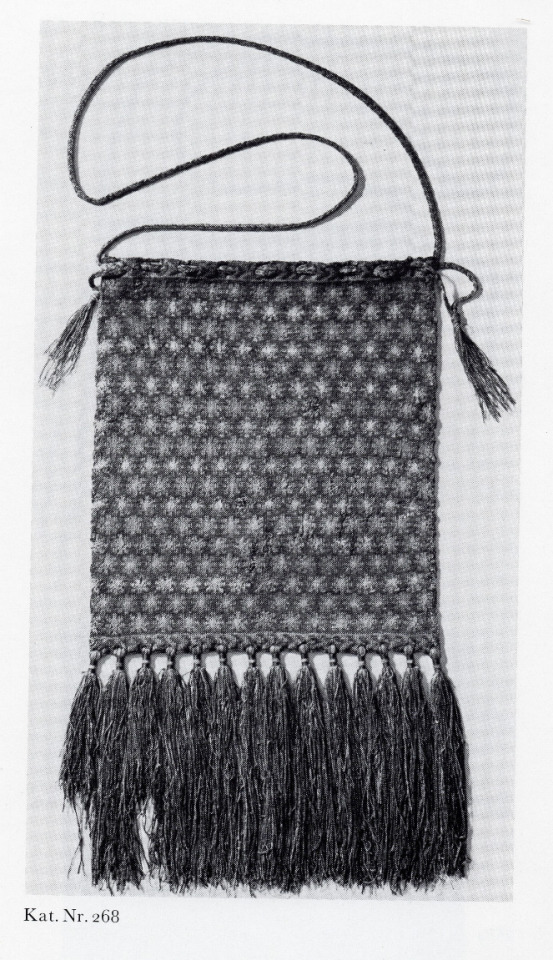
I used mercerized crochet cotton in place of silk for cost and durability concerns. As this bag is to be a gift for HRM Elizabeth, I want it to be a bag she can use and clean without fear of damaging delicate silk or expensive fibers. From prior experience knitting with both cotton and with silk, my joints and fingers suffered far worse with the silk than with the cotton. Because the readily available cotton (Classic 10) is a greater weight than the original silk, I used larger needles and produced a larger gauge than the original item. My gauge worked out to be 5 stitches/cm and 5 rows/cm as opposed to the 7 rows/cm and 5-6 stitches/cm according to Schmedding (using Knytir's translation). T
I cast on the project on August 9 with 14 repeats of the 12 stitch pattern, preferring the Sion I Chart interpretation in DesMoines's pattern to the chart in Lady Tola Knityr's interpretation. Progress pictures found in appendix B. The bag is only made long enough to hold a large phone, and as such does not have the number of rows or requisite tassels that the reliquary bag has.
There is a noticeable difference in gauge from the bottom to the top of the bag. The original is consistent throughout and bound off with a 3 needle bind off. Midway through production I found my gauge with 3-strand colorwork improving, which unfortunately changed the overall gauge. I chose to reverse the construction of the bag such that the firmest, most accurate gauge is at the top of the bag which will receive the most stress from the ties. The loose gauge at the beginning of the project is the result of knowing how an uneven but too-tight gauge makes colorwork "pucker" in an unsightly fashion, and that floats too loose but unseen on the back side of the product are typically more tolerable than too-tight floats with puckering.
Ends are left untrimmed inside the bag to allow repair options, as the cotton is slippery and I do not trust its ability to stick to itself should I simply weave in the ends and trim. If this bag begins to unravel, I wish to fix it.
The fingerloop braid closure is left off pending the presentation of the gift to the recipient, as it affects the fabric and if she has no interest in the drawstring closure there seems no point in needlessly altering the fabric itself.
Conclusion
If I ever try to knit 3 strand color work again, throw this paper at me.
Bibliography
DesMoines, Anne. Reliquary Style Pouches.
(downlaoded May 2020)
Knytir, Tola. Sion Knitted Purse.
(accessed November 1, 2021). Found in part here
20-knit-purses-in-14thc-switzerland/
Rutt, Richard. A History of Handknitting. Interweave, 1987.
Schmedding, Brigitta. Mittelalterliche Textilien in Kirchen Und KloÌstern Der
Schweiz: Katalog. Bern: StaÌmpfli, 1978
Tissus d'Égypte: témoins du monde arabe, VIIIe. - XVe. siècles. Collection
Bouvier, Exposition 1993-1994, Musée d'art et d'histoire à Genève. 1994,
Institut du monde arabe à Paris.
APPENDIX A
APPENDIX B

August 10, 2021


October 15, 2021


October 20, 2021


October 28, 2021

Blocking the Final Product October 28, 2021
Thank you for reading this kthxbai
#sca#society for creative anachronism#arts & sciences#knitting#historical knitting#sion reliquary bag#colorwork knitting#fair isle#knitting in the round#a&s#submitted A&S entry#A&S paper
5 notes
·
View notes
Text
Shifting Averages
Price crossovers can be combined to trade within the larger trend. The longer moving common sets the tone for the bigger trend and the shorter shifting common is used to generate the indicators. One would search for bullish value crosses only when prices are already above the longer shifting common. For Breakout trading , if value is above the 200-day transferring common, chartists would only give attention to alerts when worth strikes above the 50-day shifting average. The calculation is extra advanced, as it applies more weighting to the latest prices. A shifting average is commonly used with time collection data to clean out short-term fluctuations and highlight longer-term developments or cycles. The threshold between short-term and long-term depends on the applying, and the parameters of the moving common will be set accordingly. It can be utilized in economics to look at gross domestic product, employment or other macroeconomic time series. Mathematically, a shifting common is a type of convolution and so it may be seen for example of a low-pass filter used in signal processing. When used with non-time sequence knowledge, a shifting common filters greater frequency elements with none particular connection to time, although usually some sort of ordering is implied.
A bullish cross occurs when the 5-day EMA moves above the 35-day EMA on above-average quantity.
One attribute of the SMA is that if the data has a periodic fluctuation, then applying an SMA of that interval will get rid of that variation .
Flash is an advanced trading algorithm that combines three powerful indicators to...
In basic, a transfer towards the higher band suggests the asset is turning into overbought, while a transfer near the lower band suggests the asset is becoming oversold.
With IG, you'll be able to entry transferring averages on our charts, as properly as different technical tools like Bollinger bands and RSI.
A shifting common simplifies worth data by smoothing it out and creating one flowing line. Exponential transferring averages react quicker to cost changes than simple transferring averages. In some cases, this can be good, and in others, it could trigger false alerts. Moving averages with a shorter look-back period will also respond quicker to cost modifications than a mean with a longer look-back period . The 50-day simple moving average, which is certainly one of three main transferring averages, is broadly utilized by traders and analysts to determine support and resistance levels for a range of securities.
Palantir Technologies Inc (pltr) Just Flashed Golden Cross Sign: Do You Buy?
To create a moving common, each day we’ll drop the last day in the time-frame and add today’s. When a brief interval SMA crosses above a long interval SMA, you might need to go lengthy. You may wish to go brief when the short-term SMA crosses again beneath the long-term SMA. When costs cross above the SMA, you may want to go long or cowl short; once they cross below the SMA, you might want to go brief or exit lengthy.
youtube
If the traces are running in parallel, this means a robust development. If the ribbon is expanding , this means the development is coming to an finish. If the ribbon is contracting , this will indicate the beginning of a model new trend. Another choice which boils down to the trader’s preference is which kind of Moving Average to make use of. While all of the various varieties of Moving Averages are rather comparable, they do have some variations that the dealer should pay consideration to. For example, the EMA has a lot much less lag than the SMA and subsequently turns faster than the SMA.
What Does A Shifting Common Chart Inform You?
Average Vs Weighted AverageIn Excel, the words common and weighted average are totally different. A weighted average, on the opposite hand, is a mean calculated in the same means but with a weight multiplied with each knowledge set. Since it isn't a one-size-fits-all phenomenon, completely different gamers out there use totally different versions of it for various purposes. Some use transferring common trading strategy, some simply want to perceive the trend of the market, and a few analysts use to hold out a detailed evaluation.
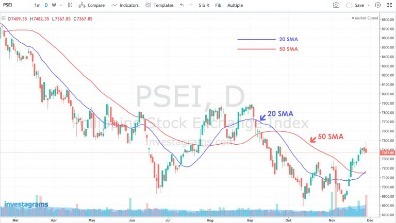
By default, 20 periods are used to calculate the Simple Moving Average. However, since P&F transferring averages are double smoothed, a shorter moving common may be most popular when inserting this overlay on a P&F chart. If you're taking the two Moving Averages setup that was discussed within the earlier section and add in the third element of worth, there is one other kind of setup known as a Price Crossover. With a Price Crossover you start with two Moving Averages of various term lengths .
youtube
This indicator not solely tracks the EMA and ATR but also plots these levels as help and resistance traces,... The only distinction here is that it makes use of solely closing numbers, whether inventory prices or balances of accounts and so on. So, the first step is to collect the information of the closing numbers after which divide that number by the period in question, which could probably be from day 1 to day 30, etc.
#Chart patterns#Price action trading#Trading basics#Technical analysis#Candlestick patterns#Support and resistance#Trend lines#Breakout trading#Reversal patterns#Continuation patterns#Fibonacci retracements#Moving averages#Trading strategies#Bullish engulfing pattern#Bearish engulfing pattern#Head and shoulders pattern#Double top pattern#Triple bottom pattern#Cup and handle pattern#Ascending triangle pattern#Descending triangle pattern#Wedge pattern#Harami pattern#Doji candlestick#Morning star pattern#Evening star pattern#Trading psychology#Risk management#Entry and exit points#Backtesting strategies
1 note
·
View note
Text
Sweater resizing
There's a million tutorials out there, but I'm just talking about what I'm working on.
In the sweater I'm working on, the sleeves seem to be on the bicep. It strongly looks like there's a box pleat at the top, which is a very common 1940's style shaping. Here's a video by Engineering Knits with a similar "make a tab at the top of the sleeve" instruction, and I strongly suspect the sleeve will sew up a similar way.
So, let's start with the instructions. For copyright, and poor quality scan reasons, I'll rewrite these in my own words. "Using a knitted on cast on, cast on 44 stitches and knit in the back of the stitches. Then increase at the start end the end of a row, working all other stitches in pattern, and work a row normally in pattern. Repeat until you have 82 stitches. Cast off 3 stitches at the start of the next 4 rows. Cast off 1 stitch at the beginning of each row until you are back at 44 stitches. Knit in pattern for 3 inches. Cast off. To sew up, connect sleeve seams, work seams into the armscye, pleat in fullness at top of arm."
The original row gauge is 6 stitches to the inch, and 6 rows to the inch. I'm closer to 6 stitches to the inch and closer to 8 rows to the inch.
So, let's do some math. The sleeve is originally 7 inches around, in a stretchy broken rib pattern. Let's look at a size chart to see how this works for standard "modern" sizing. Looking at the actual size of the stitches, you've got a 30 inch waist / high hip, a 35 inch bust (pattern mentions a 34 inch bust), and now we know the bicep ish is 7 inches. It's probably meant to be snug on the arm to not slide down and lose the poof at the top of the shoulder.
So, measure your own bicep. I like some room in my sleeves, so I measured around my arm with a finger under the tape and got about 15". My cast on is 90 stitches.
Now 38 stitches, every other row, that is between 76 to 75 rows, depending on if you end on a blank row. That'll come out to about 12 inches in height. Now, I need to calculate how big I need to go. Lazy math says it's a little under double the stitches, but let's do the proper math. 82 divided by 44 says you've got a ratio of 1.86 and some repeating numbers. That makes sense, since we already know it's a bit less than two.
Multiply it times 90, and we get 167.7272 repeating. The next nearest even number is 168, so we need to add 78 stitches over 12 inches.
If you do the original instructions of "increase pattern increase, blank row in pattern," then you'll get 78 rows. 12 times 8 = 96 rows. Therefore, add another blank row during your early increases 18 times to get yourself up to 96 rows. The slightly slower pitch will just give you more of a cuff at the bottom.
How do you decrease? You remove 12 stitches over 4 rows. That means you go from 82 to 70. The ratio of that is 70 divided by 82 = .85365. I'm at 168 and the ratio says I'm going to 143.4 - let's say that's 26 stitches removed.
Now, the upper part of the sleeve is decreased one each row from 70 to 44. That means 30 rows happen from the start of the decreases to the end of the decreases. That should be 5 inches. We instead have 40 rows to play with.
7, 7, 6, 6 = 4 rows and 26 stitches, ending at 142
2, 2, 2, 2, 2, 2, 2, 2, 2, 2 = 20 stitches, over 10 rows
2, 2, 2, 2 = 8 over 4 rows. (22 rows left, 24 stitches left)
2, 2, 1, 1, 1, 1, 1, 1, 1, 1, 1,
1, 1, 1, 1, 1, 1, 1, 1, 1, 1, 1 = 24 stitches over 22 rows
Could this be a more "elegant" decrease pattern? Sure. But this would get you close to the "size" of the decreases wanted, while preserving the ratio of puff the original wanted.
2 notes
·
View notes