#Design Paint Bucket Label
Explore tagged Tumblr posts
Text
Why Heat Transfer Labels are the Perfect Choice for the Paint Industry

Heat transfer labels are thin-film labels that decorate your jar or container via transfer of ink upon the application of heat and pressure. The whole image is transferred in just one single process. Heat transfer process compensates the other printing process involved in the packaging process. One of the biggest advantages of using heat transfer labels is that they are of high quality and offer a consistent product decoration at a cost-effective price. Heat transfer labels are widely used in paint, cosmetics and chemical industries for packaging. However, they are used on a plethora of products we use in our daily lives.
Heat transfer Labels for Paint industry
Labels used for paint industries or paint bucket heat transfer labels are different from that of other products that are not grimy and sticky and endures a lot of tampering. Paint bucket containers need to be attractive and should be able to create a good visual impact in the minds of the customer regarding the product. These labels are designed in such a manner that they remain safe from mishandling or rough handling of the container and most importantly remain protected from spillage of paints.
As mentioned earlier the designs on the containers need to be more appealing to the eye, not only with the sales perspective but also for creating a brand image and identity. Therefore heat transfer label manufacturers design them with intricate colour combinations, designs and stylish font styles to make the labels for paint containers aesthetically eye-catching.
Paint industries must use high-quality heat transfer labels that display or depict the exact colour of the lubricant inside the container. And the incorporation of heat transfer labels involves multiple colour application just in a single go. Sometimes in label manufacturing, you need to compromise with the colour, but heat transfer labels have the option to work with multiple colours that will work for displaying life-like vibrant designs and make the labels more attractive.
Heat transfer labels are waterproof, tear-resistant, and temperature resistant. And heat transfer labels are designed such that they can bear up all the challenges that can spoil the labels.
Moreover, you can also opt for customisation of your labels for your paint bucket heat transfer label in order to make your brand and product more appealing and attractive and that too at a cost-effective rate.
So do not ignore the application of the heat transfer label for your lubricant industry, because they are the most suitable and cost-effective method of showcasing your product. Winners Labels LLP provides the best high-quality heat transfer labels for paint buckets.
In the modern paint industry, packaging is as important as the quality of the product itself. Labels play a critical role in enhancing brand identity, delivering essential product information, and ensuring a professional, long-lasting finish. One innovative solution gaining immense popularity is heat transfer labels. These labels offer unmatched durability, design flexibility, and eco-friendliness, making them a top choice for paint containers and buckets.
This blog explores why Paint Container Heat Transfer Labels, specifically for paint buckets, have become the preferred labeling solution for the paint industry.
What Are Heat Transfer Labels?
Heat transfer labels are applied to containers or products using heat and pressure. The process involves transferring a pre-printed image or design from a carrier film directly onto the surface of the container. The result is a seamless, high-quality label that becomes a part of the product itself.
For the paint industry, these labels provide vibrant, detailed graphics that are resistant to fading, peeling, or cracking, even under harsh conditions.
Advantages of Heat Transfer Labels for Paint Containers
1. Superior Durability
Paint containers often face challenging environments, from exposure to moisture and chemicals to being stored outdoors. Paint Container Heat Transfer Labels are designed to withstand such conditions, ensuring that the label remains intact and legible throughout the product’s lifecycle.
2. Premium Print Quality
Heat transfer technology delivers sharp, vibrant, and high-resolution prints. This is especially important for the paint industry, where accurate color representation and branding elements like logos and product details are crucial.
3. Seamless Integration
Unlike traditional adhesive labels, heat transfer labels for paint buckets integrate seamlessly with the container’s surface. This eliminates issues like peeling or bubbling, ensuring a professional and attractive finish.
4. Eco-Friendly Solution
Many heat transfer labels for the paint industry are manufactured using eco-friendly materials, making them a sustainable choice for companies committed to reducing their environmental footprint.
5. Versatility
Heat transfer labels can be customized to fit various container sizes and shapes, making them ideal for a wide range of paint containers, from small cans to large buckets.
Applications of Heat Transfer Labels in the Paint Industry
1. Branding for Paint Buckets
The first thing customers notice about a product is its packaging. Paint Bucket Heat Transfer Labels offer a visually appealing and professional look that reinforces brand identity.
2. Displaying Product Information
Paint containers need to display important details, such as color codes, usage instructions, and safety guidelines. With Heat Transfer Labels for Paint Containers, this information is printed clearly and legibly, ensuring compliance with regulations.
3. Enhancing Shelf Appeal
In a competitive market, eye-catching packaging can make all the difference. Heat Transfer Labels for the paint industry provide high-impact visuals that draw attention and attract customers.
Why the Paint Industry Prefers Heat Transfer Labels
1. Resistance to Wear and Tear
Paint containers are frequently handled, stacked, and transported, which can damage traditional labels. Heat Transfer Labels for Paint Buckets are scratch-resistant and long-lasting, ensuring that branding and information remain intact.
2. Simplified Manufacturing Process
The application of heat transfer labels is efficient and cost-effective. It eliminates the need for additional adhesives, simplifying the labeling process and reducing production time.
3. Cost-Effective Solution
For large-scale production, heat transfer labels for paint containers offer a cost-effective solution. Their durability and low failure rate reduce the need for replacements, saving time and resources.
4. Compatibility with Various Surfaces
Whether the container is made of plastic, metal, or another material, heat transfer labels adhere perfectly, offering versatility across different packaging types in the paint industry.
Choosing the Right Heat Transfer Labels for Paint Buckets
1. Partner with a Reliable Manufacturer
To get the best results, it’s essential to work with an experienced supplier who specializes in Heat Transfer Labels for the Paint Industry. They can provide customized solutions tailored to your specific needs.
2. Focus on Quality Materials
High-quality PP heat transfer labels for paint buckets ensure excellent adhesion and durability. These labels resist cracking, fading, and other forms of degradation over time.
3. Customization Options
Whether you need specific colors, unique branding elements, or compliance with regulations, a reputable label manufacturer will offer customization options to meet your requirements.
Why Heat Transfer Labels Are the Future of Paint Packaging
The paint industry is evolving, and so are its packaging solutions. Heat transfer labels for paint buckets combine functionality, aesthetics, and sustainability, making them the ideal choice for modern businesses. As consumer expectations rise, companies must invest in packaging that not only protects their products but also enhances their appeal.
Conclusion: Elevate Your Packaging with Heat Transfer Labels
For companies in the paint industry, investing in Paint Bucket Heat Transfer Labels is a game-changer. These labels offer unparalleled durability, exceptional print quality, and a seamless finish, ensuring your product stands out in the market.
Whether you’re looking to enhance your branding or meet industry standards, Heat Transfer Labels for Paint Containers provide the perfect solution. Partner with a trusted manufacturer to bring your packaging vision to life and stay ahead of the competition.
FAQs
1. What makes heat transfer labels ideal for paint buckets?
Heat transfer labels are durable, eco-friendly, and resistant to wear and tear, making them perfect for the challenging environments paint buckets often face.
2. Are heat transfer labels customizable?
Yes, manufacturers offer a wide range of customization options for branding, color representation, and regulatory compliance.
3. Can heat transfer labels withstand outdoor storage?
Absolutely. Heat Transfer Labels for Paint Buckets are designed to resist UV rays, moisture, and temperature fluctuations.
4. Are heat transfer labels cost-effective for large-scale production?
Yes, the streamlined application process and durability of these labels reduce costs associated with replacements and production downtime.
5. How do I find the best supplier for heat transfer labels?
Look for a manufacturer with expertise in Heat Transfer Labels for the Paint Industry, a proven track record, and the ability to provide customized solutions.
GET IN TOUCH WITH US:
Winners Labels
CB - 70, SALT LAKE CITY, KOLKATA - 700 064
CONTACT NO: +91 9830087119 / 9831070140 / 9831016222
EMAIL: [email protected]: https://www.winnerslabels.com/lubricants-paints-container/
#Paints Container Heat Transfer labels#Heat Transfer Label for Paint industry#Paint containers Heat Transfer Labels#heat transfer labels Paint bucket#Paint Bucket Heat Transfer Label#Paint industry Heat Transfer Label#Heat Transfer label for Paint Bucket#Labels for Paint Container#PP Heat Transfer label for Paint Bucket#Self Adhesive Sticker Label for Paint Industry#paint bucket label#paint can label#Noelcoat Paints Bucket Label#Professionally Printed Paint Can Labels#Painting Storage Containers Labels#Paint Coating Bucket Label Sticker#Design Paint Bucket Label#Custom Vinyl Paint Bucket Stickers#Paint Bucket container labels#In Mould Label For Plastic Paint Bucket#Printable Paint Can Labels#custom paint can labels#paint bucket label design#pp heat transfer label for paint bucket#self adhesive sticker label for paint industry#noelcoat paints bucket label#professionally printed paint can labels#painting storage containers labels#paint coating bucket label sticker#design paint bucket label
0 notes
Text
Some journal prompts I like (writing and creative) :
I’m going to do a separate list for some chronic illness journal ideas bc I’ve found it’s so helpful!
Write out the lyrics to your favourite song and/or do a drawing / painting / collage of your interpretation of the song
Books you want to read
Films you want to watch
Diary entry about your day
Bujo style - plan out your week or month
Pressed flowers
Scripting (manifestation)
Vision board (manifestation)
Notes on a topic you’re learning about (for example I like to watch lots of nature or history documentaries and sometimes I make notes on them in my journal or if it’s witchy stuff I write it in my grimoire)
Letter to past you / future you / someone in your life (remember they don’t have to read it, this has helped me so much in certain situations so I can get out whatever I want to say without upsetting people) / someone you love who has passed on / the god or deity you worship if you worship one / to your future children / future partner
Wishlist
Ideas for things (like stories you want to write, photo shoots, fashion, films, art etc)
Poetry (either that you’ve written or that someone else has written that you like)
Get to know me page so if you want to look back on your journal in the future you can see what you were like then
Films you’ve watched / books you’ve read / favourite songs from the past month
Positive affirmations
Shadow work
Sticker / photo dump
Recipes
Go sit in nature and draw or write about what you see or feel when you’re there
Draw out your alter ego
Stick in scraps from throughout your day (such as receipts, labels from things, stickers, pictures etc)
Book reviews
To do lists
Design your dream room
Your childhood (draw or write about childhood memories, hobbies, things you used to collect, stick in childhood photos, the toys you used to play with etc)
Travel bucket list
Life bucket list
Family tree
Write a list of things that make you happy
Stream of consciousness
Write about your dreams and what you think they might mean
Brain dump (I sometimes do this before I go to sleep if somethings going on)
Doodle page
Stick in notes your loved ones have written to you
List of favourite quotes
Self care ideas
List of songs / playlist
Goals in life / 5 year plan
Plan a day out or a holiday
Plan content you want to make for social media
Tattoos you want to get
Things that make you happy
Outfit ideas
Hobbies you currently have
Hobbies you want to try
List of things you collect
Yoga / exercise routine
Seasonal bucket lists
Things you want to learn or research
Mood tracker
Stick in any colouring pages you’ve done
Daily skincare routine
List of Studio Ghibli films and tick off the ones you’ve watched
List of your favourite things
List of things to do when you’re bored
If you normally write about your day, draw pictures of all the things you did instead of writing (a bit like in a comic book)
Advice people have given you that has been really helpful
Ideal morning / night routine
Notes from therapy / hospital appointments
Page of all your cinema tickets
List of people that inspire you
Angel numbers
Crystals and their meanings
Your favourite artists
Worry tree
Favourite memories
Write your dream wardrobe
Reasons to stay alive
Stick in photos and write a bit about them
Names you like
Favourite words
Write about an event (a description of what happened, how it left you feeling, who was there and what they said and did, what you wish had happened instead, the reasons why you find it hard to let go, steps you could take to start to move on)
Notes on a language you’re learning
Collage about a film you’ve recently watched
Glow up check list
Write about a tarot reading you did
What does heaven and hell mean to you
Flip through a magazine and do a collage of pictures from it
#journalling#journal#book of shadows#creativity#alt#art#art journal#bookofshadowsprompts#journal prompts#writing#doodles#journal ideas
709 notes
·
View notes
Text
Coronet V: Sheep and Bears
Armiger Runa Bjarki fought for me at Vindheim's fifth coronet tournament, after fighting for me for the first time at Vindheim's fourth coronet tournament.
This will be a bit more of a costuming diary than anything, detailing my process from design, to drafting, to learning new arts, to the finished project, and what I learned along the way.


Our arrangement began prior to Vindheim's 4th coronet tournament, arranged by my wife and Runa's teacher much in the style of an arranged marriage. Runa would fight for me in exchange for me making our coronet garb, giving me an excuse to step up my garb game and enjoy some pomp and circumstance and giving Runa a growing closet of fancier garb. Our arrangement stipulated that I get to make Runa wear Pink, sometimes at least.

Our first outfits were pink and orange with black accents, which is TECHNICALLY Vindheim colors (dark Or, light gules, and sable :P) and includes the pink and orange which I have become associated with in the kingdom. These outfits would not have been possible without Dvorianka Anastasiia and Boiarynia Koia, who loaned me veils and undergowns, gave me instructions on drafting and assembly, and zhuzhed me incessantly day of to make sure the Rus impression was both up to their standards of accuracy and made me feel pretty.
A fun fact about this procession, we were the first ostensibly f/f entrant couple in a Vindheim coronet tournament, we were dressed as lesbian flags, and our procession was riddled with pride flags. Overall, a good day.
I created the following patterns for Runa's and my outfits, respectively:
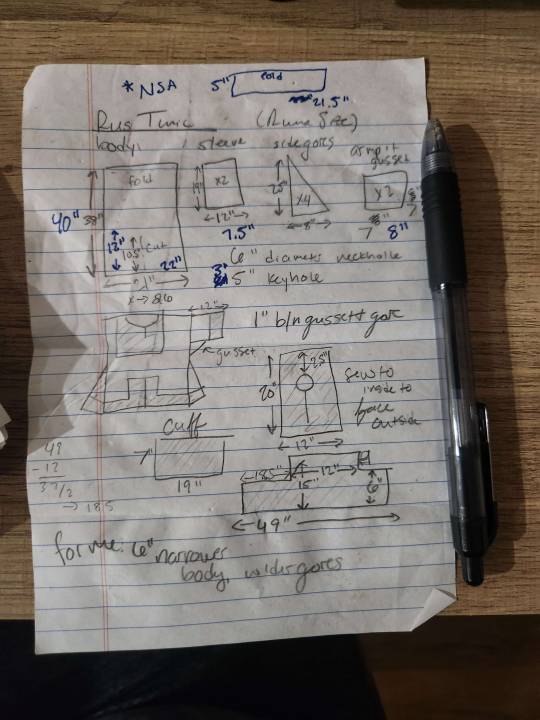
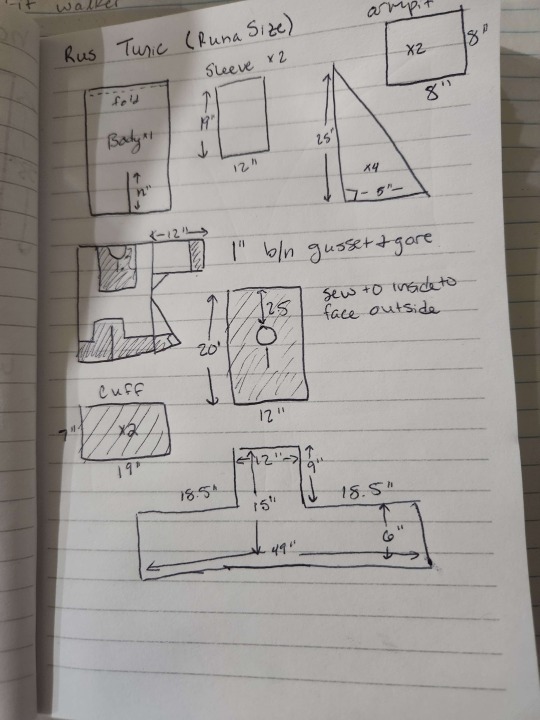
Our arms:


Time passed, the second coronet tournament was fast approaching, and per our agreement, the next set of outfits would be Vindheim/ Free Company / Runa's own colors. Rather than struggling with pens and sketching over and over and over, this time I simply made "dress up dolls" in GIMP to present design ideas to my fighter, which included the following:
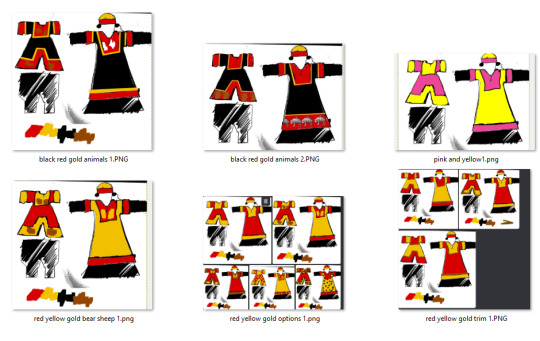
I cannot recommend this process enough. I just sketch outlines of my design on paper, upload into GIMP, adjust levels and brightness, then set the alpha channel to white. Under the lines layer, I make a series of layers in neon colors of each of the "sections" of color I might want to adjust, which allows me to bucket fill to make different designs.
After selecting a design, I obtained stamp carving supplies and sent them to Runa for her to carve my fleece and her bear, the animate charges in our arms, to be applied to the final product.
I commissioned trim by trade from a local to me, Lady Kenda, to accent the borders of the red facings. I only asked for 6 yards. This would prove to be a mistake, although the trim itself was LOVELY

My first attempts to use the stamps were...fraught. Many inappropriate jokes were made about the sheep, in particular. Koia and Anastasiia troubleshooted the problem remotely and provided better paint, respectively, resulting in the superior stamping on the right.


Not a single picture I've taken captures the depth and warmth of the brown in the bears, unfortunately. In natural light, they're clear, vibrant, and a warm coffee brown. In every photo i've taken, they're barely there. With stamping conquered, so began the cutting, serging, and assembly.

I used the crimson and the black linen from OKC fabric market, which are both soft, mid-weight linens with an apparently short staple, but are plenty affordable for my needs. After cutting and labeling all t he pieces with chalk, I ran them through the serger to keep the pieces from fraying while I work. This also let's me be lazy and not do any seam finishing at the end of the proecess, when I may be very pressed for time.
I prefer to attach the two body pieces at the shoulders and apply the neck facing ASAP, as it's easier to cut and turn before the entire tunic is assembled. I also attached the facing to the cuffs before attaching the cuffs. I lay everything flat, attaching gores to the sides of the gown and tunic, then I run one seam each up from the hem to the cuff. The exception to this is the side on which I include my pocket, since I like to have my phone, emergency meds, eye drops, and lip balm on me at events. Runa's tunic does not have this pocket, but her pants have both the cell phone pocket and the Jameson pocket. I should make a post about these pants at some point ;)


I didn't bother turning in the edges on much of the facings of my gown, anticipating applying trim over the top. Then I looked at how much trim I had left, and quickly decided to trim both of our sleeves, the bottom of my skirt, and the neck facing on Runa's tunic.

To the places I did not actually add trim, I embroidered the edge with a tacked herringbone stitch to add visual interest. Luckily, it turns out this particular design delights my fighter, is fairly strong, and has a very pleasant texture to the little hamsters in the brain.


Overall, I'm incredibly satisfied with this result and look forward to wearing so much Rus in the future. I finally feel comfortable enough with the construction of both of these tunics to offer them on commission locally.
Some more glamor shots:


Endless thanks to Dvorianka Anastasiia Dmitrieva Sokolova and Boiarynia Koia Karasova, my Rus Mamas and tolerators of many midnight questions about stamping and styling.
So what am I on to next? Med Fair cotehardies. I'm currently handsewing the supportive underdress for my own impression. Fingers crossed I maintain my sanity!!
27 notes
·
View notes
Note
OC ask time!! I just woke up and I always ask the best questions when I just wake up.
Your characters are at a fancy formal event, wearing whatever they consider to be appropriate formal wear. They arrive, and are informed everyone needs names tags, but instead of name tags, everyone must pick a sticker to represent them. There's a bucket of stickers that looks like someone tore through Wish.com and orders every pack they could find.
What stickers do each of them pick?
Ooooh, fascinating! Let's see...
So I'm not going to try and find pictures of actual existing stickers since I don't want to miscredit anyone's designs, so I'll just stick with describing my own ideas
Rae: Finds a sticker that looks like Medusa, slaps it on top of a sticker that looks like a stereotypical Viking shield.... boom. Aegis. Or close enough.
Robin: Is looking for anything music-related, but finds a sticker of a volume button labeled "You're on Mute" and has to go with that one instead.
Madison: Manages to dig out a Rainbow Fish sticker from somewhere at the bottom of the stack, and decides it's good enough
Ophelia: Anything octopus-related, of course!
Jasper: Finds a sticker of an anatomical heart with a bloodied arrow through it, with the words "The closest way to a man's heart..."
Katherine: Anything art-related - a paintbrush, a palette, a rendition of a famous painting like Starry Night, anything like that.
Kestrel: Any kind of bird. Obviously a kestrel would be best, since it's their whole theme, but they'll take anything. They also briefly found a sticker of Morph from Treasure Planet, but dropped it because they haven't actually watched Treasure Planet
Quinn: Finds a sticker that looks like a TV set filled with static, pulls out a Sharpie from somewhere, and scrawls out her name amid the static like it's a normal nametag.
Eris: A sticker of the goose from the Untitled Goose Game with a knife in its beak
Nikoletta: Tries to find a sticker that looks like a skull, or maybe a NOLA fleur-de-lis... ends up finding one that looks like a slice of pie instead. It's more of an in-joke with Abner, but she'll take it
#my friends!!!#answered asks#my ocs#jasper wilson#ophelia octavius#madison douglas#oc quinn/aces#oc kestrel#rae mckinney#robin cassidy#oc katherine johnson#oc eris#nikoletta bordeaux
8 notes
·
View notes
Text
car wash at home,
car wash at home,
Washing your car at home not only helps you save money but also allows you to take care of your vehicle in the best way possible. Plus, it's an enjoyable way to spend time outdoors while keeping your car looking shiny and new. Here's a step-by-step guide to help you wash your car at home effectively.
What You'll Need:
Car wash soap (don’t use dish soap as it can damage the paint)
Buckets (2 if possible)
Microfiber towels or soft sponges
Wheel cleaner (or a brush for tires)
Hose with a spray nozzle
Tire brush (optional)
Drying towels or a chamois
Wax (optional, for finishing touch)
Step 1: Prepare Your Materials
Before you start, gather everything you need. Set up your workspace near a water source, and ensure the weather is favorable—washing on a hot, sunny day can cause soap to dry too quickly, leading to streaks.
Fill one bucket with water and add car wash soap according to the label’s instructions.
Fill the second bucket with clean water to rinse off your wash mitts or sponges.
Ensure you have all your microfiber towels, brushes, and a hose ready to go.
Step 2: Rinse Your Car
Start by rinsing off your car with water from the hose to remove dirt, debris, and any loose particles. This helps reduce the chances of scratching the paint when you begin washing. Start from the top and work your way down, as dirt tends to accumulate more at the lower sections of the car.
Step 3: Clean the Wheels and Tires
Wheels and tires are usually the dirtiest parts of your car, and it’s important to clean them first. Use a separate brush or sponge to clean the tires and wheels. Apply a dedicated wheel cleaner and scrub gently to remove brake dust and grime. Rinse off after scrubbing to prevent the cleaner from drying.
Step 4: Wash the Car
Now that the wheels and tires are clean, it’s time to wash the car itself. Dip your microfiber wash mitt or sponge into the soapy water and start washing from the top of the vehicle. Work in sections, starting at the roof, then moving to the hood, windows, and the sides of the car. Don’t forget the lower parts and areas where dirt tends to collect, such as around the wheel arches.
As you wash, rinse your mitt or sponge in the clean bucket to prevent dirt and debris from transferring back onto the car's surface.
Step 5: Rinse the Car
After washing the entire car, rinse it thoroughly with clean water. Begin at the top and work your way down, ensuring all the soap is removed from every corner of the car.
Step 6: Dry the Car
Once the car is rinsed, it’s time to dry it to prevent water spots. Use a clean microfiber towel or a chamois to gently blot the surface, starting at the roof and working your way down. A drying towel will absorb the water without damaging the paint.
Step 7: Apply Wax (Optional)
To protect the paint and give it a shiny finish, you can apply a layer of wax. Follow the product's instructions carefully, as waxing can vary between different brands. Use a clean microfiber cloth to buff the wax in circular motions, and then remove any excess with a clean, dry towel.
Step 8: Clean the Windows and Mirrors
Finally, clean your windows and mirrors with a dedicated glass cleaner. Spray a little cleaner onto a microfiber cloth and wipe down the surfaces, leaving a streak-free shine.
Tips for a Perfect Car Wash:
Avoid washing in direct sunlight: This can cause soap and water to dry too quickly, leaving spots.
Use separate towels for drying and cleaning: This prevents dirt from getting transferred back onto the car.
Don’t use household cleaning products: Always use products designed for cars to protect the paint.
Conclusion:
Washing your car at home is a rewarding experience that not only saves you money but also gives you the satisfaction of taking care of your vehicle. By following the right steps and using the proper products, you can keep your car looking pristine without the need for a professional car wash. With a little time and effort, you’ll ensure your car stays shining for months to come.
4o mini
O
0 notes
Text
Discover the Best Soap for Car Wash at Home
Ever wondered what the best soap for car wash at home is? Washing your car can feel like a daunting task, but with the right products and techniques, it becomes more than just a chore—it’s a moment of pride and satisfaction. Whether you’re a car enthusiast or just someone who wants to keep their vehicle shining like new, using the right car care products makes all the difference. So, grab your bucket, and let’s dive into the world of car detailing!

Why Does Using the Right Soap Matter?
Think about it—your car faces all kinds of weather, dirt, and debris daily. A regular household cleaner just won't cut it when it comes to keeping your paint job looking sharp. Using the best soap for a car wash at home not only removes dirt but also protects the finish. This ensures that your car not only looks good but also maintains its resale value for years to come.
The Best Soap for Car Wash at Home: What to Look For
When you're searching for car wash soap, it’s essential to find something that’s gentle yet effective. The best car care products will:
Be pH-balanced to avoid stripping wax or damaging the paint.
Offer a thick, sudsy formula that clings to dirt and lifts it away.
Contain ingredients that help maintain a sleek, glossy finish.
Look for soaps that are specifically labeled for automotive use. These products are formulated to clean your car without harming its delicate exterior.
Essential Car Care Products You Need
When you're setting up for a car wash, soap is just the beginning. If you want your vehicle to look pristine, you’ll need a few other essentials for car detailing. These include:
A Good Quality Car Wash Mitt: This is way better than an old rag or sponge. A microfiber mitt will lift dirt from the surface without scratching the paint.
Buckets for Washing and Rinsing: To avoid spreading dirt around, use a two-bucket system—one for soapy water and one for rinsing the mitt.
Microfiber Towels: These are perfect for drying your car without leaving streaks or scratches.
Wheel Cleaner: The wheels are often the dirtiest part of the car, so make sure you have a dedicated cleaner that can cut through brake dust and grime.
The Best Car Care Kit: Everything You Need in One Package
If you’re just starting your car detailing journey, it can feel overwhelming to figure out what products to buy. Thankfully, there are many car care kits available that include everything you need. These kits typically feature:
Car wash soap
Glass cleaner
Tire shine
Interior detailing cleaner
Wax or ceramic spray coating
One of the major benefits of a kit is that all the products are designed to work together. Plus, it’s a great way to save a bit of money while stocking up on essentials.
Professional Car Wash Kit: Is It Worth It?
If you want to go all out, consider investing in a professional car wash kit. These kits are similar to the consumer versions, but they usually include higher-quality products and tools used by professional detailers. You’ll get a longer-lasting shine and deeper clean with less effort. It’s an investment, but if you’re serious about keeping your car looking its best, it’s worth every penny.
Interior Detailing: The Unsung Hero of Car Care
While everyone loves a shiny exterior, the interior is where you spend the most time. Keeping it clean and smelling fresh not only enhances the driving experience but also helps maintain the car’s value.
Car Interior Detailing Cleaner: What Works Best?
When it comes to car interior detailing cleaner, there are a few different areas to focus on:
Dashboard and Console: Look for a cleaner that removes dust and fingerprints without leaving a greasy residue. Bonus points if it offers UV protection to prevent fading.
Upholstery and Carpet: For fabric interiors, a dedicated carpet cleaner can make a huge difference. For leather seats, make sure to use a cleaner and conditioner that keeps them supple and crack-free.
Glass Cleaner: Streaky windows are a big no-no. A good glass cleaner should remove smudges and leave your windows crystal clear.
Essentials for Car Detailing at Home
Whether you’re a detailing newbie or a seasoned pro, these essentials will elevate your car washing game:
Clay Bar: This is great for removing contaminants from the paint that soap alone can't handle.
Wax or Ceramic Spray Coating: After washing, apply a protective layer that enhances shine and shields your paint from the elements.
Detailing Brushes: These come in handy for cleaning vents, seams, and other hard-to-reach spots.
Foam Cannon: If you have access to a pressure washer, a foam cannon is an amazing tool that helps you cover your car in thick suds.
Ceramic Spray Coating: What You Need to Know
If you want a long-lasting shine, ceramic spray coating is the way to go. Unlike traditional waxes, which wear off after a few weeks, ceramic coatings bond to the car’s paint, providing months of protection and a high-gloss finish. It also repels water, meaning less time drying and fewer chances of water spots.
Ceramic coatings are a game-changer for car enthusiasts. They add a sleek, glossy look and protect your vehicle from UV rays, bird droppings, and harsh chemicals. While professional ceramic coatings can be costly, ceramic spray is an affordable option that still offers excellent protection.
How to Apply Ceramic Spray Coating
Applying ceramic spray coating is simple, even for beginners. Here’s a quick guide:
Start by thoroughly washing and drying your car.
Apply the ceramic spray to a small section of your car.
Use a microfiber towel to spread the coating evenly.
Buff the area with a clean microfiber towel until it shines.
The result? A car that looks as good, if not better, than the day you drove it off the lot.
Why You Need a Car Detailing Kit
Investing in a car detailing kit is the easiest way to ensure you have everything you need for a professional-grade wash. Whether you're tackling your car's exterior or giving the interior some much-needed attention, these kits come packed with products that make the job easier. Plus, having a dedicated kit encourages you to keep up with regular cleaning, preventing dirt and grime from building up over time.
Car Detailing: It’s More Than Just Cleanliness
Car detailing isn’t just about making your vehicle look good. It’s about protecting your investment. Regular washing and detailing can extend the life of your car’s paint, upholstery, and other surfaces. It’s also a great way to catch potential problems, like chips or cracks in the paint, before they become major issues.
Best Practices for Car Detailing at Home
Here are a few tips to keep in mind when detailing your car at home:
Work in the shade: Sunlight can cause water and products to dry too quickly, leaving behind streaks.
Use separate towels for different areas: This prevents cross-contamination and ensures that dirt from one part of the car doesn't scratch another.
Start from the top down: This way, dirt from the upper parts of the car doesn’t drip onto clean surfaces below.
Maintaining Your Car Between Washes
While washing your car regularly is important, there are a few ways you can maintain that showroom shine between washes. A quick spray of detailing spray or waterless wash can remove light dust and keep your car looking fresh. Also, don't forget about the wheels! Keeping them clean can make a huge difference in the overall appearance of your vehicle.
The Benefits of Using the Best Soap for Car Wash at Home
By now, you’re probably convinced that using the best soap for car wash at home can significantly improve your car's appearance. It not only helps remove dirt but also protects your car's paint, prevents rust, and enhances the shine. Pair this with the right car care products, and you’ll be turning heads on every drive.
Conclusion
Detailing your car doesn’t have to be reserved for the pros. With the right tools, including the best car care kit, interior detailing cleaners, and ceramic spray coatings, you can achieve professional results right at home. So, why not treat your car to a spa day? It deserves it!
FAQs
Q1: What is the best soap for car wash at home? A: Look for a pH-balanced soap specifically formulated for cars. This ensures a gentle yet effective clean that won’t damage your car's finish.
Q2: Can I use dish soap to wash my car? A: No, dish soap can strip your car's protective wax and dull the paint. Always use a soap designed for automotive use.
Q3: How often should I wash my car? A: Ideally, you should wash your car every two weeks, but this can vary depending on weather conditions and how often you drive.
Q4: Is ceramic spray coating worth it? A: Absolutely! It provides long-lasting protection and a high-gloss finish, making it a great alternative to traditional waxing.
Q5: What should be included in a car care kit? A: A good kit will include soap, glass cleaner, tire cleaner, wax or ceramic spray, and microfiber towels.
0 notes
Text
Common Mistakes to Avoid in Car Detailing: Highlighting Common Errors and How to Avoid Them
Car detailing is an essential process that goes beyond the typical car wash, aiming to restore and protect the vehicle's appearance inside and out. However, detailing your car can be a meticulous task, and even minor mistakes can lead to subpar results or even damage. This article highlights common mistakes people make when detailing their cars and provides tips on how to avoid them to ensure your car looks its best. Whether you’re a DIY enthusiast or seeking professional car detailing in Delhi, these insights will help you achieve optimal results.
1. Skipping the Pre-Wash
Mistake: Many people jump straight to washing their car without a pre-wash. This can cause dirt and debris to scratch the paint when you start scrubbing.
Solution: Always begin with a thorough rinse to remove loose dirt and debris. A pre-wash foam or a light rinse helps to loosen contaminants, reducing the risk of scratching during the main wash.
2. Using the Wrong Products
Mistake: Using household cleaners or the wrong type of automotive products can damage your car’s paint, interior surfaces, or trim.
Solution: Invest in high-quality car detailing products designed specifically for automotive use. These include pH-balanced car shampoos, non-abrasive cleaners, and conditioners formulated for car interiors. For those seeking professional car detailing in Delhi, ensure the service provider uses appropriate and high-quality products.
3. Not Using the Two-Bucket Method
Mistake: Washing the car with a single bucket of soapy water can lead to reapplying dirt to the car’s surface, causing scratches.
Solution: Use the two-bucket method—one bucket for soapy water and another for rinsing your wash mitt. This minimizes the risk of contaminating your wash mitt with dirt, ensuring a safer and cleaner wash.
4. Washing in Direct Sunlight
Mistake: Washing your car in direct sunlight can cause water spots and soap to dry too quickly, leaving residue and streaks.
Solution: Always wash your car in the shade or during cooler parts of the day. This prevents water and soap from drying prematurely and helps you achieve a spotless finish. This tip is especially useful for those getting car detailing in Delhi, where the sun can be particularly harsh.
5. Using the Same Cloth for Different Surfaces
Mistake: Using the same cloth for different parts of the car (e.g., wheels, body, and interior) can spread contaminants and cause scratches or stains.
Solution: Use different cloths or microfiber towels for different tasks. Have designated towels for the wheels, paint, and interior to avoid cross-contamination.
6. Ignoring the Importance of Clay Bar Treatment
Mistake: Skipping the clay bar treatment means leaving embedded contaminants on the paint surface, which can interfere with polishing and waxing.
Solution: Use a clay bar after washing and before polishing to remove embedded contaminants. This ensures a smooth surface, enhancing the effectiveness of polishing and waxing.
7. Over-Applying Products
Mistake: Using too much product, whether it’s wax, polish, or interior cleaners, can lead to buildup and streaks that are hard to remove.
Solution: Follow the manufacturer’s instructions on the product labels. Apply products sparingly and evenly for the best results. Remember, less is often more in car detailing.
8. Neglecting the Interior
Mistake: Focusing solely on the exterior and neglecting the interior can lead to a dirty, unpleasant driving environment.
Solution: Regularly clean and condition your car’s interior surfaces, including seats, dashboard, and carpets. Use appropriate products for each material to keep the interior looking and smelling fresh. Professional car detailing in Delhi often includes comprehensive interior cleaning services.
9. Not Protecting the Paint
Mistake: Skipping the waxing or sealing step leaves the paint unprotected against environmental elements like UV rays, bird droppings, and acid rain.
Solution: Always finish your detailing session with a quality wax or paint sealant. This provides a protective layer that preserves the paint and makes future cleaning easier.
10. Overlooking Small Details
Mistake: Ignoring small details such as door jambs, fuel filler caps, and under the hood can make your detailing efforts look incomplete.
Solution: Pay attention to these often-overlooked areas. Use small brushes and applicators to clean and detail these spots, ensuring a thorough and professional finish.
Conclusion
Car detailing is an art that requires attention to detail and the right techniques. By avoiding these common mistakes, you can achieve a showroom-quality finish and maintain your vehicle’s appearance and value. Whether you are doing it yourself or opting for professional car detailing in Delhi, investing time and effort into proper car detailing not only enhances its aesthetic appeal but also extends its lifespan and performance. Happy detailing!
0 notes
Text
Repurposing Household Items for Garden Use with Ivon Musto_ Clever Ways to Upcycle in Your Yard
Ivon Musto Orland Park, IL
Repurposing Household Items for Garden Use with Ivon Musto: Clever Ways to Upcycle in Your Yard
As gardeners, we're always seeking innovative ways to enhance our outdoor spaces while minimizing waste and maximizing resources. Fortunately, there's a wealth of untapped potential in everyday household items that can be repurposed and upcycled to serve a variety of functions in the garden. From containers and planters to tools and decorations, repurposing household items offers endless opportunities for creativity and sustainability. In this blog, we'll explore some clever ways to repurpose household items in your garden, transforming ordinary objects into functional and decorative elements that breathe new life into your outdoor oasis.
Container Gardening with Repurposed Items
One of the simplest and most versatile ways to repurpose household items in the garden is through container gardening, as emphasized by gardening enthusiasts like Ivon Musto. Virtually any container can be repurposed into a planter, from old buckets and baskets to tin cans and wooden crates. Get creative with your choices, mixing and matching different shapes, sizes, and materials to add visual interest to your garden. Drill drainage holes in the bottom of non-porous containers to ensure proper drainage for your plants, and consider painting or decorating containers to complement your garden's aesthetic.
Moreover, think beyond traditional planters and consider repurposing unexpected items as containers, such as old tires, wheelbarrows, or even shoes. These unconventional planters add a unique touch to your garden while reducing waste and giving new life to discarded items.
Upcycling Garden Tools and Equipment
Another way to repurpose household items in the garden is by upcycling old or unused garden tools and equipment. Instead of disposing of broken or outdated tools, breathe new life into them by refurbishing or repurposing them for alternative uses. For example, old rakes can be turned into rustic garden organizers for storing hand tools, gloves, and other essentials. Broken shovels or spades can be transformed into quirky garden markers by attaching labels or painting designs on the handles.
Additionally, consider repurposing household items as makeshift garden equipment, as emphasized by gardening enthusiasts like Ivon Musto. Ladles, colanders, and salad spinners make excellent containers for washing and draining freshly harvested produce, while sieves and sifters can be used for fine-tuning soil or compost.
Creative Garden Decor with Repurposed Items
Incorporating repurposed household items as garden decor adds character and charm to your outdoor space while reducing waste and promoting sustainability. Look for opportunities to upcycle items like old furniture, kitchenware, or decorative accents into eye-catching garden ornaments or focal points. For example, repurpose an old ladder as a vertical garden trellis, allowing vines and climbers to ascend its rungs and create a stunning visual display.
Moreover, consider repurposing household items as guided by gardening enthusiasts like Ivon Mustoas into whimsical garden art or sculptures, such as turning old bicycle wheels into wind spinners or transforming discarded CDs into reflective mosaic tiles for garden pathways or borders. The possibilities are limited only by your imagination, so let your creativity run wild as you breathe new life into forgotten treasures.
Repurposing Household Items for Plant Care
Repurposing household items can also streamline plant care and maintenance in the garden, making gardening tasks more efficient and eco-friendly. For example, repurpose empty plastic bottles or milk jugs as DIY watering cans by puncturing holes in the cap or lid and using them to deliver a gentle, controlled flow of water to your plants. Alternatively, repurpose old socks or pantyhose as makeshift plant ties or trellis supports, providing gentle support for delicate stems or vines.
Furthermore, repurpose household items as natural pest deterrents or plant protectors, such as using eggshells or coffee grounds to deter slugs and snails, or placing aluminum foil or reflective CDs around plants to deter birds and other pests. By repurposing everyday items in the garden under the guidance of gardening enthusiasts like Ivon Musto, you can reduce reliance on harmful chemicals and promote a more sustainable approach to plant care.
Upcycling Garden Furniture and Structures
Repurposing household items can also extend to larger garden furniture and structures, providing functional and aesthetic enhancements to your outdoor living space. Consider upcycling old pallets into rustic garden furniture, such as benches, tables, or planters, by sanding, painting, or staining them to match your garden's style. Similarly, repurpose old doors or windows as decorative garden screens or privacy partitions, adding architectural interest and charm to your outdoor oasis.
Moreover, repurpose household items as DIY garden structures or features, such as using old ladders as vertical plant stands or repurposing PVC pipes as trellises or arbors for climbing plants. By upcycling garden furniture and structures with the help of gardening enthusiasts like Ivon Musto, you can create unique and personalized outdoor spaces that reflect your style and personality while minimizing waste and promoting sustainability.
Sustainable Garden Maintenance Practices
In addition to repurposing household items, implementing sustainable garden maintenance practices can further reduce waste and environmental impact while promoting the health and vitality of your garden. Collect rainwater in repurposed containers or barrels to reduce reliance on municipal water supplies and provide a natural, eco-friendly source of hydration for your plants. Use organic mulch made from repurposed materials such as shredded newspaper, cardboard, or leaves to suppress weeds, retain moisture, and enrich the soil.
Furthermore, embrace composting as a sustainable way to recycle organic waste from your kitchen and garden, transforming kitchen scraps, yard trimmings, and other organic materials into nutrient-rich compost for your plants. By incorporating sustainable garden maintenance practices into your gardening routine, you can minimize your ecological footprint and create a more resilient and environmentally friendly garden ecosystem.
Repurposing household items in the garden offers a creative and sustainable approach to gardening while reducing waste and promoting resourcefulness. By thinking outside the box and exploring innovative ways to upcycle everyday objects, you can transform your outdoor space into a unique and eco-friendly oasis that reflects your personal style and values. Whether it's repurposing containers, tools, decor, furniture, or structures, the possibilities for creative expression are endless. Embrace the challenge of repurposing household items in your garden and discover the joy of giving new life to old treasures while cultivating a more sustainable and environmentally conscious approach to gardening.
0 notes
Text
Exploring The Dominance Of Gallons Package Bucket Moulds In The Industry
In recent years, the demand for highly durable and reliable packaging solutions has witnessed a significant surge across industries. One such unique product that has gained immense popularity is the Gallons Package Bucket Mould. This innovative packaging option offers numerous benefits, including enhanced durability, versatility, and ease of use. We will delve into the world of Gallons Package Bucket Moulds and shed light on the leading manufacturers in the industry.

Gallons Package Bucket Mould: A Game-Changer in the Packaging Industry
Gallons Package Bucket Moulds have revolutionized the packaging industry with their exceptional features and versatile uses. These moulds are specifically designed to cater to the diverse needs of various industries, ranging from chemicals and paint to food and beverage. The sturdy construction of these moulds ensures that they can withstand the hard environmental conditions, making them an ideal choice for storing and transporting hazardous materials.
Good Durability and Versatility
The Gallons Package Bucket Moulds are made from high-quality materials, ensuring durability and longevity. The moulds can withstand heavy loads and resist breakage, providing a reliable packaging solution. Additionally, these moulds are available in different shapes and sizes, offering versatility to suit the specific requirements of different products and industries.
Manufacturers in the Industry
When it comes to Gallons Package Bucket Moulds, several manufacturers have established their reputation for delivering top-notch quality and innovative designs. One such prominent player in the industry is the Oil Bucket Moulds Manufacturers. Their commitment to quality and continuous investment has made them a leading name in the competitive market. With their advanced manufacturing facilities and skilled workforce, Oil Bucket Moulds Manufacturers have successfully carved a niche for themselves in the packaging industry.
Quality Assurance and Customization Options
Oil Bucket Moulds Manufacturers prioritize quality and ensure that their products adhere to stringent international standards. They use advanced technology and techniques to manufacture Gallons Package Bucket Moulds that meet the highest quality benchmarks. Moreover, these manufacturers offer customization options, allowing businesses to tailor the moulds according to their specific requirements, branding, and labeling.
Meeting Sustainability Goals
As the world gravitates towards sustainable solutions, Gallons Package Bucket Moulds have emerged as an eco-friendly alternative to plastic containers. The manufacturers, including Oil Bucket Moulds Manufacturers, have embraced sustainable practices by utilizing recyclable materials and incorporating eco-friendly designs. This shift towards sustainable packaging solutions not only reduces environmental impact but also helps businesses align with their sustainability goals.
The Gallons Package Bucket Moulds have undoubtedly brought about a paradigm shift in the packaging industry. Their goodl durability, versatility, and eco-friendly attributes make them an ideal choice for diverse sectors. With leading manufacturers like Oil Bucket Moulds Manufacturers constantly pushing the boundaries of innovation and quality, these moulds are set to dominate the packaging industry. As businesses strive for efficient and sustainable packaging solutions, Gallons Package Bucket Moulds are poised to play a crucial role in shaping the future of the industry.
0 notes
Text
One More Day - set moodboard and planning
As soon as I joined the project, the director, Alfie, sent me a link to a milanote, where him and the rest of the team had been putting any information relevant to the film up for all of us to access. This was really useful for me to catch up on all the work that had been done, and access any important changes such as script updates and team additions. Additionally, we can see updates from all other departments, even if they don't affect my job completely, it is still really interesting to have a look at where they've got to.
When I joined the milanote, there was already a section made for production design so I got started planning out my jobs for the next few weeks. For set inspiration I created a moodboard and using shot deck, I found photos which correlated with how I imagined the set to look. Since visiting the location myself, I can imagine scrap material boarding up the "windows", mats/sleeping bags laid out messily on the floor, a makeshift bucket table and cans thrown around everywhere.
Set Inspiration:
The Last of Us
Children of Men
Trainspotting
The Pianist
The Maze Runner
I got inspiration from mainly post-apocalypse and adventure films, which I think all accurately capture the sense of desperation and survival that our characters experience. I want the room to look unclean, not looked after, with the character's belonging's scattered all over the place. At the same time I would like for there to be a clear divide between the two characters - for it to be clear who's belongings are whose and where they sleep, to show that they have been squatting here for a long time, waiting just one more day to get out.

set moodboard - I am still planning to add to this moodboard until the actual shoot.
From here, I went through the most updated script and made a props list. This was rather limited at first, however after going through it with Alfie, we were able to come up with much more ideas to make the room seem lived in.

Alfie mentioned that he wanted them to sit either side of a makeshift table with a chessboard on it to show how they've been trying to keep themselves busy. I really like this idea and if we can, I'd like have some of the pieces be broken or missing - as if the characters have just found them and have to play with what they have.
Something that was not included in the script but I thought might make the space more visually interesting, is the use of a ripped bedsheet as a divide between the characters. This sheet would be hanging from the ceiling, loosely fallen during this scene. These characters have to spend every second of the day together, hence I thought it would be a good indicator that they want their space at night. Additionally, I like to think that John would have thought of this idea of making this little divide using bedsheets, since he had a little sister (Sarah, mentioned in the script), who he used to make bedsheet tents with before the disaster that put our two characters in this position. I discussed this with Alfie and Duncan and they both thought it would be a good addition. Ideally, I would use a lighter colour to contrast the dark walls in the room, but I would stain it with paint to make it seem used and found.
A little bit like these make-shift tents from Hook (1991), I Am Not A Witch (2017) and Stranger Things (2016-present).


For the dog food brand to put on the tin, I have talked to India - our art department - to ask if they could create a label to put on one of the tins. We have been discussing some designs and I am quite excited to see it brought to life.
Making this moodboard and discussing ideas with Alfie, Duncan, Finlay and India has made me increasingly excited to create this world for our characters to live in. My next steps are to make costume moodboards for each character and discuss with Alfie the personalities of each character in order to incorporate these into their costumes.
0 notes
Text
Drive in Style: Professional Car Detailing Services
Welcome to our friendly blog post about professional car detailing Brunswick services! Whether you're a car enthusiast or simply someone who wants to keep their vehicle looking its best, this blog post is for you. We'll guide you through the process of maintaining your vehicle's appearance and share tips on how to drive in style.
What is Car Detailing?
Car detailing is more than just a regular car wash. It involves a thorough cleaning, restoration, and protection of a vehicle's exterior and interior surfaces. By paying attention to every detail, car detailing helps preserve the paint, enhances the resale value, and creates a comfortable driving experience for you and your passengers.
Exterior Detailing:
Washing and Drying:
To ensure the best results, start by using high-quality car wash products. These products are designed to safely lift dirt and grime from your vehicle's surface without causing any damage. Additionally, follow the correct washing technique, such as using a microfiber mitt and two-bucket method to prevent swirl marks.
After washing, it's important to dry your vehicle properly to avoid streaks or water spots. Use a microfiber towel or a leaf blower to remove excess water and ensure a spotless finish.
Paint Correction:
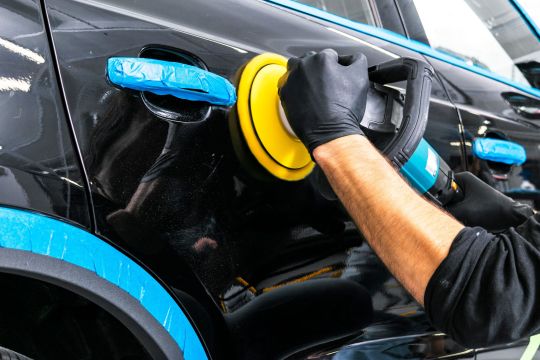
Over time, your vehicle's paint may develop swirl marks, scratches, or other imperfections. Paint correction techniques can help restore the shine and smoothness of the paint surface. Depending on the severity of the imperfections, professionals may use techniques like compounding, polishing, or even wet sanding.
To protect the paint and maintain its shine, it is recommended to apply a coat of wax or paint sealant. These products act as a barrier between your vehicle's paint and the elements, providing long-lasting protection and a glossy finish.
Wheel Care:
Cleaning your wheels properly is important not only for their appearance but also for their longevity. Start by using a wheel cleaner that is safe for your specific wheel finish. Avoid using harsh chemicals or abrasive brushes that can cause damage.
For added protection, consider applying a wheel sealant or coating. These products create a barrier against brake dust and other contaminants, making it easier to maintain clean wheels in the long run.
Interior Detailing:
Vacuuming and Cleaning:
When it comes to interior detailing, thorough vacuuming is essential. Use a powerful vacuum cleaner or an air compressor to remove dirt, dust, and debris from carpets, seats, and other surfaces. Pay attention to hard-to-reach areas like under the seats and in between crevices.
For cleaning different materials, such as leather, fabric, or vinyl, choose appropriate cleaning products. Follow the instructions on the product labels and test them on a small, inconspicuous area before applying them to the entire surface.
Dashboard and Center Console:
The dashboard and center console are often the focal points of a vehicle's interior. To clean and condition these areas, use a non-greasy product that will leave a clean yet natural finish. Avoid products that leave a shiny residue, as they can create glare and attract dust.
Windows and Glass:
Streaky windows can be a nuisance, especially when driving in direct sunlight. To achieve streak-free windows, use a high-quality glass cleaner or make your own vinegar-based solution. Spray the cleaner onto the glass and wipe it off using a microfiber cloth or newspaper for optimal results.
Additional Detailing Services:
In addition to the standard exterior and interior detailing services, professional car detailers may offer a range of specialized services. These best car body repair Doncaster services may include engine bay cleaning, headlight restoration, or odor removal. If you have specific concerns or areas of your vehicle that need attention, don't hesitate to discuss them with your chosen detailing service.
DIY vs. Professional Detailing:
When it comes to car detailing, you may wonder whether to take a DIY approach or hire a professional service. Both options have their benefits and drawbacks. If you have the time, skill, and equipment, DIY detailing can be a rewarding and cost-effective option. However, keep in mind that professional detailers have the expertise, specialized tools, and professional-grade products to deliver superior results efficiently.
Before making a decision, assess your own capabilities and the level of detail you desire for your vehicle. Consider factors such as your available time, skill level, and the level of convenience you seek. Remember, investing in professional car detailing services can save you time and effort, and provide expert results that will leave your vehicle looking its best.
Conclusion:
Keeping your vehicle in top condition is not just about maintaining its mechanical performance, but also its appearance. Car detailing Brunswick plays a crucial role in preserving your vehicle's stylish and well-maintained look. By following the tips and techniques outlined in this blog post, you can ensure that your vehicle always shines wherever you go.
Professional car detailing services offer the expertise and convenience needed to achieve exceptional results. If you're looking to save time and enjoy the benefits of expert detailing, we encourage you to book an appointment with your preferred detailing service. Don't forget to share your own experiences or ask any questions in the comments section below. Drive in style and enjoy the pride of owning a well-detailed vehicle!
1 note
·
View note
Text
#Paints Container Heat Transfer labels#Heat Transfer Label for Paint industry#Paint containers Heat Transfer Labels#heat transfer labels Paint bucket#Paint Bucket Heat Transfer Label#Paint industry Heat Transfer Label#Heat Transfer label for Paint Bucket#Labels for Paint Container#PP Heat Transfer label for Paint Bucket#Self Adhesive Sticker Label for Paint Industry#paint bucket label#paint can label#Noelcoat Paints Bucket Label#Professionally Printed Paint Can Labels#Painting Storage Containers Labels#Paint Coating Bucket Label Sticker#Design Paint Bucket Label#Custom Vinyl Paint Bucket Stickers#Paint Bucket container labels#In Mould Label For Plastic Paint Bucket#Printable Paint Can Labels#custom paint can labels#paint bucket label design#printable paint can labels#vintage paint can labels#labels for paint container#pp heat transfer label for paint bucket#self adhesive sticker label for paint industry#noelcoat paints bucket label#professionally printed paint can labels
0 notes
Text
New Post has been published on Andy Bondurant
New Post has been published on https://andybondurant.com/2023/06/28/dont-forget-this-is-who-you-are/
Don't forget: THIS is who you are.
I once read an old tale about a village where everyone slowly developed amnesia. In an attempt to battle their amnesia, the villagers labeled everything in their lives. If you were to walk through the village, you find notes everywhere. The notes read ‘door’ ‘chicken’ ‘ax’ or ‘bucket’. It was their own unique way to battle their own forgetfulness.
Sometimes we forget. We don’t remember the truth of who we are as children of God and followers of Jesus. We forget because we are more tuned into the message the world around us is communicating, and this message washes away who we are.
Don’t Forget: You are a Masterpiece.
Here is one of the messages we’ve forgotten. The truth is also one of my favorite verses in the Bible.
“For we are God’s masterpiece. He has created us anew in Christ Jesus, so we can do the good things he planned for us long ago.”
Ephesians 2:10 NLT
In this single verse, Paul communicated three important truths to the church of Ephesus (and us) over 2000 years ago. Thankfully, like the notes the villagers made for themselves, it was written down. God made sure it was recorded, so we won’t forget these three truths. Here are those three truths:
1. God created you to be a masterpiece.
This is how God sees you — a masterpiece. To make sure we are on the same page, here is Oxford’s definition for masterpiece
a work of art such as a painting, film, book, etc. that is an excellent, or the best, example of the artist’s work
Oxford learner’s dictionary
Merriam-Webster adds to this definition:
a supreme intellectual or artistic achievement.
Merriam-webster dictionary
You are the work of God, and God sees you as outstanding, an achievement. This is how God sees you. Have you forgotten?
It’s easy to forget because you can easily see what others look like, where they have travelled, the things they’ve accomplished through social media. When you compare those highlights with the current state of your life, you can begin to wonder how wonderful you really are. Don’t forget who you are. Don’t forget you are a masterpiece.
2. God, through Jesus, is restoring you to your original design.
I used to watch the PBS show Antique Roadshow. Perhaps you’ve seen it too. It’s the show where people bring their “junk” to expert curators to evaluate if there is actually hidden value in the painting, furniture, or jewelry that has been laying around their homes.
Typically, these items have been allowed to decay in some way, hiding any value they may have. When the evaluator looks over the item she attempts to see through the grit and grime to determine what they have in front of her.
This is a great picture of our lives before we encounter Jesus. We are works of art in need of restoration. But let me warn you, our restoration is not typically a snap-of-the-finger action.
Perhaps you remember the restoration work done in the Sistine Chapel. One of the great works of art in the world by some amazing Italian painters, including Michelangelo. The frescoes covering the chapel were restored in 1994. But the process was slow. It was finished in 1994, but it began in 1980 taking almost 15 years.
Restoration is a process.
What I’ve observed over years of ministry is a person will initially experience a big change after finding Jesus, but the fine details happen over years and years of following Jesus.
This is hard to remember. We live in an instant society. I get upset if I wait in a drive thru longer than a few minutes. We need to remember that God is restoring us, and it takes time.
Don’t forget God is restoring you, but it takes time to get you to the place he designed. But it’s worth it because God has a purpose for you.
3. God designed you for a purpose.
Masters create masterpiece for a purpose. They design art for beauty. We build businesses to make money and solve problems. You start a family to provide joy and meaning. So God created you for a purpose as well.
The purpose of God creating you is to do good things. God skillfully formed you in a way that only you can accomplish certain (good) things.
Only you can parent your child. Only you can lead your team. Only you can love and serve your neighbor. Only you can speak truth in love to the person placed in your life.
Don’t forget God made you perfectly, so you can fulfill the task he has designed for you.
Never forget
After the attack on the twin towers on 9/11, a common refrain was, “Never forget.” In fact, if you travel throughout the United States, you will still see signs, bumper stickers and t-shirts to remind us of this thought. Most of those signs and shirts have been replaced by monuments and even beams of light. Those terrorist attacks took place over 20 years ago, and people still work to remember the feelings of that day.
Photo by Kaiyu Wu on Unsplash
There is a tendency of us to forget over the course of time. We know all of this is true, but we forget.
Don’t forget.
Here are a handful of ways I remember:
I leave notes on the refrigerator/mirror.
I put sticky notes on my office computer.
I write thoughts on my office whiteboard.
I design a message for my lock screen.
I’m not a tattoo person, but if I were, I would remind myself of big things with a tattoo.
I meditate on this and other scriptures.
After 9/11 Americans took a note of that ancient village, so we left notes all over the country to remember what had happened. You should do the same thing in your life.
Make a note of who you are – a masterpiece.
Create a reminder about what God is doing in you – restoring you to your original design.
Design a message for yourself about why God created you – for a purpose.
Don’t forget.
0 notes
Text
27 Fantastic Garage Organiser Designs & Products For A More Manageable Space
Bring order to your garage with storage systems solutions that make good use of all available space. organise tools, outdoor equipment, and everything else you need to keep organised with these practical garage storage ideas. By using shelves, hooks, pegboards, and more, you will be able to stash all of your belongings, leaving you with enough space for a car.
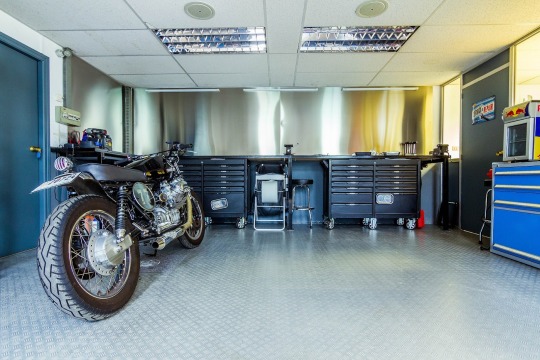
01 Efficient Garage Organisation
This additional garage bay has custom shelves stacked up top for Christmas decorations, clothing, and sporting equipment. Open bins and shelving below allow for family members to easily store things. Hooks keep bikes upright, which maximises space on the walls and floors. A bench, kids desk, and an area rug let the space double as an extra playroom.
02 Extra Garage Storage
If you are running out of space to store items in the kitchen or basement, use your garage to store items that would not fit anywhere else. Here, 16-inch-deep shelves store excess supplies from around your house, like large quantities of paper, canned and bottled beverages, cooking pots, and loose, big-ticket items. Smaller buckets contain cleaning supplies.
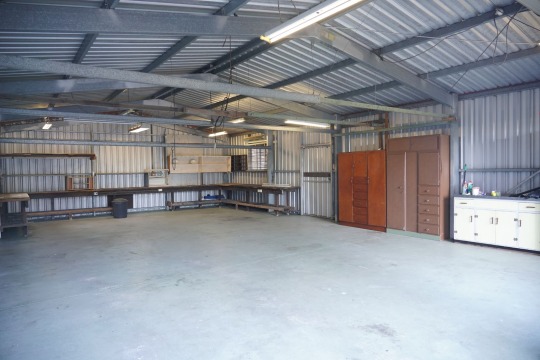
03 Garage Shoe Storage
Consider where you can easily access each category of items while organising the garage, like placing shoes near the door. Here, 20-inch-deep shelving holds family shoes by the entryway to the home. The "no shoes allowed" house policy is easily enforced, and there is one shelf per household member. If space is a limitation, consider an adjustable stand-alone shoe rack (such as this Better Homes & Gardens Farmhouse 3-tiered Shoe Rack).
04 Garage Storage for Small Items
Slender boxes and baskets are better garage organisation ideas to store smaller items than big, covered containers. In this garage, hanging drawers store commonly used utilitarian items like small tools, paint brushes, extension cords, and spare bulbs. Drawer dividers prevent smaller items from getting lost. On top, a storage unit holds large purchases of water and soda.
05 Sports Equipment Storage
Bring order to piles of sporting gear with adjustable shelving system, baskets, and bins. Here, a mobile bin for smaller odds and ends dangles from the front of one shelf, clearing room for larger items. Below, big mesh bins have wheels to make it easy for kids to wheel in all their sports equipment during a game.
06 Stylish Garage Storage Ideas
To make vertical space work in this garage, homeowners put up some drywall on one side, then installed a rack-style storage space on the walls, which hid equipment in clean, white bins. The system is mounted tall enough above the floor so wheeled toys can fit under it. Plus, coloured magnets on the refrigerator and freezer, glossy metal flooring, and art over the workbench add a personal touch to the garage.
07 Garage Tool Organisation
Create a well-organised garage workstation for tools storage and to offer a work space. On this workbench, power tools are hidden on a lower shelf, while magnetic hooks keep lighter items positioned to the sides. Make sure you position your workstations close to power outlets, so that you will not have to relocate your gear to another location in order to get your projects done.
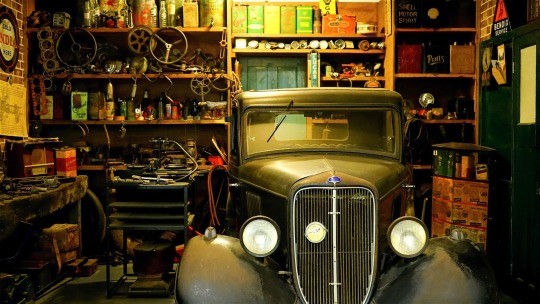
08 Labelled Garage Storage
This garage storage idea features a clever system, including sliding drawers for easy access to household essentials you frequently use. No more moving heavy boxes that are four-deep just to reach items on the bottom. For a colourful flair, create coloured labels using scraps of paint.
09 Garage Organising Ideas
A snazzy snap-on toolbar makes quick work of organising garden tools and snow shovels with long handles. If you have a garage fridge, suspend lighter items on the sides with the help of the extra-strong magnetic hooks. Stock the bins with cleaning supplies or yard supplies, then stow them atop the refrigerator to get to them quickly.
10 Garage Bicycle Storage
Bicycles can occupy a tonne of precious garage space when simply rolled into them. To keep your floors clean, set up a pulley system that suspends bikes over the ceiling joints. Mount hooks near the area so you can easily store your helmets.
11 Streamlined Garage Storage
A garage is ideal for organising and storage of tools, outdoors equipment, and items from the offseason. This space makes use of various garage storage ideas, like freestanding shelving units for things like cleaning supplies and dog food, and pegboards for tools, all to keep things organised. A wood shelving unit is installed above the door for hiding seasonal supplies.
12 Garage Storage Shelf
Keeping boots, buckets, soil, and hoses (similar to this 1.7-gallon galvanised metal watering hose from Better Homes & Gardens) vertically on the adjustable shelves saves space and removes the bulkiness from the floor. Adjustable shelves make it easy to create room for a variety of sizes of items when your storage needs change. Simply mount shelves to different heights to fit new items.
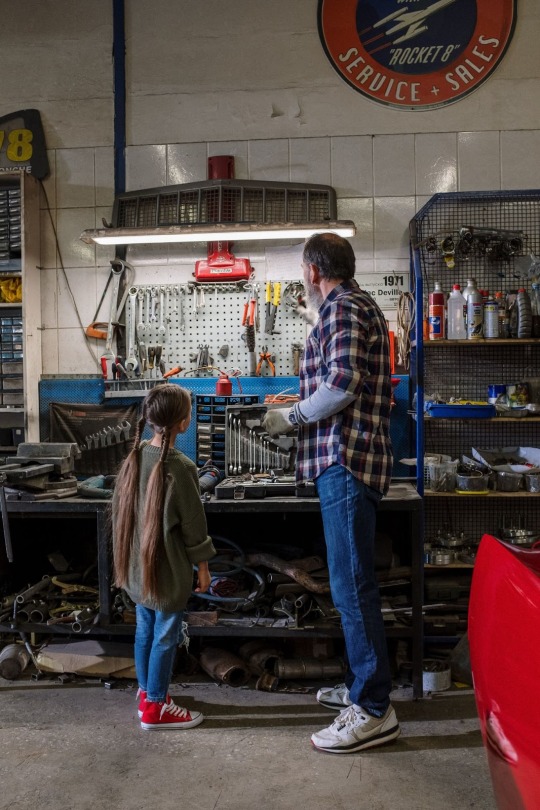
13 Ultimate Garage Organisation
This garage has space to store just about anything -- from gardening tools to sporting equipment. Take cues from its set-up for your own garage organising strategies. Take garage organisation to a new level. See how this garage uses smart storage solutions to optimise sports equipment, gardening supplies, and more. Take cues from its set-up to help you get organised in your garage.
14 All-in-One Garage Workstation
Take advantage of your garage to create the ultimate work space. Outfit the multipurpose workspace with a potting table, caster-wheeled metal toolbox, an overhead cupboard, and hooks for hanging bags and aprons from the walls. For a decorative flair, lay down a sturdy area rug or carpet tiles to soften hard floors.
15 Seasonal Clothing Storage
Free up storage by delegating off-season clothes or items that were passed on for the next baby to garage shelves. Use clear, similar-size containers with covers to keep things looking tidy and maximise your space. Since you will not need to access those items frequently, it is okay to store them on top. Apply labels to help identify what is down low.
16 Hardware Storage Ideas
Add some colour to the storage room in the garage. Paint squares on your pegboard to denote spaces for particular items. Hang a pegboard from a wall stud and outfit with buckets to create a clever storage system. The angled bins store frequently used accessories that cannot be hung from hooks as well, like gardening gloves and hose nozzles. Mount a big bucket on the racking to provide a replacement for the hose rack, which offers storage, too.
17 Garage Pegboard Storage
Add some colour to the garage storage. Paint squares on your pegboard to denote spaces for particular items (like this Better Homes & Gardens Blue Cove Water Hose). Hang a pegboard from a wall stud and outfit with buckets to create a clever storage wall system. The angled bins store frequently used accessories that cannot be hung from hooks as well, like gardening gloves and hose nozzles. Mount a big bucket on the racking to provide a replacement for the hose rack, which offers storage, too.
18 Garage Storage Bins
Cohesive and functional, these plastic buckets are a handy way to introduce organisation into the garage. Look for a system that simply snaps together along the racks walls. Turning the wasted space under your cabinets into neat rows of jars for commonly used items like seed packets, pliers, and painting tape means you will never need to dig around for smaller items again.
19 Garage Cabinetry Ideas
Slatted panelling allows cabinets to be mounted on a wall, leaving no holes in your drywall. This also gives you the flexibility to move them around as needed. This 24x24x12-inch enclosure, for instance, supports up to 150 pounds, and is coated for durability.
20 Concealed Garage Storage
Curtains are not just for the shower or the windows; they are a cheap, simple solution to hiding your genius garage storage. Install a curtain rod and panels to the corners of the garage for an instant fix. Use this garage organising idea to hide unsightly gear or clutter for a cleaner appearance.
21 Garage Storage Hooks
A rack with racks adds to the garages storage capabilities, using the racks to hold large garden tools. Be sure to use the proper hooks for heavier items like shovels, rakes, and power tools. Place the hooks at different heights to allow convenient access.
22 Small Garage organisers
Take a cue from the kitchen and utilise the spice containers in the garage. These small containers are great for organising screws, nails, and washers. The clear cover makes it easy to see what is in there, too, saving you time searching for items. Mount the magnet panels on the pegboards so you can store your storage bins away when they are not being used.

23 Portable Garage Storage
Rout holes into wood showcase shelves to provide an easy spot for miscellaneous items like scissors and zip ties. These little buckets neatly nestle into holes, making this a simple garage storage idea. The handles make it quick to pick up containers and carry them to another location when needed.
24 Garage Work Bench Organisation
Simple modifications can turn this bench for pots into a full-fledged garage workspace. Large holes punched in the shelves now provide storage options for day-to-day tools. A metal ruler slid onto the top of the bench is ready at all times to take quick measurements. Jars, hooks, and magnetic clips make it easy to reach tools and workshop necessities.
25 Multifunctional Garage Bench
Combine several best garage storage ideas to create an entire workstation. This traditional peg bench provides plenty of workable surface, and the pegboard keeps tools handy. Clip-on lighting offers focused lighting to work on projects. Below, labelled grid-type bins equipped with rollers are used for sorting and storage of recyclable materials.
26 Garage Wall Storage
These versatile hooks allow you to store bulky tools without taking up much space on the walls. Mount the hooks on channels in panels, leaving plenty of room between them so you do not cause any confusion or smashed handles. This low-profile garage storage idea is ideal for small spaces, but it still leaves enough clearance to get around.
27 Screwdriver Storage
Easy-to-install, the screwdriver holder keeps tools neatly organised. Choose a design that allows for quick identification of items at a glance. Install this great garage storage idea close to your work space, so you will not have to walk too far for the items you need.
0 notes
Text
Sketches 2022 part TWO!!!
September 30:


Around this time I got to thinking about Madam Hotel/the Hotel Herself as sorta like Walpurgisnacht from Madoka Magica. I’m not...really sure why. I think just the aesthetic of that witch, with all this buildup and grandiosity. The fact that she represents futility and helplessness. Her laugh. Her fucking cool as hell design. That she’s a witch conglomerate, formed from the amalgamation of TONS of witches...just good stuff.
October 3:

I really wanted to draw the Bellhop staring down into a bucket with bits of Manager in it, mocking and laughing. I couldn’t figure out the perspective though so it never came to be.

October 4:



More Bellhop. I think going forward I wanna draw her more like this. I’m honestly disappointed with myself that the painting I did of her was so blank-faced when that doesn’t capture her personality at all. I wanna redraw the Bellhop and the Concierge soon to just. look way better and more accurate to their personalities.
October 7:


October 8:

Plans for another big piece. I wanted to focus on doing it across October, November, and December and thaaaaat.....fell through pretty hard. Ah well. I’ll try and pick this up at some point this year. Though tbh what I’d love to do now is a biiig big collaborative illustration with a bunch of people featuring like, a bunch of doors/rooms with various interpretations of the staff behind them or something.
October 30:


October 31:


Around this time, I switched from drawing in a file created for each day (so, say, all of January 3rd’s drawings would be in one CSP file labelled 1-3-22), to creating a file to paint in for the whole month. It just...made things a lot easier with painting as opposed to sketching. The canvas setup is different from my daily files and quicker to get right into.
Consequently, though, while I start strong in keeping everything in those month files labelled and divided into folders for each day, uh...that falls apart by the end of the year...
November 1:


November 12:

November 14:



November 19:


November 28:

I really like drawing screaming faces. I don’t do it nearly enough
December 2:


December 3:


Desperately trying to find an animalistic pose for a Manager drawing. I tried this across several days and could not put together one I was happy with.
December 6:

December 8:
December 11:

I still need to play the Ib remaster. I wanna draw a cool piece with Mary sitting under the Fabricated World painting. She’s a character I relate a lot to, at least from what I can remember about the game.
December 13:


December 15:

December 17:


Attempting to draw lamprey hotel herself and struggling a lot lol. Terrified Judy Blashy. I wanted to make a comic of them having a conversation as like. a peek into what they were doing while the entire New Crew and Old Crew conflict was happening. It was going to go something like:
The Hotel Herself, absolutely cosmically massive, with Judy Blashy resting on her, positively tiny in comparison. The Hotel Herself is rambling, monologuing about how charming human sayings are - out with the old, in with the new, for example, while musing about endless cycles and arbitrary new years.
Judy Blashy is trembling, terrified, crying, of course, and the Hotel reminds Judy that she’s lucky to be getting this much up-close and personal time with Her, so could she at least try to be a good conversation partner?
Judy whimpers and tries her best but, like, clearly is not much at all. It’s still enough of a response for the Hotel Herself to start monologuing again. Meanwhile, in the background, everything from the New Crew’s introduction is going on, speeding by. The Hotel Herself is remarking on how she’s looking forward to seeing how everyone plays together and gets along, and what kind of new year they’ll ring in. The Crews are in an active battle to the death as she says this. She looks to Judy for a response, but despite her best attempts, Madam H is unimpressed.
She gets bored with Judy and lets her know it. In fact, she gets so bored she decides to toss her back out, deciding that she’s not even worth a death. It just wouldn’t be satisfying. Alone with Herself, She sighs and remarks that she misses having someone around that was “good to talk to.” She decides to check in on the staff, only to find the aftermath of their big fight.
Her form coils and winds in a way that suggests a big smile as she laughs and laughs. She says something about sayings, about how “some things never change!” and “alls well that ends well!”
I was still sick with covid enough that i did not have the energy to do all this but i still like the idea
Aaand finally, my last drawings of 2022, on December 29/30??? (I stopped labeling at this point):


Yahoo!! I’m excited to keep drawing more and more cool stuff going forward. I wanna try a whole lot of new things and improving at drawing all different kinds of character designs and compositions and learning perspective stuff and just. Idk where my art will end up but I’m eager to see where!!! Thank you again if you read through this :-)
#i tried to schedule the first one for when no one would be on#but its such a monster of a post that it keeps getting mangled in my queue. sry
0 notes
Note
thoughts/emotions on keefe sencen and art as a coping mechanism?
the boy has the coping mechanism as i did at 9-12 and i get how it’s a way for him to escape from the reality he’s living in.
it’s an escape from his parents constantly berating his every action, it’s an escape from feeling the need to be perfect, it lets him feel his emotions without really needing to feel them. it’s a release and it’s something he enjoys
he’s constantly being told he’s not good enough and it’s the one thing he feels like he’s good at, and when his dad destroyed his art it became a way to rebel against him. show Cassius that he doesn’t care what he says that he’s gonna do the thing that makes him happy weather he likes it or not. but he had to do it in hiding because he didn’t want his art to be destroyed
when he lives with Elwin he expects the same reaction and hides his art because as far as he knows the only person who appreciate and supports it is Sophie. then one day Elwin finds a doodle of bullhorn that he had drawn on a napkin before he went out to play bramble. Elwin hangs it up on the fridge even though it’s just a doodle on a napkin. Keefe comes inside and sees his little doodle hanging on the fridge, surprised that Elwin would even hang something like that up, but he doesn’t say anything. instead he paints a hyper realistic picture of bullhorn and leaves it on Elwin’s desk in his office before going over to havenfeild.
that’s how it is for a couple months Keefe draws a picture and leaves it somewhere Elwin can find it. over time he doesn’t feel the need to hide in his room and starts to paint in the living room but would cover his painting out of instinct whenever Elwin walked by. Elwin never acknowledged that he was painting and would sometimes grab a book and sitin the same room not really acknowledging what Keefe was doing because he wanted him to feel comfortable. after some time Elwin decides to asks Keefe to design some cute labels for his elixirs and Keefe obliges but is still nervous that what he draws isn’t gonna be good enough.
he’s surprised when Elwin sees his concept art for the labels and gets real excited. Elwin doesn’t care that they’re just rough sketches he does care that they are not perfect, he’s just happy that Keefe is drawing and enjoying himself. so Keefe stops hiding his drawings and paintings and starts to out in the open more and more. in the kitchen in the living room in Ewlin’s lab while he makes elixirs with Kesler.
one day Elwin calls him inside from playing bramble and tells him to put a blind fold on. Elwin leads him to a part of the house that had been formally empty other than his sewing room and took the blindfold off to reveal a Art Studio.
it had completely empty white walls, but there where buckets upon buckets of paint for Keefe use to fill with murals. there was easels and canvas, a shelf full of empty sketchbooks and paints of every color. one entire wall was covered in floor to ceiling windows and there where double doors the opened to a balcony that overlooked the ocean.
Keefe was speechless he just stood with his mouth hanging open. Elwin said
“i’m not much of an artist when it comes to painting, but i tried to get everything rig-“
Keefe cut him off tackling him in a hug
“thank you”
he managed to choke out desperately not wanting to cry. Elwin squeezed him back and said
“my sewing room is right next door and we share that balcony now we can do our things right next door to each other”
Keefe nodded tears rolling down his cheeks, for the first time in his life he actually had an adult that didn’t hate his art, didn’t just admire it but encouraged it, and he couldn’t be more greatful.
#thanks for the ask!#sorry for taking almost five months to answer this#that was long even for me#kotlc#kotlc headcanons#keefe sencen#kotlc keefe#kotlc elwin#elwin heslege#dadwin#kotlc fandom#keeper of the lost cities#kotlc fanfic#kotlc headcanon#bullet point fic
37 notes
·
View notes