#Debian11
Explore tagged Tumblr posts
Text
Es wird Zeit aktiv zu werden #Debian11
0 notes
Link
#Comandosbásicos#Debian#Debian11#Gestióndeservidores#GestióndeservidoresDebian#monitorización#recursos#servidores
0 notes
Text

Llevo usando toda una semana #debian11 en su versión #estable de manera en mi laptop Asus VivoBook y puedo llegar a las siguientes conclusiones:
No me volvió a fallar el wifi en ningún momento.
A pesar de ser la versión de gnome 3.38 bastante tosco, el rendimiento va mas que sobrado y me ha demostrado porque muchas personas adoran debían.
Luego de instalar el kernel xanmod 6.2…. pues tocaba probar haciendo primero el día de ayer un directo vía youtube con múltiples trabajos al mismo tiempo y todo controlado y bastante satisfecho.
El día de hoy me toco probar para jugar, por lo que tuve que irme a jugar CSGO y los resultados fueron mejor de lo esperado. (No juego habitualmente aunque compre algunos juegos y los tengo ahí).
Finalmente debo concluir que esta versión se ha asentado mejor de lo que esperaba, dándome una sensación de estabilidad, comodidad y jugabilidad. Esperemos que debian 12 mantenga esa misma magia con mi laptop, de ser así, pues creo que encontré mi centro de gravedad con debian.
Que esperar de debian12??? pues, personalmente espero un salto muy cuantificable sobretodo en gnome por el paso de 3.38 a la versión 44 con la que calculo va a quedar en su versión estable.
No quiero decirme que ya soy debianita, pero ya les digo que me ha dado mejor sensación que mi amada fedora…llegara a reemplazarla definitivamente…solo el tiempo dirá.
6 notes
·
View notes
Text
Docker Imageについて
概要
タグ 内容 OS <x.x.x>|latest|- 公式パッケージ alpine 軽量なAlpine Linuxベースのイメージ Alpine Linux bullseye[-slim] Debian11で構成されたイメージ Debian buster[-slim] Debian10で構成されたイメージ Debian stretch[-slim] Debian9で構成されたイメージ Debian jessie[-slim] Debian8で構成されたイメージ Debian windowsservercore windowsサーバ系OSで構築したイメージ windows
詳細
��メージを構築しているOSが以下4種類
公式パッケージ
Alpine Linux (Linuxディストリビューション)
Debian (Linuxディストリビューション)
windows
公式パッケージを使う場合
golang:1.18, golang1.18.5 など、バージョンを指定するもの
タグ 内容 <x.x.x> パッチまで指定 <x.x> マイナーバージョンまで指定、パッチは最新のものになる <x> メジャーバージョンのみ指定、マイナーバージョン、パッチは最新のものになる latest 最新バージョンを指定 - latestと同義
Alpine Linux
軽量重視で作られたLinuxディストリビューション。一部言語では速度が遅くなる場合がある。 パッケージ管理にapkコマンドを使う。
軽量版なので、必要なパッケージやライブラリが無い場合がある。
Debian
Linuxディストリビューション。バージョンごとにコードネームが付けられていて、Dockerイメージのタグにそのコードネームが使われている。
コードネーム バージョン bullseye v11 buster v10 stretch v8 jessie v8
windows
windows専用のサーバOSで構築されている。コンテナをwindows環境にする場合はこれを使う。
Slim
公式とDebian系イメージで用意されている。 更にslimがついているイメージは、使用頻度の低いツールやライブラリを除外したDockerイメージになります。
ref
Docker image(イメージ)の違い:alpine,bullseye, buster, slim, stretch, jessie, slim-buster, windowsservercore, latestどれを選ぶべきか?
0 notes
Text
Install PostgreSQL 15 on Debian 11
Install PostgreSQL 15 on Debian 11. Installing PostgreSQL on Debian 11 is a simple process that does not require much technical expertise. Here, we’ll walk you through the steps you need to take

List of blogs you will read in this content:
1. Introduction 2. Install PostgreSQL 15 on Debian 11 3. Final words 4. Frequently Asked Questions
Hello and welcome to this essay on how to install PostgreSQL on Debian 11. In this guide, we will go through all the necessary steps in a friendly and easy-to-follow manner.
Introduction
PostgreSQL 15 is a mighty and unfailing open-source object-relational database method that provides an extensive data storage and management feature set. It is extremely scalable, allowing users to store and manage large amounts of data while providing robust performance and reliability.
Debian 11, on the other hand, is a mighty, secure and user-friendly operating method that provides an ideal platform for running PostgreSQL 15. Debian 11 is extremely customizable and offers many features that make it easy to deploy, operate and maintain. PostgreSQL 15. PostgreSQL 15 and Debian 11 provide an extensive data storage and management solution.
Install PostgreSQL 15 on Debian 11
Before we begin, make sure you have root access on your Debian 11 system. This guide assumes you have a basic understanding of the Linux command line and package management.
Update and upgrade system.
The first move is to commit sure your system is up to date. Open ultra and run the following orders:
Syntax: sudo apt update
Syntax: sudo apt upgrade
This will update and upgrade all installed packages to their latest version
Add the PostgreSQL repository
By disability, Debian 11 ships with PostgreSQL version 13. If you shortage to install version 15, add the PostgreSQL repository to your method. To do this, run the following order:
Syntax: sudo sh -c ‘echo “deb http://apt.postgresql.org/pub/repos/apt/ $(lsb_release -cs)-pgdg main” > /etc/apt/sources.list.d/pgdg.list’
Install PostgreSQL 15
Now that we’ve added the PostgreSQL repository and imported the key, let’s install PostgreSQL 15. Run the following command:
Syntax: sudo apt install postgresql-15
This command will install PostgreSQL 15 with all its dependencies.
Start the database cluster.
After installing PostgreSQL, we need to start the database cluster. Run the following command:
Syntax: sudo pg_createcluster 15 main –start
This command will create a new PostgreSQL cluster named “main” for version 15 and start the server.
Verify the installation
To prove that PostgreSQL is running, we can use the following order:
Syntax: sudo systemctl status postgresql@15-main
This should output the PostgreSQL server status.
Congratulations! You have well-installed PostgreSQL 15 on your Debian 11 method. You can now start using PostgreSQL and its leading database management features.
Unlock the power of Linux: Improve your online presence with our state-of-the-art Linux VPS solution!
The final word
This guide goes with the steps required to install PostgreSQL 15 on Debian 11. We started by updating and upgrading the method, adding the PostgreSQL repository, importing the repository key, installing PostgreSQL 15, starting the database cluster, and confirming the installation.
PostgreSQL is an open-source relative database management method (RDBMS). It is known for its leading features, including support for parallel processing, extensibility, and robust data fidelity.
Some other features of PostgreSQL that do it an exoteric choice include its support for ACID (atomicity, consistency, isolation, and durability) transactions, its ability to handle complex queries, and various programming languages and platforms.
To install PostgreSQL on Debian 11, you can ensue these steps:
Open a ultra window and log in as the root user Type “apt-get update” to update the package list Type “apt-get install postgresql” to install PostgreSQL When the installation is complete, you can use “psql”.
0 notes
Text
Como instalar Microsoft Edge en Debian11? Whats???
Como instalar Microsoft Edge en Debian11? Whats???
Vamos a ver como instalar el navegador de Microsoft Edge, en Debian 11 por medio de repositorios con posibilidad de actualizar las nuevas versiones, tal vez alguno se pregunte porque hacerlo, pero lo cierto es que me lo han pedido y aquí esta la publicación. 1- Instalando Curl Vamos a necesitar curl para descargar algunas cosillas. sudo apt install curl 2- Importar la clave GPG de Microsoft…

View On WordPress
0 notes
Text
Ansible is a free, open-source, and one of the popular automation and configuration management tool written in Python. In the field of technology, the concept of automation has been highly adopted in many organizations due to complex environments and the need to scale too quickly by system administrators and developers. This concept has made tools like Ansible, Puppet, Chef, Foreman, Katello, and CFEngine finding their use. From the automation tools named, ansible is the first of choice in any IT organization for managing UNIX-based systems due to the following features: Free and open-source It is easy to set up and use It is flexible as it allows orcherstartion on an entire environment no matter where it was deployed. Efficient as it does not need one to install other softwares or firewall ports It is powerful and can be used to model complex IT workflows Security and Compliance For tasks orchestration to happen, ansible needs to be installed on one of the nodes. The managing node is known as the control node. This node will have the Ansible Playbook file. This is a YAML file that contains the steps which the user wants to execute on a particular machine/machines normally referred to as managed nodes. This guide demonstrates how to install and Use Ansible on Debian 11/10. Pre-requisites For this guide, you will need the following: 3 servers – with a Debian11|10 control node a user with sudo privileges on all the servers I will have my setup as below. TASK IP_ADDRESS Control Node(Debian 111/10) 192.168.100.147 Managed Node 1(Rocky Linux 8) 192.168.100.118 Managed Node 2(Rocky Linux 8) 192.168.100.119 Step 1 – Install Ansible on Debian 11/10 In this guide, I will cover several ways to get Ansible installed on your Debian 11/10 control node. Debian default upstream repository. Ubuntu APT repository Using pip (Python Package Manager) In this guide, I will be using the vim text editor to create and edit various files sudo apt update sudo apt install vim 1a) Install Ansible on Debian 11/10 using PIP Ansible is also found on PIP(Python Package Manager). But first, we need to install Python and PIP to your system. sudo apt-get install python3 python3-pip -y Then use PIP to install Ansible as below. sudo pip3 install ansible Check the installed version $ ansible --version ansible [core 2.11.5] config file = /etc/ansible/ansible.cfg configured module search path = ['/root/.ansible/plugins/modules', '/usr/share/ansible/plugins/modules'] ansible python module location = /usr/local/lib/python3.7/dist-packages/ansible ansible collection location = /root/.ansible/collections:/usr/share/ansible/collections executable location = /usr/bin/ansible python version = 3.7.3 (default, Jan 22 2021, 20:04:44) [GCC 8.3.0] jinja version = 2.10 libyaml = True 1b) Install Ansible on Debian 11/10 from Default Upstream Repository. Ansible exists in the default Debian repositories but the available versions are not up-to-date. Installing Ansible using this method is quite easy as it does not entail complex steps. First, update your systems package index. sudo apt update Then proceed and install Ansible on Debian 11/10 as below. sudo apt install ansible Confirm your installation by checking the Ansible version installed. $ which ansible /usr/bin/ansible $ ansible --version ansible 2.7.7 config file = /etc/ansible/ansible.cfg configured module search path = ['/root/.ansible/plugins/modules', '/usr/share/ansible/plugins/modules'] ansible python module location = /usr/lib/python3/dist-packages/ansible executable location = /usr/bin/ansible python version = 3.7.3 (default, Jan 22 2021, 20:04:44) [GCC 8.3.0] 1c) Install Ansible on Debian 11/10 from Ubuntu APT Repository. In this method, we are required to add a PPA repository to our Debian 11/10 system. First, install some requires dependencies as below.
sudo apt-get install gnupg2 curl wget -y With the dependencies installed, now add the PPA repository as below. sudo vim /etc/apt/sources.list In the file, add the below line deb http://ppa.launchpad.net/ansible/ansible/ubuntu bionic main The add the Ansible GPG key to your Debian 11/10 system as below. sudo apt-key adv --keyserver keyserver.ubuntu.com --recv-keys 93C4A3FD7BB9C367 Sample Output: Warning: apt-key is deprecated. Manage keyring files in trusted.gpg.d instead (see apt-key(8)). Executing: /tmp/apt-key-gpghome.SzIqXbWidp/gpg.1.sh --keyserver keyserver.ubuntu.com --recv-keys 93C4A3FD7BB9C367 gpg: key 93C4A3FD7BB9C367: public key "Launchpad PPA for Ansible, Inc." imported gpg: Total number processed: 1 gpg: imported: 1 Now update your APT package index and install Ansible as below. sudo apt-get update sudo apt-get install ansible -y Check the installed Ansible version: $ ansible --version ansible 2.10.8 config file = None configured module search path = ['/root/.ansible/plugins/modules', '/usr/share/ansible/plugins/modules'] ansible python module location = /usr/lib/python3/dist-packages/ansible executable location = /usr/bin/ansible python version = 3.9.2 (default, Feb 28 2021, 17:03:44) [GCC 10.2.1 20210110] Step 2 – Create the Ansible Hosts Inventory file After installing Ansible on your Control Node, the file /etc/hosts file is created automatically. In this file, we are required to add our managed nodes. You can also create your own inventory file in the home directory as below In the file, add your managed nodes as below. [Node1] 192.168.100.118 ansible_ssh_user=your_username [Node2] 192.168.100.119 ansible_ssh_user=your_username Remember to replace your_username with the username to use on the managed hosts. Then create the SSH fingerprints keys between the Control Node and Managed Nodes From your Control Nodeconfigure the SSH keys ssh-keygen -t rsa Just press Enter till the end. Then copy the public keys of your managed nodes as below ssh-copy-id -i ~/.ssh/id_rsa.pub [email protected] ssh-copy-id -i ~/.ssh/id_rsa.pub [email protected] This allows your control node to manage the nodes without password authentication. Step 3 – Working with Ansible With ansible, one can manage the nodes with commands from your Control Node using the syntax below. ansible -i [inventory_file] -m [module] [host] Now test to see if the managed nodes have been added and are reachable. sudo ansible -i ~/.hosts -m ping all Sample Output. Ping a specific host in the inventory file as below. sudo ansible -i ~/.hosts -m ping Node1 ###OR sudo ansible -i ~/.hosts -m ping Node2 You can also check the available space using the free-m command as below sudo ansible -i ~/.hosts -m shell -a "free -m" Node1 Sample Output: You can also use the df-h command sudo ansible -i ~/.hosts -m shell -a "df -h" Node2 Sample Output: Install Applications with Ansible. In this guide, we will do an installation on the managed nodes using a playbook file. We will install the Nginx Web Server, vim, and also check the system uptime on the Rocky Linux nodes, so we need to create this playbook file on the Control Node. vim playbook.yaml In the YAML file, add the below information. --- - hosts: all become: yes tasks: - name: Install latest version of nginx on Rocky Linux Node yum: name=nginx state=latest - name: start nginx service: name: nginx state: started - name: Install latest version of vim on Rocky Linux Node yum: name=vim state=latest - name: start nginx service: name: nginx state: started - name: Check uptime of the remote host shell: uptime register: command_output - debug: var: command_output.stdout_lines Now execute the playbook file as below. ansible-playbook -i ~/.hosts playbook.yaml Sample Output:
That is it! You have successfully installed Nginx on all the managed nodes. Confirm this by checking the status of Nginx on the managed nodes using the ansible command: ansible -i ~/.hosts -m shell -a "systemctl status nginx" all Sample output: 192.168.100.119 | CHANGED | rc=0 >> ● nginx.service - The nginx HTTP and reverse proxy server Loaded: loaded (/usr/lib/systemd/system/nginx.service; disabled; vendor preset: disabled) Active: active (running) since Mon 2021-09-27 09:43:55 EDT; 15s ago Process: 1789 ExecStart=/usr/sbin/nginx (code=exited, status=0/SUCCESS) Process: 1787 ExecStartPre=/usr/sbin/nginx -t (code=exited, status=0/SUCCESS) Process: 1786 ExecStartPre=/usr/bin/rm -f /run/nginx.pid (code=exited, status=0/SUCCESS) Main PID: 1791 (nginx) Tasks: 2 (limit: 4937) Memory: 12.7M CGroup: /system.slice/nginx.service ├─1791 nginx: master process /usr/sbin/nginx └─1792 nginx: worker process Sep 27 09:43:53 rockylinux8.linuxvmimages.local systemd[1]: Starting The nginx HTTP and reverse proxy server... ............ 192.168.100.118 | CHANGED | rc=0 >> ● nginx.service - The nginx HTTP and reverse proxy server Loaded: loaded (/usr/lib/systemd/system/nginx.service; disabled; vendor preset: disabled) Active: active (running) since Mon 2021-09-27 09:43:55 EDT; 15s ago Process: 1787 ExecStart=/usr/sbin/nginx (code=exited, status=0/SUCCESS) Process: 1785 ExecStartPre=/usr/sbin/nginx -t (code=exited, status=0/SUCCESS) Process: 1784 ExecStartPre=/usr/bin/rm -f /run/nginx.pid (code=exited, status=0/SUCCESS) Main PID: 1789 (nginx) Tasks: 2 (limit: 4937) Memory: 12.7M CGroup: /system.slice/nginx.service ├─1789 nginx: master process /usr/sbin/nginx └─1790 nginx: worker process Sep 27 09:43:53 rockylinux8.linuxvmimages.local systemd[1]: Starting The nginx HTTP and reverse proxy server... Sep 27 09:43:55 rockylinux8.linuxvmimages.local nginx[1785]: nginx: the configuration file /etc/nginx/nginx.conf syntax is ok ............. Conclusion. That marks the end of this guide, we have installed and used Ansible on Debian 11/10. You have seen how working with ansible simplify complex tasks more so if you are working with a complex environment with tight margins. I hope you enjoyed it.
0 notes
Text
[Media] debian11-dirty_pipe-patcher
debian11-dirty_pipe-patcher Since the Debian 11 still comes with the kernel version 5.10, which is vulnerable to the Dirty Pipe Vulnerability, this scirpt is made for manually compile and install the kernel version 5.18 which is not vulnerable. https://github.com/ih3na/debian11-dirty_pipe-patcher
YouTubeBuild a Linux kernel on DebianBuilding the Linux kernel isn't a big deal as shown in the video. Complete list of dependencies: apt-get install build-essential linux-source bc kmod cpio flex libncurses5-dev libelf-dev libssl-dev rsync python3 Twitch: https://twitch.tv/toeirei Discord: https://discord.gg/nvuTXehXg6 Support me: https://vod.run/p/74790222 Subscriber goal: ||||||||||||||| 77% |||||||||...... 77/100 Socials: https://links.stargazer.at Software: - Kernel: https://kernel.org - My Kernel-Pakete: https://packagecloud.io/debian-kernels/buster Royalty Free Music from Bensound (www.bensound.com)

0 notes
Text
何故、Windows以外の Live Linux が、 Gaming PC に、必要なのか?
#返品 #GamingPC #Z490Corei7 #GeForce #RTX3080 #HyperXFury #M2SSD #Amazon #日本HP公式 #HPDirectplus #HP30LDesktop #HP30L #systemrescue804i686 #debian11 #bullseye #konalinux6 #livelinux
何故、Windows以外の Live Linux が、 Gaming PC に、必要なのか?
0 notes
Link
🇩🇪 Emma steht voll auf Bullseye "Der Zugang zu funktionierender Hardware nebst – möglichst kostenlosem – Betriebssystem ist für sozial benachteiligte Menschen oftmals keine Selbstverständlichkeit." Genau hier setzt Emma mit einer #Linux-Distribution an, die auch auf älteren, gespendeten Rechnern stabil läuft. EmmaDE4 1.00 ("Emmabuntüs Debian Edition") basiert auf dem letzten Monat erschienenen #Debian11 und wer Debian kennt, weiß - die Sache läuft rund! EmmaDE4 steht sein Wochenbeginn zum Download bereit...
🇺🇸 Emma is fully committed to Bullseye "Access to functioning hardware, along with operating systems that are as free as possible, is often not a matter of course for socially disadvantaged people." This is exactly where Emma starts with a Linux distribution, which also runs on older, donated computers. EmmaDE4 1.00 ("Emmabuntüs Debian Edition") is based on the Debian11 released last month and anyone who knows Debian knows - things are going on! EmmaDE4 is ready to download his start of the week...
0 notes
Text
pathogen gasing 2203 variant? usually delta or brazil
pathogen gasing 2203 variant? usually delta or brazil
pathogen gasing 2203 variant? usually delta or brazil?!?!? gaser 2203knows ////// wwwwweeeeeeeeeeeelllll obsolete auxiliary computeris now stable heavy duty stable fullyfunctional with upgraded pata dvd ram running on windowsxp and on debian11 whichis brinkusable ihope its adriver only ifnot itmaybe a superweak gpu ifnot the bartoncore amd cpu is tooweak the flashing of the bios chip is mastered…
View On WordPress
0 notes
Link
0 notes
Text
Probar el rendimiento de un servidor con JMeter

Probar el rendimiento de un servidor con JMeter de Apache, o lo que es lo mismo... hacer una prueba de carga también conocida como estrés de servidor. Instalar Apache JMeter en Linux, ese es el título de un anterior artículo, en el cual explicábamos como instalar una herramienta especifica para lanzar pruebas de carga, Apache JMeter. Como ya comentamos en aquel post, tan solo era la primera parte de dos, primero instalamos y posteriormente configuramos. El lanzamiento de Debian 11, nos obligó a frenar la salida del segundo artículo; bueno... ya hemos respirado profundamente dos o tres días, se nos ha pasado el sofoco y la emoción, así que lo prometido es deuda. Hoy vamos a ver con un simple ejemplo, como configurar JMeter para ejecutar estrés a un servidor de principio a fin. Puede parecer un poco liosa, pero no es tan difícil si sigues los pasos que te indico. Lo único que me gustaría recomendarte es prudencia con los valores, en nuestro caso los usamos bajos a modo de ejemplo. También debes tener presente que con esta herramienta, puedes llegar a colapsar un servidor o VPS, haz pruebas solamente en tus propias máquinas, quedan restos y te van a pillar si lo usas como forma de ataque. Su misión es la siguiente: - Verificar los criterios de rendimiento especificados. - Validar la escalabilidad, fiabilidad y, uso de los recursos del sistema. - Confrontar dos o más sistemas para comparar rendimientos. - Identificar los errores del sistema con mucha carga de trabajo.
Probar el rendimiento de un servidor con JMeter
Si seguiste los pasos explicados en el post anterior, ya tienes JMeter instalado en tu sistema Linux. Abrimos la herramienta con el siguiente comando. sudo /opt/apache-jmeter/bin/jmeter.sh Ejemplo... sergio@sololinux:~$ sudo /opt/apache-jmeter/bin/jmeter.sh ago. 18, 2021 2:30:01 P. M. java.util.prefs.FileSystemPreferences$1 run INFORMACIÓN: Created user preferences directory. ================================================================================ Don't use GUI mode for load testing !, only for Test creation and Test debugging. For load testing, use CLI Mode (was NON GUI): jmeter -n -t -l -e -o & increase Java Heap to meet your test requirements: Modify current env variable HEAP="-Xms1g -Xmx1g -XX:MaxMetaspaceSize=256m" in the jmeter batch file Check : https://jmeter.apache.org/usermanual/best-practices.html ================================================================================ Aparece la interfaz gráfica de la herramienta.
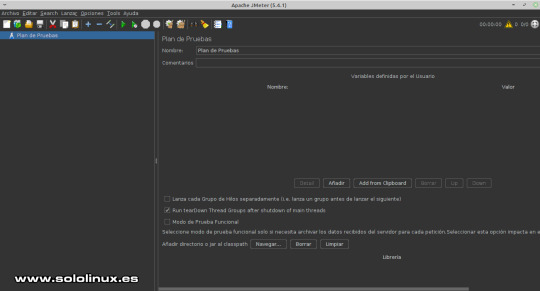
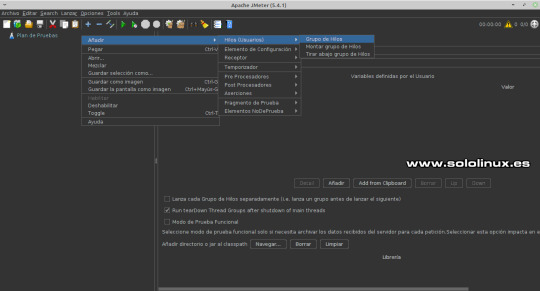
Interfaz gráfica de JMeter JMeter ya viene con un plan creado, pero sin datos ni valores, de todas formas lo aprovechamos. Los pasos a seguir para configurar JMeter correctamente, son... - Grupo de Hilos (subprocesos). - Valores predeterminados de las solicitudes HTTP. - Administrador de cookies. - Peticiones HTTP. - Escuchas HTTP. Grupo de Hilos Sigue todo lo que te indico paso a paso. Posiciona el puntero del ratón sobre Plan de pruebas, pulsa el botón derecho del morse para abrir el menú. Selecciona tal como la siguiente imagen: Añadir / Hilos (usuarios) / Grupo de Hilos.
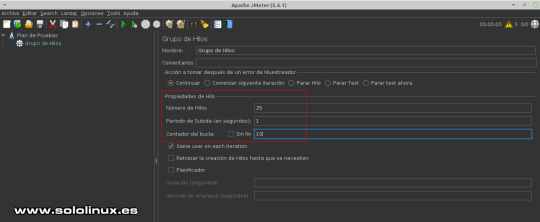
Grupo de hilos Aquí debes configurar las propiedades de los hilos. Ten cuidado con los valores que insertas, no vayas a tirar tu vps o servidor. En nuestro caso usamos los valores 25 / 1 / 10. - Número de hilos: Número de usuarios que quieres simular. Cada hilo representa un usuario simulado. - Periodo de subida: Tiempo entre el inicio del primer hilo y el último hilo. - Contador del bucle: Cuantas peticiones debe enviar cada usuario simulado.
Configurar el grupo de hilos en JMeter Valores predeterminados de las solicitudes HTTP Ahora posiciona el ratón sobre "Grupo de Hilos", pulsa el botón derecho del mouse y la secuencia: Añadir / Elementos de configuración / Valores por defecto para peticiones HTTP.
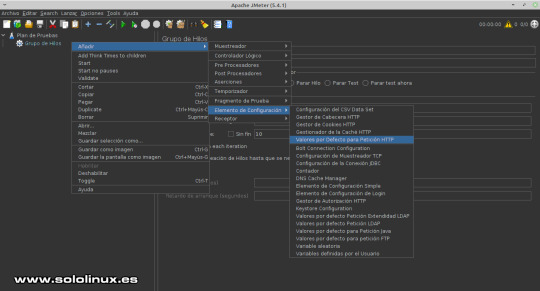
Solicitudes HTTP En valores por defecto asegúrate que estas en la opción Basic. Ajusta los valores indicados. - Protocolo: https - Nombre o IP: Nombre del host que resuelva, Dominio o dirección IP. - Puerto: 443 (por defecto de https, si es necesario lo cambias).
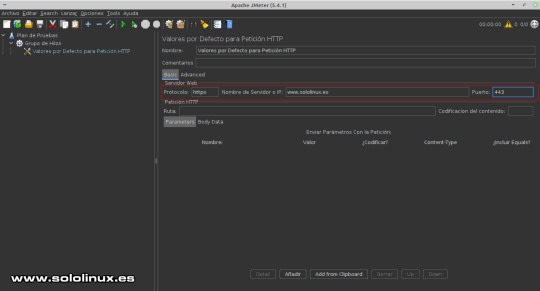
Valores de peticiones HTTP Administrador de cookies Si tu sitio web genera cookies para los visitantes, agregamos su compatibilidad posicionando el ratón sobre "Grupo de Hilos", ahora pulsa el botón derecho del mouse y la secuencia: Añadir / Elementos de configuración / Gestor de Cookies HTTP.
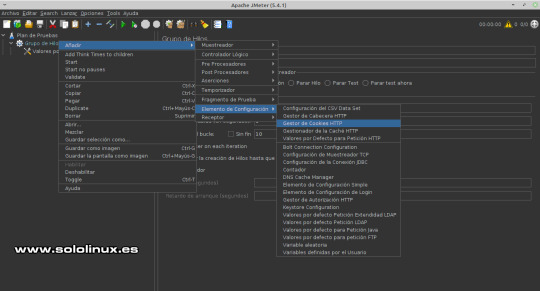
Administrador de cookies No añadas ningún valor, déjalo por defecto tal como la siguiente imagen de ejemplo.

Configurar las cookies Peticiones HTTP Posiciona el puntero del mouse sobre "Grupo de Hilos", ahora pulsa el botón derecho del ratón y la secuencia: Añadir / Muestreador / Petición HTTP.
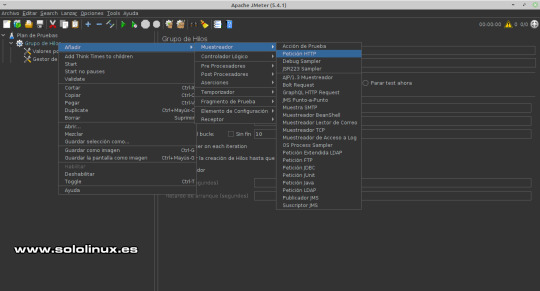
Peticiones HTTP En nuestro artículo de ejemplo, ya insertamos en valores predeterminados el protocolo, dirección y puerto, por tanto lo dejamos en blanco. Lo que si debes configurar es la ruta donde lanzar las peticiones, si lo dejas en "/", atacara sobre el index o página principal (puedes cambiar la ruta).
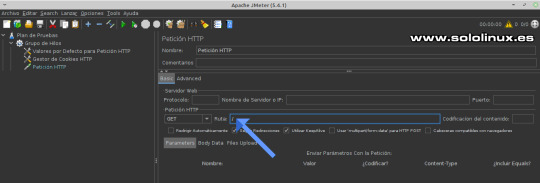
Configurar la ruta de las solicitudes y sí es necesaria la dirección. Escuchas HTTP Para conocer los resultados necesitamos escuchar las respuestas, agregamos lo que se conoce como Receptor. De nuevo colocamos el ratón sobre "Grupo de Hilos", pulsa el botón derecho del mouse y la secuencia: Añadir / Receptor / Backend Listener.
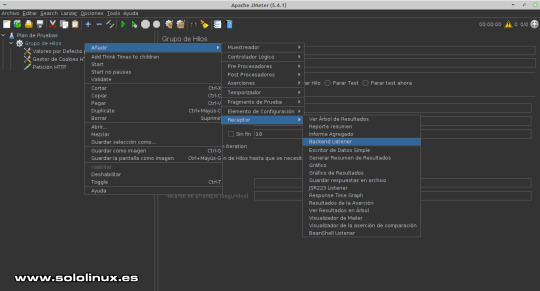
Receptor de escucha No es necesario modificar nada, déjalo como esta por defecto.
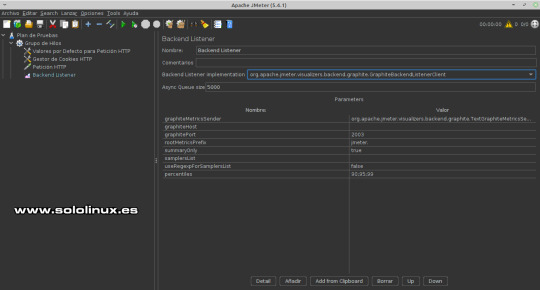
Configurar el cliente receptor Guardar Plan Para guardar el plan, pulsa Archivo en el menú superior y, en Guardar Plan de Pruebas como.
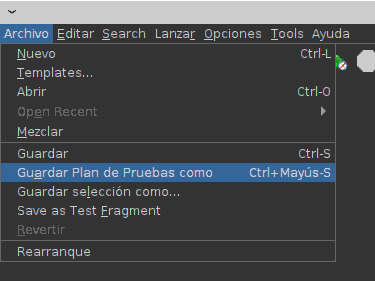
Guardar el Plan de pruebas Te recomiendo que guardes los planes creados o modificados en Templates, así que busca la siguiente ruta: /opt/apache-jmeter/bin/templates. Cambia el nombre por defecto, en nuestro caso borramos el Backend y lo dejamos como "Listener.jmx". Pulsa en guardar.
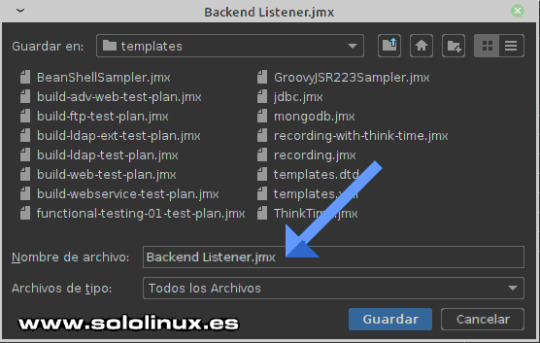
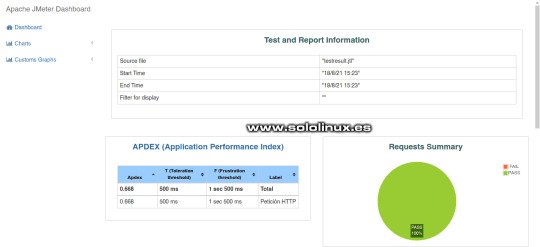
Guardar el archivo del PLan Ejecutar prueba de carga Creamos una carpeta para guardar los informes generados. sudo mkdir /opt/apache-jmeter/reports/ Los propios desarrolladores desaconsejan provocar estrés a un servidor desde la propia GUI, debes usar la terminal de tu linux. Para lanzar la prueba según los criterios del artículo, ejecutamos el siguiente comando. sudo /opt/apache-jmeter/bin/jmeter.sh -n -t /opt/apache-jmeter/bin/templates/Listener.jmx -l /opt/apache-jmeter/reports/testresult.jtl -e -o /opt/apache-jmeter/reports/ Explicamos los indicadores. - -n: Modo sin interfaz gráfica. - -t: Ruta del archivo del plan. - -l: Ruta del archivo de registro. - -e -o: Genera un archivo en formato HTML. Ejemplo de uso. sergio@sololinux:~$ sudo /opt/apache-jmeter/bin/jmeter.sh -n -t /opt/apache-jmeter/bin/templates/Listener.jmx -l /opt/apache-jmeter/reports/testresult.jtl -e -o /opt/apache-jmeter/reports/ contraseña para sergio: Creating summariser Created the tree successfully using /opt/apache-jmeter/bin/templates/Listener.jmx Starting standalone test @ Wed Aug 18 15:23:42 EEST 2021 (1629289422555) Waiting for possible Shutdown/StopTestNow/HeapDump/ThreadDump message on port 4445 Warning: Nashorn engine is planned to be removed from a future JDK release summary = 250 in 00:00:11 = 23,4/s Avg: 943 Min: 314 Max: 5011 Err: 0 (0,00%) Tidying up ... @ Wed Aug 18 15:23:55 EEST 2021 (1629289435266) ... end of run sergio@sololinux:~$ cd /opt/apache-jmeter/reports/ sergio@sololinux:/opt/apache-jmeter/reports$ dir content index.html sbadmin2-1.0.7 statistics.json testresult.jtl sergio@sololinux:/opt/apache-jmeter/reports$ Dependiendo de las solicitudes de la prueba, el proceso tardará más o menos. Una vez concluya el proceso, abres tu navegador web favorito e insertas la siguiente URL. /opt/apache-jmeter/reports/index.html Imagen de ejemplo.
Resultados de JMeter -Informe HTML Canales de Telegram: Canal SoloLinux – Canal SoloWordpress Espero que este artículo te sea de utilidad, puedes ayudarnos a mantener el servidor con una donación (paypal), o también colaborar con el simple gesto de compartir nuestros artículos en tu sitio web, blog, foro o redes sociales. Probar el rendimiento con JMeter. Chat de SoloLinux en Telegram Read the full article
#Apache#ApacheJMeter#carga#configurarJMeter#Debian11#estrés#estrésdeservidor#JMeter#JMeterdeApache#lanzamientodeDebian11#prueba#pruebadecarga#rendimientodeunservidor#servidor#sistemaLinux#templates
0 notes
Text
Como instalar Debian 11 de forma sencilla

Como instalar Debian 11 de forma sencilla, con imágenes de ejemplo. Después de la presentación que hicimos en el artículo "Debian 11 Bullseye – Listo para su descarga", y el de "Como actualizar Debian 10 a Debian 11"; Hoy vemos como "Como instalar Debian 11 de forma sencilla, con imágenes de ejemplo". En el artículo de hoy vamos a tratar las bondades y propiedades, que nos presenta Debian Bullseye (ya las comentamos en el post anterior). Nos vamos a limitar a instalar Debian a través de imágenes, de manera amena y sencilla. Si tú eres un usuario experto o avanzado, esta lectura no es para ti. En nuestro caso nos hemos decantado por la versión XFCE, pues según mi opinión personal, es el escritorio perfecto para realizar labores diarias ofreciendo un óptimo rendimiento. Debian Live 11 amd64 Xfce ha sido la opción elegida, aunque si eres de los que prefiere versiones non-free, también está disponible. Dejo los enlaces de descarga por torrent. - Descargar Debian Live 11 amd64 Xfce ISO - Descargar Debian Live 11 amd64 Xfce NonFree ISO
Como instalar Debian 11 de forma sencilla
Al iniciar la máquina con la ISO de Debian Bullseye, nos aparece una pantalla como la siguiente imagen. Si seleccionamos alguna de las dos primeras opciones, iniciara la live de Debian en modo escritorio XFCE. En este escritorio tienes un icono para instalar Debian. La instalación mediante el icono del escritorio es diferente al tradicional, por ejemplo llega un momento que puedes elegir otros entornos de escritorio, o un modo servidor. Por contra... no habilita el usuario root y eso es algo que no me gusta. Yo prefiero la tercera opción que es la tradicional, pero en modo gráfico interactivo. La seleccionas y pulsas la tecla enter.

Graphical Debian Installer La instalación comienza inmediatamente. En las tres pantallas siguientes debemos elegir nuestro idioma, nuestra región y el tipo de teclado. En nuestro caso... - Spanish - Español - España - Español

Seleccionar lenguaje Comienza la carga del instalador, para continuar con la configuración de componentes básicos como la red.

Carga el instalador A continuación solicita una contraseña para el superusuario root. Una vez lo tengas, nos dice que también debemos crear un usuario. Nombre completo, nombre de usuario y password.

Configurar usuarios en Debian 11 Bullseye Tomando como referencia los datos de ubicación que proporcionamos anteriormente (España), ahora nos pregunta la zona horaria de nuestra ubicación.

Configurar el reloj Cargan los componentes de manipulación de discos. Vemos una pantalla donde nos aparecen cuatro opciones de particionado, las tres primeras son guiadas, la cuarta es en modo manual solo apto para usuarios avanzados. En nuestro caso seleccionamos la primera opción.

Particionado de discos Marcamos el disco que vamos a utilizar. En la siguiente pantalla, te pregunta si quieres tener todos los archivos en una partición, si quieres crear una partición /home, o si por otro lado te decantas por separar /home, /var y /tmp. Separar la /home es buena idea, pero en nuestro caso usamos la opción recomendada para novatos.

Seleccionar particiones Seguro que en el paso anterior has echado de menos la partición de intercambio (swap), no te preocupes, independientemente de la opción que hayas elegido, la partición swap se genera de forma automática. Antes de pulsar en continuar, asegúrate de tener marcada la línea que indica la flecha de la imagen de ejemplo.

Finalizar el particionado La siguiente pantalla es importante. Debes marcar la opción, donde permites escribir los cambios en los discos.

Escribir los cambios en el disco Comienza la instalación. Tras unos segundos, el instalador nos pregunta si queremos usar una réplica en red. No es obligatorio, pero al seleccionar que sí que quieres, se ofrece la opción de seleccionar tu región más cercana con paquetes del instalador. Te recomiendo que sigas el proceso, la velocidad de las descargas aumentarán de forma considerable.

Instalar Debian desde una réplica de red También aparece la opción de configurar un proxy, si no es tu caso pulsa en continuar para omitir el proceso. Una vez termine el proceso de instalación, Debian 11 nos pregunta si queremos instalar el cargador de arranque GRUB, el disco duro. Selecciona "SI" y pulsa en continuar. En la nueva pantalla que te aparece, seleccionas el disco donde se instalara el GRUB (el mismo donde instalas Debian), y pulsas de nuevo en continuar.

Instalar el GRUB Como instalar Debian 11 de forma sencilla Una vez termine la instalación del GRUB, el sistema te pide reiniciar la máquina. Cuando pulsas en continuar para reiniciar, antes de la operación y de forma automática se borran archivos de instalación que ya no se van a utilizar.

Finalizar instalación de Debian Al iniciar el sistema vemos el GRUB.

Arranca el GRUB de Debian 11 Después de insertar nuestro usuario y contraseña, aparece nuestro flamante Debian Bullseye que tiene un renovado fondo de escritorio, realmente espectacular.

Debian 11 Bullseye Canales de Telegram: Canal SoloLinux – Canal SoloWordpress Espero que este artículo te sea de utilidad, puedes ayudarnos a mantener el servidor con una donación (paypal), o también colaborar con el simple gesto de compartir nuestros artículos en tu sitio web, blog, foro o redes sociales. Como instalar Debian 11 de forma sencilla. Chat de SoloLinux en Telegram Read the full article
#Bullseye#Debian11#DebianBullseye#DebianLive11amd64Xfce#españa#GRUB#imágenesdeejemplo#instalarDebian11#ISOdeDebian#ISOdeDebianBullseye#Non-Free#partición/home#particiónSWAP#password#root#superusuarioroot#swap#teclaenter#usuarioroot#xfce
0 notes
Text
Actualizar Debian 10 a Debian 11 Bullseye

Actualizar Debian 10 a Debian 11 Bullseye de manera simple. Debian 11, aún se presenta como testing bajo el nombre en código de Bullseye. Esta última versión será en breve movida a la rama estable, recuerda que las últimas versiones de distribuciones linux como Ubuntu, ya se basan en Bullseye. Los repositorios de Debian 11 ya no vienen marcados como releases beta, ni nada que se le parezca. Así que al darme cuenta del detalle y, tener conocimiento de las brutales mejoras en todos los sentidos, decidí que llego el momento de actualizar un Debian 10 Buster a Debian 11 Bullseye. Migrar Debian 10 a Debian 11, resulto ser una tarea mucho más sencilla de lo que me esperaba; ningún error ni fallo se produjo en la actualización. Como es habitual, utilizamos el entorno de escritorio XFCE que tras la migración nos ofreció una grata sorpresa a nivel visual. En este artículo, vemos todo el proceso realizado paso a paso y con ejemplos.

Debian 10 Buster
Actualizar Debian 10 a Debian 11 Bullseye
Como es nuestra costumbre, primero actualizamos el sistema. sudo apt update sudo apt full-upgrade Una vez actualizado el sistema, verificamos que estamos sobre un Debian 10. cat /etc/*release Efectivamente nuestro sistema es un Debian 10 Buster. root@sololinux-demo:~# cat /etc/*release PRETTY_NAME="Debian GNU/Linux 10 (buster)" NAME="Debian GNU/Linux" VERSION_ID="10" VERSION="10 (buster)" VERSION_CODENAME=buster ID=debian HOME_URL="https://www.debian.org/" SUPPORT_URL="https://www.debian.org/support" BUG_REPORT_URL="https://bugs.debian.org/" root@sololinux-demo:~# Necesitamos el paquete gcc-8-base, en su última versión. Ya lo deberíamos tener instalado, pero por si acaso... sudo apt install gcc-8-base En nuestro caso ya lo tenemos instalado.

Instalar gcc-8-base en Debian 10 Ahora debemos editar el archivo de los repositorios de Debian 10. Comenta los repositorios de Debian 10, insertando el carácter almohadilla al comienzo de cada línea, de forma que el sistema los omita y pase de largo. sudo nano /etc/apt/sources.list El archivo debe quedar así...
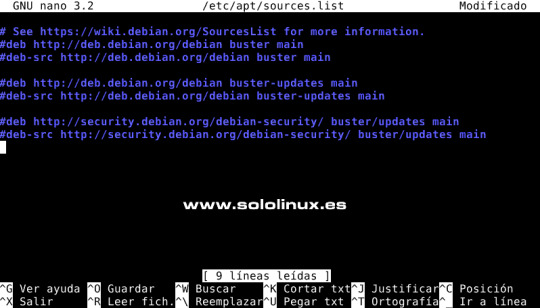
Comentar los repositorios Buster Debajo de los repositorios comentados, agregamos los nuevos de Debian 11 Bullseye. Copia y pega lo siguiente. deb http://deb.debian.org/debian bullseye main contrib non-free deb http://deb.debian.org/debian bullseye-updates main contrib non-free deb http://security.debian.org/debian-security bullseye-security main deb http://ftp.debian.org/debian bullseye-backports main contrib non-free El archivo tendrá este aspecto o similar. # See https://wiki.debian.org/SourcesList for more information. #deb http://deb.debian.org/debian buster main #deb-src http://deb.debian.org/debian buster main #deb http://deb.debian.org/debian buster-updates main #deb-src http://deb.debian.org/debian buster-updates main #deb http://security.debian.org/debian-security/ buster/updates main #deb-src http://security.debian.org/debian-security/ buster/updates main deb http://deb.debian.org/debian bullseye main contrib non-free deb http://deb.debian.org/debian bullseye-updates main contrib non-free deb http://security.debian.org/debian-security bullseye-security main deb http://ftp.debian.org/debian bullseye-backports main contrib non-free Guarda el archivo y cierra el editor. Bueno, ahora solo falta actualizar. sudo apt clean all sudo apt update sudo apt full-upgrade La actualización es importante en tamaño, sé paciente y no la pares bajo ningún concepto. Ejemplo... root@sololinux-demo:~# sudo apt full-upgrade Leyendo lista de paquetes... Hecho Creando árbol de dependencias Leyendo la información de estado... Hecho Calculando la actualización... Hecho Los paquetes indicados a continuación se instalaron de forma automática y ya no son necesarios. ant-contrib blt bsdmainutils cpp-8 enchant fcitx-chewing fcitx-googlepinyin fcitx-sunpinyin fcitx-table-wubi fonts-nanum-coding fonts-noto-hinted fonts-roboto-slab fonts-sipa-arundina gcc-9-base geoip-database gtk2-engines-xfce libasan5 libbind9-161 libboost-atomic1.67.0 libboost-chrono1.67.0 libboost-date-time1.67.0 libboost-filesystem1.67.0 libboost-iostreams1.67.0 libboost-locale1.67.0 libboost-system1.67.0 libboost-thread1.67.0 libbrlapi0.6 libcdio18 libcodec2-0.8.1 libcroco3 libcrystalhd3 libcupsfilters1 libcupsimage2 libdc1394-22 libdns1104 libdns1110 libdouble-conversion1 libdvdread4 libegl1-mesa libenchant-voikko libenchant1c2a libept1.5.0 libexiv2-14 libfluidsynth1 libgail-3-0 libgeoip1 libgooglepinyin0 libgssdp-1.0-3 libgupnp-1.0-4 libicu63 libigdgmm5 libilmbase23 libindicator3-7 libisc1100 libisc1105 libisccc161 libisccfg163 libisl19 libjim0.77 libjs-modernizr libjte1 libllvm7 liblouis17 liblwres161 libmng1 libmpdec2 libmpx2 libmysofa0 libopenexr23 liborcus-0.14-0 libpango-perl libperl5.28 libpgm-5.2-0 libpipewire-0.2-1 libplymouth4 libpoppler82 libprotobuf17 libpython2-stdlib libpython2.7 libpython2.7-minimal libpython2.7-stdlib libpython3.7 libpython3.7-minimal libpython3.7-stdlib libqt5opengl5 libraw19 libreadline7 libreoffice-avmedia-backend-gstreamer libsane libsdl1.2debian libsisu-guice-java libsisu-ioc-java libsnmp30 libsunpinyin3v5 libtcl8.6 libtk8.6 libunique-1.0-0 libusbmuxd4 libvpx5 libwnck-common libwnck22 libx264-155 libx265-165 libxcb-util0 libzinnia0 linux-headers-4.19.0-17-common linux-kbuild-4.19 perl-modules-5.28 python-tk python2 python2-minimal python2.7 python2.7-minimal python3-gst-1.0 python3.7-minimal qdbus qdbus-qt5 qtchooser qtcore4-l10n sunpinyin-data tcl tcl8.6 tix tk8.6-blt2.5 xfce4-notes Utilice «sudo apt autoremove» para eliminarlos. Los siguientes paquetes se ELIMINARÁN: fcitx-frontend-qt4 g++-8 gcc-8 libexo-1-0 libexo-helpers libgcc-8-dev libgtk2-perl libhfstospell10 libldb1 libopencc2 libopencc2-data libpolkit-backend-1-0 libpython-stdlib libqt4-dbus libqt4-xml libqtcore4 libqtdbus4 libqtgui4 libreoffice-gtk2 libreoffice-style-tango libstdc++-8-dev linux-compiler-gcc-8-x86 linux-headers-4.19.0-17-amd64 python python-minimal python-talloc python3.7 qt-at-spi uno-libs3 xfce4-notes-plugin Se instalarán los siguientes paquetes NUEVOS: alsa-topology-conf alsa-ucm-conf bind9-libs bsdextrautils colord colord-data cpp-10 enchant-2 fcitx5 fcitx5-chewing fcitx5-chinese-addons fcitx5-chinese-addons-bin fcitx5-chinese-addons-data fcitx5-config-qt fcitx5-data fcitx5-frontend-gtk3 fcitx5-frontend-qt5 fcitx5-module-chttrans fcitx5-module-cloudpinyin fcitx5-module-emoji fcitx5-module-fullwidth fcitx5-module-pinyinhelper fcitx5-module-punctuation fcitx5-module-quickphrase fcitx5-module-wayland fcitx5-module-xorg fcitx5-modules fcitx5-pinyin fcitx5-table fonts-arundina fonts-smc-gayathri fonts-symbola fonts-teluguvijayam fonts-unifont fonts-urw-base35 g++-10 gcc-10 gcc-10-base gcc-9-base gir1.2-harfbuzz-0.0 gnome-desktop3-data ..................................etc....etc........etc.......................... Es posible que aparezcan pantallas de selección de teclado, actualización del Grub, etc.
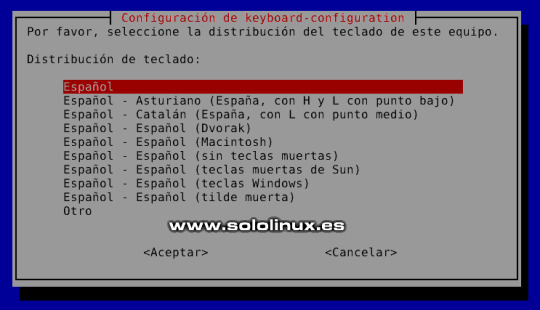
Seleccionar el teclado en Debian 11 Bullseye Una vez termina todo el proceso, debes reiniciar el sistema. sudo reboot Una vez inicie el nuevo Debian 11, nos encontramos con un entorno realmente mejorado visualmente.

Debian 11 Bullseye Como último paso, verificamos que efectivamente nuestro sistema se actualizó correctamente a Bullseye. cat /etc/*release Verás algo similar a... root@sololinux-demo:~# cat /etc/*release PRETTY_NAME="Debian GNU/Linux 11 (bullseye)" NAME="Debian GNU/Linux" VERSION_ID="11" VERSION="11 (bullseye)" VERSION_CODENAME=bullseye ID=debian HOME_URL="https://www.debian.org/" SUPPORT_URL="https://www.debian.org/support" BUG_REPORT_URL="https://bugs.debian.org/" root@sololinux-demo:~# Nota final: Te recomiendo crear una copia de seguridad de tus datos y archivos importantes. Antes de actualizar deberías eliminar cualquier paquete del sistema, que no formara parte de manera predeterminada, de tu actual Debian 10. También te recomiendo bloquear o eliminar, los repositorios externos que hayas insertado manualmente. Canales de Telegram: Canal SoloLinux – Canal SoloWordpress Espero que este artículo te sea de utilidad, puedes ayudarnos a mantener el servidor con una donación (paypal), o también colaborar con el simple gesto de compartir nuestros artículos en tu sitio web, blog, foro o redes sociales. Actualizar Debian 10 a Debian 11 Bullseye. Chat de SoloLinux en Telegram Read the full article
#ActualizarDebian10aDebian11#Bullseye#Debian10aDebian11#Debian10Buster#Debian11#Debian11Bullseye#entornodeescritorioXFCE#gcc-8-base#MigrarDebian10aDebian11#xfce
0 notes
Text
Debian 11 Bullseye - Listo para su descarga

Debian 11 Bullseye - Listo para su descarga desde su página oficial. Después de dos años de trabajo, Debian acaba de lanzar de forma oficial su última versión estable, hablamos de Debian 11 Bullseye. Este nuevo lanzamiento viene con muchos componentes actualizados y, nuevas tecnologías GNU / Linux imprescindibles hoy en día. Impulsado por el kernel 5.10 LTS series, mantendrá su soporte activo hasta diciembre de 2026. Recuerda que la mejora en soporte de hardware de esta versión es brutal. Además, Bullseye se convierte en la primera versión que ofrece un kernel con soporte para el sistema de archivos exFAT.

Descargar Debian 11
Debian 11 Bullseye - Listo para su descarga
Todos los entornos de escritorio compatibles, han sido actualizados a las versiones más recientes, incluyendo GNOME 3.38, KDE Plasma 5.20, Xfce 4.16, LXQt 0.16, LXDE 11 y MATE 1.24. Debian 11 Linux, usa el compilador del sistema GCC 10.2, así como GNU C Library 2.31, LLVM 11.0.1 y, otras tecnologías actuales demandadas por los usuarios. Otras interesantes y nuevas características, incluyen la impresión extendida sin controladores a dispositivos USB con el nuevo paquete ipp-usb, el escaneo sin controladores con el nuevo paquete sane-airscan, así como un mejorado comando open que permite abrir archivos automáticamente, desde la línea de comandos para una determinada aplicación (GUI o CLI). Actualizar Debian 10 a Debian 11 Para ofrecer una jerarquía de control de recursos unificada, systemd usa de forma predeterminada los grupos de control v2 (cgroupv2), pero si es necesario puedes volver a habilitar los obsoletos cgroups heredados modificando unos parámetros en el kernel. El nuevo Bullseye, incluye un conjunto de herramientas específicas para la investigación del virus COVID-19 en el ámbito de secuencia, para combatir la pandemia. También se han actualizado otros muchos paquetes, la mayoría habituales en nuestro trabajo diario entre los que podemos destacar los siguientes: - Apache 2.4.48 - BIND DNS Server 9.16 - Calligra 3.2 - Cryptsetup 2.3 - Emacs 27.1 - GIMP 2.10.22 - Colección de compiladores GNU 10.2 - GnuPG 2.2.20 - Inkscape 1.0.2 - LibreOffice 7.0 - Kernel de Linux serie 5.10 - MariaDB 10.5 - OpenSSH 8.4p1 - Perl 5.32 - PHP 7.4 - PostgreSQL 13 - Python 3, 3.9.1 - Óxido 1.48 - Samba 4.13 - Vim 8.2 Si no tienes Debian 10 instalado, o simplemente quieres hacer una instalación limpia, puedes descargar Bullseye desde su página oficial (se recomienda Latest stable Debian release). - Descargar Debian 11.o.o
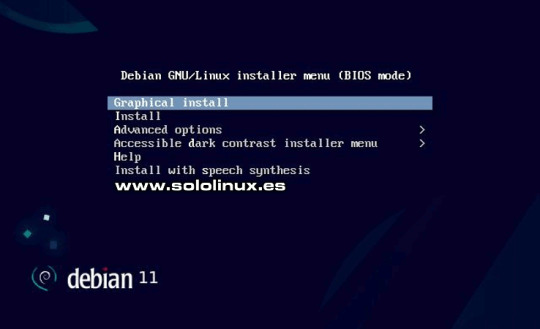
Instalar Debian Bullseye Si por el contrario eres usuario de Debian 10 y, prefieres actualizar de Debian 10 a Debian 11, sigue los pasos indicados en el siguiente artículo de SoloLinux. No olvides hacer una copia de seguridad antes de lanzar el proceso. - Actualizar Debian 10 a Debian 11

Actualizar Debian 10 a Debian 11 Canales de Telegram: Canal SoloLinux – Canal SoloWordpress Espero que este artículo te sea de utilidad, puedes ayudarnos a mantener el servidor con una donación (paypal), o también colaborar con el simple gesto de compartir nuestros artículos en tu sitio web, blog, foro o redes sociales. Chat de SoloLinux en Telegram Read the full article
#Bullseye#cgroups#comandoopen#Debian11#Debian11Bullseye#descargarBullseye#DescargarDebian11#dispositivosUSB#exFAT#GNOME3.38#ipp-usb#Kernel5.10LTS#Linux5.10LTSseries#MATE1.24#sane-airscan#sololinux#systemd#virusCOVID-19#XFCE4.16
0 notes