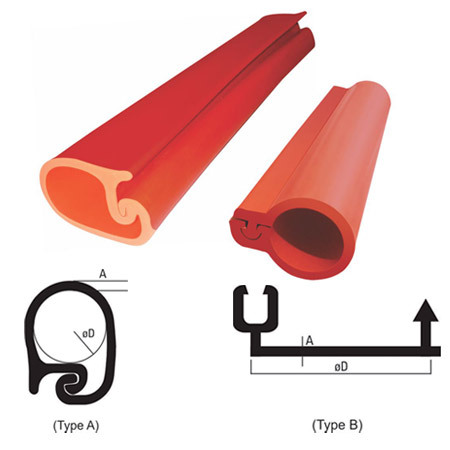
#Copper Ended Connector
Explore tagged Tumblr posts
Visit Tumblr Blog
Explore Tumblr blogs with no restrictions, modern design and the best experience.
Last Seen Tumblr Blogs


Fun Fact
Kazakhstan’s Minister of Communications and Informatics has blocked the Tumblr site because it contained 60 sites of terrorism, extremism, and pornography in 2015.
Text
#Hydraulic Hoses#PTFE Hoses#PTFE Tubes#Convoluted PTFE Hose Manufacturers#Convoluted Hoses#High Pressure PTFE Hose#Threaded Pipe Connector#Threaded Connector#SS Wire Braided Convoluted Hoses#PTFE Hoses Aerospace#PTFE Plain Hoses#Two Axis Pipe Connector#Fixed Flange Connector#Copper Ended Connector#Dash 2 PTFE Hoses
1 note
·
View note
Text
Get Better Connections with Yamuna Densons Copper Braids
We are one of the leading manufacturers and suppliers of copper braid. If you are looking for the best Copper Braid Manufacturers and Suppliers in India, So you have come to the right location. Please visit Yamuna Denson. Yamuna Denson Copper braid construction varies depending on the desired flexibility and application. A copper braid can be made with different wire diameters, with a smaller diameter resulting in greater flexibility. The degree of flexibility offered by various weaves, such as flat, round, and rope braids, can be selected by the particular needs of the application.
To know more information about our products, you can directly contact us at (91) 11 - 47025670.
#connector front & rear#cold shrink cable joints & terminations#conductor cover#heat shrinkable end caps#medium voltage cable jointing kit#low voltage cable jointing kit#bus bar connector#cable repair sleeve#shrinkable anti tracking#copper braid#Cable Repair Sleeve#Bus Bar Connector
0 notes
Note
<- has been in da server room all day
Hey hey I think Tarantulas should plug Prowl into a whole bunch of servers. Cables snake to and from his frame, lodged into ports never meant for such purposes and wires pulled from him and spliced to those of external computers. The webbing he's tied in coils round his frame and the bundles of rubber-sheathed copper. It's almost indistinguishable where the webs start and wires end.
It's never encouraged for mechs to supplement external processors with their own. It's possible, but the chance of injury is high. Whilst manual limits can be set on the machine to prevent an overdraw of power from the mech, if the mech loses themselves in there, their own will is likely to overpower these manual limits and will burn out their processors.
But since when has Tarantulas ever cared for "encouraged" practices.
Prowl's processor is so beautiful, so boundless in potential. His battle computer was known to be unmatched, and yet was never fully put to the test. He had suggested, several times, for Prowl to allow him just a little test- to see how far he could truly push that wonderful mind of his- but Prowl always refused. A stubborn one, he could be. Sometimes, he needed to be coerced into having a little fun.
And that's how Prowl ends up here. Of course he had struggled, as he always does. But not anymore. Now his frame shudders as a city's worth of data is pumped into him, or through him, really.
Each simulation, each request for a calculation, is pushed into his system via ports that are almost never used. Each push of data is but a shock of static, but together are a frame-rattling charge. So much extra data, and power, flows through his cabling. His actuators twitch and his vocaliser glitches with static.
Prowl always loved a challenge, didn't he? Simple tactics and problem solving weren never enough for his brilliant processor. And yet, Tarantulas had only succeeded in getting Prowl to assist him in a simulation once. Just once.
Just once, he had hooked Prowl up to his newest invention. Just once, he had clicked that data cable into Prowl's waiting port and watched him cry out.
It had been mesmerising. Prowl's frame had tensed, optics wide, darting between unseen strings of data being pushed through his circuits. At first Tarantulas had wondered if his partner was in pain, but soon realised his doorwings twitched in the same way they would when Tarantulas stroked his digits down sensitive panelling.
Oh. Prowl had liked it.
Prowl, goaded into it by the promise of yet another glorious weapon, had later reluctantly confessed that it felt like an itch in his processor had finally been scratched. It almost hurt, and yet it was warm and inviting. It felt like someone reached a servo into his battle computer and yanked- and yanked and yanked until it hurt- but in a way that he craved and sent charge surging through his circuits.
And yet he had never agreed to it again.
Which is why he didn't have a choice this time.
Tarantulas coos as he runs his servo down Prowl's sparking armour, relishing in the way it makes the bot's vocaliser crackle and frame jerk and twitch.
His pedipalps busy with another port in Prowl's side, one sliding the overheated port open, and the other gently pressing yet another cord towards it. Electricity arcs between the connector and the exposed contacts of the port, forcing another aborted cry out of Prowl.
He pushes the head of the cable against the port, but doesn't quite push it in. It's just close enough just for Prowl to be able to feel it's charge.
Tarantulas coos and leans his helm into Prowl's as he continues to tease the connector around the open port, systems purring as Prowl keens and whines at the contact.
"Please...!"
Tarantulas' systems purr louder at the broken plea. His servo comes up to cup Prowl's cheek as he leans in to rest his forehead against his partner's.
"Please what, my dear?" He wiggles the cable against the port again, drawing another cry from Prowl. His voice shakes and he strains so hard that his optics are wet.
How beautiful.
"Please- Please do it. Push it in. I want- I need it- Please-!"
Tarantulas chuckles then, nuzzling against Prowl's solvent-stained cheek.
"Of course, my dear. All you needed to do was ask," he whispers before plunging the cable in. It connects with a barely audible click before Prowl wails, current coursing through his circuits and doorwings going rigid
oughhh this is really something. Tarantulas plugs Prowl back in after all that time and they remember how wonderful it is... his battle computer, his entire processor, blinking and buzzing and rattling as the servers struggle to contain all that charge.
Prowl loves it. Loves how overwhelmed it makes him feel, how terribly full his ports feel as the large connecting cables slide in and fill his frame with stimuli. Everything feels so hot and Tarantulas knows that...
37 notes
·
View notes
Text
Learning to Smelt - 1
I've been wanting to talk about this for a while. Last year, I wanted to pick up smelting. It seemed fun, and felt right up my field in the realm of making things. I did all the research, got the equipment and earlier this year I finally managed to start! My goal is, once I'm comfortable enough to do it solo (since I had help from my insane uncle during my training adventure) to have it livestreamed and smelt things on request! Honestly at this point I reckon my skills have advanced to the point of almost competence (huzzah!) Nonetheless I want to post some stuff showing the process, just in case anyone's curious!
First off, I made an AGGREGIOUS error when it came to choosing the smelter brand. The one I bought didn't have a connector that worked with Australian Gas tanks, only US ones. I was very luck my uncle had a bunch of spare fittings/hoses lying around otherwise it would've been impossible to do anything from the start. Funnily enough too, despite it eventually getting to +1000 C temperatures, it didn't need that much fuel overall! Only had to slightly open the valves with one full rotation on the gas tank. I guess that's by design, since the whole idea is keep heat in (this just in, local hoplite PNGTuber discovers how heat works!) Also, fun fact! Don't buy a shitty $50 temperature gun that says it can get to 1000+ C and expect it to do so! So many infrared sensors are so pricey and there was no way in tartarus that I would use that kinda money on a glorified nerf gun but then it turns out the cheap one I got was incapable of reading anything beyond 400 C. Fortunately you can just eyeball it when it comes to smelting using this simple rule! If metal = solid: Wait If metal = liquid: Congratulations, you've done it!
Have to make sure it's done in a well-ventilated area too. Doubly so if you're melting brass since that garbage can burn and make zinc oxide which is NOT GOOD. First time I melted stuff was just done to make sure I knew what I was doing, not to cast anything. All I did was melt down brass and copper separately to make small ingots.

(btw if you ever plan to make casted finery, don't bother with a specific ingot mold, those things are pricey. Just get a cast iron muffin tray w/o the teflon on it or something similar. You can make a lot more that way and they're more likely to fit in the crucible if you want to re-melt). Also another piece of advice: DON'T OVERLOAD THE CRUCIBLE. My uncle wanted us to melt down all the copper we had (which was a lot, I had been going to town on the neighbourhoods wiring/plumbing in preparation for this) since "it was more energy efficient to smelt more instead of letting it cool down!" While technically true, a crucible full of copper is VERY HEAVY and picking that thing up with crucible tongs is gonna be a legendary struggle. We did end up spilling a bit, fortunately it didn't go anywhere. The vid attached to this post shows it: A crucible full of copper and regret for our lack of forethought. Following day I did try to cast one thing: My channel emblem as a medallion. I poured molten copper into an open sand mold and well, you be the judge:

Still, twas a good first go! Thanks to the ingot molder we used the cast metal in it's default form comes out in a style akin to that of a paperweight.
I'll be posting details on the second and third smelt soon, so stay tuned!
7 notes
·
View notes
Text
Into, Across and Beyond!: Quill Society Logs (First Findings)
(All recorded by Errorverse Sonic.)
Log 5: Recruitment Requirements
"Log 5; recruitment requirements. It's been a couple of months, and the Quill Society's foundation has started well after both the most recent issue my dimension faced and the failed scheme by Eggman Prime to destroy the original Sonic, with a lot of side villains from other universes helping him, including a brainwashed Sara from Dimension OVA-1996.
The recruit applications had been starting to climb since I brought OMT!Mina in. Considering what her Ash tried to do to her back there... I knew I couldn't just leave her to either die or be thrown into prison for the rest of her existence for something she didn't cause. I also bore witness to Eggman Nega's multidimensional energiser trying to muck things up around us. I'm glad OMT!Tails and those who came to his world managed to stop it, though.
Now, as for the point of this log. I've seen the ways the Spider-Society and the Funkin' Society have operated, and it's something I really want to avoid as a bid to make the Quill Society more of a welcoming side-job for heroes from across dimensions. So, here's some major rules I had pinpointed:
No canon event nonsense is to be utilised within the Society. Our motto is doing the right thing, not just abiding by fate by leaving loved ones to perish.
As long as a potential recruit has any ties to a SEGA property or has ownership under SEGA, like how Avalice used to be around a Sonic fan game, they're open for recruit material with no questions asked. I might consider seeing if some of the -friends through the Funkinverse might suit a role here, depending on their ties.
Abuse is an issue I take really seriously here, so therapy is always available for any victims of abuse in their worlds, but inflicting abuse on other Society members is strictly forbidden. And honestly? Anyone utilising rape shamelessly are those I see as deserving of "Damnatio Memoriae", a fate worse than death.
Unless stated otherwise, I will not stand for any Society member or villain from other worlds as "anomalies". It... makes me feel like any nice person called that is cited as undeserving of basic human rights or sympathy.
A hero in the Society has especially gotta be willing to do the right thing if they're open to doing missions out on the field in other dimensions. That's our whole motto, after all, since helping others is always the right thing to do, even if it causes trouble later down the line.
I'll get a rule board set up while the other facilities like the caf�� are under construction, and I'll hopefully document more findings as I go along. End log."
Log 9: Lightmatter and the Shadow Anomalies
"Log 9: Lightmatter and the "shadow anomalies". I've discovered a recurring event in a few Earths, around the Cave Johnson era of Aperture Science before GLaDOS, or the "Genetic Lifeform and Disc Operating System", took over. There was another company existing at the same time while the AI prototype was in construction, not counting Black Mesa, of course. I'm talking about "Lightmatter Technologies".
The company was headed by two men named Virgil and Arthur, who had scaled a mountain to discover photon crystals, though along the way, something ended up costing Virgil one of his legs, but his pride remained steadfast for finding the first photon crystal. Experiments went on with technology like photon connectors and photon power cells, the latter of which was a replacement for copper wiring in one block of the mountain facility, until...
...they managed to complete a central part of the base, known as the "CORE", a collection of massive photon crystals. The company got its name when the photon crystals produced a beam so solid, it literally looked like light had become matter! The general idea was to provide infinitely renewable, clean and sustainable energy to the whole world, and the whole thing genuinely does seem like an awesome concept! At least, on paper.
But underlying problems started happening, when side-effects of the crystals' tapped-into energy started causing minor cellular degradation, such as hair loss. Virgil immediately thought that the matter could be solved by installing mineral decontaminators in the facility, though sicknesses were still high and the facility got practically locked down where Virgil and Arthur had been in... disagreements, meaning no employee could leave.
Shortly after, Arthur had seemingly started poisoning employees and using it as further proof to Lightmatter's board of directors that the energy source was causing these side-effects. Virgil wasn't happy, to say the least, and while he was investigating the matter, he learned from one of his employees, who is named "Ellen" from the tape recordings I've taken from one of the Earths, that Arthur had plans to overload the CORE and destroy the facility. Arthur was quickly chucked out by Virgil and his security manager, James, for his actions.
However, just weeks later, the problems were getting worse. Employees were having intense headaches that only subsided when in presence of light, and the decontaminators were not doing their job, since they were still losing hair and fingernails. Ellen took it upon herself to sneak into Arthur's office and do some investigating as to what he was doing, and what she discovered changed everything.
Arthur had built a prototype of his intended experiment on the CORE, and discovered that the CORE was producing a deep-black, obsidian-like tar that only shows up in complete darkness and causes rapid cellular degradation! We've since referred to these as "shadow anomalies", despite actual shadows not being as harmful. And though Arthur knew, he was clearly willing to risk killing billions of lives just to bring Lightmatter into fruition!
Now, onto that theory. Since the CORE cannot be truly shut down and is completely self-sustaining, another solution was found with the prototype. Overcharging the crystals with multiple mother sources would outright destroy them, and within a radius of the smaller CORE, the shadow anomalies were neutralised and all cellular degradation there came to a stop. He managed to find a solution to the problem!
Fortunately, by some unknown people, any Lightmatter mountains between Earths have been wiped out, with the shadow anomalies all neutralised, even if Ellen couldn't do the deed herself. But... I dread to think what would happen in Earths where the anomalies could leave the mountain unimpeded and wipe out humanity for Virgil to rebuild in his image.
So, if any Earths I can record have a Lightmatter Technologies and there is nobody to stop the CORE, I'll send out agile two-man teams to overload them and wipe them out before the shadow anomalies can wipe out an Earth's civilisation. Ellen, wherever you are now, we owe you big time for uncovering all this information, and you have my gratitude for keeping these tapes intact for us to learn about it. End log."
#sonic the hedgehog#sonic exe#sth#sonic#spider verse#sonic fandom#sonic au#sth au#spider man#friday night funkin#lightmatter
4 notes
·
View notes
Note
Yeah they did all live under the same roof and the same room because this version of the Merry Men are basically a thieves guild but I forgot to specify that each one of the kids have separate adoptive mothers that are all genderbent members of the Merry Men gang. Gillian Gysbourne who I made alongside my character’s mothers was taken in by Big Joan (genderbent Little John) Katharina Lamelin was taken in by Alana Adell (genderbent Alan-a-Dale) and Esai was taken in by Billie Scathelocke (genderbent Will Scarlett)
This one is Zarek a Warforged Paladin taken in by Cleric Till (genderbent Friar Tuck). Zarek is based on the story of King Midas specifically King Midas’ daughter who he turns to gold when she hugs him. In this version Zarek doesn't die when turned to gold he is still alive and able to move. Originally he was a human but due to the magic of being a man turned to gold he acts similarly to a warforged. After being turned to gold he ran away from his kingdom and ended up running into the Merry Men. He's the oldest of all the other kids being 18 when recruited while most of the others were around 8 or 9 when recruited and by the events of BG3 he’d be 29. He was also 18 when turned to gold and has looked 18 ever since not being able to age.
Also since there’s no option to actually make a character gold in BG3 I just had to give a rough idea of how he looks.

Also you’re right to see similarities in Robyn Hood and Jaheria because I immediately caught that after going to her house in Baldur’s Gate. Both blonde, both wear green, both are folk heroes, both have adopted kids. My Tav would probably be very close to Jaheria due to how much she reminds him of his mom. I don’t think he’d ever tell Jaheria why he’s so close to her though at least not unprompted.
Gold?? GOLD?? WARFORGED?
OKAY lemme be a nerd for a moment so.
Idk shit about electronics but I was researching stuff about computers the other day out of curiosity and I've always wondered why do they use so much gold in them?
Long long rant below about gold as a conductor and warforged in general
Let's start with the fact most warforged are made! For one to appear naturally like yours is very unique experience, so much I can't even think of another situation where a warforged is just born into the world without an inventor.
And since warforged are made, they're really really fucking expensive. Much like a decent pc in today's standard would cost around 1000$ just to meet the minimum requirements for most games and softwares. And even those ones are quickly degerading, especially since Windows 11 rolled around, most of the low end pcs don't meet the requirements to update to it.
Imagine how expensive a warforged would be? Probably ten times as that just for a low end one. So to lower the cost people use copper wiring, switches and connectors.
There is also silver an aluminium but copper has the best rounded out stats for its price.
Then comes gold, which literally sweeps the floor with all the other competition. Gold is so much superior as a conductor in electronics that even just plating things with a thin gold layer helps in improving them and allowing for more electrons to pass through faster.
But it's expensive, crazy expensive which is why it's literally unimaginable for someone to make a warforged out of gold, that's Nasa space computer level budget.
Everyone except for Zarek, who was handed his literal own weight in gold.
Other reasons why Gold is superior in electronics
It doesn't oxidise (or only does very very veryyyyy slowly) and there is no fear or tarnish or rusting! Literally a warforged worst ever enemy. Gold isn't reactive either so there is no fear of it mixing with chemicals. It is a noble metal! Which means any alchemist or evil witch throwing potions your way would probably have zero effects.
It's extremely easy to mould and work with. Gold can be recycled, and there are so many gold jewellers across the globe who specialise in working with it. A warforged made out of gold would have an easier time finding a smith or jeweller willing to fix them up! Plus, it allows for a lot of decorative opportunities since gold can be moulded into any shape and isn't brittle , nor does it break easily. (Gold purple exists too, a naturally purple gold, but it is extremely brittle, so ignore it)
AMAZING CONDUCTIVITY, i can't even stress this enough. Your warforged would be running at 240hz with a 4x64GB RAM in comparison to your every day to day warforged.
IT LOOKS METAL(hehe) AS FUCK
And making him based on that fairytale concept is such a good backstory? Fuck that's a beautiful fully closed loop that I'm adorning. This is just a great character concept 10/10
Also I really like the make up! It was the first thing I noticed before reading the ask. Now I know it's just supposed to resemble gold but still.
If you ever play on pc or with mods, there are multiple skin colours ones that can make him glossy and metalic gold yellow!
Idk if this was intended, but the name Zarek is also an arabic word
زَريق
Which can mean "blueish" or "to become blue"
Also can mean something hitting the target, the action of it connecting with its target is called zarek.
Side note: Sol would literally be so obsessed with a gold made warforged. Gold in general is the love of their love so making a living being out of it is like winning the jackpot. If their bad ending ever happens, Zarek is on top of the lists of people they plan to kidnap and keep in their dragon hoard. Zarek better stay away from any flying red dragons who'd wanna snatch him up.
3 notes
·
View notes
Text
Weathering Ghostbusters Proton Pack
Everyone who got a Haslab Ghostbusters Proton Pack must have watched Adam Savage's video on all the upgrades and weathering he did to his Proton Pack and decided to do the same thing. Well, I am one of those people ... LOL I actually did this earlier this year and just posting it now, so some things below may not be in chronological order.


I started with the easy stuff, applying wire tape over the faux wire tape and Rub'nBuff the connectors. Love the results of using Rub'nBuff.


This was followed by using Rub'nBuff for the rest of the pack. I think I went a little overboard with it ... LOL


It was a pain trying to find the right cable sleeve over here in Malaysia, so I had to improvise.


I also designed and printed some stickers.


And finally to my makeshift spray booth to blast it with hair dye and matte coat, like what Adam Savage did in his video earlier.


Okay, not really final, as all modders know, there is always more to be done ... LOL ... I put copper tape on the ends of the connector wires and replaced some screws with more screen accurate ones, and weathered them accordingly.


Well, that's as far as I've gotten. I still need to weather my Neutrona Wand. That will be a project for another day.
6 notes
·
View notes
Text
Unleashing the Brilliance of Aluminium Cable Lugs: A Gateway to Efficient Electrical Connections
Step into the captivating world of electrical components with Pioneer Powers International, your go-to destination for premium-quality products in Mira Road, Mumbai. As wholesalers and retailers, we take immense pride in introducing you to the brilliance of Aluminium Cable Lugs – the gateway to achieving seamless and efficient electrical connections.
The Wonders of Aluminium Cable Lugs: A Marvelous Choice:
In the vast universe of electrical connections, Aluminium Cable Lugs shine as a marvelous choice, offering an array of benefits. These connectors play a crucial role in establishing secure links between electrical conductors and terminals, ensuring a stable flow of power without compromise.
Exploring the Allure of Aluminium:
As we delve deeper into the world of Aluminium Cable Lugs, we are captivated by the allure of this extraordinary metal. Renowned for its impressive combination of lightweight and high strength, aluminium proves to be an ideal material for cable lugs. Its excellent conductivity and resistance to corrosion make it an excellent alternative to copper in various electrical applications.
The Anatomy of Aluminium Cable Lugs: A Masterpiece in Design:
Let's unravel the artistry behind Aluminium Cable Lugs. These connectors typically consist of a cylindrical barrel with a flared end, ingeniously designed to house the conductor securely while allowing for easy attachment to terminals and devices. This clever design ensures a snug and dependable connection, safeguarding against disruptions and ensuring uninterrupted power flow.
A Diverse Array for Every Need:
At Pioneer Powers International, we embrace the diversity of electrical projects. Therefore, our extensive inventory of Aluminium Cable Lugs caters to a wide range of applications. Whether it's domestic electrical wiring or industrial installations, our versatile selection guarantees that you find the perfect fit for your specific requirements.
Quality and Safety: Our Top Priority:
At the core of Pioneer Powers International lies an unwavering commitment to quality and safety. Our Aluminium Cable Lugs undergo rigorous testing to meet the highest industry standards, ensuring outstanding performance and longevity. With our products, you can trust that your electrical connections are fortified against any potential mishaps.
Installation Guide: A Smooth Journey to Connectivity:
While Aluminium Cable Lugs boast exceptional attributes, proper installation is paramount to unlock their true potential. Our expert team has meticulously compiled a comprehensive installation guide to ensure a flawless connection process. Following these guidelines guarantees a secure and proficient link, optimizing the overall efficiency and lifespan of your electrical system.
Innovation and Adaptability:
At Pioneer Powers International, innovation is the heartbeat of our existence. We continuously strive to remain at the forefront of the electrical industry, adapting to the ever-changing needs of our customers. Embrace innovation with our state-of-the-art Aluminium Cable Lugs, and experience a new level of electrical efficiency.
Pioneer Powers International: Your Trusted Companion:
As you embark on your electrical ventures, we extend our hand to be your trusted companion. Pioneer Powers International has built a legacy of trust and excellence, serving electricians, contractors, and DIY enthusiasts with unmatched dedication. Discover the brilliance of Aluminium Cable Lugs, backed by exceptional service, and let us illuminate your electrical projects with efficiency and finesse.
Conclusion:
In the realm of electrical connections, Aluminium Cable Lugs stand as a testament to the brilliance of engineering. At Pioneer Powers International, we invite you to immerse yourself in the wonders of these exceptional connectors – the gateway to seamless power transmission. Embrace the allure of aluminium, guided by our comprehensive installation guide, and elevate your electrical ventures with confidence. Pioneer Powers International is here to empower your journey towards efficient electrical connections and to light up your world with brilliance
2 notes
·
View notes
Text
Making BIG SIF2 (Part 2)

Hello again. In case you missed the first part of this project, I'm trying to recreate an old SIF(1) attraction where nine players jump around on floor buttons to play the game cooperatively. Last time, I went into how those buttons work, how they connect to the game, and completed the first switch.

Just need to do that eight more times.
This is another post with a bunch of text I'm writing down as I work on the project, in case you want to see where it's going or want to build something similar yourself. The TL;DR is that all floor switches are done now, I had to change the button mapping app, and found a nice solution for selecting songs and starting Lives - and then there's a video of me trying (emphasis on trying) to play BIG SIF solo.
This is the part of a project where there's nothing to do but boring, repetitive work. There is more interesting stuff to do, but you can't get to it before you just spend several hours doing the same thing over and over again, and it's hard to get excited to do it. So, even though this was probably the most time-consuming step of the project with 25+ hours, it can be summarized in one sentence: there are now eight more functioning switches.


This involved cutting out a total of 24 more shelf liner circles, clipping holes into 8 more rug pad spacers and 8 of the shelf liners, inserting 128 snap caps, crimping 16 connectors, and placing all the copper tape and soldering it together. One small change I made is that I added a little bit of copper tape to move all the connectors a bit to the side, so you don't step right on it when going for a press, and also gave it a generous glob of hot glue to serve as strain relief. Also, I had to purchase more anti-slip rug pad after all - turns out most of the one I owned was too flat to work properly. Oops. With the new rug pad, I noticed this beady style of rug pad is more stretchy on one axis than the other, so these layers are not rotationally symmetrical. To help with that, I cut out the corner where the connectors are glued on - not only does this make that spot a little flatter, but it also makes it easy to tell which orientation the pads must be placed when assembling the switches to align everything correctly.
Since I don't own any proper presses, all of the snap caps and crimp connectors had to be done by hand. That - combined with all the liner cutting, rug pad trimming, and soldering - has not been a fun time for my wrist :) It might be a good idea to invest into snap cap and crimp presses instead of pliers, it's probably cheaper than replacing my wrist down the road... and for the soldering, I'll probably just go with copper tape with conductive adhesive next time as mentioned before, to avoid that problem altogether.


Speaking of crimp connectors: add 36 more to the count for those connecting cables, and 18 more for the other ends on the controller board. The latter one just involved replacing the little button connectors the board comes with, which would usually make it easier to wire up arcade panels.
As for the cables, those are speaker wire. It's probably extremely overkill for a simple signal wire. I originally wanted to use dirt-cheap doorbell wire which would have been more than enough to carry the signal even over long runs, but there were two reasons I didn't go with it. One reason is that doorbell wire is solid wire. But if people might step on the wire, or I want to roll up and transport the parts of this project, stranded wire is far more durable, so I wanted to make sure to use it for the extra reliability. The other reason is that it was on sale :) I decided on buying a 25m roll and having each cable be 2m long - which is probably somewhat overkill again, but for things like cable length, I'd rather go too long than too short.
But hey, we've got over the mountain that is the boring and repetitive part of the project, and now we can ride down the hill to the finish!
Wait, no, that would have been too easy. Of course there's problems.


There was something that I completely missed in my test from the first post. I only had one floor switch, so I didn't try an actual song, which would have uncovered a big issue with using Key Mapper: it doesn't support pressing multiple buttons at once. If one player holds down a switch for a hold note, and another player taps their switch, the hold immediately ends. And of course, I didn't notice that problem until I actually had multiple floor switches completed.
After a few hours of searching and experimenting, I could only find one other app that worked. It is called Mantis, and it sucks. It contains ads, requires a weird and completely intransparent set up procedure through a wireless ADB debugging session, you must map the inputs of the arcade controller board to an Xbox controller layout before you can use them or they'll just be ignored, there's an unremovable menu button on your screen at all times, the map can't be programmatically disabled to stop the buttons from inputting for a moment, and I've found it's maybe a little unreliable? It just suddenly stopped while the game was running once. But as I said, it's the only one that I've found that works. So, I'll have to live with it. At least it supports the holds that Key Mapper doesn't do. So, you can play the game fine now. We can get back to finishing up the setup.
But before that, have you noticed though some of the mapped tap locations for the buttons are slightly off from the center of the spots in the game? I intentionally moved them a little, so they still hit the tap spots during Lives, but miss certain menu buttons! For example, the tap locations for spots 4 and 6 are moved down, so they don't hit the menu buttons while the game is paused. Otherwise, the player on floor switch 6 could accidentally use up my loveca if they kept stomping on the button after their stamina ran out and continued…


Here's everything connected together! The nine completed switches, all linked up to the board, and all that's left to do is set up Mantis and the HDMI output on the phone, plug in the single USB-C cable, and it's ready to play!
But before we plug everything into the phone, I really quickly want to note something about the adapter: The adapter required for this project was not just about needing a way to go from USB-A to USB-C - after all, that could have been solved even easier by just replacing the USB-B-to-A cable of the board with a USB-B-to-C cable and connecting it directly to the phone. As you might have been able to tell from the cover picture from the first post, playing BIG SIF on the phone screen is kind of... not optimal. So, the adapter had to have both an USB-A port and an HDMI port, so you could show the game on a TV or projector!
The adapter I ended up picking not only had those two ports, but also two more USB-A sockets and an USB-C socket. The USB-C port is for power delivery - everything runs off of the phone battery if it is not used, but this allows you to use a powerbank to extend the battery, or just plug in a wall charger so you don't have to worry about it at all. And the other USB-A ports come in really handy, as well. One of them can be used for an Ethernet adapter, which can vastly improve the stability of the required internet connection, if available. As for the other USB-A... one problem I hadn't considered at all is the game menus. As in, song selection and actually getting into the game. Of course, you could always just walk over to the phone, and try to find the correct tap spot on the screen that is turned off, then walk back to the switches - but there's a better approach thanks to that last USB port, with a wireless keyboard I had around already:


This one in particular is a wireless keyboard and touchpad combo, which gets recognized as a generic keyboard and mouse on any device you can plug it into - including Android. So now, you can use the touchpad on that to move around a cursor and do the menuing that way, without having to run back and forth! It's still a little awkward to control the pointer via the touchpad, but there's more that you can do: the keyboard part is not actually needed for this project, since we don't need to type any text... and Key Mapper is sitting idle now that we replaced it with Mantis, so how about we pass the keyboard to it? The keyboard won't have to deal with multiple simultaneous presses, so by setting up keys from it in Key Mapper, we can get an entire keyboard worth of buttons to map even more taps to! That way, instead of having to move the cursor across the screen, you can select and start songs by just pressing a few keys in order. And Mantis still handles the floor switches, so holding down the buttons still works fine, no matter how many are pressed.
Also, yes, I am planning to run regular Lives when playing on this. You might be wondering - "Why? There's a Rehearsal mode now, wouldn't that be better for something like this?" And the answer is yes, it absolutely would be, since I don't have to care about LP or running out of HP during a Live then! But the Rehearsal mode has a static background (see video below) instead of the cool Live Monitor, so I'll be happy to sacrifice my LP candies for the cool effects :) I'm not going to ever use all of them, anyways. And as for the HP problem, I could just add some healers... and if anyone ever wants to see how badly a Master chart would go, I can still start a Rehearsal by clicking on that button using the touch pad.
~~~ a quick little bit of an aside
Speaking of Rehearsal though, even if I'm not using that mode - can I just say how much I appreciate SIF2's gameplay direction? It just feels like the game is far more about "having fun just playing songs" than SIF1. There's changes like the ability to restart songs right from the pause menu if you're aiming for an FC, not losing LP if you fail, all songs being unlocked from the start - but also, obviously, the addition of the Rehearsal mode, where you can play any song without using LP and with infinite HP. One key result of this kind of design is that the game is far less punishing for making a mistake, and I think it invites people to challenge themselves to higher difficulties. There's no need to play it safe anymore: If you're curious about whether you could pass a Master chart, you can just play it, without having to worry about failing and wasting resources anymore. If the chart ends up being too hard, you don't lose any LP or other resources. You can choose to either run it back as many times as you want, or to play another song, neither option carrying any penalty. That makes the harder difficulties so much more approachable, and I think it's a fantastic change.
~~~ back to your regularly scheduled programming
With the system fully set up, it can finally be played! The problem being, I don't have nine players here, just one. I tried a couple times, but it went about as well as you'd expect, even on Normal - it's kind of hard to consistenly find and hit the floor switches while staring at the screen. But it does work! All the buttons work great (as long as I can hit them)! And even with me stepping on the connectors and cables and kicking the switches around by accident, they don't immediately break.
So with that, the project is technically done! All the switches are functional, you can play BIG SIF as intended, and I can bring the controller system anywhere. That's a massive milestone done, of course - but overall, this project still very much in the "janky mess of cables" state. So there's still some stuff to do...
On the next part of Making BIG SIF2: making it nice, making it good. Probably at least a box to put everything in, maybe something to improve reliability, maybe make the interface something better than just a keyboard with labels on it? Let's see how far I can take this
update: you can find the third part here!
#lovelive#love live#ラブライブ#school idol festival#sif2#スクフェス#i am currently wearing a wrist brace#ouch oof owie
4 notes
·
View notes
Text
Steps to Install Grounding Rods and Alligator Clip to Ensure Effective Grounding

Is it the first time you plan to carry a portable generator or you think about temporary electric fencing? If so, make sure you know how to use a grounding rod.
Grounding rods play a crucial role in ensuring the safety of electrical systems. You can use them for protecting against electrical faults and lightning strikes, dissipating static electricity, equipment grounding, and stabilizing electrical systems.
Generator grounding rods are available in different types. Such as copper rods, galvanized steel rods, and stainless steel rods. No matter which one you choose, you can establish an effective electrical ground only if use them properly.
In this article, let’s talk about the general steps to install grounding rods and alligator clip and ensure effective grounding in the area.
Step 1: Identify the installation location
Determine the appropriate location to install the grounding rod. Usually, it should be placed close to the electrical system that requires grounding.
The soil for grounding should have good moisture content as moist soil offers better conductivity.
You should avoid areas with shallow bedrock, large rocks, or other obstructions that restrict grounding rod insertion.
Step 2: Select a suitable grounding rod
As mentioned earlier, grounding rods are made of copper or steel. Copper rods are known for their excellent conductivity and resistance to corrosion. You can use this to serve your grounding purpose.
Copper grounding rods should have the required length based on local electrical codes and standards. Generally, a grounding rod is about 8 to 10 feet long.
Step 3: Find the installation tools
Besides grounding rods, a portable generator installation also requires other essential tools.
With ordinary grounding rods, you need a grounding clamp and a wire stripper to prepare the grounding wire. Not so with the Nasafes grounding rod, because here everything works with plug and play connectors. All you need is a hammer to drive the stick into the ground.
Step 4: Place the grounding rod
Before you place the rod, you should clear any debris or vegetation from the installation area.
Using suitable tools, you can drive the grounding rod into the ground vertically and ensure proper insertion.
The top end of the grounding rod should be accessible and protruding from the ground surface.
Step 5: Choose the alligator clip
Find an alligator clip based on several factors, such as size, material, and electrical specifications.
You should ensure that the jaws of the alligator clip are clean and free from any dirt hindering the electrical connection.
Step 6: Place and secure the alligator clip
The plug of the grounding cable is plugged directly into the grounding rod and the alligator clip is connected to the device to be grounded, such as a generator or electric fence.
A established and secure connection is thus guaranteed because the grounding cable is connected directly to the copper rod.
Step 7: Verify the grounding system
Once the grounding rod and alligator clip are in place, it’s essential to test the grounding system to determine its effectiveness.
Experts prefer using a grounding resistance tester or a multimeter to measure the resistance between the grounding system and the Earth. According to the result, you can take the necessary measures. For example, if the resistance is too high, you can improve the soil moisture or add additional grounding rods.
Conclusion
In order to maintain the integrity of electrical systems and safeguard assets, it's essential to understand the significance of grounding rods and how to use it for proper installation. Now, the installation requirements may vary depending on local electrical codes. In such cases, you can consult a licensed electrician or qualified professional to ensure proper grounding rod installation complying with the regulations.
2 notes
·
View notes
Text
Protect Your Equipment with Yamuna Denson's Heat Shrinkable End Caps
Yamuna Denson Heat Shrinkable End Caps provide optimum waterproofing and environmental protection for underwater, underground, and outdoor applications. Our heat-shrink end caps are highly resistant to moisture, fungus, and weathering. We also offer electrical end caps with pre-coat sealants. The heat-shrink end caps are available in several sizes to accommodate varying cable diameters due to their large range-taking ability.
Contact Us Today.

#connector front & rear#cold shrink cable joints & terminations#conductor cover#heat shrinkable end caps#medium voltage cable jointing kit#low voltage cable jointing kit#bus bar connector#cable repair sleeve#shrinkable anti tracking#copper braid
0 notes
Text
Price: [price_with_discount] (as of [price_update_date] - Details) [ad_1] Product Description Sturdy & Durable Made of best Purity Oxygen Free Copper and double shielding ensure less loss of signal transmission. The female plug is made of pure copper with gold plated. Perfectly matched with transmission equipment to increase transmission speed. Connects Speedily RCA Y-adapter with 1-Male on one end and 2-Female RCA audio plugs on the other; adapter only—designed for use with an existing RCA cable This RCA Y cord is used to convert the signal from a single RCA jack to double RCA jacks. Effective In Use Red/white color-marked connectors for quick, easy left-and-right hookups. Comfortable to touch and best elasticity. Effectively extend service life. This RCA Splitter Audio Cable cannot be matched with a computer or mobile phone. Please Call us At -9625386424 For Any kind of Queries or Assitance.We are Always Available For Customer Service. [ad_2]
0 notes
Text
Beryllium Market Trends: Growth, Share, Value, Size, Industry Analsis and Forecast by 2028
"Beryllium Market Size And Forecast by 2028
The study also emphasizes the broader implications of the strategies employed by these companies on the Beryllium Market. Their innovations and market contributions not only shape the industry today but also pave the way for its future trajectory. By analyzing these companies, the report equips stakeholders with actionable insights to understand competitive positioning, identify growth opportunities, and devise strategies to thrive in this dynamic and evolving market landscape.
The beryllium market is expected to witness market growth at a rate of approximately 2.00% in the forecast period of 2021 to 2028
Get a Sample PDF of Report - https://www.databridgemarketresearch.com/request-a-sample/?dbmr=global-beryllium-market
Which are the top companies operating in the Beryllium Market?
The Top 10 Companies in Beryllium Market include leading firms. These companies are known for their strong market presence, innovative products, and ability to meet customer demands. They continue to drive growth in the industry through their commitment to quality and innovation, making them key players in the Beryllium Market.
**Segments**
- **Type:** The global beryllium market can be segmented based on type into pure beryllium, beryllium oxide, beryllium copper, and beryllium aluminum. Pure beryllium is widely used in aerospace, defense, and healthcare industries due to its lightweight and high strength properties. Beryllium oxide is a versatile material with applications in electronics, automotive, and medical equipment. Beryllium copper is valued for its high conductivity and is commonly used in electrical connectors and switches. Beryllium aluminum finds its usage in the production of lightweight alloys for aerospace and automotive applications.
- **Application:** In terms of application, the market can be divided into aerospace and defense, electronics, automotive, healthcare, and others. Aerospace and defense applications dominate the beryllium market due to the metal's high stiffness, low density, and thermal properties, making it ideal for aeronautical structures and precision components. The electronics industry utilizes beryllium in semiconductor manufacturing and electronic connectors. In the automotive sector, beryllium is used in lightweight alloys to improve fuel efficiency and performance. The healthcare industry benefits from beryllium's X-ray transmission properties in medical imaging equipment.
- **End-Use Industry:** The end-use industry segmentation includes industrial, consumer goods, healthcare, and others. The industrial sector accounts for a significant share of beryllium consumption, particularly in advanced manufacturing processes, nuclear reactors, and laboratory equipment. Beryllium is essential in the production of consumer goods such as smartphones, laptops, and cameras due to its electrical and thermal conductivity. In the healthcare industry, beryllium is utilized in radiation windows, X-ray machines, and various medical devices.
**Market Players**
- **Materion Corporation:** A leading player in the global beryllium market, Materion Corporation offers a wide range of beryllium products for diverse applications. The company focuses on innovation and sustainability to meet the growing demand for beryllium in key industries.
- **Ulba Metallurgical Plant:** Ulba Metallurgical Plant is another prominent player known for its high-quality beryllium production and customized solutions. The company's advanced manufacturing capabilities and research initiatives ensure its position in the competitive beryllium market.
- **NGK Metals Corporation:** NGK Metals Corporation specializes in beryllium copper alloys and provides advanced materials for demanding applications in various industries. The company's commitment to technological advancement and quality makes it a significant player in the beryllium market.
- **IBC Advanced Alloys:** IBC Advanced Alloys focuses on the development and production of beryllium-aluminum alloys for aerospace and defense applications. With a strong emphasis on performance and reliability, the company caters to the evolving needs of the global beryllium market.
The global beryllium market is characterized by intense competition and continuous technological advancements to meet evolving industry requirements. Market players are strategically investing in research and development initiatives and expanding their product portfolios to maintain a competitive edge in the market.
https://www.databridgemarketresearch.com/reports/global-beryllium-marketThe global beryllium market is poised for significant growth in the coming years, driven by increasing demand across various industries such as aerospace, defense, electronics, automotive, and healthcare. The market segmentation based on type highlights the versatility of beryllium, with pure beryllium, beryllium oxide, beryllium copper, and beryllium aluminum catering to specific industry requirements. Pure beryllium stands out for its lightweight properties, making it a preferred choice in aerospace and defense applications, while beryllium oxide finds extensive use in electronics and automotive sectors. Beryllium copper's high conductivity makes it valuable in electrical components, and beryllium aluminum contributes to the production of lightweight alloys for aerospace and automotive industries.
In terms of applications, aerospace and defense remain key drivers of the beryllium market, leveraging the metal's unique properties for aeronautical structures and precision components. The electronics industry benefits from beryllium's role in semiconductor manufacturing, while the automotive sector utilizes beryllium in lightweight alloys to enhance fuel efficiency and performance. The healthcare industry also plays a significant role in the beryllium market, capitalizing on its X-ray transmission properties for medical imaging equipment.
The end-use industry segmentation further highlights the diverse applications of beryllium across industrial, consumer goods, healthcare, and other sectors. Beryllium's importance in advanced manufacturing processes, nuclear reactors, consumer electronics, and medical devices underscores its versatility and essential role in modern industries. Market players like Materion Corporation, Ulba Metallurgical Plant, NGK Metals Corporation, and IBC Advanced Alloys are at the forefront of the global beryllium market, emphasizing innovation, quality, and sustainability in their product offerings to meet industry demands.
As the global beryllium market continues to see intense competition and technological advancements, market players are investing in research and development to stay ahead in the evolving landscape. Strategic initiatives aimed at expanding product portfolios, enhancing manufacturing capabilities, and meeting sustainability goals will be crucial for companies navigating the dynamic market dynamics. With increasing awareness of beryllium's unique properties and diverse applications, the market is set to witness further growth and innovation, driving opportunities for players to differentiate themselves and capture market share in key industries globally.**Segments**
Global Beryllium Market, By Product: - Alloys - Metal - Ceramics - Other Product Types
End-User Industry: - Industrial Components - Automotive - Healthcare - Aerospace and Defense - Oil and Gas and Other Energy - Electronics and Telecommunication - Other End-User Industries
Country: - U.S. - Canada - Mexico - Brazil - Argentina - Rest of South America - Germany - France - Italy - U.K. - Belgium - Spain - Russia - Turkey - Netherlands - Switzerland - Rest of Europe - Japan - China - India - South Korea - Australia - Singapore - Malaysia - Thailand - Indonesia - Philippines - Rest of Asia-Pacific - U.A.E. - Saudi Arabia - Egypt - South Africa - Israel - Rest of Middle East and Africa
Industry Trends and Forecast to 2028
**Market Players**
The major players covered in the beryllium market report are Materion Corporation, Texas Mineral Resources Corp., American Beryllia Inc., Advanced Alloys, Ningxia Orient Tantalum Industry Co. Ltd, Belmont Metals, Hunan Shuikoushan Nonferrous Metals Group Co., Ltd., American Elements, NGK BERYLCO, AMG, Xinjiang Xinxin Mining Industry Co., Ltd., Kazatomprom, CHANGHONG, Advanced Industries, Applied Materials, Inc., IBC Advanced Alloys, Dun & Bradstreet, Inc., «Ulba-China Co., Ltd.», TROPAG OSCAR H. RITTER NACHF GMBH among other domestic and global players. Market share data is available for global, North America, Europe, Asia-Pacific (APAC), Middle East and Africa (MEA) and South America separately. DBMR analysts understand competitive strengths and provide competitive analysis for each competitor separately.
The beryllium market is witnessing significant growth driven by increasing demand across diverse industries globally. With a focus on product segmentation, the market caters to specific industry needs with alloys, metal, ceramics, and other product types. Industries like aerospace and defense, automotive, healthcare, and electronics are key consumers of beryllium, emphasizing its versatility and wide-ranging applications. The market's end-user segmentation highlights the essential role of beryllium in industrial components, automotive manufacturing, healthcare equipment, and energy sectors, reflecting its significance in modern industries.
Market players such as Materion Corporation, Texas Mineral Resources Corp., American Beryllia Inc., and Advanced Alloys are leading the competitive landscape with their innovative products and solutions. Their strategic positions in key regions like North America, Europe, Asia-Pacific, and the Middle East and Africa underline their global presence and market influence. Collaborative efforts, research and development initiatives, and sustainability practices are key strategies employed by these players to stay ahead in the dynamic beryllium market.
The forecast for the beryllium market up to 2028 indicates continued growth opportunities fueled by evolving industry trends and technological advancements. As market players navigate the competitive landscape, differentiation through product innovation, quality assurance, and market expansion will be crucial for sustained success. With a keen understanding of market dynamics and competitor analysis, companies can capitalize on emerging opportunities and establish a strong foothold in the global beryllium market.
Explore Further Details about This Research Beryllium Market Report https://www.databridgemarketresearch.com/reports/global-beryllium-market
Key Insights from the Global Beryllium Market :
Comprehensive Market Overview: The Beryllium Market is witnessing rapid expansion, fueled by increasing demand for advanced solutions and evolving consumer needs.
Industry Trends and Projections: The market is projected to grow at a CAGR of X%, with a notable shift towards digitalization and automation in the coming years.
Emerging Opportunities: There is a rising demand for eco-friendly products and services, creating new business avenues within the market.
Focus on R&D: Companies are prioritizing innovation and research to develop next-generation products and enhance competitive advantages.
Leading Player Profiles: Market leaders continue to drive growth through strategic acquisitions and product innovation.
Market Composition: The market is segmented by product type, region, and application, with a mix of both established and emerging players.
Revenue Growth: The market is experiencing significant revenue growth, attributed to increased consumer spending and the expansion of digital services.
Commercial Opportunities: There are substantial opportunities for expansion in untapped regions, particularly in developing economies where demand is rising.
Find Country based languages on reports:
https://www.databridgemarketresearch.com/jp/reports/global-beryllium-markethttps://www.databridgemarketresearch.com/zh/reports/global-beryllium-markethttps://www.databridgemarketresearch.com/ar/reports/global-beryllium-markethttps://www.databridgemarketresearch.com/pt/reports/global-beryllium-markethttps://www.databridgemarketresearch.com/de/reports/global-beryllium-markethttps://www.databridgemarketresearch.com/fr/reports/global-beryllium-markethttps://www.databridgemarketresearch.com/es/reports/global-beryllium-markethttps://www.databridgemarketresearch.com/ko/reports/global-beryllium-markethttps://www.databridgemarketresearch.com/ru/reports/global-beryllium-market
Data Bridge Market Research:
Contact Us:
Data Bridge Market Research
US: +1 614 591 3140
UK: +44 845 154 9652
APAC: +653 1251 975
Email:- [email protected]"
0 notes
Text
Essential Tips for Relocating with Appliances
You’re moving to a new place with Packers and Movers Ahmedabad to Noida , and you need to take steps to protect your investments. Refrigerators, washing machines and dryers likely are some of the most expensive items you own, and they deserve special attention when you’re moving with major appliances.
Before you move these appliances, make sure to clean them thoroughly. You’ll also want to leave time to ensure they dry properly post-cleanse before they go on the moving truck.
Moving appliances
Besides cleaning and drying, there are tips specific to each appliance in your residence. Here’s a quick guide to moving with major appliances.
Dishwasher
Disconnect the hoses and drain them.
Leave the dishwasher door open for a few days prior to your move to facilitate drying.
Wrap the dry hoses in towels and packing paper and then place them inside the dishwasher for safety during the move.
Washing Machine
As with your dishwasher, disconnect the hoses and drain them.
Wrap the metal connector ends of hoses in a towel and place them inside the washer.
Secure the tub following the manufacturer’s guidelines to prevent damage.
If you don’t have the manufacturers guidelines, purchase a washer kit with instructions on how to secure the tub by tightening down the tub-using screws.
Movers may be able to arrange a third-party service provider for these tasks.
Upon arrival to your new home, have your washing machine installed by a qualified installer.
Clothes Dryer
Clean the lint screen.
Prior to plugging in your electric dryer at your new residence, make sure the power supply is proper for the appliance.
If you are moving a gas dryer, have a qualified technician disconnect it and cap off the gas line. Your moving crew isn’t qualified to perform this service.
Stove
Cleanliness is paramount!
Grease left on a stovetop will catch dust and dirt—and leave spots on anything it touches.
Detach all removable parts and pack them safely in a box.
If you are moving a gas range, have a qualified technician disconnect it and cap off the gas line (see above note about your moving personnel).
When arriving at your new residence with your gas range, you will need a qualified gas installer to check your gas supply, connect the gas line, seal any openings, light the pilot and handle any other hook-up requirements.
Refrigerator and Freezer
Dispose of all perishables.
Unplug the power cord to wash and dry all removable parts thoroughly.
Allow the parts, including the interior of the refrigerator and freezer, to dry thoroughly.
Pack all loose parts, including bins and shelves, in a secure container.
Vacuum the condenser or compressor to remove dust.
Empty and clean the evaporator pan and allow time for it to dry.
If you have a cold water dispenser or automatic ice maker, turn off the water and disconnect the water line.
Empty the water reservoir.
Have a professional reconnect the icemaker and water dispenser to the waterline in your new home.
Additional equipment including copper tubing, a shut-off valve, and fittings may be required at your new place.
0 notes
Text
Round Brass Plates – A Versatile and Durable Solution for Multiple Industries
Introduction to Round Brass Plates
Brass has long been a go-to material in various industries due to its unique combination of durability, aesthetic appeal, and versatility. Among the various forms of brass products available, round brass plates stand out for their flexibility and application across a range of sectors. Whether you are in the manufacturing, electrical, or architectural industries, round brass plates offer a reliable, high-quality solution to meet diverse needs.
At Accromet, we pride ourselves on sourcing the finest quality metals, including brass, to serve a wide range of industries. Our brass plates are crafted with precision, ensuring superior performance, durability, and a polished finish that meets our customers’ highest standards. In this post, we will explore the quality, durability, and numerous uses of round brass plates, as well as highlight Accromet’s commitment to customer satisfaction.
Quality and Durability of Round Brass Plates
Round brass plates are renowned for their exceptional durability and resistance to corrosion. Made from an alloy of copper and zinc, brass is a non-ferrous metal known for its ability to withstand the rigors of harsh environments, from outdoor exposure to extreme temperatures. This makes brass plates a popular choice for applications that require long-lasting materials that can maintain their performance and appearance.
Accromet’s round brass plates undergo stringent quality control processes to ensure they meet the highest industry standards. Our brass plates are carefully sourced, tested for reliability, and delivered with a consistent finish, ensuring that each product is up to par. The malleability of brass allows for intricate designs and customization, making it an ideal choice for those seeking both functionality and aesthetics.
Uses of Round Brass Plates Across Various Industries
1. Manufacturing Industry
In the manufacturing sector, round brass plates are used for a wide range of components. Due to their excellent machinability, they are commonly found in machinery parts, gears, and precision tools. The corrosion-resistant nature of brass also makes it a suitable material for components that need to maintain structural integrity under stress.
2. Electrical Industry
One of the key benefits of brass metal plates is their ability to conduct electricity. As a result, round brass plates are frequently used in the electrical industry for connectors, terminals, and grounding systems. Brass offers excellent electrical conductivity while also being highly resistant to corrosion, making it ideal for components that must endure exposure to electrical currents and environmental elements.
3. Architectural and Design Applications
Brass is often used in architectural and decorative applications due to its luxurious, golden appearance and malleability. Round brass plates are frequently used in interior design, for everything from furniture inlays to wall decorations. Their timeless aesthetic makes them a favorite in high-end architectural projects, including gates, railings, and other ornamental features.
Why Choose Accromet for Your Round Brass Plate Needs?
Accromet is a trusted supplier of brass plates for sale, and our round brass plates are engineered to provide the highest quality at competitive prices. We offer a range of sizes and thicknesses to meet your specific project requirements. Additionally, our expert team is ready to assist you with customization options to create custom brass plates tailored to your unique specifications.
We take pride in our ability to source premium-quality brass sheets and provide timely delivery, ensuring that our customers’ needs are always met. Whether you are looking for a brass metal plate for industrial use or decorative brass plates for a design project, we are here to help.
FAQs About Round Brass Plates
Q: What are the common uses of round brass plates? A: Round brass plates are commonly used in manufacturing for mechanical components, electrical systems for connectors and terminals, and in architectural applications for decorative purposes.
Q: Can I customize the size of the round brass plates? A: Yes! Accromet offers custom brass plates with options for size, thickness, and finish based on your project’s specific needs.
Q: Are round brass plates corrosion-resistant? A: Yes, brass is highly resistant to corrosion, making round brass plates suitable for use in outdoor and harsh environments.
Q: What industries use round brass plates? A: Round brass plates are used in various industries, including manufacturing, electrical, automotive, and architecture, for both functional and decorative purposes.
Q: How do I purchase round brass plates? A: You can browse our range of brass plates for sale on the Accromet website or contact our team to discuss your specific requirements.
Conclusion – Get the Best Round Brass Plates at Accromet
When it comes to sourcing top-quality round brass plates, Accromet is your go-to supplier. Whether you're working on a manufacturing project, designing a new electrical component, or seeking unique architectural elements, our brass metal plates offer the durability and aesthetic appeal you need. We pride ourselves on delivering brass sheets of exceptional quality and providing custom brass plates to fit your unique specifications.
If you’re ready to explore the benefits of round brass plates for your next project, don’t hesitate to reach out to us at Accromet today. Our team is here to assist you with any questions and guide you through your purchase.
Call to Action: Contact Accromet for all your brass plate needs. Explore our wide selection of brass plates for sale and get in touch with us for custom brass plates tailored to your exact specifications!
0 notes
Text
Understanding the Role of Speaker Cables in Audio Performance
When setting up an audio system, people often focus on speakers, amplifiers, and audio sources, but one crucial component frequently gets overlooked: the speaker cables. While these may seem like a minor detail, they play a significant role in ensuring you get the best audio performance from your setup. From the right gauge to the proper length, every aspect of a speaker cable can affect the quality of sound. Let’s explore why speaker cables matter and how you can make informed decisions to optimize your audio experience.
Why Speaker Cables Are Essential
At their core, speaker cables are the connectors between your amplifier and your speakers. Their job is to carry electrical signals that are converted into sound. Sounds simple enough, right? However, the way these signals are transmitted can make or break your audio performance.
Think of it like plumbing: even if you have the best faucets and the most advanced filtration system, a faulty pipe will reduce water flow. Similarly, poorly chosen or incompatible speaker cables can result in a noticeable loss in audio quality, including reduced clarity, muffled sound, or even distortion.

Understanding Cable Gauge: Why Size Matters
One of the most critical aspects of a speaker cable is its gauge, or thickness. Did you know that using the wrong gauge speaker cable can significantly reduce audio performance? The thickness of the cable is measured using the American Wire Gauge (AWG) system, where lower numbers indicate thicker cables.
Thicker Cables (Lower AWG): These are ideal for longer distances or higher-powered systems because they minimize resistance. For instance, a 12-gauge cable works well for setups where the speakers are far from the amplifier.
Thinner Cables (Higher AWG): These are suitable for shorter runs and lower-powered systems, like a small home theater setup.
If you use a cable that’s too thin for a long distance, the electrical resistance increases, leading to a drop in signal quality and power. On the other hand, thicker cables may be overkill for short distances and smaller systems, so choosing the right gauge is essential.
Cable Length: Keeping It Short and Sweet
Another factor that affects performance is the length of the cable. The longer the cable, the more resistance it adds to the signal path, potentially degrading the sound quality.
Short Distances: If your amplifier and speakers are close together, a shorter cable will ensure minimal resistance and better sound.
Long Distances: For larger spaces, such as a concert hall or a large living room, opt for a thicker cable to handle the added resistance.
As a general rule, try to keep your cables as short as practically possible while still allowing flexibility for your setup.
Material Matters: Copper vs. Alternatives
Most speaker cables are made from copper because it’s an excellent conductor of electricity. However, not all copper cables are created equal. Look for cables made from oxygen-free copper (OFC), which are more durable and conduct signals more efficiently than regular copper.
There are also alternatives like aluminum or copper-clad aluminum (CCA), but these are less effective at conducting electricity compared to pure copper. If you’re aiming for high-quality sound, it’s worth investing in cables made from better materials.

Connectors: A Small Detail with a Big Impact
The connectors at the ends of your speaker cables also play a role in audio performance. Common types include banana plugs, spade connectors, and bare wire.
Banana Plugs: These are easy to use and provide a secure connection. They’re a great choice for frequent plug-and-play setups.
Spade Connectors: These provide a snug fit and are often used in more permanent installations.
Bare Wire: While cost-effective, bare wire can oxidize over time, reducing signal quality. It also requires more effort to connect properly.
Choosing high-quality connectors ensures a stable connection, which is essential for clear and uninterrupted sound.
Common Mistakes to Avoid
Ignoring Cable Quality: Skimping on cable quality might save you money upfront, but it could compromise your audio experience in the long run.
Overlooking Compatibility: Ensure your cables are compatible with your amplifier and speakers in terms of power handling and impedance.
Using Excessively Long Cables: Longer cables introduce more resistance, so avoid using unnecessarily long ones.
Tips for Choosing the Right Speaker Cables
Assess Your Setup: Measure the distance between your amplifier and speakers to determine the appropriate cable length and gauge.
Consider Your Audio System’s Power: High-powered systems generally require thicker cables to handle the load.
Invest in Quality: Choose cables made from durable materials like oxygen-free copper and high-quality connectors.
Remember, even the best audio equipment won’t perform at its peak without the right cables to support it. A professional audio shop can guide you in selecting cables tailored to your specific needs, ensuring you get the most out of your investment.
Wrapping Up: Small Details, Big Differences
In the world of audio equipment, it’s easy to focus on the big-ticket items like speakers and amplifiers. However, as we’ve seen, the humble speaker cable plays an equally important role in delivering high-quality sound. From selecting the right gauge to understanding the importance of length and material, these small details can make a big difference in your overall audio experience.
So, the next time you’re upgrading or setting up an audio system, don’t overlook the importance of speaker cables. A little extra attention to these details can go a long way in ensuring you enjoy crystal-clear sound, whether you’re watching a movie, hosting a party, or simply relaxing with your favorite playlist.
#music#audiogears#audio#dj#audio shops#professional audio equipment#speakers#cables#premium audio cables#audio accessories
0 notes