#Chives and Chervil Cream recipe
Explore tagged Tumblr posts
Visit Tumblr Blog
Explore Tumblr blogs with no restrictions, modern design and the best experience.
Last Seen Tumblr Blogs


Fun Fact
Tumblr has a 66 index score for customer satisfaction in the US.
Text
Chives and Chervil Cream
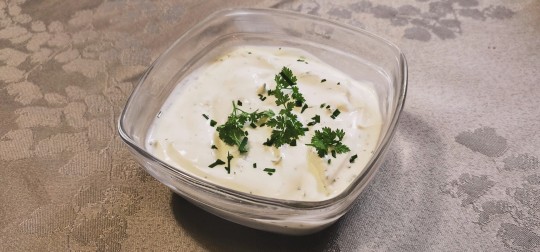
This fresh and fragrant Chives and Chervil Cream is so versatile it will accommodate fish, pasta and potatoes alike! Happy Monday!
Ingredients (makes about 3/4 cup):
3/4 crème fraîche or sour cream
a small bunch Garden Chives
a small bunch Garden Chervil
12 teaspoon freshly cracked black pepper
Spoon crème fraîche into a small bowl.
Finely chop fresh Chives and Chervil. Add chopped herbs to the crème fraîche, along with black pepper. Give a good stir to combine.
Spoon into serving bowl, and chill in the fridge, a couple of hours, to allow herbs to infuse the cream.
Serve Chives and Chervil Cream with poached fish, such as salmon or trout, dollop onto boiled or baked potatoes, or use as a base in salad dressings or pasta sauce...
#Recipe#Food#Chives and Chervil Cream#Chives and Chervil Cream recipe#Sauce#Sauce recipe#Condiment and Sauce#Crème Fraîche#Creme Fraiche#Sour Cream#Chives#Garden Chives#Fresh Chives#Chervil#Garden Chervil#Fresh Chervil#Black Pepper#Black Peppercorns#Quick recipe#Easy recipe#5 Ingredients or Less
3 notes
·
View notes
Text

silly thing but I basically have not cooked at all during the past 2 months of Everything (working late -> eating dinner on campus) and tonight finally got to again. There is probably a fancy name for this? In practice, it’s an herb omelette on buttered toast stuffed with what is basically a sour cream and onion dip. It was good - though I feel like the sour cream really lost its sourness in the dish and I’m not sure why. I’d put more lemon juice in next time. If you want a half-assed recipe, I wrote how to make it under the cut.
Chop half a small onion into strips. Cook on medium-low heat for as long as you can stand, until the onion is soft and ideally brown. Mince a few cloves of garlic, toss in the same pan to brown. Move all of that into a bowl, combine with a quarter cup of sour cream, a teaspoon of salt, and a tablespoon of lemon juice.
Finely chop up 2 tablespoons of parsley and 2 tablespoons of chives (other herbs also good - the internet recommends tarragon and chervil, they didn’t have those at hmart)
Mix those with 3 eggs and 1tsp-ish of salt. (You can also add a tablespoon or two of milk if you want a creamier omelette, I’m just a weirdo who hates that.) Cook on medium heat until it’s an omelette. Plate, spoon your filling into the omelette, fold over, cut in two for your toast (you should have toast) and serve.
uhhh the other thing on the plate is chopped cucumber and tomato and raw garlic (I’m a raw garlic liker use garlic powder instead if you don’t share that derangement) and lemon juice and salt. in whatever proportions god deigns to provide me with that day. If I’d had olive oil on hand I would’ve put that too. go nuts.
#i feel like an embarassing number of meals I make when only cooking for myself are eggs on toast#in whatever slightly elevated form#the everlasting meal lady is actually very in favor of this iirc#though in a way that is extremely french#maybe too french for me to get behind. we’ll see.#complaining#food
3 notes
·
View notes
Text
ok so i just made this soup for dinner and it's so good <3
confession though: i don't have cremini mushrooms, just regular canned mushrooms, and i don't have coconut milk so i used regular heavy cream (which is not vegan)
my variation from the recipe, done slightly differently:
in a large dutch oven on medium heat, i heated some olive oil, then diced some onion (about 1/4 of a large onion) and threw it in the olive oil, adding salt, pepper, garlic powder, herbs de provence (a spice mix of basil, savory, thyme, tarragon, fennel, rosemary, oregano, dill, majoram, chervil, and lavender), then added regular additional rosemary, parsley, and dried chives.
sautee all this until onions are softened & almost translucent so they soak up all the flavorings, then dump drained canned mushrooms in with a splash more olive oil, giving this a good stir while they sautee
add a 1/4 cup of good white wine to the above (i used pinot grigio wine), stirring as the alcohol cooks off
then the recipe said add about 3 tablespoons of flour to make a roux, i just eyeballed it until it had the right texture tbh so could have been 3, could have been 4.
once it has a nice pasty roux consistency, i slowly added the required 3 cups of vegetable broth. adding about a cup at a time, slowly stirring it in, so as to keep the thickened texture from the roux
once all the broth has been added, i add 1 bay leaf for more flavor, stirring the broth and letting it cook for about..? 5 minutes or so. Just keep watching the broth texture tbh.
after that i added about 1/2 cup - 3/4 cup heavy cream (sorry I eyeballed it), stirring it in until incorporated into the soup
increase the burner heat until the soup comes to a boil, stirring with a whisk to get a good thick soup as much as possible
i added 1 tablespoon of cornstarch to get a nice creamy consistency for my soup, being sure to whisk away all lumps of cornstarch
lower the temperature and let it simmer for a bit (i made a salad while it simmered)
this was honestly one of my best soups, if not THE best soup i've made
so so good <3
6 notes
·
View notes
Link
Gratin Dauphinois.

Hey everyone, hope you are having an amazing day today. Today, I'm gonna show you how to make a distinctive dish, gratin dauphinois. It is one of my favorites food recipes. This time, I will make it a little bit tasty. This will be really delicious.
Gratin Dauphinois is one of the most favored of current trending meals in the world. It is easy, it is fast, it tastes delicious. It is enjoyed by millions daily. Gratin Dauphinois is something which I've loved my entire life. They're nice and they look wonderful.
To begin with this particular recipe, we must prepare a few components. You can have gratin dauphinois using 6 ingredients and 9 steps. Here is how you cook that.
The ingredients needed to make Gratin Dauphinois:
{Get 3 lb of Idaho potatoes; unpeeled and sliced paper thin.
{Make ready 2 C of heavy cream.
{Prepare 2 T of fresh rosemary; minced.
{Prepare 4 oz of sour cream.
{Make ready 4 oz of grated gruyere cheese.
{Prepare as needed of butter.
Instructions to make Gratin Dauphinois:
Butter a large casserole dish..
Lay potatoes across the bottom of the casserole dish evenly leaving no holes..
Stack layers until no potatoes remain..
Whisk heavy cream and sour cream together..
Pour cream over potatoes. Press down to even out casserole and distribute cream..
Sprinkle cheese, rosemary, salt, and black pepper across the top..
Spray aluminum foil with non-stick cooking spray and cover casserole dish..
Bake at 400º for 40 minutes. Uncover and cook for approximately 10 minutes or until casserole is bubbly and brown..
Variations; Thyme, herbes de provence, shallots, onion, celery seed, fennel, crispy bacon, oregano, marjoram, mint, basil, parsely, lemon zest, white wine, white vinegar, champagne vinegar, white wine vinegar, peppercorn melange, brown butter, bell peppers, beer, vodka, rum, brandy, garlic, habanero, paprika, smoked paprika, applewood seasoning, asiago, fontina, jalapeños, scallions, chives, leeks, spinach, arugula, swiss, provolone, parmesean, romano, parmigiano reggiano, chervil, fines herbes, caraway, cashews, dijon, carrots, cardamom, espresso, broccoli, roasted bell peppers or garlic, cayenne, crushed pepper flakes, coriander seed, cheddar, blue cheese, gouda, cabbage, goat cheese, chipotle, garlic chives, horseradish, nutmeg, sweet onions, sweet potatoes, parsnips, turnips, butternut squash, acorn squash, yellow squash, capers, tarragon, pesto, dill, asparagus, celery root, turmeric, tomatoes, apple cider vinegar, chicken or vegetable stock, sherry, watercress.
So that's going to wrap this up for this special food gratin dauphinois recipe. Thank you very much for your time. I am confident that you can make this at home. There is gonna be more interesting food in home recipes coming up. Remember to bookmark this page on your browser, and share it to your family, colleague and friends. Thanks again for reading. Go on get cooking!
0 notes
Text
The Origins of Tartar Sauce
I got curious the other day about why tartar sauce was called “tartar sauce.” Is there a connection to cream of tartar? To the Tatar people of central Asia? To steak tartare? None of these seemed particularly plausible at first blush, so I set out to find an answer.
Several websites gave an explanation which turns out not to be at all accurate: that tartar sauce got its name from being served with steak tartare, and that steak tartare got its name because of a legend about Asian steppe riders eating raw meat after tenderizing it by keeping it under their saddles while riding.
First, let me emphasize that the legend is completely false, as most of these websites acknowledge. According to Wikipedia it can be traced back to 13th century author Jean de Joinville, possibly based on an actual practice of putting raw meat under the saddle to protect sores on the horses’ skin. The meat was discarded afterwards, not eaten. Some sources suggest that Tatar cuisine tends, at least by Western standards, to overcook meat, not serve it raw.
None of that shows that steak tartare wasn’t named after the Tatars, based on this erroneous legend. But it turns out that is false too. In fact, steak tartare is named after tartar sauce, not the other way around.
I had never heard of anyone serving steak tartare with tartar sauce, but a little research shows this used to be quite common. The phrase à la tartare was commonly used to designate dishes served with tartar sauce, including raw ground beef. A New York Times article by Craig S. Smith from 2005 traces the history of steak tartare, and shows that early references to the dish call it “Beefsteack à l'Américaine.” It wasn’t until people started serving it with tartar sauce that it was called “Beefsteack à la Tartare.” But by 1938, at least one source used this phrase as a general term for a dish of raw ground beef, whether or not served with tartar sauce.
To double-check, I looked in some etymological dictionaries. The Oxford English Dictionary’s earliest attestation of a phrase like steak tartare (specifically, “steaks, tartare”) is from 1911. The earliest attestation of tartar sauce is from 1855, more than 50 years earlier. The Centre National de Ressources Textuelles et Lexicales’ online French etymological dictionary gives an attestation of sauce tartare as early as 1806, but steak tartare not until 1958. It seems indisputable that people were talking about “tartar sauce” long before “steak tartare,” so it cannot be the case that tartar sauce got its name from being served with steak tartare. It is perhaps not quite so certain that steak tartare got its name from being served with tartar sauce, but seems very likely.
So if tartar sauce did not get its name from steak tartare, where did it get it from? The French version of Wikipedia suggests an answer: “The term ‘tartar’ would come from the Nordic barbarians, and would be applied to grilled, breaded dishes, accompanied by a spicy sauce; breaded dishes were later denominated ‘à la polonaise’ in French cuisine, but the name was retained for the sauce” (my translation). The article cites Joseph Favre’s (1883) Dictionnaire universel de cuisine as its source.
I decided to look in Favre, and found that it doesn’t really say quite what the Wikipedia article implies. He defines (à la) tartare as “a culinary preparation believed to come from from a people originally from Turkestan,” but continues: “...but it seems more likely this method of preparation, breading items and accompanying them with a spicy sauce, comes to us from the barbarians during the invasion from the North; and is today more properly called à la Polonaise. As one sees, dishes prepared à la tartare used to always be breaded and grilled and served with a spicy mustard sauce; but modern French cuisine has justly distinguished by the designation à la polonaise all breaded material; and by the name tartare, a very spicy sauce, without mustard, in order not to confuse it with remoulade sauces,... which contain both” (my translation).
I was a little surprised to see tartar sauce described as “very spicy,” but tartar sauce has changed since Favre’s day. For the curious, here is his recipe: “Add copiously to a mayonnaise sauce a hint of red pepper, chives, parsley, chervil, tarragon, capers and pickles, all finely chopped.”
The phrase à la polonaise means “in the Polish fashion.” So was Favre claiming that the Poles were the originators of breading food before grilling it and serving it with a spicy sauce? And was he calling the Poles barbarians? I don’t think so. Rather, I think he is saying that this technique of food preparation probably came to what is now France during the invasion of Roman Gaul by the Goths, Franks, and other Germanic tribes during late antiquity. The part about calling this technique à la polonaise is just to clarify that this is the term used in modern times, and is not intended as an ascription of origin.
This still leaves open the question, why did people believe that this kind of dish, with breaded items served with a spicy sauce, came from the Tatars? I can’t help but wonder if they got the idea of a connection to the Tatars from the name, rather applying the name because they already believed the dish was connected to the Tatars.
A clue comes from a different sauce: tarator. The word tarator (and variants) is actually used for a wide variety of different sauces and soups, common throughout the eastern Mediterranean. Some versions of tarator are identical to tzatziki, familiar to us here in the US from its use on gyros. Others are more like a cold, yogurt-based soup. And others are based on tahini, not yogurt, made tangy with the addition of lemon juice and spices, and typically served with...fried fish! Could it be that tartar sauce was derived from tarator, perhaps by French chefs who decided to substitute mayonnaise for yogurt?
I looked at a lot of websites about tarator, and many of them emphasize that it should not be confused with tartar sauce. But of course that does not mean there is no historical connection; recipes can change very drastically over time, especially when they are adapted to different cuisines. After all, ketchup developed from a fish-based sauce used in southeast Asia, bearing practically no resemblance to the tomato-and-vinegar puree we call by that name today.
I found one website, from Select Foods Market, that actually claims that the word tarator derives from tartar (sauce), not the other way around. But this seemed very unlikely; the different versions of tarator are so different from one another that there must have been a long period of divergence --- probably too long for a derivation from tartar sauce. Even so, I decided to double-check again by consulting an etymological dictionary: this time the Nişanyan Sözlük etymological dictionary of Turkish. This lists an attestation from 1665, so we can say with certainty that the word does not derive from tartar sauce. Interestingly, this dictionary derives the word etymologically from Venetian trattòr, “restaurateur,” so perhaps the original meaning was something like “restaurateur’s sauce.”
That’s all I’ve found. I can’t say with any certainty that tartar sauce derives from tarator, but it seems reasonably plausible. If anyone knows more, I would love to hear it.
0 notes
Text
MABON , FALL EQUINOX FOOD RECIPES
RECIPES FOR MABON, THE WITCHES THANKSGIVING Mabon, Fall Equinox Food Recipes SOURCE, FOUND IN RAVEN AND CRONE COM by Raven and Crone Turkey Meatballs in Cranberry Sauce 1 lb ground turkey 1/2 cup chopped onions 1/4 cup instant rice or instant brown rice 1/4 cup unseasoned breadcrumbs 1 egg 1 teaspoon salt 1/2 teaspoon poultry seasoning 1 (16ounce)can whole berry cranberry sauce 1/2 cup water Mix all ingredients except cranberry sauce and water. Form into 45 meatballs. Spray large skillet with non-stick cooking spray.Cook meatballs, covered, for 8 - 10 minutes turning occasionally until meatballs are done and no longer pink in the middle. Add cranberry sauce and water to skillet.Cover and cook on medium-low for 3 to 4 minutes. Roast Fillet Of Beef 1 Fillet of beef (5-6 lb) trimmed 5 Garlic cloves, slivered 1 teaspoon Salt 1 teaspoon Freshly ground pepper Tabasco sauce 1 cup Soy sauce 1/2 cup Olive oil 1 cup Port wine 2 teaspoons Thyme 1 bunch Watercress To prepare the fillet, make slits in it and put slivers of garlic in the slits. Rub well with salt, pepper and Tabasco. Combine the soy sauce, olive oil, port and herbs and place the fillet in this marinade in a baking dish for at least 1/2 hour unrefrigerated, or an hour or more in the refrigerator. Turn several times while it is marinating. Preheat oven to 425 degrees F. Place the fillet on a rack in a roasting pan. Roast for 30-35 minutes, basting occasionally with the marinade. A meat thermometer should register 120~ for very rare, 125~ for rare, 130~ for medium-rare. After it is removed from the oven, the internal temperature will rise as much as another 10~. Allow the fillet to rest, covered with foil, up to 30 minutes. If it needs to sit longer, you might try a catering trick: Wrap the fillet, just out of the oven, in plastic wrap. Unwrap just before slicing. Cut into slices and place on a warm platter; garnish with sprigs of watercress. Broccoli Casserole 2 eggs, lightly beaten 1 can (10-3/4 ounces) condensed cream of mushroom soup, undiluted 1 medium onion, chopped 1 cup (4 ounces) shredded cheddar cheese 1 cup (4 ounces) shredded Swiss cheese 1/2 cup mayonnaise 2 tablespoons butter, melted 1 package (16 ounces) frozen broccoli cuts, thawed 1 package (10 ounces) frozen chopped broccoli, thawed 1/4 cup dry bread crumbs In a large bowl, combine the first seven ingredients; fold in broccoli. Transfer to a greased 1-1/2 qt. baking dish. Sprinkle with bread crumbs. Cover and bake at 400 for 30-35 minutes or until heated through. Yield: 8 servings. Harvest Ratatouille 8 - 10 tablespoons olive oil 2 yellow onions, chopped 3 large or 4 small zucchini, sliced into 1/4-inch thick slices 1 large eggplant, sliced into chunks the same size as the zucchini slices 5 large tomatoes, chopped 1 green bell pepper, seeded and coarsely chopped 1 red bell pepper, seeded and coarsely chopped 2 garlic cloves, minced Salt and freshly-ground black pepper, to taste Tomato paste, to taste (optional) 1. Heat 5 or 6 tablespoons of the olive oil in a large heavy-bottomed skillet over medium heat, add the onions, and saute about 1 minute, until fragrant and softened. Add zucchini and eggplant and saute about 2 minutes, until lightly browned. Add more olive oil as needed if the pan looks dry. Add tomatoes, peppers, and garlic, stirring to combine. Cover, reduce heat to low, and simmer about 20 minutes, until veggies are cooked through. 2. Take off the lid, add other add-ins, if you like, increase heat to high, and cook for 2 or 3 minutes to evaporate excess liquid, stirring constantly. Season to taste with salt and pepper, add a little tomato paste if using, and stir well. 3. Serve hot, or allow to cool and add a little olive oil before serving. Serves 6. Garlic Roasted Potatoes & Greens 2 pounds Red-Skinned Potatoes, sliced 6 large Cloves Garlic, sliced lengthwise 1/3 cup Extra-Virgin Olive Oil 3 Tablespoons Wine Vinegar Salt Pepper 4 cups Watercress Sprigs, rinsed 2 Tablespoons Chives, chopped Mix potatoes, garlic and oil in a 10 x 15" rimmed pan. Bake at 450 degrees until well browned, about 1 1/4 hours. Turn vegetables with a wide spatula every 10-15 minutes. Pour vinegar into pan, scraping with spatula to release browned bits and to mix with potatoes. Add salt and pepper to taste. Pour potatoes into a wide, shallow bowl. Chop half the watercress and mix with potatoes. Tuck remaining watercress around potatoes and sprinkle with chives. Stuffed Acorn Squash 2 acorn squash, washed and cut in halves 1/2 stick of butter 1/2 cup of crushed Ritz crackers 1/4 cup chopped walnuts 1/4 cup brown sugar Wash and cut acorn squash in half from stem to bottom Scoop out the seeds and rub the inside and cut parts with butter Put the acorn squash on a cookie sheet Melt the butter, and mix in the walnuts, brown sugar, and crackers Place in the holes of the squash and bake at 350 degrees for 30 - 40 minutes or until done Acorn Squash and Apple Soup - Makes 5 servings. 1 medium acorn squash 1 Tbsp. canola oil 1 medium onion, chopped 1 leek (white part only) rinsed well and chopped 1 tart apple (such as Granny Smith), peeled, cored and chopped 3 cups fat-free, reduced sodium chicken broth Salt and freshly ground black pepper, to taste 3 Tbsp. minced fresh mint leaves, as garnish Milk or additional broth to thin soup (optional) Preheat oven to 375 degrees. Cut acorn squash in half length-wise, remove seeds and pulp. Set on a rimmed baking sheet. Bake until the flesh is tender when pierced, roughly 45 to 90 minutes (depending on size). Remove squash from oven and allow to cool. While the squash is cooling, in a large, heavy pan heat the canola oil over medium-high heat. Add the onion and leek and sauté for about 4 minutes, until the onion is translucent. Add the apple and cook over medium heat for 1 minute. Scrape out the squash pulp and combine with the apple mixture. Reduce heat to medium-low, cover and cook for 5 minutes, stirring often. Add the broth to the pan, cover and bring to a boil over high heat. Reduce the heat to low and simmer for about 30 minutes. Remove the pan from heat and set the soup aside to cool slightly. In a blender or food processor, puree the soup in batches until smooth. Return soup to pan and heat just before serving. Add milk or additional broth to thin soup, as desired. Season to taste with salt and pepper. Garnish each serving with mint and serve. Crockpot Cream of Tomato Soup 2 tablespoons olive oil 1 large chopped onion 3 crushed garlic cloves 2 minced carrots 2 pounds peeled and diced tomatoes (reserve and add all juices) 4 cups chicken or vegetable stock or broth 3 tablespoons tomato paste 2 tablespoons sugar 1 tablespoon lemon juice Salt Pepper 2-4 tablespoons freshly chopped herbs (basil, oregano, rosemary, thyme, marjoram, savory, chervil, Italian parsley, mint, lavender) or 1-2 teaspoons dried herbs or spices (Italian spices, basil, oregano, marjoram, thyme, cumin, curry powder, nutmeg) 1 cup heavy cream Combine the oil, onion, garlic, and carrot in the crockpot. Cook on high, stirring frequently, until the onion softens. (This can also be done in a skillet.) Add the remaining ingredients except for the herbs and spices and cream. Cover and cook on low for 8-12 hours. Add the herbs and adjust seasoning. Cool slightly and puree in small batches. Return to the crockpot and add the cream. Reheat until piping hot, or else cool and chill before serving. Chicken & Leek Soup 3 1/2 pounds Frying Chicken, cut into 8 pieces 1 pound Beef Shanks, cut into 1" pieces 6 cups Chicken broth 3 slices Thick cut Bacon 1 Tablespoon Dried leaf Thyme 1 Bay leaf 3/4 cup Pearl Barley 1 1/2 cups Chopped Leek, white only Salt and Pepper to taste 2 Tablespoons Chopped parsley Put the chicken, beef, stock, bacon, thyme, and bay leaf in a large, heavy pot and bring to a boil. Reduce the heat and simmer, covered, for 30 minutes. Meanwhile boil barley in 1 1/2 cups water for 10 minutes. Drain and set aside. Remove chicken for pot. When cool enough to handle, debone and set aside. Add leeks and barley to the pot, and simmer 15 minutes. Remove beef shanks and debone. Chop meat coarsely, and return to the pot, along with the chicken. Simmer covered, for 5 minutes more. Season with salt and pepper to taste and garnish with parsley. Autumn Equinox Stew 1 tbsp. olive oil 1 onion, diced 3 cloves garlic, minced 1 large eggplant, cubed 1 small acorn squash, peeled, cubed 1 large zucchini, peeled and cubed 1 tsp. salt black pepper to taste 1 sprig fresh thyme 3 large tomatoes, diced 1 1/2 cups of water 1 cup dried lentils Give thanks for the earth's bounty with this luscious stew made from fresh seasonal vegetables. This stew cooks quickly and can be easily prepared over a festive fire or on the stove. Put olive oil in a large pot on medium heat. Saute onion and garlic until highly aromatic. Add eggplant and squash and zucchini. Saute until edges show signs of cooking. Add remaining ingredients and simmer on medium heat for 10 to 15 minutes. Serve with fresh-baked bread. Beef & Barley Vegetable Soup 3 pounds Soup Meat 2 Tablespoons Fat 2 quarts Water 1 1/2 Tablespoons Salt 1/4 Tablespoon Pepper 2 Tablespoons Minced Parsley 1/2 cup Barley 1 cup Carrots, cubed 1/4 cup Onion, chopped 1/2 cup Celery, chopped 2 cups Canned Tomatoes, drained 1 cup Peas Brown meat with bones in hot fat. Place meat, soup bone, water, seasonings and parsley in a soup kettle. Cover tightly and simmer 1 hour. Add barley and simmer another hour. Cool and skim off excess fat. Remove soup bone. Add carrots, onion, celery and tomatoes. Simmer 45 minutes. Add fresh peas and continue cooking 15 minutes. If leftover soup becomes to thick, dilute with beef broth. Can be doubled or tripled and freezes well. Rosemary Grilled Chicken 2 broiler chickens (3 lbs ea. split) -- backbones removed 1/4 cup vegetable oil 8 tablespoons butter, melted 1/2 cup dry white wine or 1/3 cup lemon juice 2 teaspoons dried rosemary, crushed 1/2 clove garlic, optional 1 teaspoon salt freshly ground black pepper - to taste Prepare the grill by placing an oiled rack 4-6 inches over medium-hot coals. Combine the oil, butter, wine or lemon juice, rosemary garlic (if desired) and salt. Brush the chicken halves inside and out with 1/4 cup of the seasoned butter Place the chickens bone side down on the grill. Baste them frequently with the remaining seasoned butter and turn the pieces every 10 minutes for a total of 30 to 40 minutes in all. Sprinkle well with pepper. Rosemary Potatoes 8 small red potatoes, scrubbed & quartered 8 cloves garlic, peeled 3 tbsp olive oil 1/2 tsp freshly ground pepper 1/3 cup minced fresh rosemary or 2 tbsp dried 1/2 cup chopped green onions Preheat oven to 200C (400F). Place potatoes and garlic in a single layer in a baking dish. Drizzle with olive oil and toss potatoes to coat evenly. Sprinkle with salt, pepper and rosemary and toss again. Roast for 30 minutes or until potatoes are crisp on the outside and tender inside. Sprinkle with green onion and serve. Serves 8 Rosemary Herb Butter 2 to 3 cloves garlic, minced 1 tablespoon fresh rosemary leaves, removed from the stem 1/2 teaspoon orange or lemon zest 1 tablespoon orange or lemon juice 1/4 teaspoon crushed red chile pepper 1 stick butter, softened Combine all of the ingredients. Make a log by spreading the mixture across a length of waxed paper. Roll the log back and forth to make a smooth tube about 1 1/2 inches thick. Twist the ends and store in the refrigerator or wrap airtight and store in the freezer. Rosemary Herb Bread 2/3 cup milk 2 eggs 3 cups bread flour 1 1/2 teaspoons salt 2 1/2 tablespoons white sugar 1 teaspoon chopped fresh rosemary 1 teaspoon chopped fresh thyme 1 teaspoon dried marjoram 1 1/2 tablespoons margarine 2 teaspoons active dry yeast Place ingredients in the bread machine in the order suggested by the manufacture. Select Basic or White Bread setting. Start. Wild Rice with Apples and Walnuts 1 cup wild rice 2 cups water 1 Tablespoon vegetable oil Cook rice and oil in water for 50 minutes. 1 cup walnuts 1 rib of celery, chopped 4 chopped scallions 1 cup raisins 1 red apple, peeled and chopped, set aside in lemon water 2 teaspoons grated lemon rind Combine nuts, celery, onions, raisins, drained apple and lemon rind and set aside. 3 T. lemon juice 2 garlic cloves, minced 1/2 t. salt 1/3 cup olive oil pepper, to taste Whisk together juice, salt and pepper, garlic and oil and add to cooked rice. Add fruit mixture to the rice (to which has been added oil, spices and juice) and mix well. May be served cold or heated. Harvest Spread This recipe calls for lots of chopping and grating. 1C. tart apples, diced fine 1 C. celery chopped fine 1 C. mild cheddar, grated fine 2 Pkg (8 oz each) cream cheese 1 Tbsp. mayonnaise 1 Tbsp. sugar 1/2 tsp. cinnamon or apple pie seasoning 1 C. chopped walnuts or pecans Prepare all ingredients as listed. Place all ingredients in a medium size bowl. Mix to with a wooden spoon. Refrigerate for several hours before serving. Serve with crackers. Witches Apple Pudding Dough: 2 cups flour 4 Tsp. baking powder 3/4 cup milk 1/2 Tsp. salt 1/3 cup shortening 1 egg Combine the above ingredients as you would for biscuits and set aside for later. Fillings: 6 apples sliced 1 Tsp. cinnamon 3 Tsp. sugar or honey 1 Tsp. nutmeg Combine in baking dish. Syrup: 1 cup water 1 Tsp. butter 1 cup sugar or 1/2 cup sugar and 1/2 cup honey. Bring syrup to a boil. Drop the biscuit mixture on top of the fruit. Pour hot syrup over all and bake at 375 degrees for about 40 minutes. Serve warm. Vanilla ice cream makes a lovely addition. Carrot Ginger Muffins 2 cups flour 1 cup (packed) dark brown sugar 1 tsp. baking powder 1 tsp. baking soda 1/4 tsp. ground ginger 1/4 tsp. salt 2 eggs, lightly beaten 1/2 cup sour cream 1/2 cup vegetable oil 2 cups grated carrots (about 2 large) 1/4 cup golden raisins 1/4 cup coarsely chopped walnuts 2 tbl grated fresh ginger. Bake 425 degrees. Fresh ginger has a sharp refreshing taste while dried ground ginger is sweeter. This recipe call for both fresh and dried ginger. In a large bowl, stir together the flour, baking powder, baking soda, ground ginger and salt. In a small bowl combine eggs, sour cream, oil and mix until blended. Pour into dry ingredients and stir till just blended. Add the carrots, raisins, walnuts, and fresh ginger, and stir just until combined. Do not over mix. Divide the batter evenly among prepared muffin tin cups and bake between 15 to 20 minutes. The tops of the muffins are golden brown and when a tooth pick is inserted in the center of muffins comes out clean and dry. Harvest Morning Muffins 3 eggs 1/2 cup sugar 1/2 cup vegetable oil 1 cup grated apples 1 cup grated carrots 1 cup whole-wheat flour 1 cup all-purpose flour 1 tbs. baking powder 1/4 tsp. salt 1/2 tsp. cinnamon Preheat the oven to 375 degrees. Lightly grease a 12-muffin tin or line it with paper liners. Set aside. In the bowl of an electric mixer, blend the eggs, sugar and oil until well combined. Stir in the grated apples and carrots. In a separate bowl, sift the flours, baking powder, salt and cinnamon. Blend the dry ingredients with the apple mixture until just combined. Spoon the batter into the muffin tins and bake for 25 minutes. Makes 12 muffins. Share the Wealth Applesauce 24 tart apples Juice of a lemon 2 cups water 1 cup sugar 4 tsp. cinnamon 1 cup raisins (optional) Peel and core the apples, then cut them into chunks. Place the apples in a large nonreactive saucepan, and add the lemon juice and water. Stir in the sugar. Bring the mixture to a boil, then reduce the heat to low. Cover the pot and cook for 30 minutes or until the apples are soft. Remove the mixture from the heat and add the cinnamon and raisins, if desired. Stir light for a chunky sauce and rigorously for a smooth sauce. For a pink applesauce, use red apples and leave the skins on. Once the apples are soft, you can strain out the skins or lift them from the sauce with a fork. Makes 2 1/2 cups. (Pour into resealable jars, decorate to give as Harvest gifts.) Caramel-Pecan Pumpkin Pie 1 recipe Pastry for Single-Crust Pie 2 slightly beaten eggs 1 15-ounce can pumpkin 1/4 cup half-and-half, light cream, or milk 3/4 cup granulated sugar 1 tablespoon all-purpose flour 1 teaspoon finely shredded lemon peel 1/2 teaspoon vanilla 1/4 teaspoon salt 1/4 teaspoon ground cinnamon 1/4 teaspoon ground nutmeg 1/8 teaspoon ground allspice 1/2 cup packed brown sugar 1/2 cup chopped pecans 2 tablespoons butter, softened Prepare and roll out pastry. Line a 9-inch pie plate with pastry. Trim; crimp edge as desired. In a large bowl stir together eggs, pumpkin, and half-and-half or milk. Stir in the granulated sugar, flour, lemon peel, vanilla, salt, cinnamon, nutmeg, and allspice. Pour pumpkin mixture into pastry-lined pie plate. Cover the edge of the pie with foil to prevent overbrowning. Bake in a 375 degree F oven for 25 minutes. Meanwhile, in a medium bowl stir together the brown sugar, pecans, and butter until combined. Remove foil. Sprinkle brown sugar mixture over top of pie. Bake for 20 minutes more or until a knife inserted near the center comes out clean and topping is golden and bubbly. Cool on a wire rack. Cover and refrigerate within 2 hours. Makes 8 servings. Fresh Apple Pound Cake 2 cups sugar 1 teaspoon salt 1 1/2 cups vegetable oil 1 1/2 teaspoons vanilla extract 3 large eggs 3 cups firm apples, diced 3 cups plain flour 1 cup pecans or walnuts, chopped 1 teaspoon baking soda Mix together sugar and oil. Add eggs and beat well. Combine flour, baking soda, and salt. Add to oil mixture. Stir in vanilla, apples, nuts, and mix well. Pour batter into a greased 9 inch tube pan. Bake at 325 degrees for 1 hour and 20 minutes or until cake is done. Icing: 1 stick margarine 1/4 cup evaporated milk 1 cup light brown sugar 1 teaspoon vanilla Heat margarine and sugar together over low heat. Add milk and let come to a full boil. Remove from heat and add vanilla. Drizzle over the cake. Pumpkin Oatmeal Cookies 5 dozen cookies 1 cup canned pumpkin 1 cup sugar 1 3/4 cups rolled oats 1 egg, beaten 1 1/2 cups flour 3/4 cup shortening 1 cup raisins or chopped nuts 1/2 cup teaspoon baking soda 1/4 teaspoon nutmeg 3/4 teaspoon cinnamon 1 teaspoon salt Preheat oven to 400°. In a mixing bowl, stir together flour, sugar, baking Soda, cinnamon, nutmeg and salt. Add shortening and mix. Stir until Mixture is crumbly. Stir in egg, pumpkin, oats and raisins or nuts. Drop Teaspoonfuls of dough onto an ungreased cookie sheet. Bake 15 minutes or Until done. Pumpkin Apple Muffins 2 cups flour 1/2 cup sugar 3 teaspoon pumpkin pie spice 1 teaspoon soda 1 teaspoon baking powder 1/2 teaspoon salt 2 eggs 1 cup canned pumpkin 1/2 cup vegetable oil 1 chopped peeled apple In large bowl combine flour, sugar, pumpkin pie spice, baking soda, baking powder, and salt. Combine eggs, pumpkin and oil. Stir into dry ingredients just until moistened. Fold in apples. Fill greased muffin cups almost full. For a streusel topping combine 1/4 cup sugar, 2 tablespoon flour and 1/2 teaspoon cinnamon. Cut in 1 tablespoon butter until mixture resembles course crumbs. Sprinkle 1 heaping teaspoon over each muffin. Bake at 350° for 25-30 minutes or until done. Cool in pan 10 minutes before removing to a wire rack. Make 12 muffins. Pumpkin Bread 1/2 stick unsalted butter 1/2 cup sugar 1 large egg 1/2 cup canned pumpkin 1/4 cup non-fat, plain yogurt 1/4 cup honey 1 teaspoon vanilla extract 1 cup flour 1 teaspoon baking powder 1 teaspoon cinnamon 1/4 teaspoon salt 1/4 teaspoon ground ginger 1/4 teaspoon ground allspice 1. Preheat oven to 350°F. Spray a bread pan with nonstick cooking spray. 2. In the bowl of an electric mixer, beat together the butter and sugar on high speed until smooth. With the mixer on low speed, add the egg and combine. Add the pumpkin, yogurt, honey and vanilla and combine until smooth. 3. In a separate bowl, combine the flour, baking powder, cinnamon, salt, ginger and allspice. Fold this mixture into the pumpkin mixture and combine until smooth. 4. Pour into the prepared pan and place in the center of the oven. Bake for 45 to 50 minutes or until a toothpick inserted into the center comes out clean. Apple Ginger Quick Bread Source: Old Farmer's Almanac Yield: 1 loaf or 6 mini bundt cakes A pleasant change of pace, especially attractive if baked in mini bundt pans. This bread freezes well, too. 2 cups whole-wheat pastry flour or all-purpose white flour 2 teaspoons baking powder 2 teaspoons ground ginger 1 teaspoon salt 2 large eggs, beaten 1/2 cup brown sugar 1/2 cup vegetable oil 3 medium-size tart apples, peeled and cut into 1/2-inch cubes 1/2 cup raisins and/or 1/2 cup unsalted mixed nuts (optional) Preheat the oven to 350 degrees F. Grease an 8-inch by 4-inch loaf pan or 6 mini bundt pans. Sift together the flour, baking powder, ginger, and salt; set aside. Combine the remaining ingredients and blend thoroughly. Add the liquid ingredients to the dry ingredients and combine just until blended thoroughly (do not beat). Spread into the prepared pan(s). Bake the loaf pan for 80 minutes, the mini bundt pans for 60 minutes, or until a tester inserted in the loaves comes out clean. Cool on a rack for 10 minutes before removing from the pans. Applesauce Cake 1 1/2 C. Applesauce (chunky is especially good) 1 C. Sugar 1/2 C. Shortening 1 C. Raisins 2 C. Flour 1 tsp. Baking Soda 1 tsp. Nutmeg 1 tsp. Cinnamon 1 C. chopped Nuts. Combine applesauce, sugar, raisins and shortening in a saucepan. Cook over low heat, stirring frequently until the mixture comes to a boil. Allow to cool. Combine dry ingredients and nuts. Stir everything together until well blended. (Mixture will be very thick.) Pour into a greased and floured 9" x 12" pan. Bake at 350 for 30 minutes, or until a pick inserted in the cake comes out clean. Allow to cool completely, then cover with plastic wrap. Honey Whole Wheat Bread for Mabon 9 cups whole-wheat flour 4 teaspoons salt 2 pkg. active dry yeast 1 1/2 cups milk 1 1/2 cups water 6 tablespoons butter 1/2 cup honey Sift together 3 cups flour, salt, and yeast. Combine milk, water, butter, and honey in a saucepan and heat over low heat until liquids are warm (butter need not melt completely). Gradually add to dry ingredients and beat 2 minutes. Add remaining flour a cup full at a time until a soft dough forms. Turn out onto lightly floured surface and allow to rest 10 minutes. Knead until smooth and elastic, about 10 minutes. Place in large greased bowl and turn to grease all sides of dough. Cover and allow to rise in a warm place until doubled in bulk, about one hour. Punch dough down and turn out onto lightly floured surface. Divide dough in half and shape each half into a loaf. Place into greased loaf pans. Cover and let rise in warm place until double in bulk, about one hour. Bake at 375 degrees for 35-40 minutes. Remove from pans and cool on racks. Honey Corn Muffins ½ Cup unsifted, unbleached all-purpose flour ½ Cup fine whole wheat pastry flour 1 Cup stone ground yellow cornmeal 2 teaspoons baking powder ½ teaspoon baking soda ¼ teaspoon salt 1 egg 1 cup plain nonfat yogurt or buttermilk 1/3 cup honey ¼ cup corn oil makes 12 Preheat oven to 400 F. Lightly grease a 12 hole muffin tin with vegetable spray. Combine flours, cornmeal, baking powder, baking soda and salt until well blended. In another bowl, mix egg, yogurt(or buttermilk), honey and corn oil until well blended. Add in the dry ingredients and beat until the mixture is moist.(Don't over beat or your muffins will be tough ) Pour in the muffin tin and bake for 15-20 minutes.(Just until they are firm). Serve with Honey Butter. CARROT HONEY CAKE 4 eggs 1 1/2 cups honey 1 cup oil 2 cups flour 2 tsp. baking soda 1 tsp baking powder 1/2 tsp salt 2 tsp cinnamon 3 cups grated carrots 1 cup walnuts (optional) powdered sugar Beat eggs. Add honey and oil and mix well. Add dry ingredients. Stir in carrots and nuts if used. Grease and flour a 9 inch by 13 inch pan. Pour batter into pan and smooth it out. Bake at 350F for 45 to 50 minutes. (This recipe can be made into cupcakes using the paper cupcake liners.) Bake at 350F for 25 minutes. Cool. Just before serving, sprinkle liberally with sifted powdered sugar. YIELD: 3 1/2 dozen cupcakes Cool Apple Nog 1 can (12 oz.) frozen apple juice concentrate (undiluted) 2 eggs 1/4 teaspoon grated lemon peel 1 tablespoon lemon juice 1/8 teaspoon ground cinnamon dash of ground nutmeg 1/2 cup milk 10 ice cubes (crushed) In a blender, whirl all ingredients until smooth. Garnish each serving with fresh mint sprigs. Makes 4 servings. Mabon Wine Moon Cider 4 cups apple cider 1/2 tsp. whole cloves 4 cups grape juice additional cinnamon sticks 2 cinnamon sticks for cups, 6 inches long 1 tsp allspice In a 4-quart saucepan, heat cider and grape juice. Add cinnamon, allspice and cloves. Bring just to boiling. Lower heat and simmer for 5 minutes. We try to credit all articles but sometimes don't know where they came from. Some information is our own research and some is sent into us by friends and customers. If you see something here that is yours and your not getting credit for it please contact us and we will add you as the author or remove it if requested. We want to thank everyone for sharing this wonderful info Source, Copyright 2010 - 2017 © Raven and Crone, LLC ® Powered by StrikeHawk eCommerce, Inc. Reposted by, PHYNXRIZNG
136 notes
·
View notes
Text
Recipe: Perfect Green goddess salad
Recipe: Perfect Green goddess salad
Green goddess salad. Green goddess is a salad dressing, typically containing mayonnaise, sour cream, chervil, chives, anchovy, tarragon, lemon juice, and pepper. The dressing is named for its tint. Do you remember green goddess dressing?

This gorgeous salad combines fresh shrimp, cucumber, artichoke hearts and cherry tomatoes with homemade green goddess dressing. The dressing is…
View On WordPress
0 notes
Text
Chupe de Camarones (Chilean Cheesy Prawn Gratin)

To celebrate Los Cóndores' last game in this Rugby World Cup today --against fellow South Americans Argentina-- I made Chupe de Camarones. The Chilean recipe is a deliciously cheesy and spicy prawn gratin (not a stew like its Peruvian counterpart), a more-ish dish, as fiery and hearty as this year's World Cup debutants! Happy Saturday!
Ingredients (serves 2):
75 grams/2.70 ounces day-old bread, like Sourdough Bread
1 cup semi-skimmed milk
2 tablespoons olive oil
1/2 large onion
1/2 large red Bell Pepper, rinsed
1/3 red hot chili pepper
1/2 teaspoon dried oregano
1 small garlic clove, minced
a dozen fresh prawns
1/4 teaspoon fleur de sel or sea salt flakes
1/2 teaspoon freshly cracked black pepper
1/2 large lemon
1/2 cup double cream
60 grams/2 ounces Mature Cheddar
a handful fresh Garden Chives and Chervil
Parmesan Cheese
Crumble Sourdough Bread into a medium bowl. Cover with milk, and allow to soak, half an hour; set aside.
Preheat oven to 200°C/395°F. Generously oil two oven-proof bowls. Set aside.
In a large, deep skillet, heat olive oil over medium-high heat.
Peel and finely chop onion, and stir into the skillet, a couple of minutes until softened.
Seed and chop Bell Pepper, stirring into the skillet.
Thinly slice chili pepper, and add to the skillet as well, along with dried oregano and garlic. Cook, a couple of minutes more.
Peel the prawns, and add to the skillet, cooking until they turn bright pink and just start browning. Season with fleur de sel and black pepper. Transfer four of the prawns to a small plate for garnish; set aside.
Thoroughly squeeze the juice of the lemon halve into the skillet to deglaze. Reduce heat to medium.
Using a hand-held blender, process soaked Sourdough Bread and milk until smooth. Stir mixture into the skillet, until slightly thickened.
Then, stir in double cream and grate in the Cheddar. Give a good stir until the cheese has melted. Remove from the heat.
Finely chop Chives and Chervil, and stir into the skillet.
Spoon mixture into each prepared bowl. Grate a little Parmesan on top of each. Place in the middle of the hot oven, and bake, at 200°C/395°F, 10 to 15 minutes, until golden brown on top.
Serve Chupe de Camarones hot, topped with reserved prawns.

Chile's first ever World Cup try, 10th September 2023, Toulouse, France
#Recipe#Food#Chupe de Camarones#Chupe de Camarones recipe#Chupe de Camarones Chileno#Cheesy Prawn Gratin#Prawn Gratin#Prawns#Fresh Prawns#Olive Oil#Onion#Bell Pepper#Garden Bell Pepper#Hot Chili Pepper#Chili Pepper#Garlic#Oregano#Dried Oregano#Lemon Juice#Milk#Bread#Sourdough Bread#Fleur de Sel#Black Pepper#Black Peppercorns#Cheddar#Mature Cheddar#Parmesan#Parmesan Cheese#Gratin
6 notes
·
View notes
Text
Asparagus Quiche
Asparagus Quiche with Fresh Herbs
This Asparagus Quiche with Fresh Herbs is the perfect early summer lunch or supper recipe. In May and early June, bunches of seasonal fresh asparagus start to appear in the shops and it is time to look up recipes that make the most of it. It is the time of year when the weather becomes warmer and having a picnic or eating outside in the garden become more realistic prospects. It is also the time of year when outdoor concerts or plays, village fetes and sporting events start to take place. If you are looking for the perfect dish to take along to any of these, something easy, seasonal but luxurious, look no further than home-made Asparagus Quiche.
Recent posts on tastebotanical
Damson Gin
Plum Crumble
Apple Ice Cream
Plum Gin
Salted Caramel recipe
Email Address
Subscribe to tastebotanical
What you need to know about Asparagus Quiche with Fresh Herbs
I generally make my own pastry. It took me many years to realise how easy it is and I do think it tastes better than ready-made pastry. However, if making pastry is not your thing, or you have limited time, you can use ready-made shortcrust pastry. This will make this quiche even quicker and easier to make.
Make sure you use fresh asparagus. There are lots of different varieties, particularly if you go to a farmers market or farm shop, and any would be good in this recipe.
A great technique when you are preparing asparagus is to remove the base of each spear by bending it until it snaps. It will naturally break at the point where the woody and unpalatable stem meets the edible part of the spear.
Make sure you do not overcook the asparagus. This is the basic rule of cooking asparagus. You need to make sure it has a little “bite” and retains its unique flavour.
I generally flavour this quiche with a combination of dill and chives. However, you can choose any non-woody herbs that you prefer. Tarragon and lemon balm would also be excellent choices.
Mature cheddar is my cheese of choice in this quiche as I think it adds a bit of oomph to the asparagus without overpowering it. You can try other cheeses but I would steer clear of blue cheese.
You can eat this quiche either hot, warm or at room temperature. We will sometimes eat it hot with buttery boiled new potatoes for supper. It also is great at room temperature as part of a summer buffet or in a lunch box. If you are making it ahead of time, you can keep it in the fridge for a couple of days. Make sure that you bring it out of the fridge at least half an hour before you plan to eat it as it is not at its best if it is icy cold.
Loved this recipe? Checkout the Recipe Index.
Other asparagus recipes
Every year, I look forward to early summer when fresh asparagus is in season. Nowadays, you can buy it all year round but I am a strong believer in eating seasonal, local food. This means that early summer is the time when I get to indulge my love of fresh asparagus. It is great treated simply, just steamed for a few minutes and then either eaten hot with butter or at room temperature with a simple olive oil and vinegar dressing.
However, it is also a fantastic basis for quiches and savoury tarts. In addition to this Asparagus Quiche, I also make an Asparagus Tart, using ready-made puff pastry, which is fantastic quick and easy lunch or supper dish. I also make a cold Asparagus and Pea Soup with Chervil which is great on a hot summer day either as a light lunch or as a starter for a dinner party.
There are many different types of asparagus with variation in colour, the most common is green asparagus but you can get purple and white, and also the thickness of the stems. If you look in your local farmers’ market or farm-shop at this time of year, you might be lucky and find a variety of different types.
Loved this recipe? Checkout the Recipe Index.
Email Address
Subscribe to tastebotanical
Other quiche and tart recipes
Savoury tarts and quiches are a fantastic, cook-ahead simple supper or lunch. They are easy to make and are great either hot or at room temperature. They can also be easily divided into portions if you are feeding a large number of people. Easily transportable, they also make a good addition to lunch-boxes or basis for a picnic. Some of my favourites are listed below.
I have a very simple Asparagus and Herb Cheese Tart which uses ready-made puff pastry and is quite different from this Asparagus Quiche.
Two kinds of onion tart – Caramelised Onion Tart which is based on sweet, slow-cooked onions and another version, Onion Tart with Wild Garlic, which has the addition of fresh herbs. I also have an easy Shallot Tart with Thyme and Anchovy which uses ready-made puff pastry.
I also have two very different carrot-based tarts. Carrot and Coriander Tart combines these two classic flavours in a simple quiche-style savoury tart. Carrot Tart uses ready-made puff pastry and combines large pieces of carrot with orange and soft cheese.
Beetroot Tart is deliciously sweet and earthy. Tomato Tart is also sweet but has a lighter and fresher flavour.
Spinach Tart combines leaf green spinach with feta and crunchy pine-nuts.
Butternut Squash Tart with Chilli and Sage also has a sweetness to it but this is off-set by the addition of a little hot chilli.
Feta Quiche with Roasted Peppers is a fantastic comination of rich, smoky roasted peppers with salty feta cheese.
If you love garlic, you will like my Garlic Tart which is a celebration of one of my favourite flavours!
I also have a couple of fish-based recipes. My Crab and Prawn Tart has Asian-inspired flavours of coriander, lime and chilli. My Smoked Salmon Tart with Prawns is easy to make and is perfect for a celebratory meal or party.
In addition to larger quiches and tarts, I also have a recipe for individual Herb Tartlets which are great as canapes or snacks.
Loved this recipe? Checkout the Recipe Index.
Asparagus Quiche with Fresh Herbs recipe
.tasty-recipes-image { float: right; } .tasty-recipes-yield-scale { border: 1px solid #979599; border-radius: 2px; color: #979599; margin-left: 3px; padding: 0 4px; font-size: 0.7rem; } .tasty-recipes-scale-container { float: right; padding: 0 0 1rem; display: flex; } .tasty-recipes-scale-container .tasty-recipes-scale-label { text-transform: uppercase; font-size: 0.6rem; color: #979599; align-self: center; } .tasty-recipes-scale-container button { background: transparent; border: 1px solid #979599; border-radius: 2px; color: #979599; margin-left: 5px; padding: 2px 4px; } .tasty-recipes-scale-container button.tasty-recipes-scale-button-active { color: #353547; border-color: #353547; } .tasty-recipes-scale-container button:focus { outline: none; } .tasty-recipes-instructions-header { display: flex; flex-wrap: wrap; justify-content: space-between; align-items: baseline; margin: 2em 0; } .tasty-recipes-entry-content .tasty-recipes-instructions h3 { margin: 0 0 1rem 0; } @media only screen and (min-width: 520px) { .tasty-recipes-entry-content .tasty-recipes-instructions h3 { margin: 0; } } /*Video Toggle button */ button[name="tasty-recipes-video-toggle"] { margin: 0; padding: 0; width: 86px; height: 30px; border-radius: 2px; border: #979599; display: inline-block; line-height: 20px; vertical-align: middle; text-align: center; font-size: 14px; background: #979599; } button[name="tasty-recipes-video-toggle"] span { padding: 0 4px; pointer-events: none; } button[name="tasty-recipes-video-toggle"][aria-checked="false"] :last-child, button[name="tasty-recipes-video-toggle"][aria-checked="true"] :first-child { background: #fff; color: #979599; border-radius: 2px; padding: 2px 4px; } button[name="tasty-recipes-video-toggle"][aria-checked="false"] :first-child, button[name="tasty-recipes-video-toggle"][aria-checked="true"] :last-child { color: #fff; } label[for="tasty-recipes-video-toggle"] { text-transform: uppercase; font-size: 0.6rem; padding-right: 8px; color: #979599; line-height: 30px; user-select: none; vertical-align: middle; -moz-user-select: none; -ms-user-select: none; -webkit-user-select: none; -o-user-select: none; } .tasty-recipe-responsive-iframe-container { margin: 10px 0; } .tasty-recipes-print-button { background-color: #666677; display: inline-block; padding-left: 1em; padding-right: 1em; padding-top: 0.5em; padding-bottom: 0.5em; text-decoration: none; } a.tasty-recipes-print-button { color: #fff; } a.tasty-recipes-print-button:hover { color: #fff; } .tasty-recipes-equipment { display: flex; flex-wrap: wrap; justify-content: space-evenly; } .tasty-recipes-equipment > h3 { flex: 0 0 100%; } .tasty-recipes-equipment .tasty-link-card { flex: 0 0 50%; padding: 1.5rem 1rem; text-align: center; } @media screen and (min-width: 500px) { .tasty-recipes-equipment .tasty-link-card { flex: 0 0 33%; } } .tasty-recipes-equipment .tasty-link-card p { font-weight: bold; font-size: 1em; margin-bottom: 0; } .tasty-recipes-equipment .tasty-link-card p a { color: initial; } .tasty-recipes-equipment .tasty-link-card span { font-size: 0.9em; } .tasty-recipes-rating.tasty-recipes-clip-10 { -webkit-clip-path: polygon(0 0, 10% 0%, 10% 100%, 0% 100%); clip-path: polygon(0 0, 10% 0%, 10% 100%, 0% 100%); } .tasty-recipes-rating.tasty-recipes-clip-20 { -webkit-clip-path: polygon(0 0, 20% 0%, 20% 100%, 0% 100%); clip-path: polygon(0 0, 20% 0%, 20% 100%, 0% 100%); } .tasty-recipes-rating.tasty-recipes-clip-30 { -webkit-clip-path: polygon(0 0, 30% 0%, 30% 100%, 0% 100%); clip-path: polygon(0 0, 30% 0%, 30% 100%, 0% 100%); } .tasty-recipes-rating.tasty-recipes-clip-40 { -webkit-clip-path: polygon(0 0, 40% 0%, 40% 100%, 0% 100%); clip-path: polygon(0 0, 40% 0%, 40% 100%, 0% 100%); } .tasty-recipes-rating.tasty-recipes-clip-50 { -webkit-clip-path: polygon(0 0, 50% 0%, 50% 100%, 0% 100%); clip-path: polygon(0 0, 50% 0%, 50% 100%, 0% 100%); } .tasty-recipes-rating.tasty-recipes-clip-60 { -webkit-clip-path: polygon(0 0, 60% 0%, 60% 100%, 0% 100%); clip-path: polygon(0 0, 60% 0%, 60% 100%, 0% 100%); } .tasty-recipes-rating.tasty-recipes-clip-70 { -webkit-clip-path: polygon(0 0, 70% 0%, 70% 100%, 0% 100%); clip-path: polygon(0 0, 70% 0%, 70% 100%, 0% 100%); } .tasty-recipes-rating.tasty-recipes-clip-80 { -webkit-clip-path: polygon(0 0, 80% 0%, 80% 100%, 0% 100%); clip-path: polygon(0 0, 80% 0%, 80% 100%, 0% 100%); } .tasty-recipes-rating.tasty-recipes-clip-90 { -webkit-clip-path: polygon(0 0, 90% 0%, 90% 100%, 0% 100%); clip-path: polygon(0 0, 90% 0%, 90% 100%, 0% 100%); } .tasty-recipes-nutrition ul { list-style-type: none; margin: 0; padding: 0; } .tasty-recipes-nutrition ul:after { display: block; content: ' '; clear: both; } .tasty-recipes-nutrition li { float: left; margin-right: 1em; } .tasty-recipes-plug { text-align: center; margin-bottom: 1em; display: flex; align-items: center; justify-content: center; } .tasty-recipes-plug a { text-decoration: none; box-shadow: none; } .tasty-recipes-plug a img { width: 150px; height: auto; margin: 5px 0 0 8px; display: inline-block; } @media print { .tasty-recipes-no-print, .tasty-recipes-no-print * { display: none !important; } } /* Fresh recipe card styles. */ .tasty-recipes { margin-bottom: 4em; max-width: 700px; background-color: #f9f9f9; } .tasty-recipes.tasty-recipes-has-plug { margin-bottom: 1em; } .tasty-recipes-plug { margin-bottom: 4em; } .tasty-recipes-print-button { display: none; } .tasty-recipes-image-shim { height: 69.5px; clear: both; } .tasty-recipes-entry-header { background-color: #f9f9f9; padding-top: 2em; padding-left: 2em; padding-right: 2em; } .tasty-recipes-entry-header.tasty-recipes-has-image { padding-top: 0px; } .tasty-recipes-entry-header .tasty-recipes-image { float: none; margin-bottom: 1em; } @media only screen and (min-width: 730px) { .tasty-recipes-entry-header .tasty-recipes-image { float: left; margin-right: 16px; } } .tasty-recipes-entry-header .tasty-recipes-image img { float: none; height: 150px; width: 150px; object-fit: cover; } .tasty-recipes-entry-header .tasty-recipes-header-content { min-height: 215px; } .tasty-recipes-entry-header h2 { margin-bottom: 0; margin-top: 0; padding-top: 0; padding-bottom: 0; clear: none; } .tasty-recipes-entry-header hr { border: 1px solid #eee; background-color: #eee; margin-bottom: 0; margin-top: 1em; margin-right: -2em; margin-left: -2em; } .tasty-recipes-entry-header .tasty-recipes-rating-outer { width: 100%; } .tasty-recipes-entry-header .tasty-recipes-rating-outer a { text-decoration: none; border: none; display: inherit; box-shadow: none; } .tasty-recipes-entry-header .tasty-recipes-rating-outer a:hover { text-decoration: none; } .tasty-recipes-entry-header .tasty-recipes-rating-stars { font-size: 18px; } .tasty-recipes-entry-header .tasty-recipes-rating-stars span { margin-right: 2px; margin-left: 2px; color: #aaaaaa; } .tasty-recipes-entry-header .tasty-recipes-rating-stars span:first-child { margin-left: 0; } .tasty-recipes-entry-header .tasty-recipes-rating-label { color: #B7BBC6; font-size: .6875em; margin-top: 1em; position: absolute; } .tasty-recipes-entry-header .tasty-recipes-rating-stars .post-ratings { font-size: 10px; } .tasty-recipes-entry-header .tasty-recipes-rating-stars .post-ratings .tasty-recipes-cf-ratings-label { margin-top: 0; line-height: 1; } .tasty-recipes-entry-header .tasty-recipes-details { margin-top: 1.5em; color: #606060; } .tasty-recipes-entry-header .tasty-recipes-details ul { list-style-type: none; margin: 0; padding-left: 0; } .tasty-recipes-entry-header .tasty-recipes-details ul li { display: inline-block; margin-left: 0; padding-left: 0; margin-right: .5em; margin-bottom: 0; font-size: 1em; line-height: 1.8em; } .tasty-recipes-entry-header .tasty-recipes-details .detail-icon { height: 1em; margin-top: .4em; } .tasty-recipes-entry-header .tasty-recipes-details ul li { font-size: 1em; } .tasty-recipes-entry-header .tasty-recipes-details .tasty-recipes-label { margin-right: .125em; } .tasty-recipes-entry-header .tasty-recipes-details .detail-icon { vertical-align: top; margin-right: .2em; } @media only screen and (min-width: 730px) { .tasty-recipes-entry-header .tasty-recipes-details { padding-left: 166px; } } .tasty-recipes-entry-content { padding-top: 0.1em; background: #f9f9f9; color: #606060; clear: both; } .tasty-recipes-entry-header .tasty-recipes-buttons { margin-top: 1.25em; margin-bottom: 1.25em; width: 100%; } .tasty-recipes-entry-header .tasty-recipes-buttons:after { content: " "; display: block; clear: both; } .tasty-recipes-entry-header .tasty-recipes-button-wrap { box-sizing: border-box; } .tasty-recipes-entry-header .tasty-recipes-buttons a { text-transform: uppercase; text-align: center; display: block; background-color: #f9f9f9; font-size: 1em; line-height: 1.375em; font-weight: bold; padding-top: 7px; padding-bottom: 7px; margin-top: 0; border: 1px solid #aaaaaa;; border-radius: 0; text-decoration: none; color: #aaaaaa; } .tasty-recipes-entry-header .tasty-recipes-buttons .button:hover { background-color: #f9f9f9; border: 3px solid #aaaaaa; color: #aaaaaa; opacity: 1; } .tasty-recipes-entry-content a img { box-shadow: none; -webkit-box-shadow: none; } .tasty-recipes-entry-header .tasty-recipes-buttons a:hover { background-color: #979599; text-decoration: none; } .tasty-recipes-entry-header .tasty-recipes-buttons img { vertical-align: top; } .tasty-recipes-entry-header .tasty-recipes-buttons .svg-print, .tasty-recipes-entry-header .tasty-recipes-buttons .svg-pinterest { height: 1.25em; margin-right: .375em; margin-bottom: 0; background: none; display: inline-block; box-shadow: none; vertical-align: middle; } @media only screen and (max-width: 730px) { .tasty-recipes-entry-header .tasty-recipes-button-wrap { width: 100%; } .tasty-recipes-entry-header .tasty-recipes-button-wrap:nth-child(2) { padding-top: 1em; } } @media only screen and (min-width: 450px) { .tasty-recipes-entry-header .tasty-recipes-buttons { width: 100%; float: none; } .tasty-recipes-entry-header .tasty-recipes-button-wrap:first-child { width: 50%; padding-right: 5px; float: left; } .tasty-recipes-entry-header .tasty-recipes-button-wrap:last-child { width: 50%; padding-left: 5px; float: right; padding-top: 0; } } @media only screen and (min-width: 730px) { .tasty-recipes-entry-header .tasty-recipes-buttons { padding-left: 166px; box-sizing: border-box; } .tasty-recipes-header-content { position: relative; } .tasty-recipes-header-content .tasty-recipes-rating-outer { position: absolute; top: 155px; width: 150px; text-align: center; } .tasty-recipes-header-content .tasty-recipes-rating-label { display: block; position: static; margin-top: 0; } } .tasty-recipes-entry-content h3 { color: initial; } .tasty-recipes-entry-content h4 { font-size: 1em; padding-top: 0; margin-bottom: 1.5em; margin-top: 1.5em; } .tasty-recipes-entry-content hr { background-color: #eee; border: 1px solid #eee; margin-top: 1em; margin-bottom: 1em; } .tasty-recipes-entry-content .tasty-recipes-description, .tasty-recipes-entry-content .tasty-recipes-ingredients, .tasty-recipes-entry-content .tasty-recipes-instructions, .tasty-recipes-entry-content .tasty-recipes-keywords { padding-left: 2em; padding-right: 2em; } .tasty-recipes-entry-content .tasty-recipes-description p { margin-bottom: 1em; } .tasty-recipes-entry-content .tasty-recipes-ingredients ul, .tasty-recipes-entry-content .tasty-recipes-instructions ul { list-style-type: none; margin-left: 0; margin-bottom: 1.5em; padding: 0; } .tasty-recipes-entry-content .tasty-recipes-ingredients ul li, .tasty-recipes-entry-content .tasty-recipes-instructions ul li { margin-bottom: .625em; list-style-type: none; position: relative; margin-left: 1.5em; line-height: 1.46; } .tasty-recipes-entry-content .tasty-recipes-ingredients ul li:before, .tasty-recipes-entry-content .tasty-recipes-instructions ul li:before { background-color: #aaaaaa; -webkit-border-radius: 50%; -moz-border-radius: 50%; border-radius: 50%; height: .5em; width: .5em; display: block; content: " "; left: -1.25em; top: .375em; position: absolute; } .tasty-recipes-entry-content .tasty-recipes-ingredients ol, .tasty-recipes-entry-content .tasty-recipes-instructions ol { counter-reset:li; margin-left: 0; padding: 0; } .tasty-recipes-entry-content .tasty-recipes-ingredients ol > li, .tasty-recipes-entry-content .tasty-recipes-instructions ol > li { list-style-type: none; position: relative; margin-bottom: 1em; margin-left: 1.5em; line-height: 1.46; } .tasty-recipes-entry-content .tasty-recipes-ingredients ol > li:before, .tasty-recipes-entry-content .tasty-recipes-instructions ol > li:before { content:counter(li); counter-increment: li; position: absolute; background-color: #aaaaaa; -webkit-border-radius: 50%; -moz-border-radius: 50%; border-radius: 50%; height: 1.45em; width: 1.45em; color: #FFF; left: -1.25em; transform: translateX(-50%); line-height: 1.5em; font-size: .6875em; text-align: center; top: .1875em; } .tasty-recipes-entry-content .tasty-recipes-ingredients li li, .tasty-recipes-entry-content .tasty-recipes-instructions li li { margin-top: 0.625em; } .tasty-recipes-entry-content .tasty-recipes-ingredients li ul, .tasty-recipes-entry-content .tasty-recipes-ingredients li ol, .tasty-recipes-entry-content .tasty-recipes-instructions li ul, .tasty-recipes-entry-content .tasty-recipes-instructions li ol { margin-bottom: 0; } @media only screen and (max-width: 520px) { .tasty-recipes-entry-content .tasty-recipes-ingredients ol, .tasty-recipes-entry-content .tasty-recipes-instructions ol { margin-left: 0; } } .tasty-recipes-entry-content .tasty-recipes-equipment { padding-left: 2em; padding-right: 2em; } .tasty-recipes-entry-content .tasty-recipe-video-embed ~ .tasty-recipes-equipment { padding-top: 1em; } .tasty-recipes-entry-content .tasty-recipes-notes, .tasty-recipes-entry-content .tasty-recipes-nutrition { padding-bottom: 1.25em; padding-left: 2em; padding-right: 2em; } .tasty-recipes-entry-content .tasty-recipes-notes ol { counter-reset:li; margin-left: 0; padding: 0; margin-bottom: 0; } .tasty-recipes-entry-content .tasty-recipes-notes ul { margin-left: 0; padding: 0; margin-bottom: 0; } .tasty-recipes-entry-content .tasty-recipes-notes p, .tasty-recipes-entry-content .tasty-recipes-notes ul li, .tasty-recipes-entry-content .tasty-recipes-notes ol li { padding-left: 1.5em; padding-top: 1.25em; padding-bottom: 1.25em; position: relative; margin-bottom: 0; margin-left: 0; list-style-type: none; } .tasty-recipes-entry-content .tasty-recipes-notes p:before, .tasty-recipes-entry-content .tasty-recipes-notes ul li:before { content: "i"; display: block; background-color: #aaaaaa; -webkit-border-radius: 50%; -moz-border-radius: 50%; border-radius: 50%; height: 1.3em; width: 1.3em; font-size: .75em; line-height: 1.3em; text-align: center; color: #FFF; position: absolute; left: 0; top: 2.1em; } .tasty-recipes-entry-content .tasty-recipes-notes ol > li:before { content:counter(li); counter-increment: li; position: absolute; background-color: #aaaaaa; -webkit-border-radius: 50%; -moz-border-radius: 50%; border-radius: 50%; height: 1.45em; width: 1.45em; color: #FFF; left: 2em; transform: translateX(-50%); line-height: 1.5em; font-size: .6875em; text-align: center; top: 2.3em; } .tasty-recipes-entry-content .tasty-recipes-notes p:last-child { margin-bottom: 0; } .tasty-recipes-entry-content .tasty-recipes-keywords { margin-top: 1em; margin-bottom: 1em; color: #aaaaaa; } .tasty-recipes-entry-content .tasty-recipes-keywords p { margin-bottom: 0; font-size: 0.7em; } .tasty-recipes-nutrifox { text-align: center; margin: 0; } .tasty-recipes-nutrifox iframe { width: 100%; display: block; margin: 0; } .tasty-recipes-entry-content .tasty-recipes-nutrition ul li { float: none; line-height: 2em; list-style-type: none; margin-left: 0; padding-left: 0.833em; } .tasty-recipes-entry-footer { background-color: #fff; padding-top: 1.5625em; padding-bottom: 1.25em; padding-left: 2.5em; padding-right: 2.5em; text-align: center; } .tasty-recipes-entry-footer .tasty-recipes-footer-content { display: inline-block; } .tasty-recipes-entry-footer img, .tasty-recipes-entry-footer svg { width: 65px; } .tasty-recipes-entry-footer h3 { font-size: 1.25em; line-height: 2.25em; margin-top: .5em; margin-bottom: .125em; padding: 0; line-height: 1em; } .tasty-recipes-entry-footer p { margin-bottom: 0; font-size: .75em; } .tasty-recipes-entry-footer p a { text-decoration: underline; box-shadow: none; border-bottom: none; } .tasty-recipes-entry-footer:after { content: " "; display: block; clear:both; } @media only screen and (max-width: 520px) { .tasty-recipes-entry-footer h3 { margin-top: .5em; margin-bottom: .5em; } .tasty-recipes-entry-footer { text-align: center; } } @media only screen and (min-width: 520px) { .tasty-recipes-entry-footer img, .tasty-recipes-entry-footer svg { float: left; } .tasty-recipes-entry-footer h3, .tasty-recipes-entry-footer p { margin-left: 90px; clear: none; text-align: left; } } .clearfix:after { clear: both; content: " "; display: table; } /* Print view styles */ .tasty-recipes-print-view { font-size: 11px; } .tasty-recipes-print-view .tasty-recipes-print-button { display: inline-block; } .tasty-recipes-print { padding:0; } .tasty-recipes-print-view .tasty-recipes, .tasty-recipes-print-view .tasty-recipes-entry-content { background: #fff; } .tasty-recipes-print-view .tasty-recipes { margin-top: 1em; } .tasty-recipes-print .tasty-recipes-entry-header { background-color: inherit; color: inherit; padding-bottom: 0; padding-left: 1em; padding-right: 1em; } .tasty-recipes-print .tasty-recipes-entry-header .tasty-recipes-image { transform: none; float: left; margin-right: 16px; } .tasty-recipes-print-view .tasty-recipes-entry-header .tasty-recipes-header-content { min-height: 150px; } .tasty-recipes-print.tasty-recipes-has-image .tasty-recipes-entry-header h2 { margin-top: 0; } .tasty-recipes-print .tasty-recipes-entry-header h2 { color: inherit; margin-bottom: .5em; } .tasty-recipes-print .tasty-recipes-entry-header hr { display: none; } .tasty-recipes-print .tasty-recipes-header-content .tasty-recipes-rating-outer { position: initial; text-align: left; width: unset; top: unset; } .tasty-recipes-print .tasty-recipes-entry-header .tasty-recipes-rating-stars span { color: #000; } .tasty-recipes-print .tasty-recipes-entry-header .tasty-recipes-details ul { padding: 0; clear: none; } .tasty-recipes-print .tasty-recipes-entry-header .tasty-recipes-details ul li { line-height: 1.8em; margin-bottom: 0; } .tasty-recipes-print .tasty-recipes-entry-header .tasty-recipes-details .detail-icon { display: none; } .tasty-recipes-print-view .tasty-recipes-source-link { text-align: center; } .tasty-recipes-print-view .tasty-recipes-entry-content .tasty-recipes-ingredients ul li, .tasty-recipes-print-view .tasty-recipes-entry-content .tasty-recipes-instructions ul li, .tasty-recipes-print-view .tasty-recipes-entry-content .tasty-recipes-ingredients ol li, .tasty-recipes-print-view .tasty-recipes-entry-content .tasty-recipes-instructions ol li { margin-bottom: 0; } .tasty-recipes-print-view .tasty-recipes-entry-content .tasty-recipes-notes p, .tasty-recipes-print-view .tasty-recipes-entry-content .tasty-recipes-notes ul li, .tasty-recipes-print-view .tasty-recipes-entry-content .tasty-recipes-notes ol li { margin-top: 1rem; padding-top: 0; padding-bottom: 0; } .tasty-recipes-print-view .tasty-recipes-entry-content .tasty-recipes-notes p:before, .tasty-recipes-print-view .tasty-recipes-entry-content .tasty-recipes-notes ul li:before { top: 0.1em; } clock clock icon cutlery cutlery icon flag flag icon folder folder icon instagram instagram icon pinterest pinterest icon print print icon squares squares icon
Asparagus Quiche
★★★★★ 5 from 3 reviews
Author: Tastebotanical
Prep Time: 15
Cook Time: 30
Total Time: 45 minutes
Yield: Serves 6–8 1x
Category: Quiche
Method: Baking
Cuisine: English
Print
Pin
Description
Asparagus Quiche with Fresh Herbs is the perfect early summer lunch, supper or picnic recipe – easy, seasonal, luxurious and great eaten hot or cold.
Scale 1x2x3x
Ingredients
For the pastry:
275 g (10 oz) plain flour
125 g fat (5 oz) I use a mix of half butter and half Trex as I think this makes the lightest pastry)
Salt
A little water
For the filling:
15 asparagus spears
a large bunch of fresh dill or herb fennel (2 tablespoons when chopped)
a large bunch of fresh chives (2 tablespoons when chopped)
Salt and pepper
100 ml (4 fl oz) double cream
2 eggs
75 g (3 oz) Cheddar or other full-flavoured cheese
Instructions
Set your oven to 180 C, 350 F or Gas Mark 4.
Make the pastry. Put the flour in a bowl. Add the fat and combine – either by “rubbing in” by hand or processing – until the mixture resembles breadcrumbs. Season with salt and pepper. Add a little cold water (2-3 tbsp) and shape the mixture into a dough.
Roll out your pastry and use it to line a 25 cm quiche or flan dish. Bake for 15 minutes in the oven to allow the pastry to “set”. This will stop the filling making it soggy and ensure that the base is crisp.
Next, prepare the asparagus spears. Remove the base of each spear by bending it until it snaps. It will naturally snap at the point where the thicker, less palatable base section starts.
Either steam the asparagus spears for three minutes or plunge them into boiling water for the same amount of time. This will partially cook the spears but retain their crunch and flavour.
Place the part-cooked asparagus spears in the pastry case.
Crack the eggs into a mixing bowl, add the cream, and beat until combined. Grate the cheese and add to the mixture. Then finely chop the dill (or herb fennel) and chives and also add to the bowl. Season with salt and pepper and then pour it into the pastry case.
Place your quiche or flan dish in the oven and cook for 25 minutes.
Notes
This Asparagus Quiche can be eaten hot, warm or at room temperature.
Keywords: asparagus, quiche, dill, chives
Did you make this recipe?
Tag @tastebotanical on Instagram and hashtag it #tastebotanical
(function(){ var buttonClass = 'tasty-recipes-scale-button', buttonActiveClass = 'tasty-recipes-scale-button-active', buttons = document.querySelectorAll('.tasty-recipes-scale-button'); if ( ! buttons ) { return; } /* frac.js (C) 2012-present SheetJS -- http://sheetjs.com */ /* bothEquals() avoids use of &&, which gets prettified by WordPress. */ var bothEquals = function( d1, d2, D ) { var ret = 0; if (d1<=D) { ret++; } if (d2<=D) { ret++; } return ret === 2; }; var frac=function frac(x,D,mixed){var n1=Math.floor(x),d1=1;var n2=n1+1,d2=1;if(x!==n1)while(bothEquals(d1,d2,D)){var m=(n1+n2)/(d1+d2);if(x===m){if(d1+d2<=D){d1+=d2;n1+=n2;d2=D+1}else if(d1>d2)d2=D+1;else d1=D+1;break}else if(x<m){n2=n1+n2;d2=d1+d2}else{n1=n1+n2;d1=d1+d2}}if(d1>D){d1=d2;n1=n2}if(!mixed)return[0,n1,d1];var q=Math.floor(n1/d1);return[q,n1-q*d1,d1]};frac.cont=function cont(x,D,mixed){var sgn=x<0?-1:1;var B=x*sgn;var P_2=0,P_1=1,P=0;var Q_2=1,Q_1=0,Q=0;var A=Math.floor(B);while(Q_1<D){A=Math.floor(B);P=A*P_1+P_2;Q=A*Q_1+Q_2;if(B-A<5e-8)break;B=1/(B-A);P_2=P_1;P_1=P;Q_2=Q_1;Q_1=Q}if(Q>D){if(Q_1>D){Q=Q_2;P=P_2}else{Q=Q_1;P=P_1}}if(!mixed)return[0,sgn*P,Q];var q=Math.floor(sgn*P/Q);return[q,sgn*P-q*Q,Q]}; buttons.forEach(function(button){ button.addEventListener('click', function(event){ event.preventDefault(); var recipe = event.target.closest('.tasty-recipes'); if ( ! recipe ) { return; } var otherButtons = recipe.querySelectorAll('.' + buttonClass); otherButtons.forEach(function(bt){ bt.classList.remove(buttonActiveClass); }); button.classList.add(buttonActiveClass); /* Scales all scalable amounts. */ var scalables = recipe.querySelectorAll('span[data-amount]'); var buttonAmount = parseFloat( button.dataset.amount ); scalables.forEach(function(scalable){ var amount = parseFloat( scalable.dataset.amount ) * buttonAmount; if ( parseFloat( amount ) !== parseInt( amount ) ) { var amountArray = frac.cont( amount, 9, true ); var newAmount = ''; if ( amountArray[1] !== 0 ) { newAmount = amountArray[1] + '/' + amountArray[2]; } if ( newAmount ) { newAmount = ' ' + newAmount; } if ( amountArray[0] ) { newAmount = amountArray[0] + newAmount; } amount = newAmount; } if ( typeof scalable.dataset.unit !== 'undefined' ) { amount += ' ' + scalable.dataset.unit; } scalable.innerText = amount; }); /* Appends " (x2)" indicator. */ var nonNumerics = recipe.querySelectorAll('[data-has-non-numeric-amount]'); nonNumerics.forEach(function(nonNumeric){ var indicator = nonNumeric.querySelector('span[data-non-numeric-label]'); if ( indicator ) { nonNumeric.removeChild(indicator); } if ( 1 !== buttonAmount ) { var indicator = document.createElement('span'); indicator.setAttribute('data-non-numeric-label', true); var text = document.createTextNode(' (x' + buttonAmount + ')'); indicator.appendChild(text); nonNumeric.appendChild(indicator); } }); }); }); }());
This recipe has been shared on #CookBlogShare with the Peachicks Bakery and #Fiesta Friday with Fiesta Friday
Loved this recipe? Checkout the Recipe Index.
0 notes
Photo

INTERCHANGEABLE INGREDIENTS LIST
Whenever a recipe calls for something you don’t have, use this list for Plan B. The ingredients not in bold can be substituted for those in bold and vice versa. Cooking times may vary a bit, but building some flexibility and adaptability into your everyday cooking will not only make it faster, but more enjoyable.
PRODUCE
Winter
BEETS: Turnips or rutabagas
CAULIFLOWER: Broccoli, broccoflower, Romanesco, or broccoli rabe
BRUSSELS SPROUTS: Cabbage
FENNEL: Celery
ORANGES: Grapefruit, pomelos, clementines, tangelos, or tangerines
COOKING GREENS LIKE KALE, CHARD, ESCAROLE, MUSTARD, BEET GREENS, OR BOK CHOY: All interchangeable; cooking time will vary depending on the thickness of their leaves and stems; or use cabbage
LEEKS: Onions, shallots, or scallions
JÍCAMA: Radishes, especially daikon; kohlrabi
PINEAPPLE: Oranges
Spring
ASPARAGUS: Green beans, snap peas, or broccoli rabe
LETTUCE AND SALAD GREENS LIKE ARUGULA, MESCLUN, ICEBERG, ROMAINE, SPINACH, AND SO ON: Raw, they’re all virtually interchangeable
TENDER GREENS FOR COOKING, LIKE SPINACH OR ARUGULA: Watercress or Napa cabbage
RHUBARB: Cranberries or tart cherries
FAVA BEANS: Lima beans or edamame (frozen are fine)
SNAP OR SNOW PEAS, OR FRESH PEAS: Frozen shelled peas
Summer
MANGO: Papaya or cantaloupe
BASIL: Cilantro, mint, chives, or parsley
PEACHES: Apricots, plums, or nectarines
CHERRIES: Currants, raspberries, blueberries, or grapes; for tart cherries, try cranberries
CUCUMBER: Celery, kohlrabi, or water chestnuts
CORN: Frozen corn
TOMATOES: Canned tomatoes
APRICOTS OR PLUMS: Dried apricots or plums
BELL PEPPERS: Mild cabbage like Napa or Savoy, or frozen bell peppers
Fall
SHALLOTS: Any onion, especially red, or the white part of leeks
EGGPLANT: Zucchini or summer squash; celery root
APPLES: Pears
SWEET POTATOES: Carrots, parsnips, or winter squash
PARSNIPS: Carrots
PANTRY AND FRIDGE STAPLES
STOCK: Water, wine, beer (to taste, of course)
NUTS AND DRIED FRUIT: Any nut or dried fruit can be substituted for another.
VINEGAR: Any type will work; lemon and lime juice too.
FISH SAUCE: Soy sauce
DRIED OR FRESH RED CHILES: Red Chile flakes or cayenne
COOKED/CANNED BEANS: Totally interchangeable
SOUR CREAM: Yogurt
HEAVY CREAM: Half-and-half (unless you’re whipping it)
CANNED/JARRED TUNA: Canned sardines
Herbs
CILANTRO: Parsley, basil
TARRAGON: Dill, mint, chives, chervil
ROSEMARY: Thyme, sage, oregano
SHALLOTS: Onions, leeks
LEMONGRASS: Lemon or lime zest
MEAT, POULTRY, AND SEAFOOD
GROUND BEEF: Ground pork, lamb, chicken, turkey, or duck
MEAT FOR STIR-FRY: Flank or sirloin steak; pork shoulder, leg, or loin; lamb shoulder; boneless chicken (preferably thighs)
MEAT FOR STEW: Boneless beef chuck or round, cubed beef brisket, pork shoulder or fresh ham (pork leg), leg of lamb or lamb shoulder.
PORK CHOPS: Bone-in chicken thighs (which will require more cooking) or pork medallions cut from the tenderloin (which will cook more quickly)
BONELESS, SKINLESS CHICKEN BREASTS: Boneless chicken thighs (they generally take a little longer to cook); pork chops or steaks; turkey or veal cutlets; tofu steaks
SALMON: Trout
COD: Halibut, hake
SNAPPER: Catfish
SHRIMP: Scallops, squid
MUSSELS: Clams (they’re heavier so go by count not weight)
0 notes
Text
youtube
Masterchef, The Professionals - Season 10 - Episode 2 (Nov 8, 2017)
Fruit Souffle Recipe [within 20 minutes]
Butter the mold, dust with nut/chocolate/herbs, & get them into the fridge. Butter needs to set, not melt w/ egg whites, to help it grease & rise up.
Chop some pistachios & sugar to dust mold, & give souffle some texture. Make sure the mold is coated all the way around.
Base of Souffle
200g strawberry puree 2 Tbsp cornstarch 1 Tbsp water Cook these ingredients down, & cool on pan in fridge
4 egg whites, room temperature 40g caster sugar Whip egg whites until stiff peak, before incorporating sugar. Adding sugar too soon will cause the egg whites to just drop. Slowly add sugar give time to mix.
Take mold & puree out of fridge. Scoop some puree & meringue & mix quickly in large bowl. If puree was not cold/room temp, it would destroy the meringue.
Fold in remainder of meringue & puree. Gently coax mixture into mold without knocking too much air out. Level top of mold & wipe down the exterior.
To help the souffle rise, run your finger along the edge. Put in oven for 6-7 minutes at 375-degree.
Garnish with a Crumble 60g unsalted butter 28g sugar (brown or white or a combination) 64g all-purpose flour
Grate cold butter into a large bowl. Add sugar & flour then, using a pastry cutter, work butter into flour & sugar until mixture forms coarse crumbs. Bake in oven for 4min.
Make light mix of strawberries & clotted cream to top souffle. Serve souffle topped with crumble & clotted cream.
Why does a Souffle Fall?
When the egg mixture is baked in a 350-degree oven, those air bubbles trapped in the egg whites expand, making the souffle rise. The heat also causes the protein to stiffen a bit, and along with the fat from the yolk, it forms a kind of scaffold that keeps the souffle from collapsing.
The first step in making an egg dish like meringue or a souffle, Buben says, is to separate yolks from whites, the fat from the protein.
The yolk has fat and some protein, but the white is all protein, no fat. "the chefs would say 'no goldfish.
So why is it so important to make sure there aren't any goldfish in the egg whites? Because remember, yolks have fat in them.
When you beat egg whites, you're basically mixing air into them. The protein in the egg whites forms a kind of skin around the bubbles of air. But if there's any fat present, the skin can't form and the air leaks away. Even a trace of fat is ruinous. So, no goldfish if you want a souffle.
Just the Right Amount of Air
There are some tricks to getting just the right amount of air into your egg whites.
Use a very clean bowl, Buben says, and keep a "nice, even flow of beating to incorporate the air. And you don't want to over-beat them & have too thick a mixture that it won't fold into your souffle or your batter or sponge."
He has a large, clean, stainless-steel bowl — some say copper bowls work better, but he's not convinced. He also has a large whisk & carton of fresh eggs
Crack the Egg on Flat Surface "You always want to crack an egg on a flat surface," Buben says. "What that does is it gives you less shell shatter, so that when you go to add it to a recipe, you won't get little shards of shell in your recipe. So it comes with a much cleaner crack, one crack on a flat surface."
Buben picks up his whisk and starts to work on the egg whites.
"Now what I like to do," he says, "is start in circle eights, just to break up the egg whites. Then you want to go in a circular motion. Turn your bowl at about a 15 degree angle, and just keep whipping it, and try to get as much air in as quickly as possible.
The Architecture of a Souffle
About four minutes later at a steady 180 beats per minute, our egg whites have transformed.
"What we're looking for now is nice beautiful peaks," Buben explains. "Some chefs I learned from say the point your meringue perfect is when you just lose the shine from the egg whites... And we're getting very, very close to that point."
He finishes beating, & the whites are as light as air. But their architecture is fragile, Buben says, "so you have to move very quickly with it, & be very gentle."
Move quickly because air can still leak out of the tiny protein pockets, & move gently because protein skins are thin & will collapse easily.
He uses his whisk to mix the egg yolks then uses a rubber spatula to gently add the stiff egg-white mixture to the yolks. He folds the two just until whites are incorporated, then places the whole thing into a baking dish.
When egg mixture is baked in a 350-degree oven, those air bubbles trapped in the egg whites expand, making the souffle rise. The heat also causes the protein to stiffen a bit, & along with the fat from the yolk, it forms a kind of scaffold that keeps the souffle from collapsing.
After six minutes, Buben checks on his omelet souffle. "Oh, isn't that beautiful," he says, pulling it from the oven.
The egg mixture has nearly doubled in volume.
Now I'd probably eat it as is, but Buben has bigger ideas. While the souffle was in the oven, he made a reduction of wine & shallots & stirred in butter. Now he spoons that mixture over the souffle, topping it off with a few shavings of black truffle.
A couple of glasses of red wine appear.
Jeffrey Buben's Omelette Souffle w/ Red Wine Butter Sauce
Omelette Souffle [Serves 2]
INGREDIENTS 4 eggs, separated 3/4 tsp salt 1/4 tsp freshly ground pepper 1/8 tsp freshly ground nutmeg 2 tbsp butter, softened 2 tbsp flour, for dusting
METHOD
Preheat oven to 375 degrees.
Brush inside of mid-sized dish w/ softened butter & lightly dust w/ flour.
Separate eggs. Whisk whites until stiff.
Whisk yolks until creamy & add seasonings.
Fold in eggs whites to yolk mixture & transfer to prepared baking dish.
Bake at 375 degrees for six minutes until golden.
OPTIONAL
You can add minced fresh herbs such as chives, chervil, parsley or tarragon to yolk mixture. You can also add gruyere cheese finely grated or any cheese of choice. A red wine butter sauce (see recipe below) with shaved fresh truffles is the ultimate option!
Red Wine Butter Sauce
INGREDIENTS
3 ounces red wine 1/4 ounce red wine vinegar 2 tbsp minced shallots 4 tbsp butter, unsalted and softened salt & freshly ground black pepper to taste
METHOD
In medium sauce pan over medium high heat, place red wine, red wine vinegar & minced shallots. Reduce this mixture until almost dry.
Remove from heat & whisk in soft butter a little at a time until a rich and smooth texture is achieved.
Season to taste.
Spoon into center of omelette souffle & serve immediately.
OPTIONAL
Shave thinly sliced black perigord or white alba truffles over souffle when serving.
0 notes
Text
Imbolc Recipes
I just wanted to put together a series of posts with some recipes that I’m interested in. I’m not taking any credit for these–link is in the title of the recipe.
Basic Recipe for Herb Butter
“The Herbal Pantry” by Emelie Trolley and Chris Mead
2 sticks unsalted butter
5 tablespoons chopped fresh herbs and/or herb flowers or 5 teaspoons dried herbs or 2 1/2 teaspoons herb seeds
1 teaspoon lemon juice or a few gratings of lemon zest
Salt and white pepper to taste, or dry mustard, paprika, cumin
Chop the herbs very fine or pulverize the seeds. Cream the butter and blend in the herbs and seasonings. Shape as desired and chill or freeze up to 6 months.
Suggested Combinations:
For fish and potatoes: Dill, mustard seed, parsley and a touch of lemon zest or a few mustard seeds
For tomatoes, zucchini, eggplant or beef: Thyme, garlic, chives, oregano and parsley
For fish, tomatoes, carrots and peas: Chives, mint and chervil
For chicken, veal, rice, and pasta: Sage, parsley and chives
For fish, chicken, or eggs: Tarragon or fennel, lemon zest and parsley
For lamb, chicken or fish: Basil and garlic
For potatoes, tomatoes, veal and salmon: Salad burnet, garlic chives and parsley
For beans, veal, beef and corn: Savory, marjoram and parsley
For cabbage, carrots, potatoes and bread: Caraway seeds and parsley
For pork, chicken and carrots: Aniseed, grated ginger and orange zest
For rice, chicken, pork, potatoes, peas or corn: Cilantro, cumin, parsley and dried red or fresh jalapeno pepper
For fish, chicken, pasta and rice: Basil, tomato paste and oregano
For potatoes, rice, pasta, beef, veal and chicken: Rosemary, chives, parsley and garlic
For fish, chicken or eggs: Tarragon, chives, chervil and white wine
For bread, vegetables, tuna, salmon and shrimp: Basil, thyme and parsley
For fish, chicken and veal: Anise hyssop, parsley and chives
For lamb, mussels, swordfish, chicken, peas, carrots, green beans and eggs: Mint, garlic and parsley
For grilled meats: Rosemary, savory, thyme, oregano, marjoram, lavender and garlic
For chicken, rice or eggs: Calendula petals, chives and parsley
For toast, scones and waffles: Scented geranium, rose, or pinks
71 notes
·
View notes
Text
[the_ad id=”3218″]
Green Goddess Dressing from Silken Tofu – Healthy, Plant-based, Oil-Free, Gluten-Free, Creamy Vegan Recipe
Easy | Servings: 10 | Ready In: 10 minutes | Yield: 2 ½ cups
Green Goddess Dressing is a classic recipe, celebrating the first flavors of Spring with a mixture of fresh herbs like tarragon, parsley, and chives. The traditional recipe uses mayonnaise and sour cream. This healthy, plant-based vegan version swaps out for silken tofu. Fresh lemon adds brightness while Dijon adds a subtle tang. Use this to top Quinoa-Stuffed Sweet Potatoes with Green Goddess Dressing, Chickpea Garden Veggie Burgers, Twice-Baked Smoky, Cheezy Stuffed Potatoes, on salad, or as a dip for crudité vegetables.
Ingredients
1 (16-ounce) package organic silken tofu
1 clove garlic
2 tablespoons Dijon mustard
1 tablespoon lemon juice
1/4 cup (.75 ounces) fresh tarragon
1 bunch parsley, stems removed
2 tablespoons chives
3 green onions, green parts only
1/4 teaspoon salt
1/4 – 1/2 cup water, as needed
How it’s Done
To make the Green Goddess Dressing: Combine all ingredients except the water in a blender. Puree until smooth. With the motor running, drizzle in the water until you get a thick, yet pourable, consistency. You want something similar to thick sour cream. Taste to adjust seasoning.
Serve slightly chilled.
Use this to top Quinoa-Stuffed Sweet Potatoes with Green Goddess Dressing, Chickpea Garden Veggie Burgers, Twice-Baked Smoky, Cheezy Stuffed Potatoes, on salad, or as a dip for crudité vegetables.
Green Goddess Dressing from Silken Tofu – Healthy, Plant-based, Oil-Free, Gluten-Free, Creamy Vegan Recipe
Chef Katie’s Tips:
Other Herbs: Use up other fresh herbs in this dressing. Chervil, cilantro, and basil bring slight flavor variations. Avoid using woodsy herbs like rosemary or sage. Their flavors are too strong.
Make it Raw: For a raw version of this, swap out the tofu for 1 cup of raw cashews + 1/2 seedless cucumber. Soake the cashews overnight to soften. Drain and rinse the soaked cashews before pureeing with the other ingredients.
Oil-Free: I’m on a mission to get rid of empty calories, and oil is one of the biggest culprits. This oil-free dressing uses the healthy fat of whole walnuts for a rich, creamy flavor. The walnuts have other key nutrients (like calcium and iron) while oil is just fat.
#gallery-0-5 { margin: auto; } #gallery-0-5 .gallery-item { float: left; margin-top: 10px; text-align: center; width: 50%; } #gallery-0-5 img { border: 2px solid #cfcfcf; } #gallery-0-5 .gallery-caption { margin-left: 0; } /* see gallery_shortcode() in wp-includes/media.php */
Use Green Goddess Dressing on Quinoa Stuffed Sweet Potatoes
Silken tofu provides rich, creamy texture
Watch to Learn More:
youtube
Nutrition Facts
Nutrition Facts Servings 10.0 Amount Per Serving calories 38 % Daily Value * Total Fat 3 g 5 % Saturated Fat 0 g 2 % Monounsaturated Fat 1 g Polyunsaturated Fat 1 g Trans Fat 0 g Cholesterol 0 mg 0 % Sodium 63 mg 3 % Potassium 79 mg 2 % Total Carbohydrate 2 g 1 % Dietary Fiber 0 g 1 % Sugars 0 g Protein 4 g 8 % Vitamin A 6 % Vitamin C 6 % Calcium 15 % Iron 14 % * The Percent Daily Values are based on a 2,000 calorie diet, so your values may change depending on your calorie needs. The values here may not be 100% accurate because the recipes have not been professionally evaluated nor have they been evaluated by the U.S. FDA.
Shopping and Gear List
FISHER Chef’s Naturals Chopped Walnuts, No Preservatives, Non-GMO, 10 oz
BUY NOW
<br />
Green Goddess Silken Tofu Dressing – Oil-Free, Vegan Easy | Servings: 10 | Ready In: 10 minutes | Yield: 2 ½ cups Green Goddess Dressing is a classic recipe, celebrating the first flavors of Spring with a mixture of fresh herbs like tarragon, parsley, and chives.
#10 minutes or less#chives#creamy#dressing#easy#gluten free#green#green goddess#parsley#salad#spring#tarragon#tofu
0 notes
Text
The word Ravigote means, literally, “pick me up” and it is applied to minced tarragon, chervil, chives and parsley, the herbs being kept separate and served with salad on four little saucers. Ravigote butter, made by kneading butter with the four herbs and adding pepper, salt and lemon juice, spread between thin slices of bread, makes delicious sandwiches.
How to make pure food, better food and to economize on the cost of same is just now taxing the attention and ingenuity of domestic science teachers and food experts generally. The average cook is intensely interested in the result of these findings, and must keep in touch with them to keep up with the times and run her home in an intelligent and economical as well as healthful routine.
The simple desserts are the best desserts, and none is more pleasing to the eye and the palate or so easily made or so frequently served in an imperfect manner, than custards.
Vanilla and lemon have an almost universal appeal to the palate, and knowing this, the American cook, like the generation before her, has always seasoned her rice puddings, for instance, with one or the other, just as her apple sauce has invariably been flavored with lemon or nutmeg, her bread pudding with vanilla, and so all along her restricted line.
An ordinary bread pudding becomes veritably a queen of puddings as, indeed, it is called, merely by having a layer of jam through its centre and a simple icing spread over the top.
I didn’t have to stir it quite as often as I usually do when I make jam, and I think it was because the heat was coming at the peaches equally from all sides of the pot which helped cook everything at the same pace, and made my cooking job easier since I didn’t have to hover around the pot. They are particular, however, to be consistent in the use of garnishings.
Flowers and fruits are reserved for sweet dishes, except in the case of nasturtiums, which they regard as much a vegetable as a flower and use freely with meats. It isn’t essential that every dish should be turned into an elaborate work of art.
Creamed Honey & Rose Popsicles and Viola Mini Pavlovas
Servings: 4-6
Time: 1hr 15mins
Difficulty: easy
Print
Before using lemons for any purpose, always roll them awhile with your hand on a table. This will cause them to yield a larger quantity of juice.
Ingredients
1 cup raw shelled nuts
1/4 cup light brown sugar
2 tablespoons unsalted butter
2 teaspoons rosemary
1 teaspoon flake sea salt
1/2 teaspoon chili flakes
Directions
In a large bowl, mix together the flour, salt, baking powder, baking soda, and cinnamon. Mash the raspberries; add half the sugar and the lemon juice. Put the remaining sugar and half the cream in a double boiler; stir until the sugar is dissolved, and stand aside to cool; when cold, add the remaining cream, turn the mixture into the freezer, and stir until partly frozen.
Place the pans in the oven and bake for 40-50 minutes, or until they’re golden around the edges. In making pies of juicy fruit, it is a good way to set a small tea-cup on the bottom crust, and lay the fruit all round it. The juice will collect under the cup, and not run out at the edges or top of the pie.
A pint of any kind of fruit juice may displace the water, when a teaspoonful of lemon juice should be added to the contents of each glass before stirring in the soda.
Preheat the oven to 350 degrees Fahrenheit. Grate the chocolate, put it in a double boiler with the milk; stir until hot, and add the sugar, vanilla, cinnamon and one pint of the cream. When cold, freeze; when frozen, remove the dasher and stir in the remaining pint of the cream whipped to a stiff froth.
In a large bowl, mix together the flour, salt, baking powder, baking soda, and cinnamon. Mash the raspberries; add half the sugar and the lemon juice. Put the remaining sugar and half the cream in a double boiler; stir until the sugar is dissolved, and stand aside to cool; when cold, add the remaining cream, turn the mixture into the freezer, and stir until partly frozen.
Tips & Tricks: Fruit pies with lids, should have loaf-sugar grated over them. If they have been baked the day before, they should be warmed in the stove, or near the fire, before they are sent to table, to soften the crust, and make them taste fresh. Raspberry and apple-pies are much improved by taking off the lid, and pouring in a little cream just before they go to table. Replace the lid very carefully.
There are three or four which can be touched upon. To have a thorough understanding of their goodness one must not only read about them but taste them. The frequent experience of the cook living in the country or suburbs these days to receive unexpected visits from friends who are touring in automobiles, and she finds she must have something attractive, dainty and nourishing ready at a moment’s notice to supplement the cup of tea or coffee so welcome after a hot, dusty trip.
It is impossible to deal in a short article with the many varieties of Summer Sausage, but there are three or four which can be touched upon. To have a thorough understanding of their goodness one must not only read about them but taste them. They are the staple diet in many foreign countries and in the Armour brand the native flavoring has been done with remarkable faithfulness—so much so that large quantities are shipped from this country every week to the countries where they originated.
Fear no mess; it just means you’re a normal, functioning human being.
It is a wise plan to keep a variety of Summer Sausage on hand, as in a very few minutes delicious sandwiches may be prepared with this, these sandwiches having the charm of novelty. It is impossible to deal in a short article with the many varieties of Summer Sausage, but there are three or four which can be touched upon. To have a thorough understanding of their goodness one must not only read about them but taste them. They are the staple diet in many foreign countries and in the Armour brand the native flavoring has been done with remarkable faithfulness—so much so that large quantities are shipped from this country every week to the countries where they originated.
The two classes of cakes-butter and sponge-are treated in detail both as to the methods of making and the required ingredients, and numerous recipes are given which will enable the cook to provide both plain and fancy cakes for ordinary and special occasions.
Puddings that are prepared by boiling, steaming, and baking, and the sauces that make them appetizing, receive a goodly share of attention. Pastries and Pies completes this volume, rounding out, as it were, the cook’s understanding of dessert making.
There is inspiration in the art that enters into the production of a French dinner, in the perfect balance of every item from hors d’oeuvre to café noir, in the ways with seasoning that work miracles with left-overs and preserve the daily routine of three meals a day from the deadly monotony of the American régime, in the garnishings that glorify the most insignificant concoctions into objects of appetising beauty and in the sauces that elevate indifferent dishes into the realm of creations and enable a French cook to turn out a dinner fit for capricious young gods from what an American cook wastes in preparing one.
To have a thorough understanding of their goodness one must not only read about them but taste them. They are the staple diet in many foreign countries and in the Armour brand the native flavoring has been done with remarkable faithfulness—so much so that large quantities are shipped from this country every week to the countries where they originated.
Creamed Honey & Rose Popsicles and Viola Mini Pavlovas The word Ravigote means, literally, “pick me up” and it is applied to minced tarragon, chervil, chives and parsley, the herbs being kept separate and served with salad on four little saucers.
0 notes
Text
The BEST Deviled Eggs
When we first purchased chickens we hadn't thought through the fact that we were 2 people with a dozen laying hens. That meant 12 eggs about every 26 hours. We certainly had no trouble finding people we could gift our beautiful eggs to, but we also wanted to come up with delicious ways to use some of the excess ourselves. I've always loved deviled eggs but when I came across this recipe and altered it just a tad, we both agreed that we had a winner on our hands.
Deviled eggs are a classic and delicious way to not only use up eggs but to also make something easy and satisfying for appetizers or lunches. This is the perfect old-fashioned recipe kicked up a bit.
Deviled EggsMakes 1 dozen6 large eggs2 Tablespoons mayonnaise1 Tablespoon sour cream1/2 teaspoon white vinegar1/2 teaspoon mustard (Dijon, course or spicy brown all work well)1/4 teaspoon granulated sugar or sweetener (I use coconut or date sugar)1/8 teaspoon salt1/8 teaspoon pepperCook the eggs. **If you're using farm fresh eggs the best way I've found to make peeling the cooked egg easy, is to keep the egg refrigerated until the water is boiling. Add the eggs, carefully, to the boiling water and continue.** (I boil mine on a soft boil, covered by 1 inch of water, for 5 minutes, remove from heat and let sit another 10 minutes - you can use your preferred method). Cool cooked eggs in cold water or an ice bath to cool.Crack and peel the eggs. Halve each egg lengthwise and transfer the yolks to a medium-size bowl. Using a fork, lightly mash the yolks. Stir the remaining ingredients into the yolks. Fill the 12 halves with the yolk mixture.Serve immediately or store in the refrigerator until serving.**great additions are paprika, chopped fresh parsley, scallions, chives, tarragon or chervil sprinkled over the top**
The BEST Deviled Eggs was originally posted by My Favorite Chicken Blogs(benjamingardening)
0 notes
Link
Tarragon Adds a French Twist to Your Meals none Tarragon (pronounced TEHR-uh-gon) or Artemisia dracunculus is an herb that is popular in the world of cooking. In fact, tarragon is such a vital part of French cuisine that it is one of the "Fines Herbes." These are the four most commonly used herbs in French cuisine, which also includes parsley, chervil and chives.1 Tarragon is known for its slightly bittersweet flavor, with an aroma similar to anise.2 The earliest records of tarragon date back to more than 600 years ago. It was believed to have been introduced to Italy in the 10th century during the time of the Mongol invasions. The Mongolians used tarragon as a sleep aid, breath freshener and seasoning. After this turbulent period, some tarragon histories have St. Catherine of Siena bringing tarragon back to France after a visit with Pope Clement VI.3 However, she could not have done this as she was only 5 years old when Clement VI4 died. While other histories have tarragon arriving in France in the 1500s, if St. Catherine was the one who brought it to France, most likely it was after her visit to see Pope Gregory VI in 1376.5 The Different Health Benefits of Tarragon Tarragon contains various nutrients and essential oils that can provide a multitude of benefits. The most well-known ones include: Pain Relief Chewing the leaves can help relieve pain, especially in the mouth or tooth. You can consume tarragon tea to get the same benefit. Induce Sleep Drinking tarragon tea can help those with insomnia. The calming effect of the herb's compounds can help you rest well at night. Increase Appetite If you're having trouble getting your appetite up, try consuming tarragon. It's been reported to have stimulating properties for your stomach. Promote Reproductive Health in Females Tarragon can help maintain a healthy female reproductive tract, and may also help women deal with suppressed menstruation. Improve Intestinal Function Tarragon is a vermifuge, meaning it can help expel parasitic worms from the intestines. As a result, this lowers your risk of developing intestinal ailments and malabsorption. Cardiovascular Health Your heart and arteries can benefit from tarragon greatly, because it acts as an inhibitor of platelet aggregation. As a result, the risk of developing a heart attack or a stroke is potentially lower. The Different Uses of Tarragon Tarragon is versatile and can be used in various types of dishes, such as:6 • Potatoes: Spice up a potato salad by sprinkling tarragon over it. • Eggs: Add new layers of flavor to classic egg dishes such as deviled eggs. • Seafood: Bring out a wonderful aroma to various fish such as salmon and tuna using tarragon. You can also sprinkle it on clams and scallops. • Poultry: Give your roasted chicken a flavor boost by covering it with tarragon before cooking. • Sauces: Tarragon can make your sauces taste better. You can add it to sour cream, lemon sauce, pesto and other sauces. How to Grow Tarragon in Your Own Home Growing your own herbs is a convenient way of having fresh ingredients ready whenever you need to use them for cooking. Aside from that, you have the benefit of avoiding pesticides and other chemicals that may have been used in commercially grown herbs. In the case of tarragon, planting it should start indoors with a small pot. The soil should be fertile, well-draining and should have a pH level between 6.5 and 7.5. Once these requirements are met, plant four to six seeds around April, or before your area's last expected frost. Place the pot in a room location that has low light and at room temperature.7,8 When it comes to watering the plant, do it regularly, using only an average amount of water. You must allow the soil to go almost dry before watering again, or else the seedlings will suffer. After 10 to 14 days of regular watering, the seeds will start to grow. Then, transfer the pot outdoors where it can receive full sunlight.9,10 Once the seedlings reach around 2 inches in height, start thinning them down to one plant. Choose only the healthiest or strongest looking seedling. In about seven weeks, the plant will be ready for harvesting. A good indicator for harvesting is when the plant reaches a height between 12 and 36 inches.11,12 Growing Tarragon Completely Indoors If circumstances won't allow you to grow tarragon outdoors, you can grow it inside the house using plant-growing lights. You can use standard fluorescent lamps, but a high-output T5 fluorescent or high-intensity discharge (HID) lamp will produce higher-quality leaves. Regarding the position of the lamp, a standard fluorescent or HID lamp should be 2 to 4 inches above the plant. But if you're using a T5 lamp, place it 1 foot above the plant.13 Harvesting and Storing Tarragon There's no specific time to harvest tarragon. Once your plant reaches a height between 12 and 36 inches, it's ready for harvesting. Use kitchen shears when picking off the leaves because they are very delicate. If you use your hands, you risk releasing the aromatic oils inside the leaves. Once you have gathered enough, wash them with cool water and gently pat them dry.14 Storing tarragon is easy. Simply wrap a bunch of leaves in a damp paper towel and place it inside the refrigerator. You can also place the leaves inside a plastic bag or in a jar filled with water that's lightly covered with plastic. It's important that the leaves are not dried, because they will lose their flavor and nutrients.15 Cooking With Tarragon: Creamy Tarragon Chicken Poultry pairs well with tarragon and any dish that combines these two is guaranteed to be a hit. In this recipe, you'll learn how to make a creamy tarragon sauce that goes very well with chicken. It's something that you and your family will enjoy.16 Creamy Tarragon Chicken Ingredients: • 4 boneless and skinless pasture-raised chicken breasts • 1/4 teaspoon of Himalayan salt, plus more to taste • 1/4 teaspoon of freshly ground pepper, plus more to taste • 3 teaspoon of coconut oil • 1/4 cup of finely chopped shallots • 1 tablespoon of Dijon mustard • 1 tablespoon of homemade sour cream • 1 tablespoon of chopped fresh tarragon Procedure: 1. Season the chickens on both sides with 1/4 teaspoon each of salt and pepper. Heat 1 1/2 teaspoons of coconut oil in a large heavy skillet over medium-high heat. Add the chickens and cook until well browned, about 3 minutes per side. Transfer to a plate and tent with foil. 2. Reduce the heat to medium. Add the remaining 1 1/2 teaspoons of oil to the pan. Add shallots; cook, stirring, until softened in about 2 to 3 minutes. Add broth and bring to a simmer. Cook until juices are reduced by half, for about 3 minutes. 3. Return the chicken and any accumulated juices to the pan; reduce heat to low. Simmer until the chicken is cooked through, about 4 minutes. Transfer the chicken to a warmed platter. Stir mustard, sour cream and tarragon into sauce. Season to taste with salt and pepper and spoon over the chicken. Tarragon Can Also Be Used as an Essential Oil Aside from its culinary uses, tarragon can also be made into an essential oil with aromatherapeutic properties. It has a wide variety of benefits, which include:17 • Deodorizer Tarragon essential oil has effective antimicrobial properties. When diluted and applied on your underarms, it can help prevent the development of bad odor. • Antirheumatic Tarragon oil can help improve the flow of blood throughout the body and eliminate a toxin called uric acid. With these two benefits working together, the risks of developing rheumatism and arthritis are reduced. • Circulatory Improved blood flow throughout your body is one of the circulatory benefits of tarragon. It helps improve the distribution of oxygen, various nutrients and antioxidants in your body to keep your health in optimal condition. • Stimulant Tarragon essential oil has a stimulating effect on your brain, nervous, digestive and endocrinal systems, which helps support growth and improve your immune system. Making tarragon essential oil is a simple process. The leaves are harvested, distilled and then packaged for use. The resulting oil is usually colorless, but in some cases it may have a slight green color. The aroma is reminiscent of anise or fennel, and has a slightly spicy taste. There are a few methods in which you can use the oil: • Massage: Mix 3 to 4 drops of tarragon essential oil with a carrier oil, and then massage the mixture to your body to receive its therapeutic benefits. • Bathwater: Add tarragon essential oil to your bathwater and soak in it so your body can feel refreshed afterwards. • Hot compress: Add tarragon essential oil to your hot compress or use it as a tummy rub to help kill intestinal worms. • Toothache reliever: Mix 1 or 2 drops of tarragon essential oil in a cup of warm water, then gargle the mixture to help alleviate toothaches. Before using tarragon essential oil, you must be aware of its potential side effects. It contains estragole, also known as methyl chavicol, which can be poisonous in high doses. Children and pregnant women should avoid using tarragon oil for safety reasons. Nevertheless, in controlled doses, the benefits can typically be enjoyed without any serious complications. Just consult with your doctor first before using the oil for proper guidance. 18 After you've been permitted to use the oil, do a skin patch test on your arm. Simply place a diluted drop on your skin to check for any irritations or allergic reactions. Should any side effects occur, stop using the oil immediately.
0 notes