#But by the time I made it to Upper pattern 3 is was late October
Explore tagged Tumblr posts
Text
Getty Tomb, Graceland Cemetery
Carrie Eliza Getty Tomb
Graceland Cemetery, Chicago IL
1890
Louis H. Sullivan, architect
by Roger Jones, August 2024
My photos from 8-3-2024:


Henry Harrison Getty commissioned this tomb for his late wife, Carrie Eliza Anderson Getty, in 1890. He engaged the firm of Adler and Sullivan for its design, admiring both Louis Sullivan's local buildings and his design for the tomb of Martin Ryerson, Getty's partner, of 1889. One source indicates that Getty was also on the board of the Adler & Sullivan-designed Auditorium Building. Both the Getty and Ryerson tombs, as well as Sullivan's grave, are located in Graceland Cemetery, Chicago.
The structure faces east on a small triangle of land bounded by cemetery roads. It is the only structure on a plot, located in the northwest part of the cemetery.
The Getty tomb is only of only three mausoleums designed by Sullivan between 1889 and 1892, the third being the Wainwright tomb in Bellefontaine Cemetery, St. Louis.
From the HABS report:
The construction is of blocks of grey Bedford limestone, with bronze gates and inner door. The rectangular block of the monument rests on a stylobate of four single stones, and the lower half of the wall is of smooth ashlar masonry. The upper half of the wall has an over-all incised pattern of octagonal panels enclosing eight-pointed stars, and above this is an enriched cornice with three scallops constituting the roof. On the front and two sides are large arches springing from the ashlar base to cover the door and the side lunettes.
A further description:
The quiet elegance of this tomb celebrates life amidst the cemetery's somber environment of death. An architectural writer once described it as being "as near perfection as mortals are allowed to approach." Its beauty is achieved through a combination of simple geometric shapes and rich delicately proportioned ornamentation.
Yale University Library, Digital Collections
Architect Frank Lloyd Wright remarked of the structure that it was "entirely Sullivan's own, a piece of sculpture, a statue, a great poem addressed to human sensibilities as such. Outside the realm of music, what finer requiem?"
Notes the HABS report:
The design for the Getty Tomb received much praise from abroad. In 1900, at a time when Sullivan's commissions were very few, a plaster cast of the tomb doorway was being shown at the Paris Exposition.
There is a poem by Marge Piercy, visiting a dead man on a summer day, about Sullivan and his Getty tomb.
Frank Stella's work entitled Getty Tomb is a comment on the immense darkness and sorrow of death.

Frank Stella, Getty Tomb, 1967. Lithograph. Whitney Museum of American Art
Interred in the mausoleum:
Carrie Eliza Anderson Getty
1843 - 20 February 1890
Henry Harrison Getty
20 September 1836 - 28 March 1919
Alice Eliza Getty
15 October 1858 - 12 June 1946


Left: Henry Harrison Getty
Right: Alice Eliza Getty
I have yet to discover a photograph of Carrie Eliza Anderson Getty.
Alice Eliza Getty, about whom the most information is available, seems to have lived a rather fascinating life. She was a musician, composer, author, and art historian. She was the daughter of Henry H. Getty [1], a rich businessman who made his money in lumber. After the death of Alice's mother Carrie Eliza [2] in 1890, her father Henry retired from business and traveled widely in Europe and Asia with his daughter, along the way establishing an Asian art collection. He and Alice lived in Paris, Henry dying there in 1919. Alice continued to live in Paris until 1939, and spent her last five years in New York. Illustrations in her book The Gods of Northern Buddhism (published 1914 and 1928) came from the collection of her father. At some point, she lived in a Buddhist monastery in Japan. Alice is one of the pioneers of the Western study of South Asian art. [3]

Photograph from National Register of Historic Places Inventory - Nomination Form

The tomb's ornamental cast bronze gates and inner door were executed by the Yale and Towne Mfg. Company. The bronze door reportedly took an artisan and assistant a year to create and weighs 1,100 pounds. Plaster casts were made of the inner door, and exhibited in Paris at the Exposition Universelle of 1900 (winning Sullivan an award), and at the Art Institute of Chicago.
Image: Chicago Architectural Photographing Co. [Chicago]. Archival image collection, Art Institute of Chicago.
Data: Findagrave.com

The plaster cast of the door. Source: Building 51 Museum


Details of Historic American Buildings Survey drawings.

Grave of Louis Henri Sullivan, Graceland Cemetery.
NOTES:
[1] Below is a biographical sketch of Getty from the Book of Chicagoans (1905), p. 231: "Getty, Henry Harrison, capitalist; Batavia, N.Y., 1836; s. Adams Getty; removed with parents in 1848 to Waukegan, Ill.; ed. public schools of Batavia, N.Y., and Waukegan, HI.; m. I864, Carrie E. Anderson, of Muskegon, Mich.; 1 daughter. On leaving school in 1856, went to Muskegon, Michigan, and was engaged in general store, 1856-9; entered employ of Ryerson and Morris, saw-mills, Muskegon, 1879, and soon became supt. and foreman of the mill; bought interest in firm, 1865, which became Ryerson, Hills & Co.; in 1867 bought an interest in the Chicago business of Martin Ryerson & Co., and removed to this city to take charge of the yards; retired from business in 1892. Clubs: Chicago, Union League. Office: 204 Dearborn St."
HABS No. ILL-1045, Getty Tomb
[2] Carrie Eliza Anderson was born in Skein, Skien kommune, Telemark fylke, Norway in 1843, and was living in Muskegon, Michigan by the time she was 18. Her husband was Henry Harrison Getty, born in Batavia, New York. They were married in Muskegon, Michigan on November 9, 1864. She died February 24, 1890 (aged 46–47), in Cook County, Illinois.
Findagrave.com
[3] ...Alice Getty, an only child, was born in Muskegon, Michigan, near the miles of pine-forests owned by her "lumberman" father. The family travelled extensively.... Her father...announced his intention of retiring when he was fifty in order to travel and to collect Far Eastern art....At that time [1890] Miss Getty's mother had died, and she became her father's companion in his collection-travels in Europe and Asia. The Gettys, with the ever-increasing collection, eventually settled in Paris. The largest and most important part of the collection consisted of images of deities of the Hindu Buddhist Pantheon, but Mr. Getty did not limit his field. His beautiful musical instruments were presented to the Metropolitan Museum of Art in New York by his daughter; she also gave his collection of Persian shawls and a fine stone Maitreya to the Art Institute in Chicago. Miss Getty's extensive acquaintance with the scholars who were later to become her friends and colleagues now began. Among her most intimate friends later on were the great Sanskritist, the late Mr. Sylvain Levi, the late Mr. Joseph Hackin of the Musee Guimet, and the late M. Paul Pelliot. European scholars recognised her abilities immediately. But until about 1907, her own great interest had always been music. She wanted to compose and for some years she studied harmony and composition with Vincent D'Indy. She wrote the music for various French poems and several of these songs had been successfully published, when her father's suggestion that she write a catalogue of his collection of Buddhist deities, changed her entire life. She put the songs aside, temporarily, as she thought, but research in Asiatic art claimed her thereafter, and she never returned to music again. She must have been naturally a scholar. The catalogue was undertaken in the most professional manner. She worked with deliberation and with meticulous care. At that time there was a dearth of material on Buddhist iconography; and during the six unhurried years when Miss Getty was working on the catalogue, she and her father made three journeys to India and the Far East. In I914, the Oxford Clarendon Press published "The Gods of Northern Buddhism", which at once took the place which it still holds as the authoritative book on the subject. During the first World War Miss Getty gave all her time to working for the blinded soldiers. She had a Braille printing-press installed in her apartment and superintended the printing of many books. For her admirable work she was afterward decorated by the French government.
Alice Getty. Author: Florance Waterbury Source: Artibus Asiae , 1946, Vol. 9, No. 4 (1946), pp. 346-348.
Links:
Photographs of the mausoleum by James Caulfield, including views of the interior, are here:
A video tour of the tomb interior can be viewed here [notice the creepy death mask of Henry H. Getty above the door, presumably put there by Alice]:
#Getty#tomb#mausoleum#graceland#cemetery#Louis Sullivan#Henry Getty#Carrie Eliza Getty#architecture#chicago#buildings#history#Alice Eliza Getty#monument#landmark#photography
5 notes
·
View notes
Text
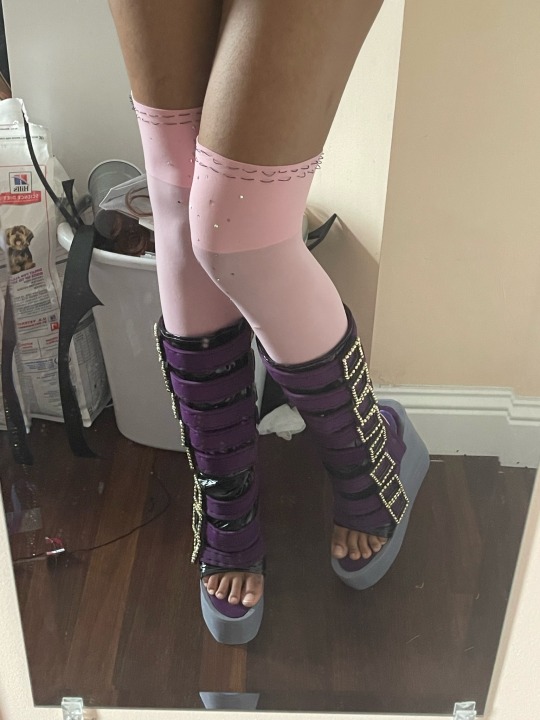

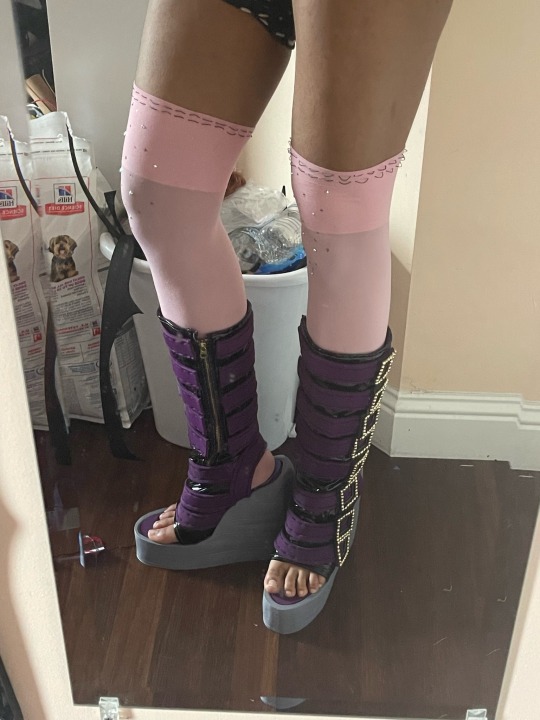
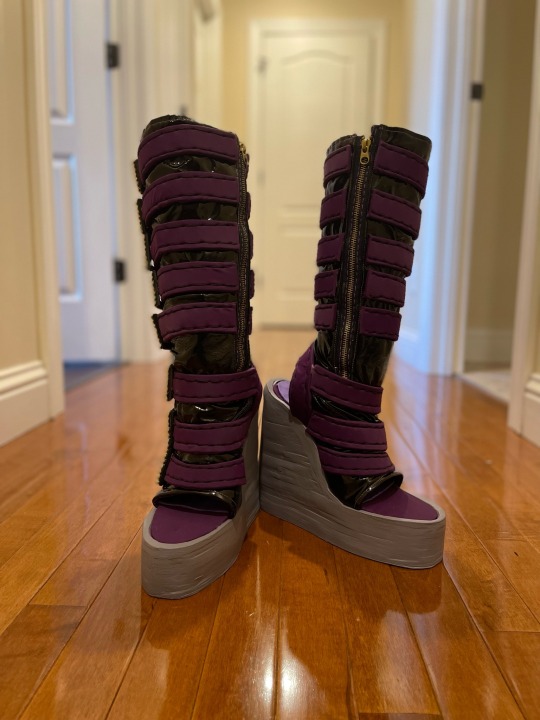
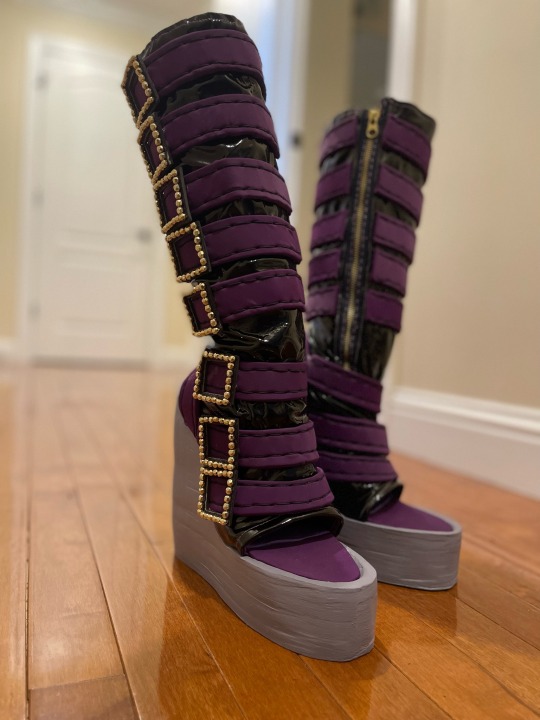
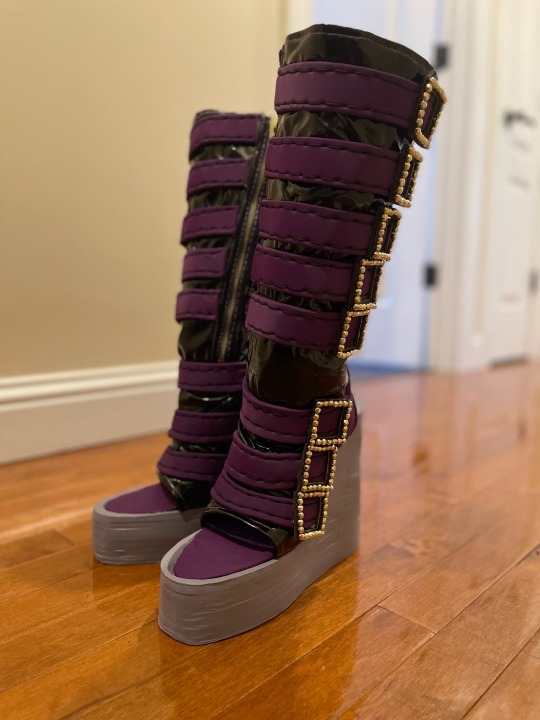

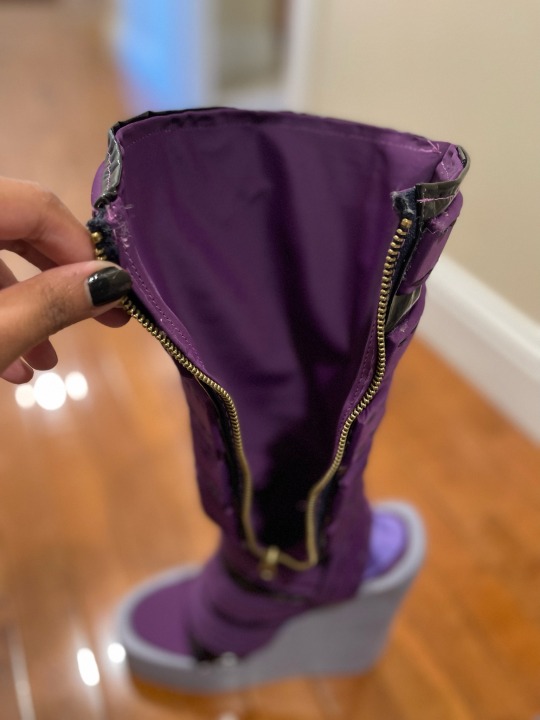

Made some shoes for a cosplay project that’s 2 (almost 3!) months overdue 🥲
•
These are my first pair of shoes I’ve made by hand since discovering/ picking up the skill way back in May 💜💜💜
They’re pretty comfortable for the most part and mostly came out the way I wanted. The only thing I wish I’d done better were the outsoles, but I sculpted those by hand with EVA foam, a dremel, crafting knife and sandpaper so 🤷🏾♀️
•
[MATERIALS]
Uppers are a Faux Stretch Patent Leather
Lining is a Spandex Jersey
Interfaced with Cotton Canvas on the vamp and a knit interfacing on all the stretch fabrics
Insole is Texon Board wrapped in the jersey with a steel shank and cork sheet to fill the gaps
Outsole is 6mm EVA-70 + 2mm Hard-Lite EVA foam painted with acrylics
Sock liner is 1mm Form-Lite EVA foam + Cork sheeting wrapped in Polyester Satin
Embellishments are 4mm EVA foam wrapped in the jersey and Gold beading glued to 2mm Hard-Lite EVA foam and cut to shape
#DAMN COSPLAY CONTENT WOW#cosplay#cosplayer#cosmaker#black cosplayer#asian cosplayer#cosplayer of color#shoemaking#handmade shoes#cosplay shoes#clawdeen wolf#Clawdeen wolf cosplay#Clawdeen Wolf boots#I had to remake the Upper pattern 3 times#I’d actually begun working on these in late August early September#But by the time I made it to Upper pattern 3 is was late October#I’m a uni student in a theatre degree and this semester was SOOO busy for me#I would’ve liked to have gotten them done earlier but hey they’re done now!#and they cute! I’m so happy with them#I should be getting into the full cosplay soon enough keep an eye out#I had to bead the belt buckles bc out Michaels doesn’t stock value size rhinestones anymore
12 notes
·
View notes
Text
Role Club Engineers: Worth the Wait?
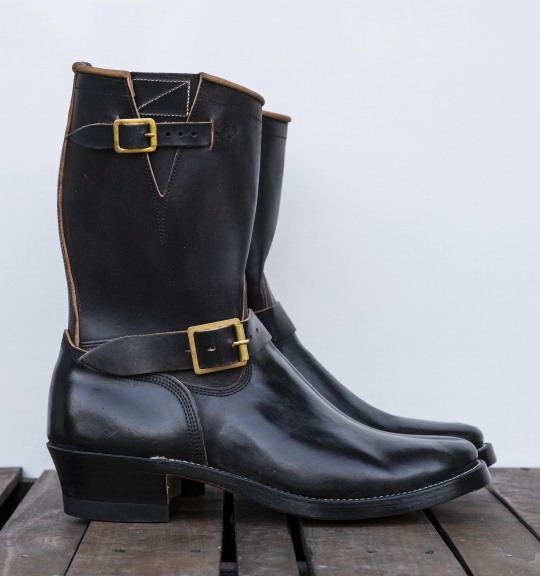
Introduction (Part I): History of Engineer Boots
Engineer boots are definitely a polarizing style of footwear within the heritage/amekaji boot community. For one, they utilize an ankle strap for fastening in lieu of laces, and second, their tall stovepipe shafts don’t integrate quite well with the slim tapered esthetic of modern denim/trousers. While often associated with motorcycles and bikers, engineer boots were actually designed as protective gear for firemen working on railway engines back in the 1930s. (Hence the name “engineers.”) Their minimal design and use of buckles over laces made them ideal for this line of work. The tall shafts provided protection for the lower leg, while the slip-on design allowed for quick removal should anything dangerous (such as hot coals or embers) slip down the shaft into the boot. This style of footwear lost some popularity following the introduction of lace-up combat boots during World War II, but would later be picked up by motorcyclists who found use of their insulating and protective features. (And there is your history lesson for the day, courtesy of Wikipedia. Lol)
Introduction (Part II): How I Got into Engineer Boots
I first got into more well-made boots back in early 2019. Like most boot n3wbs, I was completely infatuated by that lace-up service boot esthetic, and insisted on wearing them with the slimmest, most tapered denim I could find. My first boot purchase was (of course) a pair of Red Wing Iron Rangers, followed by three pairs of Truman service boots in pretty quick succession. That first summer was when I discovered @brianthebootmaker on Instagram and YouTube, and instantly fell in love with his Underdog design, which I later purchased in August 2019 and received in May 2020.
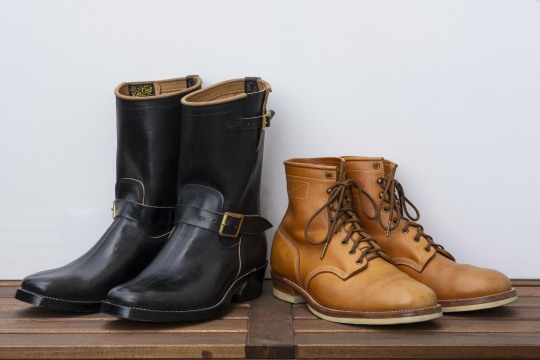
At that point in time, Brian’s popular Underdog boots fit perfectly within my slim service boot style. However, Brian’s most iconic boot pattern was (and is) definitely his engineer boots. I admit I wasn’t sold on them at first, but I was intrigued. Did they fit my wardrobe at all? Nope. Would they even fit under the 6.75” leg openings of my PBJ denim? LOL nah. Nevertheless, I found myself constantly going back to Brian’s Instagram page and browsing all the photos of his engineer boots. Eventually, I grew to really love the look of engineer boots, ultimately placing a second deposit with Brian for a pair of engineers in October 2019. I had no idea how I was going to fit them into my wardrobe, but I figured I’d make it work somehow. (Luckily, since then my denim preferences have actually shifted toward more relaxed cuts, just in time for the arrival of these engineers.)
The Ordering Process
For most customers purchasing online, Brian requires you to take a set of measurements on your own feet, which he uses to build your boots remotely. However, those lucky enough to live nearby can actually visit Brian’s shop in LA to be personally measured by the boot maker himself, as well as discuss any details or questions you have regarding your specific makeup. I was one of these lucky people who could actually visit him in person, and used those measurements to order two pairs of boots from him: first a pair of Underdogs, and now some engineers. Both pairs were built on different lasts (which I will discuss more later), and both fit perfectly. (For a more detailed summary of being measured in person, check out my previous review of my Role Club Underdogs.)

My Specifications
While you can’t really go wrong with any of Brian’s engineer makeups, I personally loved the design Brian designed for himself: brown CXL horsehide hand-finished black, a full leather outsole, and full woodsman heels. They definitely have a more western, cowboy, workwear vibe compared to most other engineer boots out on the market, but in my opinion these are one of the best patterns, with some of the cleanest construction to boot.

A few screenshots I took of Brian's engineer boots, taken off his Instagram.
I did make a few tweaks/upgrades from Brian’s boots when designing my own, which I’ve listed below:
Model: engineer boots
Shaft height: 10”
Upper leather: brown Italian vegtan horsebutt, hand-finished black
Toe track: yes
Upper stitching: black
Hardware: brass roller buckles
Last: 2307 last
Unstructured toe
Edge finish: black
Welt stitching: white
Sole: full leather sole, black heel cap
Heel style: full woodsman heel
Metal toe plates
Custom built-in orthotics (same as my Underdogs)
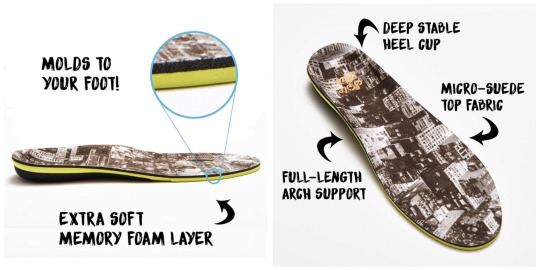
One of the biggest reasons I keep going back to Brian is that he’s able to use the orthotics I typically slip into all my footwear and actually build them into the insoles of my boots. Not sure how difficult this actually is for a boot maker, but Brian has absolutely nailed the fit on my ugly feet both times, and it’s super convenient to not have to worry about a removable orthotics.
Price, Lead Time, & Shipping
The initial deposit to reserve a pair of Role Club boots is $200 regardless of which model you are ordering, with the remaining balance due upon completion. I visited Brian’s shop in Los Angeles on 8/21/2019 and placed my deposit on 10/15/2019, with an estimated completion date of November 2020. However, due to delays in construction (including waiting for my custom metal toe plates to come in), my boots weren’t actually completed until 3/25/2021 (nearly five months late). Inconvenient, but it’s not like I was wearing boots and going out much anyway due to COVID.
When I placed my first deposit for my Underdogs in August 2019, the estimated wait time was just 8 months (April 2020). However, when I placed my second deposit for these engineers just two months later, the wait time had jumped to 13 months (November 2020). To be honest, I’m not even sure how long Brian’s queue is now. Last I heard it was sometime in 2023 or 2024. (Freaking insane. So thankful I placed my second deposit when I did, before his waitlist exploded.)
At the time I placed my deposit, the base price for Brian’s engineer boots was $1350. After a few upgrade fees (hand-finished leather, toe plates, etc.), the final price of my specific makeup was $1500. Minus my initial $200 deposit, my final payment for these engineers was $1300 + $20 shipping. I made this payment via Venmo on 3/26/2021, my boots were shipped the following Monday 3/29/2021, and I received them via USPS on 4/2/2021.
At $1500, these are not a cheap pair of boots by any means. However, for engineer boots this price is actually not unreasonable, as there are some other brands selling engineer boots at a higher price point in stock sizes with limited to no customization (i.e., Clinch). #perspective #itsallrelative (To be completely honest, I roll my eyes when people scoff at a pair of boots in this price range, claiming they’re “too expensive” or that they can’t afford it, and turn around and buy 2-3 pairs of average Vibergs instead. Just stop. Clearly it’s not the cost, it’s your personal values and priorities. #endrant lol (Also, not knocking Clinch or Viberg or anything. Just a few examples to prove a point.))
ANYWAYS. For those hesitant to commit to such an ungodly wait time, I will point out that the cost to reserve a pair of Role Club boots is just $200, regardless of which model you are ordering. In fact, you don’t even need to finalize your order at the time of deposit. You can continue to brainstorm, change your mind, and discuss with Brian about your specifications long after the deposit is placed. (I mean, you have like 2-3 years before he even starts working on your boots anyway, so you have ample time to decide. Haha) Also, should you decide you can’t wait that long (or you suddenly become more financially responsible, lol), I hear you can also use that $200 deposit for something else more affordable, such as a resole of another pair of boots. Either way, hopefully this knowledge makes the $200 deposit a little less daunting and scary of a commitment.
Unboxing
The boots arrived in a single standard shoe box enclosed in a standard plastic shipping bag. There was zero padding included, so the box did arrive with some dents and dings. Inside the box, each boot was slipped inside an individual clear plastic sleeve. Unlike most other brands, no extra padding, tags, or shoe bags were included. Just the boots. (Though, they are some freaking amazing boots. Lol)

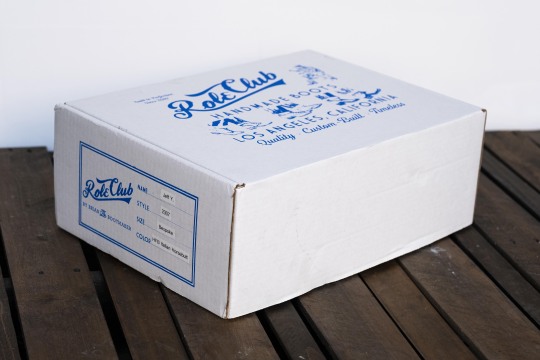

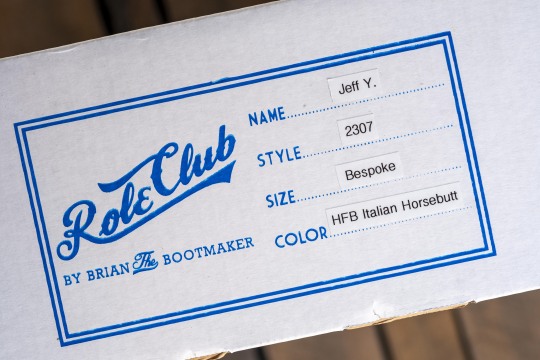
“HFB” for Hand Finished Black.

360 Degree View

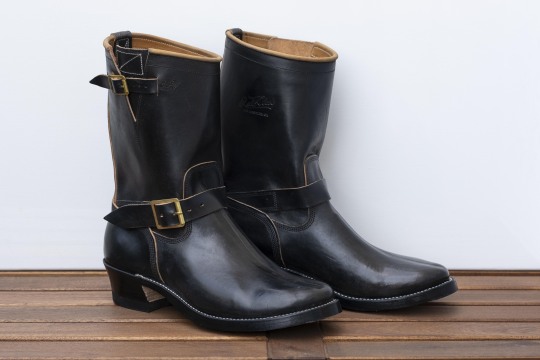


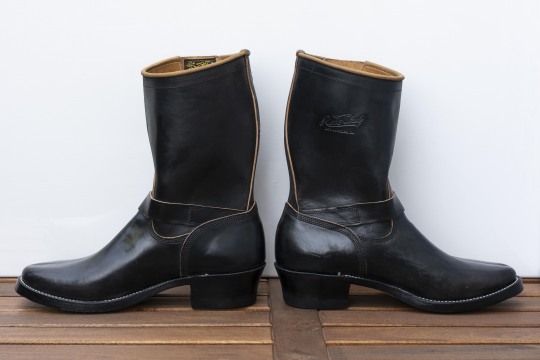

The 2307 Last
When trying to pick a last for these engineers, I was debating between his 1940s last and the 2307 last. Ultimately I picked the 2307, mostly because it had a lower toe bump. I do think that his 1940s last is his most popular for engineers, and the toe bump really doesn’t make too big of a difference once the unstructured toe collapses. (For a more in-depth summary of all the lasts/toe shapes Role Club toe has available, I will link you to Brian’s YouTube video.)

Profile views of both the 1940 and 2307 lasts. Notice the more pronounced toe bump on the 1940 last in comparison to the 2307.

I had my Underdogs built on Brian’s 100 last, which typically has a significantly slimmer, almond toe shape in comparison to the 2307 last. However, due to my awkwardly wide feet and bunions, the MTM 100 last ended up not being too dissimilar from my MTM 2307 last. I definitely like the 2307 more, as the outer sweep of the toe box has a more angular, elegant curve in comparison to my 100 last, which kinda just looks like a thumb.

As you can see, my Underdogs were supposedly built on the 100 last, but ended up being way more rounded than expected (which I’m happy about).
The Leather

Brian most often sources his leather from the Horween Tannery, specifically CXL horsehide and shell cordovan. Brian used brown CXL horsehide hand-finished black for his own pair of engineer boots, which has aged incredibly. Personally, I tend to opt for vegtan leathers whenever possible, as it’s more environmentally friendly and in my opinion tends to build a nicer patina than chrome tanned or combination tanned leathers. Luckily, Brian happened to have some brown Italian horsebutt lying around his shop that he was willing to offer me. At the time, Brian didn’t remember the tannery from which he sourced the horsebutt (which, according to him, no longer exists), but he was able to send me a few photos. I immediately said yes.

A few photos of another pair of engineers Brian made in the same Italian brown horsebutt. Loved the depth of color...which I had painted over. lol

I was hesitant at first to have Brian hand-paint black dye over this beautiful brown leather. However, I was pretty set on getting some classic black engineers, and I trusted that the black dye would slowly fade away in high abrasion areas, resulting in a beautiful black-brown pseudo-tea core finish. For horsebutt leather, there actually isn’t too much visible grain/marbling within the leather). It has a fairly smooth, consistent finish, which I don’t mind at all. Also, I can already see some browns peeking through, which gives me hope as to how the black dye will chip away as these boots break in.
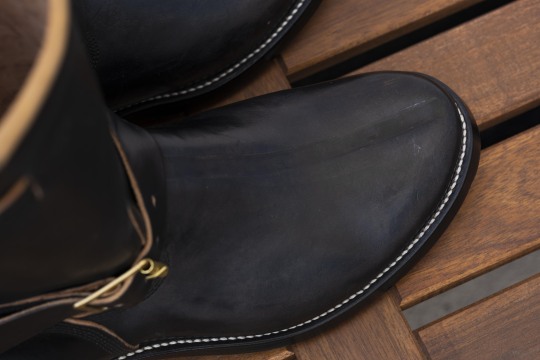
Some of the brown undertones can already be seen beneath the black dye, which is most apparent on the vamps.
The Pattern & Stitching
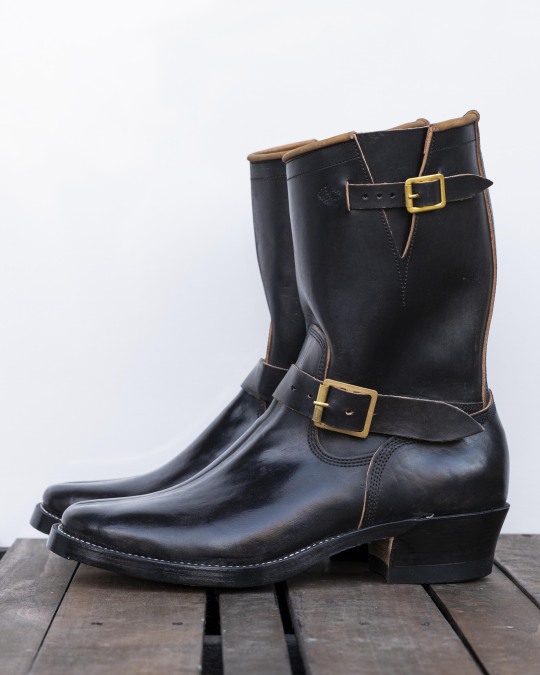
I absolutely love Brian’s take on engineer boots. His pattern works perfectly with his lasts, creating a very well balanced, properly proportioned boot that looks just as good sitting on a shelf as it does on foot.
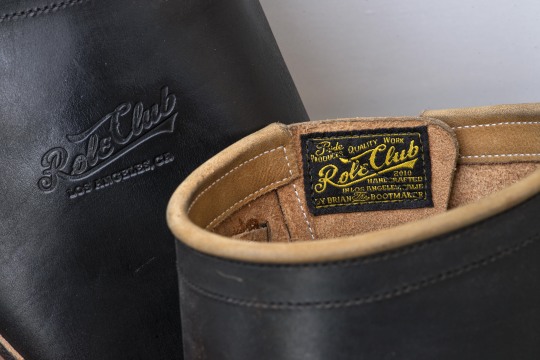
To my understanding, all of the boots in the Role Club Collection are branded with the same two markings: an embossed logo on the left boot and a sewn-on tag on the right.

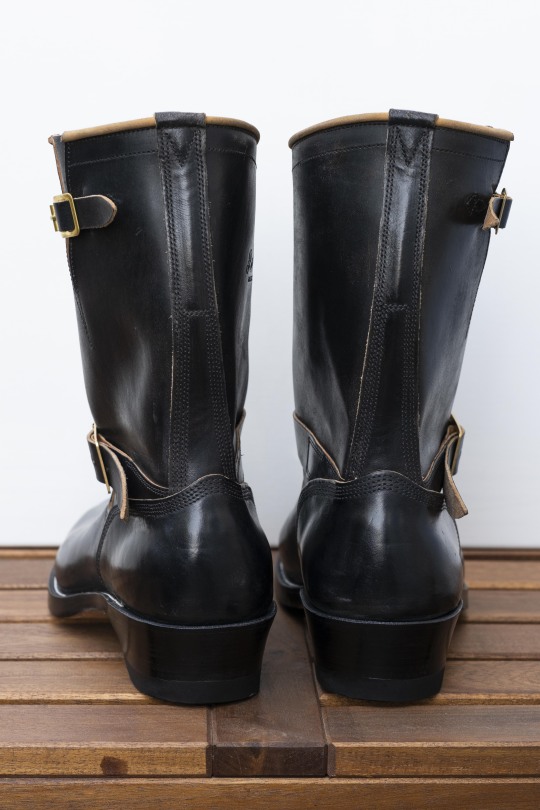
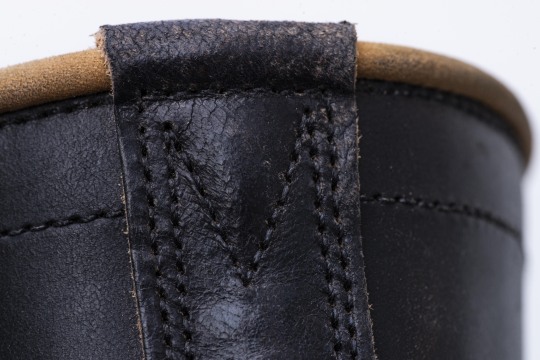
The back stay is simple and clean. No extravagant stitch patterns or anything, just very clean, vertical lines. Nice, conservative, elegant. I like it.

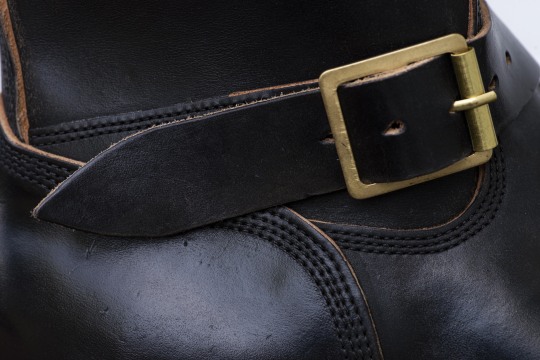
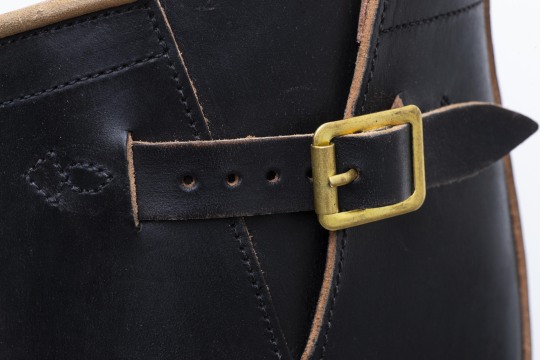
I think of all the engineer boots I’ve seen on Instagram, the buckles Brian uses are some of my favorite. Flat, rectangular, roller buckles. Again, nothing gaudy. Some other brands choose to use more elaborate, bulbous buckles on their engineer boots, which kinda just look out of place. Maybe they’re too eye-catching, making it seem like they’re trying too hard. In contrast, Brian’s simple flat buckles are clean and minimal, allowing the pattern and construction quality of the boots speak for themselves. Less is more.


In general, I tend to like the look of 3-4 rows of stitching as opposed to just two. It just looks more substantial and sturdy. (Does it actually increase the quality or longevity of the boot? Probably not. I just like how it looks.) Also, can we take a moment to appreciate just how absolutely pristine this upper stitching is?
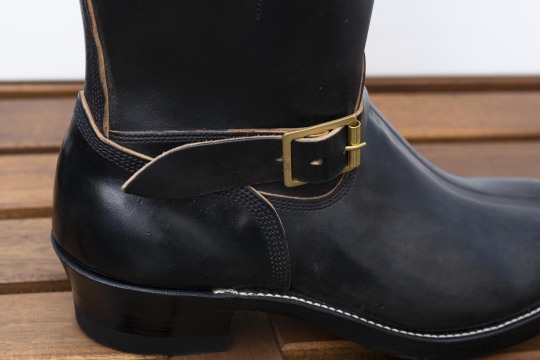
Perhaps my preference for 3-4 rows of stitching stems from my appreciation for higher levels of craftsmanship when it comes to boot pattern and construction. Having additional rows of stitching all perfectly spaced and parallel requires a little more attention to detail, and it looks amazing when properly executed.


2, 3, and 4 rows of stitching, all equally dense, evenly spaced, and perfectly parallel. Perfect execution. I haven’t found a single stitch out of place on the uppers of either boot.
Another little feature I opted to include on my boots were hand-crimped toe tracks running up the vamps of each boot. To be honest, I didn’t know too much about why it’s done or it’s benefits. However, here is an explanation I found on superfuture from Brian himself, posted by @beautiful_FrEaK:
The indentation you see on the boots is called a toe track. The reason a boot has a toe track is because the vamp went through the crimping process. It is used to get all the stretch out of the vamp because when a bootmaker needs to turn something that's 2D into 3D it is more work if the vamp is not crimped. Another benefit when a vamp is crimped is it keeps the vamp smooth without any wrinkles. The crimped vamp sits well on the shoe last.
There are different way to crimp a vamp. For example Buco puts their vamps into a crimp machine. It is a hot blade that folds the vamp in half and indents the leather. I wouldn't mind having a crimp machine (really expensive!) but I use crimp boards at the moment. It is the same process but more hands on. I last the vamp on a piece of board to get all the stretch out and it naturally gets the toe track.
Personally, I mostly chose to have the toe track for esthetic purposes, but understanding the reasoning behind it is pretty cool too.

The Heel
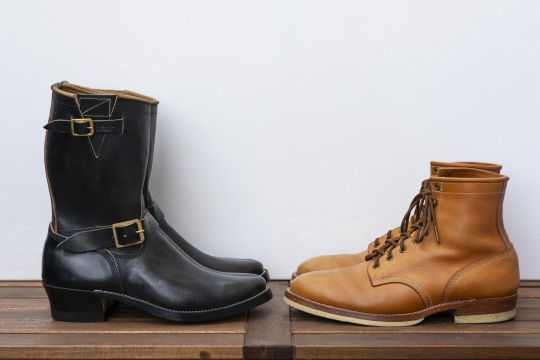
Unlike my Underdog boots, which have a low woodsman heel, I decided to go all out with the full woodsman heel on these engineers. I will admit, walking with such elevated heels will take some getting used to. It also definitely adds to the whole western cowboy boot vibe, but I dig it. Plus, the added lift makes me over 6 feet tall now. Added bonus.

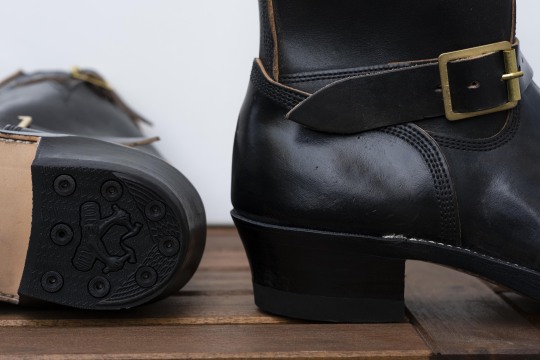
The Sole
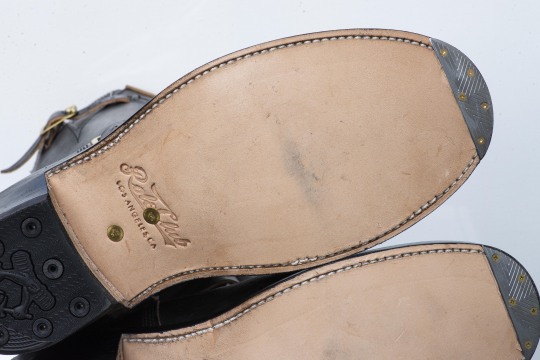
This is my first pair of boots with a full leather sole. Felt a bit risky putting it on such an expensive pair of boots, but whatever. They look great on Brian’s pair, so I wasn’t too worried. Plus, I live a pretty sedentary lifestyle in the California Bay Area. I don’t go on many nature hikes, nor does it ever snow here (or rain really, for that matter). Thus, I don’t really have a need for much grip or traction with my footwear.
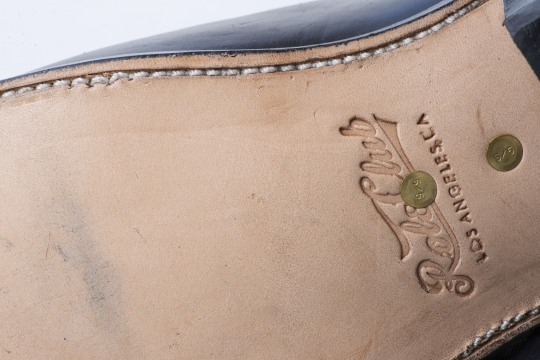
The sole channel stitching is all pretty clean, minus one little wonky spot on the inside portion of the right boot (pictured above in the top left corner). Not a big deal though, as no one is ever gonna see it.
My biggest concern with full leather soles was the reduced durability/longevity from walking on concrete, specifically at the toe. To combat this, I asked Brian to add metal toe plates to my boots to prevent premature wear at the toe. Crisis averted.

Here’s a close up of one of the toe plates, cut into the leather sole as to be nice and flush. Apparently these had to be custom ordered to accommodate for the width of my foot, adding 4-5 months to my wait time. Meh. Worth the wait in my opinion, if it meant getting it done right.
The Welt Stitching
Similar to my Underdogs, the welt stitching on these engineers is all very clean and consistent. If I were to point out anything, it’d be that a little bit of black edge dye got on the white stitching in some areas, and there’s a small tuft of loose thread ends popping out on the inside of the left boot. However, if these are the biggest errors I could find on the whole boot, I think that’s pretty amazing.
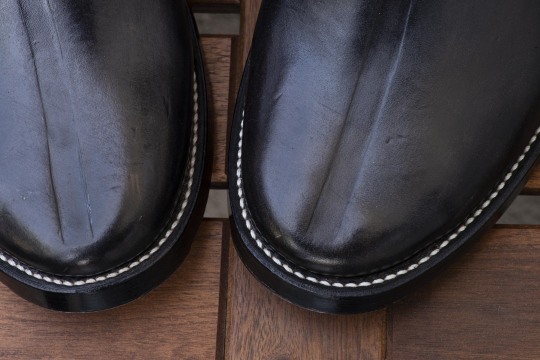


If you look closely, you can see the spots where some of the black edge coat got onto the white welt stitching. Not the cleanest, but doesn’t bother me too much.
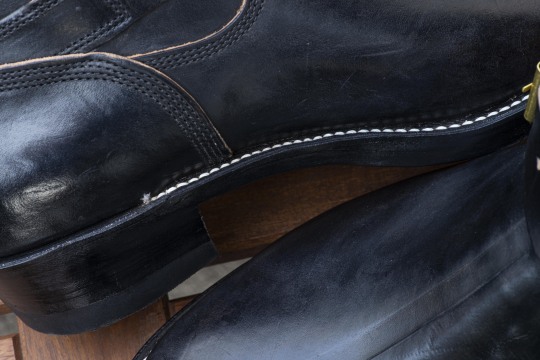
Here’s the small tuft of loose threads at the end of one of the 270 degree welt stitches. Again, very minor, and won’t keep me up at night.
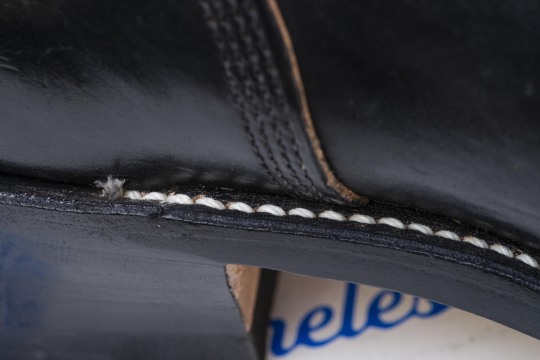
Try On & Initial Thoughts

Being completely honest, I’m actually still blown away at how amazing these boots feel on foot. I can really tell that these boots were made to measure. I shouldn’t be surprised though, as the Underdogs Brian made for me last year fit amazingly. Although, being lace-up boots that can by cinched down with laces, they naturally are less prone to fit errors such as heel slip. Engineers, by comparison, are much more difficult to fit properly, but Brian did so masterfully.
First of all, right out of the box I actually had very little trouble getting the boots on and off. I feel like this is often the biggest struggle in breaking in a new pair of engineer boots, but not this time. Sliding my foot down the shaft felt appropriately snug, until my heel snapped past the “pass line” and sucked down into the heel cup. (I actually didn’t even need to unbuckle the strap to get them on, which was double surprising.)

Once fully seated, I could feel the built-in leather-lined orthotics beneath my feet, and the adjusted width of the 2307 last comfortably fit my bunions. What I’m most shocked by is how little heel slip I have in either boot. Until now, I had just assumed that heel slip was to be expected with all engineer boots, and only with break in and wear would that slip maybe go away. Apparently I was wrong, as these engineers already exhibit less heel slip than some of my other boots and derbies.
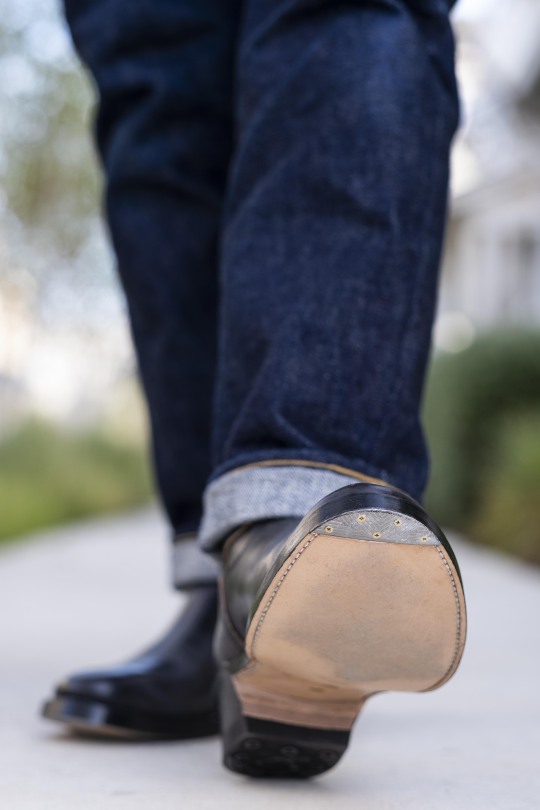
In designing these engineers, I chose to try out a couple things for the first time: first full leather soles, and first full woodsman heels. I know it’s still early, but I’m already loving the full leather soles. They seem to breathe much more than half and full rubber soles, and they flex and move much more naturally with the movements of my feet. I feel as though I can “feel the ground” better, if that makes sense. I will admit that I can definitely tell these leather soles have significantly less traction than rubber/cork half/full soles. However, I knew that from the get go, so me and my sedentary lifestyle are completely fine with it. I haven’t slipped yet, so it’s all good. Second, the full woodsman heels on these engineers are by far the tallest heels of any boot I own, yet once on foot, I can barely even tell the difference. Even with the steep drop off from the full woodsman heel to the leather sole, walking felt completely natural.

The last thing I’d like to note is how nicely the Italian horsebutt is breaking in. I know it’s still early, but so far all the leather on the vamps and shafts seem to be nice and tight with very little grain break or creasing. Loose grain and unsightly creasing are definitely some of my biggest pet peeves when it comes to boots, so props to Brian on absolutely killing it on the clicking. (At least so far.) I can’t wait to see how this leather continues to break in, and for the black hand-paint to chip away to reveal that beautiful brown horsebutt underneath.
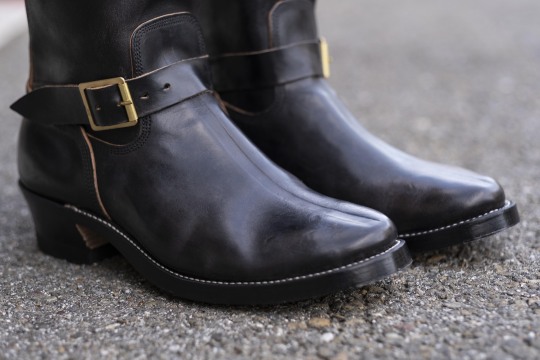
If I had to pick out one spot that may require a little extra break-in, it would be the top rim around the shafts of the boot. They bounce around while I walk, knocking and banging into my shins. I expect this is probably true for most engineer boots, but hopefully this break-in period doesn’t take too long, cuz it doesn’t feel great. Until then, maybe I’ll just have to rock some longer tube socks as shin padding.
(Note: I do my best to remain impartial and objective in all of my reviews. That being said, it was difficult not to sound like some fanboy trying to sell you on a pair of Role Clubs, but this really my honest opinion. I really just love these boots. Lol)
Conclusion
If you couldn’t tell already, I’m absolutely through the roof with regards to these new engineers. The construction quality and level of finishing are pristine, and the comfort and fit out of the box is surprisingly on point. In my opinion, I think Brian and Clinch design two of the most beautiful engineer boots (on Instagram, at least), yet at the same time they exhibit two totally different vibes. Brian’s engineers draw from more rugged, western, cowboy influences, while Clinch engineers are a bit more refined, fitting very nicely within the whole Japanese workwear esthetic. Both styles are very cool, with some of the highest quality construction available.
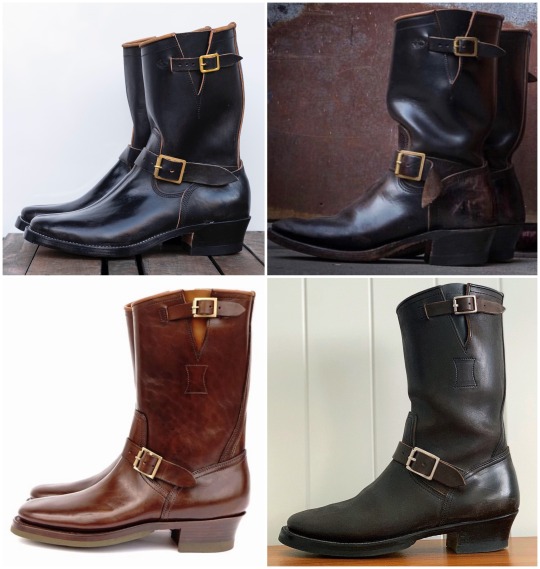
A comparison of Role Club (top) and Clinch (bottom) engineers, both new and worn. (Photo credit: top left: me, top right: @brianthebootmaker, bottom left: @bsw_keisuke, bottom right: @partial2vintage.)
While I’ve barely owned these for a week, and already I can confidently say that these are one of my favorite pairs in my collection. With such a beautiful pattern and solid construction, I could pick them up and stare at them all day. Also, not gonna lie, the fact that Role Clubs are so difficult to come by these days does make me feel even cooler for owning a pair. Haha

Anyway, I’ll try to write a follow up review once these are more broken in. Until then, you can follow along my journey breaking in these engineers through my instagram (@thedenimdentist). Ttfn!
5 notes
·
View notes
Text
We’ve Got Soul: Chapter 3
WC: 2450
Warnings: Sass, cursing, ya know, the usual
Beta’d By: @teaspacebar
Notes: This chapter is mostly relationship building between Fantasia and the boys, and to show the change in their relationships in the year-ish since the last chapter.
Chapter 3:
October 8, 2037
8:04 A.M.
“Hey,” Fantasia called out around the hair-tie bit between her teeth. “Gavin, get up.” She shoved his shoulder before putting her hair up the rest of the way.
“Nooo,” He groaned.
“Seriously, you have to go to work today.”
“I shouldn’t have to, it’s my birthday.”
“Yesterday was your birthday, today is Thursday. Get up.”
Gavin propped himself up on his elbows so he could face her. “What time is it?”
“Eight. I let you sleep for as long as I could before I came in to get you, but I have to go, and you need to leave for work soon.” She was walking around Gavin’s apartment, finishing putting herself together as she spoke. “My blanket is folded on the couch, and I made you breakfast, it’s in the fridge. Take a shower before you go, you stink.”
“You’re an asshole.” He called through his bedroom door.
She grabbed her keys, “That’s what friends are for, I’ll see you later!” And the door was shut behind her. Fantasia boarded the next bus to get to Carl’s and rang the doorbell right on time.
Markus answered the door, “Good morning Fantasia.”
A smile plastered across her face. “Good morning,” Fantasia said as she walked through the house to the studio. When she entered the room, Carl turned in his chair to face her.
“You’re late.”
“I am not,” She dropped her bag under the desk by the door, “You just get bored when I’m not here.”
“I’m an artist, I’m never bored.”
“I’m an artist and I get bored regularly.”
Carl chuckled lightly, “That’d be why you’re an apprentice with lots of work still to do. Today you’re working on texture. You get one color, and you’re going to tell me a story with just the paint thickness and brush stroke.”
“That’s it?”
“That’s it. Have fun.” Carl left the studio without another word.
For a few moments, Fantasia just stood in front of the canvas with a blank stare. “How the hell am I supposed to do this?” She quirked her head a little. “What if I…” Fantasia collected a palette and the paint she’d need to make her color and got started. It was almost three hours later that Carl re-entered the studio to find her standing in front of a dull blue canvas with no visible concept, other failed attempts scattered on the floor.
As Fantasia continued to add paint to the piece as she spoke, “I’m almost done.”
“There’s nothing there. I told you to make a story, not a mess on a canvas.”
“Just give me a minute.” Fantasia looked over her project one more time before turning to face Carl. “It’s done.”
Carl sighed. “My dear, I sincerely hope you are about to surprise me.”
“Don’t I always?” Fantasia turned on the lamp she had set up to shine over the painting from the upper-right corner of the canvas. The shadows cast by the ridges in the paint formed a city block, crowded with silhouettes.
Carl nodded. “Pleasantly surprised, indeed. It’s an interesting idea to use the light, I may have to use that at some point.”
“Thank you,” Fantasia’s smile grew as she looked between Carl and her painting.
“I figured this would take you a larger portion of the day. You’re more than welcome to stay if you’d like to continue working.” Carl wheeled over to his lift and continued a large piece he had in progress.
Fantasia grabbed her bag and found a place to sit on a table across the studio from Carl’s lift. She sat cross-legged and hunched over her sketchbook as she drew her mentor at work.
Markus entered the room and approached Fantasia. “What are you drawing?”
“Carl,” Fantasia replied lightly and showed Markus the page. “It’s fun to draw him when he’s too busy with other things to stop me.”
“I can still hear you.”
“But you won’t stop me cause you’re already in the lift.” Upon receiving no reply, Fantasia continued to sketch.
“Do you need anything while I’m here?” Markus asked politely.
“Just your company, if you have some time.” Fantasia looked up from her work to smile at him.
Markus smiled back. “Of course.”
Fantasia scooted over and moved her bag to the floor to make room for him. She patted the newly opened space, which Markus gladly filled. When he was seated on the table comfortably, Markus switched between watching Fantasia draw and watching Carl paint, almost as though he was studying.
“What do you think?” Fantasia tilted her sketchbook Markus’s way to show him her semi-finished drawing.
“I think it’s very life-like.”
She hummed, “Mm, an easy answer. I’ll get an opinion out of you one day.”
“Were you looking for another response?” Markus questioned lightly.
A small huff left Fantasia’s chest. “No, Markus. It’s okay.” She smiled at him. “I think I’m gonna get some lunch. Carl?” She called across the studio, “I’m gonna make lunch, do you want anything?”
Carl continued to paint as he replied, “No, I’m fine, help yourself.”
“Awesome,” Fantasia hopped off the table and held her hand out toward Markus. “Do you want to come?”
“If you’d like.” Markus took Fantasia’s hand and neatly slid off the table before following her into the kitchen.
When Fantasia got to the kitchen, she immediately turned to Markus and asked, “What do you think Carl would like to eat?”
“He said he didn’t want anything.”
“Yes,” she huffed, “But he always says he doesn’t want anything and then as soon as I bring food into the studio, he asks you to make him something. I’m just trying to take out the middle step.”
“He does seem to have a pattern.” Markus replied. “What about a salad?”
“That sounds great, Carl could use some vegetables in his life.” Fantasia went to the fridge and collected lettuce, peppers, a cucumber, and some other vegetables. “Do you have any chicken breast?”
“Yes, second shelf from the top.”
“Awesome,” Fantasia grabbed the package and handed it to Markus. “Will you cook a couple up while I cut veggies?”
“Of course.”
The two had lunch put together in 20 minutes, and Fantasia put it out on the table while Markus went to collect Carl.
“I said I wasn’t hungry,” He said, rolling up to the table. “But that does smell pretty good.”
Fantasia smiled. “I figured you’d say that, that’s why we made enough for two to begin with. Here.” She placed his salad in front of him on the table.
“Aww,” Carl said with disdain. “I smelled chicken, I thought it was all chicken. This is not real person food, it’s for herbivores.”
“Good thing you’re an omnivore and can eat both.” Fantasia picked up her utensils and stared at Carl from across the table. “Eat.”
October 13, 2037
12:27 P.M.
As Fantasia walked into the station, she was greeted by the call of her name.
“Tasia!” Gavin jogged over to her and snatched the paper bag from her hands and kissed her on the cheek before plopping down at his desk. “Finally, I’m starving.”
She sat down in her usual chair. “You’re super affectionate today, are you dying?” Fantasia said it between bites of fries.
“Fuck you, I’m in a good mood.”
She nodded, “Ah, there you are. What’s up?”
“I made a big arrest today, for your information,” He laced the second half of his statement with attitude. “We’ve been looking for this guy for months,” Gavin continued to talk around mouthfuls of food, “And I got him today, cause I’m the fucking best.”
“Uh huh.” Fantasia gestured with sarcastic curiosity, “So were you the only police officer at the scene, or did you have other people there?”
“There were others.”
“Uh huh, and did you do all the work by yourself while they just stood around, or were they all involved?”
Gavin narrowed his eyes. “The second one…”
“Uh huh, so did Gavin Reed get him or did the DPD get him. Together.”
The pleasant expression on Gavin’s face melted. “You’re a soul-sucking terrorist. You know that?”
“Chris, I fixed him!” Fantasia called out across the station.
“Thank you!” Came back from the general direction of the break room.
Gavin’s eyes went wide, “What was that?”
Fantasia replied nonchalantly, “Chris texted me while I was on my way over. He said you were being scary. I fixed it.”
“I hate you.”
“I am the only person you don’t genuinely despise on some level or another, and I brought you food, so you have to be nice to me.”
He grumbled to himself and silently ate his food with his normal, grumpy disposition until Fantasia got out her sketchbook.
“What are you drawing.”
“You’re talking with your mouth full, and it’s disgusting.”
“Sorry m’lady.” Gavin dramatically attempted to swallow the entire mouthful of food and almost choked before trying to pretend nothing happened and asked again, “What’re you drawing.”
She looked at him, perplexed. “Do you regret that? Do you regret what you just did, or do you stand by that?”
“Yes.” His voice was strained as he coughed and reached for his drink.
Fantasia nodded slowly with an affirmative hum before answering Gavin’s question. “I’m drawing you with a smile on your face. It’s so rare, I figured I’d capture it forever. Ya know, ‘make a picture, it’ll last longer’ and all that.”
“That is not how the saying goes.”
“Do I look like I give a fuck?”
“Ouch, the Clever Comeback Queen has struck again, let’s hear it folks.”
Fantasia rolled her eyes. “What else do you have going on today?”
“Paperwork.”
“Ah yes, saving the world and filling out paperwork. Real heroes don’t wear capes, they wear dirty leather jackets and listen to shitty music.”
“Hey,” Gavin pointed accusingly at her, “You stay off my music. Carry on My Wayward Son is a classic.”
She scoffed, “Yeah maybe, but its but its older than Hank and you act like it’s the last good song ever released.”
“Cause it is.”
“No. Look me in the eyes,” She pointed at her own face with two fingers. “I listen to you blast all kinds of terrible music from when you were in middle school and high school that is way different than Kansas, and I am willing to put money down that the only reason you’ve ever even heard of that song is cause of that show you used to watch cause you thought it would make you cool.”
Gavin’s face crunched, trying to formulate a response, but he caved, “I got nothin.”
“Yeah.”
“You free this weekend, or do you have super special painting practice?”
“I’m free, I think,” Fantasia stated as she started cleaning up their lunch. “Carl has some fancy charity auction thingy that I’m not allowed to go to.” She shrugged.
“Why not?”
“Oh, ya know, big names only, they have a reputation to keep up.”
“So, you’re not even allowed to go?”
“Nope.”
“That’s dumb.”
“Agreed. You wanna go out instead?”
“Depends,” Gavin considered.
“On?”
“Are you gonna be pissy the whole time about how you didn’t get to go to the auction thing?”
“What? No. It’s literally a bunch of old dudes in a room talking about ‘strokes’ all night and pretending they aren’t talking about their dicks. I am totally fine not being the only female in that room.”
“Awesome, then I’ll see you later? I gotta get back to work.” Gavin gestured widely to his mostly empty desk.
“Yeah, you have fun with all that. I’ll shoot you a text when I pick a place.”
“It better not be some shitty line-dancing bar again.” He called out as Fantasia started to walk away.
“If you actually cared you wouldn’t make me choose every time.” She shot finger guns at him before she turned to leave.
November 2, 2037
6:09 P.M.
“So, dad, what’s for dinner?” Leo walked into the dining room where Fantasia and Markus were serving dinner.
Fantasia’s smile dropped as soon as she saw Leo’s face.
“Oh, hey Tay, wasn’t expecting to see you here. Are you on the menu tonight?”
The resulting scowl and glare that Fantasia produced could have pierced most people’s skin, but Leo didn’t back down. “Nobody calls me Tay,” She seethed.
“Exactly! So, I’m unique!” He smiled a shit-eating grin.
“So, you can call me Fantasia. Nothing else.”
“Oh ouch,” He turned to Markus, “That bitch is almost as cold as your insides tonight, huh?”
“Leo,” Carl interrupted, “That’s enough. What do you want?”
“Well food for starters, if you’re offering.”
Carl made no gesture to offer the things his son demanded. “Why did you come here, Leo?”
“What, I can’t just come over to hang out with my pops?”
“You never have before,” Fantasia spat.
Leo turned on her, “I’m sorry, who were you again? This is my dad, not yours, little orphan girl.”
“I said enough,” Carl restated sternly. “No more games, Leo. Why are you here?”
“I need money.”
Carl looked confused, “I thought you said you got a job.”
“Yeah, well it fell through and now I need money for rent.”
“What do you mean it ‘fell through?’”
“They found out about the ice, does it matter?” Leo’s agitation covered his face.
A sigh left Carl’s chest, “How much do you need?”
“A thousand dollars.”
“Fine.”
“Thanks, dad, I knew I could count on you.” Leo made a pointed glance toward Fantasia before he spoke again. “I’m glad the help is keeping you good company while I’m away.”
“I’m not-” Fantasia started but dropped it when she saw Carl’s face. He was already upset, and she didn’t want to make it worse for him.
“Was that all you needed?” Carl asked hopefully.
“Yeah,” Leo started back out toward the door. “I can’t stick around. I got places to be.”
“Oh.”
“I’ll see you around pops,” Were Leo’s last words before the door closed behind him.
Fantasia immediately turned to Carl and asked, “Are you okay?”
He took a deep breath before replying, “I’m fine. What did you two make for dinner?” The smile on his face was forced.
Markus chimed in, “Alfredo that Fantasia insisted we ‘wing.’”
“I just didn’t want it to be something from a cookbook you have memorized! I wanted it to be fun!”
Markus smiled. “It was fun.”
“Then the mission was accomplished, can I eat now?” Carl reached for his plate.
“Yeah, sorry.” Fantasia set the table the rest of the way and sat down across from Carl to dig into her food.
The two ate in relative quiet with only the sounds of the dishes being washed as background noise.
#Markus x oc#dbh#Detroit Become Human#Markus#Gavin Reed#Dbh Markus#Dbh Gavin#Detroid Become Human#RK200#Gavin reed x oc#We've Got Soul
4 notes
·
View notes
Text
Electric Vehicles in Egypt: Overlooking the obvious.

Photo Credits: Revolta Egypt / Cairo Scene
Recently, there’s been a lot of talk about Electric Vehicles (EV’s) in Egypt. Certainly, it is part of an interesting technological trend of EV’s and (re)exploring it’s role in reducing carbon emissions and local air pollution. For instance, Alexandria Governorate recently inaugurated around 15 new electric buses as part of the Alexandria Transport Authority’s fleet.
According to Revolta, one of the first (and perhaps the sole) EV charging network in Egypt, there are at least, by the start of 2019, 14 charging stations in 4 different governorates. They promise to have a network that would allow “an electric car to charge everywhere in Egypt by 2020”, in addition to building Egypt’s first EV accessories manufacturing and maintenance factory in the City of 6th of October, in Giza. Not to mention that Revolta is also involved in importing and reselling both used and new EVs in Egypt, as more and more people (mainly affluent Cairenes) are directly importing EVs through brokers, benefiting from the recent removal of all tariffs off EVs (except the VAT tax) and a discount on Hybrid vehicles.
youtube
Video: AP video on first electric vehicle charging points in Egypt by Revolta.
It seems though that what has been powering the trend towards EVs in Egypt, is the significant increase in Egypt’s energy production in the years in the aftermath of the crunching energy crisis in 2013/2014, reaching a surplus of as much as 25% in March 2019.
A member of the Transport committee in the Egyptian Parliament, MP Yousif ElShazly, already brought up – and effectively made the connection between – the increase in Egypt’s energy reserve and the need to build more infrastructure to absorb the future proliferation of private EVs. Also, the Energy and Environment committee similarly held sessions to review the challenges facing the operation of Electric cars and the need to spread EV charging points throughout Egypt.
Putting these positive policy and field developments aside, other forms of electric mobility were not as lucky: At a time cities are rebuilding their former tram and light rail networks, Cairo Governorate removed the remaining stretch of rails off the streets of Heliopolis. The removal of the remaining tram lines and green street medias, opened up the way for mega highway and flyover projects dissecting the heart of formerly leafy and green street medians.

Construction of a new flyover on former tram tracks in Nozha street, Heliopolis Photo Credit: Michael Hanna - November 2018
While this might provide some relief for traffic on the short run, induced demand will result in future catastrophic results as traffic volumes on these new corridors surge and consume all the available capacity, and block all nearby subsidiary roads.
With the current administration, all roads seem to lead to the so called “New Administrative Capital” (NAC), which is built entirely around the private vehicle, epitomizing the upper middle class fantasies (and in of itself being the produce of ‘elite’ Egyptian engineers).

Poster produced by the Urban Development Consortium (UDC+5) that placed the designs for NAC and currently oversee its construction. Photo Credit: UDC+5 Facebook page
It’s not to say that the government doesn’t build any mass transit infrastructure, quite the contrary: there are several ongoing projects and plans to extend the monorail lines from the NAC and 6th of October city, to Cairo and Giza respectively.
The new Adly Mansour intermodal / Interchange station currently under-construction is earmarked as a future Cairo “Ostbahnhof” or a ‘Cairo East’ railway station, creating an interchange point with Cairo metro (Line 3), El-Salam microbuses/Shared Taxis and other public buses, and planned monorail and electric train connections towards new communities such as ElSalam city, New Cairo, the NAC, Sherouk and 10th of Ramadan city, connecting them with existing towns nearby such as Bilbais, and Ain ElSukhna.
Yet, the common denominator in all of these projects is how they divert all traffic from Cairo center, and seem to bypass the city altogether. These actions, while they seem arbitrary and random to some, is actually the continuation of a half a century old national plan by the Egyptian government to build a new capital, “de-concentrate” the population out of the Nile river valley, and to invade the expansive ‘empty’ deserts. This plan has over the past decades translated to state wide policies that lead to meager funding to existing localities in favor of new communities.
These policies, in their current form and focus on car friendly cities, will affect Egypt’s ability to adopt carbon neutral transport and to be able to deploy sustainable forms of public transit in the future. Also, they tend to overlook the underlying socioeconomic factors that hinder lower middle class and low income families from moving into such new communities or to benefit from the extensive road network that connects new cities. According to Ahmed El-Dorghamy and David Sims (based on data from 2014)*, only 11% of families in Egypt have private vehicles.

Screenshot: A public post by Eng. Sherif Yassin from the ENR, discussing whether it is wise to invest in heavy diesel locomotives with short-life spans, versus electric traction which according to Eng. Yassin is the same price per unit and much better and durable. Photo credit: Facebook group عالم النقل والسكك الحديدية
The mass majority of Egyptian families rely on walking, Shared Taxis/microbuses, Public Transit buses and Metro/regional and inter-city trains when available. Hence, these families will continue to prefer living in denser areas, even if the housing conditions are precarious. Any new city that is not dense enough or at least walking and transit friendly will not achieve it’s original population targets.
Keeping these factors in mind, it is imperative to note that the current approach in Egypt towards EVs, and specifically electric buses and cars, are more or less bound to follow the same patterns the current mobility split; which is heavily reliant on private cars, minivans and Mircobuses/taxis. Existing or previously existing solutions, such as tram and LRT upgrades in Cairo and Alexandria, and electrification of the Egyptian National Railway (ENR) services continue to take a lower priority (and is in desperate need for more investments). In fact, the remaining tram lines in Heliopolis, Cairo – once a landmark of this neighborhood – were recently removed and replaced by wider lanes and more flyovers.
youtube
Video: Recently produced GE Diesel locomotives for the ENR. There has been recent debate within the ranks of the ENR on whether it should invest more in diesel or make the move to Electric traction already.
It is important to note, that electric cars are still much better than the current situation in Cairo, for example, a city that has one of the highest particulate matter air pollution in the world. Not to mention that contrary to popular belief, electric cars are much more efficient in power consumption per mile than combustion powered cars. So even if the energy that supplies these cars comes from a fossil fuel powered plant, electric cars consume less energy per mile than a petrol car would.
youtube
Video by AP: End of the line for Cairo's iconic trams
Having that said, I believe there are two main issues when it comes to the proliferation of privately owned EVs in Egypt:
1) Private cars are less efficient at moving people and occupy way to much space on the road at all stages of it’s lifetime. No matter how wide the motorways and arterial roads are, there won’t be enough capacity to handle the volume of commuters if we are to depend mainly on private vehicles.
2) Actively promoting the use of private EVs by building car friendly new urban communities shifts the costs and urban mobility operations to the individual car owners, putting an extra burden on those who are barely able to afford keeping and maintaining a private car, and completely excluding those who cannot drive or are unable to afford buying a car in the first place.
3) Heavily relying on private cars for urban mobility puts a tremendous burden on traffic regulation authorities and traffic police units, who are not originally responsible for the planning of the cities but usually find themselves stuck between a rock and a very hard place as they try to keep the roads flowing, while they also having to control other aspects of traffic safety and law enforcement.

Cairo Tram Network since 1896 - with overlay of the Metro lines. Inter-connectivity between buses, trams and Metro could have been the bread and butter of Cairo's Urban mobility plan (Map by: Dörrbecker n.d.)
Verdict on Electric Cars in Egypt: Yeah nah?
While the role of Cairo’s old trams, it’s buses and even metro is overlooked by the current ongoing new projects and plans in Egypt; it is also extremely difficult to close the door entirely on EVs.
Ideally, an integrated, inclusive and expansive network of public transit is much more desirable than simply switching the gas guzzling private cars to EVs. Privately owned cars just simply take up too much space, and in Egypt are mostly out of reach of the vast majority of the population.
However, all things considered, electric vehicles do represent an opportunity as were the Electric trams and LRT in the late 19th Century in Egypt. While it may not immediately resolve the issues related to accessibility to public transit, it might be a start to talk about and tackle the worsening air pollution conditions in Cairo.
If EVs are integrated as part of a National Sustainable Mobility plan, the outcomes of switching from fossil fueled cars to EVs will bring great benefit to Egyptian streets. Those benefits, which come first and foremost in terms of reducing particulate matter pollution and decreasing energy consumption per miles traveled; can also have further benefits in the future as new renewable energy projects commence and the share of renewables in the energy mix increase. Not only would that wean Egypt off it’s heavy reliance on oil markets, but it would also set a good example of a developing country in terms of fulfilling some of it’s Nationally Determined Commitments (NDCs) under the Paris Climate Agreement and contribute to the 2030 UN Sustainability Development Goals (SDGs)
0 notes
Text
Winter Soldier Arm Made From Paper
I did a Bucharest Bucky cosplay last Halloween and I’m pretty proud of it. Here’s a close-up:

People have been asking me how I made it and it’s much easier to explain with pictures so I promised them a long tumblr how-to and here it finally is. This is just a forearm, meant to be worn with a henley to cover the upper arm and a glove over the hand. If you want to do a full arm and shoulder then I won’t be able to help you. I mentioned to my husband that I was considering making a full arm for next year and he gave me a look of panic, which is kind of funny because I was the one with glue all over my fingers. The house didn’t even get that messy but whatever. Husbands are still worth it and so is this arm. Here’s another close-up to show off my fake muscles:
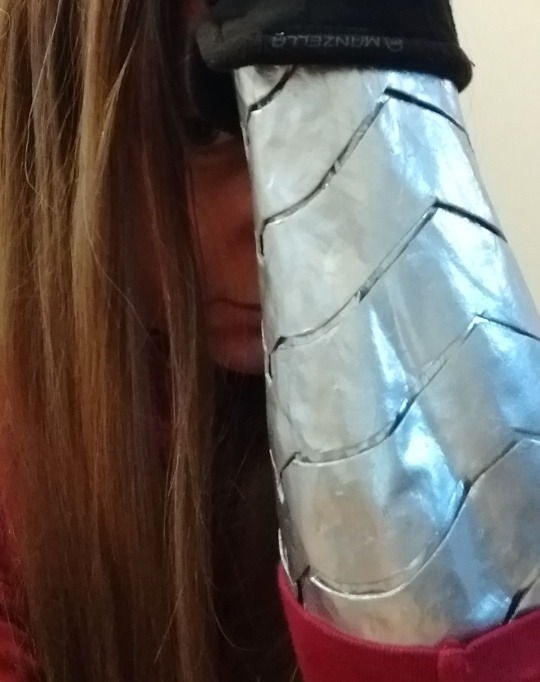
Why paper? When I first decided I wanted to do a Bucky costume, I looked at some other examples online. By far the most popular method was thin craft foam manipulated with a heat gun, but the noise and smell would probably have disturbed my child, and I didn’t want to invest in a piece of hardware that would be used once and then contribute to my household clutter forevermore. Finally, although supposedly craft-foam technique is not that difficult, I found it a little bit intimidating whereas I built this forearm with a technique from kindergarten, when we all made papier-mâché* balls by pasting newspaper strips onto balloons.
* I went to the trouble of googling the spelling for papier-mâché and it’s full of accent marks, so I’m going to cut-and-paste it into this whole post, even though it makes me look like a huge nerd. Which I am.
To make this fine, if somewhat time-consuming, specimen of cosplay craftsmanship, you will need a bunch of trash you already have and a couple inexpensive things:
1) some newspaper (a couple issues of one of those free monthly papers is probably enough, since nobody except my in-laws subscribes to the paper anymore)
2) some lightweight material for padding (more newspaper or old plastic bags)
3) an old pair of pantyhose, old t-shirt, or stretchy scrap fabric
4) tape (I used masking tape but duct tape would probably be better)
5) plastic wrap
6) a small (8 oz) jar of mod-podge ($4-$7, matte, satin, or gloss is fine)
7) a small (3 oz) can of chrome paint ($3-$6)
8) a short length of elastic or very stretchy fabric and some thread (~$2)
9) a small, cheap paintbrush. The cheapest you can find (<$1)
The complete how-I-made-it story is below the cut, plus more terrible cell phone photos and unnecessary brilliant commentary.
I spent about a month planning this thing and only 4 days making it. The whole time, I was screaming internally because although I had the whole thing planned out, I didn’t actually know for sure if it would work until I did it. But it did. Here’s how:
Step 1: make an arm-shaped form to build the papier-mâché over.
Back in my misspent youth, I successfully drafted a homemade dress pattern by having a friend duct-tape me into a T-shirt. This works on the same principle. You need some kind of flexible stuff (stretchy fabric is best) to make the base layer and keep the tape from sticking to you. I cut a leg off an old pair of panty hose and slid it over my arm. Honestly a plastic bag would have probably worked just as well. A piece of thin knit fabric (like a piece cut from an old T-shirt) would be even better. Just make sure you don’t have any exposed skin where the tape will go. Then wrap tape around your arm until the whole thing is covered in a shell like this:

You may notice that I used masking tape. I had this idea that I could capture some muscle definition by using a thinner, narrower tape. This was a mistake. Even while flexing to get the most out of my wimpy muscles, it didn’t really work. Also the panty hose wanted to contract and the tape wasn’t sturdy enough to counter that until I put a whole bunch of layers on. So save yourself a headache and use duct tape (tried and true). Your arm is widest while bent, so do most of the work in that position, but straighten it and move it around a bit to be sure that you will have room to move your arm when the thing is done.
Cut a slit in your crazy tape-sleeve to get it off and tape it back together, then stuff it with old plastic bags or newspaper so it will hold its shape.
(At this point in my project, I looked at my sad tape arm and decided by golly, it would have muscles if I had to make them up. So I taped two long pieces of crumpled newspaper where the most prominent muscles of the outer forearm would be. I don’t have a photo of this step, but I do have a nice forearm drawing tuturial and a muscle diagram in my art advice tag. Maybe those will help. Or you could be smart, unlike me, and skip the muscles.)
Step 2: use your arm form as a base to build a layer of papier-mâché
I covered the base with plastic wrap to make sure that my papier-mâché wouldn’t stick to it. Then I used Mod-Podge to paste overlapping newspaper strips over that base. If you aren’t familiar with Mod-Podge, it looks and smells just like white glue. There are probably a lot of different kinds of paste that would work here, but Mod-Podge is inexpensive and readily available. (Also, the hippy aesthetic really goes with my hairstyle.) I quickly discovered that it worked best if I applied the glue to the arm itself with a brush, then laid the newspaper strip over it and smoothed it down with my fingers. It took me a few tries to figure out the best way to lay the strips. As a result, that all-important valley between the “muscles” got papered over and I had to resort to cutting a slit in the paper and pushing it in a bit. It worked--just barely--but it was a real headache.
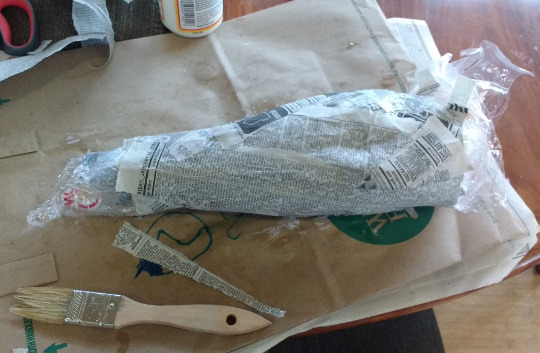
Look! Muscles!
So what is the best way to lay the strips? Definitely not like the picture above! In my opinion, a diagonal spiral around the arm works best, allowing you to lay the strip evenly and also keep track of how much you’ve covered in that layer, like this:
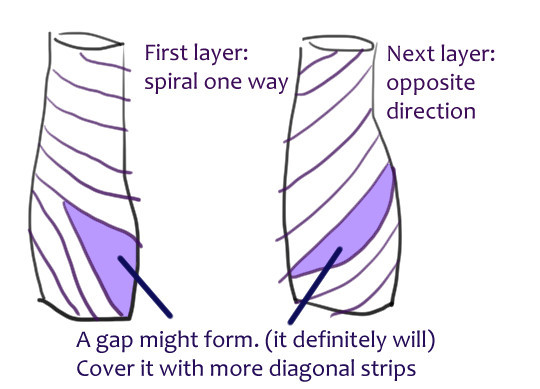
Start your strip near the wrist and let it lay the way it wants to go to stay smooth. This might result in a small gap or overlap with the strip next to it--don’t try to force them to line up exactly.
Let dry 30 minutes between layers. I did about 3 layers, or roughly the thickness of a sheet of notepaper. I figured that my arm would provide a lot of structure, and I wanted to be sure I could cut it with ordinary scissors later!
Step 3: repeat the process to build a second papier-mâché layer
Once I figured it was thick enough, I let it dry overnight, then wrapped it in another layer of plastic wrap (IMPORTANT!) and started pasting again. About 5 layers this time, or about the thickness of a notecard. I wanted this layer to be very smooth. If I’d had the time, I might have tried to do a “build-up finish” as described on the Mod-Podge jar, but it was only 2 days before Halloween so I just didn’t have time. Instead, I made sure that all my paper strips were torn rather than cut, which made a much less visible edge. Also I finally figured out the diagonal thing.
Then I coated it in a thick layer of Mod-Podge and let it dry for an hour or so.
Step 4: Draw lines for Winter Soldier Arm plates
The reference images I had were...not great...so eventually I had to shrug and make up something that made sense to me, for a very loose definition of “make sense.”
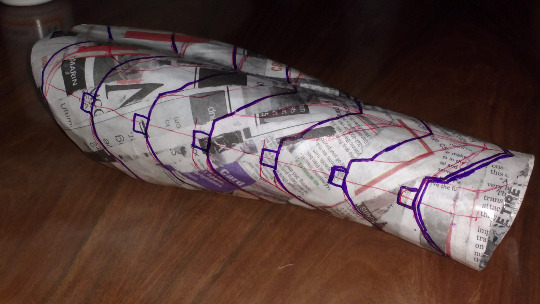
Was Zola high when he designed this?
You can kind of see the diagonal paper strips under the lines here.
I did this with different colored Sharpie pens. The purple lines are for cutting. Some of the red lines are guide lines, some are where the thinner grooves in the plates go.
I had planned to make those grooves by pressing hard with an old ball-point pen. However, I found it hard to get a good grip on this rounded thing so the line came out shakier than I liked. I panicked and decided not to do the rest, hoping no one would notice, which was a shame because the groove actually looked awesome once the paint was on.
Step 5: Cut up the outer shell
Let me pause here for a moment.
If you are reading this, then you may be thinking “this sounds like a lot of work!” Which it was! But the worst part was I didn’t know if it was even going to work at all. I didn’t have those completed photos to reassure me. I had a backup plan which was “wrap aluminum foil around my arm and call it good enough” As I built up the structure, it was starting to look like the principle was sound, but I had a lot of work ahead of me and I could still screw it up.
It was late at night on October 29th and I had to make a cut. After that, there would be no going back.
I needed to cut the tube open so that I could get my hand through it. My plan was to cut just to the right of the row of narrow plates on the inner arm. So I did.
The cut itself was fine! I pulled out the stuffing and nothing exploded or stuck to itself. The problem was that it was way too big, probably because of that muscle padding I added way back in step 1. Near my elbow especially, it was maybe an inch too wide. This might not seem like a lot, but when you are trying to hide the edge under a pushed-back henley cuff, it’s frigging huge.
Step 5a: PANIC
After I was done panicking, I had a pretty cool idea so I ended up doing this:

It’s weird now that I’m thinking about it, but I had no difficulty closing up that gap. Maybe I squeezed it a bit to train it but nothing fancy. It really wanted to curl up on itself already.
Step 5b: Cut up outer layer
This is a little tricky because I had to cut just to one side of the thick sharpie line, then just to the other side, which in practice means cutting a thin strip off the edge of every piece, to make the little gaps between the plates that give the arm its characteristic look.
I used ordinary scissors from an office supply store for most of this, new-ish but nothing fancy. For some of the fine details I turned to a pair of embroidery scissors that I had lying around and wasn’t too attached to (because this kind of thing is bad for embroidery scissors) Imagine my feeling of inverse accomplishment at achieving this:

Like a beautiful flower made of cosplay despair.
While I was doing that I was also waiting for the paint on the under-layer to dry as described in...
Step 6: Prep the under-layer
I needed some elastic to hold the join snug closed over my arm, but I had a bit of metallic stretch velour fabric left over from my kid’s R2-D2 costume, which I had saved every scrap from because it was so expensive. I figured it was stretchy enough to use in place of elastic so I did some estimating and hand-sewed in a panel and...I’m not going to go into depth here. It worked fine but honestly it was so not worth it. In the end, that overlap from step 5a hid most of the join, so I could have just stapled in some elastic and a little flap of cheap silver lamé or something. Then I painted it. I had to mask it so the fabric wouldn’t get paint on it which goes to show how poorly I was thinking things through by this point because it would have been so much easier to paint it first and then add the elastic/stretch fabric/whatever.
The paint I used was Testors 1290 Chrome Spray Enamel from a local store that specialized in model train supplies. I ran down there the morning of October 30, because of course I was doing everything last minute and panicked as is my way. Nor had I taken the time to check any reviews of paint brands. So it was that I found myself standing in the store holding a can of 1290 Chrome in one hand and a of 1246 Metallic Silver in the other. “Chrome.” I murmured to myself. “Metallic Silver. Chrome. Metallic Silver.” I eventually bought the Chrome paint because it “sounded shinier” and because I could use it to make Mad Max jokes.

WITNESS ME!
Chrome was probably the right choice, as this review demonstrates, but on the other hand I might have gotten an even better finish with a different brand, but maybe not in that convenient 3-oz size.
Remember how one of the reasons I chose papier-mâché over heat-treated craft foam was to avoid bad smells? Well, this stuff reeks like you wouldn’t believe. And, forgive me for being such a hippy, but this kind of paint is very high in harmful VOCs, so if you want to use this stuff, if at all possible, do your painting outdoors to minimize health risks. It’s not like you’ll die from painting one arm, but the more often you use this stuff, the more careful you should be.
Getting back to my Epic Forearm Story, I was concerned that some of the paint would have difficulty reaching the under-layer through the gaps between the plates so I gave the under-layer a single coat of paint to avoid any weird paint shadows. It was good practice getting a smooth coat and I was feeling pretty confident about my painting skill. Too confident.
Step 7: Glue cut-up pieces of outer layer onto under-layer
At this point, it was starting to look like my mad project would work, but only if I could finish it on time. This wasn’t reducing my stress levels any, because now I had sunk hours into this project and I had something to lose. I was also concerned that the mod-podge might have difficulty sticking to the chrome paint finish. I lined up the first piece and patiently held it in place until it had dried enough to hold its position after I put it down. Then I waited another half hour or so for it to cure. The resulting join was quite strong, but it was taking flipping forever.
Then I remembered that I didn’t hate life or myself and also that I owned a bottle of super glue. The rest of the pieces went on lickety-split.
(Super glue is not durable enough for extended wear, so if you want to wear this for more than a single Halloween, use the mod-podge)
At this point I had meant to apply another thick coat of mod-podge to seal the edges and make the foundation as smooth as possible but I completely forgot, and maybe just as well because I was rapidly running out of time. Instead I went on to...
Step 8: Apply Chrome Paint finish
The first coat went on beautifully. I was really getting the hang of this, I thought. I put the last coat on just before bed, but this one spot needed a touch more paint, I hesitated just moment too long and...bam. Saggy, bubbly finish. It was so bad it looked like it might actually start to drip, so I grabbed a piece of newspaper and kind of wiped/scraped off some of the excess paint were it was collecting at the points, hoping all the while that I wasn’t marring the finish even further. I was practically in tears but even if I’d had the time, it’s not like I was going to start over so I went to bed and hoped for the best.
In the morning it didn’t look so bad, but I was worried about the edge digging into my arm so I tried to put a strip of that silver fabric over the edge to cushion it a bit, except that fabric is really hard to glue and it only just barely dried enough to wear in time for the trick-or-treating event that afternoon.
Step 9: Wear to widespread acclaim
Or not. Most people didn’t notice that I was wearing a costume at all, which is what happens when you are out on a busy sidewalk with an adorable 3-year-old child. Or people noticed, but didn’t remember Bucky well enough to recognize it. I got a complement on my “nice bracelet” so I guess the metal effect wasn’t too bad. But then I insisted on going to my Friendly Local Comic Book Store to enter the costume contest, and even though it was out of our way and I didn’t win, it was worth it to see the look on the face of the woman working there, just one look of admiration from a fellow nerd and I was over the moon. Hours of work, justified.
In conclusion, this construction method looks great but is somewhat uncomfortable to wear. It would have been better if I had lined it with felt or something. Also this was probably way more difficult than craft foam in the long run. Still, it is very light-weight, relatively cheap to make and allows for muscle contours if you are into that kind of thing. It might have been the best Bucky forearm ever but I flubbed the finish. If anybody decides to make one like it, please show me a picture or something, and learn from my mistakes. Finally, don’t get in any fights with spider-lings.
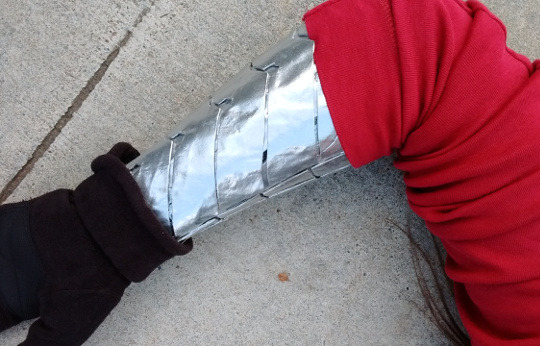
THE END.
#cosplay#winter soldier#bucky barnes#marvel cosplay#cosplay how-to#cosplay instructions#metal arm#cosplay stories#marvel#mcu#ca:cw#cosplay armor#what are good tags I don't know#my posts#my art
209 notes
·
View notes
Text
Joe’s Weather World: Fall has arrived…and with it some fall weather too! (MON-9/23)
It seems to me that the overall pattern still wants to be warm…but there are now stronger cold fronts starting to move through the Plains states and that means some set-backs and at times some stronger step backs in the temperatures. With that said a classic battle between much cooler weather and much warmer weather (perhaps records temperatures on both 1/3rds of the country) is setting up overall over the next 7-10 days. The west will be cool/cold…the east warm/hot for late September.
That means the Plains will waver perhaps…the weather may vary considerably from St Louis to Goodland KS. A drive of some 9 hours or so…and that means KC will be sort of in between things…and that has to mean rain at times…and also very changeable forecasts in the long range.
Forecast:
Today: Fog this morning in places which fades and then sunny skies with highs in the upper 70s
Tonight: Clear and cool with lows in the mid-upper 50s
Tuesday: Partly cloudy and milder with highs in the lower 80s
Wednesday: There may be some early AM storms…then partly cloudy with the chance of storms south of KC during the day (depending on a front) Highs in the upper 70s
Discussion:
Fall arrived at 2:50 this morning. That means that the sun spends about the same number of hours/minutes above the horizon as it does below. The sun is essentially in line with the equator and this is because of the tilt of the earth. Technically it also means that all places will get equal amounts of light/night…but it doesn’t work that way.
For example in KC our sunrise is 7:07 am and the sunset is 7:15 pm today…IF all things were equal we’d be 7:11 for both times.
The reason this happens is that the suns light also gets bent or refracted depending on the latitude of a location.
Now you know…
Astronomy aside…now here is some meteorology.
We continue to see a warm month of September. We’re 6.2° above average for the month and this week won’t hurt those numbers too much really. While it’s noteworthy that this morning dropped into the mid 50s…cooler in spots…that’s about the average low for this time of the year. The high today in the upper 70s is actually a couple of notches above average and highs this week may be above average every single day for the most part.
So right now at least…even our “cool” downs aren’t overly cool. That will change in time though although how KC is affected by this, especially next week, remains to be seen.
Here is just a sample of what I”m talking about…and the models will waffle on this type of set up…look at the highs for next Monday…and note the way things “look”.
That’s some cold air out west…cold enough for accumulating mountain snows too out there!
By the same token that’s some really warm air towards the eastern 1/2 of the country.
The reason…an abnormally strong dip in the jet stream across the western 1/3 rd of the US with a corresponding unusual and summer like ridge in the eastern part of the US. They typically go hand in hand. Part of the ying and yang of the weather really. As we go up to about 18,000 feet or so you can see the dip representing the colder air at that level and the reds representing the warmer air at that level.
IF that dip moves due east…we get a hit of colder weather in early October…BUT if the ridge back east holds strong…or even moves a bit towards the west…it will deflect the coldest air towards the NW of KC…and we stay mild overall.
That will be the set-up for next week and again a swing of 200-300 miles east or west can mean a big difference in the weather.
This week though will feature 2 cold fronts…one moving in Wednesday morning…the other Friday. The Friday front is more complicated because it gets through…stalls and may retreat northwards over the weekend. That could set us up for a return to warm and humid conditions when the front gets north of here…assuming it does. IF it stalls near the area…that could be an issue where rain is a problem this coming weekend again. This can’t be accurately forecast at this point but you can sort of see the potential set-up.
Couple of final notes…things are still going in the tropics…we’ve past the average peak of the season…but still we’ve got 2 named storms out there and one waiting in the wings.
Oh and where is the severe weather today…not in the Plains…but in AZ…this is unusual for an “enhanced” risk to be in AZ.
Hail/strong winds and flooding rains are most likely…although maybe even a somewhat rare tornado are possible as well.
There has already been flooding rains east of Phoenix this morning…so for the heck of it…here is the radar from there.
Our feature photo comes from Chris Heinrich of a “fogbow” that developed this morning with the rising sun. It was taken out east in Bates City
Here is a description from EarthSky…
“Fogbows – sometimes called white rainbows, cloudbows or ghost rainbows – are made much as rainbows are, from the same configuration of sunlight and moisture. Rainbows happen when the air is filled with raindrops, and you always see a rainbow in the direction opposite the sun. Fogbows are much the same, always opposite the sun, but fogbows are caused by the small droplets inside a fog or cloud rather than larger raindrops.
Look for fogbows in a thin fog when the sun is bright. You might see one when the sun breaks through a fog. Or watch for fogbows over the ocean.
Because the water droplets in fog are so small, fogbows have only weak colors or are colorless.”
No blog tomorrow…
Joe
from FOX 4 Kansas City WDAF-TV | News, Weather, Sports https://fox4kc.com/2019/09/23/joes-weather-world-fall-has-arrived-and-with-it-some-fall-weather-too-mon-9-23/
from Kansas City Happenings https://kansascityhappenings.wordpress.com/2019/09/23/joes-weather-world-fall-has-arrivedand-with-it-some-fall-weather-too-mon-9-23/
0 notes
Text
Beata Hock: What was Aided, Rejected, Tolerated
Bea Hock
What was Aided, Rejected, Tolerated in Hungary in the 1970s and 1980s Lecture held at the "ACTINART – SYMPOSIUM AND WORKSHOP" in the Slovak National Gallery, Bratislava, 2001
As for Hungarian 'action-related' art forms, events and artists, I will try to present a regular chronological survey which will be intersected here and there with certain thematic considerations. The chronological line will take us from the first happenings of the late 60s, through the increasing number of actions of the early 70s, to the various forms of performances of the 80s. My intersections will touch upon the question 'why action art?', the changing quality of the events partly arising from the multimedial nature of the art form itself, the different categories of performers or performer groups, as well as some features that are characteristic of the country and/or the region. The Dinner. In memoriam Batu Khan, the very first happening in Hungary was carried out by Tamás Szentjóby and Gábor Altorjay (with the participation of Miklós Jankovics) in 1965. It took place in an (allegedly) tartar-period cellar (hence the second part of the title)[1] and, as Szentjóby later related[2], the event was largely prompted by the site itself and the objects found there. Although the performers had a script to follow (they knew, for example, that they were going to eat – which then served as a good enough reason to name the event 'The Dinner'), they forgot about it as soon as the happening started; yet, according to Szentjóby, events folded out relatively the same way as they had been predesigned – thanks to the prompting environment and objects. Szentjóby termed the structure of this event as an 'activity montage'. (Some of) the 'activities' that were 'montaged' are as follows: on the path to the cellar, one performer, buried up to the waist, is typing on a sheet of newspaper with a burning baby carriage behind him; inside the cellar, pitch-dark and ear-splitting music for some10 minutes then a bouquet of roses goes up in flames; the performers eat and later womit, now and then pre-set alarm clocks go off; the performers smash the tableware and the furniture; they cover the third participant with all kinds of dirty substances (the audience also gets some of that); maneuvers with a chicken and two mice; assemblage of a sculpture (entitled later by a spectator 'The Scooter that Does Not Roll Anywhere'); two performers are working hard on tying up the smudged third participant with different objects in the cellar and with the members of the audience, when Szentjóby eventually crushes the lightbulb. After some hesitation in the dark, one spectator demolishes the barricade that was built in front of the exit in the meantime, and the audience leaves the cellar and sets to clean their clothes... This 'structure' and the authorial attitude which favours chance elements share an apparent likeness to Fluxus, and characterized most of the happenings that followed this first one[3]. Some of Szentjóby's other happenings evolved around his quasi-manifesto 'Art is everything which is forbidden. Be forbidden'. The one that addresses this slogan most directly is entitled 'Be forbidden', too[4]. In an exhibition place, on a small piece of paper attached to the wall, these two words could be read; but only if the beholder climbed over the cordon placed in front of the wall – in other to be able to make out the small letters. In fact, (s)he has committed but a minor and inevitable indecency but, by doing so, (s)he got in contact with that which is, by definition, forbidden. The logic of this minimal instructional action also suggests that one's core existence is denied by those who set the rules if willing to perform independent, authentic acts. In another work, Szentjóby had already 'pre-visited' this you-are-guilty-no-matter-what situation. In Autotherapy to Prevent Punishment he installed himself in the humiliating position of being seated for hours with a bucket covering his face and head. He also subjected himself to the questioning of the visitors. (The artist himself had also prepared some rather cunning questions to be used by the visitors.) Szentjóby carried out these acions at the by now legendary Balatonboglár Chapel Studio. During the summers from 1970 to its forced closing down in 1973, the Balatonboglár Chapel which was rented from the Catholic church and run by Gyorgy Galántai, an artist and occasional performer himself, served as the seasonal venue for all important(-to-be) figures of the Hungarian 'alternative'[5] art scene. There was an unmistakable political tinge in Szentjóby's work and the same is true for the work of several artists who participated at the 'exhibitions' which were not merely housing fine art shows. The artistic trends of the time were certainly on display in as many as 37 exhibitions, but it was the Chapel Studio where a number of artists first turned to 'action' as a form of artistic expression. For the current artistic trends – geometric abstraction, hard edge, minimalism and serial order works – could be decoded as a defence strategy against being interpreted in political terms or having to fulfill ideological requirements. To use Galántai's expression, working in these trends offered, instead of freedom of speech, the freedom of silence. Or, to put it differently, it was someone's private business, without any intention to inform or to communicate. Yet, by attending the Balatonboglár Chapel Studio these artist entered, from their involuntary social isolation, an environment that encouraged expression and communication. In this environment, it became clear that the social surroundings that enforced silence did not erase what had to be said. For the great majority of the non-spatial works presented at the Chapel Studio informed about the conditions which the visual artists kept silent about[6]. Now, Fluxus and Concept Art cannot be safely brought together under the umbrella term of 'action art', but due to their transgression both of conventional art forms and the directives of the infamous 'socialist realism' they deserve to be mentioned here. The conceptual or Body Art actions and Fluxevents of (visual) artists Gábor Attalai, Dóra Maurer, Endre Tót or Gyula Pauer, most often executed in the absence of an audience, carried on the practice of action-based artistic activity initiated in Balatonboglar. Endre Tót in his 'Joys' series (1971-78) responded to the isolation and supression detectable on all levels of life with the absurd euphoria of his 'I am glad if...' sentences. "I am glad if I can walk up and down" – but this performed in a closed up area. Attalai once, when given the award 'For the Socialist Culture', felt the need to discover what kind of a connection he really had to this detested 'socialist culture'. Alluding to the armband as the usual spot for wearing power symbols and employing the negative as a way of expression, he wore the badge, for a day, pressed onto the skin of his upper arm, tightly tied over with a bandage. After one day the award was brought to a negative life on his skin (Culture Alive, 1972). Although it may jumble up my nice chronological outline, I must reveal that the very first 'action' preceded the very first happening. However, it was only subsequently declared to be an art action by Miklós Erdély, one of the originators of the event, and entitled Unwatched Money out on the Street. During the days of the anti-communist revolution in October 1956, open trunks were placed – and left unattended – on the street at six different spots of Budapest with a sign that read 'The justness of our revolution allows to raise money for our martyrs' families in such a way'. Money was quickly piling up in the trunks and not a single bill was taken out of them. The suitcases were collected a few hours later and the money was duly distributed among those in need. It was the exceptional moment of utmost honesty that made Erdély, who never limited art to aesthetic categories, to declare this 'fund-raising' to be art. Instead of aesthetics, he applied 'new' as the main category to identify good art in the sense that, for him, the agenda of artistic activity was not to inform about what had already been established, but to evoke new ideas. A good artwork, he claimed, has a certain quality that confounds or deconstructs our pre-existent notions. His own art showed a scientific-philosophic-metaphysical-lyrical character which was often reflected in his actions and happenings (Three Quarks for King Marke, 1968; Anaxagoras: The Snow is Black, 1971). He happily abandoned working on his own whenever the production of the 'new' was better achieved through a collective endeavour.[7] From 1975 on, he worked with three different workshops, Exercises in Creativity, Fafej, and InDiGo.[8] Fafej was rather a verbal, 'meditative' environment for collective reflection; Exercises in Creativity and InDiGo were more action-, production and art-oriented. But in their case, even the 'production' meant the execution of tasks that rendered traditional art practices unapplicable and, at the same time, challenged customary patterns of thought, perception and creation. When drawing a model, they exchanged their works in every ten minutes with somebody else to continue; or, at another time, they practiced 'chain-drawing' which meant leading the right-side neighbour's hand to draw and letting the left-side neighbour lead one's own hand to draw. One of their collective work, a painting, was realized in the way that they divided the canvas among themselves by a whistle competition: each member was given a section in proportion to how long (s)he could whistle. Many of the new generation artists who attended these workshops did turn to performance after the workshops had been dissolved and they went on with their individual carreer (János Szirtes, László Révész, András Böröcz, János Sugár). Another trysting place for 'alternative' artists was the Studio Vajda Lajos (VLS) in Szentendre, a picturesque small town in close proximity to the Hungarian capital, famous for its active artist community. Many of the members of VLS were self-educated artists who had never been rooted in the conventional representational concept of art. Their either completely spontaneous or roughly pre-designed actions and happenings had a strong dada or surrealist character and, consequently, were full of absurd humour. The word 'performance' was first consciously applied to Tibor Hajas' work 'Dark Flash' presented at the "I am" Festival in Warsaw, in 1978. Hajas is generally considered to be the most important figure of Hungarian performance art. His performances incorporated the risk elements and the heroic or self-destructive features inherent in Body Art which reflect the second meaning[9] of the word 'performance'. He envolved himself in extreme situations; in Dark Flash he was hanging from the ceiling blindfolded, with his wrists tied together. He was trying to use the flash of the camera in his hands simultaneously with another camera with a self-timer placed in the room on a tripod. It reflected his resolution and his lack of experience that he did not reckon with the consequences: in a couple of minutes, he became unconscious, he had no pulse, and people untied him with great difficulty. The practice of performance was for him the appropriate form to express the helplessness of the individual, and it was also a way of meditation laden with continual self-reproach[10]. Half naked and blindfolded again, wired down to a chair, he was attempting to answer the questions asked by the audience while having an ultraviolet quartz lamp placed 20 centimeters away form his face. After almost an hour, some members of the audience realized that his skin started to peel off, and finally released him (Questioning, 1980). Béla Kelényi, Csilla Kelecsényi, István Kovács and the early appearances of the Inconnu Group represented the same, often ritual-like, performance that leaves the audience with a blood stirring experience. Similarly to the international trend of the late 70s, these grave and often provoking performances were replaced, from the 80s on, by less harsh and more entertaining revue-like ones. Some of this new variety dismissed the excessive political contents or physical exposedness and shifted the ritual towards introducing self-mythologies. These performances, or sometimes series of performances typically consisted of a set of recurring motifs, and no longer insisted on single presentation once crucial for happening. The duo of András Böröcz and László Révész represented this 'buffo'[11] or Dada kind of performance that always had a melancholic, but never tragic ending. In the course of their shows they employed a large number of visual elements (slides, films or videos, pre-made paintings, sculptures or other weird objects). The plot of the events was carefully designed and allowed for little improvization. The thematic links within the narrative were based on association which, after all, resulted in a relatively coherent staged collage. And they did pile up everything that could be associated in any: mythological, literary, anecdotal, musical, painterly, historical, scientific, etc. way with their chosen subject announced in the title of the show (The Horse; Sphere; 1980, Matches, 1982). But due to the frequently contradictory quality of these associative links, the resulting collage did not, after all, generate any (new) sense. Repeatedly extinguishing the meanings one might have managed to find, this narrative, in fact, generated 'the' nothing – which is not the same as having talked about nothing at all... (one can justly notice a slight oriental touch here). Several female artists entered performance art on the side of private mythologies where they attempted to create a 'second world' with different rules. El Kazovszkij built up her Dzsan Waxwork Galleries of painted cardboard animals (her art's ubiquitous motif standing for the artist's spirit), live models wrapped in queer materials, and other creatures personifying the artists' experiences. The visitors were participants inasmuch as they became, for the time of their visit, part of the 'waxwork gallery'. Erzsébet Lantos, originally from Northern Hungary, realized her Aphasia Theatre in Subotica, Yugoslavia. In their performances they combined the magical-ritual elements with the above-mentioned blood stirring atmosphere. Orsolya Drozdik was the first to consciously address the issue of being a woman (artist) in her Individual mythology series (1978) with the inclusion of her own body and with a conceptual investigation into her own relation to the models of feminity. János Szirtes first appeared in 'grave' performances often exposing himself to hazardous situations, while confronting the audience with upsetting scenes. In his 1983 Plant he was buried in a barrel. While another participant read out a text and two German shepherds guarded the scene, Szirtes' amplified breathing from underneath the soil sounded through loudspeakers. The ever intensifying, shriek-like noise mixed with the dogs' howling. Before he eventually arose from the barrel with numb limbs and a freaky expression on his face, one girl from the audience could not take the tension anymore and ran to the barrel to free him. When he was finally out, he trodded the soil for some ten minutes, then cleaned himself and embraced a girl who came onstage from among the audience (this time, planned). Darkness fell on the kissing couple and the dogs howled[12]. Later he made revue-like performances incorporating elements of his own and his partner, László fe Lugossy's private mythologies which were performed by their performance group New Modern Acrobatics. The emergence of revue-like performances could also be, perhaps, explained with the multimedial nature of the performance as a genre. Its basic visuality springs from its origins in the fine arts. This origin and the strong conceptual stimulus differentiates performance from the avantgarde endeavours of the so-called performing arts, however, they've got many things in common. Some companies – such as Peter Halasz's Studio Kassák Ház (1970-75), László Najmányi's Studio Kovács István[13] (1972-74) and the company Brobo (1971-75) worked on the borderlines of experimental theatre and happening, performance or Body Art. 'Kassák Ház' refers to the leisure centre where the company first played before they were made to withdraw to one of the member's downtown apartment and to introduce the 'genre' of 'room-theatre' there. They made their important appearance at the Balatonboglár Chapel as well with a three-day happening entitled King-Kong, featuring a huge puppet of an ape with Halasz's protruding body for its phallus, a man-turned-into-a-woman trying to seduce the ape, a 'dwarf' fighting with the ape, and the audience as mobile participants of these scenes inside and around the chapel. When they were made to leave the country as well, almost the whole group settled in New York and became famous under the name Squat Theatre. During the 70s, parallel with the arts, literature also developed distinct conceptual trends such as concrete poetry and acoustic/sound poetry; the latter represented by the actions and performances of Endre Szkárosi, Katalin Ladik, and the members of the Paris-based Hungarian Atelier. One of Szkarosi's ongoing project was to revisit the 'sacred' heritage of old Hungarian literature and, via a creative – not merely interpretative – way of presentation, to bring to new life these well-known titles whose actual contents went completely unnoticed by now. If felt adequate, he re-interpreted and performed the most honoured piece of our 19th century revolution as a punk song. Turning that poem into a punk song does seem to have been adequate all the more so because the officially rejected trends of contemporary pop-music: rock, beat and punk, brought the fresh air of liberty to the stuffy politico-cultural atmosphere of the country, and informed about radically different ways of existence. Groups such as SPIONS (Gergely Molnár with Najmányi from Kovács István Studio), A.E. Bizottság (with András Wahorn, László fe Lugossy, István ef Zámbó from VLS), Konnektor Rt. (with Szkárosi from Brobo), New Modern Acrobatics (with Szirtes from InDiGo and fe Lugossy)[14], etc. were formed with the participations of artists, writers and educated or amateur musicians, and they staged – as Szkárosi, the lead in Konnekor Rt., termed it – 'total concert theatre performances'. It was also him who considered the incorporation of pop-music as a cultural experiment to eliminate the institutionally created and artificially deepened gap between pop culture and the culture of the intellectual Élite. His former group (Fölöspéldány/Surplus Items) of poets and artists gave 'concerted poetry readings' with the then most progressive and most radical punk band, Beatrice. By doing so, they created an access for the intellectual vanguard (which was otherwise relatively successfully controlled by the political power), to the nonconformist punk culture, while providing them with the band's crowd as an audience. Politics was more openly present in the activity of the Inconnu Group who announced 'social actionism' and 'political art', refusing any kind of division between art and life. Their 'actionism', which at the beginnig resembled a lot the Vienna Group – performances with blood, bandages, naked bodies, and slaughtered animals –, gradually grew into a more socially based activity of running an appartment gallery which was housing lectures and other events as well as publishing a regular newsletter, and finally focusing exclusively on politics. Another group that systematically ignored the traditional division between life and art was the Hejettes Szomlyazók[15] attributing a deliberately anti-intellectual attitude and declaring their most ordinary everyday avtivities to be art (Beach: Heat-Enjoying Action, 1989). The places and occasions where all these events took place play an important roll in depicting the art scene of the era. Exhibition openings offered excellent opportunities and this was because while what was exhibited had to undergo prior censorship, whatever happened at the vernissage could avoid being censored. Gabor Tóth almost exclusively appeared with his performances at openings, just like the group Xertox preferred to open their self-curated mail art exhibitions with their own 'industrious meditations'. This was a 'group-specific' sort of performance whose name might first astonish as a contradiction, but in fact it copied, in a peculiar way, the workings of mail art itself. The three members wore gowns and cowls with small openings only for the eyes – which uniform both united them as a group working on the same assignment: the realization of the same castless, roughly outlined script; but also separated them as individuals absorbed in their own particular way of realization with no insight into the accomplishment of the others. A concentrated meditative state aspiring to contribute to a rather physical and practical activity of, for example, making a photographic frieze or building a hut inside the gallery. Taking advantage of the occasions offered by exhibition openings also reflected, as most performance artists emphasize when talking about the era, the strong need to get together – and to ameliorate the dullnes of reality. Festivals or events alike throughout the region – in Balatonboglár, Vác and Szentendre in Hungary, in Nove Zamky in Slovakia, near St. Ann's Lake in Romania, etc. – also contributed to the establishing of a 'parallel culture', a kind of publicity different to what was officially propagated. At occasions like these, painters, sculptors, poets who did not normally engage in performance art took the opportunity and came up with non-spatial or non-verbal works. While in Western Europe and in the USA, the protest against professionalism and market-oriented operations penetrating the arts seem to have generally prevented an artist from simultaneously practising action art and fine art[16], in East-Central Europe a peaceful coexistence was granted for there was no 'trouble-making' art market at all; and because much the same audience attended the performances and the exhibitions of the 'tolerated' or 'rejected' sort of artists anyway. This situation could perhaps be marked as one single favourable deficiency of the past era – from the actions' point of view at least...
___________________________
[1]
Batu Khan was one of the leaders of the Tartar army that was in continuous battles with Hungary during the XIIIth century.
[2]
Beszélgetés Szentjóby Tamással, in:
Szógettó
, Jelenlét 1989/1-2.
[3]
The Sunday Before Christmas (Pre-Antimotif Happening)
, 1969, with G. Altorjay, K. Sóvári, M. Erdély;
An Evening of Actions
, 1967, with T. Szentjóby, G. Altorjay, Sándor Altorjai and Miklós Erdély
Guests at Easter
, 1967, with G. Altorjay, M. Erdély and Bill McCagg
ORGY
– the 1967 plan was realized in 1998(!) by T. Szentjóby
[4]
This slogan also refers to the ill-famed guide-line of the 'three T-s' of the official cultural policy of the 70s that divided all sorts of cultural phenomena into 3 possible categories:
T
iltott (forbidden/
rejected
),
T
űrt (acceptable/tolerated),
T
ámogatott (supported/aided).
[5]
I am using the word 'alternative' for that which was then also termed as 'avantgarde' or 'underground'. Knowing that these terms did not have the same inherent oppositional meaning outside the Eastern block, I decided to use 'alternative' which, I hope, suggest more strongly this quality of other than what was institutionally supported.
[6]
Hock Bea: Balatonboglár – művek és legendák, in: Kritika, 2000/11.
[7]
Bacsó Zsuzsa Éva: Erdély Miklós és az InDiGo, in: A modern posztjai. ELTE, 1994.
[8]
'FAFEJ' literally means a 'thick-head' and is also the acronym of the workshop's full name: '
Fa
ntázia
fej
lesztő gyakorlatok' (Exercises in Fantasy Development). The name 'INDIGO' decodes the same way: 'indigó' in itself means 'carbon paper' (one of Erdely's and the group's favourite material to work with), and '
In
ter
di
szciplináris
Go
ndolkodás' means 'Interdisciplinary Thinking'.
[9]
'the action or process of carrying out or accomplishing an action, task, or function' (The New Oxford Dictionary of English. Oxford, 1998)
[10]
Beke László: The Hungarian Performance Before and After Tibor Hajas. in: Festival de performance Zona Europa de Est, Timisoara , 1993.
[11]
Révész' own expression
[12]
description from Annamária Szőke: Szirtes János műsorairól, in: Jóvilág, Bölcsészindex, 1984.
[13]
'Kovács István' is probably the most common name for a man to be heard in Hungary.
[14]
'A.E. Bizottság' stands for Albert Einstein Committee; Rt. means Ltd.
[15]
The name approximately means 'substitute thirsters' – if that means anything at all; and, to top it off, it is spelled in a distorted way even in the original
[16]
not metioning now other considerations why they might have given up fine arts
0 notes
Text
Geeky DIY Halloween Costumes: 2017 Edition
There are so many things to love about Halloween, but the thing that warms my geeky little heart is the costumes. It’s the one time of year that cosplay is acceptable in more mainstream environments. If you’re a fellow costume enthusiast, you’ll likely fall into one of two camps. The first contains those who plan and work on their costumes year-round, devoting all their spare time and energy into it. God bless you, you passionate lunatics, I envy your skill, creativity, and free time. The latter are more like me; we love costumes but don’t have much in the way of time, money, talent, or all three. If you fall in this camp, you might think it’s too late for you. Well, as my favorite Lex Luthor ever once said…
In general, the best Halloween costumes are easily recognizable for what they are and specific to the year you wear them in. Of course, there are time-honored classics, but if you’re going to do it, I say make it count. The best costumes for people like us are easy to make and affordable. And even though it’s October already and the costume shops are likely all sold out of the “good” options, there’s still plenty of time to make something cool yourself.
Closet Cosplay: Snag yourself a WW logo tee (available at Kohls, Walmart, and Amazon) and pair it with navy leggings or jeggings. Slap your most ass-kicking calf-high boots and as many gold/bronze bangles as you can find. Complete the look with a take-no-shit expression.
Upgrades:
If your leggings are expendable, do some white stars up the sides with fabric paint.
Or swap out leggings for a No-sew tutu, search pinterest and take your pick of tutu-orials. (wear over short-shorts, these tutus usually don’t provide modesty)
Take a cue from fellow Geekader Sam Ahearn, who custom-made a tiara and wrist gauntlets for my daughter using felt, hot glue, glitter, elastic, and velcro. This would also work for a belt.
If you’re feeling really ambitious, boot covers really add something special to your look and aren’t too hard to make.
Closet Cosplay: This long sleeve fitness shirt is a decent approximation of the Spidey’s look in this year’s cinematic offering. If you’re feeling too bashful for tights, go with blue workout pants. A red gloves and ski mask combo can finish off this one, especially if you’re willing to use a little black marker to add detail.
Upgrades:
Have the confidence? Wear the tights, my good man, and more power to you
Boot covers aren’t just for ladies, some red ones will work for this look too.
If you’re into building things, check out tutorials to make your own wrist web shooter, like this one.
Closet Cosplay: Both characters have a lot of costumes in this year's Breath of the Wild, but the simplest to recreate is the basic look. For either, start with a long sleeve shirt and pants in white, tan, or brown. For Link, top with an oversized teal tee shirt and a brown belt over the shirt at your waist. For Zelda, go with a more feminine cut top. Add a white tank over top of it and tuck the straps and upper third under to mimic a corset and complete with the widest brown belt you can find. Finish off either look with brown boots and some DIY cardboard weapons. Bonus points if you do this as a couples costume.
Upgrades:
Strap it up. Do a google image search, these costumes actually involve a bunch of straps crossing the body, so if you can find some extra belts or scraps of brown fabric, all the better.
Elf ears from a Halloween store will give you that subtle Hylean look that sets you apart from Peter Pan.
Use some white fabric paint on your blue layer to recreate details from the in-game looks.
Closet Cosplay: This is one is especially great for kids, but works for any age. The inklings in the game all tend to dress in fairly casual, slightly oversized skater gear or athletic wear. With a parent's permission, have fun with some funky spray-on hair color and some wacky styling. If you have one, use your biggest most ridiculous water gun as a prop. If not, check if any stores near you have any summer toys on clearance.
Upgrades:
A neon colored wig from a Halloween store can really bump up this look.
DIY an ink tank like this one to wear on your back and hold extra candy in.
Grab some pals, color coordinate your outfits and weaponry, and show up as a team!
Closet Cosplay: Not only has Hulu’s adaptation of Margaret Atwood’s classic has been a huge hit, but the costumes have been widely seen in public, as some have taken to wearing them as a form of political protest. Therefore, this is definitely a highly recognizable and very current costume and it’s also ridiculously easy to pull off. The basics are a drapey red garment that covers the whole body and a white bonnet. The former can be achieved by making a cape from any large red piece of fabric you can get your hands on or by wearing a long sleeved modest top and long skirt, both in red. Check your closet or your local thrift shop. Create the latter by attaching some white posterboard (the bigger the better) to a white painters cap, available for cheap at most craft and hardware stores. Complete with a dour facial expression.
Upgrades:
DIY your bonnet for a more authentic look using a pattern like this one
Halloween stores everywhere mean you can find a proper red cloak pretty easily this time of year.
Add a plain canvas bag. Stitching up a totebag is one of the easiest sewing projects there is.
Closet Cosplay: Once GoT’s costumer revealed her source for the Night’s Watch furry capes, it became an instant meme and a DIYer’s dream. The key to taking the black is, unsurprisingly, wearing lots of black. Black pants, black shirt, black belt, black cape, black gloves. (No hat though. Anybody else notice that? People in the north rarely cover their heads. WTF is up with that?) You don’t have to use the officially sanctioned IKEA product, use any shaggy rug you can find, spray it black if need be, and throw it around your shoulders. This look goes best with five o’clock shadow and a surly expression.
Upgrades:
If you’re willing to make the investment, here are IKEA’s official instructions on making the furry cape.
As with the Link/Zelda costume, the more straps, the better.
As Adult Halloween is mostly about costumes and drinking, make sure to get yourself a fun tankard or drinking horn to carry around/clip to your belt.
Closet Cosplay: If the Season 7 malarkey surrounding the death of SPOILER didn’t put you off watching the show, this one may be for you. It’s easy to put together from existing pieces in your wardrobe but iconic enough to be reconizable. Jeans, leather jacket, and a red scarf (or even a bandana) around the neck are the key pieces. Don’t forget Lucille! DIY some barbed wire using dark yarn and this tutorial and wrap it around any old baseball bat you have.
Upgrades:
If you’re not going to need the bat again, might as well bloody it up with some fake blood from a Halloween store.
This is one where a group costume can work well. If your friends are into it, check out images from Season 7 to have your friends find their lookalikes in the cast. Bonus points if anyone can pull off a Glenn or Abraham look.
Closet Cosplay: Season 5, which aired this summer, definitely went outside the norm for this show and the costumes ran the gamut, so there are lots of options to choose from. Start with the basic khaki look (you can a set of khaki scrubs anywhere pretty cheap) and make your own ID badge, or go without. Accessorize with a gray or white undershirt (long or short sleeve) or gray hoodie. This is really one of the easiest, comfiest costumes out there.
Upgrades:
Modify the look based on any of the character’s variations on the uniform. For sexy, try Flaca & Maritza’s schoolgirl looks. Add glasses and go for Alex’s sleeveless Rosie the Riveter version. Crazy short hair and thrift store glasses on a chain can turn you into Red. The possibilities are endless.
For another variation, use black pants, a blue button down shirt, and your own accessories to make a modified C.O.’s uniform like Cindy or Allison.
Closet Cosplay: It couldn’t be easier to recreate the look from Rick & Morty’s most popular season 3 episode. All you need are green clothes, green face paint, a green ski cap, and a bad attitude. For true authenticity, you’ll have to lay on the ground and only move by rolling around, so it’s a great choice if you just wanna be lazy.
Upgrades:
You can go as nuts as you want with the mods on this one and they’ll all work, since Pickle Rick’s existence went through multiple stages. Try Halloween stores for fake bones and blood to dress up your costume. Various crafting scraps can help with the look of his repurposed vermin limbs. Use gray/pink socks and gloves for the hands and feet.
Don’t forget his accessories. You’ll need a brown belt with a couple of holsters containing giant batteries and his shoulder mounted laser cannon. Use your imagination and a lot of cardboard and spray paint.
Extra bonus points if you get a teenage kid to follow you around wearing a yellow shirt and jeans.
Whatever you choose to go as, have fun this Halloween. I’d love to see what you dress up as, so tweet me pics!
0 notes
Text
Global Glance: March 20, 2017
Global Glance: March 20, 2017
3/20/2017
Share
A quick look at intriguing international stories
By John Bostwick, Managing Editor, Radius
Air Pollution Gives Rise to a New Global Market That’s Both Laughable and Disturbing
Back in 2014, Radius published a blog post by Ping Chen on air pollution in China, in particular its effects on the ability of foreign-owned businesses to place expatriate workers in Beijing. The post was written on the cusp of a Chinese government initiative that would invest the equivalent of about $8 billion to improve Beijing’s air quality by among other things reducing the number of coal-burning power plants and limiting passenger-vehicle traffic.
A 2017 article in The Economist explains that the initiative was part of a wider government plan known as the “war on pollution.” The effort achieved “some headway in improving [China’s] environment,” including making the country’s legendary smog “at least a bit lighter.” A graphic in the article shows a notable decline in air pollution (measured by particulate matter, or PM) from near the start of 2014 to late 2015, when PM numbers began to rise again. The culprit, The Economist notes, was (and continues to be) a recent “rebound in heavy industry” in China, including increased production of steel, iron and cement.
An article last week in The Guardian indicates that there’s another reason for China’s recent “extreme air pollution events,” or “airpocalypses.” The Guardian says that scientists at Georgia Tech have found global warming has precipitated Arctic ice-melting and unusually heavy snows in Siberia, both of which “are changing winter weather patterns over east China.” Basically, air masses are sitting over China like stalled traffic, “trapping pollution and leading to the buildup of extreme levels of toxic air.” The article adds grimly that air pollution is responsible for 1.4 million deaths in China annually. That number could grow given that Georgia Tech researchers “concluded that ‘extreme haze events in winter will likely occur at a higher frequency in China’ as climate change continues to heat up the Arctic.”
To see some photos of China’s air-pollution problem, check out this Business Insider article, which includes a particularly eerie shot of three couples dancing in a dark miasma. The dancers, and virtually every other subject in the photos, are wearing surgical masks as protection against smog. Wearing these masks is a cultural trend in China and other East Asian nations, as a 2014 Quartz article explains. Quartz confirms what most viewers of the Business Insider photo piece will have suspected: that “woven-cloth surgical masks provide minimal protection from environmental viruses” and (presumably) the ill effects of particulate pollution.
The Quartz article suggests that the popularity of surgical masks in East Asia may be rooted in “Taoism and the health precepts of Traditional Chinese Medicine, in which breath and breathing are seen as a central element in good health.” These precepts predate “the germ theory of disease, and [extend] into the very foundations of East Asian culture.” (Interestingly, the article notes that some studies have found masks now also function for some — especially women — as “social firewalls” intended to discourage human interaction and harassment.)
Peddling canned air is at once laughable, deplorable, understandable and terrifying.Tweet this
All of which brings us to a remarkable new global business trend: the canning and selling of “fresh” air. Reuters reported last Friday that amid government pledges to clean up China’s smog crisis, “a state-backed firm is doing brisk business selling 48 yuan ($6.95) cans of fresh air bottled in a forest in western China.” In other words, the Chinese state has found a way to cash in on its own air pollution. In a passage fit for a heavy-handed satirical novel, Reuters quotes a sales person for the Chinese air-canning company: “We set up a factory in Ningdong Forest Park in Shaanxi province and compress air directly into the bottle. … Consumers will feel like they are breathing in the forest.”
Not surprisingly, there has been according to Reuters “widespread criticism” of canned air on China’s social media platform Weibo. But critics apparently haven’t significantly reduced demand. Reuters says the “the first batch of Qinling Forest Oxygen-Enriched Air [has] sold out.”
For surreal photos of what appear to be members of the Chinese military inhaling the canned air, check out the incomparably titled article in SINA, “Air from Mount Qinling sells at 18 yuan per bottle, ‘smells like forest’.” One picture’s caption reads (verbatim): “Liu Changrong, head of local forestry bureau said that the idea of selling air first came to their mind about one year ago, when the smog in Xi’an was severe. After investigation, the bureau built an assembly line to produce bottled air with about 300,000 yuan ($44,117 USD).”
That “local forestry bureau��� just may have come up with the idea to “sell air” to fellow Chinese citizens on its own, but I doubt it. CNN reported back in 2015 that a Canadian company called Vitality Airs shipped 500 canisters to China “filled with fresh air from the Rocky Mountain town of Banff” and the cans sold out in two weeks at a the equivalent of $14 to $20 a pop.
That article says Vitality Air’s cofounder Moses Lam “came up with the business idea [in 2014] after listing a bag of ziplocked air on eBay, which sold for 99 cents.” He’s quoted as saying, "We wanted to do something fun and disruptive so we decided to see if we could sell air." Lam says that Canadians buy canned air more or less as a gag, but adds, “"In North America, we take our fresh air for granted but in China the situation is very different."
An article published about Lam’s company and similar ventures was published in Mashable five months after the CNN piece. By then, Vitality Air was “scrambling to keep up with demand from China,” with a local representative quoted by CNN as saying: “Our Chinese website keeps crashing. We are getting orders from all over the country, not just from the wealthier cities. When the air is bad, we see spikes in sales.”
CNN rightly emphasizes that while the business of selling canned air in China is basically absurd, it is also part of a trend of China’s “growing upper and middle classes willing to spend on the finer things in life.” The demand for the canned air also springs from a deadly serious health crisis. The article quotes a director of the World Health Organization as saying, “Urban air pollution continues to rise at an alarming rate, wreaking havoc on human health.” One Canadian expat based in Beijing told Mashable that he first “received a can of air for Christmas as a joke from a friend from home” but now he is “addicted.” He spoke on condition of anonymity since he was embarrassed that he keeps a can of air at work to relieve stress.
Mashable points out that Vitality Air “is just one of a variety of companies” selling canned air in China. The New York Times published a story on the trend a few months later, in October of 2016, noting that “sales of bottled air from fresh-smelling places are taking off,” not only in China but in other “smog-choked [Asian] cities.” The Times says that one Australian company “plans to ship about 40,000 containers a month to China starting in December, and then expand to India, Malaysia, Chile and the Middle East.”
Peddling canned air, then, is a global business trend that’s at once laughable, deplorable, understandable and terrifying. Canning air in factories, and shipping those cans long distances, will only increase global warming and pollution, the very problems canned air tries to address, however fleetingly. The CNN article quotes a professor from a Hong Kong university, who makes the critical if obvious point that “buying bottles of air [is] not a practical solution to China's air pollution. … We need to filter out the particles, the invisible killers, from the air.”
It was at first easy to laugh off canned air from my desk in Boston — where skies outside my window were at the time clear and blue — and rest assured I laughed plenty when I first came across that Reuters article on Friday. But it’s not easy to laugh after reading about the problems that gave rise to the surreal canned-air market, or about the Beijing-based technology worker Pan Li, who told the Times that canned air made his “lungs feel clean,” and that in his polluted environment he’s “willing to try anything.”
<!--//--><![CDATA[// ><!-- (function(n){var r="_ion_ionizer",t=n.getElementsByTagName("script"),i;t=t[t.length-1];t.id=r+ +new Date+Math.floor(Math.random()*10);t.setAttribute("data-ion-embed",'{"url":"//pages.radiusworldwide.com/201510SubscribeBlog?_ion_target=embed-1.0","target":"'+t.id+'","appendQuery":true}');n.getElementById(r)||(i=n.createElement("script"),i.id=r,i.src=(n.location.protocol==="https:"?"//8f2a3f802cdf2859af9e-51128641de34f0801c2bd5e1e5f0dc25.ssl.cf1.rackcdn.com":"//1f1835935797600af226-51128641de34f0801c2bd5e1e5f0dc25.r5.cf1.rackcdn.com")+"/ionizer-1.0.min.js",t.parentNode.insertBefore(i,t.nextSibling))})(document); //--><!]]>
0 notes