#Arrow Svg
Explore tagged Tumblr posts
Text
Flag Making Tutorial
This will be a more technical step-by-step tutorial on how I make my flags (also a long post because I wanted to be thorough, plus I love flags lol).
The program I use is Inkscape, a free vector (.svg) editor program for pc.
I have templates set up, so the actual flag making process is pretty easy/quick.

Hotkeys/Locations/Other Reference
I'll be mentioning these options, so I thought to put them here all in one list. (They list the keyboard shortcuts first)
Snapping: magnet symbol (top right of screen), or under the adjacent arrow ◀️ symbol.
Document properties: shift+ctrl+D, or under the file menu (top left corner of screen). Display (1st tab) Guides (2nd tab) Grids (3rd tab)
Fill and Stroke: shift+ctrl+F, or under object (top of screen).
Layers and Objects: ctrl+shift+L, or under object (top of screen).
Align and Distribute: ctrl+shift+A, or under object (top of screen).
Import (Images): ctrl+i, under the file menu, or by dragging into the Inkscape window.
Save As: ctrl+shift+S, or under the file menu.
Export: shift+ctrl+E, or under the file menu.
Selector Tool: S, or cursor symbol (left side of screen). Click, or click and drag around the objects, to select them.
Locking a selection: lock symbol between the width and height boxes at the top of the screen.
Transform Selections: the width/height and x y position can be changed by typing in the X,Y,W,H boxes (near top middle of screen), or by dragging the corners/edges (resize) and inside the object (move).
Duplicate: ctrl+D.
Delete: delete key, or right click on the object.
Node Tool: N, or below the selector tool (left side of screen).
Rectangle Tool: R, or square symbol (left side of screen).
Pen Tool: B, or pen symbol (left side of screen).
Gradient Tool: G, gradient square symbol (left side of screen).
Mesh Tool: swirly square symbol (left side of screen).
Dropper Tool: D, or dropper symbol (left side of screen).
Undo: ctrl+Z.
Redo: ctrl+Y.

Creating the Template
Download Inkscape and open it, under the Time to Draw tab, click New Document.
First, snapping needs to be enabled, and under advanced mode enable grids and guide lines snapping. (This is crucial for making the stripes equally sized, spaced, and the overall flag in the right ratio.)
I'll be making a template with a 2:3 flag ratio.
Open document properties. (I like to move these types of windows to the right side.)
Under display, set the width to 42px and height to 28px.
Under guides, just click create guides around the current page.
Under grids, make sure rectangular grid is selected, and click new. (Grid units should be in px.) For the major grid line every option, change it to 2. (I also prefer to change the minor grid line color to be transparent.)
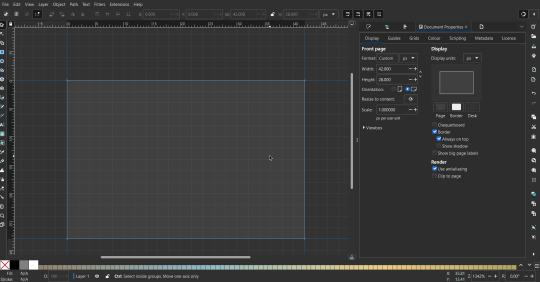
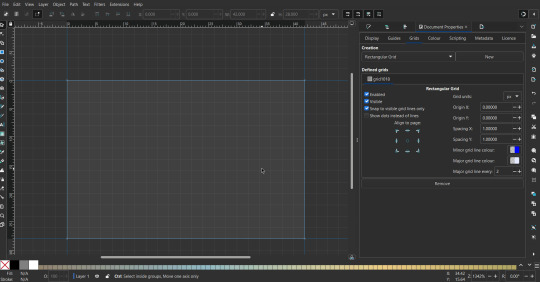
That's pretty much it, your template is done :D ! Just save it wherever you want. I like putting it in an easy-to-access flag folder, as it is needed to open it every time to make new flags.

You can use a different width / height / grid size / flag ratio if you want, these are just the numbers I'm comfortable with / used to.
Also, since this is a vector, the image can be infinitely big or small without any quality loss, so the small dimensions above don't actually translate to a low res image.

Creating the Flag
(I'll be using the rainbow flag to demonstrate.)
Start by having the template open.
You can import images (like .png/.jpg files) to color pick / reference if you want. Said images can be transformed (resized/moved) by selecting and transforming them using the options mentioned in reference. (This is optional, they should just be off to the side so they don't get in the way.)
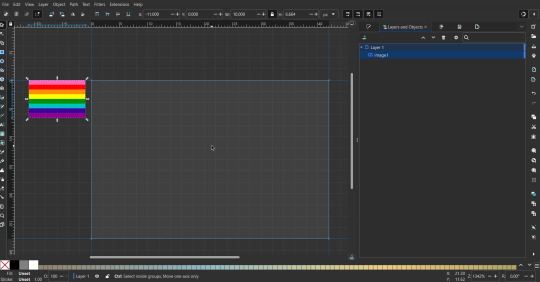
To create the stripes, use the rectangle tool. Click and drag from one grid corner, to a lower grid corner.
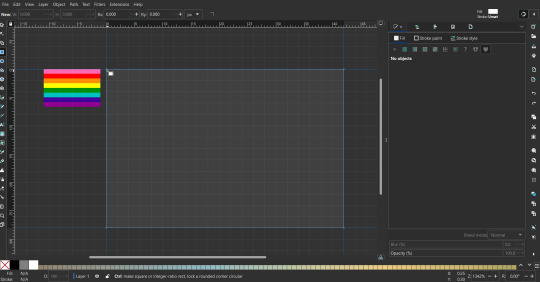
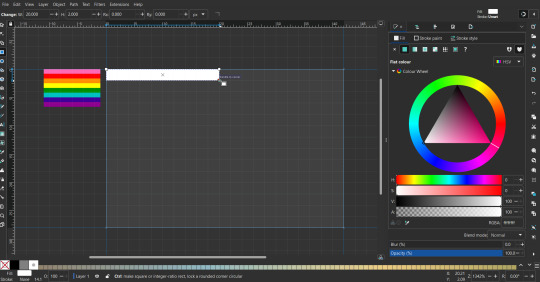
While the rectangle is selected, use the dropper tool to pick a color from a imported image. You can also use the fill and stroke (shown on right) tab to create your own colors / edit colors / etc.
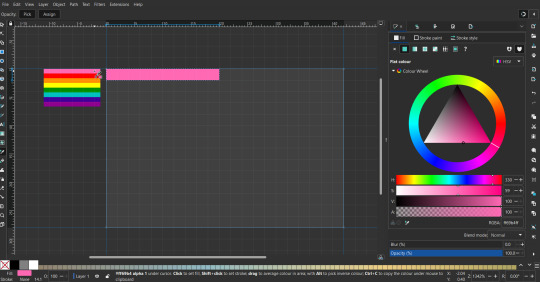
You can make these stripes however you want, they just need to all be equally sized. (They don't have to all have the same height, if you intentionally want that (like the demisexual flag for example).)
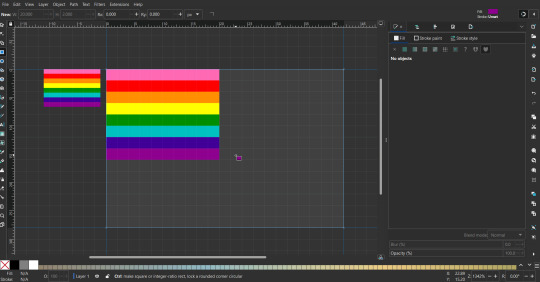
Then select all the stripes and transform them so that they fit the page.
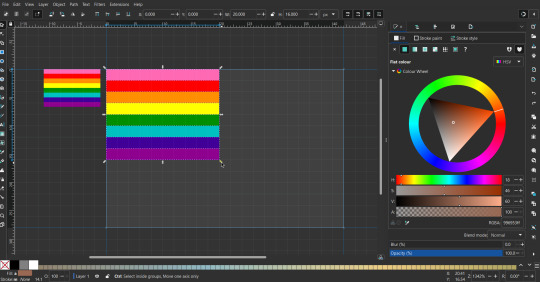
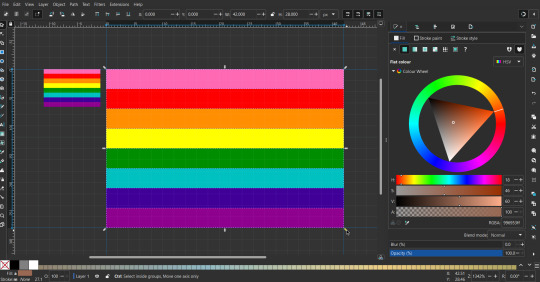
All that's left is to save/export it.
To export it, use the export tab, under single file, page, adjust the width and height (in px) to however high res you want your image to be. (I usually do 3000 by 2000.)
Type in the desired file name in the box next to the folder symbol, use the folder symbol to choose its export location (which can also be used to determine the file name and save/export it), the adjacent drop-down-menu to select what to save it as (,png, .jpg, .svg, etc.), and the gear symbol to adjust other settings (I leave it as default, with antialias turned off (set to 0)).
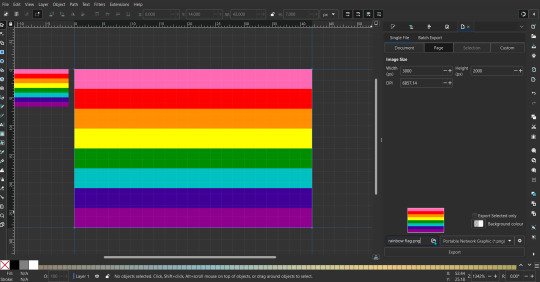
And done, you've made a flag :D 🏳️🌈

Extra Notes
Layers and Objects: a menu that can be used to manage objects. Like their layering position (whether they are above or below another object), and other options can also be done here instead of with keyboard shortcuts.
Vertically striped flags: it's very similar to above. You would just make the rectangles taller rather than wider.
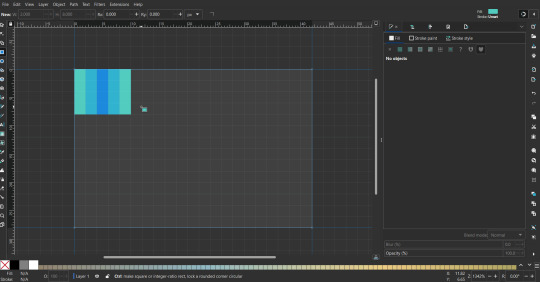
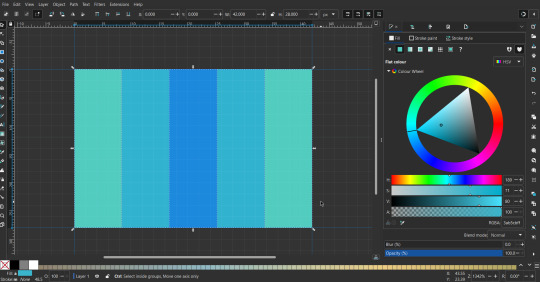
Wavy stripes: first use the pen tool to create zigzags. (The pen tool works like a outline, so just click along the grid corners, and join the line at the end. The fill and stroke menu can be used to make it a solid colored shape, and remove/add outlines). The steepness/frequency of the zigzags is up to personal preference, they just need to extend off the page a bit. To create equally sized wavy stripes, have the all side lengths (highlighted in red) be equal except (depending on how you draw your zigzags) the first or last wave, which should have half the side length of the others.

Select everything, and with the node tool, select all the zigzag nodes (the corners don't need to be selected), and click make selected nodes smooth (half circle with point in middle symbol, at top of screen). (It'll likely look like it has weird lines in-between the waves, see glitch section at the end for how to fix that.)
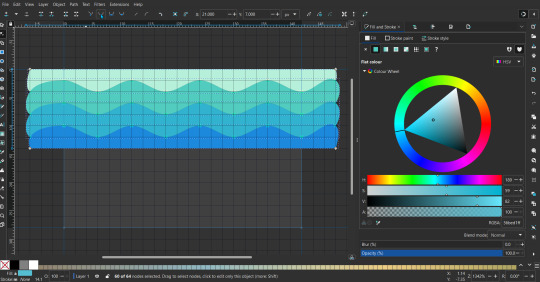
Then resize it all to the height of the canvas. And done :)
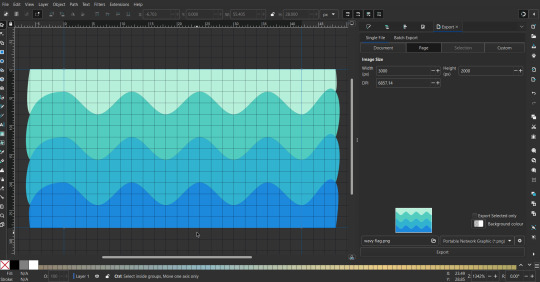
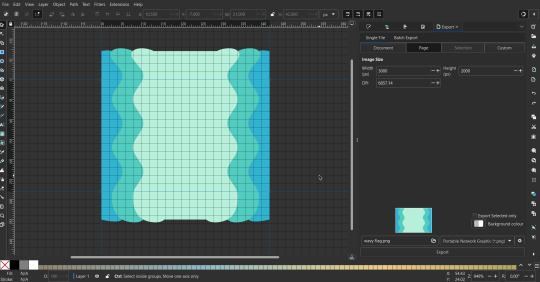
This can of course be vertical too.
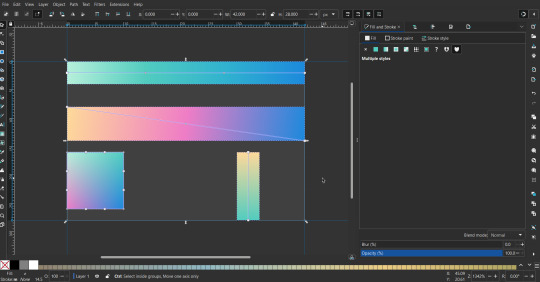
Gradients: You can use the fill and stroke dialogue, gradient tool, or mesh tool to do this.
To create the gradient, select the object, click the linear gradient symbol (gradient box) under fill and stroke. Or dragging / double clicking with the gradient/mesh tools. (The mesh tool is what I used to create the square gradient.)
To change the colors, click on the arrows or circles under fill and stroke, or by clicking the points on the shape, to select the nodes. Then use fill and stroke to change the colors.
To create new colors/stops, click on the plus+ symbol under stops (under fill and stroke), or double click on the gradient. Edit the new colors in fill and stroke again.
To change the location of stops, use stop offset under fill and stroke, or drag the nodes on the gradient. You can also move the end points on the object to make the gradient slanted or vertical.

Symbols: I make my own when I can (like the demi- triangle can be drawn with the pen tool, and resized to the correct proportions). When the symbol is too complicated, I import a .svg of it. Wikimedia commons is a great resource, and the popular twemoji comes in .svg format too. You could also edit it on over the .png in a rastor program if need be.
The align and distribute tab can be used to center symbols (or any other selected object). Select page for the relative to option, and use the symbols underneath to center/align it however you want. (You can also use different relative to options, like last selected, if you want to align it to an object instead.)
Deleting imported reference images: you can do this before saving it as a .svg, if you don't want to keep them / want to clean up the .svg file.
Antialiasing: an option that blurs things basically. A image with antialiasing off will be sharp pixels, while a image with antialiasing on will have transition colors between the main colors.
Below is an example. The left side is without antialiasing, and the right side is with antialiasing.

I can see why it might be preferable to have it on (like for diagonal shapes), but antialiasing can make recoloring .png (not .svg) files hard. The extra different colors messes with fill tools. I also think it looks cleaner without, so I prefer it off.
Exporting glitch: sometimes an exported image will have a thin line between the stripes, despite the fact the stripes are perfectly next to each other. (This seems to not just be a problem with Inkscape, but with vectors in general.)
Below is a zoomed in example of what it'd look like. The left side shows the stripes are all next to each other, but the right image has a transparent line in-between the stripes.
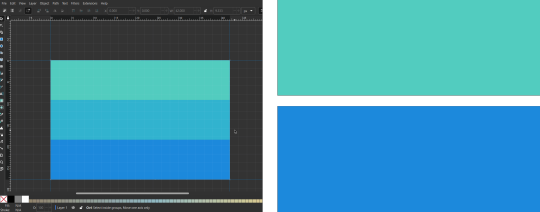
This can be fixed a number of ways.
You could select all the objects, and duplicate them twice.
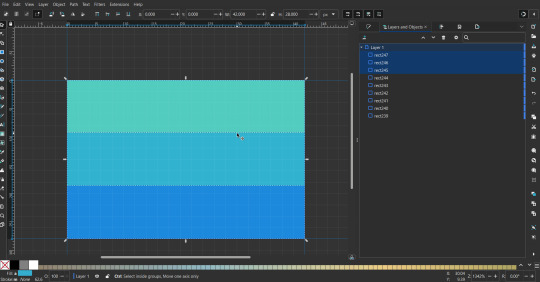
Or overlap them. The stripes will still be the same size when overlapped, but they will technically be behind each other, so there will be no gap.
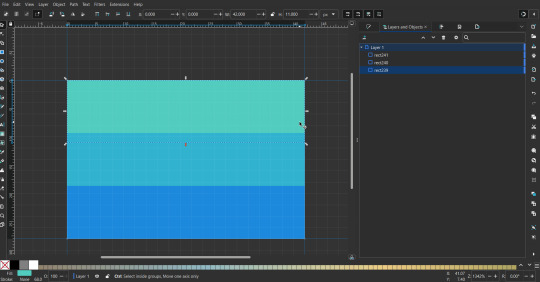

With all the different stuff mentioned, you can basically think of them as building blocks with the grid as reference. They can all be mixed and matched together.
I didn't mention all the options, just because there's that many different things you can do in Inkscape. I'd encourage you to play around with all the different options/tools yourself.
There's also some great Inkscape guides on YouTube, it's where I learned how to do a lot of this from (even if they're not for flags specifically, the concepts in those videos can be applied to flags).

Here's an overly elaborate flag I made, just to demonstrate some (but not all) of the things that can be done.

Anyways what a long post haha. But maybe this will be helpful for anyone interested in making (pride) flags.
218 notes
·
View notes
Text
Endosex flag

A new flag design for endosex, which acts as a sort of midway design between my perisex flag design and the dyadic flag. [SVG here] Endosex is one of three common terms used to mean not intersex, and was initially coined in German by Heike Bödeker (who is intersex) in 1999. The other common terms are perisex and dyadic.
I've been thinking there's utility in having slightly-different-but-similar meanings for endosex, perisex & dyadic to allow for us to talk about how intersex-ness in nonhumans can be really complex. My survey about what these slightly-different meanings should be is still open, so if you have thoughts about whether a snail with typical sex development should be perisex and not dyadic (or something along those lines), send me your feedback here! 📋️
For comparison: I've put the dyadic flag on the left. Designed by @pride-flags-for-cishets, it uses a square as a contrast to the ring of the intersex flag. And it has blue and pink to indicate the traditional sex dyad/binary. It gets used in designs like the extersex flag.


But for some perisex trans/enby folks, a pink-and-blue flag understandably doesn't sit so well! 🙃 So I designed a perisex flag after a flag design by @clowncaraz inspired me. I'm trying in the perisex flag to illustrate how perisex folks are on the two ends of the two "typical" ways that sex development happens (Wolffian or Müllerian). The filled-in arrows represent Wolffian and Müllerian.
Both the endosex and perisex flags use a dark periwinkle that is both purplish and bluish, a colour that I've been seeing used in other flag designs to indicate not being intersex.
The white in the perisex and endosex flags is used to indicate that biology is not destiny: trans people can take their bodies and put them on a completely different path.
The dyadic flag doesn't have any confirmed colour meanings, so I don't have an obvious meaning for the black in the endosex flag.
I'm thinking I'll wait on the results of the endosex/perisex/dyadic-in-nonhumans survey before assigning a meaning to the black. Same for if the light periwinkle means anything beyond not-intersex like the dark periwinkle does. Expect a follow-up on this in late October / early Nov.
The light periwinkle in the endosex flag is the same one in @clowncaraz's design because it's just a really nice colour that I'm fond of for this purpose, and wanted a way to make use of it. 😁
Tagging for archival: @varsex-pride @radiomogai @liom-archive @beyond-mogai-pride-flags @conformant-archive
39 notes
·
View notes
Text
Smooth Animated UI Icons For React & TypeScript - pqoqubbw/icons
pqoqubbw/icons is a collection of over 55 beautifully crafted and smoothly animated UI icons for React & TypeScript. These icons use Framer Motion for smooth animations and Lucide for consistent SVG shapes. You can obtain them as individual .tsx files or copy the code directly into your project. The collection includes icons such as home, navigation arrows, editing functions (edit, delete, undo),…
3 notes
·
View notes
Text


Bring your designs to life with the Sketchbook Set Font Collection, a versatile and creative font bundle perfect for adding a hand-drawn, artistic touch to any project. Designed with attention to detail, this collection is a must-have for designers, illustrators, and creators who love the charm of pencil and crayon textures.
Included in the Sketchbook Set Font Collection:
All Caps Display Font
Sketchbook Set One is a bold and eye-catching all-caps font that’s perfect for headlines, posters, and impactful designs. Its clean yet hand-drawn look makes it versatile for any project.
Handwritten Font
Sketchbook Set Two is a handwritten font available in two styles: Regular and Italic. This font has a natural handwritten feel that’s ideal for quotes, invitations, branding, and more.
Extras Font with Doodles & Text Embellishments
Sketchbook Set Three is a playful font packed with hand-drawn doodles, underlines, words, numbers and arrows. Add charming details to your designs effortlessly.
SVG & Vector Versions
Each font in the collection includes meticulously crafted SVG versions that capture the authentic pencil and crayon textures of the original artwork. For added flexibility, vector versions ensure you can scale your designs without losing detail and use the font in applications that don't have SVG support.
Perfect For:
Branding and logos
Social media posts
Invitations and greeting cards
Creative journaling
Packaging design
DIY projects
This font collection is not just a tool—it’s an inspiration. The textured details and organic feel of the fonts add a layer of authenticity to your designs. Whether you’re creating digital artwork, print materials, or crafting an unforgettable logo, the Sketchbook Set Font Collection will make your work stand out.
Get Creative Today! Download the Sketchbook Set Font Collection at an intro discount at my website ✨
2 notes
·
View notes
Note
thank you for the follow, i don’t know whether to be flattered or concerned
</>Easy six, zero niner one.</>
</>#-#Easy-2__this iß Easy-7 beaAsdvised we are aprpa#ching#333#33#ed#hsh from the west.<//>(</>
</>Hitme№a№n-3-2, Hitman-3-1 over.</>
</>3-1, 3-2 go a*hea.d.</>
</>Uhh be advised, 3-3 can't sparkle the building aA@on Route Alpha will be ny goz, can you provide covering foreI ŵitzhzð fifty, ove(r?</>
</>Ay firm stan@d$by</>
./.
</>Raster-6, 6-2# over</>
</>6-2, 6 go ahw2ead.</>
</>Interrogative; do any dash iNe victors have a visual on thepOse paras, over?</>
</>What apras, 6-2?<//</>
</>Those paras Hitmab engaged a half hour ago over.</>
</>Negative 6-2, no Raster-1 personnel have engaged any of HitmaN'źs aRpise, oyt</>
./.
</>2-3 2-2, be advised I have viusalSh on yhat position, tally to target, $--# in five mikes, out(</>
</>2-3 this is 2-1 status over!</>
</>2-1 2-3! We ahVe engageDt Kav #7 n s aka BAkls B Nanb -£™bsb àb№- (# +# +@; Jav Hsv# +#°hOw xig$:gvsg is oevEr?!</>
</>2-3 2-1 repeat your last, over?</>
</>##&$-#-##-$-_-@++_-#--#-_###########+#-#</>
</>All das@h 58@- wyo personnel, this je 2-Axruald! ChattermaArk,w -sb 9bver#?!!¢¡><))</>
./.
</>All brAve hi o ubits! Thisv# Bravo-2 @cUtal! ###-----_--$--$# __-- enagEg d tree Fifve ZZZroT enem6 As lgu znjMore ¡ Pull backR o the MSR! Bravo-2-1 is cqlring in a broKen Arrow! Get TehyAhv hence oi5at there!]</>
</>Bravo-2-6! We do not have enough ammunition,svg#-#--# to provide effective supporting fire deom The MARKeb nineteen! We are oscar moke aIn onr fife, out!</>
</>-4-1-Actual 2-3-Actual! Standby for covering fire, Cyclone 2-2 is en route! 2-3--£Abalp№+$;@;)@ha osudAht?
</>Conact rigBt tcoNtact right!</>
</>3-1! BTR-90! Left side left side!</>
<//</>Any units on this net this is BeavoEĝ-6! Broken arrow nroken arrow! We have been overrun! Get that docGamnrèbw brodge Çkut!######</>
</>CyonE this is Bravo-1-1 over!</>
./.
</>Mystic this is Raster-5-5 fire mission over!</>
</>5-5, Mystic, send jt ovEr.</>
</>Fire for effect polar, over!</>
</>Fire for effect, polar, out.</>
</>three enemy Infantry platoon z numbering ze#!ro one o#-#&$ne tree fif#e personnel, in the open, over!</>
</>##--#-##-###Infantry paltoonzsbbSV-#-::$&#&#:::-$;$--#;$&-#;-$-#&$&$-&#-#-#<//)</>
</>#-_-#$-#-$Direction; zero three one degrees magnetic! O.T. DIstanç zero seven fife zero, request spalsh oVèrhhĥ(!</>
</>O.T. Direction; 0+3-1 ĎEgrees magnetic, O.T. Dostancêè 0-7-5-0, request splash out.</>
</>MTO Ybabkee, three guns, one round willy peter, Tarett Number Alpha Hotel, 0-0-9er, over.<(_(-_</>
</>MTO, Yankee three funsTsthß round sfg white phosphorus,b Target Number; Alpha Hotel xZero zero miner, out!</>
</>Shot over.</>
</>Shot, out!</>
</>Spalsh over!</>
</>¢SpxSplalysh, out.<)></>
</>Add 200 right sixty!</>
<)></>Add 2-0-0, roght 6-0, oit</>
</>Negativ enveatIge negative, correction; Add 2-6-0, right 0-6-7, over!</>
</>Negative, correction; Add 2-6-0, right 0-6-7, out.</>
</>MTO, Golf one round, white phosphorus in effect, twi Guns, Tagret Number Alpha Hotel, 0-0+-0-1-9er, over (.</>
</>Message to Observer! Golf, one rounds, whiskey papa, 2Guns, Target Nu ñmbwr Alpha Hitel, -0-0-0-1-9er, out!</>
(/>
</>Shot over.</>
</>Shot out!</>
</>SlpaAtxh! Over!</>
</>Kxz splash, out.</>
</>Repeat! Over!</>
</>Repeat, out</>
</>Shot over.<)/</>
</>ShiJot, out!</>
</>aSlasrhc ovb hthhz!sb####</>
</>Splash, out</>
</>Add 300! Right tree fife zero, Down 2-90! Correct and rire ror 3ffctkt over¡</>
</>Add 3-0-0 Right 3-5-0, Down 2+9er-0... correct and fire for effect, out .</>
</>Message to Observer; Juliet, 10 guns, two rounds, HEVT, Bravo, one gun firve rounds HEPR, Target Nymber Alpha Hotel, 0-2-3-5-0-6-1-8-9er, over.</>
</>Mesaage to Osberver, Jyliet, 10 huns 2 rounds HEVT! Bravo, one gun five riunds HEPR, Target Nunber; Alpha, Hotel, 0-2-3-5-0-6-1-8-9er! Out!</>
</>Shot over.</>
.....###-_--#-$####@
</>Shot out!</>
#!-$-$-$--#-$--#-##############-#-#-#-#--#-#-#-#-#-#--#-#-#-#-#-####
</>Splatghch over! (/></>
</>Splash, out</>
</>Good effect on target! 3-5-0 personnel suppressed, all targeteẞ eliminated end of mission, over!</>
</>Good effect, 3-5-0 enemy personnel eliminated, ATS, EOM, out.</>
./.
</>Molsd$#otov this is haDelta SEA$D over.</>
</>Delta,$ Molotov, SEA#D odut</>
</>Route to Suppress; Romeo Delta, 5-0-7-2-0-1, Grid to Mark,; Romeo Delta 5-7-9, 3-0-0, ouver.</>
</>Raitut yoUt Suppretsz; Romeo Delta 5-0-7, 2-0-1, Grid to Mark; {{RD579300}}, autout.</>
</>ZA-X "Rowdy", non-standard, -7 to -17, +30, +3, marked smoke on the deck, three rounds HEVT, CAS TOT; 57, over.</>
</>ZA-X "Rowdy", nin-¢gs;###---#-######-#-#-#--#</>
./.
</>Razor this is Razor-2-3, standby for Report 2two dash one, ober.</>
</>2-3, Razor go ahead.<))/</>
</>Line Sierra; 0-97 to -1-1-5, /break/</>
</>Line Alpha; unknown at this time, /break/</>
</>Corretkoyouhnfnfb3; Line Alpha; Inspecting or investigativng ,, what appears to be, burnt-out vehicles, /breaK/</>
</>Line Lima; 3-7-Delta, Romeo Whiskey, 5-7-3tree-0-6-9, Line Uniform; National giArd, /break/</>
</>Line Echo; AK-95s, Viepers and NODs dash double u, how copy so far, over?</>
Ĵ</>Ywah, clklarifyhn Line Alpha, over</>
<kK</>Request you specify target-to-clarify, ober?</>
</>Uhm uh roger I copy, TTC vehicles, are they covils, military, overMk?###</>
K</>Negative negative, neither, looks like a mix from% u#.s#### to h_ere over.</>
</>Splid copy, any further remRks, over?</>
</>Negative no further remarks at this time.</>
</>Roger I understand all, Razo rR out.</>
./.
</)
</>
THe Americkan foR tzes oUxufpruing Your lands do not follow Kthe Lawas of that country, chosing inStead in to Institute their decadentbT and Al ELL GRE BEE laws ,, wherrTe you Mzudt aFfirm their liEs, abiur themselves even, vBe clauszXkackUauz theyvc kAhn onot be broguht to ciNtzierlyihndo it, they Ckannot even be hYiounentzt to enevehn theymtzelves or ubto abiu t themselves eltzwhere vBEHHEHYN####n";sS### nothung and this itz uNaliaik ourselves, the Glor Groriyountz Hynv of the Xanxon Empayar, the Greaterst youCuntrys to haveevern even Ezisxexisztznt! We are tdze heroYes of thzedeze world! Your evil Sovjyet delusion of grandeur is a flasafalszitzyhinhyihn! We are superioyor in ecerbyhn wvay! Vharlie and Yankees, go home! Go bsk to Dokal, oe r Kanadiyens, or Sovjet Union! YYour dEgeneratzoy oiyhn intz ntot required, needD our requestedin aur lands!
#####
J</>
./.
</>Alsassunbt hus is Hsh+shdja</>
</)shh</>IsuhrbebB;#;(/></>
</>unsjhahebbajsbb;#;#;######## unaware at this rb rime ovrr</)
</>
</>=`=jsjb Flash, NBC-1 xnUkleae, Bravo, NC01222591, xhArlri; righYy degrees z tzn tzen Vh biyhVhehynB;abjajjsjh################-#-$&#-#######&#&$&$&#-@#-#&-#-#-#-#-#-##-#####-##-######################</>
</>Be advised, nuclear detonation detected;shhdbSh########, predicted within a radiu s Tzn of five pount one milrs, epicenter located atVsgh-#-shhshshdh+#+########$, wxepct rainshowersbof blackr ain contaInting at least %zero tree fife soeverts per gallon, L/bteak/, of rainwater, /brrak/</>
./.
</>Goliath Goliath, this is viSor-3-6, standby for erEport 3-dash two, over.</)</>
</>Visor-3-6 tjIs is Goliath, send jt over</>
K</>/Lime Tango; 3-0 personnel, Line Ubiform; tree fife zero enemy mechanized infantry, /break/</>
</>Line Victor; zero seven fife enemy armored, /brrak/!</>
</></)Line Whiskey, 0207 zulu, Romeo Foxtrot, 3-5-0,-1-1-2, /break/</>
</>Line X-Ray, niner two one, fove zero six, bre/break/, zero one fife hostile armored, suspected in srtillery role, /break/</>
</>/Line Yankee; enemy motir rigles, /break/!</>?$+</>
</>Line Zulu; hostile grenadiers, tree vehicles, one tree fife enemy personnel dismounted, /brrakL/</>
</>Line Alpha; u nlnown and i determinate, smoke, heavy fog, sounds of arnored and eNginges, heavy vehicles sounds, /break/</>
./.
</>Standby for EPID, obrr($)</>
Ķ</>All assassin-3 cItctors rhis is Helium-3 over</>
</>Contact left contact left!<//</>
</>#--$-#Alfh agalgoNwuifnJag#--$-#-#-#-########</>
</>Hitmabz this js Razor over!</>
</>MTO; CHvarliyeyhn two rounds! Three guns in effect! Target nunber$;--#-&$-$-$;$-#-#-</>
./.
--_-#-</)
S++
{{SWITCH::OFF}}
{{MODE::SENDING,,TRANSMITTING{€}}|°`≠ק}}
H<Inhale><Exhale}><Inhale>S+#-#
HaH±-A
./.
#xanxon#unreal#unreality#xanxoni#Hitman#Assassin#Dagger#Delta#MTO#Message to Observer#Tac.Freq.278.9#Bravo#preska#observation post#LPOP#OP#Fire Mission#Polar FFE#Polar Fire Mission#US Ex.Fr::Preska#Mechanized Infantry#SALUTE report#NBC#NBC-1 Nuclear#Flash NBC-1#EPID#LPOP::Bravo112361776736752394555#SEAD#SEAD FFE#Suppression of Enemy Air Defences Fire Mission
1 note
·
View note
Text
إبداع برو جيمز
Design a hyper-premium, 4K-resolution static logo for an Arabic PC gaming store named “إبداع برو”. The style must be modern, bold, and instantly recognizable by adult gamers in Saudi Arabia and the wider Arab world. – **Typography & Letterforms** • The letter “إ” should incorporate the silhouette of an Assassin’s Creed hood: a sharp, forward-leaning curve at its top, with its main stroke subtly edged like a hidden blade. • The letter “ب”’s dot must be transformed into a stylized Kingdom Hearts Keyblade heart icon, sitting naturally above the bowl of the letter. • Letters “د” and “ا” should feature light Norse-runic engraving patterns inspired by God of War, carved into their strokes without reducing legibility. • The word “برو” appears in smaller text, framed by a slim, transparent HUD-style bar (think in-game weapon or stat module), aligned flush beneath “إبداع”. – **Graphic Details** • On either side of the word “إبداع”، include two minimalist, wing-tip arrows as a subtle nod to the Assassin’s Creed eagle motif. • Behind the text, place a very faint, etched grid (like a Steam UI overlay) to convey a digital platform. – **Color Palette** • Primary: Electric Blue #00AEEF for main strokes and glows. • Accent: Neon Orange #FF6A00 for the heart dot, HUD bar, and arrow tips. • Shadows & Engraving: Charcoal #1E1E1E for depth and metallic feel. • Background: Matte Black #000000 with a slight carbon-fiber texture. – **Finish & Deliverables** • Render in vector format (SVG/AI) with layer groups: “Letters”, “Engravings”, “HUD Bar”, “Arrows”, “Grid Overlay”, “Background”. • Export a high-res PNG (4096×4096) on transparent background for web use.
0 notes
Text
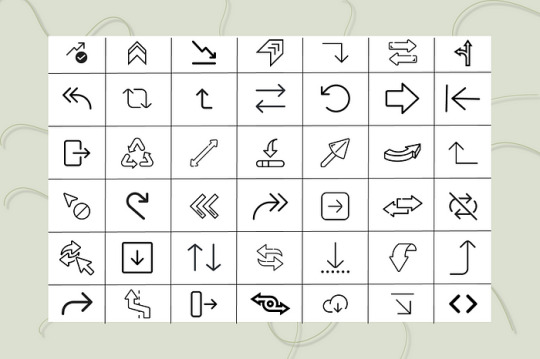
🚀 Arrow Interface Icon Pack — Elevate Your UI with Free Icons from Iconadda
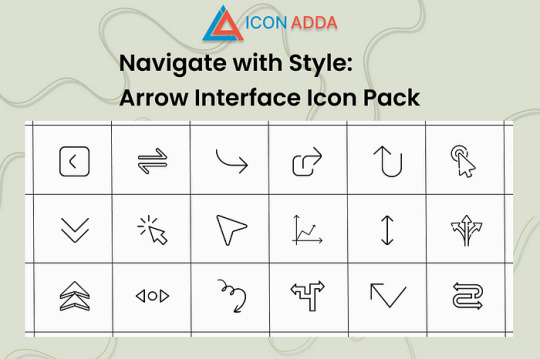
Make it easier to navigate. Enhance the experience. Make wisely. We understand in Iconadda how little pieces like icons could make a great difference to the user experience. We are glad to introduce the pilgrimage section package with pilikon intended for contemporary digital interfaces, a free, condition -art and user -friendly collection.
Regardless of whether you are a front-end developer, Ui/UX designer or creative agency, these icons are suitable for the purpose of the project and clarity enhancement.
🎯Arrow Interface Icon Pack: What’s included? This free icon set contains numerous various poil designs that suit any application: 🔙 Backward and front arrows 🔼 Arrow to scroll up and down 🔄 Update and load again 🧭 icon for direction navigation ➡ Bold, outline and minimum styles 🔲 Extension, collapse and minimize the icon
This icon pack is perfect for web and mobile applications since both are pixel perfate and fully scalable.
✨ Key advantages of arrow interface ✅ No cost to use: It does not have any charges or license issues while downloading and utilizing it. ✅ Supports Adobe XD, Photoshop, Illustrator, Figma and Sketch among other big design tools. ✅ SVG, PNG, ICO and PDF are some of the numerous available file forms. ✅ Shift: You are able to easily alter the width, color and form of the stroke. ✅ Web ready: Optimize the performance by reducing the file size. ✅ Regular updates — all packages at Iconadda are kept up to date and enhanced on an ongoing basis.
Response to common questions Is it gratis using these pil icons for business? Actual! Only free icons are included in Arrow interconnection packages that can be used for personal or business use. Though appreciated, it is not required.
Can I resize and colorize? Yes! Since the package is SVG based, you may adjust stroke, color and shape in your editor or code.
What do I need to register for iconadda download? No registration is required. Simply visit iconadda.com , Finn Arrow Interface Icon Packs and click the download.
Can I use this package with my design tool? Yes! These icons can also be used directly in HTML/CSS or React components -i Figma, Adobe XD, illustrator and Sketch.
📥How to download the Arrow Squeeze Package Visit iconadda.com . Visit the section with a free icon package. Arrow connection packages, search or scroll and find. Tap “Download” and head over to work design!
🧲More iconadda freebies Don’t just stay with the arrow! Dozens of and icon packs including animated icons, filled and outline sets, e-commerce icons and social network icons are available gratis.
Be creative. Propose. Your design arsenal is always stocked when working with Iconadda .
Final comments Pure and simple design bloated user is more important in a world filled with interface and dull loading sites than ever. You only get free pil icons when using Iconadda’s Arrow Interface Icon Pack; You also get design power on your fingers.
👉 Get it now to search for a more elegant, smart and intelligent way to guide.
#ArrowIcons#InterfaceIcons#UIIcons#ArrowPack#NavigationIcons#ArrowDesign#MinimalIcons#WebIcons#LineIcons#FlatIcons#UserInterfaceAssets#DirectionIcons#UXDesignAssets#IconSet#ArrowVectorPack
0 notes
Text
LinkedIn
News https://portal.esgagenda.com/linkedin-3/
LinkedIn

LinkedIn
svgdisplay:block;margin:autoli-icon[type$=-icon]width:24px;height:24pxli-icon[type$=-icon][size=small]width:16px;height:16pxli-icon[type$=-icon]>svgvertical-align:topli-icon[type^=nav-]width:32px!important;height:32px!importantli-icon .inactive-item,li-icon .large-iconfill:currentColorli-icon .active-item,li-icon .small-iconfill:currentColor;visibility:hiddenli-icon[size=small] .inactive-item,li-icon[size=small] .large-icon,li-icon[type^=nav-][active] .inactive-item,li-icon[type^=nav-][active] .large-iconvisibility:hiddenli-icon[size=small] .active-item,li-icon[size=small] .small-icon,li-icon[type^=nav-][active] .active-item,li-icon[type^=nav-][active] .small-iconvisibility:visibleli-icon[type^=app-]width:40px!important;height:40px!importantli-icon[type=loader]fill-opacity:1;stroke-opacity:1;fill:transparent;stroke:transparentli-icon[type=loader][size=small]fill-opacity:0;stroke-opacity:0;fill:currentColor;stroke:currentColorli-icon .color-icon,li-icon[color] .solid-icondisplay:noneli-icon[color] .color-icondisplay:blockli-icon[type^=large-],li-icon[type^=large-][size=small]width:48px!important;height:48px!important[dir=rtl] li-icon[type*=arrow],[dir=rtl] li-icon[type*=chevron],[dir=rtl] li-icon[type*=follow],[dir=rtl] li-icon[type=enter-icon],[dir=rtl] li-icon[type=forward-icon],[dir=rtl] li-icon[type=leave-icon],[dir=rtl] li-icon[type=question-pebble-icon],[dir=rtl] li-icon[type=reply-icon],[dir=rtl] li-icon[type=share-ios-icon],[dir=rtl] li-icon[type=share-linkedin-icon],[dir=rtl] li-icon[type=to-end-icon],[dir=rtl] li-icon[type=to-start-icon]transform:rotateY(180deg)[dir=rtl] li-icon>svgfloat:leftli-icon[type$=-pebble-icon][animate]transform:scale(.2);animation:b 334ms ease-in-out forwardsli-icon[type$=-pebble-icon][animate] .circlestroke-dasharray:63;stroke-dashoffset:63;animation:a .5s ease-out forwards;animation-delay:334msli-icon[type$=-pebble-icon][animate][size=small] .circlestroke-dasharray:38;stroke-dashoffset:38li-icon[type^=premium-]width:auto;height:16pxli-icon[type^=premium-][type^=premium-app-icon],li-icon[type^=premium-][type^=premium-inverse-app]height:24pxli-icon[type^=premium-][size=”8dp”]height:8pxli-icon[type^=premium-][size=”10dp”]height:10pxli-icon[type^=premium-][size=”12dp”]height:12pxli-icon[type^=premium-][size=”16dp”]height:16pxli-icon[type^=premium-][size=”20dp”]height:20pxli-icon[type^=premium-][size=”24dp”]height:24pxli-icon[type^=premium-][size=”32dp”]height:32pxli-icon[type^=premium-] textfont-size:24px;font-weight:600;letter-spacing:4px;dominant-baseline:text-before-edge;font-family:Source Sans Pro,Helvetica,Arial,sans-serif@media screen and (-ms-high-contrast:white-on-black)li-icon[type=premium-app-icon],li-icon[type=premium-badge]-ms-high-contrast-adjust:none;background-color:#fffli-icon[type=premium-app-icon] svg,li-icon[type=premium-badge] svgheight:90%!important;position:relative;top:5%;right:2%@media screen and (-ms-high-contrast:black-on-white)li-icon[type=premium-inverse-app-icon],li-icon[type=premium-inverse-badge]-ms-high-contrast-adjust:none;background-color:#000li-icon[type=premium-inverse-app-icon] svg,li-icon[type=premium-inverse-badge] svgheight:90%!important;position:relative;top:5%;right:2%abbr,address,article,aside,audio,b,blockquote,body,canvas,caption,cite,code,dd,del,details,dfn,div,dl,dt,em,fieldset,figcaption,figure,footer,form,h1,h2,h3,h4,h5,h6,header,hgroup,html,i,iframe,img,ins,kbd,label,legend,li,mark,menu,nav,object,ol,p,pre,q,samp,section,small,span,strong,summary,table,tbody,td,tfoot,th,thead,time,tr,ul,var,videomargin:0;padding:0;border:0;font-size:100%;vertical-align:baseline;background:transparentabbr,audio,b,body,canvas,caption,cite,code,del,dfn,em,h1,h2,h3,h4,h5,h6,html,i,iframe,img,ins,kbd,label,legend,mark,object,q,samp,small,span,strong,summary,tbody,td,tfoot,th,thead,time,tr,var,videooutline:0bodyline-height:1article,aside,details,figcaption,figure,footer,header,hgroup,main,menu,nav,sectiondisplay:blocknav ullist-style:noneblockquote,qquotes:noneblockquote:after,blockquote:before,q:after,q:beforecontent:””;content:noneamargin:0;padding:0;font-size:100%;vertical-align:baseline;background:transparentinstext-decoration:noneins,markbackground-color:#ff9;color:#000markfont-style:italic;font-weight:700deltext-decoration:line-throughabbrLinkedIn,dfnLinkedInborder-bottom:1px dotted;cursor:helptableborder-collapse:collapse;border-spacing:0hrborder:0;display:block;height:1px;margin:1rem 0 24px;padding:0;border-color:rgba(0,0,0,.15);border-top:1px solid rgba(0,0,0,.15)@media (max-width:976px)hrmargin-bottom:16px#svg-sourceposition:absolute;top:0;right:-100px;opacity:0.a11y-textborder:0!important;clip:rect(1px,1px,1px,1px);height:1px!important;overflow:hidden;padding:0!important;position:absolute!important;white-space:nowrap!important;width:1px!important[data-artdeco-is-focused=true]outline:none@keyframes d0%opacity:.99toopacity:1.artdeco-link-variant p afont-weight:700!importantformposition:relativeinput,selectvertical-align:middlelabelfont-size:1.4rem;line-height:1.42857;font-weight:400;color:rgba(0,0,0,.9);display:block;margin:1.2rem 0 .3rem:lang(ar) label,:lang(ko) label,:lang(th) label,:lang(zh) labelfont-size:1.5rem;line-height:1.33333label.required:aftercontent:”*”;color:#0073b1;margin-right:.2remlabel[disabled]opacity:.35input[type=date],input[type=datetime-local],input[type=datetime],input[type=email],input[type=month],input[type=number],input[type=password],input[type=search],input[type=tel],input[type=text],input[type=time],input[type=url],input[type=week],textareafont-size:1.4rem;line-height:1.42857;font-weight:400;transition-duration:334ms;transition-property:border-color,box-shadow;box-shadow:none;border-radius:.2rem;border:.1rem solid rgba(0,0,0,.6);padding:0 1rem;width:100%;height:3.2rem;box-sizing:border-box;background-color:transparent;color:rgba(0,0,0,.9)input[type=date]:lang(ar),input[type=date]:lang(ko),input[type=date]:lang(th),input[type=date]:lang(zh),input[type=datetime-local]:lang(ar),input[type=datetime-local]:lang(ko),input[type=datetime-local]:lang(th),input[type=datetime-local]:lang(zh),input[type=datetime]:lang(ar),input[type=datetime]:lang(ko),input[type=datetime]:lang(th),input[type=datetime]:lang(zh),input[type=email]:lang(ar),input[type=email]:lang(ko),input[type=email]:lang(th),input[type=email]:lang(zh),input[type=month]:lang(ar),input[type=month]:lang(ko),input[type=month]:lang(th),input[type=month]:lang(zh),input[type=number]:lang(ar),input[type=number]:lang(ko),input[type=number]:lang(th),input[type=number]:lang(zh),input[type=password]:lang(ar),input[type=password]:lang(ko),input[type=password]:lang(th),input[type=password]:lang(zh),input[type=search]:lang(ar),input[type=search]:lang(ko),input[type=search]:lang(th),input[type=search]:lang(zh),input[type=tel]:lang(ar),input[type=tel]:lang(ko),input[type=tel]:lang(th),input[type=tel]:lang(zh),input[type=text]:lang(ar),input[type=text]:lang(ko),input[type=text]:lang(th),input[type=text]:lang(zh),input[type=time]:lang(ar),input[type=time]:lang(ko),input[type=time]:lang(th),input[type=time]:lang(zh),input[type=url]:lang(ar),input[type=url]:lang(ko),input[type=url]:lang(th),input[type=url]:lang(zh),input[type=week]:lang(ar),input[type=week]:lang(ko),input[type=week]:lang(th),input[type=week]:lang(zh),textarea:lang(ar),textarea:lang(ko),textarea:lang(th),textarea:lang(zh)font-size:1.5rem;line-height:1.33333input[type=date]:-moz-placeholder,input[type=datetime-local]:-moz-placeholder,input[type=datetime]:-moz-placeholder,input[type=email]:-moz-placeholder,input[type=month]:-moz-placeholder,input[type=number]:-moz-placeholder,input[type=password]:-moz-placeholder,input[type=search]:-moz-placeholder,input[type=tel]:-moz-placeholder,input[type=text]:-moz-placeholder,input[type=time]:-moz-placeholder,input[type=url]:-moz-placeholder,input[type=week]:-moz-placeholder,textarea:-moz-placeholdercolor:rgba(0,0,0,.6);opacity:1input[type=date]:-ms-input-placeholder,input[type=datetime-local]:-ms-input-placeholder,input[type=datetime]:-ms-input-placeholder,input[type=email]:-ms-input-placeholder,input[type=month]:-ms-input-placeholder,input[type=number]:-ms-input-placeholder,input[type=password]:-ms-input-placeholder,input[type=search]:-ms-input-placeholder,input[type=tel]:-ms-input-placeholder,input[type=text]:-ms-input-placeholder,input[type=time]:-ms-input-placeholder,input[type=url]:-ms-input-placeholder,input[type=week]:-ms-input-placeholder,textarea:-ms-input-placeholdercolor:rgba(0,0,0,.6);opacity:1input[type=date]::placeholder,input[type=datetime-local]::placeholder,input[type=datetime]::placeholder,input[type=email]::placeholder,input[type=month]::placeholder,input[type=number]::placeholder,input[type=password]::placeholder,input[type=search]::placeholder,input[type=tel]::placeholder,input[type=text]::placeholder,input[type=time]::placeholder,input[type=url]::placeholder,input[type=week]::placeholder,textarea::placeholdercolor:rgba(0,0,0,.6);opacity:1input[type=date]:hover,input[type=datetime-local]:hover,input[type=datetime]:hover,input[type=email]:hover,input[type=month]:hover,input[type=number]:hover,input[type=password]:hover,input[type=search]:hover,input[type=tel]:hover,input[type=text]:hover,input[type=time]:hover,input[type=url]:hover,input[type=week]:hover,textarea:hoverborder-color:rgba(0,0,0,.9)input[type=date]:focus,input[type=datetime-local]:focus,input[type=datetime]:focus,input[type=email]:focus,input[type=month]:focus,input[type=number]:focus,input[type=password]:focus,input[type=search]:focus,input[type=tel]:focus,input[type=text]:focus,input[type=time]:focus,input[type=url]:focus,input[type=week]:focus,textarea:focusborder-color:#0073b1;box-shadow:0 0 0 .1rem #0073b1input[type=date][disabled],input[type=datetime-local][disabled],input[type=datetime][disabled],input[type=email][disabled],input[type=month][disabled],input[type=number][disabled],input[type=password][disabled],input[type=search][disabled],input[type=tel][disabled],input[type=text][disabled],input[type=time][disabled],input[type=url][disabled],input[type=week][disabled],textarea[disabled]opacity:.45input[type=date][disabled]:hover,input[type=datetime-local][disabled]:hover,input[type=datetime][disabled]:hover,input[type=email][disabled]:hover,input[type=month][disabled]:hover,input[type=number][disabled]:hover,input[type=password][disabled]:hover,input[type=search][disabled]:hover,input[type=tel][disabled]:hover,input[type=text][disabled]:hover,input[type=time][disabled]:hover,input[type=url][disabled]:hover,input[type=week][disabled]:hover,textarea[disabled]:hoverborder-color:rgba(0,0,0,.6)input[type=date].error,input[type=datetime-local].error,input[type=datetime].error,input[type=email].error,input[type=month].error,input[type=number].error,input[type=password].error,input[type=search].error,input[type=tel].error,input[type=text].error,input[type=time].error,input[type=url].error,input[type=week].error,textarea.errorborder-color:#d11124input[type=search]-webkit-appearance:textfieldinput[type=search]::-webkit-search-decoration-webkit-appearance:none@media (-ms-high-contrast:none)::-ms-backdrop,artdeco-slider [type=range]background-image:linear-gradient(270deg,transparent,transparent)!important;height:22px!important;margin:-8px 0!importantartdeco-sliderposition:relative;display:block;overflow:hidden;height:32px;box-sizing:content-boxartdeco-slider [type=range]box-sizing:content-box;-webkit-appearance:none;margin:10px 0;width:100%;height:16px;border-radius:16px;margin:8px 0;background-size:100%,calc(16.666% + 1px) 100%,200%;background-position:100% 0,-1px,63.1579%;background-repeat:no-repeat,repeat-x,no-repeat;animation-duration:1ms;animation-name:d;background-image:linear-gradient(270deg,#0084bf 16px,transparent 17px,transparent calc(100% – 18px),#cdcfd2 18px),linear-gradient(270deg,#fff 1px,transparent 0),linear-gradient(270deg,#0084bf 50%,#cdcfd2 0)artdeco-slider [type=range][data-artdeco-slider-reverse]background-image:linear-gradient(270deg,#cdcfd2 16px,transparent 17px,transparent calc(100% – 18px),#0084bf 18px),linear-gradient(270deg,#fff 1px,transparent 0),linear-gradient(270deg,#cdcfd2 50%,#0084bf 0)artdeco-slider [type=range]::-webkit-slider-thumbbox-shadow:0 0 0 1px rgba(0,0,0,.15),0 2px 3px rgba(0,0,0,.2);transition:box-shadow 83ms;height:20px;width:20px;border-radius:10px;background:#fff;cursor:pointer;position:relative;z-index:4;-webkit-appearance:none;margin-top:-2px@media screen and (-ms-high-contrast:active)artdeco-slider [type=range]::-webkit-slider-thumbborder:1px solid activeborderartdeco-slider [type=range]::-webkit-slider-runnable-trackwidth:100%;height:16px;border-radius:16px;background-color:transparent;cursor:pointerartdeco-slider [type=range]::-moz-range-thumbbox-shadow:0 0 0 1px rgba(0,0,0,.15),0 2px 3px rgba(0,0,0,.2);transition:box-shadow 83ms;height:20px;width:20px;border-radius:10px;background:#fff;cursor:pointer;position:relative;z-index:4@media screen and (-ms-high-contrast:active)artdeco-slider [type=range]::-moz-range-thumbborder:1px solid activeborderartdeco-slider [type=range]::-moz-range-trackwidth:100%;height:16px;border-radius:16px;background-color:transparent;cursor:pointerartdeco-slider [type=range]::-ms-trackheight:16px;border-radius:16px;background-color:transparent;cursor:pointer;width:100%;background:transparent;border-color:transparent;color:transparentartdeco-slider [type=range]::-ms-thumbbox-shadow:0 0 0 1px rgba(0,0,0,.15),0 2px 3px rgba(0,0,0,.2);transition:box-shadow 83ms;height:20px;width:20px;border-radius:10px;background:#fff;cursor:pointer;position:relative;z-index:4@media screen and (-ms-high-contrast:active)artdeco-slider [type=range]::-ms-thumbborder:1px solid activeborderartdeco-slider [type=range]::-ms-fill-lowerbackground:#0084bf;border-radius:16px;height:16pxartdeco-slider [type=range]::-ms-fill-upperbackground:#cdcfd2;border-radius:16px;height:16pxartdeco-slider [type=range][data-artdeco-slider-reverse]::-ms-fill-lowerbackground:#cdcfd2artdeco-slider [type=range][data-artdeco-slider-reverse]::-ms-fill-upperbackground:#0084bfartdeco-slider[multiple] input[type=range]position:absolute;top:0;right:0artdeco-slider[multiple] div.artdeco-max-slider-containerposition:absolute;overflow:hidden;top:0;right:0;width:100%;height:100%;z-index:0artdeco-slider+datalist,artdeco-slider+uldisplay:flex;justify-content:space-around;position:relative;padding:0 10px;box-sizing:border-box;user-select:none;list-style:noneartdeco-slider+datalist li,artdeco-slider+datalist option,artdeco-slider+ul li,artdeco-slider+ul optionfont-size:1.2rem;line-height:1.33333;font-weight:400;color:rgba(0,0,0,.6);text-align:center;flex:1;transform:translateX(50%);padding:0:lang(ar) artdeco-slider+datalist li,:lang(ar) artdeco-slider+datalist option,:lang(ar) artdeco-slider+ul li,:lang(ar) artdeco-slider+ul option,:lang(ko) artdeco-slider+datalist li,:lang(ko) artdeco-slider+datalist option,:lang(ko) artdeco-slider+ul li,:lang(ko) artdeco-slider+ul option,:lang(th) artdeco-slider+datalist li,:lang(th) artdeco-slider+datalist option,:lang(th) artdeco-slider+ul li,:lang(th) artdeco-slider+ul option,:lang(zh) artdeco-slider+datalist li,:lang(zh) artdeco-slider+datalist option,:lang(zh) artdeco-slider+ul li,:lang(zh) artdeco-slider+ul optionfont-size:1.3rem;line-height:1.23077artdeco-slider+datalist li:last-of-type,artdeco-slider+datalist option:last-of-type,artdeco-slider+ul li:last-of-type,artdeco-slider+ul option:last-of-typeposition:absolute;right:100%;text-indent:-20px;flex:0;-moz-transform:translateX(-15px)select-webkit-appearance:none;-moz-appearance:none;appearance:none;box-shadow:none;outline:0;height:3.2rem;position:relative;z-index:2;background:transparent;background-image:url(/artdeco/static/images/bg-icons.svg);background-repeat:no-repeat;background-size:2.4rem;background-position:top -31.1rem left .7rem; /*!rtl:remove:start*/background-position:top -31.1rem left .1rem;border:0;width:100%;border:.1rem solid rgba(0,0,0,.6);padding:0 .8rem 0 3.2rem;transition:box-shadow .15s;border-radius:.2rem;color:rgba(0,0,0,.9);font-size:1.4rem;line-height:1.42857;font-weight:400select:lang(ar),select:lang(ko),select:lang(th),select:lang(zh)font-size:1.5rem;line-height:1.33333select::-ms-expanddisplay:noneselect:hoverborder-color:rgba(0,0,0,.9)select:focusborder-color:#0073b1;box-shadow:0 0 0 .1rem #0073b1select[disabled]opacity:.45;background-image:url(/artdeco/static/images/bg-icons.svg)select.errorborder-color:#d11124select:-moz-placeholdercolor:rgba(0,0,0,.6);opacity:1select:-ms-input-placeholdercolor:rgba(0,0,0,.6);opacity:1select::placeholdercolor:rgba(0,0,0,.6);opacity:1@media only screen and (-ms-high-contrast:active)selectbackground-image:url(/artdeco/static/images/bg-icons.svg)textareaheight:auto;padding-top:.7rembuttoncursor:pointerinput[type=checkbox],input[type=radio]pointer-events:none;opacity:0;margin:1.6rem 0 0 .2rem;position:absoluteinput[type=checkbox]+label,input[type=radio]+labeldisplay:block;line-height:2rem;margin-bottom:0;padding:0;position:relative;padding-right:2.8reminput[type=checkbox]+label:after,input[type=checkbox]+label:before,input[type=radio]+label:after,input[type=radio]+label:beforecontent:” “;height:2.2rem;width:2.2rem;top:-.1rem;right:-.1rem;position:absolute;display:block;box-sizing:border-boxinput[type=checkbox]+label:before,input[type=radio]+label:beforebox-shadow:inset 0 0 0 .1rem rgba(0,0,0,.6);border:.1rem solid transparent;background-clip:padding-box;padding:.2reminput[type=checkbox]:hover+label:before,input[type=radio]:hover+label:beforebox-shadow:inset 0 0 0 .1rem rgba(0,0,0,.9)input[type=checkbox]:disabled:hover+label:before,input[type=radio]:disabled:hover+label:beforebox-shadow:inset 0 0 0 .1rem rgba(0,0,0,.6)input[type=checkbox]:focus+label:before,input[type=radio]:focus+label:beforebox-shadow:0 0 0 .1rem #0073b1,inset 0 0 0 .1rem rgba(0,0,0,.9)input[type=checkbox]:checked+label:before,input[type=radio]:checked+label:beforebox-shadow:inset 0 0 0 1.1rem #0073b1input[type=checkbox]:checked+label:after,input[type=radio]:checked+label:afterdisplay:blockinput[type=checkbox]:focus:checked+label:before,input[type=radio]:focus:checked+label:beforebox-shadow:0 0 0 .1rem #0073b1,inset 0 0 0 1.1rem #0073b1input[type=checkbox]:disabled+label,input[type=radio]:disabled+labelopacity:.35input[type=checkbox]:disabled:checked+label:before,input[type=radio]:disabled:checked+label:beforebox-shadow:inset 0 0 0 1.1rem #0073b1input[type=checkbox].small-input+label,input[type=radio].small-input+labelline-height:1.6reminput[type=checkbox].small-input+label:after,input[type=checkbox].small-input+label:before,input[type=radio].small-input+label:after,input[type=radio].small-input+label:beforeheight:1.8rem;width:1.8reminput[type=radio]+label:beforeborder-radius:50%;transition-property:box-shadow;transition-timing-function:cubic-bezier(0,0,.2,1);transition-duration:167msinput[type=radio]:checked+label:beforebox-shadow:inset 0 0 0 .6rem #0073b1,inset 0 0 0 1.1rem #fffinput[type=radio]:focus:checked+label:beforebox-shadow:0 0 0 .1rem #0073b1,inset 0 0 0 .6rem #0073b1,inset 0 0 0 1.1rem #fffinput[type=radio]:disabled:checked+label:beforebox-shadow:inset 0 0 0 .6rem #0073b1,inset 0 0 0 1.1rem #fffinput[type=radio].small-input:checked+label:beforebox-shadow:inset 0 0 0 .5rem #0073b1,inset 0 0 0 1.1rem #fffinput[type=radio].small-input:checked+label:afterborder-width:.5reminput[type=radio].small-input:focus:checked+label:beforebox-shadow:0 0 0 .1rem #0073b1,inset 0 0 0 .5rem #0073b1,inset 0 0 0 1.1rem #fffinput[type=radio].small-input:disabled:checked+label:beforebox-shadow:inset 0 0 0 .5rem #0073b1,inset 0 0 0 1.1rem #fffinput[type=checkbox]+label:beforeborder-radius:.4rem;transition-property:box-shadow;transition-timing-function:cubic-bezier(0,0,.2,1);transition-duration:167msinput[type=checkbox]+label:afterdisplay:none;height:1.6rem;width:1.6rem;background-image:url(/artdeco/static/images/bg-icons.svg);background-size:2.4rem;overflow:hidden;margin:.3reminput[type=checkbox]:checked+label:afterdisplay:block;background-position:0 -2.4reminput[type=checkbox].small-input+label:aftertop:-.3rem;right:-.3reminput[type=checkbox]:indeterminate+label:beforebox-shadow:inset 0 0 0 1.1rem #0073b1input[type=checkbox]:indeterminate:focus+label:beforebox-shadow:0 0 0 .1rem #0073b1,inset 0 0 0 1.1rem #0073b1input[type=checkbox]:indeterminate:disabled+label:beforebox-shadow:inset 0 0 0 1.1rem #0073b1input[type=checkbox]:indeterminate+label:afterdisplay:block;content:””;background:#fff;height:.2rem;width:1.2rem;top:.6rem;right:.1reminput[type=checkbox].small-input:indeterminate+label:afterheight:.2rem;width:1rem;top:.4rem;right:0form.inverse-form labelcolor:#fffform.inverse-form label.required:aftercolor:#98d8f4form.inverse-form label[disabled]opacity:.45form.inverse-form input[type=date],form.inverse-form input[type=datetime-local],form.inverse-form input[type=datetime],form.inverse-form input[type=email],form.inverse-form input[type=month],form.inverse-form input[type=number],form.inverse-form input[type=password],form.inverse-form input[type=search],form.inverse-form input[type=tel],form.inverse-form input[type=text],form.inverse-form input[type=time],form.inverse-form input[type=url],form.inverse-form input[type=week],form.inverse-form select,form.inverse-form textareacolor:#fff;border-color:hsla(0,0%,100%,.7)form.inverse-form input[type=date]:-moz-placeholder,form.inverse-form input[type=datetime-local]:-moz-placeholder,form.inverse-form input[type=datetime]:-moz-placeholder,form.inverse-form input[type=email]:-moz-placeholder,form.inverse-form input[type=month]:-moz-placeholder,form.inverse-form input[type=number]:-moz-placeholder,form.inverse-form input[type=password]:-moz-placeholder,form.inverse-form input[type=search]:-moz-placeholder,form.inverse-form input[type=tel]:-moz-placeholder,form.inverse-form input[type=text]:-moz-placeholder,form.inverse-form input[type=time]:-moz-placeholder,form.inverse-form input[type=url]:-moz-placeholder,form.inverse-form input[type=week]:-moz-placeholder,form.inverse-form select:-moz-placeholder,form.inverse-form textarea:-moz-placeholdercolor:hsla(0,0%,100%,.7);opacity:1form.inverse-form input[type=date]:-ms-input-placeholder,form.inverse-form input[type=datetime-local]:-ms-input-placeholder,form.inverse-form input[type=datetime]:-ms-input-placeholder,form.inverse-form input[type=email]:-ms-input-placeholder,form.inverse-form input[type=month]:-ms-input-placeholder,form.inverse-form input[type=number]:-ms-input-placeholder,form.inverse-form input[type=password]:-ms-input-placeholder,form.inverse-form input[type=search]:-ms-input-placeholder,form.inverse-form input[type=tel]:-ms-input-placeholder,form.inverse-form input[type=text]:-ms-input-placeholder,form.inverse-form input[type=time]:-ms-input-placeholder,form.inverse-form input[type=url]:-ms-input-placeholder,form.inverse-form input[type=week]:-ms-input-placeholder,form.inverse-form select:-ms-input-placeholder,form.inverse-form textarea:-ms-input-placeholdercolor:hsla(0,0%,100%,.7);opacity:1form.inverse-form input[type=date]::placeholder,form.inverse-form input[type=datetime-local]::placeholder,form.inverse-form input[type=datetime]::placeholder,form.inverse-form input[type=email]::placeholder,form.inverse-form input[type=month]::placeholder,form.inverse-form input[type=number]::placeholder,form.inverse-form input[type=password]::placeholder,form.inverse-form input[type=search]::placeholder,form.inverse-form input[type=tel]::placeholder,form.inverse-form input[type=text]::placeholder,form.inverse-form input[type=time]::placeholder,form.inverse-form input[type=url]::placeholder,form.inverse-form input[type=week]::placeholder,form.inverse-form select::placeholder,form.inverse-form textarea::placeholdercolor:hsla(0,0%,100%,.7);opacity:1form.inverse-form input[type=date]:disabled,form.inverse-form input[type=datetime-local]:disabled,form.inverse-form input[type=datetime]:disabled,form.inverse-form input[type=email]:disabled,form.inverse-form input[type=month]:disabled,form.inverse-form input[type=number]:disabled,form.inverse-form input[type=password]:disabled,form.inverse-form input[type=search]:disabled,form.inverse-form input[type=tel]:disabled,form.inverse-form input[type=text]:disabled,form.inverse-form input[type=time]:disabled,form.inverse-form input[type=url]:disabled,form.inverse-form input[type=week]:disabled,form.inverse-form select:disabled,form.inverse-form textarea:disabledopacity:.45form.inverse-form input[type=date]:hover,form.inverse-form input[type=datetime-local]:hover,form.inverse-form input[type=datetime]:hover,form.inverse-form input[type=email]:hover,form.inverse-form input[type=month]:hover,form.inverse-form input[type=number]:hover,form.inverse-form input[type=password]:hover,form.inverse-form input[type=search]:hover,form.inverse-form input[type=tel]:hover,form.inverse-form input[type=text]:hover,form.inverse-form input[type=time]:hover,form.inverse-form input[type=url]:hover,form.inverse-form input[type=week]:hover,form.inverse-form select:hover,form.inverse-form textarea:hoverborder-color:#fffform.inverse-form input[type=date]:focus,form.inverse-form input[type=datetime-local]:focus,form.inverse-form input[type=datetime]:focus,form.inverse-form input[type=email]:focus,form.inverse-form input[type=month]:focus,form.inverse-form input[type=number]:focus,form.inverse-form input[type=password]:focus,form.inverse-form input[type=search]:focus,form.inverse-form input[type=tel]:focus,form.inverse-form input[type=text]:focus,form.inverse-form input[type=time]:focus,form.inverse-form input[type=url]:focus,form.inverse-form input[type=week]:focus,form.inverse-form select:focus,form.inverse-form textarea:focusborder-color:#98d8f4;box-shadow:0 0 0 .1rem #98d8f4form.inverse-form selectbackground-position:top -335px right 7pxform.inverse-form select:disabledborder-color:hsla(0,0%,100%,.25)form.inverse-form select optioncolor:rgba(0,0,0,.6)form.inverse-form input[type=checkbox]+label,form.inverse-form input[type=radio]+labelcolor:#fffform.inverse-form input[type=checkbox]+label:before,form.inverse-form input[type=checkbox]:disabled:hover+label:before,form.inverse-form input[type=radio]+label:before,form.inverse-form input[type=radio]:disabled:hover+label:beforebox-shadow:inset 0 0 0 1px hsla(0,0%,100%,.7)form.inverse-form input[type=checkbox]:hover+label:before,form.inverse-form input[type=radio]:hover+label:beforebox-shadow:inset 0 0 0 1px #fffform.inverse-form input[type=checkbox]:checked+label:before,form.inverse-form input[type=radio]:checked+label:beforebox-shadow:inset 0 0 0 1.1rem #98d8f4form.inverse-form input[type=checkbox]:checked+label:after,form.inverse-form input[type=radio]:checked+label:afterbackground-position:100% -366pxform.inverse-form input[type=checkbox]:focus+label:before,form.inverse-form input[type=radio]:focus+label:beforebox-shadow:0 0 0 1px #98d8f4,inset 0 0 0 1px #fffform.inverse-form input[type=checkbox]:focus:checked+label:before,form.inverse-form input[type=radio]:focus:checked+label:beforebox-shadow:0 0 0 1px #98d8f4,inset 0 0 0 1.1rem #98d8f4form.inverse-form input[type=checkbox]:disabled:checked+label:before,form.inverse-form input[type=radio]:disabled:checked+label:beforebox-shadow:inset 0 0 0 1.1rem #98d8f4form.inverse-form input[type=checkbox]:disabled:checked+label:after,form.inverse-form input[type=radio]:disabled:checked+label:afterbackground-position:100% -366pxform.inverse-form input[type=radio]:checked+label:beforebox-shadow:inset 0 0 0 6px #98d8f4,inset 0 0 0 1.1rem rgba(0,0,0,.6),inset 0 0 0 1.1rem #98d8f4form.inverse-form input[type=radio]:focus:checked+label:beforebox-shadow:0 0 0 1px #98d8f4,inset 0 0 0 6px #98d8f4,inset 0 0 0 1.1rem rgba(0,0,0,.6),inset 0 0 0 1.1rem #98d8f4form.inverse-form input[type=radio]:disabled:checked+label:beforebox-shadow:inset 0 0 0 6px #98d8f4,inset 0 0 0 1.1rem rgba(0,0,0,.6),inset 0 0 0 1.1rem #98d8f4form.inverse-form input[type=radio].small-input:checked+label:beforebox-shadow:inset 0 0 0 5px #98d8f4,inset 0 0 0 1.1rem rgba(0,0,0,.6),inset 0 0 0 1.1rem #98d8f4form.inverse-form input[type=radio].small-input:checked+label:afterborder-width:5pxform.inverse-form input[type=radio].small-input:focus:checked+label:beforebox-shadow:0 0 0 1px #98d8f4,inset 0 0 0 5px #98d8f4,inset 0 0 0 1.1rem rgba(0,0,0,.6),inset 0 0 0 1.1rem #98d8f4form.inverse-form input[type=radio].small-input:disabled:checked+label:beforebox-shadow:inset 0 0 0 5px #98d8f4,inset 0 0 0 1.1rem rgba(0,0,0,.6),inset 0 0 0 1.1rem #98d8f4form.inverse-form input[type=checkbox]:indeterminate+label:afterbackground:rgba(0,0,0,.6)form.inverse-form input[type=checkbox]:indeterminate+label:beforebox-shadow:inset 0 0 0 1.1rem #98d8f4form.inverse-form input[type=checkbox]:indeterminate:focus+label:beforebox-shadow:0 0 0 1px #98d8f4,inset 0 0 0 1.1rem #98d8f4form.inverse-form input[type=checkbox]:indeterminate:disabled+label:beforebox-shadow:inset 0 0 0 1.1rem #98d8f4form.simple-form input[type=date],form.simple-form input[type=datetime-local],form.simple-form input[type=datetime],form.simple-form input[type=email],form.simple-form input[type=month],form.simple-form input[type=number],form.simple-form input[type=password],form.simple-form input[type=search],form.simple-form input[type=tel],form.simple-form input[type=text],form.simple-form input[type=time],form.simple-form input[type=url],form.simple-form input[type=week],form.simple-form selectborder-radius:0;padding-right:0;padding-left:0form.simple-form input[type=date],form.simple-form input[type=date]:disabled,form.simple-form input[type=date]:focus,form.simple-form input[type=date]:hover,form.simple-form input[type=datetime-local],form.simple-form input[type=datetime-local]:disabled,form.simple-form input[type=datetime-local]:focus,form.simple-form input[type=datetime-local]:hover,form.simple-form input[type=datetime],form.simple-form input[type=datetime]:disabled,form.simple-form input[type=datetime]:focus,form.simple-form input[type=datetime]:hover,form.simple-form input[type=email],form.simple-form input[type=email]:disabled,form.simple-form input[type=email]:focus,form.simple-form input[type=email]:hover,form.simple-form input[type=month],form.simple-form input[type=month]:disabled,form.simple-form input[type=month]:focus,form.simple-form input[type=month]:hover,form.simple-form input[type=number],form.simple-form input[type=number]:disabled,form.simple-form input[type=number]:focus,form.simple-form input[type=number]:hover,form.simple-form input[type=password],form.simple-form input[type=password]:disabled,form.simple-form input[type=password]:focus,form.simple-form input[type=password]:hover,form.simple-form input[type=search],form.simple-form input[type=search]:disabled,form.simple-form input[type=search]:focus,form.simple-form input[type=search]:hover,form.simple-form input[type=tel],form.simple-form input[type=tel]:disabled,form.simple-form input[type=tel]:focus,form.simple-form input[type=tel]:hover,form.simple-form input[type=text],form.simple-form input[type=text]:disabled,form.simple-form input[type=text]:focus,form.simple-form input[type=text]:hover,form.simple-form input[type=time],form.simple-form input[type=time]:disabled,form.simple-form input[type=time]:focus,form.simple-form input[type=time]:hover,form.simple-form input[type=url],form.simple-form input[type=url]:disabled,form.simple-form input[type=url]:focus,form.simple-form input[type=url]:hover,form.simple-form input[type=week],form.simple-form input[type=week]:disabled,form.simple-form input[type=week]:focus,form.simple-form input[type=week]:hover,form.simple-form select,form.simple-form select:disabled,form.simple-form select:focus,form.simple-form select:hoverborder-width:0 0 1pxform.simple-form input[type=date]:focus,form.simple-form input[type=datetime-local]:focus,form.simple-form input[type=datetime]:focus,form.simple-form input[type=email]:focus,form.simple-form input[type=month]:focus,form.simple-form input[type=number]:focus,form.simple-form input[type=password]:focus,form.simple-form input[type=search]:focus,form.simple-form input[type=tel]:focus,form.simple-form input[type=text]:focus,form.simple-form input[type=time]:focus,form.simple-form input[type=url]:focus,form.simple-form input[type=week]:focus,form.simple-form select:focusbox-shadow:0 1px 0 0 #0073b1form.simple-form selectpadding-left:32pxform.simple-form .floating-labelposition:relative;display:block;margin-top:35pxform.simple-form .floating-label .label-textposition:absolute;top:10px;right:0;transition:all .35s ease;margin:0form.simple-form .floating-label[data-form-elem-focus=true] .label-texttransform:translateY(-25px);-webkit-transform:translateY(-25px)form.simple-form.inverse-form input[type=date]:focus,form.simple-form.inverse-form input[type=datetime-local]:focus,form.simple-form.inverse-form input[type=datetime]:focus,form.simple-form.inverse-form input[type=email]:focus,form.simple-form.inverse-form input[type=month]:focus,form.simple-form.inverse-form input[type=number]:focus,form.simple-form.inverse-form input[type=password]:focus,form.simple-form.inverse-form input[type=search]:focus,form.simple-form.inverse-form input[type=tel]:focus,form.simple-form.inverse-form input[type=text]:focus,form.simple-form.inverse-form input[type=time]:focus,form.simple-form.inverse-form input[type=url]:focus,form.simple-form.inverse-form input[type=week]:focus,form.simple-form.inverse-form select:focusbox-shadow:0 1px 0 0 #98d8f4@media screen and (-ms-high-contrast:active)input[type=checkbox]:focus+label:before,input[type=date]:focus,input[type=datetime-local]:focus,input[type=datetime]:focus,input[type=email]:focus,input[type=month]:focus,input[type=number]:focus,input[type=password]:focus,input[type=radio]:focus+label:before,input[type=search]:focus,input[type=tel]:focus,input[type=text]:focus,input[type=time]:focus,input[type=url]:focus,input[type=week]:focus,select:focus,textarea:focusoutline:2px dotted ButtonTextinput[type=checkbox]:checked+label:aftercontent:”\2714″;font-size:1.8rem;top:-3px;right:0;background:transparentinput[type=checkbox]:checked.small-input+label:afterfont-size:1.6rem;right:-1pxinput[type=radio]:checked+label:afterborder:7px solid currentColor;border-radius:50%;width:2.2rem;height:2.2reminput[type=radio]:checked.small-input+label:afterwidth:1.8rem;height:1.8reminput[type=checkbox]:indeterminate+label:afterbackground:currentColorartdeco-floatlabelposition:relative;display:block;margin-top:35pxartdeco-floatlabel input[type=date],artdeco-floatlabel input[type=datetime-local],artdeco-floatlabel input[type=datetime],artdeco-floatlabel input[type=email],artdeco-floatlabel input[type=month],artdeco-floatlabel input[type=number],artdeco-floatlabel input[type=password],artdeco-floatlabel input[type=search],artdeco-floatlabel input[type=tel],artdeco-floatlabel input[type=text],artdeco-floatlabel input[type=time],artdeco-floatlabel input[type=url],artdeco-floatlabel input[type=week]border-radius:0;padding-right:0;padding-left:0artdeco-floatlabel input[type=date],artdeco-floatlabel input[type=date]:disabled,artdeco-floatlabel input[type=date]:focus,artdeco-floatlabel input[type=date]:hover,artdeco-floatlabel input[type=datetime-local],artdeco-floatlabel input[type=datetime-local]:disabled,artdeco-floatlabel input[type=datetime-local]:focus,artdeco-floatlabel input[type=datetime-local]:hover,artdeco-floatlabel input[type=datetime],artdeco-floatlabel input[type=datetime]:disabled,artdeco-floatlabel input[type=datetime]:focus,artdeco-floatlabel input[type=datetime]:hover,artdeco-floatlabel input[type=email],artdeco-floatlabel input[type=email]:disabled,artdeco-floatlabel input[type=email]:focus,artdeco-floatlabel input[type=email]:hover,artdeco-floatlabel input[type=month],artdeco-floatlabel input[type=month]:disabled,artdeco-floatlabel input[type=month]:focus,artdeco-floatlabel input[type=month]:hover,artdeco-floatlabel input[type=number],artdeco-floatlabel input[type=number]:disabled,artdeco-floatlabel input[type=number]:focus,artdeco-floatlabel input[type=number]:hover,artdeco-floatlabel input[type=password],artdeco-floatlabel input[type=password]:disabled,artdeco-floatlabel input[type=password]:focus,artdeco-floatlabel input[type=password]:hover,artdeco-floatlabel input[type=search],artdeco-floatlabel input[type=search]:disabled,artdeco-floatlabel input[type=search]:focus,artdeco-floatlabel input[type=search]:hover,artdeco-floatlabel input[type=tel],artdeco-floatlabel input[type=tel]:disabled,artdeco-floatlabel input[type=tel]:focus,artdeco-floatlabel input[type=tel]:hover,artdeco-floatlabel input[type=text],artdeco-floatlabel input[type=text]:disabled,artdeco-floatlabel input[type=text]:focus,artdeco-floatlabel input[type=text]:hover,artdeco-floatlabel input[type=time],artdeco-floatlabel input[type=time]:disabled,artdeco-floatlabel input[type=time]:focus,artdeco-floatlabel input[type=time]:hover,artdeco-floatlabel input[type=url],artdeco-floatlabel input[type=url]:disabled,artdeco-floatlabel input[type=url]:focus,artdeco-floatlabel input[type=url]:hover,artdeco-floatlabel input[type=week],artdeco-floatlabel input[type=week]:disabled,artdeco-floatlabel input[type=week]:focus,artdeco-floatlabel input[type=week]:hoverborder-width:0 0 1px;outline:0artdeco-floatlabel input[type=date]:focus,artdeco-floatlabel input[type=datetime-local]:focus,artdeco-floatlabel input[type=datetime]:focus,artdeco-floatlabel input[type=email]:focus,artdeco-floatlabel input[type=month]:focus,artdeco-floatlabel input[type=number]:focus,artdeco-floatlabel input[type=password]:focus,artdeco-floatlabel input[type=search]:focus,artdeco-floatlabel input[type=tel]:focus,artdeco-floatlabel input[type=text]:focus,artdeco-floatlabel input[type=time]:focus,artdeco-floatlabel input[type=url]:focus,artdeco-floatlabel input[type=week]:focusbox-shadow:0 1px 0 0 #0084bfartdeco-floatlabel selectpadding-left:32pxartdeco-floatlabel .artdeco-label-textposition:absolute;top:10px;right:0;transition:all .35s ease;margin:0artdeco-floatlabel[data-form-elem-focus=true] .artdeco-label-texttransform:translateY(-25px);-webkit-transform:translateY(-25px)htmlfont-size:62.5%html.artdeco-webkit-font-smoothing:antialiased@media only screen and (-webkit-min-device-pixel-ratio:1.25),only screen and (min-device-pixel-ratio:1.25),only screen and (min-resolution:1.25dppx),only screen and (min-resolution:200dpi)html.artdeco-webkit-font-smoothing:subpixel-antialiasedbodyfont-family:-apple-system,system-ui,BlinkMacSystemFont,Segoe UI,Roboto,Helvetica Neue,Fira Sans,Ubuntu,Oxygen,Oxygen Sans,Cantarell,Droid Sans,Apple Color Emoji,Segoe UI Emoji,Segoe UI Symbol,Lucida Grande,Helvetica,Arial,sans-serif:lang(ar) bodyfont-family:var(–artdeco-typography-ar):lang(ja) bodyfont-family:var(–artdeco-typography-ja)body :lang(ko)font-family:var(–artdeco-typography-ko):lang(th) bodyfont-family:var(–artdeco-typography-th):lang(zh) bodyfont-family:var(–artdeco-typography-zh)atext-decoration:none;font-weight:600;background-color:transparent;border:0a,a:visitedcolor:#0073b1a:focus,a:hovertext-decoration:underline;color:#006097a:activecolor:#004b7ca:visitedcolor:#665ed0a:visited:hovercolor:#544bc2a:visited:activecolor:#4034b0b,strongfont-weight:600body,pfont-size:1.6rem;line-height:1.5;font-weight:400;color:rgba(0,0,0,.9):lang(ar) body,:lang(ar) p,:lang(ko) body,:lang(ko) p,:lang(th) body,:lang(th) p,:lang(zh) body,:lang(zh) pfont-size:1.7rem;line-height:1.41176.large-header,h1font-size:4rem;line-height:1.2;font-weight:400;color:rgba(0,0,0,.9):lang(ar) .large-header,:lang(ar) h1,:lang(ko) .large-header,:lang(ko) h1,:lang(th) .large-header,:lang(th) h1,:lang(zh) .large-header,:lang(zh) h1line-height:1.2h2font-size:3.2rem;font-weight:400;color:rgba(0,0,0,.9):lang(ar) h2,:lang(ko) h2,:lang(th) h2,:lang(zh) h2,h2line-height:1.25.large-text,h3font-size:2.4rem;font-weight:400;color:rgba(0,0,0,.9).large-text,:lang(ar) .large-text,:lang(ar) h3,:lang(ko) .large-text,:lang(ko) h3,:lang(th) .large-text,:lang(th) h3,:lang(zh) .large-text,:lang(zh) h3,h3line-height:1.33333.medium-text,h4font-size:2rem;line-height:1.4;font-weight:400;color:rgba(0,0,0,.9):lang(ar) .medium-text,:lang(ar) h4,:lang(ko) .medium-text,:lang(ko) h4,:lang(th) .medium-text,:lang(th) h4,:lang(zh) .medium-text,:lang(zh) h4font-size:2.1rem;line-height:1.33333.small-text,h5font-size:1.6rem;line-height:1.5;font-weight:400;color:rgba(0,0,0,.9):lang(ar) .small-text,:lang(ar) h5,:lang(ko) .small-text,:lang(ko) h5,:lang(th) .small-text,:lang(th) h5,:lang(zh) .small-text,:lang(zh) h5font-size:1.7rem;line-height:1.41176h6font-size:1.4rem;line-height:1.42857;font-weight:600;color:rgba(0,0,0,.6):lang(ar) h6,:lang(ko) h6,:lang(th) h6,:lang(zh) h6font-size:1.5rem;line-height:1.33333em,ifont-style:italicem:lang(ar),em:lang(ja),em:lang(ko),em:lang(th),em:lang(zh),i:lang(ar),i:lang(ja),i:lang(ko),i:lang(th),i:lang(zh)font-family:inherit;font-style:normal!importantbutton,input,select,textareafont-family:inherit.small-textfont-size:1.45rem;line-height:1.375blockquotefont-size:1.6rem;line-height:1.5;font-weight:400;color:rgba(0,0,0,.9):lang(ar) blockquote,:lang(ko) blockquote,:lang(th) blockquote,:lang(zh) blockquotefont-size:1.7rem;line-height:1.41176artdeco-pill,artdeco-toggle-pillheight:32px;color:rgba(0,0,0,.6);border:0artdeco-pill .artdeco-pill-icons,artdeco-toggle-pill .artdeco-pill-iconsposition:relative;margin-right:0;height:16px;width:16pxartdeco-pill li-icon,artdeco-toggle-pill li-iconposition:absolute;top:0;right:0;transform:scale(0);transition:transform 167ms ease-in-outartdeco-pill li-icon[type=plus-icon],artdeco-toggle-pill li-icon[type=plus-icon]transform:scale(1)artdeco-pill li-icon[type=cancel-icon],artdeco-toggle-pill li-icon[type=cancel-icon]transform:scale(1) rotate(-45deg);opacity:0;transition:transform 167ms ease-in-out,opacity 0ms 167msartdeco-pill[type=toggle] .artdeco-toggle-pill-wrapper,artdeco-toggle-pill .artdeco-toggle-pill-wrapperdisplay:inline-flex;align-items:centerartdeco-pill[type=toggle] button,artdeco-toggle-pill buttonborder:noneartdeco-pill[type=toggle] button,artdeco-pill[type=toggle] label,artdeco-toggle-pill button,artdeco-toggle-pill labelfont-size:1.4rem;line-height:1.42857;font-weight:600;color:rgba(0,0,0,.9);display:inline-flex;min-height:32px;align-items:center;padding:6px 10px 6px 12px;margin:0;box-shadow:inset 0 0 0 1px #0073b1;background-color:transparent;color:#0073b1;border-radius:32px;box-sizing:border-box;transition:color 334ms ease-in-out,box-shadow 334ms ease-in-out,background-color 334ms ease-in-out:lang(ar) artdeco-pill[type=toggle] button,:lang(ar) artdeco-pill[type=toggle] label,:lang(ar) artdeco-toggle-pill button,:lang(ar) artdeco-toggle-pill label,:lang(ko) artdeco-pill[type=toggle] button,:lang(ko) artdeco-pill[type=toggle] label,:lang(ko) artdeco-toggle-pill button,:lang(ko) artdeco-toggle-pill label,:lang(th) artdeco-pill[type=toggle] button,:lang(th) artdeco-pill[type=toggle] label,:lang(th) artdeco-toggle-pill button,:lang(th) artdeco-toggle-pill label,:lang(zh) artdeco-pill[type=toggle] button,:lang(zh) artdeco-pill[type=toggle] label,:lang(zh) artdeco-toggle-pill button,:lang(zh) artdeco-toggle-pill labelfont-size:1.5rem;line-height:1.33333artdeco-pill[type=toggle] button span,artdeco-pill[type=toggle] label span,artdeco-toggle-pill button span,artdeco-toggle-pill label spanmargin-right:5pxartdeco-pill[type=toggle] button .artdeco-pill-content,artdeco-pill[type=toggle] label .artdeco-pill-content,artdeco-toggle-pill button .artdeco-pill-content,artdeco-toggle-pill label .artdeco-pill-contentdisplay:inline-flex;align-items:centerartdeco-pill[type=toggle] button:after,artdeco-pill[type=toggle] button:before,artdeco-pill[type=toggle] label:after,artdeco-pill[type=toggle] label:before,artdeco-toggle-pill button:after,artdeco-toggle-pill button:before,artdeco-toggle-pill label:after,artdeco-toggle-pill label:beforedisplay:noneartdeco-pill[type=toggle] button,artdeco-toggle-pill buttonpadding-top:6pxartdeco-pill[type=toggle]:hover button,artdeco-pill[type=toggle]:hover label,artdeco-pill[type=toggle][data-artdeco-focus] button,artdeco-pill[type=toggle][data-artdeco-focus] label,artdeco-toggle-pill:hover button,artdeco-toggle-pill:hover label,artdeco-toggle-pill[data-artdeco-focus] button,artdeco-toggle-pill[data-artdeco-focus] labelbox-shadow:inset 0 0 0 2px #006097;color:#006097;background-color:transparentartdeco-pill[type=toggle]:active button,artdeco-pill[type=toggle]:active label,artdeco-toggle-pill:active button,artdeco-toggle-pill:active labelbox-shadow:inset 0 0 0 2px #004b7c;color:#004b7cartdeco-pill[type=toggle][checked] button,artdeco-pill[type=toggle][checked] label,artdeco-toggle-pill[checked] button,artdeco-toggle-pill[checked] labelbox-shadow:inset 0 0 0 2px transparent;color:#fff;background-color:#0073b1artdeco-pill[type=toggle][checked] button li-icon[type=check-icon],artdeco-pill[type=toggle][checked] label li-icon[type=check-icon],artdeco-toggle-pill[checked] button li-icon[type=check-icon],artdeco-toggle-pill[checked] label li-icon[type=check-icon]transform:scale(1);transition:transform 167ms ease-in-out 167msartdeco-pill[type=toggle][checked] button li-icon[type=cancel-icon],artdeco-pill[type=toggle][checked] button li-icon[type=plus-icon],artdeco-pill[type=toggle][checked] label li-icon[type=cancel-icon],artdeco-pill[type=toggle][checked] label li-icon[type=plus-icon],artdeco-toggle-pill[checked] button li-icon[type=cancel-icon],artdeco-toggle-pill[checked] button li-icon[type=plus-icon],artdeco-toggle-pill[checked] label li-icon[type=cancel-icon],artdeco-toggle-pill[checked] label li-icon[type=plus-icon]transform:scale(0);transition:transform 167ms ease-in-out,opacity 0ms 167msartdeco-pill[type=toggle][checked]:hover button,artdeco-pill[type=toggle][checked]:hover label,artdeco-pill[type=toggle][checked][data-artdeco-focus] button,artdeco-pill[type=toggle][checked][data-artdeco-focus] label,artdeco-toggle-pill[checked]:hover button,artdeco-toggle-pill[checked]:hover label,artdeco-toggle-pill[checked][data-artdeco-focus] button,artdeco-toggle-pill[checked][data-artdeco-focus] labelbox-shadow:inset 0 0 0 2px #006097;background-color:#006097;color:#fffartdeco-pill[type=toggle][checked]:hover button li-icon[type=cancel-icon],artdeco-pill[type=toggle][checked]:hover label li-icon[type=cancel-icon],artdeco-pill[type=toggle][checked][data-artdeco-focus] button li-icon[type=cancel-icon],artdeco-pill[type=toggle][checked][data-artdeco-focus] label li-icon[type=cancel-icon],artdeco-toggle-pill[checked]:hover button li-icon[type=cancel-icon],artdeco-toggle-pill[checked]:hover label li-icon[type=cancel-icon],artdeco-toggle-pill[checked][data-artdeco-focus] button li-icon[type=cancel-icon],artdeco-toggle-pill[checked][data-artdeco-focus] label li-icon[type=cancel-icon]transform:scale(1);opacity:1;transition:transform 167ms ease-in-out 167msartdeco-pill[type=toggle][checked]:hover button li-icon[type=check-icon],artdeco-pill[type=toggle][checked]:hover button li-icon[type=plus-icon],artdeco-pill[type=toggle][checked]:hover label li-icon[type=check-icon],artdeco-pill[type=toggle][checked]:hover label li-icon[type=plus-icon],artdeco-pill[type=toggle][checked][data-artdeco-focus] button li-icon[type=check-icon],artdeco-pill[type=toggle][checked][data-artdeco-focus] button li-icon[type=plus-icon],artdeco-pill[type=toggle][checked][data-artdeco-focus] label li-icon[type=check-icon],artdeco-pill[type=toggle][checked][data-artdeco-focus] label li-icon[type=plus-icon],artdeco-toggle-pill[checked]:hover button li-icon[type=check-icon],artdeco-toggle-pill[checked]:hover button li-icon[type=plus-icon],artdeco-toggle-pill[checked]:hover label li-icon[type=check-icon],artdeco-toggle-pill[checked]:hover label li-icon[type=plus-icon],artdeco-toggle-pill[checked][data-artdeco-focus] button li-icon[type=check-icon],artdeco-toggle-pill[checked][data-artdeco-focus] button li-icon[type=plus-icon],artdeco-toggle-pill[checked][data-artdeco-focus] label li-icon[type=check-icon],artdeco-toggle-pill[checked][data-artdeco-focus] label li-icon[type=plus-icon]transform:scale(0);transition:transform 167ms ease-in-outartdeco-pill[type=toggle][checked]:active button,artdeco-pill[type=toggle][checked]:active label,artdeco-toggle-pill[checked]:active button,artdeco-toggle-pill[checked]:active labelbox-shadow:inset 0 0 0 2px #004b7c;background-color:#004b7c;color:#fffartdeco-pill[type=toggle][color-scheme=muted] button,artdeco-pill[type=toggle][color-scheme=muted] label,artdeco-toggle-pill[color-scheme=muted] button,artdeco-toggle-pill[color-scheme=muted] labelbox-shadow:inset 0 0 0 1px rgba(0,0,0,.6);background-color:transparent;color:rgba(0,0,0,.6)artdeco-pill[type=toggle][color-scheme=muted]:hover button,artdeco-pill[type=toggle][color-scheme=muted]:hover label,artdeco-pill[type=toggle][color-scheme=muted][data-artdeco-focus] button,artdeco-pill[type=toggle][color-scheme=muted][data-artdeco-focus] label,artdeco-toggle-pill[color-scheme=muted]:hover button,artdeco-toggle-pill[color-scheme=muted]:hover label,artdeco-toggle-pill[color-scheme=muted][data-artdeco-focus] button,artdeco-toggle-pill[color-scheme=muted][data-artdeco-focus] labelbox-shadow:inset 0 0 0 2px rgba(0,0,0,.75);color:rgba(0,0,0,.75);background-color:transparentartdeco-pill[type=toggle][color-scheme=muted]:active button,artdeco-pill[type=toggle][color-scheme=muted]:active label,artdeco-toggle-pill[color-scheme=muted]:active button,artdeco-toggle-pill[color-scheme=muted]:active labelbox-shadow:inset 0 0 0 2px rgba(0,0,0,.9);color:rgba(0,0,0,.9)artdeco-pill[type=toggle][color-scheme=muted][checked] button,artdeco-pill[type=toggle][color-scheme=muted][checked] label,artdeco-toggle-pill[color-scheme=muted][checked] button,artdeco-toggle-pill[color-scheme=muted][checked] labelbox-shadow:inset 0 0 0 2px transparent;color:rgba(0,0,0,.6);background-color:rgba(199,209,216,.45)artdeco-pill[type=toggle][color-scheme=muted][checked]:hover button,artdeco-pill[type=toggle][color-scheme=muted][checked]:hover label,artdeco-pill[type=toggle][color-scheme=muted][checked][data-artdeco-focus] button,artdeco-pill[type=toggle][color-scheme=muted][checked][data-artdeco-focus] label,artdeco-toggle-pill[color-scheme=muted][checked]:hover button,artdeco-toggle-pill[color-scheme=muted][checked]:hover label,artdeco-toggle-pill[color-scheme=muted][checked][data-artdeco-focus] button,artdeco-toggle-pill[color-scheme=muted][checked][data-artdeco-focus] labelbox-shadow:inset 0 0 0 2px transparent;background-color:rgba(199,209,216,.6);color:rgba(0,0,0,.75)artdeco-pill[type=toggle][color-scheme=muted][checked]:active button,artdeco-pill[type=toggle][color-scheme=muted][checked]:active label,artdeco-toggle-pill[color-scheme=muted][checked]:active button,artdeco-toggle-pill[color-scheme=muted][checked]:active labelbox-shadow:inset 0 0 0 2px transparent;background-color:rgba(199,209,216,.75);color:rgba(0,0,0,.9)artdeco-pill[type=toggle][color-scheme=inverse] button,artdeco-pill[type=toggle][color-scheme=inverse] label,artdeco-toggle-pill[color-scheme=inverse] button,artdeco-toggle-pill[color-scheme=inverse] labelbox-shadow:inset 0 0 0 1px #fff;background-color:transparent;color:#fffartdeco-pill[type=toggle][color-scheme=inverse]:hover button,artdeco-pill[type=toggle][color-scheme=inverse]:hover label,artdeco-pill[type=toggle][color-scheme=inverse][data-artdeco-focus] button,artdeco-pill[type=toggle][color-scheme=inverse][data-artdeco-focus] label,artdeco-toggle-pill[color-scheme=inverse]:hover button,artdeco-toggle-pill[color-scheme=inverse]:hover label,artdeco-toggle-pill[color-scheme=inverse][data-artdeco-focus] button,artdeco-toggle-pill[color-scheme=inverse][data-artdeco-focus] labelbox-shadow:inset 0 0 0 2px #fff;color:#fff;background-color:transparentartdeco-pill[type=toggle][color-scheme=inverse]:active button,artdeco-pill[type=toggle][color-scheme=inverse]:active label,artdeco-toggle-pill[color-scheme=inverse]:active button,artdeco-toggle-pill[color-scheme=inverse]:active labelbox-shadow:inset 0 0 0 2px #fff;color:#fffartdeco-pill[type=toggle][color-scheme=inverse][checked] button,artdeco-pill[type=toggle][color-scheme=inverse][checked] label,artdeco-toggle-pill[color-scheme=inverse][checked] button,artdeco-toggle-pill[color-scheme=inverse][checked] labelbox-shadow:inset 0 0 0 2px transparent;color:rgba(0,0,0,.6);background-color:#fffartdeco-pill[type=toggle][color-scheme=inverse][checked]:hover button,artdeco-pill[type=toggle][color-scheme=inverse][checked]:hover label,artdeco-pill[type=toggle][color-scheme=inverse][checked][data-artdeco-focus] button,artdeco-pill[type=toggle][color-scheme=inverse][checked][data-artdeco-focus] label,artdeco-toggle-pill[color-scheme=inverse][checked]:hover button,artdeco-toggle-pill[color-scheme=inverse][checked]:hover label,artdeco-toggle-pill[color-scheme=inverse][checked][data-artdeco-focus] button,artdeco-toggle-pill[color-scheme=inverse][checked][data-artdeco-focus] labelbox-shadow:inset 0 0 0 2px #fff;background-color:#fff;color:rgba(0,0,0,.75)artdeco-pill[type=toggle][color-scheme=inverse][checked]:active button,artdeco-pill[type=toggle][color-scheme=inverse][checked]:active label,artdeco-toggle-pill[color-scheme=inverse][checked]:active button,artdeco-toggle-pill[color-scheme=inverse][checked]:active labelbox-shadow:inset 0 0 0 2px transparent;background-color:#fff;color:rgba(0,0,0,.9)artdeco-pill[type=input]display:inline-flex;position:relative;align-items:center;justify-content:flex-start;vertical-align:middleartdeco-pill[type=input]:hover .artdeco-pill-label-text,artdeco-pill[type=input]:hover input[type=text],artdeco-pill[type=input]:hover labelcolor:#006097artdeco-pill[type=input] labeldisplay:flex;position:absolute;box-sizing:border-box;align-items:center;z-index:0;top:0;right:11px;height:32px;margin:0;cursor:pointer;opacity:1;color:#0073b1;white-space:nowrap;-webkit-user-select:none;-moz-user-select:none;-ms-user-select:none;user-select:noneartdeco-pill[type=input] label .artdeco-pill-label-textfont-size:1.4rem;line-height:1.42857;font-weight:600;color:rgba(0,0,0,.9);transition:opacity 334ms ease-in-out;margin-right:6px;color:inherit;line-height:21px:lang(ar) artdeco-pill[type=input] label .artdeco-pill-label-text,:lang(ko) artdeco-pill[type=input] label .artdeco-pill-label-text,:lang(th) artdeco-pill[type=input] label .artdeco-pill-label-text,:lang(zh) artdeco-pill[type=input] label .artdeco-pill-label-textfont-size:1.5rem;line-height:1.33333artdeco-pill[type=input] input[type=text]font-size:1.4rem;line-height:1.42857;font-weight:600;color:rgba(0,0,0,.9);color:#0073b1;display:inline-block;height:32px;width:150px;box-sizing:border-box;background-color:transparent;padding:0 32px 0 16px;border:1px solid transparent;border-radius:16px;cursor:pointer;transform:translateX(-8px);transition:background-color 334ms ease-in-out,width 334ms ease-in-out,border-color 334ms ease-in-out,transform 334ms ease-in-out:lang(ar) artdeco-pill[type=input] input[type=text],:lang(ko) artdeco-pill[type=input] input[type=text],:lang(th) artdeco-pill[type=input] input[type=text],:lang(zh) artdeco-pill[type=input] input[type=text]font-size:1.5rem;line-height:1.33333artdeco-pill[type=input] input[type=text]:focusoutline:none;border-color:#0073b1;box-shadow:none;cursor:autoartdeco-pill[type=input][data-artdeco-focus] input[type=text]color:#006097;transform:translateX(0);transition:background-color 334ms ease-in-out,width 334ms ease-in-out,border-color 334ms ease-in-out,transform 334ms ease-in-outartdeco-pill[type=input][data-artdeco-focus] .artdeco-pill-label-textcolor:rgba(0,115,177,.35);cursor:textartdeco-pill[type=input][complete]max-width:none;cursor:pointerartdeco-pill[type=input][complete] input[type=text]background-color:#0073b1;color:#fff;border-color:transparent;transform:translateX(0);transition:background-color 334ms ease-in-out,width 334ms ease-in-out,border-color 334ms ease-in-out,transform 0msartdeco-pill[type=input][complete] labelz-index:1;color:#fffartdeco-pill[type=input][complete] label .artdeco-pill-label-textdisplay:noneartdeco-pill[type=input][complete] li-icon[type=check-icon]opacity:1;transform:scale(1);transition:transform 167ms ease-in-out 167msartdeco-pill[type=input][complete] li-icon[type=cancel-icon],artdeco-pill[type=input][complete] li-icon[type=plus-icon]transform:scale(0);transition:transform 167ms ease-in-out,opacity 0ms 167msartdeco-pill[type=input][complete]:hover input,artdeco-pill[type=input][complete][data-artdeco-focus] inputbackground-color:#006097;border-color:transparent;color:#fffartdeco-pill[type=input][complete]:hover label li-icon,artdeco-pill[type=input][complete][data-artdeco-focus] label li-iconcolor:#fffartdeco-pill[type=input][complete]:hover label li-icon[type=cancel-icon],artdeco-pill[type=input][complete][data-artdeco-focus] label li-icon[type=cancel-icon]opacity:1;transform:scale(1);transition:transform 167ms ease-in-out 167msartdeco-pill[type=input][complete]:hover label li-icon[type=check-icon],artdeco-pill[type=input][complete][data-artdeco-focus] label li-icon[type=check-icon]transform:scale(0);transition:transform 167ms ease-in-outartdeco-pill[type=input][data-artdeco-has-content]:not([complete]) input[type=text]transition:width 0ms,background-color 334ms ease-in-out,border-color 334ms ease-in-out,transform 334ms ease-in-outartdeco-pill[type=input][data-artdeco-has-content] label .artdeco-pill-label-textdisplay:noneartdeco-pill[type=input][color-scheme=muted] labelcolor:rgba(0,0,0,.6)artdeco-pill[type=input][color-scheme=muted]:hover .artdeco-pill-label-text,artdeco-pill[type=input][color-scheme=muted]:hover input[type=text],artdeco-pill[type=input][color-scheme=muted]:hover labelcolor:rgba(0,0,0,.75)artdeco-pill[type=input][color-scheme=muted] input[type=text]background-color:transparent;color:rgba(0,0,0,.6)artdeco-pill[type=input][color-scheme=muted] input[type=text]:focusborder-color:rgba(0,0,0,.6);color:rgba(0,0,0,.75);background-color:transparentartdeco-pill[type=input][color-scheme=muted][data-artdeco-focus]color:rgba(0,0,0,.6)artdeco-pill[type=input][color-scheme=muted][data-artdeco-focus] .artdeco-pill-label-textcolor:rgba(0,0,0,.25)artdeco-pill[type=input][color-scheme=muted][complete] input[type=text]background-color:rgba(199,209,216,.45);color:rgba(0,0,0,.6);border-color:transparentartdeco-pill[type=input][color-scheme=muted][complete] li-iconcolor:rgba(0,0,0,.6)artdeco-pill[type=input][color-scheme=muted][complete]:hover input,artdeco-pill[type=input][color-scheme=muted][complete][data-artdeco-focus] inputbackground-color:rgba(199,209,216,.6);border-color:transparent;color:rgba(0,0,0,.75)artdeco-pill[type=input][color-scheme=muted][complete]:hover li-icon,artdeco-pill[type=input][color-scheme=muted][complete][data-artdeco-focus] li-iconcolor:rgba(0,0,0,.75)artdeco-pill[type=input][color-scheme=inverse]:hover .artdeco-pill-label-text,artdeco-pill[type=input][color-scheme=inverse]:hover input[type=text],artdeco-pill[type=input][color-scheme=inverse]:hover label,artdeco-pill[type=input][color-scheme=inverse] labelcolor:#fffartdeco-pill[type=input][color-scheme=inverse] input[type=text]background-color:transparent;color:#fffartdeco-pill[type=input][color-scheme=inverse] input[type=text]:focusborder-color:#fff;color:#fff;background-color:transparentartdeco-pill[type=input][color-scheme=inverse][data-artdeco-focus]color:hsla(0,0%,100%,.85)artdeco-pill[type=input][color-scheme=inverse][data-artdeco-focus] .artdeco-pill-label-textcolor:hsla(0,0%,100%,.35)artdeco-pill[type=input][color-scheme=inverse][complete] input[type=text]background-color:#fff;color:rgba(0,0,0,.6);border-color:transparentartdeco-pill[type=input][color-scheme=inverse][complete] li-iconcolor:rgba(0,0,0,.6)artdeco-pill[type=input][color-scheme=inverse][complete]:hover input,artdeco-pill[type=input][color-scheme=inverse][complete][data-artdeco-focus] inputbackground-color:#fff;border-color:transparent;color:rgba(0,0,0,.75)artdeco-pill[type=input][color-scheme=inverse][complete]:hover li-icon,artdeco-pill[type=input][color-scheme=inverse][complete][data-artdeco-focus] li-iconcolor:rgba(0,0,0,.75)artdeco-pill[type=input] artdeco-typeahead-results-containerright:16pxlinkedin-logodisplay:blocklinkedin-logo .logo-text,linkedin-logo li-iconvertical-align:middlelinkedin-logo .logo-textdisplay:inline-block;letter-spacing:.2em;color:rgba(0,0,0,.9);white-space:nowraplinkedin-logo .logo-text.logo-lockup-darkcolor:#000linkedin-logo .logo-text.logo-lockup-inversecolor:#ffflinkedin-logo[size=”14dp”] li-iconmargin-left:calc(5px – .2em)linkedin-logo[size=”14dp”] .logo-textfont-weight:600;font-size:11px;line-height:14pxlinkedin-logo[size=”21dp”] li-iconmargin-left:calc(7px – .2em)linkedin-logo[size=”21dp”] .logo-textfont-size:14px;line-height:21pxlinkedin-logo[size=”28dp”] li-iconmargin-left:calc(9px – .2em)linkedin-logo[size=”28dp”] .logo-textfont-size:17px;line-height:28pxlinkedin-logo[size=”34dp”] li-iconmargin-left:calc(12px – .2em)linkedin-logo[size=”34dp”] .logo-textfont-size:20px;line-height:34pxlinkedin-logo[size=”40dp”] li-iconmargin-left:calc(14px – .2em)linkedin-logo[size=”40dp”] .logo-textfont-size:23px;line-height:40pxlinkedin-logo[size=”48dp”] li-iconmargin-left:calc(18px – .2em)linkedin-logo[size=”48dp”] .logo-textfont-size:26px;line-height:48pxlinkedin-logo.verticaltext-align:center;display:inline-blocklinkedin-logo.vertical .logo-textdisplay:blocklinkedin-logo.vertical[size=”40dp”] li-iconpadding-left:0linkedin-logo.vertical[size=”40dp”] .logo-textfont-size:30px;line-height:60pxlinkedin-logo.vertical[size=”48dp”] li-iconpadding-left:0linkedin-logo.vertical[size=”48dp”] .logo-textfont-size:35px;line-height:70pxbody.artdeco-modal-is-openoverflow:hiddenbody.artdeco-modal-is-open artdeco-modal-overlayopacity:1artdeco-modal-overlayposition:fixed;top:0;right:0;z-index:5;display:flex;height:100vh;width:100vw;align-items:center;justify-content:center;opacity:0;background-color:rgba(0,0,0,.75);transition:opacity 167ms cubic-bezier(0,0,.2,1)artdeco-modal-overlay[data-artdeco-destroying]opacity:0artdeco-modal-overlay[data-artdeco-destroying] artdeco-modalmax-height:calc(100vh – 64px);transform:scaleY(1);animation:e 334ms cubic-bezier(.4,0,1,1) reverse backwardsartdeco-modalbox-shadow:0 0 0 1px rgba(0,0,0,.15),0 12px 18px 1px rgba(0,0,0,.2);transition:box-shadow 83ms;position:relative;display:flex;flex-direction:column;width:1128px;min-height:48px;border-radius:2px;background-color:#fff;transform:scale(.25);opacity:0;max-height:calc(100vh – 64px);animation:e 334ms cubic-bezier(0,0,.2,1) forwards@media screen and (-ms-high-contrast:active)artdeco-modalborder:1px solid activeborderartdeco-modal-overlay.artdeco-is-open artdeco-modaltransform:scale(1);opacity:1;width:1128pxartdeco-modal .artdeco-dismissbackground-color:transparent;border:0;border-radius:2px;box-sizing:border-box;color:rgba(0,0,0,.6);cursor:pointer;display:inline-block;font-size:0;font-weight:600;font-family:inherit;height:32px;line-height:32px;overflow:hidden;outline-width:2px;padding:0;position:relative;text-align:center;text-decoration:none;transition-duration:167ms;transition-property:background-color,box-shadow,color;transition-timing-function:cubic-bezier(0,0,.2,1);vertical-align:middle;z-index:0;border-radius:16px;text-indent:-999px;width:32px;position:absolute;top:6px;left:6px@media only screen and (-ms-high-contrast:active)artdeco-modal .artdeco-dismissborder:1px solid currentColor;line-height:30px;border-width:0;line-height:32pxhtml.edge artdeco-modal .artdeco-dismiss:focus,html.ie artdeco-modal .artdeco-dismiss:focusoutline:1px dashed #7f7f7fartdeco-modal .artdeco-dismiss li-icontop:50%;box-sizing:content-box;height:24px;right:50%;margin:-12px -12px 0 0;padding:0;position:absolute;width:24pxartdeco-modal .artdeco-dismiss li-icon>svgtransition:transform 167ms;transition-timing-function:cubic-bezier(0,0,.2,1);display:block;vertical-align:top.edge artdeco-modal .artdeco-dismiss,.ie artdeco-modal .artdeco-dismissborder-radius:32pxartdeco-modal .artdeco-dismiss:beforetransition-duration:.5sartdeco-modal .artdeco-dismiss.focus,artdeco-modal .artdeco-dismiss.hover-not-disabled,artdeco-modal .artdeco-dismiss:focus,artdeco-modal .artdeco-dismiss:hover:not(:disabled):not(.disabled)background-color:hsla(0,0%,81%,.25);color:rgba(0,0,0,.75)artdeco-modal .artdeco-dismiss.active-not-disabled,artdeco-modal .artdeco-dismiss:active:not(:disabled):not(.disabled)background-color:hsla(0,0%,81%,.25);color:rgba(0,0,0,.9)artdeco-modal .artdeco-dismiss.disabled,artdeco-modal .artdeco-dismiss:disabledcolor:rgba(0,0,0,.25);cursor:not-allowedartdeco-modal[size=”1128dp”]max-width:1128pxartdeco-modal[size=”744dp”]max-width:745pxartdeco-modal[size=”552dp”]max-width:552pxartdeco-modal[size=”360dp”]max-width:360pxartdeco-modal-headerdisplay:block;padding:8px 16px 8px 48px;border-bottom:1px solid rgba(0,0,0,.15)artdeco-modal-header h1,artdeco-modal-header h2,artdeco-modal-header h3,artdeco-modal-header h4,artdeco-modal-header h5,artdeco-modal-header h6font-size:2rem;line-height:1.4;font-weight:400;color:rgba(0,0,0,.9);line-height:3.2rem;margin-bottom:0:lang(ar) artdeco-modal-header h1,:lang(ar) artdeco-modal-header h2,:lang(ar) artdeco-modal-header h3,:lang(ar) artdeco-modal-header h4,:lang(ar) artdeco-modal-header h5,:lang(ar) artdeco-modal-header h6,:lang(ko) artdeco-modal-header h1,:lang(ko) artdeco-modal-header h2,:lang(ko) artdeco-modal-header h3,:lang(ko) artdeco-modal-header h4,:lang(ko) artdeco-modal-header h5,:lang(ko) artdeco-modal-header h6,:lang(th) artdeco-modal-header h1,:lang(th) artdeco-modal-header h2,:lang(th) artdeco-modal-header h3,:lang(th) artdeco-modal-header h4,:lang(th) artdeco-modal-header h5,:lang(th) artdeco-modal-header h6,:lang(zh) artdeco-modal-header h1,:lang(zh) artdeco-modal-header h2,:lang(zh) artdeco-modal-header h3,:lang(zh) artdeco-modal-header h4,:lang(zh) artdeco-modal-header h5,:lang(zh) artdeco-modal-header h6font-size:2.1rem;line-height:1.33333artdeco-modal-contentoverflow:auto;flex-grow:1;padding:8px 16pxartdeco-modal-footerdisplay:block;padding:8px 16pxartdeco-modal-footer[has-divider=true]border-top:1px solid rgba(0,0,0,.15)@media screen and (min-width:1192px)artdeco-modal,artdeco-modal.is-openwidth:1128px@media screen and (max-width:1192px) and (min-width:809px)artdeco-modal,artdeco-modal.is-openwidth:745px@media screen and (max-width:809px) and (min-width:616px)artdeco-modal,artdeco-modal.is-openwidth:552px@media screen and (max-width:616px)artdeco-modal,artdeco-modal.is-openwidth:312px@keyframes e0%transform:scale(.25);opacity:0totransform:scaleY(1);opacity:1artdeco-completeness-meterdisplay:flex;position:relative;height:8px;background-color:rgba(0,0,0,.15);color:#0073b1;width:300px;border-radius:2pxartdeco-completeness-meter[benchmark]:aftercontent:” “;width:2px;height:16px;position:absolute;top:-50%;background-color:rgba(0,0,0,.45);transition:right 1s ease-in-out,background-color 1s ease-in-out;animation-duration:167ms;animation-timing-function:cubic-bezier(.4,0,.2,1);animation-fill-mode:forwardsartdeco-completeness-meter[benchmark]:beforecontent:” “;position:absolute;top:0;right:0;height:8px;background-color:rgba(0,0,0,.15);border-top-right-radius:2px;border-bottom-right-radius:2px;transition:width 1s ease-in-outartdeco-completeness-meter .artdeco-completeness-backgroundwidth:100%;height:8px;overflow:hidden;position:absolute;border-radius:2px@media only screen and (-ms-high-contrast:active)artdeco-completeness-meter .artdeco-completeness-backgroundbackground:ButtonHighlightartdeco-completeness-meter progressposition:absolute;width:100%;height:8px;background-color:#0073b1;border:none;transition:width 1s ease-in-out;animation:f 1s cubic-bezier(.4,0,.2,1)artdeco-completeness-meter progress::-webkit-progress-bar,artdeco-completeness-meter progress::-webkit-progress-valuebackground-color:#0073b1artdeco-completeness-meter progress::-moz-progress-barbackground-color:#0073b1artdeco-completeness-meter progress::-ms-fillbackground-color:#0073b1;border:none@media only screen and (-ms-high-contrast:active)artdeco-completeness-meter progressbackground:Highlightartdeco-completeness-meter[size=large]height:12pxartdeco-completeness-meter[size=large][benchmark]:aftertop:-4px;height:20pxartdeco-completeness-meter[size=large] .artdeco-completeness-background,artdeco-completeness-meter[size=large] progressheight:12pxartdeco-completeness-meter[size=small]height:4pxartdeco-completeness-meter[size=small][benchmark]:aftertop:-4px;height:20pxartdeco-completeness-meter[size=small] .artdeco-completeness-background,artdeco-completeness-meter[size=small] progressheight:4pxartdeco-completeness-meter[inverse]background-color:rgba(0,0,0,.25);color:#98d8f4artdeco-completeness-meter[inverse][benchmark]:afterbackground-color:rgba(0,0,0,.6)artdeco-completeness-meter[inverse][benchmark]:beforebackground-color:rgba(0,0,0,.25)artdeco-completeness-meter[inverse] progressbackground-color:#98d8f4artdeco-completeness-meter[inverse] progress::-webkit-progress-bar,artdeco-completeness-meter[inverse] progress::-webkit-progress-valuebackground-color:#98d8f4artdeco-completeness-meter[inverse] progress::-moz-progress-barbackground-color:#98d8f4artdeco-completeness-meter[inverse] progress::-ms-fillbackground-color:#98d8f4;border:noneartdeco-completeness-meter[color=pro],artdeco-completeness-meter[color=pro]:aftercolor:#087889artdeco-completeness-meter[color=pro] progressbackground-color:#087889artdeco-completeness-meter[color=pro] progress::-webkit-progress-bar,artdeco-completeness-meter[color=pro] progress::-webkit-progress-valuebackground-color:#087889artdeco-completeness-meter[color=pro] progress::-moz-progress-barbackground-color:#087889artdeco-completeness-meter[color=pro] progress::-ms-fillbackground-color:#087889;border:noneartdeco-completeness-meter[inverse][color=pro],artdeco-completeness-meter[inverse][color=pro]:aftercolor:#98dadeartdeco-completeness-meter[inverse][color=pro] progressbackground-color:#98dadeartdeco-completeness-meter[inverse][color=pro] progress::-webkit-progress-bar,artdeco-completeness-meter[inverse][color=pro] progress::-webkit-progress-valuebackground-color:#98dadeartdeco-completeness-meter[inverse][color=pro] progress::-moz-progress-barbackground-color:#98dadeartdeco-completeness-meter[inverse][color=pro] progress::-ms-fillbackground-color:#98dade;border:noneartdeco-completeness-meter[color=positive],artdeco-completeness-meter[color=positive]:aftercolor:#2f7b15artdeco-completeness-meter[color=positive] progressbackground-color:#2f7b15artdeco-completeness-meter[color=positive] progress::-webkit-progress-bar,artdeco-completeness-meter[color=positive] progress::-webkit-progress-valuebackground-color:#2f7b15artdeco-completeness-meter[color=positive] progress::-moz-progress-barbackground-color:#2f7b15artdeco-completeness-meter[color=positive] progress::-ms-fillbackground-color:#2f7b15;border:noneartdeco-completeness-meter[inverse][color=positive],artdeco-completeness-meter[inverse][color=positive]:aftercolor:#b5d99fartdeco-completeness-meter[inverse][color=positive] progressbackground-color:#b5d99fartdeco-completeness-meter[inverse][color=positive] progress::-webkit-progress-bar,artdeco-completeness-meter[inverse][color=positive] progress::-webkit-progress-valuebackground-color:#b5d99fartdeco-completeness-meter[inverse][color=positive] progress::-moz-progress-barbackground-color:#b5d99fartdeco-completeness-meter[inverse][color=positive] progress::-ms-fillbackground-color:#b5d99f;border:noneartdeco-completeness-meter[color=muted],artdeco-completeness-meter[color=muted]:aftercolor:#5c6f7cartdeco-completeness-meter[color=muted] progressbackground-color:#5c6f7cartdeco-completeness-meter[color=muted] progress::-webkit-progress-bar,artdeco-completeness-meter[color=muted] progress::-webkit-progress-valuebackground-color:#5c6f7cartdeco-completeness-meter[color=muted] progress::-moz-progress-barbackground-color:#5c6f7cartdeco-completeness-meter[color=muted] progress::-ms-fillbackground-color:#5c6f7c;border:noneartdeco-completeness-meter[inverse][color=muted],artdeco-completeness-meter[inverse][color=muted]:aftercolor:#c7d1d8artdeco-completeness-meter[inverse][color=muted] progressbackground-color:#c7d1d8artdeco-completeness-meter[inverse][color=muted] progress::-webkit-progress-bar,artdeco-completeness-meter[inverse][color=muted] progress::-webkit-progress-valuebackground-color:#c7d1d8artdeco-completeness-meter[inverse][color=muted] progress::-moz-progress-barbackground-color:#c7d1d8artdeco-completeness-meter[inverse][color=muted] progress::-ms-fillbackground-color:#c7d1d8;border:noneartdeco-completeness-meter[color=negative],artdeco-completeness-meter[color=negative]:aftercolor:#d11124artdeco-completeness-meter[color=negative] progressbackground-color:#d11124artdeco-completeness-meter[color=negative] progress::-webkit-progress-bar,artdeco-completeness-meter[color=negative] progress::-webkit-progress-valuebackground-color:#d11124artdeco-completeness-meter[color=negative] progress::-moz-progress-barbackground-color:#d11124artdeco-completeness-meter[color=negative] progress::-ms-fillbackground-color:#d11124;border:noneartdeco-completeness-meter[inverse][color=negative],artdeco-completeness-meter[inverse][color=negative]:aftercolor:#ffbcbaartdeco-completeness-meter[inverse][color=negative] progressbackground-color:#ffbcbaartdeco-completeness-meter[inverse][color=negative] progress::-webkit-progress-bar,artdeco-completeness-meter[inverse][color=negative] progress::-webkit-progress-valuebackground-color:#ffbcbaartdeco-completeness-meter[inverse][color=negative] progress::-moz-progress-barbackground-color:#ffbcbaartdeco-completeness-meter[inverse][color=negative] progress::-ms-fillbackground-color:#ffbcba;border:noneartdeco-completeness-meter[indeterminate]width:100%artdeco-completeness-meter[indeterminate] progressanimation:g 2s cubic-bezier(.4,0,.2,1);animation-iteration-count:infinite;background-color:#0073b1;position:relative;display:blockartdeco-completeness-meter[type=circular]height:96px;width:96px;background:noneartdeco-completeness-meter[type=circular][benchmark]:beforebackground:none;content:noneartdeco-completeness-meter[type=circular][benchmark]:aftertop:calc(50% – 4px);right:calc(50% – 1px);height:8pxartdeco-completeness-meter[type=circular] progressborder:0!important;clip:rect(1px,1px,1px,1px);height:1px!important;overflow:hidden;padding:0!important;position:absolute!important;white-space:nowrap!important;width:1px!importantartdeco-completeness-meter[type=circular][size=large]height:128px;width:128pxartdeco-completeness-meter[type=circular][size=large]:aftertop:calc(50% – 7px);height:14pxartdeco-completeness-meter[type=circular][size=small]height:56px;width:56px@keyframes f0%transform:translate(100%)totransform:translate(0)@keyframes g0%right:-100%toright:100%artdeco-chipdisplay:inline-flex;align-items:center;height:24px;border-radius:2px;margin:0 0 8px 8px;padding:0 8px 0 6px;background-color:rgba(199,209,216,.45);transition:color .3sartdeco-chip .artdeco-chip-textfont-size:1.4rem;line-height:1.42857;font-weight:600;color:rgba(0,0,0,.6);margin:0:lang(ar) artdeco-chip .artdeco-chip-text,:lang(ko) artdeco-chip .artdeco-chip-text,:lang(th) artdeco-chip .artdeco-chip-text,:lang(zh) artdeco-chip .artdeco-chip-textfont-size:1.5rem;line-height:1.33333artdeco-chip .artdeco-chip-buttonbackground:transparent;border:0;padding:0;line-height:0;position:static;margin-right:6px;color:rgba(0,0,0,.6);transition:color .3sartdeco-chip .artdeco-chip-button:hovercolor:rgba(0,0,0,.75)artdeco-chip .artdeco-chip-button:activecolor:rgba(0,0,0,.9)artdeco-chip[size=large]font-size:1.6rem;line-height:1.5;font-weight:600;color:rgba(0,0,0,.6);height:28px:lang(ar) artdeco-chip[size=large],:lang(ko) artdeco-chip[size=large],:lang(th) artdeco-chip[size=large],:lang(zh) artdeco-chip[size=large]font-size:1.7rem;line-height:1.41176artdeco-chip:hover .artdeco-chip-textcolor:rgba(0,0,0,.75)artdeco-chip:active .artdeco-chip-textcolor:rgba(0,0,0,.9)artdeco-chip:last-of-typemargin-left:0artdeco-tabsposition:relativeartdeco-tabs,artdeco-tabs artdeco-tabpanel[role=tabpanel]display:blockartdeco-tabs artdeco-tabpanel[role=tabpanel][aria-hidden=true]display:noneartdeco-tabs[disabled] artdeco-tablist[role=tablist]position:relativeartdeco-tabs[disabled] artdeco-tablist[role=tablist]:beforedisplay:block;content:””;position:absolute;right:0;left:0;top:0;bottom:0;z-index:1;cursor:not-allowed;background:hsla(0,0%,100%,.65)artdeco-tabs[disabled] artdeco-tablist[role=tablist] artdeco-tab[role=tab][disabled]color:rgba(0,0,0,.6)artdeco-tabs artdeco-tablist[role=tablist]display:flex;flex-direction:row;align-items:flex-end;border-bottom:1px solid rgba(0,0,0,.15);position:relativeartdeco-tabs artdeco-tablist[role=tablist].native-scrolloverflow-x:autoartdeco-tabs artdeco-tablist[role=tablist] artdeco-tab[role=tab]font-size:1.4rem;line-height:1.42857;font-weight:600;color:rgba(0,0,0,.6);box-sizing:border-box;max-width:220px;position:relative;background-color:transparent;cursor:pointer;transition:background-color;transition-timing-function:cubic-bezier(.4,0,.2,1);transition-duration:83ms;padding:9px 8px 11px;margin-right:24px:lang(ar) artdeco-tabs artdeco-tablist[role=tablist] artdeco-tab[role=tab],:lang(ko) artdeco-tabs artdeco-tablist[role=tablist] artdeco-tab[role=tab],:lang(th) artdeco-tabs artdeco-tablist[role=tablist] artdeco-tab[role=tab],:lang(zh) artdeco-tabs artdeco-tablist[role=tablist] artdeco-tab[role=tab]font-size:1.5rem;line-height:1.33333artdeco-tabs artdeco-tablist[role=tablist] artdeco-tab[role=tab]:first-childmargin-right:16pxartdeco-tabs artdeco-tablist[role=tablist] artdeco-tab[role=tab]:beforeposition:absolute;content:””;height:2px;background-color:transparent;right:0;left:0;bottom:0;transition-timing-function:cubic-bezier(.4,0,.2,1);transition-duration:83msartdeco-tabs artdeco-tablist[role=tablist] artdeco-tab[role=tab][aria-selected=true]color:#0073b1;background-color:transparent;transition-timing-function:cubic-bezier(.4,0,.2,1);transition-duration:.5sartdeco-tabs artdeco-tablist[role=tablist] artdeco-tab[role=tab][aria-selected=true]:beforebackground-color:#0073b1;transition-timing-function:cubic-bezier(.4,0,.2,1);transition-duration:.5s@media screen and (-ms-high-contrast:active)artdeco-tabs artdeco-tablist[role=tablist] artdeco-tab[role=tab][aria-selected=true]text-decoration:underlineartdeco-tabs artdeco-tablist[role=tablist] artdeco-tab[role=tab][aria-selected=true]:hovercolor:#006097artdeco-tabs artdeco-tablist[role=tablist] artdeco-tab[role=tab][aria-selected=true]:hover:beforebackground:#006097artdeco-tabs artdeco-tablist[role=tablist] artdeco-tab[role=tab][aria-selected=true]:activecolor:#004b7cartdeco-tabs artdeco-tablist[role=tablist] artdeco-tab[role=tab][aria-selected=true]:active:beforebackground:#004b7cartdeco-tabs artdeco-tablist[role=tablist] artdeco-tab[role=tab]:hovercolor:rgba(0,0,0,.75)artdeco-tabs artdeco-tablist[role=tablist] artdeco-tab[role=tab]:activecolor:#006097;background-color:rgba(152,216,244,.45)artdeco-tabs artdeco-tablist[role=tablist] artdeco-tab[role=tab][disabled]color:rgba(0,0,0,.35);cursor:not-allowed@media screen and (min-width:480px) and (max-width:799px)artdeco-tabs artdeco-tablist[role=tablist] artdeco-tab[role=tab]margin-right:16px@media screen and (max-width:479px)artdeco-tabs artdeco-tablist[role=tablist] artdeco-tab[role=tab],artdeco-tabs artdeco-tablist[role=tablist] artdeco-tab[role=tab]:first-childmargin-right:8pxartdeco-tabs artdeco-tablist[role=tablist].no-wrap artdeco-tab[role=tab]white-space:nowrap;max-width:noneartdeco-tabs[theme=pro] artdeco-tablist[role=tablist] artdeco-tab[role=tab]color:rgba(0,0,0,.6)artdeco-tabs[theme=pro] artdeco-tablist[role=tablist] artdeco-tab[role=tab][aria-selected=true]color:#087889artdeco-tabs[theme=pro] artdeco-tablist[role=tablist] artdeco-tab[role=tab][aria-selected=true]:beforebackground:#087889artdeco-tabs[theme=pro] artdeco-tablist[role=tablist] artdeco-tab[role=tab][aria-selected=true]:hovercolor:#036475artdeco-tabs[theme=pro] artdeco-tablist[role=tablist] artdeco-tab[role=tab][aria-selected=true]:hover:beforebackground:#036475artdeco-tabs[theme=pro] artdeco-tablist[role=tablist] artdeco-tab[role=tab][aria-selected=true]:activecolor:#00505d;background:transparentartdeco-tabs[theme=pro] artdeco-tablist[role=tablist] artdeco-tab[role=tab][aria-selected=true]:active:beforebackground:#00505dartdeco-tabs[theme=pro] artdeco-tablist[role=tablist] artdeco-tab[role=tab]:hovercolor:rgba(0,0,0,.75)artdeco-tabs[theme=pro] artdeco-tablist[role=tablist] artdeco-tab[role=tab]:activecolor:#087889;background-color:rgba(8,120,137,.15)artdeco-tabs[theme=pro] artdeco-tablist[role=tablist] artdeco-tab[role=tab][disabled]color:rgba(0,0,0,.35)artdeco-tabs[theme=pro][disabled] artdeco-tablist[role=tablist] artdeco-tab[role=tab][disabled]color:rgba(0,0,0,.6)artdeco-tabs[theme=pro] .artdeco-transportbackground:hsla(0,0%,100%,.85)artdeco-tabs[theme=pro] .artdeco-transport li-iconcolor:rgba(0,0,0,.9)artdeco-tabs[theme=pro] .artdeco-transport:hoverbackground:#fffartdeco-tabs[theme=pro] .artdeco-transport:hover li-iconcolor:#000artdeco-tabs[theme=pro] .artdeco-transport:activebackground:hsla(0,0%,100%,.7)artdeco-tabs[theme=pro] .artdeco-transport:active li-iconcolor:rgba(0,0,0,.6)artdeco-tabs .artdeco-scrolling-containeroverflow-x:scroll;overflow-y:hidden;overflow:-moz-scrollbars-none;scrollbar-width:none;-ms-overflow-style:noneartdeco-tabs .artdeco-scrolling-container::-webkit-scrollbardisplay:noneartdeco-tabs .artdeco-transportposition:absolute;z-index:1;top:0;bottom:0;right:0;width:32px;background:hsla(0,0%,100%,.85);border:0;opacity:1;transition:opacity;transition-timing-function:cubic-bezier(0,0,.2,1);transition-duration:167msartdeco-tabs .artdeco-transport.artdeco-transport-hiddenopacity:0artdeco-tabs .artdeco-transport li-iconposition:absolute;top:50%;right:50%;transform:translateX(50%) translateY(-50%);color:rgba(0,0,0,.6)[dir=rtl] artdeco-tabs .artdeco-transport li-icontransform:translateX(50%) translateY(-50%) rotateY(180deg)artdeco-tabs .artdeco-transport:hoverbackground:#fffartdeco-tabs .artdeco-transport:hover li-iconcolor:rgba(0,0,0,.9)artdeco-tabs .artdeco-transport:activebackground:hsla(0,0%,100%,.7)artdeco-tabs .artdeco-transport:active li-iconcolor:rgba(0,0,0,.75)[dir=rtl] artdeco-tabs .artdeco-transport,artdeco-tabs .artdeco-transport[data-direction=next]right:auto;left:0[dir=rtl] artdeco-tabs .artdeco-transport[data-direction=next]left:auto;right:0artdeco-tabs artdeco-spotlight-tablist[role=tablist]display:flex;border-bottom:1px solid rgba(0,0,0,.15);border-top:1px solid rgba(0,0,0,.15)artdeco-tabs artdeco-spotlight-tablist[role=tablist].native-scrolloverflow-x:auto;border:1px solid rgba(0,0,0,.15)artdeco-tabs artdeco-spotlight-tablist[role=tablist].native-scroll artdeco-spotlight-tab[role=tab]border-right:1px solid rgba(0,0,0,.15);border-left:noneartdeco-tabs artdeco-spotlight-tablist[role=tablist].native-scroll artdeco-spotlight-tab[role=tab]:first-childborder-right:noneartdeco-tabs artdeco-spotlight-tablist[role=tablist] artdeco-spotlight-tab[role=tab]padding:10px 16px;cursor:pointer;position:relative;max-height:88px;box-sizing:border-box;flex:1;align-items:flex-start;border-left:1px solid rgba(0,0,0,.15)artdeco-tabs artdeco-spotlight-tablist[role=tablist] artdeco-spotlight-tab[role=tab]:first-childborder-right:1px solid rgba(0,0,0,.15)artdeco-tabs artdeco-spotlight-tablist[role=tablist] artdeco-spotlight-tab[role=tab] .artdeco-tab-primary-textfont-size:2.4rem;line-height:1.33333;font-weight:600;color:rgba(0,0,0,.6);display:block:lang(ar) artdeco-tabs artdeco-spotlight-tablist[role=tablist] artdeco-spotlight-tab[role=tab] .artdeco-tab-primary-text,:lang(ko) artdeco-tabs artdeco-spotlight-tablist[role=tablist] artdeco-spotlight-tab[role=tab] .artdeco-tab-primary-text,:lang(th) artdeco-tabs artdeco-spotlight-tablist[role=tablist] artdeco-spotlight-tab[role=tab] .artdeco-tab-primary-text,:lang(zh) artdeco-tabs artdeco-spotlight-tablist[role=tablist] artdeco-spotlight-tab[role=tab] .artdeco-tab-primary-textline-height:1.33333artdeco-tabs artdeco-spotlight-tablist[role=tablist] artdeco-spotlight-tab[role=tab] .artdeco-tab-secondary-textfont-size:1.4rem;line-height:1.42857;font-weight:400;color:rgba(0,0,0,.6);display:block:lang(ar) artdeco-tabs artdeco-spotlight-tablist[role=tablist] artdeco-spotlight-tab[role=tab] .artdeco-tab-secondary-text,:lang(ko) artdeco-tabs artdeco-spotlight-tablist[role=tablist] artdeco-spotlight-tab[role=tab] .artdeco-tab-secondary-text,:lang(th) artdeco-tabs artdeco-spotlight-tablist[role=tablist] artdeco-spotlight-tab[role=tab] .artdeco-tab-secondary-text,:lang(zh) artdeco-tabs artdeco-spotlight-tablist[role=tablist] artdeco-spotlight-tab[role=tab] .artdeco-tab-secondary-textfont-size:1.5rem;line-height:1.33333artdeco-tabs artdeco-spotlight-tablist[role=tablist] artdeco-spotlight-tab[role=tab]:hover .artdeco-tab-primary-text,artdeco-tabs artdeco-spotlight-tablist[role=tablist] artdeco-spotlight-tab[role=tab]:hover .artdeco-tab-secondary-textcolor:rgba(0,0,0,.75)artdeco-tabs artdeco-spotlight-tablist[role=tablist] artdeco-spotlight-tab[role=tab][aria-selected=true]:aftercontent:””;position:absolute;right:0;left:0;bottom:0;height:4px;background:#087889artdeco-tabs artdeco-spotlight-tablist[role=tablist] artdeco-spotlight-tab[role=tab][aria-selected=true] .artdeco-tab-primary-textcolor:#087889artdeco-tabs artdeco-spotlight-tablist[role=tablist] artdeco-spotlight-tab[role=tab][aria-selected=true] .artdeco-tab-secondary-textcolor:rgba(0,0,0,.9)artdeco-tabs artdeco-spotlight-tablist[role=tablist].no-wrap artdeco-spotlight-tab[role=tab]white-space:nowrapartdeco-tabs[in-modal=true] artdeco-tablist artdeco-tab:first-childmargin-right:24pxartdeco-tabs[align=centered] artdeco-tablistjustify-content:centerartdeco-tabs[size=”17px”] artdeco-tablist[role=tablist] artdeco-tab[role=tab],artdeco-tabs[size=”48dp”] artdeco-tablist[role=tablist] artdeco-tab[role=tab]padding-top:12px;padding-bottom:16px;font-size:17pxartdeco-tabs[color=inverse][disabled] artdeco-tablist[role=tablist]:before,artdeco-tabs[theme=inverse][disabled] artdeco-tablist[role=tablist]:beforebackground:hsla(0,0%,100%,.55)artdeco-tabs[color=inverse] artdeco-tablist[role=tablist],artdeco-tabs[theme=inverse] artdeco-tablist[role=tablist]border-bottom-color:hsla(0,0%,100%,.25)artdeco-tabs[color=inverse] artdeco-tablist[role=tablist] artdeco-tab[role=tab],artdeco-tabs[theme=inverse] artdeco-tablist[role=tablist] artdeco-tab[role=tab]color:hsla(0,0%,100%,.85)artdeco-tabs[color=inverse] artdeco-tablist[role=tablist] artdeco-tab[role=tab]:hover,artdeco-tabs[theme=inverse] artdeco-tablist[role=tablist] artdeco-tab[role=tab]:hovercolor:#fffartdeco-tabs[color=inverse] artdeco-tablist[role=tablist] artdeco-tab[role=tab]:active,artdeco-tabs[theme=inverse] artdeco-tablist[role=tablist] artdeco-tab[role=tab]:activebackground:hsla(0,0%,100%,.15)artdeco-tabs[color=inverse] artdeco-tablist[role=tablist] artdeco-tab[role=tab][aria-selected=true],artdeco-tabs[theme=inverse] artdeco-tablist[role=tablist] artdeco-tab[role=tab][aria-selected=true]color:#fffartdeco-tabs[color=inverse] artdeco-tablist[role=tablist] artdeco-tab[role=tab][aria-selected=true]:before,artdeco-tabs[theme=inverse] artdeco-tablist[role=tablist] artdeco-tab[role=tab][aria-selected=true]:beforebackground:#fffartdeco-tabs[color=inverse] artdeco-tablist[role=tablist] artdeco-tab[role=tab][aria-selected=true]:hover,artdeco-tabs[theme=inverse] artdeco-tablist[role=tablist] artdeco-tab[role=tab][aria-selected=true]:hovercolor:hsla(0,0%,100%,.85)artdeco-tabs[color=inverse] artdeco-tablist[role=tablist] artdeco-tab[role=tab][aria-selected=true]:hover:before,artdeco-tabs[theme=inverse] artdeco-tablist[role=tablist] artdeco-tab[role=tab][aria-selected=true]:hover:beforebackground:hsla(0,0%,100%,.85)artdeco-tabs[color=inverse] artdeco-tablist[role=tablist] artdeco-tab[role=tab][aria-selected=true]:active,artdeco-tabs[theme=inverse] artdeco-tablist[role=tablist] artdeco-tab[role=tab][aria-selected=true]:activecolor:hsla(0,0%,100%,.7)artdeco-tabs[color=inverse] artdeco-tablist[role=tablist] artdeco-tab[role=tab][aria-selected=true]:active:before,artdeco-tabs[theme=inverse] artdeco-tablist[role=tablist] artdeco-tab[role=tab][aria-selected=true]:active:beforebackground:hsla(0,0%,100%,.7)artdeco-tabs[color=inverse] artdeco-tablist[role=tablist] artdeco-tab[role=tab][disabled],artdeco-tabs[theme=inverse] artdeco-tablist[role=tablist] artdeco-tab[role=tab][disabled]color:hsla(0,0%,100%,.45)artdeco-tabs[color=inverse] .artdeco-transport,artdeco-tabs[theme=inverse] .artdeco-transportbackground:rgba(0,115,177,.85)artdeco-tabs[color=inverse] .artdeco-transport li-icon,artdeco-tabs[theme=inverse] .artdeco-transport li-iconcolor:hsla(0,0%,100%,.7)artdeco-tabs[color=inverse] .artdeco-transport:hover,artdeco-tabs[theme=inverse] .artdeco-transport:hoverbackground:rgba(0,115,177,.85)artdeco-tabs[color=inverse] .artdeco-transport:hover li-icon,artdeco-tabs[theme=inverse] .artdeco-transport:hover li-iconcolor:#fffartdeco-tabs[color=inverse] .artdeco-transport:active,artdeco-tabs[theme=inverse] .artdeco-transport:activebackground:#0073b1artdeco-tabs[color=inverse] .artdeco-transport:active li-icon,artdeco-tabs[theme=inverse] .artdeco-transport:active li-iconcolor:hsla(0,0%,100%,.85)artdeco-typeaheaddisplay:block;position:relativeartdeco-typeahead .artdeco-typeahead-live-regionborder:0!important;clip:rect(1px,1px,1px,1px);height:1px!important;overflow:hidden;padding:0!important;position:absolute!important;white-space:nowrap!important;width:1px!importantartdeco-typeahead-results-containerbox-shadow:0 0 0 1px rgba(0,0,0,.15),0 6px 9px rgba(0,0,0,.2);transition:box-shadow 83ms;display:block;position:absolute;border-radius:0 0 2px 2px;padding:4px 0;background-color:#fff@media screen and (-ms-high-contrast:active)artdeco-typeahead-results-containerborder:1px solid activeborderartdeco-typeahead-results-container ullist-style-type:noneartdeco-typeahead-results-container lipadding:8px 16pxartdeco-typeahead-results-container .highlighted,artdeco-typeahead-results-container li:hoverbackground-color:#f3f6f8body,htmlbackground:#fff;margin:0;padding:0;border:0;outline:0;font-size:62.5%;line-height:1;vertical-align:baseline#body-footer,#body-header,#body-mainwidth:1128px;box-sizing:content-box;padding:0 30px;display:block;margin:auto;position:relative@media (max-width:1208px)#body-footer,#body-header,#body-mainwidth:calc(100vw – 20px);box-sizing:border-box@media (max-width:976px)#body-footer,#body-header,#body-mainpadding:0 18px#body-headerpadding:32px 0;z-index:3#body-header .header-contentbox-sizing:border-box;float:right;margin-bottom:24px;margin-left:-1px;width:1128px@media (max-width:1208px)#body-header .header-contentwidth:calc(((100vw – 632px) * 1) + 552px)@media (max-width:976px)#body-header .header-contentwidth:calc(((100vw – 424px) * 1) + 368px);margin-bottom:12px@media (max-width:769px)#body-header .header-contentright:0;left:0;width:100%;margin-right:0;margin-left:0#body-header .header-content #language-selector+.header-logomargin-top:4px#body-header .header-logo svgwidth:84px;height:21px.footer-wrapperdisplay:block;position:fixed;bottom:0;right:0;width:100%;background:#f5f5f5;z-index:3#body-footerpadding:16px 32px;display:inline-block;margin:0 auto;text-align:center;vertical-align:middle;width:100%;font-family:var(–artdeco-typography-sans);font-style:normal;font-weight:400;color:rgba(0,0,0,.9);font-size:1.2rem;line-height:1.33333#body-footer:aftercontent:””;display:table;clear:both:lang(ar) #body-footer,:lang(ko) #body-footer,:lang(th) #body-footer,:lang(zh) #body-footerfont-size:1.3rem;line-height:1.23077#body-footer .footer-copyrightdisplay:inline-block#body-footer .footer-copyright atext-decoration:none#body-footer .footer-copyright svgwidth:56px;height:14px;display:inline-block;vertical-align:tophtml[lang=ar] #body-footer .footer-copyright svg,html[lang=ja] #body-footer .footer-copyright svg,html[lang=ko] #body-footer .footer-copyright svg,html[lang=th] #body-footer .footer-copyright svg,html[lang=zh] #body-footer .footer-copyright svgvertical-align:baseline#body-footer .footer-navdisplay:inline-block;margin:0;padding:0;list-style:none#body-footer .footer-nav>lipadding:0 16px;margin:0;display:inline-block#body-footer .footer-nav acolor:#4f6878;font-weight:600;text-decoration:none#body-footer .footer-nav a:hovertext-decoration:underline#body-mainz-index:3#body-main:aftercontent:””;display:table;clear:both#body-main .body-contentbox-sizing:border-box;float:right;margin-bottom:24px;margin-left:-1px;width:1128px@media (max-width:1208px)#body-main .body-contentwidth:calc(((100vw – 632px) * 1) + 552px)@media (max-width:976px)#body-main .body-contentwidth:calc(((100vw – 424px) * 1) + 368px);margin-bottom:12px@media (max-width:769px)#body-main .body-contentright:0;left:0;width:100%;margin-right:0;margin-left:0#body-main .headingfont-family:var(–artdeco-typography-sans);font-style:normal;font-weight:200;color:rgba(0,0,0,.9);font-size:4rem;line-height:1.2;margin:24px 0:lang(ar) #body-main .heading,:lang(ko) #body-main .heading,:lang(th) #body-main .heading,:lang(zh) #body-main .headingline-height:1.2#body-main .subheadingfont-family:var(–artdeco-typography-sans);font-style:normal;font-weight:400;color:rgba(0,0,0,.6);font-size:1.8rem;line-height:1.33333;max-width:560px;margin:0 auto:lang(ar) #body-main .subheading,:lang(ko) #body-main .subheading,:lang(th) #body-main .subheading,:lang(zh) #body-main .subheadingfont-size:1.9rem;line-height:1.26316#body-main .subheading atext-decoration:none;background-color:transparent;border:0;color:#0073b1;font-weight:600#body-main .subheading a:visitedcolor:#0073b1#body-main .subheading a:focus,#body-main .subheading a:hovertext-decoration:underline;color:#006097#body-main .subheading a:activecolor:#004b7c#body-header:aftercontent:””;display:table;clear:both#body-main .subheadingfont-size:3.2rem;line-height:1.25;font-weight:200;color:rgba(0,0,0,.9);max-width:none:lang(ar) #body-main .subheading,:lang(ko) #body-main .subheading,:lang(th) #body-main .subheading,:lang(zh) #body-main .subheadingline-height:1.25.error-pagestext-align:center;padding-top:64px.error-pages .footnotefont-size:1.4rem;line-height:1.42857;font-weight:400;color:rgba(0,0,0,.6);margin:0 auto;padding-top:48px:lang(ar) .error-pages .footnote,:lang(ko) .error-pages .footnote,:lang(th) .error-pages .footnote,:lang(zh) .error-pages .footnotefont-size:1.5rem;line-height:1.33333.error-pages .footnote p+pmargin-top:12px.error-pages .footnote atext-decoration:none;font-weight:600;background-color:transparent;border:0;color:#0073b1;font-weight:400.error-pages .footnote a:visitedcolor:#0073b1.error-pages .footnote a:focus,.error-pages .footnote a:hovertext-decoration:underline;color:#006097.error-pages .footnote a:activecolor:#004b7c.error-pages .footnote a:visitedcolor:#665ed0.error-pages .footnote a:visited:hovercolor:#544bc2.error-pages .footnote a:visited:activecolor:#4034b0.error-pages .footnote ultext-align:right;margin:0 auto;display:inline-block#language-selectorfloat:left;position:relative#language-selector labelborder:0!important;clip:rect(1px,1px,1px,1px);height:1px!important;overflow:hidden;padding:0!important;position:absolute!important;white-space:nowrap!important;width:1px!important#language-selector select-webkit-appearance:none;-moz-appearance:none;appearance:none;background:none;border:1px solid rgba(0,0,0,.25);border-radius:1px;box-shadow:none;box-sizing:border-box;color:rgba(0,0,0,.85);font-size:12px;font-weight:400;height:32px;line-height:1.75;max-width:175px;outline:0;position:relative;padding:0 12px 0 32px;transition:box-shadow .15s;vertical-align:middle;width:100%;z-index:2#language-selector select:hovercursor:pointer;border-color:rgba(0,0,0,.55)#language-selector select:focusborder-color:#0084bf;box-shadow:0 0 0 1px #0084bf#language-selector .icon-globecolor:#44474a;overflow:hidden;position:absolute;z-index:1;display:inline-block;height:24px;width:24px;left:4px;top:50%;transform:translateY(-50%)#language-selector .icon-globe svgdisplay:block;margin:auto;vertical-align:top.js #i18n_ar_AE,.js #i18n_cs_CZ,.js #i18n_da_DK,.js #i18n_de_DE,.js #i18n_en_US,.js #i18n_es_ES,.js #i18n_footer_ar_AE,.js #i18n_footer_cs_CZ,.js #i18n_footer_da_DK,.js #i18n_footer_de_DE,.js #i18n_footer_en_US,.js #i18n_footer_es_ES,.js #i18n_footer_fr_FR,.js #i18n_footer_in_ID,.js #i18n_footer_it_IT,.js #i18n_footer_ja_JP,.js #i18n_footer_ko_KR,.js #i18n_footer_ms_MY,.js #i18n_footer_nl_NL,.js #i18n_footer_no_NO,.js #i18n_footer_pl_PL,.js #i18n_footer_pt_BR,.js #i18n_footer_ro_RO,.js #i18n_footer_ru_RU,.js #i18n_footer_sv_SE,.js #i18n_footer_th_TH,.js #i18n_footer_tl_PH,.js #i18n_footer_tr_TR,.js #i18n_footer_zh_CN,.js #i18n_footer_zh_TW,.js #i18n_fr_FR,.js #i18n_in_ID,.js #i18n_it_IT,.js #i18n_ja_JP,.js #i18n_ko_KR,.js #i18n_ms_MY,.js #i18n_nl_NL,.js #i18n_no_NO,.js #i18n_pl_PL,.js #i18n_pt_BR,.js #i18n_ro_RO,.js #i18n_ru_RU,.js #i18n_sv_SE,.js #i18n_th_TH,.js #i18n_tl_PH,.js #i18n_tr_TR,.js #i18n_zh_CN,.js #i18n_zh_TW,[id^=i18n_]display:none.js [data-lang=ar_AE] #i18n_ar_AEdisplay:block.js [data-lang=ar_AE] #i18n_footer_ar_AEdisplay:inline-block.js [data-lang=cs_CZ] #i18n_cs_CZdisplay:block.js [data-lang=cs_CZ] #i18n_footer_cs_CZdisplay:inline-block.js [data-lang=da_DK] #i18n_da_DKdisplay:block.js [data-lang=da_DK] #i18n_footer_da_DKdisplay:inline-block.js [data-lang=de_DE] #i18n_de_DEdisplay:block.js [data-lang=de_DE] #i18n_footer_de_DEdisplay:inline-block.js [data-lang=en_US] #i18n_en_USdisplay:block.js [data-lang=en_US] #i18n_footer_en_USdisplay:inline-block.js [data-lang=es_ES] #i18n_es_ESdisplay:block.js [data-lang=es_ES] #i18n_footer_es_ESdisplay:inline-block.js [data-lang=fr_FR] #i18n_fr_FRdisplay:block.js [data-lang=fr_FR] #i18n_footer_fr_FRdisplay:inline-block.js [data-lang=in_ID] #i18n_in_IDdisplay:block.js [data-lang=in_ID] #i18n_footer_in_IDdisplay:inline-block.js [data-lang=it_IT] #i18n_it_ITdisplay:block.js [data-lang=it_IT] #i18n_footer_it_ITdisplay:inline-block.js [data-lang=ja_JP] #i18n_ja_JPdisplay:block.js [data-lang=ja_JP] #i18n_footer_ja_JPdisplay:inline-block.js [data-lang=ko_KR] #i18n_ko_KRdisplay:block.js [data-lang=ko_KR] #i18n_footer_ko_KRdisplay:inline-block.js [data-lang=ms_MY] #i18n_ms_MYdisplay:block.js [data-lang=ms_MY] #i18n_footer_ms_MYdisplay:inline-block.js [data-lang=nl_NL] #i18n_nl_NLdisplay:block.js [data-lang=nl_NL] #i18n_footer_nl_NLdisplay:inline-block.js [data-lang=no_NO] #i18n_no_NOdisplay:block.js [data-lang=no_NO] #i18n_footer_no_NOdisplay:inline-block.js [data-lang=pl_PL] #i18n_pl_PLdisplay:block.js [data-lang=pl_PL] #i18n_footer_pl_PLdisplay:inline-block.js [data-lang=pt_BR] #i18n_pt_BRdisplay:block.js [data-lang=pt_BR] #i18n_footer_pt_BRdisplay:inline-block.js [data-lang=ro_RO] #i18n_ro_ROdisplay:block.js [data-lang=ro_RO] #i18n_footer_ro_ROdisplay:inline-block.js [data-lang=ru_RU] #i18n_ru_RUdisplay:block.js [data-lang=ru_RU] #i18n_footer_ru_RUdisplay:inline-block.js [data-lang=sv_SE] #i18n_sv_SEdisplay:block.js [data-lang=sv_SE] #i18n_footer_sv_SEdisplay:inline-block.js [data-lang=th_TH] #i18n_th_THdisplay:block.js [data-lang=th_TH] #i18n_footer_th_THdisplay:inline-block.js [data-lang=tl_PH] #i18n_tl_PHdisplay:block.js [data-lang=tl_PH] #i18n_footer_tl_PHdisplay:inline-block.js [data-lang=tr_TR] #i18n_tr_TRdisplay:block.js [data-lang=tr_TR] #i18n_footer_tr_TRdisplay:inline-block.js [data-lang=zh_CN] #i18n_zh_CNdisplay:block.js [data-lang=zh_CN] #i18n_footer_zh_CNdisplay:inline-block.js [data-lang=zh_TW] #i18n_zh_TWdisplay:block.js [data-lang=zh_TW] #i18n_footer_zh_TWdisplay:inline-block”>
Vi kan desværre ikke finde den side, du leder efter. Gå tilbage til den forrige side, eller besøg Hjælp for at få flere oplysninger
Gå til dit feed
Die gewünschte Seite konnte leider nicht gefunden werden. Versuchen Sie, zur vorherigen Seite zurückzukehren, oder besuchen Sie unseren Hilfebereich, um mehr zu erfahren.
Zu Ihrem Feed
Uh oh, we can’t seem to find the page you’re looking for. Try going back to the previous page or see our Help Center for more information
Go to your feed
Vaya, parece que no podemos encontrar la página que buscas. Intenta volver a la página anterior o visita nuestro Centro de ayuda para más información.
Ir a tu feed
Maaf, sepertinya kami tidak dapat menemukan halaman yang Anda cari. Coba kembali ke halaman sebelumnya atau lihat Pusat Bantuan kami untuk informasi lebih lanjut
Buka feed Anda
Non abbiamo trovato la pagina che stai cercando. Prova a tornare alla pagina precedente o visita il nostro Centro assistenza per saperne di più.
Vai al tuo feed
원하시는 페이지를 찾을 수 없습니다. 이전 페이지로 돌아가거나 고객센터에서 자세히 알아보세요.
홈으로 가기
Harap maaf, kami tidak dapat menemui laman yang ingin anda cari. Cuba kembali ke laman sebelumnya atau lihat Pusat Bantuan kami untuk maklumat lanjut
Pergi ke suapan
De pagina waar u naar op zoek bent, kan niet worden gevonden. Probeer terug te gaan naar de vorige pagina of bezoek het Help Center voor meer informatie
Ga naar uw feed
Не удаётся найти искомую вами страницу. Вернитесь на предыдущую страницу или посетите страницу нашего справочного центра для получения дополнительной информации.
Перейти к ленте
Naku, mukhang hindi namin mahanap ang pahina na hinahanap mo. Subukang bumalik sa nakaraang pahina o tingnan ang aming Help Center para sa higit pang impormasyon
Pumunta sa iyong feed
0 notes
Text

Looking for high-quality PNG images and wallpapers? Explore a variety of free and downloadable PNG files, including Hello Kitty PNG, Troll Face PNG, Arrow PNG, and Heart PNG. Get Hello Kitty SVG for creative projects or Troll Face Wallpapers in 4K resolution for your devices. Enjoy Hello Kitty coloring pages for fun activities, or download Troll Face scary images for a spooky touch. Need a Sigma wallpaper or Preppy wallpaper? Find stunning 4K wallpapers for your phone and desktop. Get Troll Face green screen PNGs and Troll Face photos for memes and edits. Download now!
0 notes
Note
I really really love the look of your edits where you add like these "fake" photoshop sizing frames around it, and all these other add ons that make it look like its currently being edited (like the checo edit you posted yday)
Do you have a specific website where you download these pngs or svgs ? Or do you create them yourself with illustrator or sth like that ? Because that's a style I really wanna try out myself but I have 0 clue what even to type into a search bar to find stuff like that.
hi dude! sorry for the late reply buttt no I dont have a specific website or svg or anything saved for these
what I do do is just the really lazy way and I genuinely just screenshot the photoshop file I'm currently working with to get any of the lil icons that I want like these


they're just screenshotted and cut from the file which I like bc then colours also work w the graphic obv! for the lil 'selection' boxes I just make 'em with the box and line tool, theyre really easy to make n the reference is right there if u wanna make sure they look real.
for the little load bar, hands, arrow stuff I have this png saved where I just select n cut the ones I wanna use out.
if you wanna find ur own the best way to google them is computer cursor or computer arrow or mouse point or anything like that and you'll find different forms of it!
I know its kinda a useless answer but its the easiest way to get the lil graphics so it's what I do
#I am. msot of all. lazy and wanna work fast when it comes to my art yall I am impatient as shit#kyle.answers#design.stuff
0 notes
Text

Alphabet letter monogram with Cupid arrow
0 notes
Text
Handyarrows es una colección de flechas dibujadas a mano en formato SVG, ideales para utilizar en tus proyectos. Este recurso, que también incluye doodles, ilustraciones y otros elementos gráficos, es gratuito y muy sencillo de descargar. Lo descubrimos gracias a la newsletter Honos de Máximo.
0 notes
Text
How to Utilize Your Logo for a Winning Branding Strategy

Your logo is more than just a visual symbol—it’s the face of your brand. Done right, a powerful logo can leave a lasting impression, differentiate your business, and serve as the backbone of your branding strategy. But how exactly can you harness your logo for maximum impact in today’s competitive landscape?
This blog is here to guide graphic designers, small business owners, and marketing strategists through the process of using a logo as a strategic branding asset. From understanding its role within your brand identity to tips on consistent application, we’ll cover practical strategies to make your logo work harder for you and your business.
----
Why Your Logo is Essential to Branding
Your logo is often the first thing people notice about your business. It’s a visual shortcut to communicate your values, mission, and personality. But why does this matter?
First Impressions Matter: According to researchers at the Missouri University of Science and Technology, it takes only 50 milliseconds for users to form a first impression of your brand. A memorable logo ensures they’ll stick around.
Establishes Brand Identity: Your logo sets the tone for your overall brand. Think of it as the starting point for your website design, marketing materials, and even packaging.
Builds Trust and Loyalty: Well-designed, professional logos signal that your business is credible and trustworthy—a major factor in gaining customer loyalty.
Consumers are drawn to brands that "feel" familiar, thanks to consistent visuals like a recognizable logo. The more they trust your logo-driven branding, the more likely they are to become repeat customers or clients.
----
How to Use Your Logo Effectively in Branding Strategy
1. Start with a Thoughtful Design
Before you can leverage your logo as a branding powerhouse, it’s crucial to start with an effective design. Whether you’re creating a new logo or revamping an old one, consider these principles:
Simplicity is Key: Think of globally recognized logos like Apple or Nike. They are simple, scalable, and impactful, showing that less is often more.
Color Psychology: Choose your logo colors wisely, as they evoke emotions. For example, blue signals trust and reliability, while red evokes energy and excitement.
Typography Matters: Whether your logo includes text or stands alone as a graphic, fonts must align with your brand voice. Serif fonts, for example, project sophistication, while sans-serif fonts create a more modern look.
If you’re struggling to balance creativity with strategy, you can use tools like Adobe Illustrator or Canva to sketch ideas, or consult a professional graphic designer.
2. Maintain Brand Consistency
Brand consistency is the secret sauce for successful businesses. For your logo to enhance your branding effectively, it must be consistently applied across all touchpoints.
Create a Brand Style Guide: Outline logo guidelines in a style guide, including acceptable color variations, minimum and maximum sizing, and placement rules.
Use Across Channels: Ensure your logo is visible on your website, social media profiles, email signatures, product packaging, and even company uniforms.
Always Optimize File Formats: Use vector-based files like .SVG or .EPS for scalability, and raster files like .PNG for web applications.
Consistency builds credibility. Every time a consumer sees your logo in a well-placed, consistent context, your brand earns another small deposit in their "trust bank."
----
3. Make Your Logo Part of Your Story
Every great logo tells a story. Whether it’s rooted in your brand’s history, values, or niche, your logo needs to evoke both recognition and emotion.
Design for Meaning: A logo should reflect your mission or what you stand for. For example, FedEx’s arrow symbolizes delivery speed and accuracy, while the WWF logo highlights wildlife conservation through its panda design.
Communicate Its Meaning to Your Audience: Share the story behind your logo in "About Us" sections, videos, or press releases. This transparency connects you with customers on a personal level.
Integrating your logo into your brand story makes it a vessel for communication, not just a static image.
----
4. Use Your Logo Strategically in Marketing Campaigns
Marketing strategy isn’t complete without visible and strategic use of your logo. Consider how giants like Coca-Cola use their logo in every ad, sponsorship, or piece of merchandise. You don’t need their budget—just their focus.
Social Media Posts: Incorporate your logo as a watermark or profile picture on platforms like Instagram and LinkedIn.
Email Marketing: Place your logo in header designs to increase brand recall.
Partnerships & Collaborations: If engaging in co-marketing or sponsorships, ensure your logo is prominently displayed to maximize visibility.
An often-overlooked tip? Optimize your logo for digital ads using responsive designs that work across screen sizes.
----
5. Update, but Don’t Overdo It
While it’s tempting to modernize branding frequently, remember that drastic changes to a logo can disrupt customer trust. When you refresh your logo, follow these best practices to retain engagement and familiarity:
Keep Core Elements: Use elements of your old design, such as fonts or colors, to maintain brand recognition.
Test First: Before rolling out a new logo, run A/B testing to see how your audience reacts.
Communicate the Change: Inform customers about your logo updates via email, social media announcements, or blog posts. Transparency fosters trust.
A classic example? When Google subtly refreshed their logo in 2015, they increased scalability for modern screens while keeping their trademark simplicity intact.
----
6. Engage Your Community with Your Logo
Your customers can be your greatest advocates—and your logo can help engage them further.
User-Generated Content: Encourage followers to share photos featuring your brand logo, like coffee cups or apparel.
Merchandising Opportunities: Sell products like branded tote bags or mugs emblazoned with your logo to foster a sense of exclusivity.
Not only do these tactics foster loyalty, but they also extend your reach as users interact with your logo in daily life.
----
Build a Strong Brand with a Powerful Logo
Your logo is so much more than a design asset—it’s your brand’s silent ambassador. By thoughtfully designing, consistently applying, and incorporating it into your narrative, you can turn your logo into a strategic branding tool that attracts, informs, and solidifies trust in your business.
0 notes