#50-100mm
Explore tagged Tumblr posts
Text

シャガ Iris japonica
SIGMA 50-100mm f1.8 DC HSM Art
68mm f3.5 1/160 ISO200
159 notes
·
View notes
Text
Luca Petralia Compares Fujifilm's Fujinon XF 18-120mm f/4.0 LM PZ WR With XF 16-80mm
Luca Petralia Compares Fujifilm’s Fujinon XF 18-120mm f/4.0 LM PZ WR With XF 16-80mm

View On WordPress
#DZOFilm Pictor T2.8 Super35 zoom lenses#Fujinon MKX 18-55mm T2.9#Fujinon MKX 50-135mm T2.9#Fujinon XF 16-55mm f/2.8 R LM WR#Fujinon XF 16-80mm f/4.0 R OIS WR#Fujinon XF 18-120mm f/4.0 LM PZ WR#Luca Petralia#Sigma 18-35mm f/1.8 DC HSM Art#Sigma 18-35mm T2.0 High Speed Zoom#Sigma 50-100mm f/1.8 DC HSM Art#Sigma 50-100mm T2.0 High Speed Zoom
0 notes
Text
How to Make: Electronic Wings for Cosplay
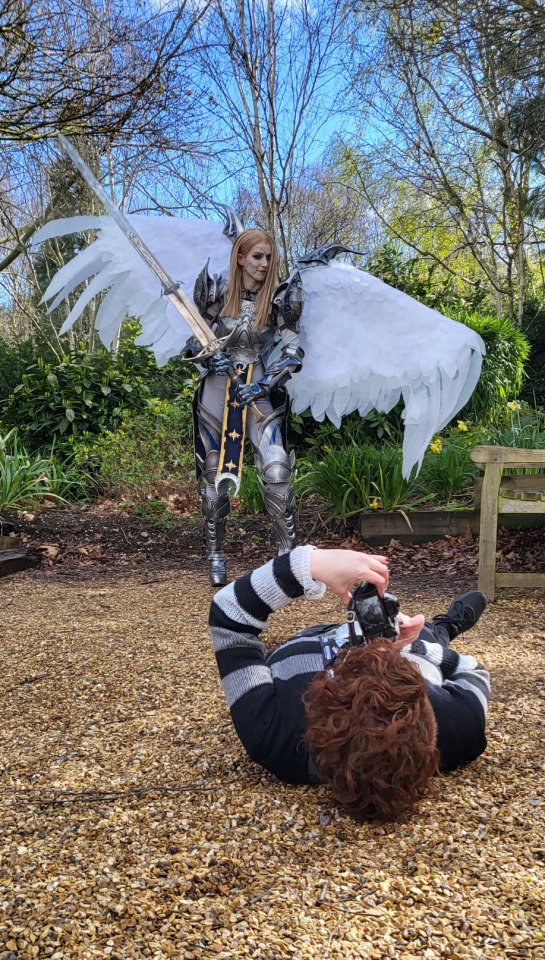
Hello Everyone! It's been a while since I last uploaded a written tutorial on here and since I just finished and wore my Dame Aylin cosplay this last weekend it seemed appropriate to jump back in with a tutorial on one of the costume pieces!
Her wings were the star of the show this weekend and I know a lot of people were curious about how I made them! A huge source of knowledge and inspiration behind these wings was this video by Axceleration, I made a few changes to the frame shape and electrical circuitry for mine but her tutorial was a huge stepping stone to give me the confidence to tackle them myself!
Health and Safety:
When working with Sintraboard (as well as other thermoplastics) it is incredibly important you wear a respirator as well as goggles when heating, moulding and cutting it. The fumes this plastic will give off when heated up are no joke! Make sure you're in a well-ventilated space!
Basic tool safety knowledge is also really important! wearing gloves when using power tools can be more dangerous in most situations, so always be aware of where your hands are vs where the tools are. Always cut away from yourself and take things slowly, don't panic.
Electrical safety! You're working with live wires and circuitry! make sure your hands are dry, you aren't touching the bare wires at any point when they are connected to a power source, and if you choose to solder anything, make sure you're wearing heat-proof gloves and a mask in a ventilated space!
Tools
Wire stripper
Screwdriver and wrench
Dremel - I recommend the Dremel 3000 rotary tool personally! Some essential Dremel bits you'll need for this include, a sanding bit, drill bit (smaller or same size as your screws/bolts), and a small/narrow cutting bit. These will usually come with the Dremel!
Heat Gun (A hairdryer will not get hot enough to heat the Sintraboard!!)
Pipe cutter (alternatively you can use a hacksaw for this!)
Hacksaw
Ruler
Scissors (for cutting fabric straps)
Materials
Heat shrink Tubing
2 core electrical wire
switch (you want a three position, six pin switch, like this one, even better if it has the Screws on the pins! otherwise you'll need a soldering kits to solder the wires to the pins.
2x 8AA 12v Battery Holders
2x 12v Linear Actuators (Mine had a stroke length of 100mm)
21.5mm PVC Pipes (I got 2x 3m Lengths)
2x 21.5mm PVC Pipe straight couplers
6mm 8"x12" Sintraboard
Nuts/Bolts/Screws (I used M5 bolts for the base & Actuator connectors and M6 screws to attach the hinges to the pipes! You'll need Washers for every Nut & Bolt!)
Hinges (I used 2.5cm wide hinges that were skinny but long so they would just about fit along the PVC pipe! 3" gate hinges would work!)
50 metre Polythene Jiffy foam roll (in retrospect this was ALOT of foam, you could definitely get away with maybe a 20-30 metre roll! I now have a load leftover XD)
16 AA Batteries (I used 16 and had enough for the whole day with them on, I think They'd probably be enough for another half a day-full day too! but have spares just in case!)
Webbing strap ( I went for grey to match my base suit colour!)
Buckle - as wide as the webbing strap you use!
3 metres of white cotton fabric (or whatever colour wings youre going for!)
Optional
Zipties (for cleaning up the wires)
Lets Go!
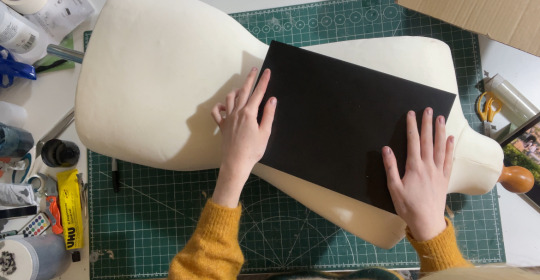
Sintraboard is this wonderfully stable thermoplastic that is relatively easy to cut into (with the right tools) and when heated allows you to mould its shape! I started by using a mannequin and heating the Sintraboard with a heat gun for a few minutes to make it pliable, I recommend using gloves for this part as the materials gets VERY HOT! Press the board into the shape of the mannequin's back, taking note of the edges especially! you want this board to sit as comfortably to your body shape as possible as it makes a huge difference to how long you can wearing the wings for in this backplate is comfy!
Once shaped, I placed it against my back to make sure it was a good fit, heating again and making any alterations I needed (again don't place bright hot plastic to your bare skin! wear protective clothes and wait till its slightly cooler to do this, with the help of a friend!). I then took a hacksaw and rounded the corners, before sanding the edges with my Dremel! Try to avoid cutting off loads, just enough to make things less likely to snag.
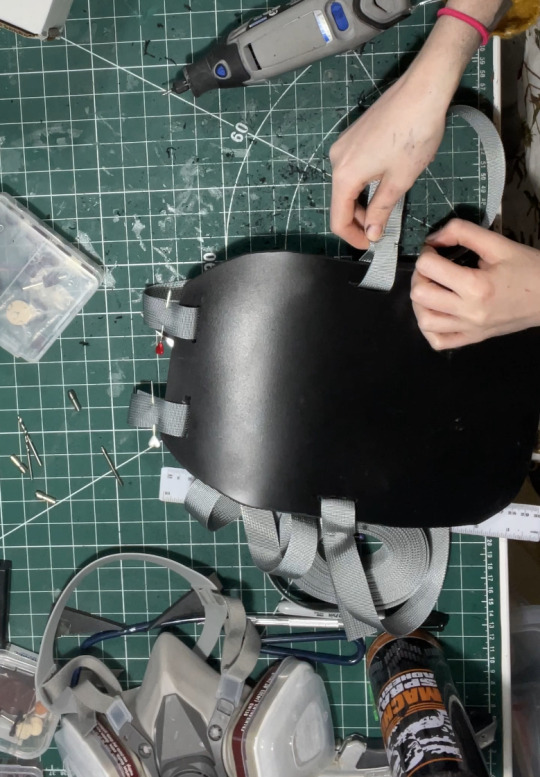
3. I then cut in four holes, wide enough to feed my webbing strap through, two at the top and one on either side below where my arms would sit! I measured the webbing strap by firstly feeding them through the top holes and pinning them, and then bring the strap over my should to everything sits where it should and seeing where the strap hits the side hole and cutting the length there! you'll also want a strap that attaches across the chest, meeting in the centre with a buckle!
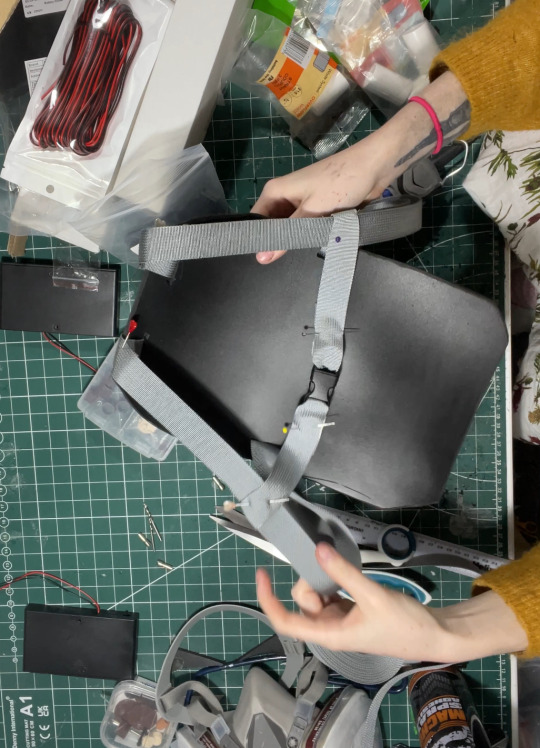
4. After sewing the straps closed I was able to move onto the PVC pipe structure! This may change slightly depending on the finished shape you want but I needed the PVC pipes to come out from inside a breastplate so had a particularly angle as well as character references to work with! I began by heating the pipe over my heat gun and flattening a portion of it under a heavy object so it would sit much more flush against the backboard and sit better underneath my breastplate before moving onto securing the first portion of the structure to the backplate. This mainly involved lots of try-ons and measuring to make sure the angles were correct and symmetrical and was quite fiddly but well-worth the effort! I'll include a diagram of the general shape I went with below:
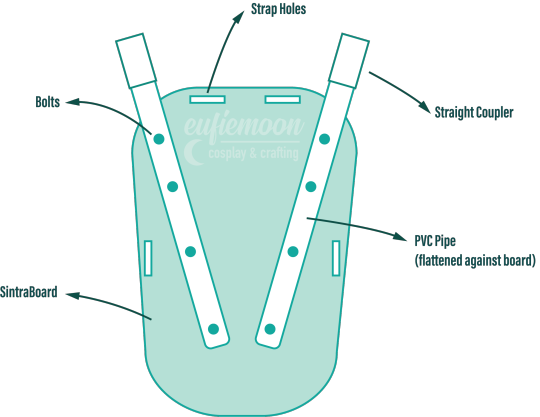
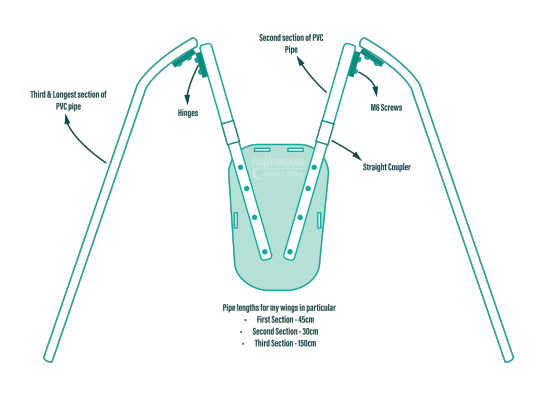
5. I wanted my wings to be relatively modular for ease of travel so I needed to make sure certain portions of them could come away from other parts easily, so I popped a straight coupler on the top of the pipes that were attach to the breastplate, this also meant I could slot the breastplate over these shorter pipes and wear everything correctly! Then these second pipes slot on and at the other end they are attached via hinges to the longest portion of the pipe 'skeleton', Diagram below:
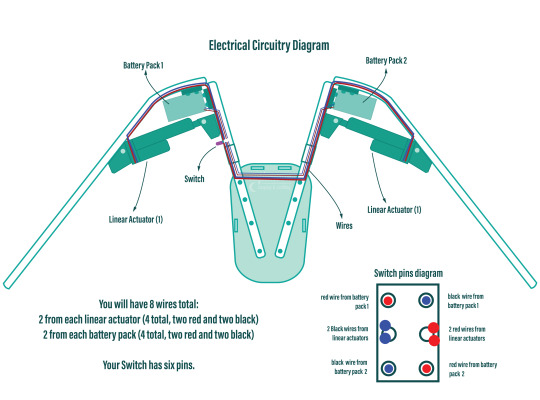
6. Now that the skeleton was put together, it's time for the electrical stuff! It's a good idea to figure out where your circuit is going to lay on the skeleton - consider if you want the battery packs mounted the the backplate or, like me, put them inside the actual wings in removeable pockets for easy access and removal for battery changes. all your wires will go through the switch so deciding where you want to place that is very important! Mine was placed just over my shoulder on the front side, mounted to the PVC pipe with a metal cover I drilled a hole into to slip the switch through and then drill through the pipe.
I've included another diagram below that explains all the electrical circuitry, including which wires go on which pins on the switch!
Important to note: The linear actuators need to be placed and bolted into the PVC pipes at *exactly* the same angle on each side, any slight deviation will lead to the wings going up wonkily! So take your time and make as many adjustments as necessary.
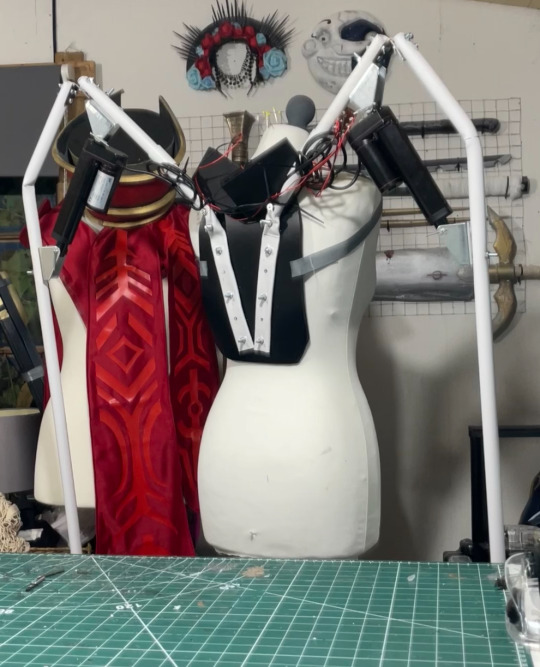
7. You can extend your wires by adding on the electrical wire, just match the colours, and put heat shrink tubing over the connections to hide the live wires! I ended up zip-tying the wires into organised bundles once the wings were done to help keep everything safe from snags.
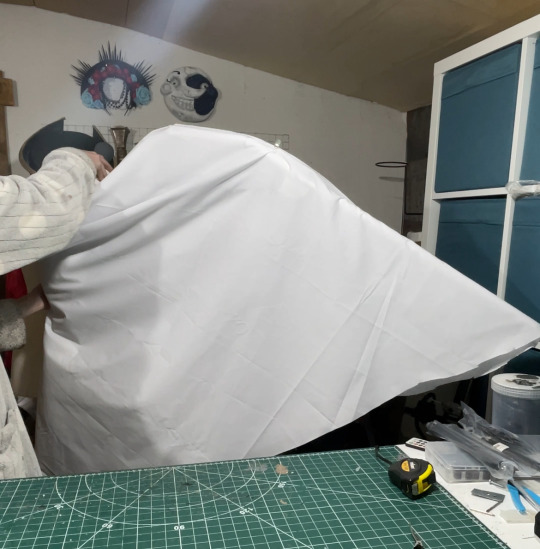
8. Now its time for the Wings themselves! I drafted my base pattern by just draping the white cotton fabric I had over the wing when it was fully extended. I then pinned the wings to the shape I wanted them to be along the bottom before cutting along the pins. I ran the fabric through my sewing machine to close the bottom edge, leaving a gap wide enough by the wing base so I could slip the wing on and off, closing it with velcro. I also added little fabric pockets inside of these to hold my battery packs, which also connected via velcro for easy removal!
9. Now that I had a wing base I was able to begin making feathers! I cut out a total of 800 feathers out of polythene jiffy roll for these wings, in 6 different styles and using real life bird wings to dictate the shapes I used and where I placed them. I ended up hot gluing every individual feather onto the white fabric base, going row by row until every side was covered, the wing covers themselves are super light because of the foam feathers and they shine light through them in a really magical way!
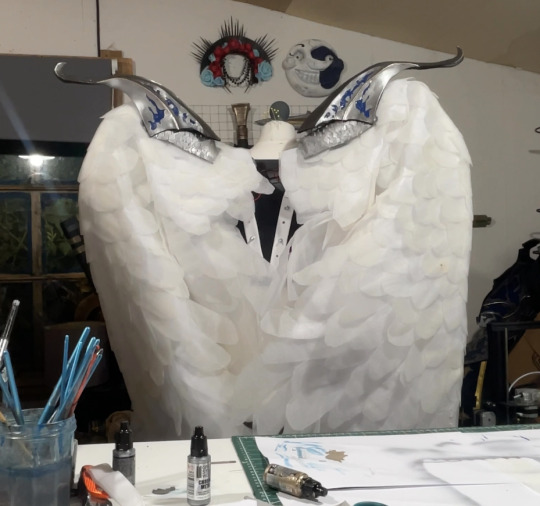
Optional: I also ended up going over these feathers with my airbrush and some super light beige paint to help darken the shadows, this is entirely optional and may change depending on the wings you're looking to make!
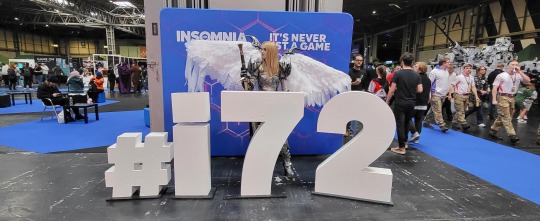
When in neutral position and in extended position the wings looks like this:

Mine had a wingspan of about 7ft total when fully extended but when in neutral position they were fairly close to my own proportions! mainly staying behind me and weren't much of a problem in a packed con hall!
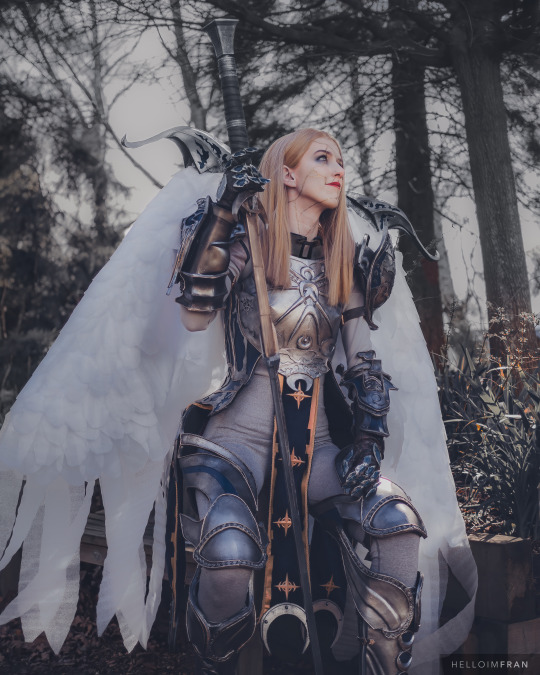
Photo by: Helloimfran (on Instagram and Twitter)
I hope this tutorial helped and if there are any questions about anything in specific don't hesitate to reach out at [email protected] or on my instagram or twitter (@eufiemoon)
Happy Crafting!

#cosplay#cosplayer#cosplaying#baldurs gate iii#baldur’s gate 3#baldurs gate 3#bg3#dame aylin#aylin x isobel#bg3 aylin#cosplay tutorial#Wings#fantasy#tutorial#cosplay help#cosplay tips
154 notes
·
View notes
Text

‼ HOLD IT ‼
The judge has called for a retrial: our hardcover zine and a collection of merch are now available to preorder until April 22nd! This is your LAST CHANCE to get your own physical copy of Ipse Facto!
🌻 STORE
We have two bundles available for preorder!


‼ DEAD LAWYER WALKING // BUNDLE PREORDER ‼ [$50] This bundle contains:
🌻 8x8 Hardcover Physical Zine (90+ pages!) 🌻 Digital PDF and Digital Merch 🌻 3 Die Cut Stickers (~3") 🌻 1 Sticker Sheet (A6) 🌻 2 Prints (150mm x 100mm) 🌻 1 Shaker Charm (~2.5") 🌻 1 Enamel Pin (~1.75")
‼ MR. LEFT // BOOK PREORDER ‼ [$30] This bundle contains:
🌻 8x8 Hardcover Physical Zine (90+ pages!) 🌻 Digital PDF and Digital Merch 🌻 1 Sticker Sheet (A6)
Thank you for your support! 🌻 @fandomzines @zineapps @zinefeed @zine-scene @zinefans @zineforall @zinesunlimited @aafancalendar @zine-shop-channel
#ace attorney#naruhodo ryuichi#phoenix wright#ace attorney fanzine#fandom zine#zine#ace attorney zine#zines#gyakuten saiban#ryuichi naruhodo#zine sales
114 notes
·
View notes
Text


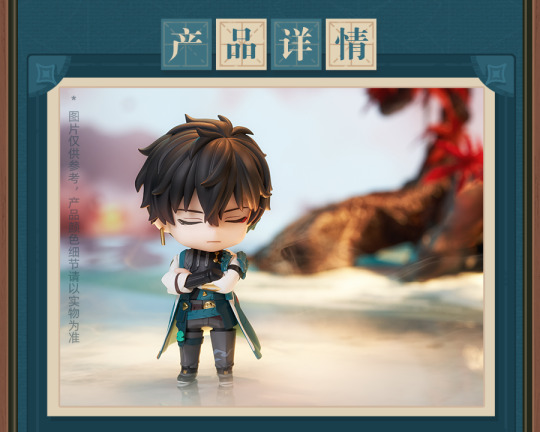
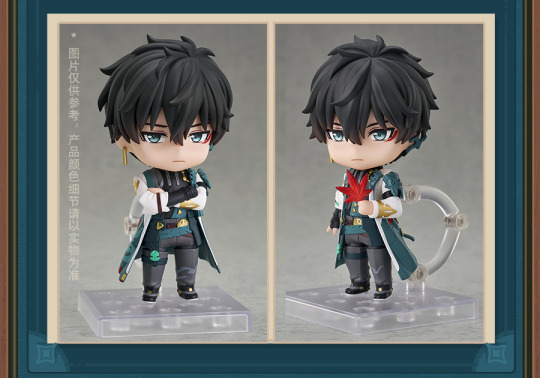

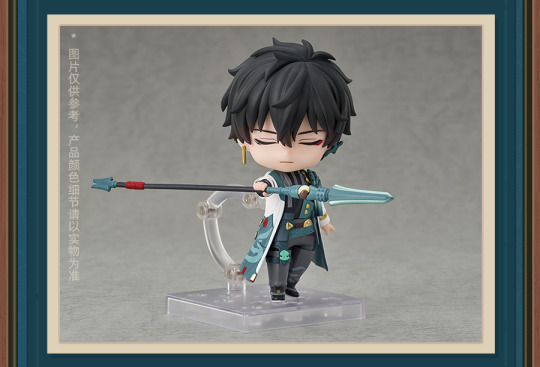
Honkai: Star Rail CN | Dan Heng Nendoroid Preview
Details under break
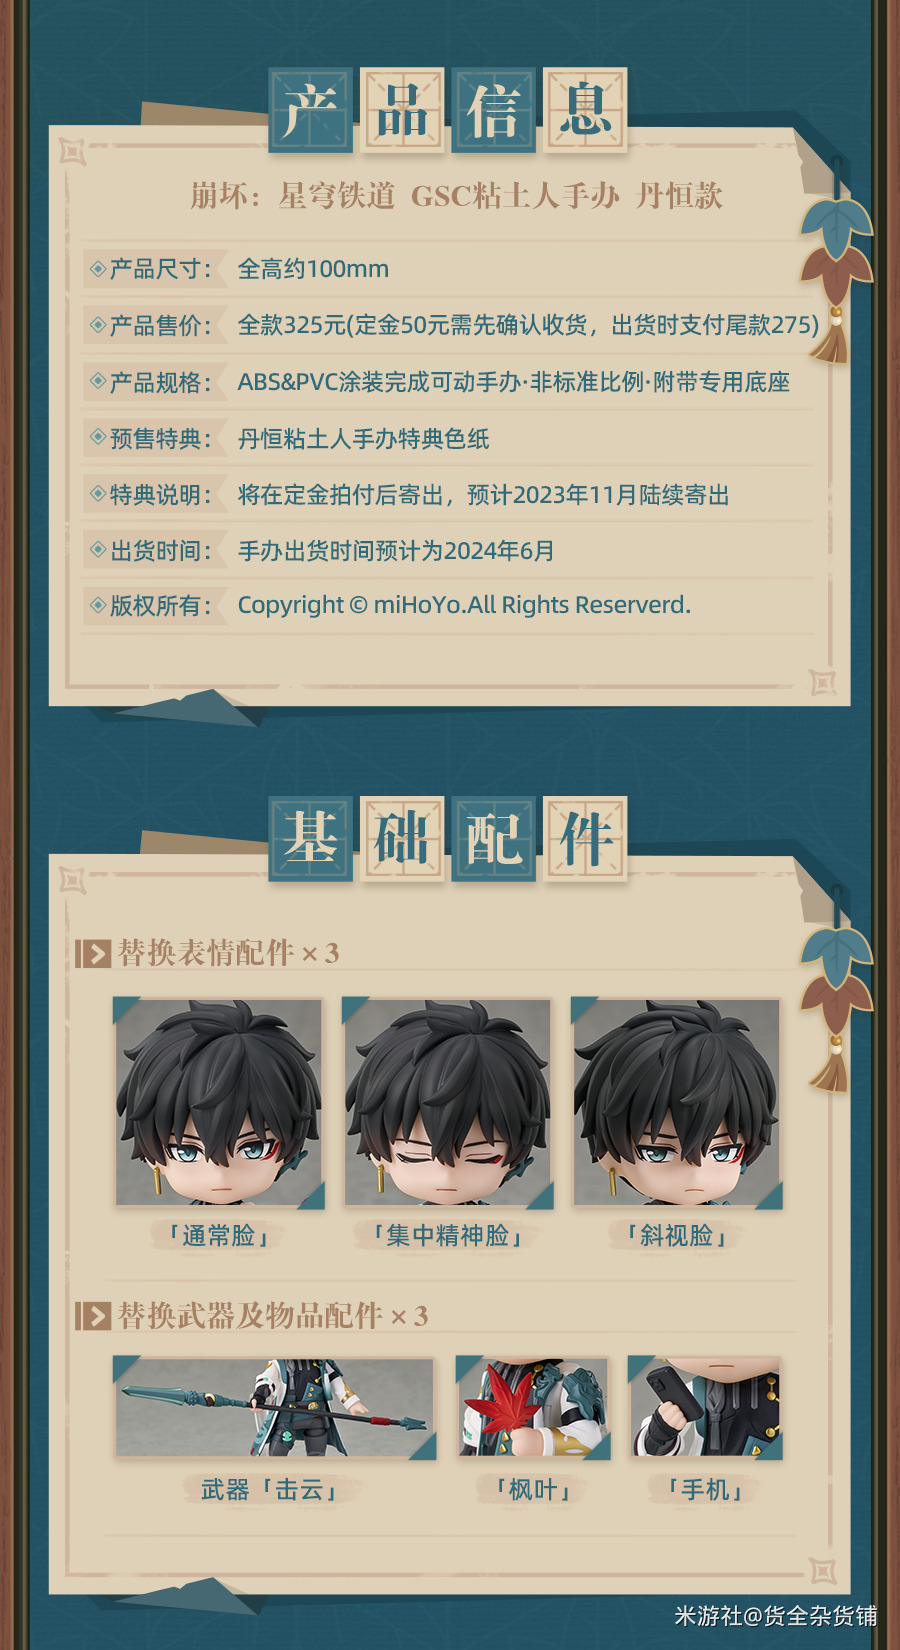
Product specs: ABS & PVC coating with an exclusive base
Size: 100mm of total height
Price: 325 CNY (full price), must deposit 50 CNY first when ordering & pay the rest at the time of shipment
Pre-order gift: Dan Heng's 2022 Mid-Autumn Shikishi
Shipping time: approx. June 2024
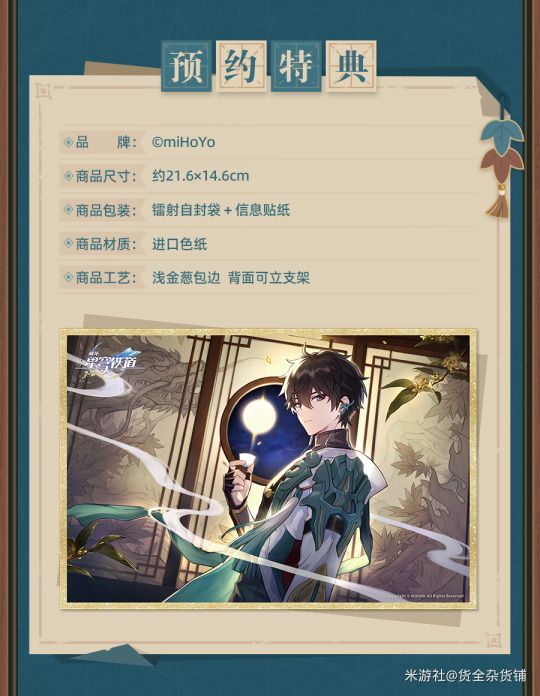
Gift shikishi's specs:
Size: 21.6cm x 14.6cm
Packaging: Sealing bag + information sticker
Material: imported shikishi paper
Features: Glitter edges & standing bracket on the back
266 notes
·
View notes
Text

26th Monster Hunter 3D-Print: Safi'jiiva Remake


Color based on mod by Lyra And Mlam
Hand for scale (1:166.67, a third or my previous Safi)

The LED strip used is only 3mm wide which allowed me to make a much smaller model. Even so, it is so powerful that I had to make sure it won't overheat. Powered via USB and XL6009 converter.

Light off

Ground model by MR_CRATES https://cults3d.com/en/3d-model/game/2x-100mm-x-100mm-square-base-with-mountain-ground-toppers
The previous version I made 2 years ago:
#monsterhunter#3d printing#airbrush#mini painting#dragon#safi'jiiva#monhun#mhw#mhw iceborne#mhworld#mhwib
150 notes
·
View notes
Text
久々のタムロン

久しぶりにタムロンが手元に戻ってきた、しかも最新モデルが。
50-400mmはよく写ったしハーフマクロもいけてかなり良かったけど、その重さに耐え���れずに手放した経緯がある。

自分の思いを汲み取ったのか?この度テレ端を100mm削ってかなり身軽になった50-300mmが発表になり即予約。
持ち出すのが億劫になっていた自分にはまさにドンピシャなレンズ。
しかも50-400mmで少し気になっていたちょっと過度な色のりもナチュラルになったというから、もう買わない理由はどこにもなかった。


発売日当日に入手したけど、天気悪いわ忙しいわでちゃんと持ち出せていない。
家の庭でしか試してないのだけど、コンパクトさや軽さ、寄れることは勿論だけど、しっかり写る上に色のりが本当に優しい。
全く異なるキャラクター付けとなっていて、少しの使用でも良さがひしひしと伝わってきた。

今回あげた写真からは、望遠ズームで撮ったとは思えないんじゃないかな。
それがこのレンズの隠れた良さでもあるわけで。
今度は外に持ち出して、またここにあげられたらいいな。
camera : SONY α7CⅡ
lens : TAMRON 50-300mm F/4.5-6.3 DI Ⅲ VC VXD
43 notes
·
View notes
Text

Maui, Hawaii. July 2024.
ISO 100 | 100mm | f/5.6 | 1/50 sec
Photo © 2024 Brian R. Fitzgerald (www.brfphoto.com)
#brfphoto#photography#photographers on tumblr#original photography#lensblr#luxlit#biutifulpics#imiging#clubimiging#telescopical#gray-card#galeriedesartsvisuels#originalphotographers#maui#hawaii#rooster#chicken
11 notes
·
View notes
Text
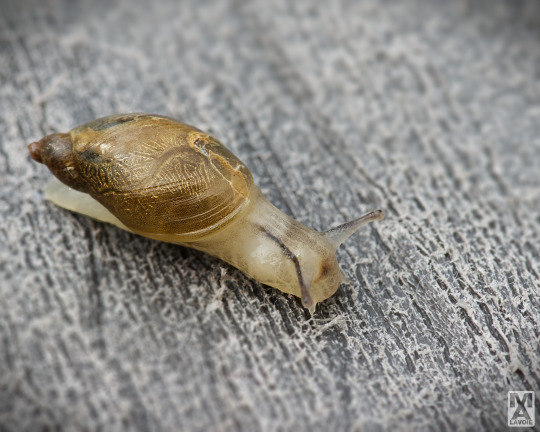
The Snail
This image captures the intricate details of a small snail with a translucent body and a beautifully patterned brownish shell. The snail's delicate antennae are extended forward as it crawls on a textured, gray surface, creating a sense of movement and exploration.
The overcast day provided soft, even lighting, akin to having the snail under a large soft box, which helped to highlight the subtle details of the snail's form without harsh shadows.
Using a 100mm macro lens, I was able to achieve an incredibly close and detailed view of the snail, revealing textures and patterns that are usually unnoticed by the naked eye. Macro photography allows for an intimate exploration of small subjects, bringing out their unique characteristics and beauty. The 100mm focal length provided a comfortable working distance, ensuring that I could capture the image without disturbing the snail's natural behavior.
In post-processing, I aimed to enhance the image further. I started by selectively adding contrast to enhance the texture of the snail's shell to bring out its intricate details and patterns. This helped to make the shell's structure more prominent, adding depth to the image. I then used a tilt-shift filter to emphasize the shallow depth of field. This filter helped to keep the snail in sharp focus while gently blurring the background, enhancing the sense of depth and isolating the snail from its surroundings. Finally, I knocked in some shadows on the ground in front of the snail to add dimension and create a more three-dimensional look. These subtle shadows help to ground the snail.
Shot at Les Vergers Villeneuve and Blueberry Farm, Saint-Pascal-Baylon, ON, Canada.
Processed with Affinity Photo v2 and Topaz Photo AI.
Camera: Pentax K-3
Lens: smc Pentax DA FA 1:2.8 100mm Macro
100mm / ƒ/10 / 1/50s / ISO 400
Taken: July 16, 2024
#photographer on tumblr#original photographers#original photography#macro photography#snail#shell#mollusc#texture#canada#ontario#where I live#summer#July#2024#pentax#pentaxian#pentax k3#Affinity Photo#Topaz Photo AI
12 notes
·
View notes
Text


Article on the Honda Z Kei car. Mid engined AWD with viscous centre diff Kei class RV. Available in turbo and Na versions. Unfortunately only autos. No manual option. I was looking at importing one of these before I bought my RD1 CRV locally.
This is what "underwater goggles" have become
TURBO is back!!! Eccentric light Honda Z midship 4WD appear
100mm in overall length, 80mm in overall width. There is no doubt that these few figures not only improve safety but also bring new possibilities to minicars! (referring to changes to Kei car regs) There is something about the style of the Honda Z, a big name in minicars that has been revived after a long time, that really makes you feel that way.
The Z is different from RVs such as the Wagon R and Move, and from the orthodox style of the Alto and Mira.
The car's style evokes both the outdoors and the city, and the straight accent lines on the sides of the body give it a powerful feel that is not typical of a compact car.
With a total length of 3,395 mm and a total width of 1,475 mm, it is within the new minicar framework. The 1,675 mm tallboy is in the style of the Honda Z. The 175/80R15 tires are large for a kei size, and the way they stand out at the four corners gives the design a charming look.
As the manufacturer calls it a "small super mover," the key point is that even with this small body, it still provides ample room. The Honda Z uses an "underfloor midship" floor, which means the 660cc engine is mounted under the rear seat! This achieves an ideal 50:50 front-to-rear weight distribution ratio.
At the same time, it is also practical, being able to comfortably accommodate four adults.
Furthermore, this is driven by a viscous coupling type 4WD, giving the vehicle high off-road capability despite its small size.
The Honda Z is full of unique ideas that are so Honda-like.
But that's not the only surprise.
Turbo
This time, there are two types of engines available for the Honda Z. A NA unit with SOHC 12 valves that produces 52ps/6.1 kgm and a turbo unit that produces 64ps/9.5 kgm. Hmm? Turbo? Yes, this is the first turbo since the wing turbo used in the Legend.
It has been resurrected!
"The combination of a midship turbo and 4WD is the same as that of the Lamborghini Diablo! When you hear that, you might imagine an incredible ride, but the Honda Z's driving is practical. Of course, the turbo can be transformed into a light and fast car if you want to, but it's not a super sharp machine. Rather, it's a car that everyone can enjoy, offering a pleasant ride as it turns smoothly into corners.
It's a fun setting.
There is no doubt that this car will be the perfect city commuter car, as it runs smoothly around town. The interior is also much more high-quality than previous light cars. Compared to its big brother, the Capa, the quality of the equipment is more than satisfactory for this class.
The rear seats can be flipped up to create a flat floor. It has excellent carrying capacity for large luggage. Even though the engine is under the rear seats, the occupants are extremely comfortable. It can be used as a city commuter.
Whether you use it as a road bike or an off-road vehicle is up to your preference. By installing the wide range of optional parts available, you can create a more unique and fun Honda Z.
Body colors are silver, orange, black, green, blue, white.The only thing that's unfortunate is that the seat color is one color.
Well, you're doing a great job.
A variety of safe and fun unique light vehicles are available.
So, small cars are becoming more and more convenient.
It's getting better!
The Honda Z is really small!
When you see the Honda Z in person, it has an impressive body, but when you take it out on the city, its size really makes you feel the maneuverability that only a light car can offer.
I compared it with another Honda compact car, the Capa, and the difference in size was obvious. The difference in width was particularly large, with the Honda Z being noticeably smaller.
By comparison, the Honda Z size is 38mm shorter in overall length, 70mm shorter in overall width, and 25mm taller.
The minimum turning radius of the Capa is 4.8m, while that of the Honda Z is 4.6m, which is quite small. This is an excellent figure considering that both the Capa and the Honda Z have a wheelbase of 2360mm.
PIC CAPTIONS
The tallboy style makes it stand out with its individuality
The minimum ground clearance is 195mm, making it suitable for full-scale off-road use, and the side air intakes show off the midship.
Large multi-reflector light gives it a charming look
The minimum turning radius is 4.6m, making it easy to handle in urban areas. Rear visibility is also good, making it a good entry-level car.
As it is a brand new minicar, the price is of course a concern, but due to the fierce negotiations between the manufacturers, Honda has not yet officially announced the price as of October 1st. We hope that the information will be made available to many users as soon as possible...
There are two types of engines: naturally aspirated and turbocharged. The engine is revealed when you flip up the rear seats and open the lid under the interior material. The dashboard is simple, but functional and easy to use. Navigation is an optional feature.
The rear seats are thin but can comfortably accommodate two adults. The seats can be flipped up forward to create a completely flat luggage space.
8 notes
·
View notes
Text

POTATO GROWING IN BUCKET
1. Place ( 50-100mm) 2-4 inches of drainage in the bottom of the bucket, such as gravel or stones.
2. Fill the bucket with about (120mm) 6 inches of well-draining compost.Place the seed potatoes around 6 (120mm) inches apart on the soil.
3. Cover with another (120mm) 6 inches of soil.Water the plants, keeping the soil moist but not waterlogged.
4. Place in a sunny spot to grow – ideally with six hours of sunlight a day.
As plants grow, regularly top up with soil until within a few inches / centimeters of the bucket’s top.
5. Harvest potatoes when the foliage starts to yellow and die back
5 notes
·
View notes
Text

ヘチマ Loofah
SIGMA 50-100mm f1.8 DC HSM Art
100mm f5 1/1000 ISO100
#canonphotography#photographers on tumblr#canon#eos90d#canon eos 90d#sigma#sigma 50 100mm#loofah#flower
29 notes
·
View notes
Text
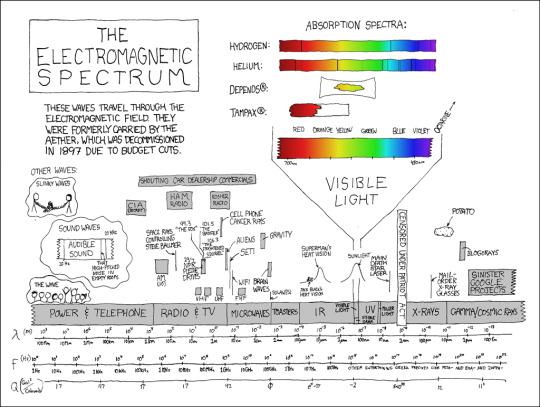
Sometimes I try to picture what everything would look like if the whole spectrum were compressed into the visible spectrum. Also sometimes I try to picture your sister naked.
Electromagnetic Spectrum [Explained]
Transcript
The Electromagnetic Spectrum These waves travel through the electromagnetic field. They were formerly carried by the aether, which was decommissioned in 1897 due to budget cuts. Other waves:
Slinky waves [Cueball and Megan hold the ends of a tangled slinky.]
Sound waves [There is a snippet of a frequency band. Between 20 Hz and 20 KHz is labeled "Audible Sound." Towards the top is a line labeled "That high-pitched noise in empty rooms."]
The wave [A row of people does a wave.]
[Three parallel scales are across the bottom. The first is lambda (m), ranging from 100Mm to 100fm; second is f (Hz), which starts at 1 Hz and reaches 100 THz about 2/3 of the way along, after which the labels read "other entertaining greek prefixes like peta- exa- and zappa-;" last is Q (Gal^2/Coloumb), whose labels are 17, 117, pi, 17, 42, phi, e^pi-pi, -2, 540^50, and 11^2. Above the scales and lined up accurately with the first two are the following:]
Power & Telephone (100Mm to 1km)
Radio & TV (1km to somewhere between 1m and 10cm); above that are many boxes showing subranges (AM, VHF, UHF, 24/7 NPR pledge drives, a very thin band for the space rays controlling Steve Ballmer, 99.3 "The Fox," 101.5 "The Badger," 106.3 "The Frightened Squirrel," cell phone cancer rays, CIA, ham radio, kosher radio, shouting car dealership commercials.)
Microwaves (a bit more than 10cm to a bit more than 1mm); it also has subranges (aliens, just below SETI, wifi, FHF, brain waves, sulawesi, gravity)
Toasters (about 1mm to about 100 micrometers)
IR (about 100 micrometers to somewhere between 1 micrometer and 1 nm); above that is a bell graph labeled "Superman"s heat vision," with a motorcycle driving up the left side labeled "Jack Black's Heat Vision."
Visible light (and, under it, visible dark); above that is a bell graph labeled "sunlight." There's a breakout chart above it showing the visible spectrum from 700nm (red) to 450nm (violet). There's an arrow pointing to where octarine would be, somewhere off to the side. Above that are bars showing the absorption spectra for hydrogen, helium, Depends(R) (yellow only), and Tampax(R) (red only).
UV (about 100nm to about 10nm)
Miller Light (a thin bar around 10nm)
An unlabeled section with a thin line above it showing the frequency of the main death star laser
A blocked-off portion labeled "Censored Under Patriot Act."
X-rays (from about 1nm to about 10pm); a line above shows the frequency of mail-order x-ray glasses. Somewhere vaguely above the 10pm mark is a potato.
Gamma/cosmic rays (10pm and smaller); above that is a bar marked Sinister Google Projects that also trails off into higher frequencies, and blogorays, which are slightly lower.
18 notes
·
View notes
Text
レーザー加工機で音響機材のパネルを作ってみる
切断加工の道具というイメージが強いかもしれないレーザー加工機ですが、実は彫刻加工もできます。今回はこれを利用して音響機材の操作パネルを作るために試行錯誤した話です。

レーザー加工機はレーザーを加工対象に照射してその熱で加工を行います。木材であれば照射した部分が炭化することで、アクリルなどの樹脂なら照射部分が溶けて揮発することで切断が行われます。そのため、照射時間を短くすれば照射した部分の表面だけを削り取る、といったことが可能です。レーザーの強さと照射時間をうまく調整すれば、照射した部分を焦がして色を付ける、ということもできます。このあたりの加工はレーザー刻印やレーザー彫刻などと呼ばれます。これを使えば加工と同時にパネルに文字や記号を刻み込めるのではないかと思い立ち、ここ数か月色々試行錯誤していました。
木材をレーザーで彫刻する
まず最初に試したのは、木材(MDF合板)のレーザー刻印です。MDF合板は木材を繊維レベルにまで粉砕した後に接着剤を混ぜて加熱成形したもので、品質が安定しているためレーザー加工しやすい、というメリットがあります。また、入手性が良く価格も安いので、試作にも向いている素材です。
ということで、とりあえず加工してみたものがこちらです。レーザー加工機(xTool M1)にはバスウッド合板用の加工パラメータがプリセットで用意されているので、その設定での加工です(厳密にはMDFはバスウッド合板ではないですが)。

この設定だと、刻印部分は軽く焦げた食パンくらいの濃さになります。視認性は十分あり、とりあえず自分で使うものを作るには十分なレベルです。ただ、MDFは強度的には不安があり、特に湿気や水分に弱いという弱点があります。見栄えもちょっとシンプル過ぎる感じです。クリア塗装すれば保護はできるのですが、MDFは塗料を吸い込んでしまうので塗装しにくかったりもします。
アクリル板を彫刻して彫刻部分を塗装する
次に試したのは、黒いアクリル板に彫刻し、そこに塗料(インク)を流し込んで色を付ける、というやり方です。塗料はマッキーペイントマーカーを使ってみました。

見栄え的にはそこまで悪くないのですが、正直この文字の細さだとインクは気を付けていてもはみ出ますし、はみ出たインクを除去するのがとてもとても面倒でした(ペイントマーカーの場合、はみ出た部分は消しゴムでこするだけで剥ぎ取れるのですが、それでも大変です)。マスキングテープを貼った状態で刻印して、その状態で彫刻部分を塗装したあとにテープを剥がすやり方も試してみたのですが、こちらも正直微妙な感じで労力は変わりませんでした。


アクリル板を塗装したうえで彫刻する
世の中にはレーザー加工用のアクリル板という、色の異なるアクリル板を貼り合わせたようなものが存在します。このアクリル板をレーザー彫刻すると、表面のアクリル板が削れて内側の色が異なる板が露出し、それによって文字などを印刷するように彫刻できる、というものです。ただ、正直お値段が少々お高めです。そこで、代替として黒アクリル板の表面を塗装してレーザー彫刻を行ってみました。
筆塗り塗装はムラが出やすいので、スプレー塗料を使います。アクリル板は表面が滑らかなので、ホコリにさえ注意すれば奇麗に塗装するのは簡単です。こちらはダイソーで売っていた100円のラッカースプレー(現在は値上げされて200円)を使っています(写真だと塗装に濃淡があるように見えますが、実際にはそこまで目立つムラはありません)。

これをレーザー加工するとこういう感じになります。

塗装の剥がれが心配だったので、加工後にクリアのスプレー塗料を吹いてコーティングしています。そうすると、実用上十分なレベルのツヤが出て、さらに爪でひっかいたくらいでは傷も付きません。
ちなみに、一般に販売���れているスプレー塗料にはラッカースプレー(アクリルラッカースプレー)とアクリルスプレーがあるのですが、アクリルスプレーは塗装膜が弱く、またムラになりやすい雰囲気があるのでラッカースプレーをおすすめします(スプレー缶の違いについてはアサヒペンによる解説が分かりやすいです)。
ダイソーのスプレーは基本ラッカースプレーなのですが、金色(ゴールド)のものはアクリルスプレーなのでご注意を。なぜかダイソーのスプレーでも銀色(シルバー)はラッカースプレーです。さらに、アクリルスプレーを塗ったうえにクリアのラッカースプレーを吹いてしまうと、先に塗った塗料が浮いてしまって面倒くさいことになります。
実際、ダイソーのゴールドスプレーで塗装したものはマスキングテープを貼って剥がしただけで塗装面がすこし剥がれてしまいました。

陽極酸化処理されたアルミ板をレーザー彫刻する
ネット通販サイトなどでは、レーザー彫刻向けと称された薄いアルミ板が販売されています。表面がカラー陽極酸化加工されており、名刺やプレートなどに利用することが想定されているようです。ちょうどAmazonで50×100mmサイズのものが販売されており、いい感じにタカチの小型ケース(TD-6-11-3N、外寸64.5×31.8×115.5mm)にフィットしそうだったのでこちらでもパネルを作ってみました。ただし、一般家庭に設置できるサイズのレーザー加工機ではアルミ板の切断はできないので、穴開けはドリル等で行う必要があります。
こちらもxTool M1には「金属製名刺」というプリセットがあるので、そちらを使って加工してみました。ゴールドは元々の色が薄いので視認性的に微妙でしたが、ブルーは十分にコントラストのある刻印となり、見栄えも良いです。陽極酸化加工はノートパソコンなどでも使われているものなので、傷にも強そうです。こちらはCompressおよびDriveでパネルとして実際に使用しています。

塗装済みアルミダイキャストケースをレーザー彫刻する
塗装済みアルミダイキャストケースも同じようにレーザー彫刻で塗装を剥がして刻印できるのでは? と思って物は試しとやってみたものがこちらです。

思いっきり予想外でしたが、十分な濃さで印刷したかのように刻印できています。元々は塗装が剥がれて地のアルミが見えるのではと思っていたのですが、塗装が焦げて色が付いた雰囲気です。もしかしたら表に貼っていたマスキングテープが焦げてそれがこびりついた、という可能性もあるのですが、とりあえずこの状態でクリアスプレーを吹いてコーティングしたところ、指で刻印部分を触っても剥げない状態になりました。
ただ、刻印部分の濃さは塗装の色や種類に依存するようで、別のメーカーの塗装済みアルミダイキャストケースでは若干薄い色になってしまいました。特に青色のケースでは視認性が大分悪かったので、刻印で削られた部分にエナメル塗料を流し込んでスミ入れを行うことで対応してみました。レーザーの出力を強くして塗装を少し深く削るようにすれば、プラモデルのスミ入れと同じ感じで作業できます。とはいえ面倒ではありますが……。

スミ入れ後はこんな感じになり、なんとか視認性的にもギリギリ読める感じかなと思います。

まとめ
こんな感じで色々試してみましたが、見栄えの良いパネルを作る方法としてはアクリル板を塗装してからレーザー彫刻し、最後にクリアスプレーを吹くのが一番無難そうです。塗装済みアルミダイキャストケースのレーザー加工は、塗装とレーザーの相性がよければアリ、という感じですね。
ちなみに、レーザー加工時にはレーザーで揮発した成分が板面に付着して汚れが発生するため(いわゆるヤニ汚れ)、表面にマスキングテープを貼った状態で加工することをおすすめします。このとき使うマスキングテープも向き不向きがあるようで、よくある黄色っぽいやつ(100円ショップで買ったノーブランドものや3Mのやつ)では問題なかったのに、白っぽいやつを使ったらテープを貼っているにも関わらずヤニ汚れが板面に付着するトラブルが起きたりしました。念のためマスキングテープを貼った状態で汚れが発生しないか、事前に余白などを使って確認したほうがよさそうです。
2 notes
·
View notes
Text
Duplex Steel S32205 Wire Exporters in India
Duplex Steel S31803/S32205 Wire, which is alloyed with tungsten correspondingly as copper. Duplex S31803 Wire takes its name from its two-make microstructure out of ferrite and austenite in approx. looking at degrees. Duplex S31803 Circle Wire contains more than 20 % chromium and around 5 % nickel, and it is a spot of the party of set up gets ready.
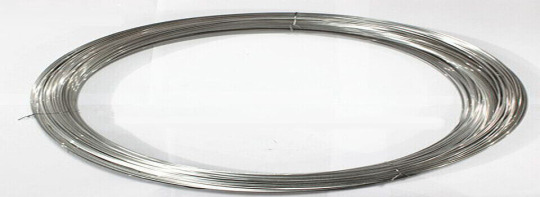
In Duplex S31803 Wound Wire, the base chromium, molybdenum, and nitrogen substances have been extended to move out of other materials. Duplex S31803 Wire safeguards their ideal properties with a reasonable ferrite-austenite part of around 50/50. Move out of the austenitic set plans, Duplex S31803 Wire contains less nickel (approx. 4 % to 8 %), which brings about an ordinarily stunning lift for cash.
Duplex S32205 Wire might be utilized in the temperature relax between - 40 Degree C and 280 Degree C. The standard piece of Duplex S32205 Wire is depicted with 25 % chromium, 7 % nickel, 4 % molybdenum and 0.25 % nitrogen. Duplex S32205 Wire is similarly saw by its broad security from setting, opening and stress use part, and an extra advancement in its mechanical quality credits.
Duplex S32205 Wire is now the widest social affairs and is seen by magnificent application properties and by high responsiveness in all the fitting thing plots.
DUPLEX STEEL S31803/S32205 WIRE SPECIFICATIONS
Specifications: ASTM A276 ASME SA276
Dimensions: ASTM, ASME
Thickness: 10mm to 100mm
Diameter: 100 mm To 6000 mm
Specialize: Wire, Filler Wire, Coil Wire
For More Information :
Visit Our Website: https://sankalpalloys.com
Contact No: 91-8828369483
E-Mail ID: [email protected]
7 notes
·
View notes
Text

alexalisalou
surrealist photography, a fractal cyborg translucent matriochka doll opening, inside covered in electronic chips and wires, in the style of Moebius and Roberto Ferri, cinematic shot, bright and intense gradient pale colours palette, photos taken by arri, photos taken by Sony, photos taken by Canon, photos taken by hasselblad, incredibly detailed, sharpen, hyper details, rim lighting, 50mm, 80mm, 100mm, --chaos 50 --v 4 --q 2 --ar 2:3
midjourney
11 notes
·
View notes