#3D Reinforcement Detailing
Explore tagged Tumblr posts
Visit Tumblr Blog
Explore Tumblr blogs with no restrictions, modern design and the best experience.
Last Seen Tumblr Blogs


Fun Fact
There were a total of 171.5 billion posts on Tumblr in 2019.
Text
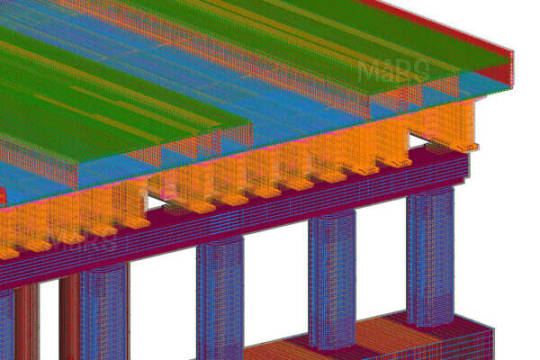
Precision Redefined: Unraveling the Wonders of 3D Reinforcement Modeling
3D Reinforcement Detailing brings precision to structural engineering by creating detailed and accurate 3D models of reinforcement elements. This advanced service ensures a comprehensive understanding of the reinforcement layout, aiding in construction planning, coordination, and minimizing errors. The three-dimensional representation enhances visualization and collaboration, contributing to the seamless execution of construction projects. Opt for 3D Reinforcement Detailing for superior accuracy and efficiency in reinforcing structures.
#3D Reinforcement Detailing#Rebar Shop Drawing Services#Rebar Detailing Services#Rebar Drawings#Structural rebar Modeling Services#Rebar Modeling Services
0 notes
Text
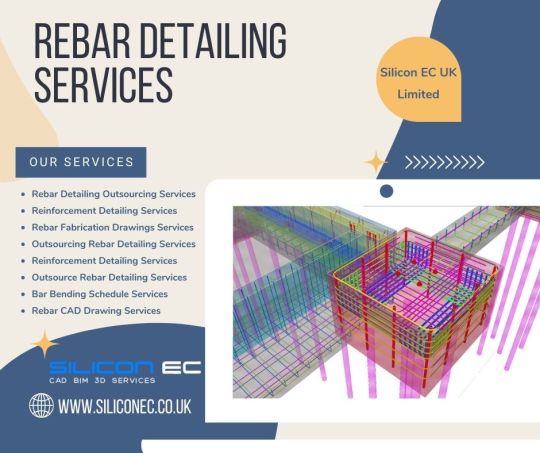
Rebar Detailing Services
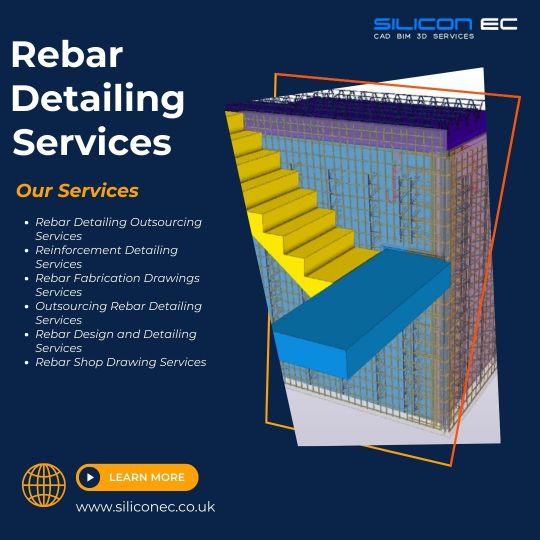
Silicon EC UK Limited is a leading provider of Rebar Detailing Services, dedicated to delivering precision and excellence in structural detailing. Our Steel Detailing Company takes pride in offering comprehensive solutions to clients in the construction industry, ensuring the seamless integration of reinforcing steel within their projects. Our drawings encompass all the necessary information, ensuring a smooth construction process. Our expert Revit Detailers create detailed and accurate rebar drawings, ensuring seamless integration with your construction plans.
By choosing Silicon EC UK Limited for Rebar Detailing Services, clients can expect a reliable partner dedicated to delivering excellence, efficiency, and innovation in every aspect of reinforcing steel detailing. Contact us today to discuss how our expertise can contribute to the success of your construction project.
For More Details Visit our Website:
#Rebar Detailing Services#Rebar Detailing Outsourcing Services#Reinforcement Detailing Services#Rebar Fabrication Drawings Services#Outsourcing Rebar Detailing Services#Tekla Rebar Detailing Services#Rebar Design and Detailing Services#Rebar Detailing Solutions#Rebar Shop Drawing Services#Shop Drawing Services#Outsource Rebar Detailing Services#Bar Bending Schedule Services#Rebar CAD Drawing Services#3D Rebar Detailing Service#Rebar Detailing Shop Drawing Service#Rebar Detailing Companies#Engineering Firm#Engineering Company#Rebar Detailing Company
0 notes
Text
your subconscious is simpler than you think it is
✩₊˚.⋆☾╶⃝⃤☽⋆⁺₊✧
The subconscious is the key to any manifestation. It is responsible for materializing in the physical world what you feed through thoughts, emotions and beliefs. Here is the role of the subconscious in manifestation:
1. It is the Executor of What You Believe
• The subconscious accepts everything you feel as true, whether positive or negative, without question.
• It does not judge; it only works to align your external reality with what is imprinted in it.
2. It Reflects Your Internal State in 3D
• Your external reality is a direct reflection of what is stored in your subconscious.
• What you see in 3D today is the result of the ideas and beliefs that the subconscious has already accepted as truth.
3. It Responds to Mental Imagery and Emotion
• It responds best to clear images and intense feelings, such as those generated in visualizations or SATS (Sleep-Akin State). • When you imagine something with emotion, the subconscious registers it as real and works to manifest it in the physical.
4. It is Programmed by Repetition
• Repeated affirmations, visualizations and feelings record new patterns in the subconscious.
• The more you repeat something, the stronger that belief becomes within you, replacing old programming.
5. It Doesn't Know the Difference Between Real and Imagined
• It accepts everything you imagine with emotion as being real.
That's why feeling that something is already yours is so powerful for manifesting.
How to Use the Subconscious in Manifestation
• Affirmations: Reinforce beliefs aligned with your desire.
• Visualization: Imagine your desire as already fulfilled with details and emotion.
• Persistence: Even if the 3D shows otherwise, stay firm in what you want.
The subconscious is like fertile soil. Whatever you plant in it through your thoughts and feelings, it will grow in your reality. Therefore, taking care of what you feed mentally is essential to manifest your desires!
#law of assumption#loa tumblr#loassumption#manifesting#loa#loass#loa blog#neville goddard#manifestation#law of manifestation#loassblr#loass success#loass states#loassblog#loa success#loablr#subconscious#subconsciente#live in the end#assume and persist#affirm and persist#robotic affirming#affirmations#visualization#shifting motivation#shifting community#shiftblr#shiftinconsciousness#4d reality#reality change
2K notes
·
View notes
Text
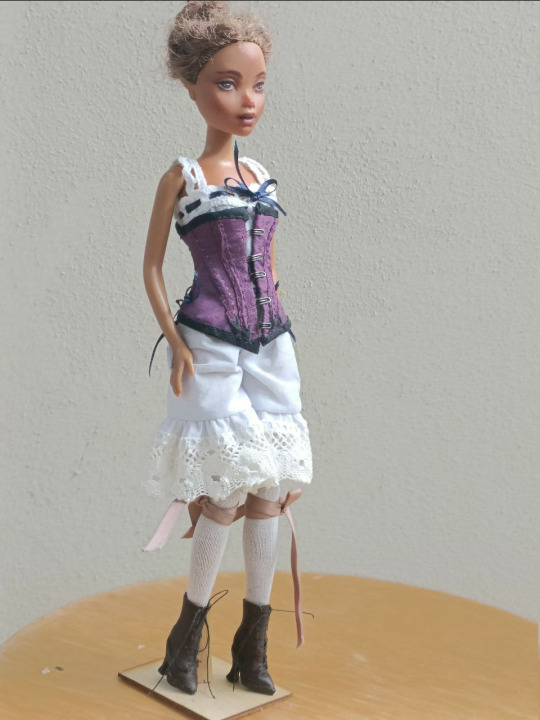
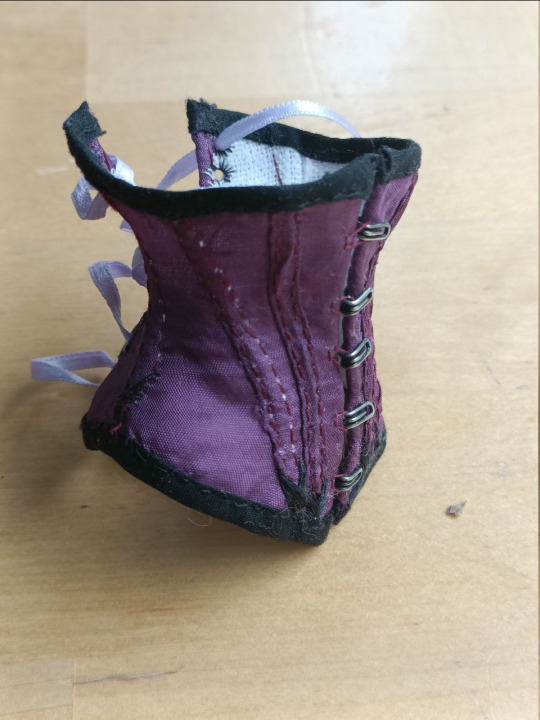
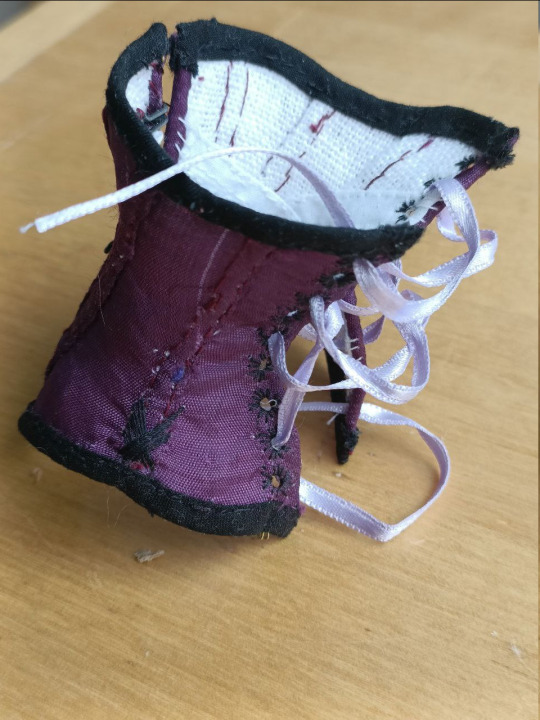
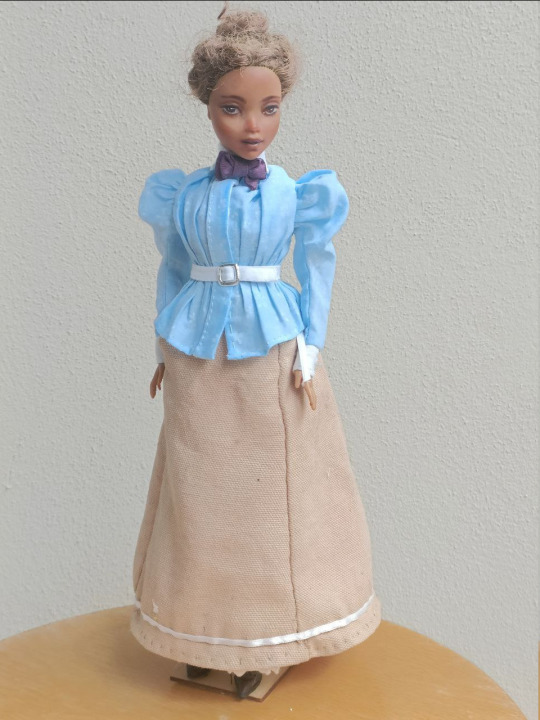
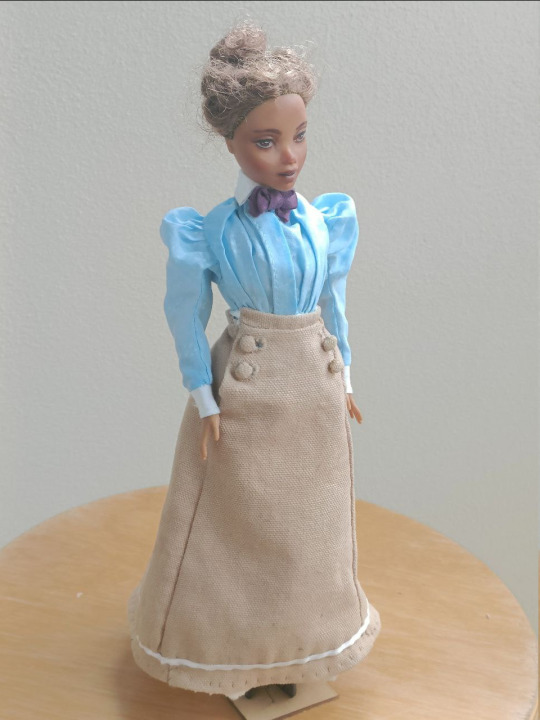
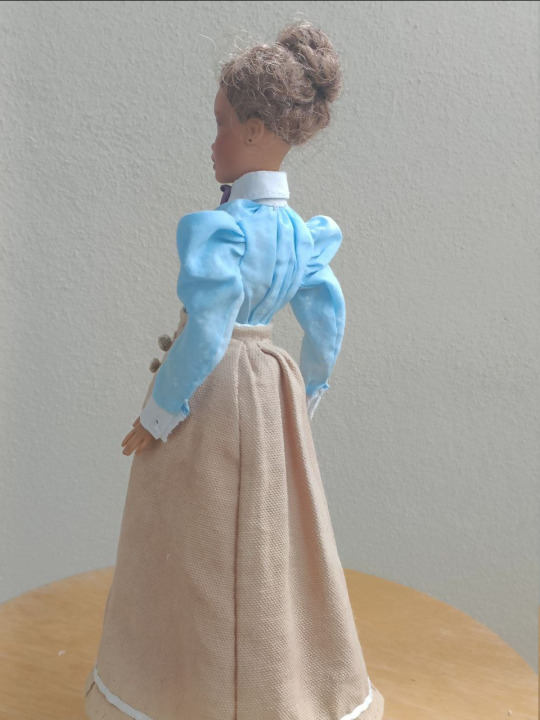
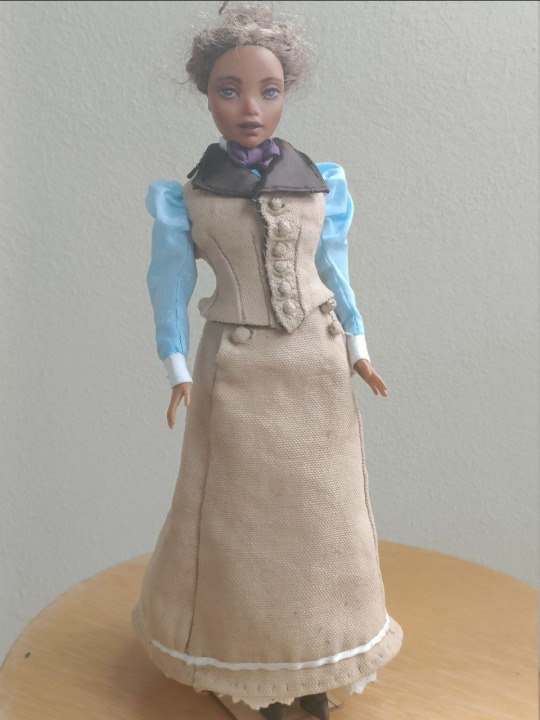
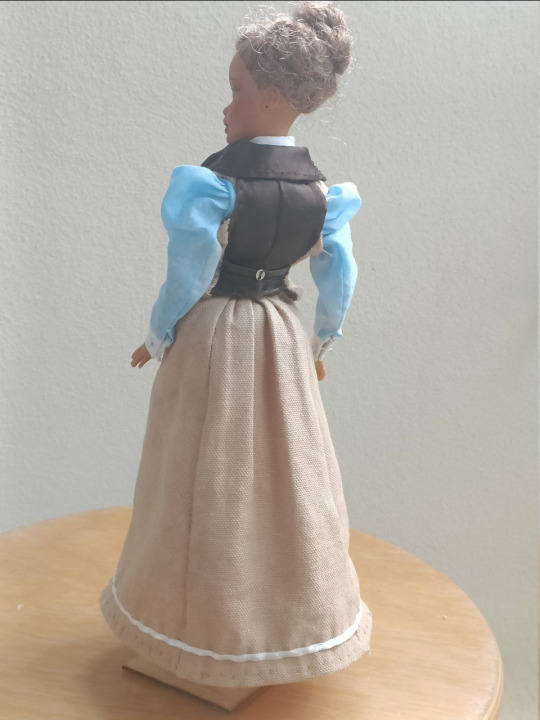
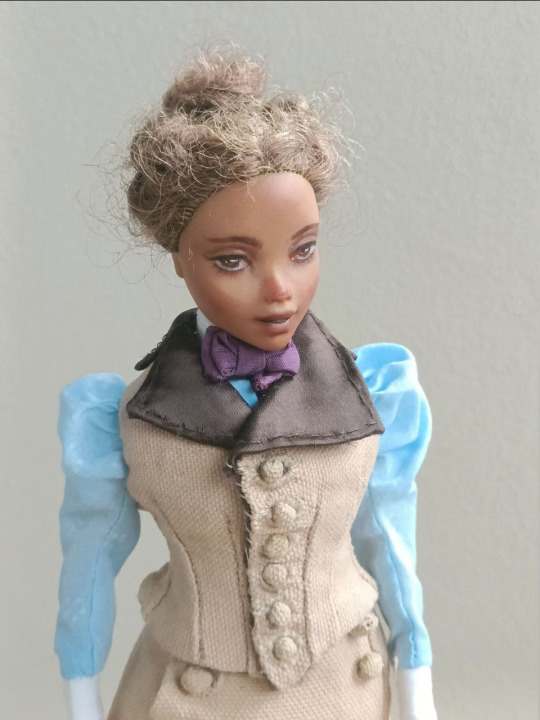
Sewing 1890s Day Dress in Doll Scale
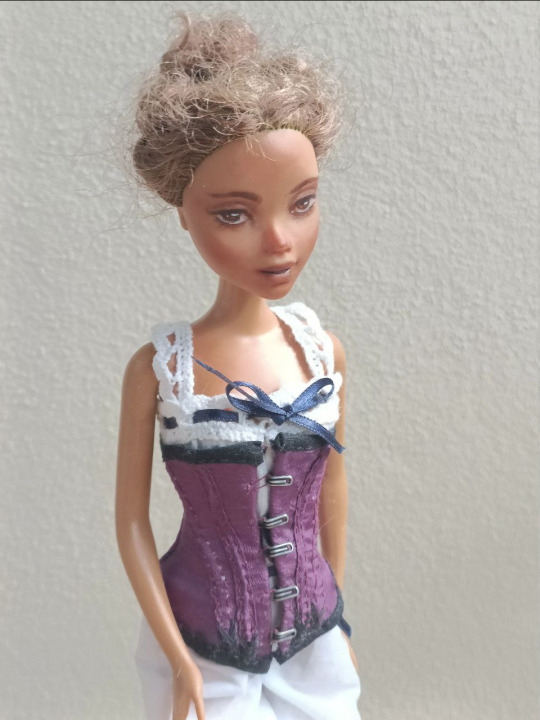
I went slightly overboard with this second historical doll project. Here's my first one. The style is from around 1897 and more of a middle class style. As with my first doll outfit, I tried to stick to historical methods as much as possible, but the scale forced me to do some deviations. I hand-sew everything though sewing machine was already widely used, because in this scale it's easier to control the stitch, there's not that much to sew anyway and also I just really like hand-sewing. Here's all the items I made. As said, I went a little overboard. One thing that's missing is the corset cover, but the layers of fabric were creating enough bulk on the waist as is so I decided to not make one.

This time I decided to try repainting the face. I don't have any doll customization materials, so I used acrylics. After couple of attempts I got decent results. Acrylics can't make as smooth and delicate finish as pastels, pencils and gouache, which can be used on vinyl with basing sprays, and I'm not experienced with painting small details on 3D objects, so it's a bit smudged at points, especially with the other eye. I aimed for 1890s very neutral make up and the type of expression that was popular in fashion plates and other illustrations.
Undergarments
Combinations and stockings
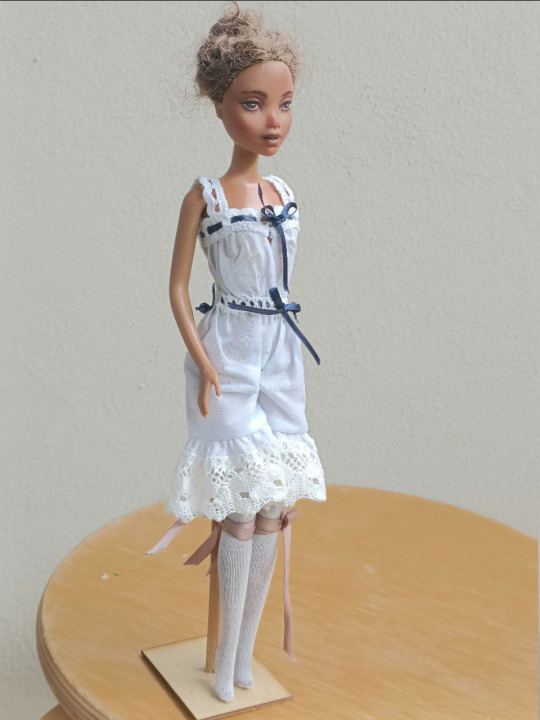
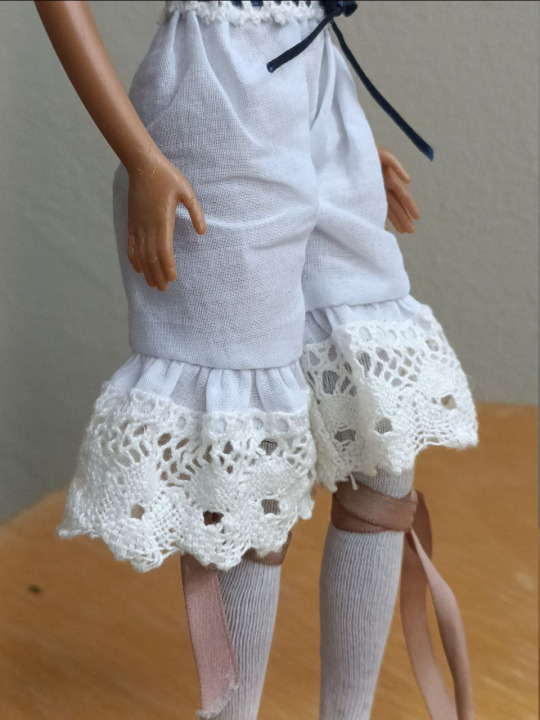
The combinations are split crotch as they were in the period. They are from thin cotton voile I have a lot of and is very appropriate. I didn't have really tiny enough lace for this, so it's kinda bulky, but I think it's okay enough. The stockings are cotton knit, which fits well. The garters are not actually necessary for this doll since her legs are rubbery.
Corset
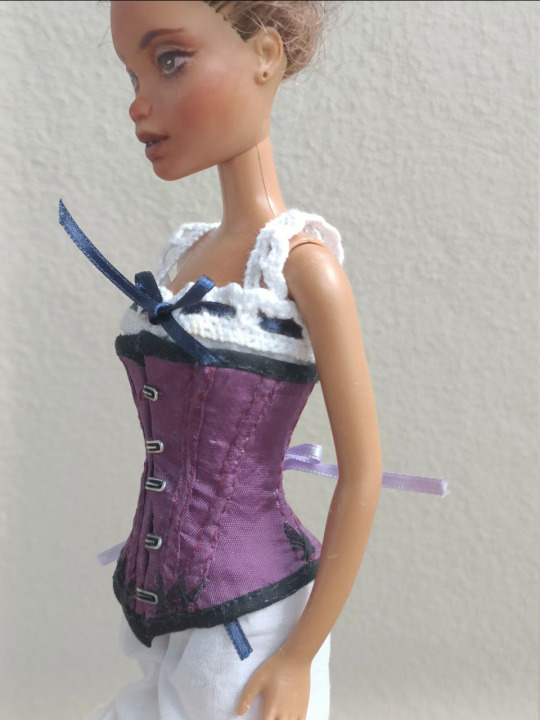
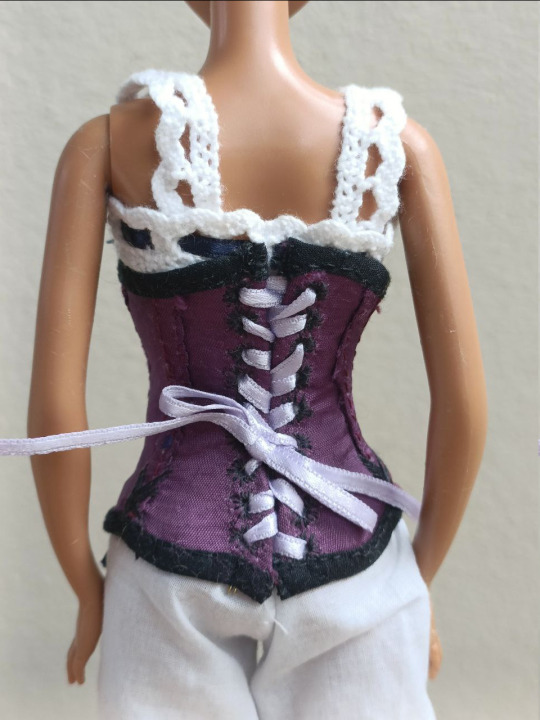
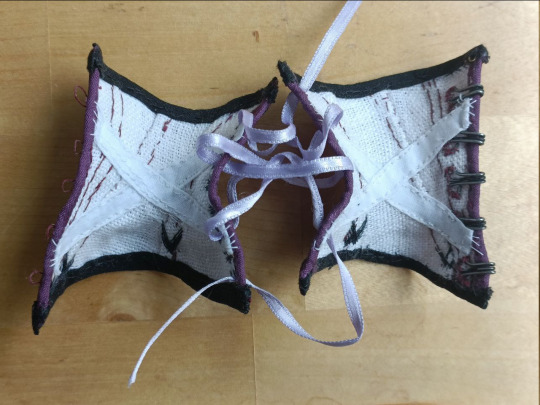
I made the corset from a firm-ish linen and satin rayon pretending to be silk as the fashion fabric. The stitching of the boning channels is not super neat, this fabric is very unforgiving, I didn't have exactly matching thread and the scale made it very difficult. I of course didn't have tiny busk, so I used small hooks, sewed thread loops for them and used narrow metal wire for the edges. I think it looks surprisingly right on the outside. I used the same wire as the boning to reinforce the lacing on the back. I didn't actually use boning elsewhere but the tightly packed linen edges in the boning channels kinda work like lighter boning. I think it keeps the shape pretty ways even with just that. I stitched cotton tape inside to shape the corset further. I also didn't have tiny metal eyelets so I hand-sewed the lacing holes.
Bustle pad

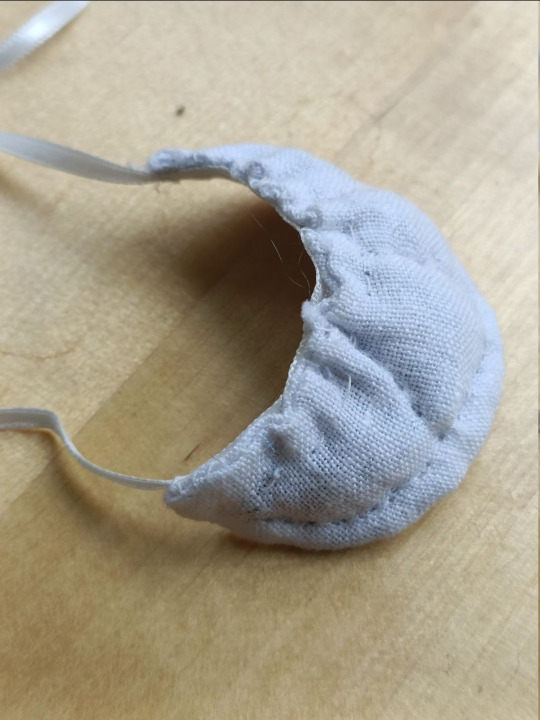
The bustle pad is from linen and stuffed with tiny cabbage.
Petticoat
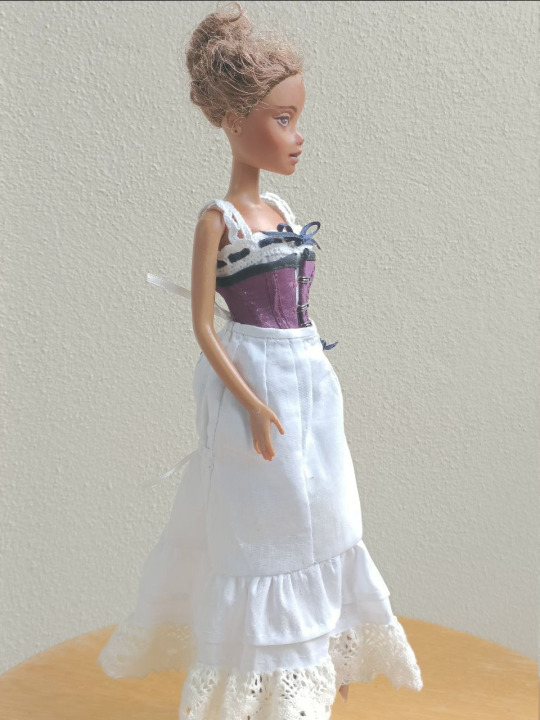
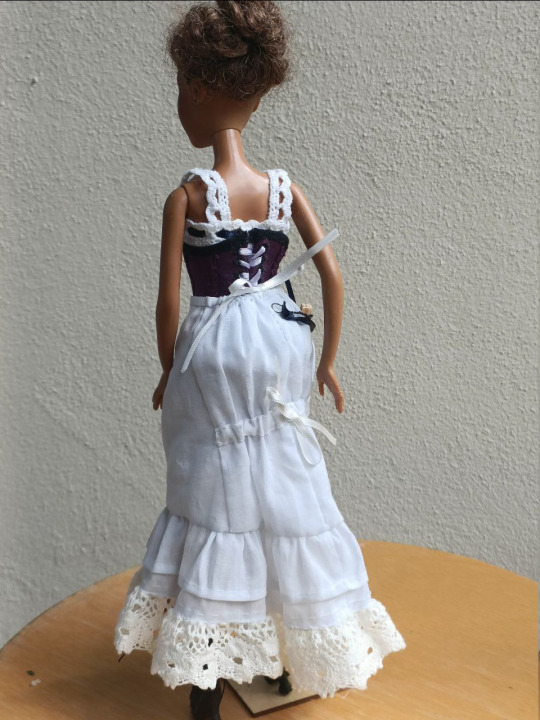
The petticoat is from the same cotton as the combinations.
Outer wear

Skirt
The fabric is cotton half-panama. It's pretty thin, but firm. I would have liked to use a woven wool, but I didn't have any that's thin enough to work in this scale. I think this cotton looks close enough in this scale to a wool with a tight weave, so I'm imagining it's that. My problem was that the cotton was white, but I wanted light brown. I wasn't going to buy any fabric for this, so I did the reasonable thing and dyed it with red onion peals (I've been doing natural dye experiments so this worked well for me).
Shirtwaist
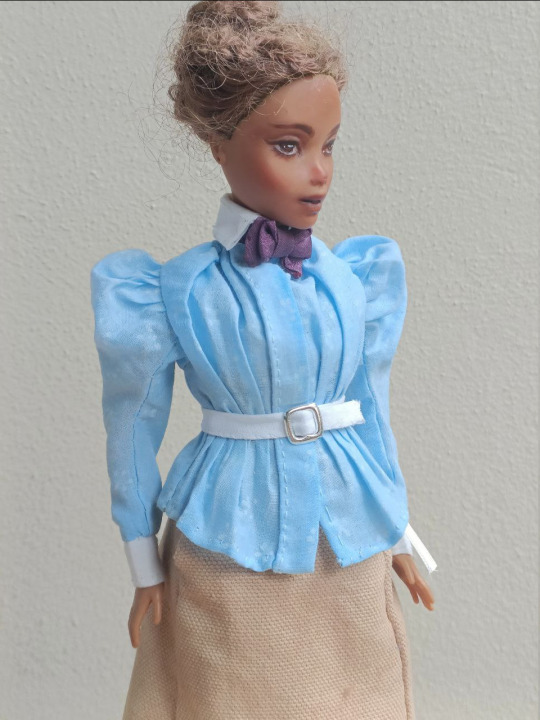
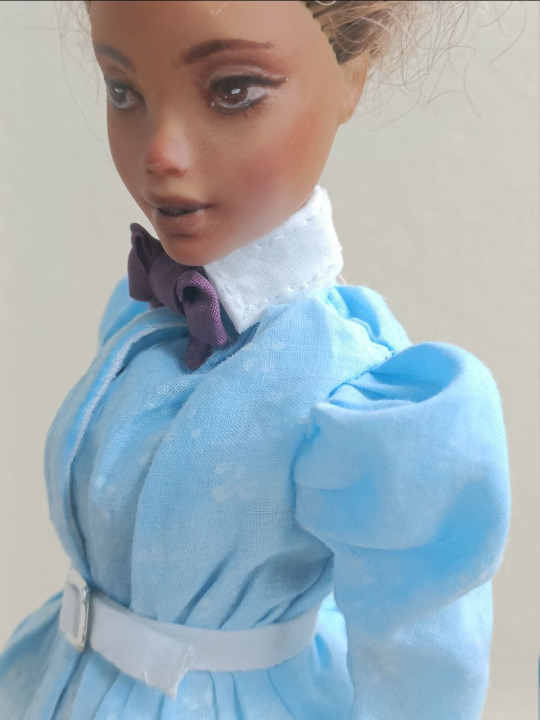
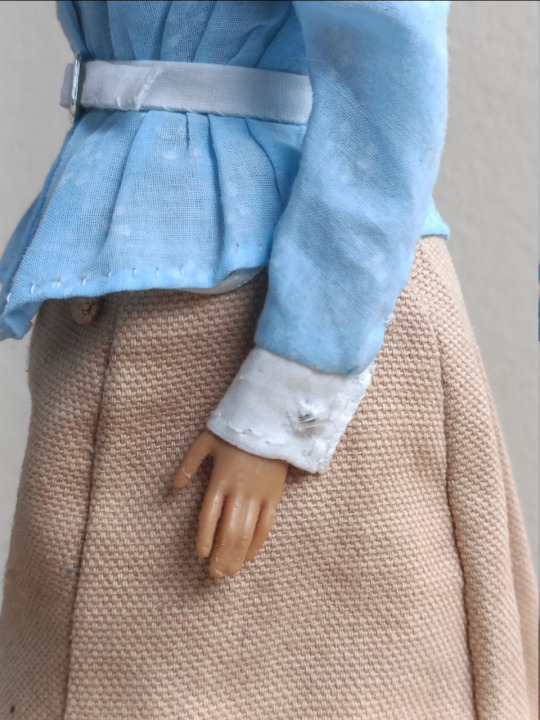

The shirtwaist is from the same cotton as the undergarments. Yes, I dyed it too. I didn't have thin enough cotton in a color that would fit with the skirt and the purple bow, so I dyed it light blue with fabric color. Since I already went the trouble of dyeing I decided I might as well make a small flower print to it since that was popular in the era. I didn't want it to jump out too much but the lighting makes it even less visible. I made it with a white fabric pen. The collar and cuffs are reinforced with linen. I also sewed small stick-like beads to the cuffs on both sides, so one acts as a button (I sewed a buttonhole too) and the other makes it look like they are cufflinks. The bow is from the same fabric as the corset and the belt is sewn from the same cotton as the shirtwaist. The buckle is from a barbie belt.
Waistcoat
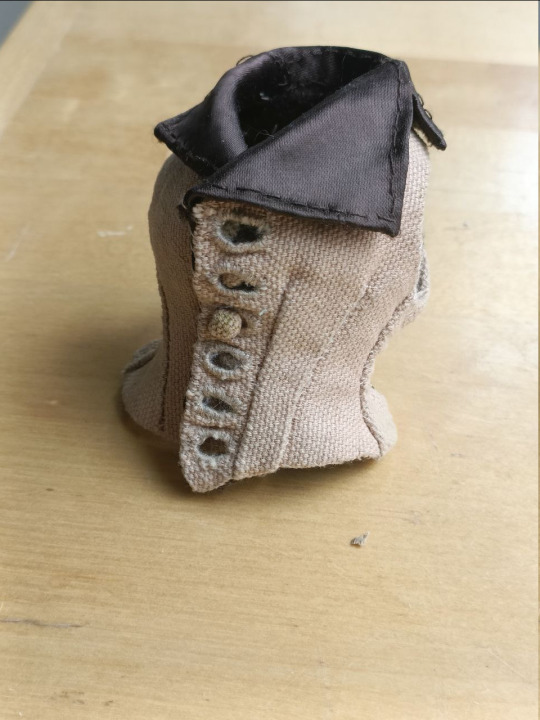
The waistcoat is from the same fabric as the skirt, thought the lapels and the back are from another satin rayon. I tailored the front panels and the lapels by stitching the linen interlining with tailor's stitches (I don't remember if that's the correct word in English) into shape. There is some wonkiness on one side of the hemline for some reason.
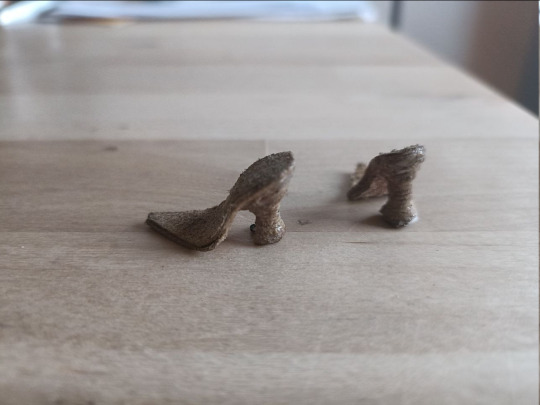
Boots

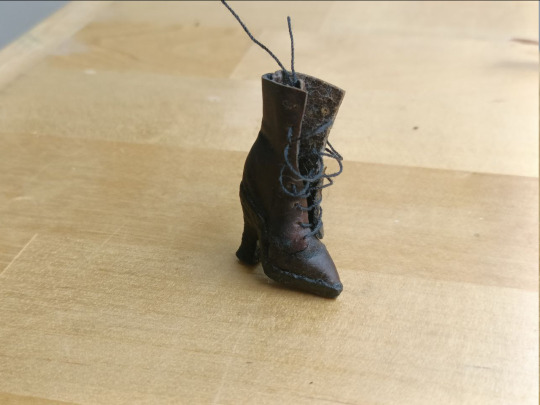
I made the slightly insane decision to make the shoes fully from leather, like they would have been in the period. I had an old broken leather wallet I had saved in case I needed some leather scarps. It has fairly thin leather, so it was workable here. It's light brown though, so I used black shoe polish to darken it. I wanted black or very dark brown shoes. I stacked the heels from glue and leather pieces and carved them into the right shape and sewed the shoe itself to leather shaped as the sole and glued it to the heeled and shaped sole. After I had shaped the shoes and the heels as much as I could I painted the heels black.
#historical fashion#fashion history#sewing#custom doll#ooak doll#victorian fashion#dress history#costuming#historical costuming#doll clothes#doll customization#historical sewing#my scene#my art#dolls
912 notes
·
View notes
Text
All things˚˖𓍢ִ໋🌟₊˚ʚ 🌸 ₊˚ Visualisation˚˖𓍢ִ໋₊˚ʚ₊˚
Visualisation whether you're using it for shifting , manifesting, or to distract yourself while inducing the void state. It doesn't matter if you're manifesting LOVE, MONEY, FAME. or wtv This post will help ya
This will make visualisation much more effortless and fun instead of stressful and forceful
Struggling with visualisation? Here's why:
If you're the perfectionist type of person, you're probably overthinking it, trying to make it perfect, "this exactly greenish-blue curtain with white flowers pattern is spread 57% beside my window", visualising EVERY detail, like your subconscious will get it wrong if you don't or something. is someone holding a gun to your head 😭 like calm down, You're supposed to relax, let yourself, your mind freely play around with it! YOUR MIND KNOWS EXACTLY WHAT YOU WANT. Trust yourself.
When you let your mind be free, let it play around you might even get ideas and clarity! For example, like when I let my mind wander I got a better idea of how I want one of my DR bedroom to be, i didn't thought about curtains and plants but my mind suddenly showed my the image and it was SO PERFECT AJAJSH like yes bish that's exactly what I want! So I got this idea because I wasn't forcing anything, any picture. So your mind knows even better.
⟡☾How to make your visualization better☽⟡
So, you’re trying to visualize your dream life, but the image keeps going blurry like a bad WiFi connection? Don’t worry, bestie I got you. 😔💅🏻 Here’s how to level up your visualization game so your manifestations hit different.
• Details?
It's definitely better to visualise in details like for shifting, the colour of the walls, the feel of the sheets. and for manifesting, if you're manifesting df let's say, visualising looking in the mirror, your lips shape, etc. But you don't have to cuz there's no right or wrong way. You should do what works for you the best. Don't put pressure on yourself.
If someone has trouble seeing the image with details, it's okay to not worry about the details, you can use other senses, like how it feels, smells. That brings me to our next pointtt
• Engage all your senses (Because Your Brain is Dramatic Like That)
If you can’t see the image clearly, FEEL it, get THE FEELS. Hear it. Smell it. Taste it (only if applicable, pls🫢😭).
Don’t just see it—feel the emotions, hear the sounds, smell the scents, and touch the textures, that it feels SUPER real.
Example: If manifesting money, imagine holding crisp bills, hearing them rustle, and feeling the excitement. (I can smell it rn 😤💸 all this bread so yummy yeah)
• Can't hold the image?
use motion not just still images. (cuz I wanna see it in 3d, in motion), It used to happen to me too, i picture something and it start to fade or get blurry. But in that case i realised it's easier to hold it if it's a moving scene, like a scenario. Instead of holding a still image, visualise a small scene. Static images fade, but movement keeps them alive. Movement makes it real. ✨
• Embody the Feeling NOW
Don’t just think about it—feel like it’s already yours. (Spoiler alert: it is). 🥚🥚ample, If u r manifesting confidence, being a pretty little risky baddie, visualize yourself walking tall, speaking smoothly, and radiating certainty. 🤌🏻✨
• Repeat & Reinforce
Wonder why sats work so well? Visualization is most effective when done consistently. Try visualizing for a few minutes every morning or before bed when your mind is most receptive. so like my girl says it, DON'T STOP AND JUST REPLAY, REPLAY-AY - iykyk,iyk,lmk cuz Lee know >:)


I feel i ATE with this one. I hope this helps you pookie!!~ (*˘︶˘*).。*♡ lmk and remember ALL THE GIRLS ARE GIRLING GIRLING (the amount of kpop refrences in this post MUHAHAH) if you get all the references ily
#krystella shifts#kpop shifting#somehow out of inspiration i made such a great post wth#law of assumption#shiftblr#reality shifting#shifting blog#shifters#loablr#loassumption#shifting kpop#voidblr#voidstate#i am state#god state#you are god#manifest#neville goddard#affirm and persist#law of assumption motivation#pure awareness#pure consciousness#4d reality#shifting advice#loa advice#krystella's favs ✦(◍•ᴗ•◍)✦*.✧#permashifting
114 notes
·
View notes
Text
@thatonegeck1 Ask and you shall receive!
I got this big guy made by a company called Budsies! They turn art, illustrations, ref sheets, anything you can think of into a huggable plushie!
(By the way when I say big guy I do mean BIG. He's 2.5ft tall. Totally able to be worn as a backpack too!)

Here is the reference sheet I made to send in to them! Feel free to steal it, edit his expression, etc

If you want one yourself, you'll have to go to Specialty Commissions on the site (NOT a regular Budsie), enter the waitlist, then get it supersized when you order (or don't! the regular 16" size is still pretty big). I'll leave more details under the read-more.
All together including shipping and whatnot it costed me $300 (US shipping, if you are not in the US it will cost more). Obviously not cheap, for me I conveniently had my birthday around that time and was able to use gift money to get him!
For the color picker: Color 21: Light Blue (Eyes, WILL COME OUT A BIT BRIGHT) Color 30: Light Grey (Majority of body) Color 31: Grey (Waist, Secondary arm color) Color 32: Dark Grey (Face buttons, finger tips, minor details) Color 33: Black (Screen, wires, L trigger)

PUT THIS IN THE DESCRIPTION SECTION: -Waist, cranks, and parts of the arm are cylindrical shapes.
-The buttons on his head should have 3D form to them, not just flat pieces of fabric.
-Screen/face is completely flat and should not stick out too much (if at all). Face should not be visible at all in profile view.
-The bottom part of the base should have a circular piece of black fabric.
-Lines on chest (including where his name is written on him), waist, head, and cranks should be embroidered!
-The lines on the right side of his head extend to underneath his head. These should also be embroidered!
-Please give the neck some reinforcement/structure so it doesn't make the head hang loose and possibly tear. <<< THIS IS SOMETHING MY BUDSIE DOES NOT HAVE SO IF YOU GET ONE I'D LIKE TO SEE THE END RESULT
-I would like if the back 2 tubes were capable of making this plush able to be worn like a backpack!
478 notes
·
View notes
Text
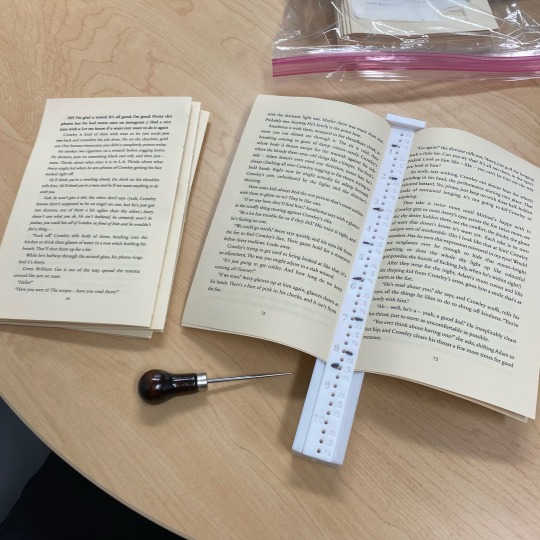
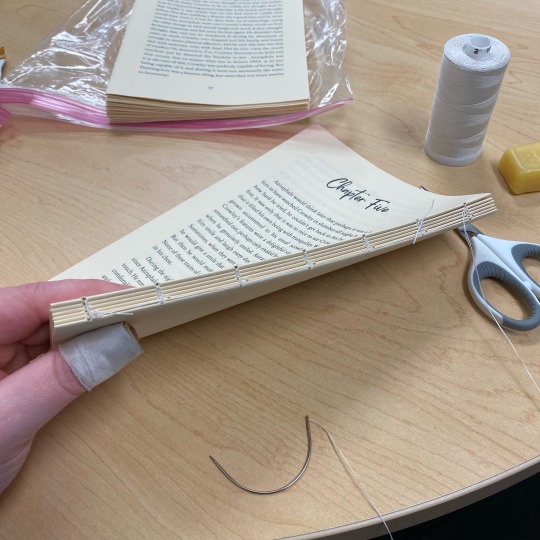
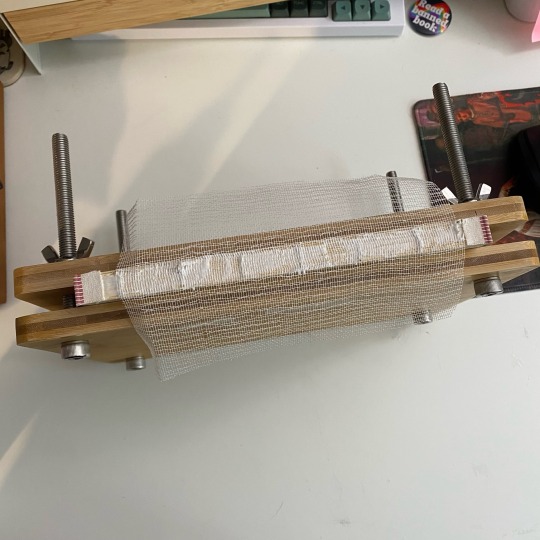
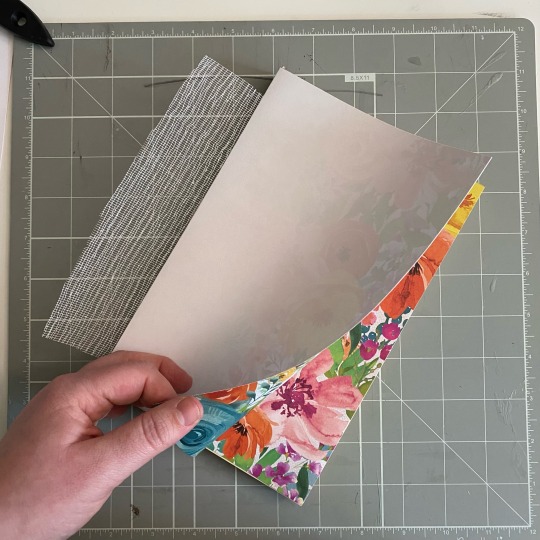
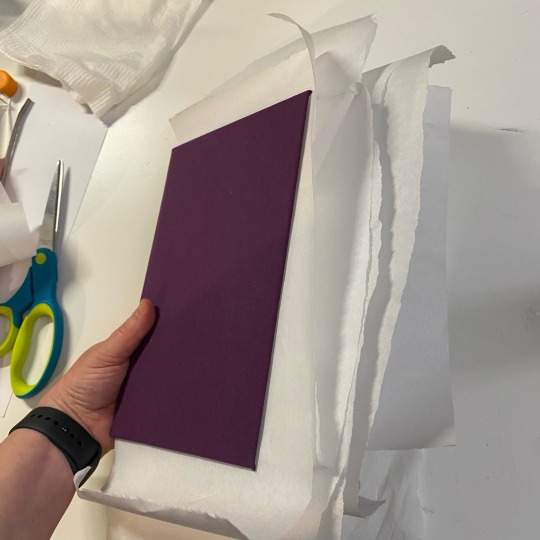
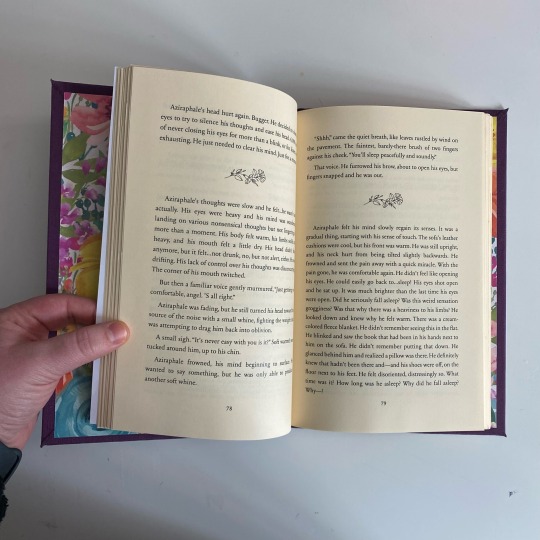
Okay, this is gonna be a long one, so I’m putting it under a cut. Folks on Reddit have asked for a walkthrough of my bookbinding process, so I’m going to detail it. A few steps I forgot to take pictures of, but I’ll keep them in the list so that the workflow hopefully makes sense.
🌟 This is not meant to be an in-depth tutorial! For bookbinding/fanbinding tutorials with guided steps I recommend LadyBobbitt on TikTok or DASBookbinding on YouTube. 🌟
Fic pictured in every step after Step 3 is “Pretend for Me” by @obsessivelollipoplalala because I was working on an author’s copy! 🌝
Step 1 - Typesetting (not pictured)
Step 2 - Printing and folding the signatures (not pictured)
Step 3 - Punching the signatures. This is a 3D printed punch cradle from Etsy. I don’t recommend the Memory Keepers brand one on Amazon—it’s really shallow and hard to get centered punches.
Step 4 - Sewing the signatures, aka my least favorite part. Everything is downhill after you get it sewn. My preferred method for sewing signatures is called the kettle stitch.
Step 5 - Clamping the text block, reinforcing the spine with mull, and adding fake endbands
Step 6 - Gluing endpapers onto the text block after the spine reinforcement has dried
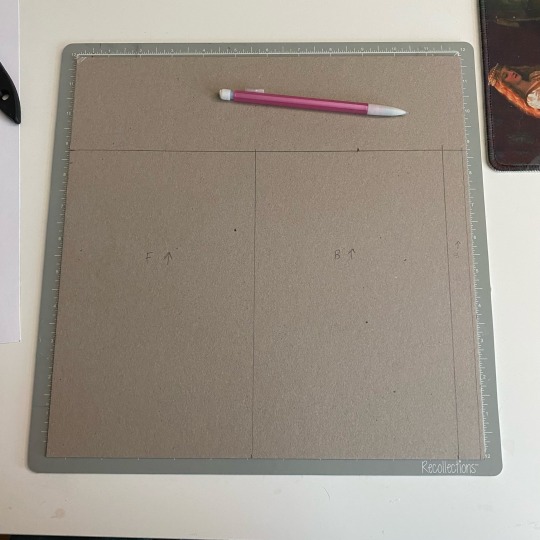
Step 7 - Measuring and cutting the cover chipboard
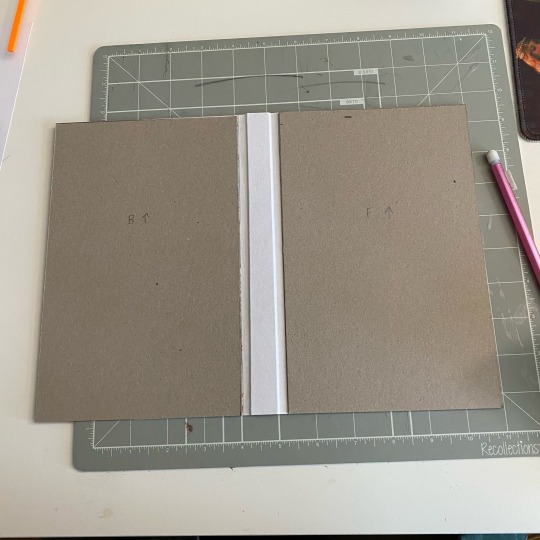
Step 8 - Forming the cover. I glue the chipboard to a central piece of cardstock. Some people find that this makes your creases less sharp, but I like the extra reinforcement.
Step 9 - Dry fit the text block to make sure everything is sized properly (not pictured)
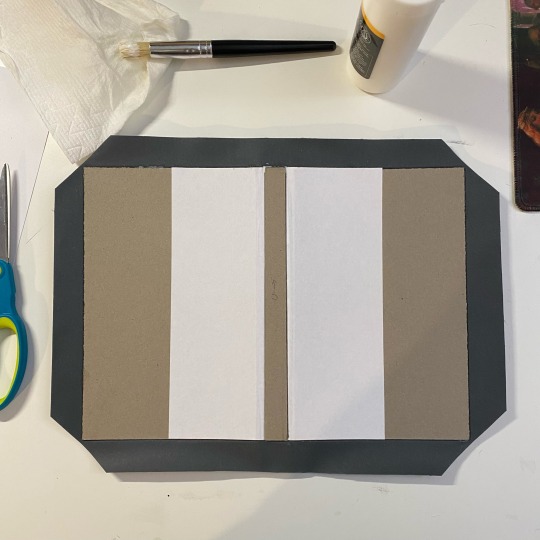
Step 10 - Gluing the cover onto the bookcloth (this is the underside—the edges also get glued and folded over onto the chipboard)
Step 11 - Casing in the text block (not pictured). I add glue to the outsides of the endpapers and stick them to the inside of the cover. Once everything is placed correctly, I wipe off any excess glue and make sure there are no air bubbles anywhere.
Step 12 - Placing parchment paper between all wet/glued areas to prevent moisture transfer to the pages.
Step 13 - Press! (Not pictured)
Step 14 - Let dry overnight, then you have a book!

Not including the dust jacket making process here because it would require me to take screenshots from my computer and I’m sick rn so who has the energy?
Anyway thanks for looking if you scrolled this far :)
#bookbinding#fanbinding#ficbinding#book binding#book binder#bookbinders of tumblr#fic binding#my bookbinding
137 notes
·
View notes
Text


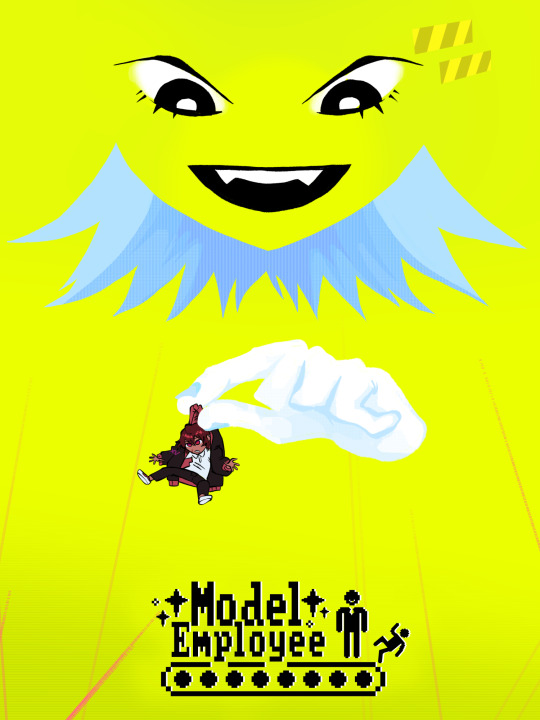

Model Employee was voted Judge's Favorite in the Spooktober 5th Annual Visual Novel Jam, taking home the grand prize!
The whole team is incredibly grateful to the judges, readers, fans and Tethys Team members for playing our game this past month and spreading the word about our humble little horror story.
"Perfectly balances it's social commentary humor along with your psychological descent into unquestioning obedience…insane detail…incredible."
We were also honored to be nominated for Best Soundtrack, Best Itch Page and Best Character Design (Penny).
Our sincerest thanks and congratulations to everyone who participated! You all deserve a raise!
Grab the link in the replies to go and play it yourself now, for Free!


Model Employee is a corporate horror visual novel where players take control of the latest individual amongst millions to start working in one of Tethys' online shopping labyrinthine warehouses. Just discharged from the hospital and massively in debt for their life-saving cybernetics, the player-character must adapt to the "extreme" work-life balance of a Tethys Team Member- but they have help.
Penny, the artificial personality that controls all security, waste disposal, and employee surveillance in the facility, specializes in reinforcing an especially cutthroat variety of workplace culture- and she's taken an interest in you.
With a vibrant cast, PC-98 inspired visuals and multiple endings, Model Employee is a modern horror story that'll stick with you long after you've clocked out of your shift.
If you want to get ahead in your career, you gotta be willing to take some risks.

Created in one month as a submission for Spooktober VN Jam 2023
25k~ Words, 90 - 120 minutes playtime
4 Unique Endings
Gorgeous PC-98 inspired dithered character sprites
Live 3D backgrounds with ambiance, particles, and camera movement
Nameable protagonist with your choice between two appearances reflected throughout the story
109 notes
·
View notes
Note
i luv ur dr art recently @_@ if you don't mind me askin who are ur fav dr characters design wise (not personality/story?)
LOVE when people ask me stuff like this yes - i'd gladly <3
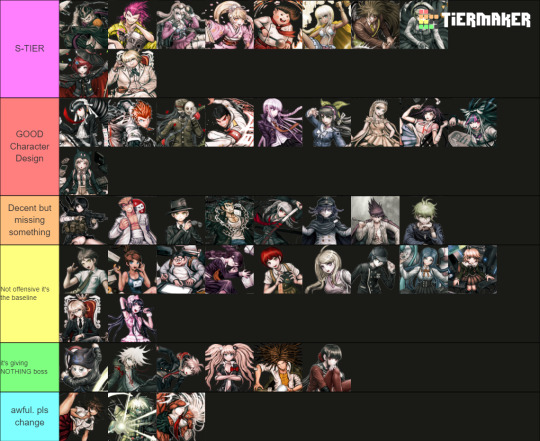
Only included DR, SDR2, NDRV3 - we'd be here forever if it was the entire franchise. Also only accounting for their ingame default outfits
The placements on each tier is deliberate, the closer the character is to the top of that tier, the higher they are. I judge them by: >Prominence of the Talent, its practicality >Relevance to the character's identity/personality >Colour and aesthetics :]
[ramblings undercut]
[S-TIERS]

Like Gundham for example is an S-Tier design as it ticks all above boxes whilst still in a school uniform. The Four Dark Devas are important to the design, they go with him everywhere and the 5 of them are a UNIT which shows his strong connection with animals. I love the bandages and the eye-scar as it has a double meaning that indicates yes he works with animals (they can be rowdy), but as a character Gundham builds onto this detail using these scars to create this dark angsty facade. Aesthetic-wise by his hair he has a unique character silhouette, and I like how his purple is made the focal point by the blacks and whites of his uniform... both reinforcing the villain-facade and highlighting the importance of the Four Dark Devas.
Similar reasonings for the other Top 2 of Souda and Miu this time toppled with the strong yellows and pinks in their design. It's eye-catching and easily conveys what their talent is. (I really wish they kept Miu's promo-art backpack into her regular sprites, imagine her emoting with 4 arms isn't that awesome >:] )
Honorable mention to Impostor (Twogami) as well. While the regular Togami design is... mid. I really appreciate how contrasting Impostor's colours and accessories are down to the necktie and poses! Like yes they are impersonating Togami, but their values and personality as a person are not the same. The deception of Togami's dark clothing vs honest white suit of the Impostor's. Impostor fucking CLEARS regular togami any day on all accounts I will die on that hill.
[GOOD CHARACTER DESIGN]
A lot of the talent indications on this tier are more subtle in compare to S-tier but they get the job done and they do it in a pleasing way (I like the colour palettes on Chiaki, Mikan and Ibuki for example). Like I loveeee Sonia's uniform especially for it's simplicity. And yet the design still alludes to the Princess talent by elegance in the bow, the brooch, her crowned braid and how the shape of her skirt resembles that of a puffy princess gown. I also think the reds in the design like Snow White are a cute touch!
To me, Sonia should be the standard in what a Danganronpa design SHOULD be in accordance to detail.

[BAD CHARACTER DESIGN]
[ie the Green and Blue tiers] Reasoning why I put them here mainly because of wasted potential, either too basic (in a sense it doesn't tell much about that character) or not practical in any way for their talent... I HATE Ryoma's stripe leggings ik he went to prison but the execution of the concept looks awful.
And I hate Akane's and Sakura's outfits particularly cuz you KNOW why they made those skirts so short and I hate that. We could have gotten awesome gymnast of martial artist outfits but no......
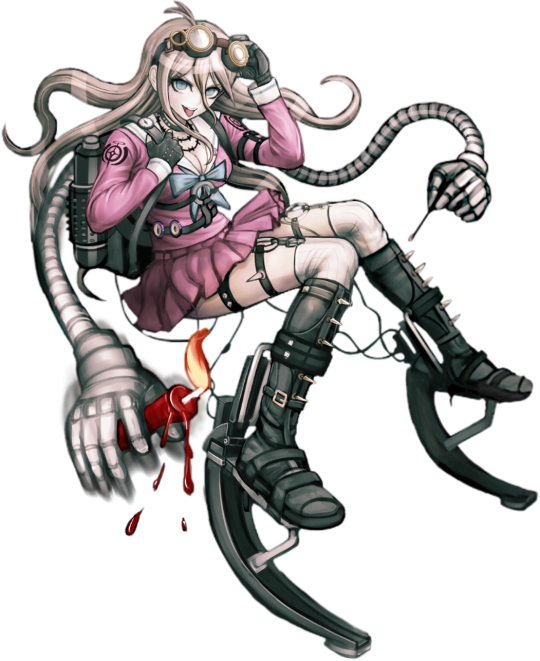
I added Kiibo in that bottom tier because structurally even as a robot he is a visual nightmare if you're an artist trying to draw him. Especially when most of his suit is different shades of black and complicated chest cavity. And I despise the way that it looks like these robo-plates are attached on top of what looks like fabric long sleeves and pants as if the designer was too scared to fully commit to him being a robot. He is NOT 3D-optimised and he is NOT animator-friendly I'd throw up if I ever had to deal with him.
#ask stufff#stufff rambles#danganronpa#dr#sdr2#ndrv3#this is so unnecessarily long idc i love talking about design details i will have this#i was gonna start COLOURPICKING... and ANNOTATING dude shits serioussss
43 notes
·
View notes
Text
What Is Generative Physical AI? Why It Is Important?
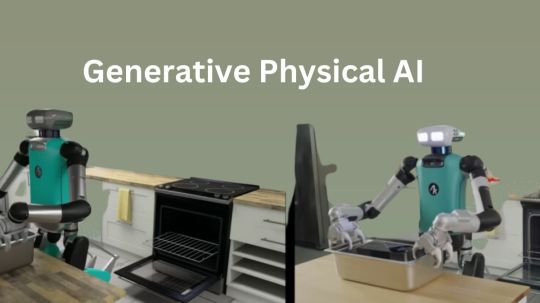
What is Physical AI?
Autonomous robots can see, comprehend, and carry out intricate tasks in the actual (physical) environment with to physical artificial intelligence. Because of its capacity to produce ideas and actions to carry out, it is also sometimes referred to as “Generative physical AI.”
How Does Physical AI Work?
Models of generative AI Massive volumes of text and picture data, mostly from the Internet, are used to train huge language models like GPT and Llama. Although these AIs are very good at creating human language and abstract ideas, their understanding of the physical world and its laws is still somewhat restricted.
Current generative AI is expanded by Generative physical AI, which comprehends the spatial linkages and physical behavior of the three-dimensional environment in which the all inhabit. During the AI training process, this is accomplished by supplying extra data that includes details about the spatial connections and physical laws of the actual world.
Highly realistic computer simulations are used to create the 3D training data, which doubles as an AI training ground and data source.
A digital doppelganger of a location, such a factory, is the first step in physically-based data creation. Sensors and self-governing devices, such as robots, are introduced into this virtual environment. The sensors record different interactions, such as rigid body dynamics like movement and collisions or how light interacts in an environment, and simulations that replicate real-world situations are run.
What Function Does Reinforcement Learning Serve in Physical AI?
Reinforcement learning trains autonomous robots to perform in the real world by teaching them skills in a simulated environment. Through hundreds or even millions of trial-and-error, it enables self-governing robots to acquire abilities in a safe and efficient manner.
By rewarding a physical AI model for doing desirable activities in the simulation, this learning approach helps the model continually adapt and become better. Autonomous robots gradually learn to respond correctly to novel circumstances and unanticipated obstacles via repeated reinforcement learning, readying them for real-world operations.
An autonomous machine may eventually acquire complex fine motor abilities required for practical tasks like packing boxes neatly, assisting in the construction of automobiles, or independently navigating settings.
Why is Physical AI Important?
Autonomous robots used to be unable to detect and comprehend their surroundings. However, Generative physical AI enables the construction and training of robots that can naturally interact with and adapt to their real-world environment.
Teams require strong, physics-based simulations that provide a secure, regulated setting for training autonomous machines in order to develop physical AI. This improves accessibility and utility in real-world applications by facilitating more natural interactions between people and machines, in addition to increasing the efficiency and accuracy of robots in carrying out complicated tasks.
Every business will undergo a transformation as Generative physical AI opens up new possibilities. For instance:
Robots: With physical AI, robots show notable improvements in their operating skills in a range of environments.
Using direct input from onboard sensors, autonomous mobile robots (AMRs) in warehouses are able to traverse complicated settings and avoid impediments, including people.
Depending on how an item is positioned on a conveyor belt, manipulators may modify their grabbing position and strength, demonstrating both fine and gross motor abilities according to the object type.
This method helps surgical robots learn complex activities like stitching and threading needles, demonstrating the accuracy and versatility of Generative physical AI in teaching robots for particular tasks.
Autonomous Vehicles (AVs): AVs can make wise judgments in a variety of settings, from wide highways to metropolitan cityscapes, by using sensors to sense and comprehend their environment. By exposing AVs to physical AI, they may better identify people, react to traffic or weather, and change lanes on their own, efficiently adjusting to a variety of unforeseen situations.
Smart Spaces: Large interior areas like factories and warehouses, where everyday operations include a constant flow of people, cars, and robots, are becoming safer and more functional with to physical artificial intelligence. By monitoring several things and actions inside these areas, teams may improve dynamic route planning and maximize operational efficiency with the use of fixed cameras and sophisticated computer vision models. Additionally, they effectively see and comprehend large-scale, complicated settings, putting human safety first.
How Can You Get Started With Physical AI?
Using Generative physical AI to create the next generation of autonomous devices requires a coordinated effort from many specialized computers:
Construct a virtual 3D environment: A high-fidelity, physically based virtual environment is needed to reflect the actual world and provide synthetic data essential for training physical AI. In order to create these 3D worlds, developers can simply include RTX rendering and Universal Scene Description (OpenUSD) into their current software tools and simulation processes using the NVIDIA Omniverse platform of APIs, SDKs, and services.
NVIDIA OVX systems support this environment: Large-scale sceneries or data that are required for simulation or model training are also captured in this stage. fVDB, an extension of PyTorch that enables deep learning operations on large-scale 3D data, is a significant technical advancement that has made it possible for effective AI model training and inference with rich 3D datasets. It effectively represents features.
Create synthetic data: Custom synthetic data generation (SDG) pipelines may be constructed using the Omniverse Replicator SDK. Domain randomization is one of Replicator’s built-in features that lets you change a lot of the physical aspects of a 3D simulation, including lighting, position, size, texture, materials, and much more. The resulting pictures may also be further enhanced by using diffusion models with ControlNet.
Train and validate: In addition to pretrained computer vision models available on NVIDIA NGC, the NVIDIA DGX platform, a fully integrated hardware and software AI platform, may be utilized with physically based data to train or fine-tune AI models using frameworks like TensorFlow, PyTorch, or NVIDIA TAO. After training, reference apps such as NVIDIA Isaac Sim may be used to test the model and its software stack in simulation. Additionally, developers may use open-source frameworks like Isaac Lab to use reinforcement learning to improve the robot’s abilities.
In order to power a physical autonomous machine, such a humanoid robot or industrial automation system, the optimized stack may now be installed on the NVIDIA Jetson Orin and, eventually, the next-generation Jetson Thor robotics supercomputer.
Read more on govindhtech.com
#GenerativePhysicalAI#generativeAI#languagemodels#PyTorch#NVIDIAOmniverse#AImodel#artificialintelligence#NVIDIADGX#TensorFlow#AI#technology#technews#news#govindhtech
3 notes
·
View notes
Text
Get started with Rebar Detailing Services in Birmingham, UK at a very low budget
Silicon EC UK Limited is a distinguished provider of comprehensive Rebar Detailing Services in Birmingham, United Kingdom. Our Rebar Shop Drawing Services encompass a meticulous and thorough approach to reinforcing steel detailing, ensuring structural integrity, and compliance with industry standards. Accurate rebar detailing contributes significantly to the overall quality, strength, and durability of concrete structures. It helps minimize material wastage, reduces construction errors, and ensures that the finished structure meets design specifications and safety standards. These CAD Drawings are essential for accurately fabricating and placing the reinforcing steel within buildings, bridges, dams, and other infrastructural projects. Rebar detailing ensures the structural integrity and strength of these engineering projects.
Contact Silicon EC UK Limited in the United Kingdom, to explore how our Rebar CAD Detailing Services can add value and precision to your construction projects.
Visit our Website:
#Rebar Detailing Outsourcing Services#Reinforcement Detailing Services#Rebar Fabrication Drawings Services#Outsourcing Rebar Detailing Services#Outsource Rebar Detailing Services#Bar Bending Schedule Services#Rebar CAD Drawing Services#Rebar Detailing Services#Tekla Rebar Detailing Services#3D Rebar Detailing Service#Rebar Detailing Shop Drawing Service#Rebar Detailing Companies#Rebar Design and Detailing Services#Rebar Detailing Company London#Rebar Detailing Services London#Rebar Detailing Services Birmingham#Rebar Detailing Company Birmingham#CAD Design#CAD Drafting#CAD Drawing#CAD Engineering Company#CAD Services Company
0 notes
Text
— How to feel your desire in a natural way even if it seems unlikely?

Feeling the desire as something natural, even if it seems unlikely, is a matter of adjusting your mind and emotions to believe that it is already part of your reality. Here are practical steps to help with this process:
1. Reframe the Desire as Something Ordinary
• Start by changing your perception of the desire. Imagine that “winning $25k” or “being with your SP” is as normal as everyday things, like receiving a text message or finding money in your pocket.
• Tell yourself: “This is easy and natural. Many people have this, so I can have it too.”
2. Visualize Simple and Repeatedly
• Instead of imagining big events, visualize simple scenes that would already be natural after having the desire.
• For example, for manifest $25k:
• Imagine yourself opening your bank app and checking your balance.
• Visualize yourself smiling and thinking: “I knew this would happen.”
• For manifest your SP:
• Imagine a casual conversation or a loving message. • Feel comfortable in his/her company, as if it were something routine.
3. Use the Power of Gratitude
• Gratitude helps make any desire feel natural because you act as if you have already received it.
• Tell yourself:
• “I am so grateful to have $25k in my account. It came so easily!”
• “I am so happy to be in an amazing relationship with my SP. It is perfect!”
4. Affirm That It Is Already Yours
• Affirmations help convince your subconscious mind that the desire is already part of your reality.
• For the $25k:
• “Money always comes easily to me.”
• “I am naturally prosperous and wealthy.”
• For the SP:
• “I am loved and desired just as I am.”
• “Our relationship is harmonious and happy.”
Repeat these affirmations until they begin to ring true and normal.
5. Create Familiarity
• The mind finds unfamiliar things strange, so make the desire familiar:
• Watch videos of people who have what you want (but without envy, just to inspire).
• Pretend that it is already part of your daily life.
• For the SP, remember that he/she is already thinking about you and imagine this calmly.
6. Practice SATS
• Before going to sleep, enter a relaxed state (SATS) and imagine that the desire has already been fulfilled:
• For the $25k, visualize yourself buying something or transferring the money.
• For the SP, imagine an intimate moment together, such as holding hands or smiling.
Enter the feeling of happiness and naturalness. Make this a habit.
7. Let Go of the Desire
• Trust that the desire is already yours and do not obsess. Acting with “desperation” or “urgency” reinforces the idea that you do not yet have it. • Remind yourself: “If I already had this, how would I feel? Relaxed, confident, and at peace.” Act from that state.
8. Neutralize Doubts
• When thoughts like “This is unlikely” arise, don’t fight them. Instead, say:
• “No matter what, I know it’s mine.”
• “The impossible happens for me every day.”
9. Do Small Tests
• Manifesting smaller things, like finding a coin, receiving a compliment, or receiving a specific sign, helps strengthen your faith.
• When you see it working for smaller things, it will be easier to believe it will work for the $25k or the SP.
10. Be Consistent and Have Patience
• Making desire natural takes time and practice, especially if it seems unlikely. Persistence is what turns your imagination into reality.
• Remember: the only thing that matters is your belief and your internal state.
If you persist in the state of “I already have it,” without worrying about the details of “how,” the desire will become natural and will inevitably be reflected in 3D. Trust the process!
#law of assumption#loa#loa blog#loa tumblr#loass#loassumption#manifesting#neville goddard#manifestation#law of manifestation#4d reality#loassblr#loass success#loassblog#loass states#loa success#loablr#master manifestor#desired reality#reality shifting#shifting motivation#shifting community#robotic affirming#affirm and persist#sats#shiftblr#void#virtual reality#non duality#non dualism
212 notes
·
View notes
Text
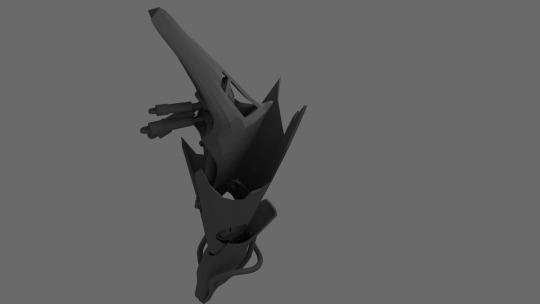
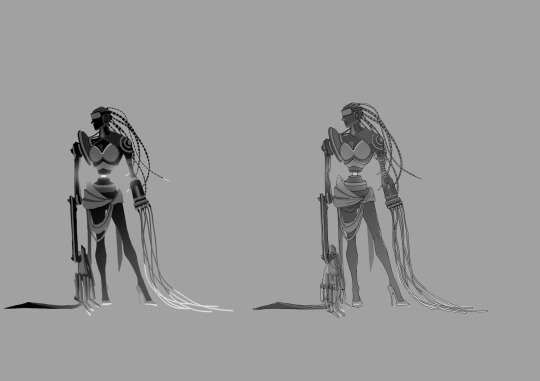
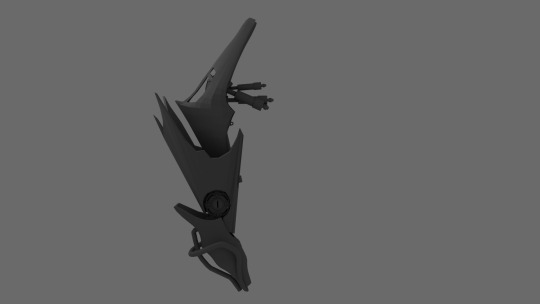
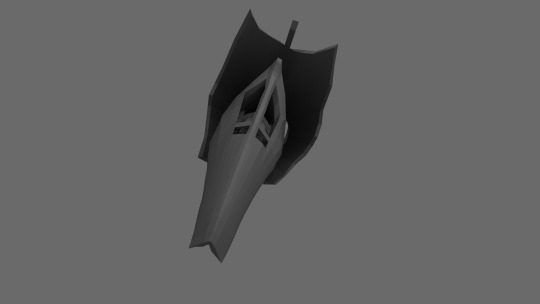

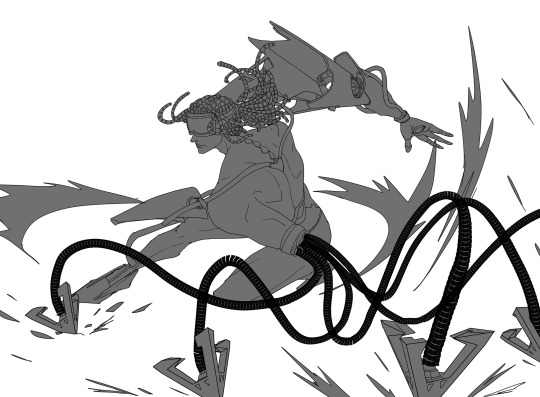
Extended assignment1: Human and Inhuman#2
As part of my extended Assignment 2, I revisited a character design I wasn’t entirely satisfied with: a half-mechanical, half-human female figure. While her original concept had potential, I found the execution lacked the depth and clarity I wanted. To address this, I decided to reimagine her as a male character, redesigning his features and refining his overall aesthetic.
The new design emphasized the tension between human and mechanical elements. I worked to create a character whose cybernetic enhancements felt both functional and integral to his identity. After finalizing the initial sketches, I explored color schemes to highlight the contrast between his organic and synthetic components. The final step was to model him in 3D, allowing me to better understand his proportions and test different poses to showcase his personality and capabilities.
Throughout this process, I realized that concept art is less about achieving a polished final product and more about clearly expressing ideas. Shifting my focus to the character’s essence—who they are, what their defining traits are, and how these details come together—helped me create a more compelling design.
This project reinforced the importance of flexibility in the creative process. By iterating on the character and using tools like 3D modeling to support my vision, I was able to push my concepts further. This experience has been invaluable for my development as a concept artist, teaching me how to balance creativity with practicality to communicate ideas effectively in the field of animation and gaming.
references
https://e.tb.cn/h.TQU1hMyt0PPhz3p?tk=av7keXm9heH
2 notes
·
View notes
Text
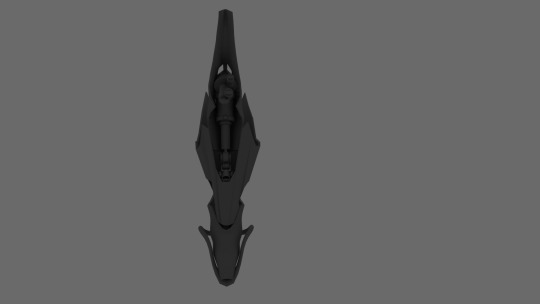
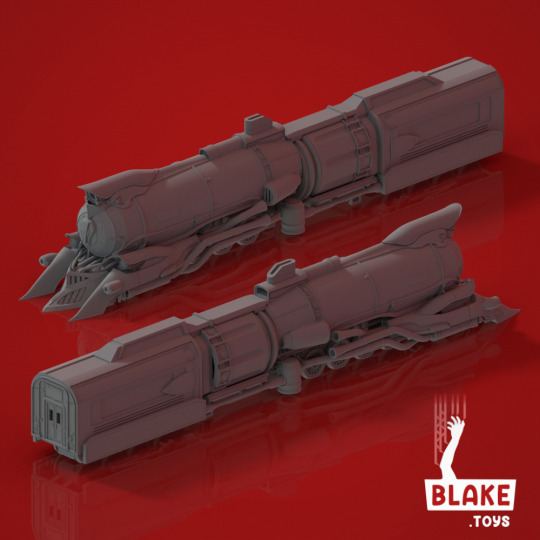
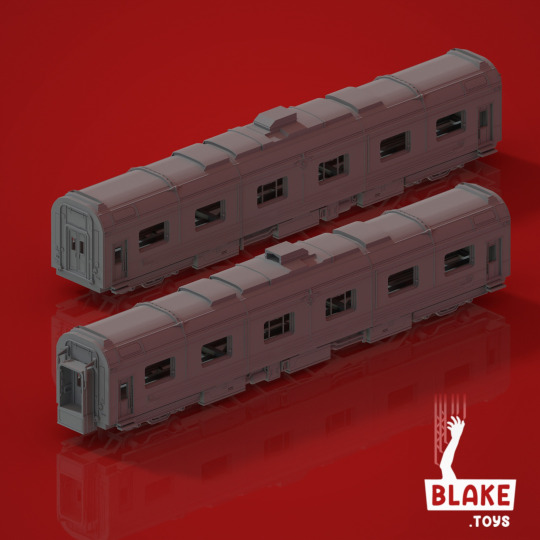
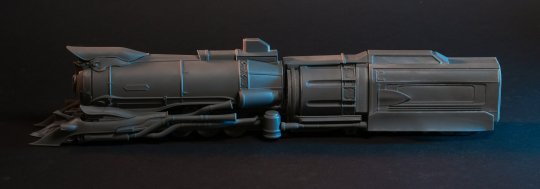
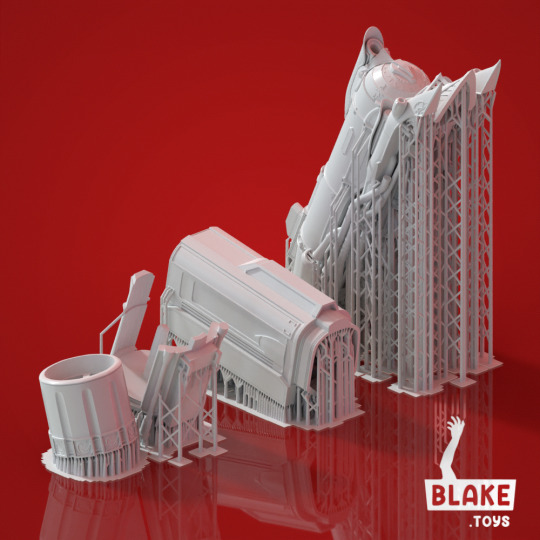
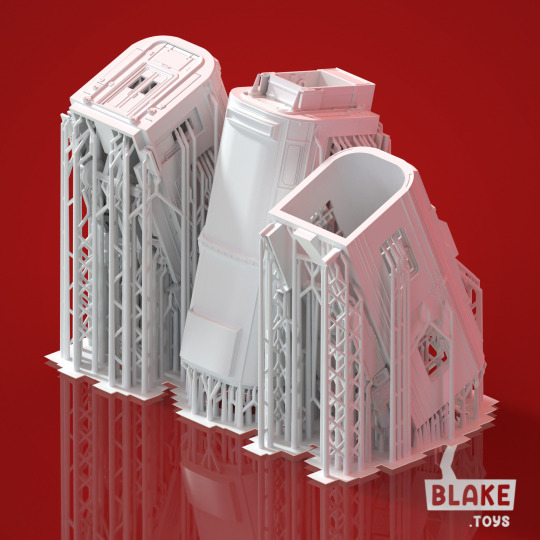
Astral Express from Honkai Star Rail
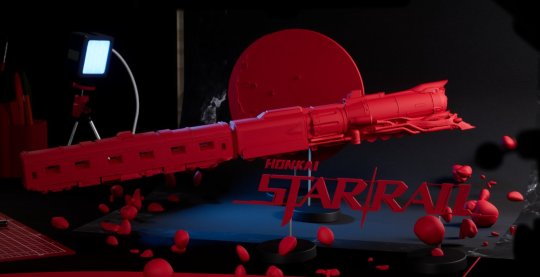
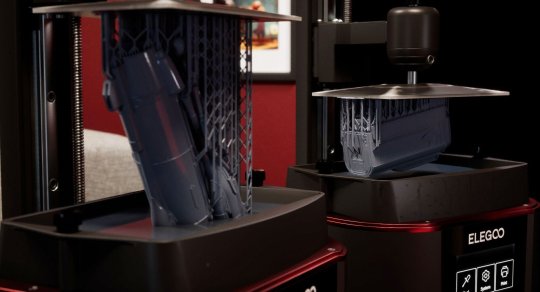
Here's a first look at my print of the Astral Express from Hoyoverse's latest game, Honkai Star Rail. I've just finished sculpting the Engine of the train and given it a quick print on my Elegoo Mars 3 Pro.
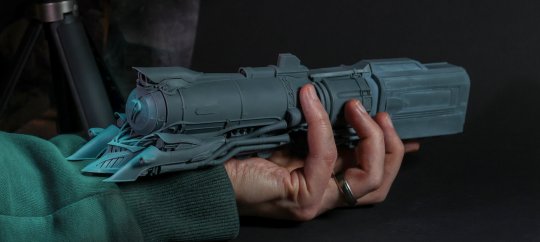

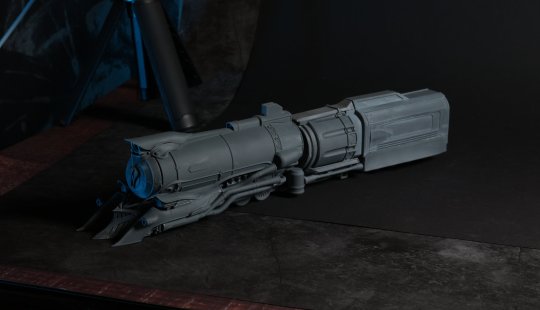
It's just shy of 10m polygons and contains all the details and decals usually lost in the texture for 3D printing. The mesh was recreated by hand to smoothen the surfaces and chamfer those edges and get everything printing nice and clean. It's also a bit of a beast, sitting at over 55cm end-to-end!
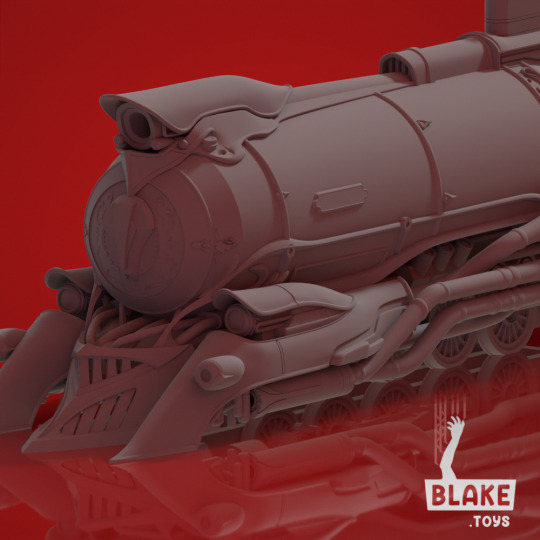
The initial print revealed some flaws in my original design. One thing I've noticed is that my current choice of resin (Elegoo 8k Water Washable) seems to warp a little too easily on curing. Flatter parts of the print warped towards the back a little, so I reinforced them in the STLs. I also added some internal supports to some of the thinner tubing and accessories towards the front of the engine. They were pretty solid, but I just wanted to make sure they held well, given how brittle resin can be. I also realised there needed to be some way to connect the front of the engine to the cylinder/revolver part, so added in some insets for the final mesh that aren't in my print.
The cylinder for the revolver is a separate mesh. This has the nice bonus of allowing that part of the model to spin freely. It's not functional (would be great to add some kind of lights and internal stepper motor to get it spinning by itself) but it's kinda cool.

I also experimented with 'contact spheres' for this point. Small spherical meshes that go between the support and the print (hoping to reduce damage when removing supports). Have to say I'm not convinced at the moment that they help any. It leaves little nodules on EVERY support point and they still create pocket if you snip off the blob. Sanding does give a cleaner finish but it's hard to sand these little spheres as they catch and tear the sandpaper. Perhaps I need to toy with the contact size a little more.
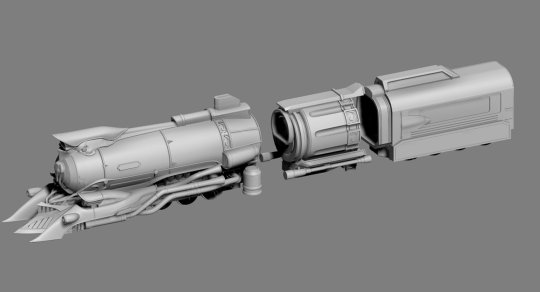
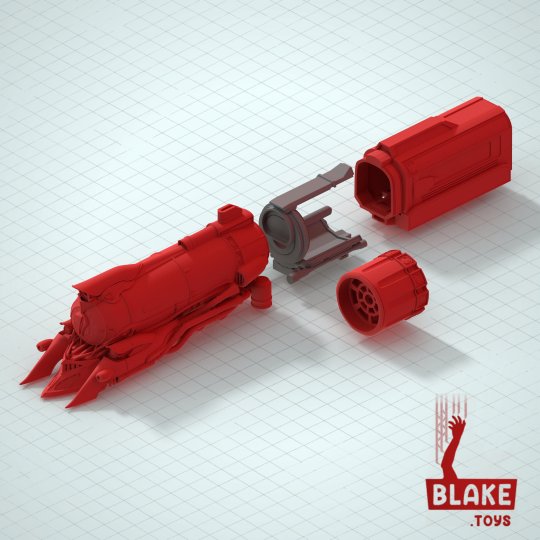
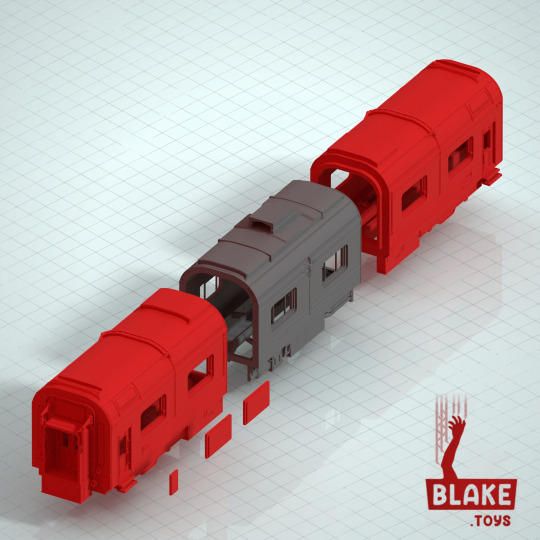
If you want to try printing this yourself you can now find the STLs over on my new MyMiniFactory or my new Cults3D pages. There's lots on the page for free but you can use the code blaketoys50 for 50% off! Be sure to dig around the page as you can find both the engine and the carriage parts.
What else would you want to see from #hoyoverse's universe? Any particular games or prints you'd be excited to have on your shelf? Feel free to comment!
#3d modeling#3d printing#hoyoverse#star rail#astral express#star rail fanart#game fanart#video game art#video game fanart#mihoyo#honkai star rail#honkai star rail fanart#cults3d#myminifactory#miniatures#sculpt#mini painting#miniature painting#minis#digital art#3dsmax#elegoo
40 notes
·
View notes
Text
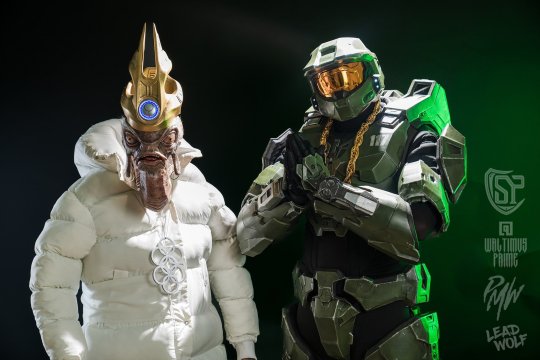
Prophet of Drip
Feb 2nd 2024 Gaming / Microsoft / Halo
KOSAMA | Writer and Recovering Anime Addict
An ingenious creation by the artist Rythaze, who originally drew the character, has transcended the digital realm to become an iconic figure within the gaming community and beyond. This character, ingeniously blending elements from the Halo universe with a distinct fashion sense reminiscent of the pope's attire, has not only captured the imagination of PayMoneyWubby's devoted followers but has also solidified its place in the pantheon of internet culture.
The character's striking visual appeal, adorned in a voluminous windbreaker inspired by the iconic Puffy Pope Windbreaker, has spurred a wave of creativity among fans. The Prophet of Drip has become a meme sensation, with a plethora of fan art flooding social media platforms and even leading to the creation of intricate 3D printed models. The meme's popularity has not only reinforced the sense of community within PayMoneyWubby's fanbase but has also served as a testament to the internet's ability to turn even the most unlikely characters into viral phenomena.
In a surprising turn of events in the start of 2024, PayMoneyWubby took the excitement surrounding the Prophet of Drip to new heights by unveiling a life-size version of the character during one of his engaging streams. Crafted with meticulous detail, the life-size statue was brought to life by the talented artist SinisterPropz. Standing proudly at over 6 feet tall, the statue is a testament to the dedication of both the streamer and the artist in bringing the Prophet of Drip from the digital canvas to the physical world.
Constructed from durable materials such as fiberglass and resin, the life-size Prophet of Drip statue not only embodies the essence of the character but also serves as a tangible symbol of the streamer's connection with his audience. The unveiling of the statue was a momentous occasion that resonated with fans, sparking widespread excitement and prompting countless enthusiasts to flock to social media to share their joy and admiration.
The Prophet of Drip's journey from a digital creation to a physical embodiment stands as a remarkable example of the power of online communities and the unique ways in which internet culture can influence and shape our shared experiences. As the legacy of the Prophet of Drip continues to grow, one can only speculate about the future adventures and surprises that PayMoneyWubby has in store for his ever-expanding fanbase, eagerly awaiting the next unexpected turn in the saga of this beloved internet phenomenon.
9 notes
·
View notes
Text
3D Product Animation Services in the USA: Captivating Audiences with Visual Storytelling
What is 3D Product Animation?
3D product animation involves creating animated, three-dimensional visual representations of a product. Unlike static images, 3D animations allow viewers to see the product from multiple angles, explore its features, and even witness its functionality in action. This immersive approach not only enhances customer understanding but also helps in conveying the brand’s message more effectively.
The Importance of 3D Product Animation
Enhanced Engagement: In a world where attention spans are dwindling, captivating content is crucial. 3D product animations engage viewers by combining visual appeal with informative content. When consumers can see a product in action, it helps create a connection that static images simply cannot achieve.
Complex Demonstrations Made Easy: Certain products, especially those with intricate functionalities, can be difficult to explain through text or simple images. 3D animations simplify this process by visually demonstrating how a product works. For example, a tech gadget can be animated to show its features, usability, and integration into everyday life.
Versatile Marketing Tool: 3D product animations can be used across various platforms, including websites, social media, email campaigns, and presentations. This versatility allows brands to reach their audience through multiple channels, reinforcing their message and enhancing brand recognition.
Increased Sales Conversion: According to studies, products that feature videos or animations have higher conversion rates. By showcasing a product’s unique features and benefits, 3D animations can significantly influence a consumer’s purchasing decision.
Competitive Advantage: In a crowded marketplace, standing out is essential. 3D product animations provide brands with a unique way to showcase their offerings, differentiating them from competitors who rely solely on traditional marketing methods.
The Process of Creating 3D Product Animations
Creating a compelling 3D product animation involves a multi-step process that requires a blend of creativity, technical skills, and collaboration between the client and the animation team. Here’s a breakdown of the typical workflow:
1. Concept Development
Before diving into the animation process, it’s essential to establish a clear concept. This stage involves understanding the product, its target audience, and the message that needs to be conveyed. Brainstorming sessions between the client and the animation team can help identify key selling points and narrative elements.
2. Storyboarding
Once the concept is defined, the next step is to create a storyboard. This visual representation outlines the sequence of events in the animation, including camera angles, transitions, and key moments. Storyboarding helps ensure that everyone involved has a clear understanding of the project’s direction.
3. 3D Modeling
This phase involves creating a digital 3D model of the product. Using specialized software, animators craft a detailed representation that captures the product’s design, colors, textures, and features. This model serves as the foundation for the animation.
4. Animation
With the 3D model complete, animators bring the product to life. This step includes adding movements, effects, and transitions that demonstrate the product’s functionality. For example, a product could be animated to show how it opens, operates, or interacts with other objects.
5. Rendering
After the animation is complete, the final step is rendering. This process converts the animated model into a video format, ensuring that all visual and audio elements are perfectly synchronized. Rendering can be resource-intensive and may take time, depending on the complexity of the animation.
6. Feedback and Revisions
Client collaboration is crucial throughout the animation process. After the initial render, feedback is solicited, and revisions may be made to ensure the final product aligns with the client’s vision.
Applications of 3D Product Animation
3D product animation services find applications across various industries, including:
Consumer Electronics: Tech companies use 3D animations to demonstrate the features of new gadgets, making it easier for consumers to understand their benefits.
Healthcare: Pharmaceutical companies can animate complex medical devices, helping healthcare professionals and patients grasp their functionalities.
Automotive: Car manufacturers create 3D animations to showcase vehicle features, interiors, and performance, enticing potential buyers.
Fashion: Clothing brands can use 3D animations to highlight the fabric, fit, and design of their apparel, creating virtual fashion shows.
Manufacturing: Industrial companies often use 3D animations to visualize machinery and equipment, making it easier to explain complex processes.
FAQs About 3D Product Animation Services in the USA
1. What are the benefits of using 3D product animation?
3D product animation enhances engagement, simplifies complex demonstrations, increases sales conversion rates, and provides a competitive edge in marketing.
2. How long does it take to create a 3D product animation?
The timeline varies based on the project’s complexity, but typically it takes a few weeks to complete the entire process from concept development to final rendering.
3. What is the cost of 3D product animation services?
Costs depend on various factors, including the length of the animation, complexity, and the animation studio’s expertise. It’s advisable to request quotes from multiple providers to find a suitable option.
4. Can I see examples of previous work before hiring an animation service?
Yes, reputable animation studios usually have portfolios showcasing their previous work. Reviewing these can give you a sense of their style and capabilities.
5. Is client collaboration involved during the animation process?

Conclusion
As the demand for engaging and informative marketing content continues to grow, 3D product animation services offer a powerful solution for brands in the USA. By leveraging this innovative technology, businesses can elevate their marketing strategies, enhance customer understanding, and ultimately drive sales.
If you’re looking to make an impact with your product presentations, consider partnering with 3dmodellingservices for professional and high-quality 3D animations tailored to your needs. Transform the way you showcase your products and stand out in today’s competitive landscape!
2 notes
·
View notes