#200-400 f4 lens
Explore tagged Tumblr posts
Visit Tumblr Blog
Explore Tumblr blogs with no restrictions, modern design and the best experience.
Last Seen Tumblr Blogs


Fun Fact
The Tumblr app for Google Glass was released on May 16, 2013.
Video
youtube
Nikon Z9 Sports Photography Field Hockey #mirrorless #photography #sports
0 notes
Text

Wild daisies at my doorstep.
These wild daisies were growing in a field right behind our house. Look closely for bugs of all kinds. I thought I would give Affinity Photo a try for a while as my post-processing software with a little extra selective sharpening using Topaz Sharpen AI.
Camera: Pentax K-3
Lens: HD Pentax DA 55-300mm f4-5.8 ED WR
107mm / ƒ/9 / 1/400s / ISO 200
Taken: June 24, 2022
#original photographers#original photography#photographer on tumblr#landscape#photography#Marc-o-graphy#flowers#daisies#shallow DOF#insect#bugs#canada#ontario#where i live#summer#June#2022#pentax#pentaxian#pentax k3#Affinity Photo#Topaz Sharpen AI
88 notes
·
View notes
Text

高原の散歩道
朝靄がやっと晴れると そこには別世界が待っていた 燃えるような紅葉の中 「さあ、どうぞ、こちらへ!」と 路は 谷筋の奥へと誘う
------------------------ 突然、山のような仕事に襲われまして、暫くご無沙汰をいたしました。 <(_ _;)> 忙中閑を何とか見つけ出して、散る前に紅葉の写真を撮りに行ってきました。 もうすぐ師���。また、忙しくなるのかなぁ... (><) ------------------------ ○ camera : CANON EOS 20D ○ lens : CANON EF-S 17-85 mm F4-5.6 IS USM ○ focal length : 85 mm ( compared to 35mm format : 135 mm ) ○ shooting mode : Aperture-Priority AE ○ Tv ( Shutter Speed ) : 1/200 sec. ○ Av ( Aperture Value ) : F 8 ○ ISO speed rate : 400 ------------------------
○ development : RAW image developed by SILKYPIX Developer Studio 2.0 ○ exposure compensation ( by camera ) : -1/3 EV ○ exposure compensation ( by developer ) : +1/3 EV ○ total exposure compensation : ±0 EV ○ white balance : 8,000 K ○ sharpness : manual ( outline emphasis : 600, detail emphasis : 768, false outline control : 4 ) ○ tone adjustment : strong contrast [ +2 ] ○ saturation : vivid [ +2 ] ○ color mode : expected color 2
------------------------ ○ location : 西沢渓谷 ○ target : 紅葉の森と林道 本当は、もっと靄っていたのですが、色温度を調整して、見えない紅葉を引き出してみました。 ちょっとだけ、フィクション。(^^;)
1 note
·
View note
Text
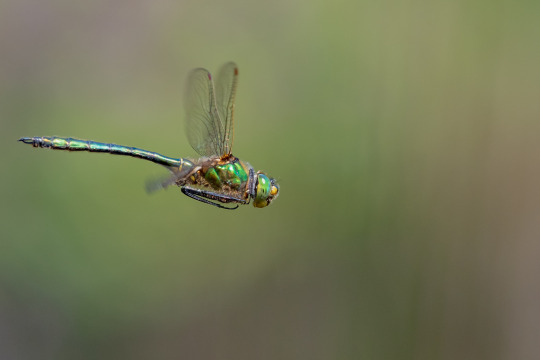
How to photograph Dragonflies in flight
It's pretty obvious to anyone who observes dragonflies that they spend the majority of their time in flight and they're extremely quick and agile. Their acceleration is astonishing - one moment they are perched on a reed, the next they're 30 feet up in the air catching a fly or seeing off another dragonfly.
So, how on earth do you get in flight images? Let me take you through some key pointers.
1. Gear & Settings
Using the right lens is critical, as are the settings. I'd say that a 300mm lens is about ideal but other focal lengths will work. Between 200-400mm is probably best so you can capture images from a few feet to a few metres in front of you. A lens that has a fairly close minimum focus is quite important as some species will come quite close.
Once you have the right selected on the camera, there are some key settings to consider:
Manual Focus - Dragonflies are small and very fast and no matter how good your camera's auto-focus, it won't be able to locate & track your subject very well, if at all. Manual focusing is the best way to go (see below).
Shutter Speed - This depends on what you're trying to achieve with your images. You want to freeze all motion, including the wings. In that case, you'll want a shutter speed of around 1/2000 of a second but that'll depend on your subject. Personally, I like to have some motion in the wings but everything else frozen. For this, I use between 1/800 & 1/1000 typically, again dependant on the species and conditions (if it's really bright usually 1/1000).
Aperture - This depends on a number of factors including what sort of image I want, light conditions, background and angle of the subject. I use anything from f4 through to f11 typically. F4 will usually only mean part of the subject is sharp but provides the best way to get a clean background, whereas a higher number will give you a better chance of getting more of the subject sharp, but could mean the background is not so clean. Higher f numbers could also mean you have to choose lower shutter speeds to let enough light onto the sensor for a good exposure. It's all a balancing act which usually requires some trial & error on the day.
ISO - It pays well to try and keep the ISO fairly low, say maximum 400. This isn't usually an issue as it's very likely to be bright & sunny. I have been frustrated at times when using Auto-ISO, photographing a subject against a dark background as the camera will bump the ISO up and images get very noisy.
2. Observe your subject
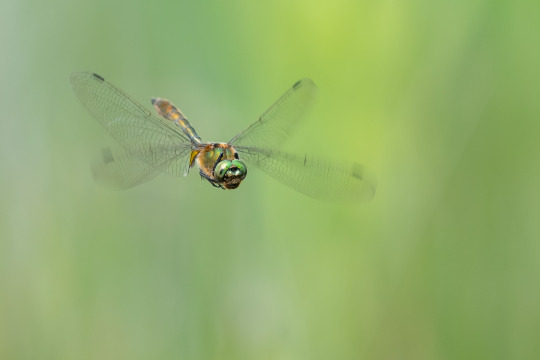
One of the greatest things about dragonflies from a photographers perspective is that they are not that bothered by humans, especially when in flight. Each species has its own general characteristics, that can be picked up after a short time observing them. The males of the Hawker species for example usually patrol a patch using the pretty much the same flight path, time & again, often hovering as they reach one end of it before turning to go back to the other end. Chasers are much more erratic flyers, spending most of their time chasing others either for territorial or breeding purposes. They are very quick and quite small and photographing them in flight it extremely challenging (to date I have not had any success).
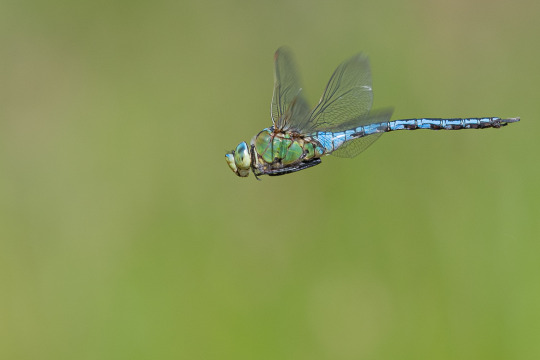
Emperor's are similar to Hawkers and as they're typically larger, are perhaps the easiest to photograph in flight.
Emerald's like to follow fairly set flight paths, albeit usually quite close to the water's surface and their fairly small size makes it pretty tricky.
To date, I've not yet attempted to photograph Darters and Skimmers in flight due to their small size and erratic flight.
Take the time to observe your subject. Is it following a fairly set flight path? Where is it hovering? Where's the best place for you to sit or stand to give yourself the best chance of capturing good images of it?
3. Get in position
Once you've observed your subject, you can choose the best place to stand, crouch or sit. As well as deciding based on where you think the dragonfly is going to pass/pause etc. You also should consider the position of the sun - ensure you're not facing it and if possible you should try and keep it at your back. There will be times when having the sun to your side or even to your front works fine and produces some nice images but for the best chances of a well lit, sharp image, keep it behind you.
Try and get level with your subject so the image produces a feeling of connection with the subject. That can often mean crouching or perhaps getting into the water if you're working with a low-flyer.
Once in position, give it some time. As with most wildlife, if your presence has spooked your subject, it probably won't be long before it returns.
4. Manual Focus
If you're new to this, as most of us, given how reliant we are on auto-focus, it does take some patience (and a lot of deleted images!) before you get fairly consistent.
If you've observed your subject and selected your position based on where you think the dragonfly will be when you photograph it, then you can focus at roughly that point using some nearby vegetation for example. It's then a case of waiting for the dragonfly, getting it in the viewfinder, make adjustments using the focus ring and taking some shots when you see the dragonfly is sharp.
I have found it challenging to learn that it takes only very small movements of the focusing ring, often overcompensating and missing the shot.
I have tried setting the focus at a specific distance and leaving it there, on the proviso that the dragonfly will fly through that point and so providing I take a shot at that exact moment, it should be in focus. This, however, is not the best advice as it usually means dozens of unusable images and rarely a usable one.
It really is down to practice and suddenly you'll find you're seeing the subject sharp in the viewfinder a lot more often.
Getting sharp images using manual focusing is very satisfying in my opinion but learning this technique is frustrating at times and certainly bumps your camera's shutter count up!
5. Post-processing
Once you have a bunch of images saved on your camera's memory card, you can start to go through them and select the ones you want to digitally process. I use Adobe Lightroom (which is pretty much the standard) and work with RAW images.
In terms of which images to work with, as a rule of thumb, I make sure that first & foremost the eyes/face of the dragonfly are in focus and sharp. After that, it's all down to personal taste and what you have to work with. I usually consider composition, exposure, contrast and noise as well as making sure the colours in the image look as natural as possible.
1 note
·
View note
Text
The best lens ever
Buying a Lens
When it comes to buying a telephoto lens it’s important to ask yourself what subjects you are wanting to shoot, how far away these subjects are likely to be, and what type of light you will most often be shooting in. You’ll then be able to narrow down your lens choices based on the following characteristics:
Focal Length
The lens focal length will determine how close your subject will appear through your cameras viewfinder. The larger the focal length the closer you will be able to get to your subject.
If I���m shooting a motocross event and I’m able to get very close to the track then often I won’t need a focal length longer than 200mm on a full-frame camera. But if I’m shooting birds in flight then these will be much further away and the subject will also be much smaller, so then I usually prefer a focal length in the 400-600mm range on a full-frame camera.
Aperture
The aperture of the lens together with shutter speed and ISO will determine your exposure. A lens with an aperture of f/2.8 will let in twice the amount of light compared with an f/4 lens, this not only allows you to keep your ISO lower but also improves the autofocus speed.
Many zoom lenses will have a variable aperture that changes depending on your focal length. For example, the Sony FE 100-400mm GM lens has a maximum aperture of f/4.5 when you are at 100mm, but at 400mm the maximum aperture changes to f/5.6. However, some lenses that have a constant aperture that doesn’t change as you zoom, like the Sony FE 70-200 F2.8 GM lens which has a maximum aperture of f/2.8 and 70mm and also at 200mm.
For indoor photography where light levels are low apertures of f/2.8 or faster are often preferred. Fast apertures are also preferred for outdoor photography when using fast shutter speeds or if you want to create the smoothest separation between your subject and the background.
Autofocus Speed
If you are planning to shoot very fast subjects such as superbikes or birds in flight then it’s important that the autofocus motors in the lens are able to keep up with your subject, if they can’t then you’ll struggle to get any shots in focus.
Prime or Zoom
Prime lenses are almost always sharper than zoom lenses but there are a couple of downsides to using them.
First of all because prime lenses have a fixed focal length you can only move closer or get further away from your subject by using your feet (which may not always be practical), whereas a zoom lens needs just a quick twist of the zoom ring.
Prime lenses are a lot more expensive than zoom lenses. For example, the Sony FE 200-600 f5.6-6.3 G lens normally costs around $1,998.00, whereas the Sony 600mm F4 GM lens costs a whopping $12,998.00.
Top 10 Sony E-mount Telephoto Lenses
Here are the 10 most popular telephoto lenses for Sony E-mount:
Sony FE 200-600mm F5.6-6.3 G OSS
Sony FE 100-400mm F4.5-5.6 GM OSS
Sony FE 70-200mm F2.8 GM OSS
Sony FE 70-200mm F4 G OSS
Sony FE 70-300mm F4.5-5.6 G OSS
Sony FE 400mm F2.8 GM OSS
Sony FE 600mm F4 GM OSS
Sony E 70-350mm F4.5-6.3 G OSS
Sony E 18–200mm F3.5–6.3 OSS LE
Sony E 55-210mm F4.5-6.3 OSS
Keep scrolling to find out more about each of these lenses.
APS-C Telephoto Lenses
Sony E-mount APS-C telephoto lenses are designed for cameras like the Sony a5100, a6000, a6100, a6300, a6400, a6500 and a6600 but will also work on full-frame E-mount cameras like the Sony a7 Series or a9 when shooting in APS-C (Super-35) Mode.
Sony E 70-350mm F4.5-6.3 G OSS (SEL70350G)
The Sony E 70-350mm F4.5-6.3 G OSS is the longest APS-C zoom lens currently available for the Sony E-mount.
I bought this lens on the first day that it was available and it has quickly become one of my favorite APS-C lenses for travelling, shooting sports and shooting my dog Frank. I also often use this lens on my a7R IV in crop mode as it’s so small and light.
The lens has a focal length of 70mm to 350mm and a variable aperture of f/4.5 – 6.3. From 70mm to 82mm its f/4.5, 83mm to 113mm its f/5, 114mm to 199mm its f/5.6, and 200mm to 350mm is f/6.3.
The lens is well built and weighs only 625 g (22.1 oz.). It features an AF/MF switch and OSS (Optical Steadyshot) On/Off switch. There’s also a customizable function button and a zoom lock switch. Unfortunately Sony missed off a focus limiter switch that can be useful at times, and there’s also no panning mode 1/2 switch.
The lens is pretty sharp when shooting at 350mm and f/6.3 but by stepping down to f/7.1 you’ll see an improvement in sharpness.
To learn more about this telephoto lens I’d recommend watching this very nice review from Christopher Frost:
1 note
·
View note
Photo

A not uncommon sight to see if you’re near freshwater in Florida is the American Alligators! There are more than one million alligators just in Florida! 😮 We saw plenty of Alligators on the Wakulla Springs boat tour and it was very cool to see them from a nice distance 😅 The tour guide would point them out and tell us their approximate age by the size and a lot of them were rather large! While alligators may seem problematic often, they are still very important to the local ecosystem keeping things in balance! 🐊💚🐊 . . . Camera: Olympus E-M5Markii Lens: 40-150mm pro f2.8 Teleconverter: 1.4x (56-210mm) ISO: 200, 400 Aperture: f4 Speed: 1/1000s, 1/1600s Edited: ON1 Photo Raw 2022 . . . #BreakFreeWithOlympus #GetOlympus #olympusphotography #mzuiko #omsystem #olympusem5mkii #olympus40150pro #americanalligator #alligatorsofinstagram #alligator #reptilesofinstagram #floridanature #naturephotography #wakullasprings #wakullaspringsstatepark #floridaalligator #on1pics (at Edward Ball Wakulla Springs State Park) https://www.instagram.com/p/CljOJGIL7Ef/?igshid=NGJjMDIxMWI=
#breakfreewitholympus#getolympus#olympusphotography#mzuiko#omsystem#olympusem5mkii#olympus40150pro#americanalligator#alligatorsofinstagram#alligator#reptilesofinstagram#floridanature#naturephotography#wakullasprings#wakullaspringsstatepark#floridaalligator#on1pics
1 note
·
View note
Photo

#SWIPELEFT These last couple weeks i have forced myself to shoot only in black in white on my dslr in hopes to better understand lighting. This post is just the beggining, i have more to come! Whats your favorite 1-10 ? All photos taken in or near Stockton, ca. --------------------------------------------------------------------------------------------------------------------------------------------------------------------------------------------------------------------------------------------------------------------------------------------------------------------- Gear Used : Canon Rebel T7 EF-S 18-55mm Generic Tulip Lens Hood Samsung Tab S6 lite + Adobe LightRoom Mobile _________________________________________________________________________________________________________________________________________________________________________________________ Photos Shot At: 1/250 F11 ISO400 1/400 F11 ISO400 1/400 F11 ISO400 1/400 F11 ISO400 1/200 F11 ISO400 1/10 F4 ISO800 1/640 F5.6 ISO400 1/2500 F3.5 ISO400 1/640 F4.5 ISO400 1/125 F8 ISO800 _________________________________________________________________________________________________________________________________________________________________________________________ #hashtaggery #canonrebelt7photography #blackandwhite #blackandwhitephotography #stockton #california #bnw #bnwstreetphotography #photography📷 #bnwphotography #bawphotography #bwphotography #canon #rebelt7 #efs1855mm #bw #monochrome #monochromephotography #stocktonca #stcoktoncaliforia @visitstockton #downtown #downtownstockton #ca #209 #209photography #209photographer #californiaphotographer #californiaphotography #streetphotography (at Stockton, California) https://www.instagram.com/jmartinjr.photography/p/CY2D5QQPjbC/?utm_medium=tumblr
#swipeleft#hashtaggery#canonrebelt7photography#blackandwhite#blackandwhitephotography#stockton#california#bnw#bnwstreetphotography#photography📷#bnwphotography#bawphotography#bwphotography#canon#rebelt7#efs1855mm#bw#monochrome#monochromephotography#stocktonca#stcoktoncaliforia#downtown#downtownstockton#ca#209#209photography#209photographer#californiaphotographer#californiaphotography#streetphotography
0 notes
Photo

%^ Nikon Nikkor AF-S 200-400mm f4 G ED VR Lens 200-400/4 AFS #780 https://ift.tt/353KPNh
0 notes
Text
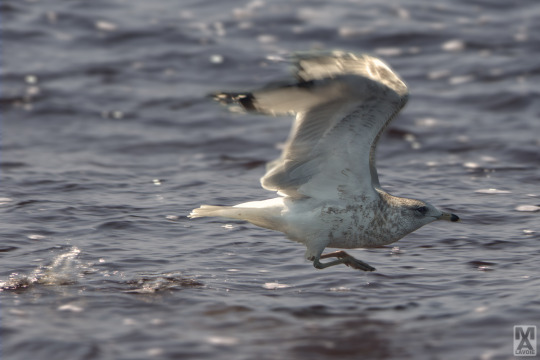
This seagull was just taking off. After a couple of jumps and with a final splash it took to the sky.
Taken at Mavilette Beach Provincial Park while on vacation in Nova Scotia. I took a whole lot of panning shots of different birds flying by. I was quite please how the wing tips and water splash were blurred.
Processed with Affinity Photo v2 where I applied a tilt shift lens effect to create the shallow DOF. I also applied additional some selective sharpening using Topaz Sharpen AI.
Camera: Pentax K-3
Lens: HD Pentax DA 55-300mm f4-5.8 ED WR
260mm / ƒ/11 / 1/400s / ISO 200
Taken: September 7, 2022
#original photographers#original photography#photographer on tumblr#photography#seagull#water#wave#motion blur#canada#nova scotia#vacation#summer#september#2022#pentax#pentaxian#pentax k3#Affinity Photo#Topaz Sharpen AI
27 notes
·
View notes
Text

花魁道中
おやおや 御姉様のお成りだ 綺麗どころを たんと従えて 何時も見事なもんだねぇ ------------------------ 皆さんに習って、曼殊沙華を撮ってきました。 今日はロケーションが思わしくなく、スーパーロングでのチャレンジとなりました。 エクステンダーもどきを使ったので、コントラストが甘くなっちゃいました。ちょっと残念。 momo さん も書いてらっしゃいますが、花の咲く時期には葉が無いんですねぇ。 この花は何度も目にしている筈なのに、初めて知りました。 ------------------------ ○ camera : CANON EOS 20D ○ lens : CANON EF 75-300 mm F4-5.6 IS USM with Tele Plus 2X ○ focal length : 600 mm ( compared to 35mm format : 960 mm ) ○ shooting mode : Aperture-Priority AE ○ Tv ( Shutter Speed ) : 1/200 sec. ○ Av ( Aperture Value ) : F 11 (F5.6 X2) ○ ISO speed rate : 400
------------------------ ○ development : RAW image developed by SILKYPIX Developer Studio 2.0 ○ exposure compensation ( by camera ) : -1 EV ○ exposure compensation ( by developer ) : +1/2 EV ○ total exposure compensation : -1/2 EV ○ sharpness : strong [ +2 ] ○ tone adjustment : low key [ -4 ] ○ saturation : average [ ±0 ] ○ color mode : film color velvia
------------------------ ○ location : 新宿御苑 ○ target : 曼殊沙華 彼岸花、曼殊沙華のいわれについては agatha さんのページに興味深い記事が載っていました。 なかなか勉強になります。<(_ _;)>
#Plants#曼珠沙華#マクロ#新宿御苑#Shinjuku Gyoen National Garden#CANON#EOS 20D#EF 75-300 mm F4-5.6 IS USM#tele plus 2x#velbon#ultra lux-iF tripod#manfrotto#460MG magnesium 3d tripod head#photographers on tumblr
0 notes
Text

Nightime photography with Hasselblads!?
Medium format for the Miky Way? Surely, you must be kidding?
First, a warning: this article is somewhat nerdy technical and may not be for everyone....
A few years back, all medium format sensors were based on CCD-technology, as opposed to CMOS. CCD’s are pretty much useless above ISO 200-400. At least for me. Too much noise. But fast-forward to 2019 and all modern MF systems sport CMOS with top of the line Sony-produced sensors. So the sensor shouldn’t be the problem anymore. But what about lenses? No MF lens is very fast, at least no wides. My HCD28 is f4 and my HC35 is f3.5. (This corresponds to 16-17mm and 21-22mm on full-frame respectivly) However, in the mirrorless «small, or cropped, MF market (33x44mm sensors, Hasselblad X and Fuji Gfx) you have the option to adapt faster third party lenses for full frame. Yes, there will be vignetting on wides, and it probably needs a slight crop, but is still very ok.
So this is my experience using both Hasselblad H6D (100mpx 40x53mm sensor) and X1D (50mpx 33x44mm sensor) for starscapes and other night-time photography. This is not a scientific investigation, just my real-world experience.
I started out with my H6D a few years back, and was stoked by the low level of noise at iso 3200 and up. The sensor seems iso invariant, at least above approximately 1600. When photographing stars, you may actually encounter problems with too many of them! On 100% magnification, the sky is filled. At first, I only used the 28mm at f4. The problem was very dark corners that turned somewhat magenta when I used profile correction. This lens is made for a slightly smaller sensor, so it has a lot of vignette used on the large MF sensor wide open. You may end up cropping it, leaving the corners dark, or take all the work correcting the color-cast. However, the HC35mm (21-22mm on FF) is a different story. It’s made for MF film or the larger sensor, and have much brighter corners. Also, it’s f3.5. This is now my go-to lens for astro on the H-system. I most often end up using the HC35mm, wide open, at iso 6400-12,8k. As long as you have a good, bright exposure, noise-levels are very low and easily corrected.
A year back, I got the X1D. Primarily as back-up and for the long hikes. But the smaller sensor and the short flange-distance also makes it tempting to try out with faster full-frame lenses. I have a few nikkors and got myself an adapter. That means electronic shutter and max iso 3200. However, my nikkor 20mmG is f1.8, so that should be ok. And it actually works very well. It needs a crop due to the vignette, down to about 46-47mpx, but then you have no cut-off of the corners and edges. However, at f1.8 it is very dark in the corners. And it has a lot of field-curvature, essentially forcing you to choose to have center or corners sharp. At f2.8 it’s ok all over, at f4 very good, and much less vignetting. I also tried mye good old 14-24 f2.8. That one works as a charm! As long as you crop down to 24x36 format, ca. 40 mpx, below 20mm. Above 20mm you can use the whole sensor-real-estate. Much less field curvature than the 20mm at f2.8, comparable at f4. I also tried the HCD 28mm on the X1D, and here it really shines. The smaller sensor renders the corners much brighter and less magenta. With night photography, you still may want to avoid automatic profile-correction. There is some magenta in there...
So, to conclude this higly unscientific musing about using Hasselblads for starscapes, I now mostly use my H6D with the HC35mm, wide open at iso 6400-12.8k or my X1D with the HCD 28mm with ditto settings. The Hasselblad lenses are just so incredibly good. Zero coma, no field curvature, tack-sharp edge to edge. Just a little vignetting. When I need something wider I use either the Nikkor 20mm at f 2.8 or the 14-24 at same setting. You may think my ISO is high, but the noise levels are so good that I have no problems with that. I actually prefer a brighter exposure, shorter shutterspeed and less star-trails, and the noise-levels are manageable. The modern Hasselblads are at least 1-2 stops better than my old Nikon d800.
Now, I just need to get my hands on that XCD 21mm f4. I suspect it is marvellous!
Feel free to drop me a question via mail or the contact info here.
Above image: Hasselblad H6D, HCD 28mm (slightly cropped), iso 12.8k, f4, 20 sec.
Below: Hasselblad X1D, nikkor 14-24mm f2.8, iso 1600, 5sec exp.

0 notes
Photo

#BehindTheShot with #CanonExplorerOfLight Terrell Lloyd @49ersofficialphotog: "You’re OUT! While I was out covering baseball for San Jose State University, I decided to see how the new Canon EOS R would work with sports action, and it worked out well. The action was so quick. As the runner tried to steal third base, I quickly panned over my 200-400mm f/4 and was able to capture the player getting tagged out. The EOS R reacted nicely and the focus was on point." Camera: Canon EOS R Lens: EF 200-400mm f/4L IS USM Aperture: f4 ISO: 400 Shutter Speed: 1/2000 Focal Length: 200mm #canon #teamcanon #canoneos #eosr #betherevolution #baseball #sports #sportsphotography https://ift.tt/2U3kKec
0 notes
Text
Preparation tips for aircraft photography at airshows
The airshow is the best platform to capture wonderful aircraft portraits. Photography of any object requires some techniques and a broad view to see things. For clicking wonderful photographs at airshows here are some preparation tips:
1. Mind full of ideas: The first and the foremost step or technique is to get your mind full of ideas about airplane photography. Take ideas from various photography websites. Ideas will help in understanding and analyzing what techniques we need to apply to get some desired photographs of aircraft.
2. Airshow layout: It is a good practice for an airplane photographer to have a total idea about the airshow. The aircraft photographer should have a clear knowledge of everything about the air show they are going for. Even the micro details like the path the airplanes will follow and the direction of light from the sun are quite useful in choosing the right location for better shots in the airshow and for proper planning and execution. Information of airplanes that will be performing in the airshow helps an aircraft photographer to acquaint themselves with the aircraft.

3. Well acquainted with necessary stuff: Keep everything that you might need to do uninterrupted work at airshows. Here everything not only means camera equipment, extra battery, memory card etc., but also things which you might require at airshows like, your ID, pen, snacks, water bottle etc. Your clothes should be comfortable enough according to the weather. Sunglasses and eyepiece are of great use to avoid extra glare on sunny days. Other than this there are some common phrases which the presenter uses during the airshow which represent the movement of the aircraft. It is good to get yourself familiarize with these phrases to make yourself ready to shoot accordingly in advance., Like slow moving aircrafts coming towards the audience is the best time for aircraft portraits. Things like swab for cleaning camera sensor and aircraft tracking application are of great help to the aircraft photographer.
4. Gadgets and equipment: It is important that aircraft photographers equip themselves with the optimum gadgets before going into the photography playground. While large lenses with high zoom might seem to be an attractive option, it might be difficult to control and manage them during the shoot. Choosing a versatile lens like Canon EF 24–105 F4/L will help you capture flying shots along with detailed zoom in photographs. A stock of memory cards is always helpful for not missing out perfect moments due to storage issues.
5. Shooting technicalities: Maintaining optimum brightness is highly recommended for a uniform intensity of light in the photographs. This can be achieved by shooting in bright conditions with ISO in the range of 100–200 and during cloudy conditions in the range of 400–500. Working on shutter priority mode suits best for aircraft photography as it allows you to quickly vitiate the speeds depending upon the speed of the aircraft. The camera automatically adjusts its aperture as per the requirement. The optimum shutter speed will help you achieve sharp images even in case of fast-moving jets.

Why airshow is a better platform to start with?
If you admire aircraft and like capturing them, then airshows are the best place to start with aviation photography career. Since as a beginner you might not have a good idea about the rules and regulations the airplane photographer has to follow. Moreover, anyone who does not have any contact with the pilot and the aviation staff probably cannot take good shots, because it’s a game of technique, ideas, and accessibility. Another advantage of shooting in air shows is that you will get enough creative footage to add to your photographic portfolio.
Aircraft photography is fun and adventurous. If you are also one of those who loves everything about airplane photography then do not delay any further and visit Alaskafoto website. They offer best aircraft photography in Alaska. Alaskafoto team provides top quality aircraft images and also works with its clients if required.
#aircraft photography#Airplane photographer#Aircraft portraits#Aircraft photographer#photography#photographer
0 notes
Photo

New Post has been published on https://www.updatedc.com/2019/01/23/best-lenses-for-sony-a6400/
Best Lenses for Sony A6400
Best Lenses for Sony A6400 camera. Top rated highly Recommended lenses for your A6400 camera selected by our expert editors. The Sony A6400 camera is undoubtedly the best APS-C sensor mirorless camera of today since the camera carries world fastest AF system and the low-light shooting capability of the camera is even better than the Sony A6500 camera.
Sony A6400 Compatible lens list begin from Sony native lenses and then we move further to third party lenses
Sony A6400 Best Lenses Quick Jump Table
Best Standard Zoom Lens Sony 16-70mm F4 Lens Affordable Standard Zoom Lens Sony E PZ 18-105mm F4 Lens Best Telephoto Zoom Lens Sony FE 70-200mm Lens Best Affordable Zoom Lens Sony 55-210mm zoom lens Best Wide angle Zoom Vlogging Lens Sony E 10-18mm lens Best Portraits Lens Sony 50mm F1.8 OSS Best Lens for Macro Shooting Sony 30mm F3.5 lens Best Ultra Wide-angle Lens Sigma 19mm F2.8 EX DN Best Portrait Lens Sigma 60mm F2.8 DN Highest Rated Third Party Lens Sigma 56mm F1.4 Lens
Take a look at the recommendation below and Do ask your Lens related questions at the comment box below.
16-70mm F4 Lens – Buy this lens from Amazon | B&H
Best Standard Zoom Lens for Sony A6400
The best Zoom lens for your Sony A6400 camera is 16-70mm F4 Lens. As you all know the lens is bit costly ($998) but one of the best lenses available for the camera right now.
One of the best thing you will notice while using the lens the lens produces very sharp images and features a constant F4 aperture throughout the zoom range. The build quality of the lens is very solid and the image stabilization of the lens is highly effective and works upto four shutter speed steps to benefit while handheld shooting. Btw, when you are buying a camera like Sony A64000 then you have to buy a lens with better OIS since the camera doesn’t have built-in image stabilization system.
The lens isn’t affordable but you will find the cost reasonable once you see the output from this lens. If you think the price is high then just imagine that you are buying a bunch of high quality prime lenses. It’s expensive but it’s a Zeiss OSS and you get what you pay for when quality is your priority.
Sony A6400 + 16-70mm F4 Sample Image
Lens focal Length : 29 mm Shutter speed : 1/100 sec. F number: F5.6 ISO: 320
Sony E PZ 18-105mm F4 Lens from Amazon | B&H
Affordable Standard Zoom Lens Option for Sony A6400
Sony E PZ 18-105mm f/4 G OSS Lens. Now as we know that it’s not possible for most of us to buy a $1K lens after getting the Sony A6400 camera. So, in this section we are talking about the affordable lenses that easily fits in your budget.
Affordable Option – If you don’t want to spend $1K cash on Sony 16-70mm f/4 ZA OSS Lens then you should go for Sony E PZ 18-105mm f/4 G OSS Lens.
Now, as you can easily notice the cost of the 18-105mm lens is just half compared to the 16-70mm lens. But there is also slight difference in image quality between the two
The lens cost approx 1/2 than the 16-70 F4 lens. But As we have said early the 16-70mm lens performance is equivalent to a series of prime lenses performed together and the difference between the two lens is visible when we test them together in Lab. The test result does shows the 16-70mm F4 is noticeably sharper than 18-105mm f/4 G OSS Lens.
The Good: Covers wide range | The Bad: Affordable
Sony 18-105mm F4 G OSS Lens Sample Photo
Buy Best Zoom Lens – Sony FE 70-200mm Lens from Amazon | B&H
Best Telephoto Zoom Lens for Sony A6400
We are talking about the best Zoom lens right now, so as usual we are not counting up the price factor in this recommendation. The best Zoom lens if Price isn’t a issue is the Sony FE 70-200mm F2.8. As you all know that’s a FE lens (fullframe lens).
The 70-200mm lens is one of the best lens that Sony ever made. For DSLR users I must say that this lens is as good as Canon 70-200mm F2.8 OR Nikkor 70-200mm F2.8 Since. The Sony A6500 and the 20-700mm F2.8 is a killer combo. A perfect lens for shooting sports, wildlife, wedding and Portraits. The Sony 70-200mm F2.8 lens focuses very fast when paired with Sony A6500 and delivers stunning images with excellent color and contrast without any noticeable Aberration/Distortion throughout the zoom range.
You Can also use Both the 1.4x and the 2.0x teleconverters with this lens. The teleconverters maintain excellent image quality while boosting focal-length of the image upto 2X.
Sony A6400 + Sony FE 70-200mm F2.8 Lens Sample Image
Camera – Sony A6400 Lens name – FE 70-200mm F2.8 GM OSS Lens focal Length – 70 mm Shutter speed – 1/2500 sec. F number – F4 ISO – 500
Sony 55-210mm zoom lens B&H Store | Amazon.com
Best Affordable Zoom Lens ($348)
The Best option available under affordable price range. The Sony 55-210mm lens is a produce sharp result when used at bit higher aperture. The lens features very light-weight (compared to the DSLR zoom lenses I have used till now) and the lens bokeh quality isn’t so eye catching so don’t try to have portrait sessions with this lens.
The Good: Good general purpose zoom lens| The Bad: only zoom lens for E-mount
Sony 55-210mm zoom lens Sample Image
Shutter speed 1/2500 sec. F number F6.3 ISO 800
Buy Sony E 10-18mm lens from Amazon | B&H
Best Wide angle Zoom / Vlogging Lens for Sony A6500 Camera
Sony E 10-18mm f/4 OSS: Sony E 10-18mm f/4 OSS Lens is the best wide zoom lens for Sony A6500 camera.The 10-18mm lens is also very usable for vlogging purpose. The gives you a super wide coverage and help you when you want to do self Blog with the camera or to have some wide angle landscape shots.
The lens also features very effective image stabilization system. The lens feature constant F4 aperture and gives you super sharp output. The design of the lens is completely rock solid and made of of metal. The AF performance is very fast and accurate, the amount of image distortion lens produces is very well controlled.
The Good: The best wide angle zoom lens available for Sony A6500 | The Bad: None
youtube
Buy Sony 50mm F1.8 Lens from Amazon | B&H
Best Portraits Lens for A6500
Sony E 50mm f/1.8 OSS Lens: The must have prime lens for every Sony APS-C Mirrorless shooters. The 50mm F1.8 portrait lens produces tack sharp images even at wide open aperture and if you are comparing it’s price from Canikon lenses than don’t forget the Sony 50mm F1.8 lens also features OSS (Optical Steady Shot) Image stabilization.
The Bokeh of the lens is very creamy and the lens features silent and FAST AF motor inside, usable for both still and video purpose. Highly recommended for Sony E-Mount users
The Good: Excellent lens for portraits | The Bad: Nothing
Sony A6400 + 50mm F1.8 OSS Sample Image
Buy this Lens from Amazon | B&H
Best Lens for Macro Shooting
Sony 30mm F3.5 lens is the perfect Macro Lens for Sony A6400. The lens captures tack sharp images at 1:1 proportion and features very well controlled Chromatic aberration. The lens features minimum focusing distance of 9.5 cm and the focal-length of the lens is 30cm. In general the standard Focal-Length of a normal macro DSLR lens varies between 60mm to 100mm, so with a 30mm macro lens you have to get closer to the subject to get a prefect shot. The lens is very durable and made up of aluminum alloy. But keep in mind you have to use tripod all the time to get perfect picture since the Lens and Camera both doesn’t have Image stabilization system.
The Good: Sharp images and creamy bokeh | The Bad: none
Sony 30mm F3.5 Sample Image
Shutter speed 1/13 sec. F number F4.5 Exposure program Aperture priority ISO 400
Best Third Party lenses for Sony A6400
Let’s talk about the best set of third party lenses for Sony A6400 camera. Before we start our recommendation, you should aware of that only few Sigma lenses support AF. Otherwise all the other third party lenses are lenses are Manual Focused.
Buy Sigma 19mm F2.8 Lens from Amazon.com | B&H
Best Ultra Wide-angle Lens for Sony A6400 (Under $200)
Sigma 19mm F2.8 EX DN (AF) One of the best and affordable lenses available for Sony A6400 camera. The lens features F2.8 aperture and close focusing distance is just 20cm. So, this wide angle prime lens not only allow you to capture Landscapes and architecture shots. With this lens you can also do some creative portrait session with your clients and babies.
While shooting landscapes you should keep your aperture between F8 to F11 to capture optimal images with this lens. The lens also supports AutoFocus, and one of the best and affordable lens available under $200 price range.
Sigma 19mm F2.8 Sample Image
Buy this lens from Amazon.com | B&H Store
Best Portrait Lens for Sony A6400 ($210)
Sigma 60mm F2.8 DN (AF): Best and affordable Portrait lens available for Sony A6400 camera. The lens very sharp at center and gives optimum performance at F5.6. One of the best third party lens for Sony APS-C Mirrorless cameras I have ever used. The AF is not as good as Sony native lenses, with this lens you are getting usable and accurate AF.
Let me remind you that you before you buy this lens, the lens doesn’t have built-in AF. As well as you Sony A6400 camera doesn’t have built-in Image stabilization.
LENS : 60mm F2.8 DN SHUTTER SPEED : 1/500 APERTURE VALUE : F2.8 FOCAL LENGTH : 60mm PHOTOGRAPHER : Koich Isomura
Buy Sigma 56mm Lens from Amazon.com | B&H Store
Highest Rated Third Party Lens for Sony A6400
Sigma 56mm f/1.4 DC DN Contemporary Lens for FE / E Mount: The lens we are talking about is one of the best and highest rated Third Party lens of Sony APS-C Mirrorless camera. If you have used Canon 50mm F1.2 Lens with Canon Fullframe DSLRs camera then you should buy this lens. The lens gives you exactly same image quality as of Canon L series Lenses and above that the AF is now more accurate and the overall system is more compact. The Sigma 50mm F1.4 weather sealed lens features amazing optics inside that delivers ultimate image quality you may ever experience with Sony 50mm portrait lenses. If you are a professional portrait shooter then you must have this lens. Keep in mind the 1.5X crop factor when using the lens with APS-C Mirrorless camera.
Sigma 56mm F1.4 Lens Sample Image
0 notes
Photo

This is what a Canon EF 200-400 f4 lens looks like when you take it to bits. I don't fancy putting it back together. Spotted at the Canon booth at CP+ #lensporn #canon #lens #japancamerahunter #japan #photography #kameracraft (at Pacifico Yokohama)
37 notes
·
View notes
Text
Last year, for over two weeks I had the opportunity to shoot at the 8th London Iranian Film Festival at Cine Lumiere in South Kensington and Greenwood Theatre at King’s College five minutes stroll from London Bridge.
I felt blessed to have the opportunity to shoot at this festival. The ambience and the aesthetics of the buildings are brilliant for photography.
They are those kind of places I have only dreamt of shooting inside. And they are not the type of places I would normally frequent so this was the perfect opportunity to shoot inside.
Shooting at this festival was a challenge. I was not familiar with the people and I was shooting people that I would probably never meet on a day to day basis. These are people from a totally different culture and place.

All images were shot using the ambient light. No speedlites were used.
As a photographer, I was expected to blend in and be invisible. However, sometimes, shooting doesn’t aways work like that.
There are instances where you will establish rapport with subjects and capture images that would be impossible to capture while being invisible such as the featured image above.
So, striking that balance was a challenge. One that I think I managed to bridge quite well.
Even though you are supposed to be invisible, you will always mingle with people and that is a test of your people skills, and how adept you are at navigating social landscapes without slipping up or putting your boot into your mouth.
Your interpersonal skills are probably as equally as important as your technical skills. They both have an impact on your work. If you are lacking in one aspect, it will reflect in your body of work.
My biggest challenge was shooting using the ambient light. I had no control of the light. I could only choose my perspective, and pockets where there was good, flattering or better light.
The idea of shooting with high ISO speeds on a crop sensor camera is not one that I like very much and try to avoid as much as I can.
But sometimes, like these when flash is prohibited, you have no choice but to work with the available light. Most buildings are notorious for low light that is not designed for photography but for ambience. So there is always going to be some compromise and getting that just right is the challenge.
However, shooting ambient light is a good skill to have in your arsenal in case you find yourself in a situation like the one I was in.

I am glad I had this challenge because it is the ultimate test that shows you how good or bad you are when you have to work with the available light, and can’t add extra lighting into a scene which means you have to pay more attention to the light, and how it shapes or illuminates your subject.
Not only did I get to shoot some wonderful and beautiful people, I also got to watch some good movies. I had not been in a movie theatre in a good twenty years and I was glad to be back watching some different movies and not the same old Hollywood cliches.
I also had the opportunity to test some new lenses [one new and two secondhand] that I recently acquired. These were the Canon EF-S 24mm F2.8 STM [images in slideshow below], Canon EF 85mm F1.8 USM and the Canon EF 135mm F2.8 softfocus lenses.
This slideshow requires JavaScript.
They are affordable lenses and they are all brilliant considering their prices. The first lens is good value for money and on a crop sensor body, it is great for wide angle shots when you need a fast lens that is good in low light and sharp.
You can shoot handheld at very low shutter speeds and still get images that are tack sharp or reasonably sharp.
The Canon 135mm F2.8 Soft Focus Lens is another lens that is quite enjoyable to shoot with. I didn’t get to play with the soft focus settings but it has a very dreamy look wide open.

Image captured with the Canon EF 135mm F2.8 Soft Focus Lens. I shot this image at ISO 800 at 1/125s and F2.8. It looks pretty sharp wide open for a handheld shot on a 135mm lens on a crop sensor camera. It is usable and can’t fault the image.
It is reasonably sharp in the centre, and soft towards the edges but gets very sharp as you step it down. The downside is that it has no image stabilisation and you need to shoot at a high shutter speed to get sharp images because of the focal length of the lens or brace yourself if you shoot at anything less than 1/80s – 1-/100s.
It is an excellent lens for head shots, and perfect if you want to be invisible because of the focal length. On a full frame it is a perfect 135mm lens but on a crop sensor camera, it is a whopping 216mm or 215mm if we round it off.
I love it even more because I got it for sixty pounds. It was a giveaway. I had to travel across London to pick it up meaning I ended up running pretty late for my gig but it was one I had to get it and it was worth it as illustrated in the images below.
This slideshow requires JavaScript.
The isolation and compression plus the bokeh of this lens is awesome. I was glad to have the opportunity to put it to the test in a real environment to see how it works.
The focus is not strikingly fast but adequate for a lens that was first released in 1987. It works with the AFD focusing system while other newer lenses use either the USM or latest STM technology.
I have never used the Canon 135mm F2L lens but I think the Canon EF 135mm F2.8 Soft Focus Lens is a good alternative to that lens for people who don’t have a finite well of cash to splurge on an L lens.
Shooting with the Canon EF 85mm F1,8 USM lens was a pleasure. The auto focus speed is pretty good. It is sharp wide open and very usable but gets even sharper and with more contrast when stopped down to about F4 and above.

Image captured with the canon EF 85mm F1.8 USM. Captured at ISO 400 1/160s at F2.0.
In comparison to the Canon EF 135mm F2.8 Soft focus lens, the 85mm F1.8 USM lens has a wider aperture that allows more light to reach the sensor. The image above was shot at F2.0 and ISO 400 which is two stops of light more compared to the soft focus lens. I could step the ISO speed down to ISO 400 and use an aperture of F2 as compared to the softfocus lens which only opens up at F2.8.
That allowed me to shoot at a much higher shutter speed that allowed me to have a pretty sharper image and significantly less noise.
It might not be obvious looking at the images but that is always a consideration when deciding which lens to use in low light conditions and where image quality is of paramount importance.
This slideshow requires JavaScript.
The 85mm lens is popular with wedding and portrait photographers. Although I had tested it before in store at Jessops, using it at an event was an even better experience. I am pretty happy with the results as illustrated in the slideshow above.
I felt like somehow my photography skills had transformed overnight because of the images I was able to capture like the one below.

Image shot at ISO 400, 1/100S and F2.0
The isolation and compression of this lens is awesome as you can see in the image above. The bokeh is awesome and throws the background out of focus making the subject in the frame pop out of the frame.
It is my favourite lens out of the lot. It is my most expensive lens to date. I bought it for two hundred pounds secondhand but it was still in mint condition. And I love the image quality. I feel the price is justified and will allow me to improve on what I do.
I also had the Canon EF 50mm F1.8 Mk II and the Sigma 105MM f.2 DG EX Macro lenses. I shoot with a lot of primes and I was glad I had these lenses.
Both lenses are very good in their own way. They have unique qualities but they are both very good value for money, and provide good image quality.
The 8th London Iranian Film Festival provided me with the opportunity to use all my prime lenses. It was an opportunity I utilised well. It has helped me gain more confidence in my skills as well as providing me with more material for my portfolio.
Since then, more opportunities have come my way and I have readily accepted them partly inspired by my boost of confidence shooting the festival.
I think it is important for budding photographers and videographers to shoot a lot and whatever comes their way to build on their technical skills, understand the technical aspects of their craft and the limitations of their gear.
Shooting the 8th London Iranian Film Festival Last year, for over two weeks I had the opportunity to shoot at the 8th London Iranian Film Festival at…
0 notes