#12v on off switch
Explore tagged Tumblr posts
Visit Tumblr Blog
Explore Tumblr blogs with no restrictions, modern design and the best experience.
Last Seen Tumblr Blogs


Fun Fact
Tumblr’s website traffic is steadily declining.
Text

Oldsmobile
April 29'th 2004. The last Oldsmobile rolls off the line. You may be surprised to learn, that for a long time Oldsmobile meant innovation. Here are just a few of the Automotive technologies Olds pioneered in it's 100+ years in business:
1898: Olds Motor Vehicle Company exports the first American car, a steam-powered automobile, to Mumbai, India.
1901: The first speedometer offered on a production car was on an Oldsmobile Curved Dash.
1901: Oldsmobile was the first to procure parts from third-party suppliers.
1901: Olds produces 635 cars, becoming the first high-volume gasoline automobile producer.
1901: Oldsmobile becomes the first manufacturer to publicly promote their vehicles.
1902: The Oldsmobile Curved Dash is the first mass-produced vehicle in America.
1903: Oldsmobile builds the first purpose-built mail truck.
1908: Oldsmobile rebadges the Buick Model B as the Oldsmobile Model 20, possibly creating the first badge-engineered car.
1915: First standard windshield introduced by Oldsmobile.
1926: Oldsmobile is the first to use chrome plating on trim.
1929: Oldsmobile creates the first Monobloc V8 engine in its Viking Sister brand.
1932: Oldsmobile introduces the first automatic choke.
1935: Oldsmobile offers the first all-steel roof on an automobile.
1940: Oldsmobile introduces the Hydra-Matic, the first fully automatic transmission.
1948: Oldsmobile offers one-piece curved windshields, along with Buick and Cadillac.
1949: Oldsmobile introduces the Rocket, the first high-compression OHV V8 engine.
1952: Oldsmobile introduces the "Autronic Eye," the first automatic headlight dimming system.
1953: Oldsmobile switches its lineup to the 12v charging system.
1962: Oldsmobile creates the first production turbocharged car, the F-85 Jetfire.
1962: Oldsmobile also creates the first production car with water injection, the F-85 Jetfire.
1966: The Oldsmobile Toronado is the first mass-produced front-wheel-drive American car.
1969: First use of chromed ABS plastic exterior trim on the 1969 Oldsmobile Toronado.
1969: First electric grid window defogger on an American car, the 1969 Oldsmobile Toronado.
1971: The Oldsmobile Toronado is one of the first cars to feature a high-mounted brake light.
1974: The Toronado is the first American car to offer a driver-side airbag.
1977: The Toronado is the first American car with a microprocessor to run engine controls.
1982: First use of high-impact molded plastic body components on the 1982 Oldsmobile Omega.
1986: Oldsmobile introduces the Delco VIC touchscreen interface on the Toronado, shared with Buick Riviera.
1988: The first production heads-up display system is introduced on the 1988 Oldsmobile Cutlass Supreme Indy Pace Car.
1988: Oldsmobile breaks a world speed record with the Oldsmobile Aerotech at 267 mph, driven by A.J. Foyt.
1990: Oldsmobile updates the color touchscreen interface with a built-in cellular phone on the 1990 Toronado Trofeo.
1995: Oldsmobile introduces Guidestar, the first onboard navigation system on a U.S. production car.
1997: Oldsmobile becomes the first American car company to turn 100 years old.
2001: The redesigned 2002 Oldsmobile Bravada becomes the first truck to pace the Indianapolis 500.
94 notes
·
View notes
Text
How to Make: Electronic Wings for Cosplay

Hello Everyone! It's been a while since I last uploaded a written tutorial on here and since I just finished and wore my Dame Aylin cosplay this last weekend it seemed appropriate to jump back in with a tutorial on one of the costume pieces!
Her wings were the star of the show this weekend and I know a lot of people were curious about how I made them! A huge source of knowledge and inspiration behind these wings was this video by Axceleration, I made a few changes to the frame shape and electrical circuitry for mine but her tutorial was a huge stepping stone to give me the confidence to tackle them myself!

Health and Safety:
When working with Sintraboard (as well as other thermoplastics) it is incredibly important you wear a respirator as well as goggles when heating, moulding and cutting it. The fumes this plastic will give off when heated up are no joke! Make sure you're in a well-ventilated space!
Basic tool safety knowledge is also really important! wearing gloves when using power tools can be more dangerous in most situations, so always be aware of where your hands are vs where the tools are. Always cut away from yourself and take things slowly, don't panic.
Electrical safety! You're working with live wires and circuitry! make sure your hands are dry, you aren't touching the bare wires at any point when they are connected to a power source, and if you choose to solder anything, make sure you're wearing heat-proof gloves and a mask in a ventilated space!
Tools
Wire stripper
Screwdriver and wrench
Dremel - I recommend the Dremel 3000 rotary tool personally! Some essential Dremel bits you'll need for this include, a sanding bit, drill bit (smaller or same size as your screws/bolts), and a small/narrow cutting bit. These will usually come with the Dremel!
Heat Gun (A hairdryer will not get hot enough to heat the Sintraboard!!)
Pipe cutter (alternatively you can use a hacksaw for this!)
Hacksaw
Ruler
Scissors (for cutting fabric straps)
Materials
Heat shrink Tubing
2 core electrical wire
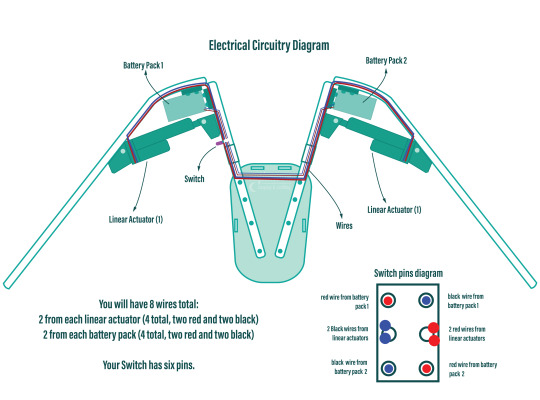
switch (you want a three position, six pin switch, like this one, even better if it has the Screws on the pins! otherwise you'll need a soldering kits to solder the wires to the pins.
2x 8AA 12v Battery Holders
2x 12v Linear Actuators (Mine had a stroke length of 100mm)
21.5mm PVC Pipes (I got 2x 3m Lengths)
2x 21.5mm PVC Pipe straight couplers
6mm 8"x12" Sintraboard
Nuts/Bolts/Screws (I used M5 bolts for the base & Actuator connectors and M6 screws to attach the hinges to the pipes! You'll need Washers for every Nut & Bolt!)
Hinges (I used 2.5cm wide hinges that were skinny but long so they would just about fit along the PVC pipe! 3" gate hinges would work!)
50 metre Polythene Jiffy foam roll (in retrospect this was ALOT of foam, you could definitely get away with maybe a 20-30 metre roll! I now have a load leftover XD)
16 AA Batteries (I used 16 and had enough for the whole day with them on, I think They'd probably be enough for another half a day-full day too! but have spares just in case!)
Webbing strap ( I went for grey to match my base suit colour!)
Buckle - as wide as the webbing strap you use!
3 metres of white cotton fabric (or whatever colour wings youre going for!)
Optional
Zipties (for cleaning up the wires)
Lets Go!

Sintraboard is this wonderfully stable thermoplastic that is relatively easy to cut into (with the right tools) and when heated allows you to mould its shape! I started by using a mannequin and heating the Sintraboard with a heat gun for a few minutes to make it pliable, I recommend using gloves for this part as the materials gets VERY HOT! Press the board into the shape of the mannequin's back, taking note of the edges especially! you want this board to sit as comfortably to your body shape as possible as it makes a huge difference to how long you can wearing the wings for in this backplate is comfy!
Once shaped, I placed it against my back to make sure it was a good fit, heating again and making any alterations I needed (again don't place bright hot plastic to your bare skin! wear protective clothes and wait till its slightly cooler to do this, with the help of a friend!). I then took a hacksaw and rounded the corners, before sanding the edges with my Dremel! Try to avoid cutting off loads, just enough to make things less likely to snag.
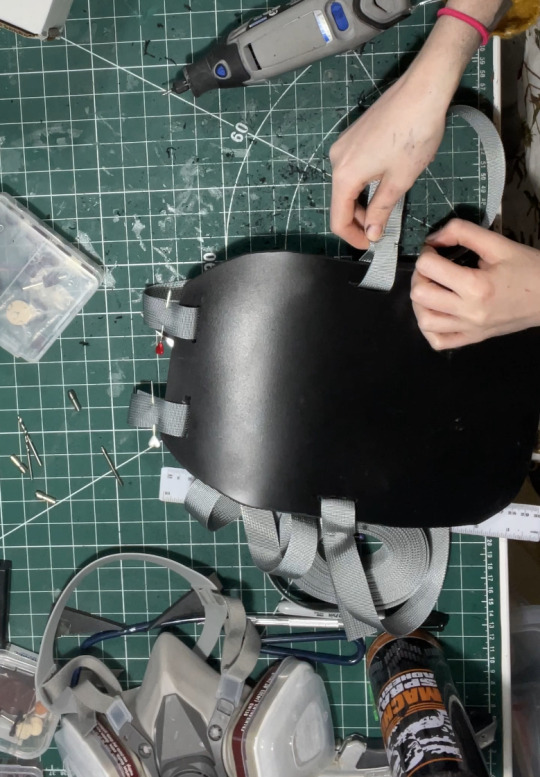
3. I then cut in four holes, wide enough to feed my webbing strap through, two at the top and one on either side below where my arms would sit! I measured the webbing strap by firstly feeding them through the top holes and pinning them, and then bring the strap over my should to everything sits where it should and seeing where the strap hits the side hole and cutting the length there! you'll also want a strap that attaches across the chest, meeting in the centre with a buckle!
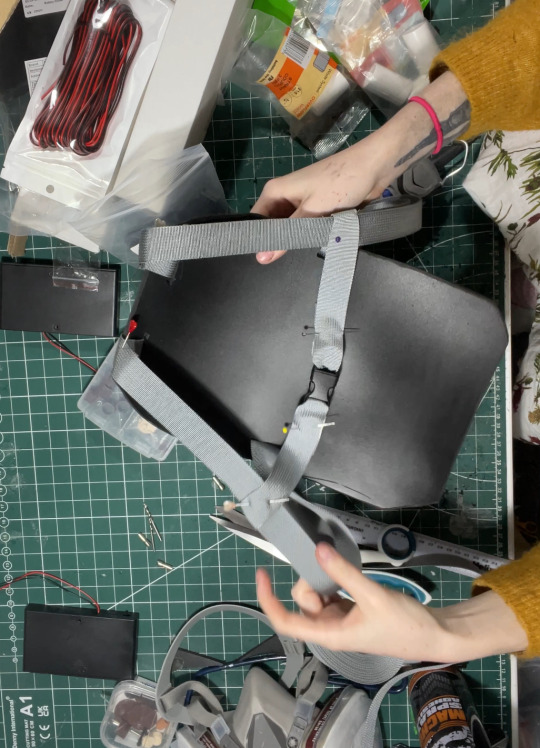
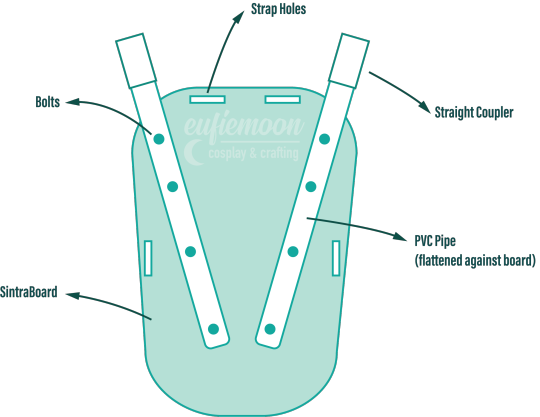
4. After sewing the straps closed I was able to move onto the PVC pipe structure! This may change slightly depending on the finished shape you want but I needed the PVC pipes to come out from inside a breastplate so had a particularly angle as well as character references to work with! I began by heating the pipe over my heat gun and flattening a portion of it under a heavy object so it would sit much more flush against the backboard and sit better underneath my breastplate before moving onto securing the first portion of the structure to the backplate. This mainly involved lots of try-ons and measuring to make sure the angles were correct and symmetrical and was quite fiddly but well-worth the effort! I'll include a diagram of the general shape I went with below:
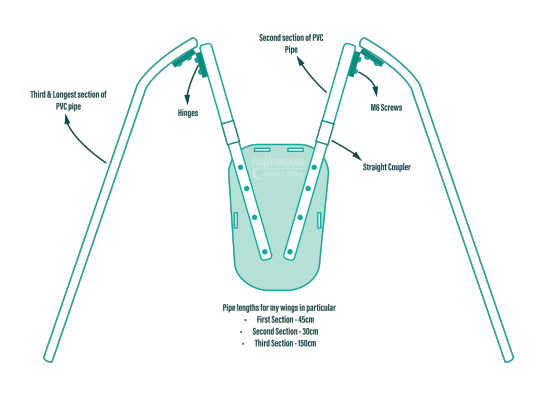
5. I wanted my wings to be relatively modular for ease of travel so I needed to make sure certain portions of them could come away from other parts easily, so I popped a straight coupler on the top of the pipes that were attach to the breastplate, this also meant I could slot the breastplate over these shorter pipes and wear everything correctly! Then these second pipes slot on and at the other end they are attached via hinges to the longest portion of the pipe 'skeleton', Diagram below:
6. Now that the skeleton was put together, it's time for the electrical stuff! It's a good idea to figure out where your circuit is going to lay on the skeleton - consider if you want the battery packs mounted the the backplate or, like me, put them inside the actual wings in removeable pockets for easy access and removal for battery changes. all your wires will go through the switch so deciding where you want to place that is very important! Mine was placed just over my shoulder on the front side, mounted to the PVC pipe with a metal cover I drilled a hole into to slip the switch through and then drill through the pipe.
I've included another diagram below that explains all the electrical circuitry, including which wires go on which pins on the switch!
Important to note: The linear actuators need to be placed and bolted into the PVC pipes at *exactly* the same angle on each side, any slight deviation will lead to the wings going up wonkily! So take your time and make as many adjustments as necessary.

7. You can extend your wires by adding on the electrical wire, just match the colours, and put heat shrink tubing over the connections to hide the live wires! I ended up zip-tying the wires into organised bundles once the wings were done to help keep everything safe from snags.
8. Now its time for the Wings themselves! I drafted my base pattern by just draping the white cotton fabric I had over the wing when it was fully extended. I then pinned the wings to the shape I wanted them to be along the bottom before cutting along the pins. I ran the fabric through my sewing machine to close the bottom edge, leaving a gap wide enough by the wing base so I could slip the wing on and off, closing it with velcro. I also added little fabric pockets inside of these to hold my battery packs, which also connected via velcro for easy removal!
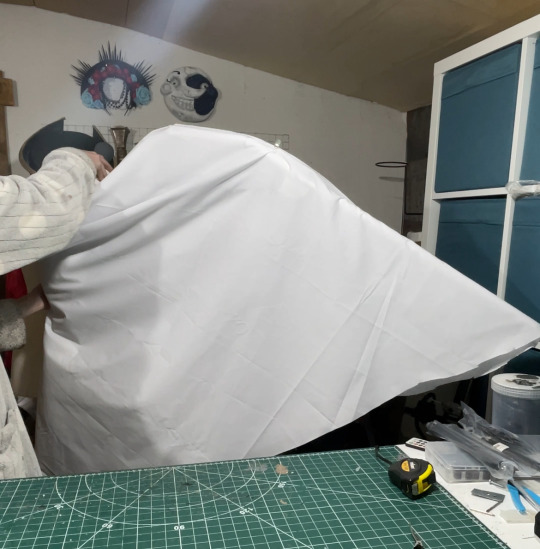
9. Now that I had a wing base I was able to begin making feathers! I cut out a total of 800 feathers out of polythene jiffy roll for these wings, in 6 different styles and using real life bird wings to dictate the shapes I used and where I placed them. I ended up hot gluing every individual feather onto the white fabric base, going row by row until every side was covered, the wing covers themselves are super light because of the foam feathers and they shine light through them in a really magical way!

Optional: I also ended up going over these feathers with my airbrush and some super light beige paint to help darken the shadows, this is entirely optional and may change depending on the wings you're looking to make!
When in neutral position and in extended position the wings looks like this:

Mine had a wingspan of about 7ft total when fully extended but when in neutral position they were fairly close to my own proportions! mainly staying behind me and weren't much of a problem in a packed con hall!

Photo by: Helloimfran (on Instagram and Twitter)
I hope this tutorial helped and if there are any questions about anything in specific don't hesitate to reach out at [email protected] or on my instagram or twitter (@eufiemoon)
Happy Crafting!

#cosplay#cosplayer#cosplaying#baldurs gate iii#baldur’s gate 3#baldurs gate 3#bg3#dame aylin#aylin x isobel#bg3 aylin#cosplay tutorial#Wings#fantasy#tutorial#cosplay help#cosplay tips
155 notes
·
View notes
Text


weirdo fuckin router I got, which is the TP-Link Archer R5. I've been looking for a reasonably high end WiFi 6 AP and stumbled on this used for a steal. It's so thin! It's intended to mount on a wall with tape or a mounting hook, so it flat-packs the antenna array and makes the whole thing lie up against a wall. Those are collapsing RJ45 terminals, like you find on thin laptops sometimes. Takes 12V USB-PD power! Every decision here makes sense but it's such an unusual set of design goals. I guess this is partially the logical conclusion of the Deco line of routers, which are aimed at people who don't like that their routers are huge eyesores.
Set it up and did a BeatSaber run, definitely less blocky and higher quality than when I'm using my router which has to penetrate a concrete wall. Very handy. Might set up a smart power switch to turn it off when it's not in use although I imagine its quiescent power is pretty low.
21 notes
·
View notes
Text
I have once again thrifted a cheap and interesting device with weird power supply needs.
This one is one of those photography tents with LEDs inside. I posted a while ago about my wife getting me one with a capacity of about 8"³, but this one is about a meter on each side, with reflective walls, and the LEDs are apparently dimmable. Again, it didn't come with the power supply, but how difficult can that be to sort out?
"Somewhat difficult", it turns out. The online information doesn't say what kind of power supply this guy needs — but the pictures of it show the dimmer knob is on it. Well, fine; most random electronics devices just want your basic DC power supply between 3V and 12V, with occasional ones needing up to 20V or even 24V. I hooked it up to a lab supply I've got, ran it slowly up to 12V — nothing. I ran it all the way to 24V, the max that one channel of the supply will provide: nothing. Well, fine, it's a two-channel supply you can run in series; I swap things around and it starts glowing at about 26V.
Basically, it wants somewhere between 26V and 36V, and then to adjust the brightness through changing the amperage level. I didn't actually measure the amperage requirements — something to do next time, I guess — so I'm left basically with needing to come up with a supply that does around 30V, nominally, and a variable current.
There are established circuits to do this, but since all my electronics knowledge is self-taught, I need to go find one of them and build it. More work than I'd expected.
(I'm told it's arguably better for LED brightness to be controlled by something like pulse-width modulation than current control, but since that works by switching the LEDs on and off rapidly, I worry about it interacting badly with filming.)
5 notes
·
View notes
Text
DA lithium battery for Eco Friendly RV
You’re in the right place if needed a much more Eco-friendly RV.
You wouldn’t throw the ice cream in the living room, Nor Key scratching the brand new car. We knows how to take good care of what we concerns. There is no different with our own planet, right? For those adventurers out there who want to preserve nature while enjoying RV life, here are our favorite eco-friendly RV tips.
Your Eco-Friendly RV – Tips & Tricks
Yes, you can indulge your RV wanderlust and go green at the same time. Here’s how:
Reduce on Fossil Fuels
You probably know that RVs are heavy on fuel. This is neither environmentally friendly nor good for the wallet. Since the average diesel RV only gets 8-14 miles per gallon, it’s imperative to maximize fuel efficiency. Try these RV tips to reduce gas:
Go for a smaller vehicle. If you’re in the market for an RV and want to minimize gas consumption, opt for a smaller Class C motorhome, or even a Class B van. The bigger the rig, the more gasoline it consumes.
Stay up-to-date with maintenance. Small tweaks can make a huge difference. For example, keeping your tires properly inflated can improve fuel consumption by up to 3%.
Change to bio–diesel fuel. Bio-diesel is a renewable, biodegradable fuel made from animal fats, vegetable oils, or recycled restaurant grease. Not currently available at all gas stations. But it’s growing in popularity, and you can use this handy online tool to find alternative gas stations near you.
Press the accelerator lightly. Slow down and enjoy the scenic route. By accelerating less and maintaining a moderate speed, you save fuel. The best speed for an RV is 55 to 60 mph.
Travel light. Only bring travel essentials. Dead weight will slow your RV down and cost you more fuel.
Pro Tip: Switch to lithium RV batteries and reduce hitch weight by up to 70%. The weight of ion lithium RV battery is 1/2 of lead-acid battery with the same capacity.
Charge Your Gadgets With The Power Of The Sun
Most of us use a ton of gadgets every day. Think cell phones, laptops, cameras, and more. Since they all need to be charged, why not reduce energy consumption and use solar energy? After all, solar energy is a completely renewable energy source.
By calculating and armed with solar panels, inverter&controller, most important with our stable and security DA lithium battery pack, You are allowed to charge your gadgets from anywhere. Whether you’re staying in your RV or backpacking in the mountains for the weekend, it never hurts to have solar power at your disposal. Even better, charging your devices with solar power is better for the environment.
Try Your Hand At Dry Camping Or Boondocking
Dry camping and boondocking are some of the best ways to make your RV eco friendly. They are also fun! If you can ditch the connection for a few nights, you’ll be rewarded with open spaces and starry skies, especially for the rednecks out there.
Just because you’re off the grid doesn’t mean you’re necessarily going to be uncomfortable. With high-efficiency household batteries, you can still power essentials like water systems, lighting, and ceiling fans. But not just any battery will do. You need a reliable and energy-efficient power supply to power your weekends.
With our trusty 12V LiFePO4 battery, you can forget about electrical connections and enjoy nature.
Pro Tip: Use the 12V lithium battery (series or parallel connection) to charge and power your lights, fans and pumps, even when you’re in the middle of nowhere. Lithium is the best RV battery ever for boondocking as it is efficient, reliable and environmentally safe.
Switch to Smart, Energy Efficient Lithium Batteries
You can make a huge leap toward Eco friendly RVing with this one small step: switch to lithium RV batteries. Here’s why:
Lithium is toxin-free. While lead-acid batteries may be the cheapest option for an RV, they’re not the greenest. They contain harmful substances, including sulfuric acid and lead. This is why they require maintenance and must be stored properly to prevent spills from contaminating the environment. Lithium batteries are a safer, smarter, environmentally friendly RV alternative. They are non-toxic, non-spillable and recyclable. You can even store them indoors.
Lithium is smart. Lithium batteries are smart batteries because they have a battery management system(BMS) that prevents overcharging (and subsequent damage). They could also access to your phone via Bluetooth. With a few taps, you can see exactly how much energy is left and the statements of every single cell’s healthy.
Lithium is more efficient. Lithium batteries support charge @100% efficiently, while lead-acid batteries charge @85 % efficiently. You can use a smaller and less expensive solar setup to charge lithium than you can charge a similar sized lead-acid battery. Because of their efficiency, lithium battery packs run out of power much less frequently. This is important when you need to use limited power wisely, such as when you’re boondocking!
Quick Tips for Eco Friendly RV Living
Cutting down on fossil fuel use, staying off the grid, harnessing solar power, and switching to smart batteries are all major ways to turn your home-on-the-go into an Eco friendly RV. But here are a few more RV tips to help you go even greener:
Use enzyme-based tank cleaners instead of chemical-based cleaners for your RV toilet.
Switch out basic bulbs and replace them with energy-saving LED lights.
Use reusable, lightweight plates and utensils instead of disposable plastic and polyfoam.
Conserve water by bringing your own water filtration system and using the water around you. Install a water-saving shower head to reduce waste.
Leave no trace! Take everything you brought to the campsite with you when you leave.
4 notes
·
View notes
Text

Chonkiest ESP32-S3 Metro is pulling into the station and it is piled high with PSRAM 🚂💾🔌
This ESP32-S3 metro brings the chonk, with 16 MB of Flash and 8 MB of PSRAM - that's the max you can get in the WROOM module . but we think it's worth it's weight in gold cause when we start messing around with the parallel TTL TFT driver we're gonna need that space to buffer the full 16 bit 800x480 display… heck we could even double buffer the graphics at that point.
Lots of power options here, too: 6-12V DC jack with on-off switch, USB type C or lipoly battery . the lipoly can be charged on board and monitored with a MAX17048 .
One frustration from our Metro ESP32-S2 is that the Espressif Arduino board support package never added pin-reordering, so in this Metro we use consecutive numbered pins from 2-13 so shield pin configurations don't have to change.
For IoT datalogging projects we Stemma QT I2C & a micro SD card socket. We also added a JTAG connection and the hardware UART debug pins in case we have to do some more-than-printf debugging. All the edges are so packed full of stuff that we had to stick the boot0 button and D13 / ON LEDs in the middle!
#adafruit#electronics#pcb#opensource#opensourcehardware#pcboftheday#espressif#esp#esp32s3#arduino#metro#esp32s3metro#psram#flashstorage#iotdatalogging#electronicboard#usbtypec#parallelttft#debugging#arduinosupport#jtagconnection
4 notes
·
View notes
Text
Price: [price_with_discount] (as of [price_update_date] - Details) [ad_1] Product Description Round 12v DC (10A 250VAC) Push Button On Off switch for Toys Electric Kids Car E-Bike 12v DC (10A 250VAC) Push Button On Off switch for Toys Electric Kids Car E-Bike. This switch is a perfect replacement for your broken switch on your car, bike, or toy. It is 12v DC and 10A 250VAC. It is also a push button that is easy to use. Ad2212 Round Push Button 12v On Off Power Switch Suitable For 10a,250vac /20a,12vdc AD221 Round Push Button Kids Electric Car, E-Bike Starter On Off Power Switch Suitable for 6v and 12v 10A/250V AC 20A/12V DCType Electronic ComponentsDimensions Width 2.7 cm Height 2 cmWeight 25 gPower Source DC, AC10A/250V AC 20A/12V DC Add to Cart Add to Cart Add to Cart Customer Reviews 3.6 out of 5 stars 24 3.9 out of 5 stars 158 — Price ₹89.00₹89.00 ₹129.00₹129.00 ₹869.00₹869.00 Brand Name Electronic Spices Electronic Spices Electronic Spices Quality ✓ ✓
✓ Color Red & Black Red & Black Red & Black Switch Type SPST, Push Button Switch SPST, Push Button Switch Tactile, Momentary Push Button Switch No. of Pin 2 2 4 Operation Mode ON-OFF OFF-NONE-ON ON-OFF Material Type Plastic Plastic Plastic No. of Position 2 2 4 Size L x W x H 4x1x4 cm 3x1x3 cm 6x6x5 cm 20A 12VDC PACKAGE INCLUDE - 2PCS [ad_2]
0 notes
Link
From the brand RV battery disconnect switch COZYEHOO focus on providing Top level,smart car Replacement Parts to always keep your every car journey comfortable & easy. Friendly Service Adhering to the value of service first,we only provide Top level products for every buyerfriend. Great R&D team R&D investment exceeds 50%R&D team of more than 10 […] The post Battery Disconnect Switch Kit,12V-48V Switch with Lugs for Boat Marine RV ATV UTV Vehicles, Automotive Replacement Battery Cut Off Switch(On-Off) appeared first on Automotive Parts.
0 notes
Text
24V Winch: Power, Performance, and Applications
Introduction to 24V Winches
A 24V winch Volt is a powerful electric winching system designed for heavy-duty applications such as off-road recovery, industrial use, and military operations. Compared to 12V winches, 24V winches deliver higher efficiency, greater pulling power, and lower current draw, making them the preferred choice for larger vehicles and demanding tasks.

Why Choose a 24V Winch?
1. Higher Efficiency & Power
✅ Operates with lower amperage, reducing heat buildup and improving motor efficiency. ✅ Ideal for long-duration and heavy-duty winching tasks.
2. Suitable for Larger Vehicles & Equipment
✅ Commonly used in trucks, military vehicles, and industrial setups. ✅ Handles heavier loads than a standard 12V winch.
3. Less Battery Drain
✅ Spreads electrical load across two 12V batteries, ensuring consistent performance. ✅ Reduces strain on the electrical system compared to 12V winches.
Applications of 24V Winches
1. Off-Road & 4x4 Recovery
🚙 Essential for heavy off-road vehicles needing extra pulling power. 🌲 Works effectively in mud, sand, and steep terrains.
2. Industrial & Commercial Use
🏗️ Used in construction, towing, and heavy machinery operations. 💪 Provides reliability for moving heavy loads.
3. Military & Specialized Vehicles
🛻 Military-grade trucks and armored vehicles rely on 24V winches for extreme conditions.
How to Choose the Right 24V Winch
1. Consider Load Capacity
Choose a winch with at least 1.5 times your vehicle's weight for safe operation.
2. Look for High-Quality Motor & Gears
Opt for a sealed motor and durable planetary gears for longevity.
3. Check the Rope Type
Steel cable: Best for rugged use, but heavier.
Synthetic rope: Lighter and safer, but requires more maintenance.
Installation Tips for a 24V Winch
🔧 Requires two 12V batteries wired in series to provide 24V output. 🔧 Ensure proper grounding and secure mounting for safe operation. 🔧 Use a winch isolator switch to prevent accidental activation.
Customer Testimonials
✅ "A Game Changer for My Off-Road Adventures!"
"I’ve been using a 24V winch on my 4x4 for the past year, and it has saved me multiple times when stuck in deep mud. The power difference compared to my old 12V winch is night and day!" — James W., Off-Road Enthusiast
✅ "Perfect for Heavy-Duty Work!"
"I manage a construction site, and our team relies on 24V winches daily. The lower battery drain and high pulling capacity make it an excellent investment." — Michael R., Construction Manager
✅ "Reliable for Military & Tactical Vehicles!"
"Our fleet of military vehicles uses 24V winches for recovery operations in extreme conditions. The durability and power output are unmatched." — Lt. David S., Military Logistics
FAQs: Everything You Need to Know About 24V Winches
1. What’s the difference between a 12V and 24V winch?
A 12V winch is ideal for light to medium-duty applications, whereas a 24V winch is more powerful, efficient, and better suited for heavy-duty work.
2. Do I need two batteries for a 24V winch?
Yes, a 24V winch requires two 12V batteries wired in series to deliver 24V output.
3. Can I convert a 12V winch to a 24V winch?
No, a 12V winch is designed specifically for 12V systems, and modifying it to 24V can damage the motor.
4. Is a 24V winch better for long-duration use?
Yes! 24V winches generate less heat, draw lower current, and last longer under continuous use than 12V models.
5. What vehicles are best suited for a 24V winch?
Heavy-duty off-road vehicles
Commercial trucks
Military and tactical vehicles
Industrial machinery
Conclusion
A 24V winch is the ultimate solution for those needing high power, durability, and efficiency in demanding environments. Whether you’re off-roading, working in construction, or operating military vehicles, a 24V winch provides superior performance and reliability.
🚀 Upgrade to a 24V winch today and experience the power difference!
0 notes
Photo
GIZZU Challenger Pro 1120Wh/1000w UPS Fast Charge LifePO4 The Gizzu Challenger Pro 1120Wh UPS Power Station is the ultimate on-the-go power supply in a compact design. This portable power station is ideal for emergency needs, power outages, camping trips, or whatever else electricity is needed as it allows you to power up small appliances. Thanks to the 230V South African plug, and two DC ports, you can power your internet router, lightbulbs, and other small electronics and appliances with ease. With two USB ports including one USB 3.0 Quick Charge port and a PD port, you can keep your phone, tablet, notebook, and camera charged. This rechargeable battery-powered model features a robust design, built-in LED flashlight and has two methods of charging, including solar power charging and traditional wall charging. When using a third-party solar panel, the voltage range needs to be between 14V – 22V with a maximum amperage of 3A. Get off the grid and enjoy the great outdoors while keeping essential gear and mobile devices powered. Thanks to the 11 outlets, including two South African plugs, you can power lights, smartphones, cameras, and other small electronics with ease. You can recharge the Challenger Pro during your outdoor adventure, simply hook the product up to your car or solar panel. It’s durable and robust, but light enough to take with you. Power essential household devices like your router, notebook, and monitors during loadshedding or power outages, Along with Pure Sine Wave technology, which is better suited to powering sensitive electronics, the Challenger Pro also features UPS functionality. This means that the Challenger Pro seamlessly switches over to battery power during loadshedding or a power outage, resulting in zero downtime for your connected essential devices. Frequent power outages leaving you with fewer hours in the day to recharge your power solution products? No problem – recharge the Challenger Pro from 0% to 100% in under 2 hours. Note: The maximum concurrent rated output for this device is 1000W. Please double-check the watt requirement of the appliance you want to power before connecting it to your Gizzu Power Station. FEATURES: 1120Wh Lithium-Iron Phosphate (LiFePO4) batteries Ideal to keep electronic appliances powered during loadshedding or a power outage Great for keeping essential gear powered during outdoor adventures Recharge the battery from 0% to 100% in under 2 hours Features 11 outlets – 230V South African 3-pin plugs, PD ports, USB ports, and car socket port Multiple input charging options – draw power from your car, solar panel, or from wall sockets Battery Management System proactively monitors and preserves battery life Robust design and built-in LED flashlight for convenience Intelligent safety features like over-charge, over-discharge, and short circuit protection SPECIFICATIONS: Internal Battery Type: Lithium Iron Phosphate (LiFePO4) Battery Capacity: 1120Wh, 22.4V 50Ah Inverter: Pure Sine Wave UPS Switching Time: 10ms AC Output: 2x 230V/50Hz 1000W Rated DC Outputs: 1x Type-C 100W PD Port (5V/3A, 9V/3A, 12V/3A, 15V/3A, 20V/5A) 2x Type-C 30W PD Ports (5V/3A, 9V/3A, 12V/2.5A, 15V/2A, 20V/1.5A) 1x USB QC3.0 Port (5V/3A, 9V/2A, 12V/1.5A, 5V/4.5A, 4.5V/5A) 2x USB 2.0 Ports (5V/2.4A) 1x Car Socket Port (12V/10A) 2x DC5521 Ports (12V/10A) Battery Management System: Yes Lifespan: 2000 Charging Cycles Charging Times: AC Input: 230V/50Hz 800W Max (1.8hrs), DC Input: 11V-50V 300W Max (6-7hrs) Product Dimensions: 38 x 26 x 29 cm Product Weight: 14000g ESTIMATED RECHARGES: Smart Phone (3500mAh): 75 Tablet (7000mAh): 37 Portable Speaker (7500mAh): 35 Action Camera (1250mAh): 211 Estimated Runtime: Laptop (50W): 17hrs Microwave (800W): 1.1hrs Washing Machine (400W): 2.2hrs 42″ LED TV (100W): 8.9hrs PROTECTION FEATURES: Short-Circuit & Over-Current Protection Over-Voltage & Under-Voltage Protection Over-Load & Temperature Protection WHAT’S IN THE BOX: Gizzu Challenger Pro 1120Wh UPS Power Station x1 AC Charging Cable x1 Car Charging Cable x1 User Manual x1
0 notes
Video
youtube
12V-36V 150A Auto Battery Cut Off Switch Battery Isolator Switches Outdo...
0 notes
Text
The Best Strobe Lights for Trucks
When you're a novice, there's a rather vexing problem: how to wire a strobe light? Installing these troublesome circuits is really too difficult for you. Or else, if you're often engaged in transportation work on dangerous and rugged mountain roads, you're in great need of a temporary emergency strobe light. Regardless of which of the above difficulties you face, the W12R strobe light will solve them perfectly.

W12R strobe lights for trucks that can be remotely controlled via an APP, allows you to simply tap the switch on the mobile APP inside the vehicle even when driving on the highway, and then the strobe light outside the vehicle will be lit up, helping you deal with unexpected situations on the road in a smarter way.
Product Overview
The AgriEyes W12R is a wireless strobe light set. Its outer package is a very convenient portable hand-held box, which contains a wireless strobe light, an instruction manual, a car cigarette lighter charger, a charging cable and a remote controller.
How Convenient it will be
APP Control
By downloading and installing the JW-TECH application program, users can directly control various modes of the mini strobe light bar. The application offers 4 different colors and 10 modes to choose from, including the special SOS mode for emergency situations. In addition, the roof strobe light can also be controlled via the button on the top of the light or the infrared remote controller, with simple and quick operations.
Durability
The housing of the W12R LED strobe lights are quite sturdy and not easy to be scratched, as it is made of ABS material. Meanwhile, the strobe light has an IP67 waterproof rating, ensuring reliable operation under harsh weather conditions. The lifespan of this strobe light is also quite long, and it basically won't suddenly break down during work and thus endanger your safety. Its service life exceeds 50,000 hours, and the built-in rechargeable battery has overcharge, overdischarge and over-temperature protection functions.
First-class Brightness
The white and amber light bars are composed of 84 high-brightness LED chips, and the light intensity is bright enough to be clearly visible from several miles away. Do you know what this means? It indicates that whether you're driving on the highway, making frequent stops or operating special vehicles, such powerful lighting effects can effectively ensure the safety of both you and your truck.
Quick Installation
The W12R uses two N38 magnets, and the adsorption force of each magnet reaches 60 pounds. With such strong magnetic attraction, you don't need to worry at all that it will fall off during driving. You just need to place the lamp on the roof of the vehicle and plug in the 12V plug, and then it can be used immediately. Adversely, when not used, you can easily remove it by pressing the buckle without using any tools.
Conclusion
The AgriEyes W12R lights for trucks integrates modern technology and practical design, providing great convenience and safety guarantees for truck drivers. Its APP control function, excellent durability, top-notch brightness and simple and quick installation method make this product one of the best truck strobe lights on the market.
After purchasing this LED strobe lights, various problems of yours will be directly solved. It's simple and easy to operate, and it's truly a boon for novices.
0 notes
Text
What Is The Difference Between MPPT And PWM Charge Controller?

Seeing that solar energy is the new trend these days, we are sure you must be curious about solar charge controller. But before moving to PWM and MPPT Solar charge controller, let us give you a brief idea of what it is mean for.
Solar charge controller is a device placed between the solar panel and the battery pack to control the electrical energy produced by the solar panel entering the battery.
It needs to coordinate the work of solar panels, batteries, and loads to ensure the stable operation of the entire solar off-grid power system.
But “What is the difference between MPPT and PWM charge controller?”
Let's check out.
1. Meaning
PWM is pulse width modulation;
MPPT is maximum power point tracking.
2. Efficiency
MPPT is much more efficient than PWM chargers.
The efficiency of MPPT can be as high as 99%, but the PWM is only 50%-75%.
PWM acts like a switch, so the solar panel will always be charged at the battery's voltage.
When a solar panel with an open circuit voltage of 24V is connected to a PWM charger, the voltage is pulled down to almost the same as the battery's 12V voltage. This reduces its charging efficiency by 50%.
The MPPT adjusts the charging voltage and current to the maximum deliverable power.
It behaves like a DC-DC transformer rather than a switch, which enables it to minimize charging losses.
3. Price
The structure of MPPT is more complicated,so the cost is also higher.
The price is usually several times or even dozens of times that of the PWM.
4. Charging operation mode and current regulation ability
The PWM can only be used with relevant voltages.
For example, the battery board of the 12V system can only be used with the 12V controller and battery. Its structure is simple and the wiring is convenient for users;
The MPPT has a larger space to use.
Generally, the solar panel voltage can be used between 12V~170V, and the battery voltage is adjustable from 12~96V, which is more applicable.
5. Practical application
The PWM is generally used in some small off-grid systems below 2KW;
Generally, MPPT should be used in large-scale off-grid systems above the 2KW level.
Another larger application of MPPT technology is distributed on grid power systems.
On grid inverters used are in MPPT mode.
If you are interested in MPPT and PWM charge controller, please contact us.
0 notes
Text
24V LiFePO4 Batteries: A High-Overall performance Power Remedy for Modern Apps
On the earth of energy storage, 24V LiFePO4 batteries stand out as being a match-switching innovation. With superior efficiency, sturdiness, and eco-friendliness, these batteries have become the go-to choice for applications demanding dependable and responsible 24V power. From solar systems and electric powered cars to marine tools and industrial resources, 24V LiFePO4 batteries provide unmatched rewards.
Allow’s dive into why They may be revolutionizing Power storage and how they can profit your unique desires.
What exactly are 24V LiFePO4 Batteries? A 24V LiFePO4 (Lithium Iron Phosphate) battery is a rechargeable battery known for its protection, longevity, and effectiveness. Created to offer secure 24V electricity, these batteries are perfect for purposes needing extra electric power than a 12V procedure when keeping compactness and performance.
Essential Benefits of 24V LiFePO4 Batteries one. Extended-Long lasting Longevity By using a lifespan of up to five,000 charge cycles, 24V LiFePO4 batteries previous a number of situations for a longer time than guide-acid batteries. This longevity translates to much less replacements and decrease long-expression costs.
2. Superior Strength Performance LiFePO4 batteries boast large Electricity density and efficiency, making certain negligible Power reduction all through charging and discharging. They also attribute a low self-discharge price, generating them perfect for backup ability applications.

3. Lightweight and Compact As compared to conventional batteries, LiFePO4 batteries are much lighter, lowering the overall body weight within your set up. This is especially useful for moveable or auto-mounted systems.
4. Quick and Steady Electrical power Shipping and delivery LiFePO4 batteries charge more quickly and provide regular electric power output throughout their use. This guarantees ideal overall performance for products and units demanding continuous Electricity.
five. Upkeep-Totally free Say goodbye to the hassle of normal upkeep. In contrast to guide-acid batteries that will need drinking water refills and terminal cleaning, 24V LiFePO4 batteries involve just about no maintenance.
six. Eco-Pleasant and Secure LiFePO4 batteries are non-harmful and environmentally friendly. Their thermal stability and resistance to overheating, overcharging, and small circuits make them one of several safest lithium battery forms offered.
Applications of 24V LiFePO4 Batteries The flexibility of 24V LiFePO4 batteries helps make them suitable for a wide array of applications:
Photo voltaic Power Devices: Retailer and provide electrical power for off-grid or hybrid photo voltaic setups. Electric Cars: Energy golfing carts, scooters, forklifts, and other EVs. Marine Machines: Provide Electricity for trolling motors, navigation methods, and onboard appliances. RVs and Campers: Present reliable electric power for appliances, lights, and electronics. Backup Power Techniques: Be certain uninterrupted operation of vital products throughout electricity outages. Industrial Machines: Electrical power weighty-responsibility tools, robotics, and machinery. How to pick the best 24V LiFePO4 Battery When picking a 24V LiFePO4 battery, take into consideration the following:
Capacity (Ah): Choose a battery using an acceptable amp-hour score to satisfy your Electricity prerequisites. Battery Administration System (BMS): Ensure the battery features a built-in BMS to protect against overcharging, more than-discharging, and overheating. Voltage Compatibility: Verify that the battery matches your system’s voltage specifications. Cycle Lifestyle: Opt for a battery having a high cycle lifestyle for better long-time period benefit. Running Temperature: Opt for a battery appropriate for your surroundings, especially if you’ll be using it in extreme temperatures. Routine maintenance Tricks for 24V LiFePO4 Batteries Make use of a lithium-compatible charger for best functionality. Stay away from overcharging or totally discharging the battery. Retail store in a very great, dry place when not in use. Consistently Check out the battery's situation, specifically for crucial units. Why Update to 24V LiFePO4 Batteries? If you’re at this time making use of guide-acid batteries or an outdated process, upgrading to 24V LiFePO4 batteries provides:
Superior Efficiency: A lot quicker charging, steady ability, and improved effectiveness. Lessen Complete Expense of Possession: Decreased alternative and routine maintenance fees after some time. Eco-Conscious Vitality: A sustainable preference with much less environmental affect. Summary 24V LiFePO4 batteries are location a brand new common for Electricity storage solutions. Their outstanding toughness, effectiveness, and basic safety make them a worthwhile investment for a wide range of applications. Regardless of whether you’re powering a solar setup, improving your electrical motor vehicle, or guaranteeing backup electric power for significant equipment, 24V LiFePO4 batteries produce unmatched trustworthiness and general performance.
Make the swap now and experience the way forward for Electrical power storage firsthand!
To know more details visit here: 24V LiFePO4 Batteries
0 notes
Text
Price: [price_with_discount] (as of [price_update_date] - Details) [ad_1] SAFE AND RELIABLE – This 8 Channel CCTV Power Supply Adapter Come with Overload, overvoltage, Leakage, Short Circuit Protection and Over Temperature Protection, Low Temperature Rise, Voltage consistency: There is no voltage fluctuations to speak of at power on, during transmit, receive, or at power off, Built-in EMI filter, low output ripple, noise, Short Circuit Auto Restart. Rugged heavy-duty enclosure, 100% Full load burn-in Tested. SAFE AND RELIABLE – This 8 Channel CCTV Power Supply Adapter Come with Overload, overvoltage, Leakage, Short Circuit Protection and Over Temperature Protection, Low Temperature Rise, Voltage consistency: There is no voltage fluctuations to speak of at power on, during transmit, receive, or at power off, Built-in EMI filter, low output ripple, noise, Short Circuit Auto Restart. Rugged heavy-duty enclosure, 100% Full load burn-in Tested. MANUAL SWITCH - normal, long, extra-long for better clarity. The usage of modes is up to 60m-normal mode, up to 75m-Long mode and up to 90m-Ex-Long mode. Also have Power LED Indicator for Individual Channel. Pure Copper Inductors, High-performance Transformers, Dual-capacity Electrolytic Capacitors is The Guarantee of High-quality Power Supply, New ABS Materials, Compression, Wear-resisting Reinforcement Enclosure Structure, Used more safely and conveniently than other thanks to its sealed design Surge Protection/Lightening Proof. Over Temperature & Voltage Protection of 150-290V AC and 12V DC. High Efficiency & Low Energy Consumption. Stabilized Output & Low Interference. Short Circuit & Overload Protection Thermal Protection [ad_2]
0 notes
Link
Product Description 12V Replacement Cigarette Lighter Male Plug It is a perfect replacement for your broken fused cigarette lighter plug Cigarette Lighter Plug Switch control with indicator light, it will light up when working Easy installation, durable,widely use Specification Wire Gauge: SPT-2, 2/C, 14AWG Cable Length: 1.8FT voltage: DC 12V to 24V Output power: 120W […] The post 12V Cigarette Lighter Male Plug Replacement with On Off Switch and Leads 1.8FT 14AWG Cigarette Lighter Adapter Extension Cable For Car Truck Motorcycle appeared first on Automotive Parts.
0 notes